Figma Plugin
Dette indhold er ikke tilgængeligt i dit sprog endnu.
Translate in CrowdinWith the Crowdin for Figma plugin, you can use texts from Crowdin Enterprise in your designs to save time for both designers and developers. These could include original or translated texts. If necessary, you can add new ones (e.g., dialog titles, button labels) and send them to translators in Crowdin Enterprise.
- Quickly generate multilingual creative assets.
- Translate mockups, preserving original formatting and styles, and test them in different languages before the programming starts.
- Stop using ‘Lorem Ipsum’, add real texts from Crowdin Enterprise to your prototypes instead. Strings added from Crowdin Enterprise become linked to the text fields in Figma.
- Create and upload source strings from your designs to your Crowdin Enterprise project. Created strings become linked to text fields in Figma. This way, developers could use uploaded strings, reducing time spent on development.
- Preview translations and string keys in your designs.
- Upload tagged screenshots to your Crowdin Enterprise project.
- Sign in to Figma.
- Open one of your design files or click New design file.
- In the file menu, click Plugins > Manage plugins…. Alternatively, right-click the canvas and click Plugins > Manage plugins.
- Use the search field to find the Crowdin for Figma plugin.
- Click on the Crowdin for Figma plugin and select Save.
- Once saved, click on the Crowdin for Figma plugin to run it.
To specify your Crowdin Enterprise credentials in Figma, follow these steps:
- In the file menu, go to Plugins > Saved plugins. Alternatively, right-click the canvas and click Plugins > Saved plugins.
- Click Crowdin for Figma.
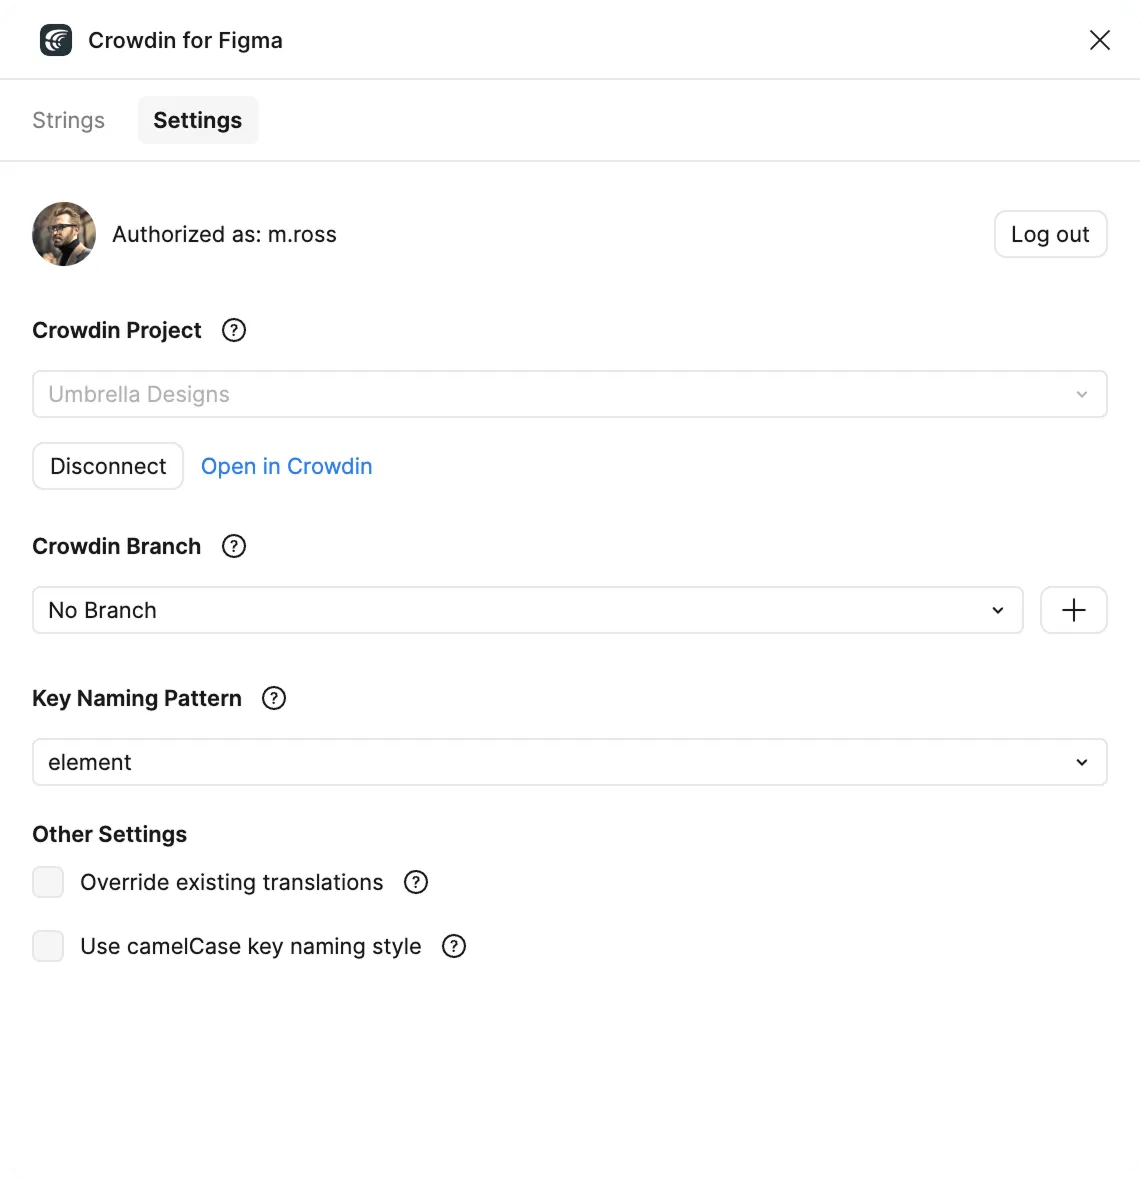
- Switch to the Settings tab.
- Provide your Personal Access Token.
- Click Connect.
To generate a new token in Crowdin Enterprise, follow these steps:
- Go to Account Settings > Access tokens, and click New Token.
- Specify Token Name, select Scopes, and click Create.
Which scopes should I select?
- Projects - Grants access to project lists, permission to view, create and update projects.
- Source files and strings - Grants access to add, get, delete, and update project branches, directories, source files, and source strings, as well as access to file revisions.
- Translations - Grants to access to add new and manage existing translations.
- Screenshots - Grants access to get screenshots list, add, get, replace, and delete screenshots, ability to access and modify screenshot tags.
To select the Crowdin Enterprise project you’d like to work with, follow these steps:
- In the Settings tab, click the drop-down menu under Crowdin Project, and select a project from the list.
- Select the type of content you’re going to work with in this project (e.g., UI Localization or Marketing Visuals Localization) and click Save. The selected option affects which mode of the Crowdin for Figma plugin will be available to you.
- (Optional) In the Crowdin Branch section, select the specific branch your content will be uploaded to. If your project uses version branches, you can either select an existing one or create a new one directly from Figma; otherwise, you can skip this step.
- To select an existing branch: Choose the desired branch from the drop-down list.
- To create a new branch: Click next to the branch field. In the New Version Branch dialog, enter a name and click Create. The new branch will be created in your Crowdin Enterprise project and automatically selected in the plugin.
Use the Strings tab when localizing UI and working on dynamic pages with your development and marketing teams. In this tab, you can add source strings from Crowdin Enterprise to your designs in Figma in a click. After the texts are used in the designs, you can automatically upload tagged screenshots for translators’ reference back to Crowdin Enterprise.
Using Source Strings from Crowdin in Figma
Section titled “Using Source Strings from Crowdin in Figma”- Open the Crowdin plugin for Figma.
- In the Strings tab, use the Search field to find the specific copy. You can search strings by source text, string identifier, or context.
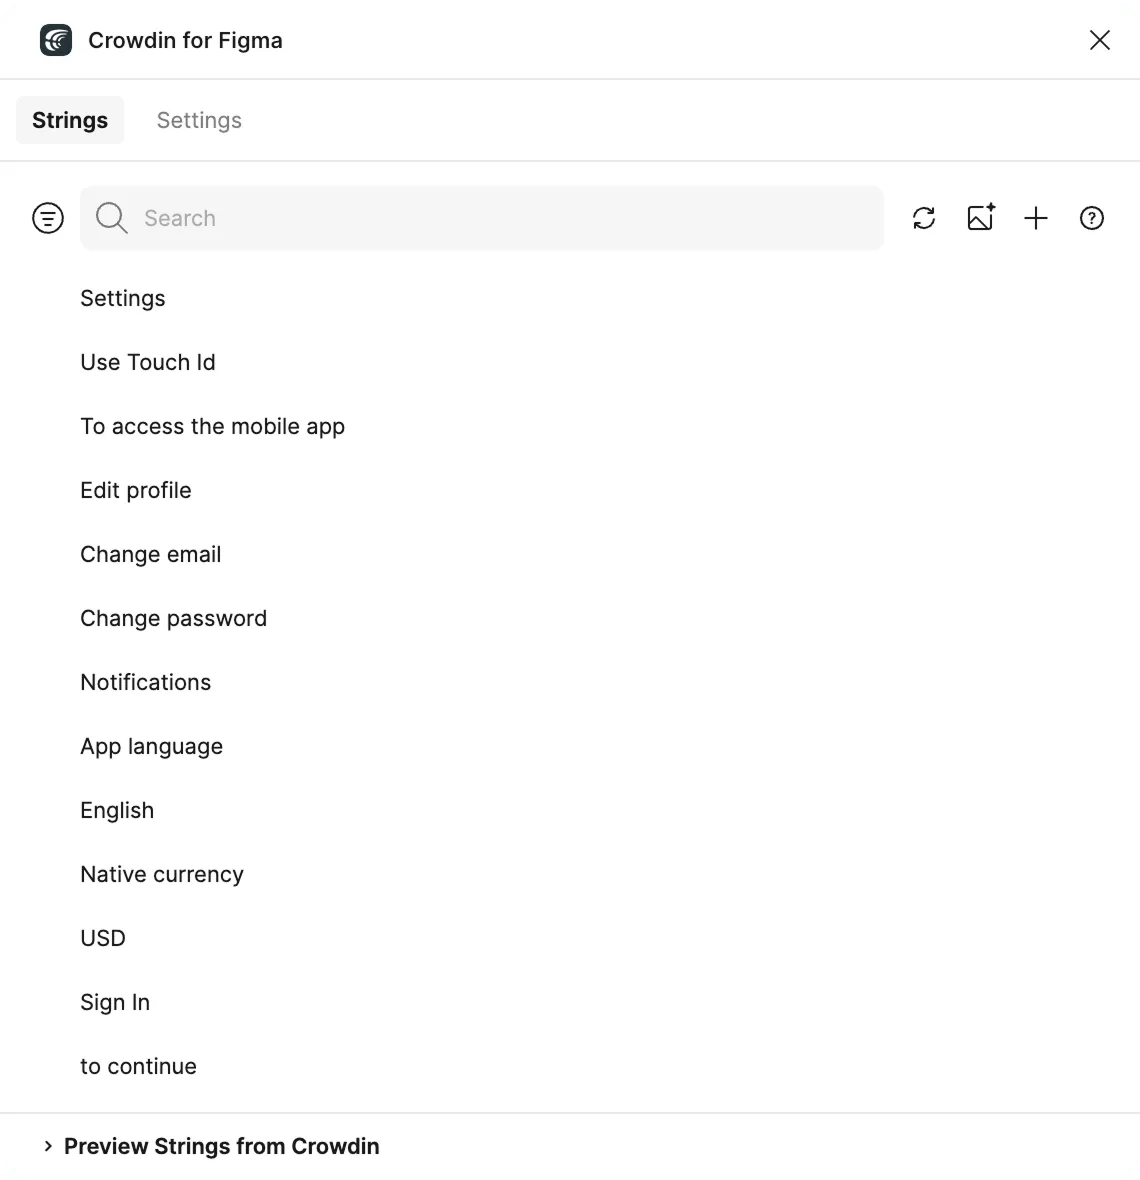
- Select the text layer in Figma to which you want to add text and click the link icon next to the needed string in the plugin.
After using the source strings from Crowdin Enterprise in your designs, they become linked with the text fields, and you can preview translations for these strings in Figma and upload screenshots for them to your Crowdin Enterprise project.
You can link a single Crowdin Enterprise string to one or multiple text fields in Figma. However, one text field can be linked only to a single Crowdin Enterprise string. If you link a text field with an existing connection to a new Crowdin Enterprise string, the previous connection will be terminated, and a new connection will be established. To unlink a Crowdin Enterprise string from all text fields it was previously linked to, right-click on the link icon next to the needed string.
You can edit a string’s text, context, or other properties directly within the plugin. To do so, click the icon next to it in the string list. Make your desired changes in the edit form and click Save.
From the same list, you can also hide or delete strings using their respective icons. Any changes you make will be synchronized with your Crowdin Enterprise project.
Adding Source Strings from Figma to Crowdin
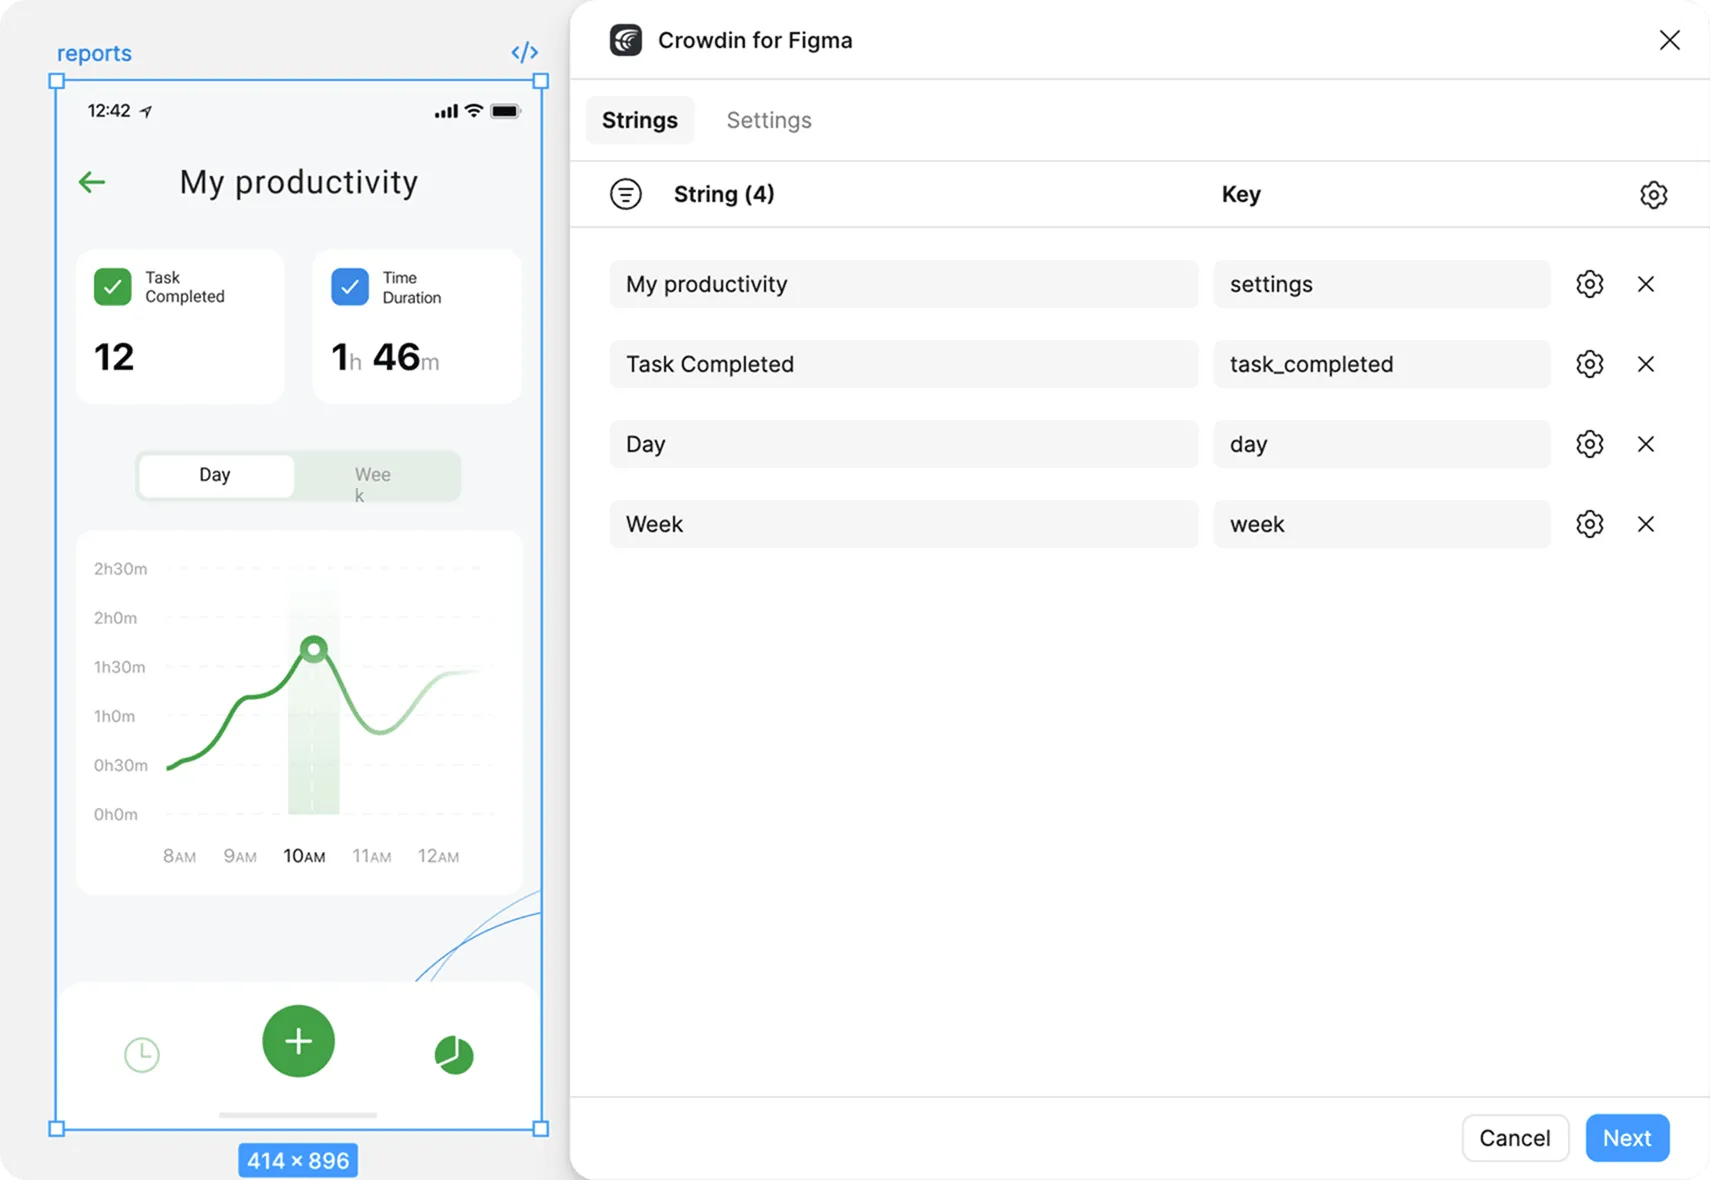
Section titled “Adding Source Strings from Figma to Crowdin”You can add strings that are already used in the designs.
- Open the Crowdin plugin for Figma.
- To add the strings used in the designs, select the whole frame, multiple frames, or the needed text elements on the frames.
- In the Strings tab, click .
- In the appeared dialog, review the list of strings to be added. If needed, click the filter icon to open the filter panel and exclude certain elements:
- Select the Skip hidden elements if some frames contain hidden elements that should not be added to Crowdin Enterprise.
- Select the Skip untranslatable elements if some frames contain untranslatable elements that should not be added to Crowdin Enterprise.
- Select the Skip locked elements to exclude any locked text elements from being sent for translation. This is useful when you want certain text to remain visible on screenshots for context but not be added to Crowdin Enterprise as a source string.
- (Optional) Configure string settings. You can adjust settings for individual strings or apply bulk settings to all strings at once:
- Individual String Settings: Click next to a specific string in the list to update its context or set the maximum length of the translated text for that row.
- Multiple Strings Settings: Click in the upper right corner, above the string list, to open settings for all selected strings. Here, you can configure the Max. Length Correction (%) option. This feature automatically sets a maximum character limit by adding a specified percentage to the original string’s length (for example, entering “20” means a 100-character string will have a max length of 120). This is particularly useful for accommodating text expansion during translation, helping you avoid text truncation in the localized UI. Any bulk settings applied here can still be overridden per string using the individual string settings.
- Once all the needed strings are selected and configured, click Next.
- In the next dialog page, select the preferred options:
- Auto-link existing strings – Automatically compare text to existing strings in Crowdin Enterprise. If there’s a match, the text element will be linked to the string in the Crowdin Enterprise project.
- Create missing keys – Only new text elements are added to Crowdin Enterprise.
- Merge duplicates – Link identical text elements to a single new string in Crowdin Enterprise. The default behavior is to identify duplicates by comparing their source text. This is useful in the following cases:
- When adding multiple text fields with the same text (e.g., several buttons with the label
Submit), the plugin adds only one string to your Crowdin Enterprise project and links all duplicate text fields to it. - If your Crowdin Enterprise project already contains a string with the same text you’re adding from designs, the plugin links to the existing string instead of creating a new one.
- To change the duplicate detection method, enable the Detect duplicates by key sub-option. This will make the plugin identify duplicates by their string identifiers (keys) rather than their text content.
- When adding multiple text fields with the same text (e.g., several buttons with the label
- (Optional) To add labels to the strings, alternately select them from the Labels drop-down menu.
- Send screenshots.
- From the File drop-down menu, select the file in Crowdin Enterprise to which you want to add the strings.
- From the Update Option drop-down menu, select what happens to existing translations and approvals in Crowdin Enterprise when you update linked strings whose text has changed in Figma. Choose one of the following:
- Keep Translations and Approvals – Retains both existing translations and their approval statuses. Ideal for minor typo fixes where the translation remains accurate.
- Keep Translations – Retains existing translations but removes approval statuses, meaning the translations will need to be reviewed and approved again.
- Clear Translations and Approvals – Removes all existing translations and approvals. Use this when the meaning of the source text changes significantly, requiring the string to be translated from scratch.
- Click Submit.
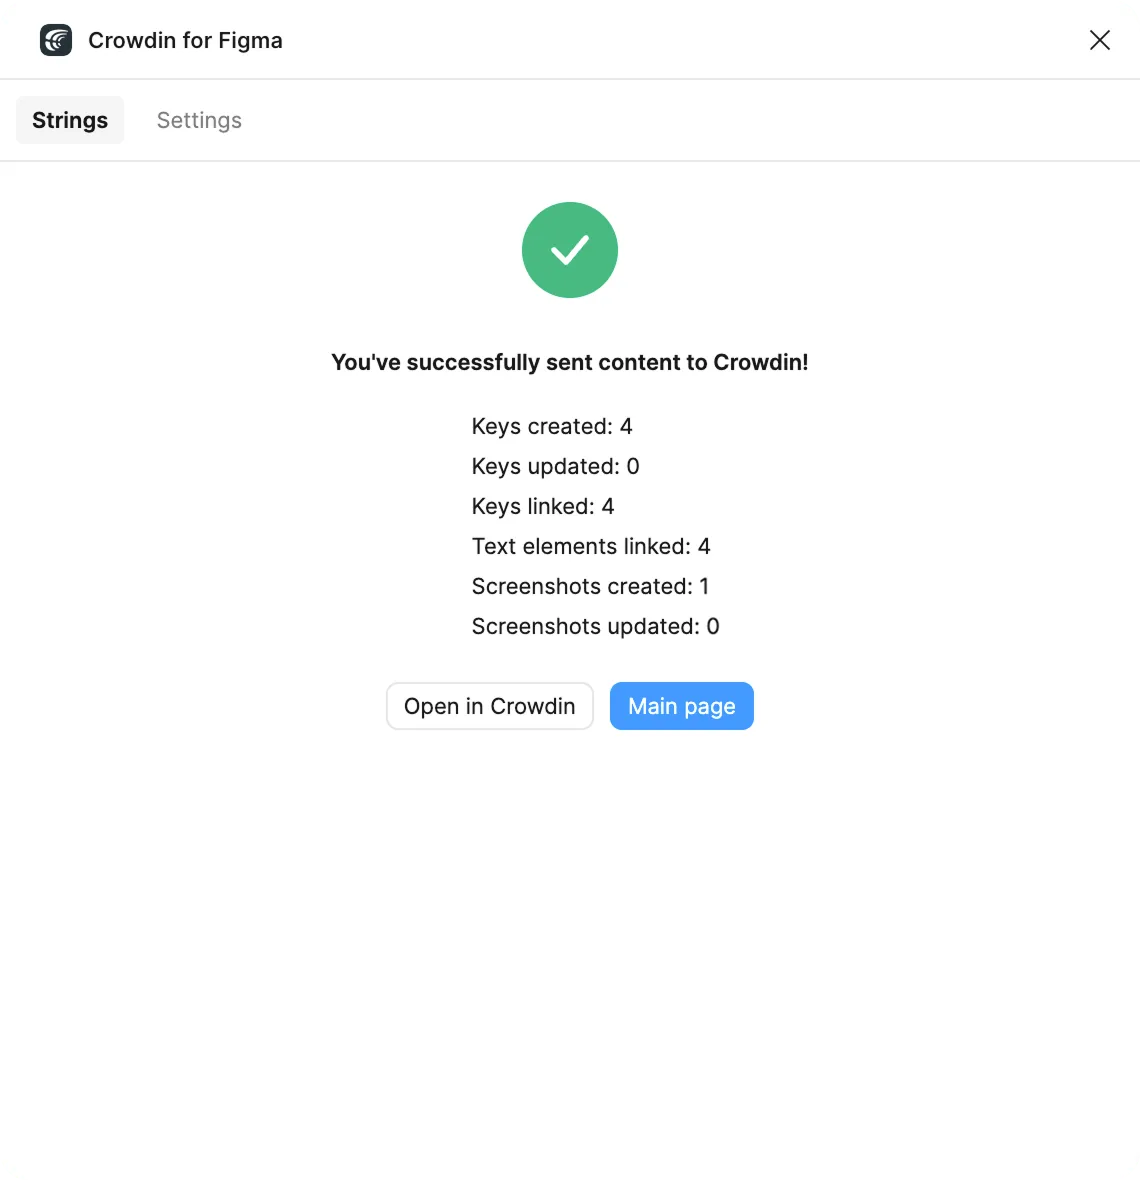
Once the strings are added to Crowdin Enterprise, you’ll see a summary of the content sent. This summary provides detailed feedback on the operation:
- Keys created: The number of new strings added to your Crowdin Enterprise project.
- Keys updated: The number of existing strings in Crowdin Enterprise that were updated.
- Keys linked: The number of existing strings in Crowdin Enterprise that were linked to text elements in Figma.
- Text elements linked: The total number of text elements in Figma that were linked to strings in Crowdin Enterprise. This number can be higher than Keys linked if multiple text elements were linked to a single string.
- Screenshots created: The number of new screenshots uploaded to Crowdin Enterprise.
- Screenshots updated: The number of existing screenshots that were updated.
From the summary screen, you can click Open in Crowdin to view the strings in your project or click Main page to return to the plugin’s main screen.
You can add strings with plural forms.
- Open the Crowdin plugin for Figma.
- To add the strings used in the designs, select the whole frame, multiple frames, or the needed text elements on the frames.
- In the Strings tab, click .
- In the appeared dialog, review the list of strings.
- Click next to the needed string and click Add plurals.
- In the appeared dialog, fill in the fields for each plural form and click Save. Depending on the source language of the connected Crowdin Enterprise project, there could be a different number of plural forms you should specify.
- Once all the needed strings are selected and configured, click Next.
- Select the preferred options and the file in Crowdin Enterprise you want to add the strings to, then click Submit.
Read more about Plural Forms.
Configuring ICU Source String Placeholders
Section titled “Configuring ICU Source String Placeholders”When using ICU strings in your design, you can set the placeholders’ values, and after adding such strings to designs, they will be displayed in a formatted view with the preconfigured values.
Once you use the needed ICU string from Crowdin Enterprise in your design, you can configure its placeholder values.
- Open the Crowdin plugin for Figma.
- In the Strings tab, use the Search field to find the specific copy by source text, string identifier, or context.
- Click on the needed ICU string.
- Click Set placeholders.
- Type the needed values for ICU string placeholders.
- Click Save to save the entered placeholders.
- Click Save to update the source string text in designs.
When previewing translations for ICU strings in Figma, they will also be displayed in a formatted view if the values were preconfigured beforehand.
To simplify adding strings from Figma to the Crowdin Enterprise project, you can set up the desired key naming pattern for the source string identifiers in the plugin settings. The Crowdin plugin for Figma will suggest the string identifiers for new strings based on the selected pattern. While adding new source strings, you can always edit the suggested identifier to the preferred look.
To select the key naming pattern, follow these steps:
- Open the Crowdin plugin for Figma.
- Switch to the Settings tab.
- In the Key Naming Pattern section, select the preferred option from the drop-down menu.
Besides the existing patterns, you can configure your own pattern. To use a custom pattern, select the Custom key naming pattern option from the drop-down list and specify your pattern in the Custom Key Naming Pattern field.
When adding source strings used in the designs, make sure to keep Send screenshots selected. As a result, the Crowdin plugin for Figma will upload screenshots along with the source strings.
Also, you can update screenshots with an Update screenshots option while editing a Crowdin Enterprise string that is linked to the text fields in designs.
Additionally, you can mass upload screenshots to Crowdin Enterprise for strings linked with text fields in designs.
- Open the Crowdin plugin for Figma.
- Select one or more frames with the linked strings.
- In the Strings tab, click Send tagged screenshots to Crowdin to upload screenshots for selected frames.
Read more about Screenshots.
Preview translations from Crowdin Enterprise for the strings used in the designs directly in Figma. By default, previews are generated on a new, duplicated page to keep your original designs intact.
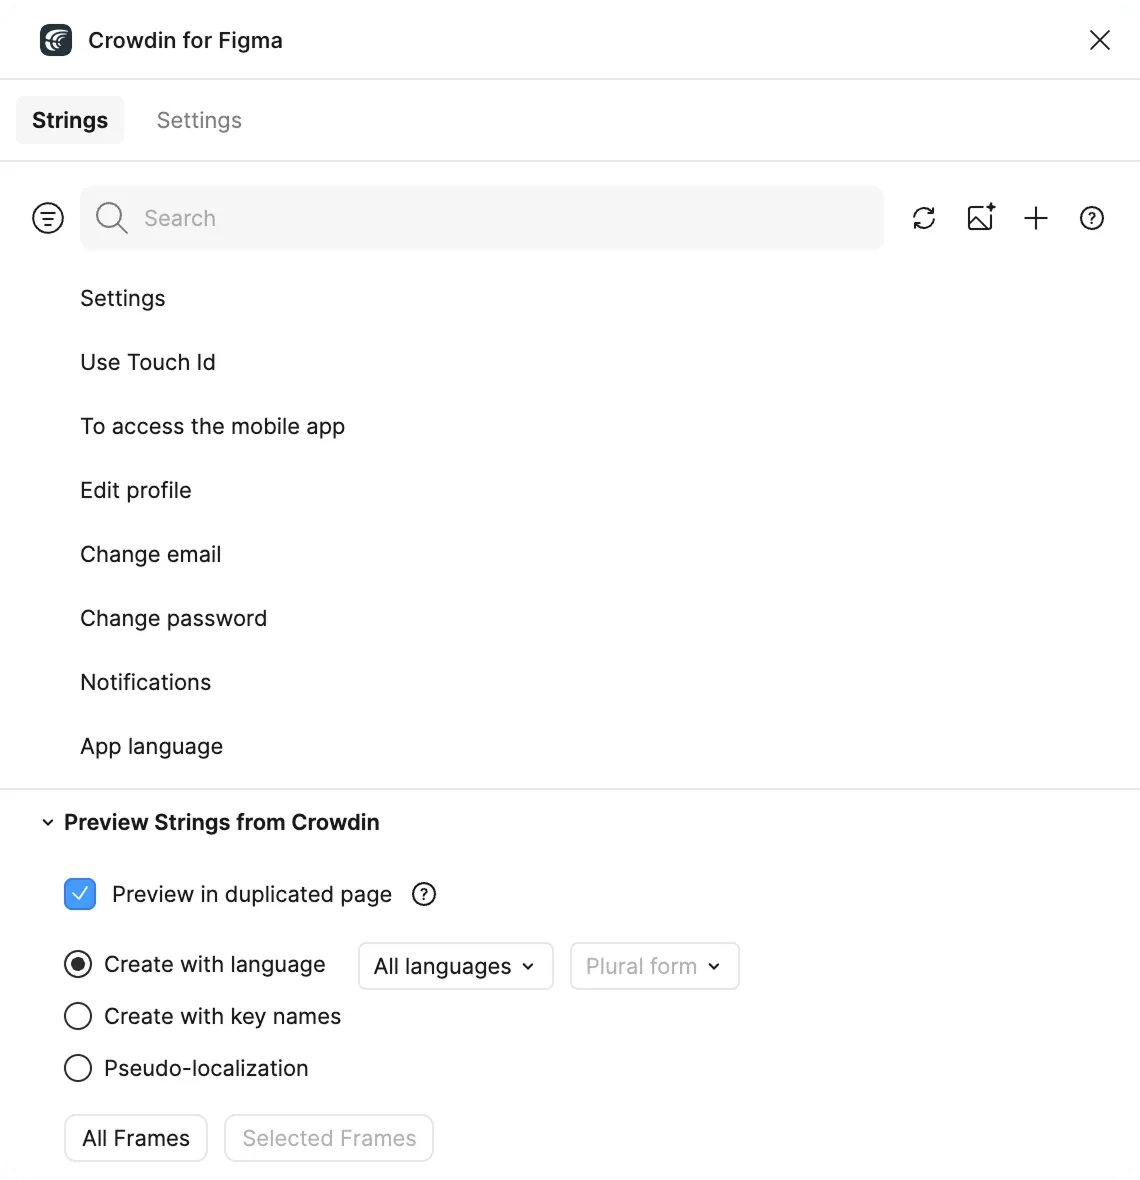
To preview strings populated with translations, follow these steps:
- Open the Crowdin plugin for Figma.
- Go to the Strings tab and expand the Preview Strings from Crowdin section.
- Ensure the Preview in duplicated page checkbox is selected.
- Select Create with language.
- Select the target language you want to preview translations for (optionally, you can select the preferred plural forms). You can also choose All languages.
- Choose the content you want to preview in Figma: All Frames or Selected Frames.
To help developers identify strings, you can populate your designs with string keys instead of translated text.
- Open the Crowdin plugin for Figma.
- Go to the Strings tab and expand the Preview Strings from Crowdin section.
- Ensure the Preview in duplicated page checkbox is selected.
- Select Create with key names.
- Choose the content you want to preview in Figma: All Frames or Selected Frames.
You can filter strings in the Strings tab by various criteria, such as file or link status. Click to open the filter side panel. Here, you can select files to view strings from or show only strings linked to your current text selection (e.g., selected text elements, an entire frame, or multiple frames). Click Reset to clear all filter options.
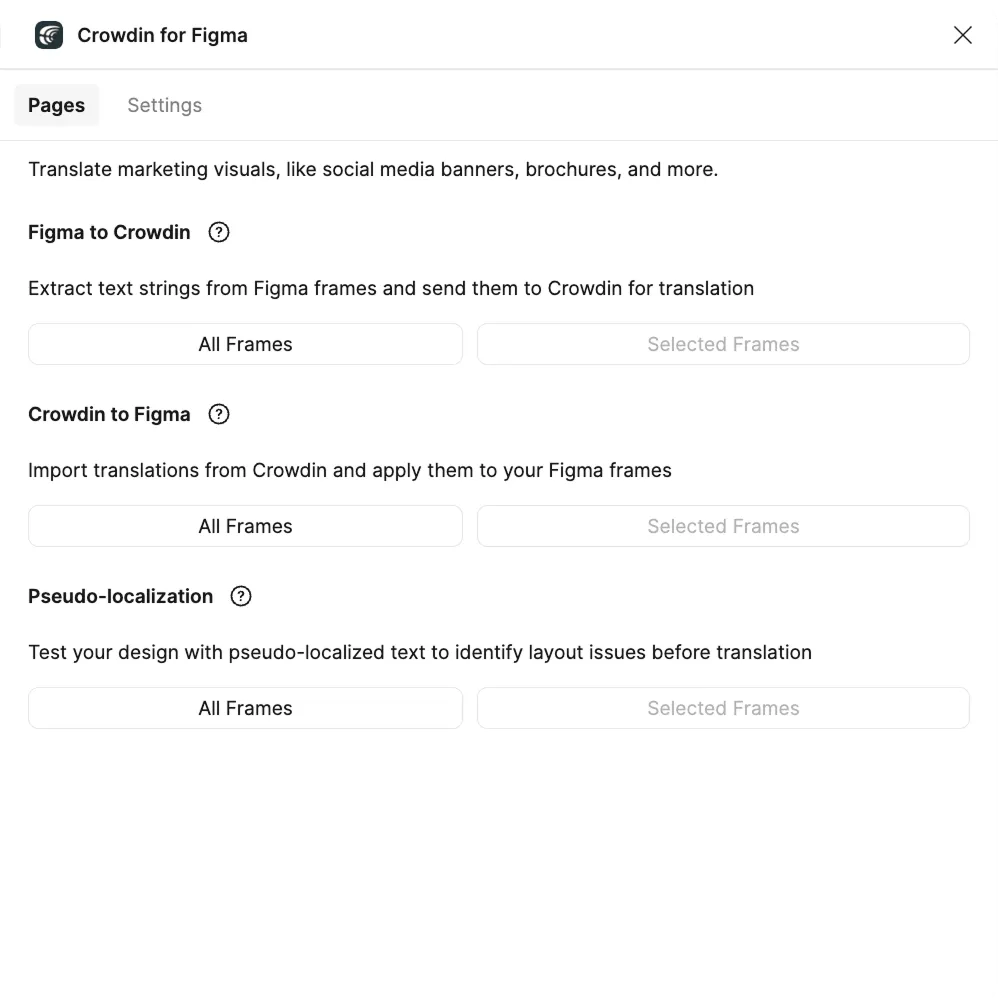
Use the Pages tab to localize static pages, like brochures and banners. In this tab, you can send texts with context for translators to Crowdin Enterprise and upload translated copies back to Figma.
You can send text for translation either from selected or all frames from a Figma file. Translators will work with those texts in the list view and use designs as an additional context for even higher translation quality.
In Crowdin Enterprise, a root folder figma-plugin will be created. It will contain a subfolder named after your Figma file with HTML files for each frame inside.
To send Figma designs for translation, follow these steps:
- Open the necessary Figma file.
- Go to Plugins > Crowdin for Figma.
- In the Pages > Figma to Crowdin section, select the content you want to translate: All Frames or Selected Frames.
- In the next screen, select the target languages for which the uploaded frames will be available for translation in Crowdin. By default, All languages is selected.
- (Optional) Select Content Segmentation to split long texts into smaller segments, such as sentences, before sending them to Crowdin.
- Click Send All Frames (or Send Selected Frames).
When the source files are uploaded to your Crowdin Enterprise project, you can invite contributors to translate and proofread them.
Read more about translation strategies.
Uploading Translations from Crowdin to Figma
Section titled “Uploading Translations from Crowdin to Figma”You can synchronize texts between Figma and Crowdin Enterprise projects whenever you want to test the translated copy inside Figma or generate multilingual assets.
To upload translated copies to Figma, follow these steps:
- Open the necessary Figma file.
- Go to Plugins > Crowdin for Figma.
- In the Pages > Crowdin to Figma section, select the content you want to apply translations to: All Frames or Selected Frames.
- In the next screen, select one or more languages you want to import translations from. You can track the translation progress for each language directly in this list. This progress reflects the translation status of the files located specifically in the figma-plugin root folder within your Crowdin Enterprise project.
- (Optional) Select Consolidate translations on the current page to place the imported translated frames on your current Figma page instead of creating a separate page for them.
- Click Import All Frames (or Import Selected Frames).
After uploading translations to Figma, the modified file will contain a separate frame with translations for each target language. The newly uploaded translated versions won’t override the ones you uploaded previously. You can always delete the translated copies you no longer need.
If you select Consolidate translations on the current page, the translated frames will be added directly to the page you are currently working on.
If you’d like the newly uploaded translated versions to override the previously uploaded ones, open the plugin Settings and select Override existing translations.
The Crowdin for Figma plugin is fully compatible with Figma’s Buzz editor, a new space designed for creating marketing and advertising content. This integration is ideal for teams localizing social media assets, digital ads, and other promotional visuals.
When using the plugin in Buzz, you’ll find a streamlined version of the Pages tab directly in the left sidebar. The workflow is optimized for the Buzz editor:
- Focused Functionality: Only the Pages tab is available, giving you direct access to the features you need for visual localization.
- Asset-Based Selection: Instead of selecting frames, you’ll work with assets. The buttons are labeled Selected Assets to match the Buzz terminology.
To localize your designs in Figma Buzz, follow these steps:
- Open the Crowdin plugin from the left sidebar.
- In the Buzz editor, select one or more assets you wish to translate.
- In the Figma to Crowdin section, click Selected Assets. Select the target languages on the next screen and click Send Selected Assets.
- Once translations are ready, go to the Crowdin to Figma section and click Selected Assets. Select the target languages you want to import on the next screen and click Import Selected Assets to apply the translations.
Even before translations are completed, you can test whether your application is ready to be localized using pseudo-localization. This feature allows you to simulate how the application’s UI will look with different languages to check whether the source strings should be modified before the project localization starts.
Depending on the content you want to test, you can use the Strings or Pages tab in the Crowdin for Figma plugin.
- Open the necessary Figma file.
- Go to Plugins > Crowdin for Figma.
- In the Strings > Preview Strings from Crowdin section, ensure Preview in duplicated page is selected.
- Select Pseudo-localization.
- Select the content you want to test with pseudo-localization: All Frames or Selected Frames.
- In the Pseudo-localization dialog, you can choose from predefined presets and configure the settings according to your preferences.
- Click Submit.
- Open the necessary Figma file.
- Go to Plugins > Crowdin for Figma.
- In the Pages > Pseudo-localization section, select the content you want to test with pseudo-localization: All Frames or Selected Frames.
- In the Pseudo-localization dialog, you can choose from predefined presets and configure the settings according to your preferences.
- Click Submit.
Read more about Pseudo-localization and its settings.
Figma’s Dev Mode allows designers and developers to collaborate, ensuring accuracy in implementation and a smooth transition from design to code.
Read more about Figma Dev Mode.
The integration of Crowdin for Figma plugin with Dev Mode extends the functionality of both platforms, enhancing the localization process within the design environment. While Dev Mode in Figma is read-only, certain limitations apply to the Crowdin for Figma plugin’s capabilities:
What You Can Do:
- Access the Strings tab to view and manage strings.
- Explore string details, including file, key, context, and labels.
- Quickly copy string keys for efficient workflow.
Features not available in Dev Mode: adding new strings to Crowdin Enterprise, linking strings, sending screenshots, previewing translations, editing, hiding, or deleting strings.
Using Crowdin for Figma Plugin in Dev Mode
Section titled “Using Crowdin for Figma Plugin in Dev Mode”Despite the limitations, the Crowdin for Figma plugin remains valuable in Dev Mode, offering developers a streamlined approach to text elements management. Here’s a typical use case:
- Enter Dev Mode.
- In the right sidebar, switch to the Plugins tab.
- Click on Crowdin for Figma.
- In the Strings tab, click Filter strings and select Show strings linked to selected text elements.
- Select the needed text element on the frame and hover over the icon in the string list to view all needed information (i.e., key, context, file it’s stored in, labels) about this particular string.
- (Optional) Click Copy string key to clipboard to further use it in code.
Furthermore, the Crowdin for Figma plugin seamlessly integrates with Figma for VS Code, extending its functionality to developers using this environment.
Read more about Figma for VS Code.
Screenshot Generation Issues in Large Figma Files
Section titled “Screenshot Generation Issues in Large Figma Files”When uploading strings with screenshots from large Figma files, users may experience slow performance or Figma freezing. This issue occurs when text elements are placed within a large top-level frame.
When you add a string from Figma to Crowdin Enterprise, the plugin:
- Identifies the top-level frame containing the text element.
- Converts this frame into an image using the Figma API.
- Uploads the image to Crowdin Enterprise as a screenshot.
The plugin always searches for the highest-level frame in the hierarchy and stops when encountering a non-frame element (such as a section or group). If the top-level frame is too large, generating a screenshot can cause performance issues.
For example:
section>group>frame>text→ The plugin captures the screenshot fromframe.frame 1>frame 2>frame 3>text→ The plugin captures the screenshot fromframe 1.
To prevent slowdowns, restructure your Figma file so that top-level frames contain only the relevant UI context. Instead of placing all UI elements in a single large frame, break them into smaller, logical sections.
When working in Figma, fonts that are missing locally may cause unexpected changes after linking strings using the Crowdin for Figma plugin.
This situation typically happens when:
- The original design uses a font that is not installed in your local Figma environment.
- Figma marks missing fonts with a special A? icon shown in the upper-left corner of the canvas and next to the font name in the Typography section of the right sidebar.
- When you select a text element with a missing font, Figma displays a Missing font dialog offering to replace it.
If you link a Crowdin string to such a text element, Figma will automatically substitute the missing font with a default available font (e.g., Roboto). This is expected behavior. The plugin attempts to preserve the original font, but when it’s not available in your local system, Figma replaces it to ensure the text remains visible and editable.
This issue may not be immediately noticeable. Some users detect the font change only after uploading screenshots from Figma to Crowdin Enterprise, which can cause confusion.
To avoid this:
- Check for missing font indicators (A?) before linking strings.
- Make sure the fonts used in the original design are installed and available in your Figma.
- If necessary, coordinate with the designer to confirm the correct font setup.