Editor Overview
The Editor is the main place in Crowdin Enterprise where project members can work on translations. It allows users to suggest, vote on, review, and approve translations online.
Using the main menu at the top of the Editor (File, Edit, View, Workflow (only in projects with a workflow), Language, Project, Help), you can select content for translation, download or upload translations, perform various string actions, change the Editor’s layout, switch target languages, access project pages and switch projects, access help materials, and more.
The Editor provides all the necessary tools for translators and proofreaders, including:
- List of strings available for translation, which may vary in different Editor modes.
- Context, labels, and additional information to guide the work.
- String search and filtering options for efficient translation management.
- AI-powered suggestions, Translation Memory (TM) suggestions, and Machine Translation (MT) suggestions.
- Glossary terms to ensure consistency.
- Comments section for collaboration and reporting issues.

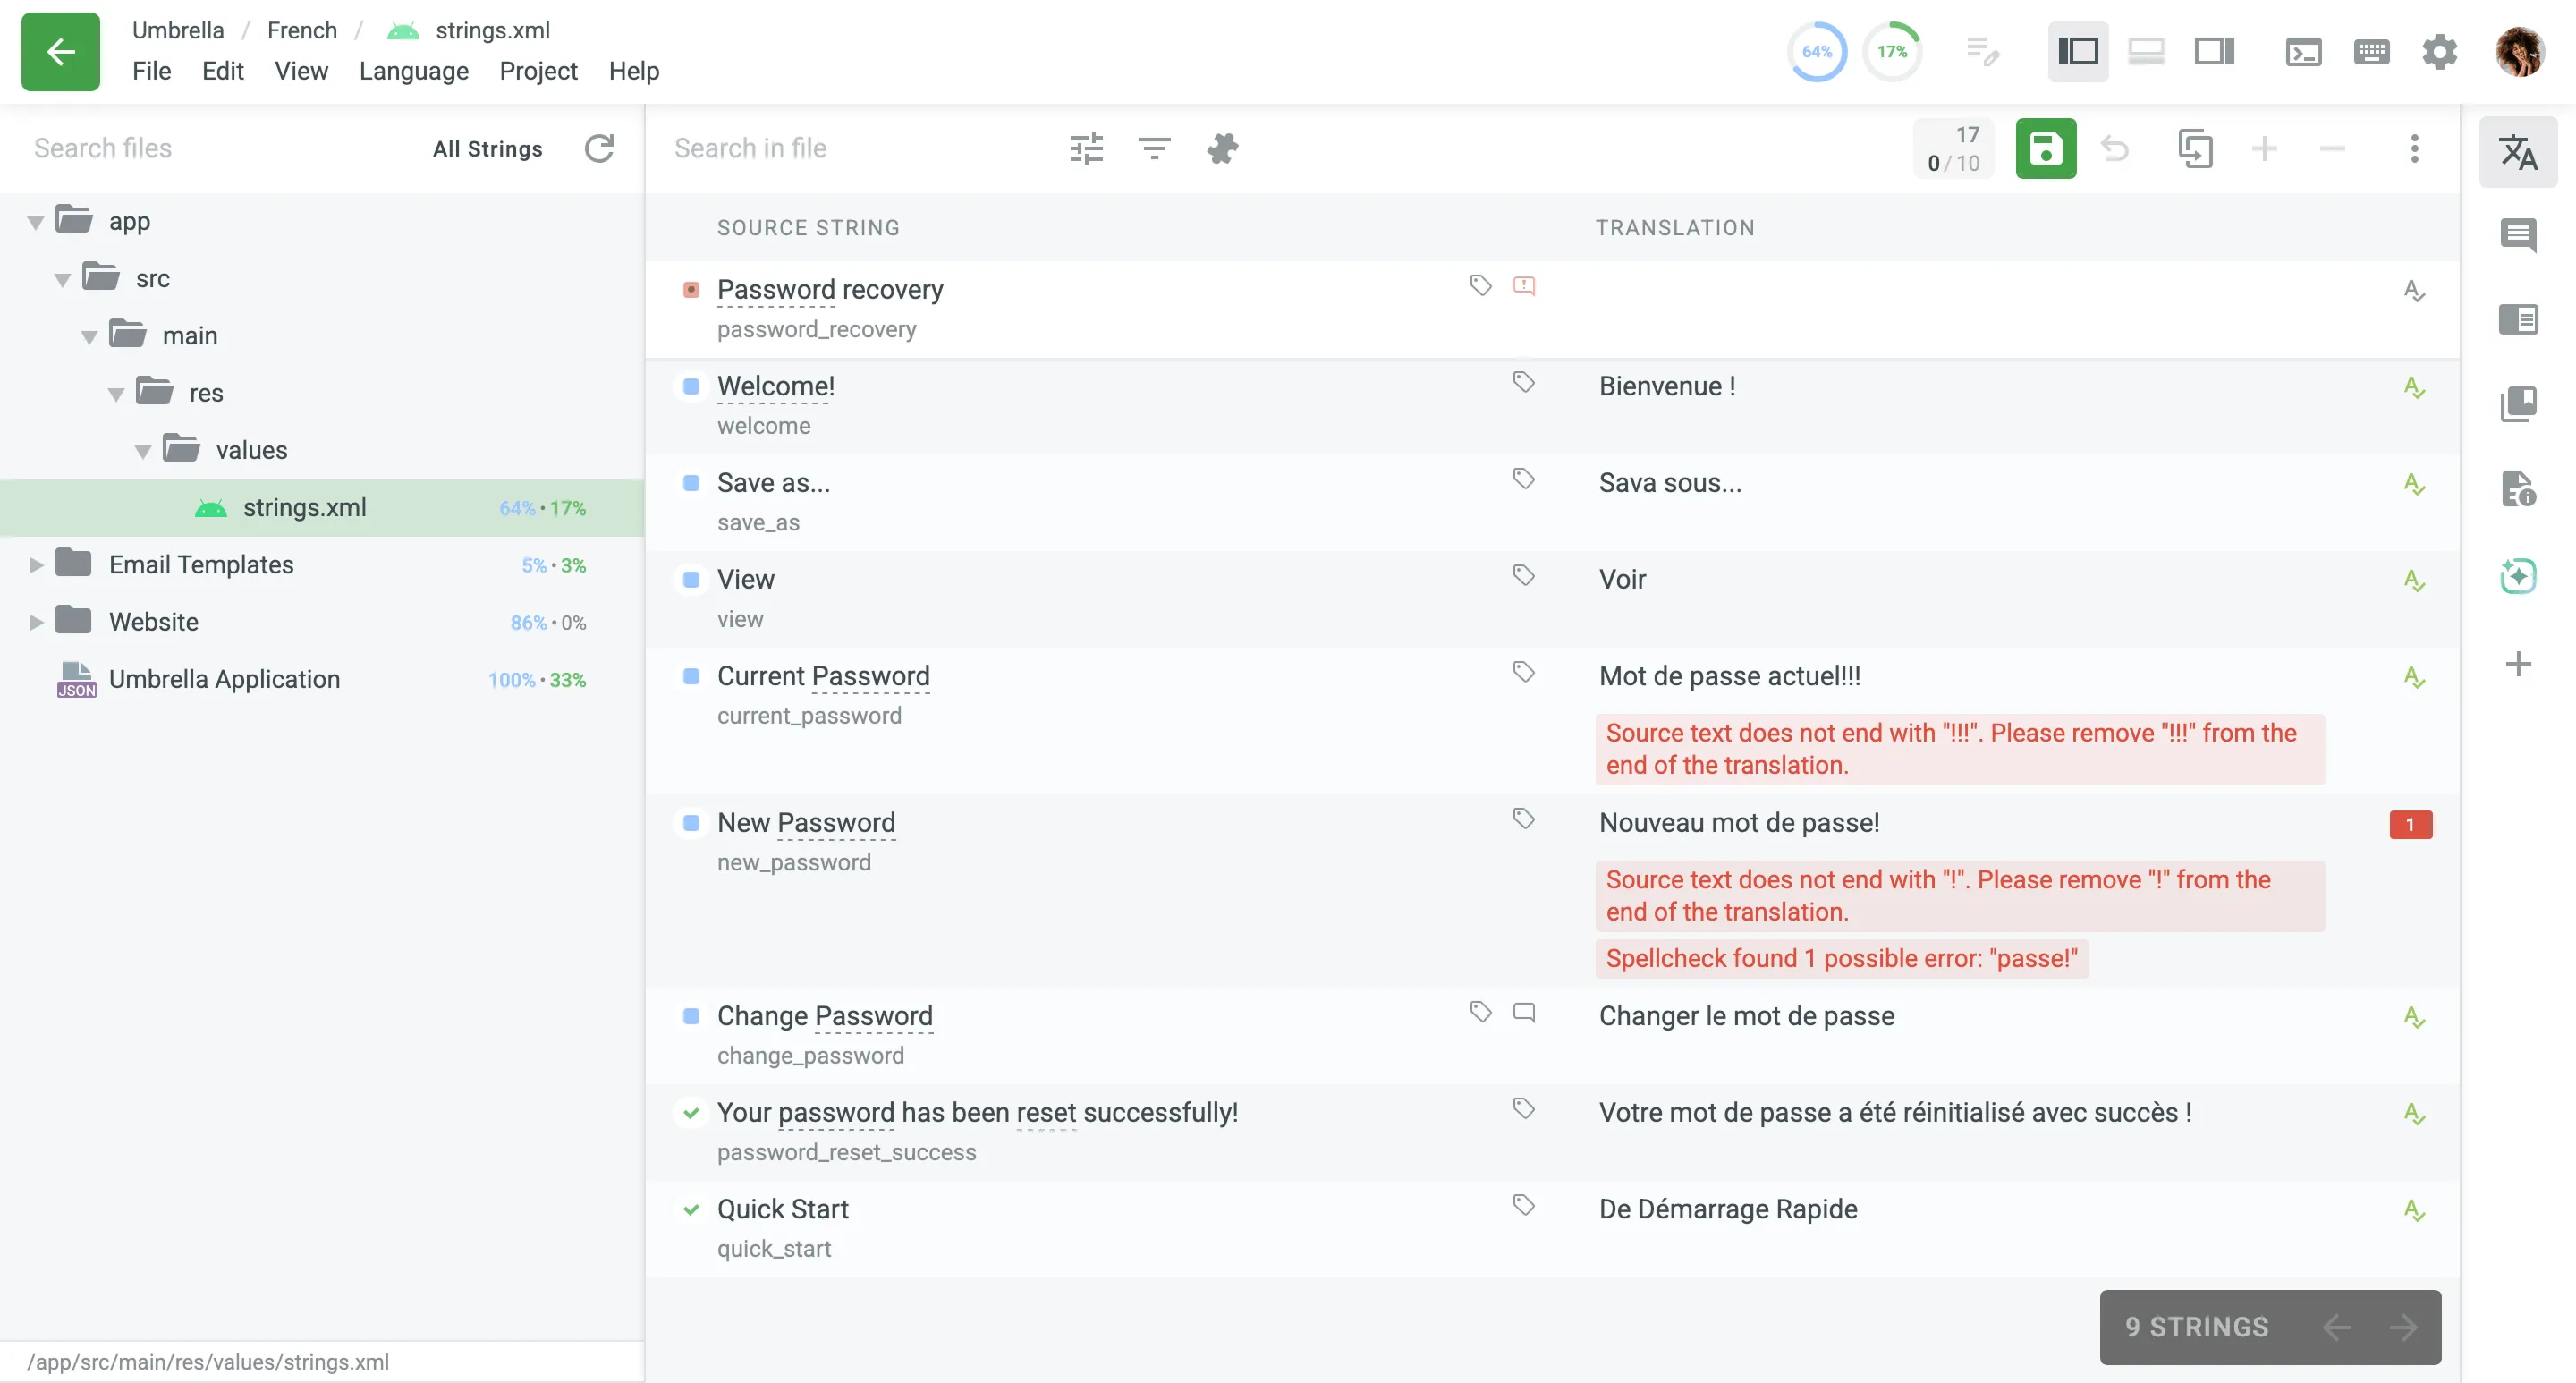
This section displays the list of strings, with the active one highlighted. Strings are text elements that are either individual words, phrases, or sentences. Some strings might have replacement tokens (e.g., 0, 1, %1, etc.) or elements of the ICU message syntax. Such items themselves should not be translated but are used by the website code to dynamically insert some information into strings. To work with such strings, you should copy the source string and translate only the real words.
Strings can have the following statuses:
- - untranslated
- - partially translated (if some of the plural forms are not translated)
- - translated
- - partially approved (if some plural forms are not approved)
- - approved
- - hidden (visible only for project managers and proofreaders)
In projects with a workflow, strings can additionally have the following workflow statuses:
- Todo – Indicates that the string is awaiting action at the current workflow step. For example, on a Translation step, it means the string is untranslated. On a Proofreading step, it means the string is not yet approved.
- Pending – This status is specific to the Source Text Review step. It indicates that a string has an approved correction with text that differs from the original source text.
- Done – Indicates that the main action for the current workflow step is complete. For example, on a Translation step, the string has been translated. On a Proofreading step, it has been approved.
Besides the status icons, strings can also display the following markers:
| Marker | Appears when | Click action |
|---|---|---|
| Labels | The string has labels. | Opens the Context & Translations panel with the string’s labels. |
| Comments | The string has comments and no unresolved issues. | Opens the comment dialog. |
| Comments with Issues | The string has unresolved issues. | Opens the comment dialog. |
| Screenshots | The string has screenshots attached. | Opens the first screenshot or the context panel, depending on how many screenshots are attached. |
| Master String | The string is the original string for one or more duplicates. | Opens the duplicates list in a new tab. |
| Duplicate String | The string is a duplicate of another string. | Opens the original string in a new tab. |
To suggest a translation, select a string from the list and enter your suggestion in the field next to the original text.
To streamline the translation process, you can enable the Auto-save feature. When the Auto-save translations setting is enabled in the Editor Settings, your translations are automatically saved when you switch to another string. A “Saving…” indicator will appear briefly, followed by a “Saved” confirmation.
By default, Auto-save is disabled, meaning you need to manually click Save translation for each string. When Auto-save is disabled, the Save translation button acts as the primary action and appears green. When Auto-save is enabled, the button becomes gray, as manual saving is optional.
Once saved, your suggestion will be added to the string’s translation suggestions list. By default, the Automatically move to next string option is enabled, so the Editor will then move to the next string.
If you need to discard your current input and revert to the previous state before saving, click Cancel.
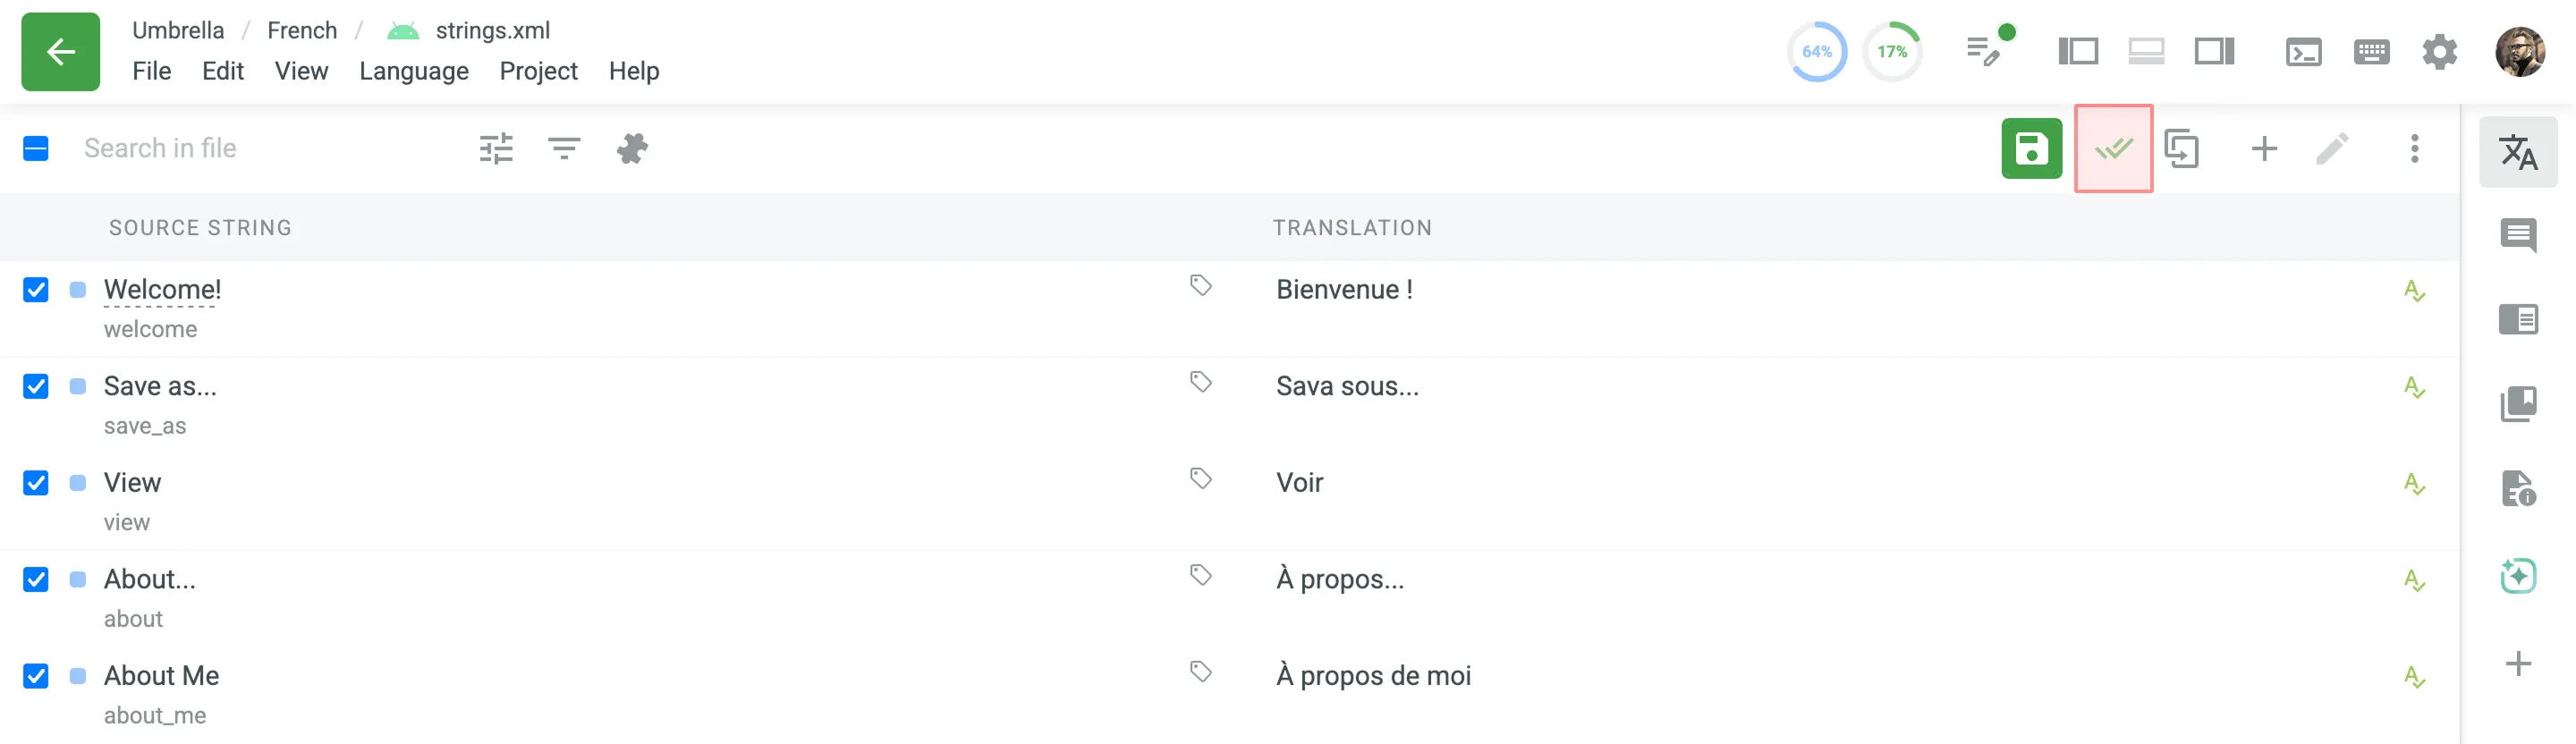
Review the translations to make sure they are ready for export, and click Approve icon next to the suggestion to approve each translation separately.
To approve all or a couple of the strings at once, check the boxes on the left and then click Approve.
Each translation can be approved either once or multiple times by multiple proofreaders and project members with manager permissions (or higher). Once a translation is approved at least once, it will be displayed as such on all workflow steps of a project.
If necessary, a proofreader or project member with manager permissions (or higher) can edit the list of approvals for translations approved twice and more by removing approvals one by one or all at once.
To edit the list of approvals, follow these steps:
- Open the needed string in the Editor.
- Click on the profile pictures of the proofreaders that approved a translation.
- In the unfolded translation details, click next to the approval you want to remove.
The translations with the highest number of approvals have the highest priority. They will be displayed at the top of the translation list in the Editor and used on translation download.
When a string has more than one translation, the translation list is formed based on the following priority:
- Translation with the highest number of approvals – Among translations approved multiple times, the translation with the highest number of approvals has a top priority.
- Translation with the last added approval – Among translations approved only once, the translation with the last added approval has a top priority.
- Most voted translation – Among translations that don’t have approvals, the translation with the highest number of votes has a top priority.
- Last added translation – Among translations that don’t have approvals or votes, the last added translation has a top priority.
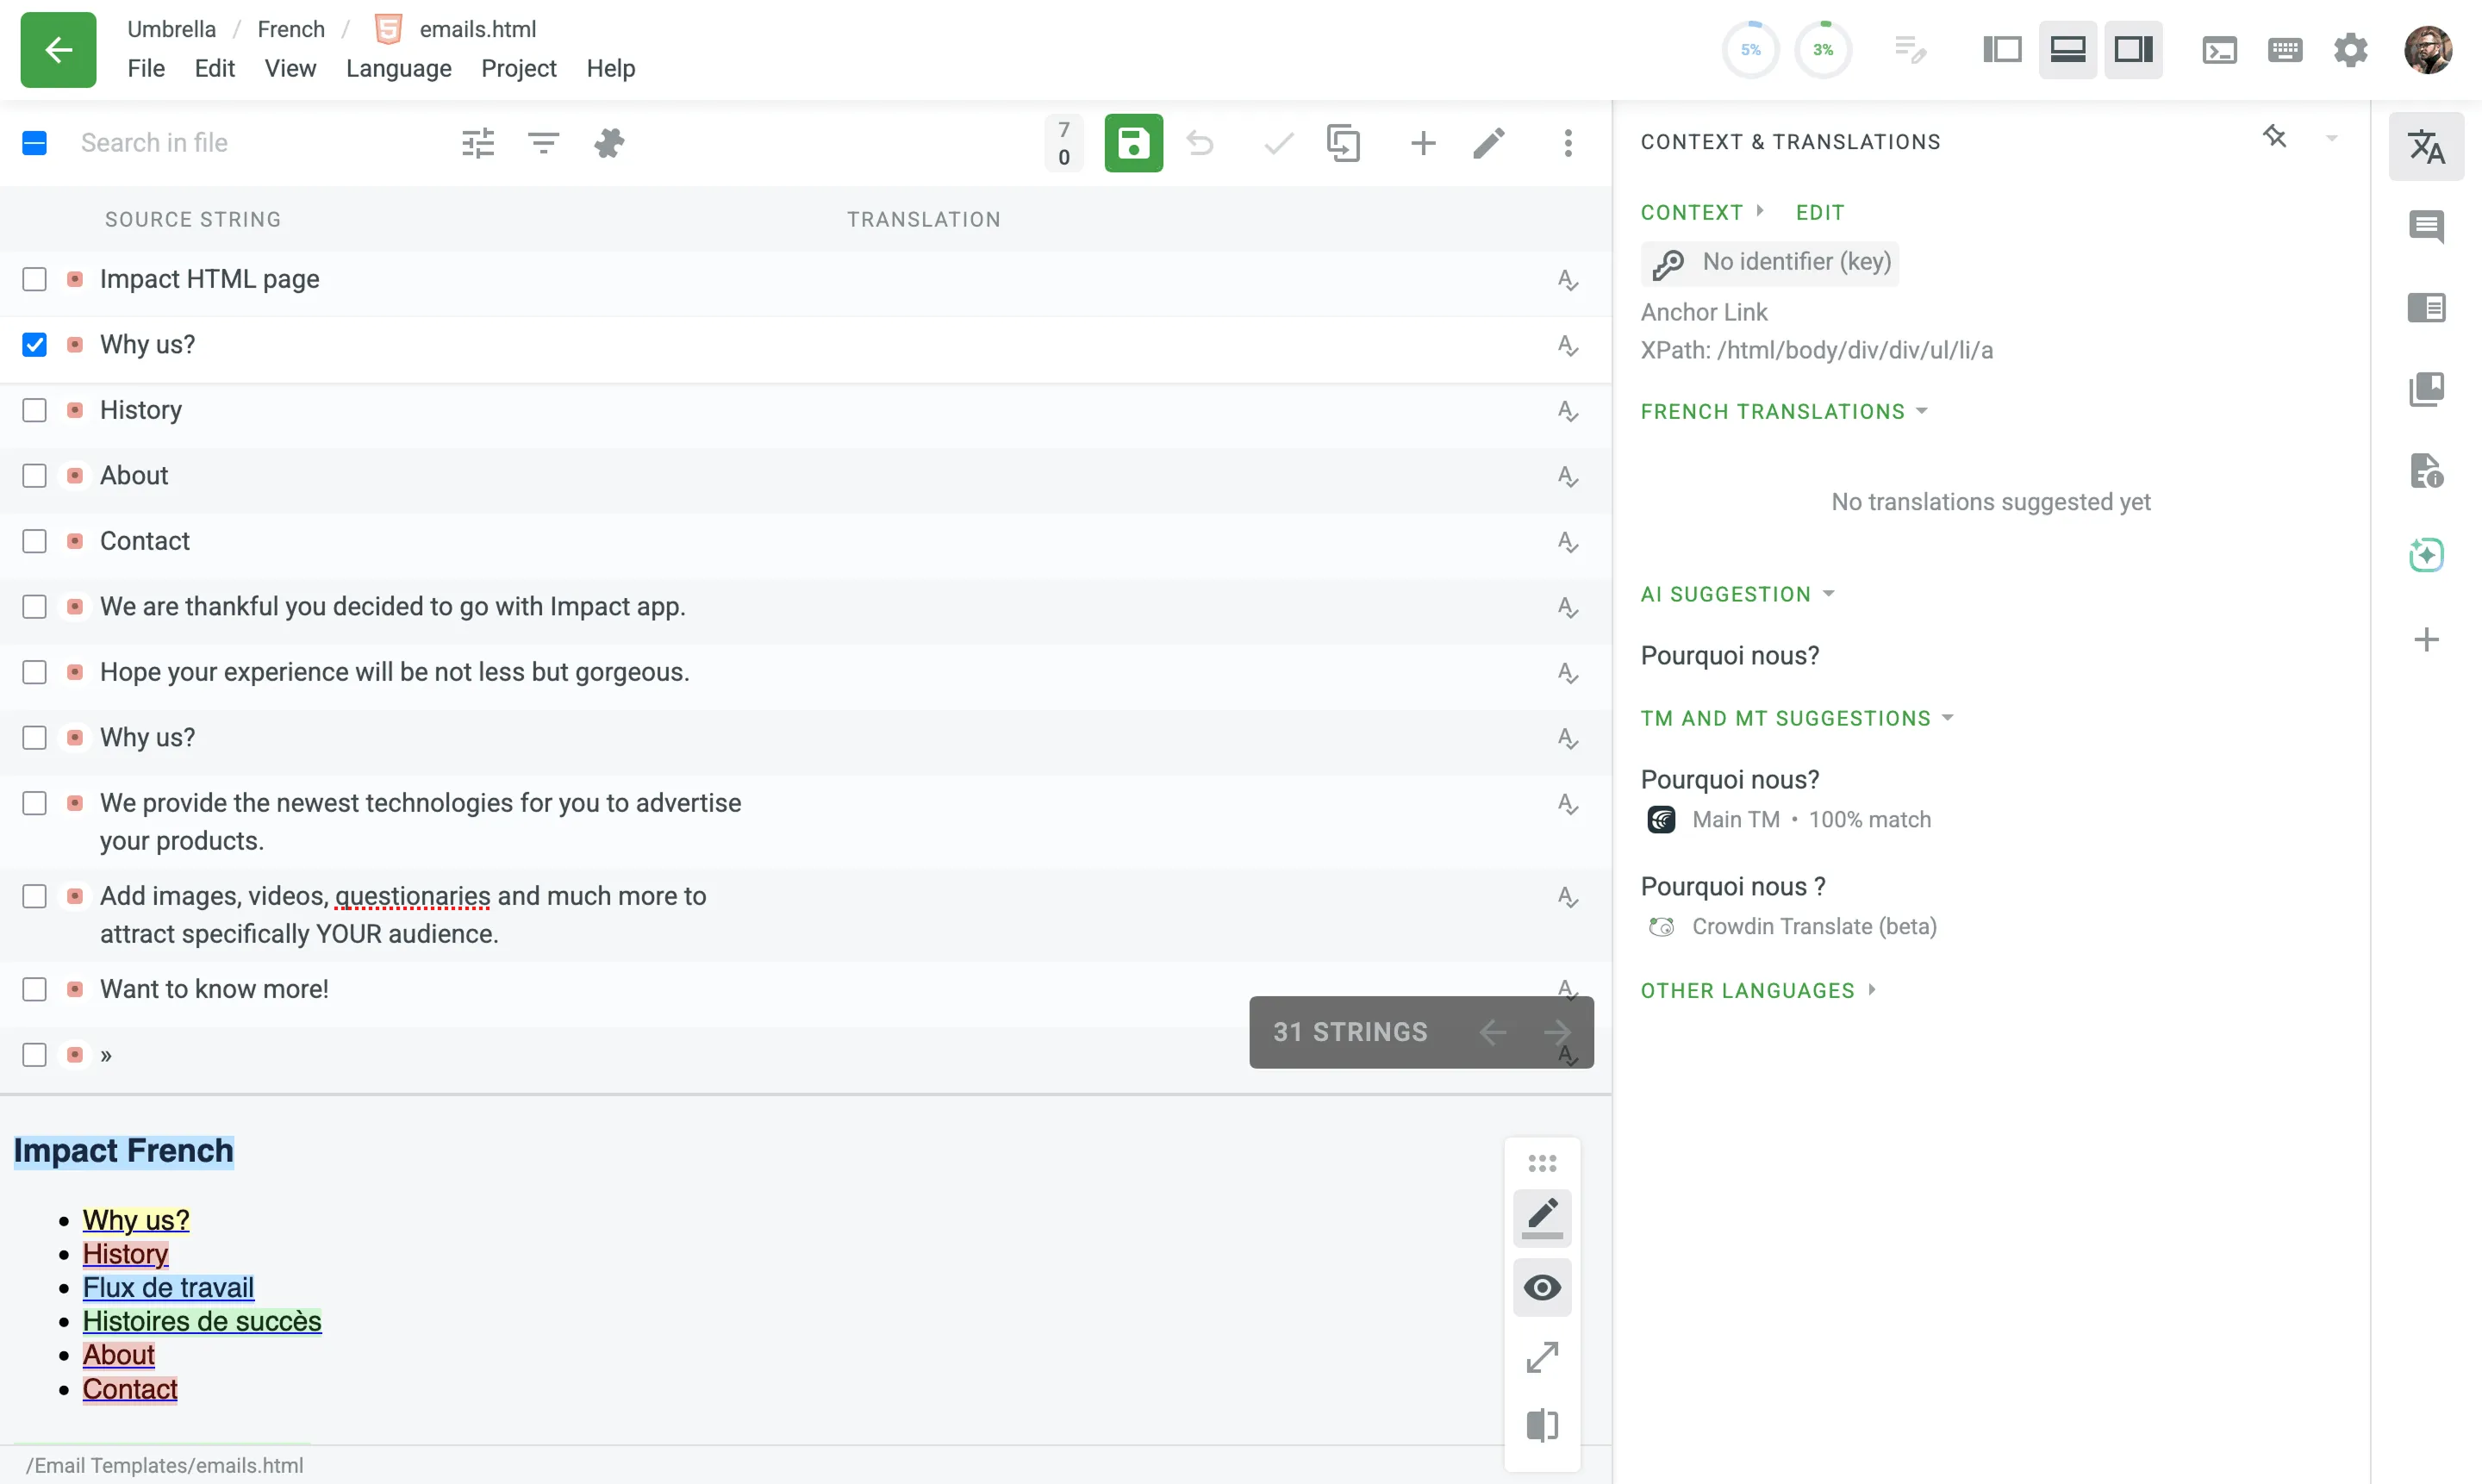
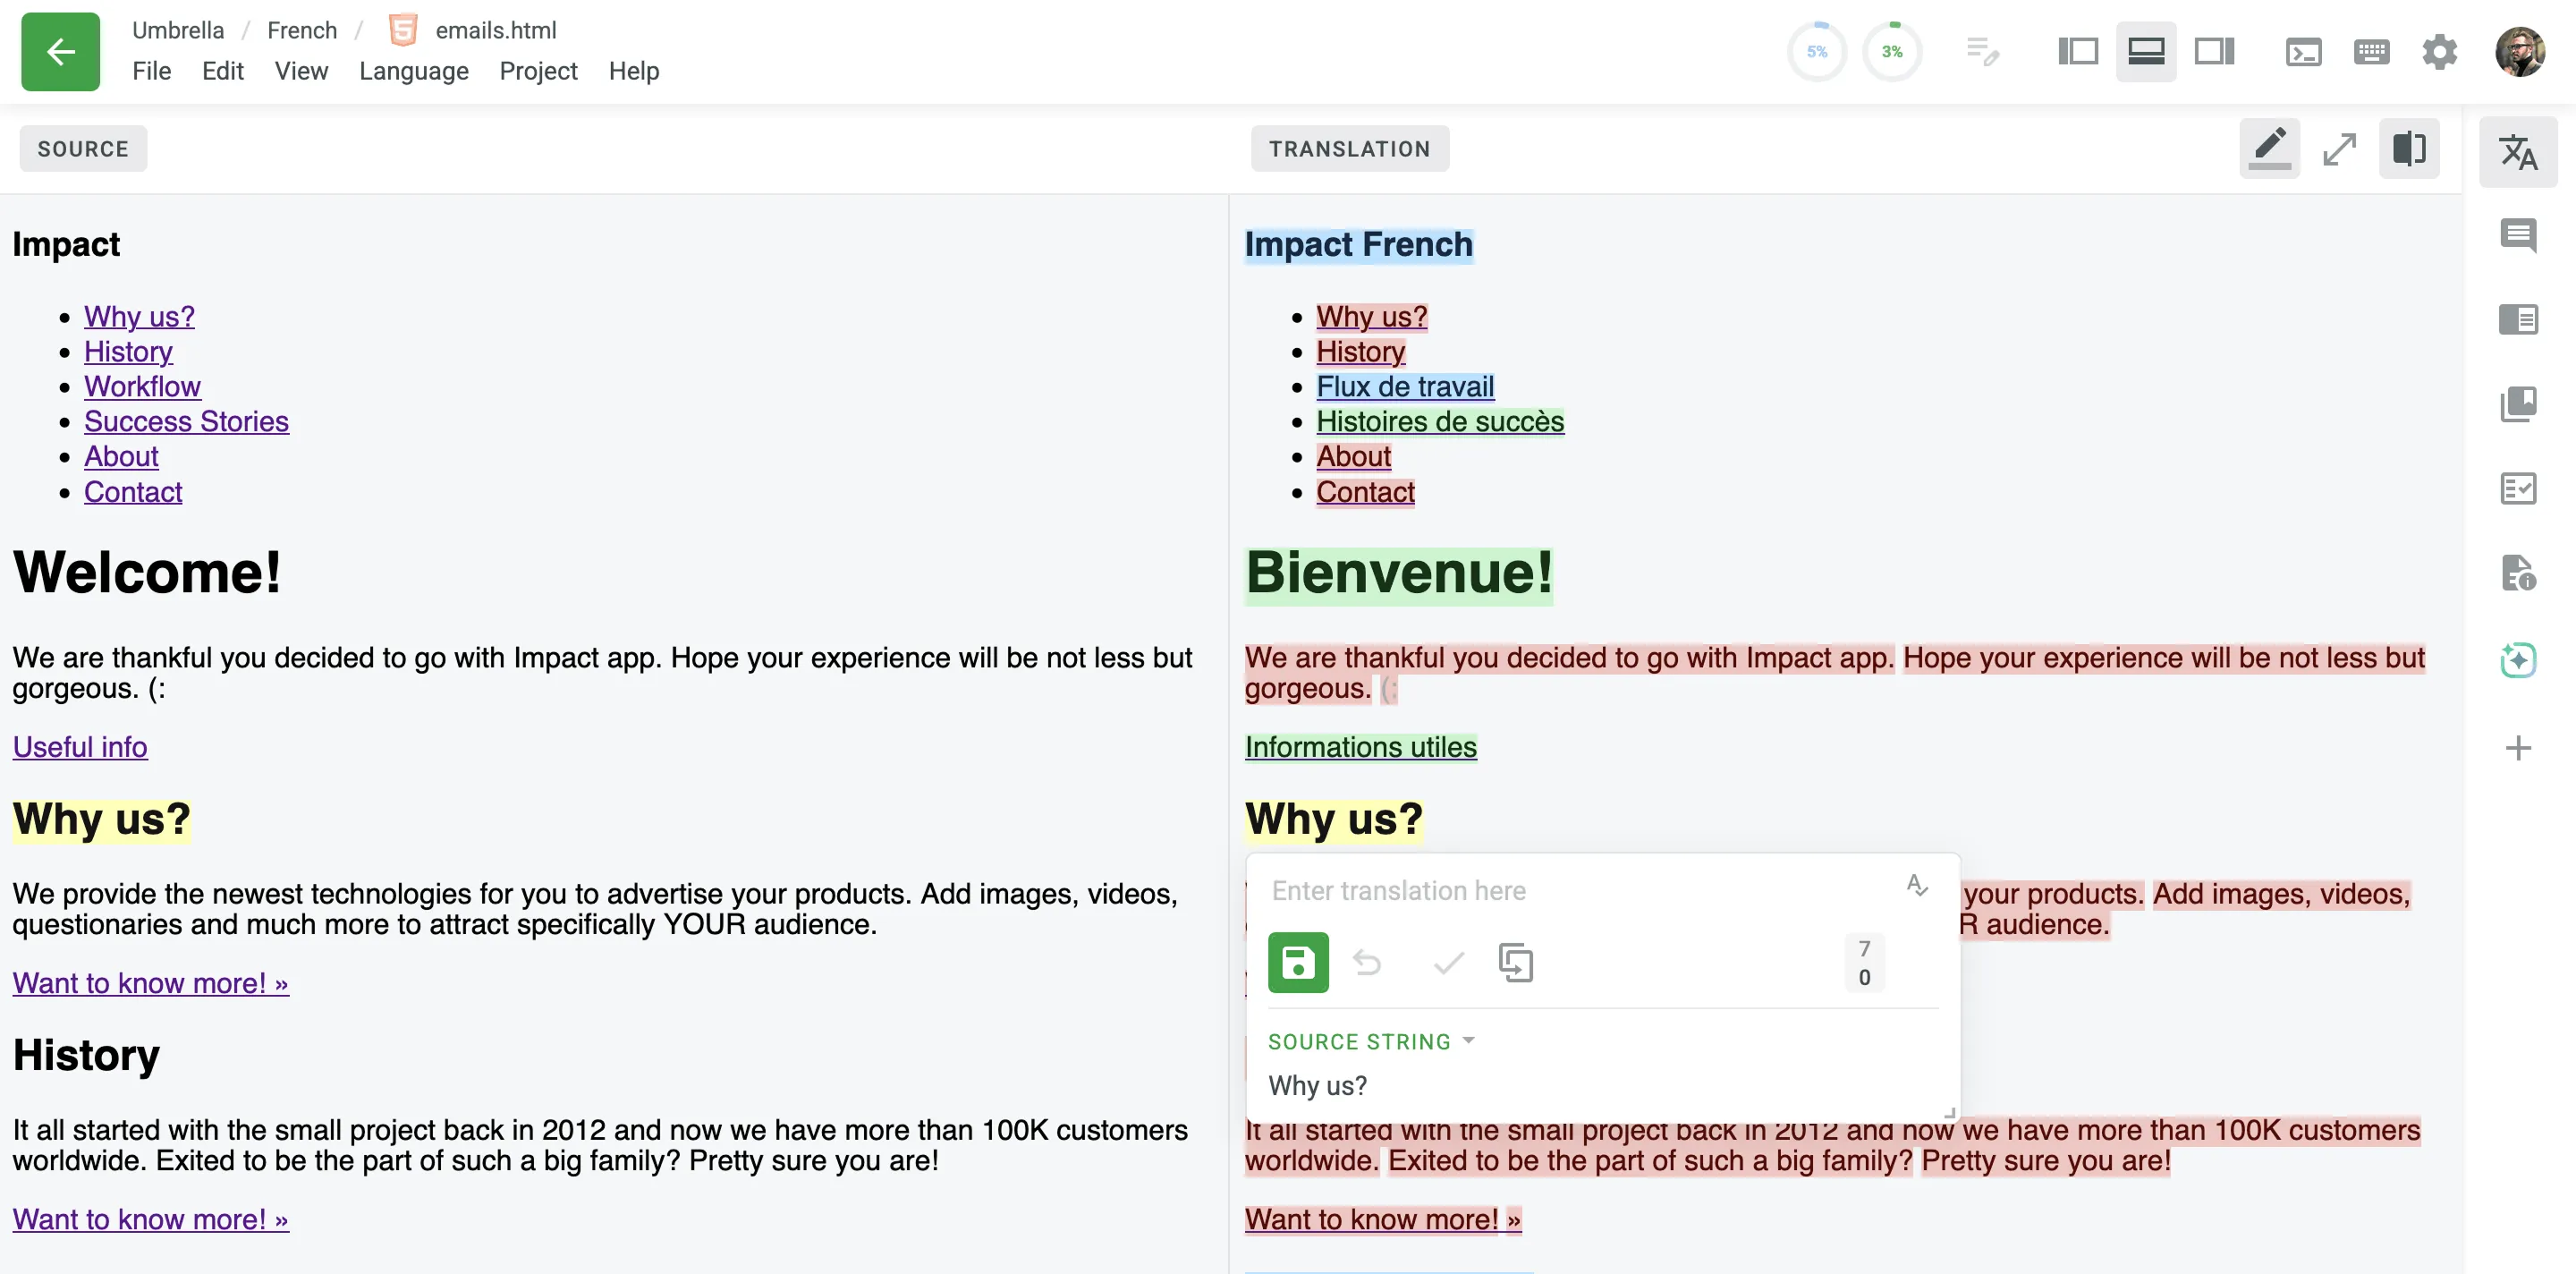
When translating the content of an HTML, XML, TXT, DOCX, XLSX, HAML, Web XML, Markdown, MDX, DITA, Wiki, ADOC, Coffee, FTL, JS, TS, and FTLH file formats, you can toggle a bottom panel (for Side-by-side and Multilingual modes) to see a file preview (i.e., WYSIWYG). For Comfortable mode, the file preview is displayed by default when working with the formats mentioned above.
The string status is indicated by the following colors:
- Red - untranslated
- Blue - translated
- Light-green - approved
- Gray - not for translation
An active string is highlighted in yellow.
The following options are available to manage the above view:
- - Load basic list view. Use it to switch to a standard mode and see a list of strings (Comfortable mode only).
- - Highlight untranslated, translated, and approved strings. Use it to toggle the color highlighting of strings on and off.
- - Show translation preview. Use it to toggle the translation preview mode on and off.
- - Scale Toggle. Use it to toggle between a zoomed-in and zoomed-out view (Comfortable mode only).
- - Full Screen (by default, Ctrl+F or ⌃+F). Use it to expand the preview to the full screen.
- - Dual Preview (by default, Ctrl+D or ⌃+D). Use it to display the Source and Translation files side-by-side.
When you switch to Full Screen or Dual Preview, the preview displays the entire file, bypassing the pagination limits of the standard string list.
Instead of using the side panel, you can translate contextually using inline editing:
- Click on any highlighted text directly within the WYSIWYG preview.
- A popover will appear where you can enter and save your translation.
- If you need to reference the original text while translating, click Source String within the popover to expand it.
In Dual Preview mode, clicking a string in the Source panel will automatically highlight the corresponding string in the Translation panel (and vice versa) while opening the translation popover.
To find specific strings in the Editor, type your query into the search field at the top of the string list. Use the keyboard shortcut (by default, Ctrl+F or ⌘+F) to instantly focus on the search field.
Depending on the content you open in the Editor, the search will apply to the currently open file, folder, or all strings in the project.
To refine your search results, click the Search filter icon next to the search field. This will open a drop-down menu with the following filters and options:
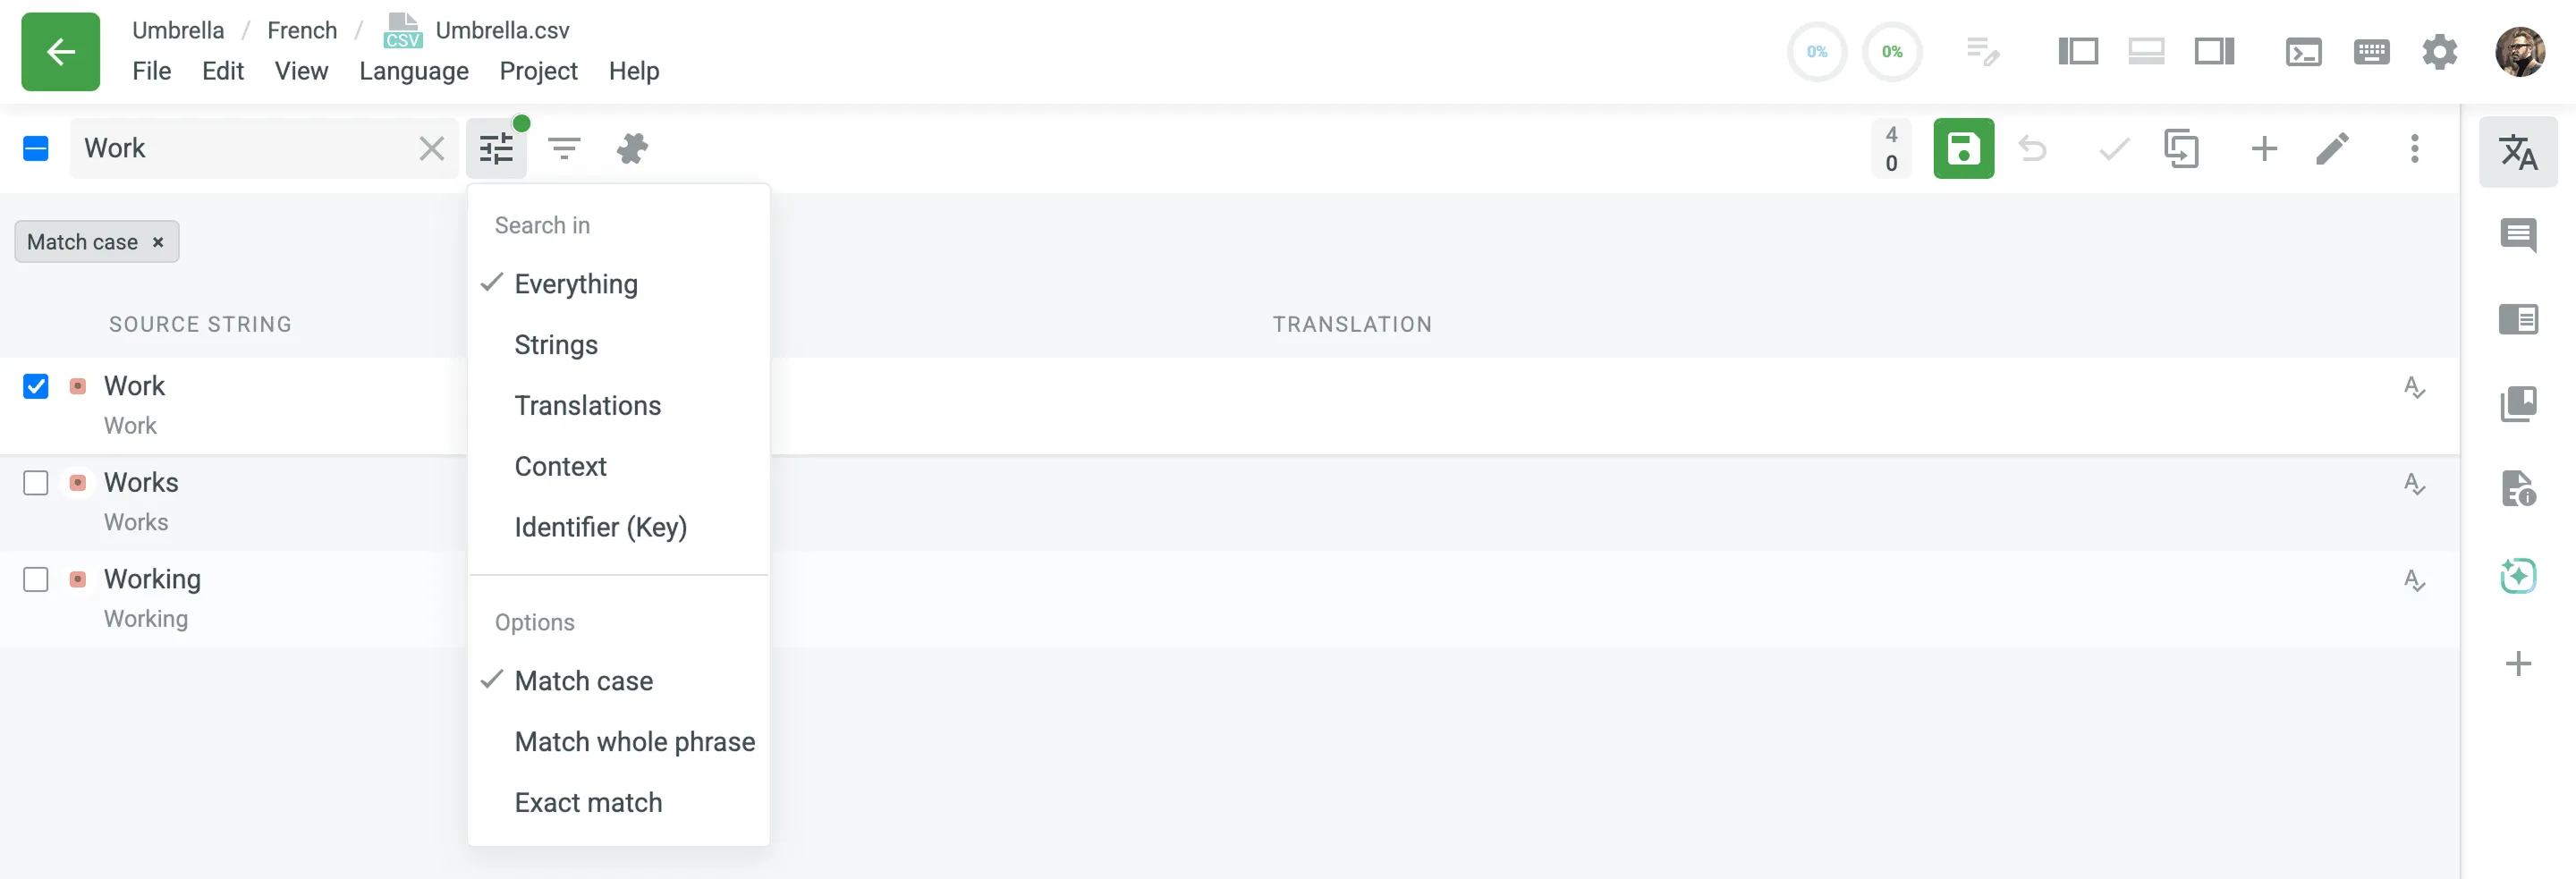
Define the scope of your search by selecting one of the following criteria:
- Everything – search through source texts, translations, context, and identifiers.
- Strings – search through source texts only.
- Translations – search through translations only.
- Context – search through string context only.
- Identifier (Key) – search through string identifiers only.
Refine your search further with these options:
- Match case – finds only strings written in the same case. For example, a search for
Workwill findWork,Works, andWorking, but notwork. - Match whole phrase – finds strings that contain the search phrase in the exact order. For example, a search for
Machine Translationwill findMachine Translationormachine translation, but notTranslation Machine. - Exact match – finds only strings that are identical to the search phrase. For example, a search for
Workwill findWorkorwork, but notWorksorWorking.
You can combine Match case with either Match whole phrase or Exact match. Note that Match whole phrase and Exact match are mutually exclusive.
The search phrase is limited to 128 characters. If you use a search phrase longer than 128 characters, it will be automatically truncated to the maximum allowed length.
You can also find a specific string by its internal numeric identifier (a number automatically assigned by Crowdin). To do so, type the numeric ID (e.g., 34354) into the search field without quotation marks to get an exact match.
To search for the occurrences of the number in the text or context, enclose it in quotation marks (e.g., "34354").
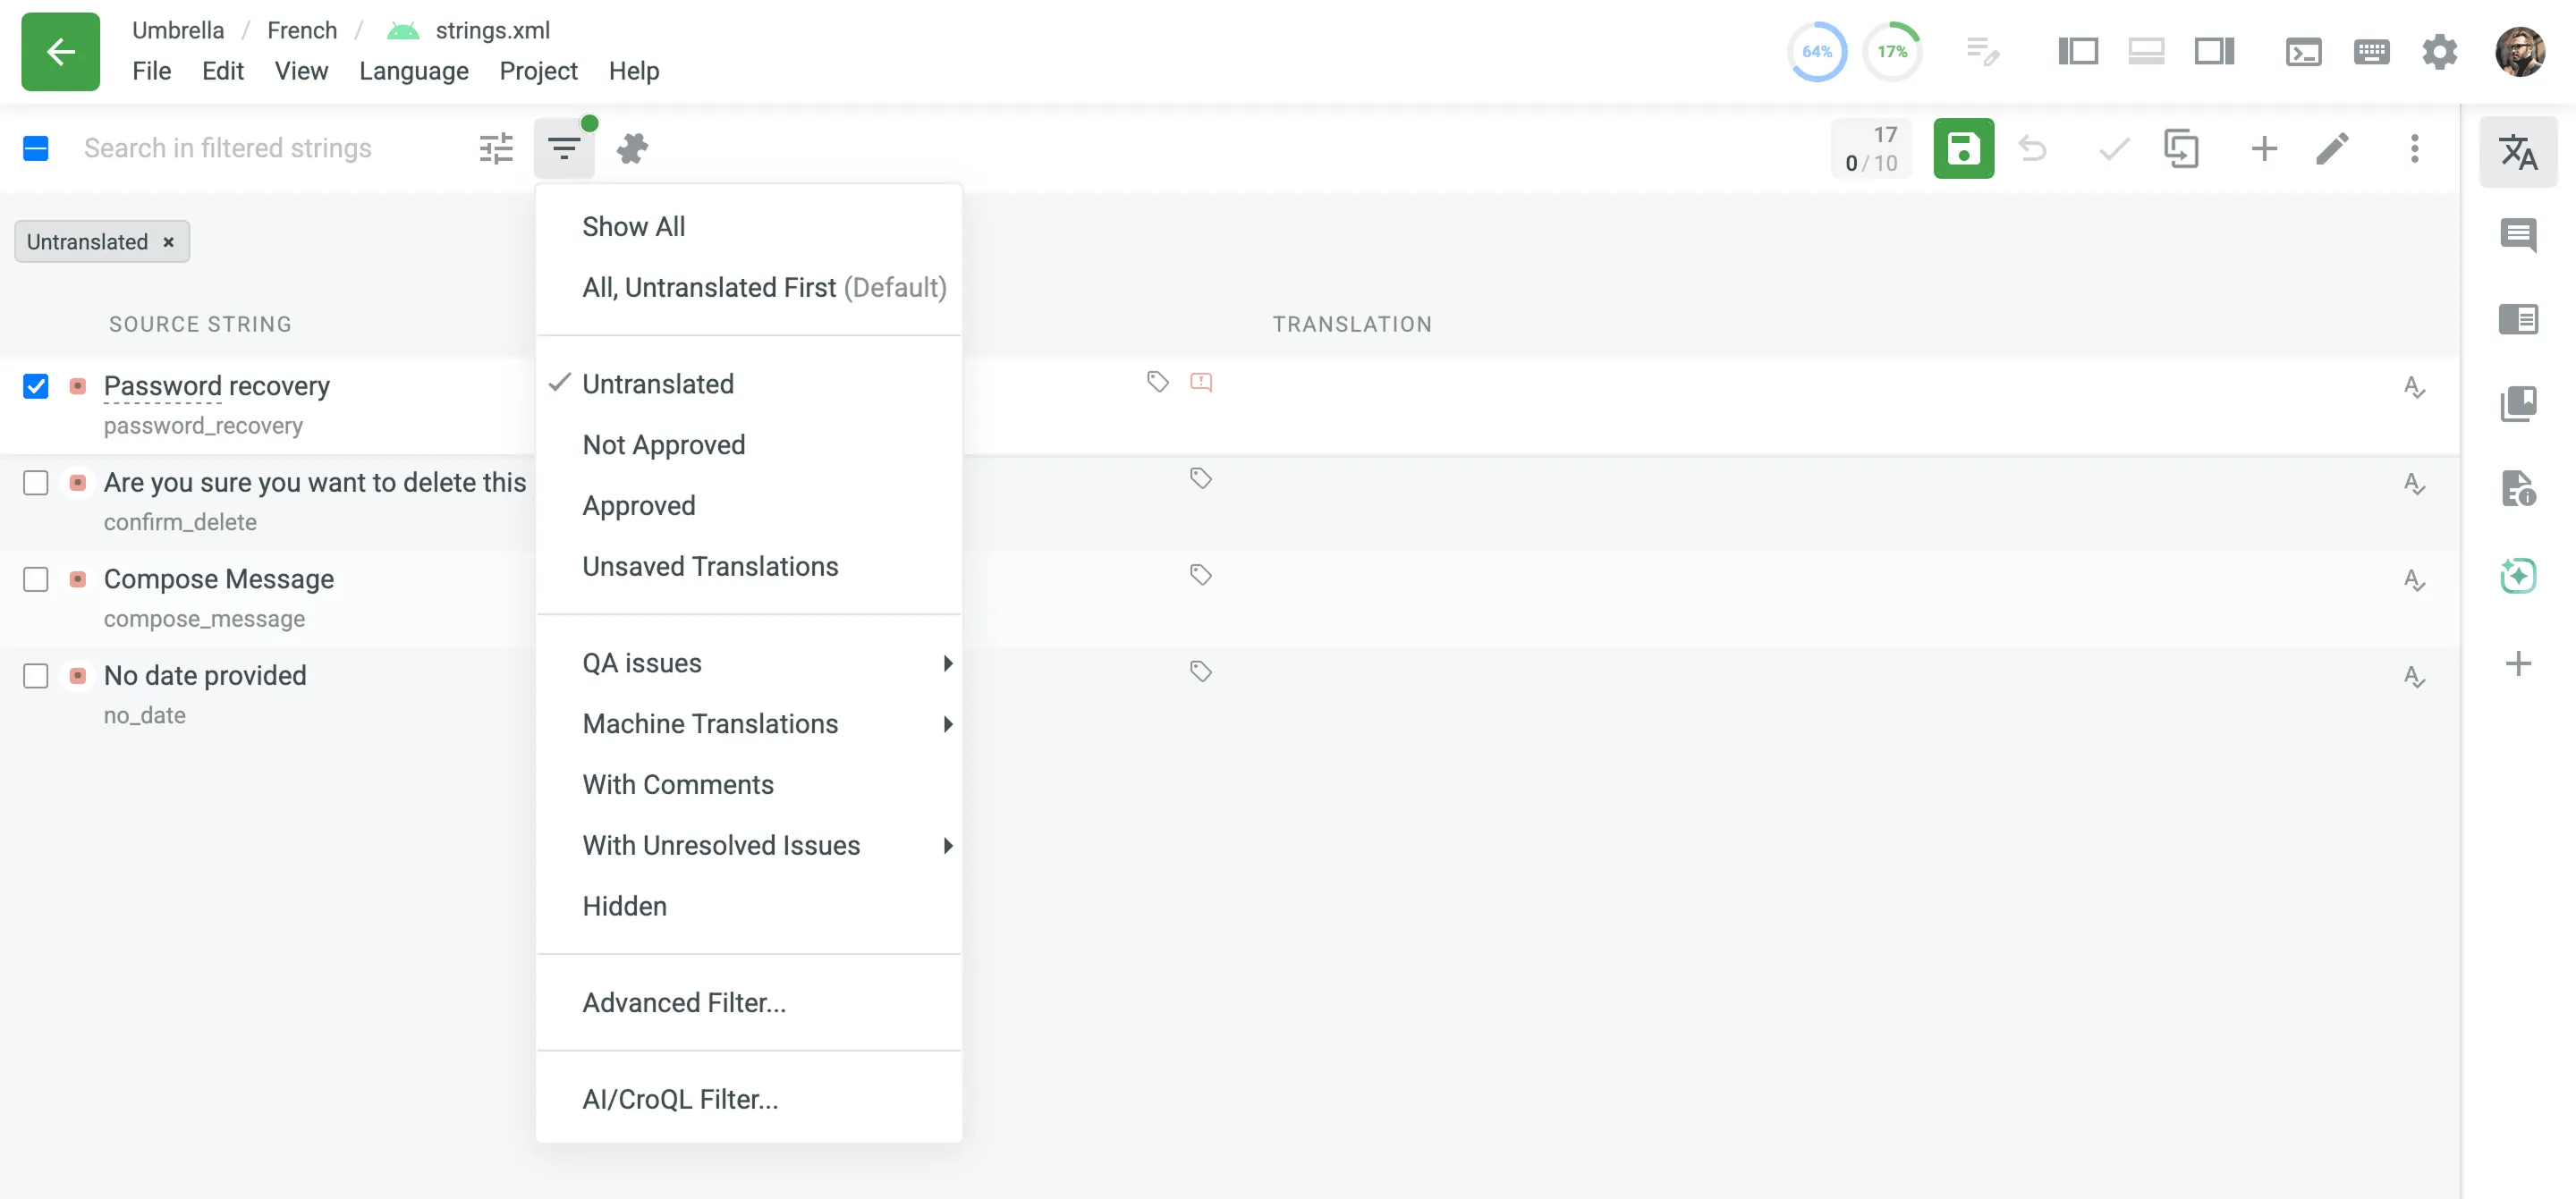
To filter the strings displayed in the left sidebar, click and select the preferred filter option.
Available filter options:
- Show All – Show all strings from the open file/folder in their original order.
- All, Untranslated First – Show all strings from the opened file/folder. Untranslated strings are displayed at the top of the list, followed by translated strings, and then approved ones are displayed at the bottom of the list.
- Untranslated – Show only strings without any translations.
- Need to Be Voted – Show already translated strings.
- Not Approved – Show strings that are already translated but not yet approved by a proofreader.
- Approved – Show only strings with approved translations.
- Unsaved Translations – Show strings with translations you entered but haven’t saved yet.
- QA issues – Show strings with or without unresolved QA issues in the current language, with the possibility to filter by specific errors.
- Machine Translations – Show strings that are translated by TM, MT, or AI suggestions without changes. Often these strings require additional review.
- With Comments – Show strings that have comments.
- With Unresolved Issues – Show strings with unresolved issues in the current language or all languages.
- Hidden – Show strings that are hidden from translators. Strings can be hidden by project managers or automatically hidden by Crowdin Enterprise when they are marked as duplicates.
- Advanced Filter – A filter that allows you to configure custom filtering and sorting parameters.
- AI/CroQL Filter – An AI-powered filter that allows you to create custom queries using the Crowdin Query Language (CroQL) for enhanced string filtering.
When translating, understanding the surrounding text can be crucial for accuracy. The Editor allows you to display the strings that immediately precede and follow your active strings in the source file, even if they don’t match your current filter criteria.
To toggle this context view on or off, click the Show surrounding strings for context icon next to the search field, or select this option from the String menu. When enabled, the Editor will load and display up to five preceding and five succeeding strings for all strings currently displayed on the page.
Context strings are visually marked with a puzzle icon and appear greyed out to distinguish them from the strings in your primary filtered view. How you can interact with them depends on how you accessed the Editor:
- Normal Editor Mode: When you open a source file directly in the Editor, you can interact with context strings just like regular strings. Despite being greyed out, you can still select them, add translations, vote on them, and approve them.
- Task Mode: When you open a specific task in the Editor, context strings are provided purely for reference. They are strictly read-only, meaning their input fields and action buttons are disabled. This ensures you have the necessary context without accidentally modifying strings outside your assigned task scope.
To help you estimate workload and track costs, the Editor can display detailed statistics for the strings in the list.
You can access these statistics by clicking the string count button (e.g., 10 STRINGS) at the bottom of the string list and then selecting Get Info from the menu.
A pop-up table will appear, providing a detailed breakdown for both Filtered (all strings in the current view) and Selected (only the strings you have manually checked) strings.
The statistics include:
- Strings
- Words
- Characters (no spaces)
- Characters (with spaces)
In projects with a workflow, strings move from one workflow step to the next. There are three string statuses: ToDo, Pending, and Done.
Use the icon to view strings with their corresponding workflow step statuses.
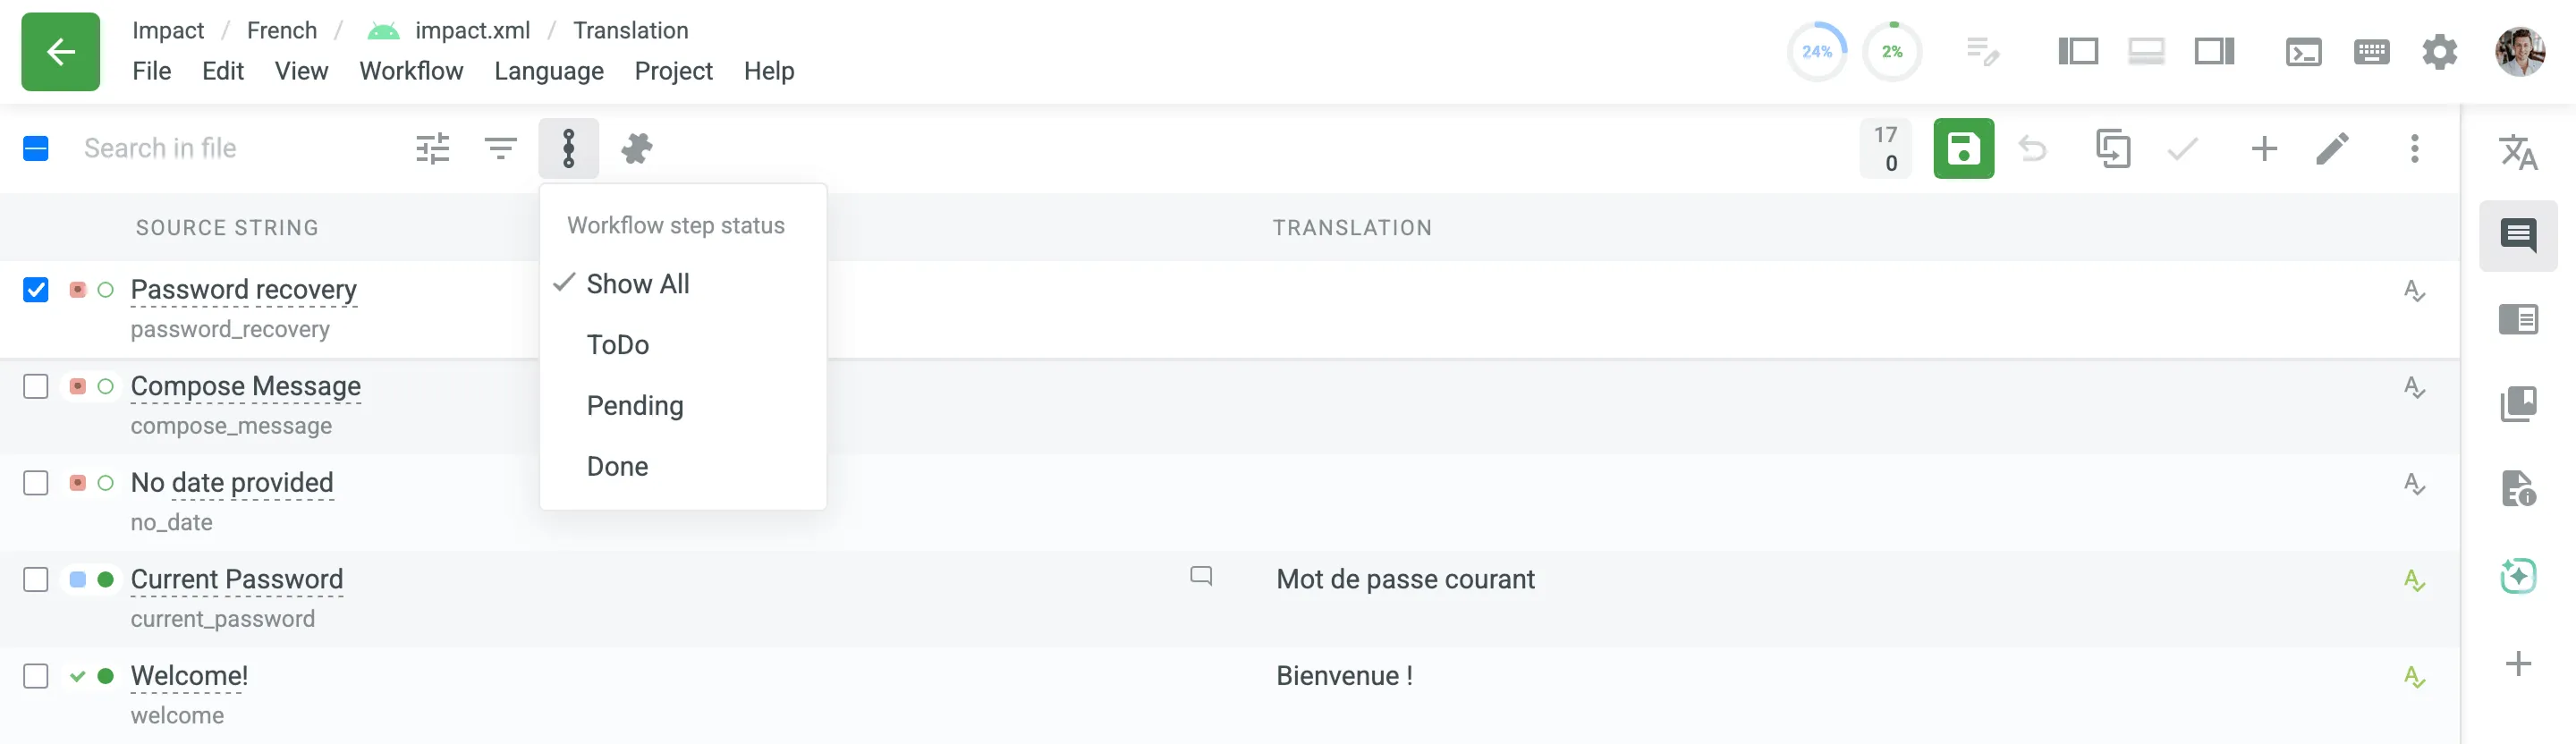
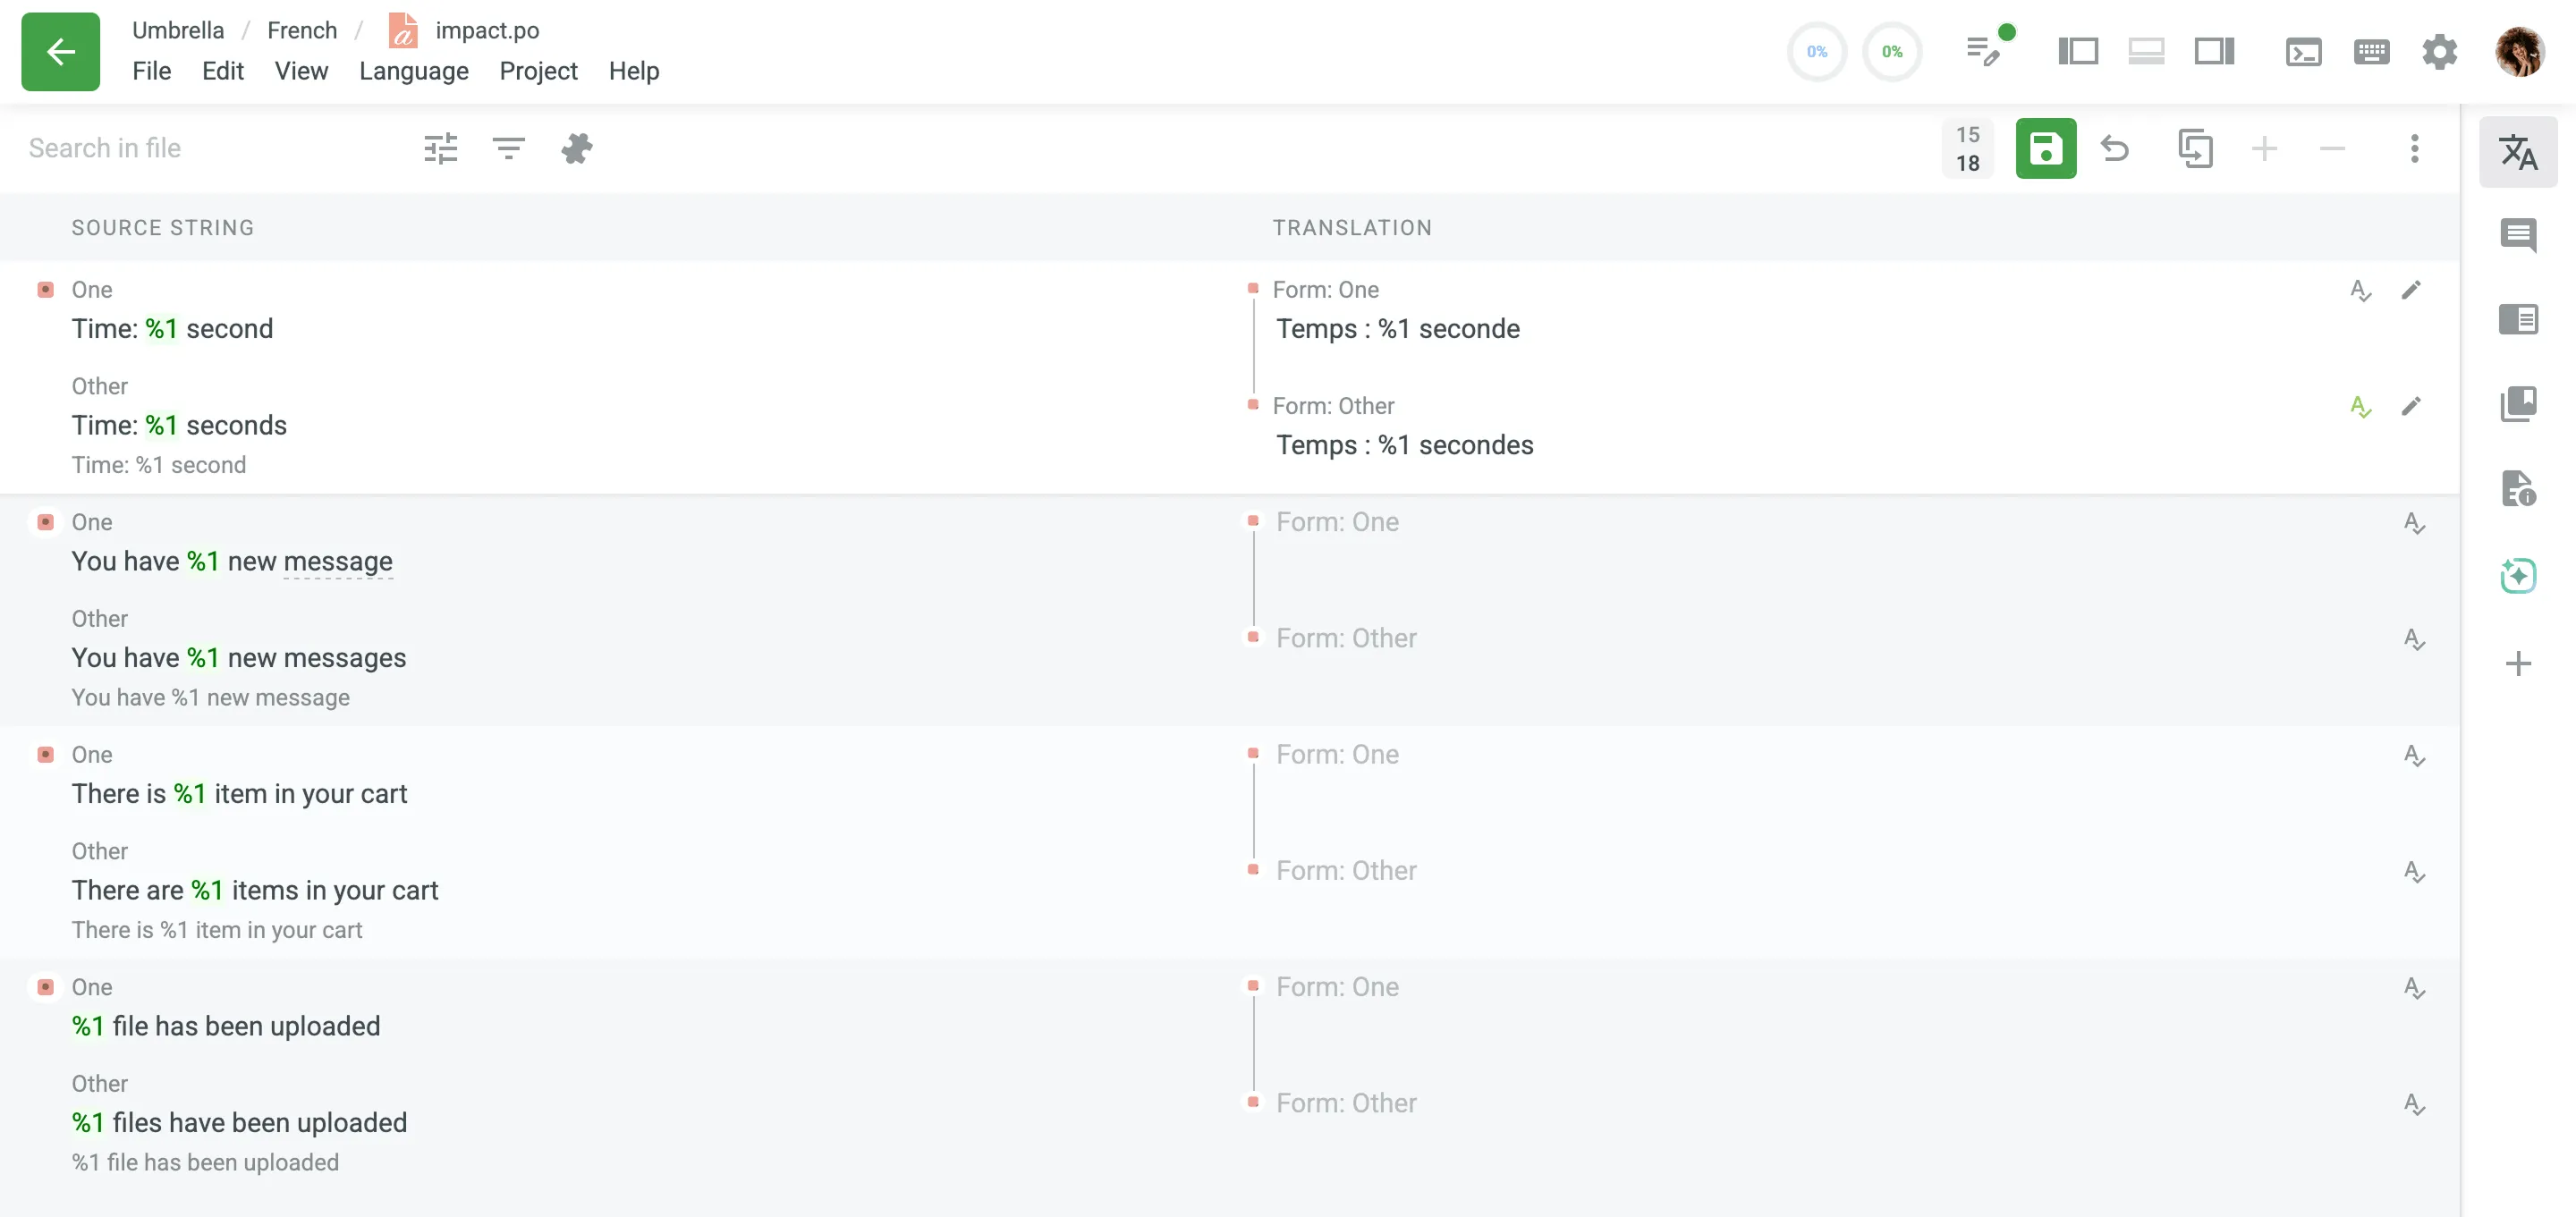
Some strings may have plural forms. Depending on the language, the number of plural forms may vary. For example, Chinese has one plural form, English has two plural forms, and other languages may have up to six plural forms. Crowdin Enterprise works with plural forms according to the CLDR Language Plural Rules.
Read more about CLDR Language Plural Rules.
If a string has multiple plural forms, all variants of the string are displayed in the section where you type in translations. Enter translations in the appropriate sections that display the plural forms of the target language.
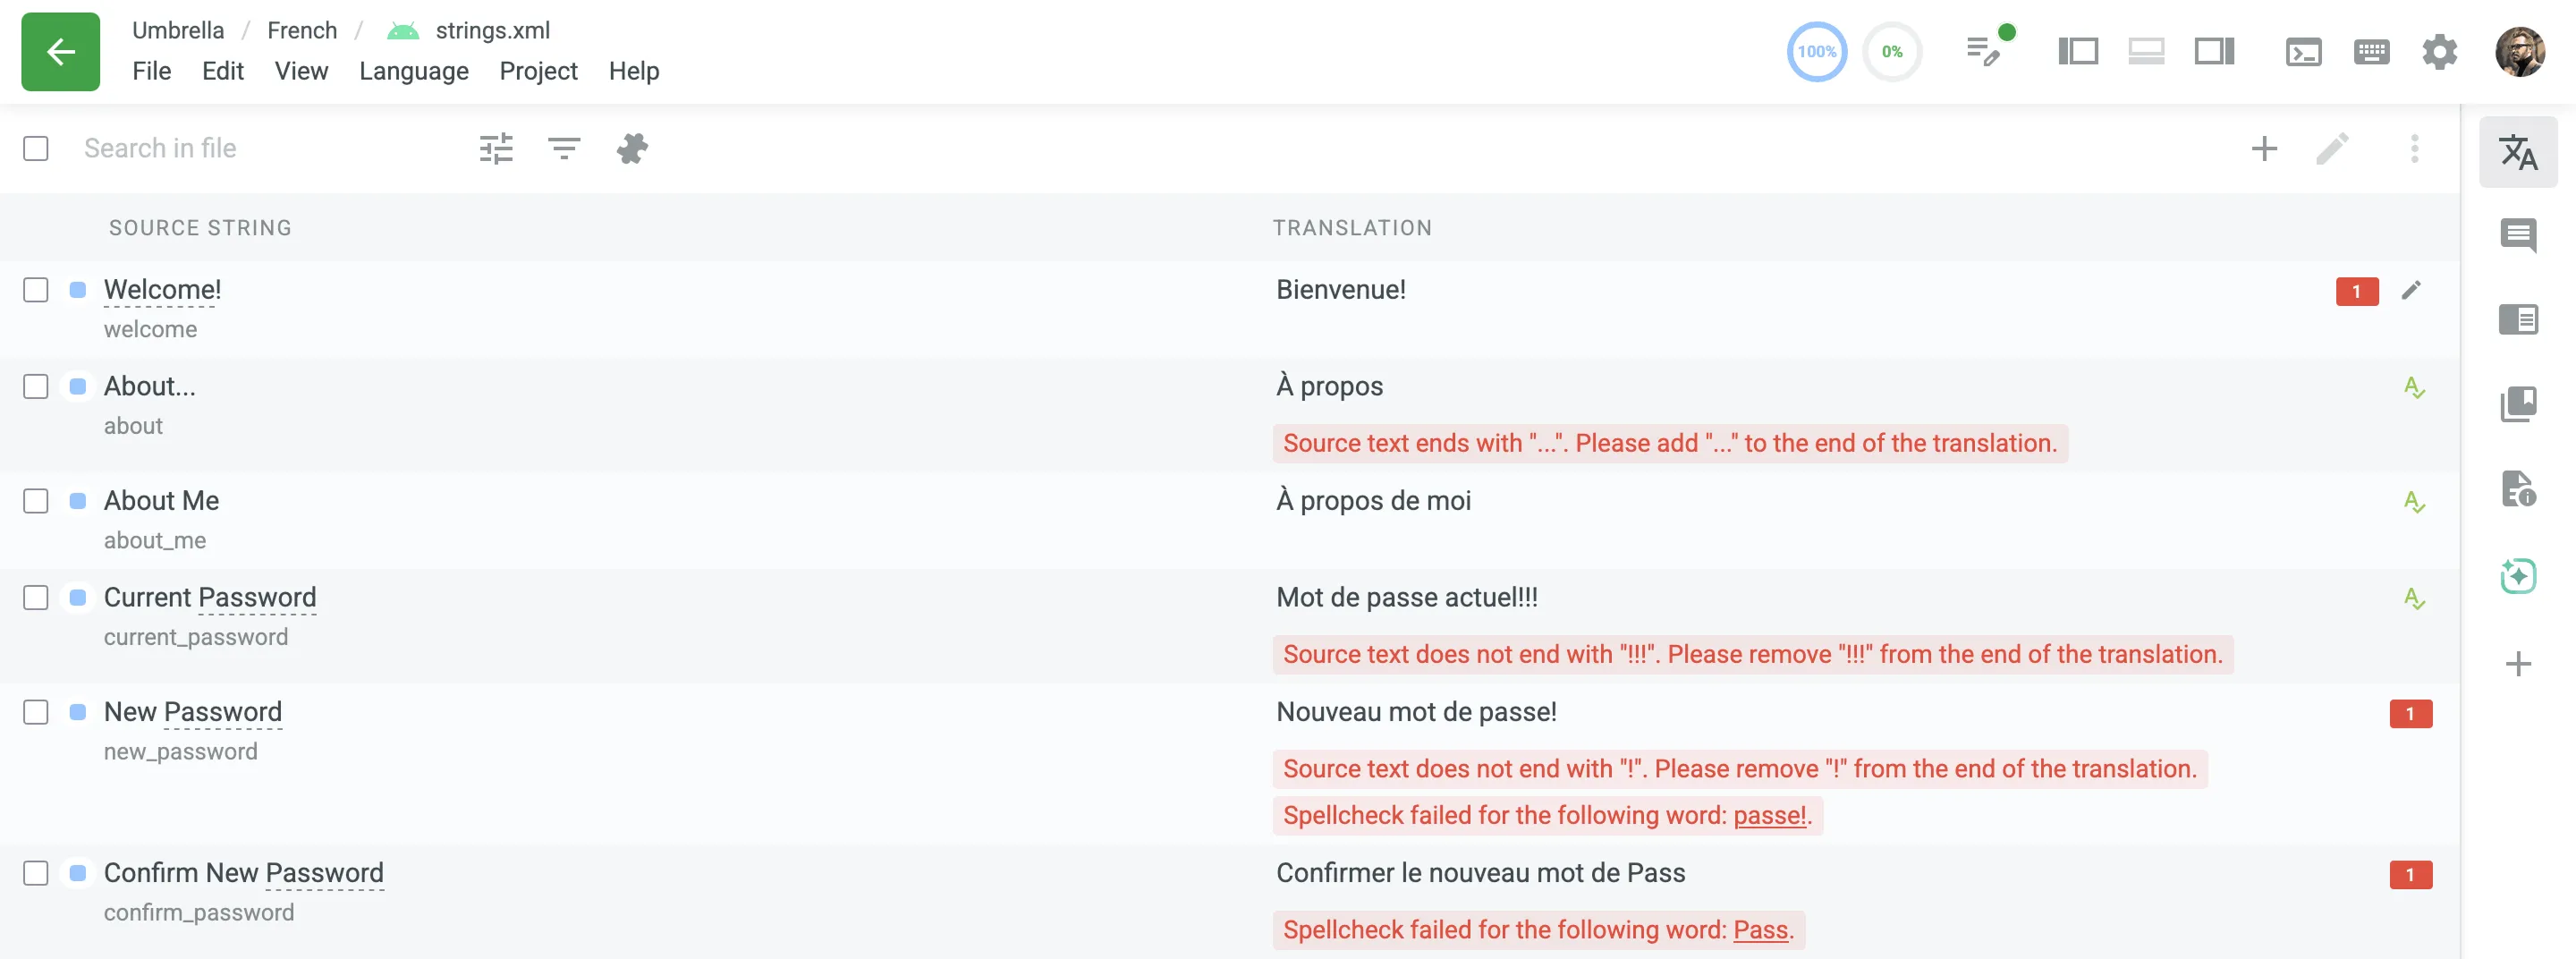
To help you maintain translation quality and prevent common inaccuracies, the Editor automatically performs Quality Assurance (QA) checks. These checks scan for issues like punctuation discrepancies, spacing mismatches, missing placeholders, or inconsistent terminology.
The Editor’s behavior depends on whether these issues are configured as Errors or Warnings:
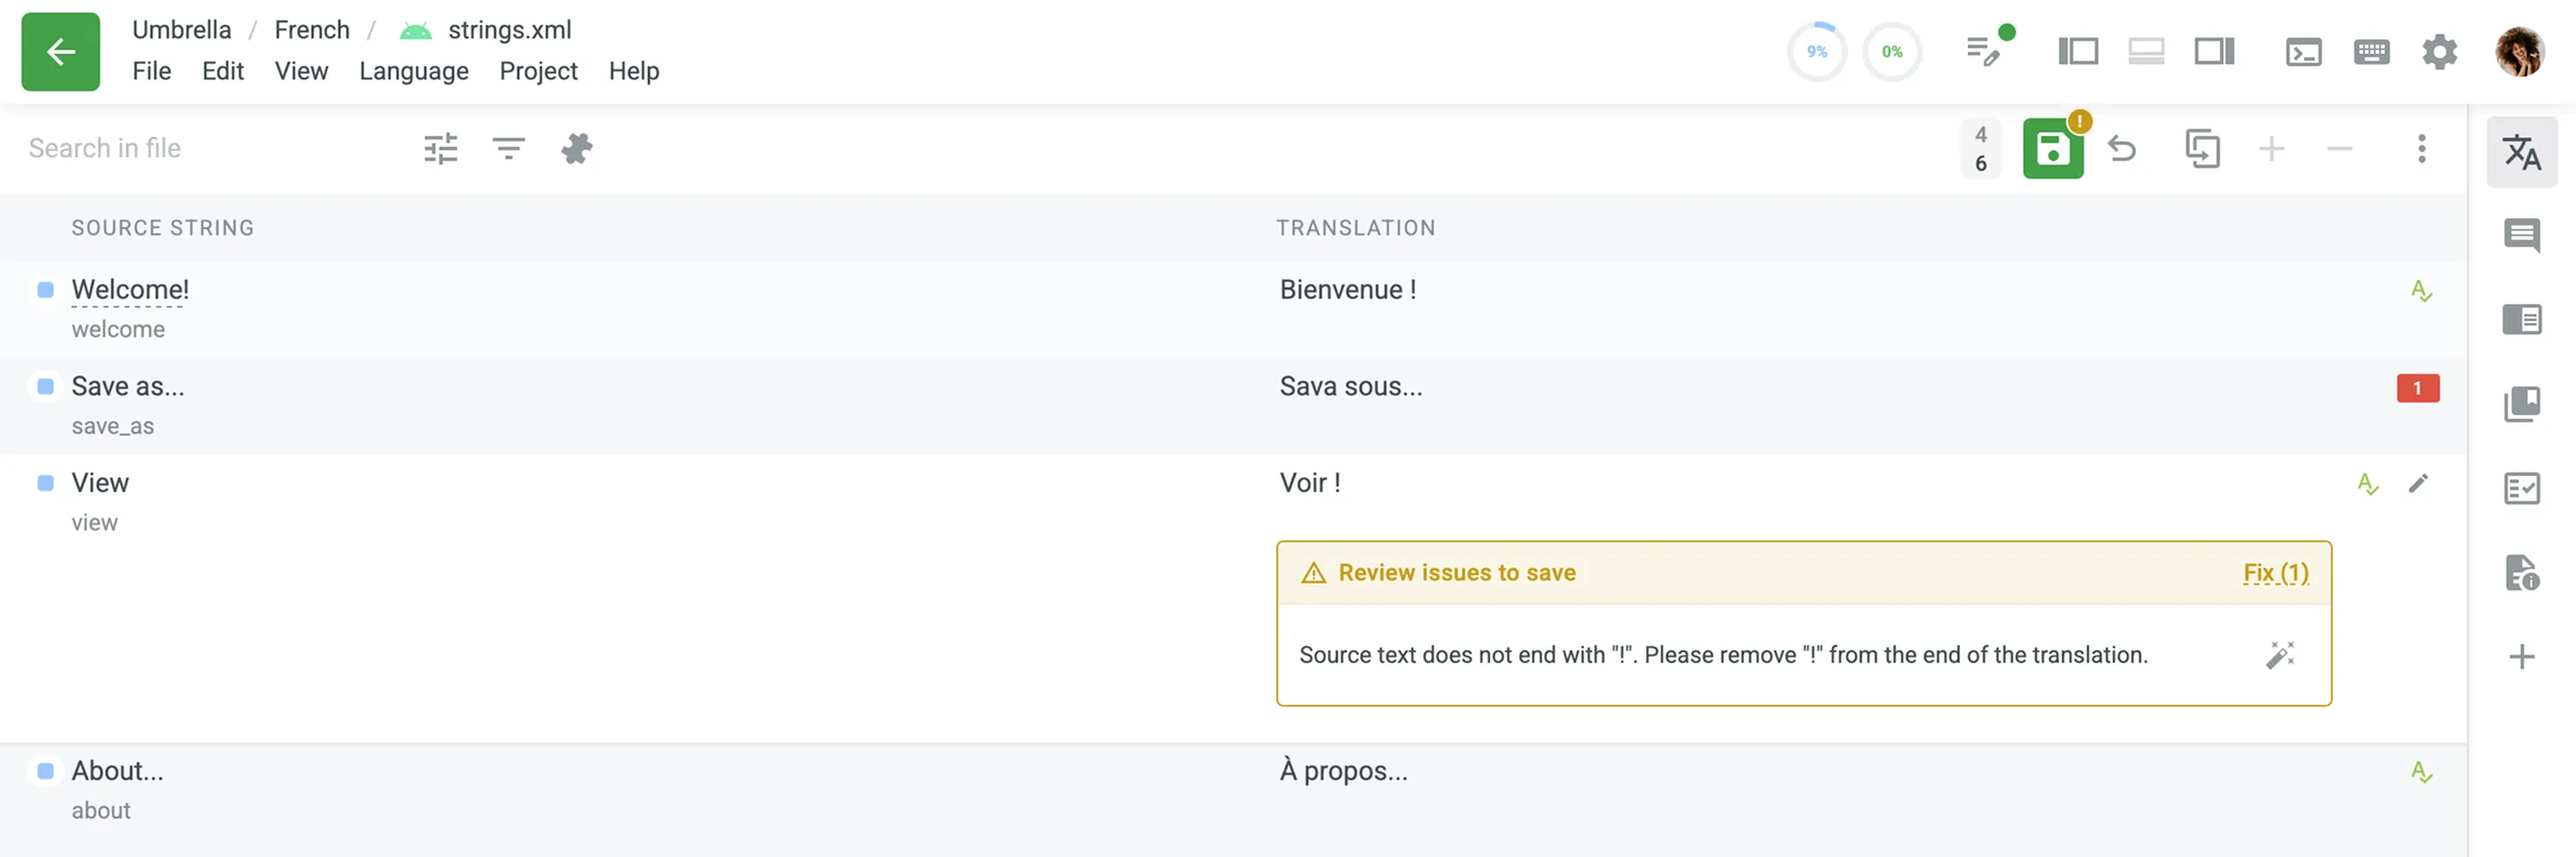
- Errors (Blocking Issues): The inline Review issues to save banner appears, and an orange warning badge appears on the Save translation button. Saving the translation and navigation (e.g., changing target languages, opening a different file, or applying filters) are prevented until you resolve the issue. Hovering over the Save translation button displays a “Resolve blocking issues first” tooltip. Errors are strictly enforced and trigger the banner even if you disabled the QA issues option in your personal Editor settings. You can still switch to translate another string, but the translation for the current string will remain unsaved until the error is fixed.
- Warnings (Non-blocking Issues): For less critical inconsistencies, the behavior depends on whether the QA issues option is enabled in your Editor Settings:
- Setting ON: The inline Review issues to save banner displays the warnings, and an orange warning badge appears on the Save translation button. Navigation is blocked until you resolve the issues or click Save Anyway.
- Setting OFF: The translation saves automatically (if Auto-save is enabled) without displaying the banner or warning badge, bypassing these warnings entirely.
If QA issues are detected when you manually save a translation or when Auto-save triggers upon switching strings, they will be displayed in the inline banner. Below is an example of a punctuation mismatch (configured as a Warning by default):
For many common errors, the inline QA banner provides automatic quick-fixes:
- Click the Autofix icon next to an individual issue to apply the correction automatically.
- Click Fix (N) in the banner header to instantly apply all available auto-fixes for the current string.
Once the issues are resolved, the translation will automatically save and allow you to continue.
Project members with manager permissions (or higher) can manage source strings directly within the Editor, allowing for quick corrections and updates without needing to switch to the project’s Sources tab.
You can access these options via the Edit menu at the top of the Editor. The most common actions are also available as quickly accessible buttons in the top toolbar:
- Add String – Add a new string to the currently opened file.
- Edit String – Modify the selected source text, identifier (key), context, labels, or maximum length limit.
- Delete String – Permanently remove the string from the file (available via the Edit menu; supported only for specific file formats).
- Hide String / Make String Visible – Toggle the string’s visibility for translators. Hidden strings are accessible only to project managers or higher (available via the Edit menu or String menu).
Read more about String Management.
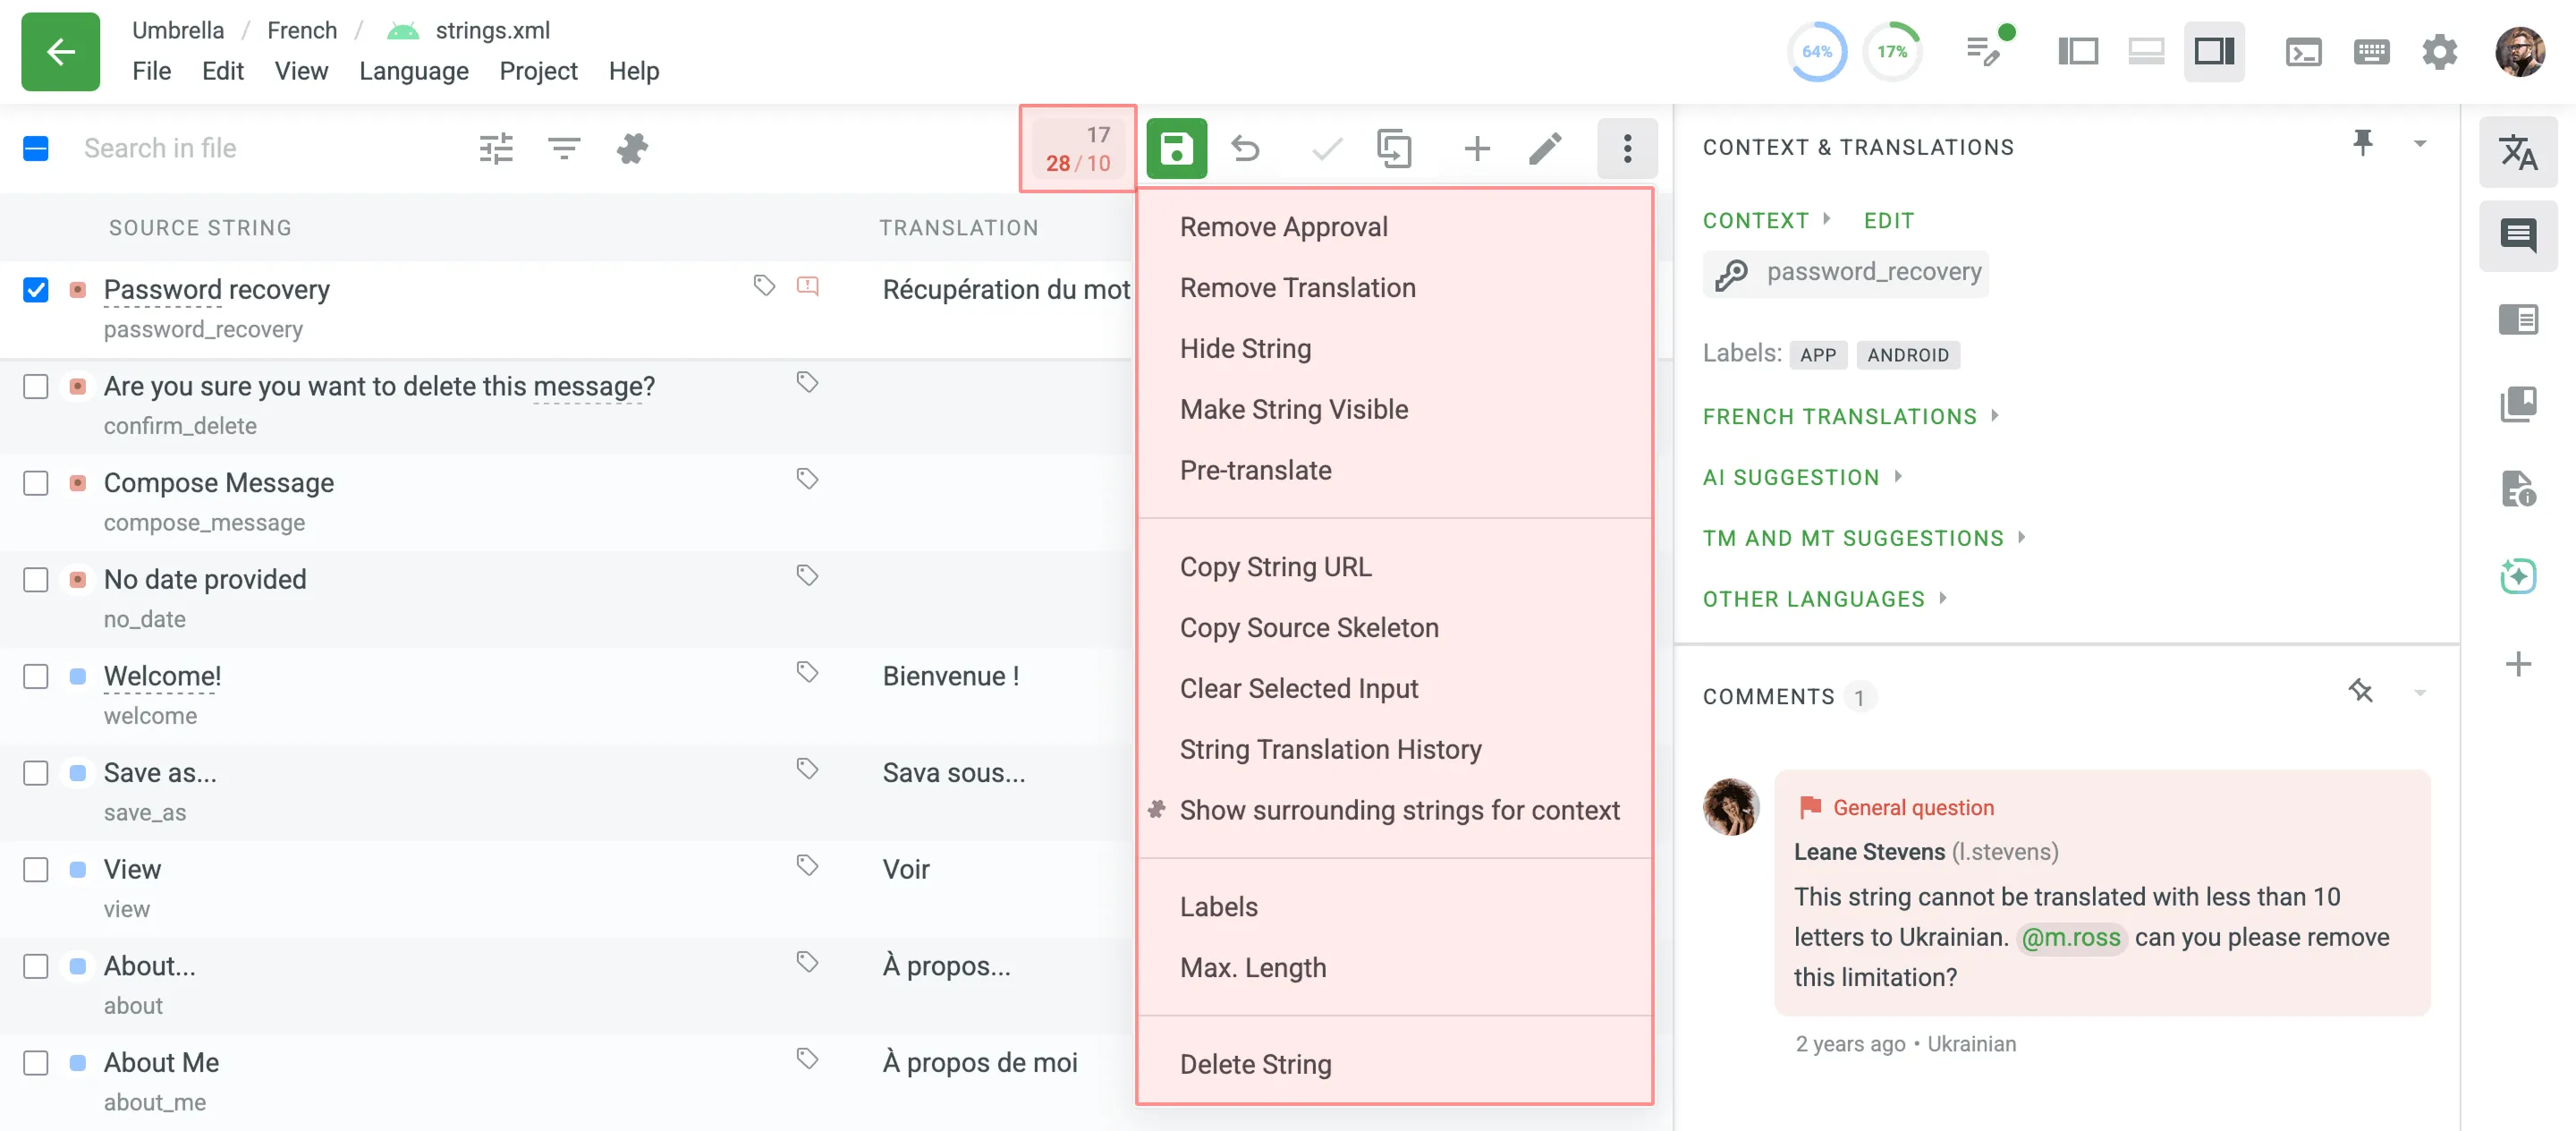
Clicking in the upper-right allows you to:
- Remove My Approvals / All Approvals – Remove the approvals for a translation, reverting its status to unapproved. (Available for proofreaders or higher.)
- Remove Translation – Clear translations for the selected strings along with the associated TM records. Duplicate translations from master strings remain unaffected.
- Hide String / Make String Visible – Toggle the visibility of a string for translators. Hidden strings are accessible only to project managers or higher.
- Auto-Translate – Initiate auto-translation directly in the Editor using Translation Memory (TM), Machine Translation (MT), or AI.
- Copy String URL – Access a specific string using its unique link or share it with colleagues.
- Copy Source Skeleton – Copy untranslatable elements to the translation section. This action can be applied to one or multiple selected strings. Useful when translating strings with ICU message syntax or HTML tags.
- Clear Selected Input – Clear the translation field for the selected string.
- Translation History – View all the modifications made to the string.
- Show / Hide surrounding strings for context – Display up to five preceding and five succeeding strings for all strings currently loaded in the Editor to help you understand their context. This performs the exact same action as the button in the main toolbar.
- Labels – Add or manage labels assigned to the string, helping to categorize or identify it for specific purposes.
- Max. Length – View and edit the maximum character length allowed for the string translation. Clicking this option opens a modal with the following settings:
- Proportional to source texts – Set the maximum length as a percentage of the source text length. Use the slider or manually enter a percentage (e.g., 100%, 150%, 200%) to define the limit.
- Fixed max. length – Specify an absolute character limit for the string translation.
- Unlimited – Allow translations of any length without restrictions.
- Delete String – Permanently remove the string from the project. (Available to project members with manager permissions or higher.)
In the translation window, you will also see the Maximum length of translation limit if it’s exceeded.
Additional action buttons available when translating a string:
- Copy Source – Use it to keep the initial string structure while translating messages with replacement tokens or elements of ICU message syntax. This action can be applied to one or multiple selected strings.
- Clear – Use it when you need to wipe the translation field quickly (Comfortable mode only). For other modes, use the Cancel button, or the Clear Selected Input option from the Edit menu or the String menu.
- Text selection mode – Use it when you want to copy a part of the translation from Translation Memory (TM) or Machine Translations (MT) (Comfortable mode only).
This section contains the resources that might be useful:
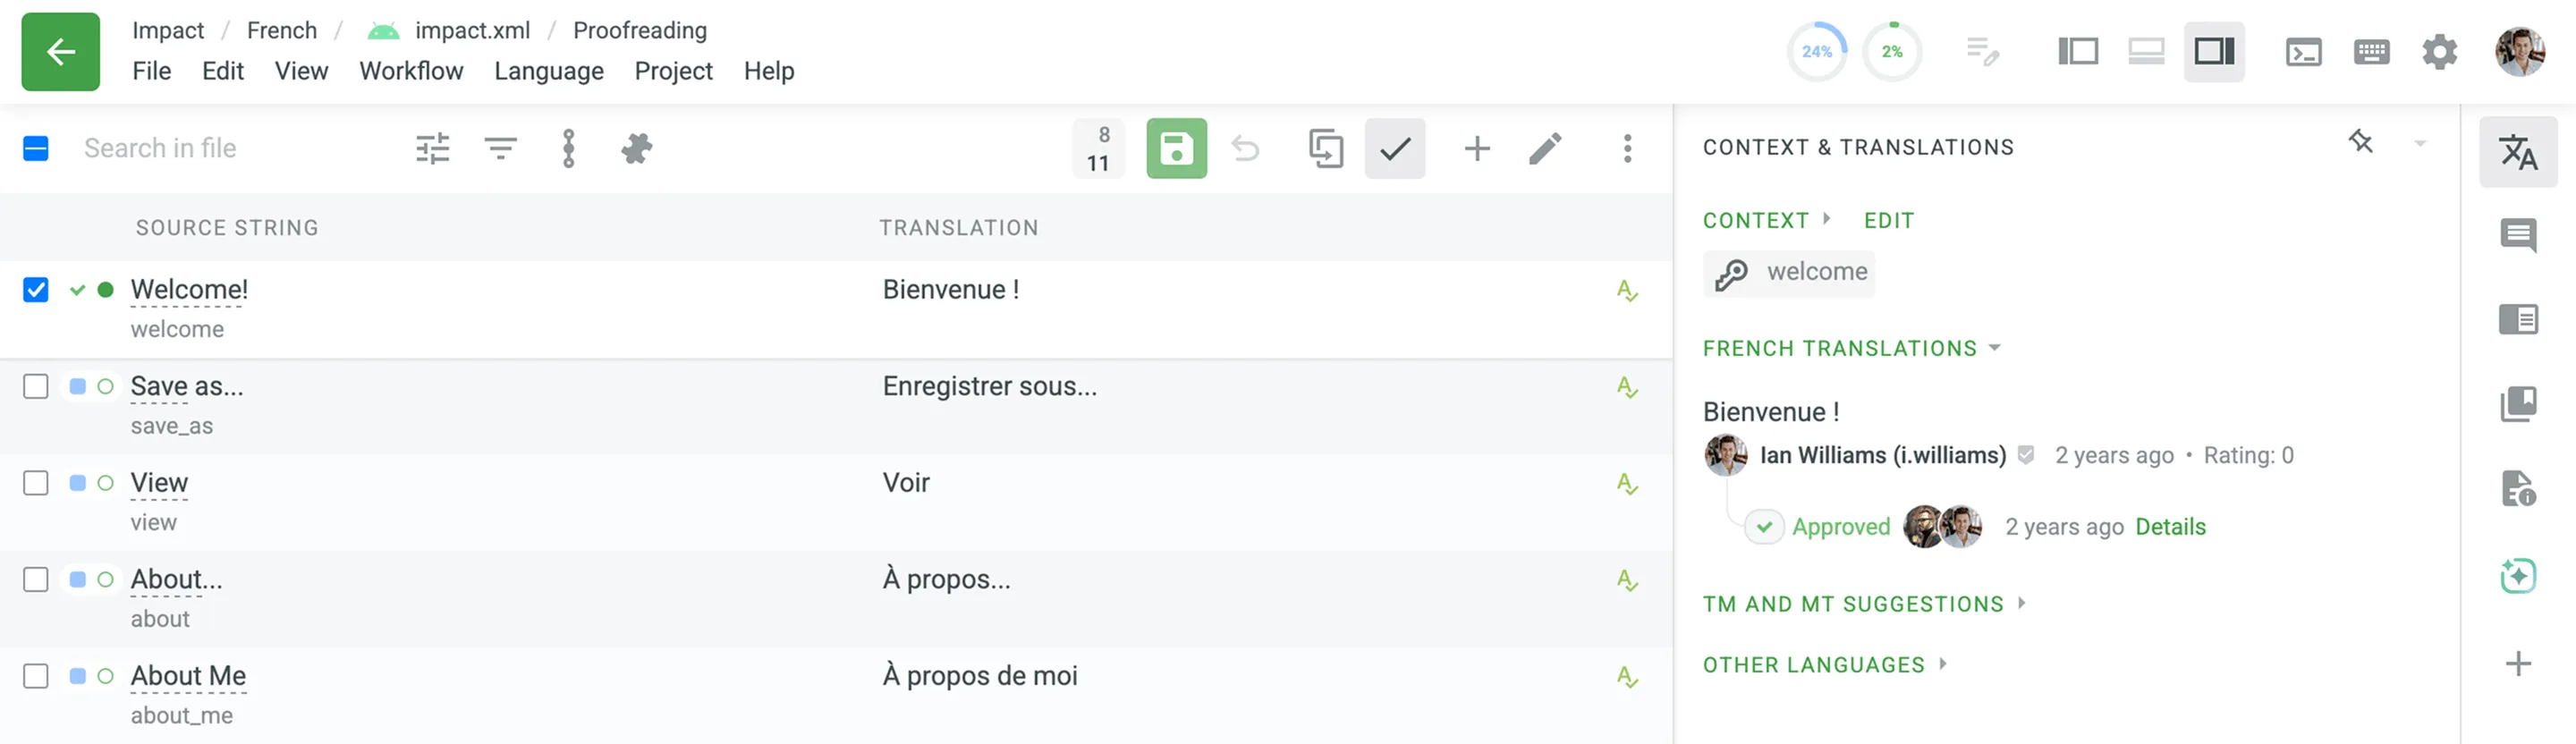
- Context, labels, screenshots, and additional information to guide the work.
- Translations by other project members
- AI suggestions (if enabled in the project settings)
- Translation Memory (TM) suggestions
- Machine Translation (MT) suggestions
- Translations to other languages
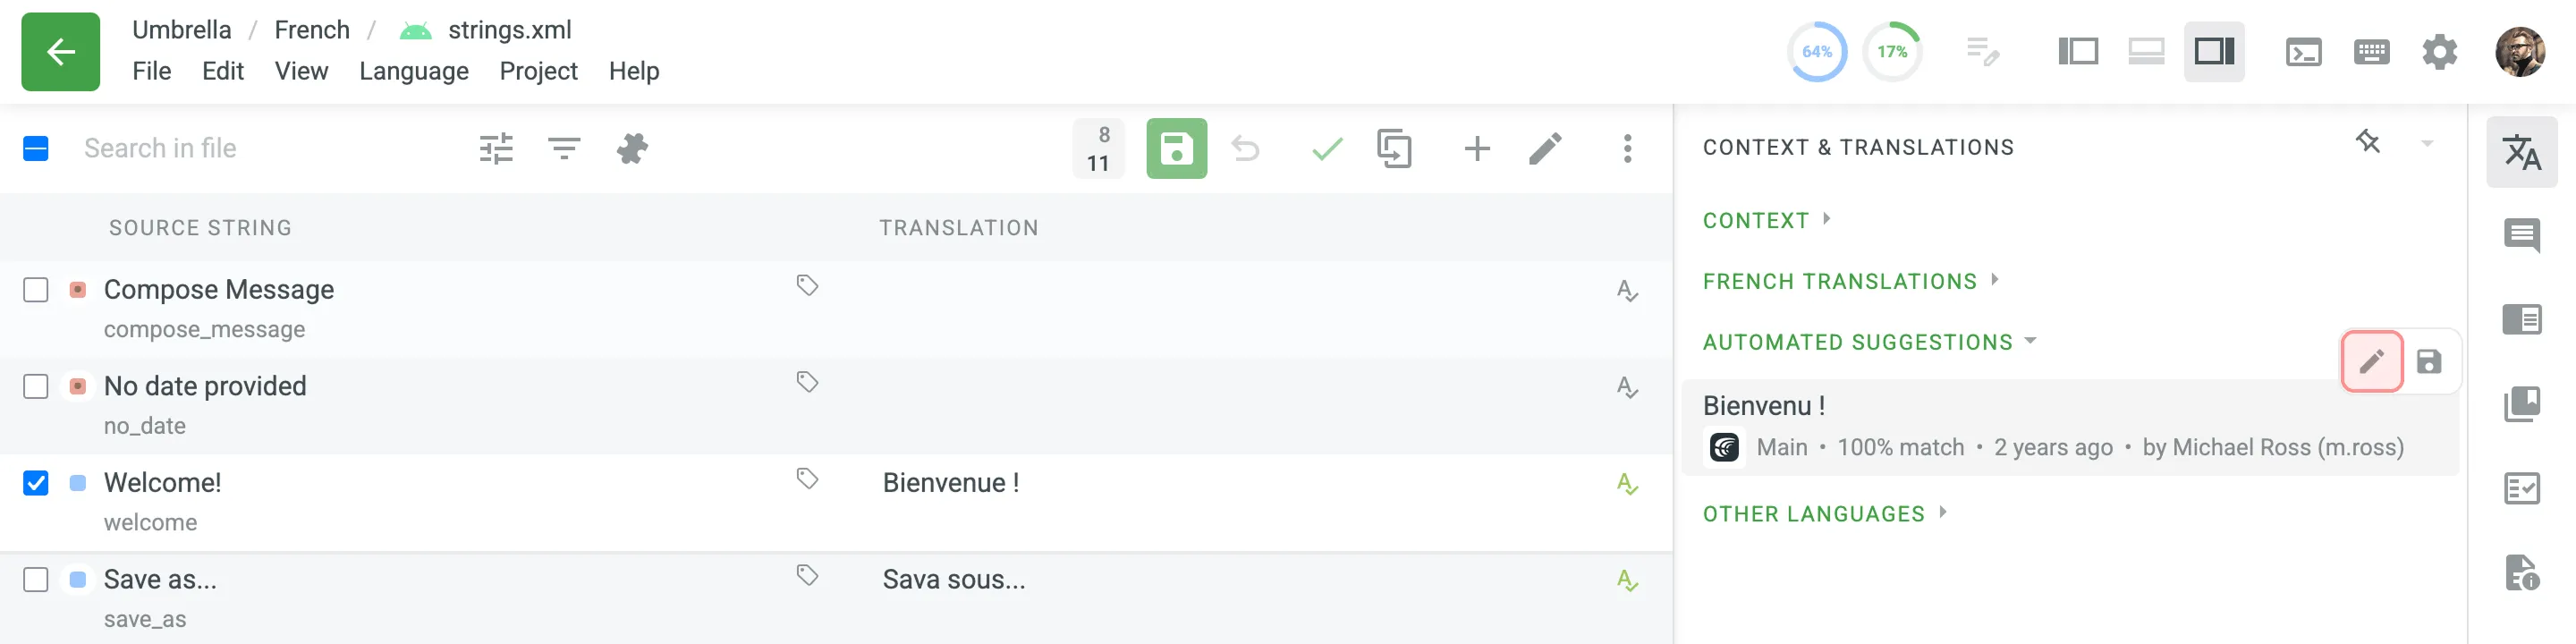
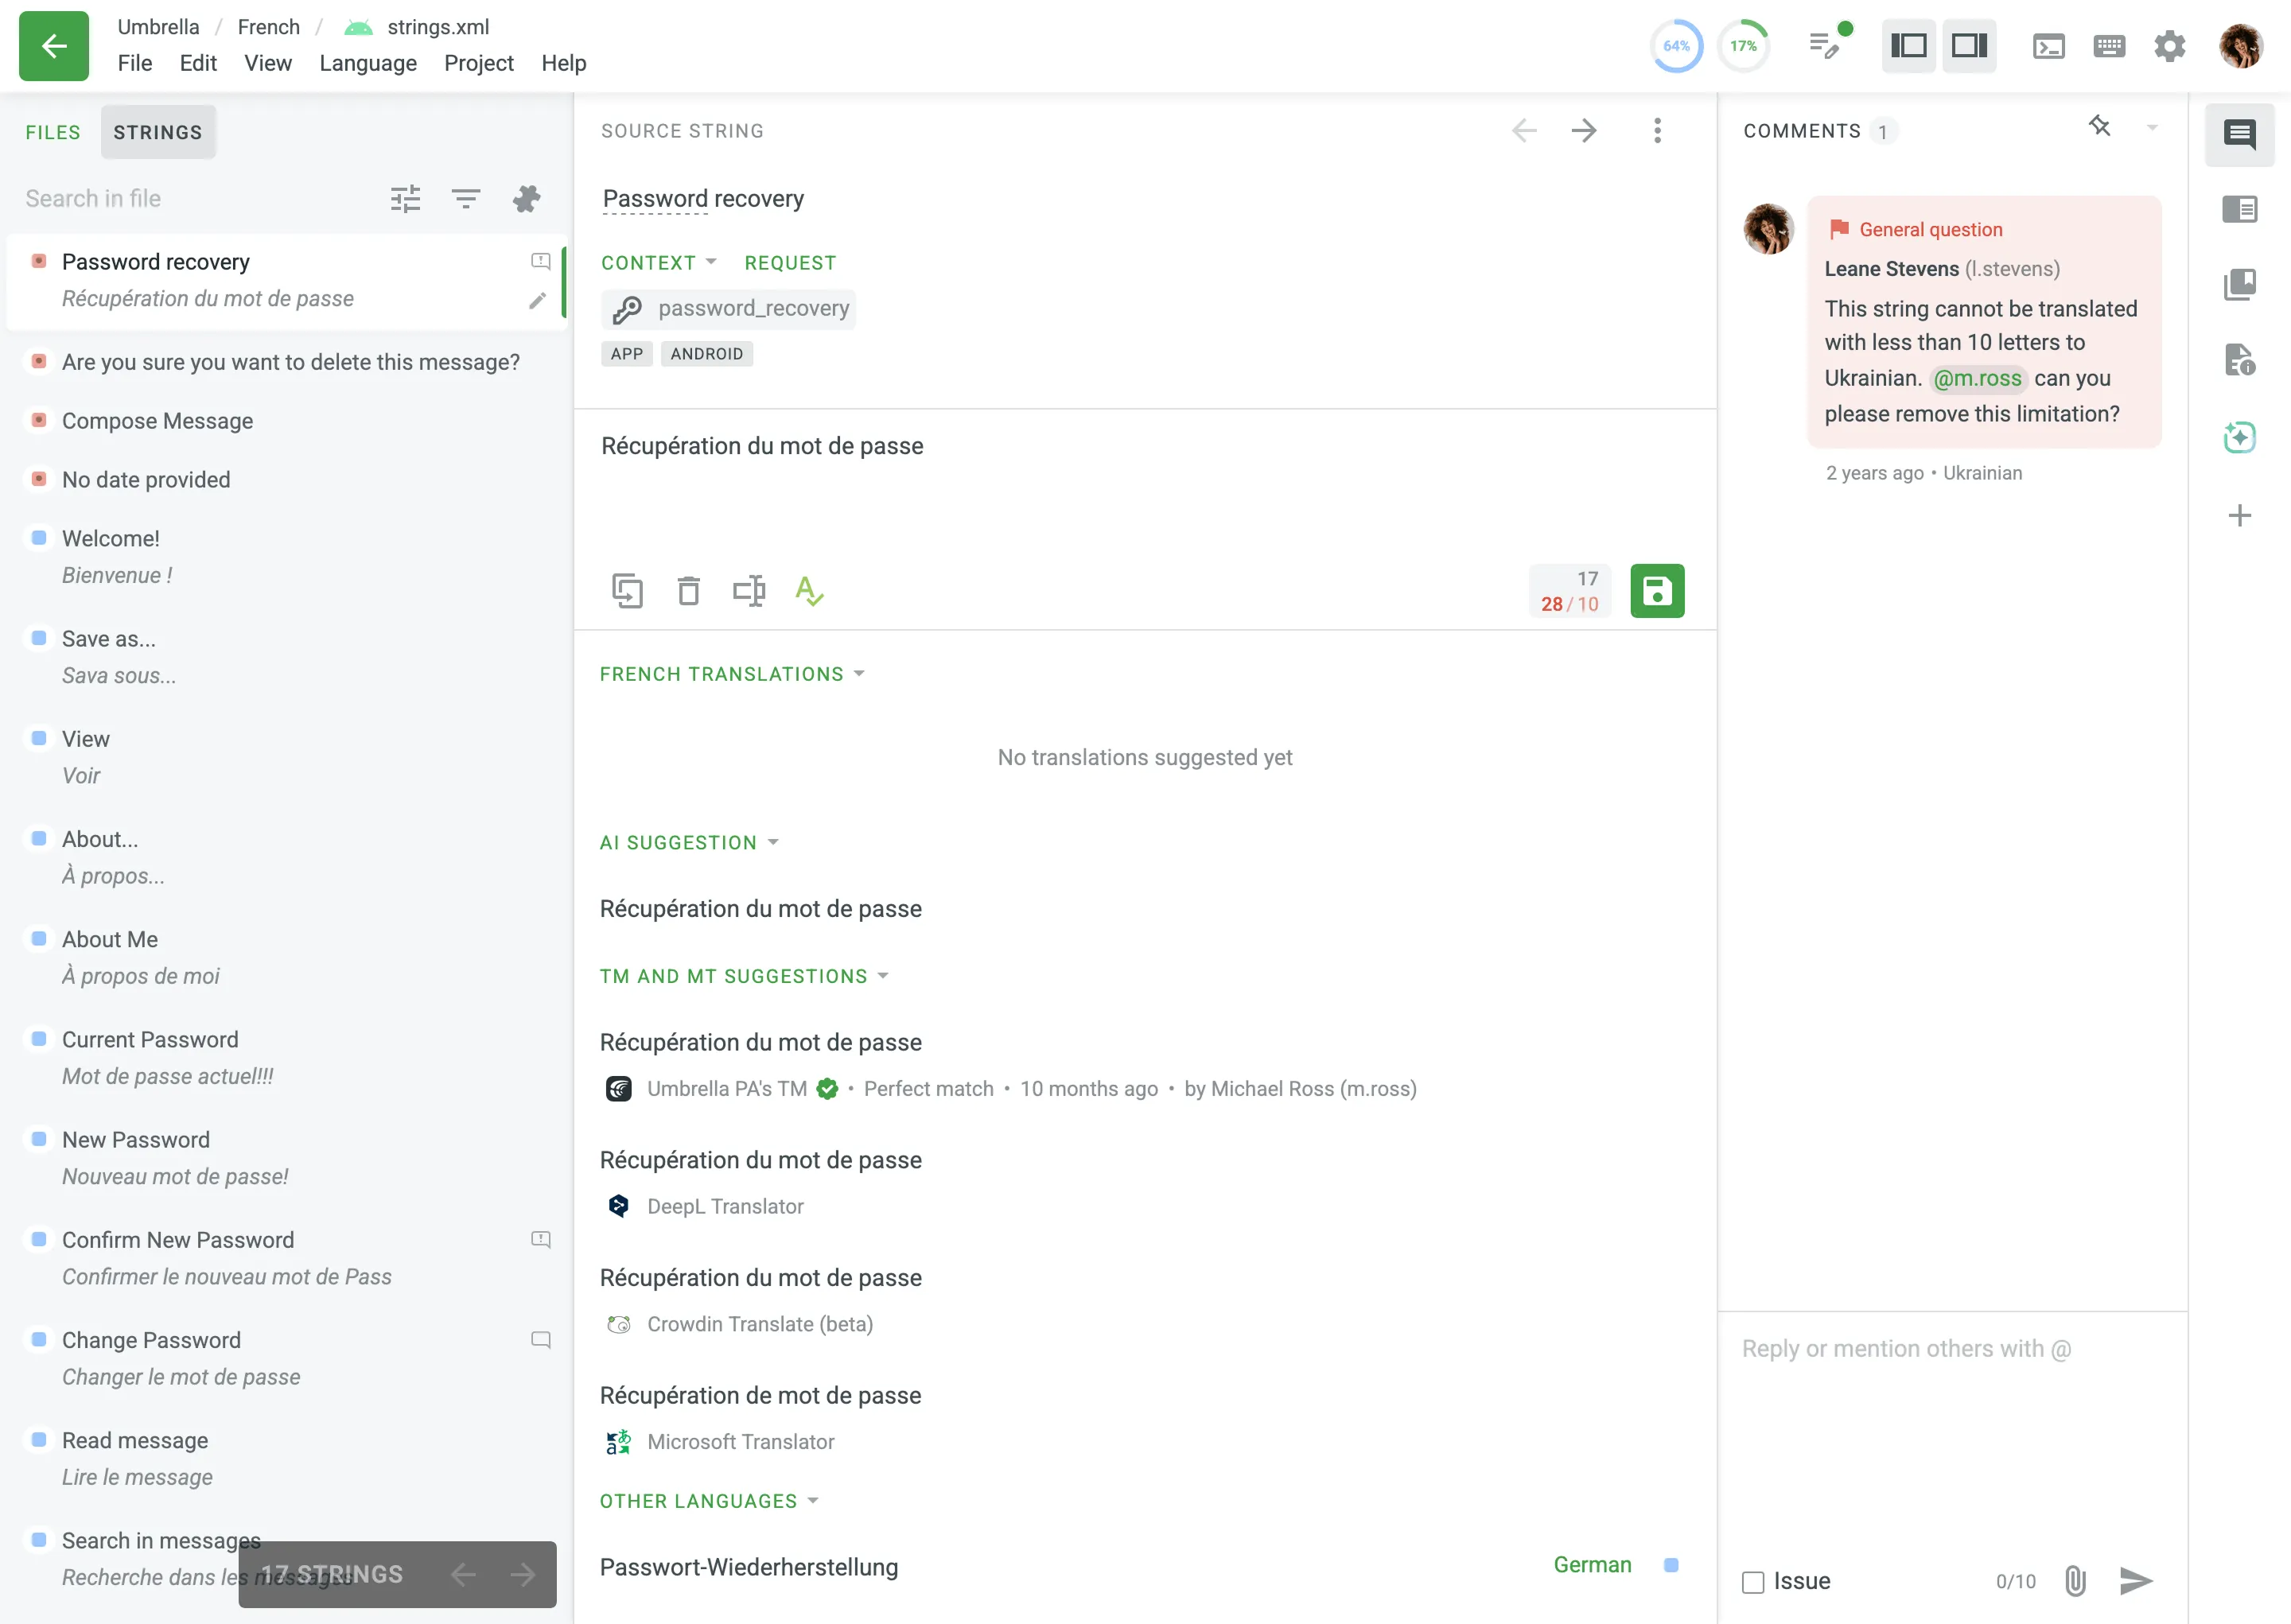
AI, TM, and MT suggestions are grouped together in a single collapsible Automated Suggestions section (shown as Automated Corrections during the Source Text Review step).
Click on one of the suggestions, and it will automatically appear in the translation field. Refer to it as a basis for your own suggestions.
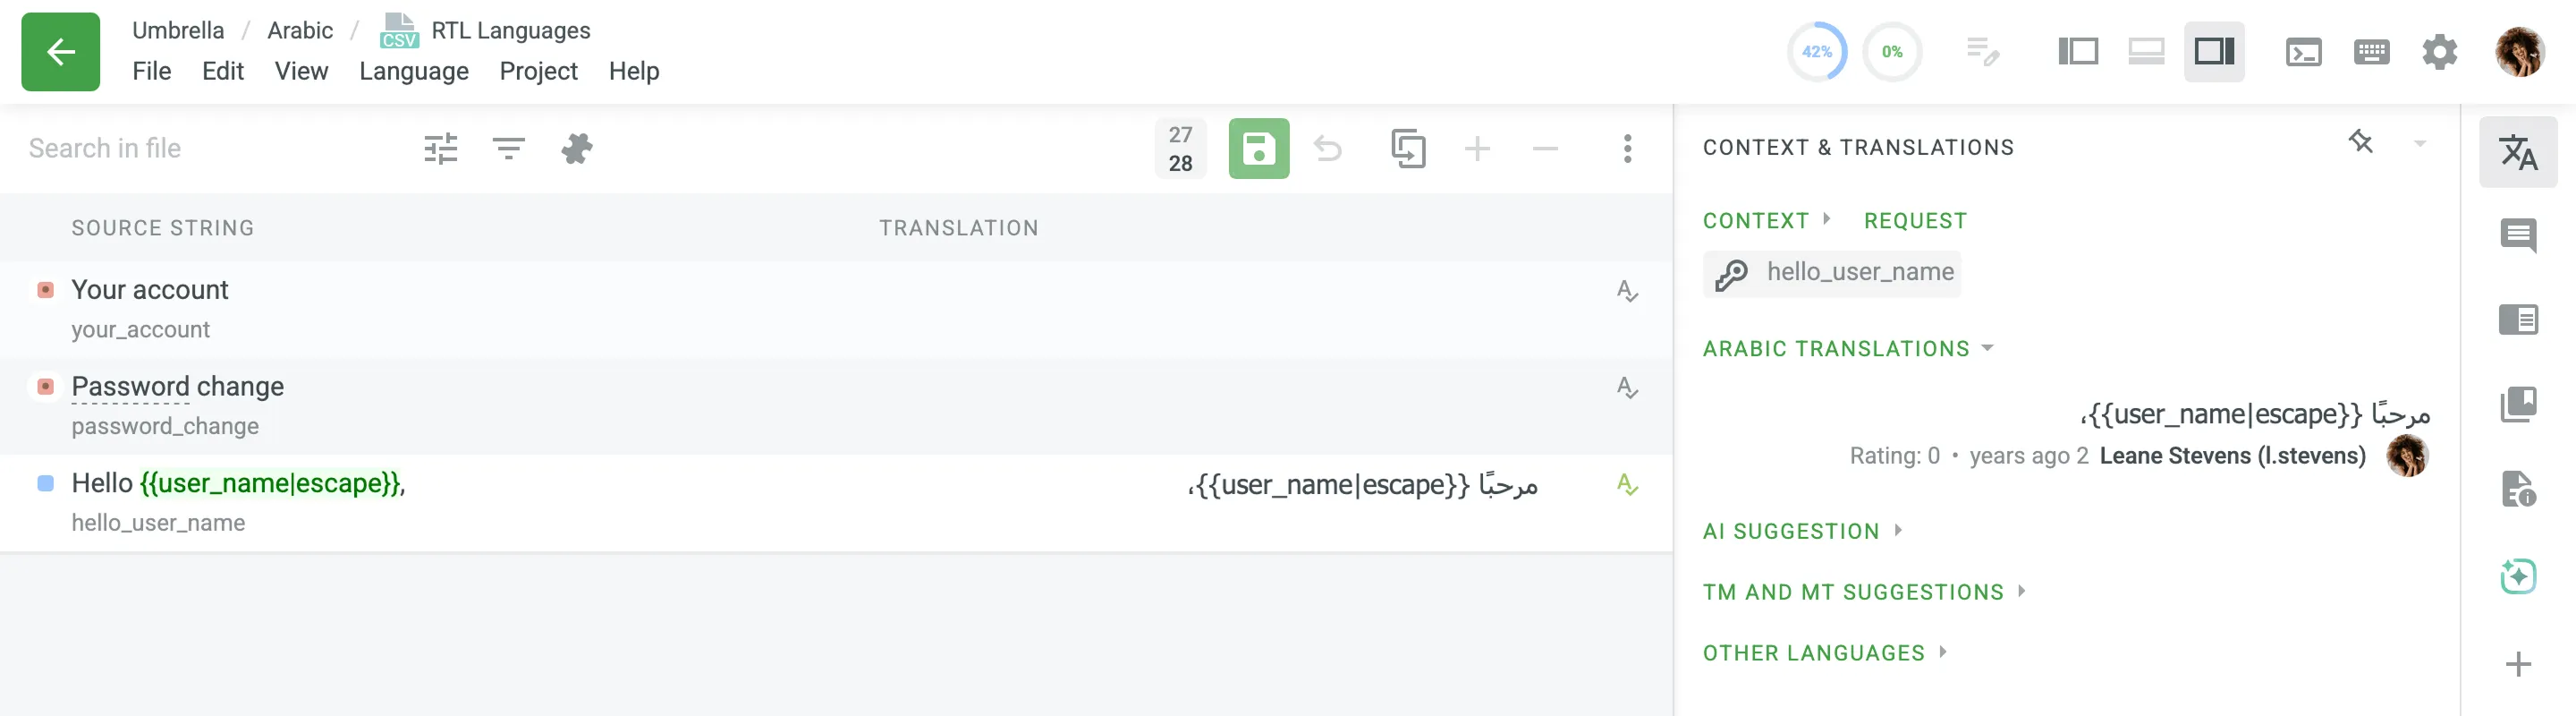
TM suggestions may include additional details such as the TM name, match percentage, creation date, and, if available, the name of the contributor who originally submitted the translation (displayed as full name and username, e.g., by Michael Ross (m.ross)). This information helps provide more context about the source and relevance of each suggestion.
Some suggestions may also feature a High relevance suggestion label. This label helps you identify highly trustworthy translations. It appears on TM suggestions that have a Perfect Match (101%) and originate from a translation that was previously approved.
To quickly copy the TM or MT suggestion to the translation field and save it, click Use and Save on the desired suggestion.
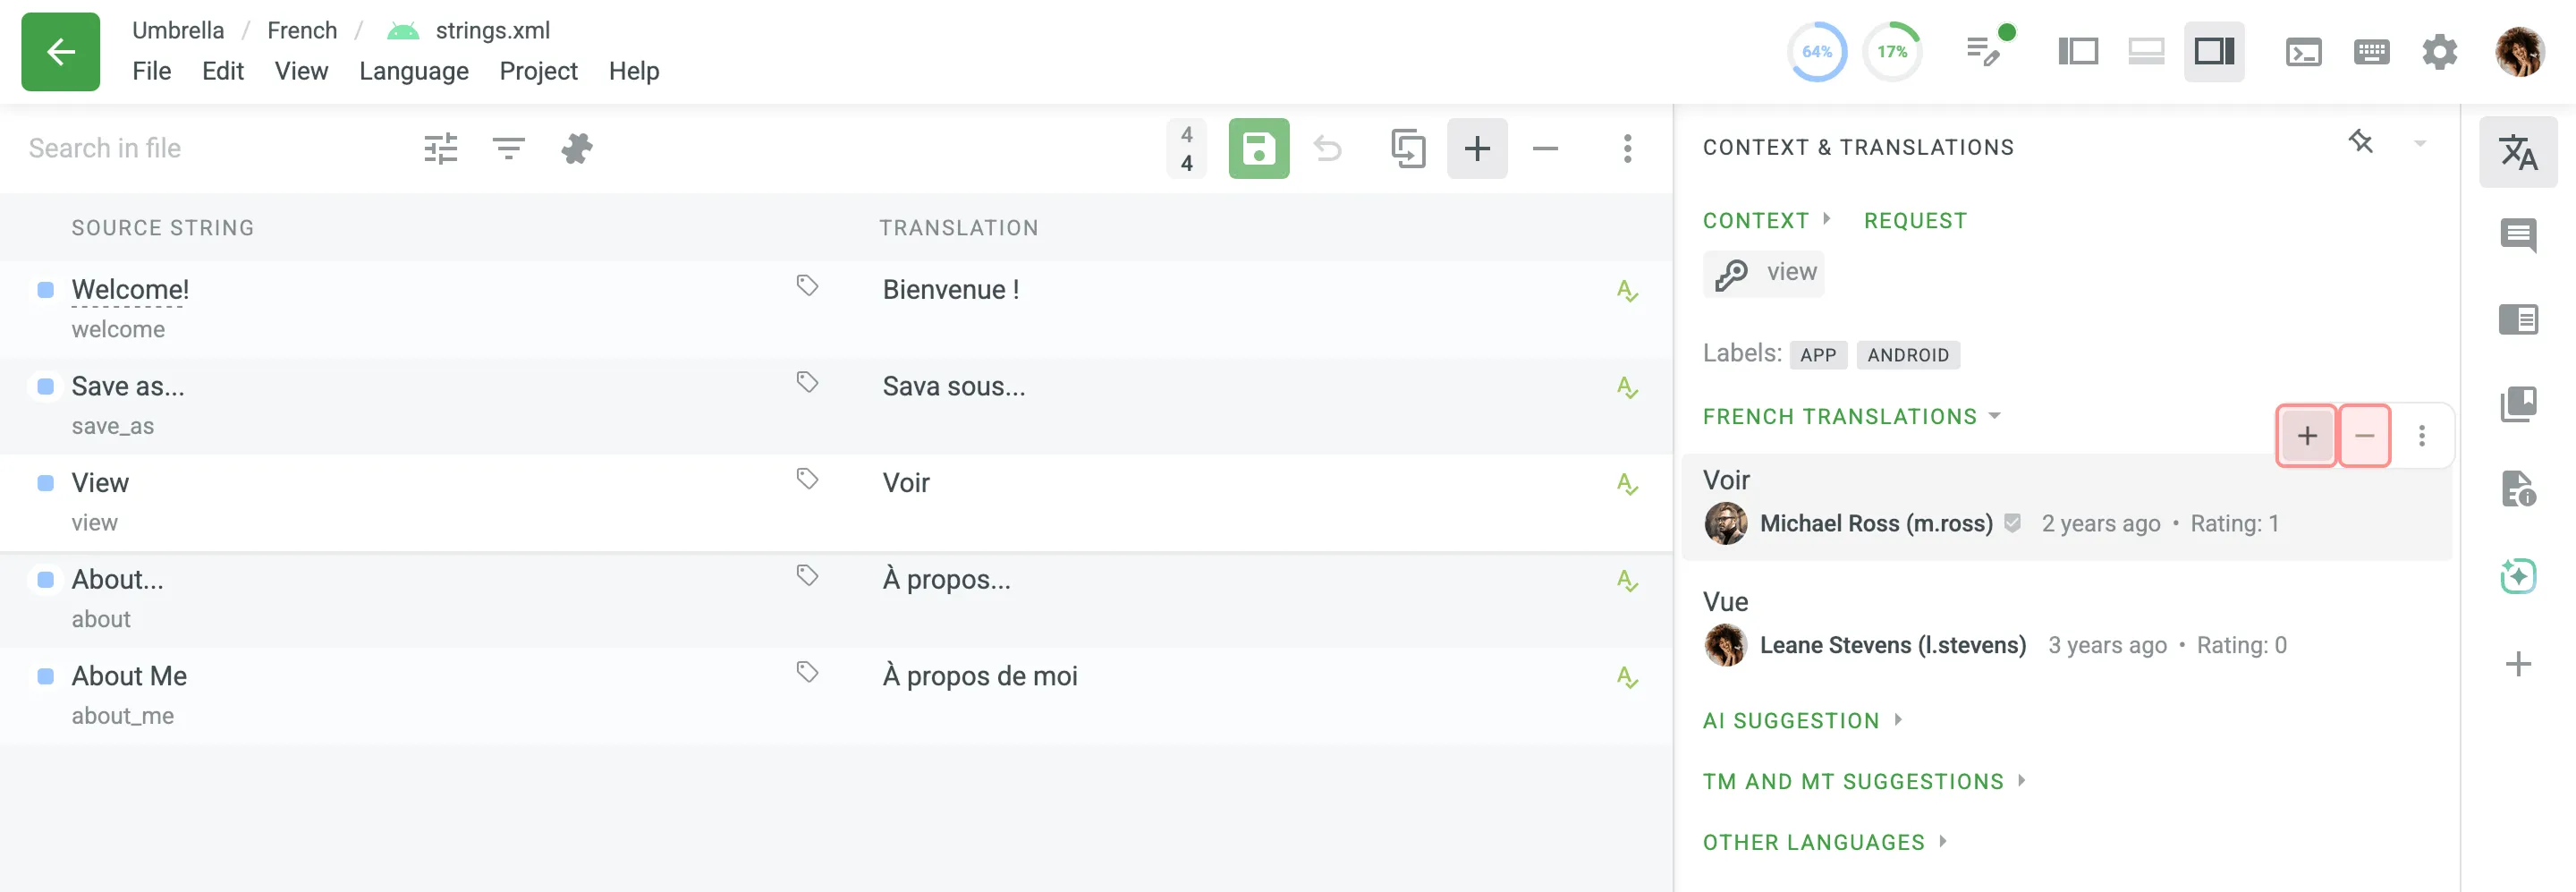
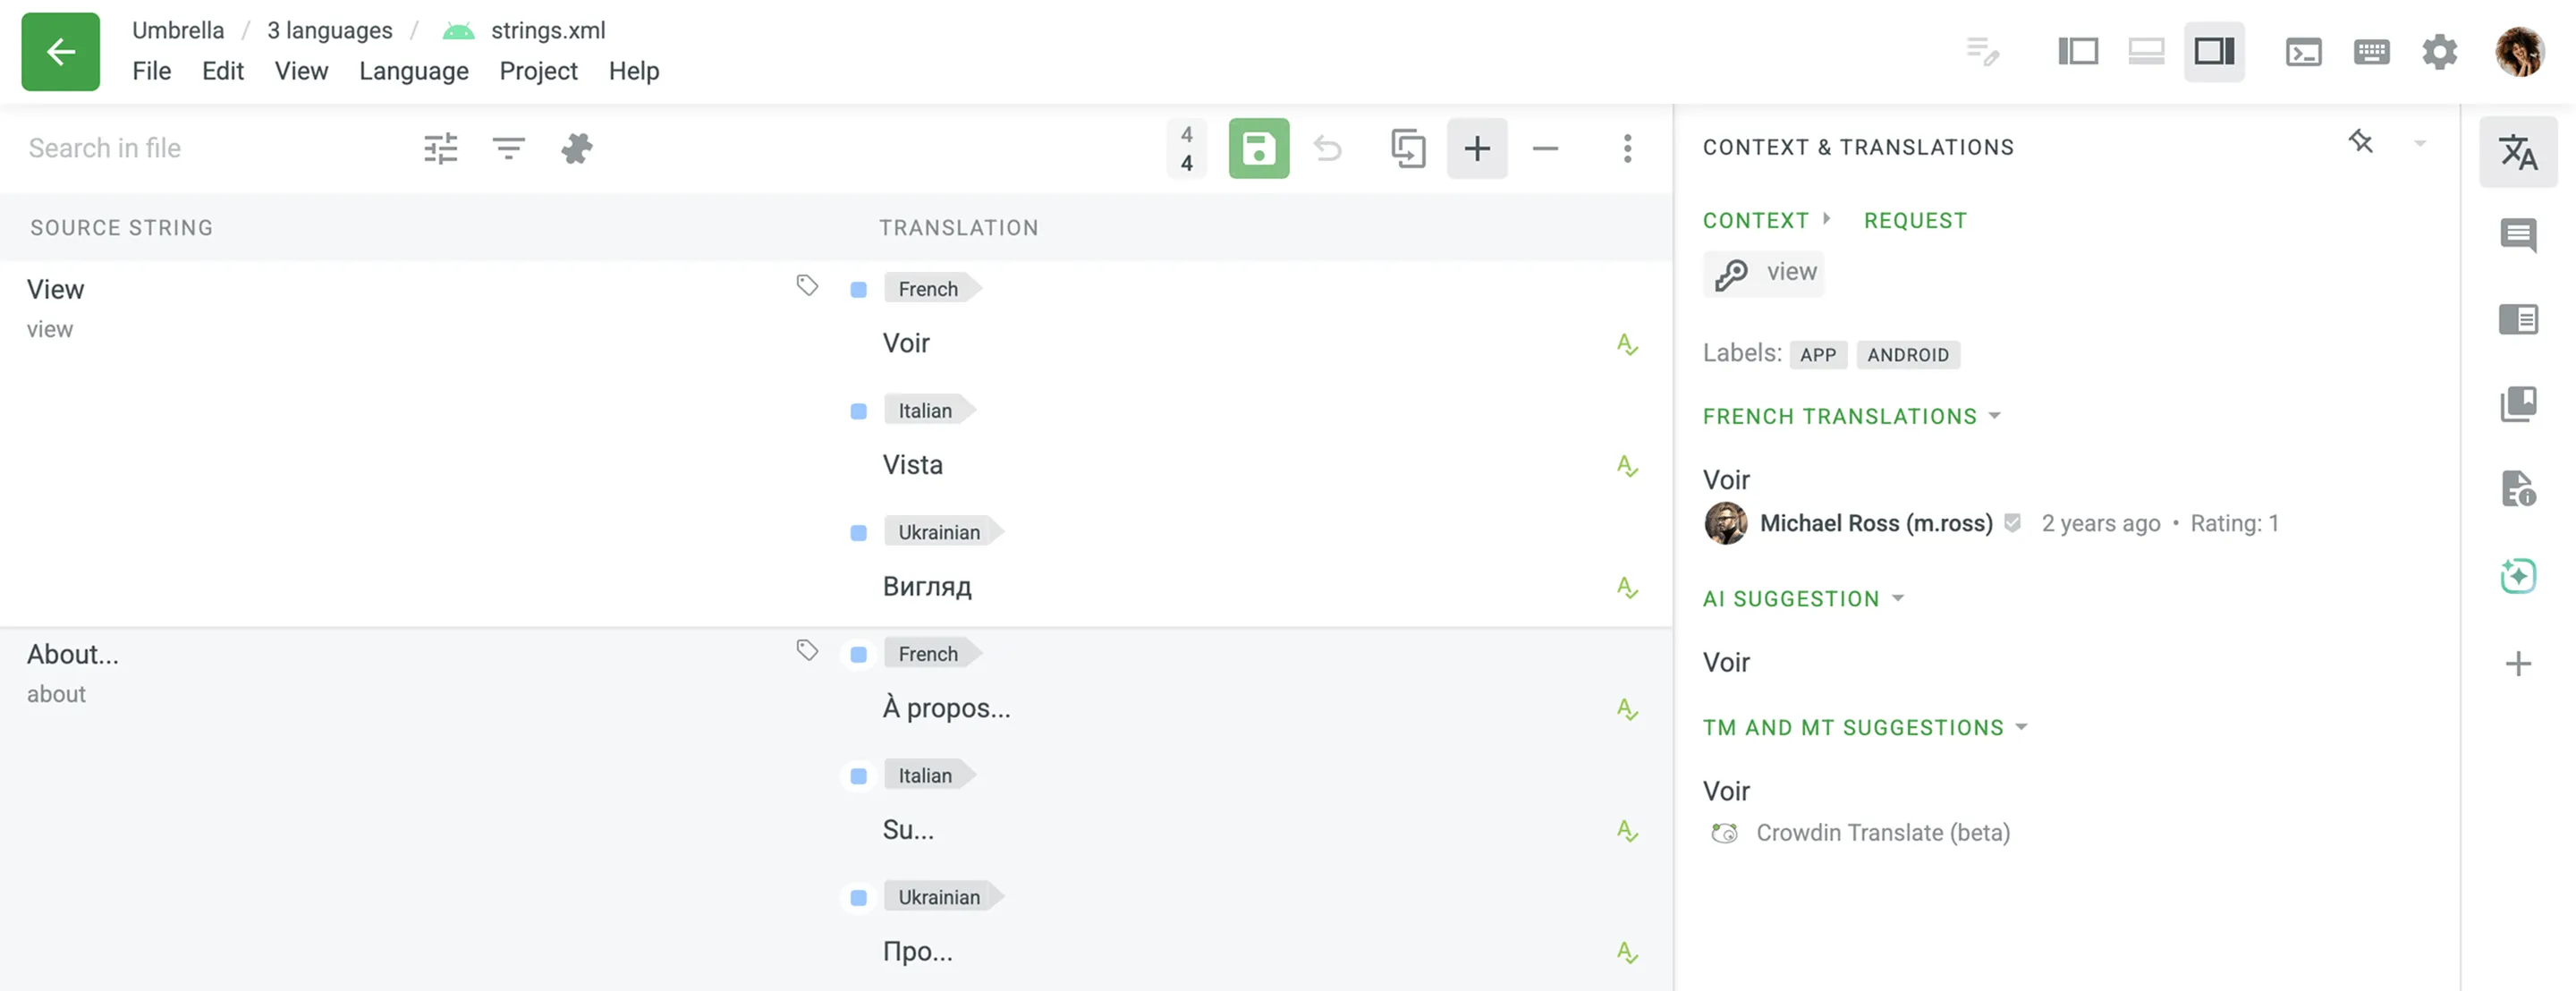
The Other Languages section allows you to check the string translations into other target languages. This can be a useful tip for multilingual people and while translating dialects of a language. This view is available for reference even if you do not have permission to work on those specific languages.
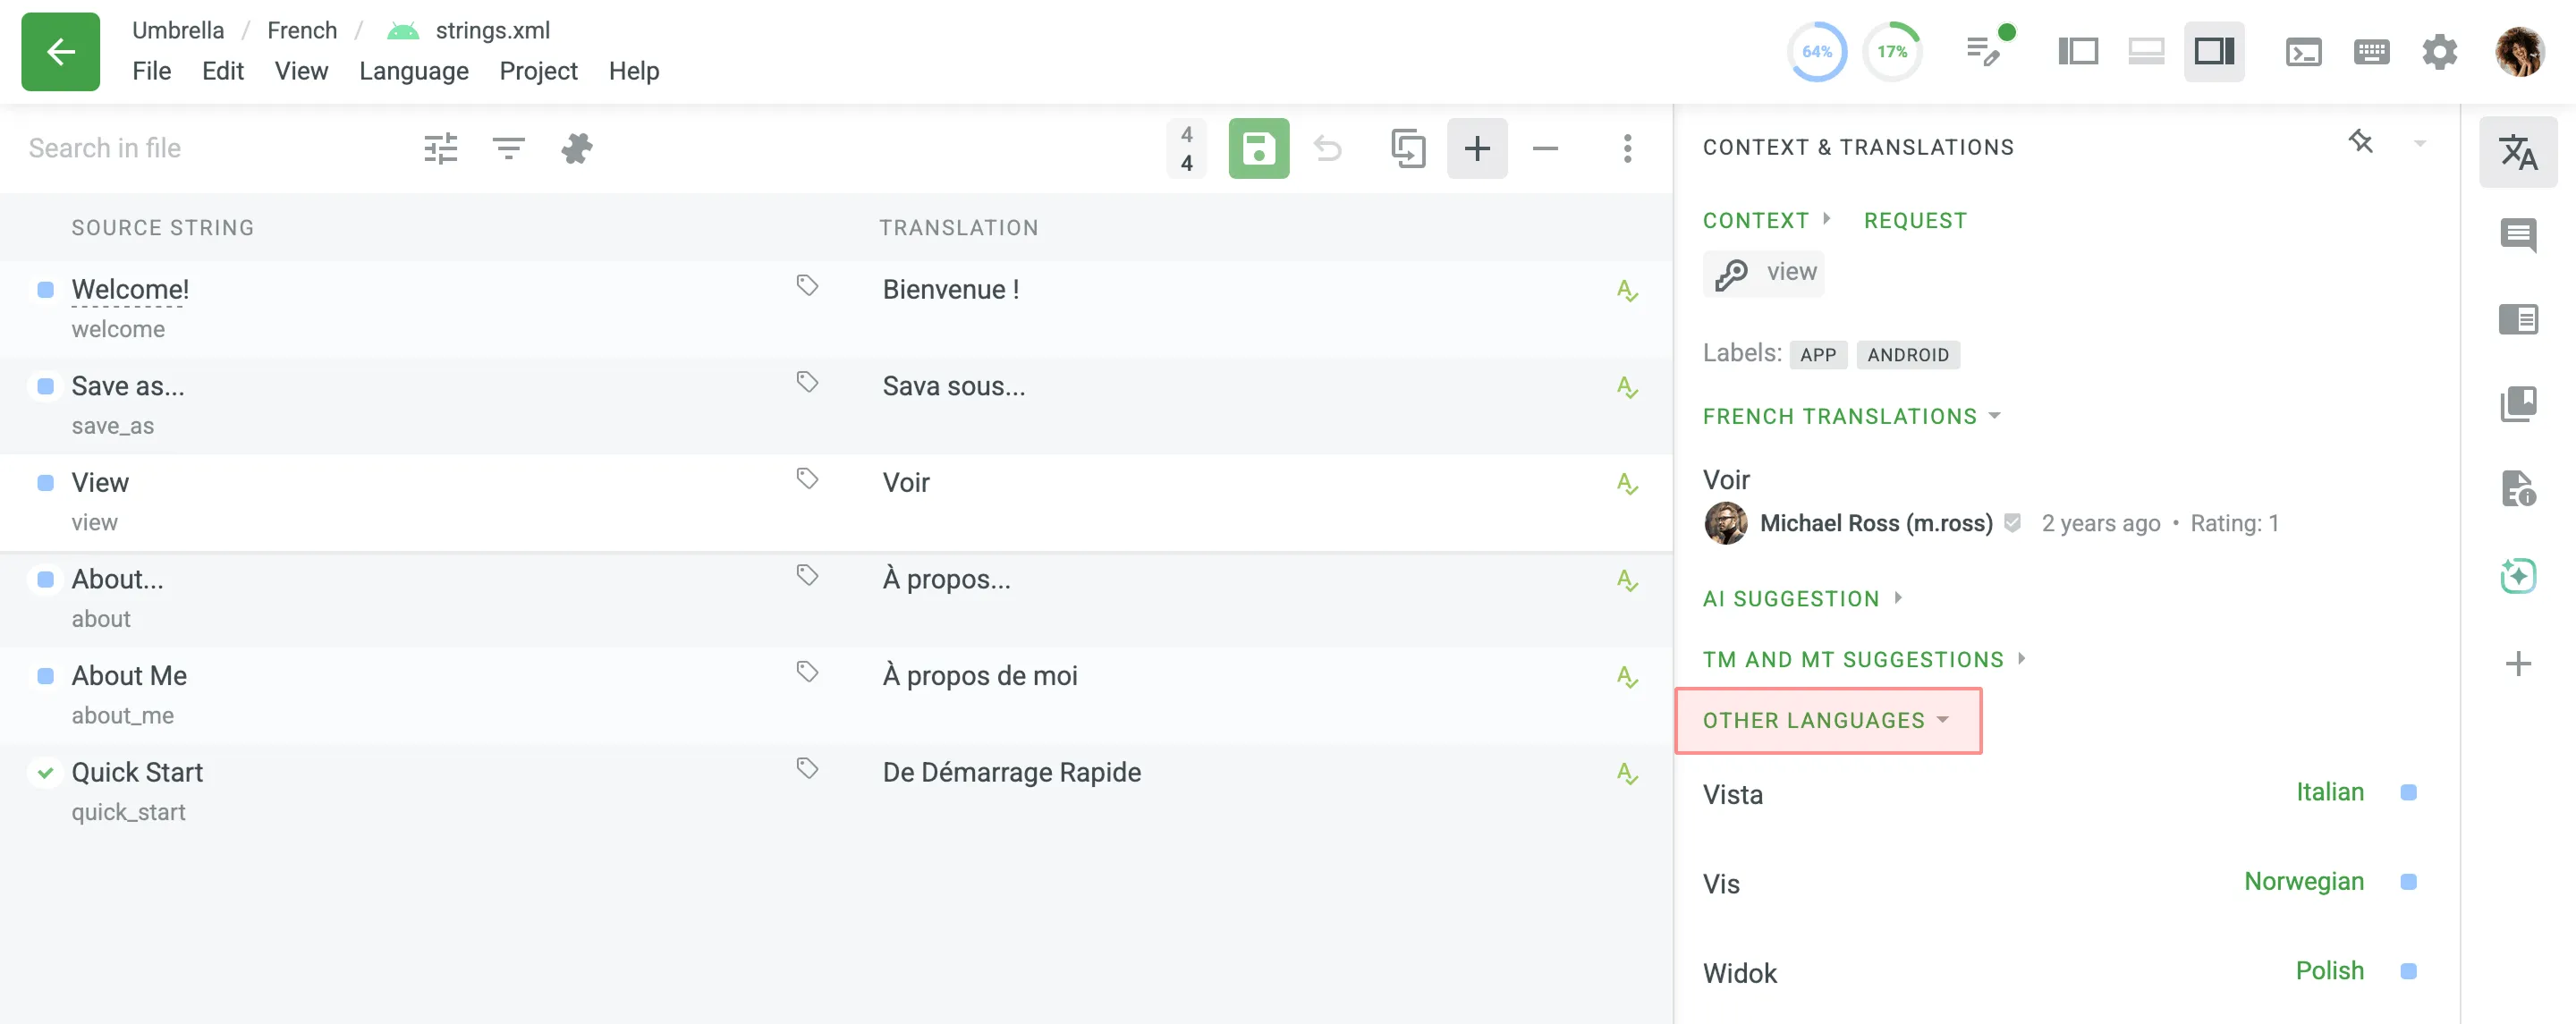
If you see that there is already a correct suggestion, vote for it by clicking the plus sign if you like the translation, or the minus sign if you don’t think the translation is correct. Translations that receive the most positive votes will have a higher rating and will appear at the top of all available translations for the string.
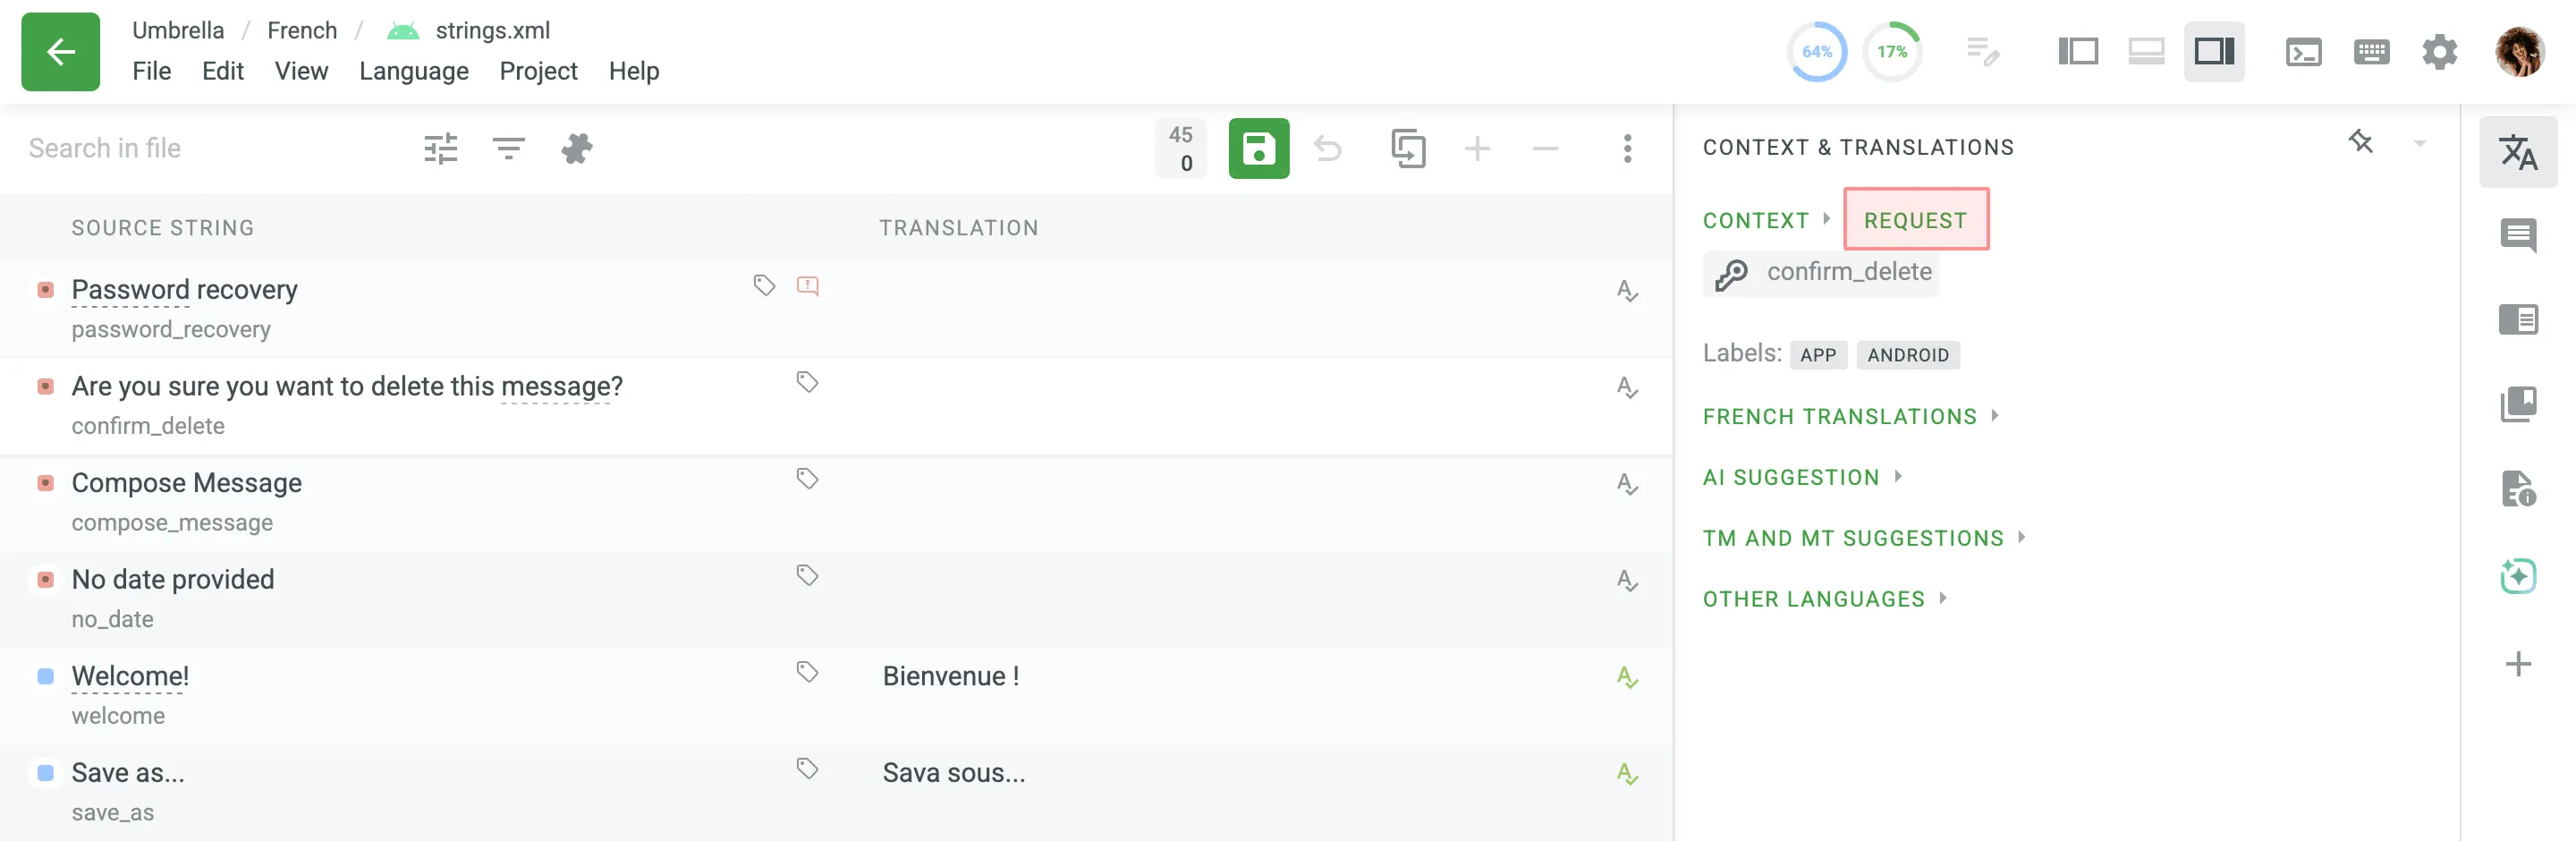
Within the Context & Translations section, you can find the context for each string, which may include technical details, a description of where the string appears in the product, or a screenshot showing its location in the user interface. If a string lacks context and its meaning is unclear, click Request to notify a project manager that additional explanation is needed.
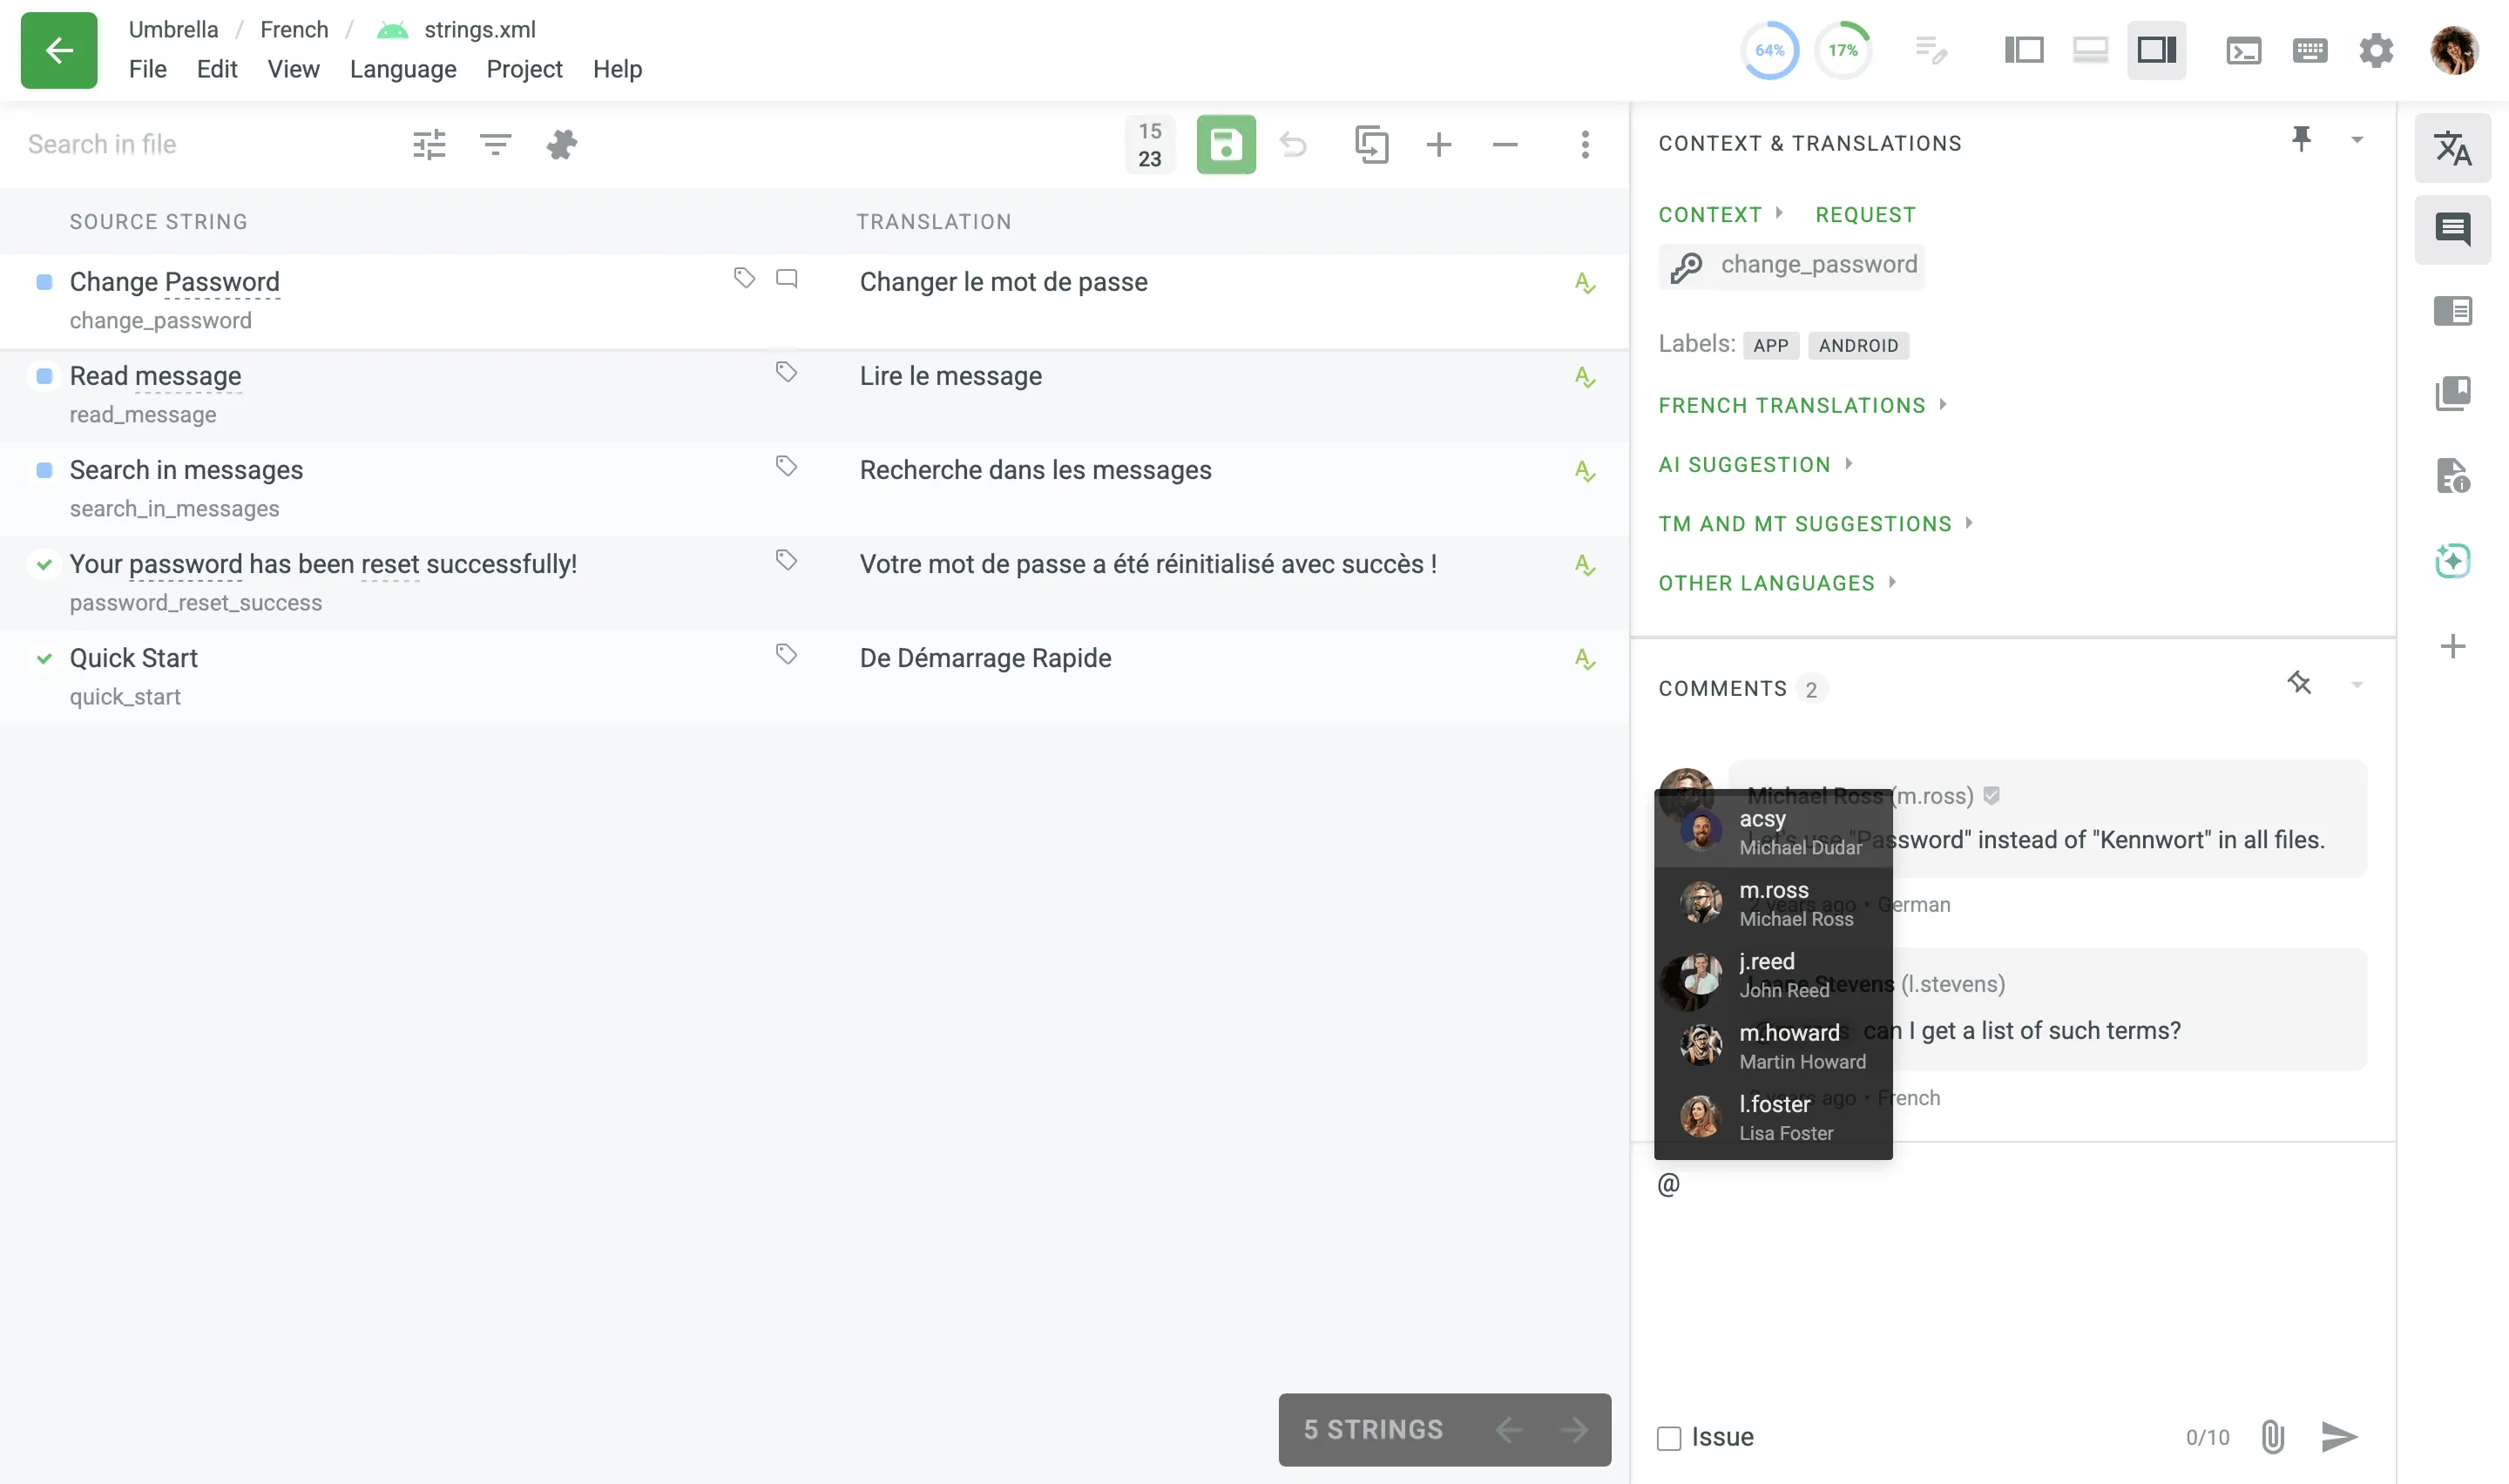
Using the Comments section, you can discuss the meaning of the source string or other related questions. It is recommended to use a source language of the project so other translators can understand it. Use the ”@” character and a username to direct your message to the specific person. You can also mention an entire team assigned to the project by typing ”@” and the team name.
To provide additional context or clarify details, you can add attachments to your comments. You can upload up to 10 files to a single comment in the following ways:
- Click Attach file.
- Drag and drop files directly into the Comments section.
- Paste files from the clipboard (e.g., Ctrl+V or Cmd+V).
The Editor supports attachments in various file formats, allowing you to preview images and play video or audio files directly within the interface. If you attach multiple files, you can navigate through them using the pagination.
Hover over an attachment to access the following options:
- Preview
- Download
- Delete
To help you track new comments, a bubble indicator with the number of unread comments is displayed next to the Comments section icon in the right panel. This bubble appears when there are unread comments for the selected string and disappears once you open the section to read them.
You can also use this section to report problems with source strings or translations, ask questions, or request additional context.
Exchanging Comments with External Organizations
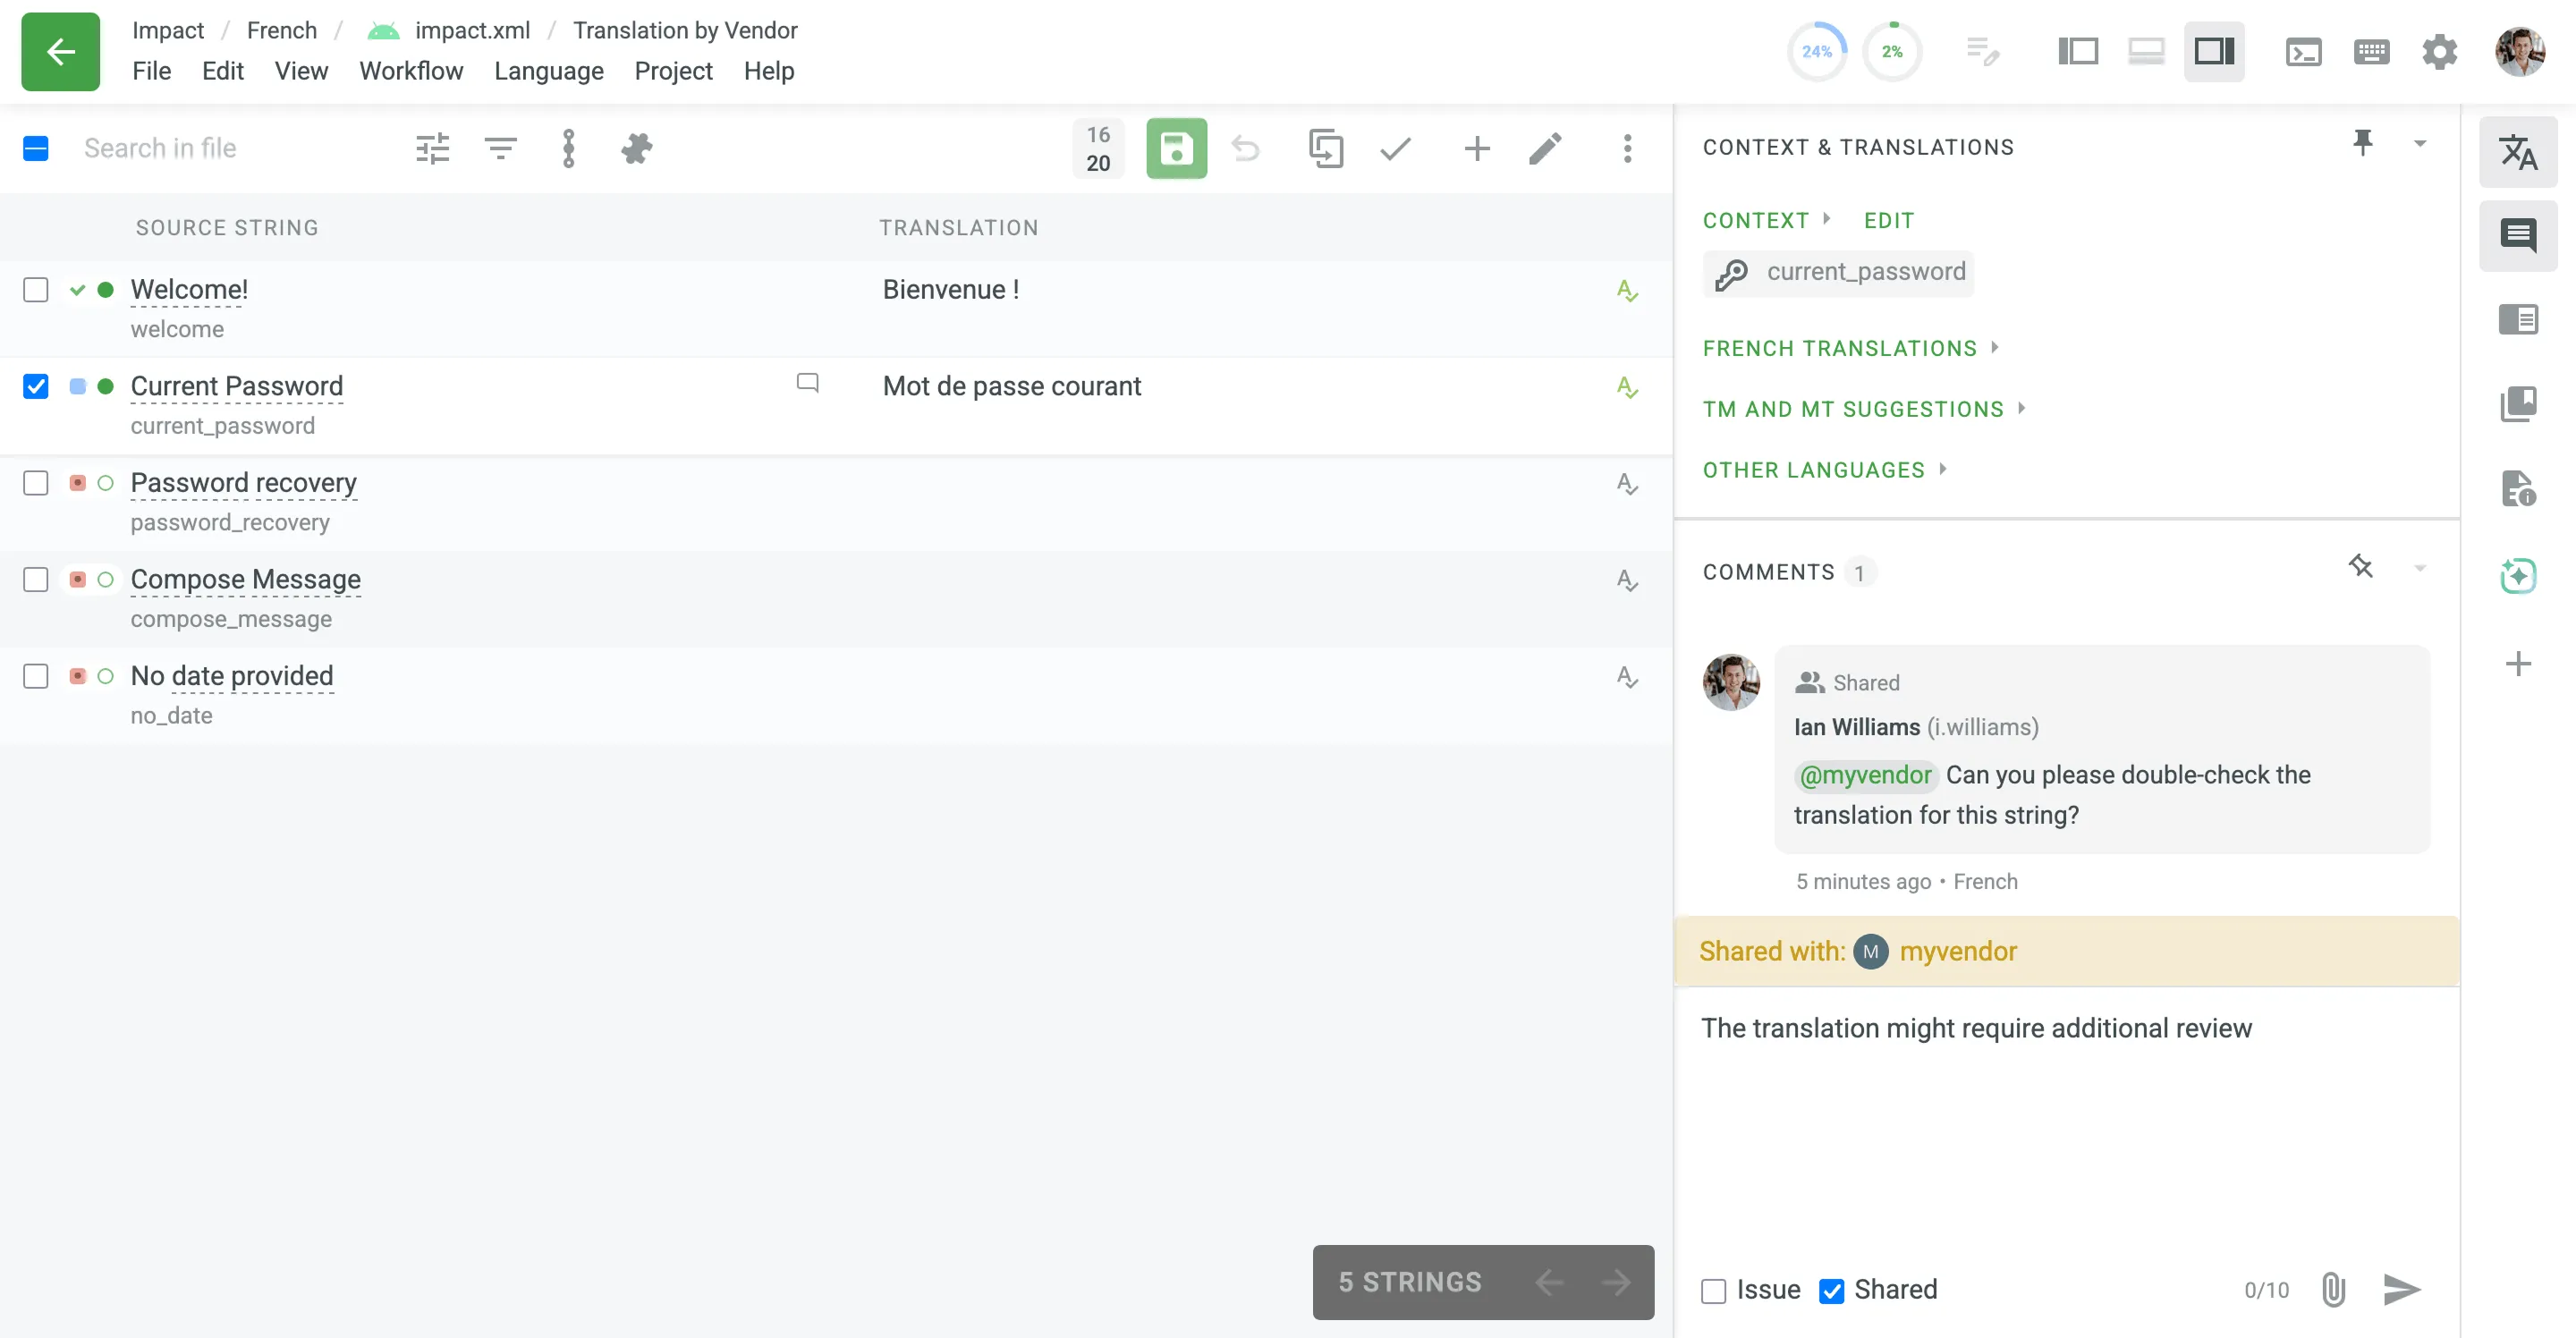
Section titled “Exchanging Comments with External Organizations”When collaborating with teams from other organizations, such as localization vendors, you can use shared comments to communicate directly within the Editor.
To make a comment visible to all involved organizations, select the Shared checkbox before posting. A notice will appear listing the organizations that will be able to see your comment, ensuring transparency in the discussion.
All comments, both private and shared, appear in a single chronological feed for easy tracking. Shared comments are clearly marked with a Shared label, making them easy to distinguish from internal-only discussions.
To ensure the right people are notified:
- When you create a shared issue (e.g., reporting a typo in the source text), project managers in all involved organizations will be notified.
- You can
@mentiona team (e.g.,@YourVendorTeam) to notify all its members. While you can only@mentionindividual users from your own organization, this allows you to direct questions to the appropriate team.
Any comments created without the Shared option enabled will remain private and visible only to the members of your organization.
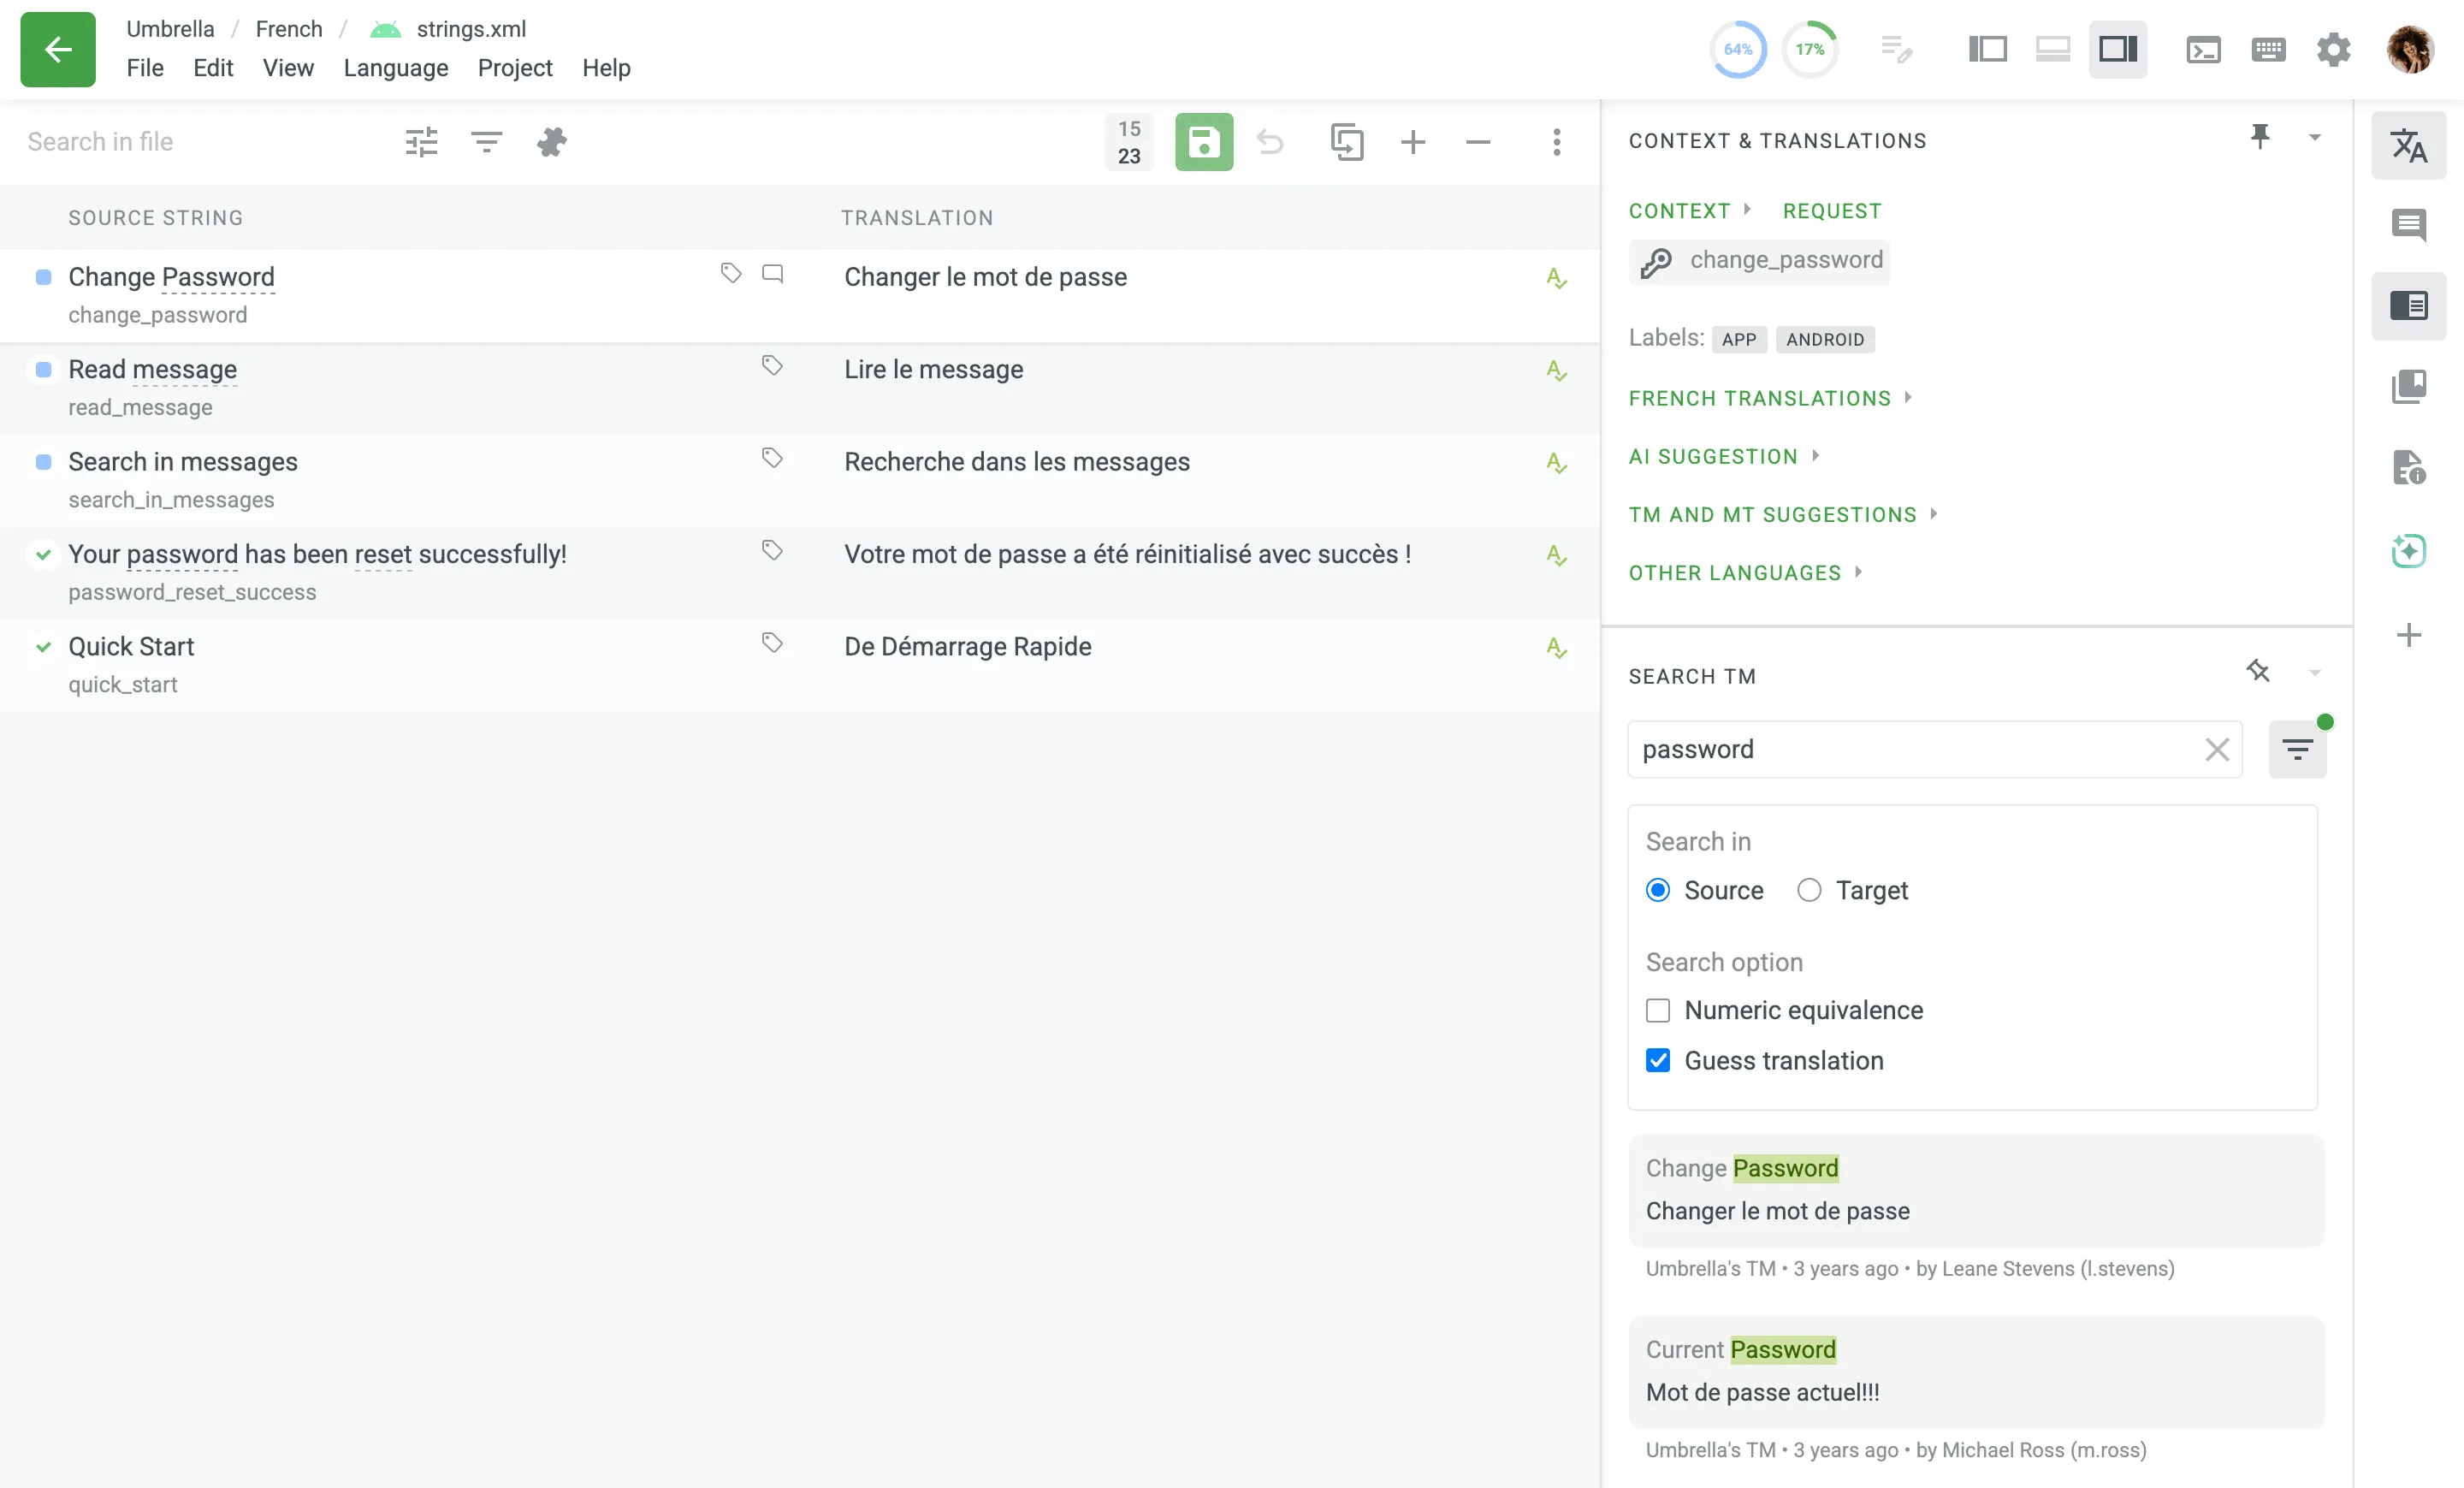
Using the Search TM section, you can check for all the available translations from Translation Memory, which is the vault of translations uploaded to the system by project managers. To help you find the best results quickly, the search prioritizes and displays the most relevant matches at the top of the list.
The Search TM section provides the following options:
- Source – Search for matches in a source language.
- Target – Search for matches in target languages.
- Guess translation – Highlight probable translation of a search phrase.
- Numeric equivalence – Match digits from a search phrase with any other digits.
Additionally, to maximize your search results, you can use the following wildcards with your search phrase:
Type an asterisk (*) to find words where the end or beginning may be different. Example: any* finds any, anyway, anything Example: *way finds way, anyway, highway
Type a plus sign (+) to find words where the end or beginning must be different. Example: any+ finds anyway, anything, anywhere, except any Example: +way finds anyway, highway, someway, except way
Type a minus sign (-) to exclude words from your search. Example: Save -as
Use quotation marks to find the exact combination of words. Example: “Save as”
Each TM suggestion in the search results also includes details such as the TM name, creation date, and, if available, the name of the contributor who originally submitted the translation.
When working in the Editor, you can view the TM suggestions displayed in the Automated Suggestions section and in the right sidebar found through the Search TM section. There may be situations where TM suggestions contain inaccuracies or need to be updated.
Project members with manager permissions (or higher) can edit or delete TM records directly in the Editor, both in the Automated Suggestions section and in the Search TM section, rather than having to go to the Translation Memories page in the Resources or Project Settings. This ensures that TM suggestions are updated safely and quickly, improving the overall quality of the TM.
To edit the TM suggestion, follow these steps:
- Click in the Automated Suggestions section or Edit in the Search TM section.
- In the appeared dialog, make the necessary edits (i.e., modify or delete) to the TM suggestions for each language present in the TM segment.
- To revert accidental deletions or unwanted changes, click Undo next to the TM suggestions or click Cancel to revert all modifications before saving.
- Once the desired edits are completed, click Save to confirm and apply these changes to the TM segment.
To completely delete a TM segment from the TM, delete all TM records across all languages and click Save.
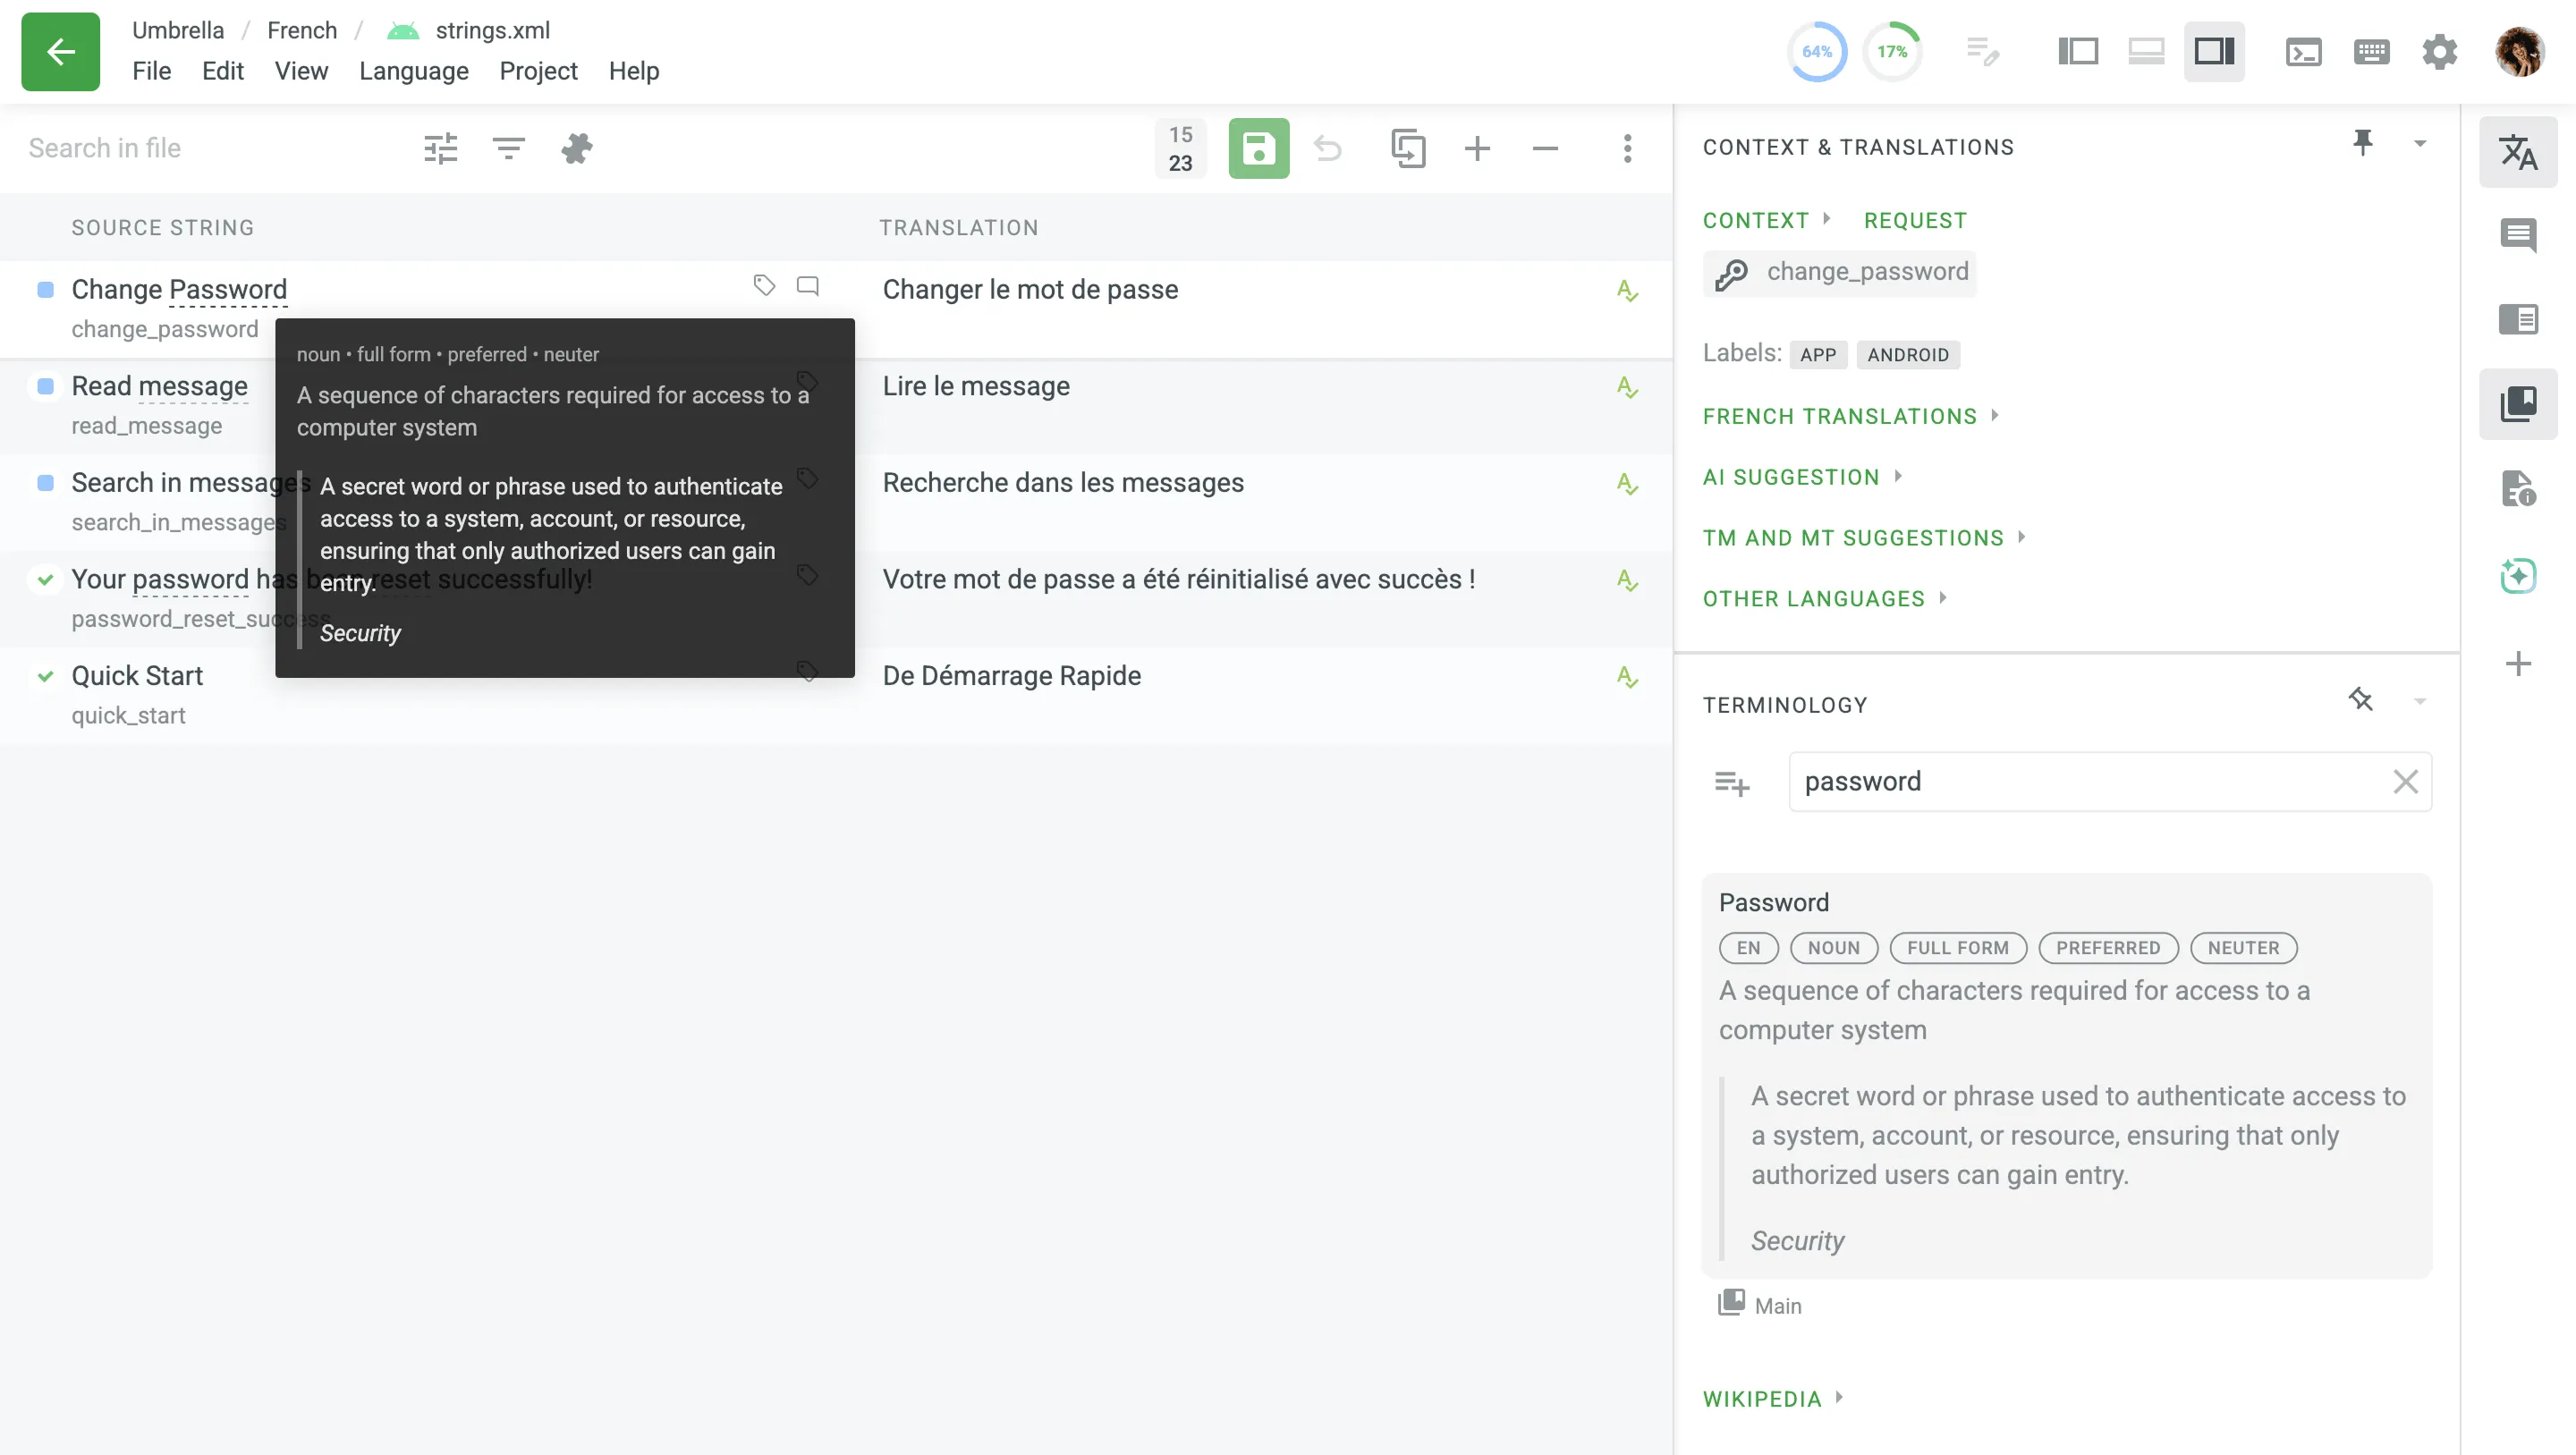
Underlined words or phrases in strings indicate project-specific terminology, which should be translated according to the provided term description. You can view detailed explanations by hovering over the underlined text or visiting the Terminology section.
The Terminology section allows you to browse the project glossary (if available) and search for specific terms. If a term is not found in the glossary, Wikipedia explanations will be displayed as a reference.
Some terms may already have translations, which help maintain consistency across the project. To reuse a translated term, simply click on the underlined text, and its translation will automatically appear in the translation field.
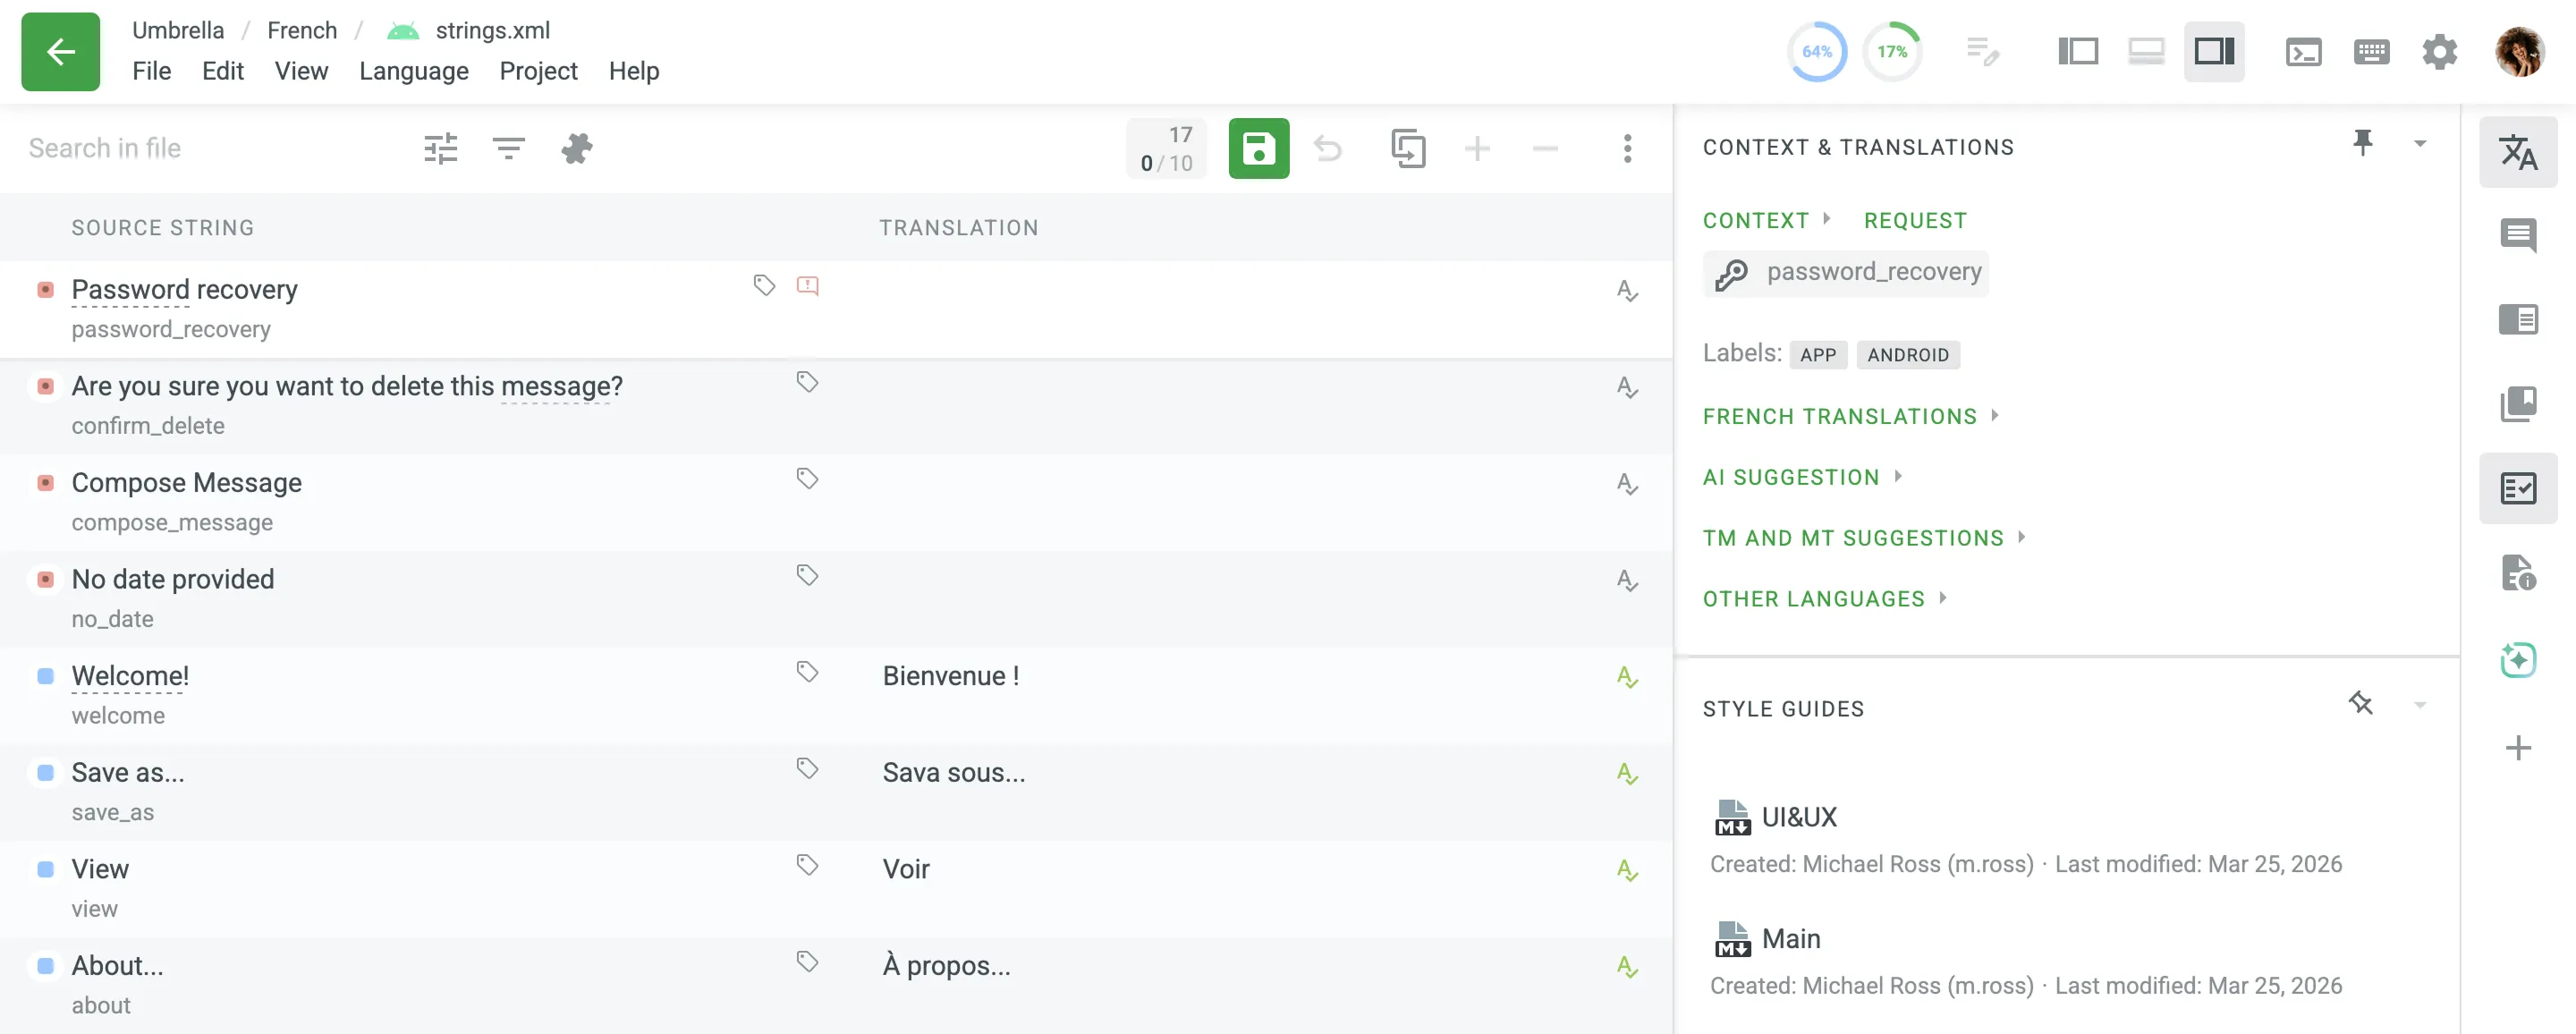
The Style Guides section provides access to the project’s style guides, which contain specific rules and guidelines for translators to follow. A style guide may include information about tone of voice, preferred terminology, formatting rules, and other important details that help maintain consistency and quality across all translations in the project.
To preview or download a style guide, follow these steps:
- Open the Style Guides section in the right sidebar.
- A project can have one or more style guides available. Click on the preferred style guide to view its full contents in a pop-up modal.
- (Optional) Click Download on the style guide to save it for offline reference.
Read more about Style Guide.
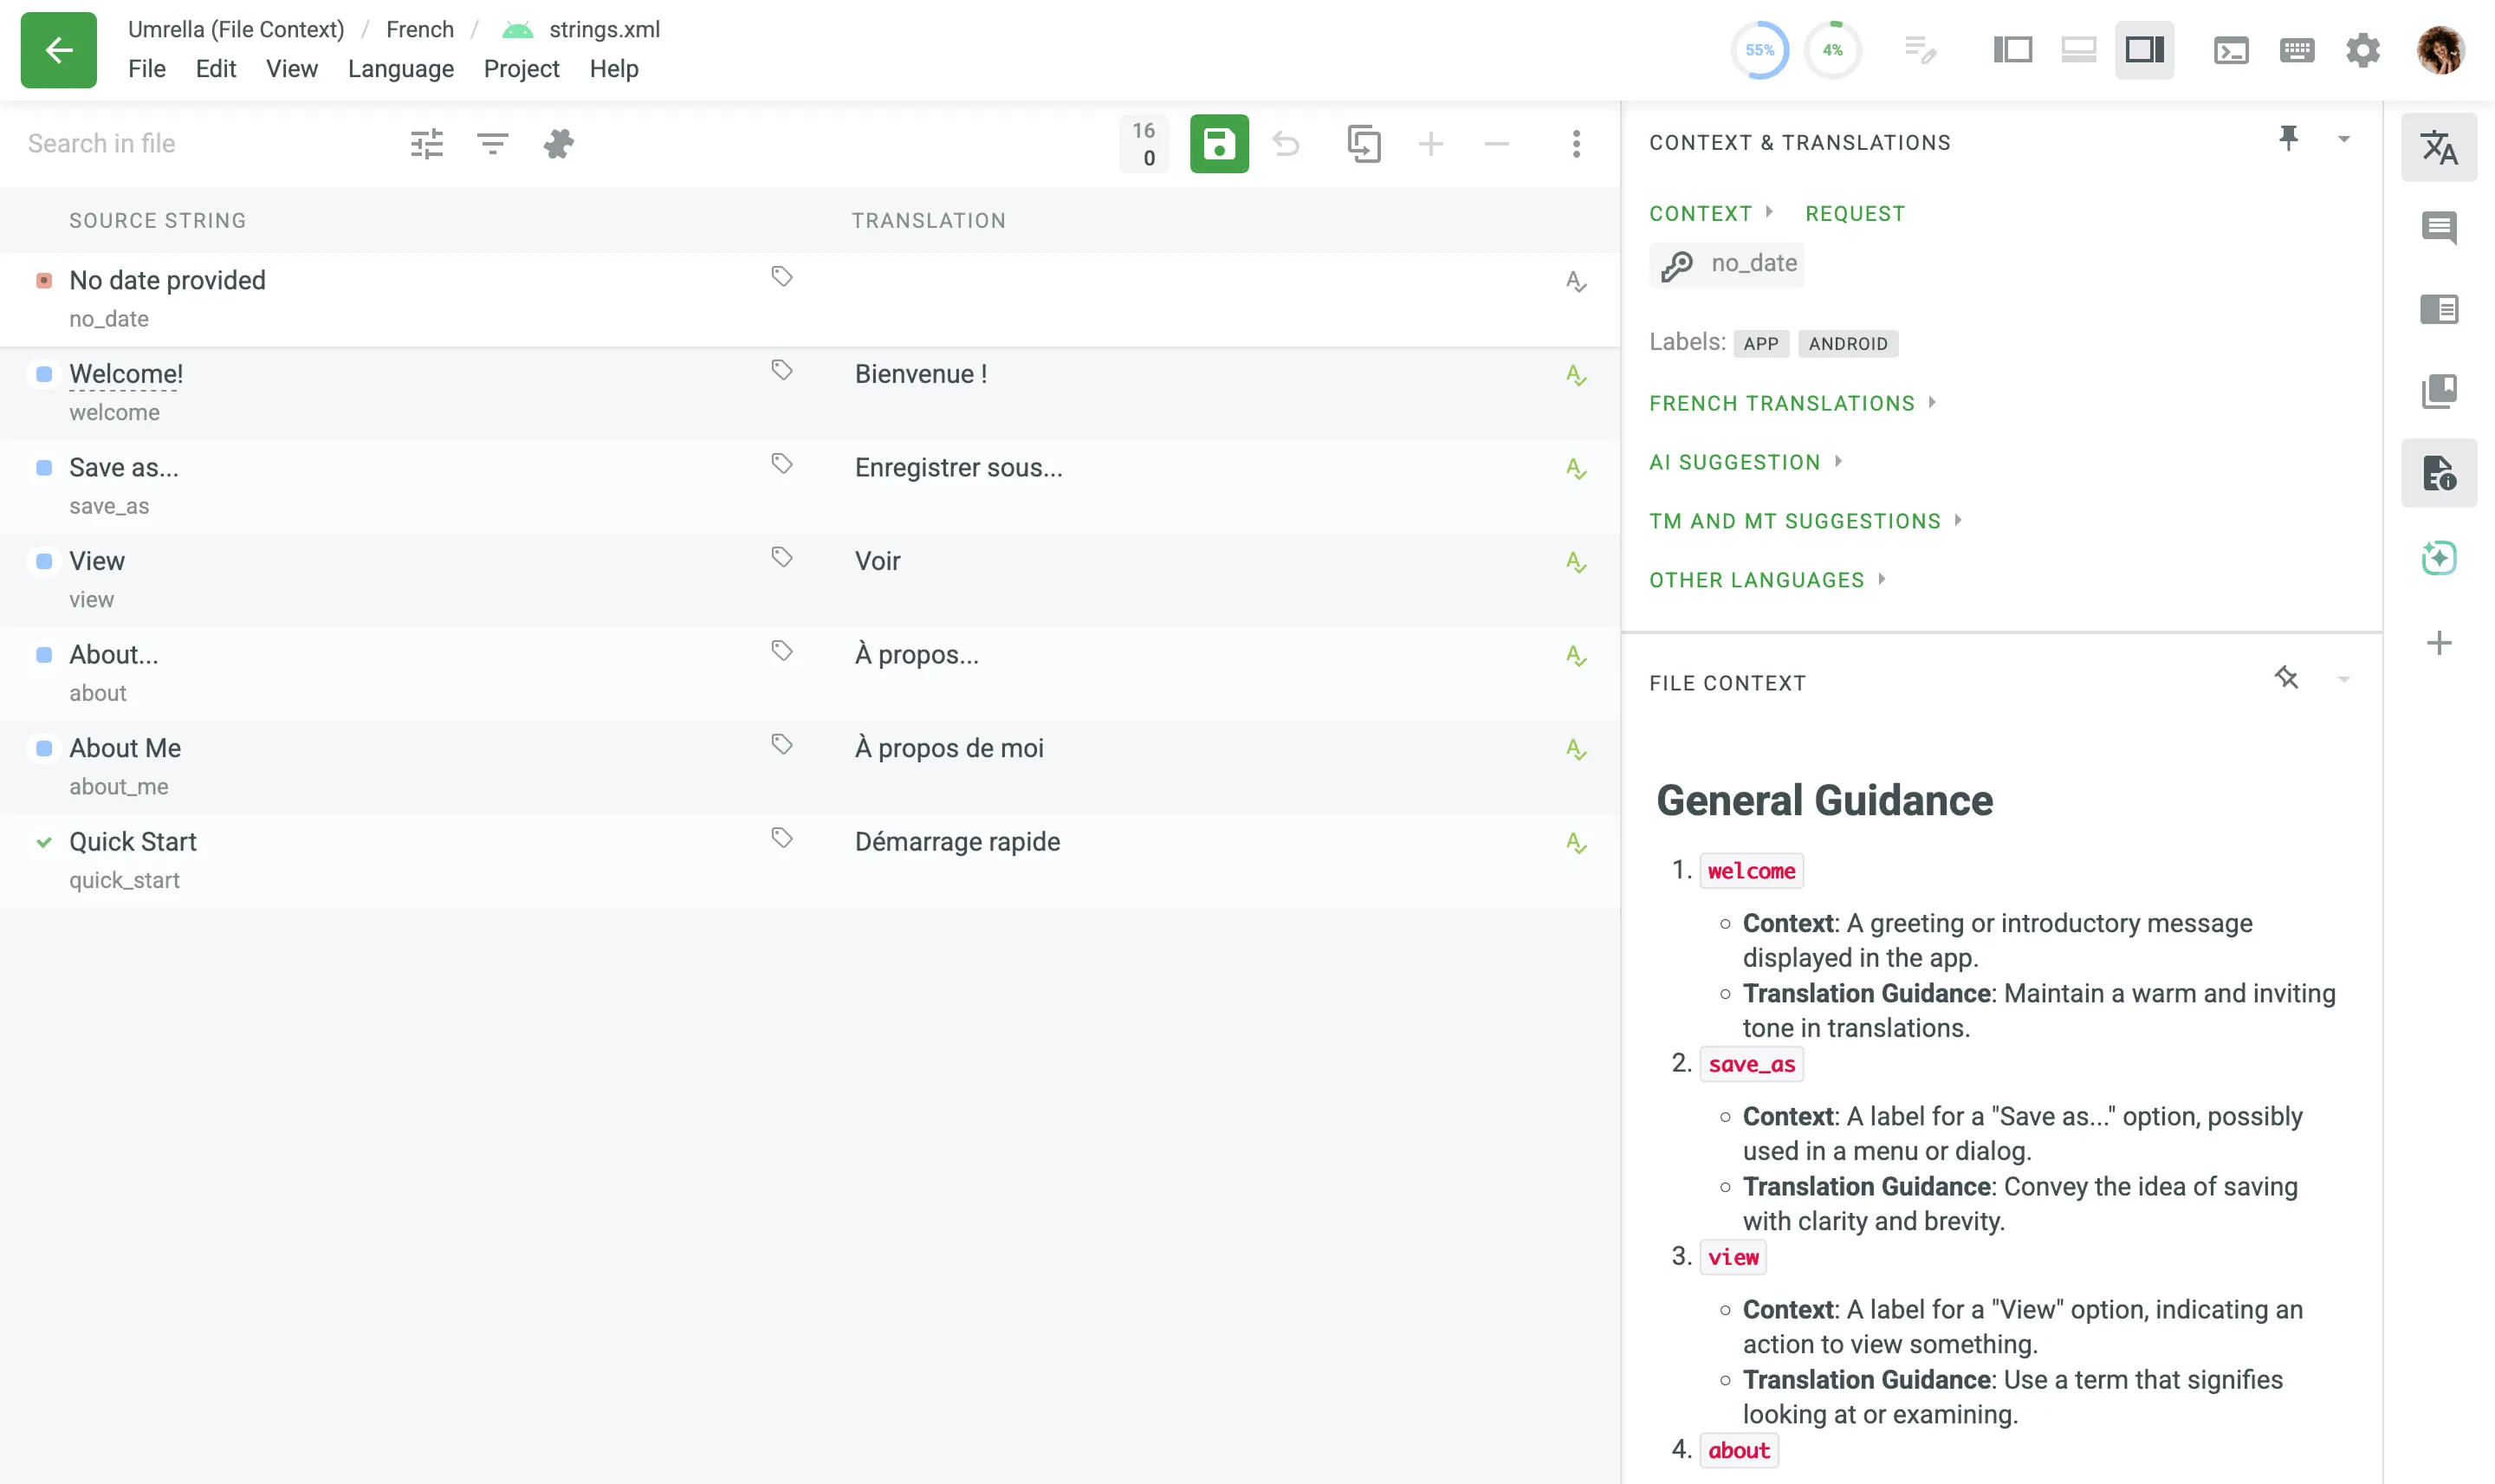
The File Context section allows you to provide translators with additional details to help them understand how to translate a specific file. File context can be added as plain text or Markdown, either directly in the Editor or through the File Settings by the project members with manager permissions (or higher). For other project members, file context is read-only.
To add file context in the Editor, follow these steps:
- Click Add File Context in the File Context section.
- Add the context or instructions for your translators. You can use either plain text or Markdown.
- (Optional) Click Preview to see how the text will appear after saving.
- Click Save.
To edit file context, click the existing text in the File Context section, make your changes, and click Save.
The Editor offers several viewing modes to accommodate different translation workflows. The available modes include Side-by-Side, Comfortable, Multilingual, and Multilingual (Grid), each providing a unique layout for presenting and managing translations. The Side-by-Side mode is enabled by default, but you can easily switch as needed.
You can switch between Editor modes using the following methods:
- Via View menu – Go to View in the main menu and choose the preferred mode.
- Via Editor View icon – Click the Editor View icon in the upper-right corner and choose the preferred mode (this icon is available only if the Horizontal Menu is disabled in the Editor Settings).
Side-by-Side mode, detailed in the Core Features section, is ideal for managing multiple translations at once. Translators can work on several strings simultaneously or swiftly review and vote on existing translations. Managers and proofreaders can efficiently approve the best options all within the same view.
Comfortable mode allows translators and proofreaders to focus on one string at a time, ensuring accuracy without distractions. It emphasizes the active string, making it easier to review context and related resources. This mode is ideal for handling complex translations or performing detailed proofreading, where precision and thoroughness are essential.
The main working area with the source string at the top and the translation section below. To add a translation, you need to select a string from the left section, and it will appear in the middle-top Source String field.
The multilingual mode provides similar features as the side-by-side mode and allows multilingual translators and proofreaders to work with multiple languages at the same time. You can select any number of languages to work with simultaneously, up to all the languages in your project. The right panel shows the string’s translations of the language you’re entering a translation for or the one that was selected last. Additionally, to provide more context with fewer page turns, the Editor displays 50 strings per page in this mode.
Once you switch to the multilingual mode, select the languages you’d like to work with, and click Apply. To quickly choose all project languages with a single click, use the Select All button. To add new languages or remove some of the earlier selected ones, go to Language in the main menu, do the necessary modifications to the language list, and click Apply. You can also use the Clear button to quickly deselect all languages before making a new selection.
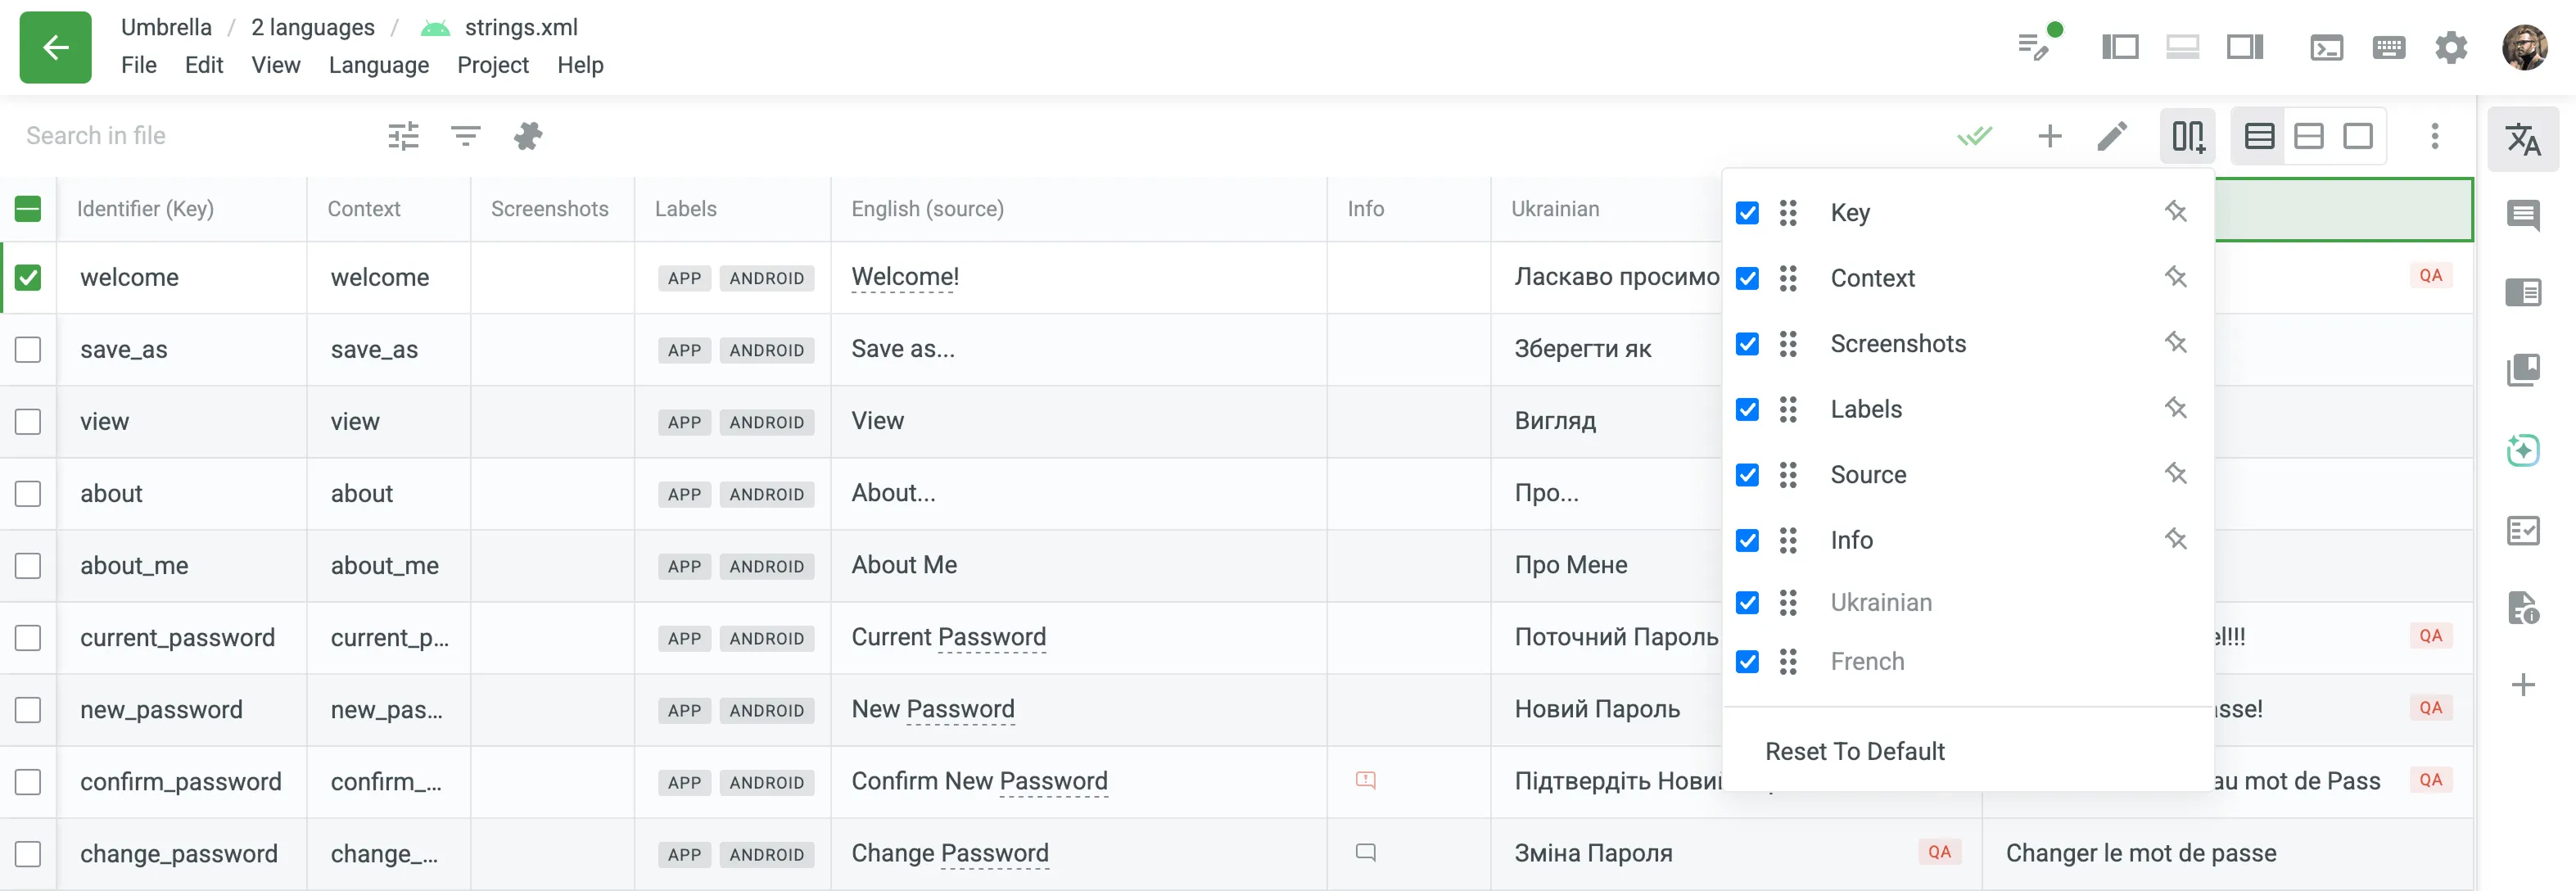
In addition to the multilingual mode, there is a separate Multilingual (Grid) mode. It provides a spreadsheet-like layout where each language is shown in a separate column, allowing you to work with multiple languages in a compact tabular format. Like the standard Multilingual mode, it supports an unlimited number of languages simultaneously and displays 50 strings per page.
To adjust the order and visibility of columns displayed in this mode, and to pin specific columns, click Sort Columns in the upper-right corner and select the preferred ones. You can also reset the layout to the default column set by selecting Reset To Default at the bottom of the list.
Additionally, to pin or hide individual columns, hover over a column header to reveal a drop-down arrow. Click the arrow and select either Pin Column or Hide Column.
You can customize the grid layout and interact with cells more efficiently using the following features:
- Row Sizes – Switch the table density between Compact, Medium, and Large modes using the buttons in the upper-right corner. This allows you to find the most comfortable display density.
- Inline Action Buttons – When hovering over a translation cell, a mini-panel appears directly in that cell with quick actions: Save, Cancel, Approve, and Copy Source. This allows you to manage translations efficiently without moving your cursor to the right panel.
- Inline Statuses and QA Checks – String statuses and Quality Assurance (QA) check results are displayed directly inside each cell. If a translation has a QA issue, it is clearly highlighted with a QA indicator next to the text, providing immediate visual feedback.
The proofreading process works mainly the same way as in side-by-side mode, except when approving or removing approvals for all or a couple of strings at once, the system performs the action for all languages selected for the multilingual mode.
When using filter options in multilingual mode, the system will show strings that meet the selected criteria for at least one of the selected languages.
This behavior applies to the following filter options:
- Untranslated
- Not Approved
- Approved
- QA issues
- Machine Translations
- Advanced Filter > Translations updated
- Advanced Filter > Translations > Partially translated (plurals)
- Advanced Filter > Translations > Same as source string
- Advanced Filter > Votes
When translating between LTR and RTL languages, some elements in the translation field in the Editor might not be displayed the same way as they will be once exported.
To be sure that RTL translations will be displayed correctly in the exported file, we recommend making translations the following way:
- Click under the source text (or Alt+C key combination).
- Translate the source texts into the target language.
- Leave variables, tags, etc., unchanged in the translation, even if they look wrong. They will be in the right positions in the exported file.
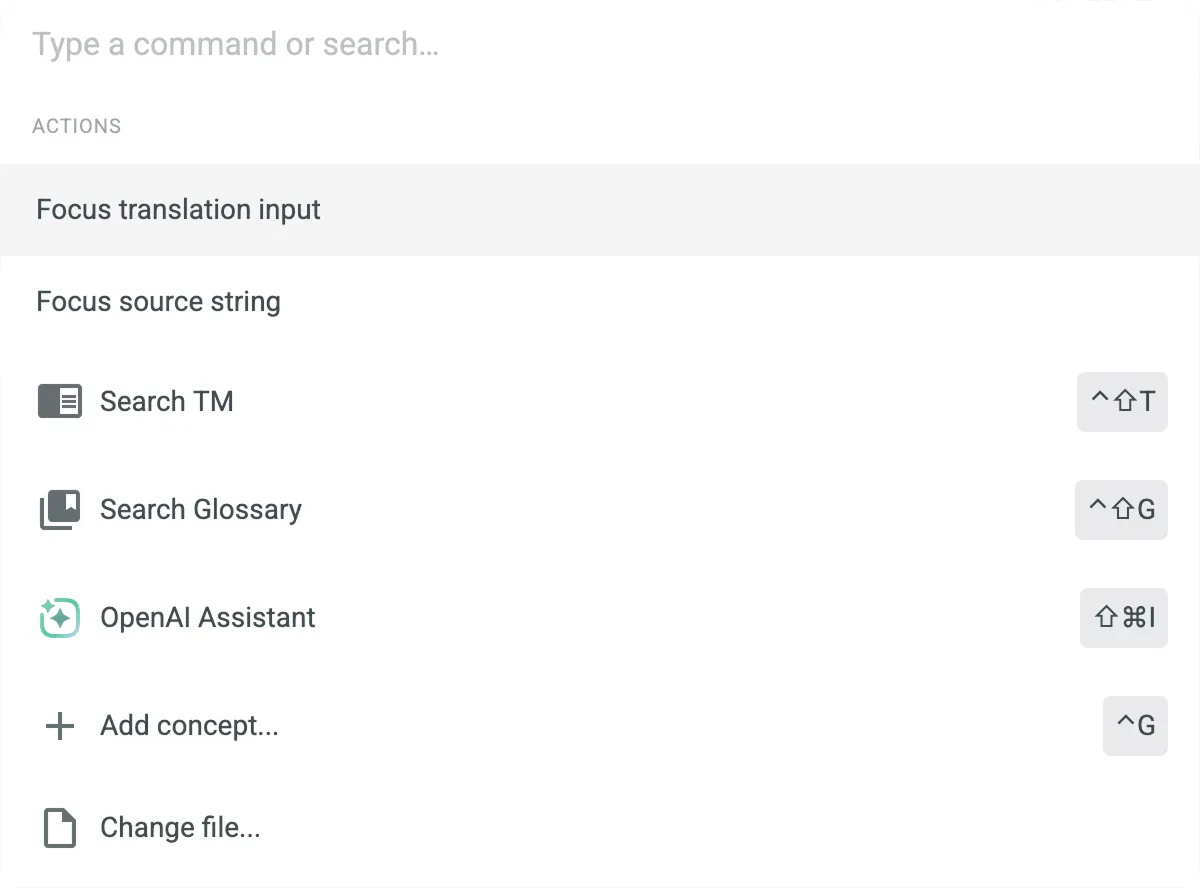
The Command Palette in the Editor is your hub for accessing various commands efficiently. It serves as a central location for all available commands, ensuring a seamless and intuitive experience.
To open the Command Palette, click in the upper-right corner or select Help > Open Command Palette in the main menu. Alternatively, press Ctrl+K or ⌘+K.
When you enter translations but haven’t saved them, a green indicator appears next to the Unsaved Translations icon. Hovering over or clicking displays a tooltip with the number of unsaved translations.
This feature offers the following options:
- Check the number of unsaved translations.
- Save all unsaved translations with a single click.
- View and manage all strings with unsaved translations.
To view unsaved translations, click in the upper-right corner and select View Strings. Alternatively, click and select Unsaved translations.
Once filtered, you can continue editing unsaved translations. If they are ready to be saved, click Save All to apply the changes.
To open the Editor settings, click in the upper-right corner.
The Editor settings are grouped into tabs that contain various options for configuring the Editor according to your preferences.
- Translation Memory Suggestions – you can specify the minimum similarity match (in percentages) for translation memory suggestions shown under the translation field.
- QA issues – if enabled, inline banners with warnings will appear each time you try to save a translation with some inaccuracy (punctuation/tags/spaces mismatch, missing variables, etc.)
- Auto-complete – if enabled, the pop-up with translation prediction and automatic translation completion will appear while you type the translation.
- Auto-approve – if enabled, the translations added by proofreaders or members with higher permissions are automatically approved.
- Automatically move to next string – if enabled, you’ll be automatically moved to the next string after saving a new translation or approving an existing one.
- Auto-save translations – if enabled, your translations are automatically saved when you navigate between strings.
- Default Editor View – set the default view mode that will be used each time you open the Editor.
- Compact strings view – if enabled, only the beginnings of the long strings will be shown in the string list.
- Translation Preview – if enabled, a translation preview will be displayed for translated strings in the string list.
- Horizontal Menu – If enabled, the main menu is displayed horizontally at the top of the Editor. This layout is enabled by default. If disabled, the main menu collapses under the icon in the upper-left corner.
- HTML Tags Displaying – you can choose Show or Hide option that applies to all HTML tags. If you choose Auto, tags will be hidden in HTML, Haml, XML, Web XML, Markdown, and DOCX files but shown in other file formats. When tags are hidden, you can expect the following:
will be replaced with<a href="https://sample.com">Sample</a><0>Sample</0>
- Non-printable characters displaying – if enabled, non-printable characters (e.g., space, tab character, line break, etc.) will be displayed in source texts and translations.
- Translation field highlighting – if enabled, words with potential QA issues will be underlined in the translation field.
- Real-Time Spellcheck – instantly view spelling issues as you type a translation. displayed next to the translation means that no spelling issues were found. Otherwise, you’ll see a red label with the number of spelling issues detected. Click it for more details. Please note, the built-in spellcheck takes priority over browser extensions (e.g., Grammarly, LanguageTool). If you prefer using a third-party tool, disable this option and reload the page.
- Customize Right Panel – allows you to revert the right panel layout to its default state. Customization options, such as pinning sections or reordering sections, are available directly in the right panel. Click Reset to default to undo these changes.
- UI Language – select your preferred language for the Crowdin Enterprise UI. The chosen language will be applied to the Editor and other parts of Crowdin Enterprise.
Set the Light or Dark theme, or select Auto to allow the Editor to set the theme based on your device system settings. In addition to the default themes, you can also install custom themes from the Crowdin Store or create your own custom theme.
This section covers additional tips and tools to help you work more efficiently in the Editor.
Use keyboard shortcuts to take actions in the editor quickly. Check the list of keyboard shortcuts by clicking the keyboard icon in the upper-right corner or selecting Help > Keyboard Shortcuts in the main menu. Alternatively, press Ctrl+Shift+K or Shift+⌘+K. Most of the hotkeys can be customized to your personal preferences. Click on the necessary key combination, and modify it with the help of your keyboard.
To browse and install apps that extend the Editor’s functionality, go to Help > Get Add-ons in the main menu. This opens the Crowdin Store page filtered to apps that integrate directly with the Editor, the same selection accessible via the Store button at the bottom of the right panel.
The navigation path in the upper-left corner of the Editor displays your current context within the workspace, offering quick access to file statistics, task information, and project navigation. Its behavior depends on whether the Horizontal Menu is enabled in your Editor Settings.
When the Horizontal Menu is enabled (default):
The path serves as a visual indicator of your location (project name, target language, file name, or workflow step (only in projects with a workflow)) and provides quick-reference information on hover:
- File Statistics – Hovering over the file name opens a popover displaying the translation and approval progress (word counts and percentages) for that specific file.
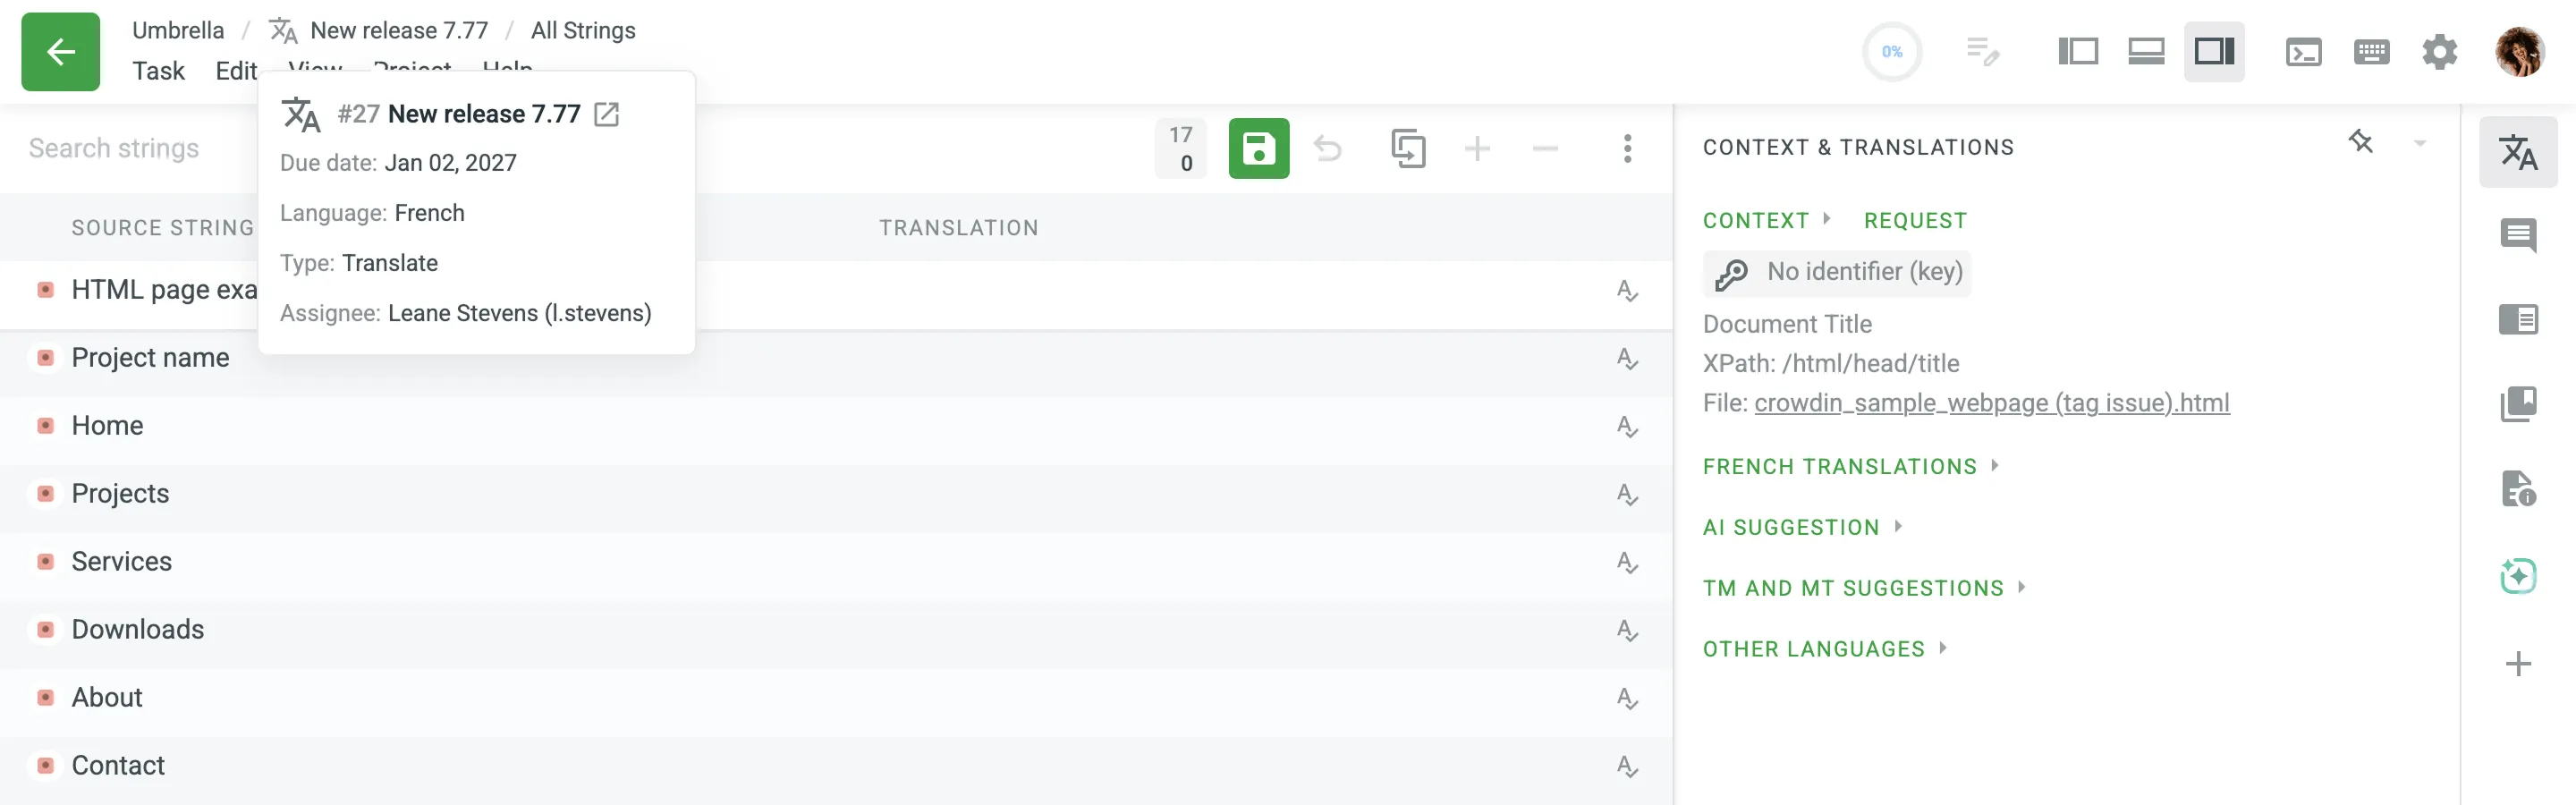
- Task Details – When you open a task in the Editor, the task title appears in the path alongside its corresponding task type icon. Hovering over the task title reveals a popover with additional details, including a direct clickable link to the task (opens in a new tab), the target language, and the task type.
When the Horizontal Menu is disabled:
You can click the individual items in the navigation path to open their respective dropdown menus:
- Project – Click the current project name to access project-level options.
- Language – Click the current language to switch to another target language.
- File – Click the current file name to open the File menu.
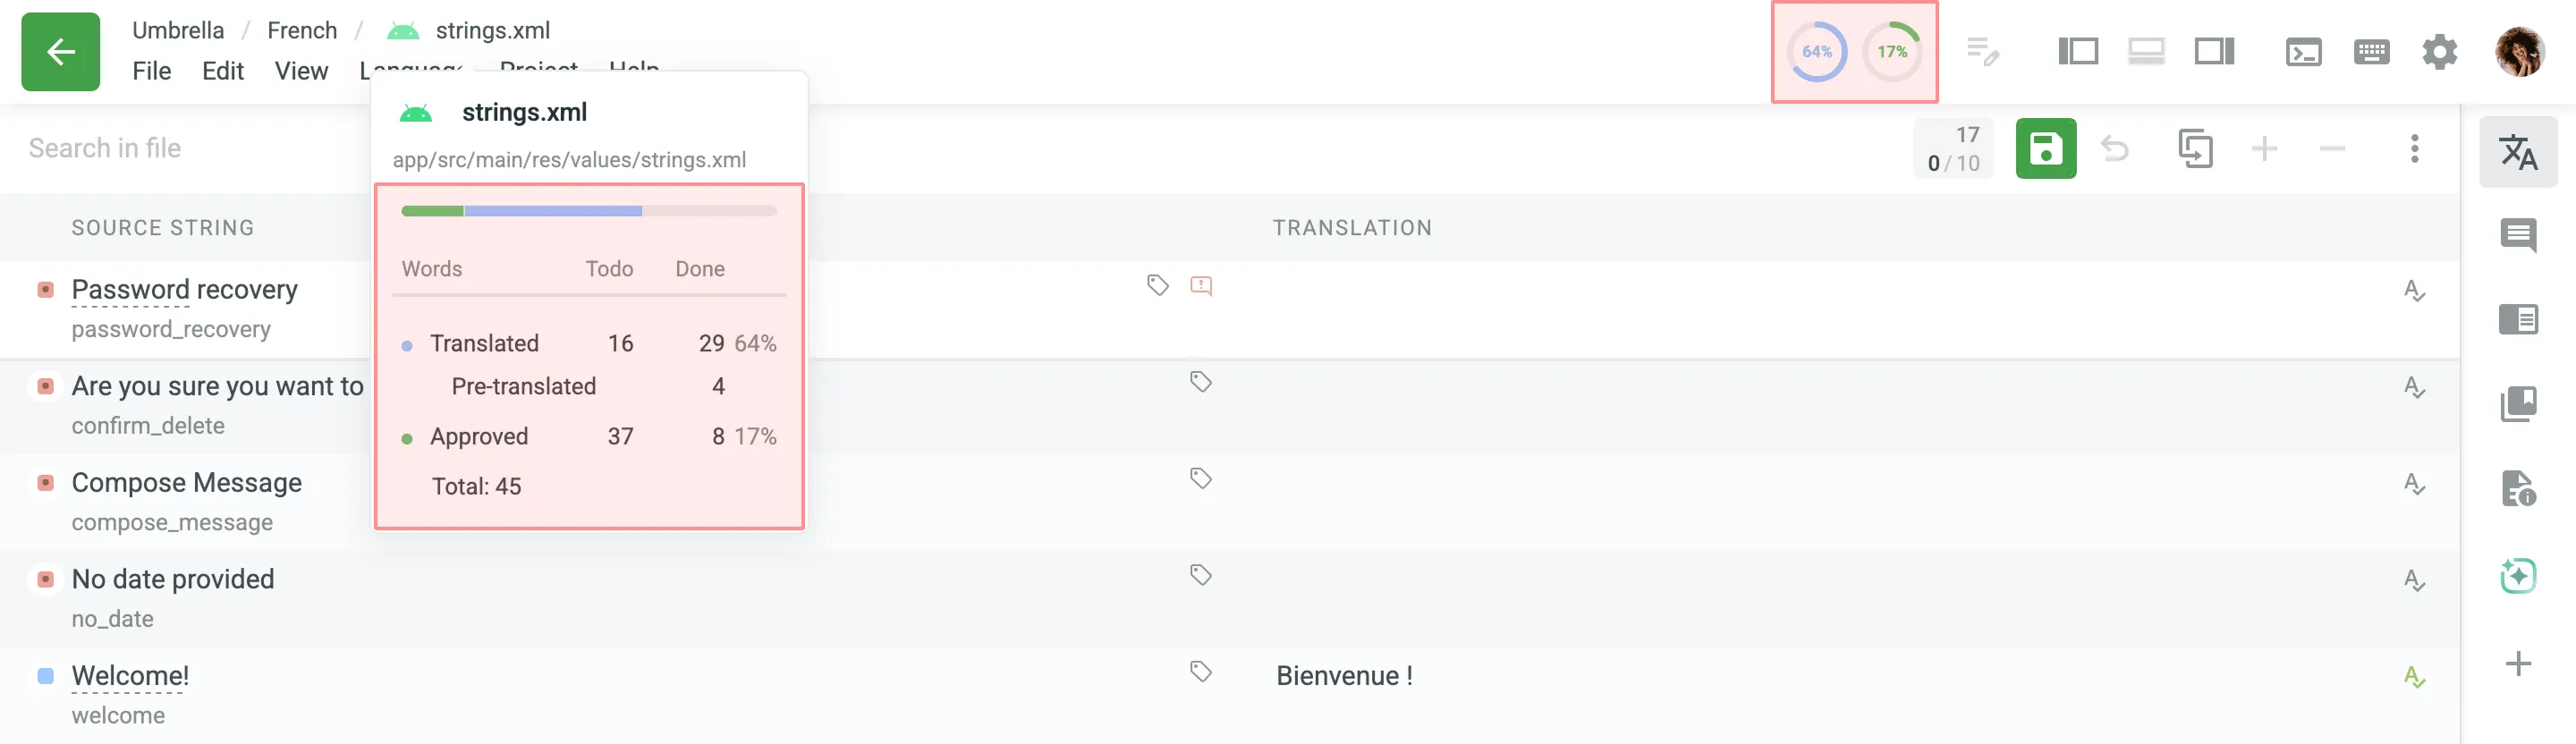
Use translation and approval indicators to monitor the progress of the currently opened file or folder. These indicators display the proportion of content that is translated and approved, allowing you to quickly assess the current status.
There are two types of indicators available in the Editor:
- Circular Progress Indicators – Located in the upper-right corner of the toolbar, these show the percentage of translated and approved content for the file or folder you’re working on.
- Detailed Progress Breakdown – Hover over the file name in the top navigation path to view a popover with information on the total word count, number of translated, auto-translated, and approved words, along with the percentage completion for each. (If the Horizontal Menu is disabled, this breakdown is located in the Main menu > File).
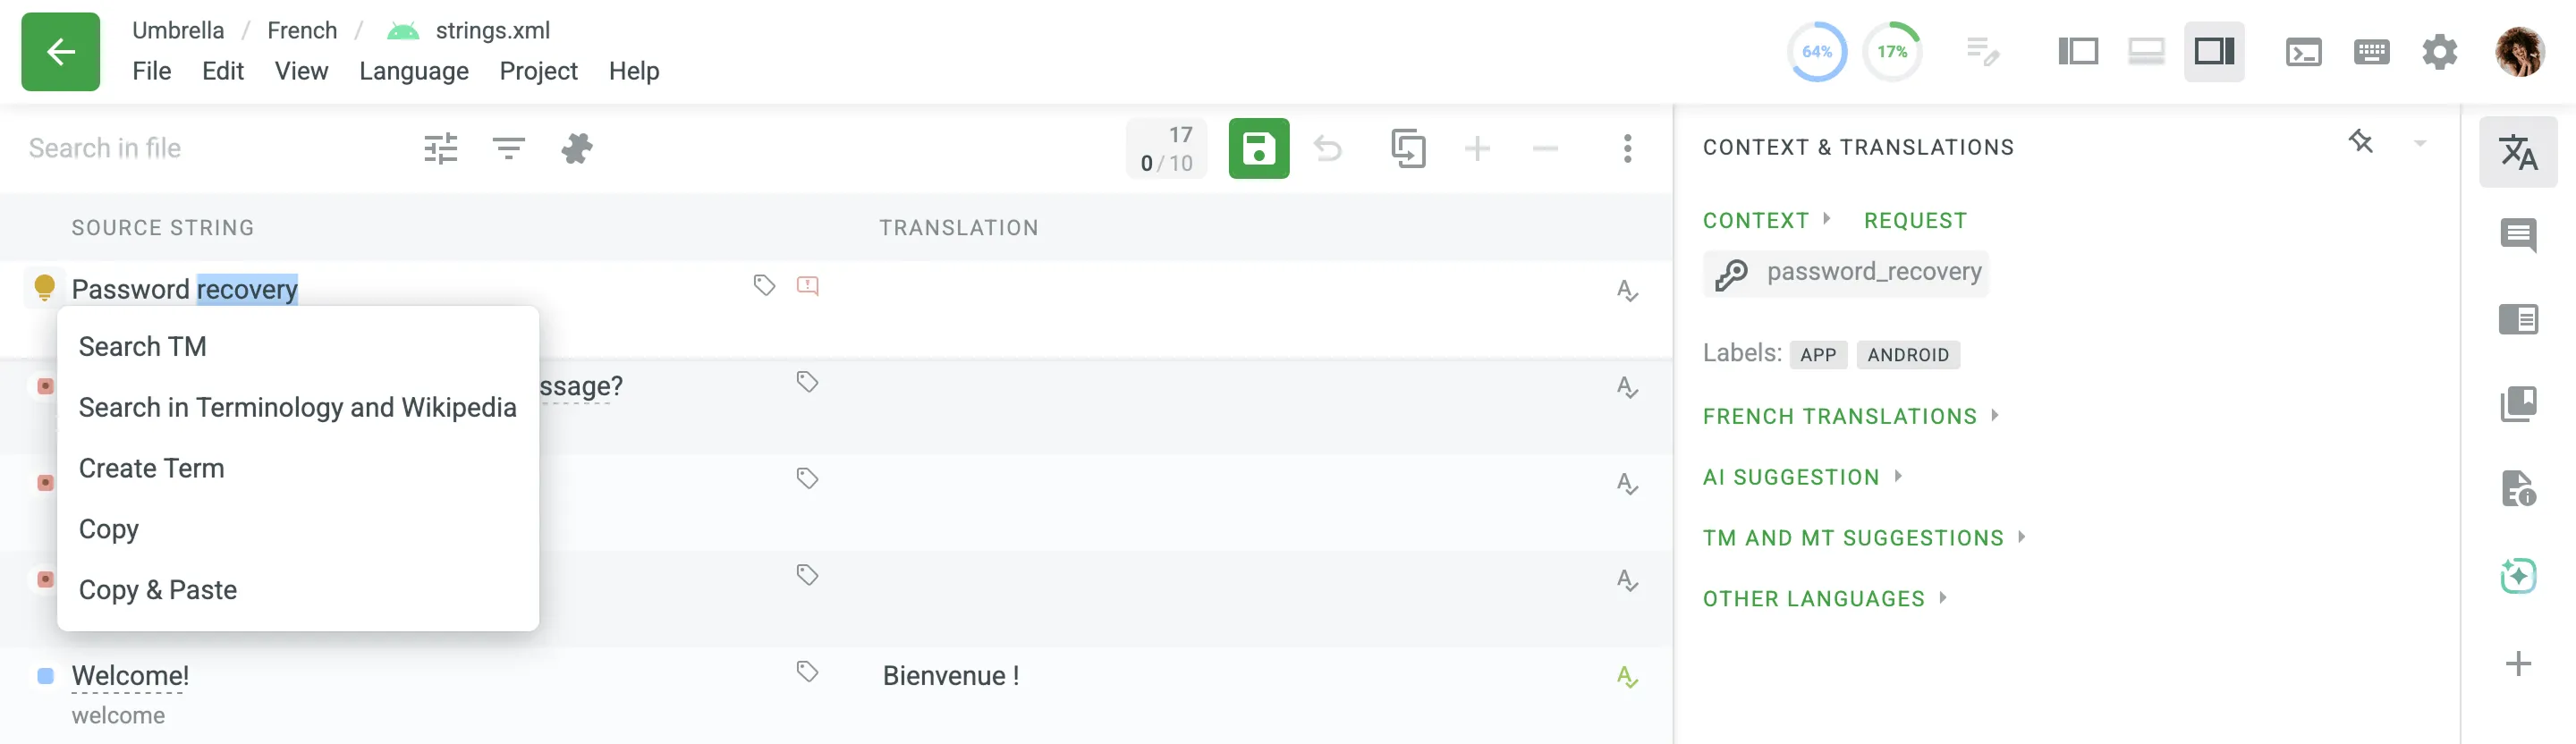
When you select a word or phrase in the source string or translation, the icon will appear. Clicking the icon opens a context menu with several useful options:
- Search TM – Look for Translation Memory (TM) suggestions for the selected word or phrase.
- Search in Terminology and Wikipedia – Find an explanation of the selected word or phrase in the project terminology or Wikipedia.
- Create Term – Add the selected word or phrase to the project glossary as a new term.
- Transform (only available for selected words in the translation) – Access a submenu with options to convert the selected text to lowercase or uppercase.
- Copy – Copy the selected word or phrase to clipboard.
- Copy & Paste – Copy the selected word or phrase and immediately paste it into the translation field.
The Editor features an integrated file browser in a collapsible left-side panel, allowing you to navigate and select files or folders without leaving your translation workspace. This provides a more fluid and efficient user experience.
How you interact with the file browser depends on your current Editor mode:
- In Side-by-Side, Multilingual, and Multilingual (Grid) Modes – You can show or hide the file browser panel by clicking the icon in the upper-right corner or by using the keyboard shortcut Ctrl+[. Alternatively, you can open the panel by selecting File > Open from the main menu or with the keyboard shortcut Ctrl+O or Cmd+O.
- In Comfortable Mode – The left panel can be switched between two views: Files and Strings. When you select an item in the Files view, the Strings view automatically updates to show the relevant content.
At the bottom of the file browser, you can see the path of the selected item (e.g., /app/src/main/res/values/strings.xml) and a summary of your selection (e.g., Currently selected: strings.xml or Currently selected: 3 files). Project members with manager permissions can also toggle the visibility of hidden files (if any) in the tree by clicking the Hidden Files icon in the file browser toolbar.
To see all strings in the project, open the file browser and select All Strings at the top of the file list.
To quickly find and reopen one of the files you recently worked on, go to File > Recent Files and select the needed file.
In addition to the WYSIWYG file preview, which shows files as they would appear when rendered, there are Source File Preview and Translated File Preview modes that allow users to view the raw content of both source and translated files directly within the Editor. These previews provide insight into the file’s structure, layout, and formatting, helping users ensure accurate translations within the correct context. This is particularly helpful for identifying discrepancies or formatting issues without leaving the Editor. While the Translated File Preview is available to all users, the Source File Preview is restricted to members with Developer / Translation Requestor permissions or higher.
To open a file in either of these previews, go to File in the main menu, and select the needed file preview mode.
You can easily find and replace suggested translations using the Replace in Translations feature.
To replace previously added translations with the new ones, follow these steps:
- On the project Dashboard page, select the necessary language.
- Click All Strings > Translate (or All Strings > Go to Editor for projects without a workflow) or choose a file for translation.
- Go to Edit > Replace in Translations.
- Enter the word, phrase, or sentence you want to substitute and the text to replace it with. Similarly to string search, you can use the Match case and Exact match options to refine the search results.
- From the drop-down menu, specify the scope of your search, selecting between File, All files, or Filtered strings options.
- Click Find to preview the strings that will be replaced.
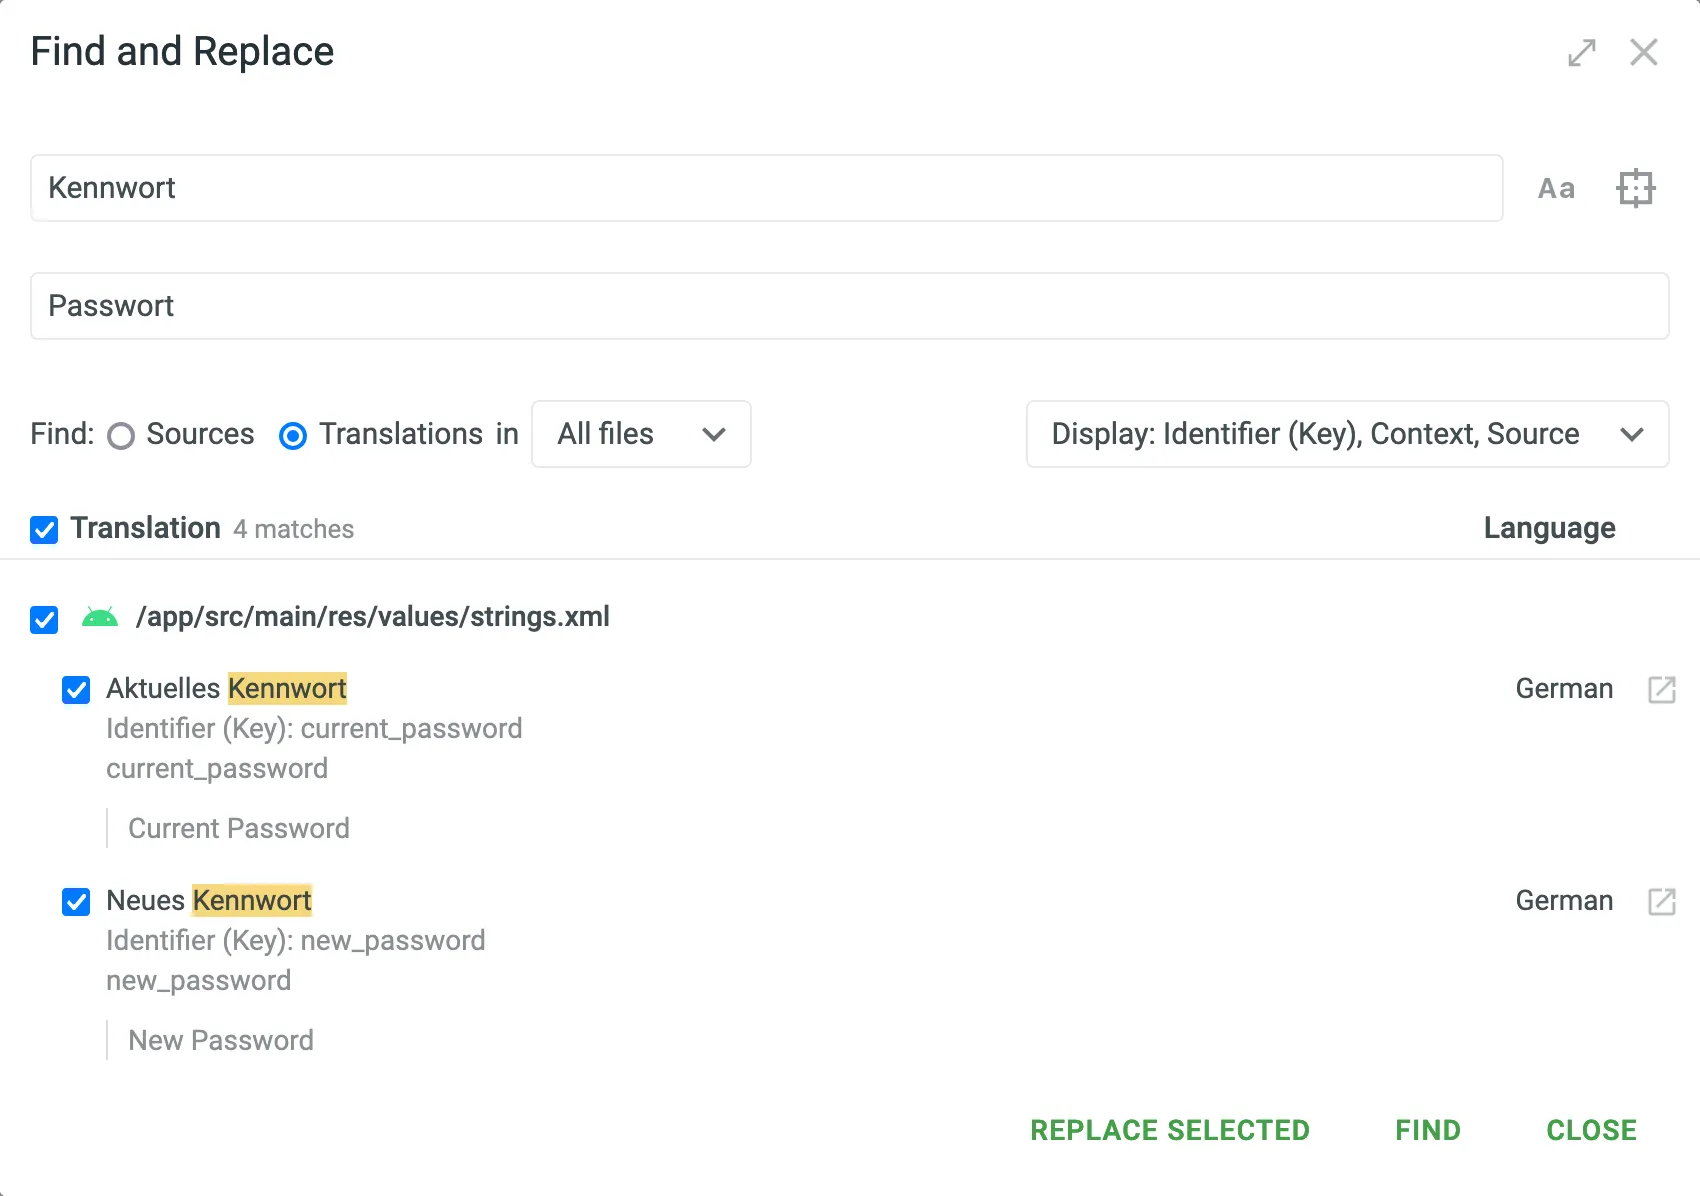
- (Optional) Click the Settings drop-down menu on the right and select what information to display in the search results other than translations. You can choose between Key, Context, and Source.
- Select the translations you want to replace and click Replace Selected to finish.
While translators can perform replacements only in their own translations, project members with proofreader permissions (or higher) can modify all suggested translations. Authorship of translations is preserved.
Project members with developer permissions (or higher) can find and replace source texts using the Replace in Sources feature.
To replace source texts, follow these steps:
- On the project Dashboard page, select the necessary language.
- Click Translate All or choose a file for translation.
- Go to Edit > Replace in Sources.
- Enter the word, phrase, or sentence you want to substitute and the text to replace it with. Similarly to string search, you can use the Match case and Exact match options to refine the search results.
- From the drop-down menu, specify the scope of your search, selecting between File, All files, or Filtered strings options.
- Click Find to preview the strings that will be replaced.
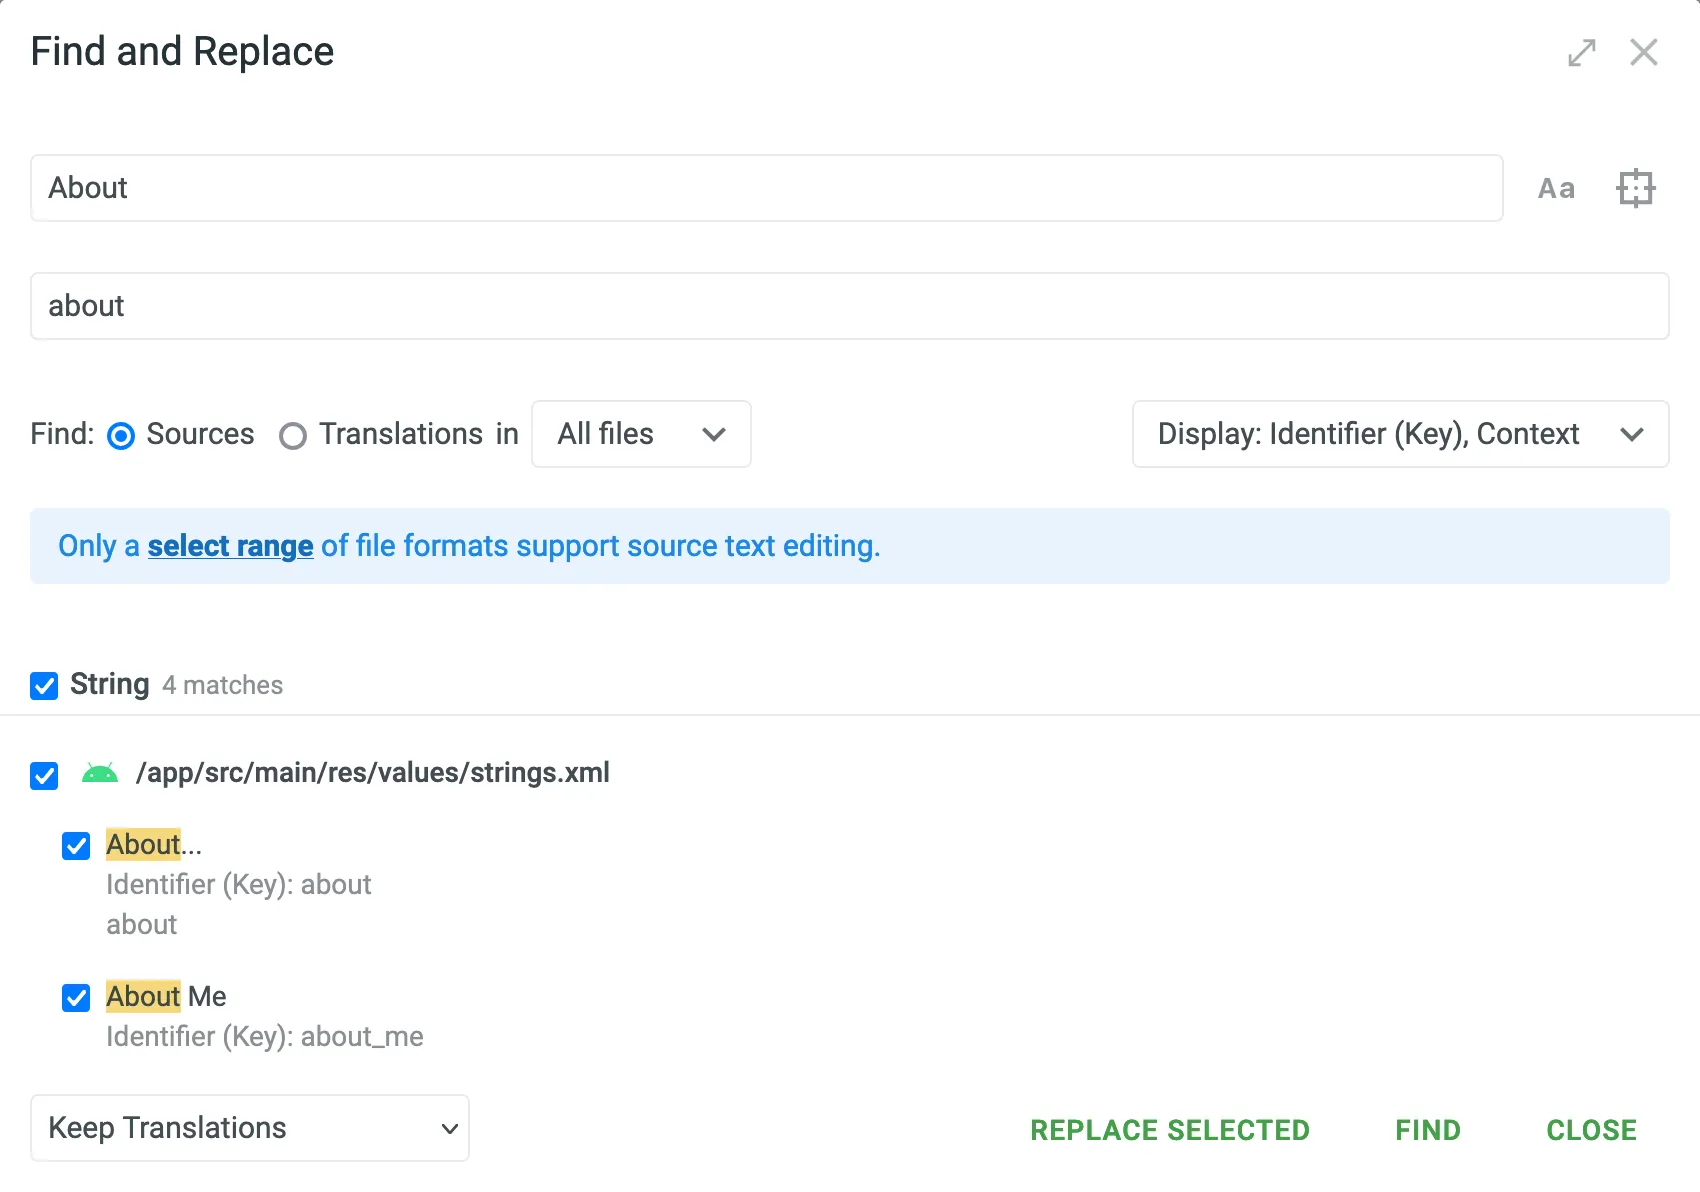
- (Optional) Click the Settings drop-down menu on the right and select what information to display in the search results other than strings. You can choose between Key and Context.
- In the lower-left corner, click the drop-down menu and select the preferred behavior for the translations of the source strings to be replaced. You can choose between Keep Translations, Remove Approvals, or Delete Translations.
- Select the source strings you want to replace and click Replace Selected to finish.
The Auto-Translation feature allows you to apply translations to multiple strings directly within the Editor using AI, Translation Memory (TM), or Machine Translation (MT). It gives you granular control over the process: you can use the Advanced Filter to isolate specific strings, visually review your selection, and run auto-translation specifically for that batch.
To apply auto-translation in the Editor, follow these steps:
- You can open the auto-translate dialog in the Editor in two ways:
- Main menu – go to Edit in the main menu and select Auto-Translate.
- String menu (available in Side-by-Side and Multilingual modes) – click in the upper-right and select Auto-Translate.
- In the Auto-Translate strings dialog, configure the following parameters:
- Auto-Translation via – select your preferred method (AI, Translation memory, or Machine translation).
- AI prompt (Specific to auto-translation via AI) – select the prompt that will guide the AI model’s behavior.
- Custom instruction (optional) (Specific to auto-translation via AI) – add any additional context or specific instructions to guide the AI. Your input will be included alongside the selected prompt.
- Translation Engine (Specific to auto-translation via Machine translation) – select the machine translation engine to use.
- Scope – select the range of strings to apply auto-translation to:
- Selected strings (Specific to Side-by-Side and Multilingual modes) – applies only to strings manually selected in the Editor.
- Filtered strings – applies to all strings matching the current filter.
- File – applies to the currently opened file.
- All files – applies to all strings across all files in the project, regardless of the file currently open in the Editor.
- Strings to process – select Untranslated strings, Translated strings (Re-translation), or both.
- When a translation already exists for this string – choose how to handle existing translations:
- Add translation alongside existing ones (default)
- Replace auto-generated translations (Keep human translations)
- Replace all existing translations
- Skip approved strings – prevents overwriting strings that already have approved translations.
- Allow duplicate translations – adds translations even if they duplicate existing ones. Useful when comparing AI prompts or MT engines in the Auto-Translation accuracy report.
- Reset approval status so proofreaders can re-review – removes the approval status from any replaced translations, ensuring they can be reviewed and validated again.
- Minimum match ratio (Specific to auto-translation via Translation memory) – select either 100% or Perfect as the minimum similarity required for TM matches.
Read more about TM Match Types.
- Expand the Advanced settings section to finetune the auto-translation process:
- Translate from – select the language to use as the source for auto-translation. By default, it’s preselected to the project’s source language, but you can choose any other project language. This provides greater flexibility and may improve translation quality by allowing you to use a more suitable existing translation (e.g., an adapted English version instead of the original Japanese) or translate directly between related languages (e.g., Spanish to Portuguese).
- Approve added translations (Specific to auto-translation via Translation memory) – allows you to auto-approve translations added through auto-translation. Options include:
- With perfect match – approve only those with a 101% match.
- With perfect match (approved previously) – approve perfect matches only if they were already approved before.
- All (skip auto-substituted translations) – approve everything except translations improved by auto-substitution.
- All – approve all added translations.
- Click Auto-Translate.
In Side-by-side and Comfortable modes, auto-translation is applied to the single language currently selected in the Editor. In Multilingual mode, translations are applied across all selected languages, as this mode allows working with multiple languages simultaneously.
Read more about Multilingual mode.
Use the Queue button in the bottom-left corner of the Auto-Translate strings dialog to track and manage all triggered auto-translation instances.
Read more about Auto-Translation Queue.
You can create a custom filter for strings by clicking the Filter strings icon and choosing Advanced Filter. This feature helps you locate specific strings faster by allowing you to combine multiple filter parameters and define a custom sort order.
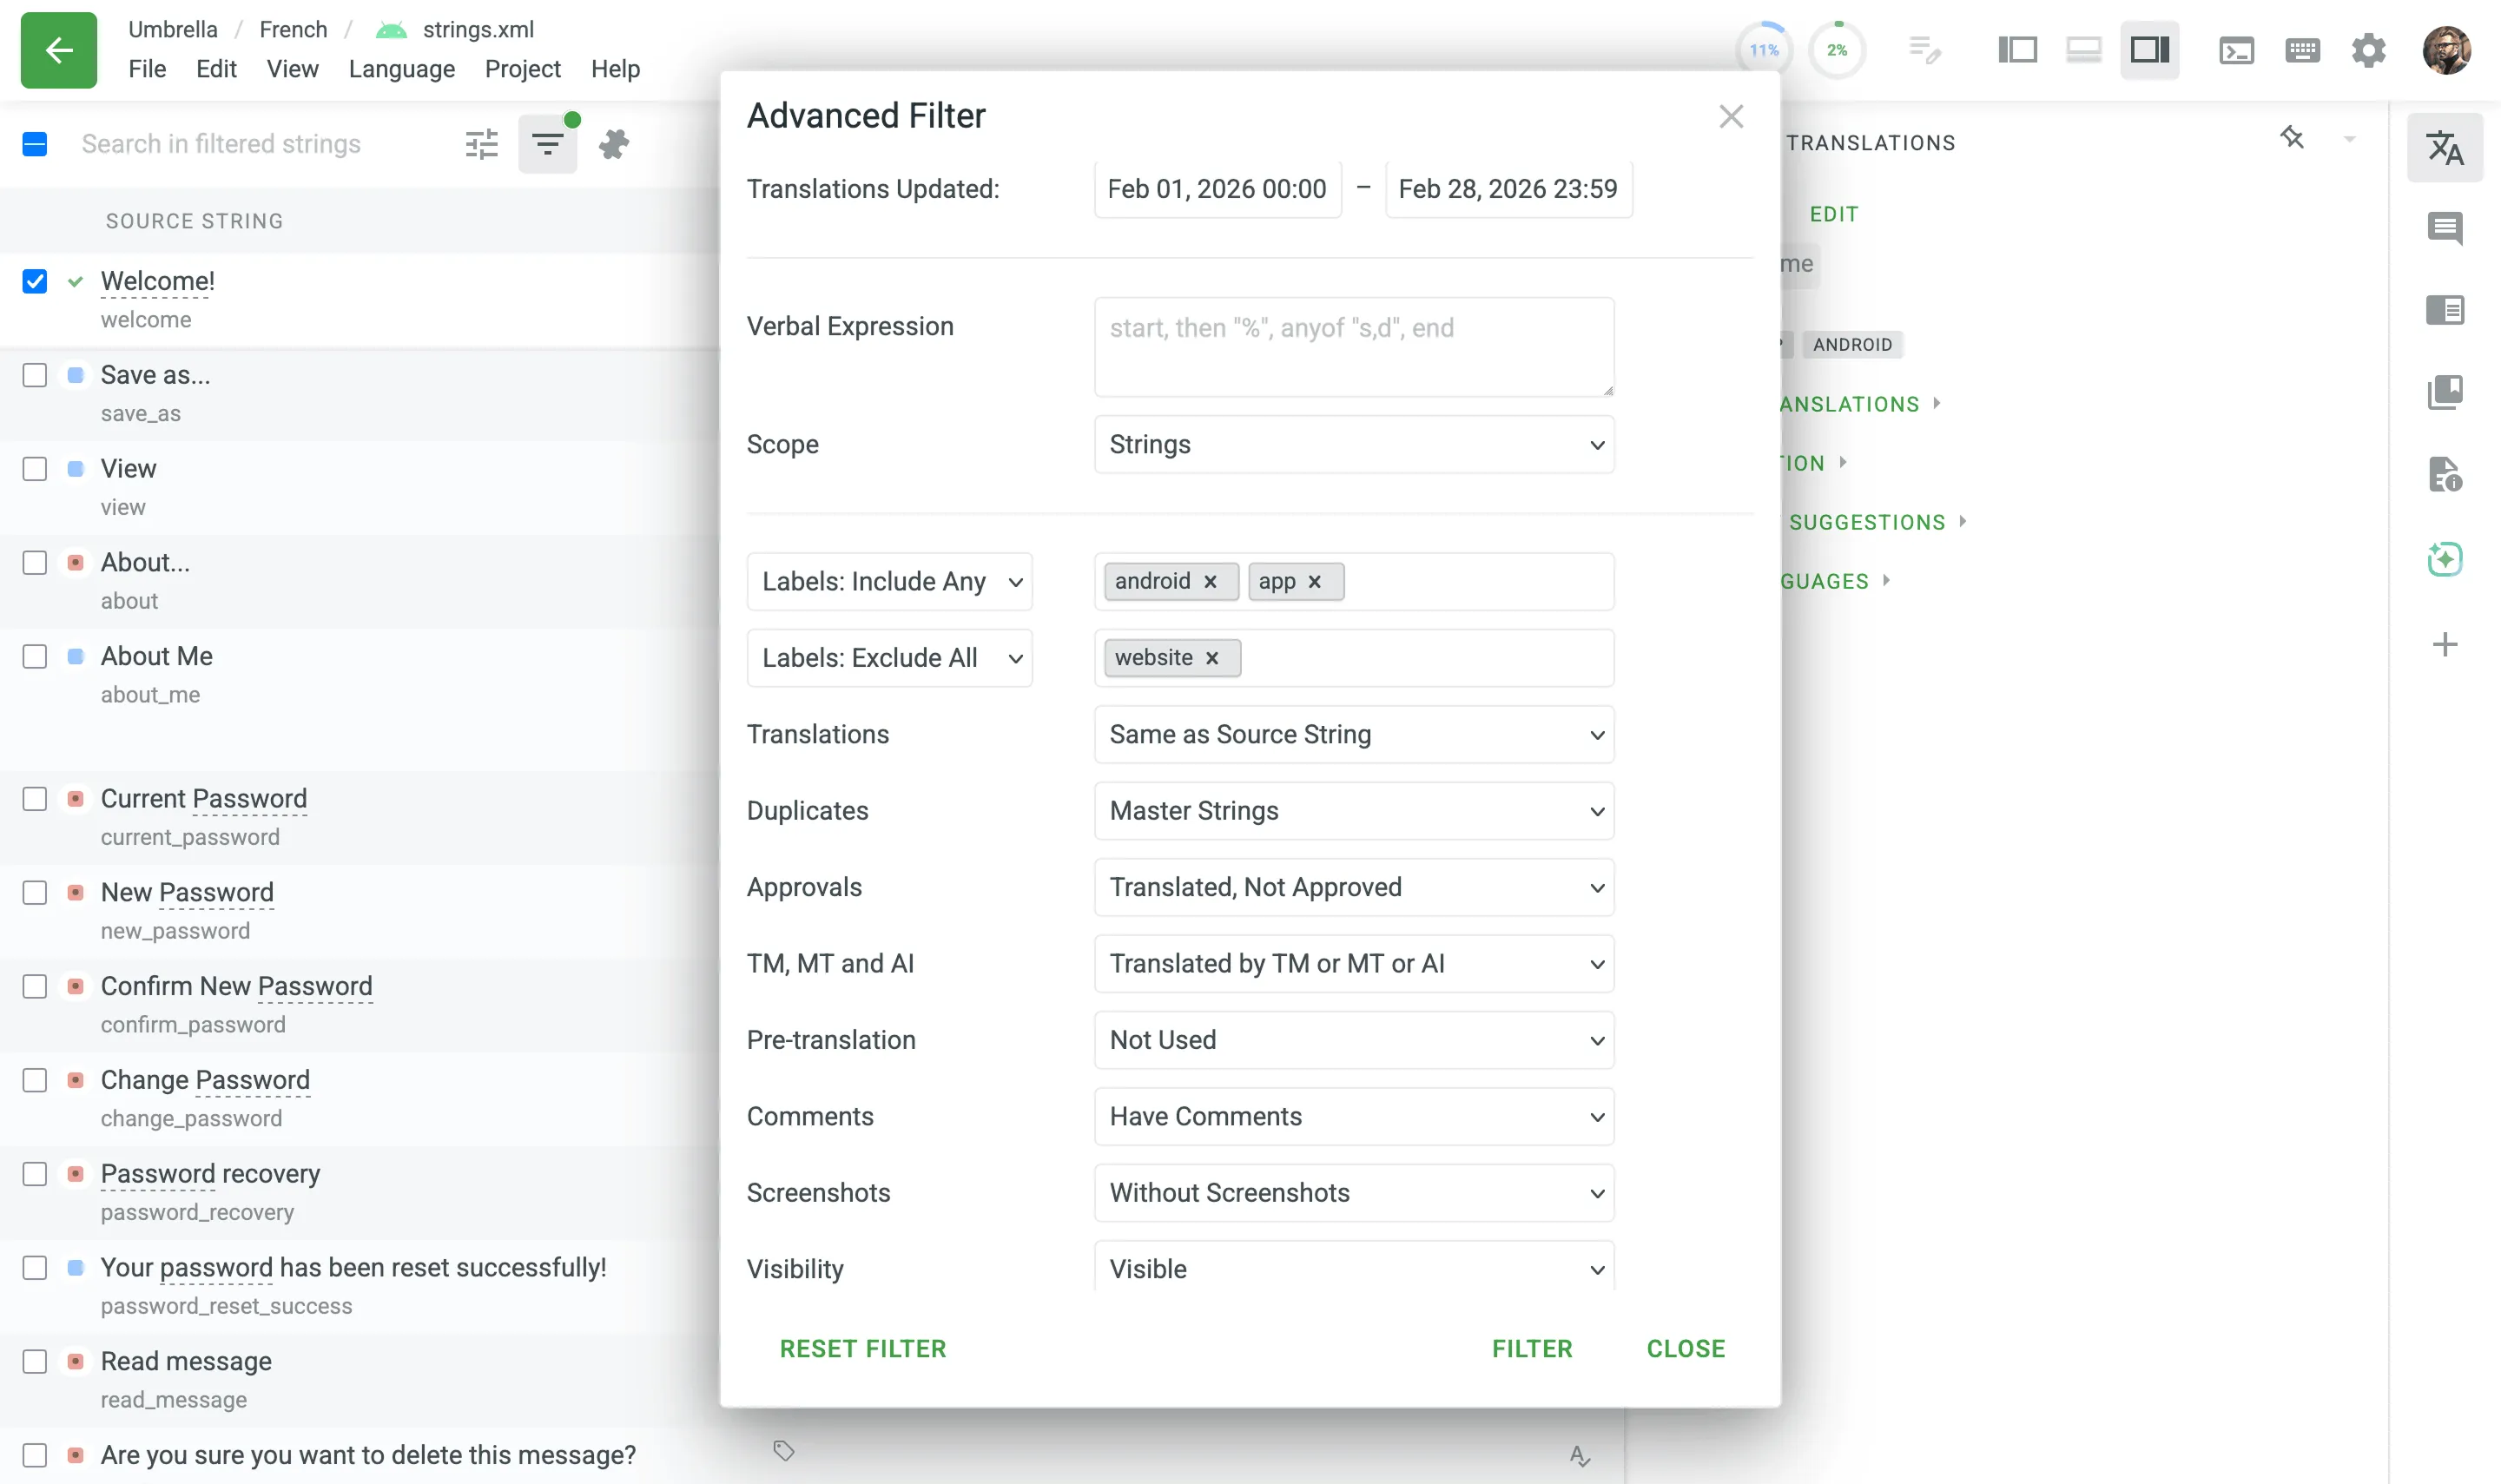
The filter dialog contains the following parameters, which you can combine to narrow down your search:
- Strings Added – Filter strings that were imported into the project within a specific date range.
- Strings Updated – Filter source strings that were updated within a specific date range.
- Translations Updated – Filter strings where translations were added or updated (including new suggestions, approvals, or votes) within a specific date range.
- Verbal Expression – Filter strings using complex structural patterns.
- Scope – Define where the Verbal Expression is applied. Options include Strings, Context, Translations, Identifier (Key), or Everything.
- Labels: Include – Include strings that have all or any of the selected labels.
- Labels: Exclude – Exclude strings that have all or any of the selected labels.
- Translations – Filter by translation status. Options include Untranslated, Partially Translated (Plurals), Translated, Same as Source String, and Modified Source Strings.
- Duplicates – Filter strings based on their duplicate status. Options include Master Strings, Duplicates Only, Duplicates with Shared Translations, and Duplicates with Own Translations.
- Approvals – Filter strings by their approval status. Options include Translated, Not Approved, Partially Approved (Plurals), Approved, and Have Translations After Approval.
- Approvals Count – Filter strings by the number of approvals they received. Options are Greater Than or Less Than a specified number.
- Engine – Filter strings based on their translation origin. Options include Machine Translation (MT), Translation Memory (TM), AI, or Any Engine.
- Translation Method – Filter strings based on whether auto-translation was applied. Options include Auto-Translation or Manual.
- Comments – Filter strings by comments or issues. Options include Do Not Have Comments, Have Comments, Unresolved Issues, General Question Issues, Current Translation Is Wrong Issues, Lack of Contextual Information Issues, or Mistake in Source String Issues.
- Screenshots – Filter strings that are With Screenshots or Without Screenshots.
- Visibility – Filter strings by their visibility to translators: Visible or Hidden.
- QA Issues – Filter strings based on quality assurance issues. Options include Without QA Checks, QA check in progress, All issues, or a specific check (e.g. Tags mismatch, Spelling mistakes, Punctuation mismatch).
- String Type – Filter by string format. Options include Simple String, Plurals, or ICU.
- Votes – Filter strings by the net number of votes. Options are Greater Than or Less Than a specified number.
- Translated By – Filter for strings Translated By or Not Translated By a specific project member.
- Approved By – Filter for strings Approved By or Not Approved By a specific project member.
The Advanced Filter also supports Verbal Expressions, which allow you to find strings that match specific structural patterns, such as the placement of variables, formatting, or punctuation, rather than matching exact text.
- Verbal Expression – Enter the pattern you want to search for.
- Scope – Define where to search for the pattern. Options include Strings, Context, Translations, Identifier (Key), or Everything.
For a quick way to filter by a single label, you can click on any label tag displayed in a string’s context area. Hovering over a label will display a tooltip that reads Filter by label: {label-name}. Clicking the label instantly applies the Advanced Filter with that specific label selected and the Labels: Include Any rule. All other filter parameters are cleared. If you then click a different label, it will replace the previous one in the filter.
For more complex queries involving multiple labels, you can set rules to include or exclude strings:
- Labels: Include All / Labels: Include Any – use this drop-down menu to choose the logic for including labels. Then, add the desired labels in the corresponding field.
- Include All: includes only strings that have all of the selected labels (AND logic).
- Include Any: includes strings that have at least one of the selected labels (OR logic).
- Labels: Exclude All / Labels: Exclude Any – use this drop-down menu to choose the logic for excluding labels. Then, add the desired labels in the corresponding field.
- Exclude All: excludes only strings that have all of the selected labels (AND logic).
- Exclude Any: excludes strings that have at least one of the selected labels (OR logic).
This allows you to narrow or expand the filtered results depending on your needs.
Here are a couple of examples of how this logic works in practice:
- Include example – to find strings tagged with both
uiandbutton, select Labels: Include All and add those two labels. - Exclude example – to exclude all strings tagged either
marketingordeprecated, select Labels: Exclude Any and add those two labels.
- Sort By – Organize the filtered strings based on a selected criterion. The available options are:
- Original Sort Order
- Strings Added
- Translations Updated
- Last Comment Added
- Alphabet (Source Text)
- Alphabet (Identifier)
- Length
- Votes
- You can also set the sort order to Ascending or Descending.
The AI/CroQL Filter allows you to filter strings similarly to the Advanced Filter but offers greater flexibility through the Crowdin Query Language (CroQL).
In the Generate CroQL with AI field, you can write queries in plain text, which will then be transformed into a CroQL expression using AI. To get the best results possible, make sure your queries are clearly structured. For example, you can enter: Return strings where there are translations by the user “username” into Ukrainian. Once you specify your query, press Enter, and the AI will generate and populate the CroQL expression field with the corresponding CroQL expression. Alternatively, you can directly input a pre-prepared CroQL expression in the CroQL expression field.
Click Filter to apply the specified filter to the strings in the Editor or click Reset Filter to clear the current filter settings.
Read more about Crowdin Query Language (CroQL).
In Side-by-Side or Multilingual modes, you can pin specific sections to keep them visible while navigating through other parts of the interface. This helps you access the pinned content quickly without losing sight of essential information.
To personalize your workspace in the Editor, you can reorder the sections in the right panel (e.g., Context & Translations, Comments, etc.) by dragging their icons.
Click and hold the icon of the section you’d like to move, then drag it to a new position. The updated order will remain applied as you continue working in the Editor.
Once a translator or proofreader has a task assigned, all the task details are accessible from the Editor.
The name of the task is displayed in the navigation path in the upper-left corner. Hovering over the task name reveals a popover with additional details, including the task ID, a direct link to the task, due date, the target language, the task type, and the assignee.
Filters and searches apply to a particular task only.
When working on a task, the standard File menu is replaced by the Task menu. You can access it by clicking Task in the main menu. It contains the following options:
- File and string navigation options (Open, All Strings, File Previews)
- Options to Export and Upload translations for the particular task
- Project Strings – select this option to quit the particular task editor and show all project strings.