SAML Single Sign-On
SAML single sign-on (SSO) gives users access to Crowdin Enterprise through an identity provider (IDP) of your choice. The benefits of SAML authentication include:
- Standardization: SAML is a standard format that allows seamless interoperability between systems, independent of implementation.
- Improved user experience: Users can access Crowdin Enterprise using your organization’s identity provider without additional authentication, allowing them to use only one set of login details.
- Increased security: SAML is a security standard for logging into applications, which provides a single point of authentication, keeping user credentials within the firewall boundary.
To get started, you’ll need to set up a connection (or connector) for Crowdin Enterprise with your IDP (for example, Auth0, Google Workspace (SAML), Okta, and others).
To configure the SAML SSO feature for your Crowdin Enterprise organization, follow these steps:
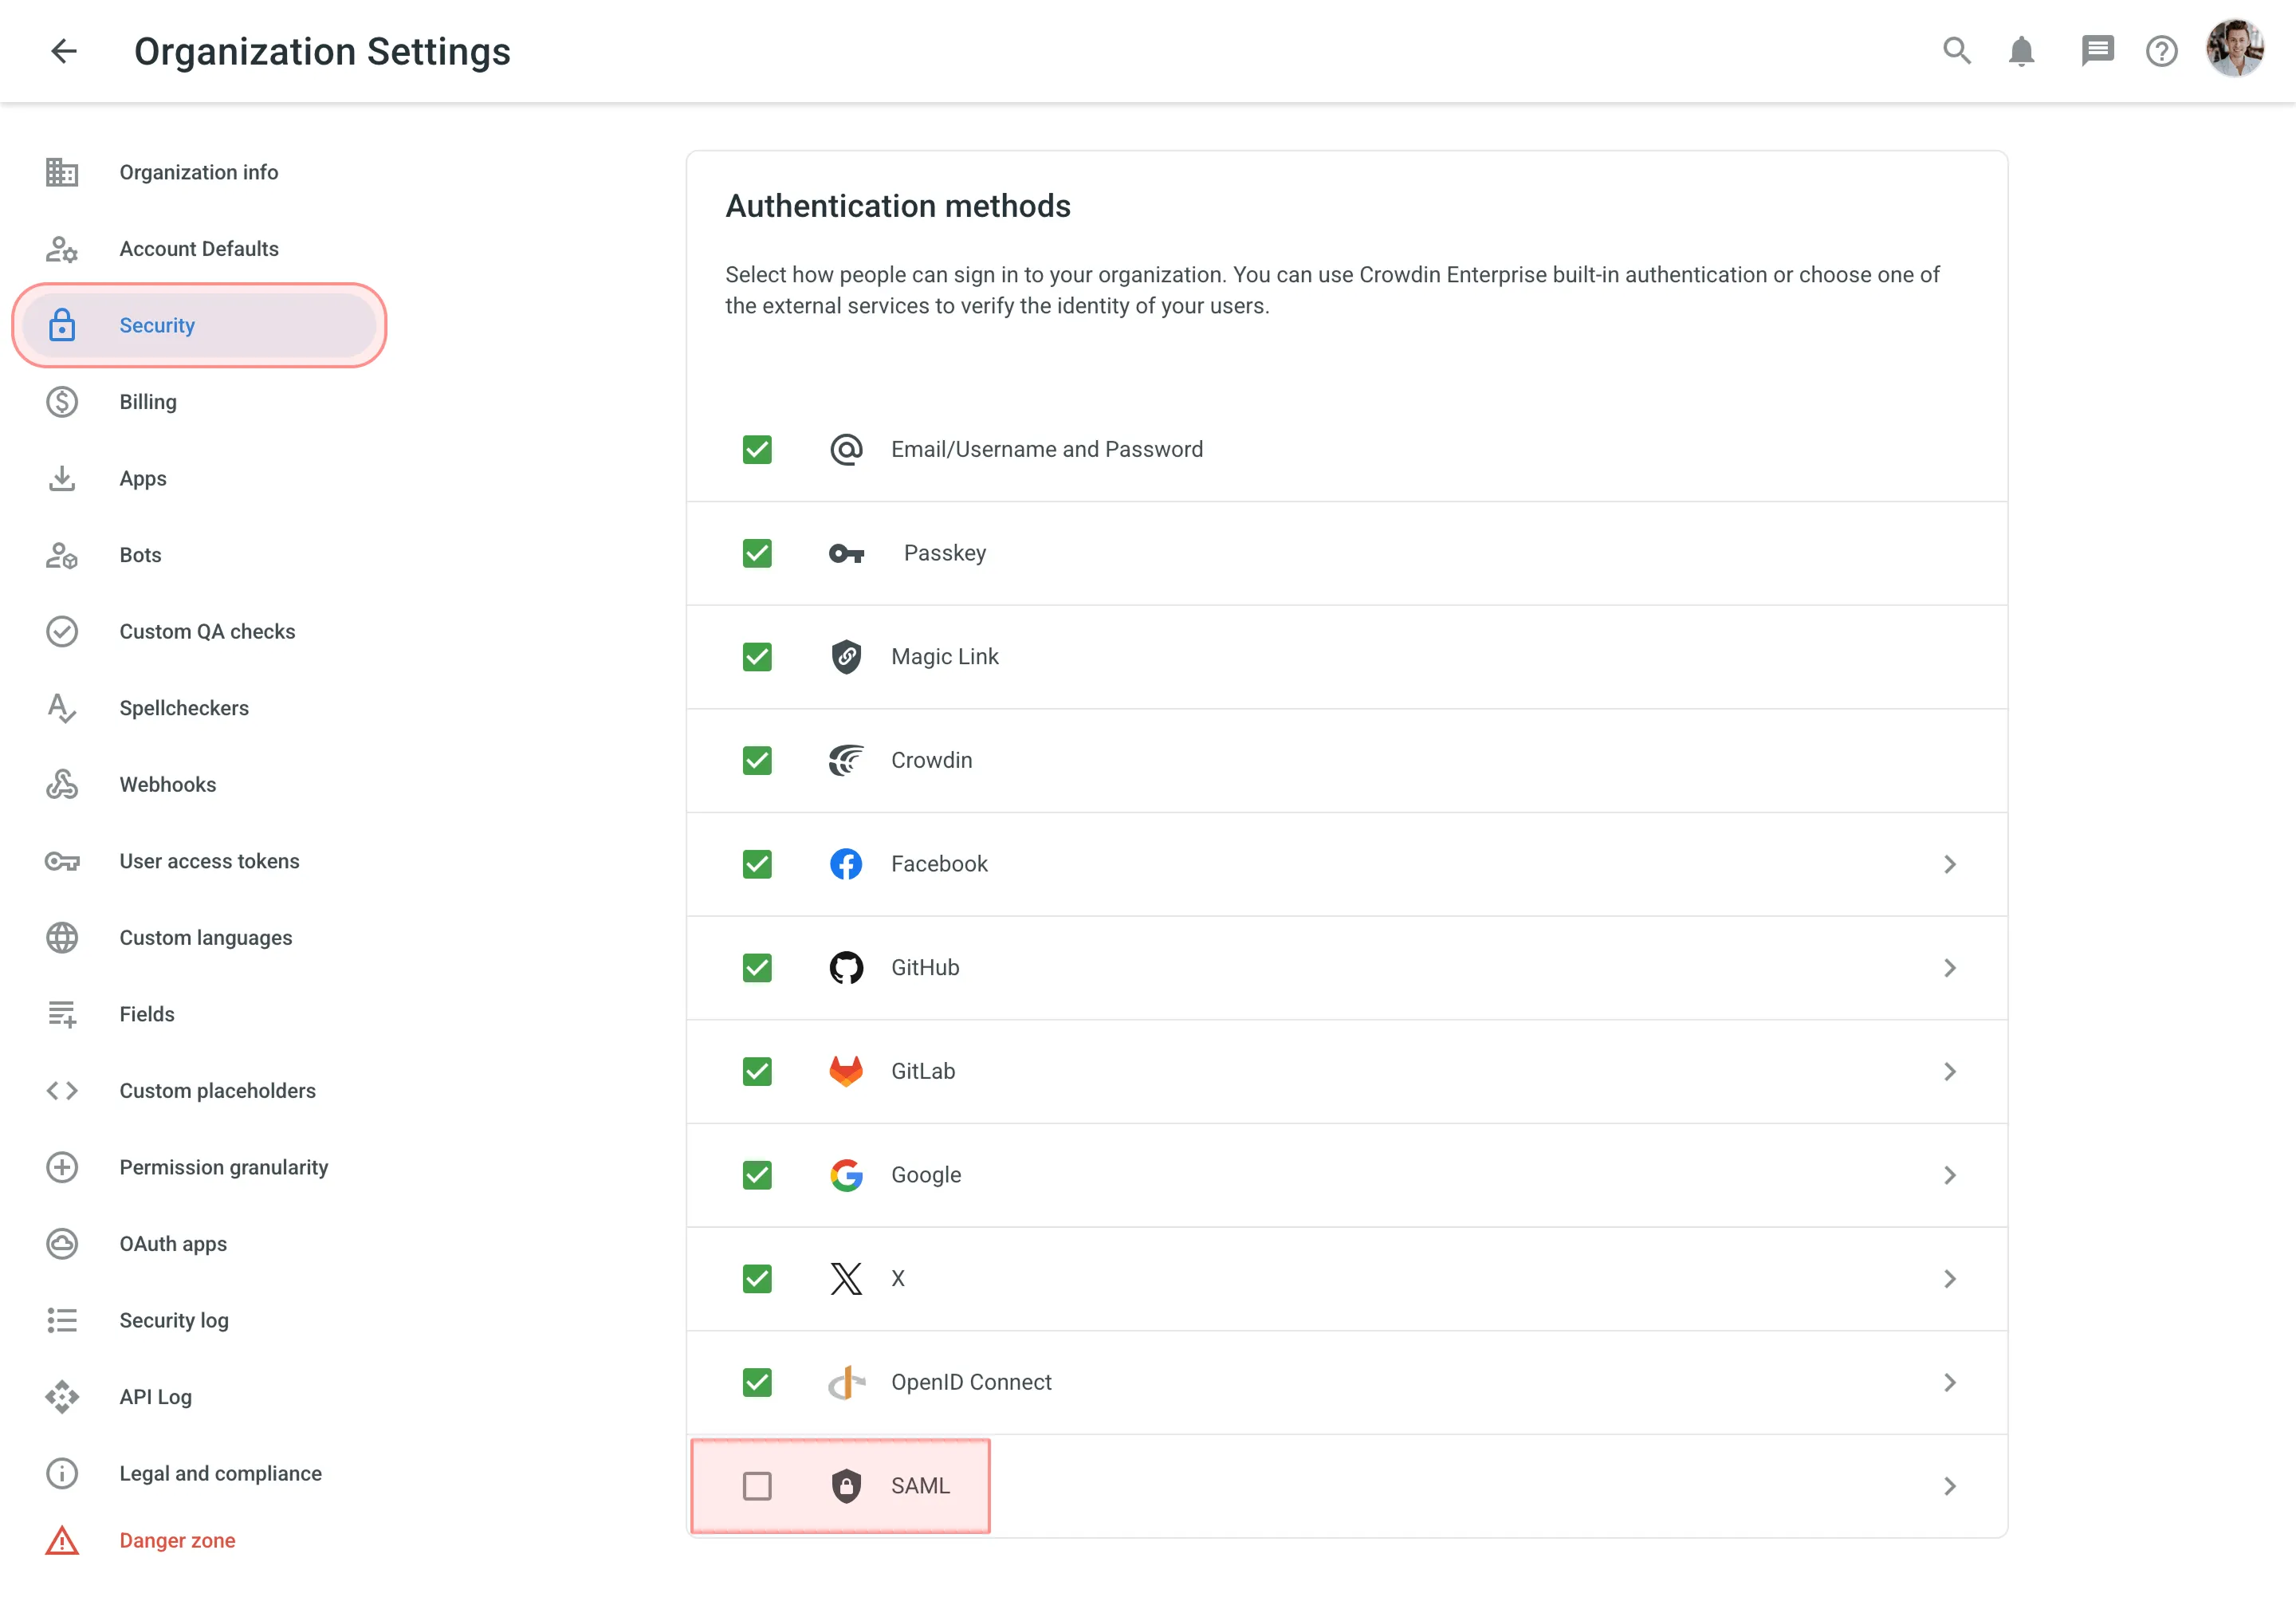
- Click on your profile picture in the upper-right corner and select Organization Settings.
- Switch to the Security section on the left sidebar and click on SAML.
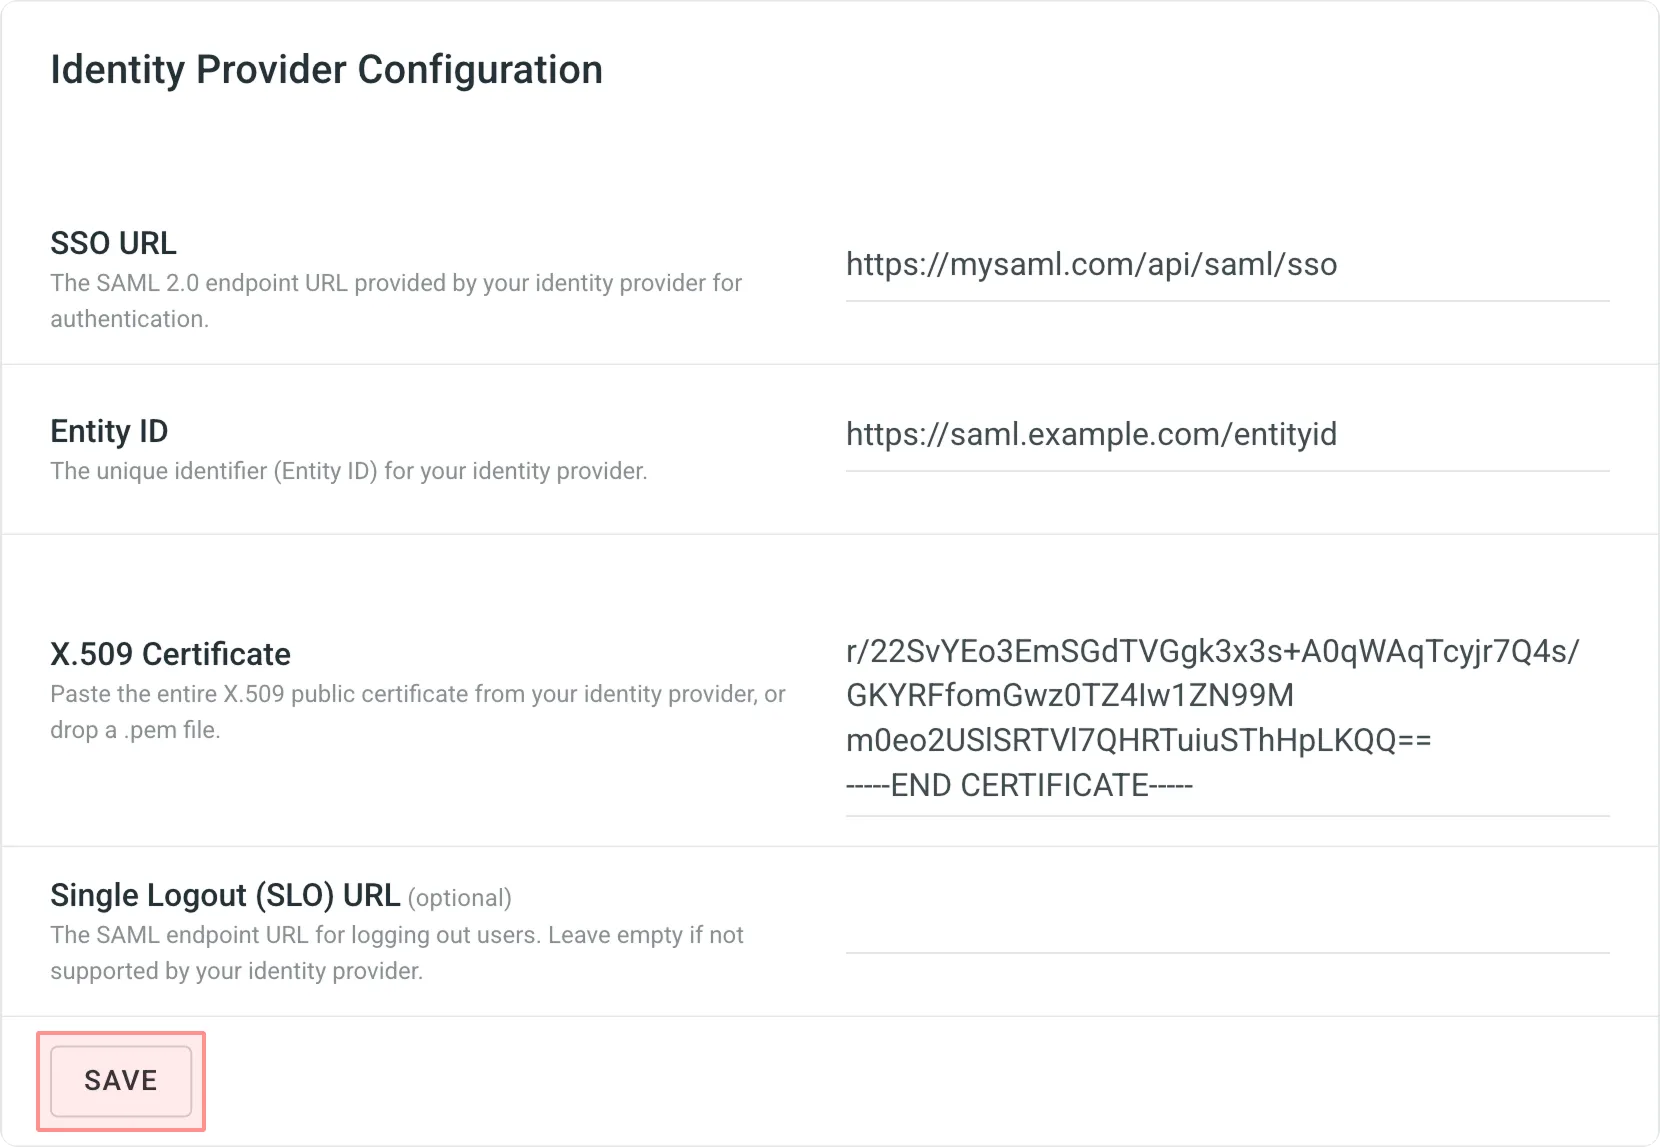
- In the Identity Provider Configuration section, enter your IDP credentials and click Save.
- If your IDP requires Crowdin Enterprise service provider details before providing its own credentials, scroll down to copy the required values from the Service Provider Details section. Note that the Settings options and the advanced options in Service Provider Details are disabled until you save your IDP credentials in Step 3.
- Configure the preferred options in the Settings and Service Provider Details sections and click Save.
Once configured, SAML becomes immediately available as an authentication option for your organization members.
The Identity Provider Configuration section is where you enter your IDP credentials to establish the SAML connection. Fill in the following fields and click Save:
- SSO URL – the SAML 2.0 endpoint URL provided by your identity provider for authentication.
- Entity ID – the unique identifier (Entity ID) for your identity provider.
- X.509 Certificate – paste your entire X.509 public certificate from your identity provider, or drop a .pem file.
- (Optional) Single Logout (SLO) URL – the SAML endpoint URL for logging out users. Leave empty if not supported by your identity provider. Required to enable the Enable Single Logout (SLO) option in the Settings section.
After saving, the section switches to a read-only view of your saved credentials. The following additional certificate details derived from your X.509 certificate are also displayed:
- Certificate expiry – the expiration date of the X.509 certificate provided by your IDP.
- Certificate issuer – the organization or entity that issued the X.509 certificate.
- Fingerprint – the unique hash fingerprint of the X.509 certificate, used to verify its authenticity.
To update your IDP credentials (for example, to replace an expiring certificate), click Edit in the Identity Provider Configuration section, make the necessary changes, and click Save.
X.509 certificates have a limited validity period — typically one to three years depending on your IDP configuration. Once a certificate expires, organization members will no longer be able to log in using SAML until the certificate is updated.
- Obtain the new X.509 certificate from your identity provider.
- In Crowdin Enterprise Organization Settings > Security > SAML, click Edit in the Identity Provider Configuration section.
- Replace the existing certificate with the new one in the X.509 Certificate field.
- Click Save.
To remove your IDP credentials (for example, when switching to a different identity provider), click Delete in the Identity Provider Configuration section, then confirm by clicking Delete in the confirmation dialog.
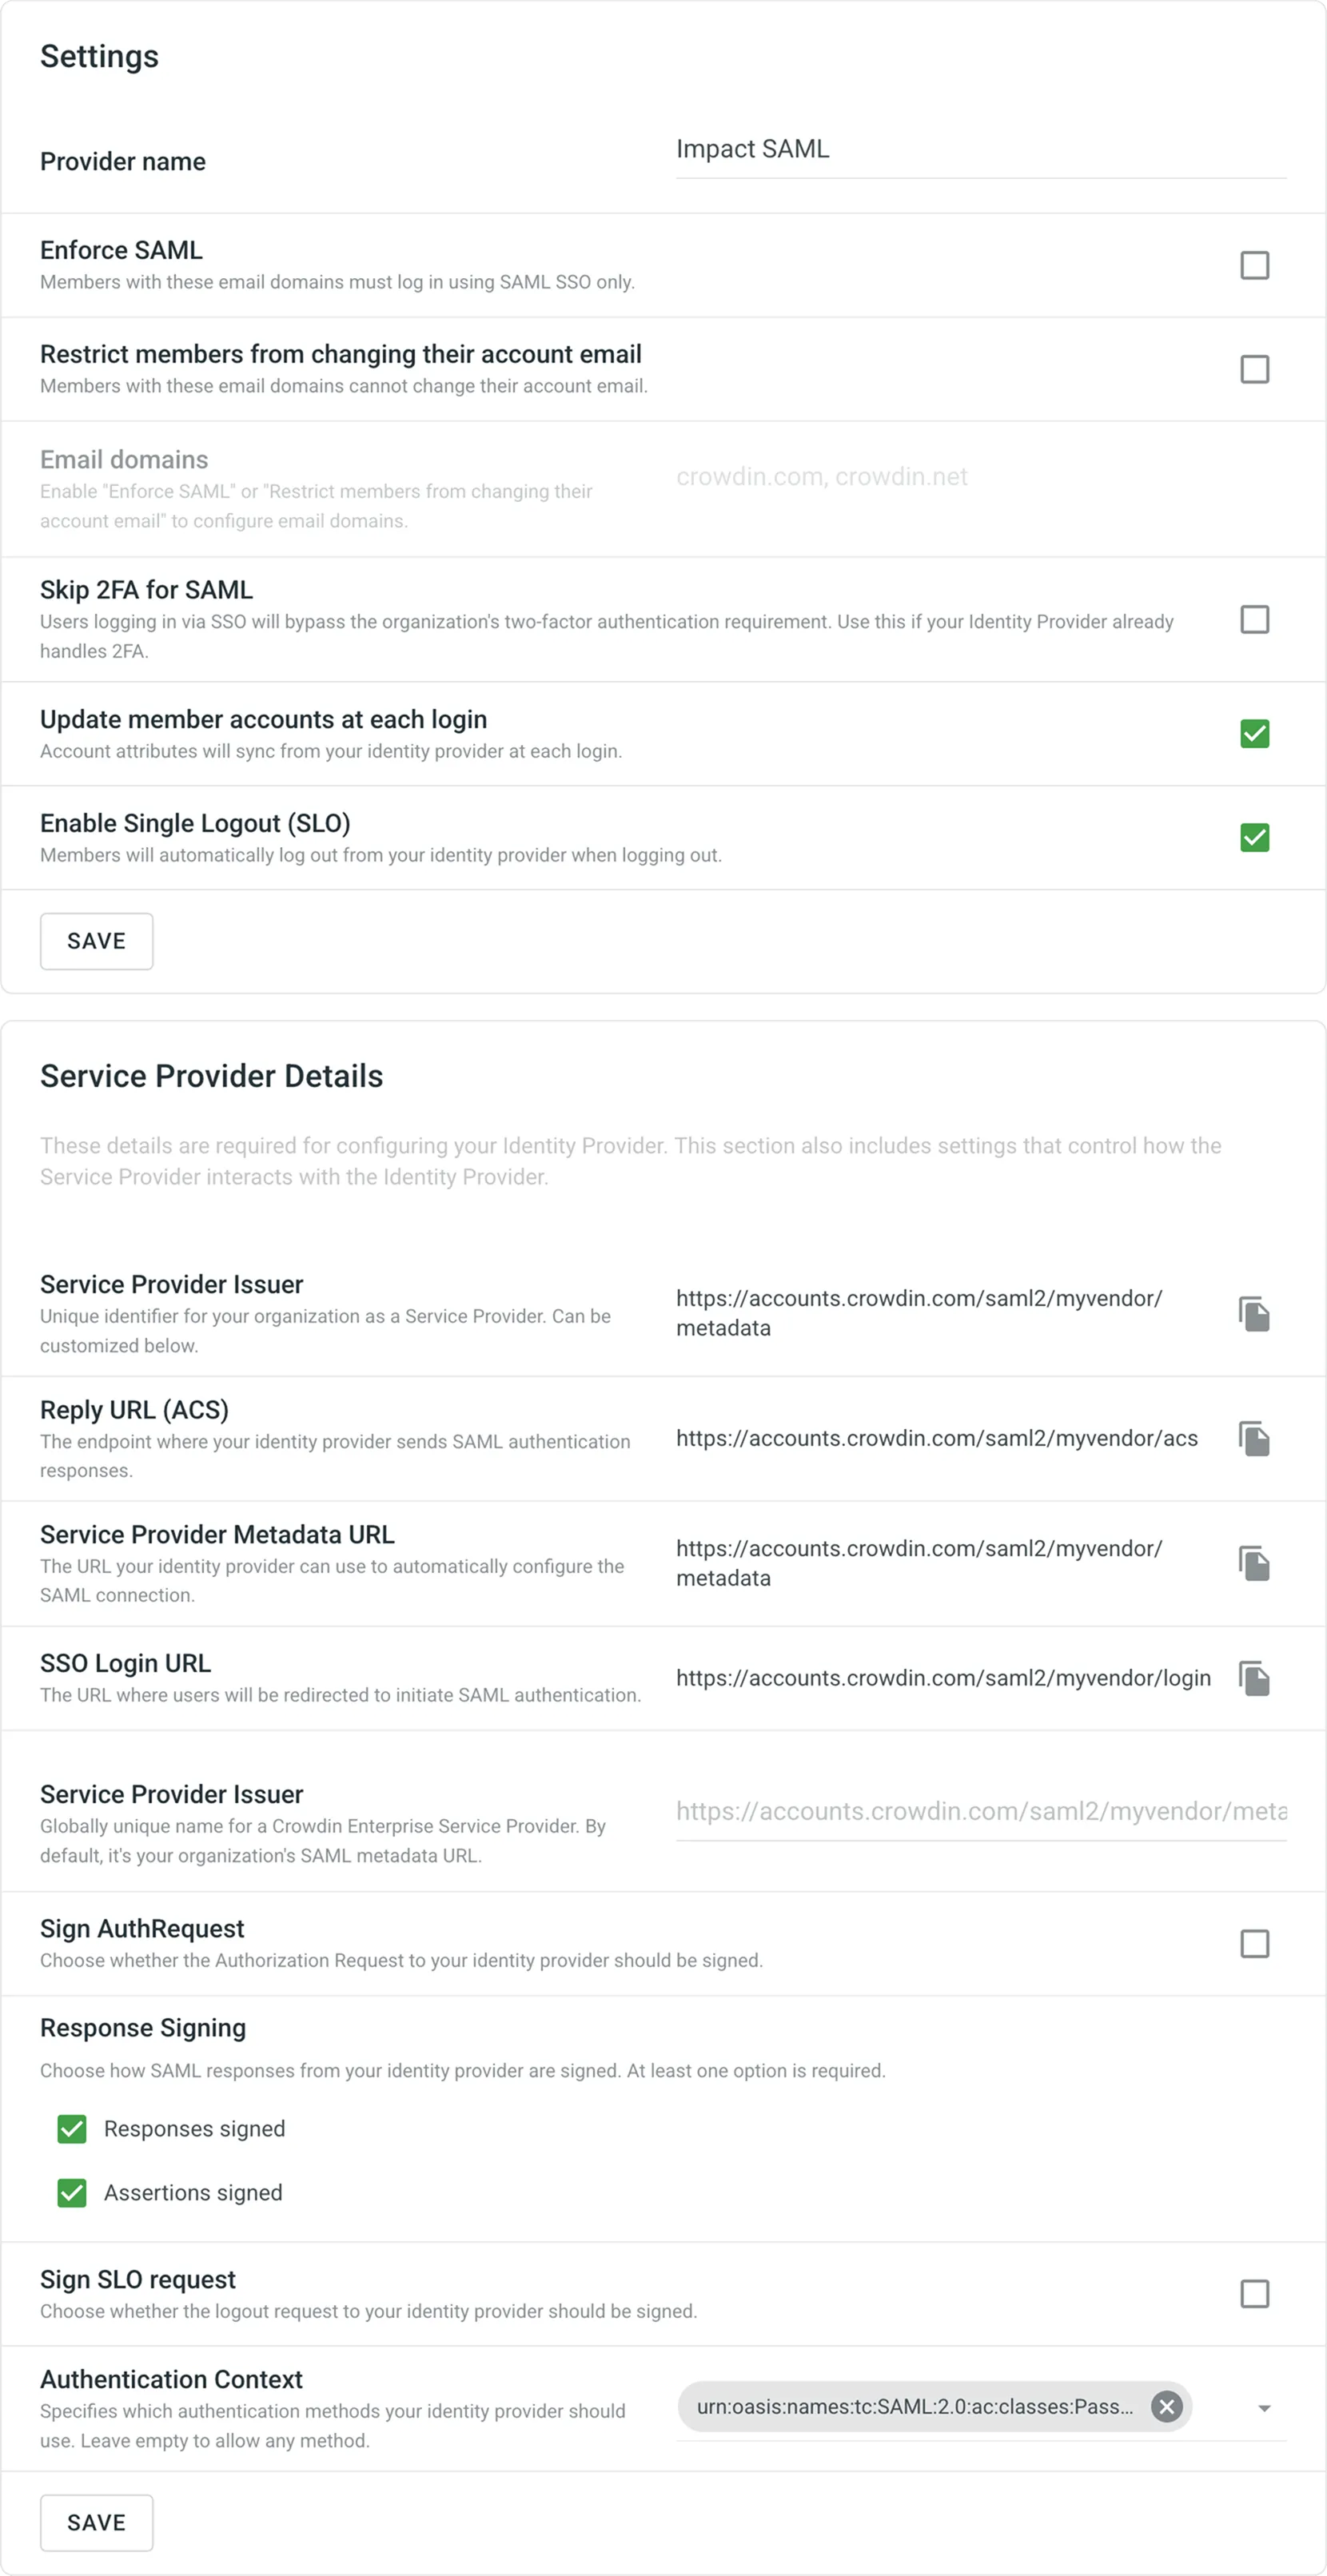
The Settings section provides options to fine-tune your SAML behavior. This section is available once your IDP credentials are saved in the Identity Provider Configuration section.
- Provider name – the name of the SAML authentication method that will be displayed on your Crowdin Enterprise login page.
- Enforce SAML – select whether organization members with emails on the domains configured in the Email domains field can use only SAML SSO to log in.
- Restrict members from changing their account email – select whether you’d like to restrict members from changing their Crowdin Enterprise emails.
- Email domains – email domains related to organization members that use SAML SSO to log in. Available only when Enforce SAML or Restrict members from changing their account email is enabled.
- Skip 2FA for SAML – select whether users logging in via SAML SSO will bypass the organization’s two-factor authentication requirement. Enable this option if your Identity Provider already handles 2FA.
- Update member accounts at each login – select whether you’d like the configured account attributes to be synced from IDP at each login of the organization member. These attributes are synced from IDP during the account creation.
- Enable Single Logout (SLO) – select whether organization members should be logged out of IDP when logging out of your Crowdin Enterprise organization. To enable this option, add an SLO URL in the Identity Provider Configuration section.
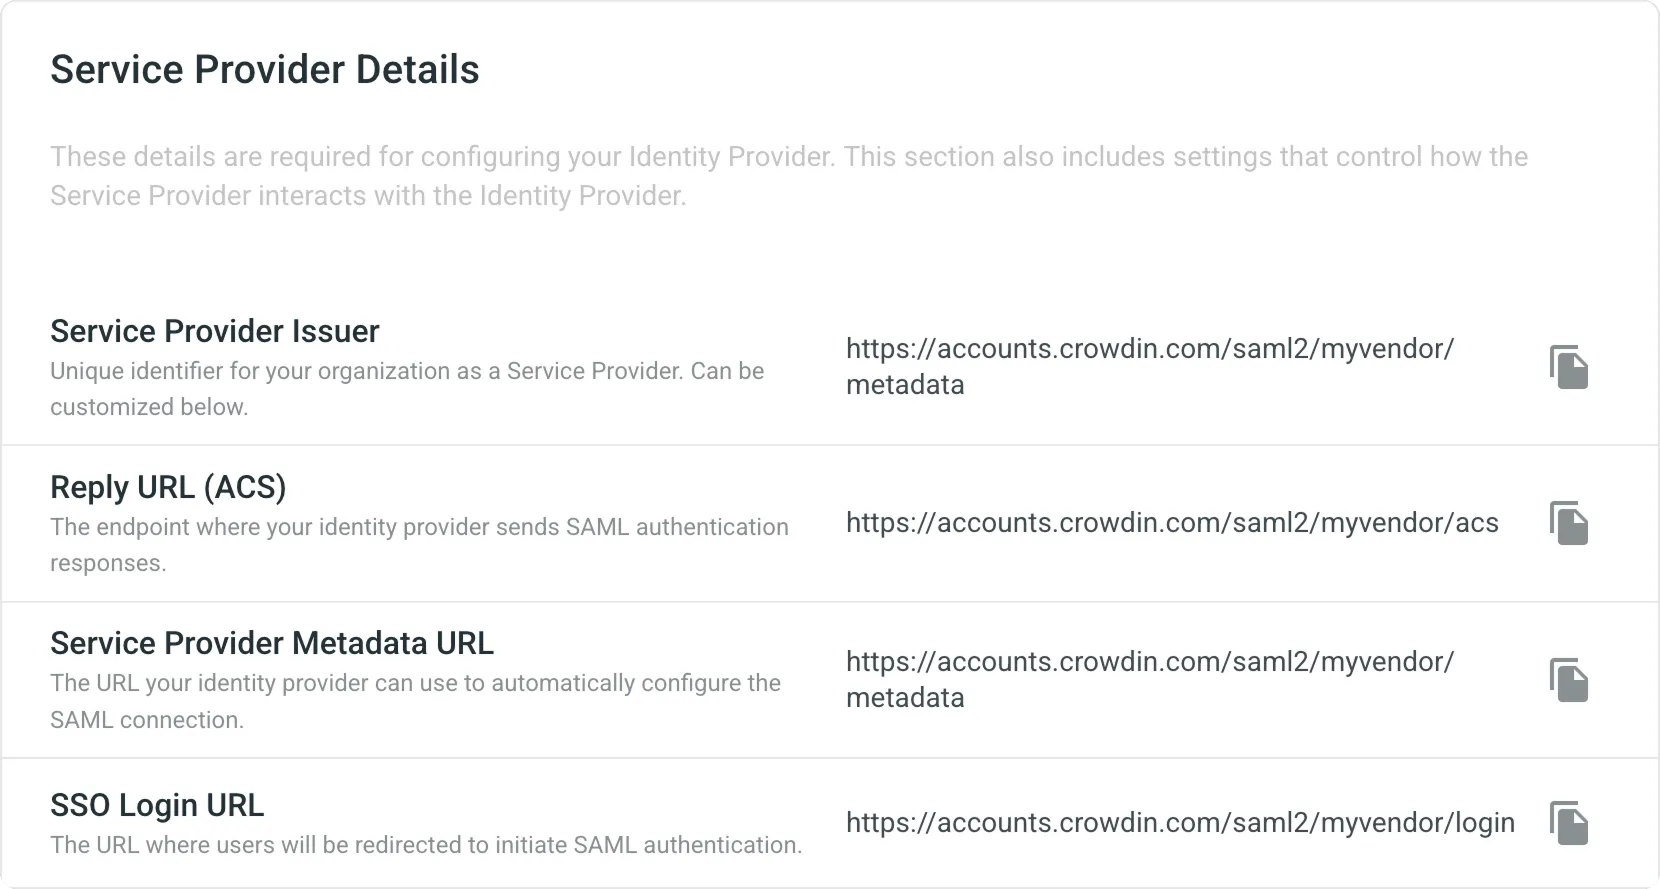
The Service Provider Details section provides Crowdin Enterprise credentials you need to enter in your IDP settings, as well as advanced configuration options. This section is visible at all times, but advanced options become available only after saving your IDP credentials in the Identity Provider Configuration section.
The following read-only values can be copied and used when configuring your IDP:
- Service Provider Issuer – unique identifier for your Crowdin Enterprise organization as a Service Provider.
- Reply URL (ACS) – the endpoint where your identity provider sends SAML authentication responses.
- Service Provider Metadata URL – the URL your identity provider can use to automatically configure the SAML connection.
- SSO Login URL – the URL where users will be redirected to initiate SAML authentication.
The following advanced options are available after your IDP credentials are saved:
- Service Provider Issuer – globally unique name for a Crowdin Enterprise Service Provider. By default, it’s your organization’s SAML metadata URL. Customize this only if required by your IDP.
- Sign AuthRequest – select whether to sign the authorization request sent to your IDP.
The following options allow you to configure response signing and authentication behavior. At least one signing option (Responses signed or Assertions signed) is required:
- Responses signed – indicates a requirement for the SAML responses received by Crowdin Enterprise to be signed.
- Assertions signed – indicates a requirement for the SAML assertions received by Crowdin Enterprise to be signed.
- Sign SLO request – indicates a requirement for the Single Logout (SLO) requests sent to your identity provider to be signed.
- Authentication Context – specifies which authentication methods your identity provider should use. Leave empty to allow any method.
You can map attributes in the IDP response to user attributes used in Crowdin Enterprise. See the available attributes in the following table.
| Parameter | Details |
|---|---|
firstName | Type: stringDescription: The first name of the user stored on the IDP. |
lastName | Type: stringDescription: The last name of the user stored on the IDP. |
timeZone | Type: stringDescription: The timezone of the user. |
avatar | Type: stringDescription: The absolute URL to user’s profile picture. |
Once SAML is configured, it becomes available as a login option on your Crowdin Enterprise login page. Users who log in via SAML will be authenticated through your IDP. If a user doesn’t yet have an account in your organization, one will be created automatically during their first SAML login.
Any users already logged in at the time of configuration will remain logged in.
To set up Crowdin Enterprise SAML SSO in your Google Workspace, follow the steps below.
- Open the Google Admin console using an administrator account.
- From the Admin console Home page, go to Apps > SAML apps.
- Click Add at the bottom right.
- Click Set up my own custom app. The Google IdP Information window opens and the SSO URL and Entity ID fields automatically populate.
- Copy the SSO URL, Entity ID, and download the certificate.
- In a separate browser tab or window, log in to your Crowdin Enterprise Organization, open Organization Settings > Security > SAML, and enter the information you copied in Step 5 in the Identity Provider Configuration section:
- Paste the SSO URL in the SSO URL field.
- Paste the Entity ID in the Entity ID field.
- Drag and drop your certificate file to the X.509 Certificate field.
- Click Save and return to the Google Admin console, then click Next.
- In the Basic information window, add an application name (for example Crowdin Enterprise) and optionally add a description.
- (Optional) Upload a PNG or GIF file to serve as an icon for your Crowdin Enterprise SSO app. The icon image should be 256 pixels square. You can find the Crowdin icon on the Using the Crowdin Logo page.
- Click Next.
- In the Service Provider Details window, you need to enter an ACS URL, Entity ID, leave the Start URL empty, leave the Signed Response box cleared, and set the Name ID Format to PERSISTENT.
- Switch to your Crowdin Enterprise Organization Settings > Security > SAML where all the values for Step 11 can be found in the Service Provider Details section.
- In the Service Provider Details window in your Google Admin console, paste the Reply URL (ACS) in the ACS URL field, Service Provider Issuer in the Entity ID field, clear the Responses signed option, and click Save.
- Click Next.
- Click Finish on the Attribute Mapping page.
- In the Setting up SSO for Crowdin Enterprise window, click OK.
- From the Admin console Home page, go to Apps > SAML apps.
- Select your new Crowdin Enterprise SAML app.
- At the top right of the gray box, click Edit Service .
- To turn service on or off for everyone in your organization, click On for everyone or Off for everyone, and then click Save.
- To turn service on or off only for users in an organizational unit:
- On the left, select the organizational unit.
- Select On or Off and then click Save. Read more about the organizational structure of Google Workspace.
- To turn service on for a set of users across or within organizational units, select an access group. For details, go to turn on a service for a group.
- Ensure that the email addresses your users use to log in to the SAML app match the email addresses they use to log in to your Google domain.
- Open the single sign-on URL for your new Crowdin Enterprise SAML app by clicking on the Crowdin Enterprise in the Google apps menu. Crowdin Enterprise could be found in the app list along with Google Drive, Gmail, and others. You should be automatically redirected to the Google login page.
- Enter your login credentials. After your login credentials are authenticated, you’re automatically redirected to Crowdin Enterprise.
To set up Crowdin Enterprise SAML SSO in your Microsoft Azure, follow the steps below.
Add Confluence SAML SSO by Microsoft from the Gallery
Section titled “Add Confluence SAML SSO by Microsoft from the Gallery”- Open the Azure portal using an administrator account.
- On the left navigation panel, select the Microsoft Entra ID service.
- Click on the Manage section and select Enterprise applications from the list. You’ll be redirected to Enterprise applications > All applications.
- To add a new application, click New application.
- In the Search application field, type Confluence SAML SSO by Microsoft.
- Select Confluence SAML SSO by Microsoft from the results panel and then click Create. Wait a few seconds while the app is being added.
Follow these steps to set up Microsoft Entra ID SSO in the Azure portal:
- As soon as the application is added, you’ll be redirected to its Overview page. On the Confluence SAML SSO by Microsoft application Overview page, find the Manage section and select Single sign-on.
- On the Select a single sign-on method page, select SAML.
- You are now on the Set up single sign-on with SAML page. The following configurations will be happening in the different sections of this page.
- Click on the Basic SAML Configuration section.
- Enter your Crowdin Enterprise service provider details here and click Save. You can find these values in the Service Provider Details section in your Crowdin Enterprise Organization Settings > Security > SAML.
- Identifier (Entity ID): copy from Service Provider Issuer
- Reply URL (Assertion Consumer Service URL): copy from Reply URL (ACS)
- Sign on URL: copy from SSO Login URL
- Click on the Attributes & Claims section.
- Click on the claim in the Required claim section.
- On the Manage claim page, select Persistent for the Name identifier format and select user.mail for the Source attribute, click Save.
- Click on the SAML Certificates section.
- Select Sign SAML response and assertion for the Signing Option and click Save.
- Click Download toward the Certificate (Base64) from the SAML Certificates section.
- Go to the Set up Confluence SAML SSO by Microsoft section.
- Copy the Login URL, Microsoft Entra Identifier, Logout URL.
- In a separate browser tab or window, log in to your Crowdin Enterprise Organization, open Organization Settings > Security > SAML, and enter the information you copied in the Azure portal in the Identity Provider Configuration section:
- Paste the Login URL in the SSO URL field.
- Paste the Microsoft Entra Identifier in the Entity ID field.
- Paste the Logout URL in the Single Logout (SLO) URL field.
- Drag and drop your certificate file to the X.509 Certificate field.
- Click Save.
Depending on the authentication method you use in the Azure portal, in some cases, it might be necessary to change the default value for the Authentication Context option in the Service Provider Details section in Crowdin Enterprise.
To allow all possible authentication methods, leave the Authentication Context field empty (the default).
In this section, you’ll enable users to use Azure single sign-on by granting access to your Crowdin Enterprise Organization.
- In the Azure portal, select Enterprise Applications, and then select All applications.
- In the applications list, select Confluence SAML SSO by Microsoft.
- In the app’s overview page, find the Manage section, and select Users and groups.
- Click Add user/group, then on the Add Assignment pane, click None Selected under Users and groups.
- In the Users and groups dialog, select your own account from the Users list to be able to test the SAML SSO, then click the Select button at the bottom of the screen, then click Assign. In the same way, you’ll be able to assign more users anytime.
- On the Confluence SAML SSO by Microsoft application Overview page, find the Manage section and select Single sign-on.
- Scroll down to the Test single sign-on with Confluence SAML SSO by Microsoft section and click Test.
- On the right-side pane, click Sign in as current user. After your login credentials are authenticated, you’re automatically redirected to Crowdin Enterprise.
To set up Crowdin Enterprise SAML SSO in your Okta, follow the steps below.
- Open the Okta Dashboard using an administrator account.
- From the Dashboard page, go to Applications.
- Click Add Application.
- Click Create New App.
- In the Create a New Application Integration dialog, set Platform to Web and Sign on method to SAML 2.0, click Create.
- On the Create SAML Integration page, add an application name (for example Crowdin Enterprise) on the General Settings step.
- (Optional) Upload a PNG, JPG, or GIF file to serve as a logo for your Crowdin Enterprise SSO app. The image should have dimensions less than 1400x400px and be less than 100k in size. You can find the Crowdin icon on the Using the Crowdin Logo page.
- Keep the App visibility options cleared, click Next.
- On the Configure SAML step > SAML Settings section, you need to enter Single sign on URL, Audience URI (SP Entity ID), leave the Default RelayState empty, set the Name ID Format to Persistent, Application username to Email, click Next. You can find the required values in the Service Provider Details section in your Crowdin Enterprise Organization Settings > Security > SAML.
- Single sign on URL: copy from Reply URL (ACS)
- Audience URI (SP Entity ID): copy from Service Provider Issuer
- On the Feedback step, select the This is an internal app that we have created option, click Finish.
- After you finished setting up the app on the Okta’s side, you’ll be redirected to the app’s Sign On tab. In the Settings section, click View SAML setup instructions.
- In the new browser tab, you’ll see the credentials that need to be specified in the Identity Provider Configuration section in your Crowdin Enterprise Organization Settings > Security > SAML.
- Copy the Identity Provider Single Sign-On URL, Identity Provider Issuer, and download the certificate.
- In a separate browser tab or window, log in to your Crowdin Enterprise Organization, open Organization Settings > Security > SAML, and enter the information you copied in Step 13 in the Identity Provider Configuration section:
- Paste the Identity Provider Single Sign-On URL in the SSO URL field.
- Paste the Identity Provider Issuer in the Entity ID field.
- Drag and drop your certificate file to the X.509 Certificate field.
- Click Save.
In this section, you’ll enable users to use Okta single sign-on by granting access to your Crowdin Enterprise Organization.
- Open your Okta Dashboard using an administrator account and go to Applications.
- Click on your new Crowdin Enterprise SAML app.
- Switch to the Assignments tab, click Assign, and select Assign to Groups.
- In the Assign Crowdin Enterprise to Groups dialog, click Assign on Everyone to enable Crowdin Enterprise SAML app to all users in your organization, click Done. Alternatively, you can assign separate groups or individual users.
- On the Crowdin Enterprise login page, select your organization and click Log in.
- Click on SAML. You should be automatically redirected to the Okta login page.
- Enter your login credentials. After your login credentials are authenticated, you’re automatically redirected to Crowdin Enterprise.
To set up Crowdin Enterprise SAML SSO in your OneLogin, follow the steps below.
Add OneLogin SAML Test (IdP) from the App Catalog
Section titled “Add OneLogin SAML Test (IdP) from the App Catalog”- Open the OneLogin Admin Console using an administrator account.
- From the Admin Console page, go to Applications.
- To add a new application, click Add App.
- On the Find Applications page, type OneLogin SAML Test (IdP) in the search box.
- Select OneLogin SAML Test (IdP) from the search results list. Wait a few seconds while the app is being added.
- Update or rename the Display Name (for example to Crowdin Enterprise).
- (Optional) Replace default app icons with a PNG or SVG file for your Crowdin Enterprise SSO app. You can find the Crowdin icon on the Using the Crowdin Logo page, click Save.
- You are now in the Info tab. Click the Configuration tab. Enter your Crowdin Enterprise service provider details here and click Save to proceed. You can find the required values in the Service Provider Details section in your Crowdin Enterprise Organization Settings > Security > SAML.
- SAML Consumer URL: copy from Reply URL (ACS)
- SAML Audience: copy from Service Provider Issuer
- SAML Recipient: copy from Reply URL (ACS)
- SAML Single Logout URL:
https://accounts.crowdin.com/saml2/{your-organization-name}/slo - ACS URL Validator:
^https:\/\/accounts\.crowdin\.com\/saml2\/{your-organization-name}\/acs$
- Navigate to the SSO tab in OneLogin and copy the Issuer URL, SAML 2.0 Endpoint (HTTP), and X.509 Certificate. To copy the X.509 certificate, click View Details.
- In a separate browser tab or window, log in to your Crowdin Enterprise Organization, open Organization Settings > Security > SAML, and enter the information you copied in Step 9 in the Identity Provider Configuration section:
- Paste the Issuer URL in the Entity ID field.
- Paste the SAML 2.0 Endpoint (HTTP) in the SSO URL field.
- Paste the X.509 certificate in the X.509 Certificate field.
- Click Save.
In this section, you’ll grant users access to your new Crowdin Enterprise SAML SSO app.
- Open the OneLogin Admin Console using an administrator account.
- From the Admin Console page, go to Applications.
- Click on your new Crowdin Enterprise SAML SSO app.
- Navigate to the Access tab and specify the roles that should have access to this app. If you don’t have the necessary role you can add a new role via Users > Roles specifying access to the needed apps. You can assign users to a new role via Users page.
- On the Crowdin Enterprise login page, select your organization and click Log in.
- Click on SAML. You should be automatically redirected to the OneLogin login page.
- Enter your login credentials. After your login credentials are authenticated, you’re automatically redirected to Crowdin Enterprise.
To set up Crowdin Enterprise SAML SSO in your Auth0, follow the steps below.
- Open the Auth0 Management Dashboard using an administrator account.
- From the Dashboard, go to Applications.
- Click + CREATE APPLICATION on the right.
- In the Name field, specify an application name (for example Crowdin Enterprise), select the Regular Web Applications application type, click CREATE.
- Go back to Dashboard > Applications.
- Find the row for the application you just created, and click on the Settings icon to the right of the application name.
- (Optional) Specify the URL for your Crowdin Enterprise SSO app logo in the Application Logo field. You can find the Crowdin icon on the Using the Crowdin Logo page.
- Switch to the Addons tab.
- Click on SAML2 WEB APP.
- In the appeared dialog, specify the Application Callback URL. You can find this value in the Service Provider Details section in your Crowdin Enterprise Organization Settings > Security > SAML — copy from Reply URL (ACS).
- In the Settings paste the following snippet
This way the NameID would be set to the user email address.{"nameIdentifierProbes": ["http://schemas.xmlsoap.org/ws/2005/05/identity/claims/emailaddress"]}
- Scroll down and click ENABLE.
- Scroll up and switch to the Usage tab.
- In the Usage tab, you’ll see the credentials that need to be specified in the Identity Provider Configuration section in your Crowdin Enterprise Organization Settings > Security > SAML.
- Copy the Issuer, Identity Provider Login URL, and download the certificate.
- In a separate browser tab or window, log in to your Crowdin Enterprise Organization, open Organization Settings > Security > SAML, and enter the information you copied in Step 15 in the Identity Provider Configuration section:
- Paste the Issuer in the Entity ID field.
- Paste the Identity Provider Login URL in the SSO URL field.
- Drag and drop your certificate file to the X.509 Certificate field.
- Click Save.
Manage Access to Crowdin Enterprise SAML App
Section titled “Manage Access to Crowdin Enterprise SAML App”By default, all users associated with a single Auth0 tenant are shared between the tenant’s applications (and therefore have access to the applications). If necessary you can restrict some users’ access to the application using rules. See this rule as an example.
- On the Crowdin Enterprise login page, select your organization and click Log in.
- Click on SAML. You should be automatically redirected to the Auth0 login page.
- Enter your login credentials. After your login credentials are authenticated, you’re automatically redirected to Crowdin Enterprise.