Glossário
With a glossary, you can create, store, and manage all the project terminology in one place. O principal objetivo da terminologia é explicar alguns termos específicos ou usados frequentemente no projeto para serem traduzidos de forma adequada e consistente.
Each glossary term is displayed as an underlined word in the Editor. Passe o mouse sobre o termo sublinhado para destacá-lo e ver sua tradução, classe gramatical e definição (se forem fornecidas).

Creating Glossary
Besides the project glossaries that are automatically created along the respective projects, you can also create separate glossaries, fill them with the appropriate content by uploading your existing glossaries in TBX, XLSX, or CSV format, and then assign these glossaries to the needed projects.
To create a glossary, follow these steps:
- Abra a página inicial do seu perfil e selecione Recursos > Glossários.
- Clique em Criar Glossário.
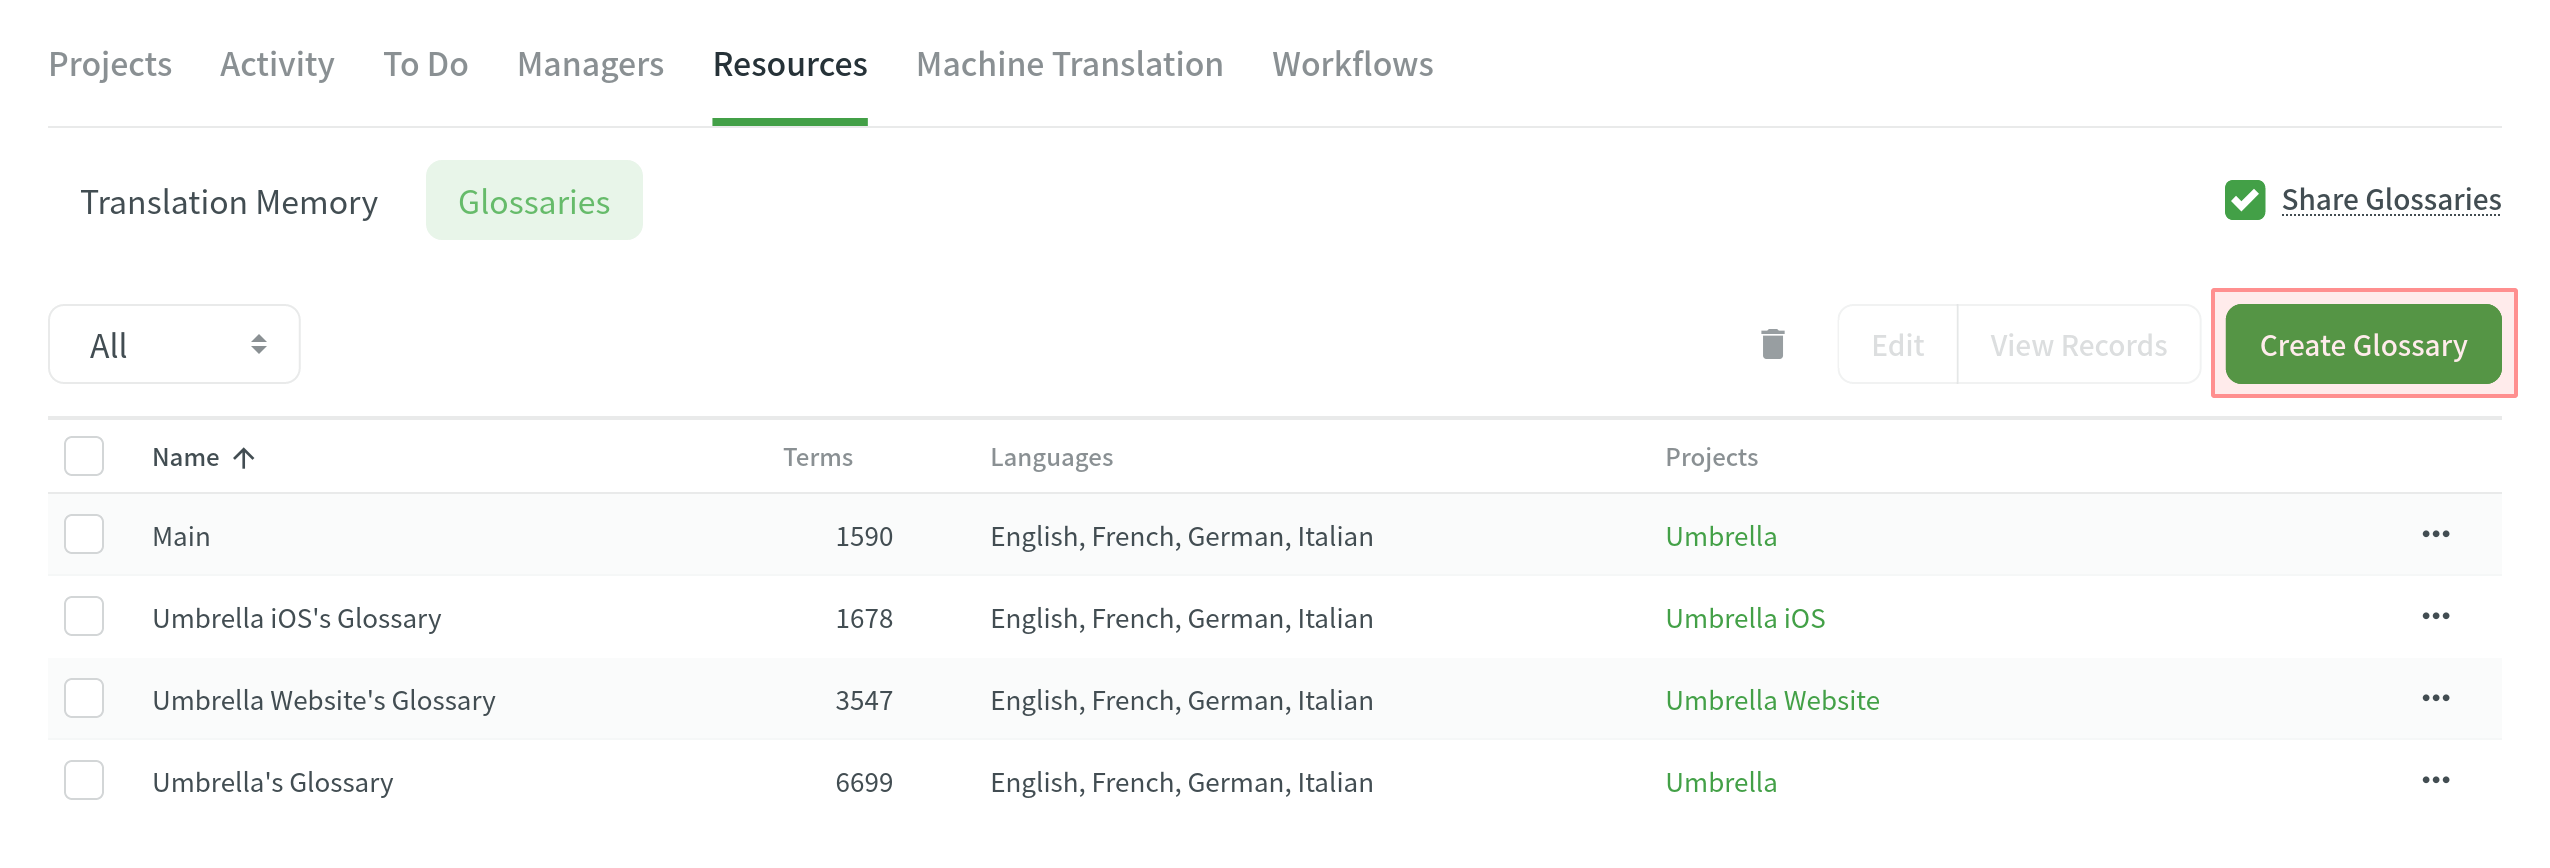
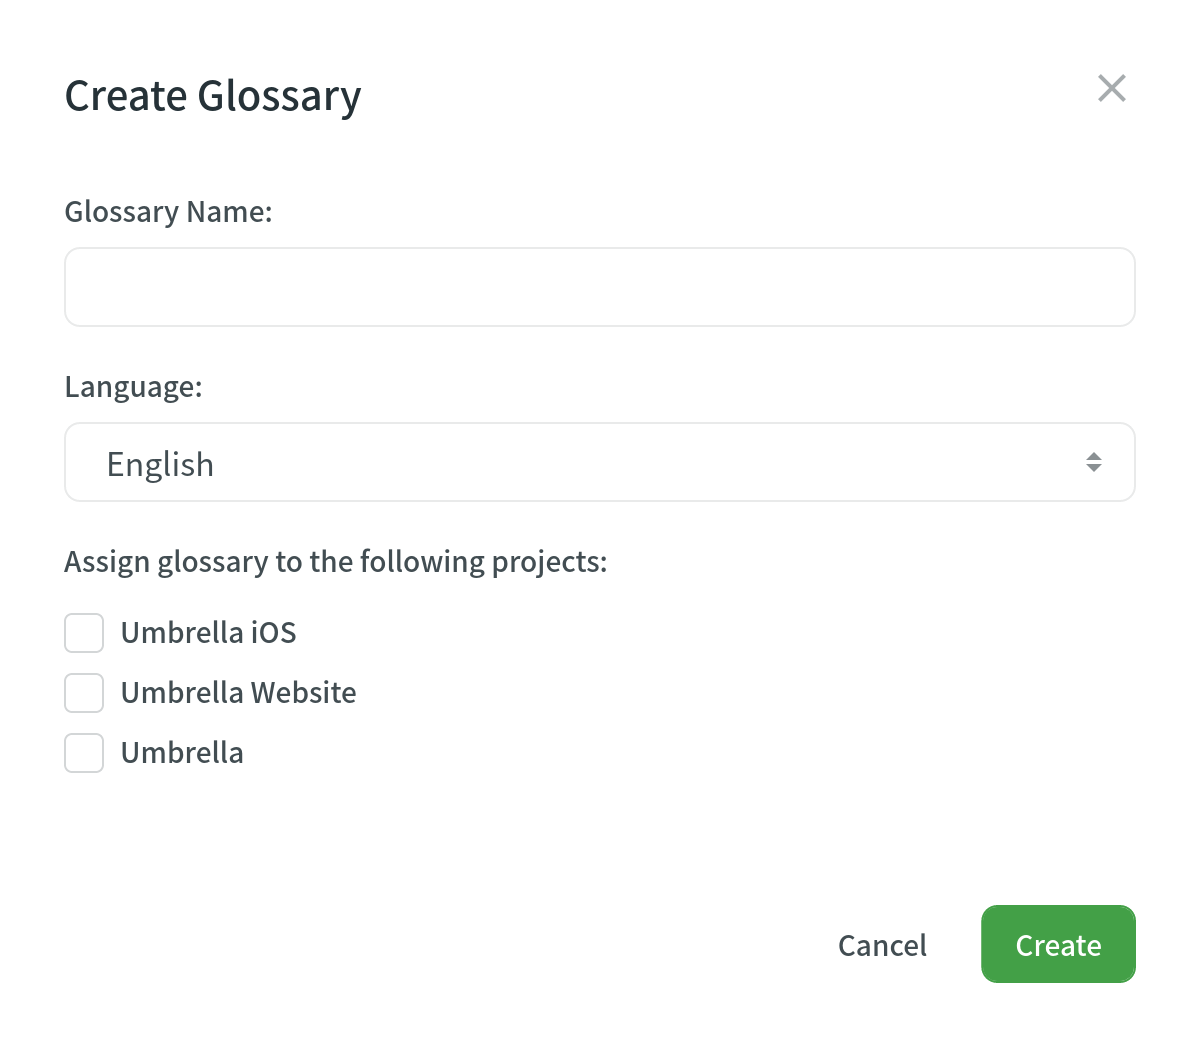
- In the appeared dialog, name your glossary and select a default language that will be displayed first in the table of glossary records.
- (Opcional) Atribua o glossário aos projetos necessários. Você pode pular esta etapa e atribuir um glossário posteriormente.
- Clique Criar.
Managing Glossary Concepts and Terms
Depending on your project needs, you can use a simpler approach with one term per language or make your glossary more detailed and complete using the advanced functionality that glossary concepts can offer.
Adding Glossary Concepts and Terms
Concept – the highest-level terminology element that contains concept-level data (e.g., concept definition, subject, etc.), including language-level (i.e., term language) and term-level data (e.g., term, the term’s part of speech, type, etc.). Simply put, a concept incorporates glossary terms and their variations with multiple translations and other relevant information.
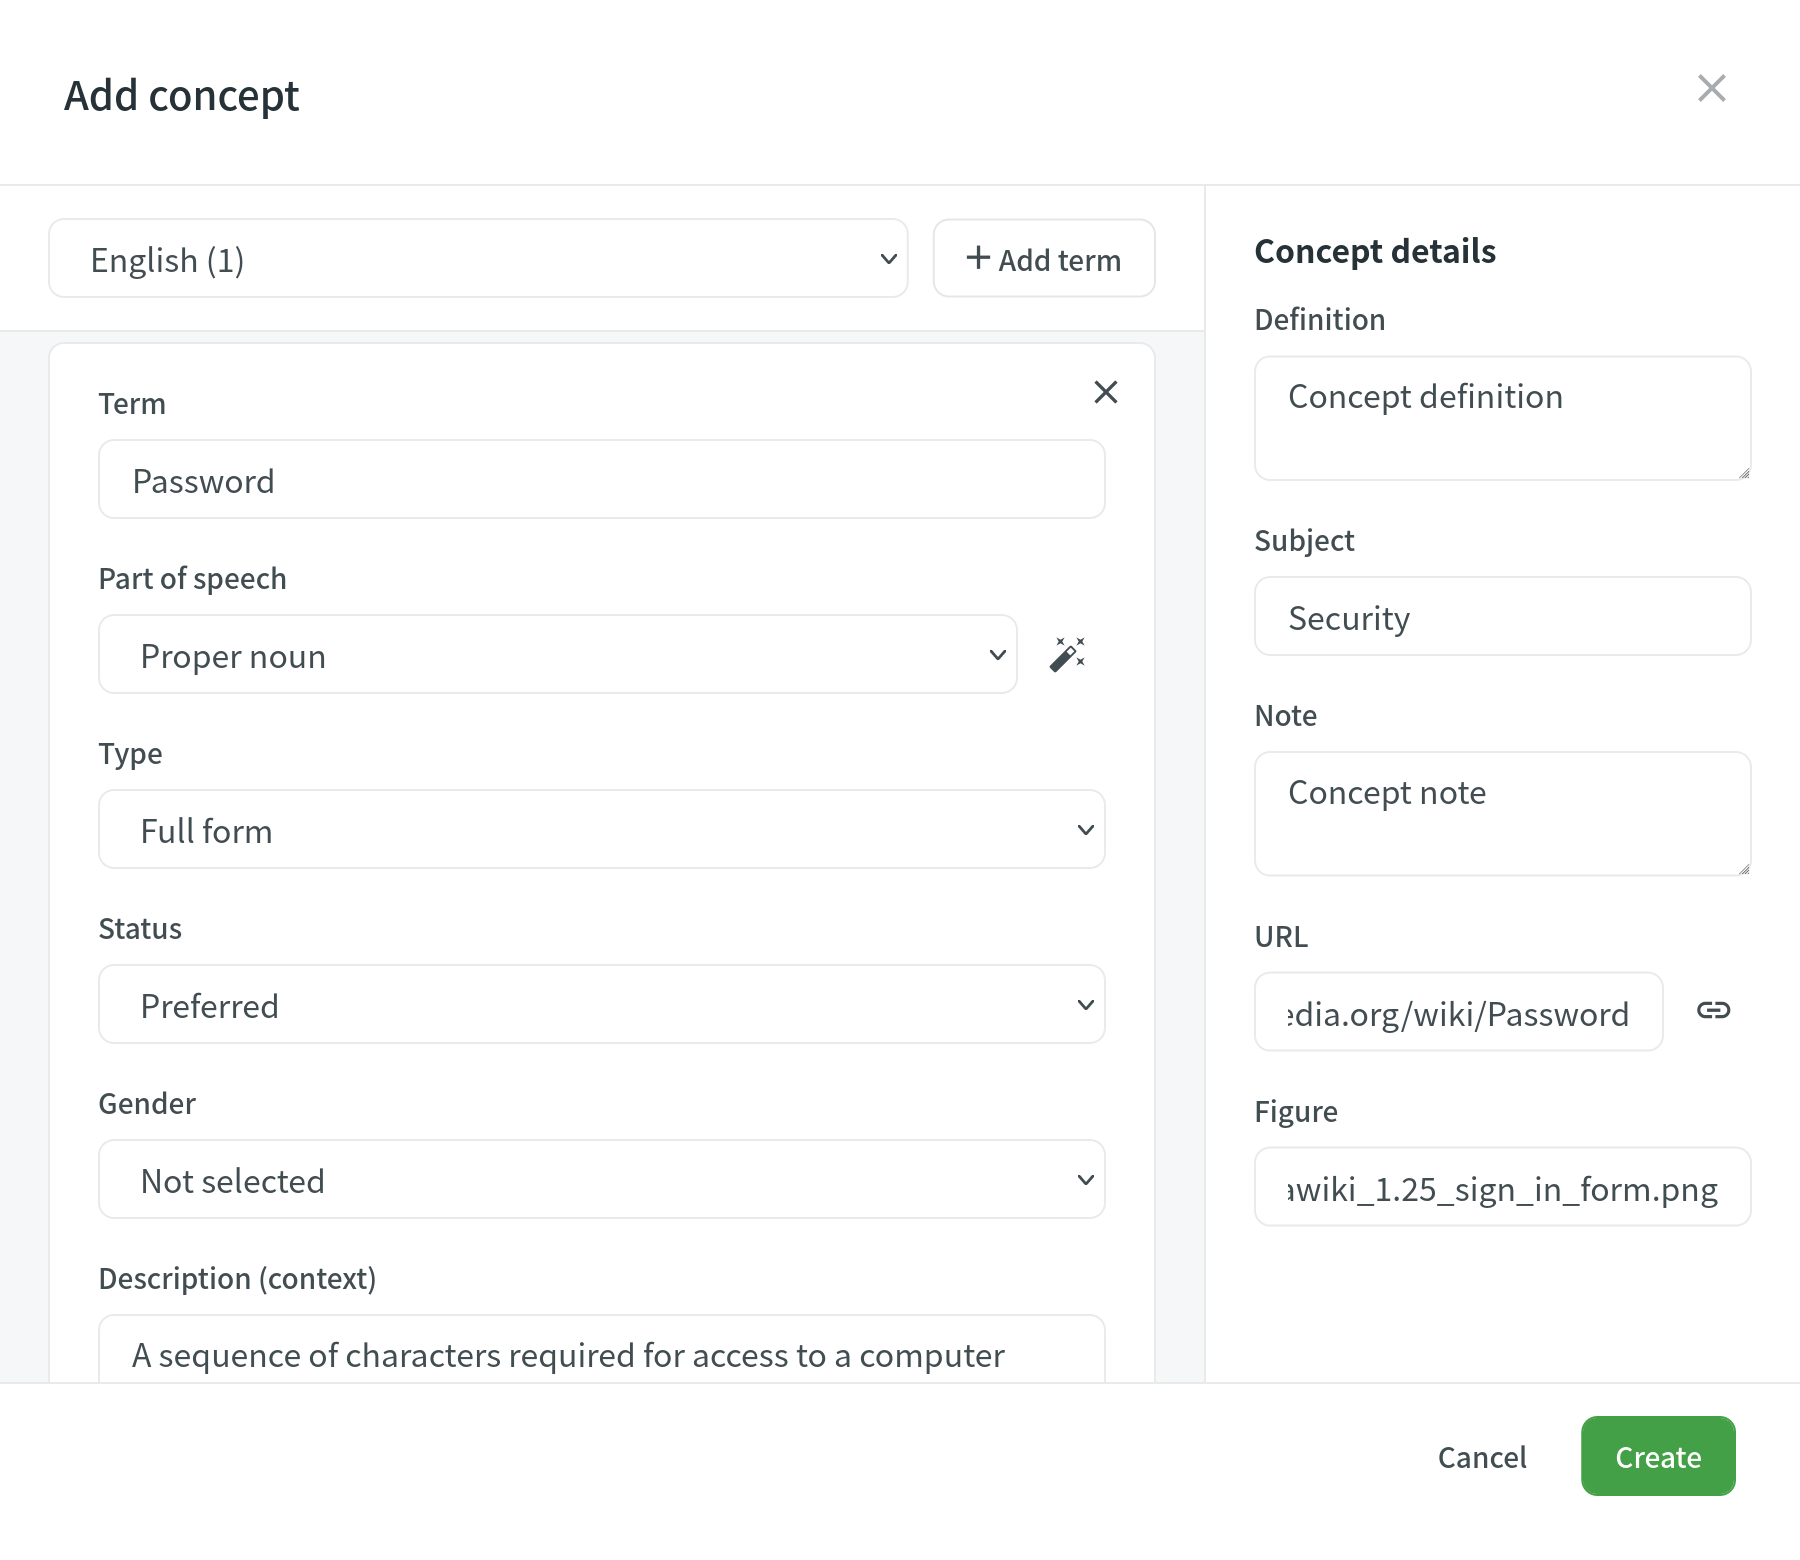
You can specify the following concept and term details when adding glossary concepts.
Concept details:
- Definition – concept definition.
- Subject – a branch of knowledge the concept is related to.
- Note – short notes about a concept that might be helpful to translators.
- URL – URL to the web page with relevant information about a concept.
- Figure – URL to the relevant image.
Term details:
- Part of speech – e.g., noun, verb, adjective, etc.
- Type – e.g., full form, acronym, abbreviation, etc.
- Status – preferred, admitted, not recommended, obsolete.
- Gender – term gender.
- Description – term description.
- Note – short notes about a term that might be helpful to translators.
- URL – URL to the web page with relevant information about a term.
To add a new glossary concept, follow these steps:
- Abra a página inicial do seu perfil e selecione Recursos > Glossários. Alternatively, open your project and go to Settings > Glossaries.
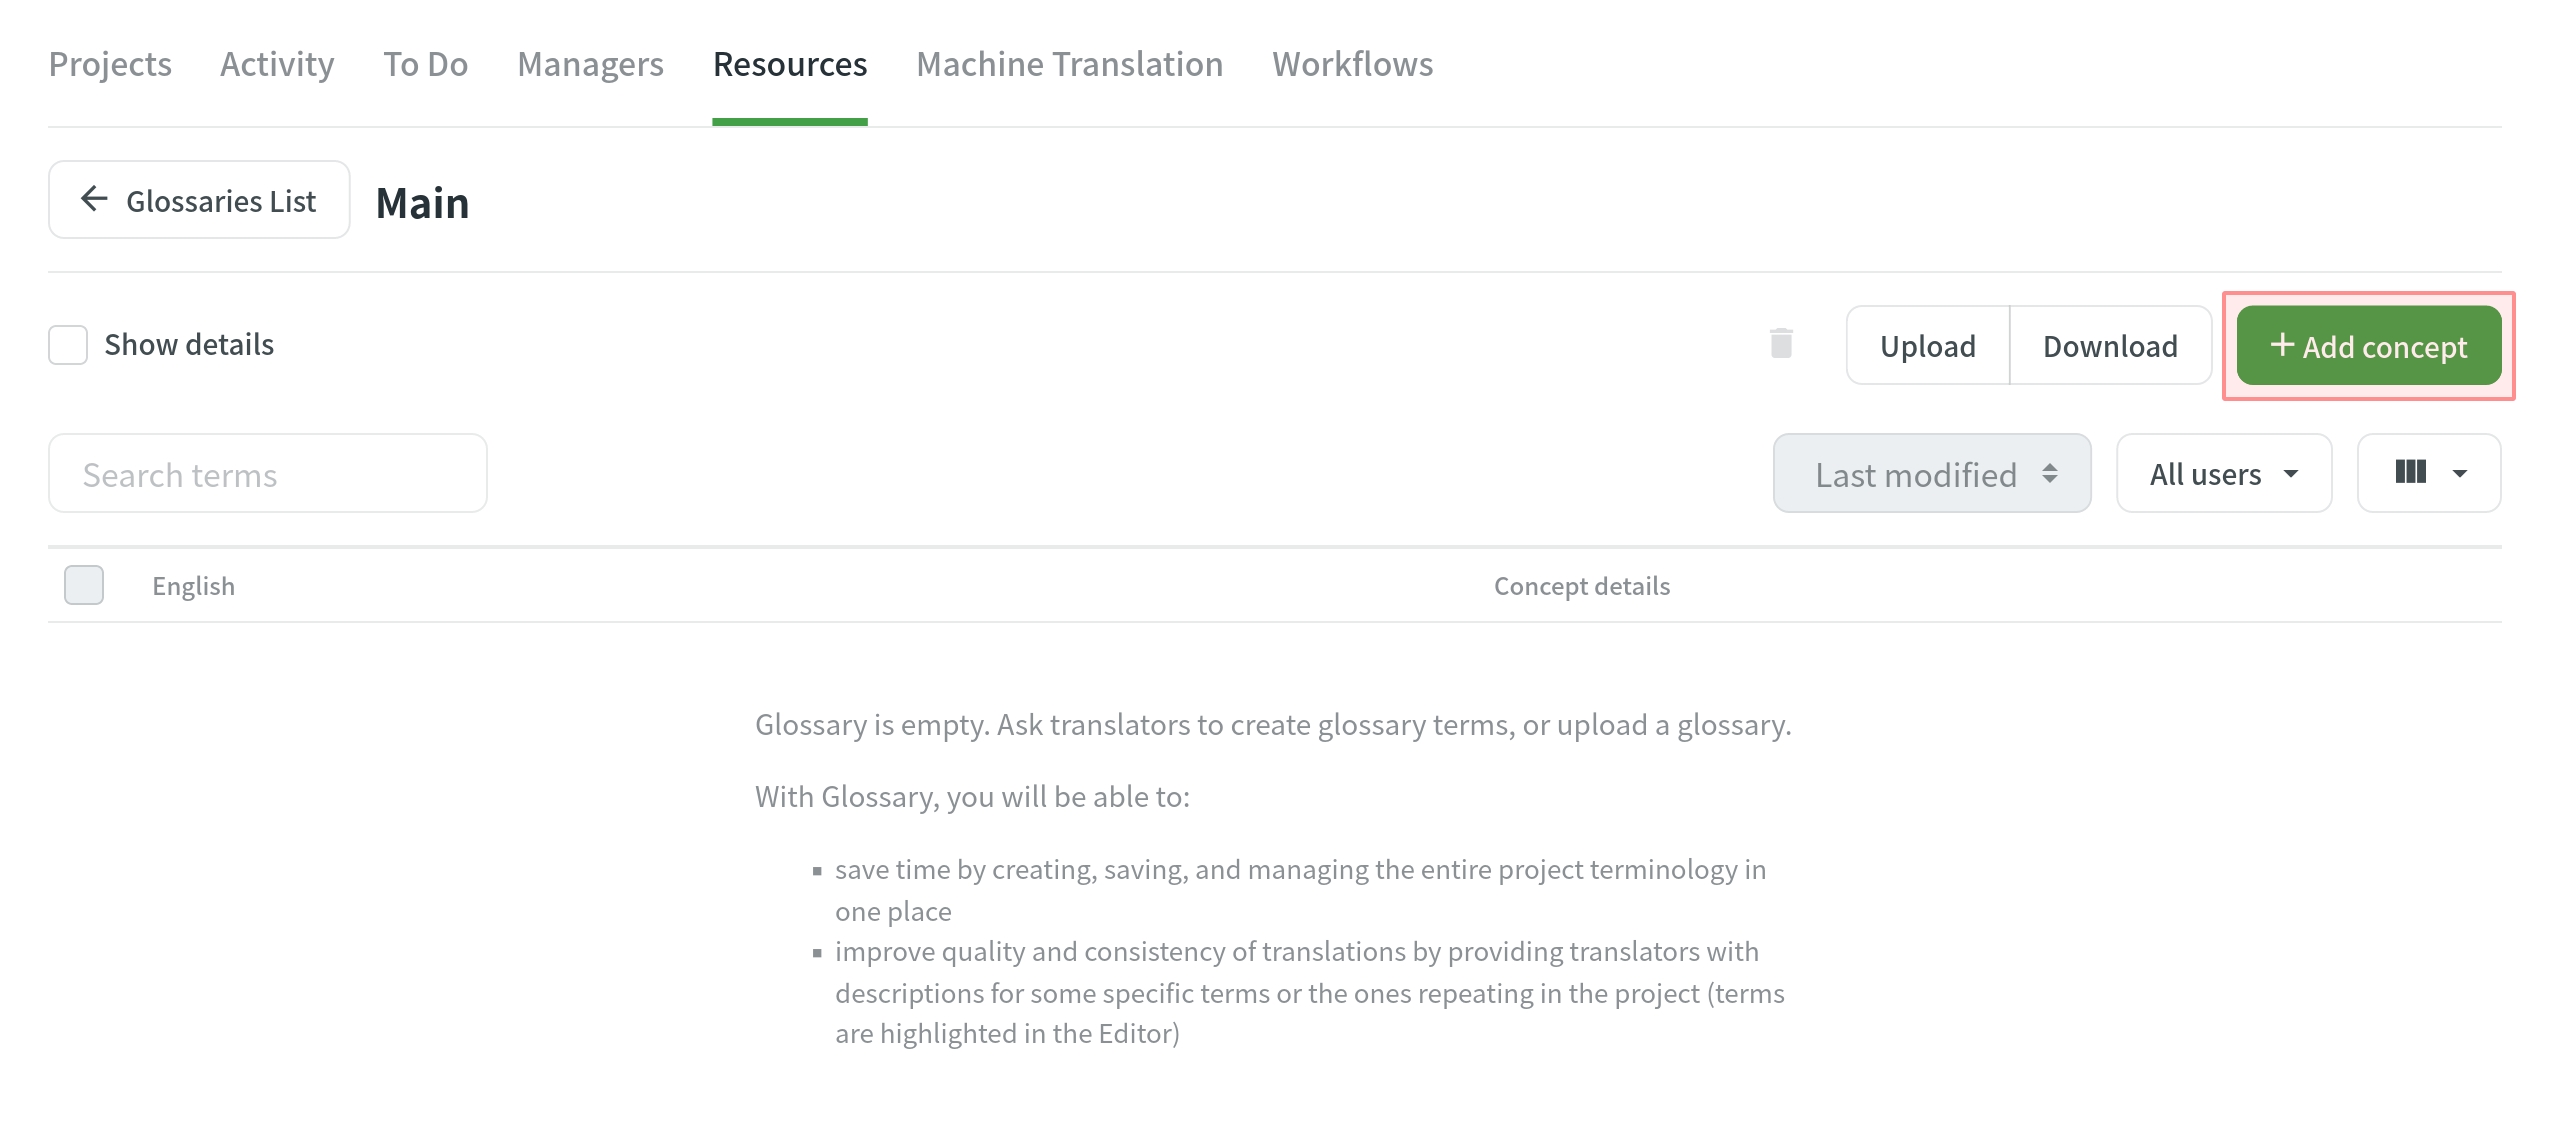
- Clique em Ver Registros no glossário necessário.
- Click Add concept.
- In the appeared dialog, select the language from the drop-down menu, and specify the term and all related details. Clique em
 para detectar a classe gramatical automaticamente.
  para detectar a classe gramatical automaticamente. Nota: Parte da fala pode ser detectada automaticamente apenas nos seguintes idiomas: inglês, francês, espanhol, alemão, norueguês, polonês, sueco, russo, italiano e chinês.
 - (Optional) Click Add term to add a term variation (e.g., acronym, short form, etc.)
- Specify the concept details.
- Clique Criar.
To add glossary concepts via the Editor, follow these steps:
- In the Editor, select the needed word in the source string.
- In the appeared menu, select Create Term. Alternatively, you can use the keyboard shortcut to add a concept (by default, Ctrl+G).

- Follow the steps described in the section above.
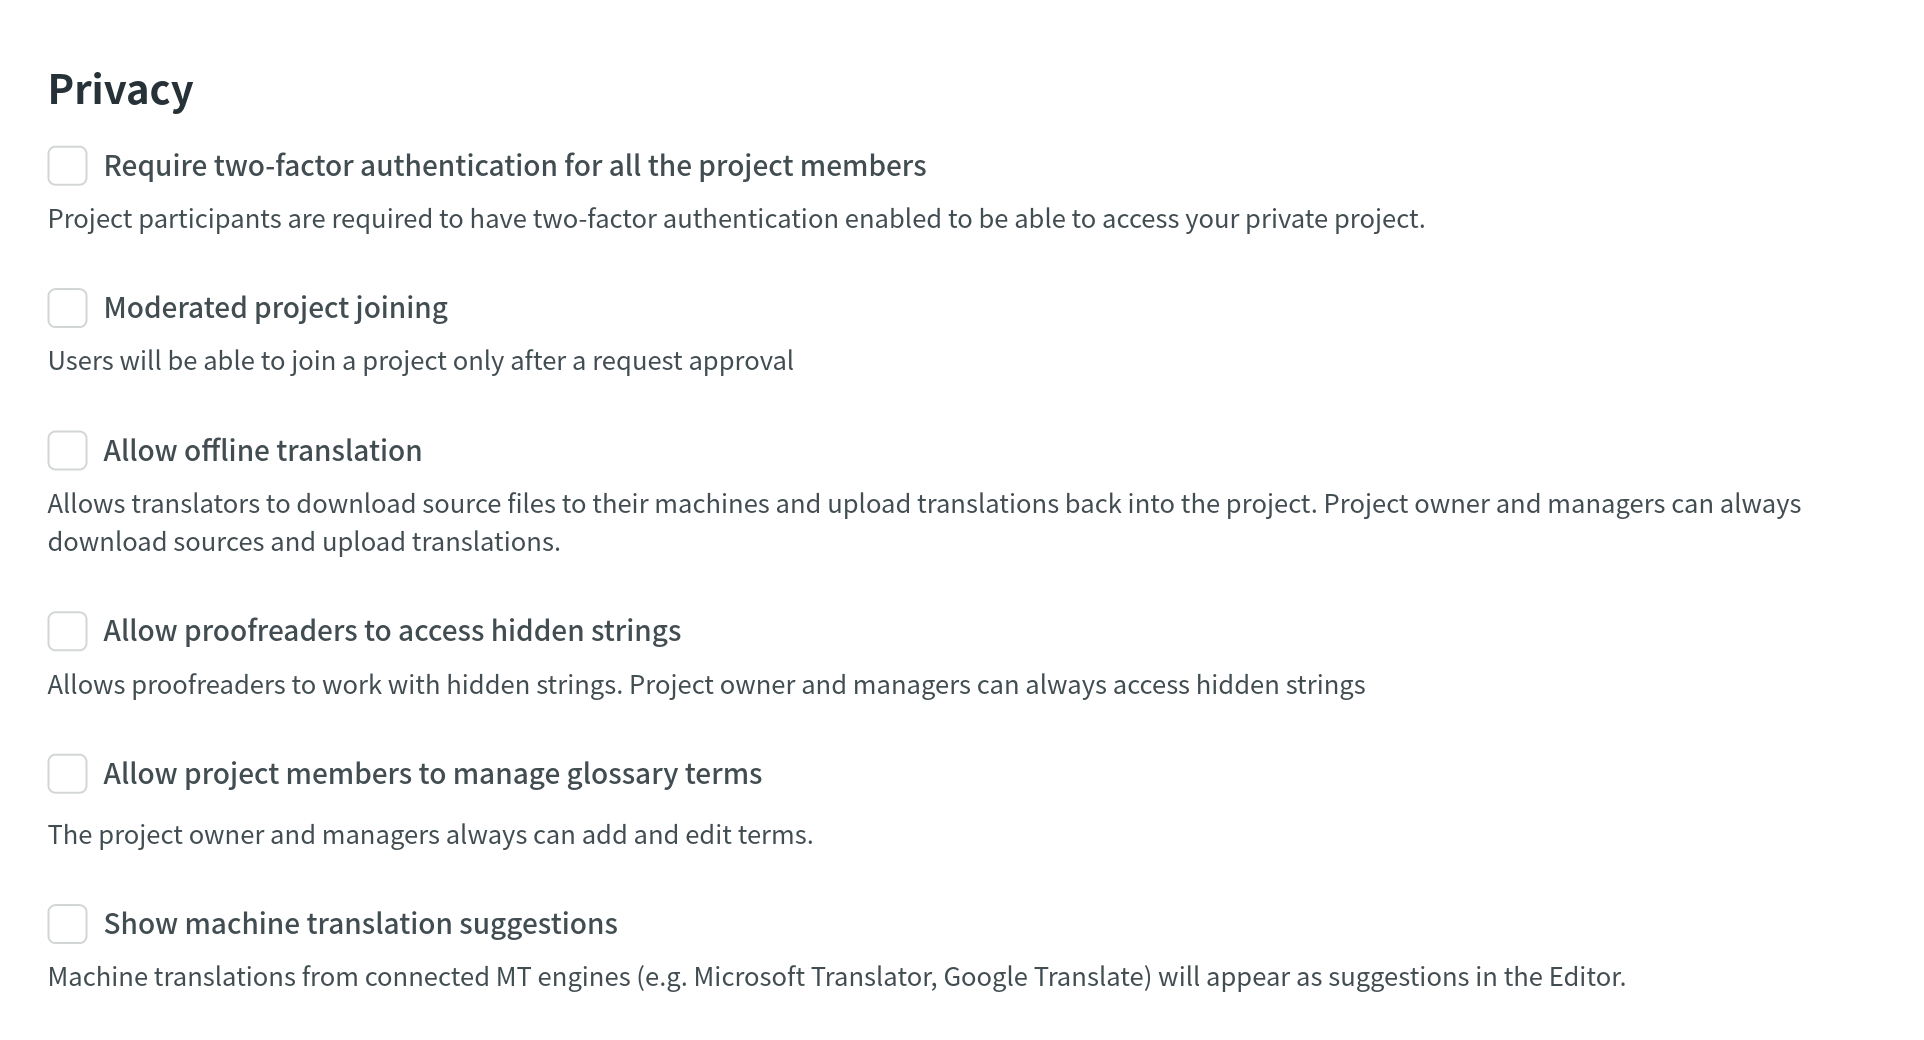
To allow translators and proofreaders to manage terms in the Editor, follow these steps:
- Abra seu projeto e vá para Configurações > Privacidade e colaboração.
- Selecione Permitir que os membros do projeto gerenciem os termos do glossário.
Editing Glossary Concepts and Terms
You can edit existing glossary concepts of a particular glossary.
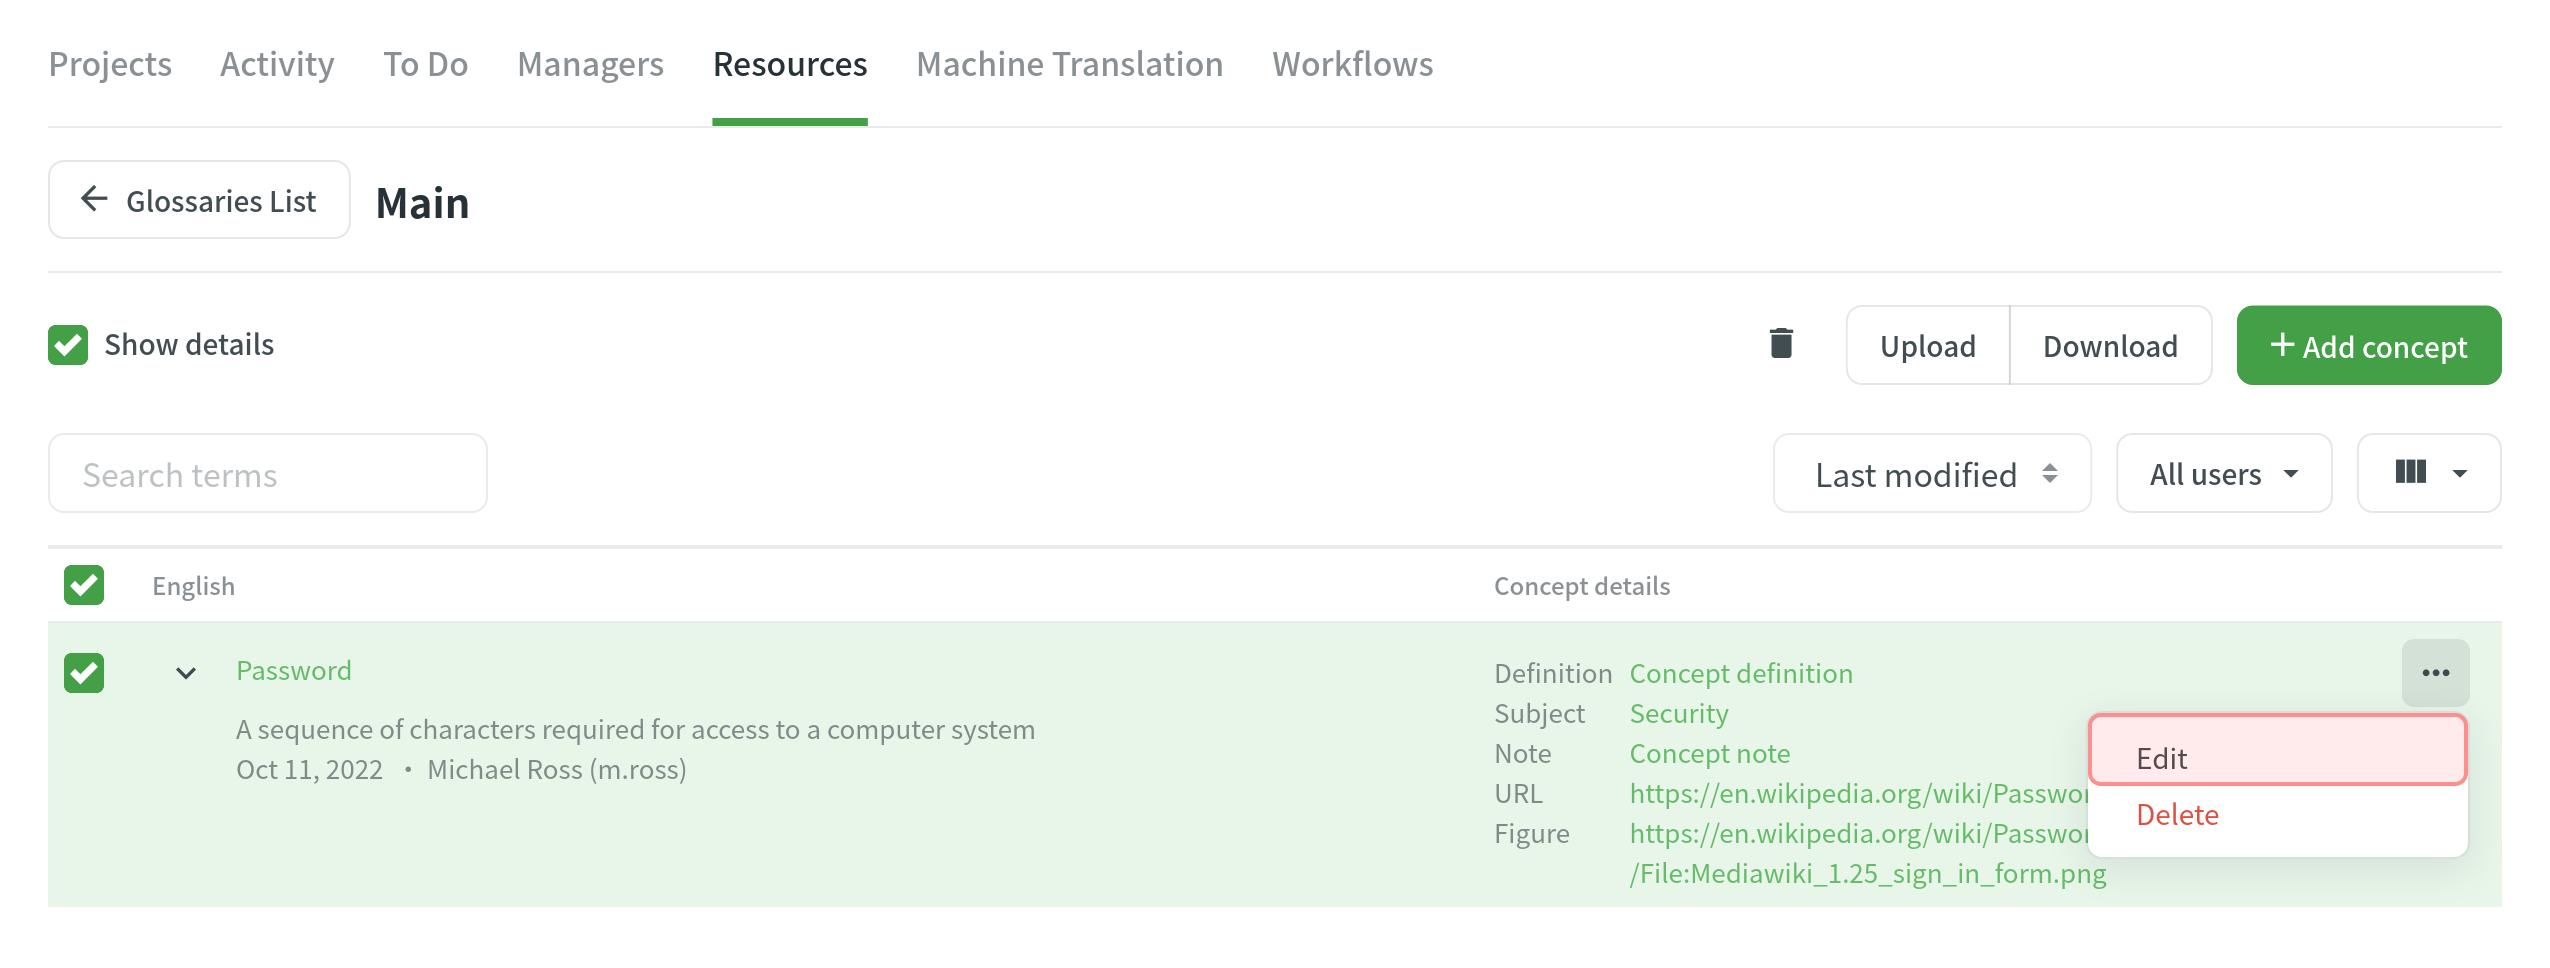
To edit a glossary concept, follow these steps:
- Abra a página inicial do seu perfil e selecione Recursos > Glossários. Alternatively, open your project and go to Settings > Glossaries.
- Clique em Ver Registros no glossário necessário.
- Abra um conceito de glossário com um clique duplo ou clique em Editar.
- In the appeared dialog, make the necessary edits to the concept or terms and click Save.
Deleting Glossary Concepts
You can delete one, multiple, or all the glossary concepts at once.
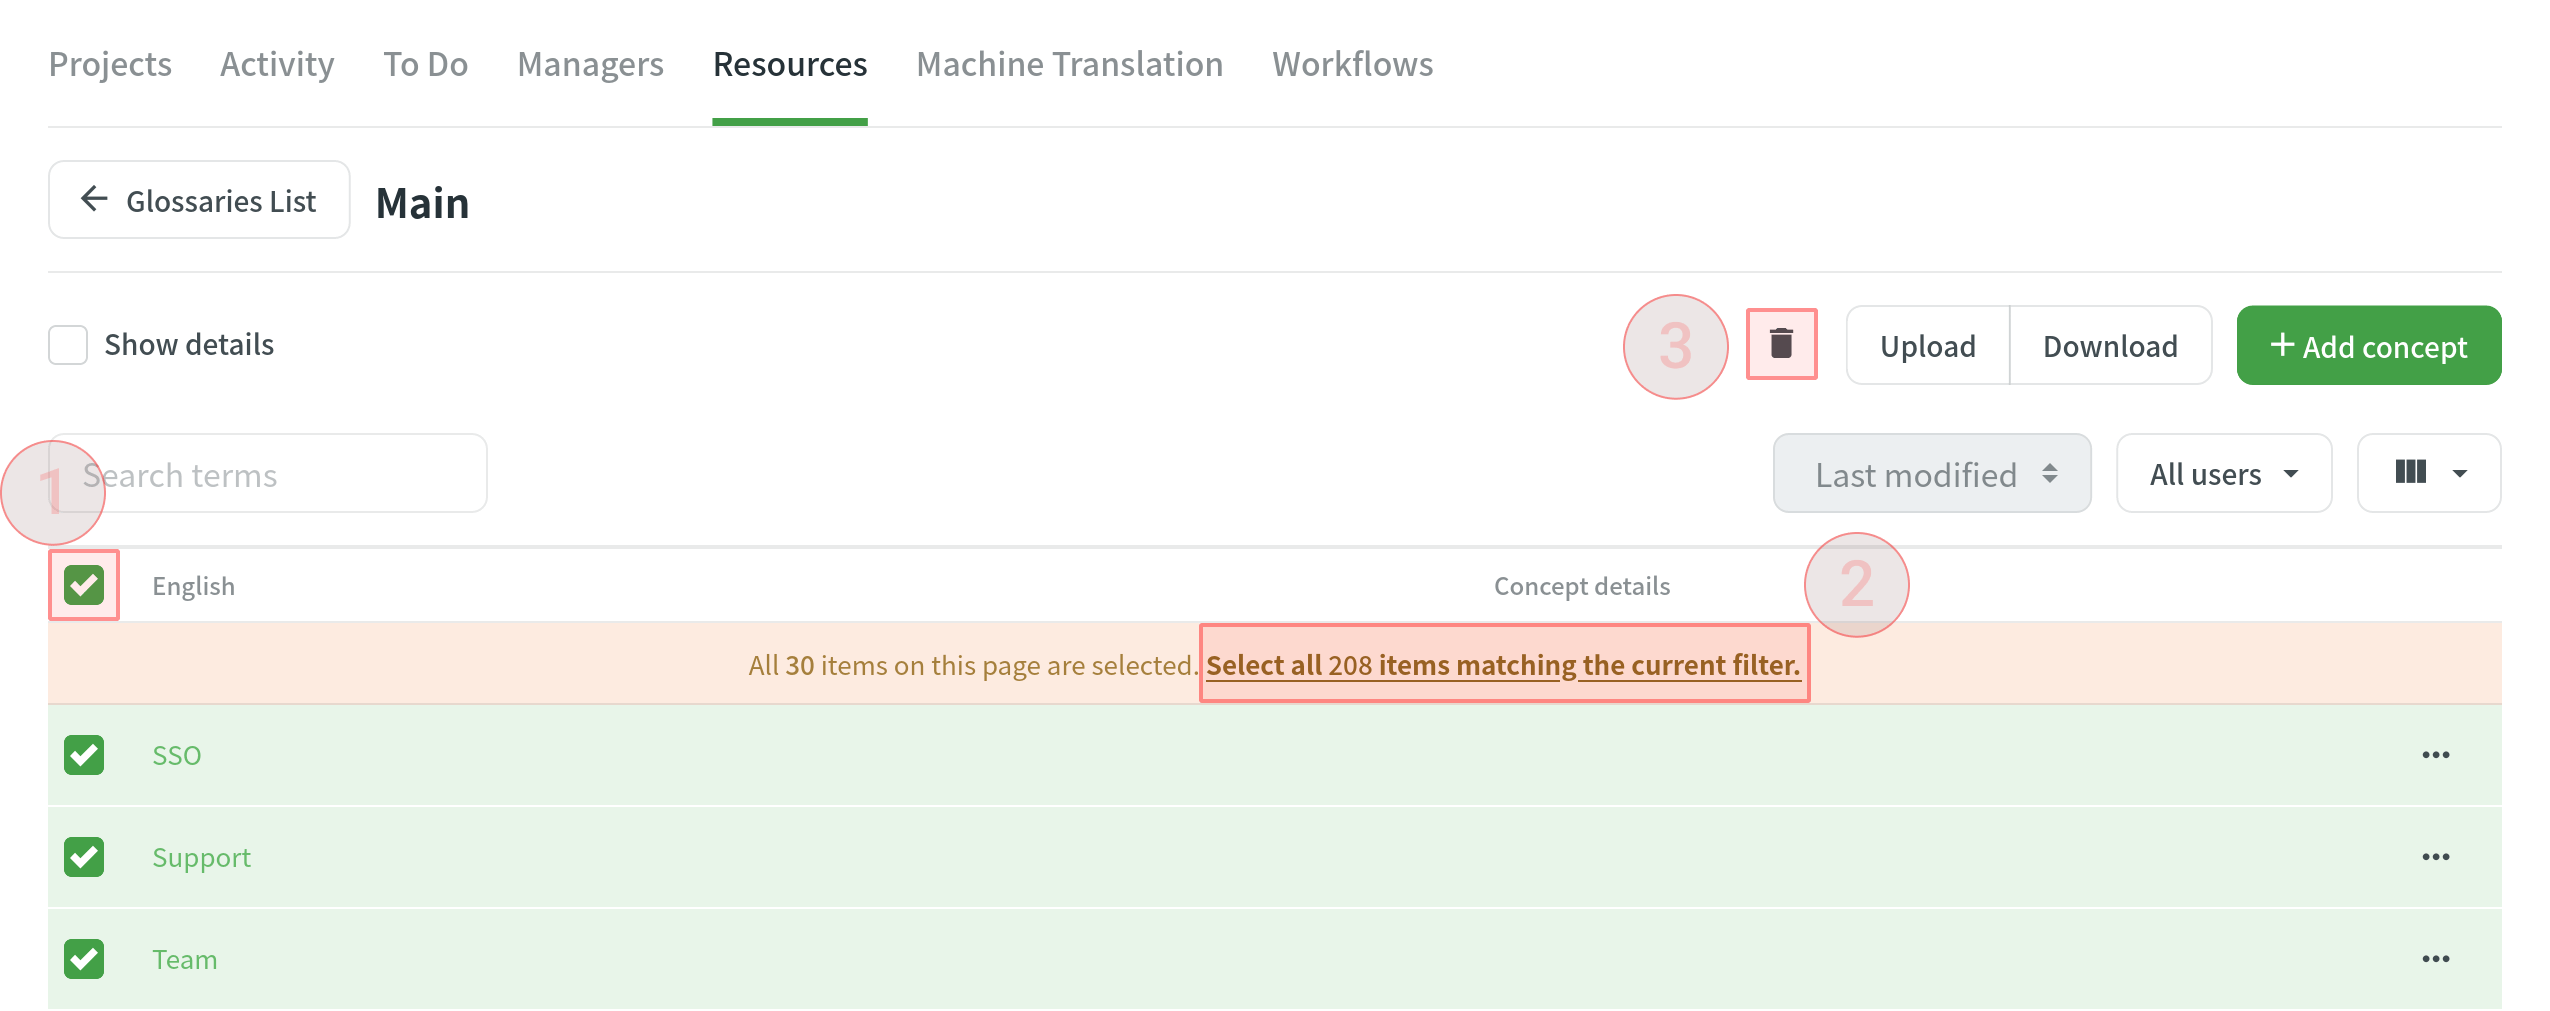
To delete all the concepts from the glossary, follow these steps:
- Select the top checkbox above the concept list.
- Confirm the selection of all concepts.
- Click
 .
. 
Downloading and Uploading Glossary
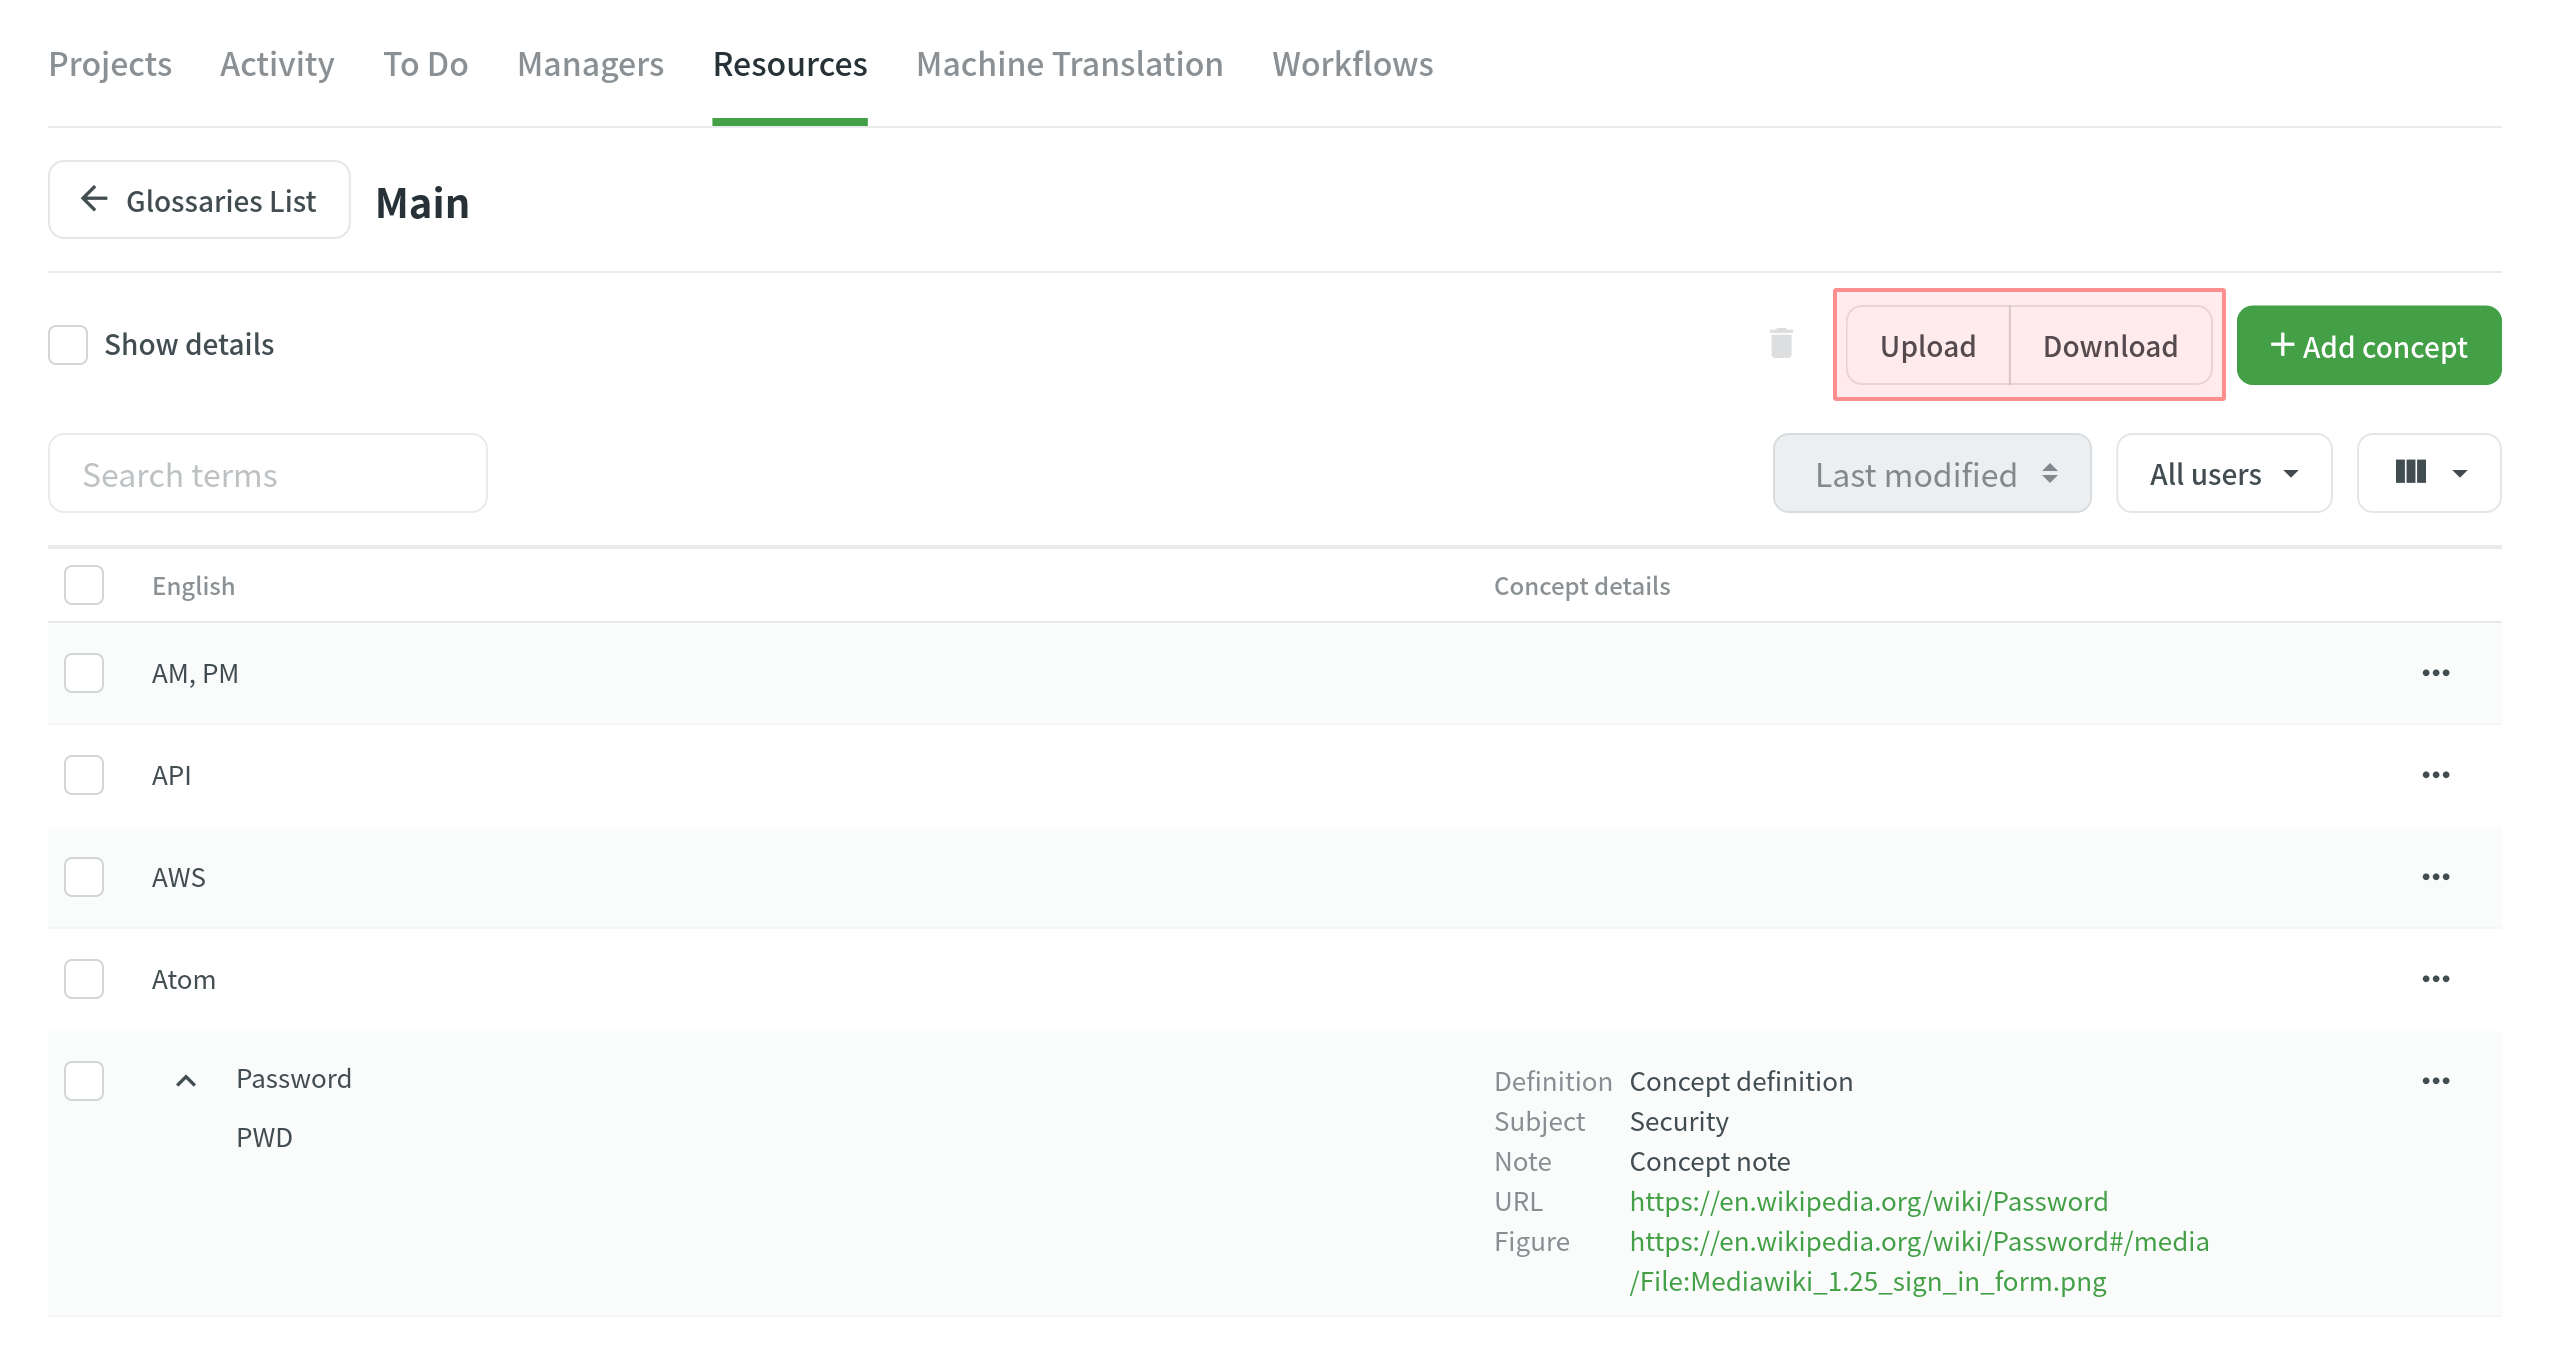
Para baixar ou enviar o glossário, siga estas etapas:
- Abra a página inicial do seu perfil e selecione Recursos > Glossários. Alternatively, open your project and go to Settings > Glossaries.
- Clique em Ver Registros no glossário necessário.
- Clique em Baixar ou Carregar.
Você pode enviar e baixar o glossário nos seguintes formatos de arquivo: TBX (v2), TBX (v3), CSV, XLSX.
Se você enviar um glossário nos formatos de arquivo CSV ou XLS/XLSX, selecione o idioma para cada coluna e o valor da coluna (termo, descrição ou classe gramatical) na caixa de diálogo de configuração. 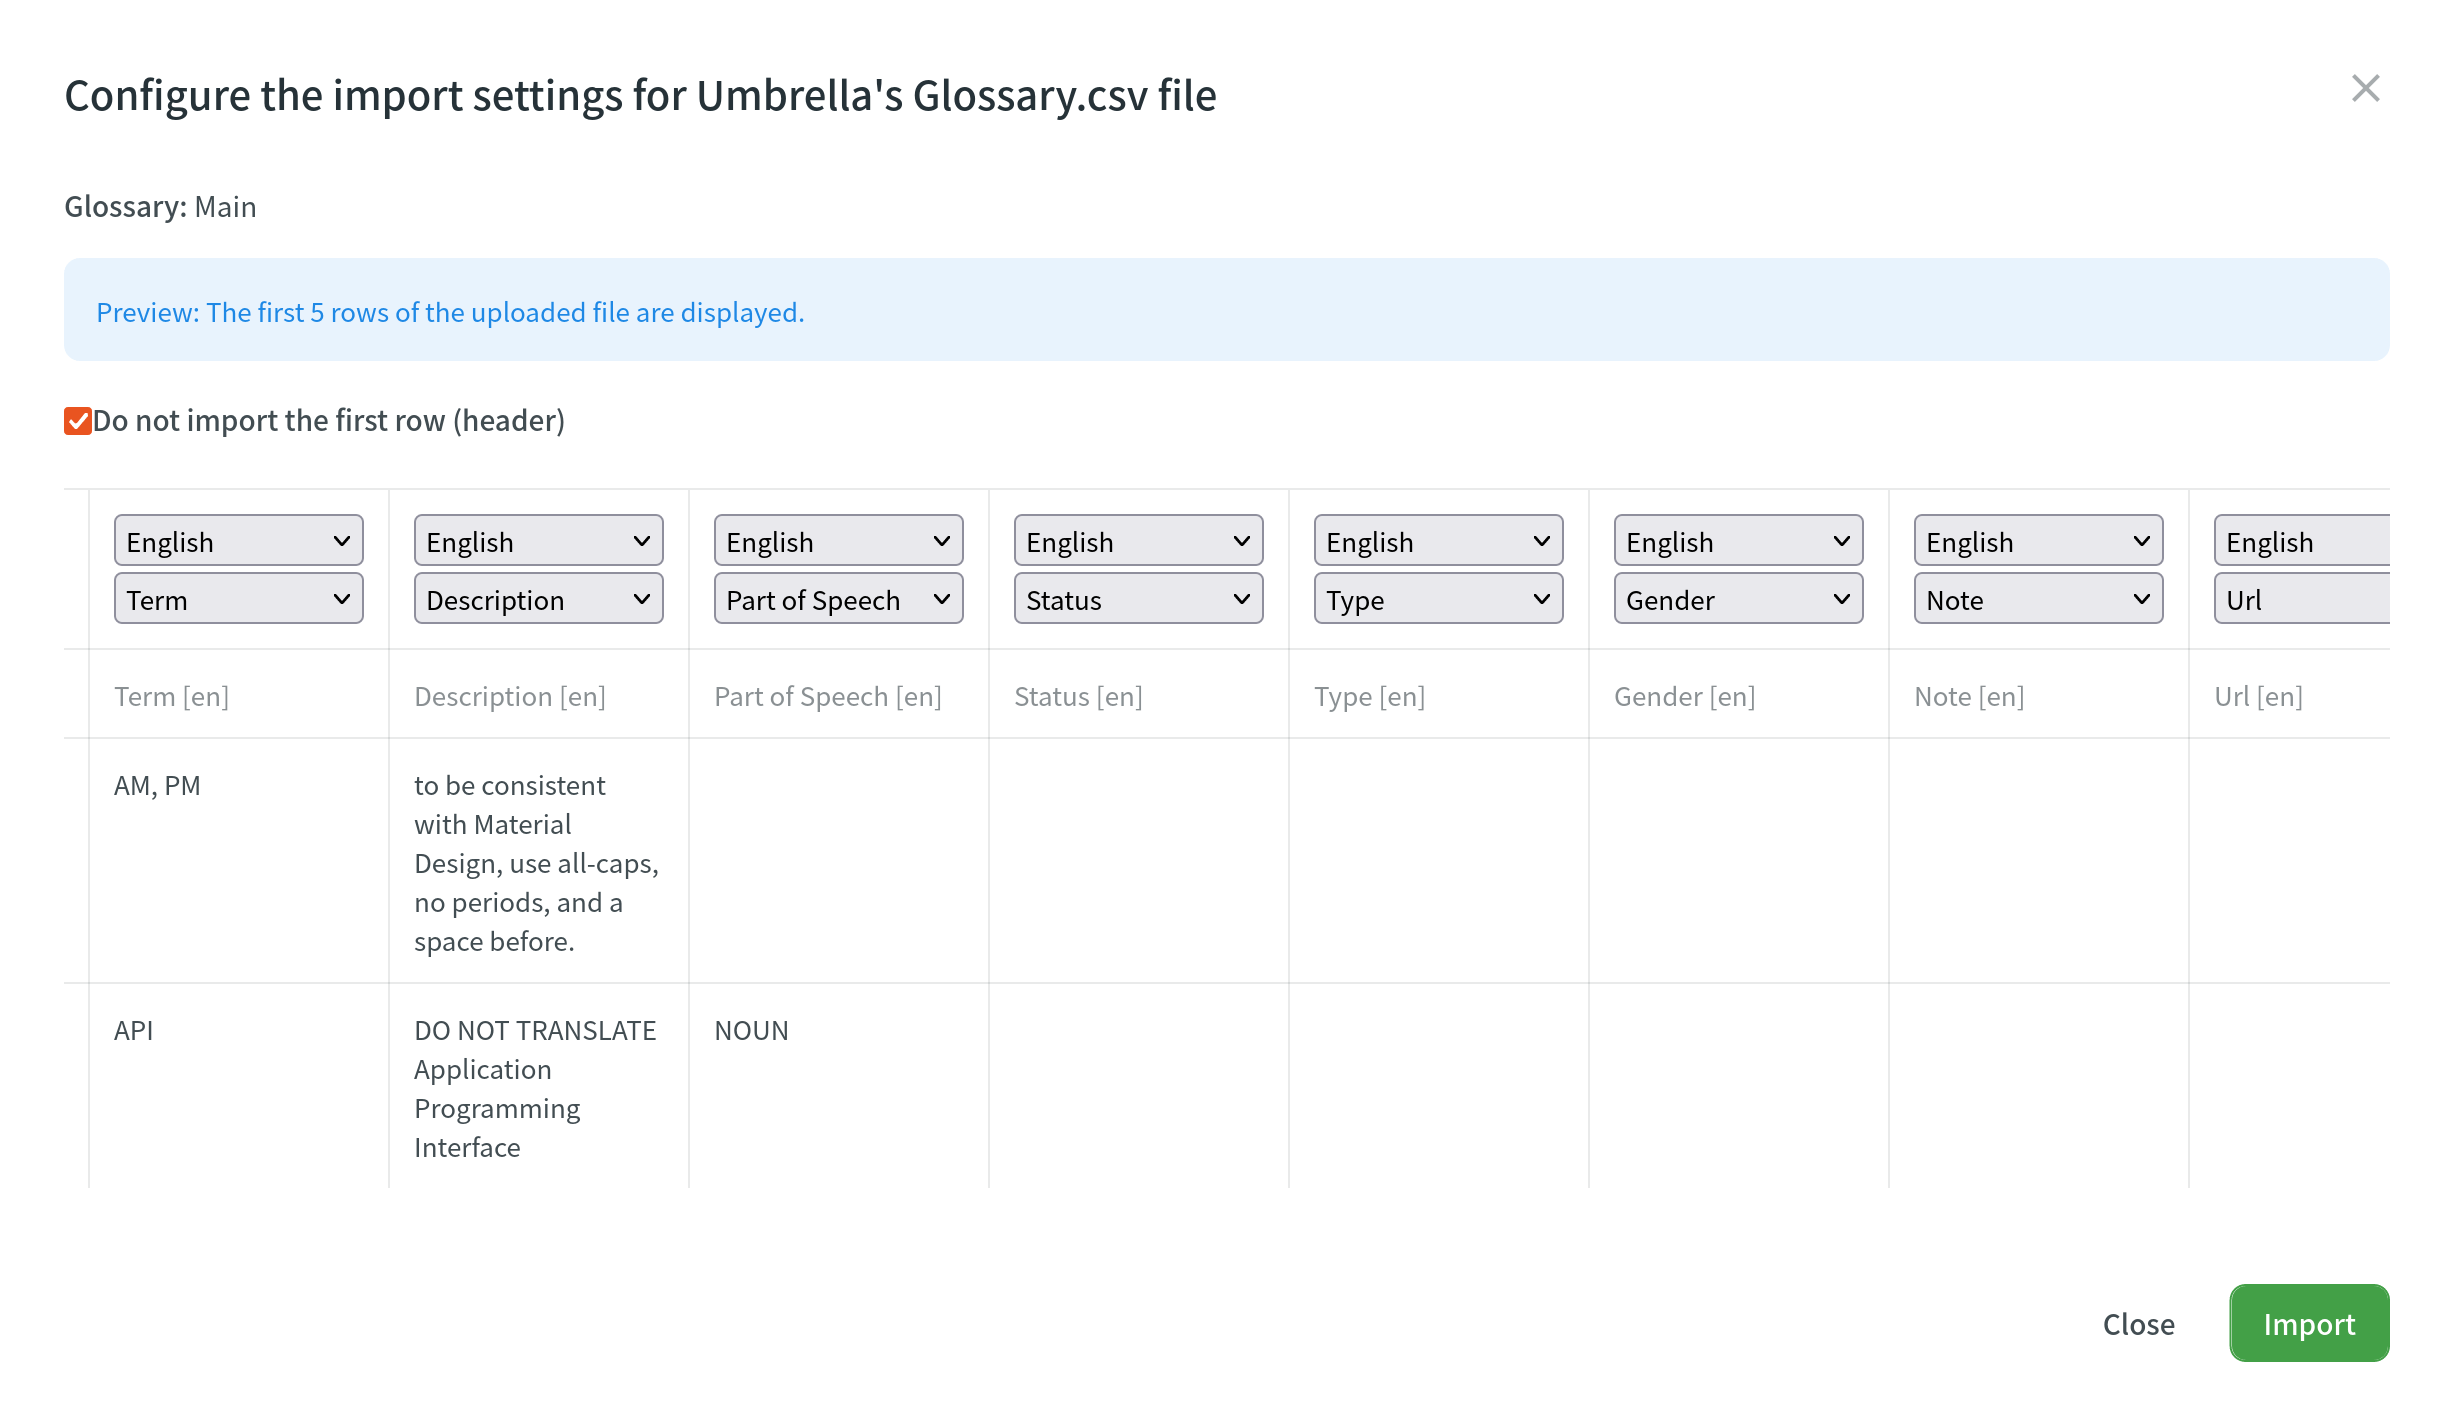
Ao baixar um glossário do Crowdin, alguns navegadores podem adicionar uma extensão XML ao arquivo baixado para que o nome do arquivo seja sample.tbx.xml. Para importar esse arquivo de volta para o Crowdin, renomeie-o para sample.tbx.
Automatic Column Identification for Glossary in CSV and XLSX File Formats
Once you upload your glossary file in CSV or XLSX formats, the system automatically detects the file scheme based on the column names specified in the first row. A identificação é realizada sem distinção entre maiúsculas e minúsculas. Columns that weren’t detected automatically will be left as Not used/Not chosen for manual configuration. Automatic column identification is especially helpful when you upload glossary spreadsheets that contain many languages and additional columns (e.g., Status, Type, Gender, etc.).
To get the most out of the automatic column detection, we recommend that you name the columns in your CSV or XLSX glossary files using the patterns described below:
- Term details –
{column-type} [{crowdin-language-code}](e.g.,Term [en],Description [en],Part of Speech [en], etc.). - Concept details –
Concept {concept-details-type}(e.g.,Concept Definition,Concept Subject,Concept Note, etc.).
To redetect the glossary file scheme, click Detect Configuration.
Atribuindo glossário
To assign a glossary to your project, follow these steps:
- Open your project and go to Resources > Glossaries.
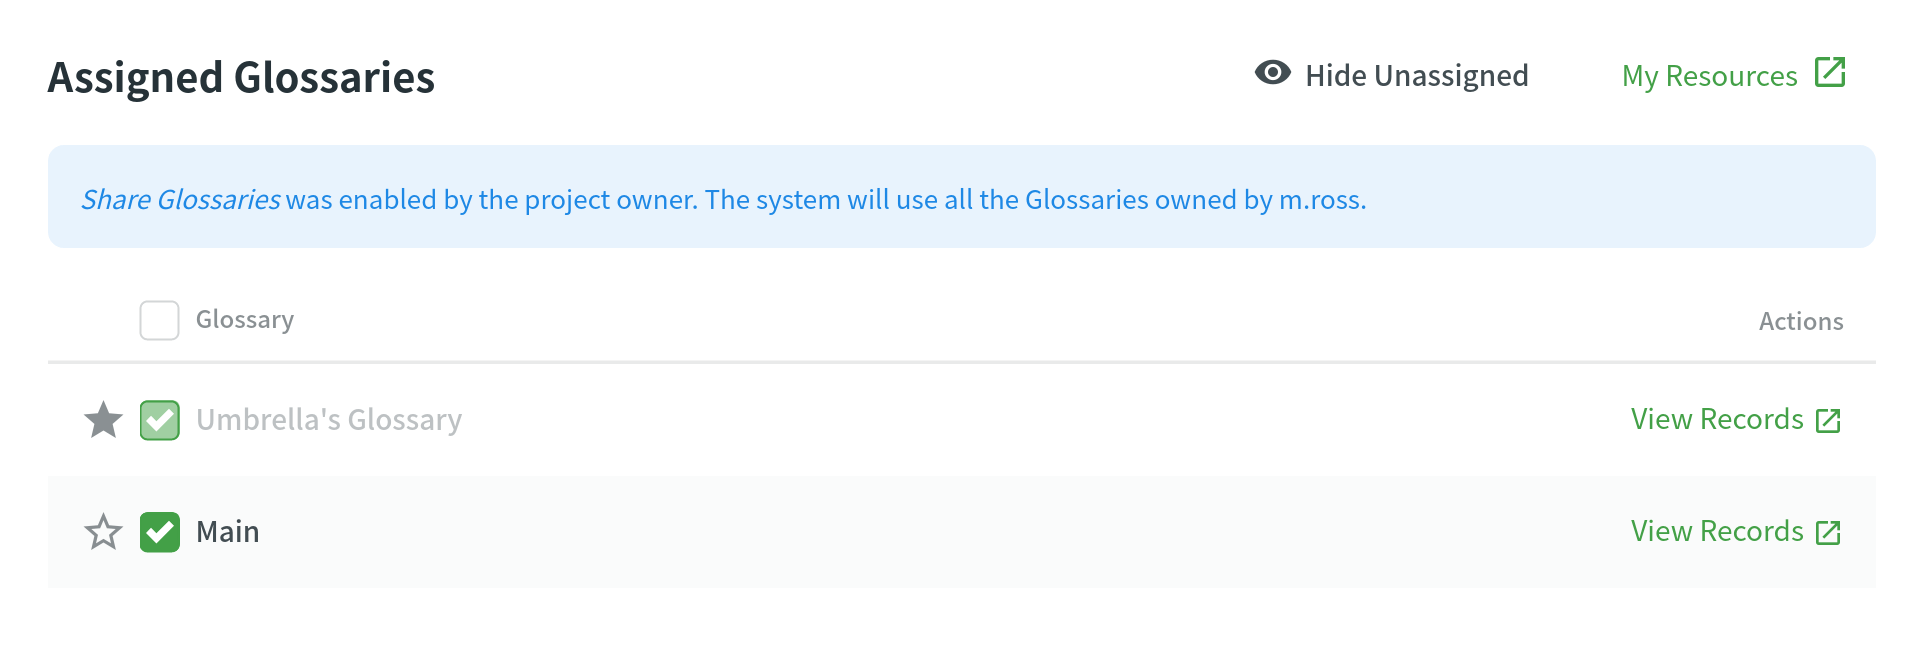
- Na seção Glossários Atribuídos, selecione os glossários necessários na lista.
Changing Default Glossary
To change your project’s default glossary, follow these steps:
- Open your project and go to Resources > Glossaries.
- Na seção Glossários Atribuídos, clique no ícone de estrela ao lado do glossário necessário na lista.

Compartilhar Glossários
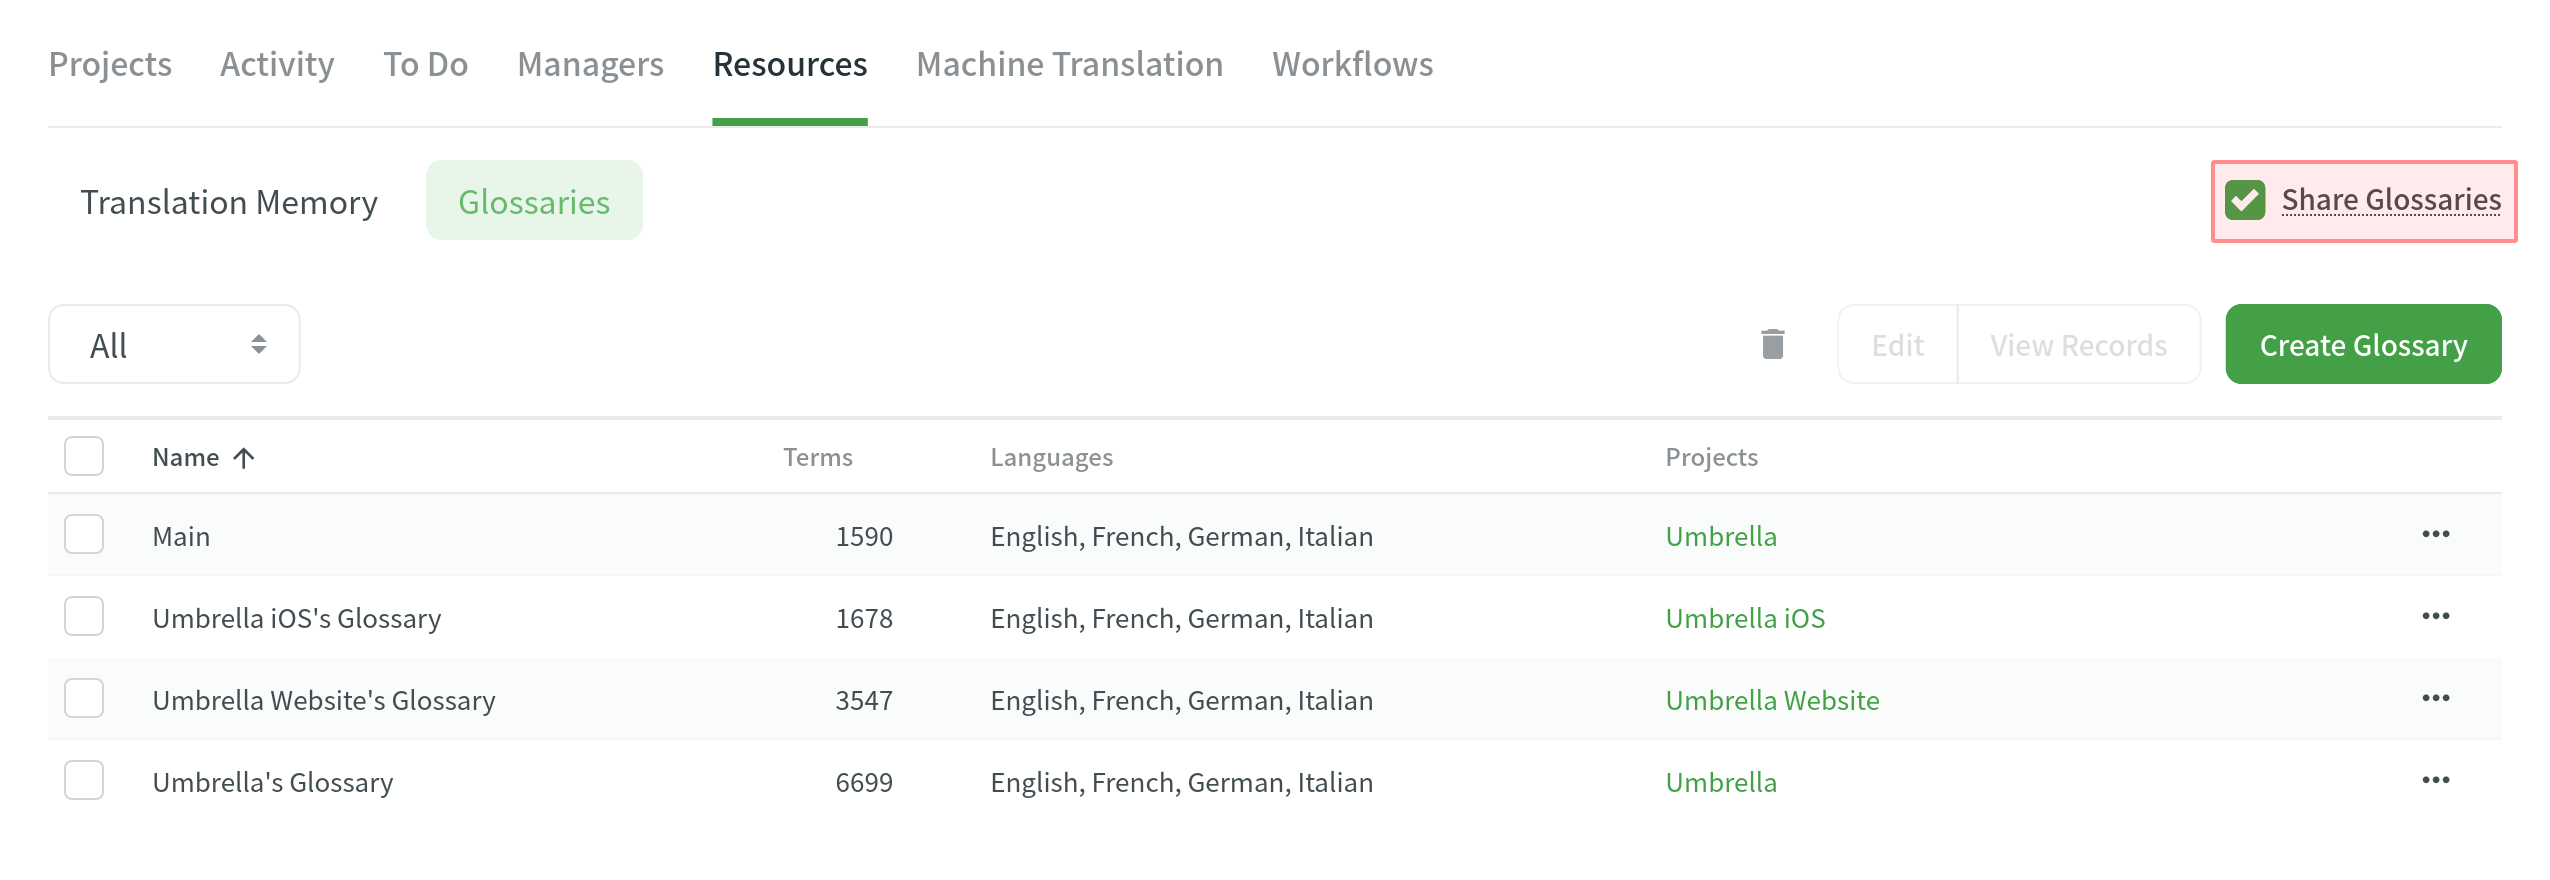
Para compartilhar seus glossários entre todos os seus projetos, siga estas etapas:
- Abra a página inicial do seu perfil e selecione Recursos > Glossários.
- Select Share Glossaries.
Termos do Glossário de Tradução
Please refer to the Translate Glossary App page.