Plugin do Figma
Com o plugin Crowdin para Figma, você pode usar textos do Crowdin em seus projetos para economizar tempo para designers e desenvolvedores. Estes podem incluir textos originais ou traduzidos. Se necessário, você pode adicionar novos (por exemplo, títulos de diálogo, rótulos de botão) e enviá-los para tradutores no Crowdin.
Casos de Uso
- Gere recursos criativos multilíngues rapidamente.
- Traduza maquetes e teste-os em diferentes idiomas antes de iniciar a programação.
- Pare de usar ‘Lorem Ipsum’, adicione textos reais do Crowdin aos seus protótipos. As strings adicionadas ao Crowdin tornam-se vinculadas aos campos de texto no Figma.
- Crie e envie strings de origem de seus designs para seu projeto Crowdin. Created strings become linked to text fields in Figma. This way, developers could use uploaded strings, reducing time spent on development.
- Preview translations and string keys in your designs.
- Carregue capturas de tela marcadas para o seu projeto Crowdin.
Running Crowdin for Figma Plugin for the First Time
- Faça login no Figma.
- Open one of your design files or click New design file.
- In the file menu, click Plugins > Manage plugins…. Alternatively, right-click the canvas and click Plugins > Manage plugins.
- Use the Search all plugins field to find Crowdin for Figma plugin.
- Click on Crowdin for Figma plugin and select Save.
- Hover over the Crowdin for Figma plugin and click Run.
Conectando o Figma com a Conta Crowdin
Configurando Credenciais Crowdin
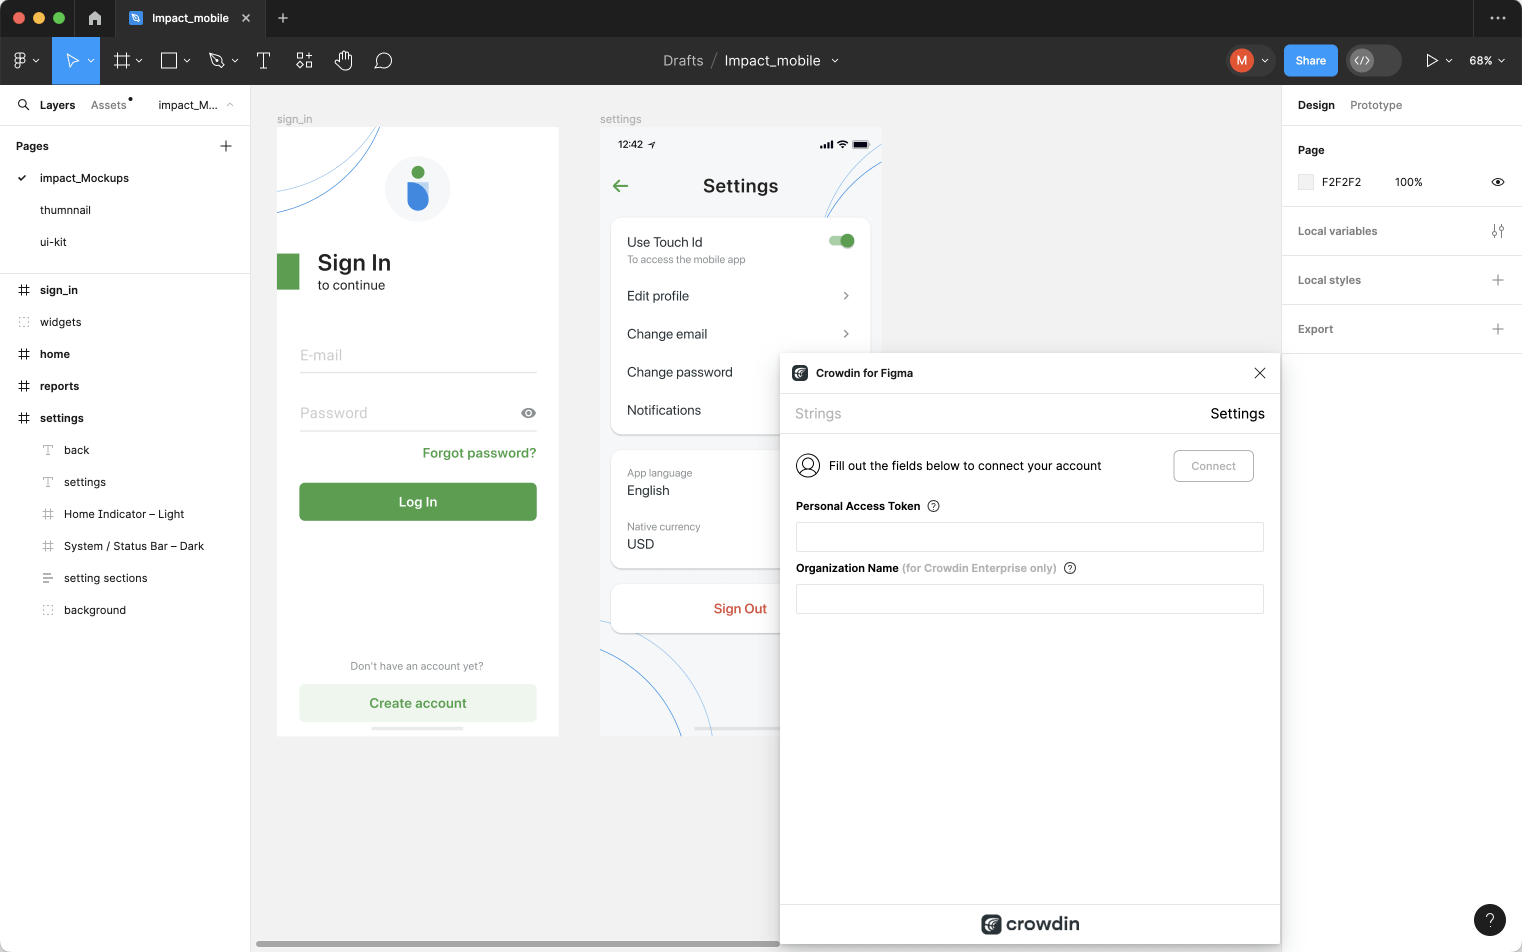
Para especificar suas credenciais do Crowdin no Figma, siga estas etapas:
- In the file menu, go to Plugins > Saved plugins. Alternatively, right-click the canvas and click Plugins > Saved plugins.
- Clique em Crowdin para Figma.
- Troque para Configurações.
- Forneça seu Token de Acesso Pessoal.
- Clique em Conectar.
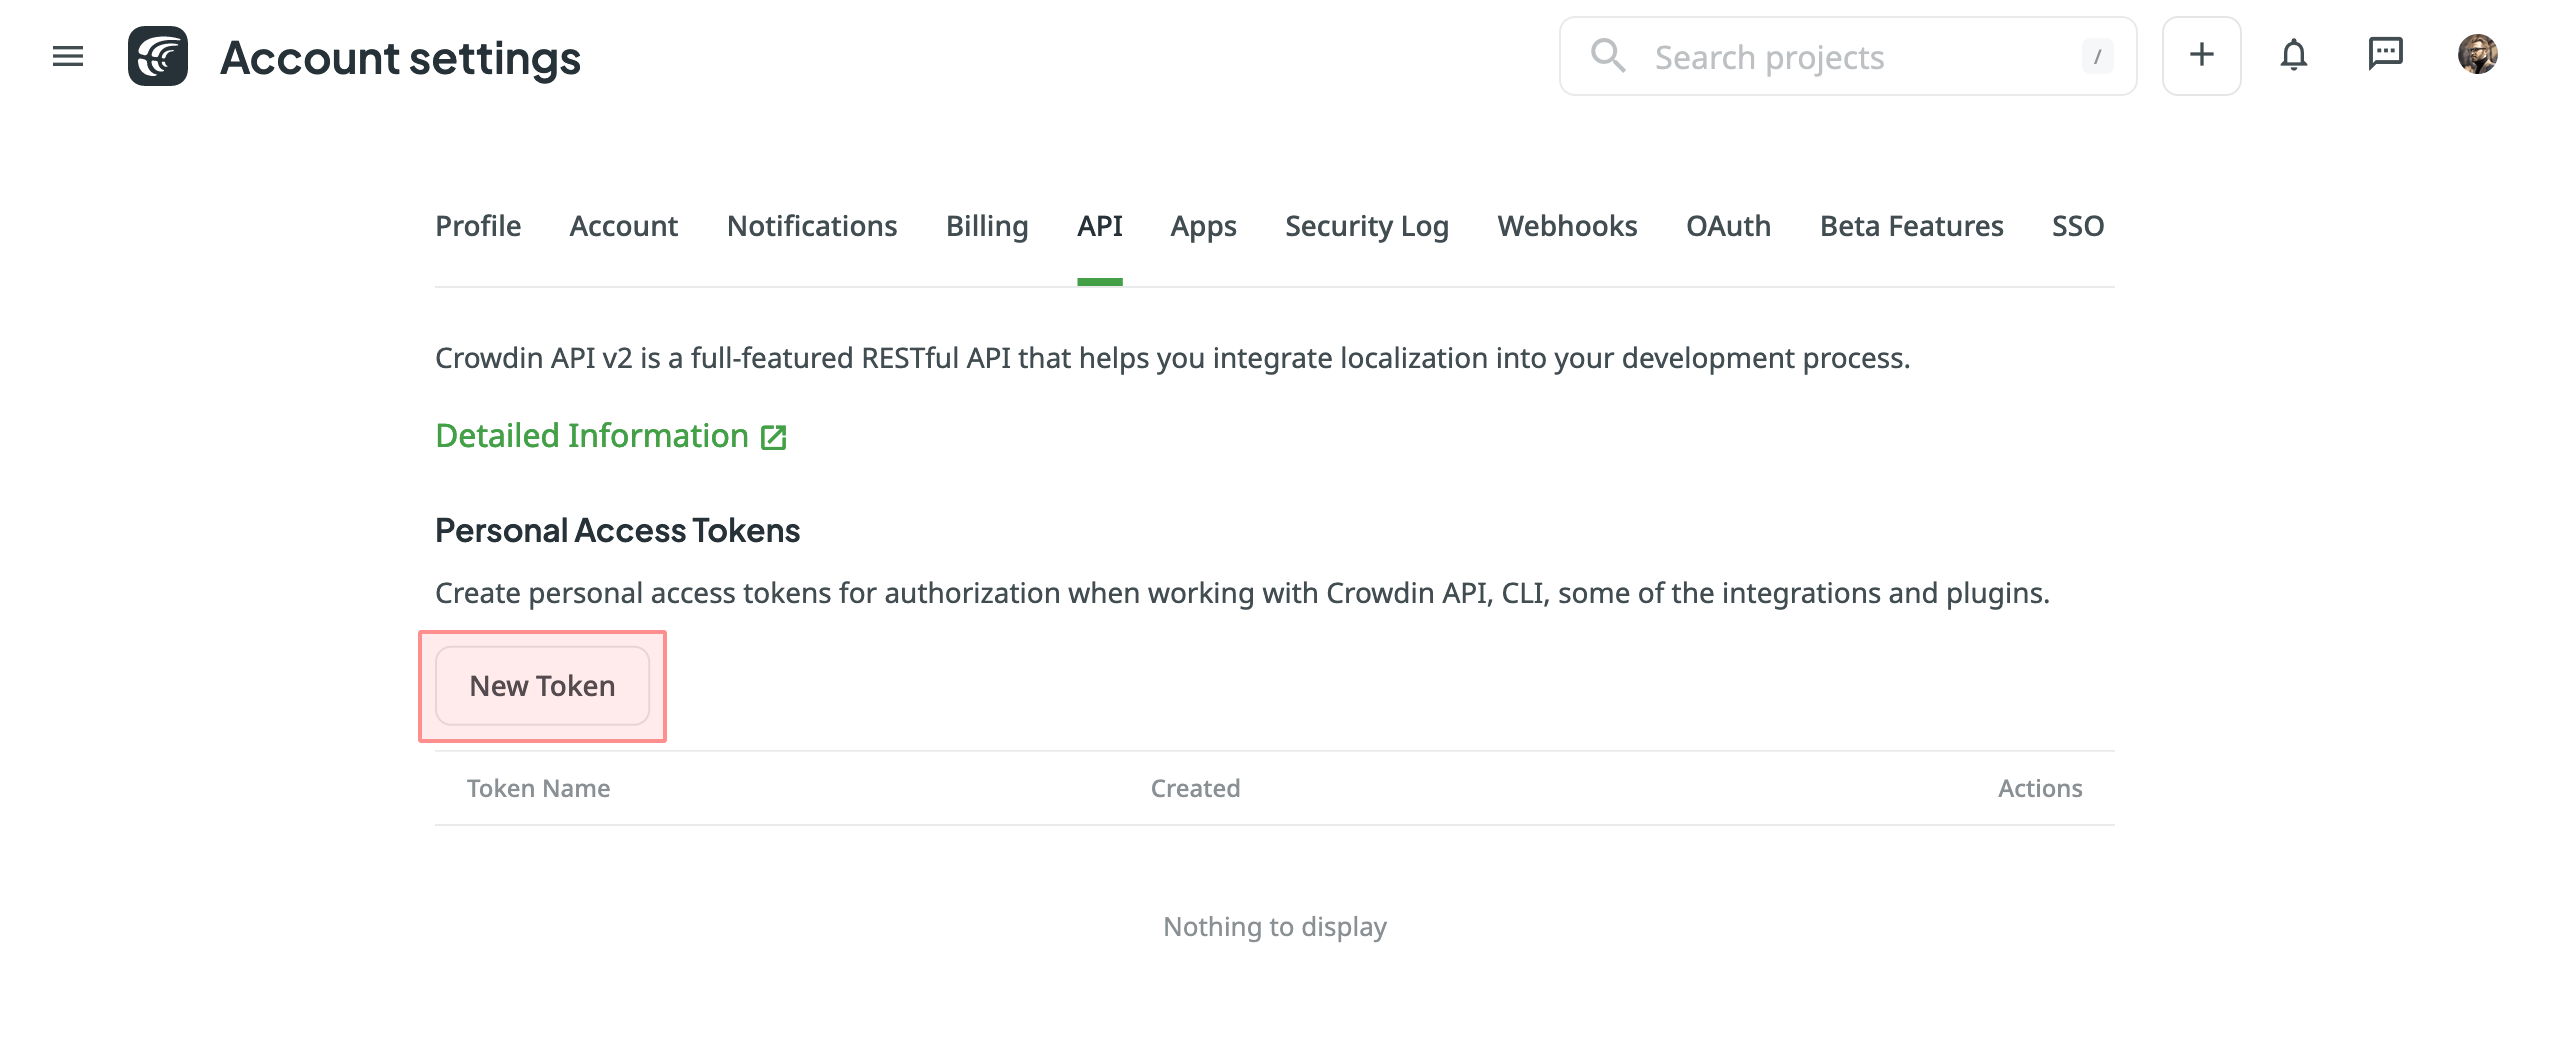
Para gerar um novo token no Crowdin, siga estas etapas:
- Vá para Configurações da Conta > API, seção Tokens de Acesso Pessoal e clique em Novo Token.
- Specify Token Name, select Scopes, and click Create.
Selecionando o projeto Crowdin
To select the project you’d like to work with, click the drop-down menu in Settings > Crowdin Project, and select a project from the list. Later, you can click Disconnect in the same section to switch to another project if needed. 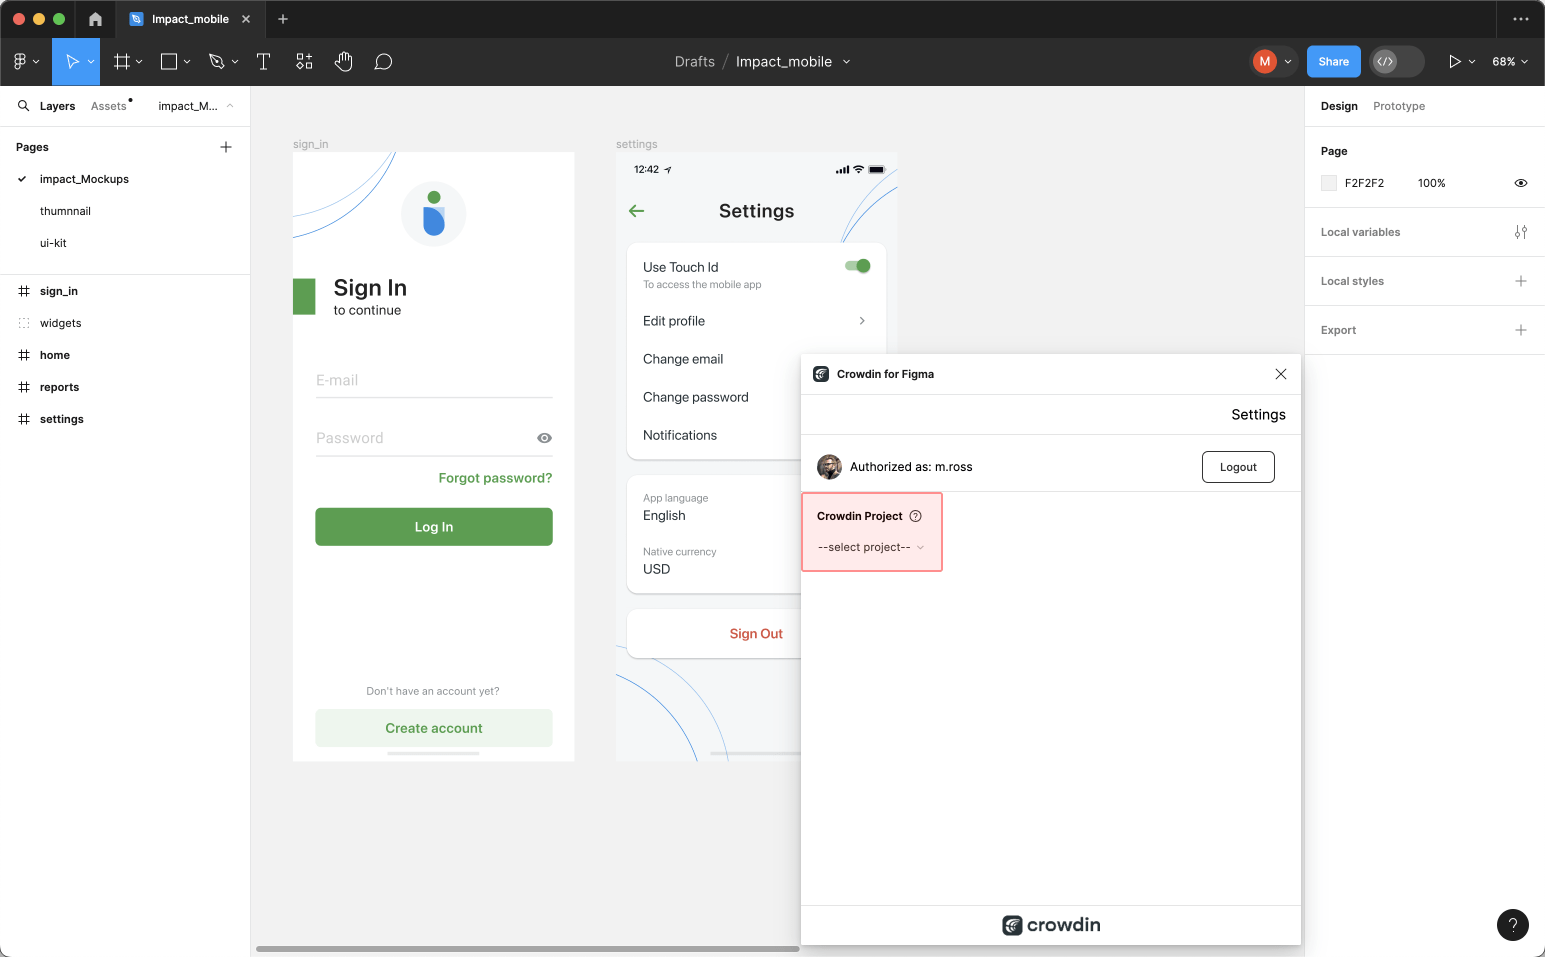
Select a content type you’re going to work with in this project and click Save.
You can choose one of the available options:
The selected content type option affects which mode of the Crowdin for Figma plugin will be available to a user. 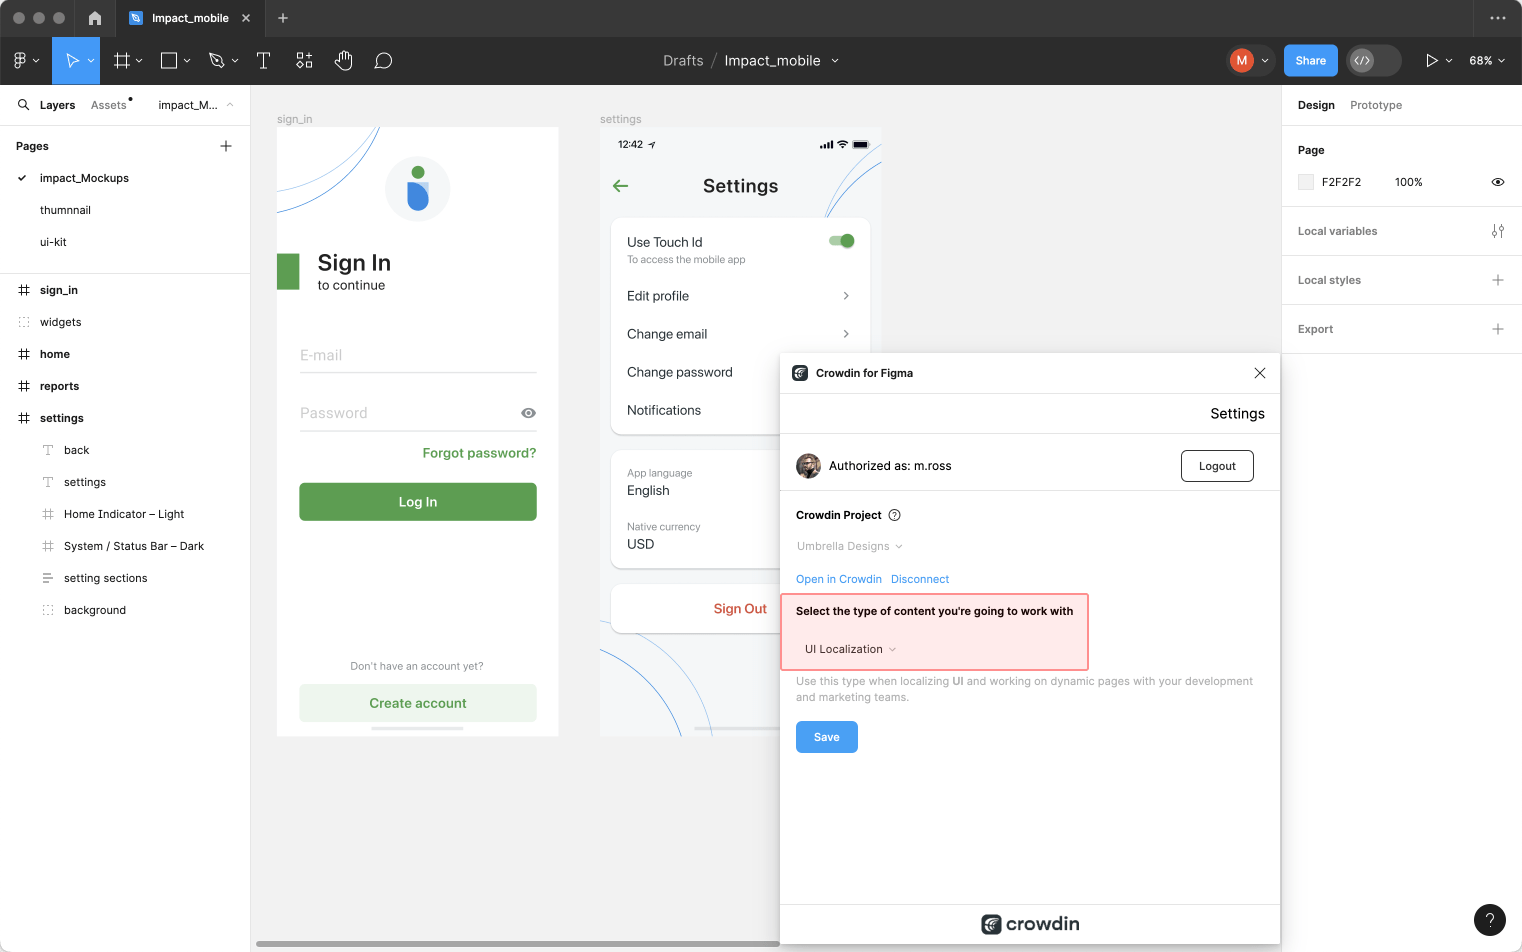
Select the specific branch your content will be uploaded to. Se o seu projeto Crowdin não tiver branches, deixe-o vazio. 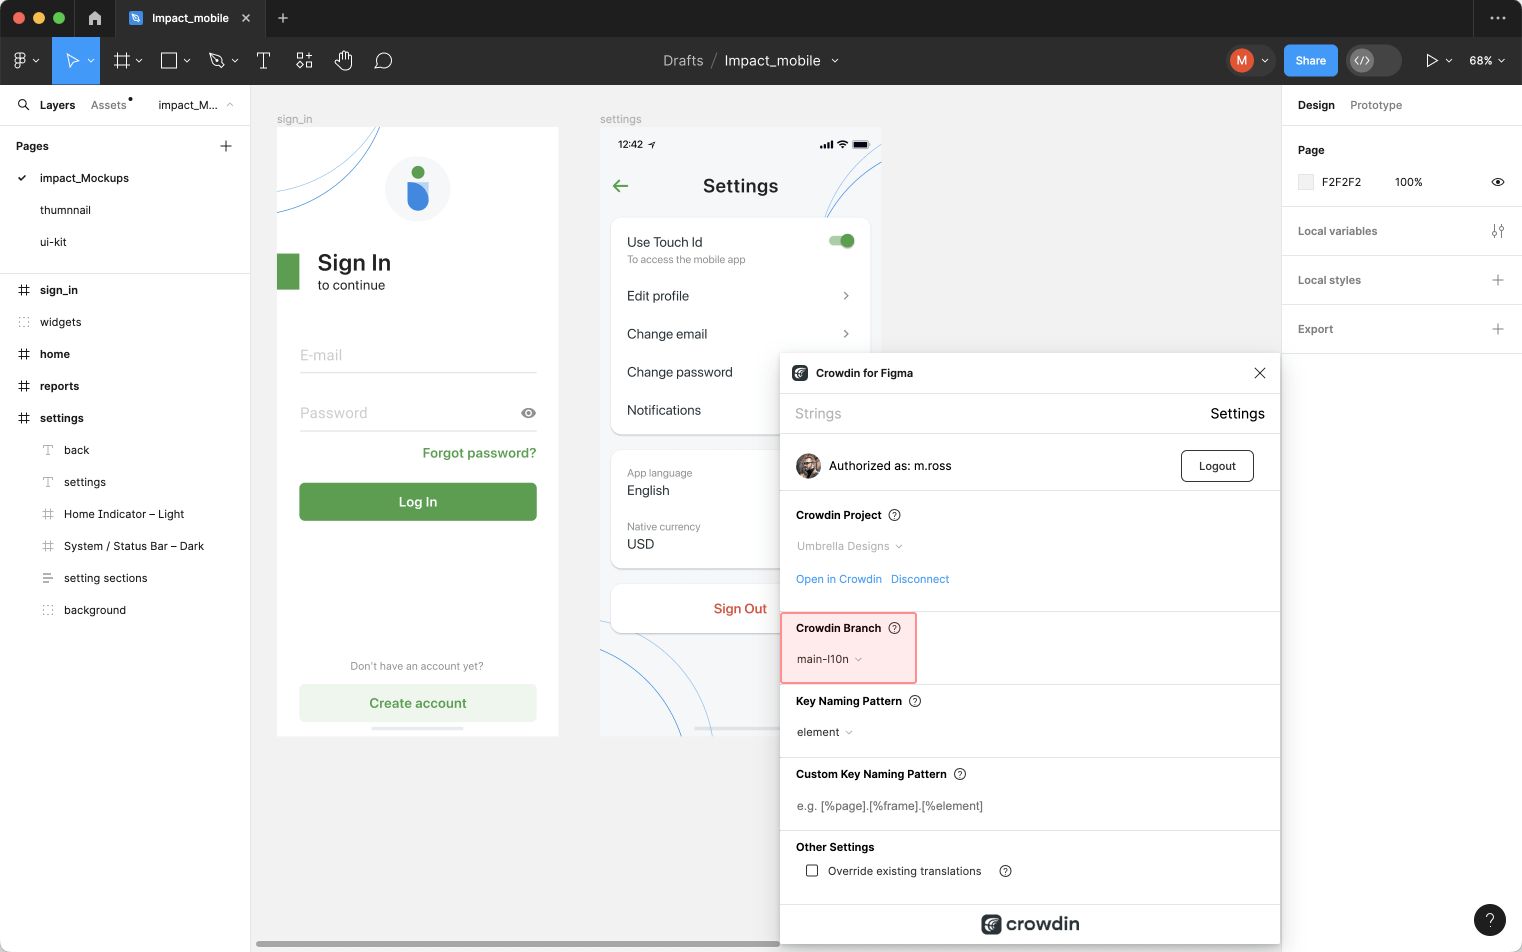
Localização da IU
Use the Strings tab when localizing UI and working on dynamic pages with your development and marketing teams. Nesta guia, você pode adicionar strings de origem do Crowdin aos seus designs no Figma com um clique. Depois que os textos são usados nos designs, você pode enviar automaticamente capturas de tela marcadas para referência dos tradutores de volta ao Crowdin.
Usando Strings de Origem do Crowdin no Figma
- Open the Crowdin plugin for Figma.
- In the Strings tab, use the Search field to find the specific copy. You can search strings by source text, string identifier, or context.
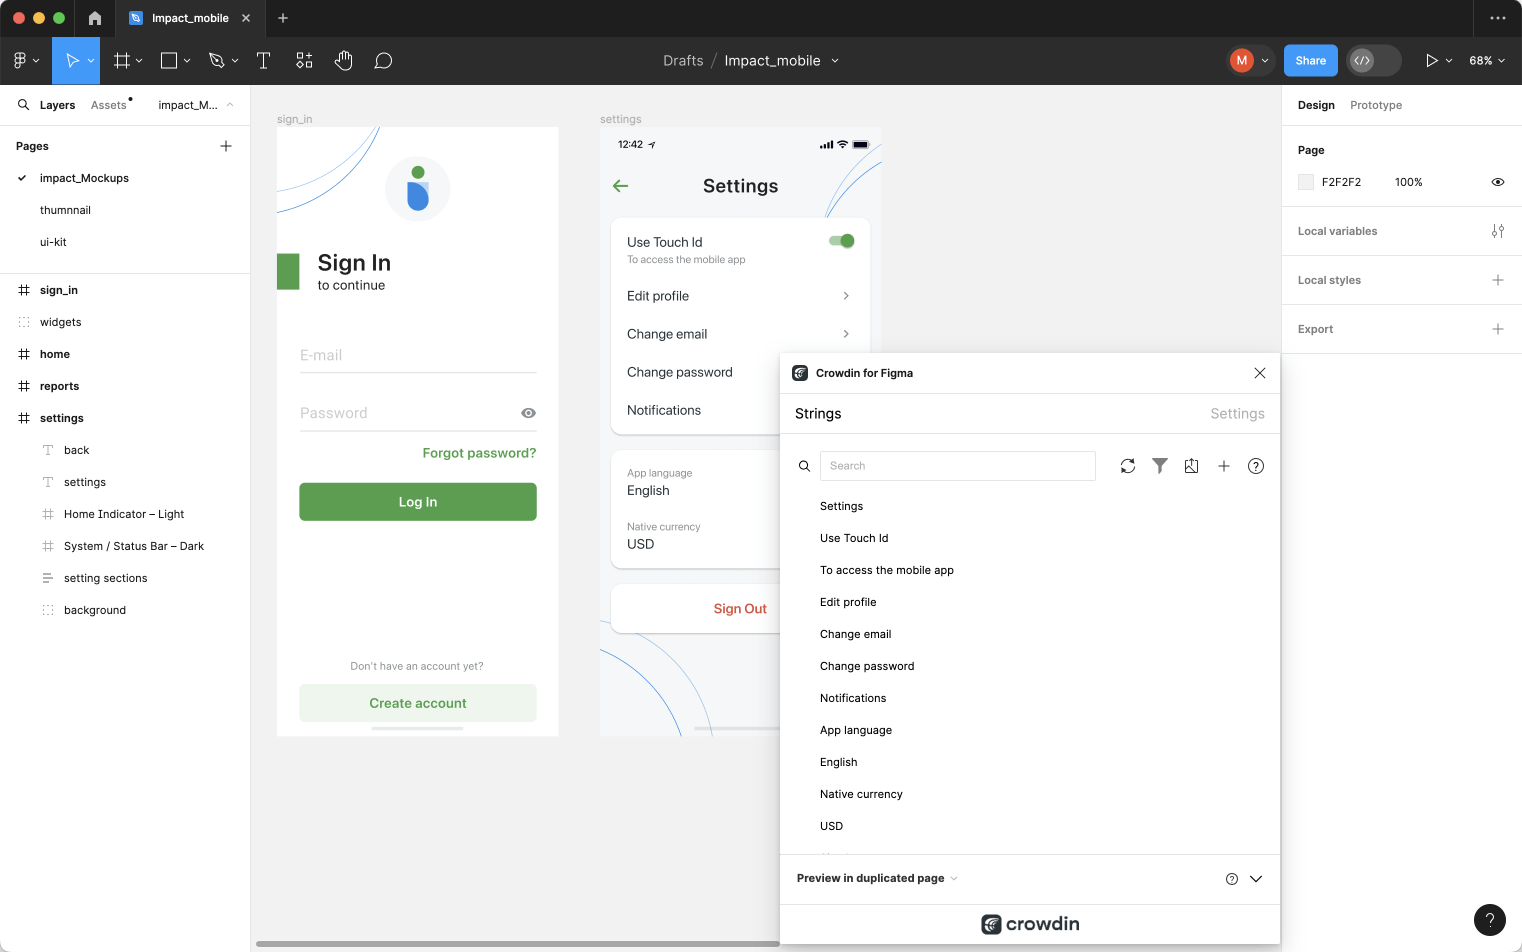
- Select the text layer to which you want to add text and click the link icon next to the needed string.
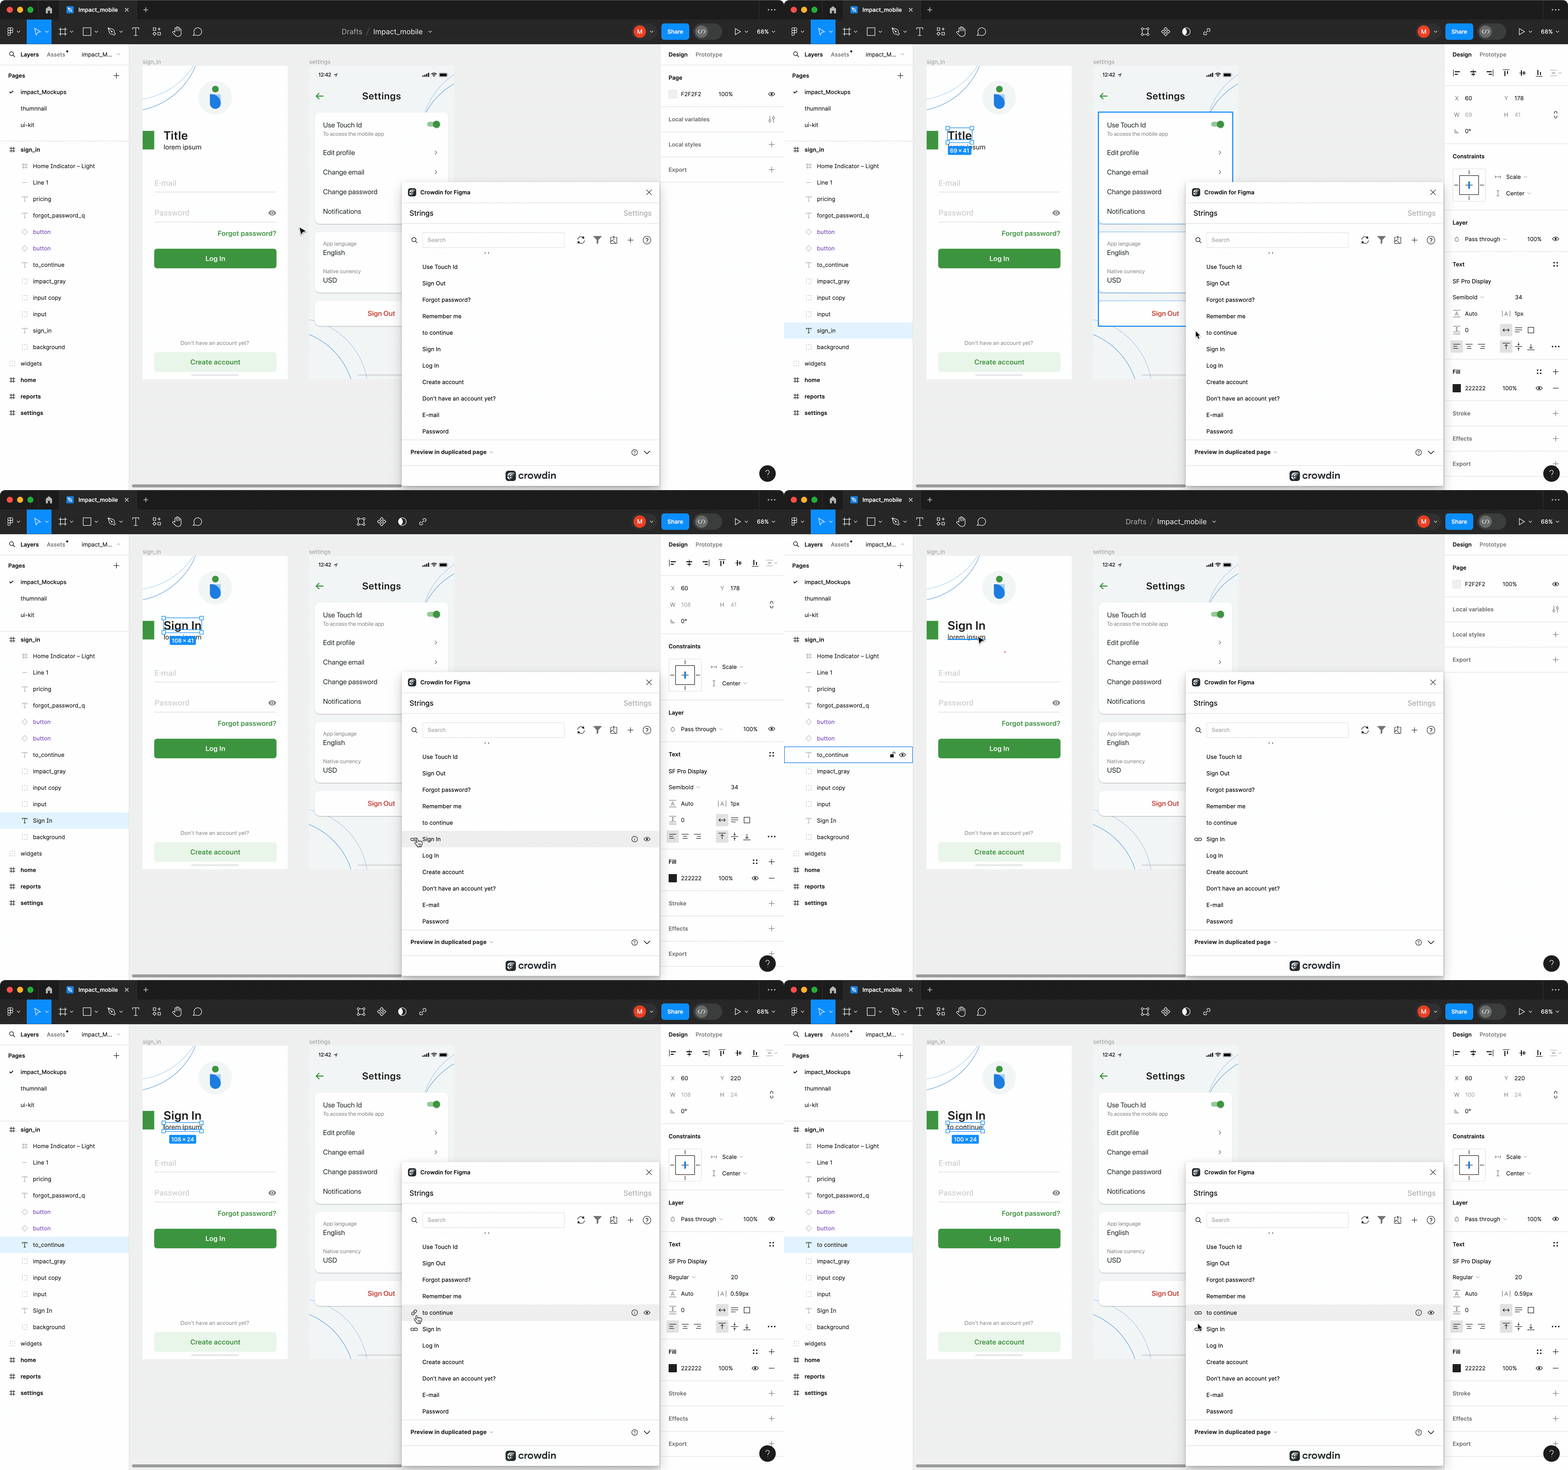
Após usar as strings de origem do Crowdin em seus designs, elas são vinculadas aos campos de texto e você pode visualizar as traduções para essas strings no Figma e enviar capturas de tela para o seu projeto Crowdin.
You can link a single Crowdin string to one or multiple text fields in Figma. However, one text field can be linked only to a single Crowdin string. If you link a text field with an existing connection to a new Crowdin string, the previous connection will be terminated, and a new connection will be established. If you’d like to unlink a Crowdin string from all text fields it was previously linked to, right-click on the link icon next to the needed string.
Adicionando Strings de Origem do Figma ao Crowdin
You can add strings that are already used in the designs.
- Open the Crowdin plugin for Figma.
- To add the strings used in the designs, select the whole frame, multiple frames, or the needed strings on the frames.
- In the Strings tab, click
 .
. - Na caixa de diálogo exibida, preencha os campos obrigatórios. You can filter the displayed strings if needed:
- Select the Skip hidden elements filter option if some frames contain hidden elements that should not be added to Crowdin.
- Select the Skip untranslated elements filter option if some frames contain untranslated elements that should not be added to Crowdin.
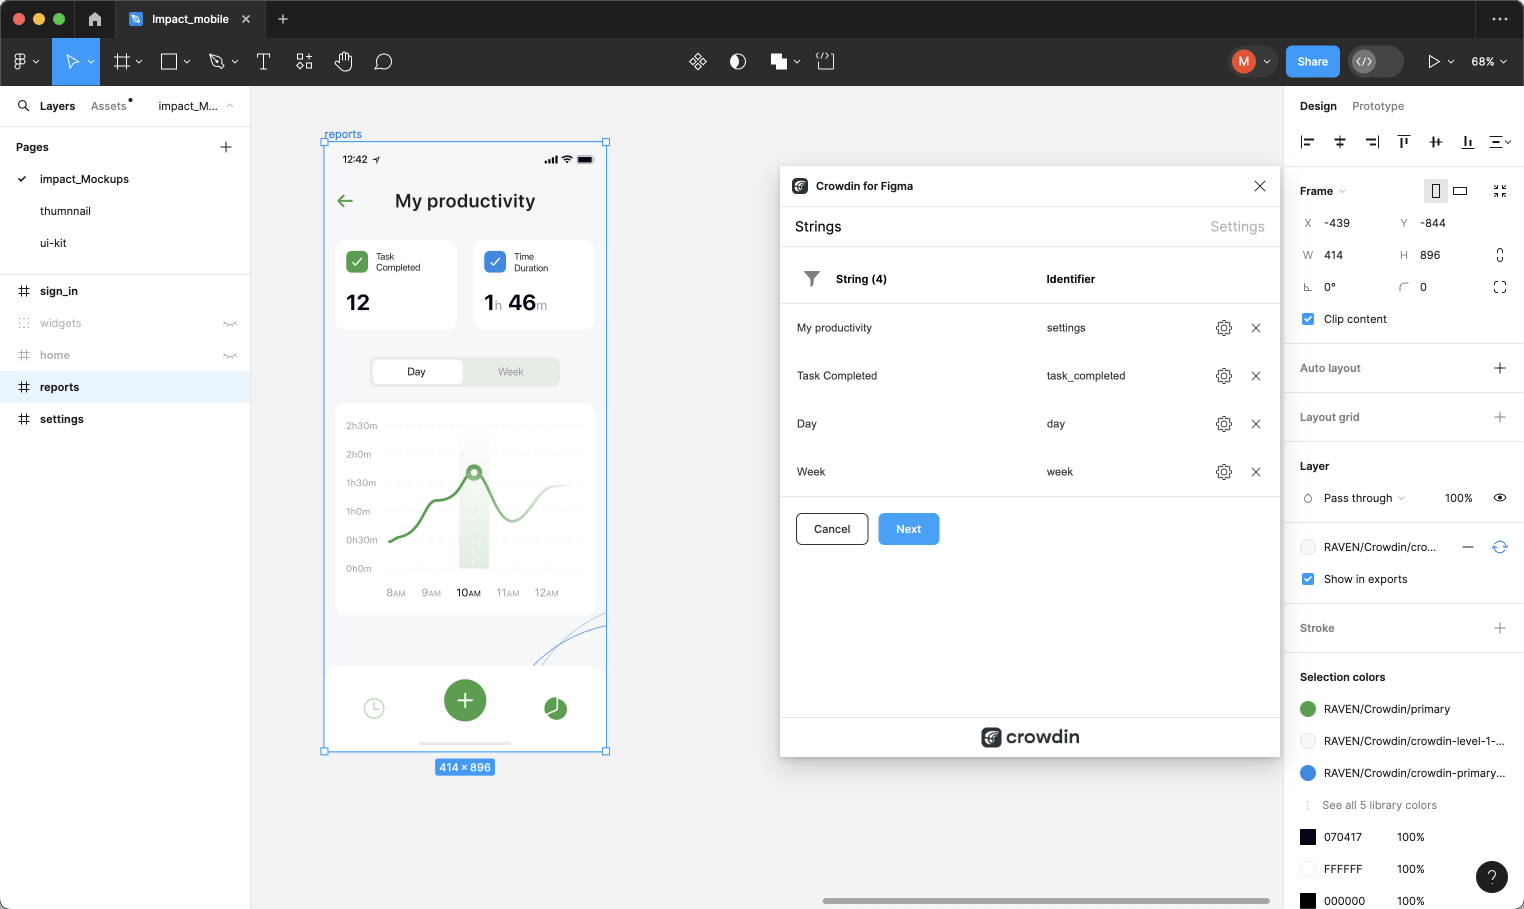
- (Optional) To update the string context and set the max.length of the translated text, click
 toward the needed string.
 - Once all the needed strings are selected and configured, click Next.
- In the next dialog page, select the preferred options:
- Auto-link existing strings – automatically compare text to existing strings in Crowdin. If there’s a match, the text element will be linked to the string in the Crowdin project.
- Create missing keys – only new text elements are added to Crowdin.
- (Optional) To add labels to the strings, alternately select them from the Select Label drop-down menu.
- Merge duplicates – link identical text elements to a single new string in Crowdin. It’s useful in the following cases:
- Ao adicionar vários campos de texto com o mesmo texto, o plugin adicionará apenas uma string ao seu projeto Crowdin e vinculará todos os campos de texto duplicados a ele.
- Se o seu projeto Crowdin já contiver uma string com o mesmo texto que você está adicionando dos designs, o plugin vinculará apenas os campos de texto à string existente e não criará uma nova.
- Send screenshots
- Select the file in Crowdin to which you want to add the strings. To add the same strings into multiple files in Crowdin, alternately select the needed files from the Select File drop-down menu.
- Click Submit.
- Once the strings are added to Crowdin, you’ll see a summary of the content sent.
As strings adicionadas serão transferidas para o seu projeto Crowdin e também exibidas na lista da guia Strings. You can edit, hide, or delete the strings from the same list anytime. As respectivas alterações também serão aplicadas às strings em seu projeto Crowdin.
Adding Source Strings with Plural Forms
You can add strings with plural forms.
- Open the Crowdin plugin for Figma.
- To add the strings used in the designs, select the whole frame, multiple frames, or the needed strings on the frames.
- In the Strings tab, click
 .
. - Na caixa de diálogo exibida, preencha os campos obrigatórios. You can filter the displayed strings if needed. Note: When adding plural strings, the fields in the String column serve for adding the other plural form.
- Click
 toward the needed string and click Add plurals.
 - In the appeared dialog, fill in the fields for each plural form and click Save. Depending on the source language of the connected Crowdin project, there could be a different number of plural forms you should specify. Note: You can add plural strings only to files that support plural forms (e.g., Android XML, Stringsdict, XLIFF, etc.).
- Once all the needed strings are selected and configured, click Next.
- In the next dialog page, select the preferred options.
- Select the file in Crowdin to which you want to add the strings.
- Click Submit.
Leia mais sobre Formas Plurais.
Configuring ICU Source String Placeholders
When using ICU strings in your design, you can set the placeholders’ values, and after adding such strings to designs, they will be displayed in a formatted view with the preconfigured values.
Once you use the needed ICU string from Crowdin in your design, you can configure its placeholder values.
- Open the Crowdin plugin for Figma.
- In the Strings tab, use the Search field to find the specific copy. You can search strings by source text, string identifier, or context.
- Click
 on the needed ICU string.
 - Click Set placeholders.
- Type the needed values for ICU string placeholders.
- Click Submit to save the entered placeholders.
- Click Submit to update the source string text in designs.
When previewing translations for ICU strings in Figma, they will also be displayed in a formatted view if the values were preconfigured beforehand.
Configurações do Padrão de Nomeação de Teclas
Para simplificar a adição de strings do Figma ao projeto Crowdin, você pode configurar o padrão de nomenclatura de chave desejado para os identificadores da string de origem nas configurações do plugin. The Crowdin plugin for Figma will suggest the string identifiers for new strings based on the selected pattern. Ao adicionar novas strings de origem, você sempre pode editar o identificador sugerido para a aparência preferida.
Para selecionar o padrão de nomeação de teclas, siga estas etapas:
- Open the Crowdin plugin for Figma.
- Troque para Configurações.
- Na seção Padrão de nomeação de teclas, selecione a opção preferida no menu suspenso.
Besides the existing patterns, you can configure your own pattern. To use a custom pattern, select the Custom key naming pattern option from the drop-down list and specify your pattern in the Custom Key Naming Pattern field.
Enviando Capturas de Tela Marcadas para o Crowdin
Ao adicionar strings de origem usadas nos designs, certifique-se de manter a opção Enviar capturas de tela selecionada. Como resultado, o plugin Crowdin para Figma carregará capturas de tela junto com as strings de origem.
Also, you can update screenshots with an Update screenshots option while editing a Crowdin string that is linked to the text fields in designs.
Além disso, você pode fazer o envio em massa de capturas de tela para o Crowdin para strings vinculadas a campos de texto em designs.
- Open the Crowdin plugin for Figma.
- Select one or more frames with the linked strings.
- In the Strings tab, click
to upload screenshots for selected frames.
Para saber mais, leia o artigo Capturas de tela.
Visualizando Strings
Visualize as traduções do Crowdin para as strings usadas nos designs no Figma. You can preview translations in the new frames or the original ones. When previewing translations in the new frames, you can populate them with the actual translations or with string keys for further use by developers.
Para visualizar strings preenchidas com traduções, siga estas etapas:
- Open the Crowdin plugin for Figma.
- In the Strings > Preview Strings section, select Preview in duplicated page or Preview in the current page.
- Selecione Criar com idioma.
- Select the target language you want to preview translations for (optionally, you can select the preferred plural forms). Você também pode escolher Todos os idiomas.
- Select the content you want to preview in Figma. Select All Frames or Selected Frames.
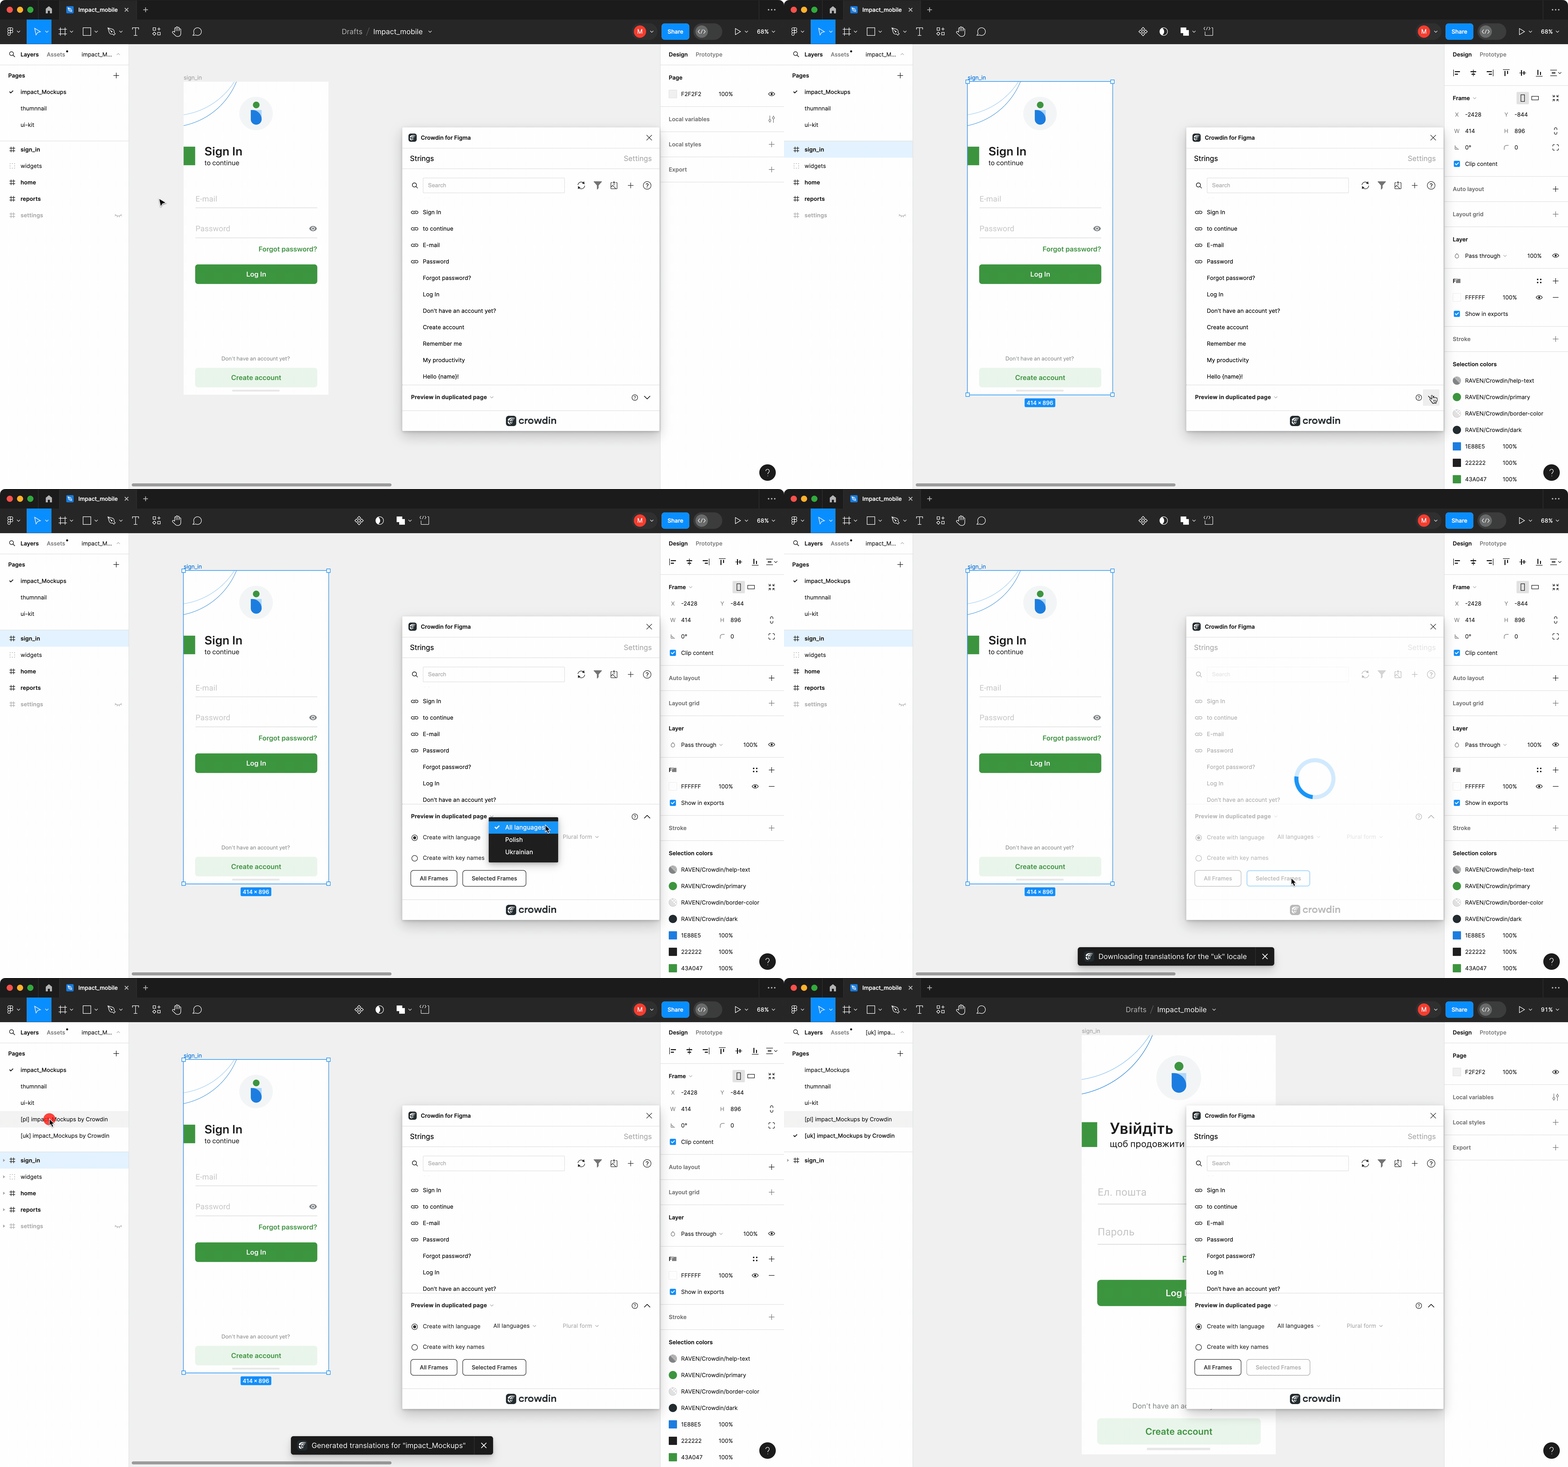
Para visualizar strings preenchidas com nomes de chave, siga estas etapas:
- Open the Crowdin plugin for Figma.
- In the Strings > Preview Strings section, select Preview in duplicated page.
- Selecione Criar com nomes de chaves.
- Select the content you want to preview in Figma. Select All Frames or Selected Frames.
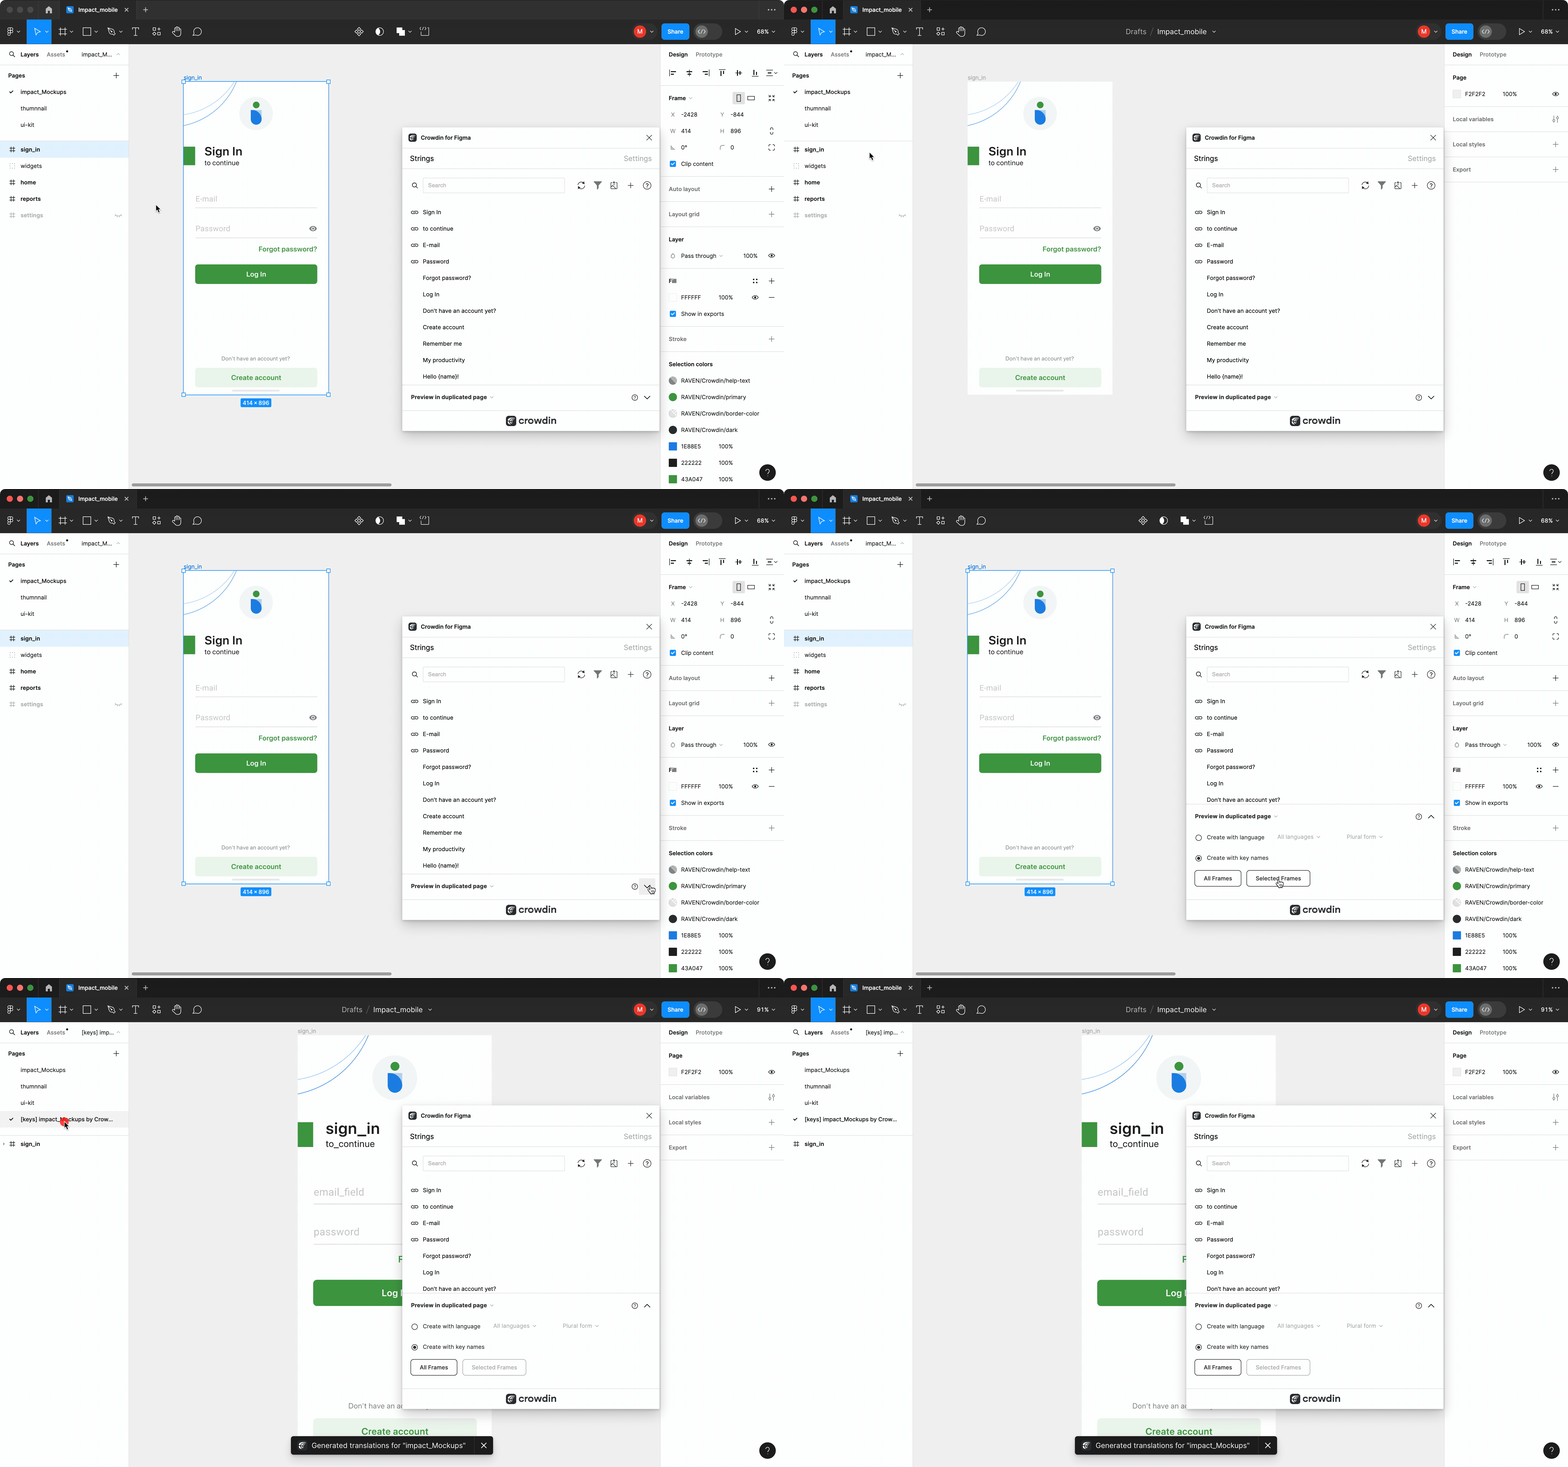
Filtrando textos
To view only the strings linked to specific text fields, follow these steps:
- Select the needed text fields.
- In the Strings tab, click Filter strings.
- Select Show strings linked to selected text elements.
In the same way, you can filter strings linked to text fields for the whole frame or multiple frames.
Localização de Visuais de Marketing
Use the Pages tab to localize static pages, like brochures and banners. Nesta guia, você pode enviar textos com contexto para tradutores para o Crowdin e enviar cópias traduzidas de volta para o Figma.
Enviando Textos para Tradução para o Crowdin
You can send text for translation either from selected or all frames from a Figma file. Os tradutores trabalharão com esses textos na exibição de lista e usarão designs como um contexto adicional para uma qualidade de tradução ainda maior.
No Crowdin, uma pasta raiz figma-plugin será criada. It will contain a subfolder named after your Figma file with HTML files for each frame inside. If needed, you can disable content segmentation in the plugin Settings so the long texts will not be split into sentences.
Para enviar projetos Figma para tradução, siga estas etapas:
- Abra o arquivo Figma necessário.
- Go to Plugins > Crowdin for Figma.
- In the Pages > Figma to Crowdin section, select the content you’d like to translate. Select All Frames or Selected Frames.
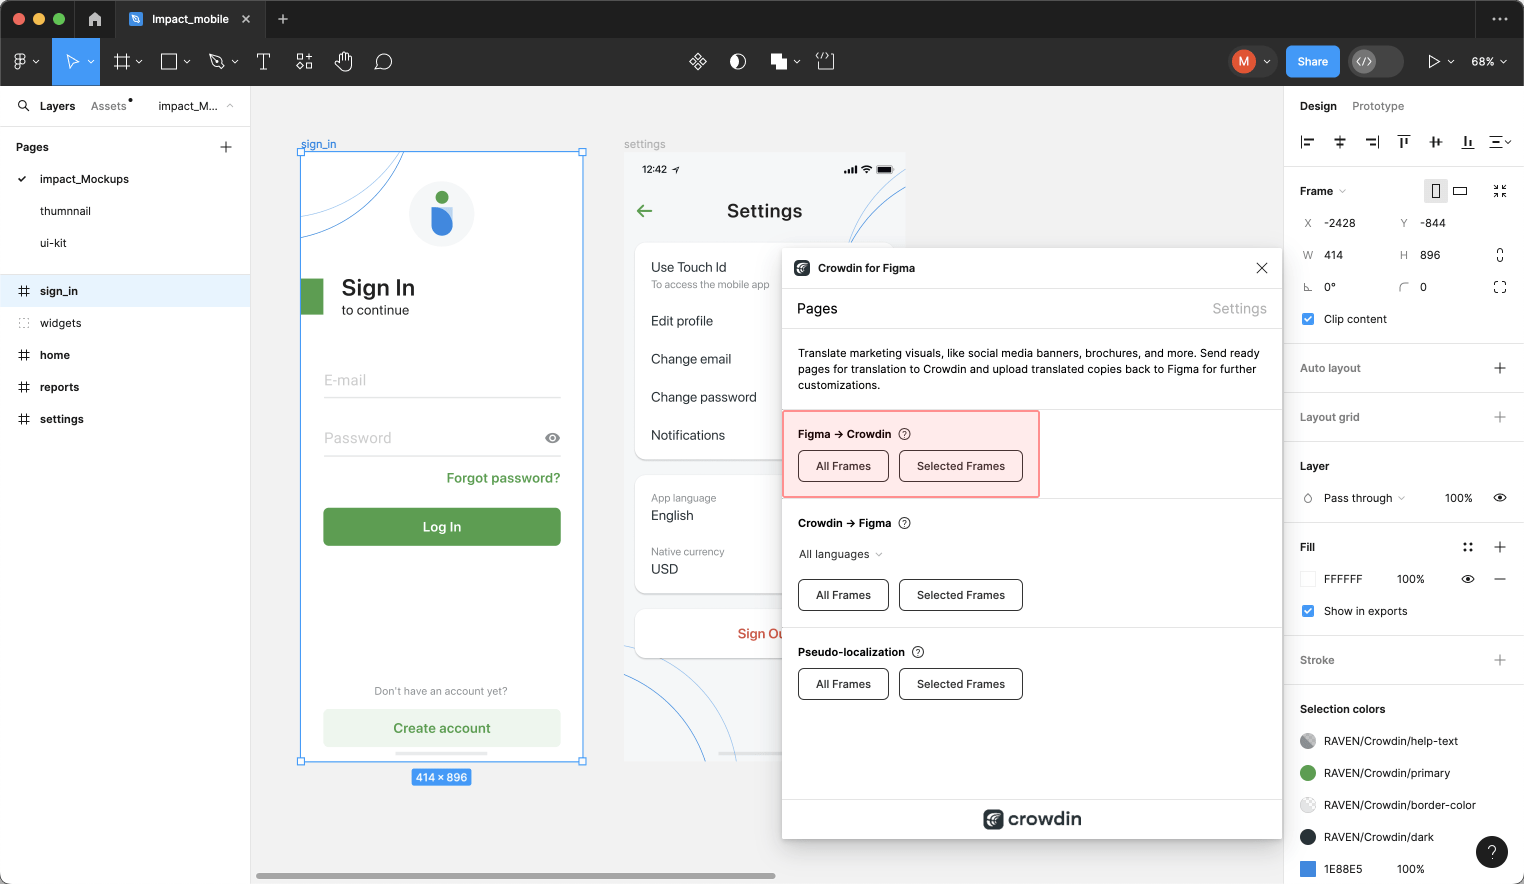
Quando os arquivos de origem são carregados no seu projeto Crowdin, você pode convidar colaboradores para traduzi-los e revisá-los.
Leia mais sobre estratégias de tradução.
Pseudo-localização
Even before translations are completed, you can test whether your application is ready to be localized using pseudo-localization. This feature allows you to simulate how the application’s UI will look with different languages to check whether the source strings should be modified before the project localization starts.
Once you send your texts for translation, you can start pseudo-localization.
- Abra o arquivo Figma necessário.
- Go to Plugins > Crowdin for Figma.
- In the Pages > Pseudo-localization section, select the content you’d like to test with pseudo-localization. Select All Frames or Selected Frames.
- In the appeared dialog, configure settings according to your preferences.
- Click Submit.
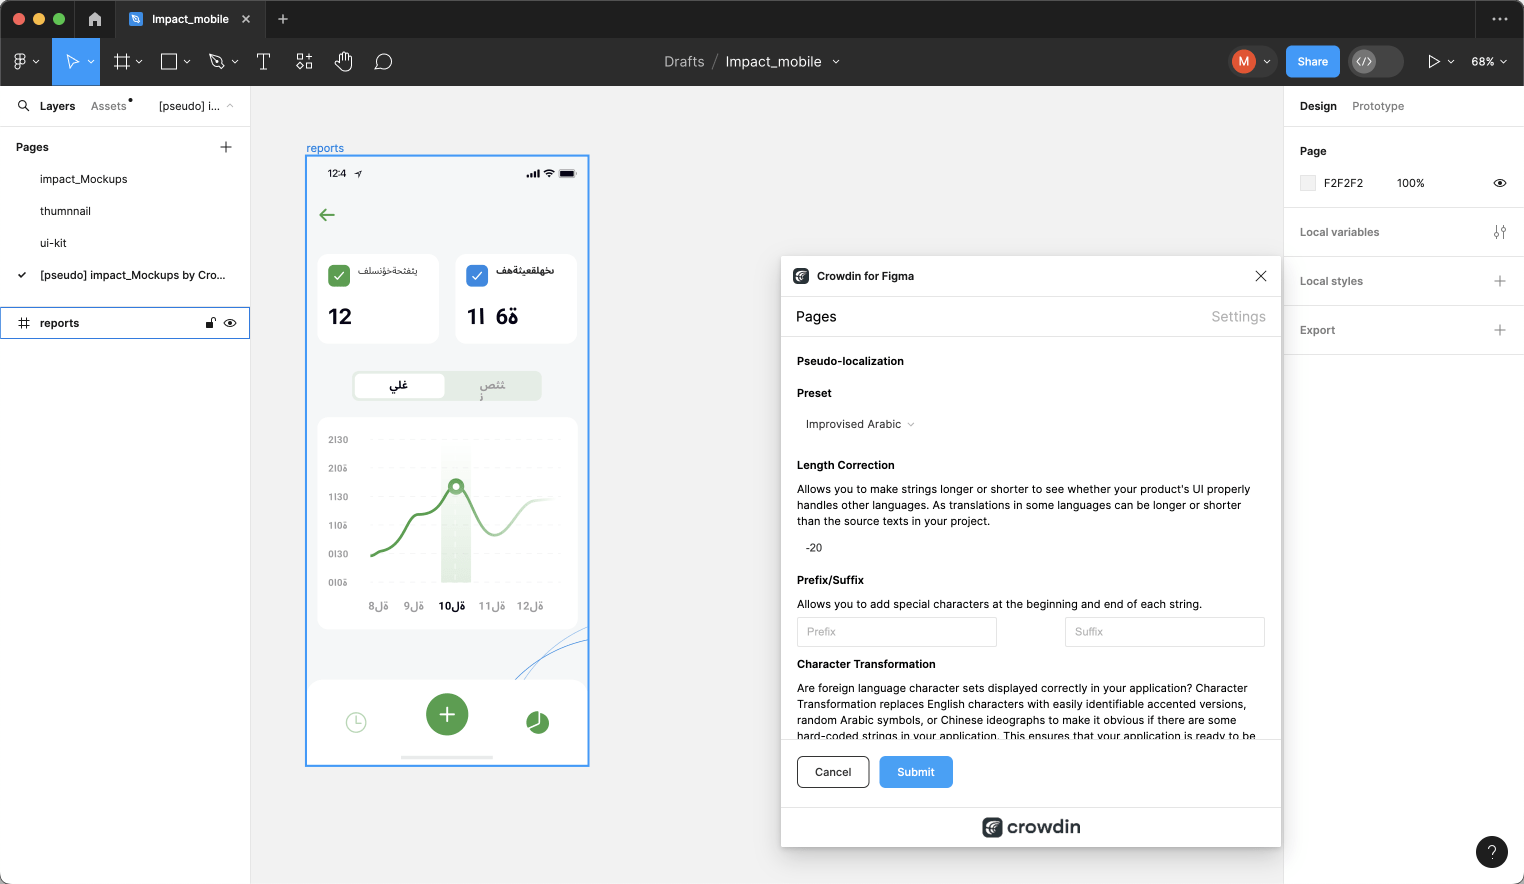
Read more about Pseudo-localization.
Fazendo o Envio de Traduções do Crowdin para Figma
Você pode sincronizar textos entre os projetos Figma e Crowdin sempre que quiser testar a cópia traduzida dentro do Figma ou gerar ativos multilíngues.
To upload translated copies to Figma, follow these steps:
- Abra o arquivo Figma necessário.
- Go to Plugins > Crowdin for Figma.
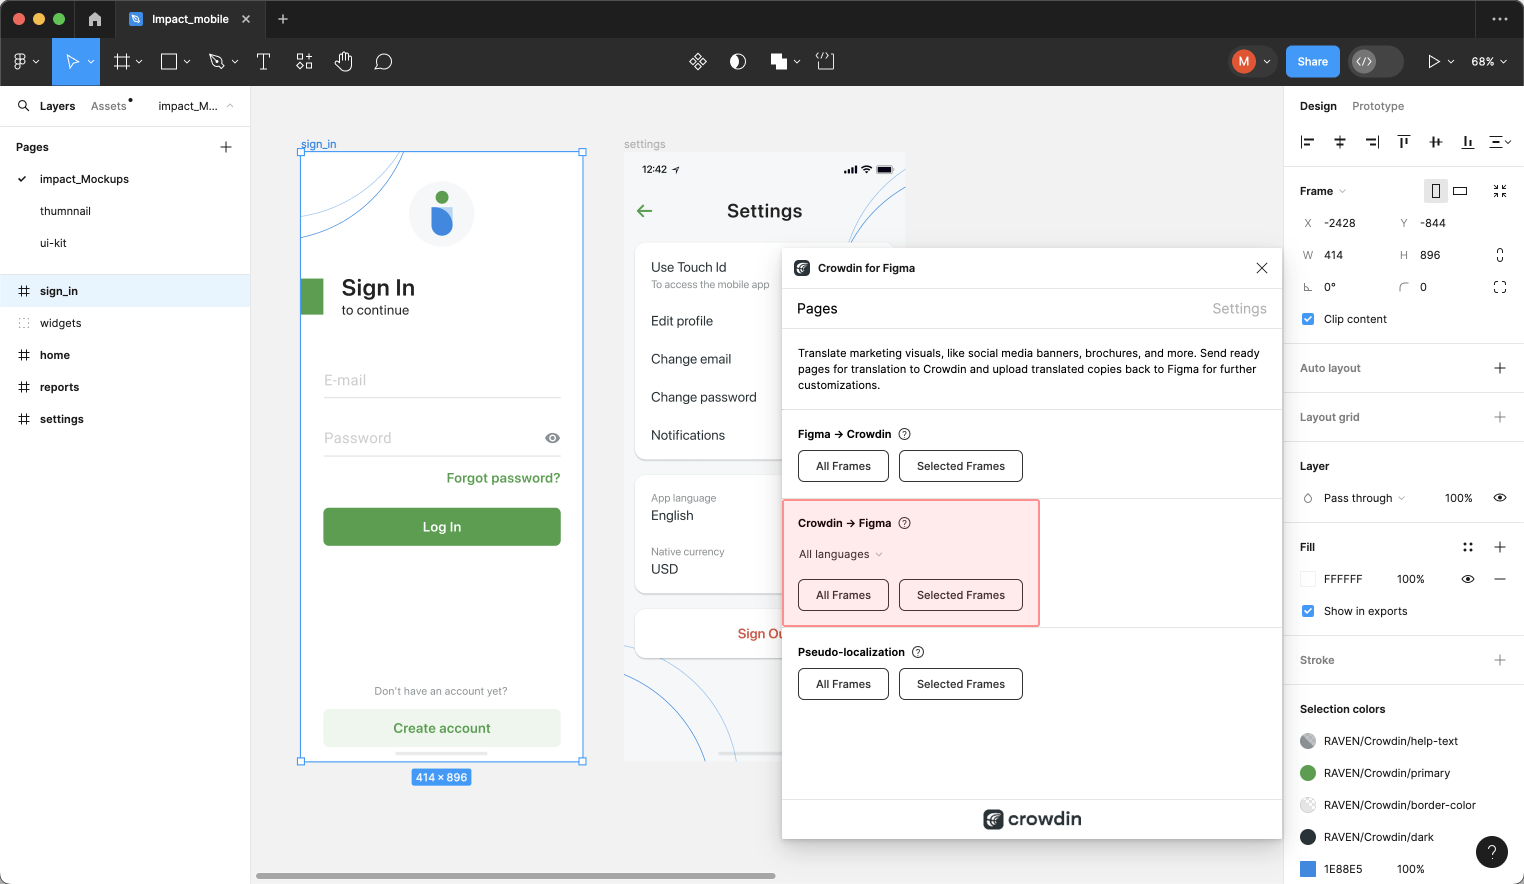
- In the Pages tab, Crowdin to Figma section, select the target language you want to upload translations for. Você também pode selecionar Todos os idiomas.
- Escolha o conteúdo que você deseja visualizar na Figma. Select All Frames or Selected Frames. Note: Page names in Figma can consist of only letters (a-z, A-Z), numbers (0-9), and special characters
-_.
After uploading translations to Figma, the modified file will contain a separate frame with translations for each target language. As versões traduzidas recém-carregadas não substituirão as que você carregou anteriormente. Você sempre pode excluir as cópias traduzidas que não são mais necessárias. 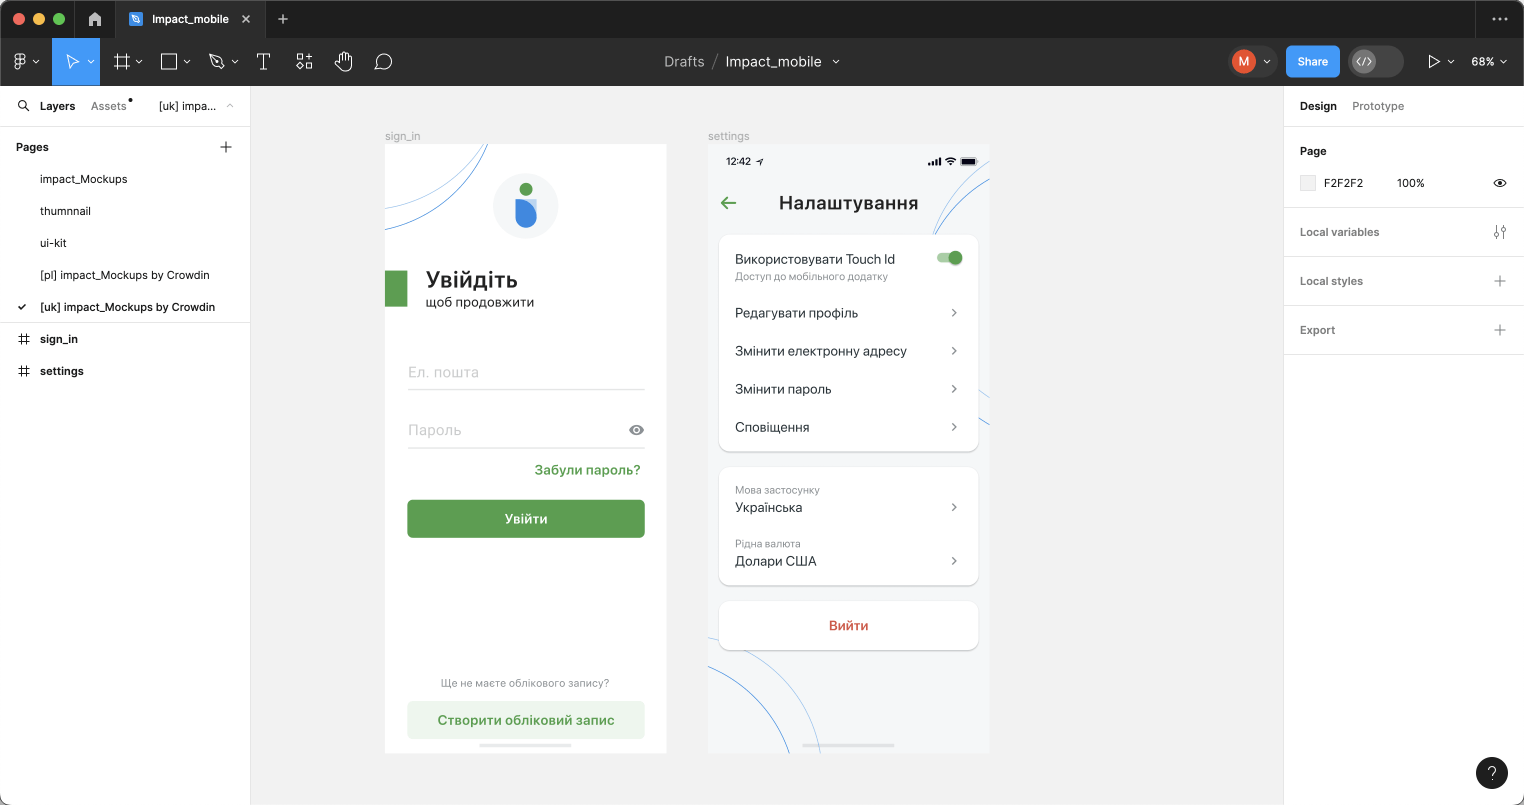
Se você quiser que as versões traduzidas recém-carregadas substituam as carregadas anteriormente, abra o plugin Configurações e selecione Substituir traduções existentes.
Crowdin for Figma Plugin in Dev Mode
Figma’s Dev Mode allows designers and developers to collaborate, ensuring accuracy in implementation and a smooth transition from design to code.
Read more about Figma Dev Mode.
The integration of Crowdin for Figma plugin with Dev Mode extends the functionality of both platforms, enhancing the localization process within the design environment. While Dev Mode in Figma has its limitations – it’s read-only, certain limitations apply to the Crowdin for Figma plugin’s capabilities:
What You Can Do:
- Access the Strings tab to view and manage strings.
- Explore string details, including file, key, context, and labels.
- Quickly copy string keys for efficient workflow.
Features not available in Dev Mode: adding new strings to Crowdin, linking strings, sending screenshots, previewing translations, editing, hiding, or deleting strings.
Using Crowdin for Figma Plugin in Dev Mode
Despite the limitations, the Crowdin for Figma plugin remains valuable in Dev Mode, offering developers a streamlined approach to text elements management. Here’s a typical use case:
- Enter Dev Mode.
- In the right sidebar, switch to the Plugins tab.
- Click on Crowdin for Figma.
- In the Strings tab, click Filter strings and select Show strings linked to selected text elements.
- Select the needed string on the frame and hover over the
 icon in the string list to view all needed information (i.e., key, context, file it’s stored in, labels) about this particular string.
 - (Optional) Click Copy string key to clipboard to further use it in code.
Compatibility with Figma for VS Code
Furthermore, the Crowdin for Figma plugin seamlessly integrates with Figma for VS Code, extending its functionality to developers using this environment.
Read more about Figma for VS Code.