Plugin di Figma
With the Crowdin for Figma plugin, you can use texts from Crowdin in your designs to save time for both designers and developers. These could include original or translated texts. If necessary, you can add new ones (e.g., dialog titles, button labels) and send them to translators in Crowdin.
Casi d’Uso
- Quickly generate multilingual creative assets.
- Traduci i mockup e testali in diverse lingue prima che la programmazione inizi.
- Stop using ‘Lorem Ipsum’, add real texts from Crowdin to your prototypes instead. Strings added from Crowdin become linked to the text fields in Figma.
- Create and upload source strings from your designs to your Crowdin project. Le stringhe create sono collegate ai campi di testo su Figma. Così, gli sviluppatori potrebbero usare le stringhe caricate, riducendo il tempo dedicato allo sviluppo.
- Anteprima delle traduzioni e chiavi della stringa nei tuoi design.
- Upload tagged screenshots to your Crowdin project.
Eseguire Crowdin per il Plugin di Figma per la Prima Volta
- Accedi a Figma.
- Apri uno dei file del tuo progetto o clicca Nuovo file del progetto.
- In the file menu, click Plugins > Manage plugins…. Alternatively, right-click the canvas and click Plugins > Manage plugins.
- Usa il campo Cerca tutti i plugin per trovare il plugin di Crowdin per Figma.
- Click on Crowdin for Figma plugin and select Save.
- Passa col mouse sul plugin di Crowdin per Figma e clicca Esegui.
Connettere Figma con il Profilo di Crowdin
Setting up Crowdin Credentials
Per specificare le tue credenziali di Crowdin in Figma, segui questi passaggi:
- Nel menu del file, vai a Plugin > Plugin salvati. Alternatively, right-click the canvas and click Plugins > Saved plugins.
- Click Crowdin for Figma.
- Passa a Impostazioni.
- Fornisci il tuo Token di Accesso Personale.
- Click Connect.
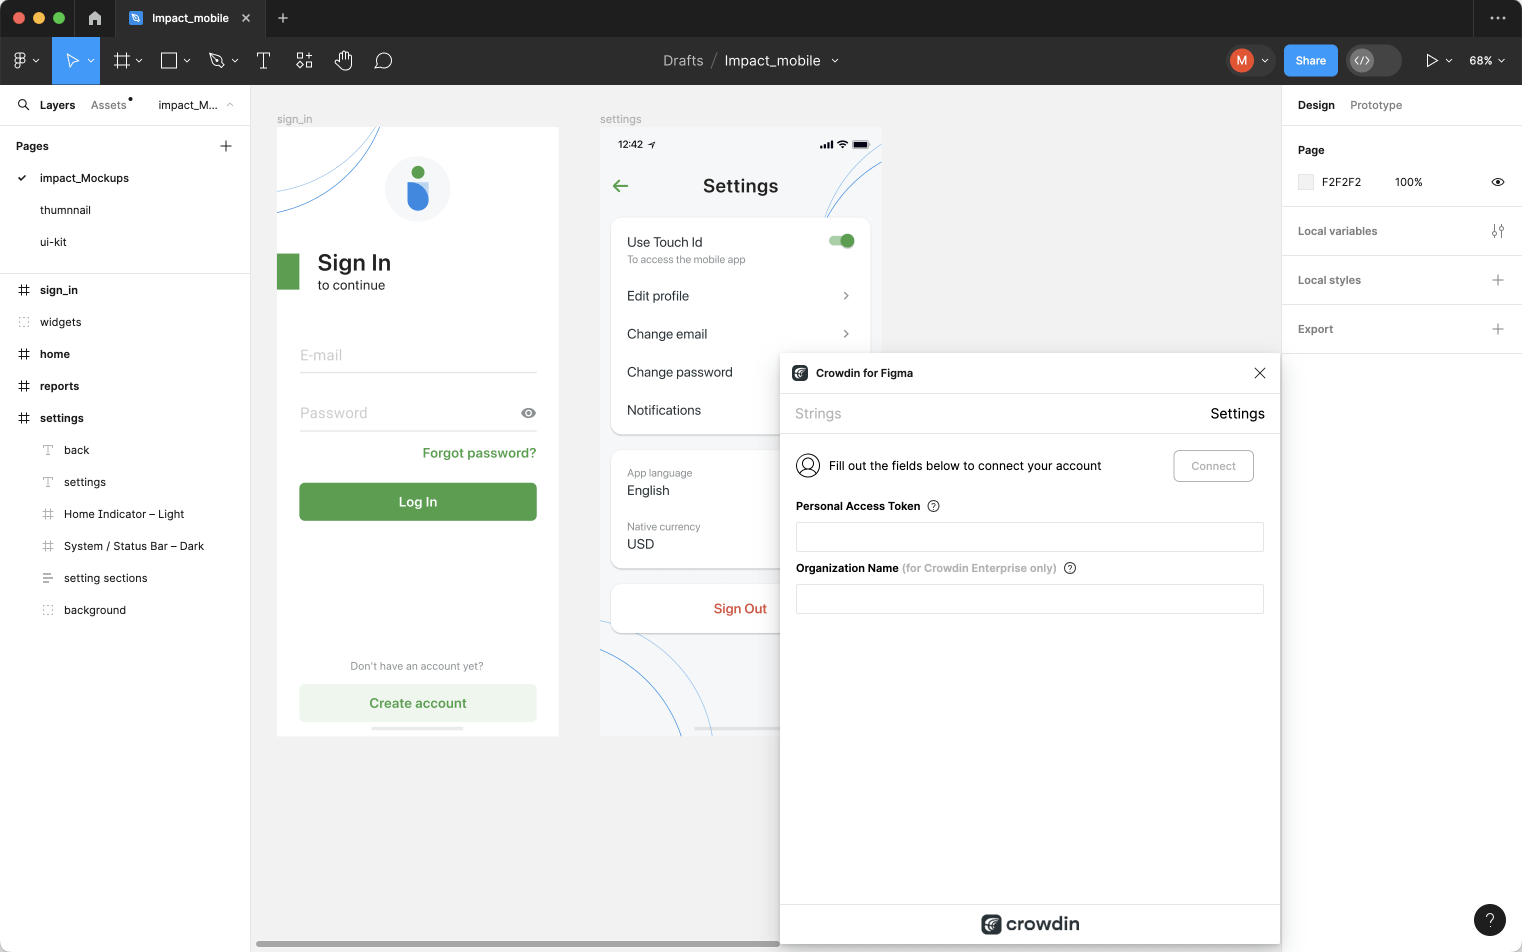
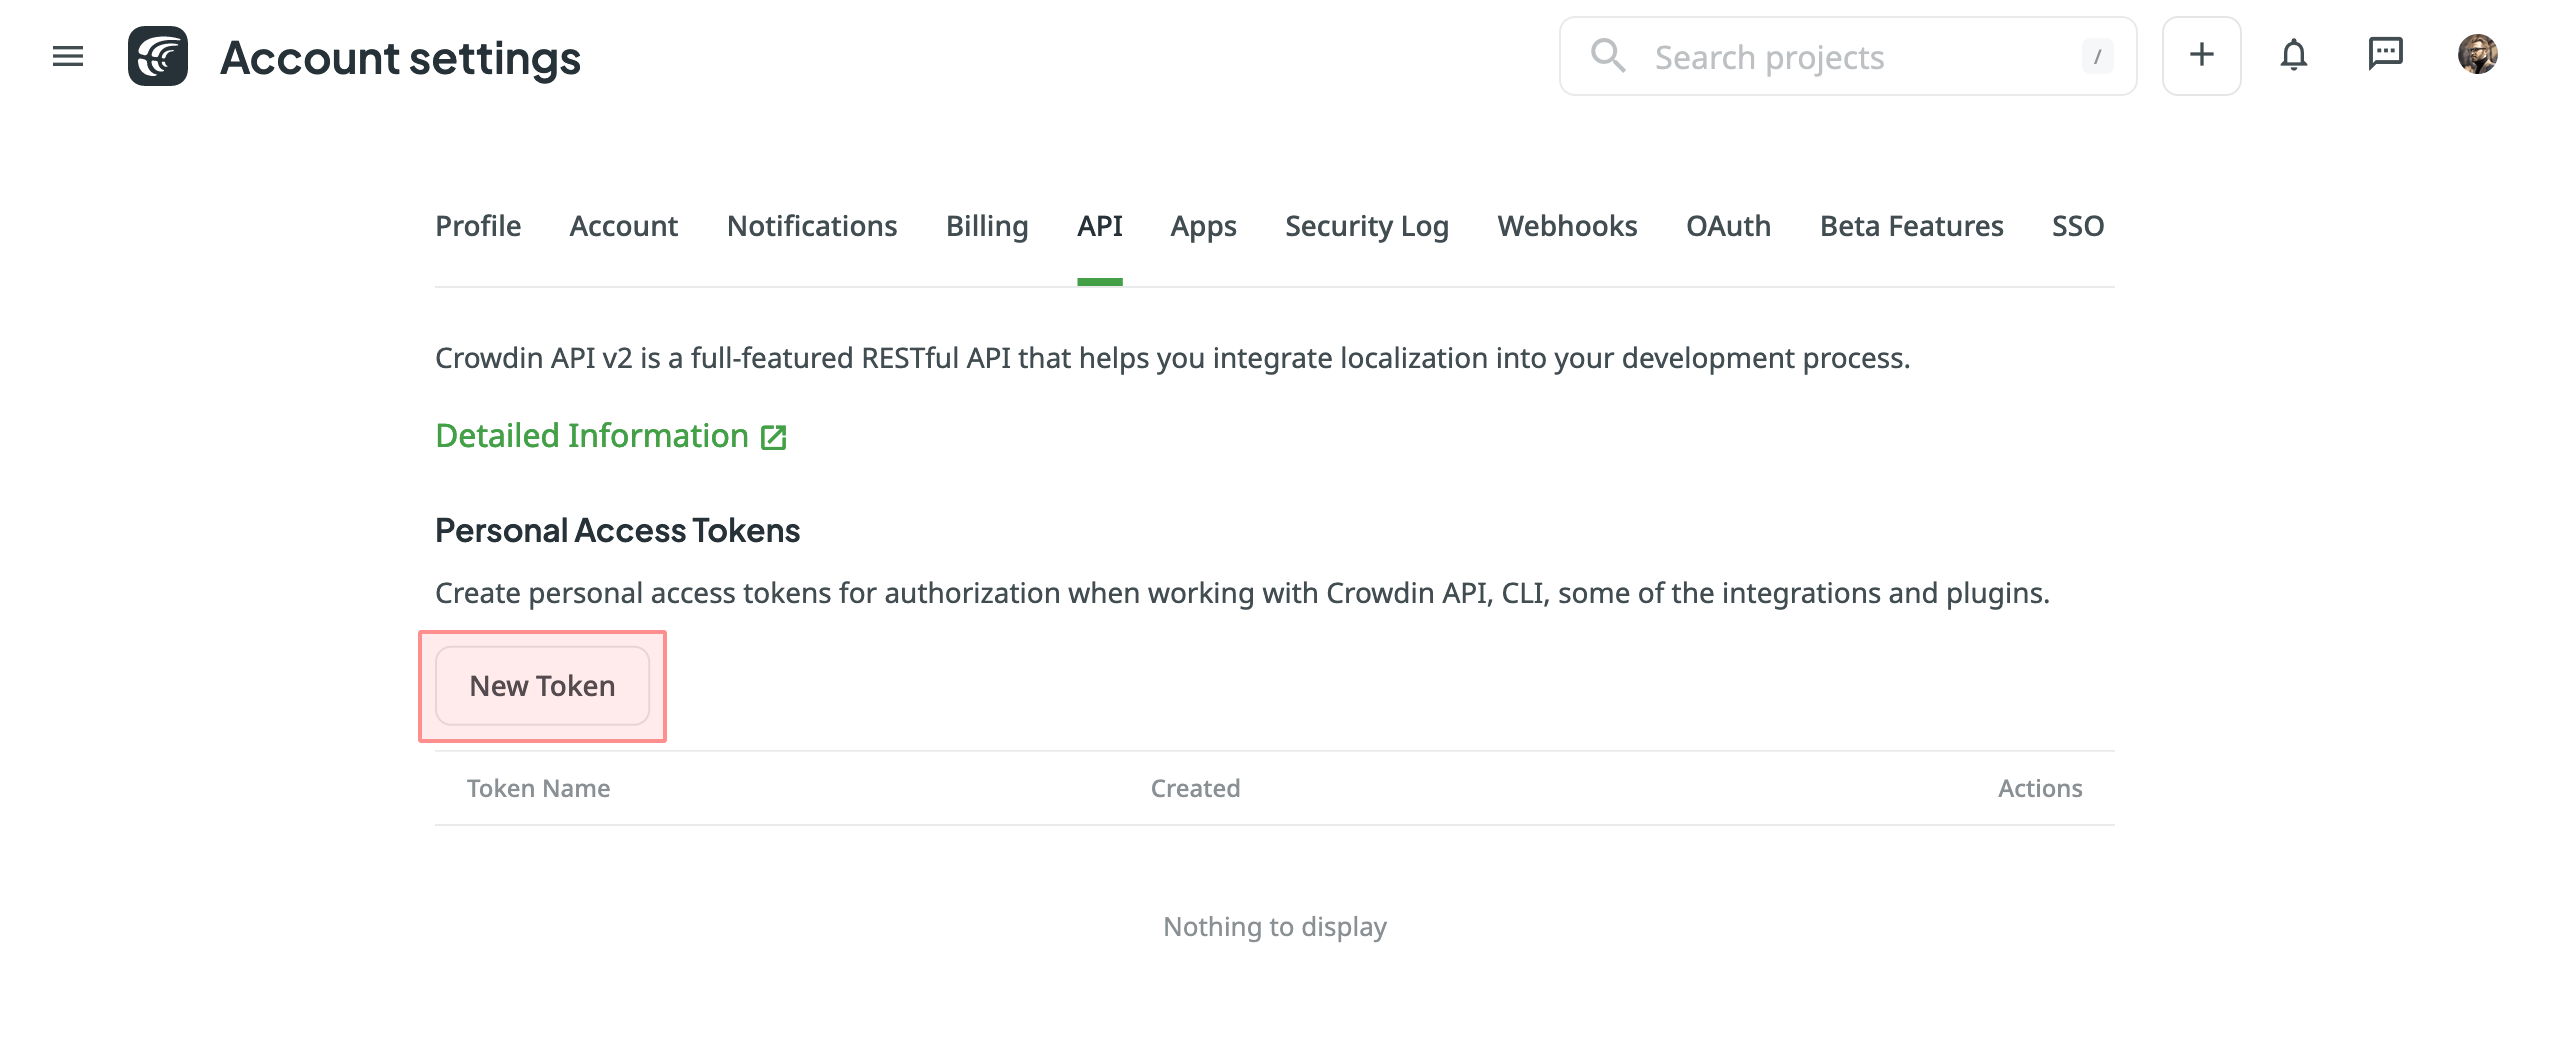
To generate a new token in Crowdin, follow these steps:
- Go to Account Settings > API, Personal Access Tokens section, and click New Token.
- Specify Token Name, select Scopes, and click Create.
Selecting Crowdin project
To select the project you’d like to work with, click the drop-down menu in Settings > Crowdin Project, and select a project from the list. Later, you can click Disconnect in the same section to switch to another project if needed. 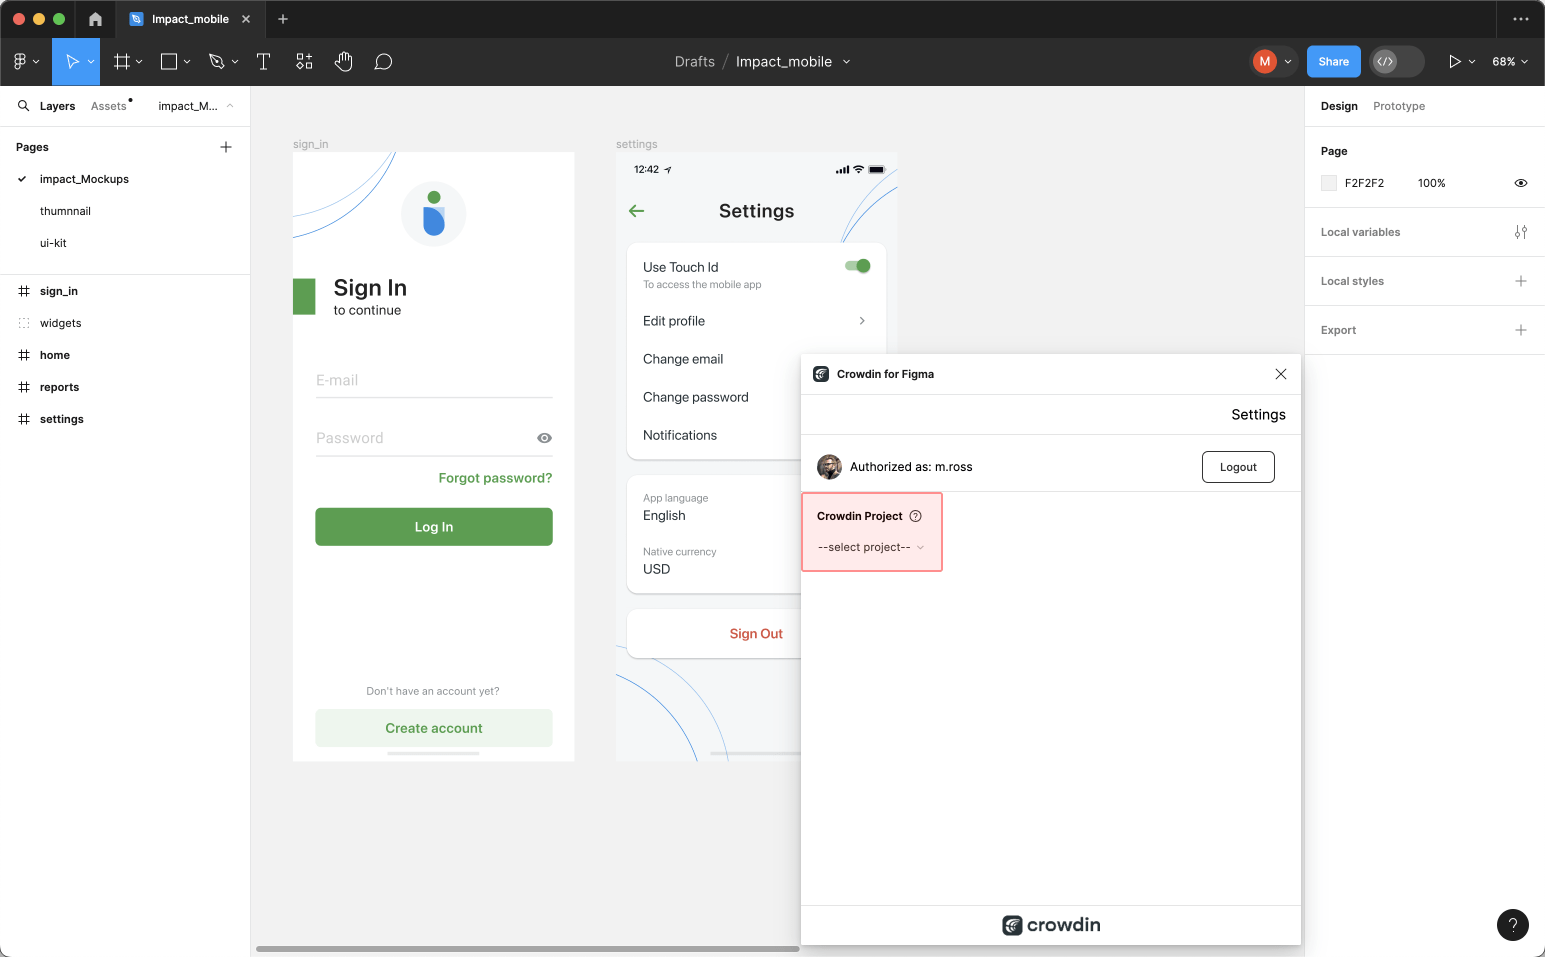
Select a content type you’re going to work with in this project and click Save.
You can choose one of the available options:
The selected content type option affects which mode of the Crowdin for Figma plugin will be available to a user. 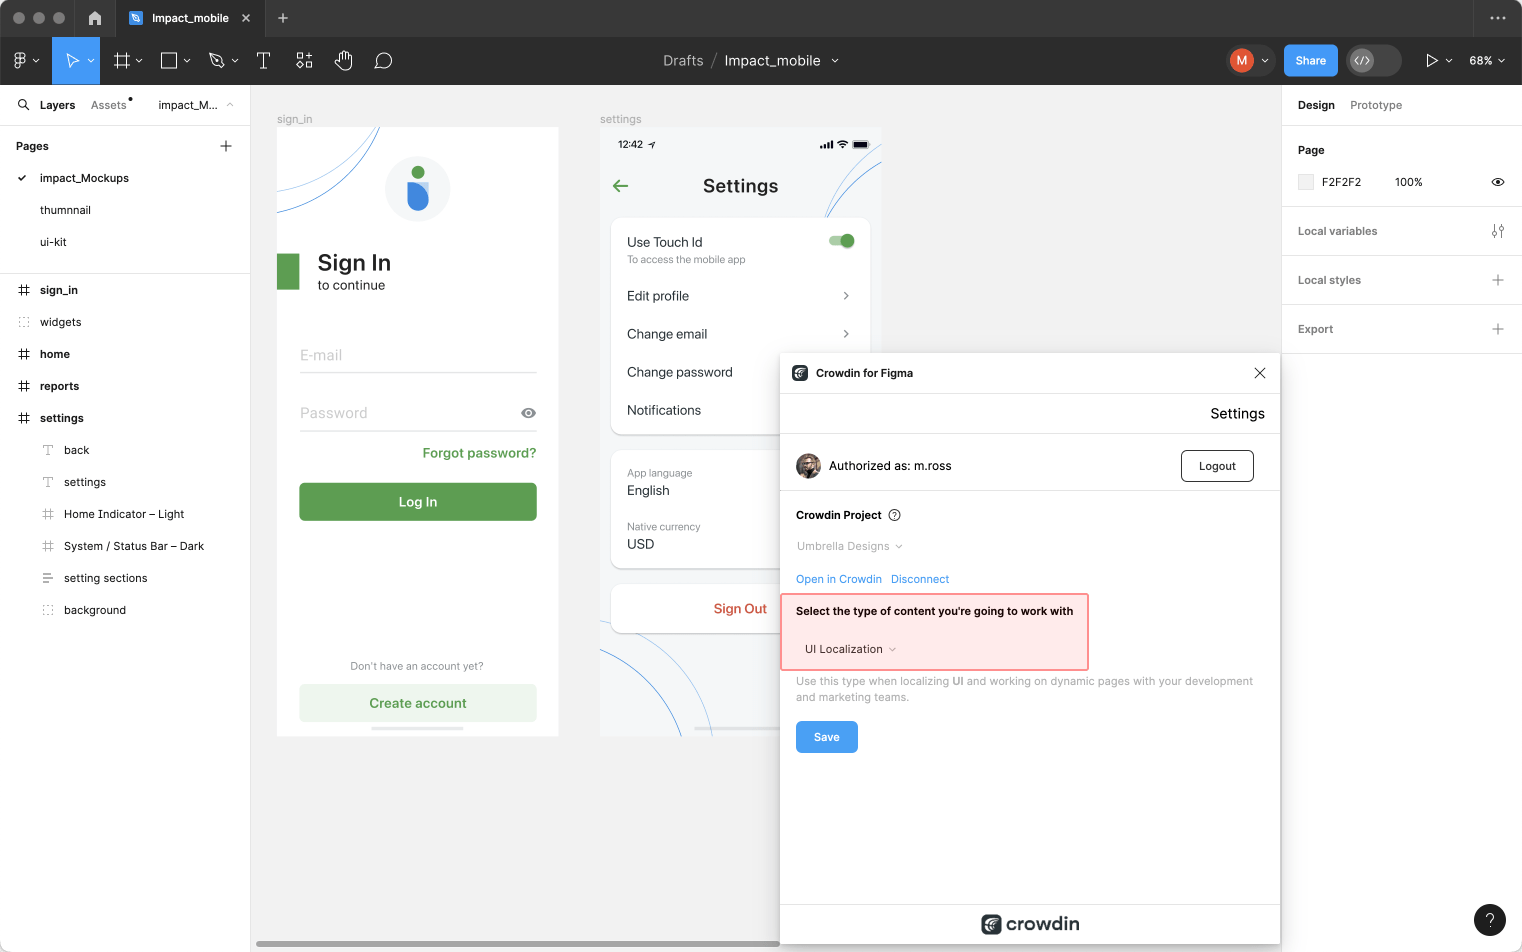
Seleziona il ramo specifico in cui saranno caricati i tuoi contenuti. If your Crowdin project doesn’t have branches, leave it empty. 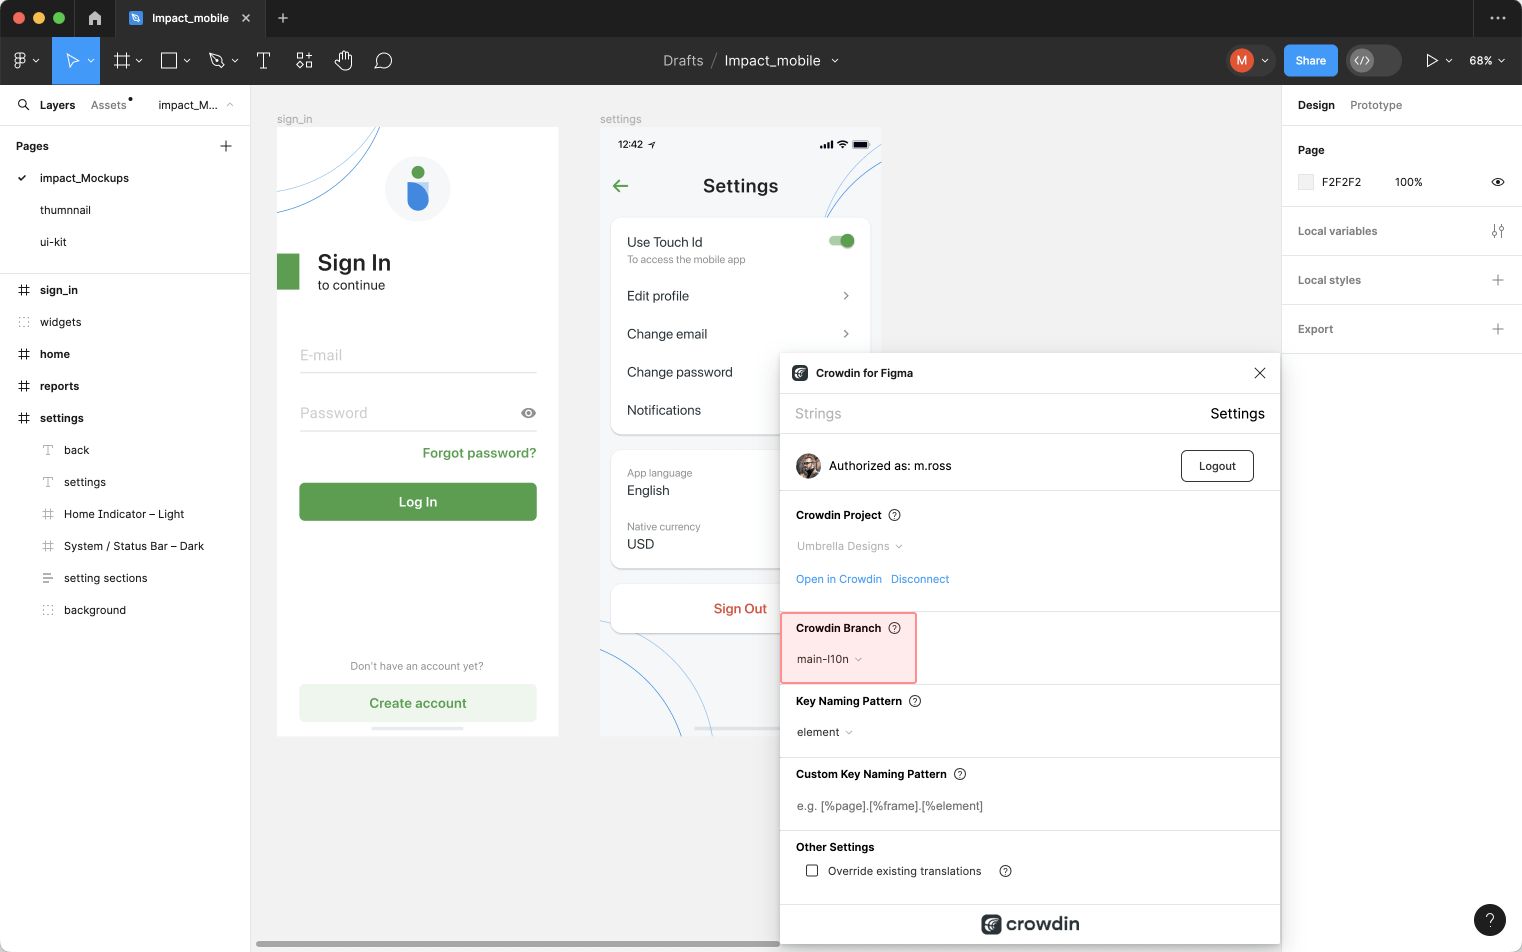
UI Localization
Use the Strings tab when localizing UI and working on dynamic pages with your development and marketing teams. In this tab, you can add source strings from Crowdin to your designs in Figma in a click. Dopo che i testi sono usati nei design, puoi caricare automaticamente gli screenshot etichettati perché i traduttori si riferiscano a Crowdin.
Usare le Stringhe Sorgente da Crowdin in Figma
- Apri il plugin di Crowdin per Figma.
- In the Strings tab, use the Search field to find the specific copy. Puoi cercare le stringhe per testo sorgente, identificativo della stringa o contesto.
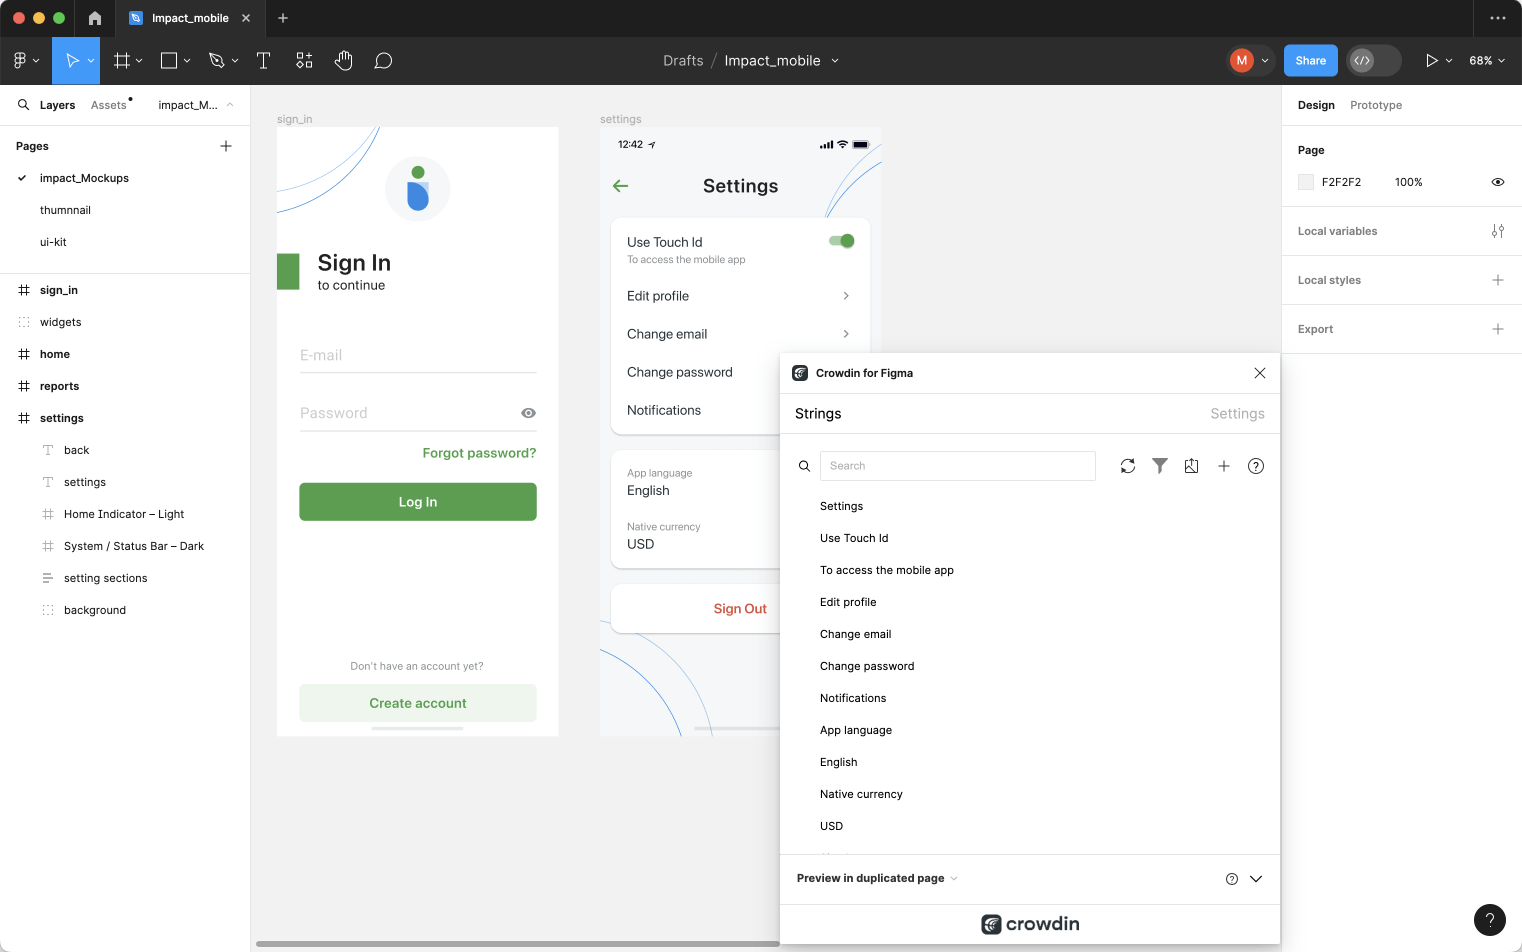
- Seleziona il livello del testo a cui desideri aggiungere testo e clicca l’icona del link affianco alla stringa necessaria.
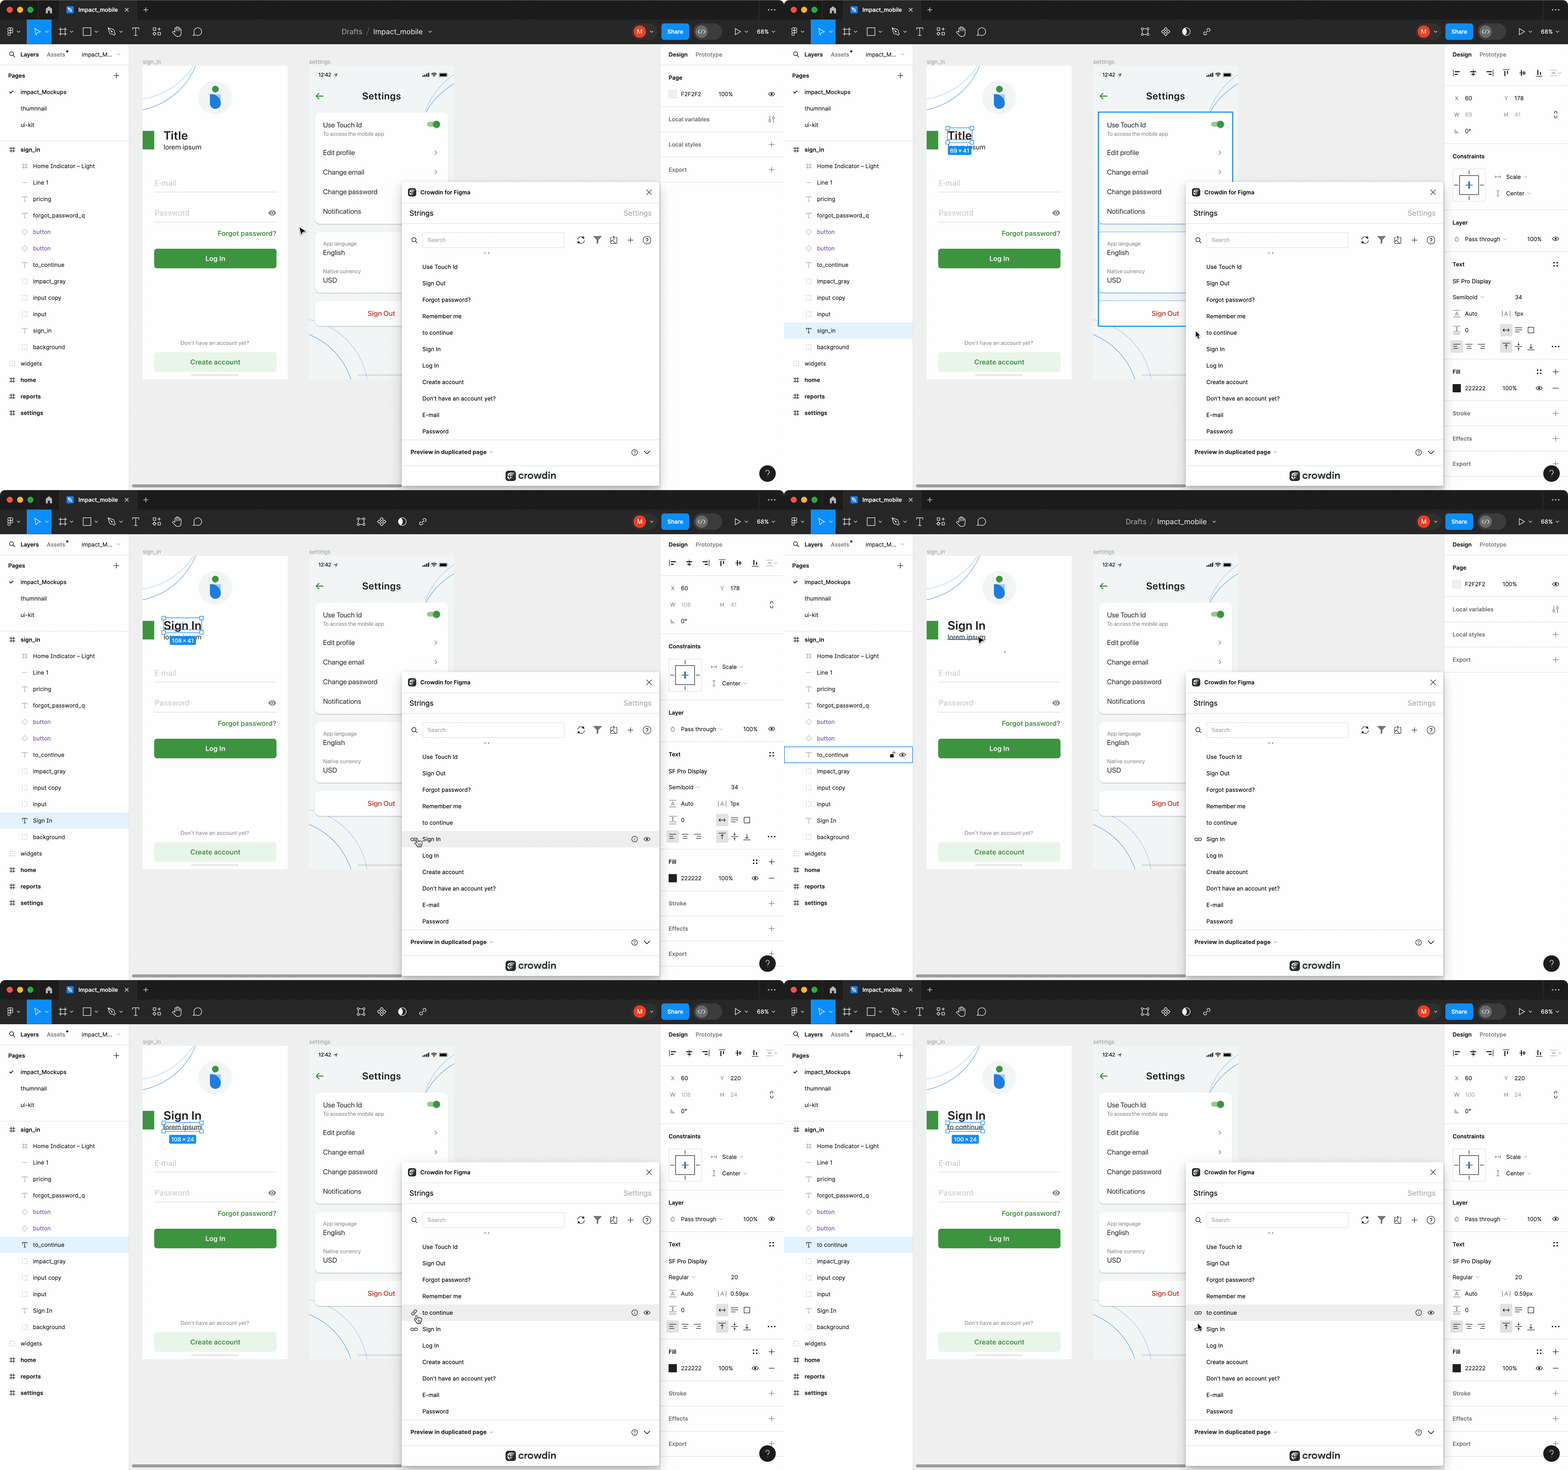
After using the source strings from Crowdin in your designs, they become linked with the text fields, and you can preview translations for these strings in Figma and upload screenshots for them to your Crowdin project.
Puoi collegare una singola stringa di Crowdin a uno o più campi di testo su Figma. Tuttavia, un campo di testo è collegabile solo a una stringa di Crowdin. Se colleghi un campo di testo con una connessione esistente a una nuova stringa di Crowdin, la connessione precedente sarà terminata e ne sarà stabilita una nuova. Se vorresti scollegare una stringa di Crowdin da tutti i campi di testo a cui era precedentemente stata collegata, clicca con il destro sull’icona del link affianco alla stringa necessaria.
Aggiungere Stringhe Sorgente da Figma a Crowdin
You can add strings that are already used in the designs.
- Apri il plugin di Crowdin per Figma.
- Per aggiungere le stringhe usate nei design, seleziona l’intero fotogramma, più fotogrammi o le stringhe necessarie sui fotogrammi.
- Nella scheda Stringhe, clicca
 .
. - In the appeared dialog, fill in the required fields. You can filter the displayed strings if needed:
- Select the Skip hidden elements filter option if some frames contain hidden elements that should not be added to Crowdin.
- Select the Skip untranslated elements filter option if some frames contain untranslated elements that should not be added to Crowdin.
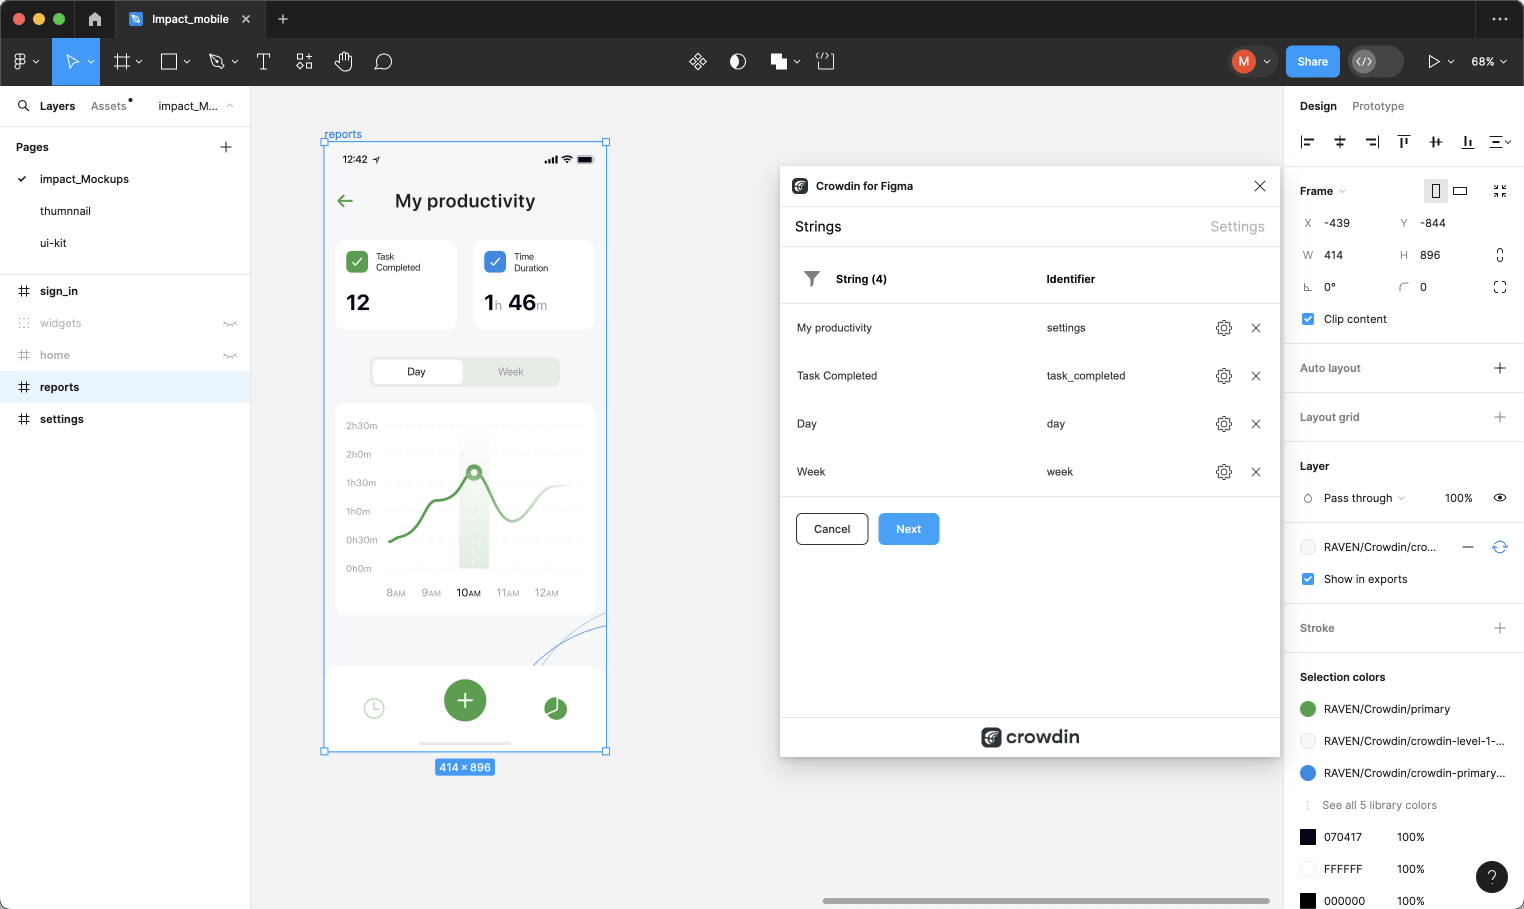
- (Optional) To update the string context and set the max.length of the translated text, click
 toward the needed string.
 - Once all the needed strings are selected and configured, click Next.
- In the next dialog page, select the preferred options:
- Auto-link existing strings – automatically compare text to existing strings in Crowdin. If there’s a match, the text element will be linked to the string in the Crowdin project.
- Create missing keys – only new text elements are added to Crowdin.
- (Optional) To add labels to the strings, alternately select them from the Select Label drop-down menu.
- Merge duplicates – link identical text elements to a single new string in Crowdin. È utile nei seguenti casi:
- When adding multiple text fields with the same text, the plugin will add only one string to your Crowdin project and link all duplicate text fields to it.
- If your Crowdin project already contains a string with the same text you’re adding from designs, the plugin will only link the text fields to the existing string and won’t create a new one.
- Send screenshots
- Select the file in Crowdin to which you want to add the strings. To add the same strings into multiple files in Crowdin, alternately select the needed files from the Select File drop-down menu.
- Clicca su Invia.
- Once the strings are added to Crowdin, you’ll see a summary of the content sent.
Added strings will be transferred to your Crowdin project and also displayed in the Strings tab’s list. You can edit, hide, or delete the strings from the same list anytime. The respective changes will also be applied to the strings in your Crowdin project.
Aggiungere Stringhe Sorgente con Forme Plurali
Puoi aggiungere le stringhe con forme plurali.
- Apri il plugin di Crowdin per Figma.
- Per aggiungere le stringhe usate nei design, seleziona l’intero fotogramma, più fotogrammi o le stringhe necessarie sui fotogrammi.
- Nella scheda Stringhe, clicca
 .
. - In the appeared dialog, fill in the required fields. You can filter the displayed strings if needed. Note: When adding plural strings, the fields in the String column serve for adding the other plural form.
- Click
 toward the needed string and click Add plurals.
 - In the appeared dialog, fill in the fields for each plural form and click Save. A seconda della lingua di partenza del progetto di Crowdin connesso, potrebbero esser disponibili numeri differenti di forme plurali che dovresti specificare. Nota: Puoi aggiungere le stringhe plurali solo ai file che supportano le forme plurali (es. Android XML, Stringsdict, XLIFF, etc.).
- Once all the needed strings are selected and configured, click Next.
- In the next dialog page, select the preferred options.
- Select the file in Crowdin to which you want to add the strings.
- Clicca su Invia.
Read more about Plural Forms.
Configurare i Segnaposto della Stringa Sorgente ICU
Usando le stringhe ICU nel tuo design, puoi impostare i valori dei segnaposto e, dopo aver aggiunto tali stringhe ai design, saranno mostrate in una vista formattata coi valori pre-configurati.
Once you use the needed ICU string from Crowdin in your design, you can configure its placeholder values.
- Apri il plugin di Crowdin per Figma.
- In the Strings tab, use the Search field to find the specific copy. Puoi cercare le stringhe per testo sorgente, identificativo della stringa o contesto.
- Clicca
 sulla stringa ICU necessaria.
 - Clicca Imposta segnaposto.
- Digita i valori necessari per i segnaposto della stringa ICU.
- Clicca Invia per salvare i segnaposto inseriti.
- Click Submit to update the source string text in designs.
Visualizzando le traduzioni in anteprima per le stringhe ICU su Figma, saranno mostrate anche in una vista formattata se i valori sono stati precedentemente pre-configurati.
Key Naming Pattern Settings
To simplify adding strings from Figma to the Crowdin project, you can set up the desired key naming pattern for the source string identifiers in the plugin settings. Il plugin di Crowdin per Figma suggerirà gli identificativi della stringa per le nuove stringhe in base allo schema selezionato. While adding new source strings, you can always edit the suggested identifier to the preferred look.
To select the key naming pattern, follow these steps:
- Apri il plugin di Crowdin per Figma.
- Passa a Impostazioni.
- In the Key naming pattern section, select the preferred option from the drop-down menu.
Oltre agli schemi esistenti, puoi configurare il tuo. Per usare uno schema personalizzato, seleziona l’opzione Schema di denominazione della chiave personalizzata dall’elenco a tendina e specifica il tuo schema nel campo Schema di Denominazione della Chiave Personalizzata.
Uploading Tagged Screenshots to Crowdin
When adding source strings used in the designs, make sure to keep Send screenshots selected. As a result, the Crowdin plugin for Figma will upload screenshots along with the source strings.
Inoltre, puoi aggiornare gli screenshot con un’opzione Aggiorna screenshot, modificando una stringa di Crowdin collegata ai campi di testo nei progetti.
Additionally, you can mass upload screenshots to Crowdin for strings linked with text fields in designs.
- Apri il plugin di Crowdin per Figma.
- Seleziona uno o più quadri con le stringhe collegate.
- Nella scheda delle Stringhe, clicca su
per caricare gli screenshot per i quadri selezionati.
To learn more, read the article Screenshots.
Previewing Strings
Preview translations from Crowdin for the strings used in the designs in Figma. These could include original or translated texts. When previewing translations in the new frames, you can populate them with the actual translations or with string keys for further use by developers.
To preview strings populated with translations, follow these steps:
- Apri il plugin di Crowdin per Figma.
- In the Strings > Preview Strings section, select Preview in duplicated page or Preview in the current page.
- Select Create with language.
- Select the target language you want to preview translations for (optionally, you can select the preferred plural forms). You can also choose All languages.
- Seleziona i contenuti che vuoi vedere in anteprima su Figma. Seleziona Tutti i Quadri o Quadri Selezionati.
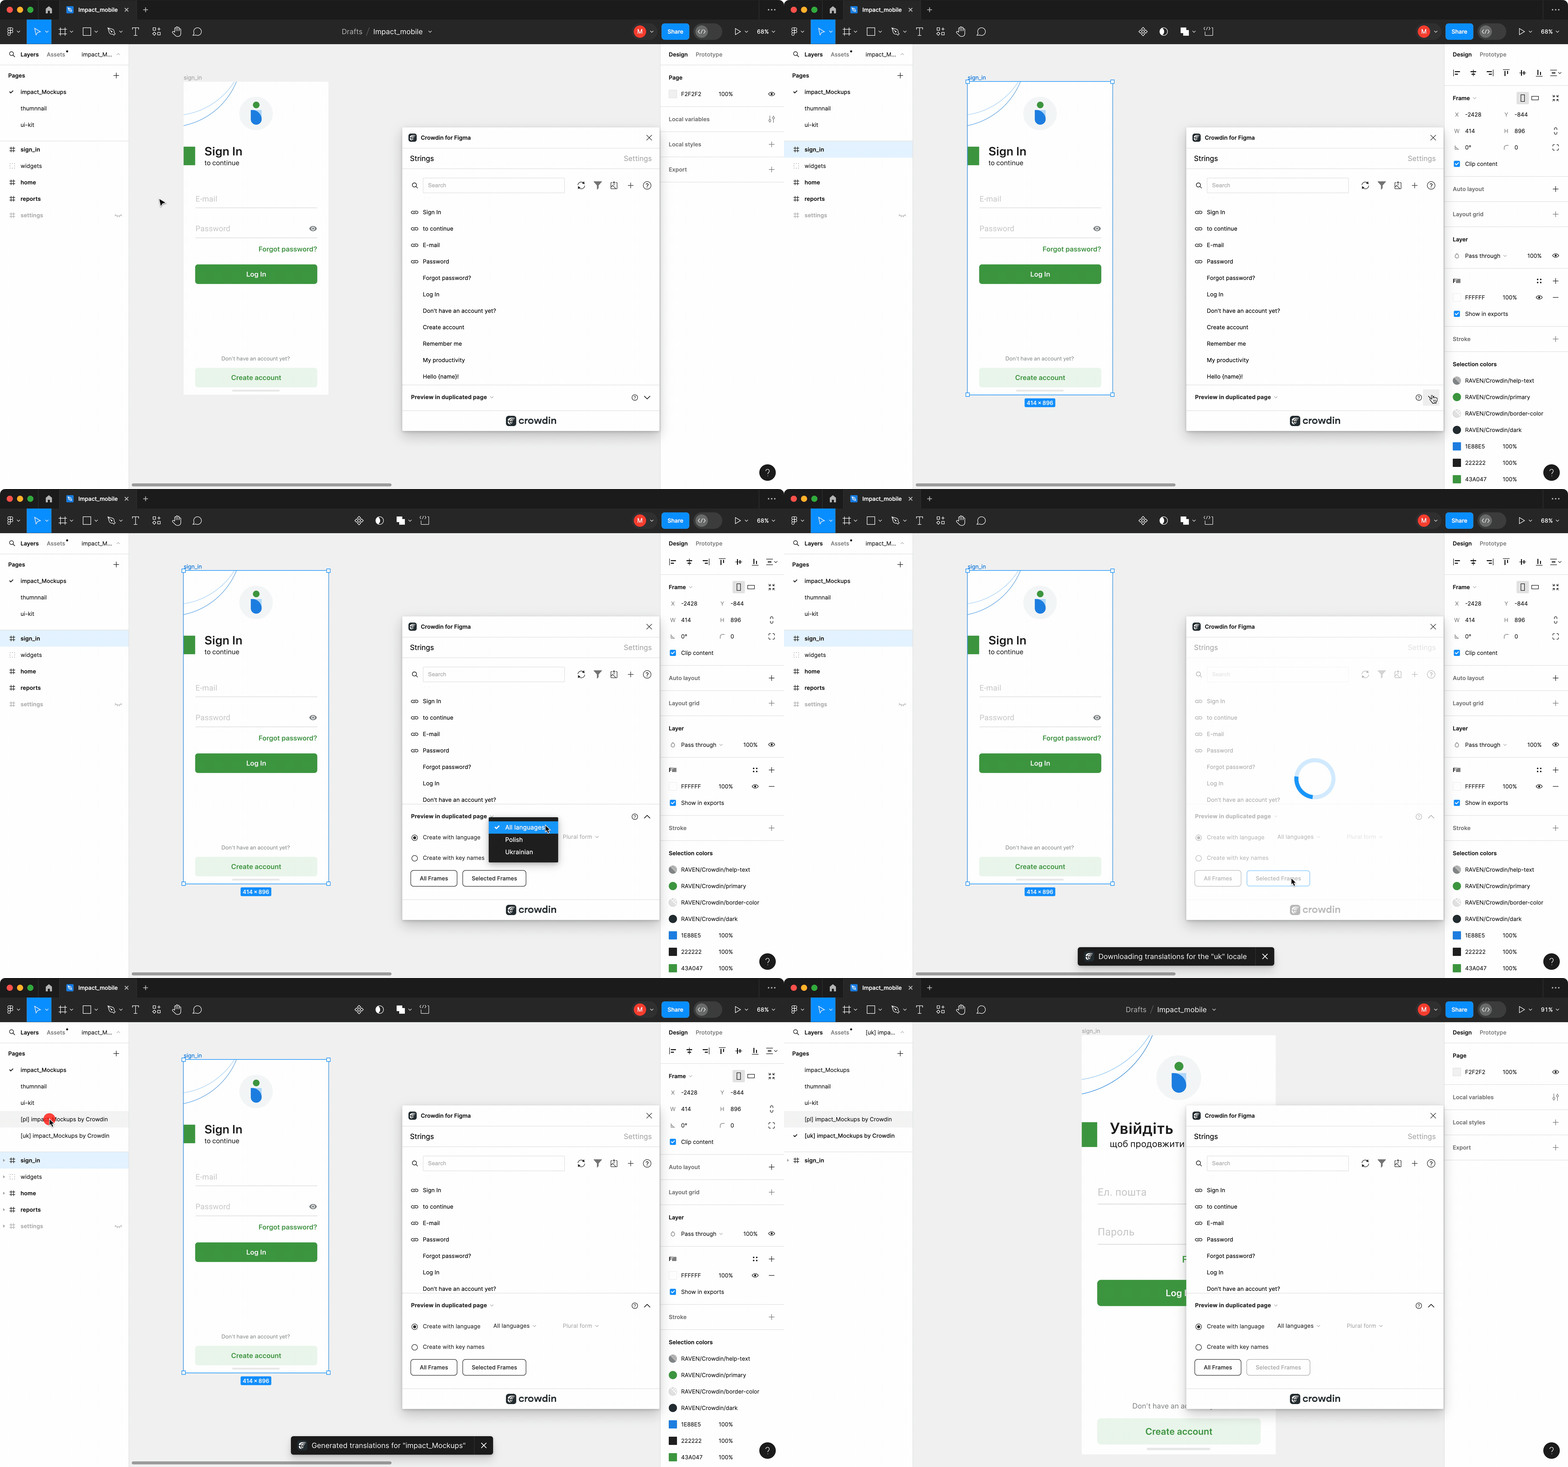
To preview strings populated with key names, follow these steps:
- Apri il plugin di Crowdin per Figma.
- In the Strings > Preview Strings section, select Preview in duplicated page.
- Select Create with key names.
- Seleziona i contenuti che vuoi vedere in anteprima su Figma. Seleziona Tutti i Quadri o Quadri Selezionati.
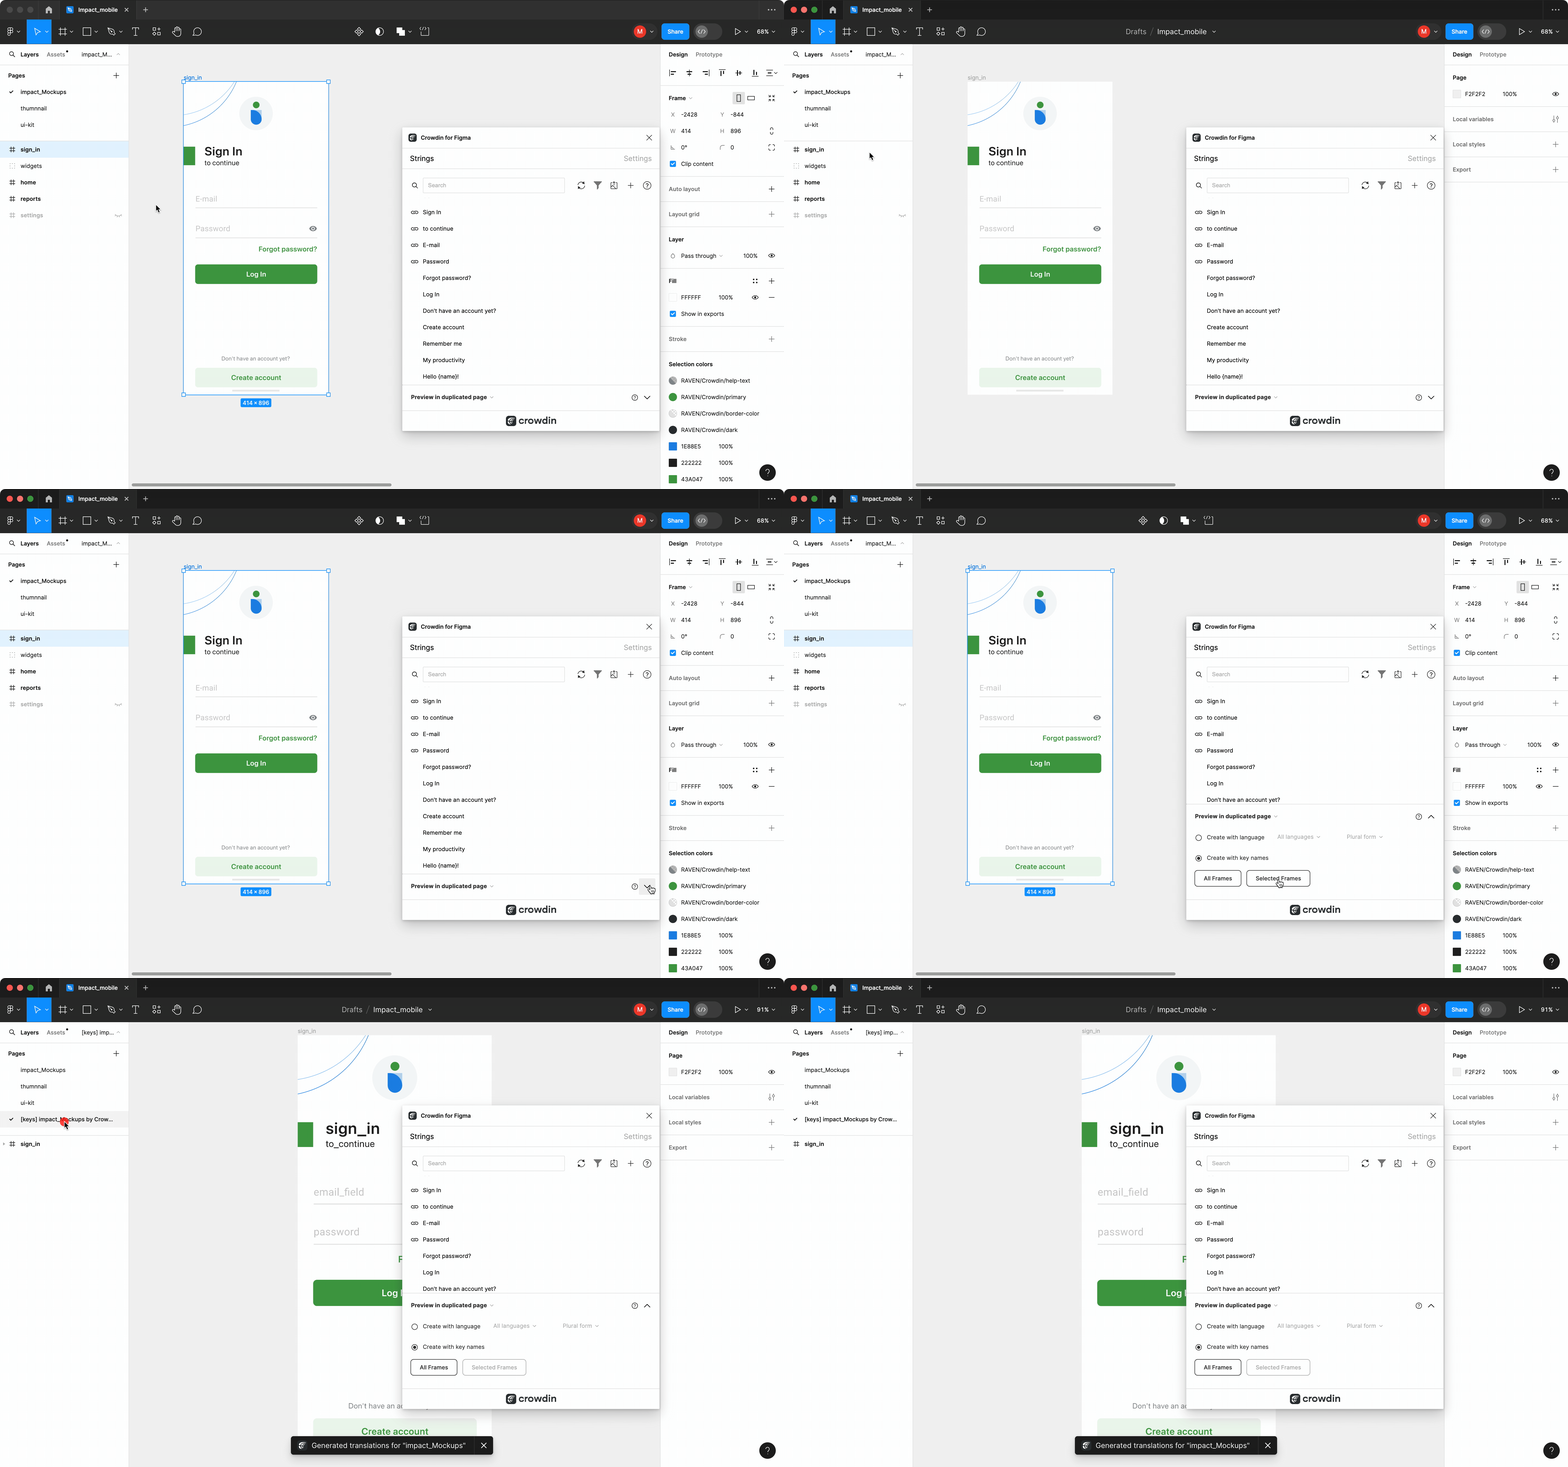
Filtering Strings
Per visualizzare solo le stringhe collegate ai campi di testo specifici, segui questi passaggi:
- Seleziona i campi di testo necessari.
- Nella scheda delle Stringhe, clicca Filtra stringhe.
- Seleziona Mostra le stringhe collegate agli elementi di testo selezionati.
Allo stesso modo, puoi filtrare le stringhe collegate ai campi di testo per l’intero fotogramma o per più fotogrammi.
Marketing Visuals Localization
Usa la scheda Pagine per localizzare le pagine statiche, come brochure e banner. In this tab, you can send texts with context for translators to Crowdin and upload translated copies back to Figma.
Sending Texts for Translation to Crowdin
Puoi inviare testo per le traduzioni da tutti i quadri o da quelli selezionati da un file di Figma. Translators will work with those texts in the list view and use designs as an additional context for even higher translation quality.
In Crowdin, a root folder figma-plugin will be created. Conterrà una cartella secondaria denominata dal tuo file di Figma con i file HTML per ogni quadro all’interno. If needed, you can disable content segmentation in the plugin Settings so the long texts will not be split into sentences.
Per inviare i design di Figma per la traduzione, segui questi passaggi:
- Apri il file necessario di Figma.
- Vai a Plugin > Crowdin per Figma.
- Nella sezione Pagine > Da Figma a Crowdin, seleziona i contenuti che vorresti tradurre. Seleziona Tutti i Quadri o Quadri Selezionati.
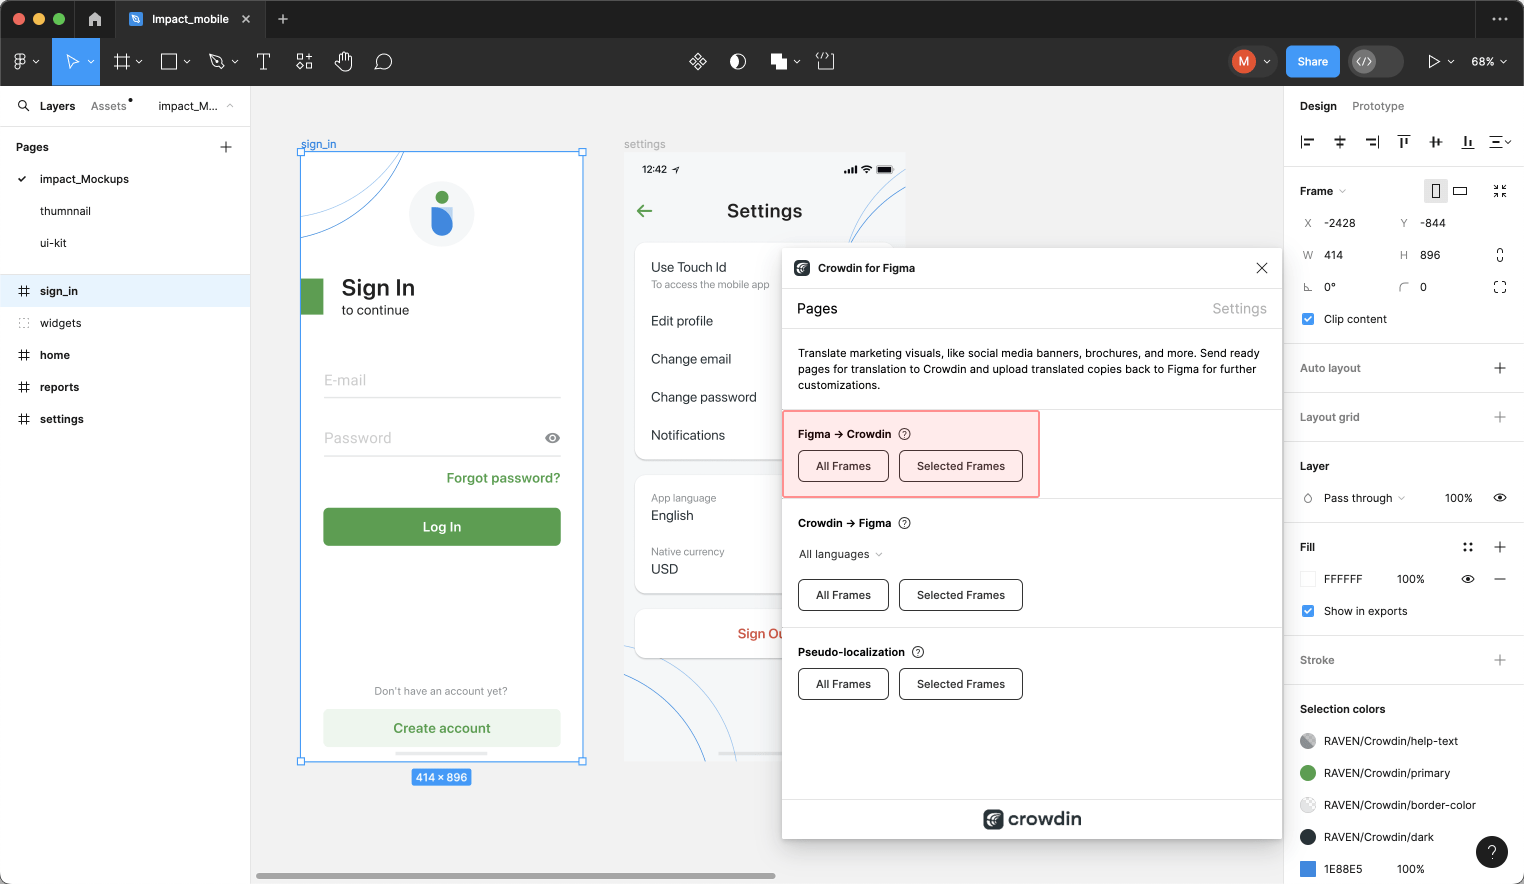
When the source files are uploaded to your Crowdin project, you can invite contributors to translate and proofread them.
Read more about translation strategies.
Pseudo-localizzazione
Anche prima del completamento delle traduzioni, puoi verificare se la tua applicazione è pronta a esser localizzata usando la pseudo-localizzazione. Questa funzionalità ti consente di stimolare come apparirà l’UI dell’applicazione con diverse lingue, per verificare se le stringhe sorgente dovrebbero esser modificate prima dell’inizio della localizzazione del progetto.
Una volta inviati i tuoi testi per la traduzione, puoi avviare la pseudo-localizzazione.
- Apri il file necessario di Figma.
- Vai a Plugin > Crowdin per Figma.
- Nella sezione Pagine > Pseudo-localizzazione, seleziona i contenuti che vorresti testare con la pseudo-localizzazione. Seleziona Tutti i Quadri o Quadri Selezionati.
- Nella finestra apparsa, configura le impostazioni secondo le tue preferenze.
- Clicca su Invia.
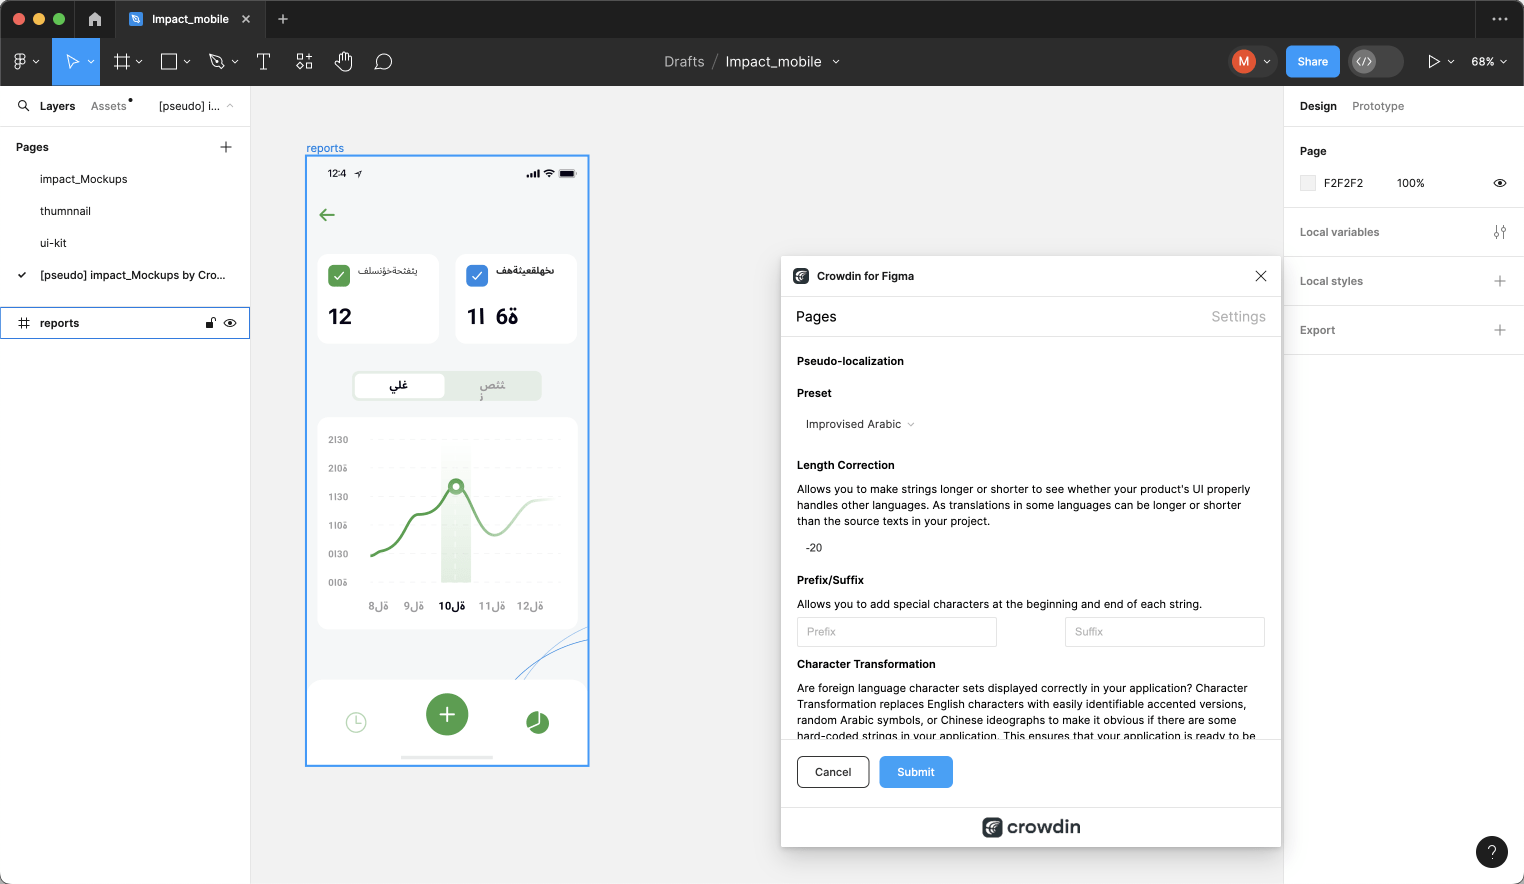
Leggi di più sulla Pseudo-localizzazione.
Uploading Translations from Crowdin to Figma
You can synchronize texts between Figma and Crowdin projects whenever you want to test the translated copy inside Figma or generate multilingual assets.
Per caricare le copie tradotte in Figma, segui questi passaggi:
- Apri il file necessario di Figma.
- Vai a Plugin > Crowdin per Figma.
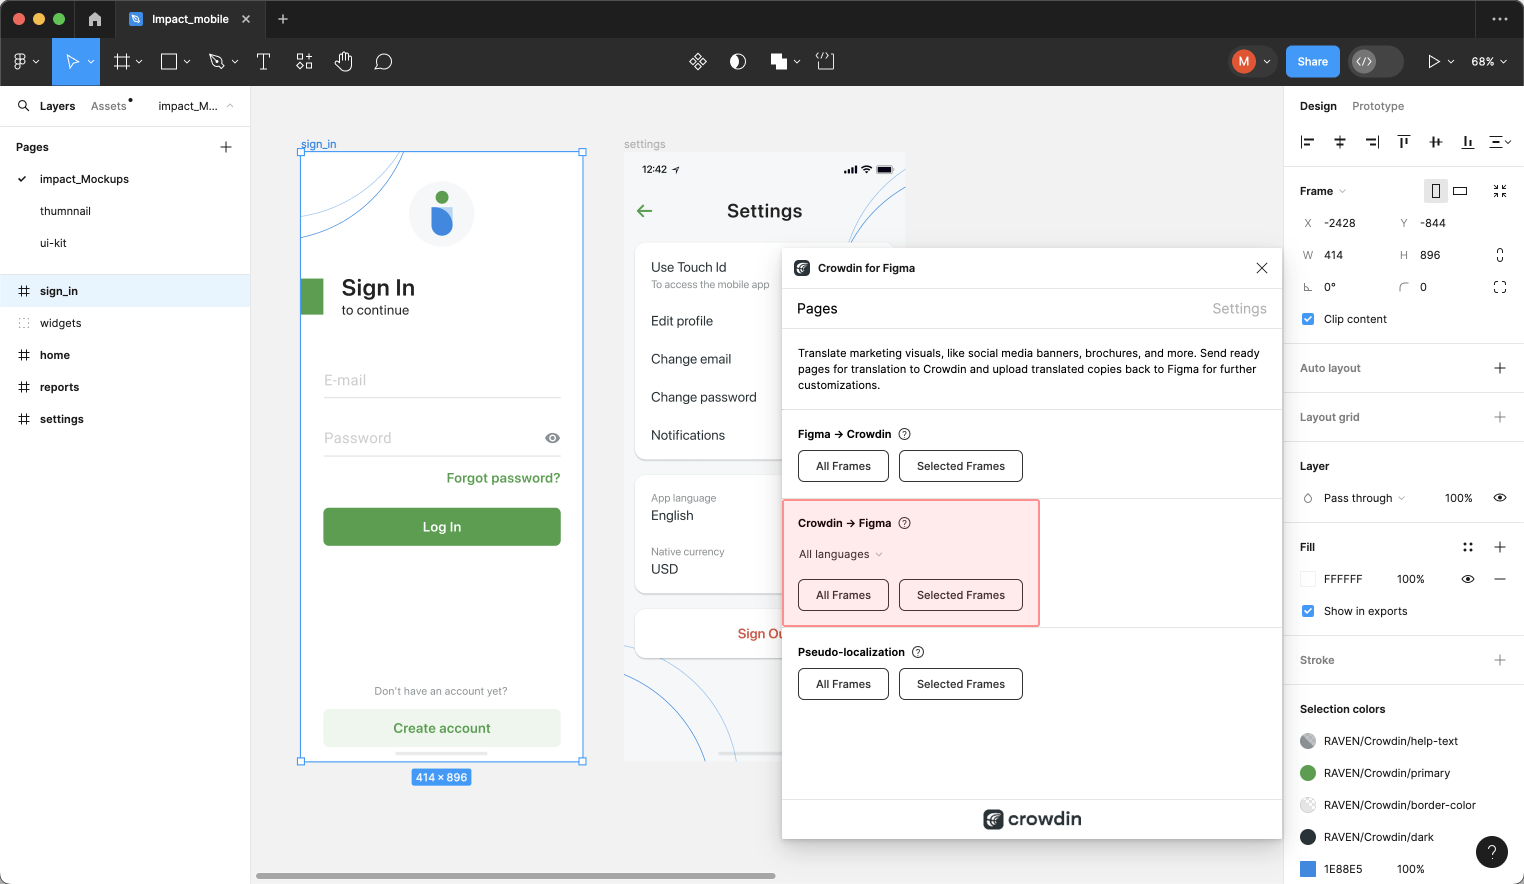
- Nella scheda Pagine, sezione Da Crowdin a Figma, seleziona la lingua di destinazione per cui desideri caricare le traduzioni. You can also select All languages.
- Scegli il contenuto che vuoi vedere in anteprima su Figma. Seleziona Tutti i Quadri o Quadri Selezionati. Nota: I nomi della pagina in Figma possono consistere di sole lettere (a-z, A-Z), numeri (0-9) e caratteri speciali
-_.
Dopo aver caricato le traduzioni su Figma, il file modificato conterrà un quadro separato con le traduzioni per ogni lingua di destinazione. The newly uploaded translated versions won’t override the ones you uploaded previously. You can always delete the translated copies you no longer need. 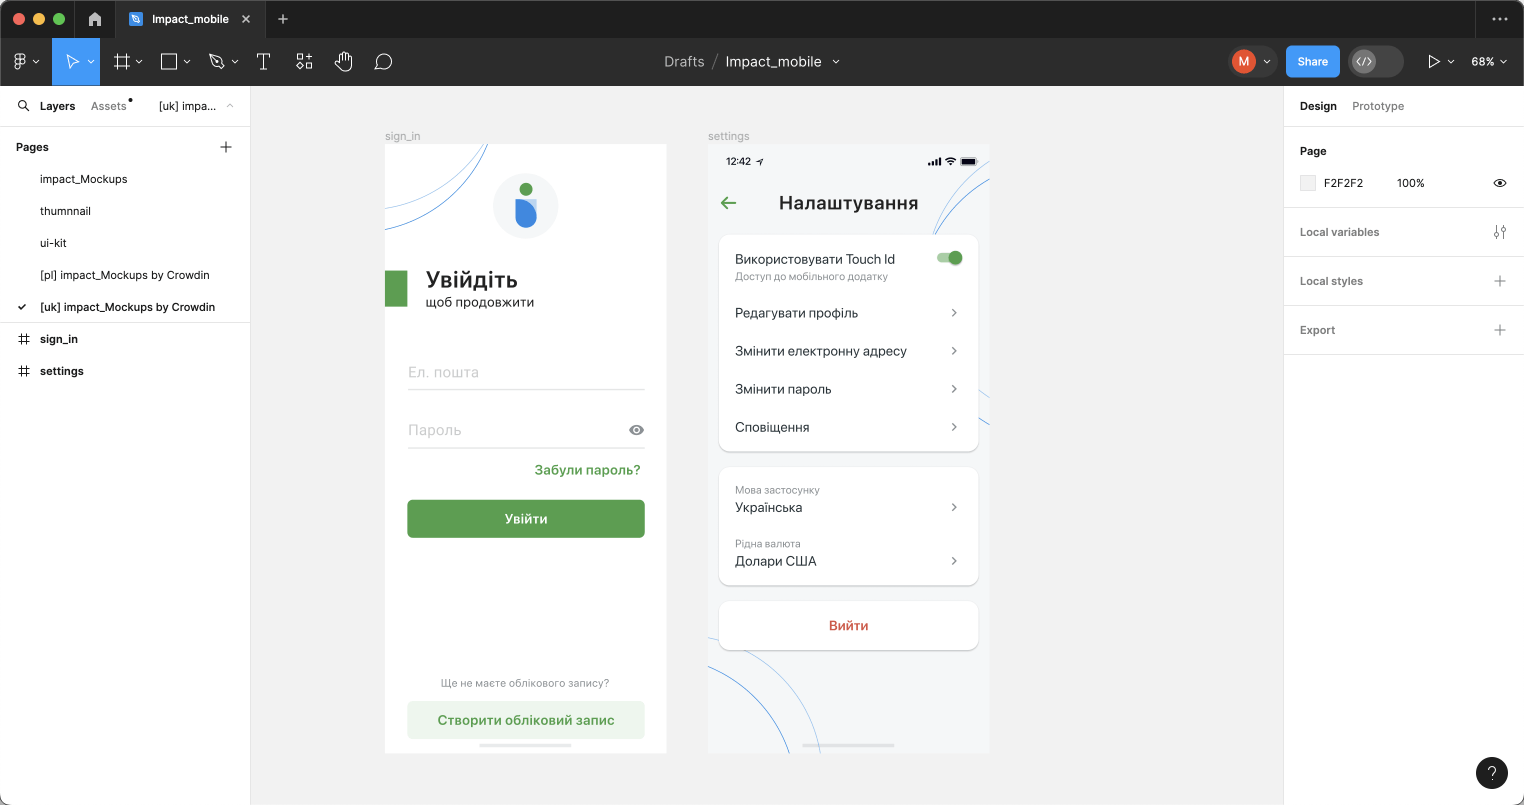
If you’d like the newly uploaded translated versions to override the previously uploaded ones, open the plugin Settings and select Override existing translations.
Crowdin for Figma Plugin in Dev Mode
Figma’s Dev Mode allows designers and developers to collaborate, ensuring accuracy in implementation and a smooth transition from design to code.
Read more about Figma Dev Mode.
The integration of Crowdin for Figma plugin with Dev Mode extends the functionality of both platforms, enhancing the localization process within the design environment. While Dev Mode in Figma has its limitations – it’s read-only, certain limitations apply to the Crowdin for Figma plugin’s capabilities:
What You Can Do:
- Access the Strings tab to view and manage strings.
- Explore string details, including file, key, context, and labels.
- Quickly copy string keys for efficient workflow.
Features not available in Dev Mode: adding new strings to Crowdin, linking strings, sending screenshots, previewing translations, editing, hiding, or deleting strings.
Using Crowdin for Figma Plugin in Dev Mode
Despite the limitations, the Crowdin for Figma plugin remains valuable in Dev Mode, offering developers a streamlined approach to text elements management. Here’s a typical use case:
- Enter Dev Mode.
- In the right sidebar, switch to the Plugins tab.
- Click on Crowdin for Figma.
- In the Strings tab, click Filter strings and select Show strings linked to selected text elements.
- Select the needed string on the frame and hover over the
 icon in the string list to view all needed information (i.e., key, context, file it’s stored in, labels) about this particular string.
 - (Optional) Click Copy string key to clipboard to further use it in code.
Compatibility with Figma for VS Code
Furthermore, the Crowdin for Figma plugin seamlessly integrates with Figma for VS Code, extending its functionality to developers using this environment.
Read more about Figma for VS Code.