Integrazioni VCS: configurazione online
To configure a version control system integration, specify the source files you’d like to translate and how Crowdin should structure the translated files in your repository.
Configurazione Ramo
Once you’ve selected your repository and branch for translation, the next step is to configure the selected branch. Click ![]() to open the Branch Configuration dialog and start the configuration. Click
to open the Branch Configuration dialog and start the configuration. Click ![]() to open the Branch Configuration dialog and start the configuration.
to open the Branch Configuration dialog and start the configuration.
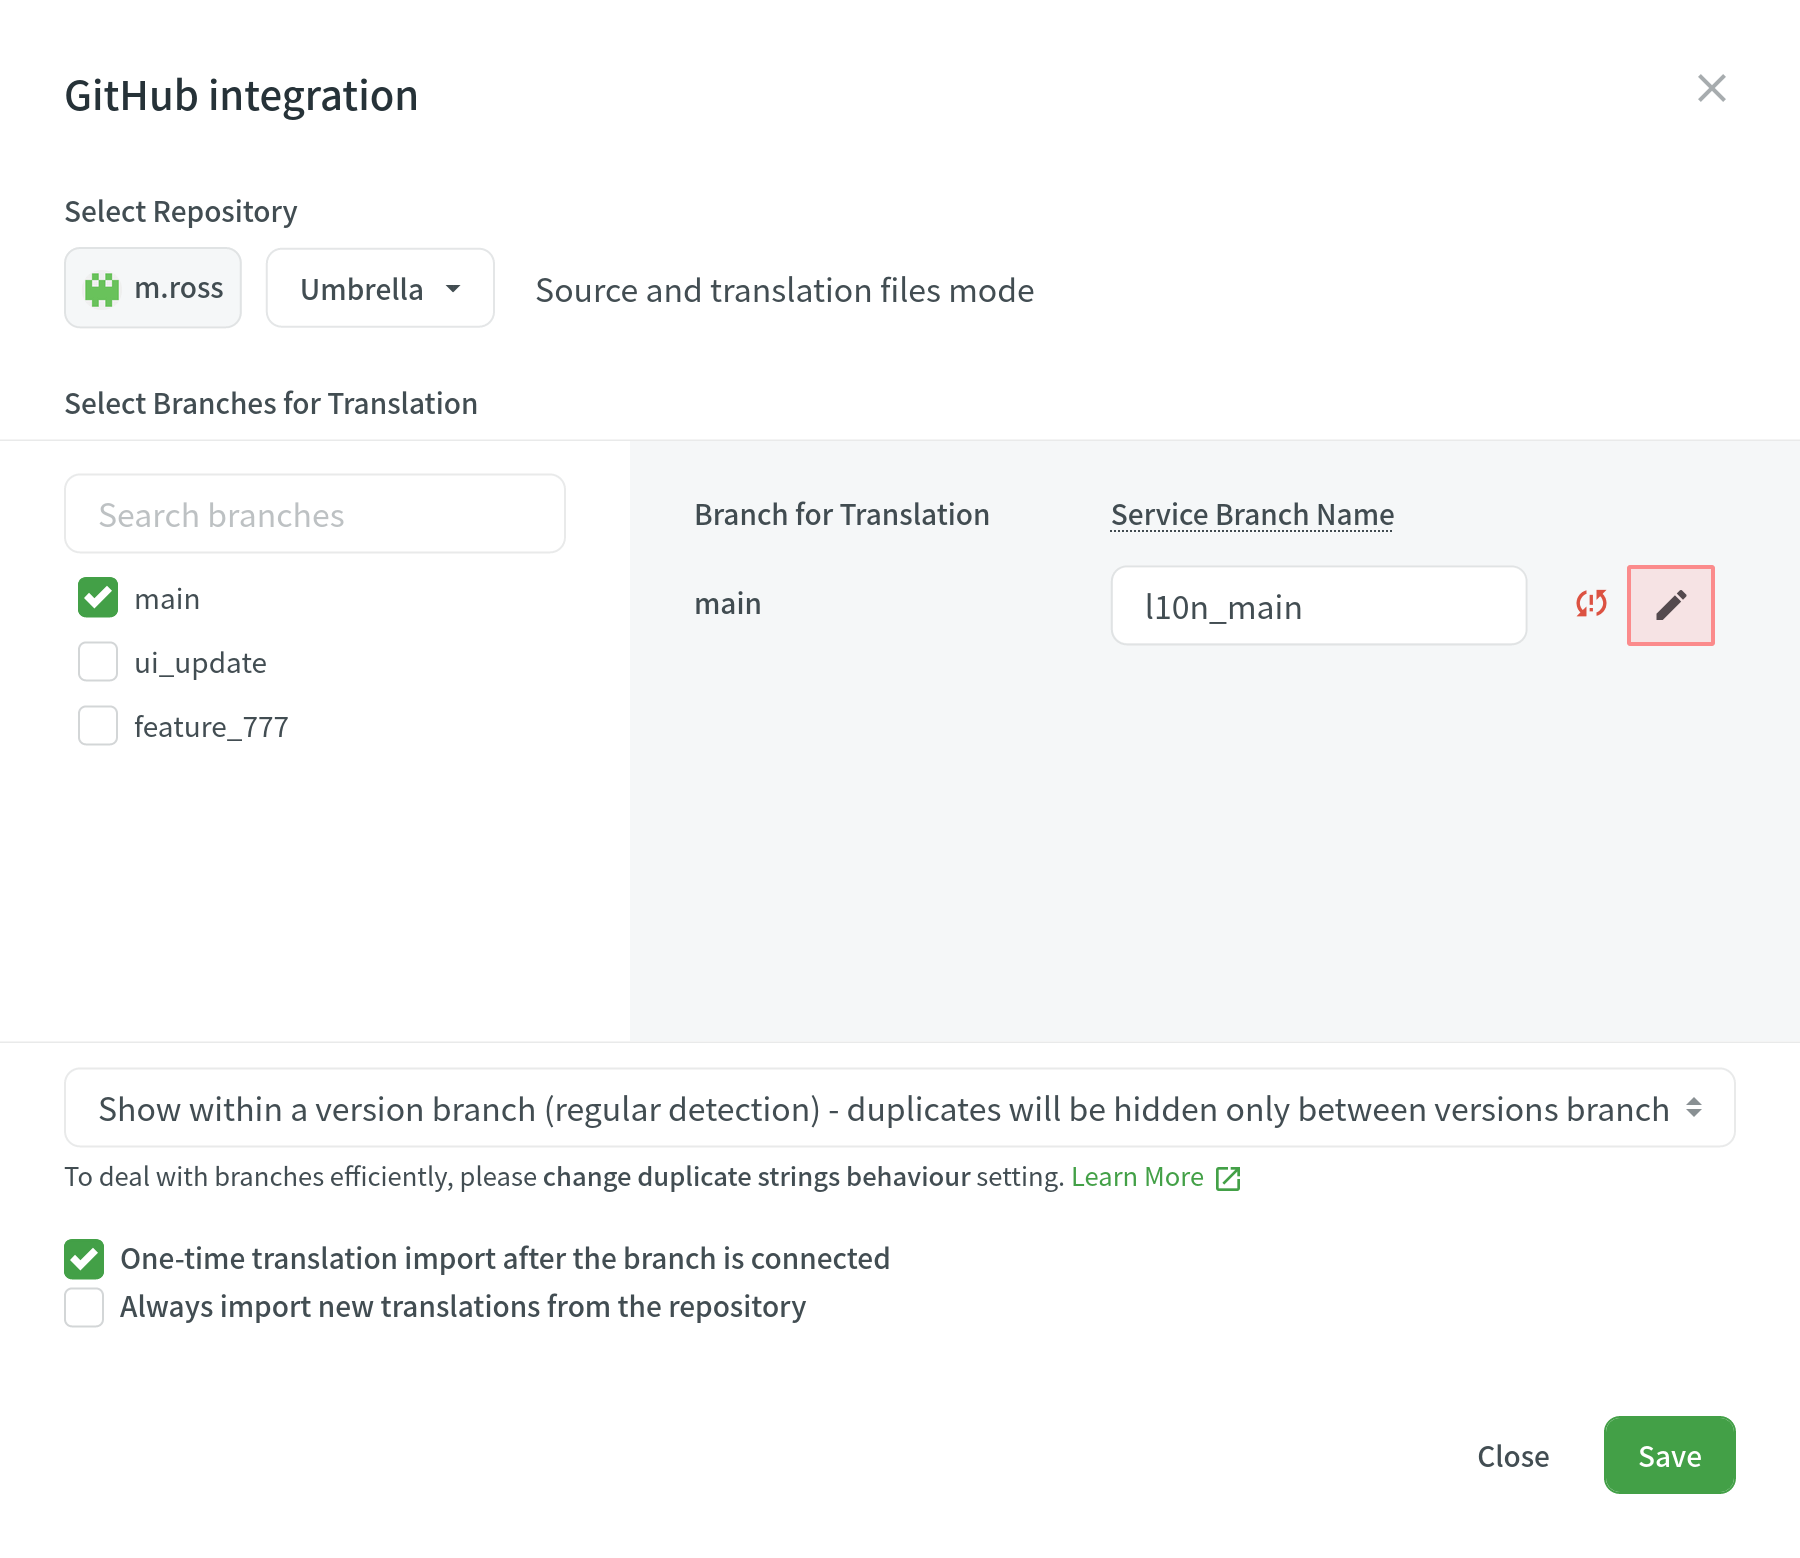
If you want your VCS integration to work in the Target File Bundles Mode, you need to configure target file bundles for each branch you have selected for translation.
Read more about configuring target file bundles for VCS integration.
Caricare una Configurazione
To load the existing configuration file stored in your repository, follow these steps:
- Click
 and select Load configuration.
 - Specify the name of the configuration file in your repository.
- Clicca Continua.
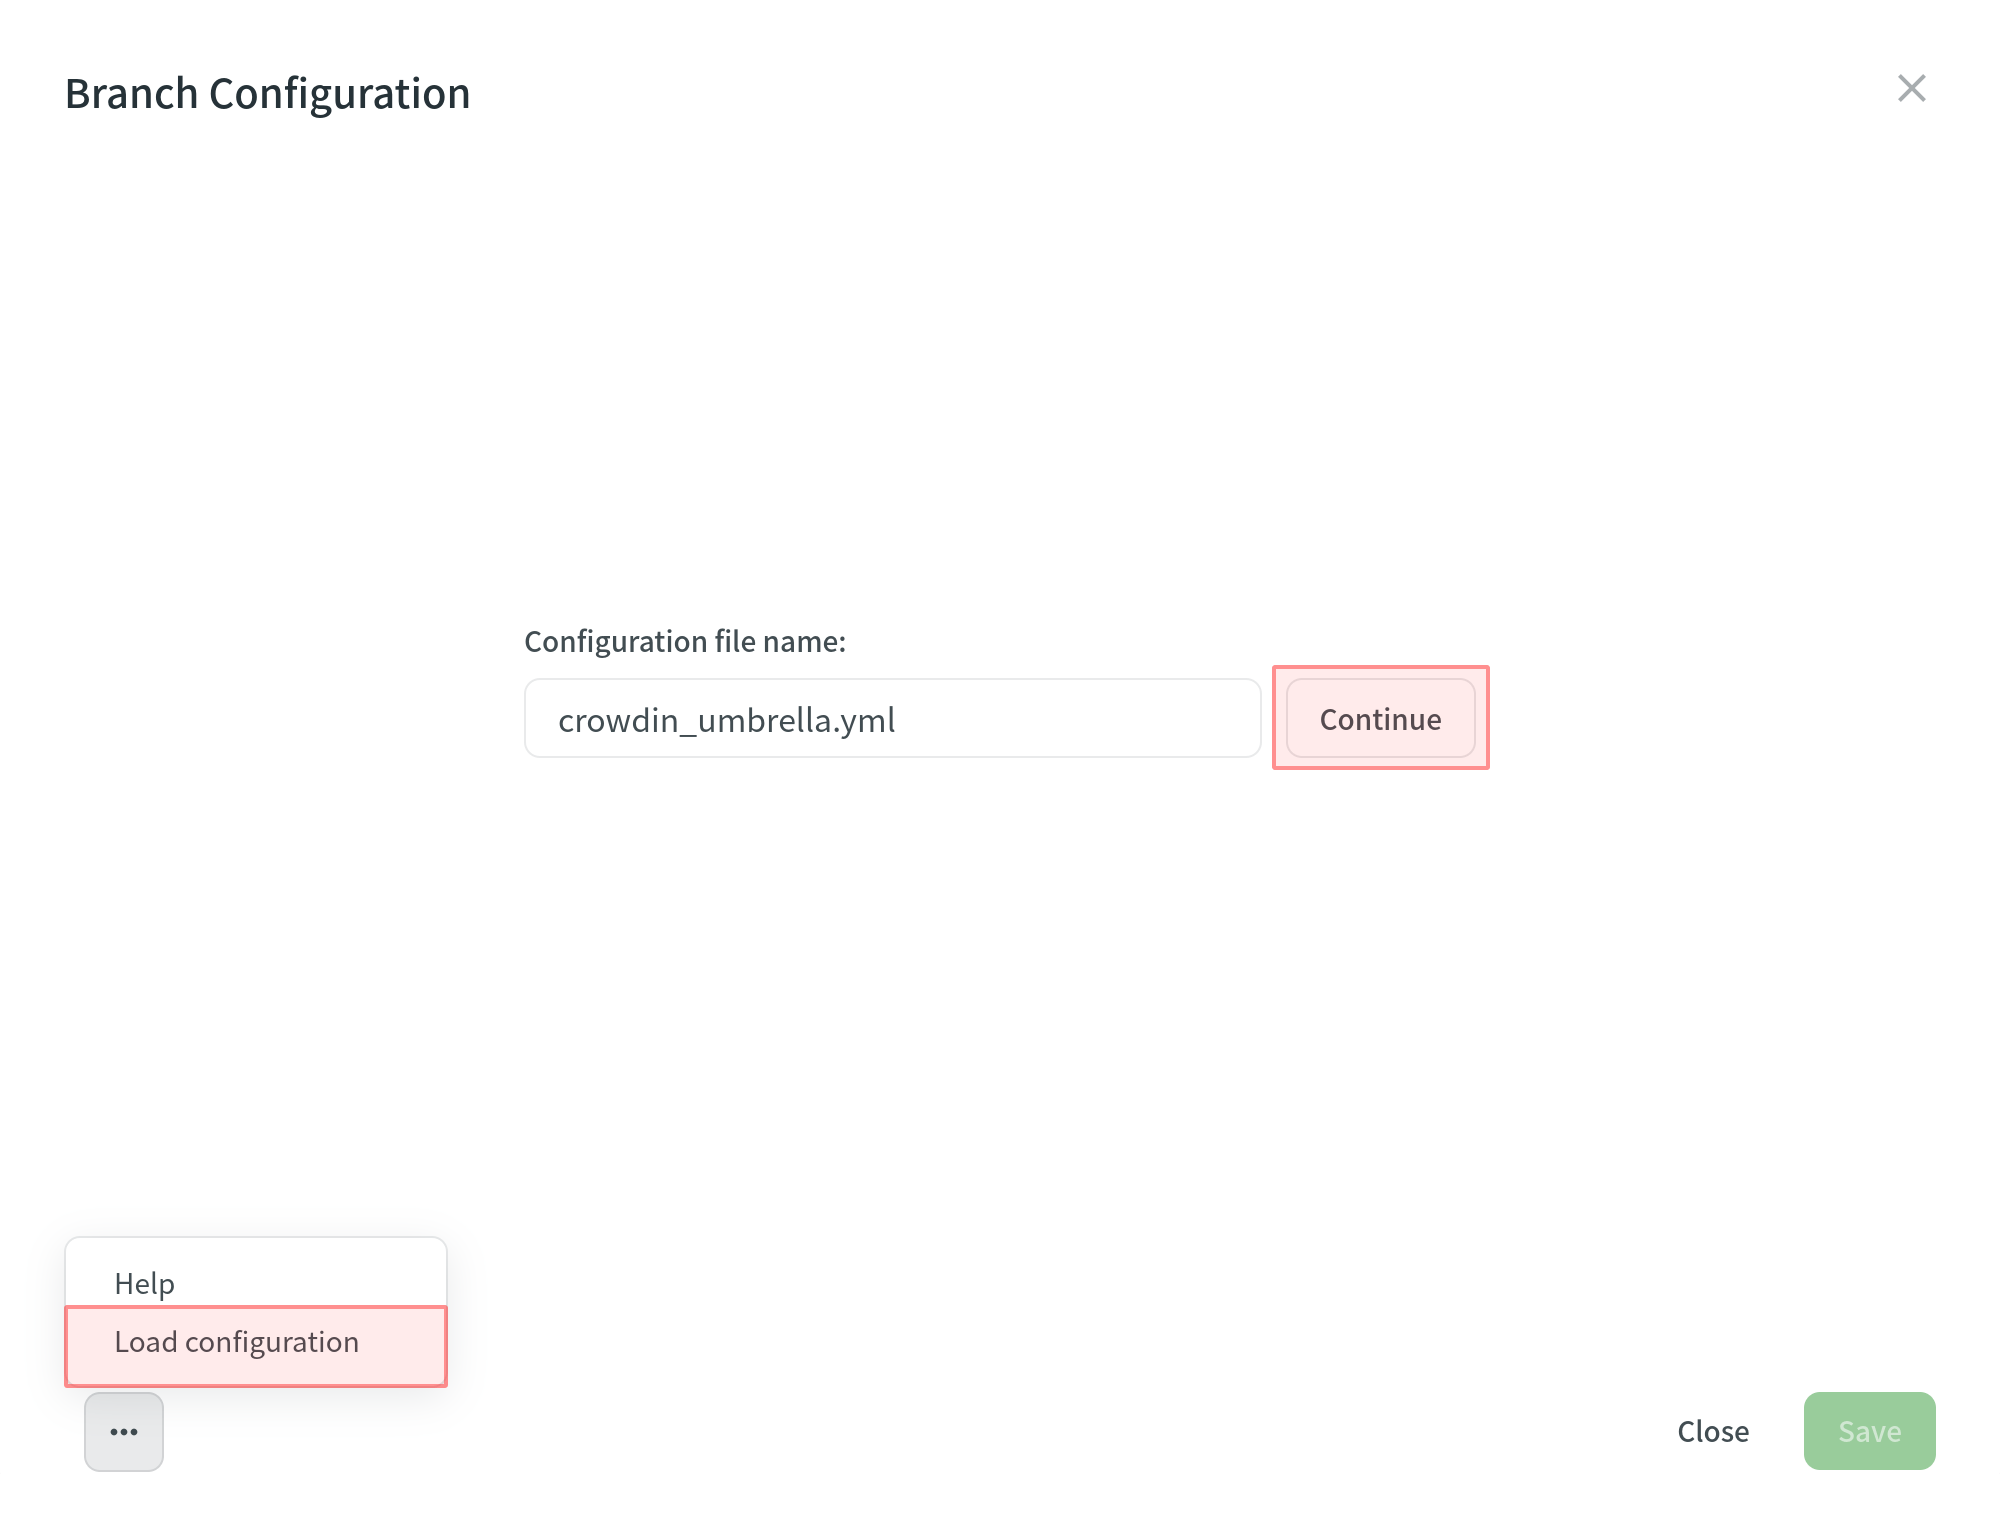
The configuration will be displayed in the Branch Configuration dialog. You can use it as is or modify it if necessary.
Creare una Configurazione
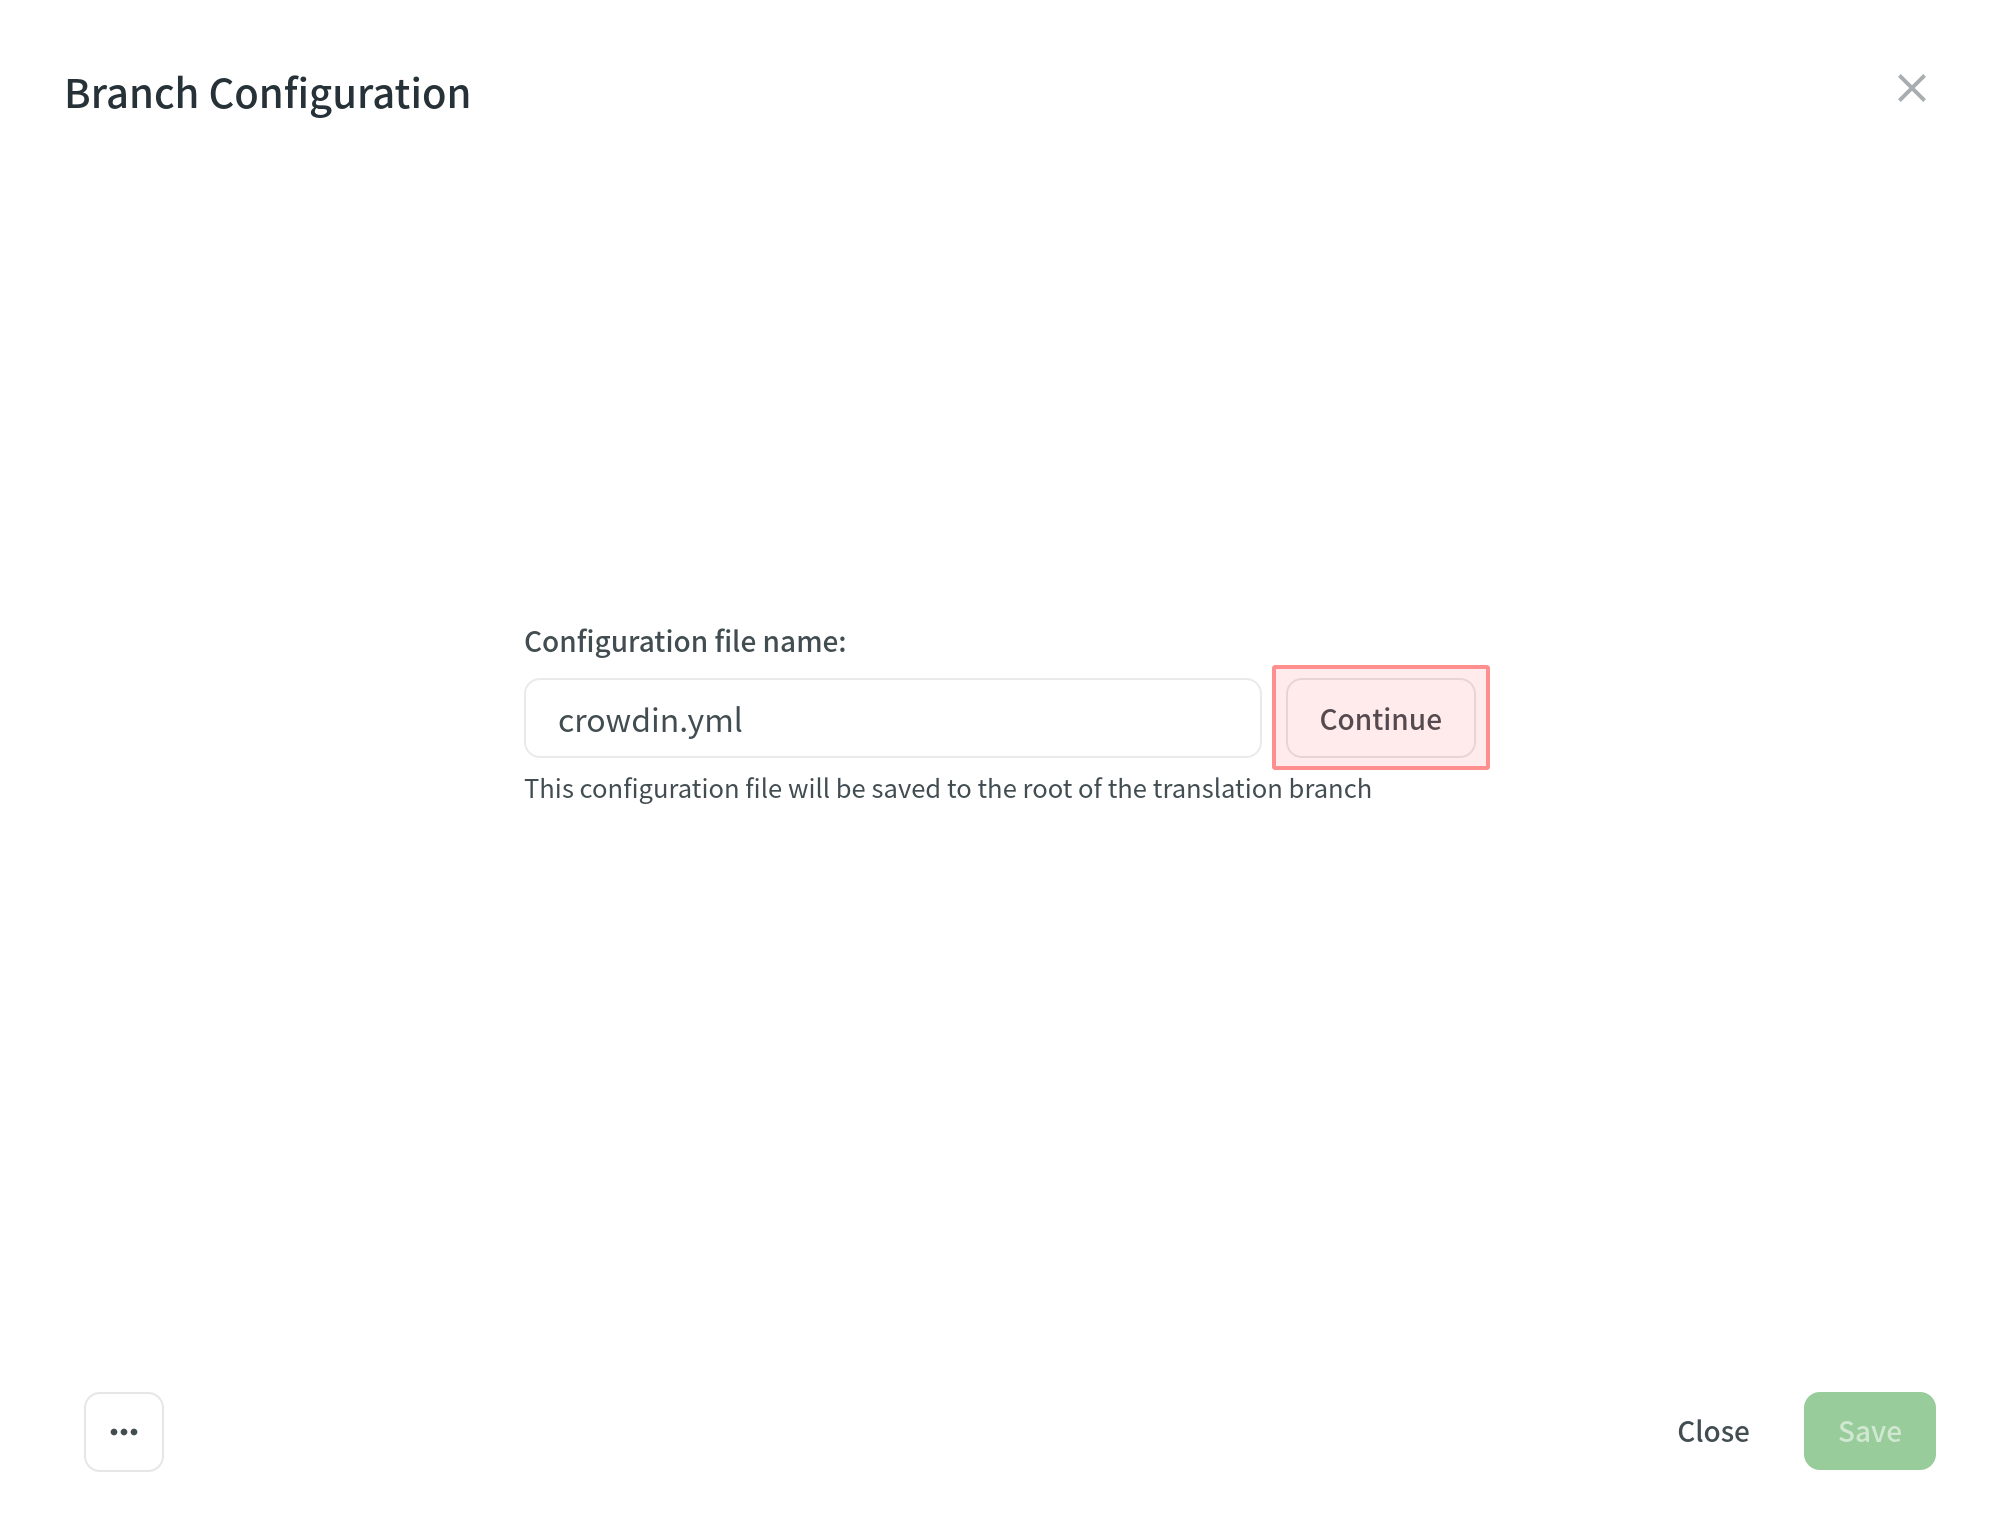
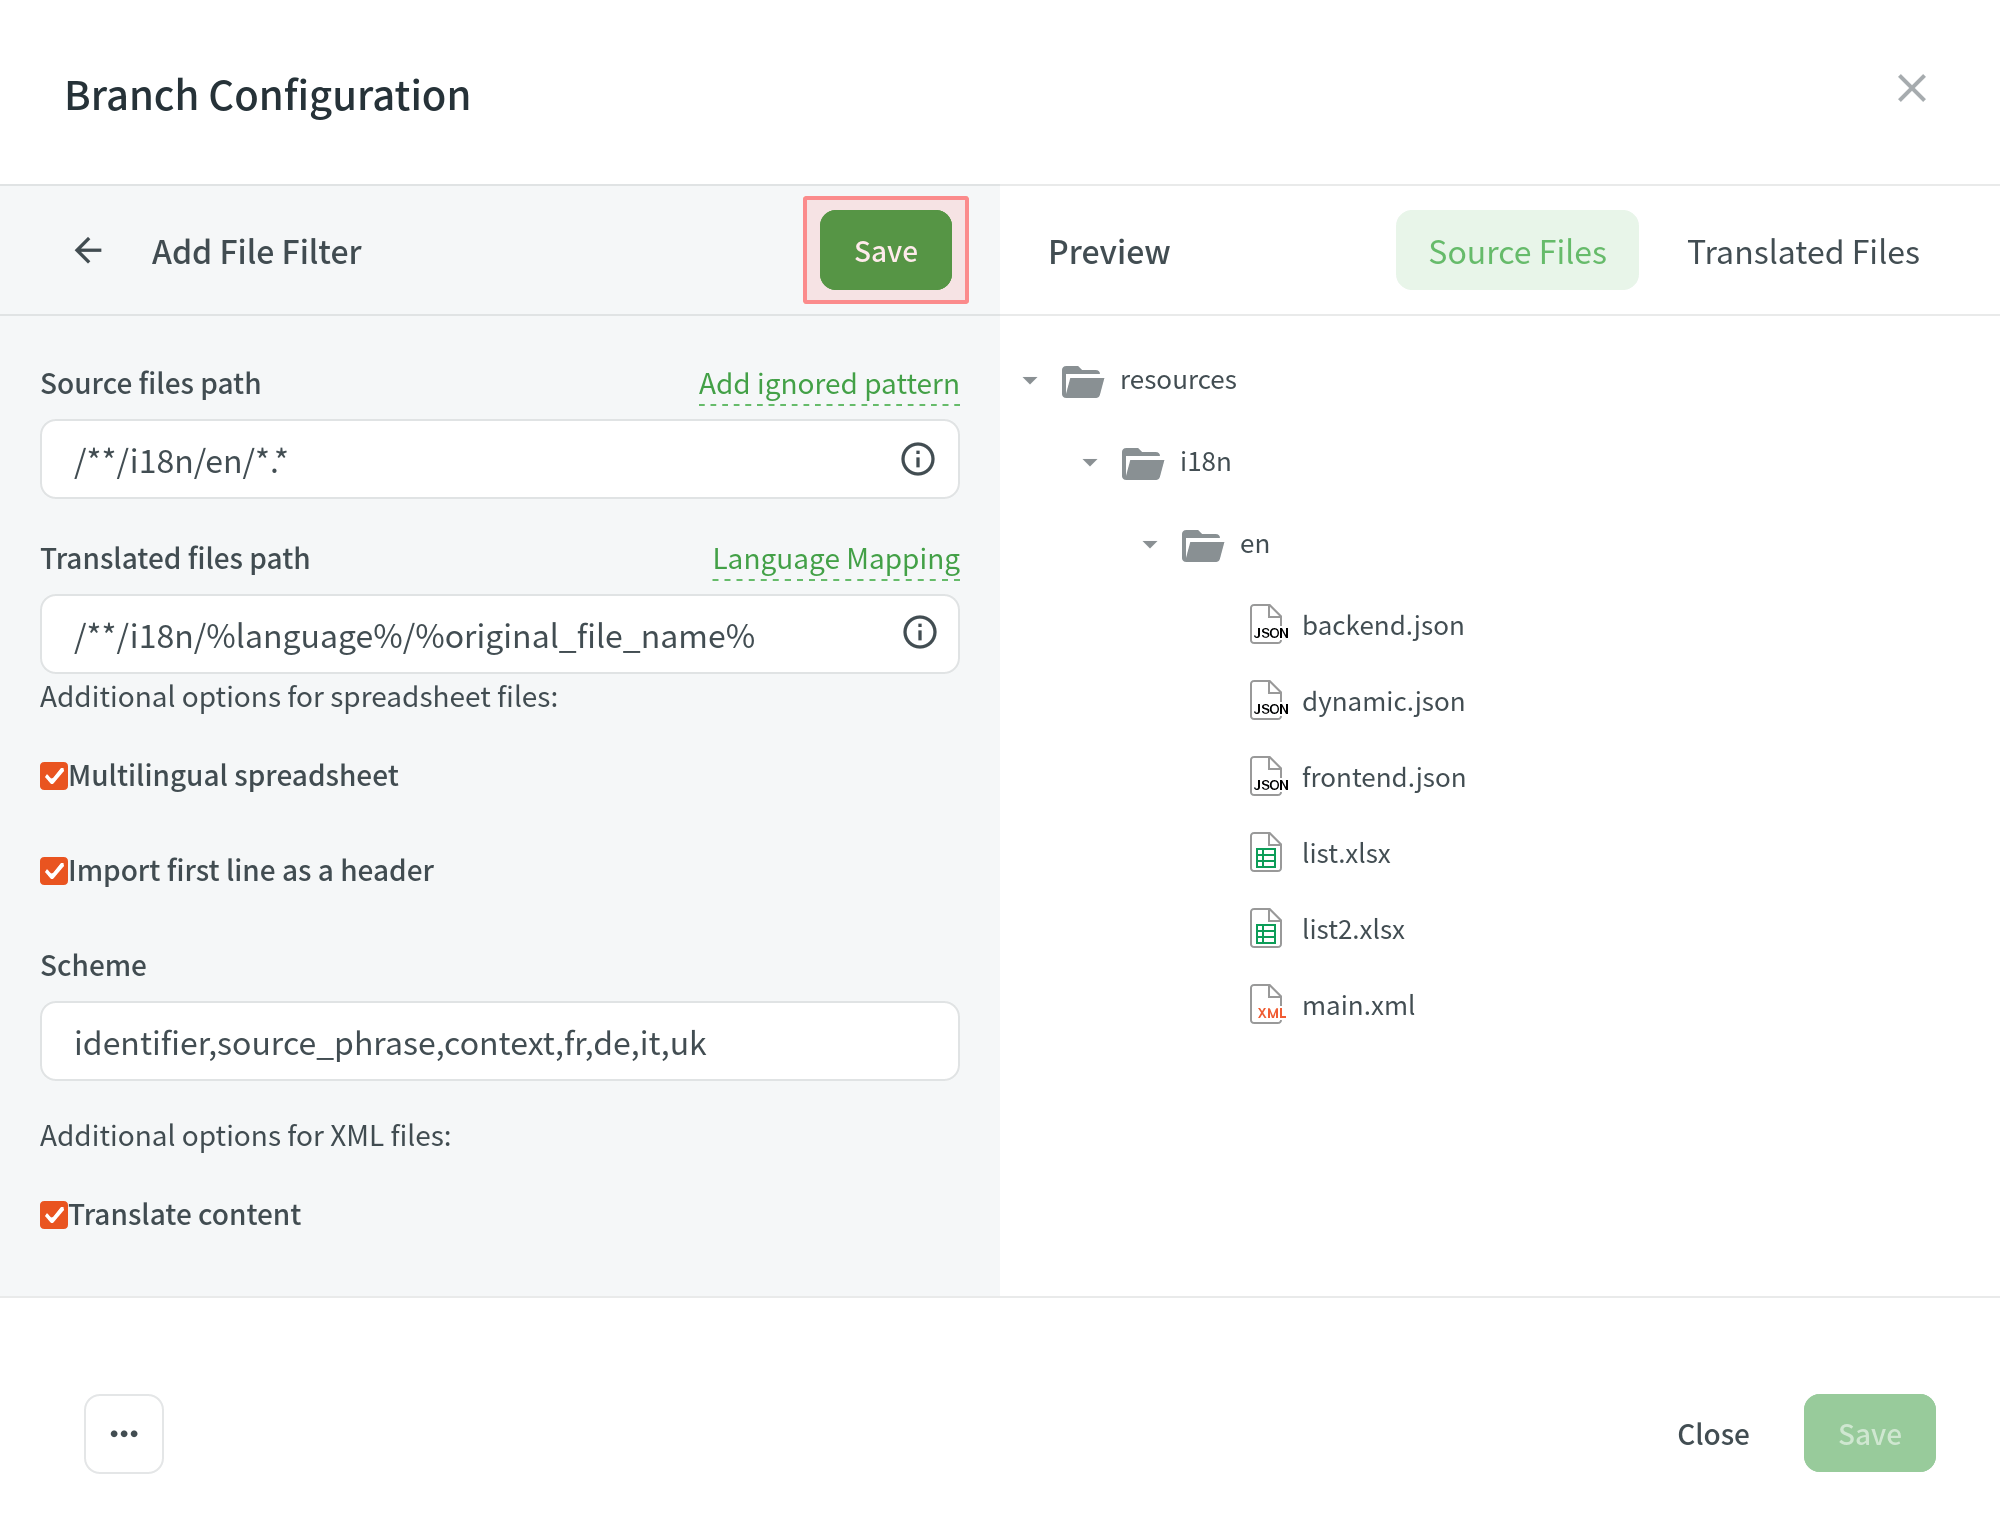
To create a new configuration file to be used by the integration, specify the preferred name and click Continue in the Branch Configuration dialog.
Then specify the source and translated file paths using the patterns and placeholders listed below. In the right panel, you can preview the structure of the source files that will be uploaded for translation and the structure of the translated files based on the specified paths.
Once you’ve finished setting up the configuration for the selected branch and saved the changes, the configuration file will be saved in the root of the translation branch in your repository.
Schemi
* (asterisk)
Matches any character in the file or directory name. If you specify “*.json”, it will include all files like “messages.json”, “about_us.json”, and anything that ends with “.json”.
** (doubled asterisk)
Matches any string recursively (including subdirectories). Note that you can use ** in both the source and translation patterns. When you use ** in the translation pattern, it always includes a subpath from the source for a given file. For example, you can use source: ‘/en/**/*.po’ to recursively upload all *.po files to Crowdin. The translation pattern will be ‘/%two_letters_code%/**/%original_file_name%’.
? (question mark)
Matches any single character.
[set]
Matches any single character in a set. Behaves exactly like character sets in Regexp, including set negation ([^a-z]).
\ (backslash)
Escapes the next metacharacter.
Segnaposto
Use placeholders to specify where translated files will be placed and how they will be named:
| Nome | Descrizione |
|---|---|
| %original_file_name% | Nome file originale |
| %original_path% | Take parent folder names in the Crowdin project to build file path in the resulting bundle |
| %file_extension% | Estensione file originale |
| %file_name% | Nome file senza estensione |
| %language% | Nome della lingua (es. Ucraino) |
| %two_letters_code% | Codice linguistico ISO 639-1 (es., uk) |
| %three_letters_code% | Codice linguistico ISO 639-2/T (es., ukr) |
| %locale% | Locale (es., uk-UA) |
| %locale_with_underscore% | Locale (es., uk_UA) |
| %android_code% | Identificativo Locale di Android usato per denominare le cartelle "values-" |
| %osx_code% | Identificatore Locale OS X usato per denominare le directory ".lproj" |
| %osx_locale% | L'OS X locale usato per denominare le risorse di traduzione (es., uk, zh-Hans, zh_HK) |
Impostazioni Avanzate
Ignorare i File
If you don’t want some files to be translated, click Add ignored pattern, specify the pattern for those files, and Crowdin will not upload those files for translation.
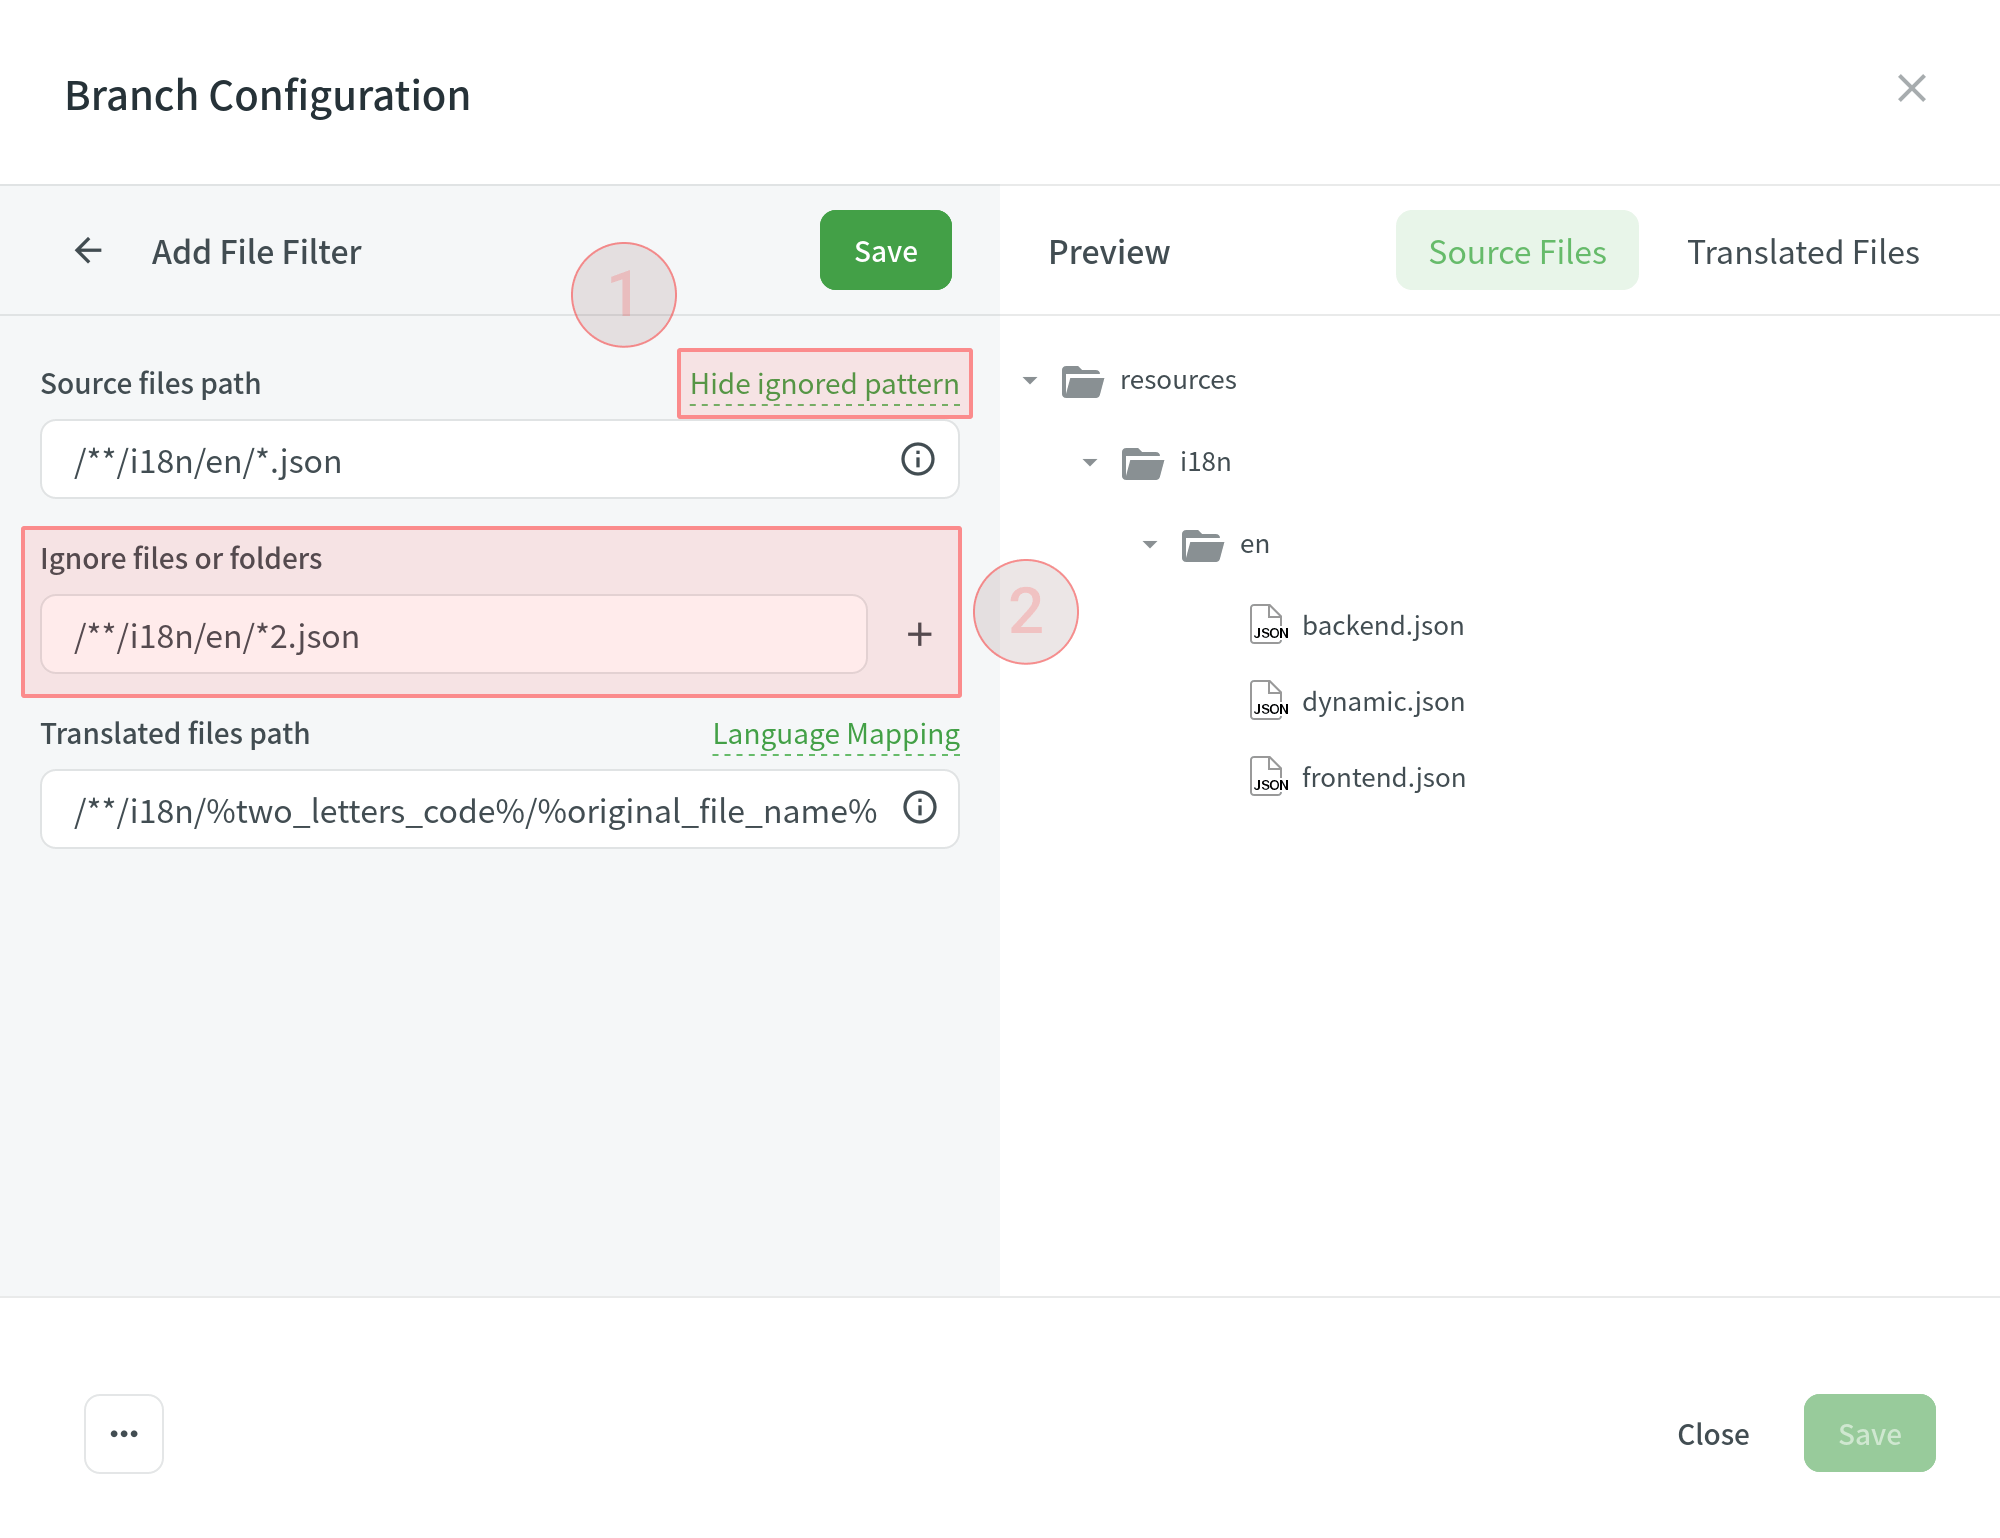
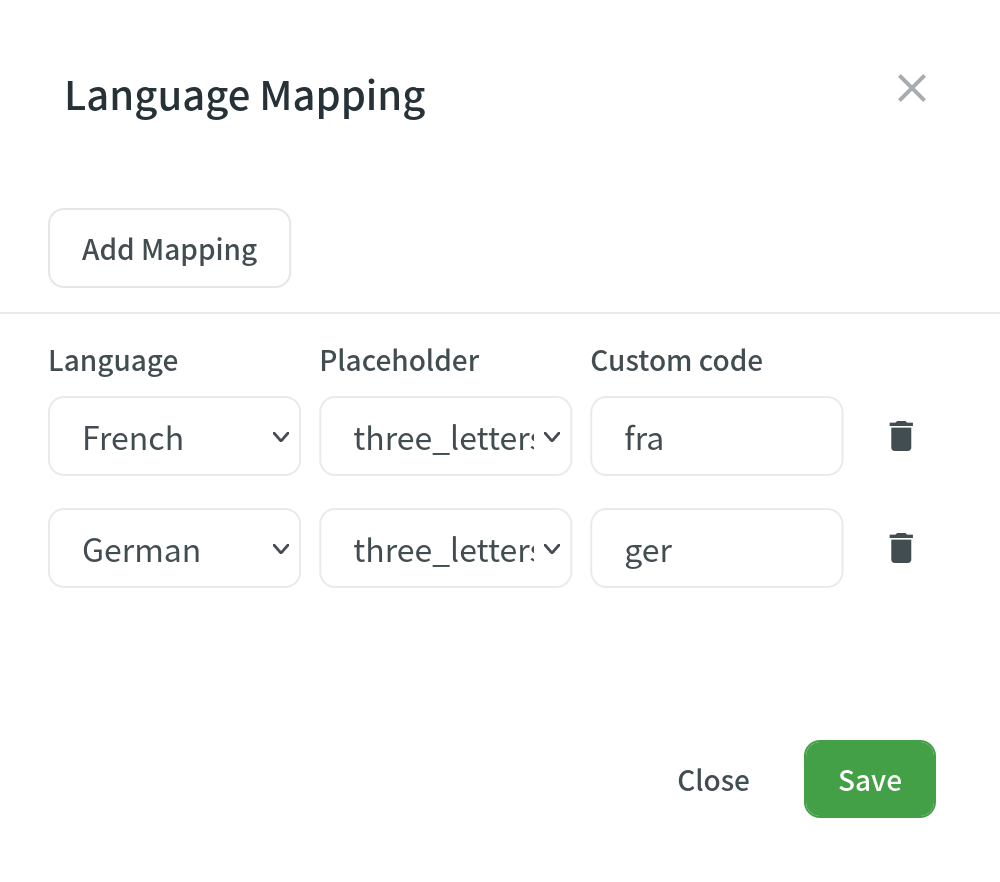
Mappatura Lingua
If your project uses custom names for locale directories, you can use language mapping to map your own languages to be recognized by Crowdin.
To add a language mapping, follow these steps:
- Click Language Mapping.

- Select the necessary language and a placeholder.
- Specify your custom code.
- Click Add Mapping to add another custom code.
- Click Save.
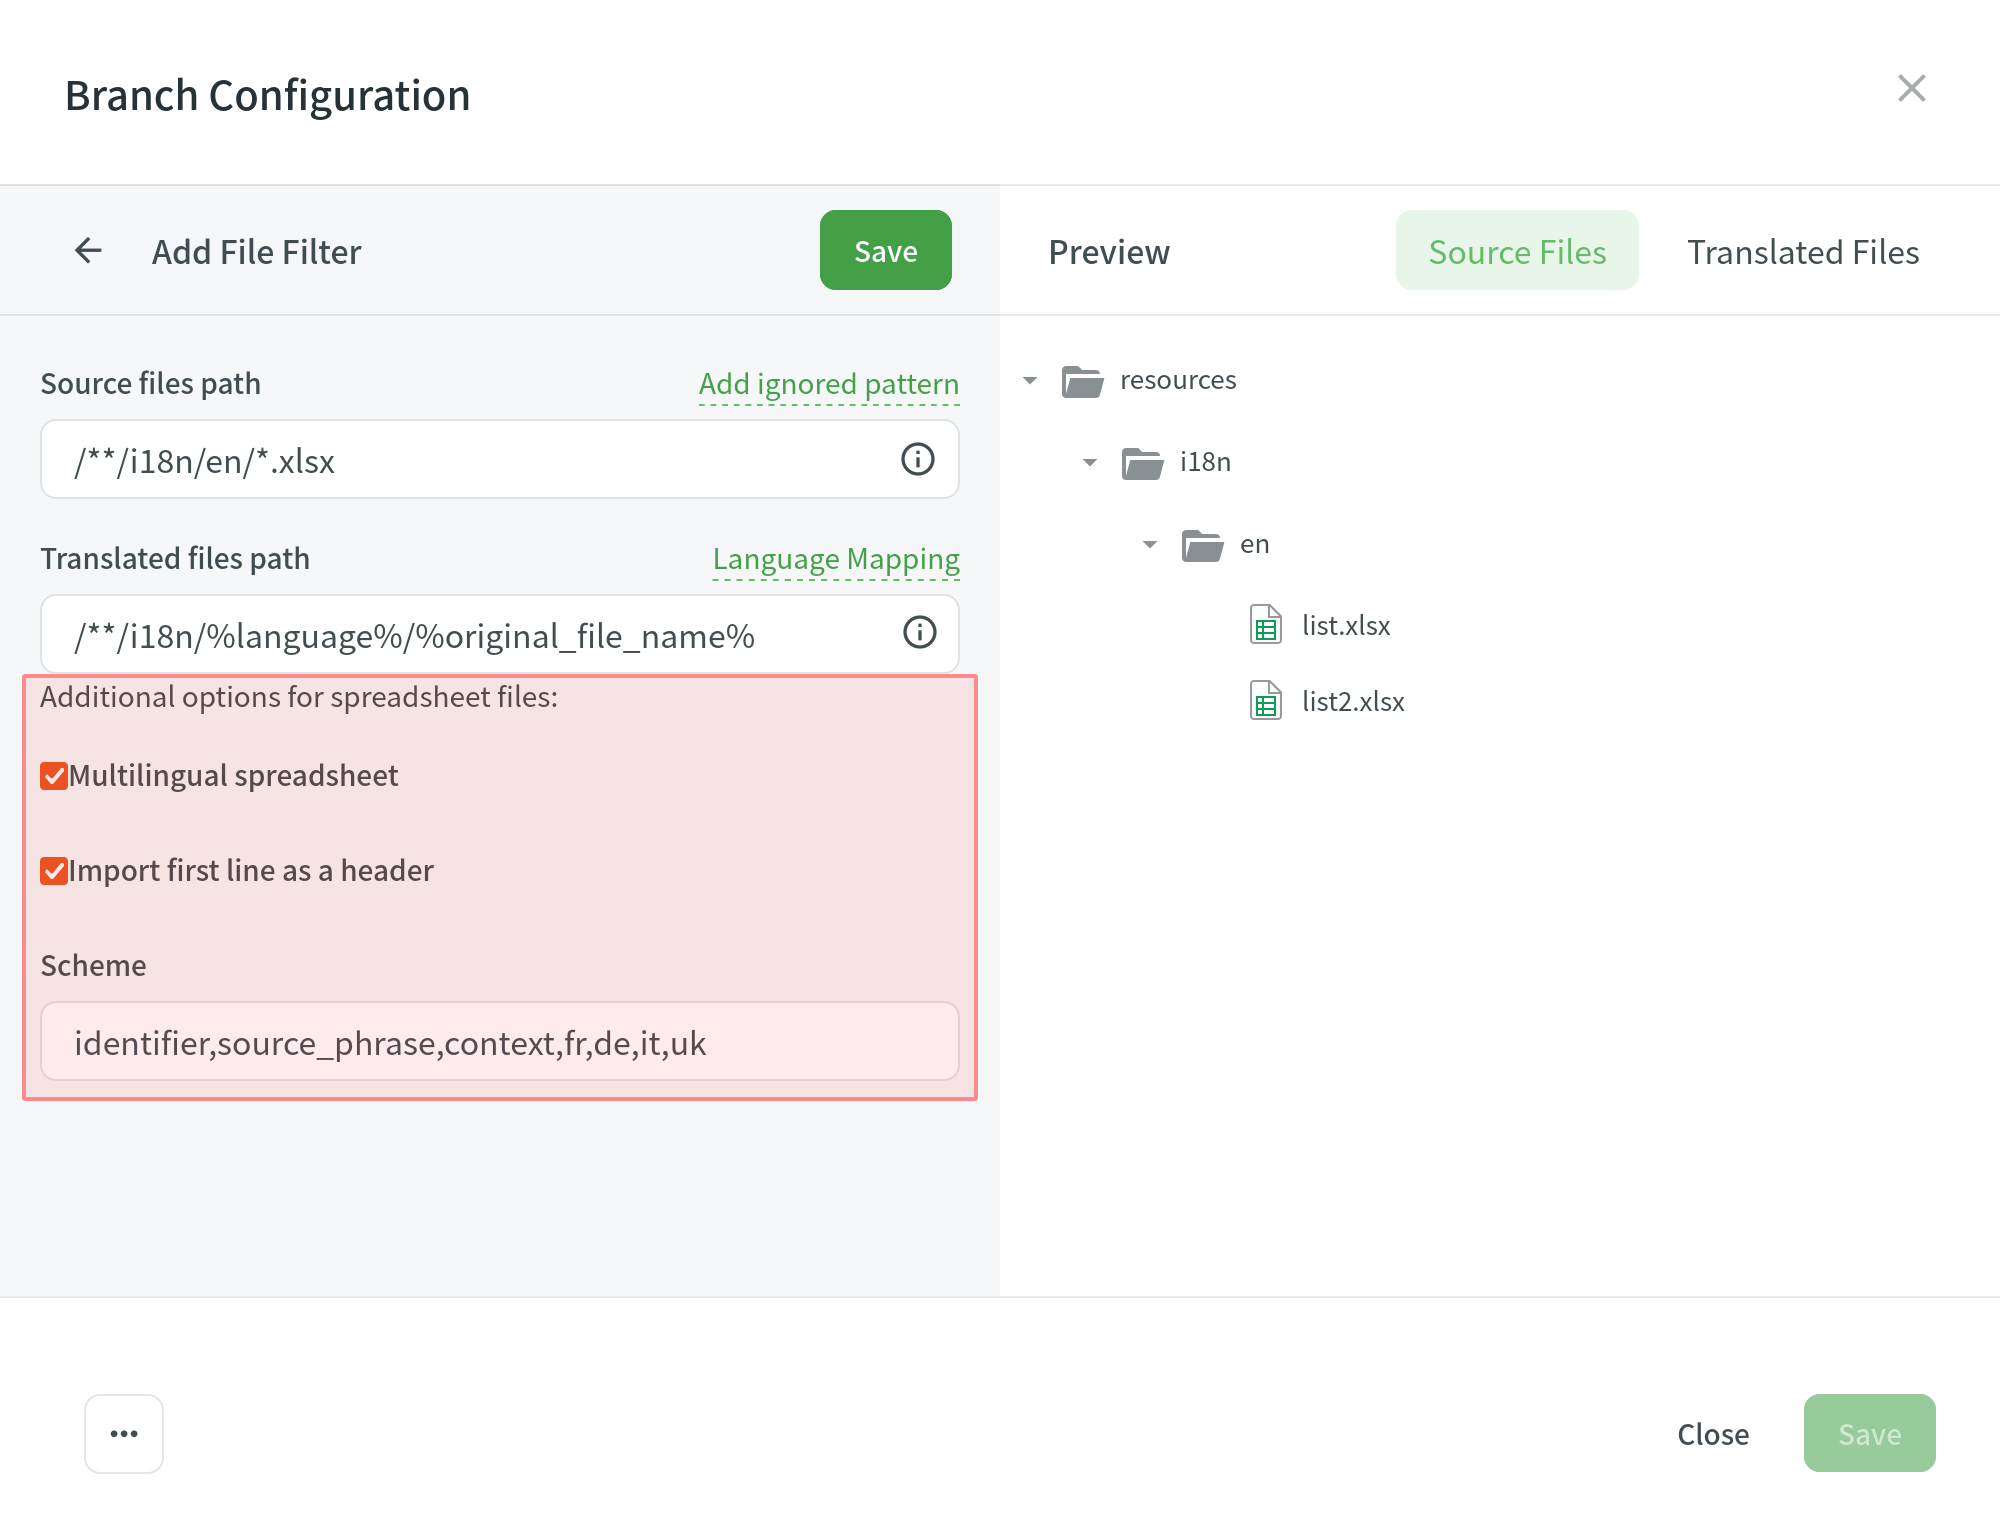
Configurare i Fogli di Calcolo
You can specify the scheme of your spreadsheet file in the Scheme field. To create the scheme for your CSV or XLS/XLSX file, use the following constants:
identifier – column contains string identifiers. source_phrase – column contains source strings. source_or_translation – column contains source strings, but the same column will be filled with translations when the file is exported. If you upload existing translations, the values from this column will be used as translations. translation – column contains translations. context – column contains comments or context information for the source strings. max_length – column contains max.length limit values for the string translations. labels – column contains labels for the source strings. none – column that will be skipped during import.
Scheme example: identifier,source_phrase,context,fr,de,it,uk (Language Codes).
If a spreadsheet contains the translations for several target languages, select Multilingual spreadsheet. If you don’t want to translate the text stored in the first row, select Import first line as a header.
Configurare i File XML
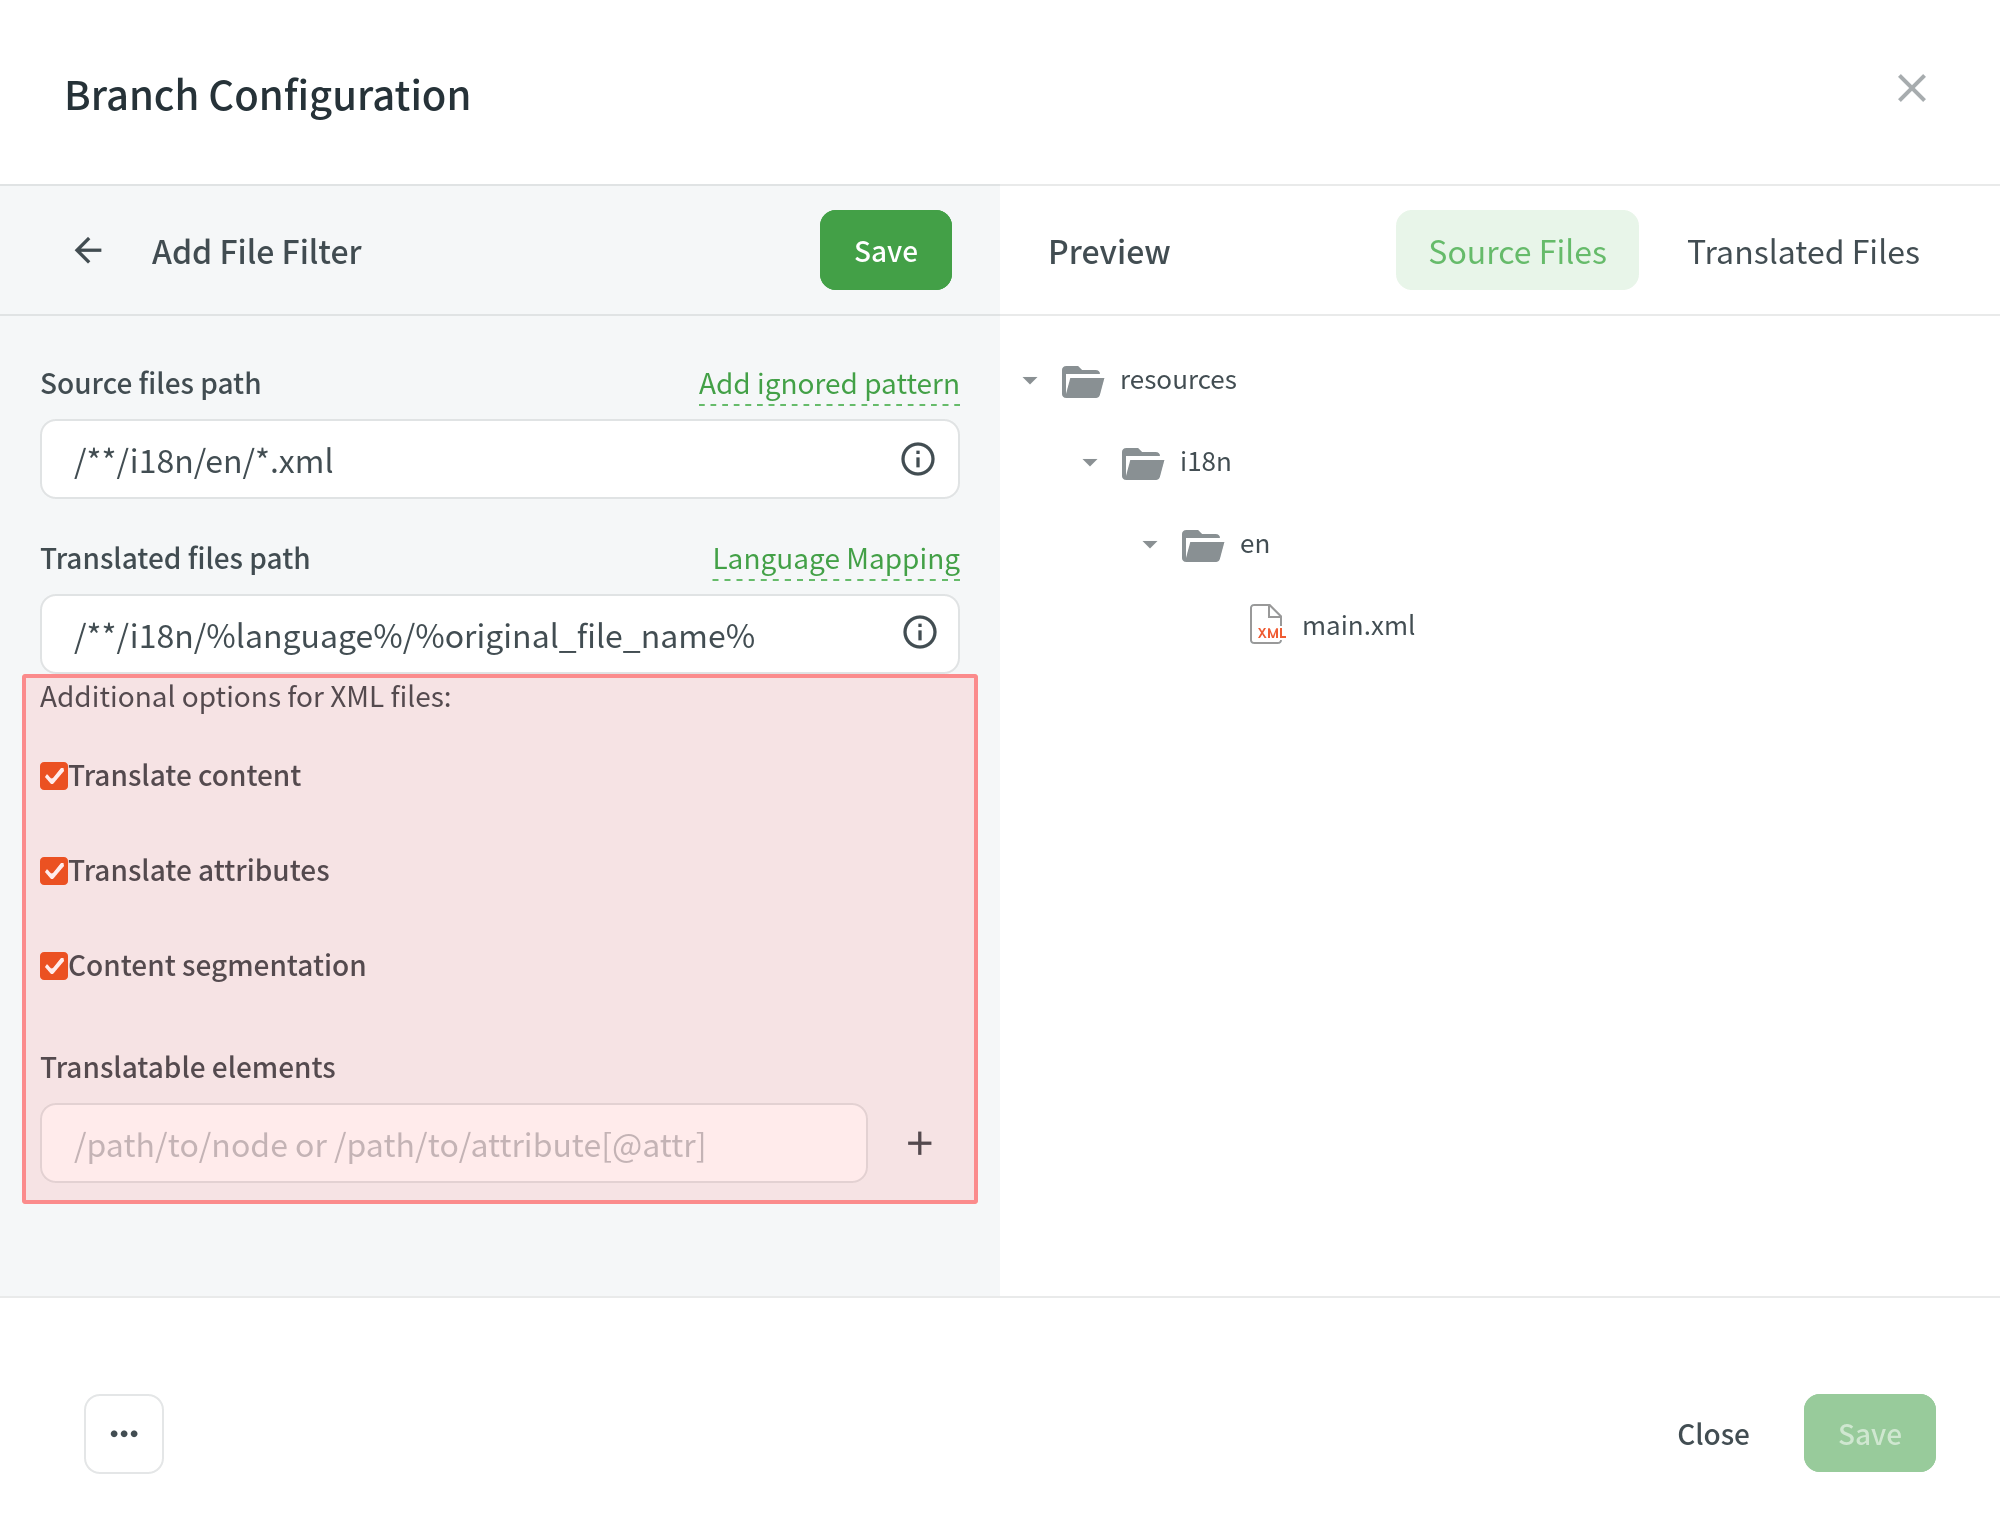
| Traduci Contenuto | Select to translate texts stored inside the tags. |
| Traduci Attributi | Select to translate tag attributes. |
| Segmentazione Contenuto | Select to split the XML source file's content into shorter text segments. Note: When Content segmentation is enabled, the translation upload is handled by an experimental machine learning technology. |
| Elementi Traducibili | This is an array of strings, where each item is the XPaths to the DOM element that should be imported. Sample path: /path/to/node or /path/to/attribute[@attr] |
Parametri Aggiuntivi
The following parameters can’t be configured online:
preserve_hierarchy- preserves the directory structure in Crowdindest- ti consente di specificare il nome di un file in Crowdintipo- ti consente di specificare il tipo di un file in Crowdinupdate_option- keeps translations and keeps/removes approvals of changed strings during a file updatecommit_message- additional commit message that can include Git tagsesporta_lingue- esporta traduzioni per le lingue specificate
Once you save the online configuration, a crowdin.yml file is saved in the root of the configured branch in your repository. You can edit this file manually to add the necessary parameters.
Read more about the configuration file.
Salvare la Configurazione
Click Save to preview the created configuration.
Click Add File Filter if you have multiple file groups with different configurations.
If several branches in the project have the same configuration, and you want the same filters to be applied to them, select Apply filters to all translatable branches.
Click Save to save the created configuration.
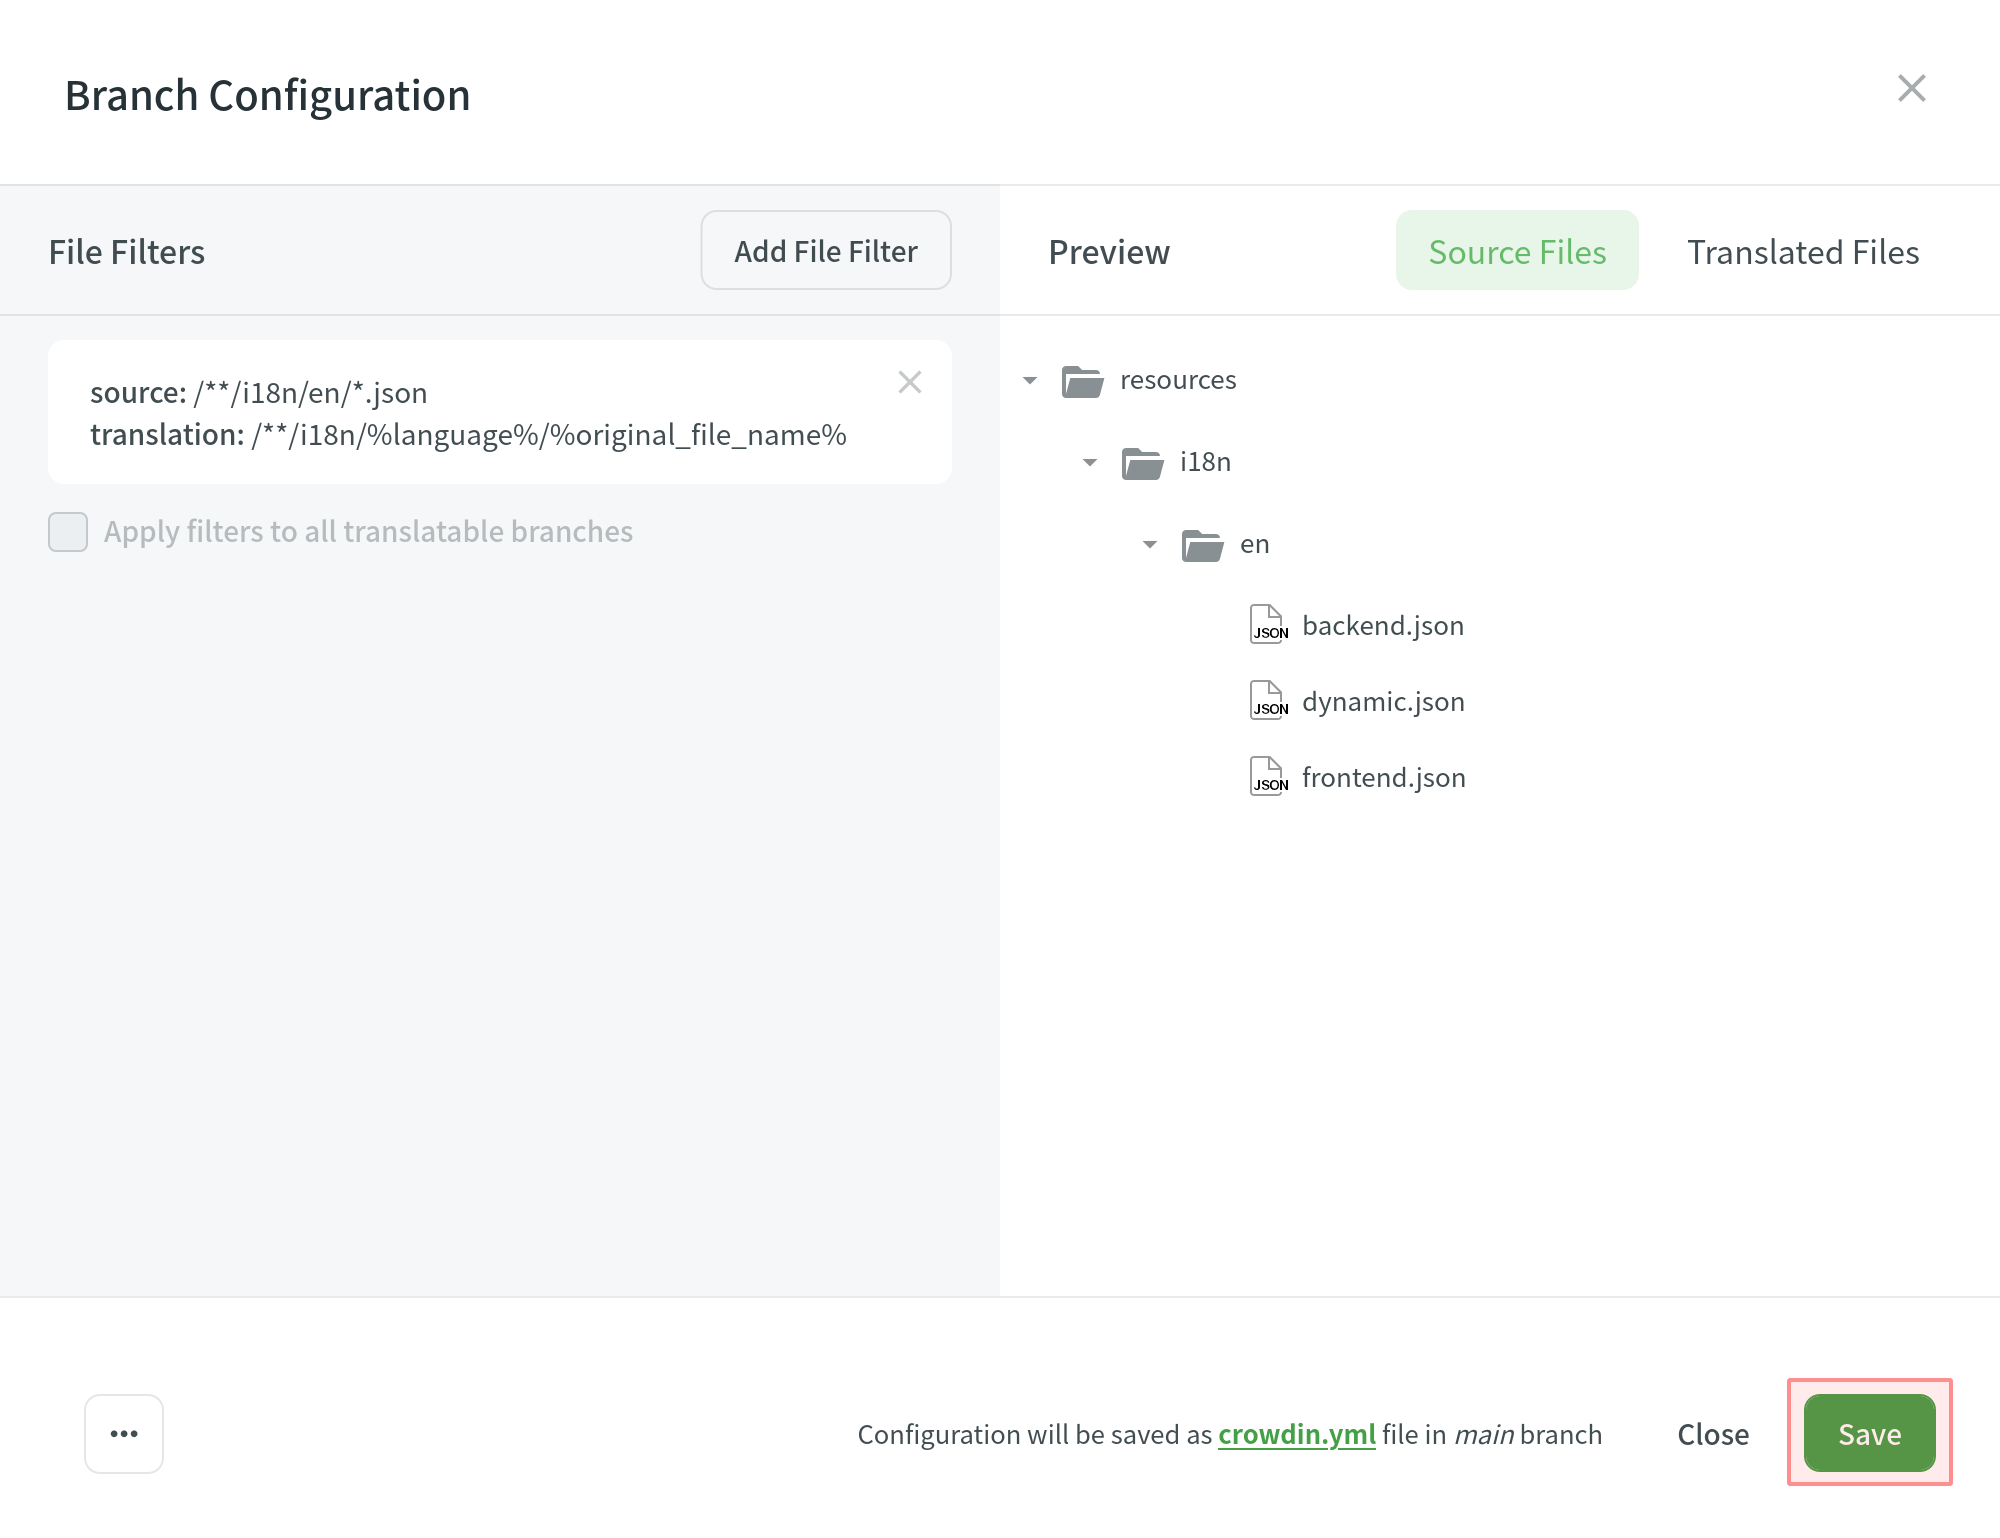
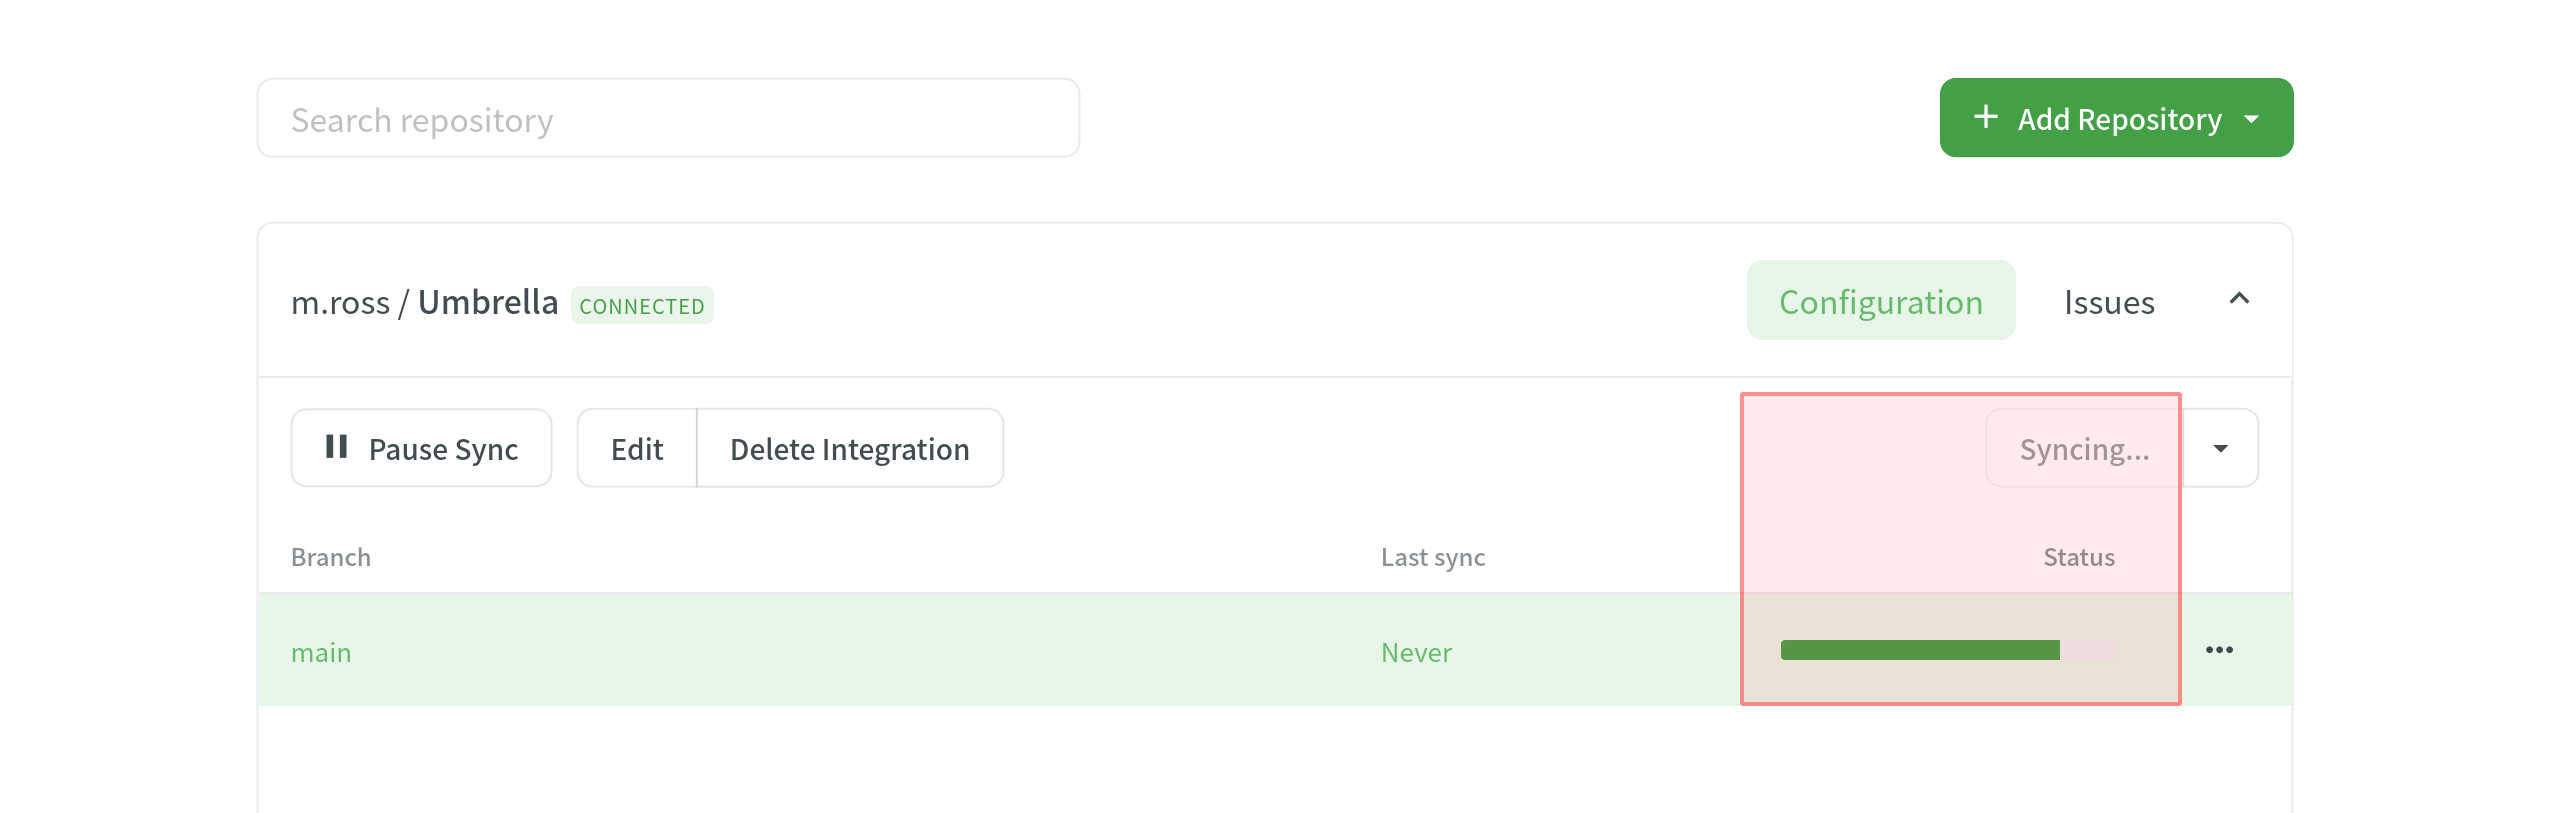
Once the configuration is saved, the localizable files will start uploading to your Crowdin project.