Figma plug-in
With the Crowdin for Figma plugin, you can use texts from Crowdin in your designs to save time for both designers and developers. Disse kan omfatte originale eller oversatte tekster. Om ønsket kan nye tilføjes (f.eks. dialogtitler, knapetiketter) og indsendes til Crowdin-oversættere.
Brugsstudier
- Generér hurtigt flersprogede, kreative aktiver.
- Oversæt modelscenarier og test dem på forskellige sprog, før programmering påbegyndes.
- Stop med at bruge ‘Lorem Ipsum’, føj i stedet reelle tekster fra Crowdin til prototyperne. Strings added from Crowdin become linked to the text fields in Figma.
- Opret og upload kildestrenge fra designs til Crowdin-projektet. Created strings become linked to text fields in Figma. This way, developers could use uploaded strings, reducing time spent on development.
- Preview translations and string keys in your designs.
- Upload taggede skærmfotos til Crowdin-projektet.
Running Crowdin for Figma Plugin for the First Time
- Log ind på Figma.
- Open one of your design files or click New design file.
- In the file menu, click Plugins > Manage plugins…. Alternatively, right-click the canvas and click Plugins > Manage plugins.
- Use the Search all plugins field to find Crowdin for Figma plugin.
- Click on Crowdin for Figma plugin and select Save.
- Hover over the Crowdin for Figma plugin and click Run.
Forbinde Figma til Crowdin-kontoen
Opsætning af Crowdins-akkreditiver
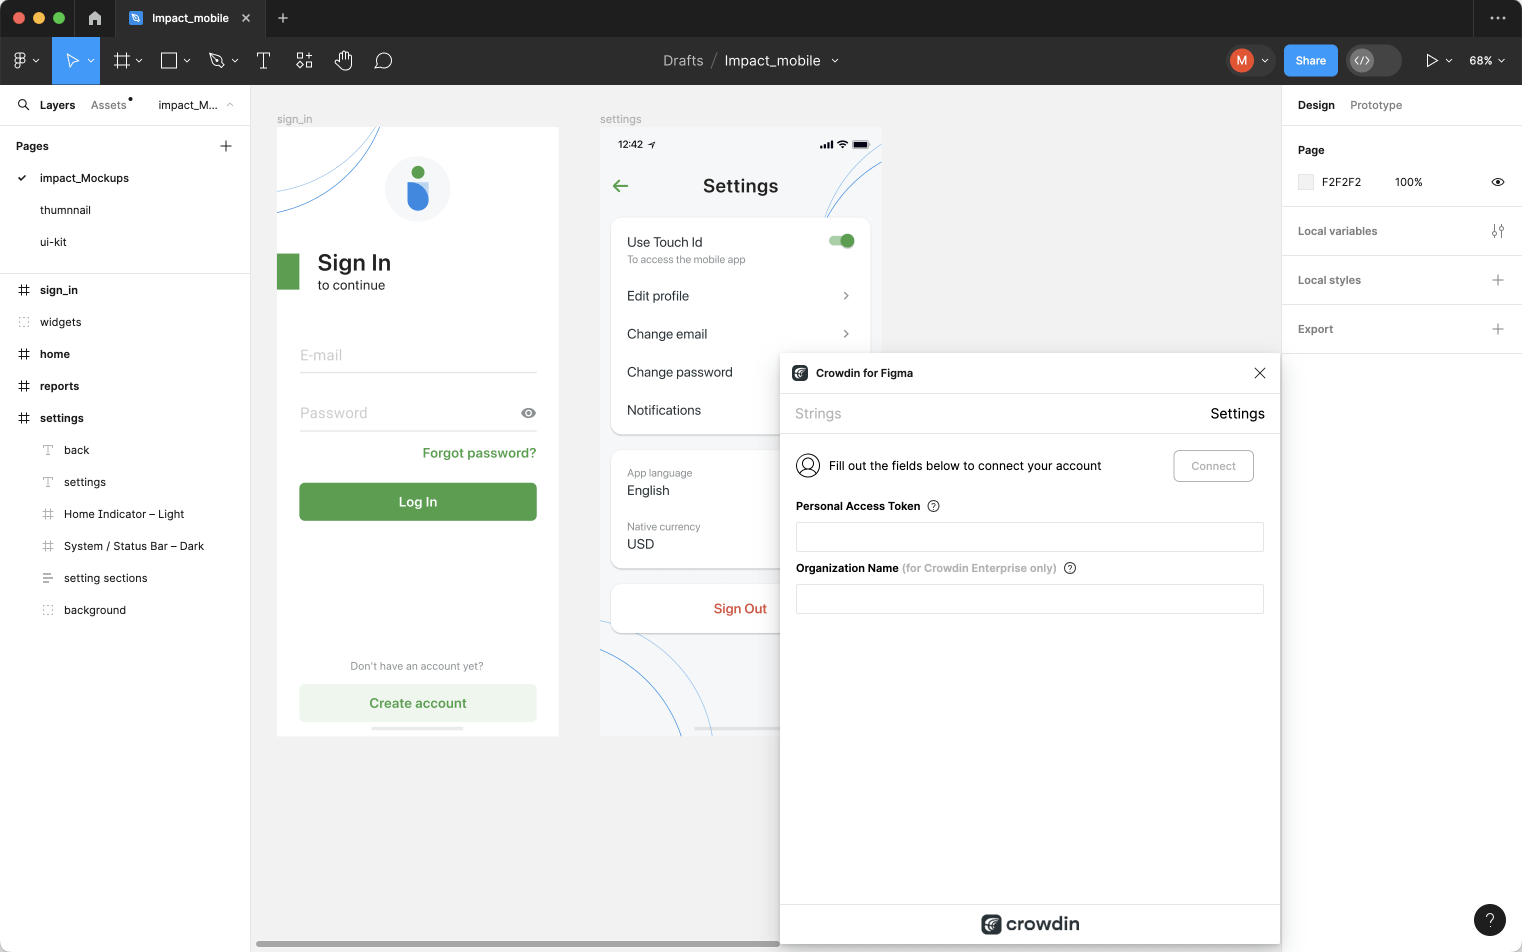
Følg disse trin for at angive Crowdin-akkreditiverne i Figma:
- In the file menu, go to Plugins > Saved plugins. Alternatively, right-click the canvas and click Plugins > Saved plugins.
- Click Crowdin for Figma.
- Skift til Indstillinger.
- Angiv det Personlige Adgangstoken.
- Click Connect.
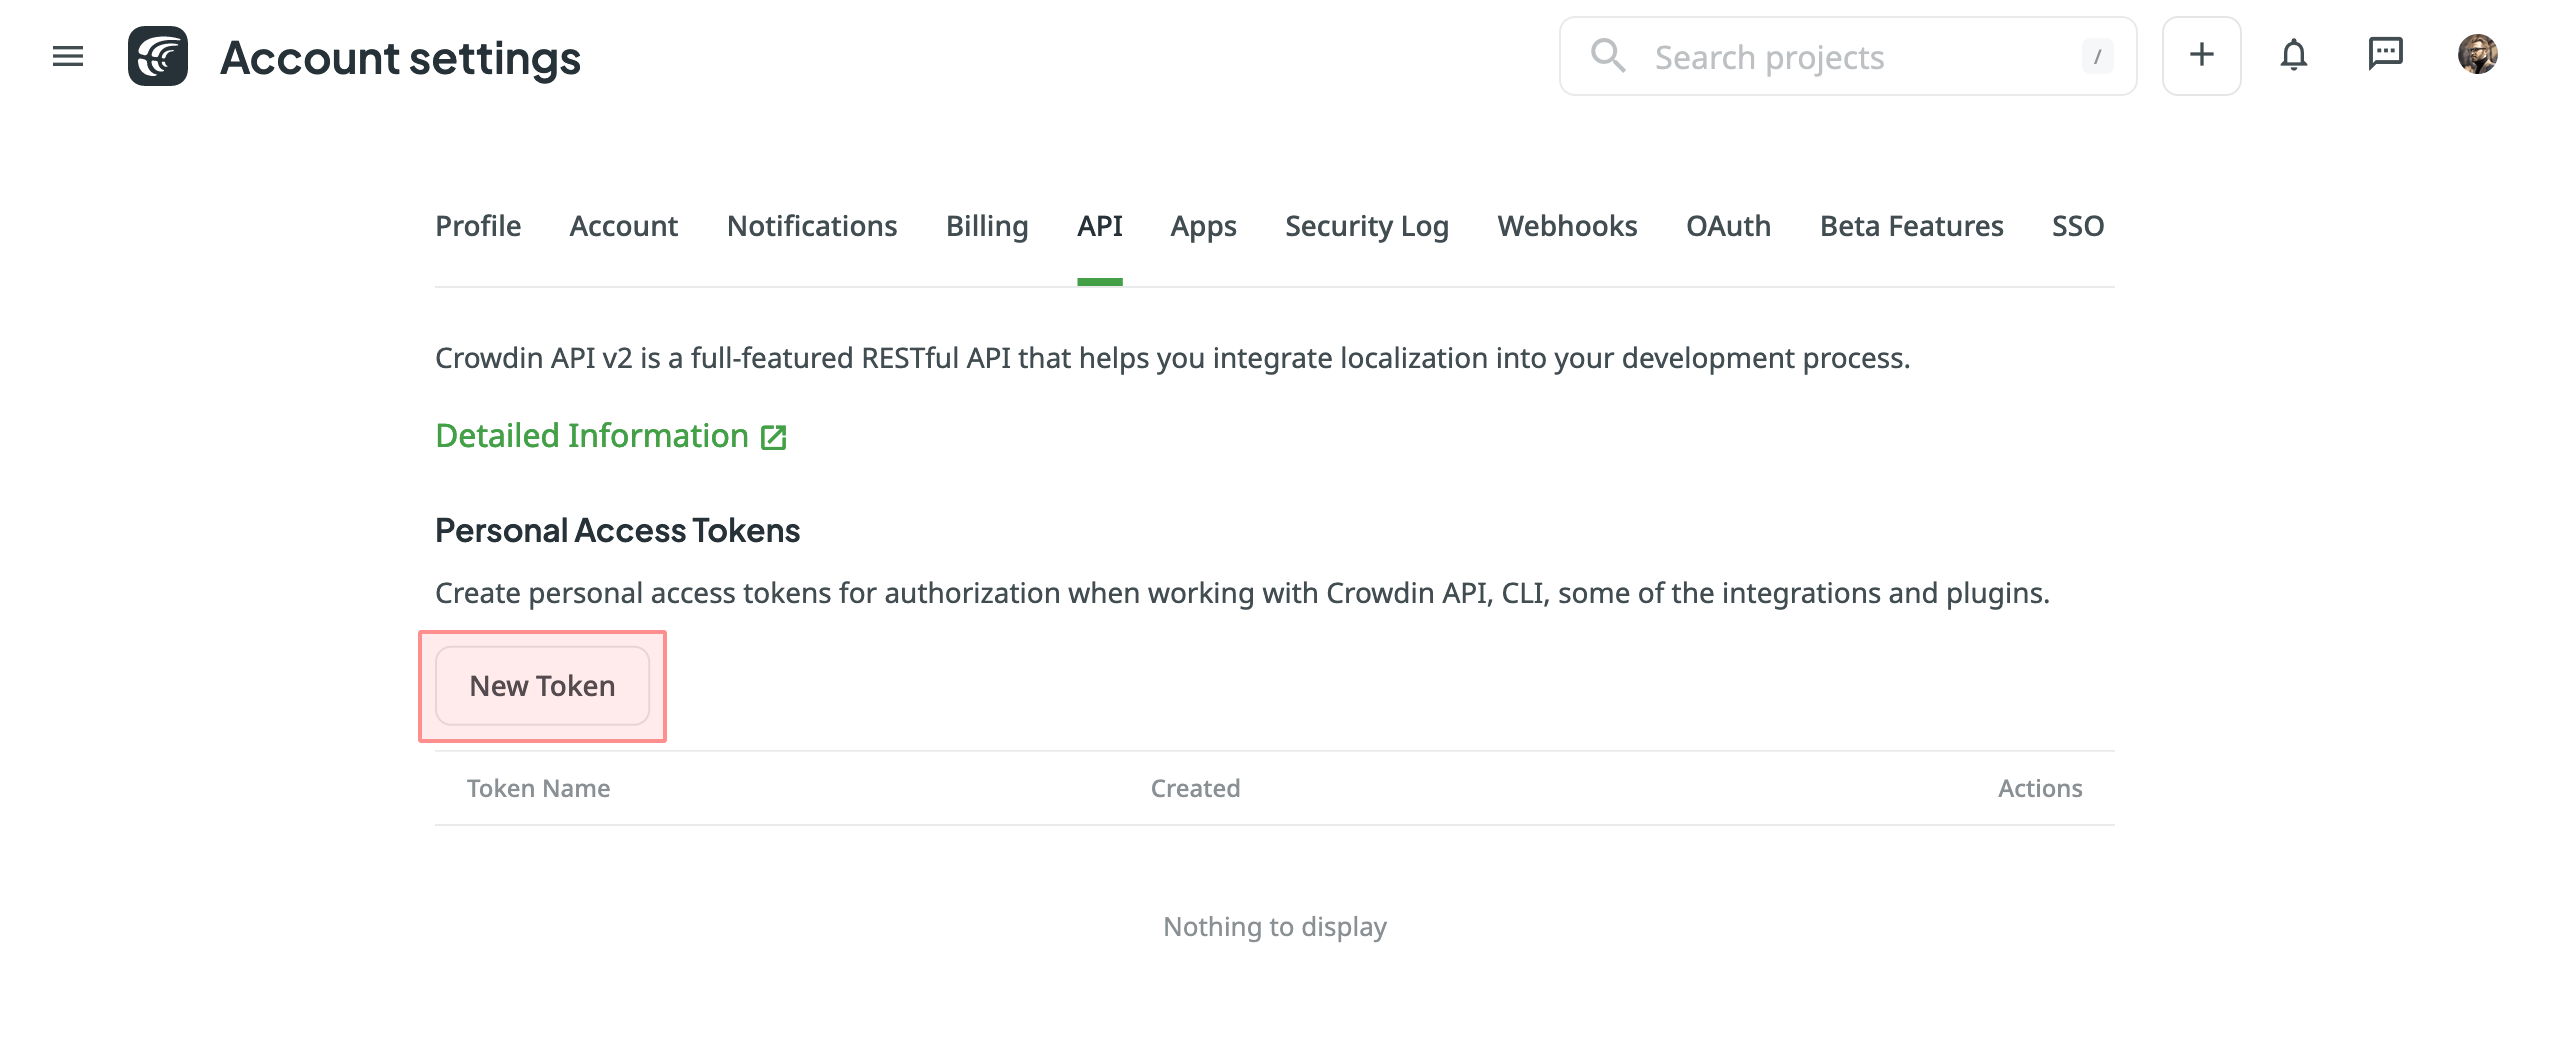
To generate a new token in Crowdin, follow these steps:
- Go to Account Settings > API, Personal Access Tokens section, and click New Token.
- Specify Token Name, select Scopes, and click Create.
Valg af Crowdin-projekt
To select the project you’d like to work with, click the drop-down menu in Settings > Crowdin Project, and select a project from the list. Later, you can click Disconnect in the same section to switch to another project if needed. 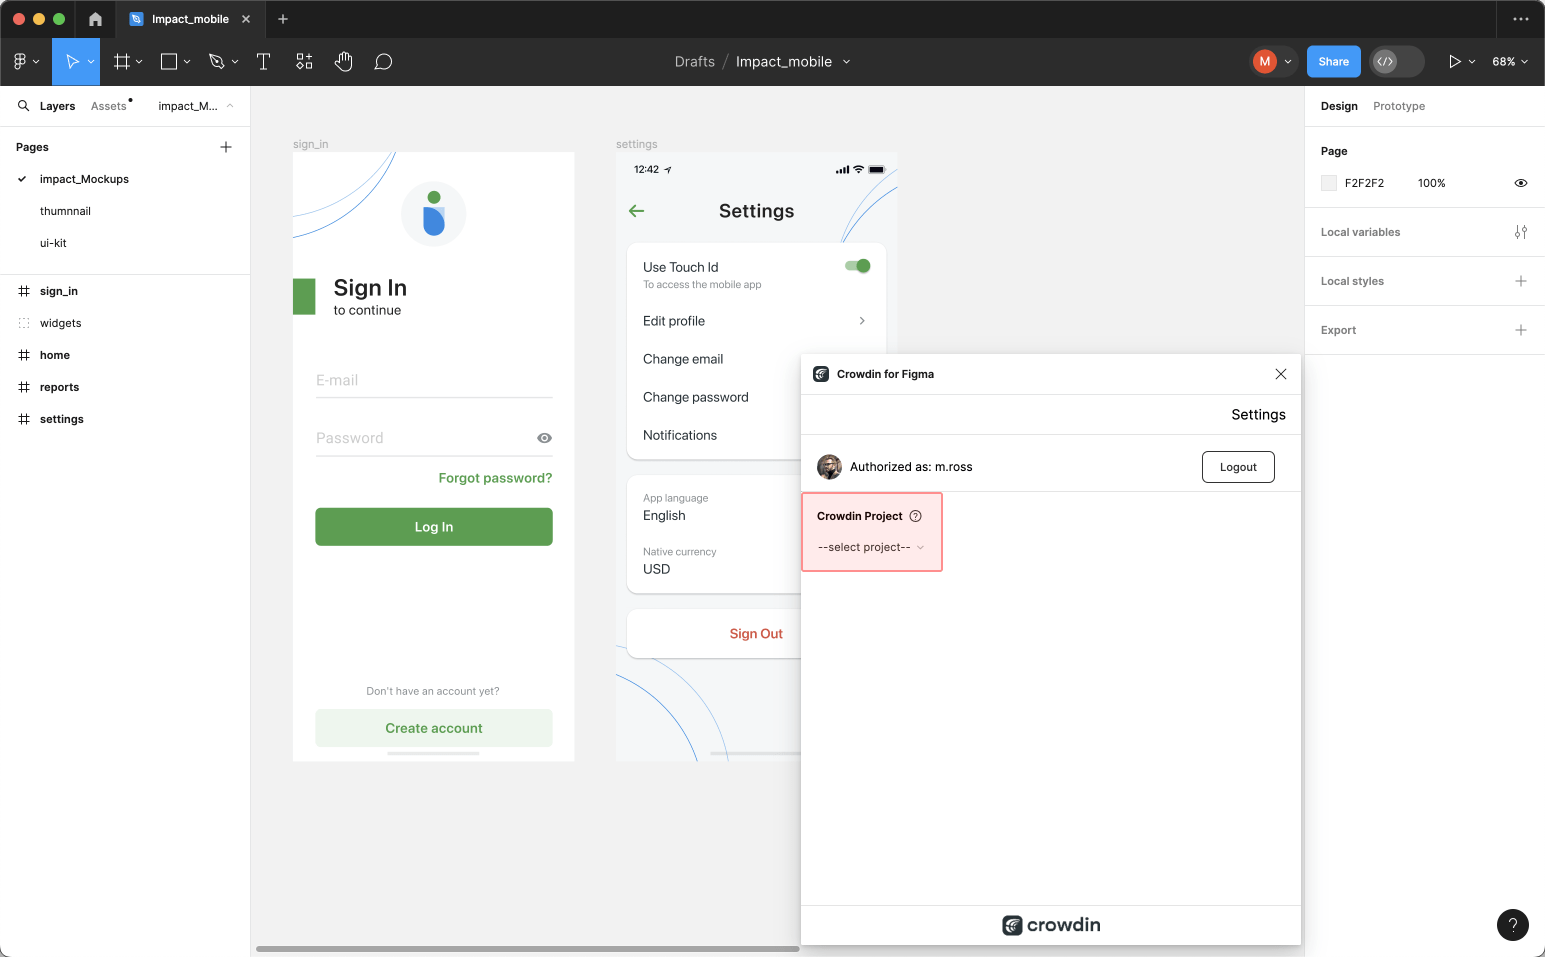
Select a content type you’re going to work with in this project and click Save.
You can choose one of the available options:
The selected content type option affects which mode of the Crowdin for Figma plugin will be available to a user. 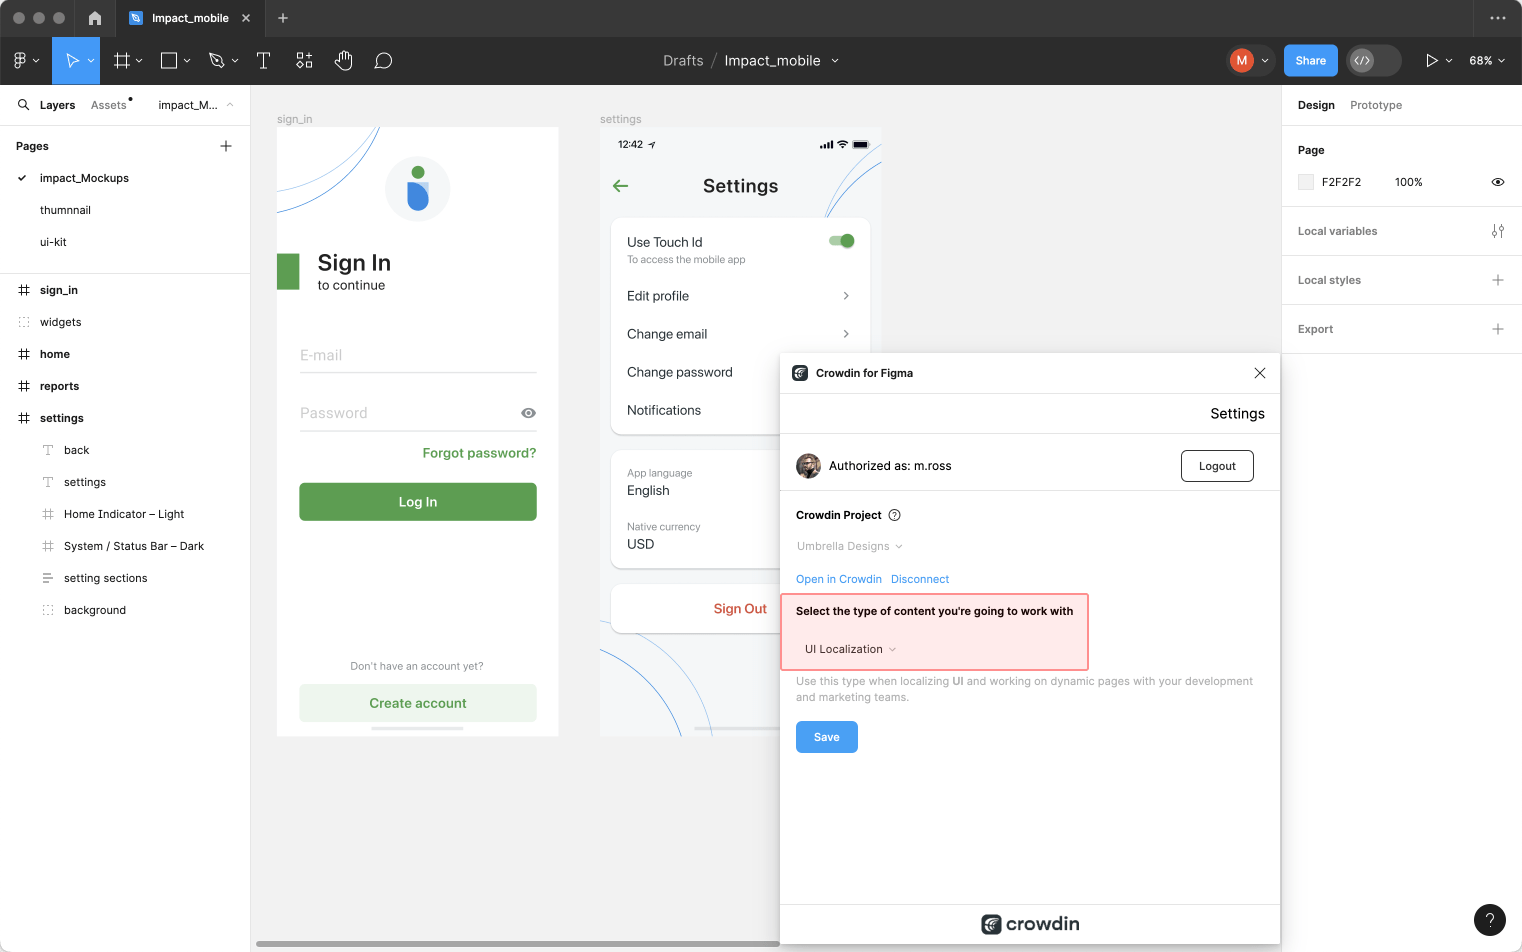
Select the specific branch your content will be uploaded to. If your Crowdin project doesn’t have branches, leave it empty. 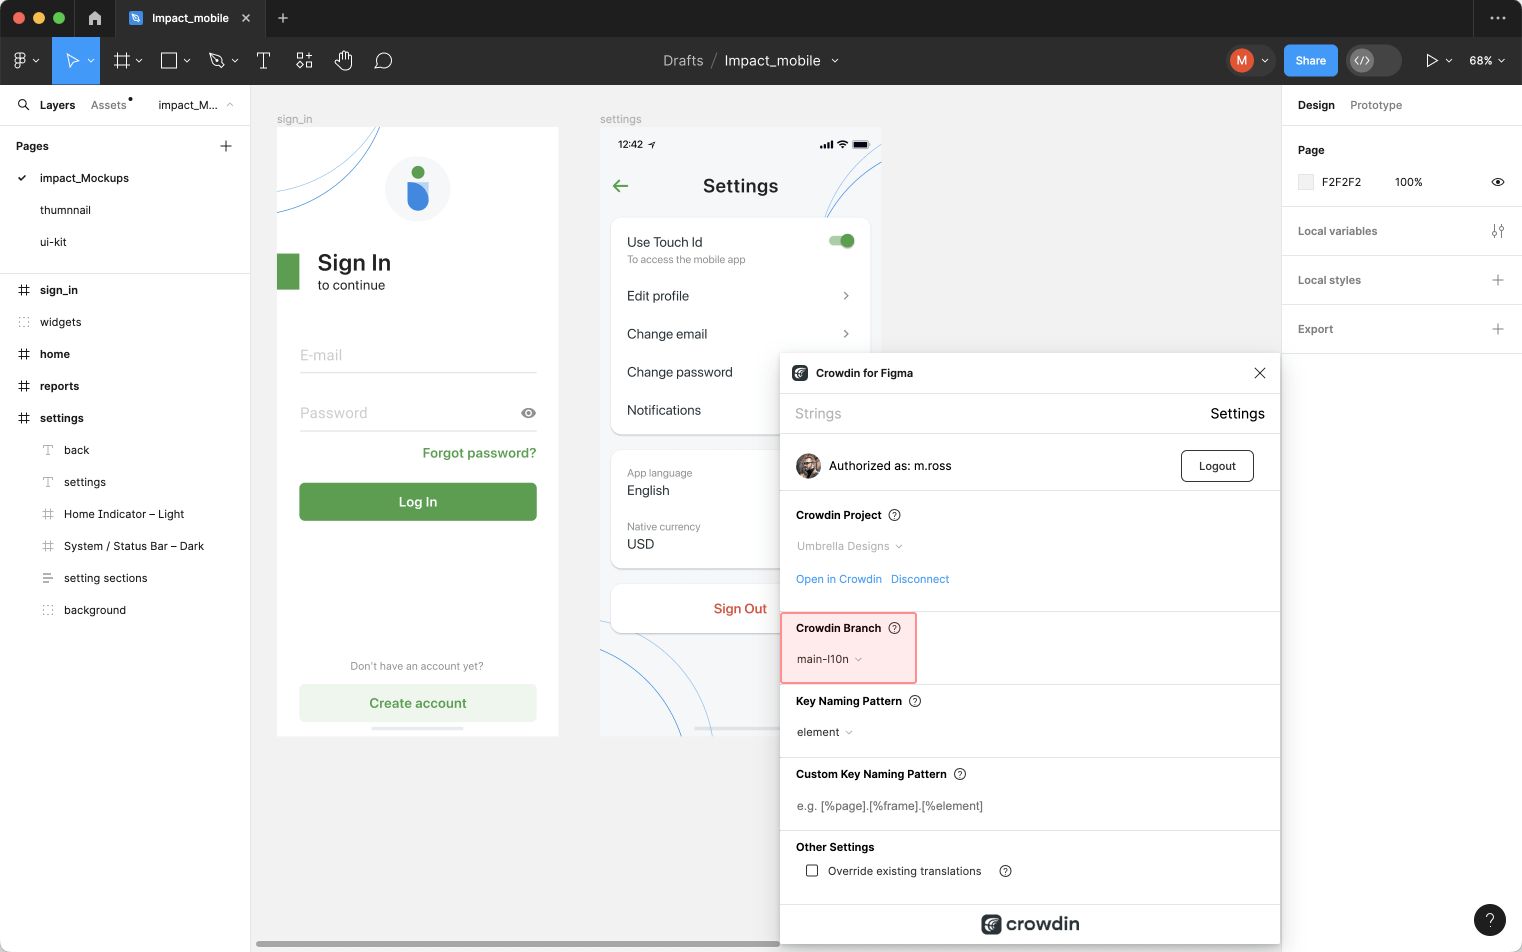
UI-lokalisering
Brug fanen Strengtilstand ved lokalisering af UI samt ved arbejde på dynamiske sider med udviklings- og marketingteams. In this tab, you can add source strings from Crowdin to your designs in Figma in a click. Når teksterne er anvendt i designs, kan taggede skærmfotos automatisk uploades tilbage i Crowdin som oversætterreferencer.
Brug af kildestrenge fra Crowdin i Figma
- Åbn Crowdin-plugin’et til Figma.
- Benyt i fanen Strenge feltet Søg til at finde den specifikke kopi. Strenge søgning kan ske efter kildetekst, streng-ID eller kontekst.
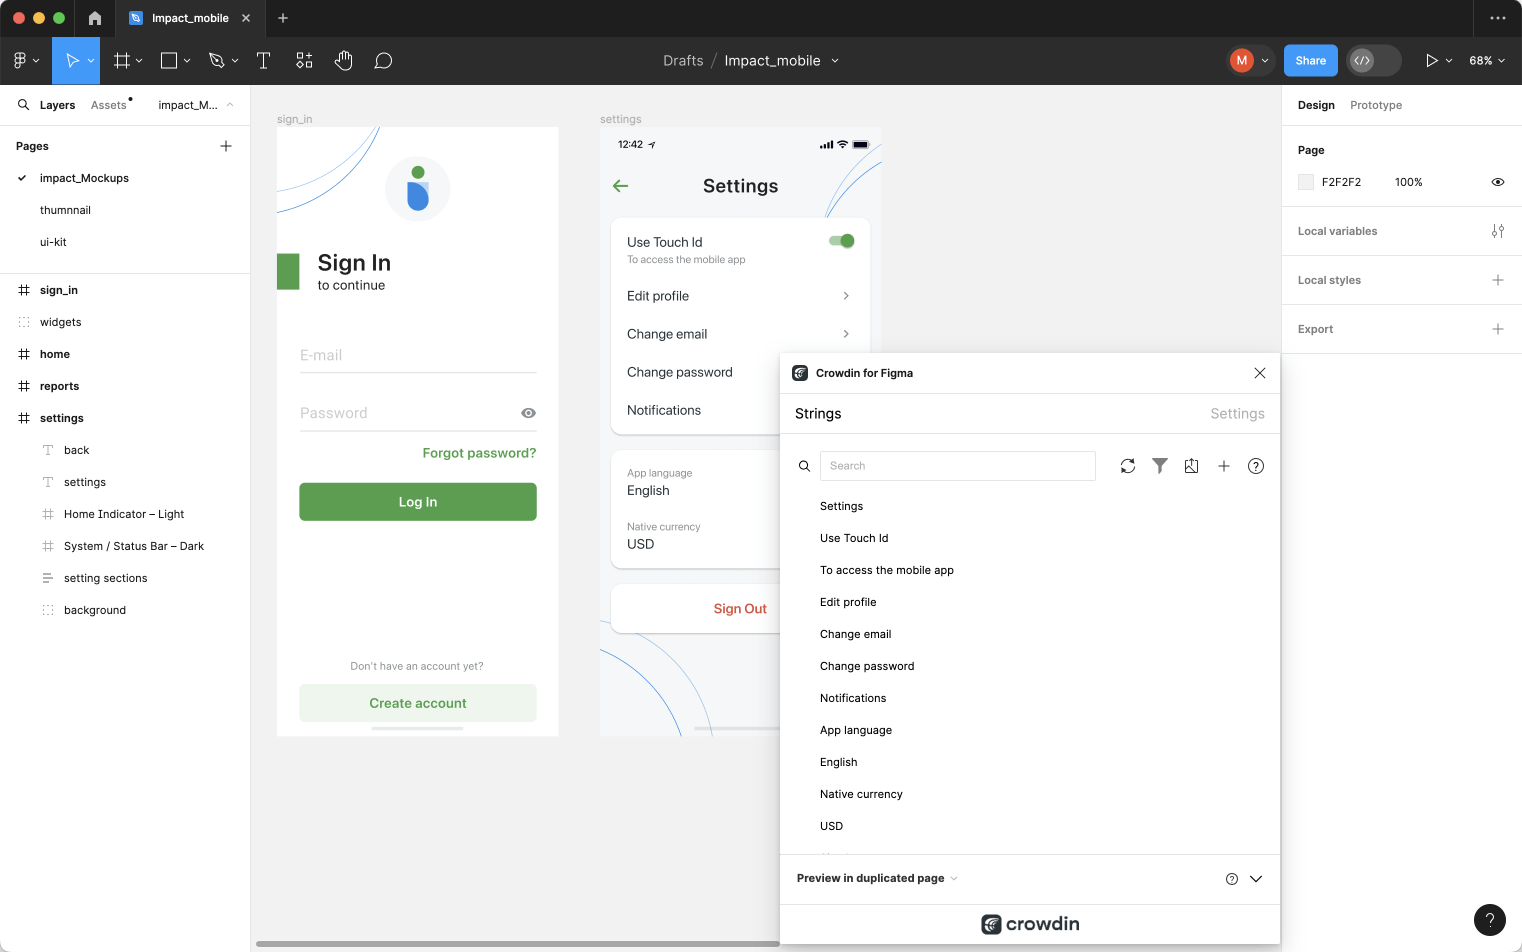
- Select the text layer to which you want to add text and click the link icon next to the needed string.
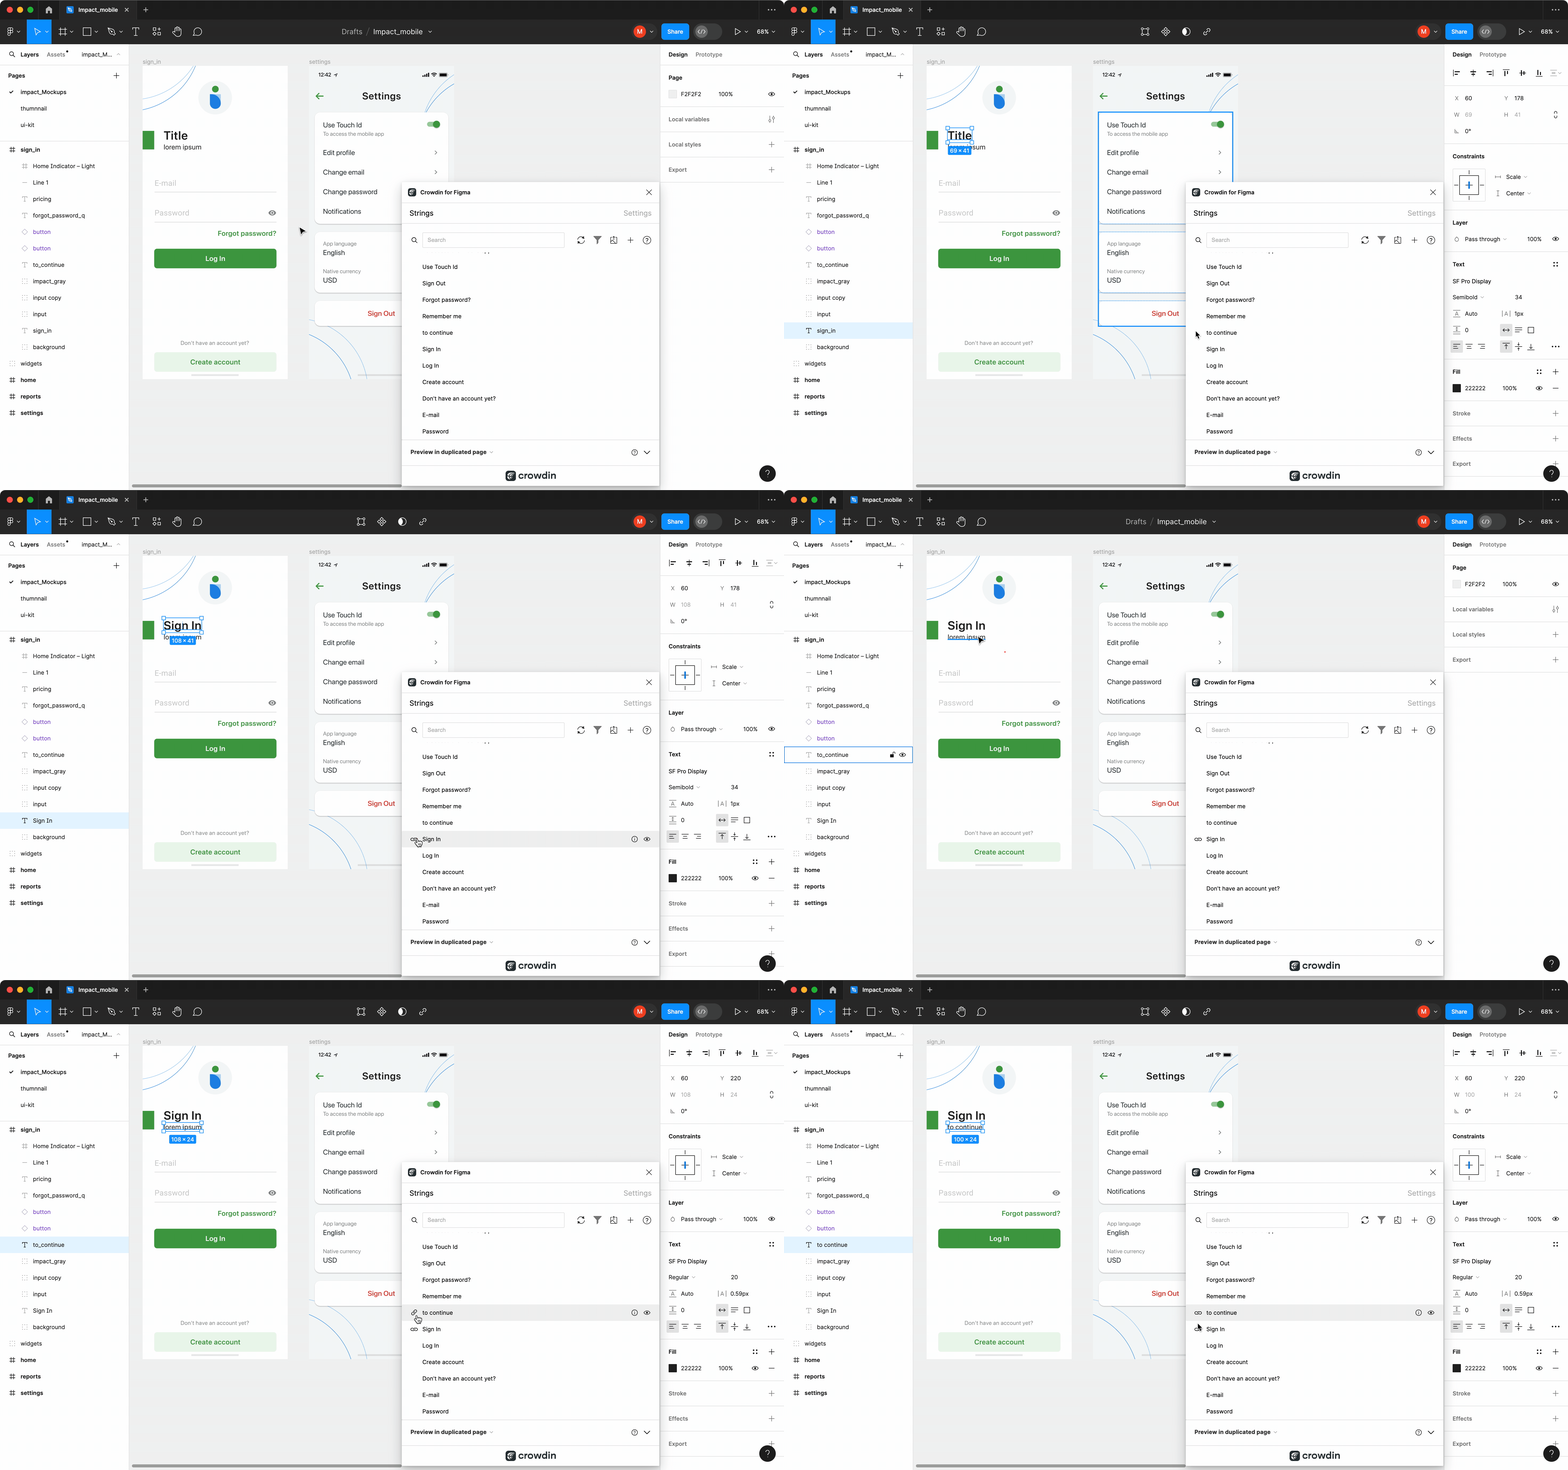
After using the source strings from Crowdin in your designs, they become linked with the text fields, and you can preview translations for these strings in Figma and upload screenshots for them to your Crowdin project.
You can link a single Crowdin string to one or multiple text fields in Figma. However, one text field can be linked only to a single Crowdin string. If you link a text field with an existing connection to a new Crowdin string, the previous connection will be terminated, and a new connection will be established. If you’d like to unlink a Crowdin string from all text fields it was previously linked to, right-click on the link icon next to the needed string.
Tilføjelse af kildestrenge fra Figma til Crowdin
You can add strings that are already used in the designs.
- Åbn Crowdin-plugin’et til Figma.
- For at tilføje de i designene anvendte strenge, så vælg hele billedet, flere billeder eller ønskede strenge på billederne.
- På på fanen Strenge, klik på
 .
. - In the appeared dialog, fill in the required fields. You can filter the displayed strings if needed:
- Select the Skip hidden elements filter option if some frames contain hidden elements that should not be added to Crowdin.
- Select the Skip untranslated elements filter option if some frames contain untranslated elements that should not be added to Crowdin.
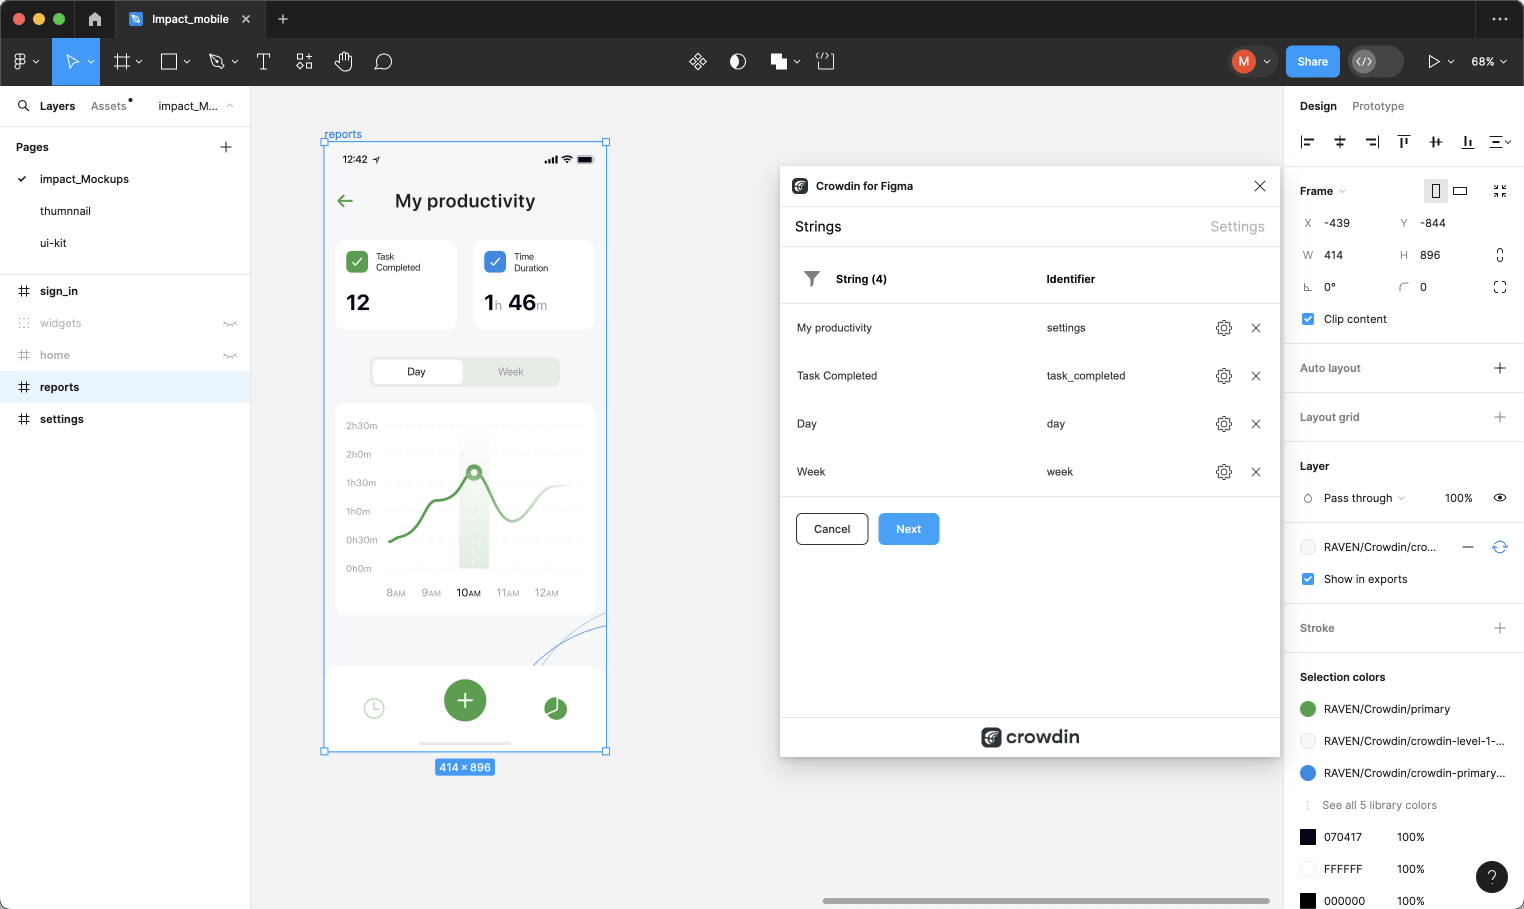
- (Optional) To update the string context and set the max.length of the translated text, click
 toward the needed string.
 - Once all the needed strings are selected and configured, click Next.
- In the next dialog page, select the preferred options:
- Auto-link existing strings – automatically compare text to existing strings in Crowdin. If there’s a match, the text element will be linked to the string in the Crowdin project.
- Create missing keys – only new text elements are added to Crowdin.
- (Optional) To add labels to the strings, alternately select them from the Select Label drop-down menu.
- Merge duplicates – link identical text elements to a single new string in Crowdin. It’s useful in the following cases:
- When adding multiple text fields with the same text, the plugin will add only one string to your Crowdin project and link all duplicate text fields to it.
- If your Crowdin project already contains a string with the same text you’re adding from designs, the plugin will only link the text fields to the existing string and won’t create a new one.
- Send screenshots
- Select the file in Crowdin to which you want to add the strings. To add the same strings into multiple files in Crowdin, alternately select the needed files from the Select File drop-down menu.
- Click Submit.
- Once the strings are added to Crowdin, you’ll see a summary of the content sent.
Added strings will be transferred to your Crowdin project and also displayed in the Strings tab’s list. You can edit, hide, or delete the strings from the same list anytime. The respective changes will also be applied to the strings in your Crowdin project.
Adding Source Strings with Plural Forms
You can add strings with plural forms.
- Åbn Crowdin-plugin’et til Figma.
- For at tilføje de i designene anvendte strenge, så vælg hele billedet, flere billeder eller ønskede strenge på billederne.
- På på fanen Strenge, klik på
 .
. - In the appeared dialog, fill in the required fields. You can filter the displayed strings if needed. Note: When adding plural strings, the fields in the String column serve for adding the other plural form.
- Click
 toward the needed string and click Add plurals.
 - In the appeared dialog, fill in the fields for each plural form and click Save. Depending on the source language of the connected Crowdin project, there could be a different number of plural forms you should specify. Note: You can add plural strings only to files that support plural forms (e.g., Android XML, Stringsdict, XLIFF, etc.).
- Once all the needed strings are selected and configured, click Next.
- In the next dialog page, select the preferred options.
- Select the file in Crowdin to which you want to add the strings.
- Click Submit.
Read more about Plural Forms.
Opsætning af ICU-kildestrengsvariabler
Ved brug af ICU-strenge i designet kan der opsættes variabelværdier, og efter tilføjelse af sådanne strenge til designs, vil de fremgå i en formateret visning med de foruddefinerede værdier.
Once you use the needed ICU string from Crowdin in your design, you can configure its placeholder values.
- Åbn Crowdin-plugin’et til Figma.
- Benyt i fanen Strenge feltet Søg til at finde den specifikke kopi. Strenge søgning kan ske efter kildetekst, streng-ID eller kontekst.
- Klik på
 på den relevante ICU-streng.
 - Klik på Opsæt variabel.
- Angiv de relevante værdier for ICU-strengvariablerne.
- Klik på Indsend for at gemme de angivne variabler.
- Click Submit to update the source string text in designs.
When previewing translations for ICU strings in Figma, they will also be displayed in a formatted view if the values were preconfigured beforehand.
Key Naming Pattern Settings
To simplify adding strings from Figma to the Crowdin project, you can set up the desired key naming pattern for the source string identifiers in the plugin settings. Crowdin-plugin’et til Figma vil foreslå streng-identifikatorerne til nye strenge baseret på det valgte mønster. While adding new source strings, you can always edit the suggested identifier to the preferred look.
To select the key naming pattern, follow these steps:
- Åbn Crowdin-plugin’et til Figma.
- Skift til Indstillinger.
- In the Key naming pattern section, select the preferred option from the drop-down menu.
Besides the existing patterns, you can configure your own pattern. To use a custom pattern, select the Custom key naming pattern option from the drop-down list and specify your pattern in the Custom Key Naming Pattern field.
Uploading Tagged Screenshots to Crowdin
When adding source strings used in the designs, make sure to keep Send screenshots selected. As a result, the Crowdin plugin for Figma will upload screenshots along with the source strings.
Also, you can update screenshots with an Update screenshots option while editing a Crowdin string that is linked to the text fields in designs.
Additionally, you can mass upload screenshots to Crowdin for strings linked with text fields in designs.
- Åbn Crowdin-plugin’et til Figma.
- Select one or more frames with the linked strings.
- In the Strings tab, click
to upload screenshots for selected frames.
To learn more, read the article Screenshots.
Previewing Strings
Preview translations from Crowdin for the strings used in the designs in Figma. Oversættelser kan forhåndsvises i nye eller de originale rammer. Ved oversættelsesforhåndsviser i de nye rammer, kan disse udfyldes med de reelle oversættelser eller strengnøgler til yderligere brug for udviklere.
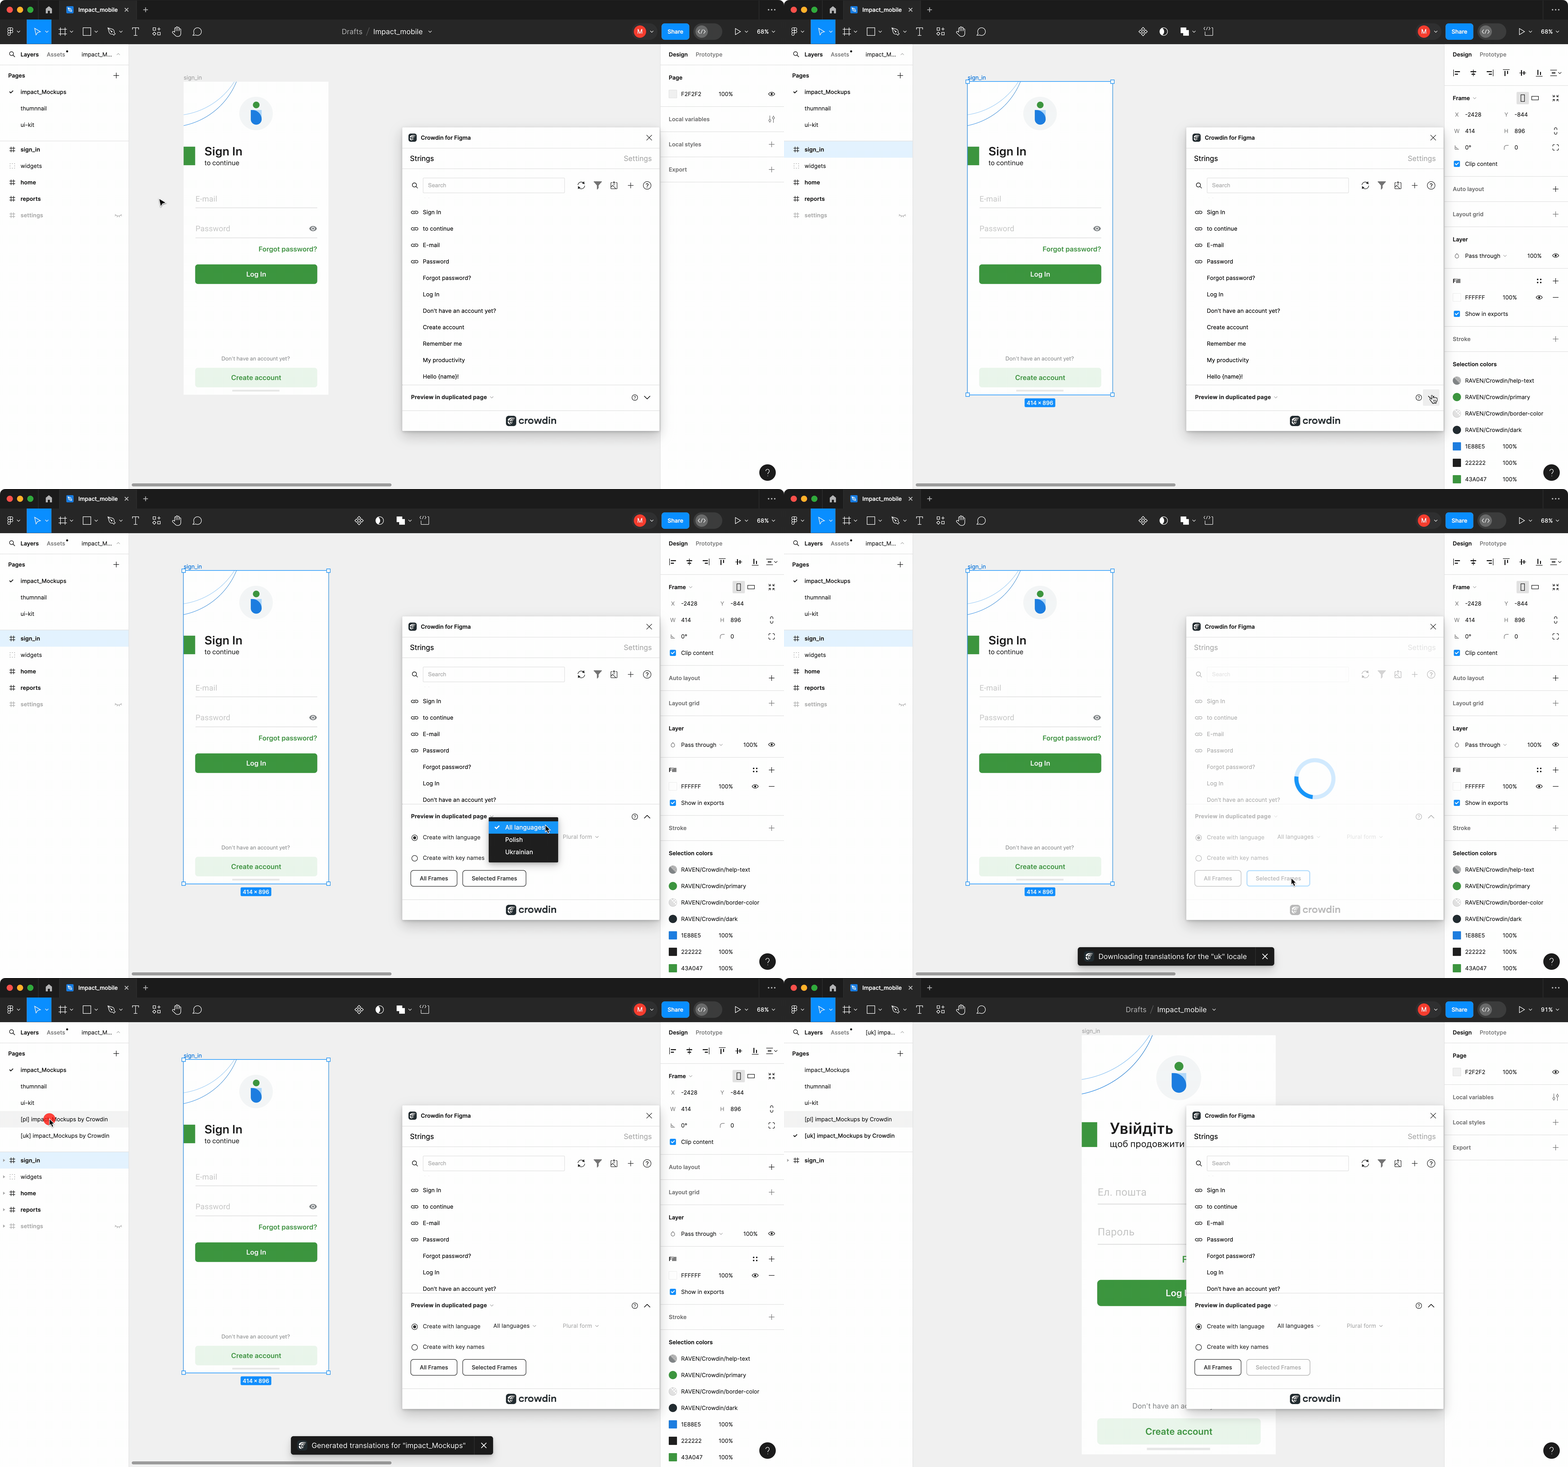
To preview strings populated with translations, follow these steps:
- Åbn Crowdin-plugin’et til Figma.
- In the Strings > Preview Strings section, select Preview in duplicated page or Preview in the current page.
- Select Create with language.
- Select the target language you want to preview translations for (optionally, you can select the preferred plural forms). You can also choose All languages.
- Vælg indholdet, der ønskes forhåndsvist i Figma. Vælg Alle billeder eller Markerede billeder.
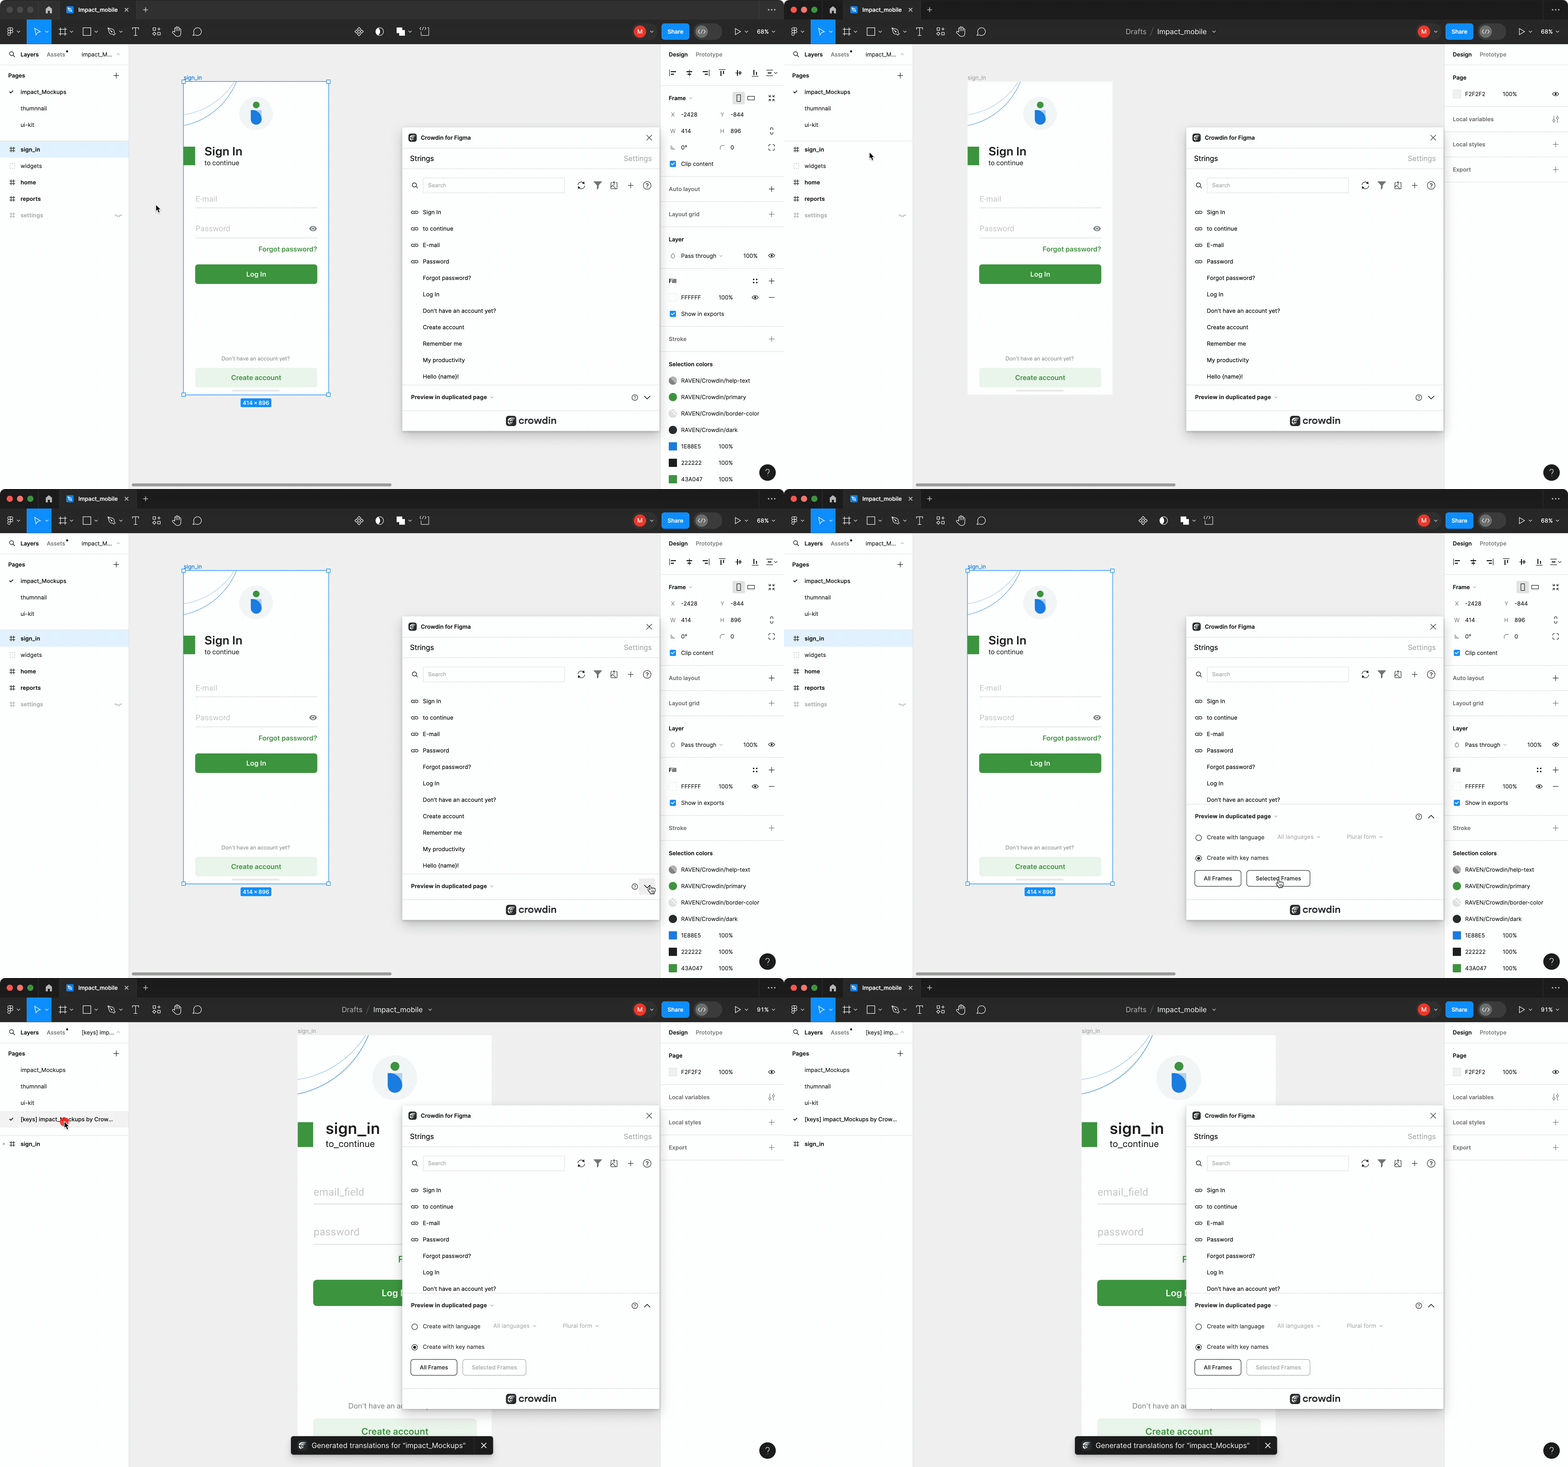
To preview strings populated with key names, follow these steps:
- Åbn Crowdin-plugin’et til Figma.
- In the Strings > Preview Strings section, select Preview in duplicated page.
- Select Create with key names.
- Vælg indholdet, der ønskes forhåndsvist i Figma. Vælg Alle billeder eller Markerede billeder.
Strengefiltrering
To view only the strings linked to specific text fields, follow these steps:
- Select the needed text fields.
- In the Strings tab, click Filter strings.
- Select Show strings linked to selected text elements.
In the same way, you can filter strings linked to text fields for the whole frame or multiple frames.
Marketingvisualiseringslokalisering
Use the Pages tab to localize static pages, like brochures and banners. In this tab, you can send texts with context for translators to Crowdin and upload translated copies back to Figma.
Sending Texts for Translation to Crowdin
Tekst til oversættelse kan sendes fra enten markerede eller alle billeder i en Figma-fil. Translators will work with those texts in the list view and use designs as an additional context for even higher translation quality.
In Crowdin, a root folder figma-plugin will be created. Den indeholder en undermappe navngivet efter Figma-filen med HTML-filer for hvert billede indeni. Om nødvendigt, kan indholdssegmentering deaktiveres i plugin’ets Indstillinger, så lange tekster ikke opdeles i sætninger.
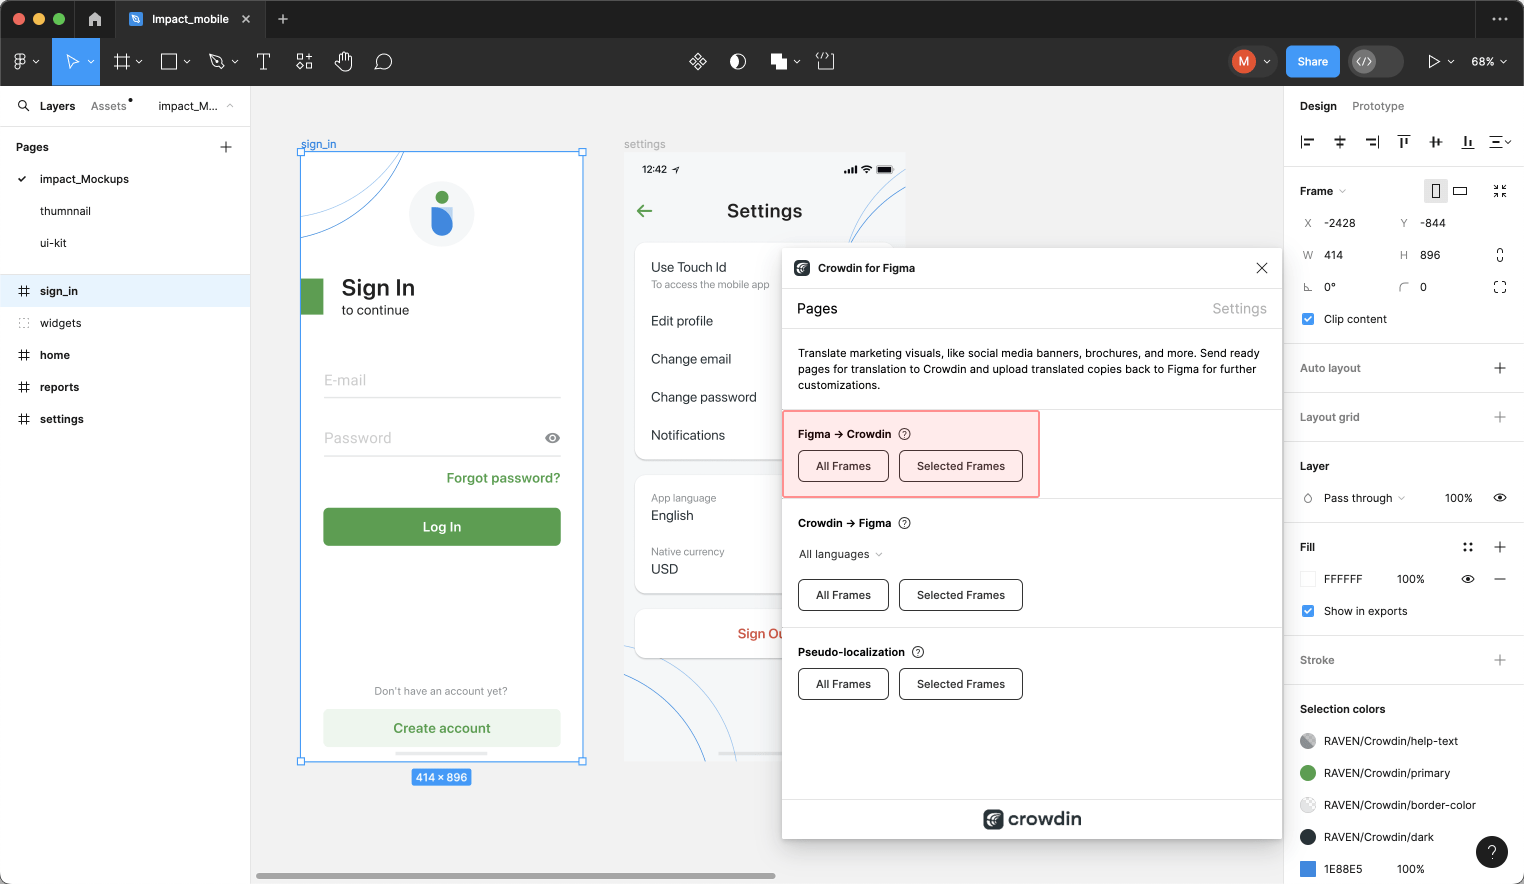
Følg disse trin for at sende Figma-designs til oversættelse:
- Åbn den relevante Figma-fil.
- Gå til Plugins > Crowdin til Figma.
- In the Pages > Figma to Crowdin section, select the content you’d like to translate. Vælg Alle billeder eller Markerede billeder.
When the source files are uploaded to your Crowdin project, you can invite contributors to translate and proofread them.
Read more about translation strategies.
Pseudolokalisering
Even before translations are completed, you can test whether your application is ready to be localized using pseudo-localization. This feature allows you to simulate how the application’s UI will look with different languages to check whether the source strings should be modified before the project localization starts.
Once you send your texts for translation, you can start pseudo-localization.
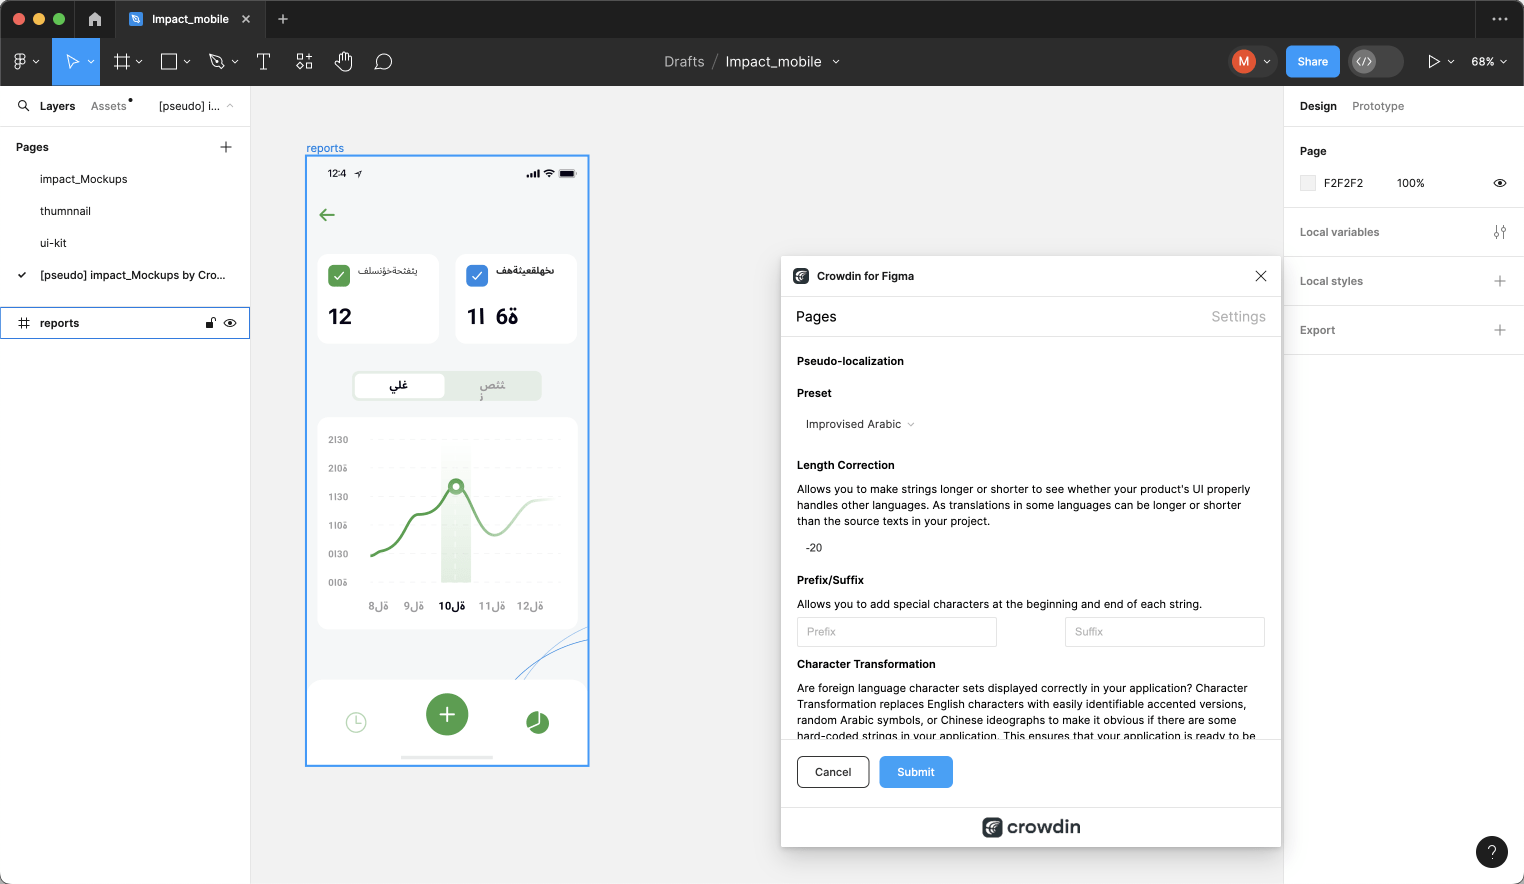
- Åbn den relevante Figma-fil.
- Gå til Plugins > Crowdin til Figma.
- In the Pages > Pseudo-localization section, select the content you’d like to test with pseudo-localization. Vælg Alle billeder eller Markerede billeder.
- In the appeared dialog, configure settings according to your preferences.
- Click Submit.
Read more about Pseudo-localization.
Uploading Translations from Crowdin to Figma
You can synchronize texts between Figma and Crowdin projects whenever you want to test the translated copy inside Figma or generate multilingual assets.
Følg disse trin for at uploade oversatte kopier til Figma:
- Åbn den relevante Figma-fil.
- Gå til Plugins > Crowdin til Figma.
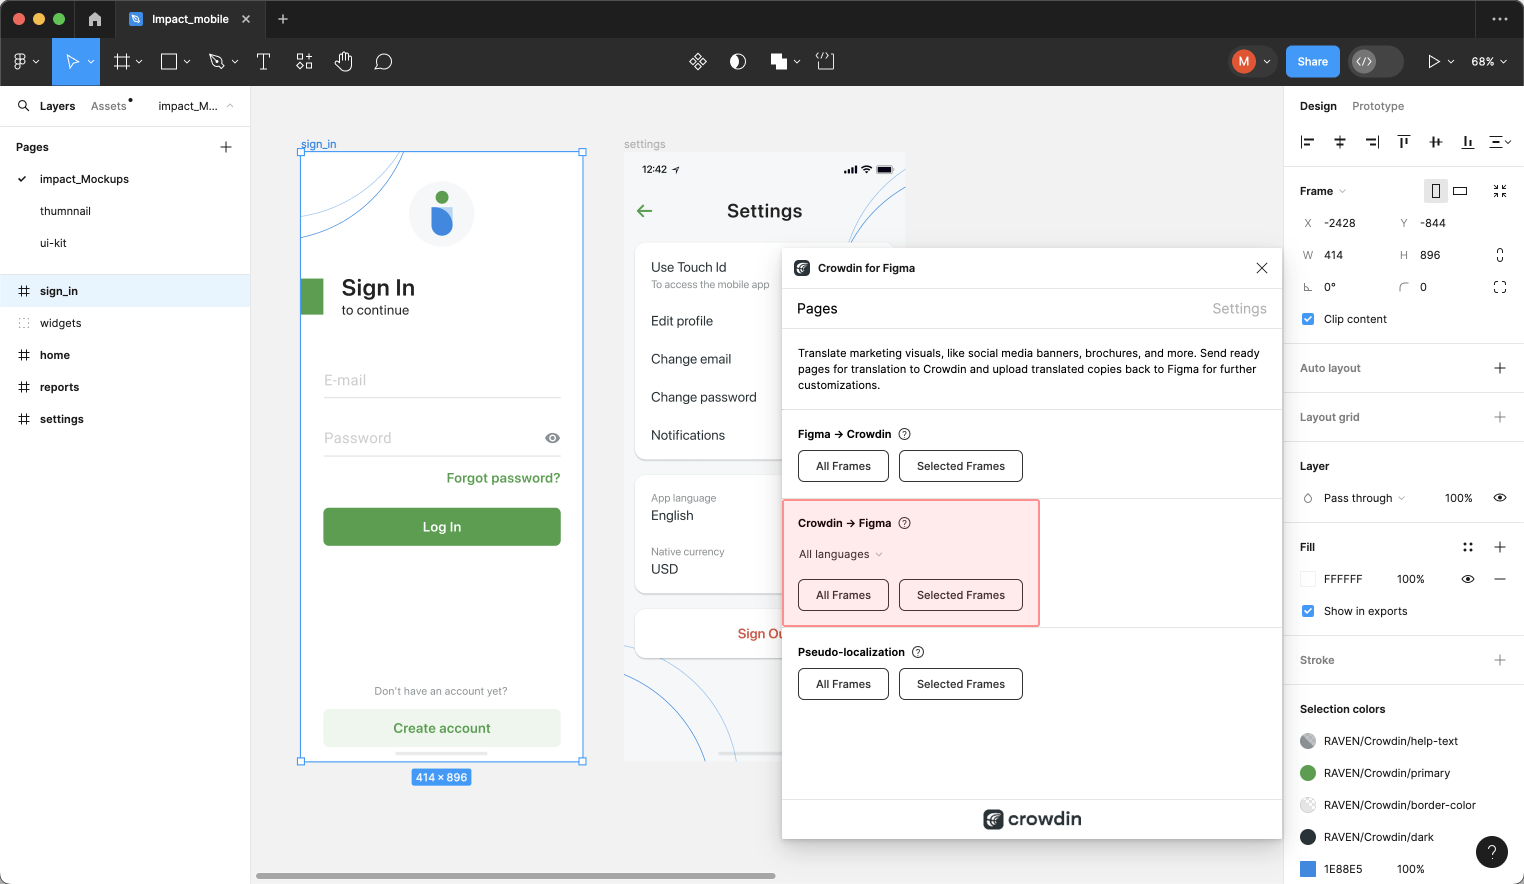
- In the Pages tab, Crowdin to Figma section, select the target language you want to upload translations for. You can also select All languages.
- Vælg det indhold, der ønskes forhåndsvist i Figma. Vælg Alle billeder eller Markerede billeder. Bemærk: Sidenavne kan i Figma kun bestå af bogstaver (a-z, A-Z), cifre (0-9) og specialtegnene
-_.
Efter upload af oversættelser til Figma, vil den ændrede fil indeholde et separat billede med oversættelser for hvert målsprog. The newly uploaded translated versions won’t override the ones you uploaded previously. You can always delete the translated copies you no longer need. 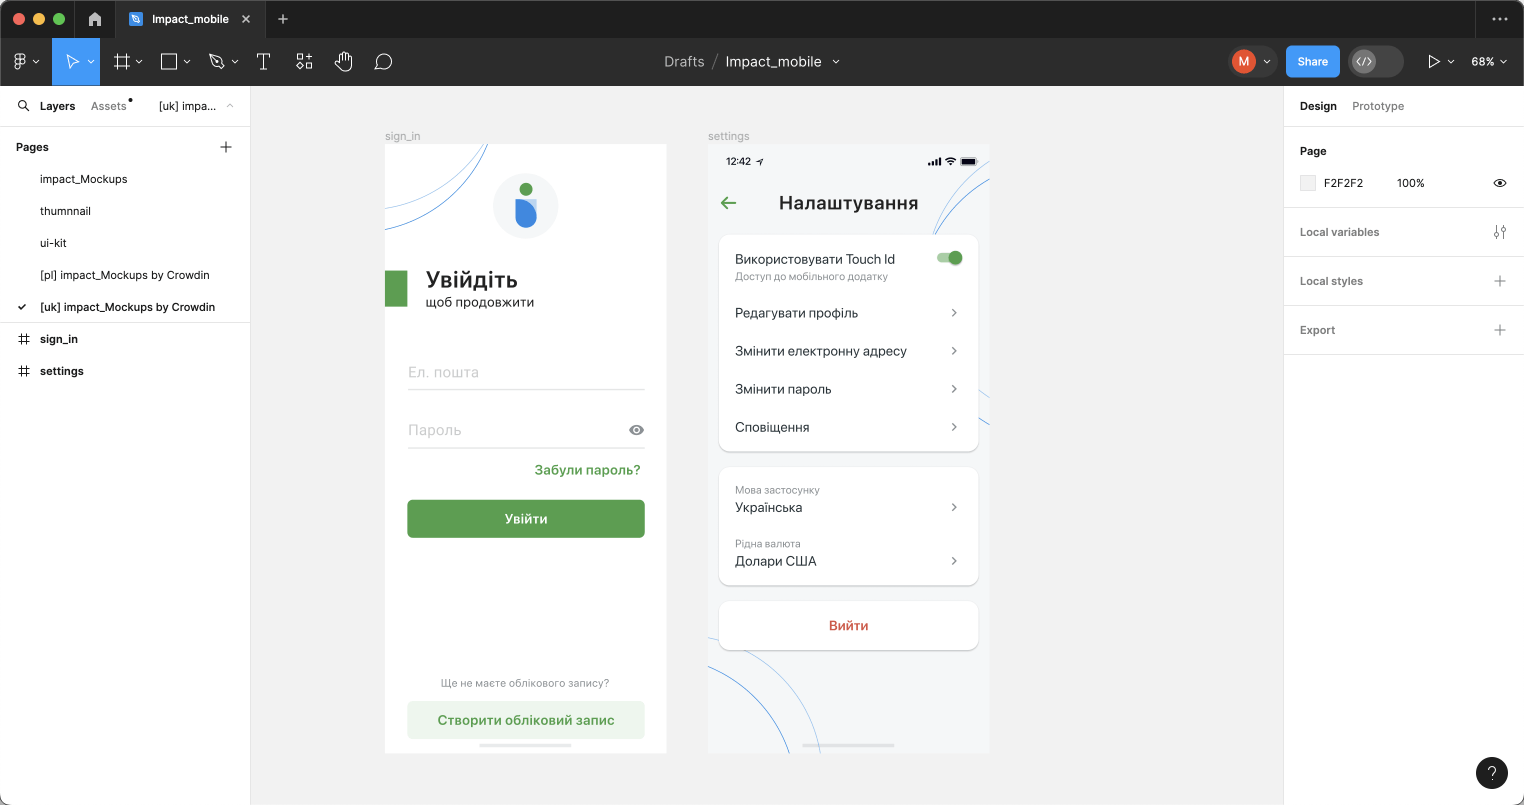
If you’d like the newly uploaded translated versions to override the previously uploaded ones, open the plugin Settings and select Override existing translations.
Crowdin for Figma Plugin in Dev Mode
Figma’s Dev Mode allows designers and developers to collaborate, ensuring accuracy in implementation and a smooth transition from design to code.
Read more about Figma Dev Mode.
The integration of Crowdin for Figma plugin with Dev Mode extends the functionality of both platforms, enhancing the localization process within the design environment. While Dev Mode in Figma has its limitations – it’s read-only, certain limitations apply to the Crowdin for Figma plugin’s capabilities:
What You Can Do:
- Access the Strings tab to view and manage strings.
- Explore string details, including file, key, context, and labels.
- Quickly copy string keys for efficient workflow.
Features not available in Dev Mode: adding new strings to Crowdin, linking strings, sending screenshots, previewing translations, editing, hiding, or deleting strings.
Using Crowdin for Figma Plugin in Dev Mode
Despite the limitations, the Crowdin for Figma plugin remains valuable in Dev Mode, offering developers a streamlined approach to text elements management. Here’s a typical use case:
- Enter Dev Mode.
- In the right sidebar, switch to the Plugins tab.
- Click on Crowdin for Figma.
- In the Strings tab, click Filter strings and select Show strings linked to selected text elements.
- Select the needed string on the frame and hover over the
 icon in the string list to view all needed information (i.e., key, context, file it’s stored in, labels) about this particular string.
 - (Optional) Click Copy string key to clipboard to further use it in code.
Compatibility with Figma for VS Code
Furthermore, the Crowdin for Figma plugin seamlessly integrates with Figma for VS Code, extending its functionality to developers using this environment.
Read more about Figma for VS Code.