Version Management
Maintain an agile localization process and prevent translation delays for added texts or new product features. Integrate your project branches with Crowdin Enterprise and allow translators to access all new texts immediately.
When several people work on product development, branches help manage different content versions. If you have a continuous project, you can add project branches to Crowdin Enterprise and allow translators to translate the texts in parallel with development to prevent deployment delays.
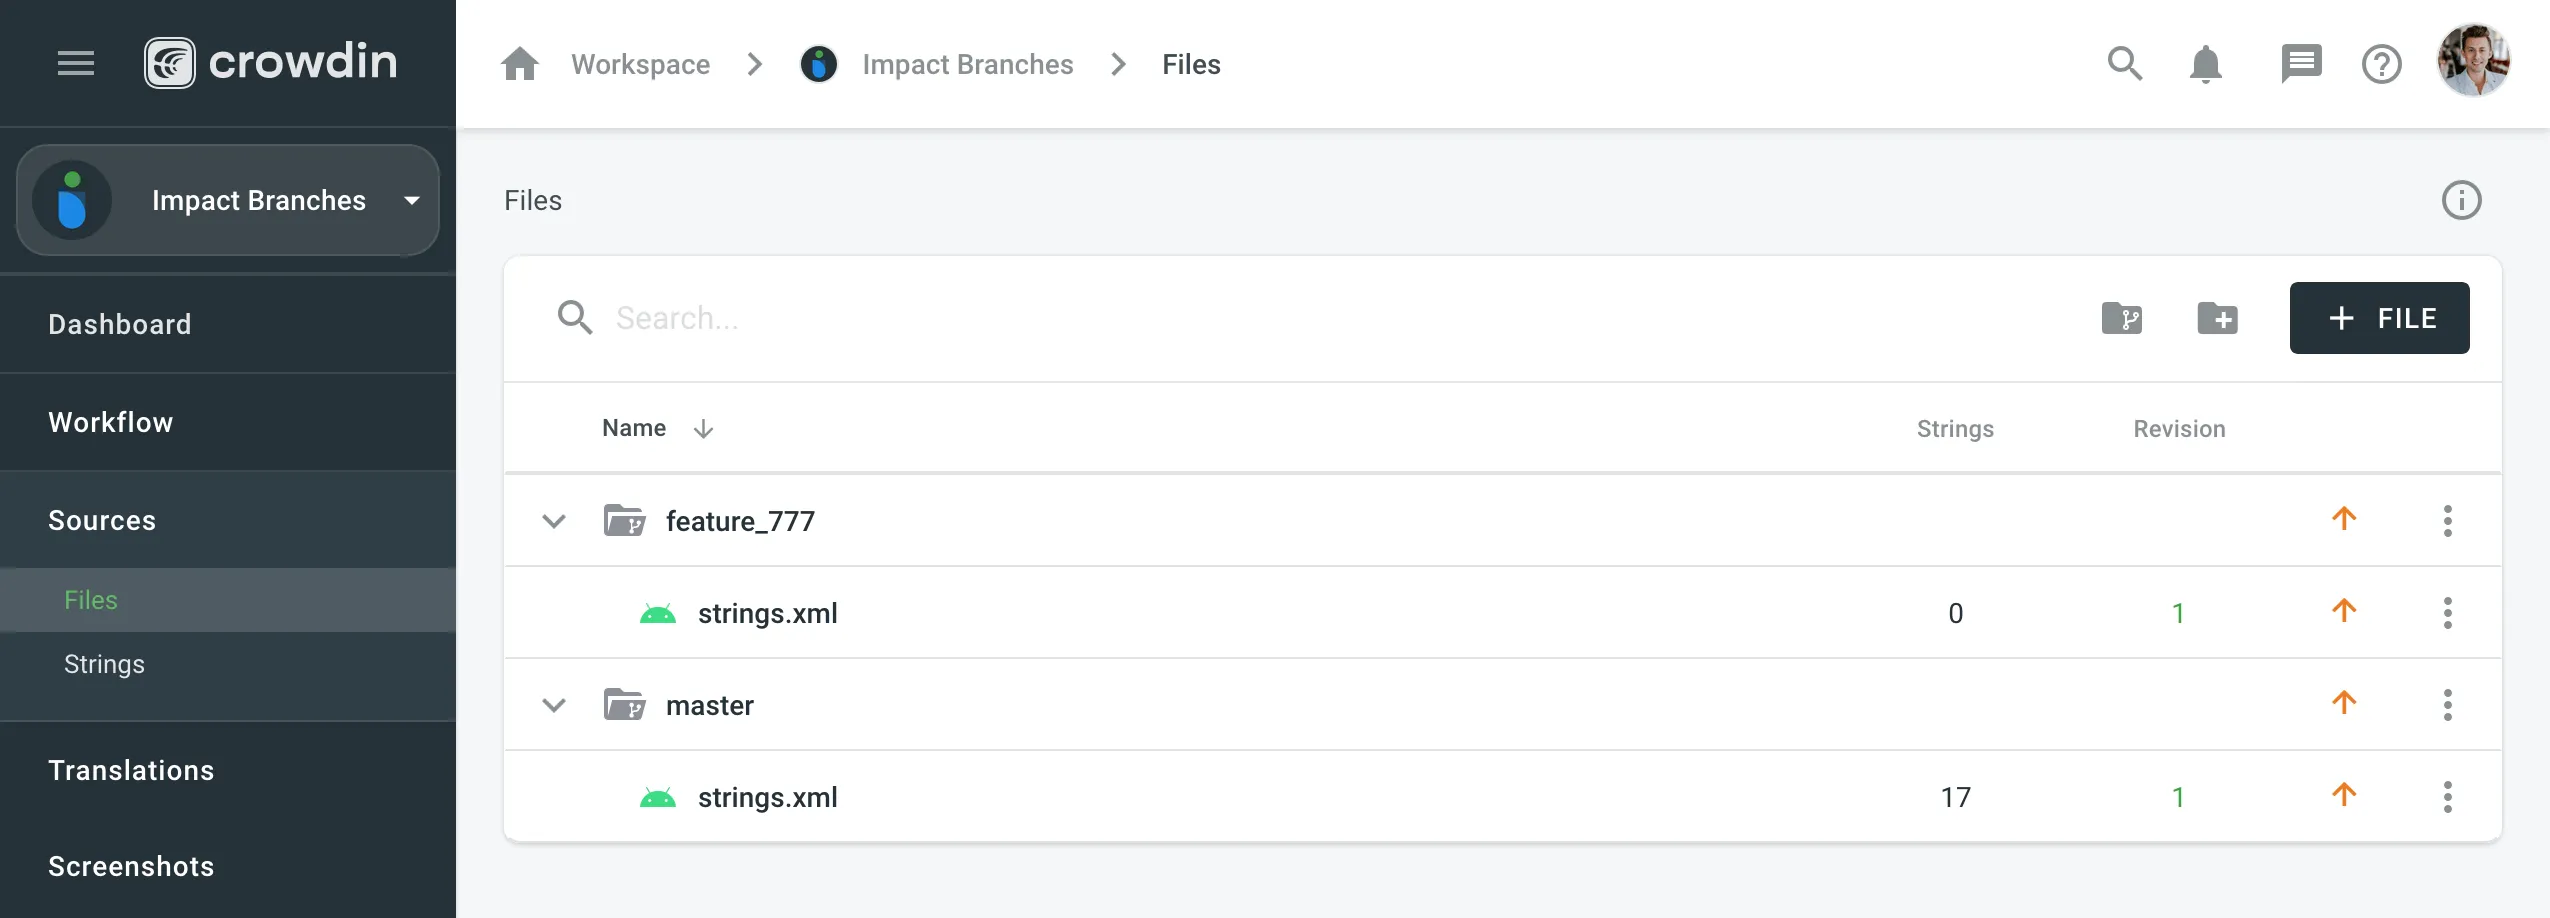
Branches in Crowdin Enterprise look like regular folders marked with a specific icon and have special behavior for duplicate strings.
Example of branch structure in Crowdin Enterprise:
You can create, clone, merge, rename, prioritize, protect, or delete branches in Crowdin Enterprise to streamline localization alongside development. Use the available UI options, API, or CLI depending on your workflow and project type.
You can create branches manually using the web interface (UI), automatically by connecting your project to a version control system, or by using CLI or API. The method you choose may depend on your project type or integration preferences.
Integrate Crowdin projects with GitLab, GitHub, Bitbucket, or Azure Repos. When you select branches for localization in your VCS, they’ll be created automatically in Crowdin.
To create branches via the web interface (UI), follow these steps:
- Open your project and go to Sources > Files.
- Click New Version Branch.
- In the appeared dialog, enter the branch name.
- In the Duplicate Strings section, select how duplicated strings should be handled.
- Click Create to finish.
- Open your project and go to the Branches tab.
- Click New Version Branch.
- In the appeared dialog, enter the branch name.
- Select Create empty branch or Clone existing branch.
- If cloning, select the source branch from the dropdown that appears.
- Click Create to finish.
You can use the Crowdin Enterprise API to programmatically create branches. The available method depends on the project type:
With the Crowdin CLI, you can manage branches directly from your local environment, using the dedicated commands. You can also create a branch automatically during file upload.
Read more about Branch Management with CLI.
For string-based projects, you can make specific branches protected (e.g., your main or production branch) to ensure content stability. When the Enable Protection option is active for a branch, direct modifications to its content are restricted.
The following actions are not allowed in a protected branch:
- Uploading new source content.
- Deleting existing source content.
- Adding translations or approvals directly to strings in that branch.
The primary workflow for protected branches involves performing all content updates and translations in a separate branch (e.g., a cloned dev branch) and then merging those changes into the protected branch.
Crowdin Enterprise provides visual indicators when you are viewing a protected branch:
- Upload Tab: If you select a protected branch as the target, a blue note appears: “The uploading of files to protected branches is not allowed.”
- Strings Tab: A yellow note appears: “You have currently selected a protected branch. No operations with strings are allowed.”
- Editor: If you attempt to edit a string, the input fields will be disabled. Hovering over the translation field displays the tooltip: “Not allowed for strings from protected branch.”
To update a protected branch, follow these steps:
- Clone the protected branch (e.g., create
devfrommain). - Perform necessary actions in the cloned branch (upload source files, add translations, approve strings).
- Merge the cloned branch back into the protected branch.
You can create a copy of an existing branch using the New Version Branch dialog or the Clone option in the context menu.
To clone a branch, follow these steps:
- Open your project and go to the Branches tab.
- Do one of the following:
- Click New Version Branch.
- Hover over the needed branch, click (or right-click), and select Clone.
- In the appeared dialog, enter the name for the new branch.
- If cloning via New Version Branch, select Clone existing branch and choose the source branch from the dropdown.
- Click Create to finish.
You can merge one branch into another directly from the Branches tab using the context menu. During the merge process, Crowdin Enterprise displays a summary of changes (i.e., source text updates and new translations), allowing you to select exactly which changes to accept before completing the merge.
- In the Branches tab, hover over the source branch you want to merge.
- Click (or right-click), and select Merge.
- In the appeared dialog, choose the target branch to merge into.
- Click Continue to proceed to the Merge summary page.
The Merge summary page displays a two-column comparison of all differences between the target branch (e.g., main) and the source branch (e.g., dev).
At the top, you’ll see a summary: You requested to merge {source_branch} into {target_branch}. Select the changes you accept before merging:. The branch titles in this message are clickable links that open all strings for that specific branch in the Editor.
In the upper-right corner, next to the filter, you’ll also see a high-level summary of the changes, with counters for:
- Deleted strings
- Added strings
- Changed strings
- Conflicted strings
Reviewing Translation Changes
If a string has no changes to the source text but includes new translations, it will appear in the list. You can expand the string details using the arrow icon to view the specific translation changes:
- New Translations: Highlighted in green with a sign.
- Deleted Translations: If a translation was removed in the source branch, it will appear highlighted in red.
- Approvals: If a translation is approved in the source branch, it will display a Approved label.
- Metadata: You can see the vote rating and the Date added for the translation.
Key features of this page:
- Selective Merging: You must manually select each change (added, changed, or removed string) that you want to apply to the target branch. A counter (e.g., 1 of 4 selected) in the upper-left corner tracks your selections.
- No Implicit Merges: Only the strings you manually select on the Merge summary page will be merged. If you do not select a string, no changes (neither source nor translation) will be applied to the target branch.
- String Details: Each string in the list displays its context, maximum length (if set), and a timestamp shows when that string was last modified.
- Open in Editor: Hover over a string to see the Open in Editor link, which opens that string in a new tab.
To filter the list to review specific types of changes, click in the upper-right corner and select the preferred filter option.
Available filter options:
- All changes: Shows all differences (source and translation) between the branches.
- Added strings: Shows only strings that exist in the source branch but not the target.
- Deleted strings: Shows only strings that exist in the target branch but were removed in the source.
- Changed strings: Shows strings that were modified in the source branch (including translation updates).
- Conflicted strings: Shows strings where the content differs between branches in a way that requires attention. This includes strings modified in both branches, or strings that are newer in the target branch than in the source branch.
Once you have selected all the changes you want to apply, you can finalize the merge.
At the bottom of the page, you’ll find:
- Delete {source_branch} after merge (Optional): Select this to automatically delete the source branch (e.g.,
dev) after its changes are successfully merged. This is useful for cleaning up temporary feature branches. Leave it unselected if you plan to continue working on the source branch. - Merge: Click this to apply all selected changes to the target branch. This button remains disabled until you select at least one change (an added, changed, or deleted string, or changes to translations) from the list.
Once the merge is complete, translations, approvals, and votes from both branches will be combined for the strings you selected.
You can set priorities to branches in file-based projects to help translators focus on the most important content first. Branches appear sorted by priority on the language page and in the Editor.
Available priorities:
- – low
- – medium
- – high
To set a priority for your branches, follow these steps:
- Open your project and go to Sources > Files.
- Click the arrow icon next to the needed branch to set the preferred priority.
In addition to cloning and merging, the context menu for each branch includes the following options:
- Rename – Allows you to change the name of the selected branch.
- Cost Estimate – Opens the cost estimation dialog scoped to the branch.
- Delete – Permanently deletes the branch from the project. Use with caution.
Because branches are different versions of the same product feature, their localization content is usually duplicated. To help translators translate versions consistently and avoid additional translation costs, Crowdin Enterprise offers the Show within a version branch option, which hides duplicate strings between branches.
When this option is applied, only the original strings (usually from the master branch) need to be translated. All duplicates in other branches automatically receive translations from those originals.
In file-based projects, you can configure how duplicates are handled in Settings > Import > Source Strings. If your source files contain clear identifiers (keys), it’s recommended to use the Strict version of the Show within a version branch option. Otherwise, the Regular option will work well for most use cases.
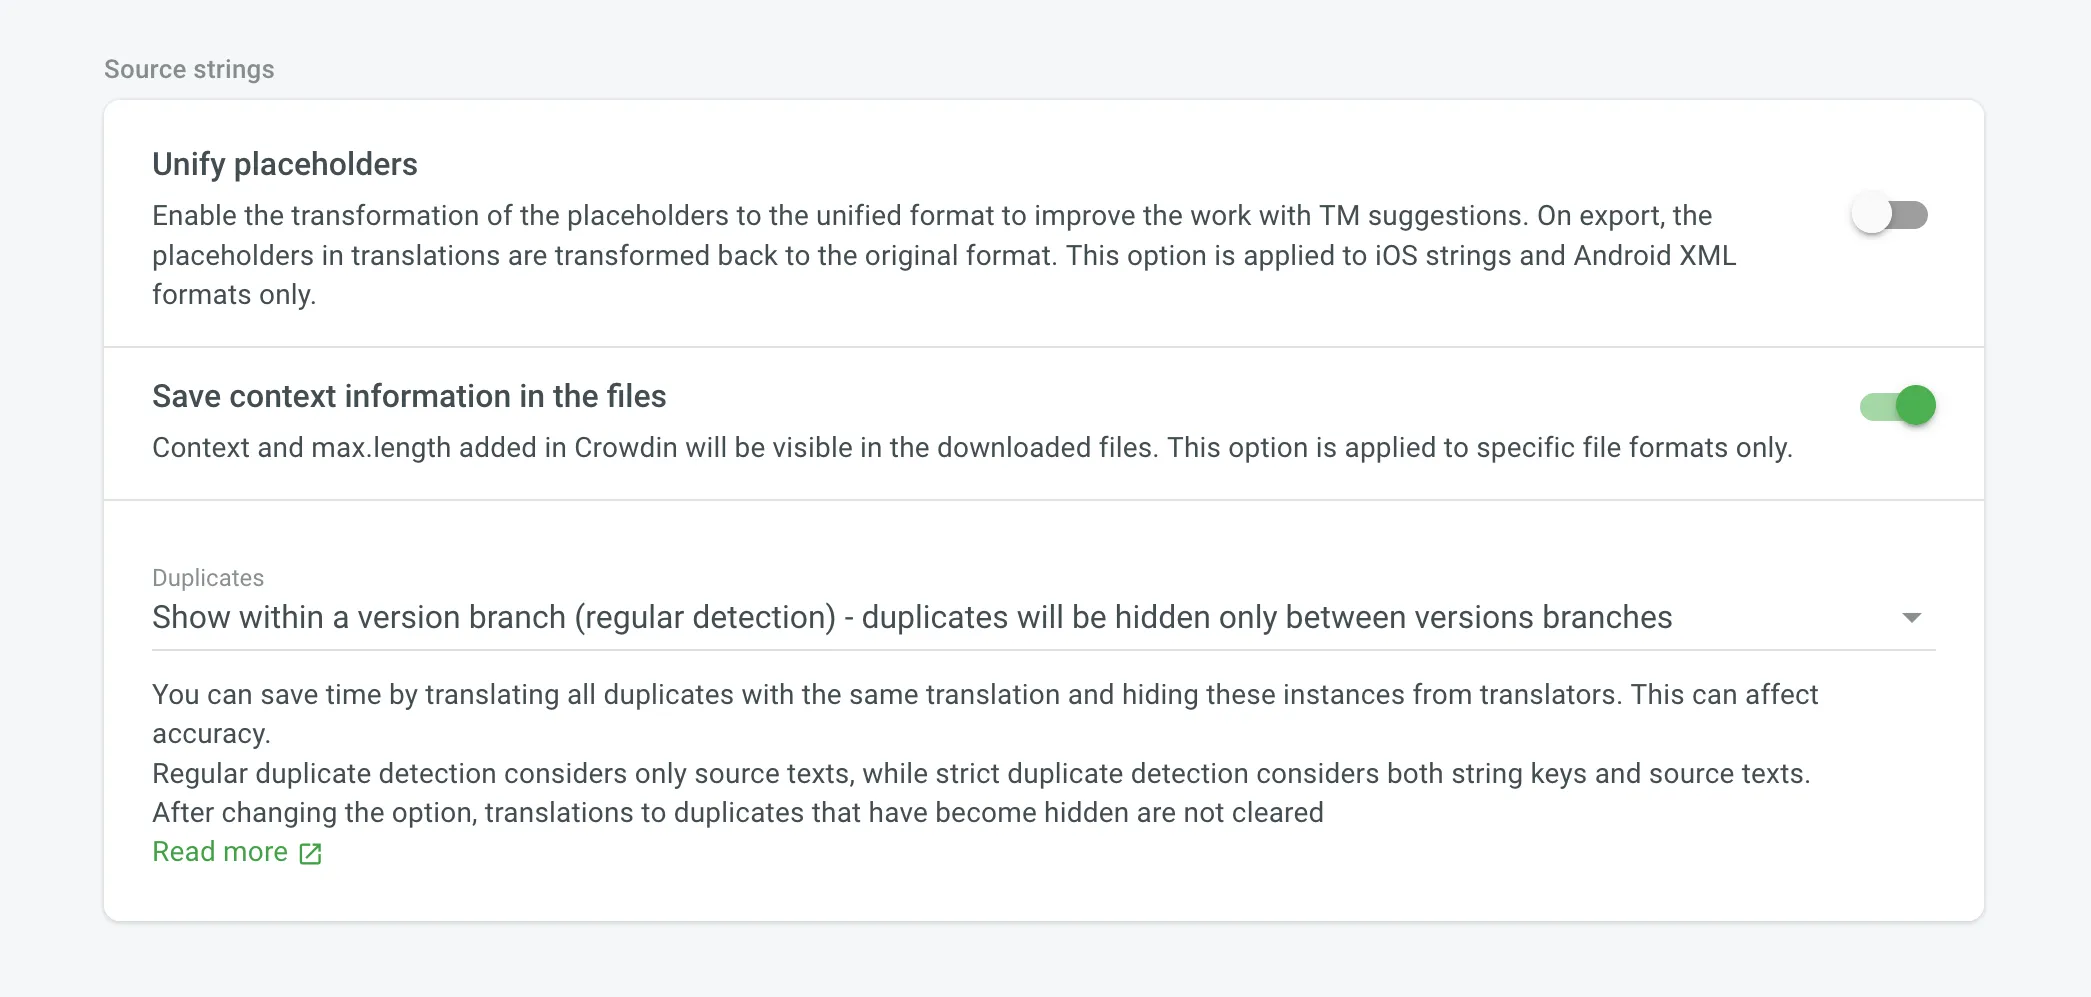
In string-based projects, the Show within a version branch (regular detection) behavior is applied automatically and cannot be changed. This ensures translations are reused between branches without requiring any additional configuration.
Read more about Duplicates settings.
To ensure smooth collaboration between developers and translators, version branches in Crowdin Enterprise can be used in different ways depending on how you manage source content and what project type you’re using.
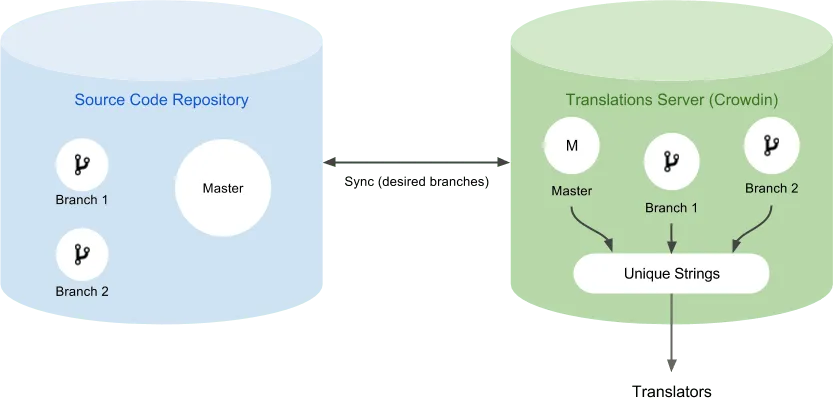
Managing Content Outside Crowdin Enterprise
Section titled “Managing Content Outside Crowdin Enterprise”In both file-based and string-based projects, you can treat your external system (e.g., file storage or version control) as the source of truth. In this setup:
- Source files are managed and updated outside of Crowdin Enterprise.
- You upload project content using the web interface (UI), API, CLI, or integrations.
- Selected branches are created in Crowdin Enterprise accordingly.
- Translations are delivered back to your system once completed.
To implement this approach for your Crowdin Enterprise project, we recommend the following workflow:
- Upload your project files to the Crowdin Enterprise project using one of the available methods.
- In file-based projects, open your project and go to Settings > Import > Source Strings.
- Set the Duplicates option to Show within a version branch.
The screenshot below visualizes how this workflow works in practice. All texts from Master, Branch 1, and Branch 2 are transferred to the translation server immediately after they appear, even though the branches are not merged into the Master branch yet.
Managing Content in Crowdin Enterprise (String-based Projects Only)
Section titled “Managing Content in Crowdin Enterprise (String-based Projects Only)”For string-based projects, you can also manage branches directly in Crowdin Enterprise without relying on an external system to define structure or content updates. In this setup:
- Source content can be added the web interface (UI), API, CLI, or integrations.
- Version branches are created, cloned, and merged within Crowdin Enterprise using the UI or API.
- Translations are optionally synced back to any connected integration, if used.
This approach gives more flexibility for teams who prefer to organize content and manage version flows entirely within Crowdin Enterprise.
Translations from all version branches are placed in one ZIP archive when downloaded through the web interface. Use the CLI or API to download the translations for each branch individually.
To download translations of the specific version branch with API, you can use the following API methods:
- Build Project Translation - make sure to use the
EnterpriseTranslationCreateProjectBuildFormschema. - Check Project Build Status.
- Download Project Translations.
Download translations of the specific version branch:
crowdin download -b branch_nameRead more about crowdin download command.
Merging Branches Outside Crowdin Enterprise
Section titled “Merging Branches Outside Crowdin Enterprise”The Master branch will contain new texts from the Feature branches as soon as they are merged. While synchronizing with Crowdin Enterprise, texts in the Master branch are populated with translations from the appropriate branch.
After synchronizing the updated Master branch with Crowdin Enterprise, you can remove the Feature branch from Crowdin Enterprise. All translations stored in the Master branch will remain.
This approach is commonly used in file-based projects but can also apply to string-based ones if content is managed outside of Crowdin Enterprise.

You can verify translations on production using only the Feature branch before changes are merged with your Master branch. Such test deployment allows you to quickly revert to the original Master branch version if needed.