Organization Members
Managing organization members in Crowdin Enterprise includes assigning project roles, granting admin or manager access, adding users to teams, contacting them, and more.
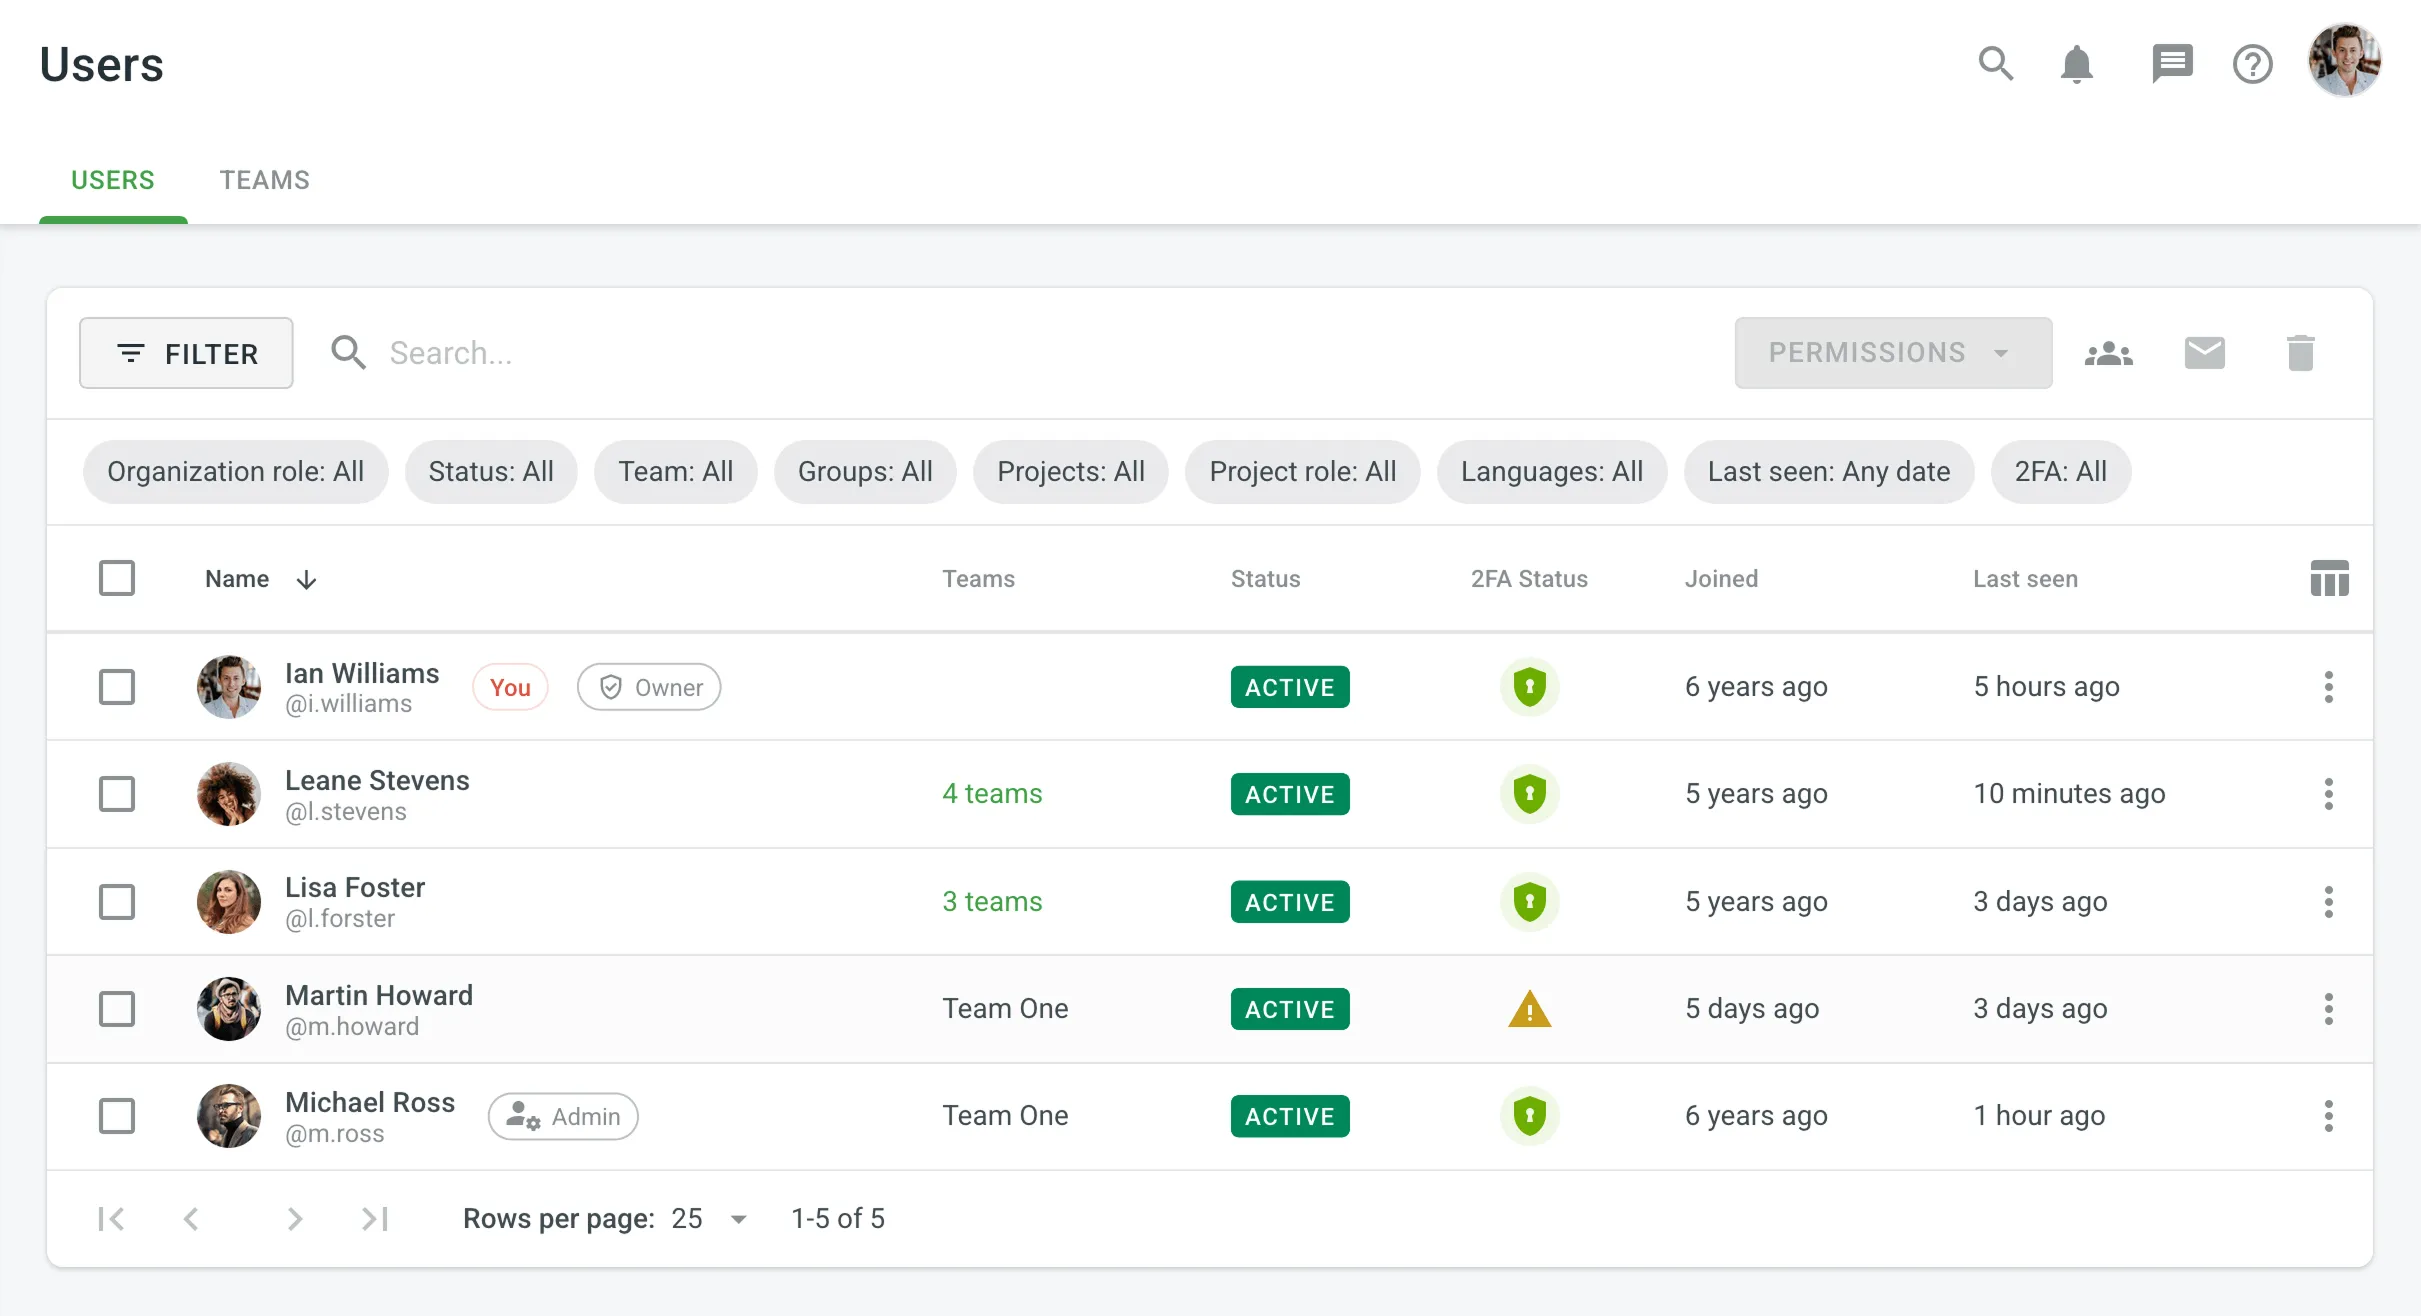
Open your organization’s Workspace and select Users on the left sidebar to view and manage the list of organization members in the Users tab. The list displays each user’s name, team, status, 2FA status, joining date, and last seen.
The Status column can show the following statuses:
- Active: The user is an active member of the organization.
- Pending: The user has been invited but has not yet accepted the invitation.
- Blocked: The user’s access to the organization has been revoked.
The 2FA Status column indicates whether a user has enabled two-factor authentication:
- Enrolled: 2FA is enabled.
- Not enrolled: 2FA is disabled.
To filter users, click and use the available filter options:
- Organization role: All, Admin, Manager, Vendor, Client.
- Status: All, Active, Pending, Blocked.
- Team: All, specific team.
- Projects: All, specific project.
- Project role: All, Manager, Developer / Translation Requestor, Translator, Proofreader, Language Coordinator, Member.
- Languages: All, specific language.
- Last seen: Any date, custom range.
- 2FA: All, Two-factor authentication enabled, Two-factor authentication disabled.
Use the Search field to find users by name or username.
Click a column heading (e.g., Name or Last seen) once or twice to toggle ascending or descending order.
To view and manage user profiles, follow these steps:
- Open your organization’s Workspace and select Users on the left sidebar.
- Click on the user or right-click and select Profile from the context menu.
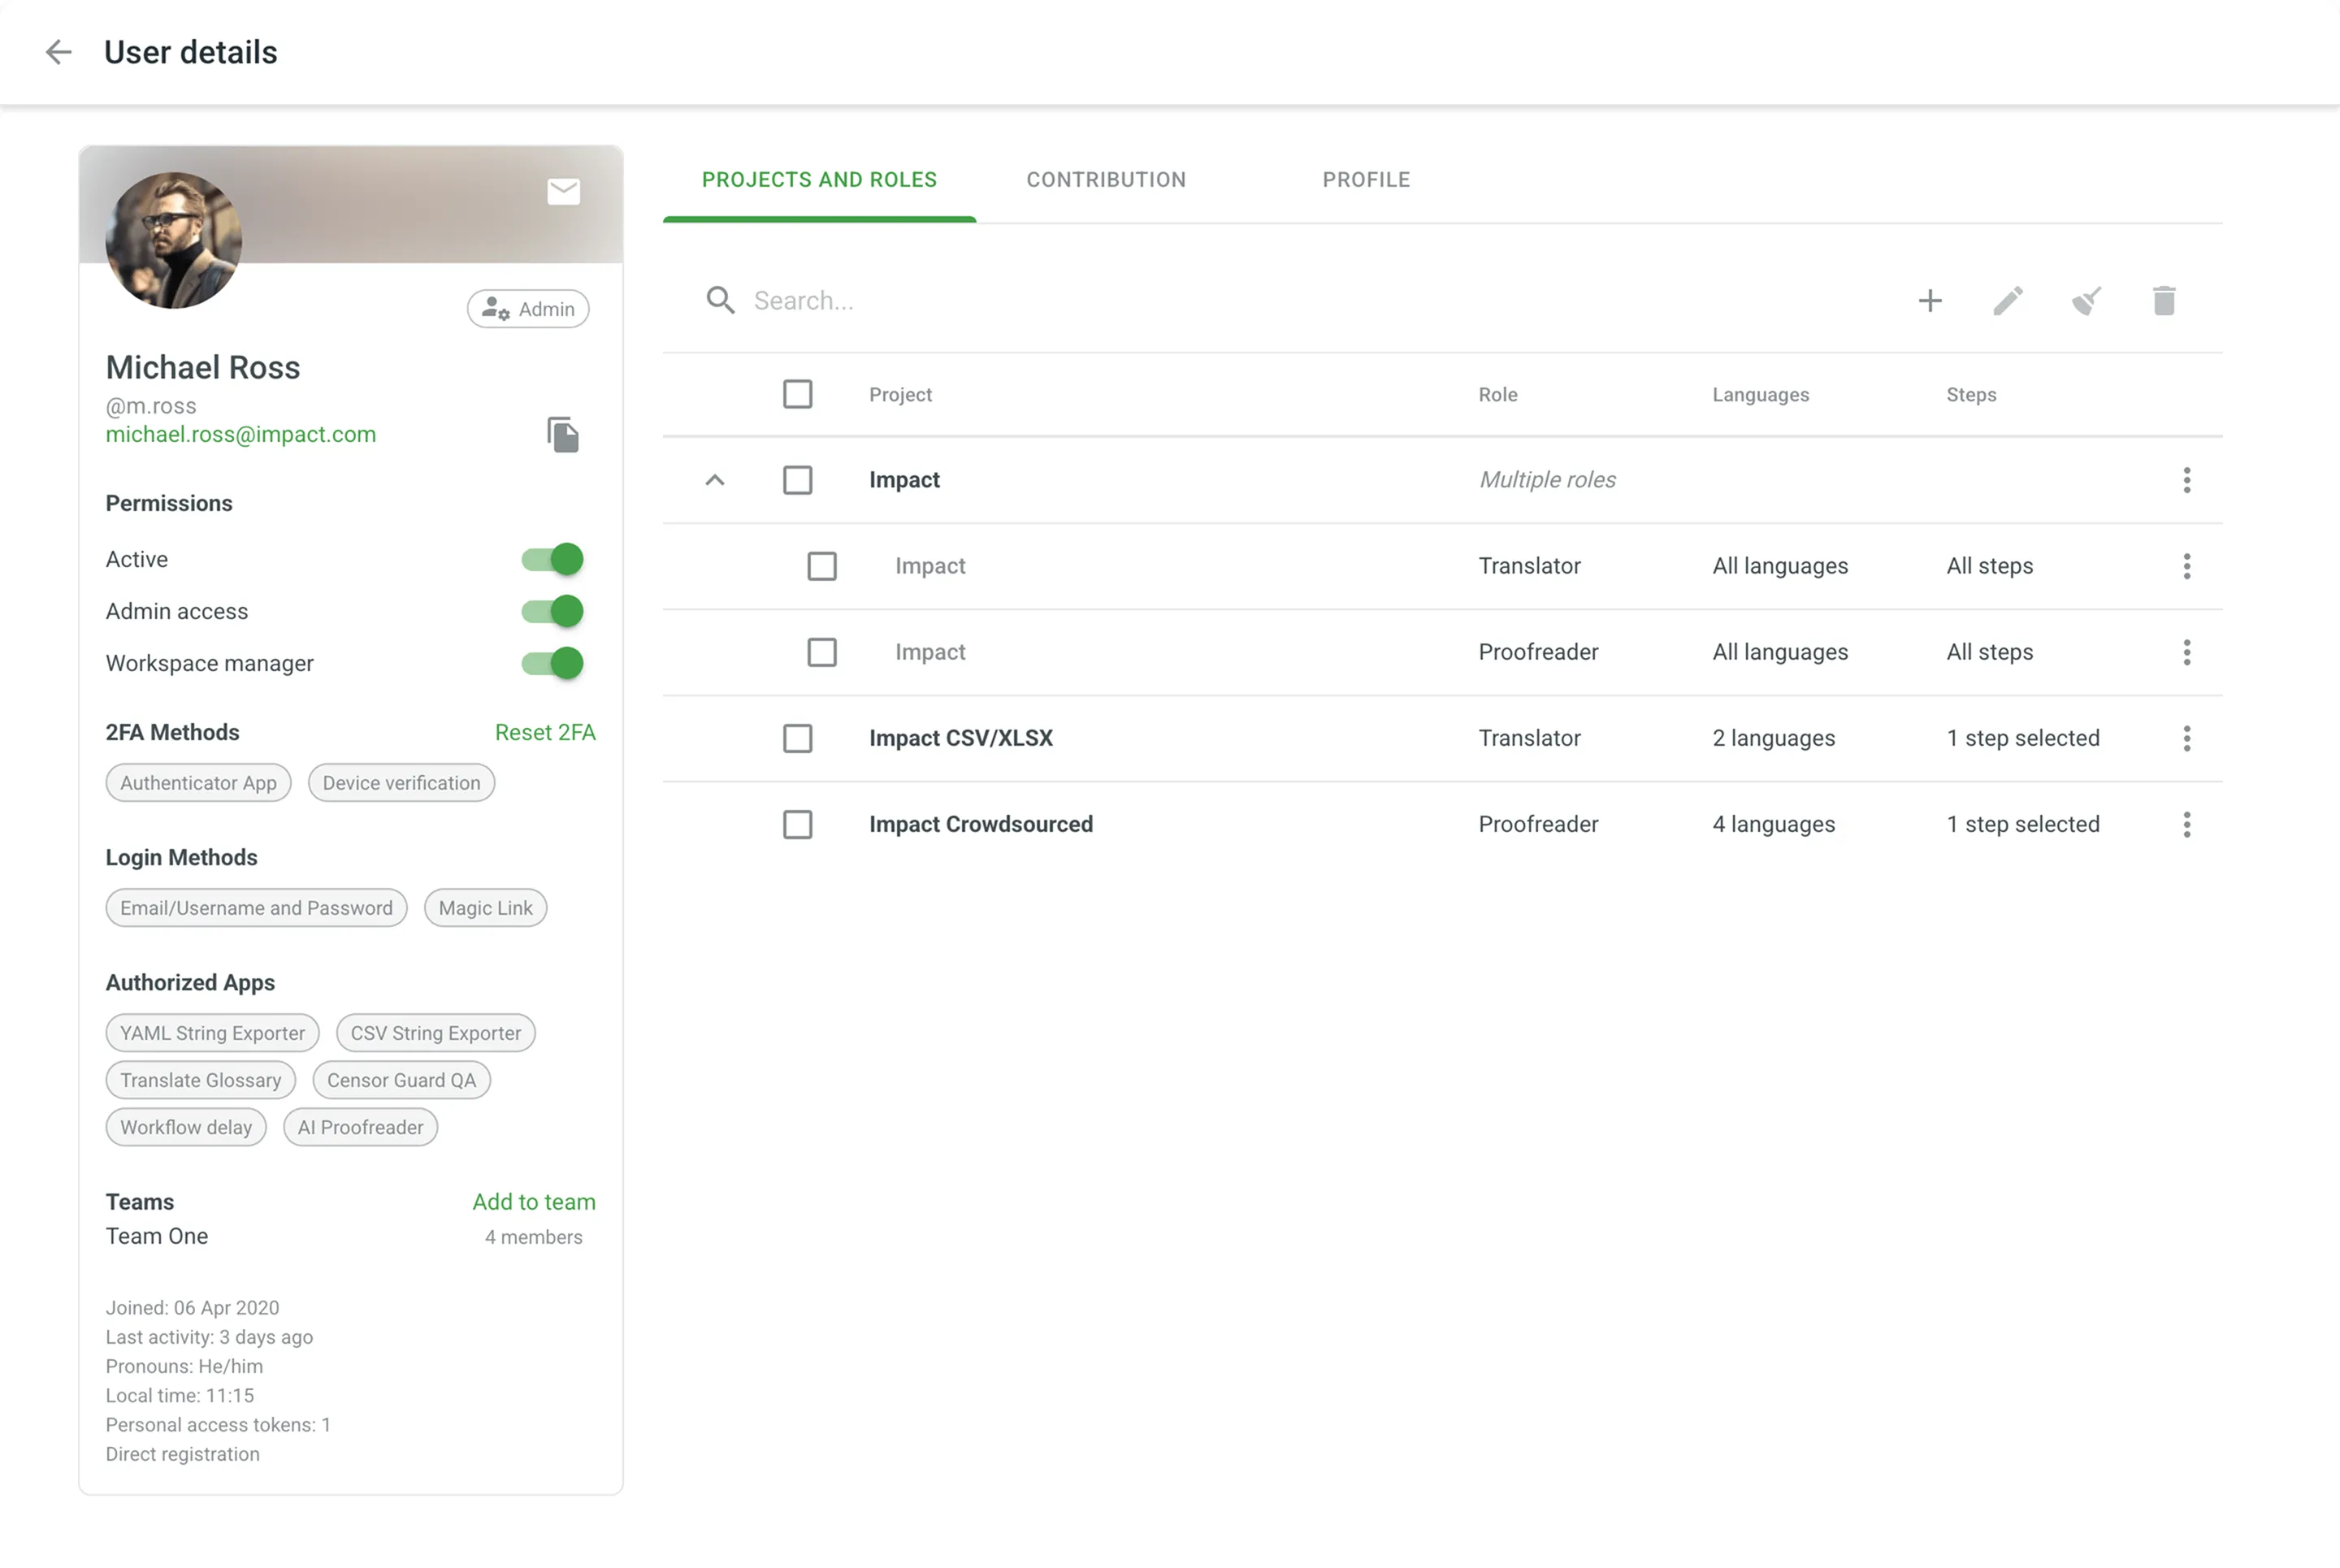
The User details page opens, providing comprehensive information and management options. The page consists of two main sections:
- The User info panel on the left provides a concise summary of the user’s profile and key settings:
- User Identity: Shows the user’s profile picture, first and last name, username, and email. Click the copy icon to copy the email address. An envelope icon allows you to contact the user directly. An Owner or Admin plate is displayed for relevant roles.
- Permissions: Contains toggles to manage the user’s status and access levels, including Admin, Admin access, and Workspace manager.
- 2FA Methods: Displays the user’s configured two-factor authentication methods (e.g., Authenticator App, Device verification). From here, you can also Reset 2FA for the user.
- Login Methods: Shows the methods the user can use to sign in (e.g., Email/Username and Password, SAML, OpenID Connect).
- Authorized Apps: Lists the Crowdin apps authorized by the user.
- Teams: Shows the teams the user is a member of. You can click Add to team to assign the user to a new team. If the user is not part of any team, “Not a team member” will be displayed.
- User Data: Includes details like Joined date, Last activity, Pronouns, Local time, number of Personal access tokens, and Method of registration.
- The Management Tabs on the right allow you to manage the user’s specific activities:
- Projects and Roles: Add, edit, clear, or delete project permissions.
- Groups: (Only in Permission Granularity mode) View and manage the groups the user manages.
- Contribution: View and delete the user’s contributions across the organization.
- Profile: View and edit the user’s first name, last name, pronouns, and time zone.
You can manage user permissions, such as project roles and organization-level access, for one or more users at once directly from the Users page.
- Open your organization’s Workspace and select Users on the left sidebar.
- Select the checkbox for one or more users.
- Access the management options in one of two ways:
- Click the Permissions dropdown menu in the upper-right corner.
- Right-click on the selected users to open the context menu.
- Select the desired action:
- Add projects permissions or Remove projects permissions. You can manage permissions for multiple projects at once by assigning or removing any project role.
- Enable admin access or Disable admin access.
- Block or Unblock.
You can also manage a user’s permissions directly from their User details page. Organization-level permissions (like Admin access) can be set using the toggles in the User info panel, while project-specific roles are managed in the Projects and Roles tab.
You can add one or more organization members to a team directly from the Users page.
- Open your organization’s Workspace and select Users on the left sidebar.
- Select the checkbox for one or more users.
- Click Add to team in the upper-right corner, or right-click on the selected users and select Add to team from the context menu.
- Select the desired team and confirm.
You can also add a user to a team directly from their User details page by clicking the Add to team link in the User info panel.
You can send messages to one or more organization members directly from the Users page.
- Open your organization’s Workspace and select Users on the left sidebar.
- Select the checkbox for one or more users.
- Click Contact in the upper-right corner, or right-click on the selected users and select Contact from the context menu.
- Compose and send your message.
You can also contact a user directly from their User details page by clicking next to their avatar.
Organization owners and admins can initiate a 2FA reset for members who have lost access to their authentication device. This process sends the user an email with a reset link.
You can trigger a 2FA reset in two ways:
- From the Users page, right-click on a user and select Reset 2FA from the context menu.
- From the user’s User details page, go to the 2FA Methods section in the User info panel and click the Reset 2FA link.
The user will receive an email with a reset link that is active for 15 minutes. Once the user clicks the Reset two-factor authentication > link in the email:
- They are redirected to a confirmation page.
- On the confirmation page, they are required to click Confirm to deactivate their current 2FA setup.
- After confirmation, they can log in to their Crowdin Enterprise account without 2FA.
- They can re-enable 2FA at any time from their Account Settings.
You can delete one or more users from the organization directly from the Users page.
- Open your organization’s Workspace and select Users on the left sidebar.
- Select the checkbox for one or more users.
- Click Delete account in the upper-right corner, or right-click on the selected users and select Delete from the context menu.
- Confirm the deletion.