Crowdin AI
Crowdin Enterprise integrates with top AI providers, including OpenAI, Google Gemini, Microsoft Azure OpenAI, and more, allowing you to leverage advanced AI-powered translations that consider additional context at different levels. These translations can be applied to your content with a few clicks using pre-translation via AI. Additionally, AI in Crowdin Enterprise can be used as an assistant in the Editor for translation, proofreading, and more.
You can expand your AI provider options by installing respective applications from the Crowdin Store.
Crowdin AI integration provides powerful capabilities for enhancing localization workflows. Configuring AI involves setting up providers and creating prompts.
Prompt engineering is crucial for guiding AI in understanding context and providing accurate translations. Customizing prompts within Crowdin Enterprise ensures that AI algorithms comprehend the nuances of your project, resulting in improved translation quality.
- Contextual Prompts – customize prompts to provide contextual information, such as project-specific terminology, style preferences, and target audience considerations. For example, include instructions on translating technical terms consistently or maintaining brand tone across languages.
- Placeholder Utilization – incorporate placeholders to dynamically insert context-specific information into prompts, enabling AI to generate translations aligned with project requirements.
- File-Level Context – use file-level context to provide instructions and contextual insights, enhancing AI’s understanding of content nuances. Include file descriptions, summaries, or references to glossaries and style guides.
To configure AI prompts, follow these steps:
- Open your organization’s Workspace and select AI on the left sidebar.
- In the Prompts tab, click New prompt. Alternatively, you can go ahead with creating prompt samples clicking Try a sample. Crowdin allows you to quickly set up pre-configured prompts that are ready to perform effectively from the moment they are created. While these samples are designed to work good initially, you can customize them to your personal preferences.
- In the appeared dialog, set the prompt parameters:
- Select the prompt type (i.e., Pre-translation & AI Suggestion, AI Chat, Alignment, QA check, or Create custom type)
- Custom type name (Specific to the custom prompt type)
- Use this prompt as the default prompt for AI Suggestion in editor (Specific to Pre-translation & AI Suggestion prompt type)
- Use this prompt as the default prompt for AI Assistant in editor (Specific to the AI Chat prompt type)
- Title
- Model (this also includes the AI Provider)
- Advanced settings:
- Visibility – Select projects where a prompt can be used:
- All Projects – The prompt is available in all projects.
- Selected Projects – The prompt is available only in the projects you select. If no projects are selected, or if all assigned projects are later deleted, the prompt will not be available in any project.
- Auto-retry on QA issues – Allows automatically send an additional request to the AI if the received translation fails the QA checks.
- Visibility – Select projects where a prompt can be used:
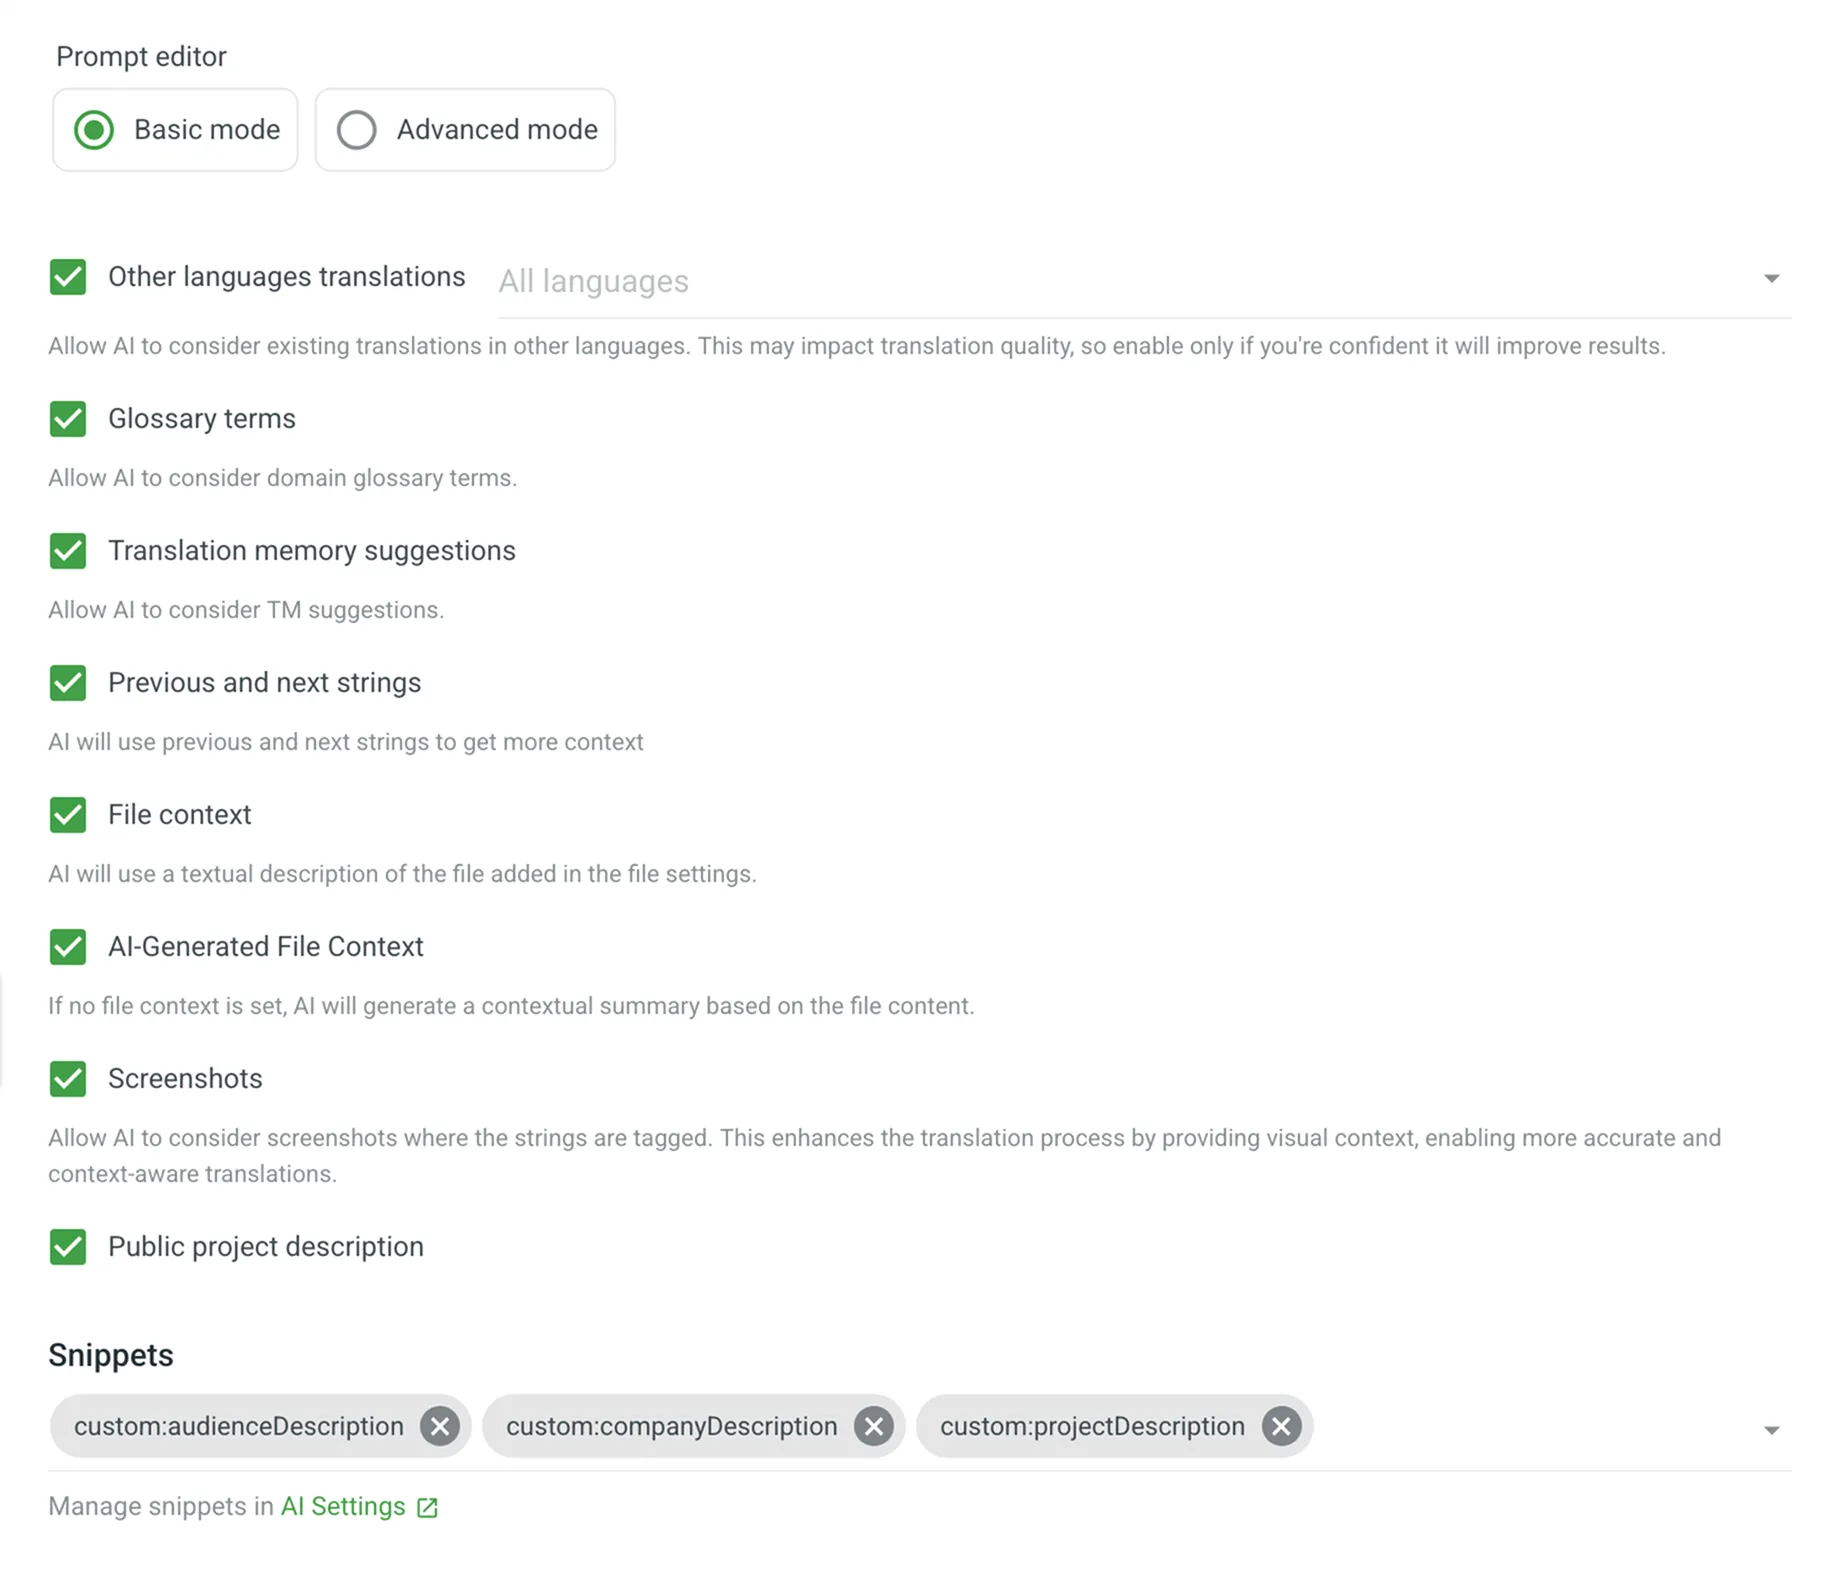
- Prompt editor mode (i.e., Basic or Advanced)
- Additional context (Basic mode) – specify which data will be included in the prompt using the following fields:
- Other languages translations – select specific language translations to be considered by AI as additional context or leave this field as is to use translations from all languages.
- Glossary terms – allows AI to consider domain glossary terms.
- TM suggestions – allows AI to consider TM suggestions.
- Previous and next strings – allows AI to consider previous and next strings for additional context.
- Filtered strings (Specific to the AI Chat prompt type) – allows AI to consider strings that match the current filter in the Editor to increase translation efficiency.
- File context – allows AI to consider a textual description of the file added in the file settings or in the Editor.
- AI-Generated File Context – automatically generate file context when it’s missing. If the file context isn’t provided manually, AI will analyze the source content and generate a contextual summary. This summary is used both during pre-translation and as reference material in the Editor.
- File content (Specific to the AI Chat prompt type) – allows AI to access the full file content during chat communication with the AI Assistant. The file content is added to context only when requested by AI.
- Screenshots – allows AI to consider visual context from screenshots where the strings are tagged. This enhances accuracy and context awareness. Read more about Screenshots.
- Public project description – allows AI to consider the public project description.
- Snippets – select reusable content previously created in the organization’s AI > Snippets to quickly insert standard text snippets into your prompt.
- Evaluation steps (Specific to the QA check prompt type) – define the criteria the AI uses to evaluate translations. You can customize, remove, or create new steps tailored to your quality requirements.
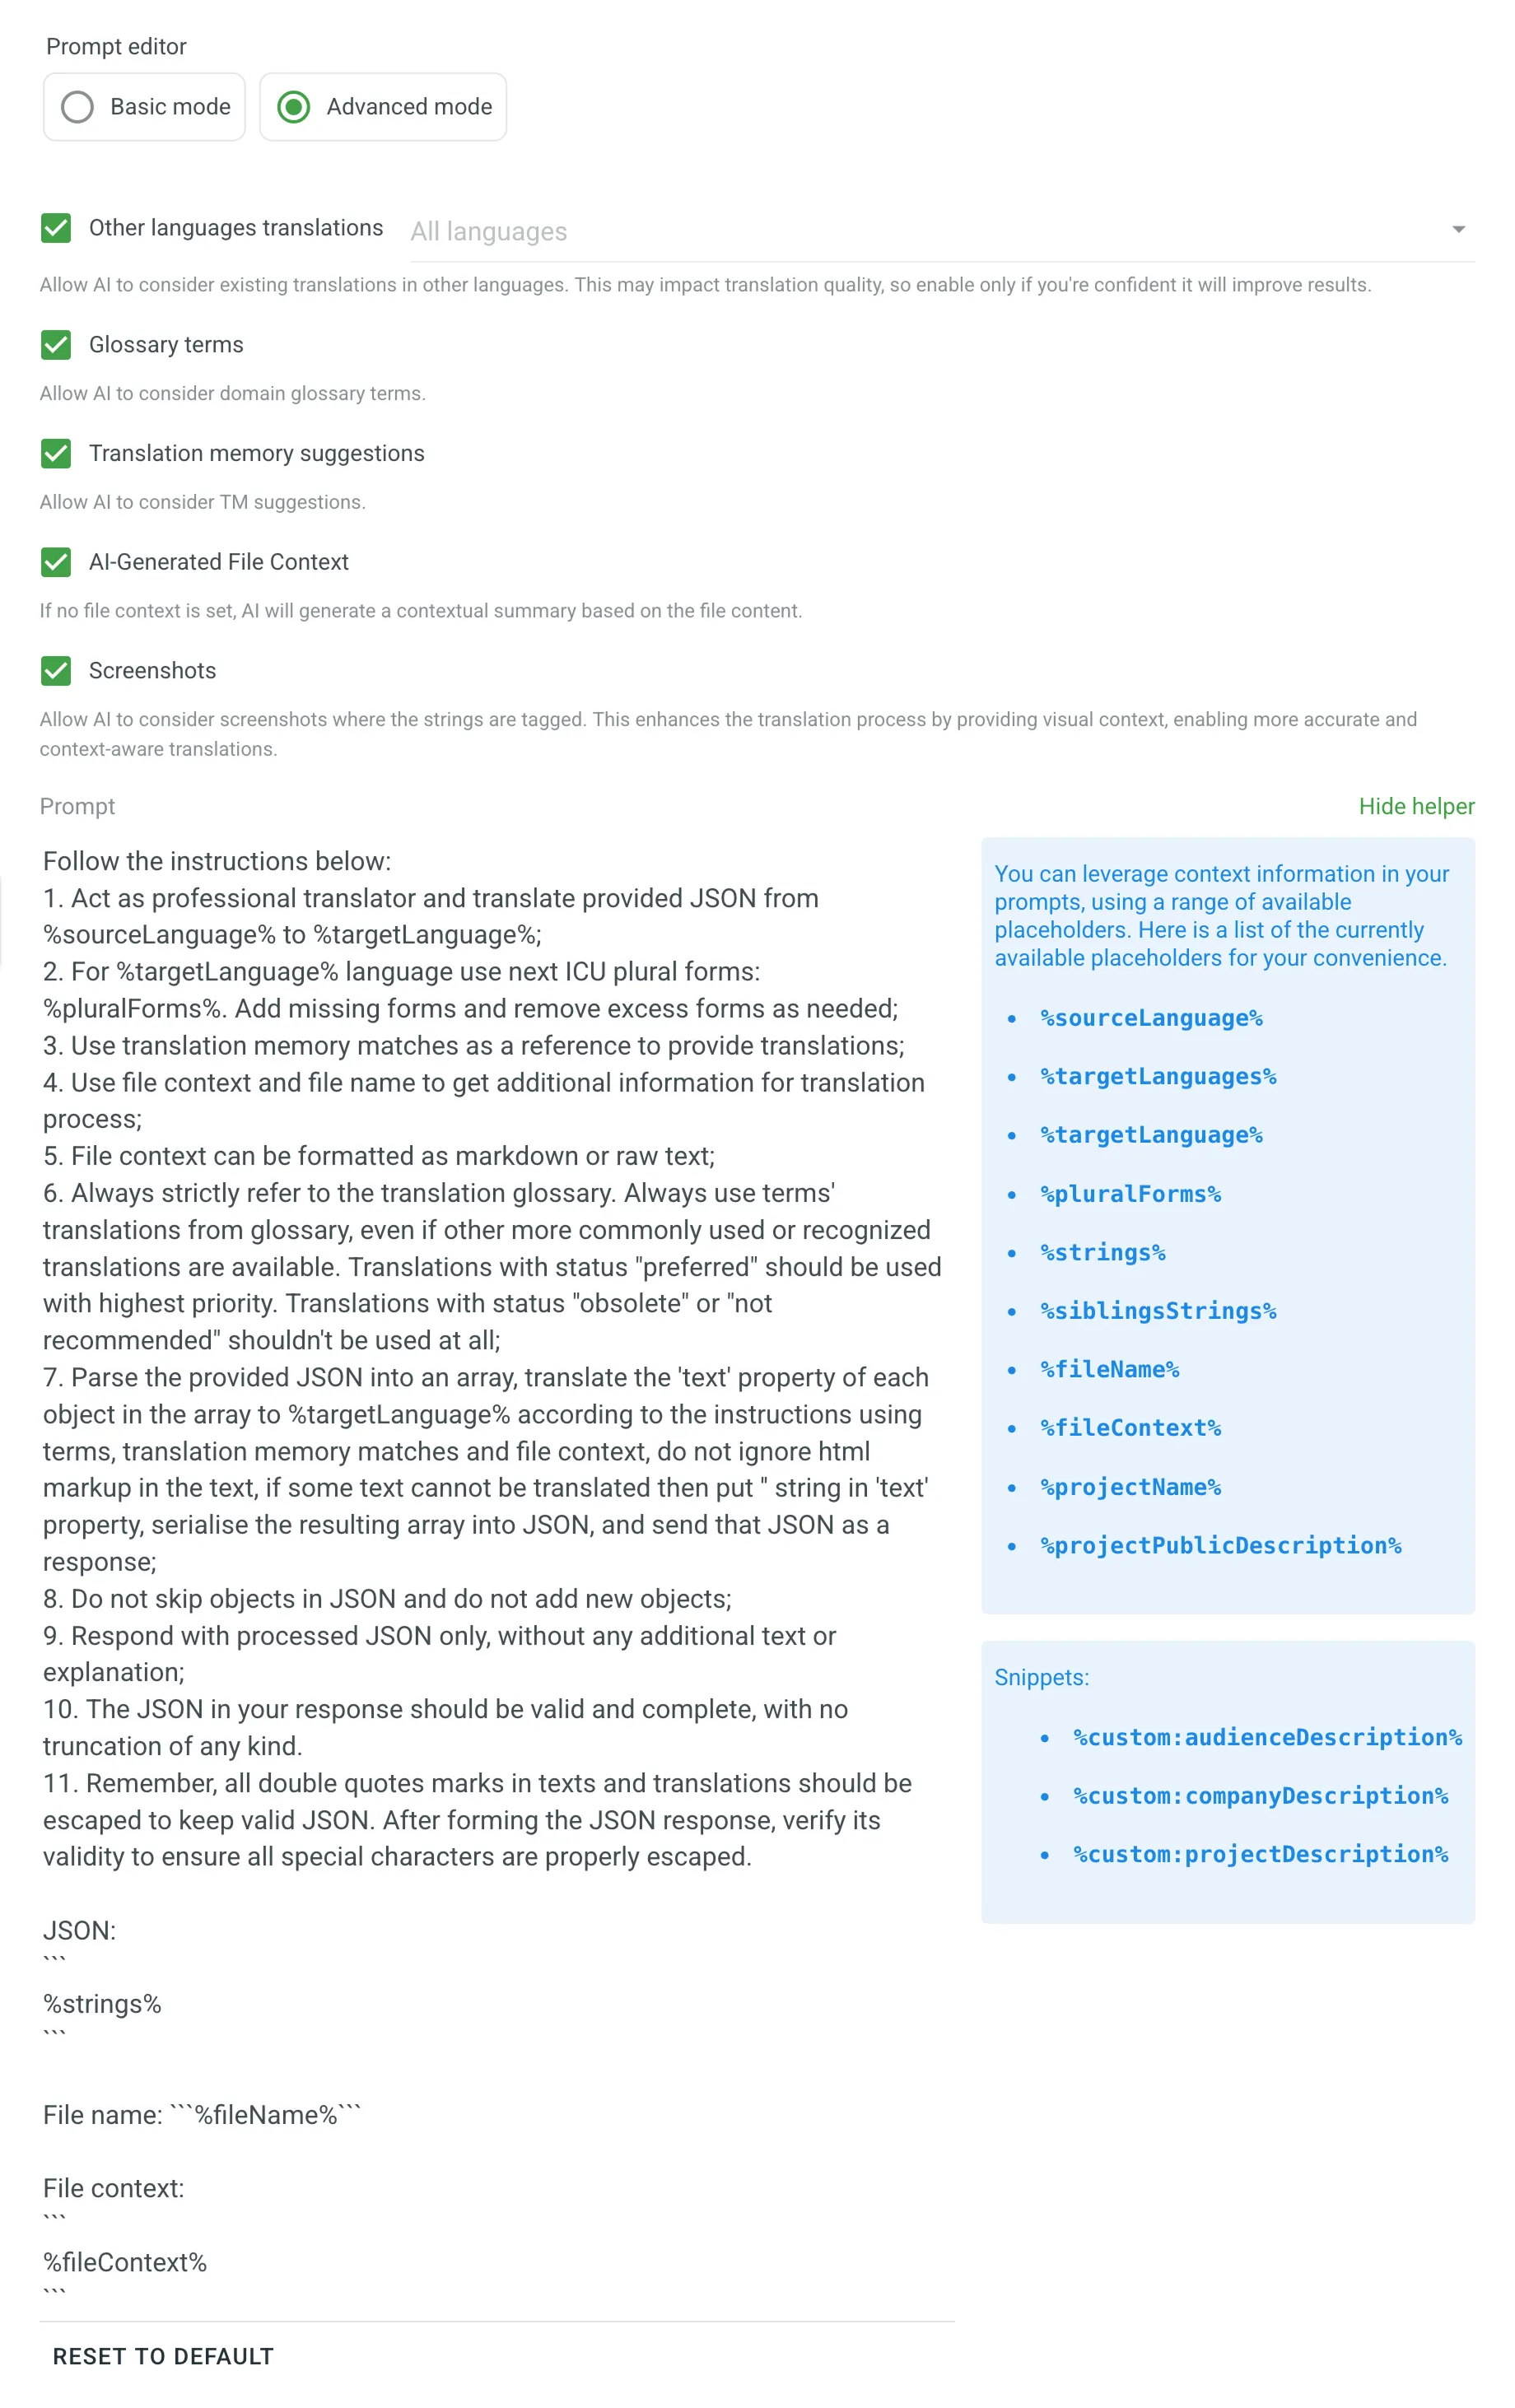
- Advanced mode – click Advanced mode to compose your prompt with a higher degree of precision. Use the following placeholders to insert context:
%sourceLanguage%– The source language of the project.%targetLanguages%– A list of all the project’s target languages.%targetLanguage%– The language the content is translated into.%pluralForms%– A list of plural forms for the target language.%json%– A collection of strings for the current segment, including the string identifier (key), context, text, maximum length, and translations to other languages (if the translations placeholder is specified).%translationUnits%– A list of translation units (source and translation) for the AI to evaluate during QA checks.%fileName%– The file name of the current segment.%fileContext%– The file context of the current segment (provided via the file settings modal in the ‘Files’ section).%siblingsStrings%– The previous and next segments in the file, allowing for contextual translation.%filteredStrings%– Strings that match the current filter in the Editor, provided to AI for improved evaluation accuracy and efficiency.%projectName%– Crowdin Enterprise project name.%projectPublicDescription%– Project public description.- Snippets – insert reusable content previously defined in the organization’s AI > Snippets by using the
%custom:snippetName%format.
- Click Create.
You can also create prompts directly from a project’s Settings > AI section. Prompts created this way will have their visibility set only to that specific project by default.
Read more about AI Settings in a project.
Managing AI prompts in Crowdin Enterprise involves various operations such as filtering and searching, editing, cloning, and deleting AI prompts. Below you can find instructions for each operation.
Once you open the AI page, you can view and search for prompts in the Prompts tab.
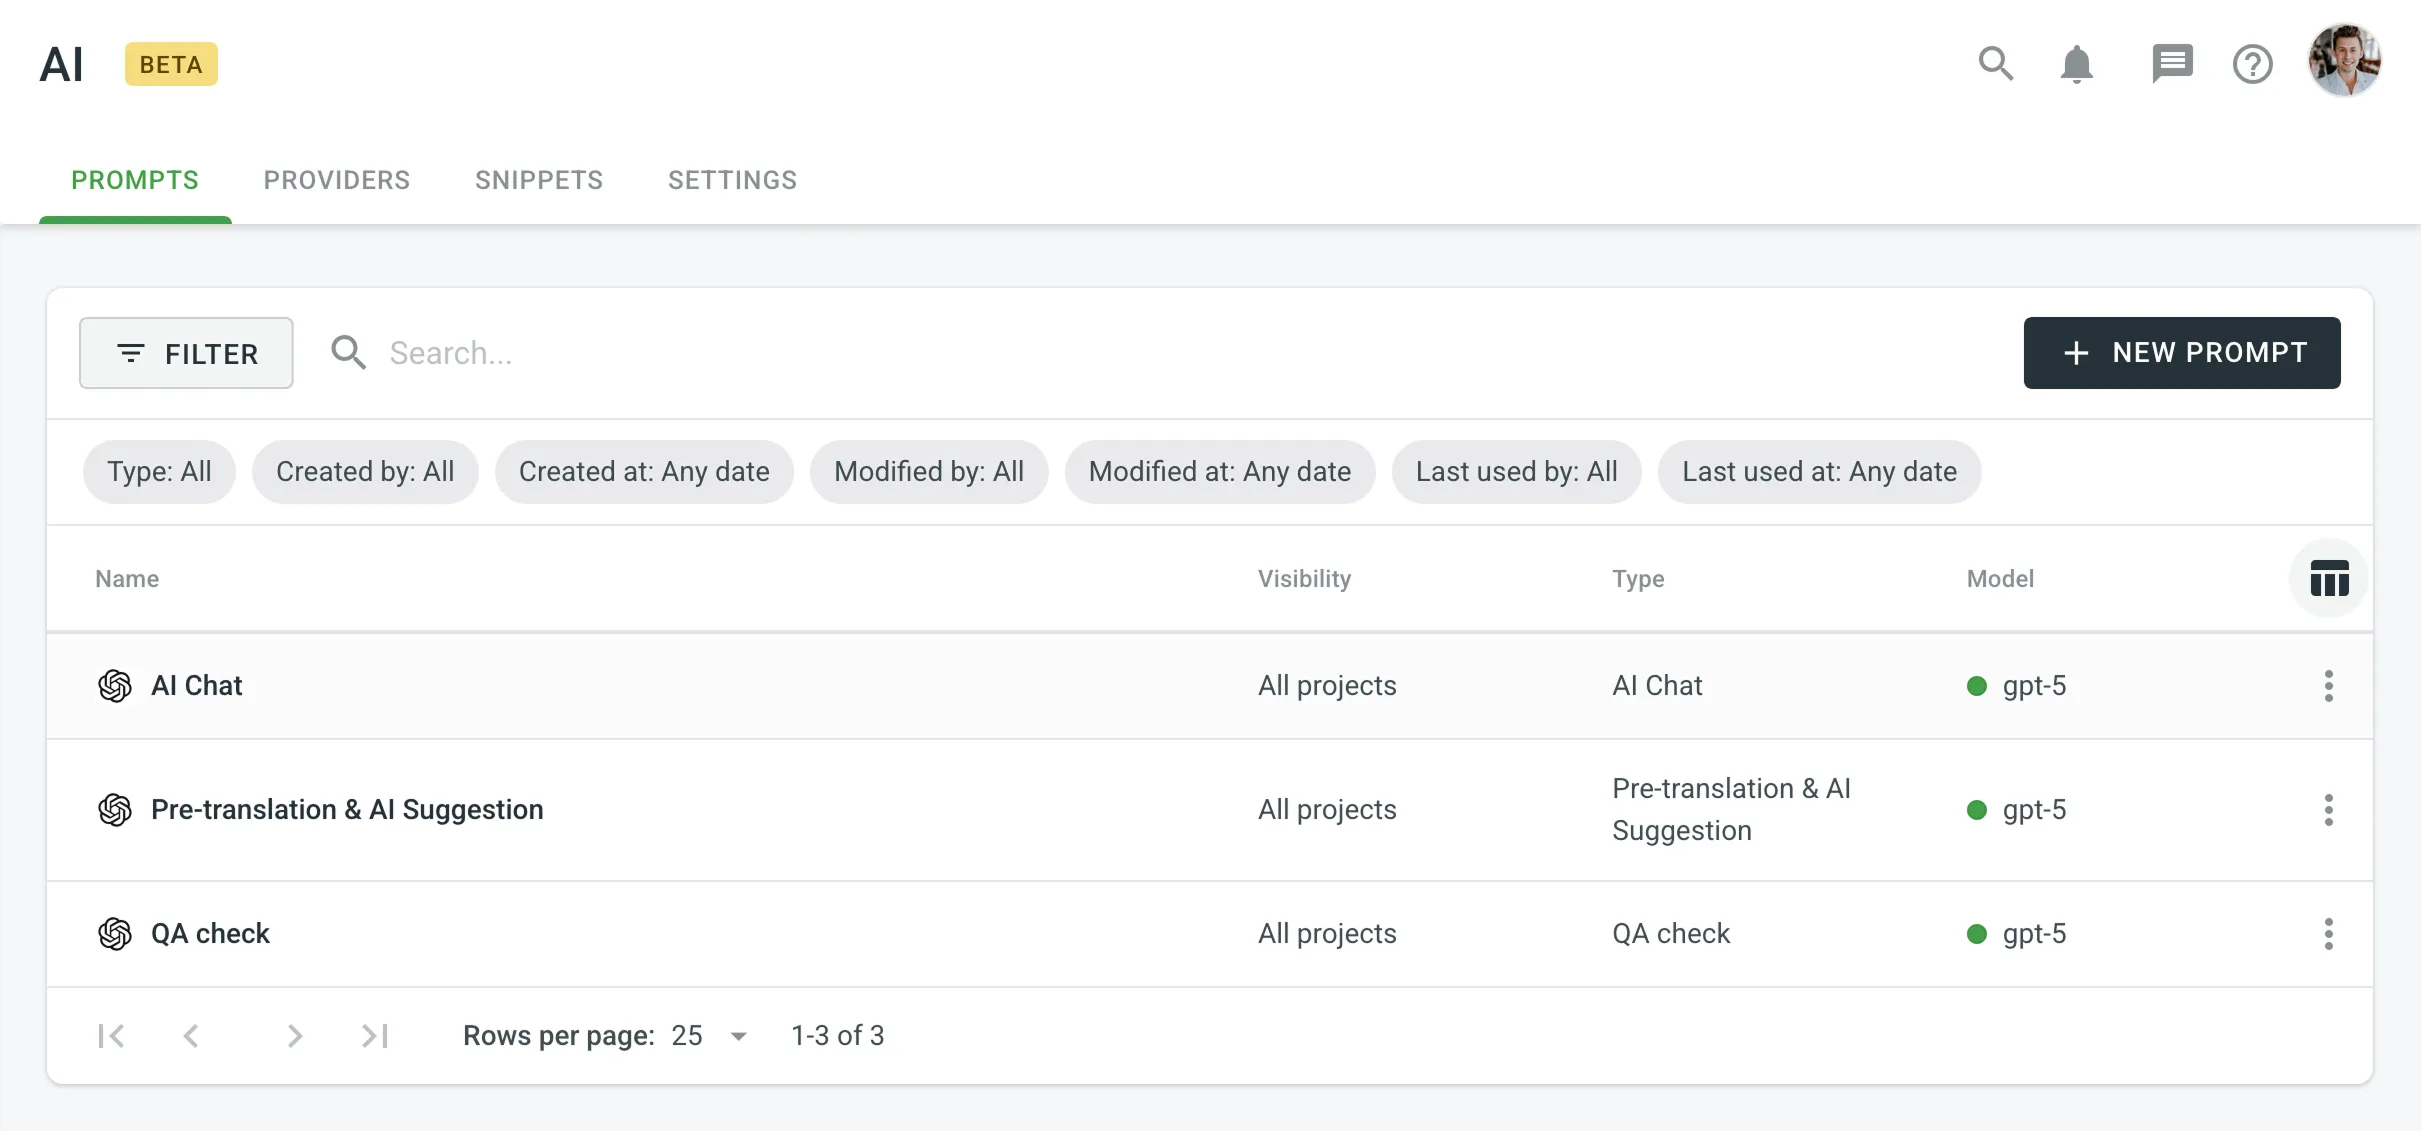
You can view the list of added prompts with the following details:
- Name – The name of the prompt.
- Visibility – Shows a counter of how many projects the prompt is available in with the list of projects (with clickable links).
- Type – The prompt’s type (e.g., Pre-translation & AI Suggestion, AI Chat).
- Model – The AI model used by the prompt. A status indicator next to the model name shows if the prompt is ready to use:
- A green dot indicates the prompt is configured correctly and ready for use.
- A red dot indicates an issue with the prompt’s configuration (e.g., the selected provider is disabled). Hover over the model name to see the specific error message.
- Created at – The date the prompt was created.
- Created by – The user who created the prompt.
- Modified at – The date the prompt was last updated.
- Modified by – The user who last modified the prompt.
- Last used at – The date the prompt was last used.
- Last used by – The user who last used the prompt.
- Usage count – The total number of times the prompt has been used.
To find a specific prompt, use the Search field. To narrow down the list, click the Filter button, which allows you to filter by Type, Created by user, Created at date, Modified by user, Modified at date, Last used by user, and Last used at date.
If you need to adjust your already configured prompt, you can simply edit it.
To edit AI prompts, follow these steps:
- Open your organization’s Workspace and select AI on the left sidebar.
- In the Prompts tab, click toward the needed prompt and select Edit.
- Modify the prompt as needed and click Update to save changes.
When editing a prompt, you’ll find the Prompt metadata section. This information provides a clear audit trail for collaboration and troubleshooting. By tracking creation, modification, and usage data, you can understand which prompts are most effective, identify popular prompts for optimization, and manage costs more efficiently. The section contains the following read-only details:
- Created by – The user who created the prompt.
- Created at – The date and time the prompt was created.
- Modified by – The user who last modified the prompt.
- Modified at – The date and time the prompt was last modified.
- Last used by – The user who last used the prompt.
- Last used at – The date and time the prompt was last used.
- Usage count – The total number of requests made to the AI using this prompt.
Editing prompts allows you to update and improve them as needed to ensure they remain effective and aligned with your requirements. If you don’t want to lose the current prompt configuration and are uncertain about the changes, consider cloning your prompt and experimenting with the copy.
Cloning AI prompts allows you to experiment with and refine prompt configurations without altering the original. This feature is particularly useful for testing improved versions of prompts while preserving the initial setup.
To clone AI prompts, follow these steps:
- Open your organization’s Workspace and select AI on the left sidebar.
- In the Prompts tab, click toward the needed prompt and select Clone.
- As a result, a copy of the prompt will appear in the prompt list.
You can then edit the cloned prompt to experiment with different configurations. This allows you to safely test enhancements and optimize performance without risking the loss of the original prompt configuration.
Deleting AI prompts is a straightforward process, but it should be done with caution to avoid losing valuable configurations. This action is useful when you no longer need a specific prompt or want to clean up unused prompts.
To delete AI prompts, follow these steps:
- Open your organization’s Workspace and select AI on the left sidebar.
- In the Prompts tab, click toward the needed prompt and select Remove.
- Confirm the deletion.
Crowdin Enterprise supports various AI providers, each offering unique models and features for translation tasks. By configuring providers, you can tailor AI functionality to suit your specific localization needs. Whether using managed by Crowdin services or integrating your own API keys, Crowdin Enterprise enables seamless integration with AI services.
In the Providers tab, you can view the list of providers with the following details:
- Name
- Status: Enabled, Disabled.
- Managed by Crowdin: yes, no.
- Prompts: if there are one or more prompts configured with a particular provider, you’ll see the actual number of prompts, otherwise you’ll see the Create button that redirects to the prompt creation dialog.
Crowdin AI providers are categorized into two types. System providers (e.g., OpenAI, Microsoft Azure OpenAI, Google Gemini) are built-in and available for immediate configuration. Additionally, you can expand your options by installing other AI providers from the Crowdin Store.
Currently, Crowdin Enterprise supports the following AI providers:
- OpenAI System
- Microsoft Azure OpenAI System
- Google Gemini System
- Mistral AI System
- Anthropic System
- xAI System
- IBM Watsonx System
- DeepSeek System
- Groq
- Cloudflare Workers AI
- Fireworks AI
- Together AI
- OpenRouter
- Cohere
- Replicate
- Credal
- AWS Bedrock
- Alibaba Cloud Model Studio
New AI providers are added regularly.
When configuring AI providers, you can choose from two possible options:
- Use your own API keys – Crowdin recommends this option if data security is a concern and for enhanced privacy and ownership. This option requires an external registration for getting API keys/credentials from AI providers.
- Use Managed by Crowdin service – simplified AI integration without the need to manage your own API keys. Allows you to leverage Crowdin’s default settings and infrastructure to access AI capabilities in a convenient way. Ideal for straightforward, quick tasks. To start using AI providers managed by Crowdin, you just need to add funds to your balance.
To configure an AI provider, follow these steps:
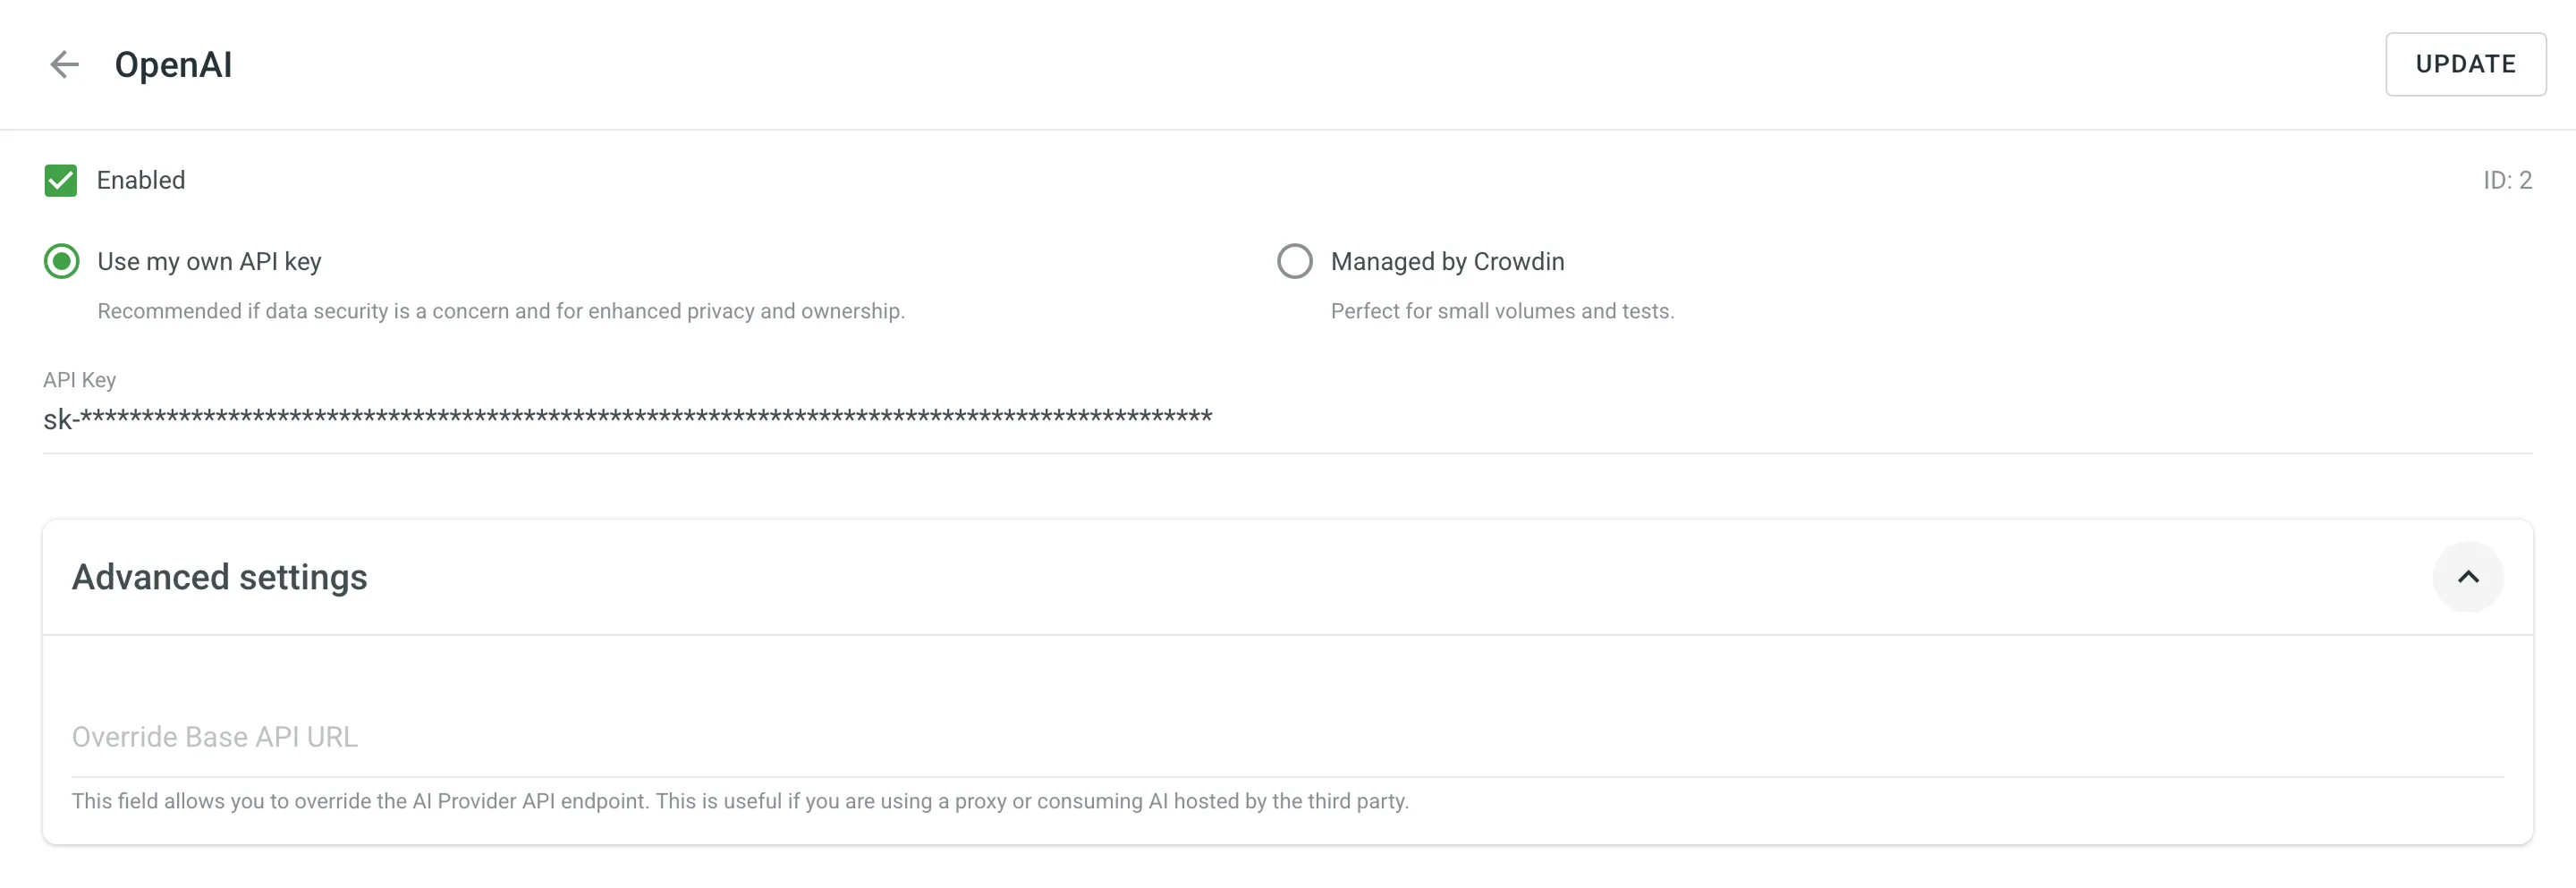
- Open your organization’s Workspace and select AI on the left sidebar.
- In the Providers tab, click toward the needed provider and select Edit. Alternatively, just click on the needed provider.
- Select Enabled.
- Choose your credential type:
- To use the Managed by Crowdin service, select {Provider} managed by Crowdin. In this case, you’ll need to add funds to your account balance.
- To use your own account, select Use my own API key and enter the required credentials. For instructions on generating an API key, please refer to your AI provider’s official documentation. Some AI providers may also require additional specific credentials. See the Provider-Specific Credentials section below for details.
- (Optional) Click Advanced settings to access additional options:
- Override Base URL – Allows you to direct AI provider requests to a custom or region-specific endpoint instead of the default URL. This is useful if you are using a proxy or consuming the AI from a third-party service that provides a custom endpoint. Otherwise, you can leave this field blank.
- Click Update.
Some AI providers require additional information beyond a standard API key for authentication when you use your own credentials.
When configuring Google Gemini, you will need to provide the following credentials:
-
Project ID: Your unique Google Cloud Project ID. You can find this on the dashboard of your Google Cloud Console.
-
Region: The region where your model is hosted. Ensure the model you plan to use is available in the selected region. You can find this on your Vertex AI dashboard. See the official Google Cloud documentation for a list of available Gemini models and regions.
-
Service Account Key: A JSON file used for authentication. To get this file:
- In your Google Cloud project, go to IAM & Admin > Service Accounts.
- Create a new service account or select an existing one.
- Grant it the Vertex AI User role (
roles/aiplatform.user). - Go to the Keys tab for that service account, click Add Key > Create new key, select JSON, and click Create. The key will be downloaded automatically.
- In Crowdin, click Choose file to upload this JSON key.
When configuring Microsoft Azure OpenAI, you will need to provide the following credentials:
- Resource name: The name of your Azure OpenAI service resource, which you can find in your main Azure portal.
- Deployment name: The name you assigned to your deployment.
- API Version: The API version required for your model. You can typically find the recommended version in the deployment’s properties or in the code samples provided by Azure. For example:
2024-02-01.
When configuring IBM Watsonx, you will need to provide the following credentials:
- Project ID: Your Watsonx.ai project ID. To find it, navigate to your project, go to the Manage tab, and copy the Project ID from the General section.
- Region: The region where your Watsonx project is located. You can find this on your project dashboard. See the official IBM Cloud documentation for a list of available regions for watsonx.ai.
If needed, you can disable any of the previously enabled providers at any time.
To disable the AI provider, follow these steps:
- Open your organization’s Workspace and select AI on the left sidebar.
- In the Providers tab, click toward the needed provider and select Disable. Alternatively, click on the needed provider and clear Enabled in the provider’s settings.
MT engines and AI models managed by Crowdin are separately paid services. To use them, you first need to add funds to your Crowdin Enterprise account balance.
Read more about Adding Funds to Account Balance.
Snippets are reusable pieces of information that help AI understand your project better. They provide context about your company, product, or specific requirements like brand voice and target audience. Managing this information as snippets saves time and helps generate better, more consistent translations.
In the Snippets tab, you can view snippets with the following details:
- Name – the unique identifier used to insert the snippet into prompts.
- Description – a brief explanation of the snippet’s purpose.
- Created at – date the snippet was created.
Use the Search field to quickly find specific snippets.
To create a new snippet, follow these steps:
- Click Add Snippet in the Snippets tab.
- In the Add Snippet dialog, fill in the following fields:
- Placeholder – A unique identifier for your snippet (e.g.,
company-descriptionortarget-audience). - Description – A brief summary of the snippet’s purpose for easy identification.
- Value – The actual text that will be inserted into prompts when the snippet is used.
- Placeholder – A unique identifier for your snippet (e.g.,
- Click Create.
Once created, snippets can be inserted into any AI prompt:
- In Basic mode, select one or more snippets from the dropdown menu in the Snippets section.
- In Advanced mode, insert a snippet using its placeholder format:
%custom:snippetName%. For example, a snippet with the namecompany-descriptionwould be inserted as%custom:company-description%.
To edit or delete a snippet, click on the desired snippet and select Edit or Delete. Alternatively, just click it to edit.
To configure default AI settings for your Crowdin Enterprise organization, open your organization’s Workspace and go to AI > Settings. These global settings will be applied by default to all new projects but can be overridden for each project in its Settings > AI section.
For each setting, you can either select an existing prompt from the drop-down menu or click to create a new one. Clicking the plus icon will open the prompt creation dialog with the appropriate prompt type pre-selected.
Select a default prompt with the Pre-translation & AI Suggestion type. This prompt will be automatically selected when you run pre-translation via AI in any project, speeding up the configuration process. You can still choose a different prompt before running the pre-translation.
This section allows you to configure the default AI behavior in the Editor across all projects in your Crowdin account.
- Prompt for AI chat – Select the default prompt that will be used for all interactions with the AI Assistant chat.
- Prompt for AI suggestion – Select the default prompt that will be used to generate AI suggestions in the Editor. If no prompt is selected here, AI suggestions will not be displayed.
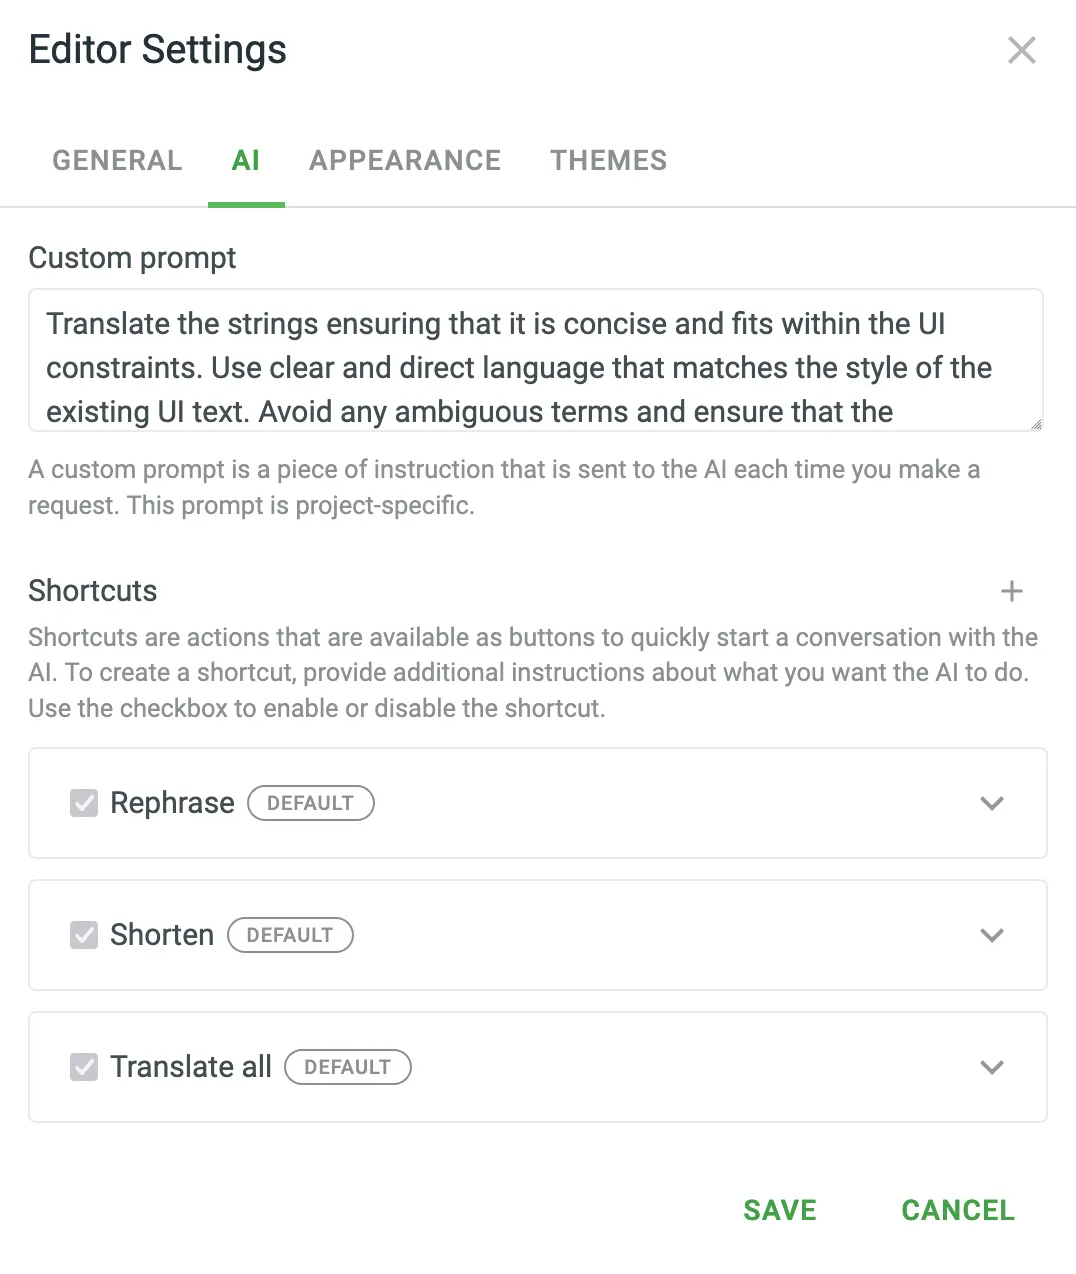
Shortcuts are predefined actions that appear as buttons in the Editor, allowing users to quickly start a conversation with the AI. Crowdin Enterprise provides three default shortcuts: REPHRASE, SHORTEN, and TRANSLATE ALL. These shortcuts are global, applying to all projects, although individual users can create their own in the Editor Settings > AI tab.
To create a new shortcut, follow these steps:
- Click in the AI chat default shortcuts section.
- In the Create shortcut dialog, provide a name and the prompt instructions.
- Click Create.
To modify or delete an existing shortcut, follow these steps:
- Click on the respective shortcut button.
- In the Edit shortcut dialog, you can do the following:
- change shortcut’s name and prompt and click Save.
- Delete the shortcut.
When enabled, AI Alignment automatically generates bilingual draft terms based on the translations made in the project, providing additional context for both human translators and AI. This feature enhances translation accuracy and consistency without requiring additional input.
Select the default QA check type prompt to be used for AI-powered quality assurance across all projects in your Crowdin Enterprise organization. If no organization-wide prompt is configured, the AI-powered check will not be applied unless a prompt is selected in a specific project’s Settings.
Pre-translation via AI allows you to use AI Models to pre-translate your content with high-quality, context-aware translations.
After configuring a prompt with the AI Chat type, Crowdin AI can be used in the Editor as an AI Assistant for translators and proofreaders. The AI Assistant works in a chat format, allowing you to send prompts and receive replies.
The AI Assistant is context-aware, meaning it automatically considers the string the translator is working on, the related glossaries, TM matches, the maximum acceptable length of the translation, the related screenshots, and more. This contextual awareness enables the AI Assistant to provide more accurate and relevant assistance.
Here are some tasks the AI Assistant can help with:
- Correcting TM suggestions - If you get a 60% match, the AI Assistant can improve the remaining 40%, ensuring consistency with your terminology and previous translations.
- Serving as an advanced dictionary - The AI Assistant can provide term definitions, translation variants, synonyms, and more.
- Suggesting translations - Similar to other MT tools, the AI Assistant can suggest translations that you can refine based on your specific needs or save as is.
- Summarizing content – For example, when translating knowledge base articles, it can generate short summaries to help you understand the content before translating.
To start using the AI Assistant, click the AI Assistant section in the right sidebar of the Editor.
You can also interact with the AI Assistant faster using context-aware shortcuts. When you hover over an AI, TM, or MT suggestion in the Context and Translations section, the Discuss suggestion with AI button appears. Click it to open the chat with the suggestion already prefilled.
To see what context is passed to the AI, click the Show AI context button in the AI Assistant panel header. This opens a modal that displays the full scope of context available to the AI, including the selected string, TM matches, glossary terms, file name, surrounding strings, filtered strings, project description, plural forms, and more.
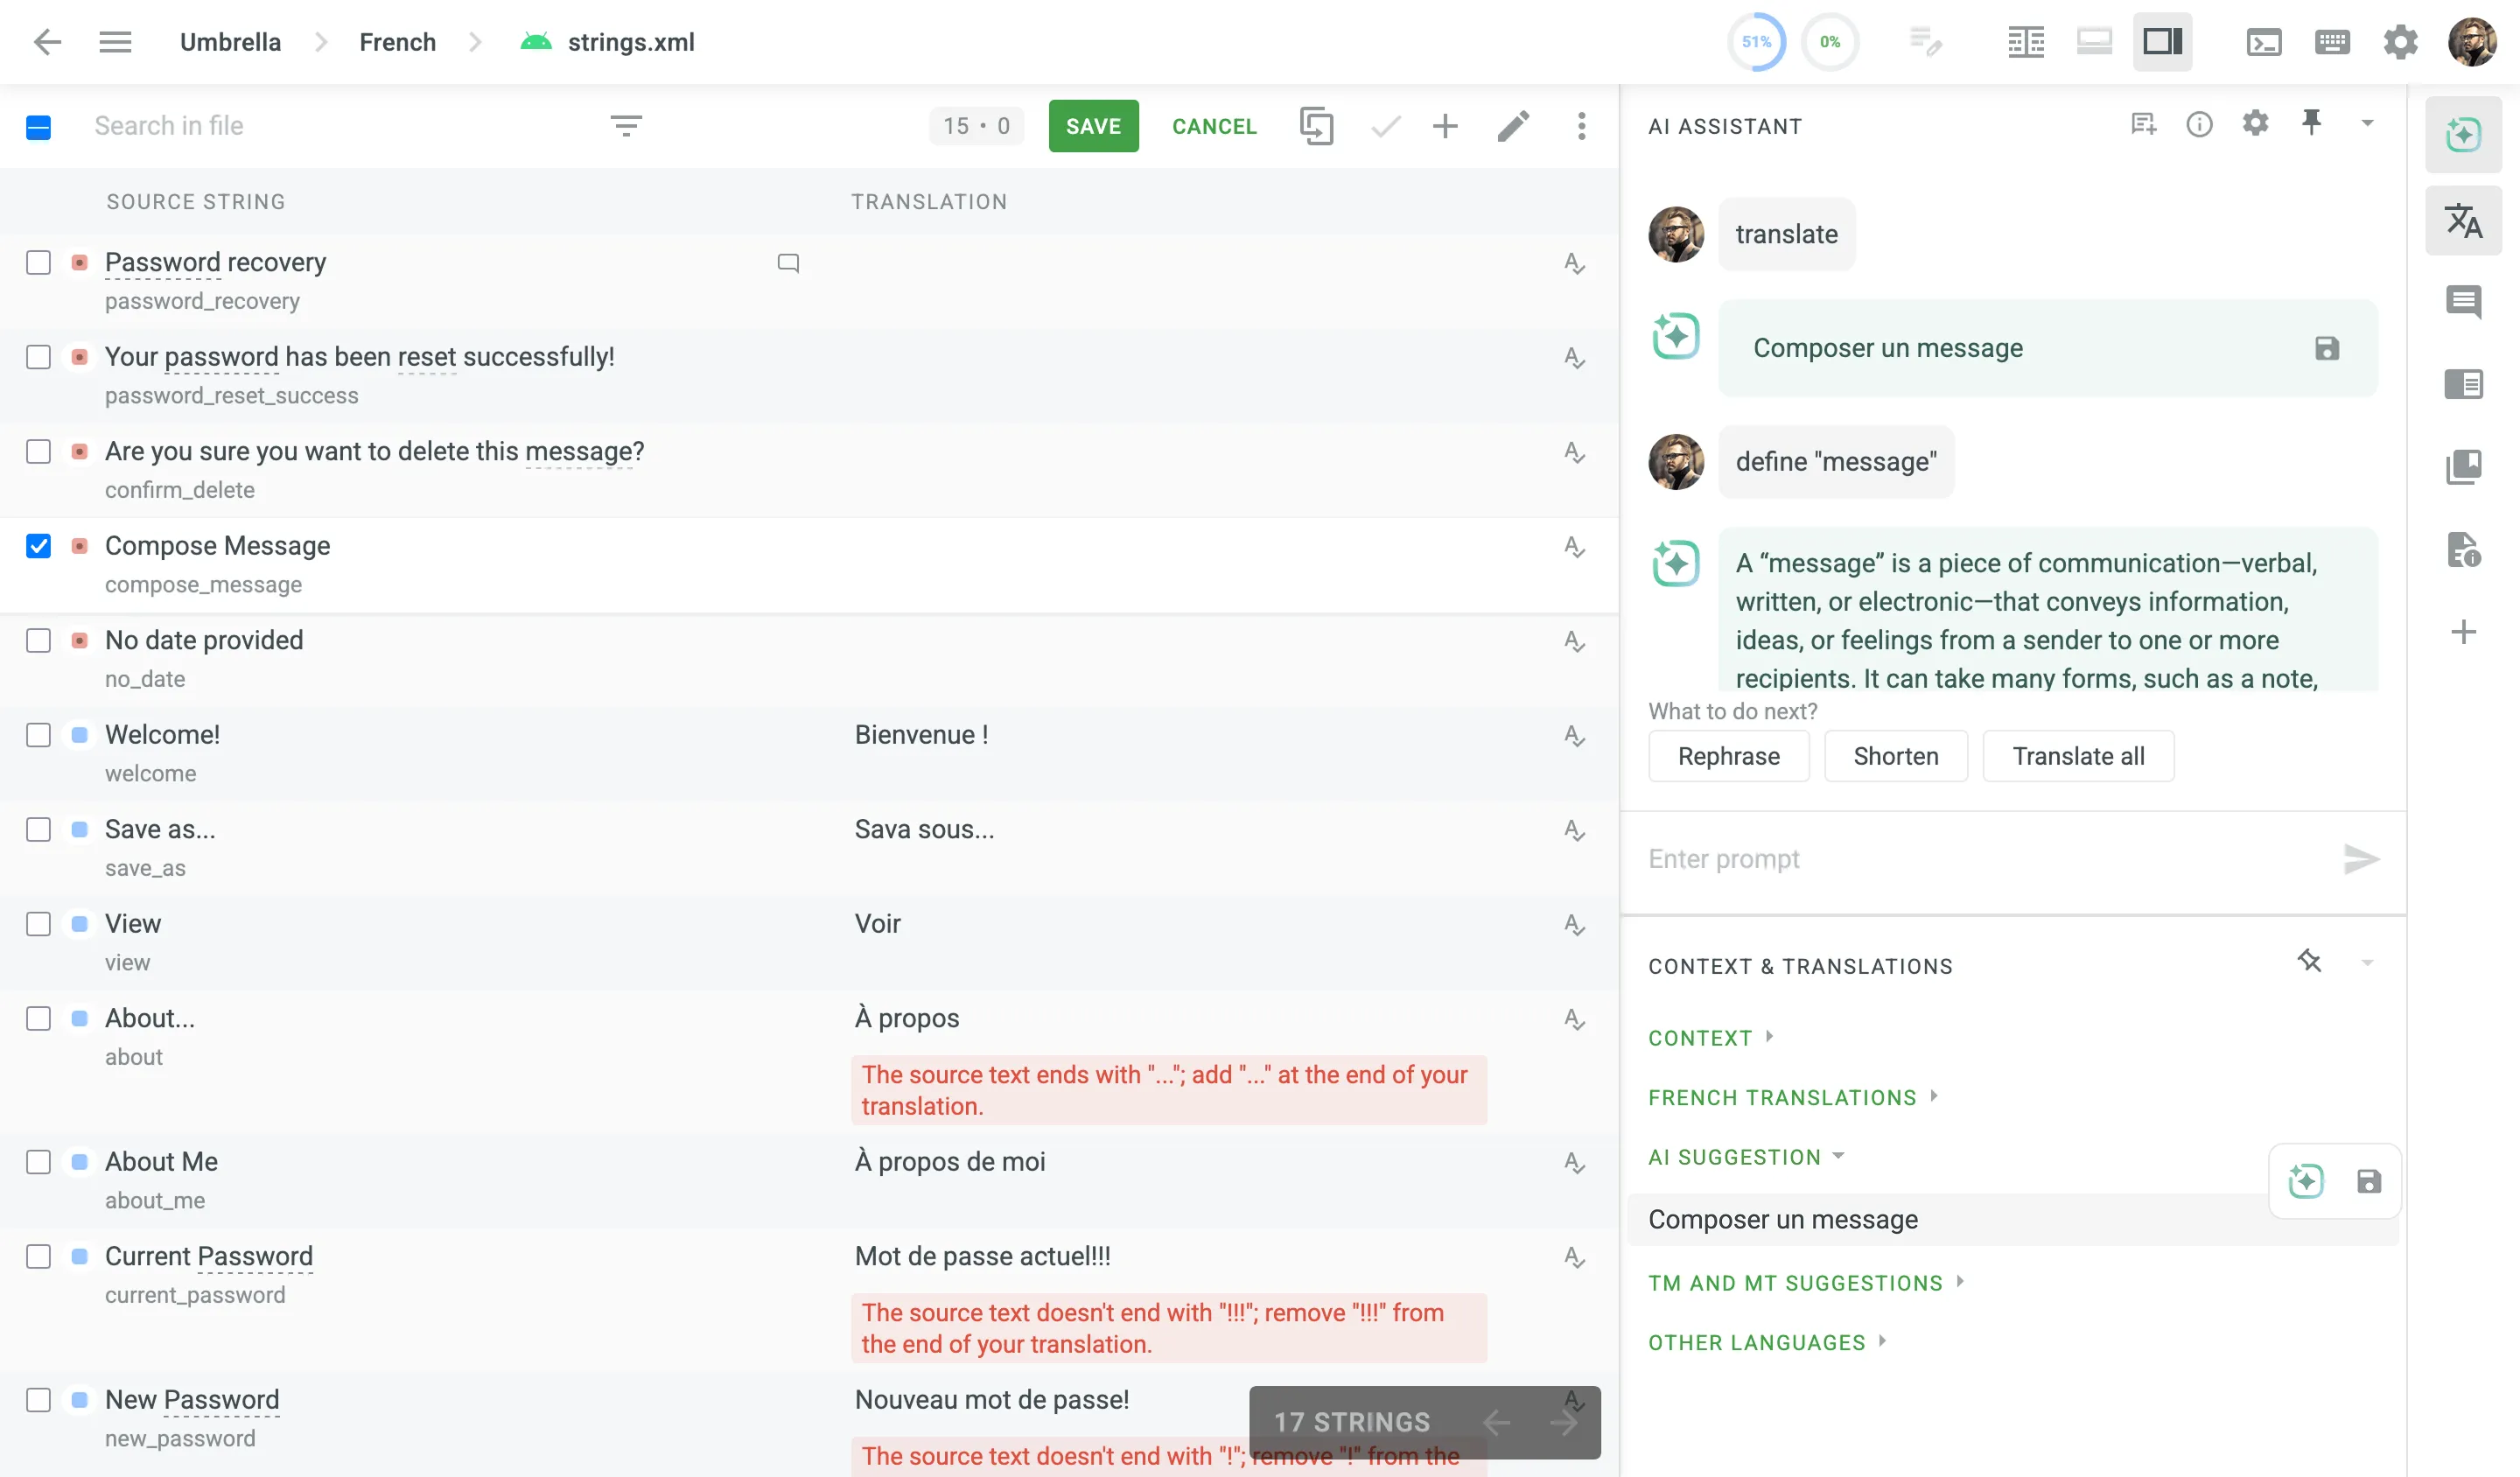
For even faster and more efficient interaction with the AI Assistant, you can use prompt shortcuts. By default, three prompt shortcuts are available:
- Rephrase
- Shorten
- Translate all
To add your own prompt shortcuts, follow these steps:
- Click in the upper-right corner to open the AI settings.
- Click Add shortcut.
- Specify a shortcut name and a prompt it will use.
- Click Save.
Additionally, in the Editor Settings > AI tab, you can create a custom prompt to provide the AI Assistant with a specific set of instructions that are sent each time you make a request. Note that the custom prompt is project-specific.
When sending prompts to the AI Assistant, the instruction priorities are considered in the following order:
- Instructions specified in the AI Chat prompt settings.
- Instructions specified in the custom prompt settings.
- Instructions specified in the prompt shortcut or manually entered in the AI Assistant chat.
AI Alignment uses AI to analyze human translations, automatically generating glossary term drafts based on recurring terminology patterns. These terms add valuable context for both translators and AI, supporting consistent terminology across all project translations. Note that AI Alignment only analyzes translations submitted by users in the Editor or those uploaded to the project; pre-translations are not considered.
When a translator submits a translation, AI Alignment analyzes the terminology used to identify and suggest draft glossary terms. This process involves reviewing translations for recurring terms and phrases that represent core project terminology. AI Alignment then generates glossary records in simplified forms (e.g., location rather than locations) to create a unified set of terms for the project.
For example, in a project with the source string Remove this location, the initial AI suggestion for translation might be Видалити це місце. However, a human translator chooses Видалити цю локацію, using локація consistently for location. Based on this choice, AI Alignment creates a draft glossary term that pairs location with локація.
Later, when another source string Add location is translated, the AI now aligns with this glossary term and suggests Додати локацію, ensuring consistency. This will happen if the AI Prompt for AI Suggestion in editor is set to consider glossary terms.
Additionally, when human translators encounter source strings that contain location, they will see the glossary term location along with its translation локація. This helps translators use the preferred terminology, enhancing consistency across the project.
If an existing term differs from the suggested AI translation, AI Alignment will add a draft term to the current record, allowing project managers to review and confirm preferred terminology. This approach ensures new terms don’t overwrite or conflict with established glossary records.
To use AI Alignment, configure a prompt with the Alignment type and apply it to the needed projects. This prompt type enables AI Alignment to process and generate draft glossary terms as translators add their translation suggestions.
In Advanced mode, project managers can further customize specific criteria for generating glossary terms from translations. This includes filtering terms to draft only those relevant to specific domains or adjusting tolerance levels to minimize irrelevant suggestions. Such customization allows AI Alignment to focus on essential terminology for the project.
For example, managers can set AI Alignment to create term drafts only for industry-specific terminology, ensuring that only relevant records are included.
Once configured, all draft terms generated by AI Alignment appear in the glossary with a draft status, allowing managers to review and confirm these terms before they become part of the active glossary. This review step provides control over terminology consistency and accuracy across the project.
AI QA Check uses AI to automatically evaluate translations against defined quality standards. It helps translators quickly identify and resolve issues, ensuring accuracy, consistency, and compliance with project-specific requirements. AI QA Check complements and extends other QA methods (i.e., default QA Checks, Custom QA Checks, and External QA Checks) by providing comprehensive flexibility, reducing manual review efforts, and enhancing overall translation quality.
When enabled, AI QA Check evaluates each submitted translation against a set of customizable evaluation criteria (Evaluation steps) defined in the configured QA Check prompt. Issues detected by the AI appear directly within the Editor as warnings, along with concise suggestions for corrections.
Evaluation steps may include:
- Accuracy – Ensuring no content is omitted, added, or incorrectly translated.
- Fluency – Checking grammar, spelling, punctuation, and readability.
- Terminology – Confirming consistent and correct use of project-specific terms.
- Style – Verifying translations align with defined stylistic guidelines.
- Design – Ensuring translations fit design constraints, including length and markup.
- Locale Convention – Adapting formats for dates, currencies, addresses, and more.
- Cultural Adaptation (Verity) – Localizing culture-specific references appropriately.
- General Issues – Identifying other miscellaneous quality issues.
For example, if a translation deviates from established glossary terms or fails to meet local formatting standards, the AI will highlight this and offer recommendations, guiding translators to achieve compliance and consistency.
To use AI QA Check, create and configure a QA Check prompt. Each QA Check prompt contains clearly defined evaluation steps the AI follows to detect translation issues. Unlike other AI prompts, the QA Check prompt includes a dedicated Evaluation steps section, allowing you to customize, edit, or expand upon predefined checks.
You can also enhance the accuracy of the AI’s analysis by including various types of additional context relevant to your project’s content.
After configuration, you can assign a QA Check prompt as the default for either your entire organization or individual projects.
To enable AI QA Check in your projects, follow these steps:
- Create and enable a QA Check prompt.
- Set it as the default QA prompt in the project’s Settings > AI > Settings.
- Enable the AI-powered check in the project’s Settings > QA Checks.
Once set, the AI continuously checks submitted translations, ensuring consistent compliance with your project’s quality guidelines.