Notifications
Crowdin Enterprise offers several types of notifications to meet the different needs of users, such as the following:
- Project Updates: Notify users of changes to the project, such as new content to translate or updates to existing content.
- Translation Activity: Notify users of new translations, approvals, or comments on translations.
- Task Management: These notifications inform users about new tasks, deadlines and task completions.
- Team Communication: These alerts notify users of messages and discussions within the project.
To see the notifications, click on the bell icon in the top right corner of the page.
With updates sent directly to Slack, you’ll instantly know what’s happening in the Crowdin Enterprise projects you manage or contribute to. After integrating your Crowdin Enterprise account with Slack, select the notifications you’d like to receive, and the Crowdin bot will send them as direct messages.
To receive Crowdin Enterprise notifications via Slack, follow these steps:
- Open your Account Settings and select Notifications on the left sidebar.
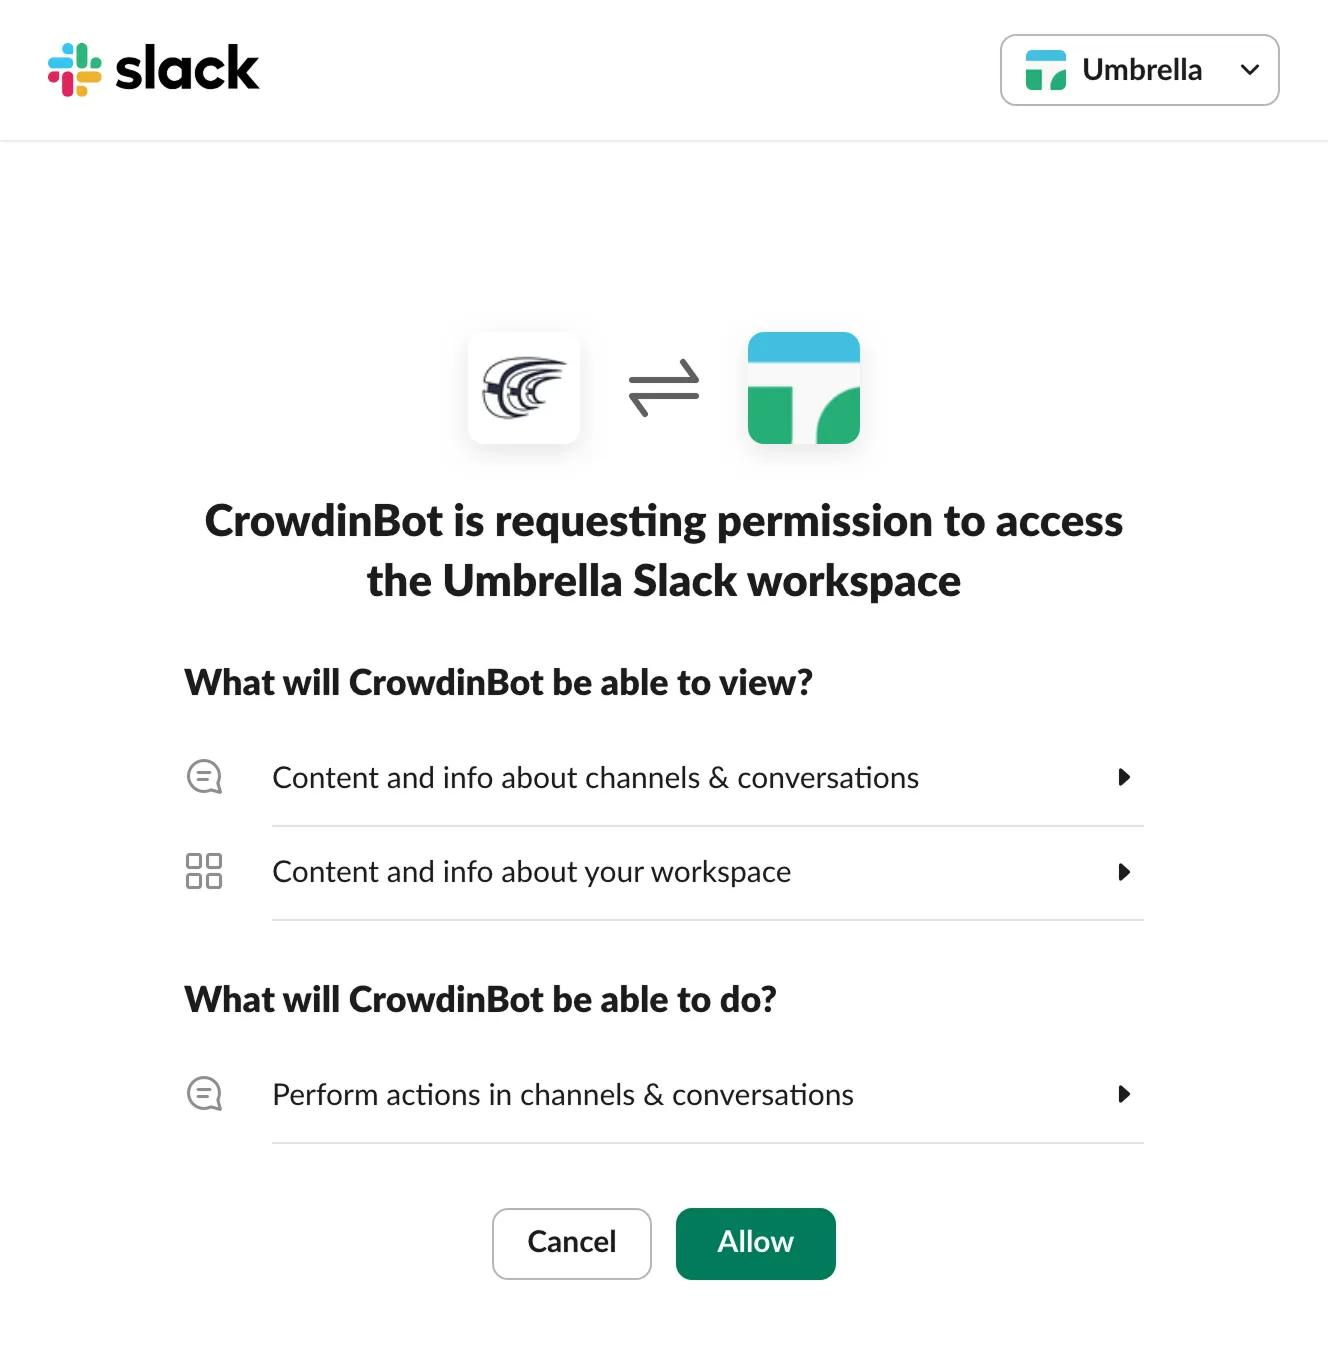
- Select Slack, then click Connect.
- Authorize the connection with Crowdin on the Slack side.
- Go back to Crowdin and select the notifications you want to receive in Slack.
Read More about Global Notification Settings.
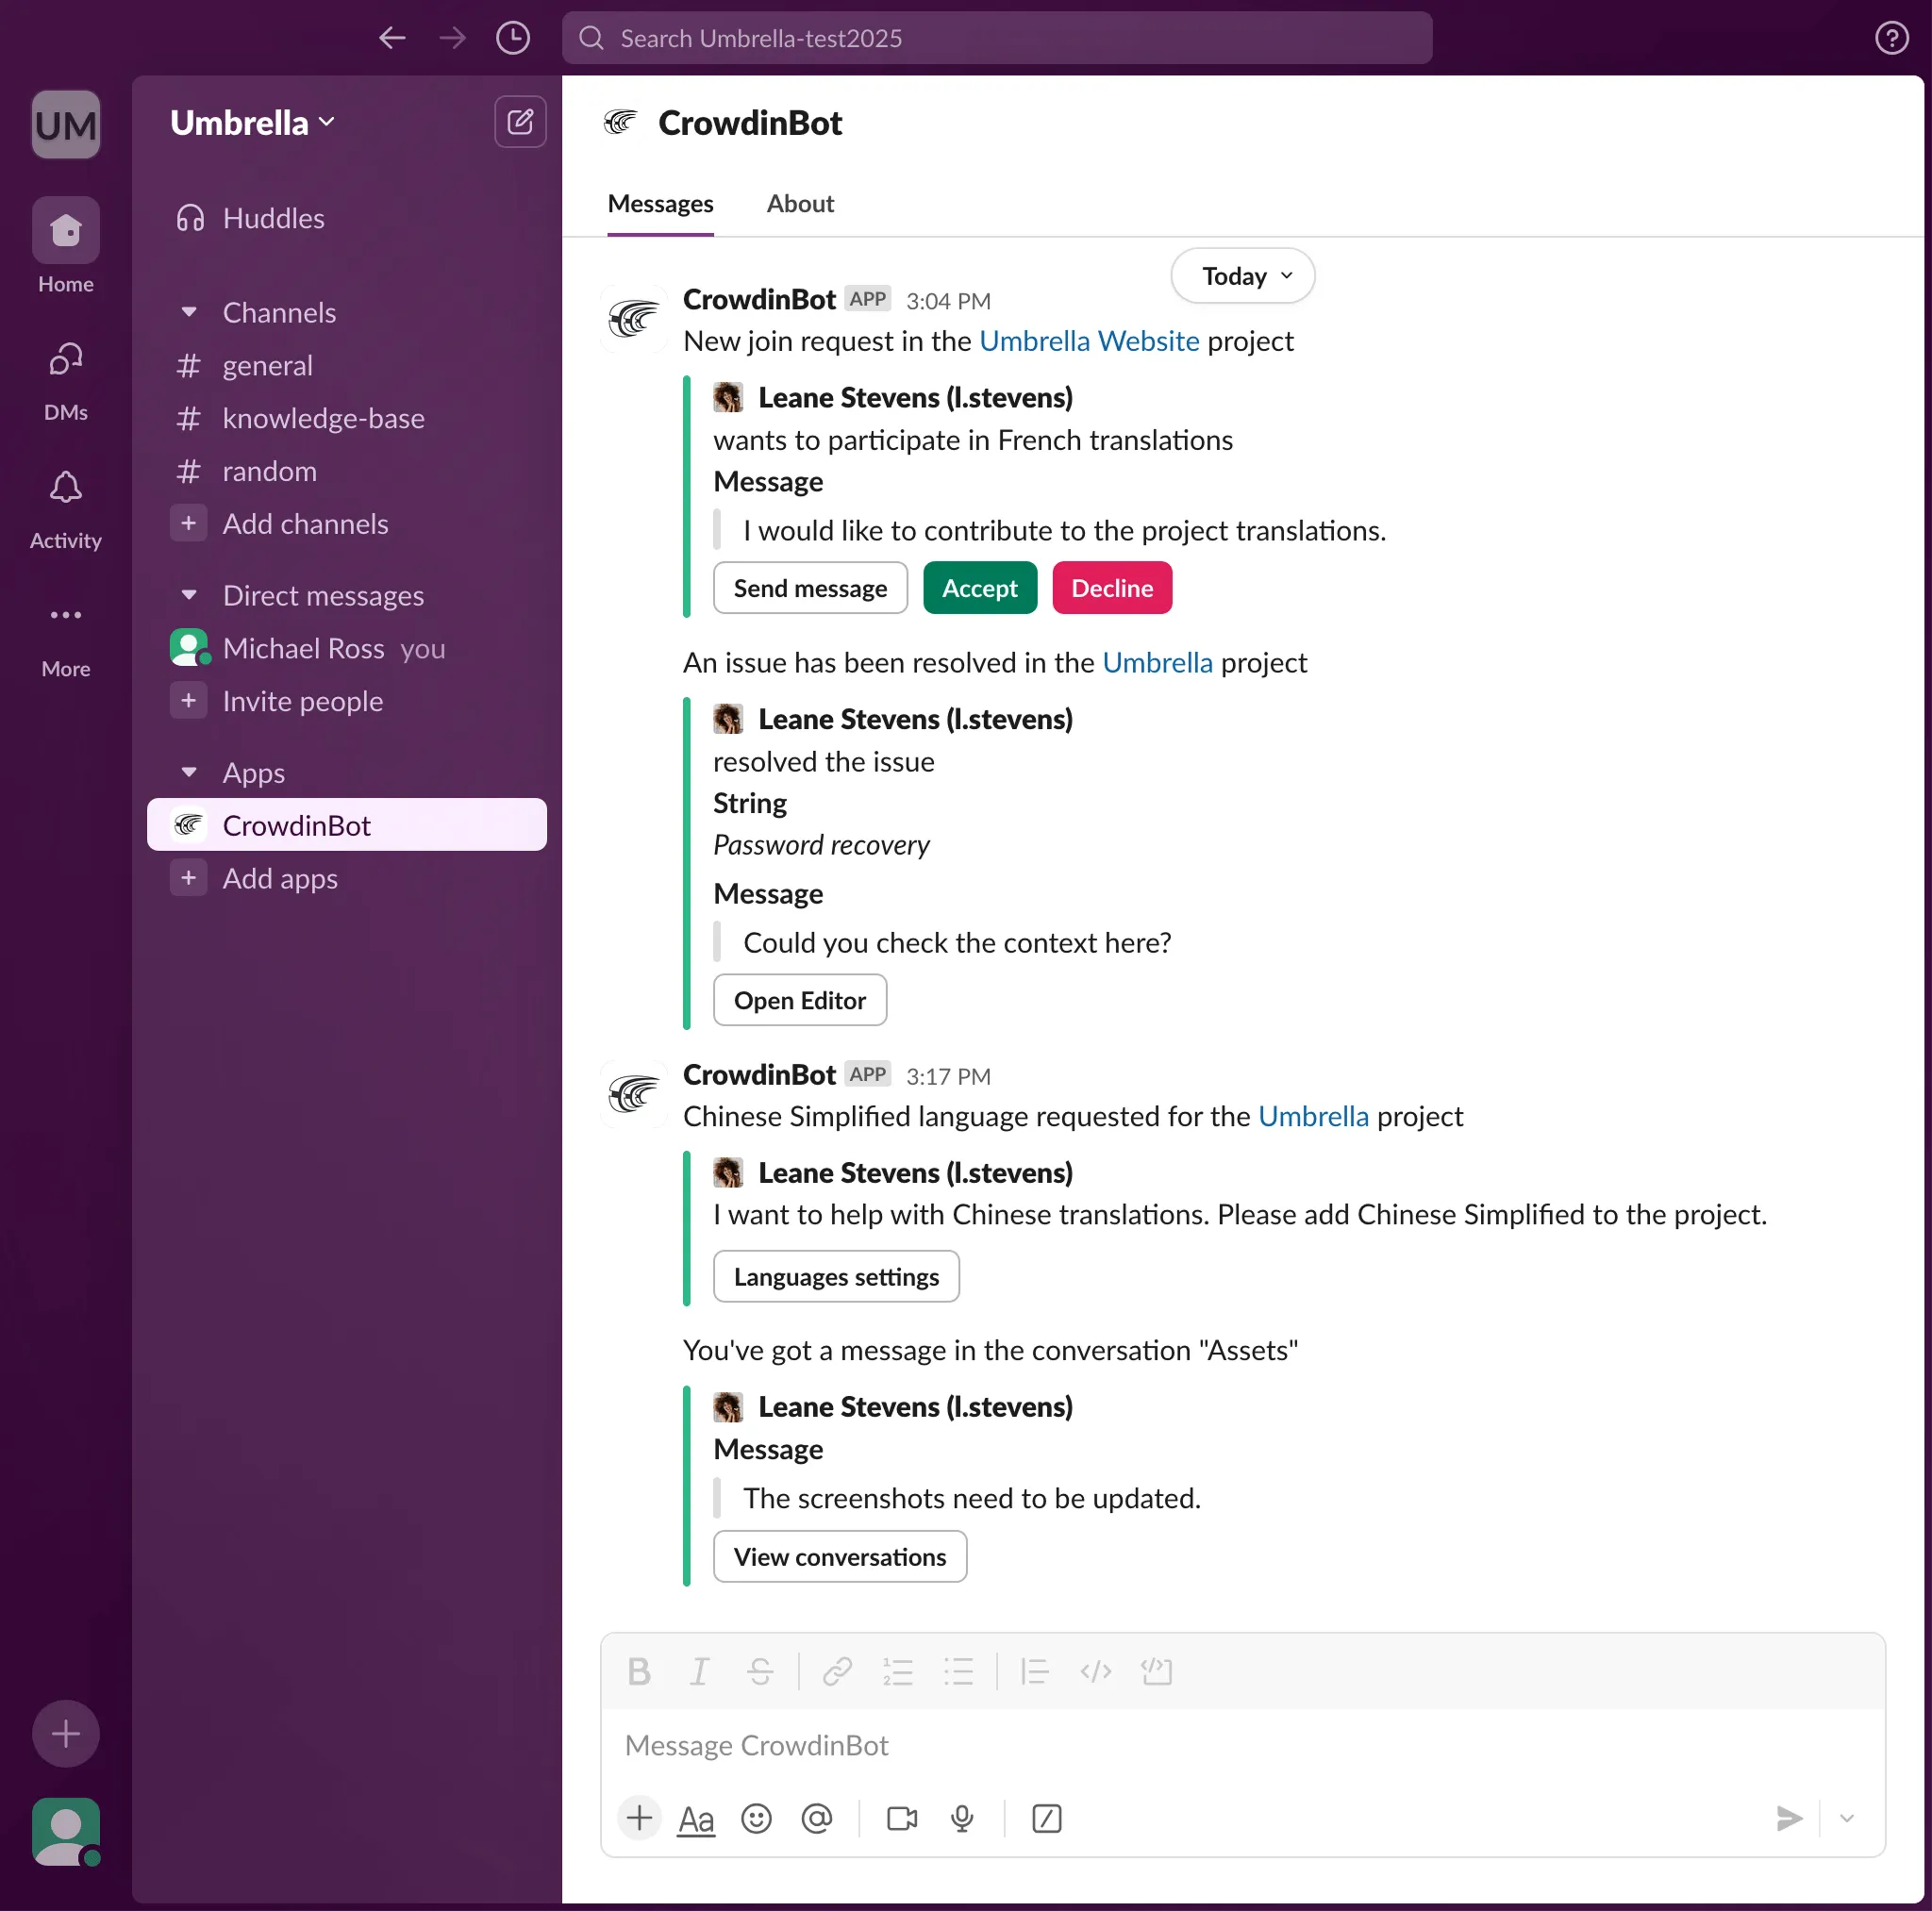
You will receive the selected types of notifications as direct messages from the Crowdin bot.
You can disable notifications and disconnect Slack from Crowdin Enterprise anytime.
Custom Notifications notify and help you collect information about the new events that happen in Crowdin Enterprise. Once you configure custom notifications for your account, Crowdin Enterprise will start sending POST requests with data to the custom notification URL via HTTP.
You can configure custom notifications to build integrations with the services or with your backend. For example:
- Set up custom notifications to send notifications to the system you use.
- Pass information to the third-party services with the specific request requirements (e.g., сontent type, headers, payload).
- Create custom integrations with Crowdin Enterprise.
To configure custom notifications in Crowdin Enterprise, follow these steps:
- Open your Account Settings and select Notifications on the left sidebar.
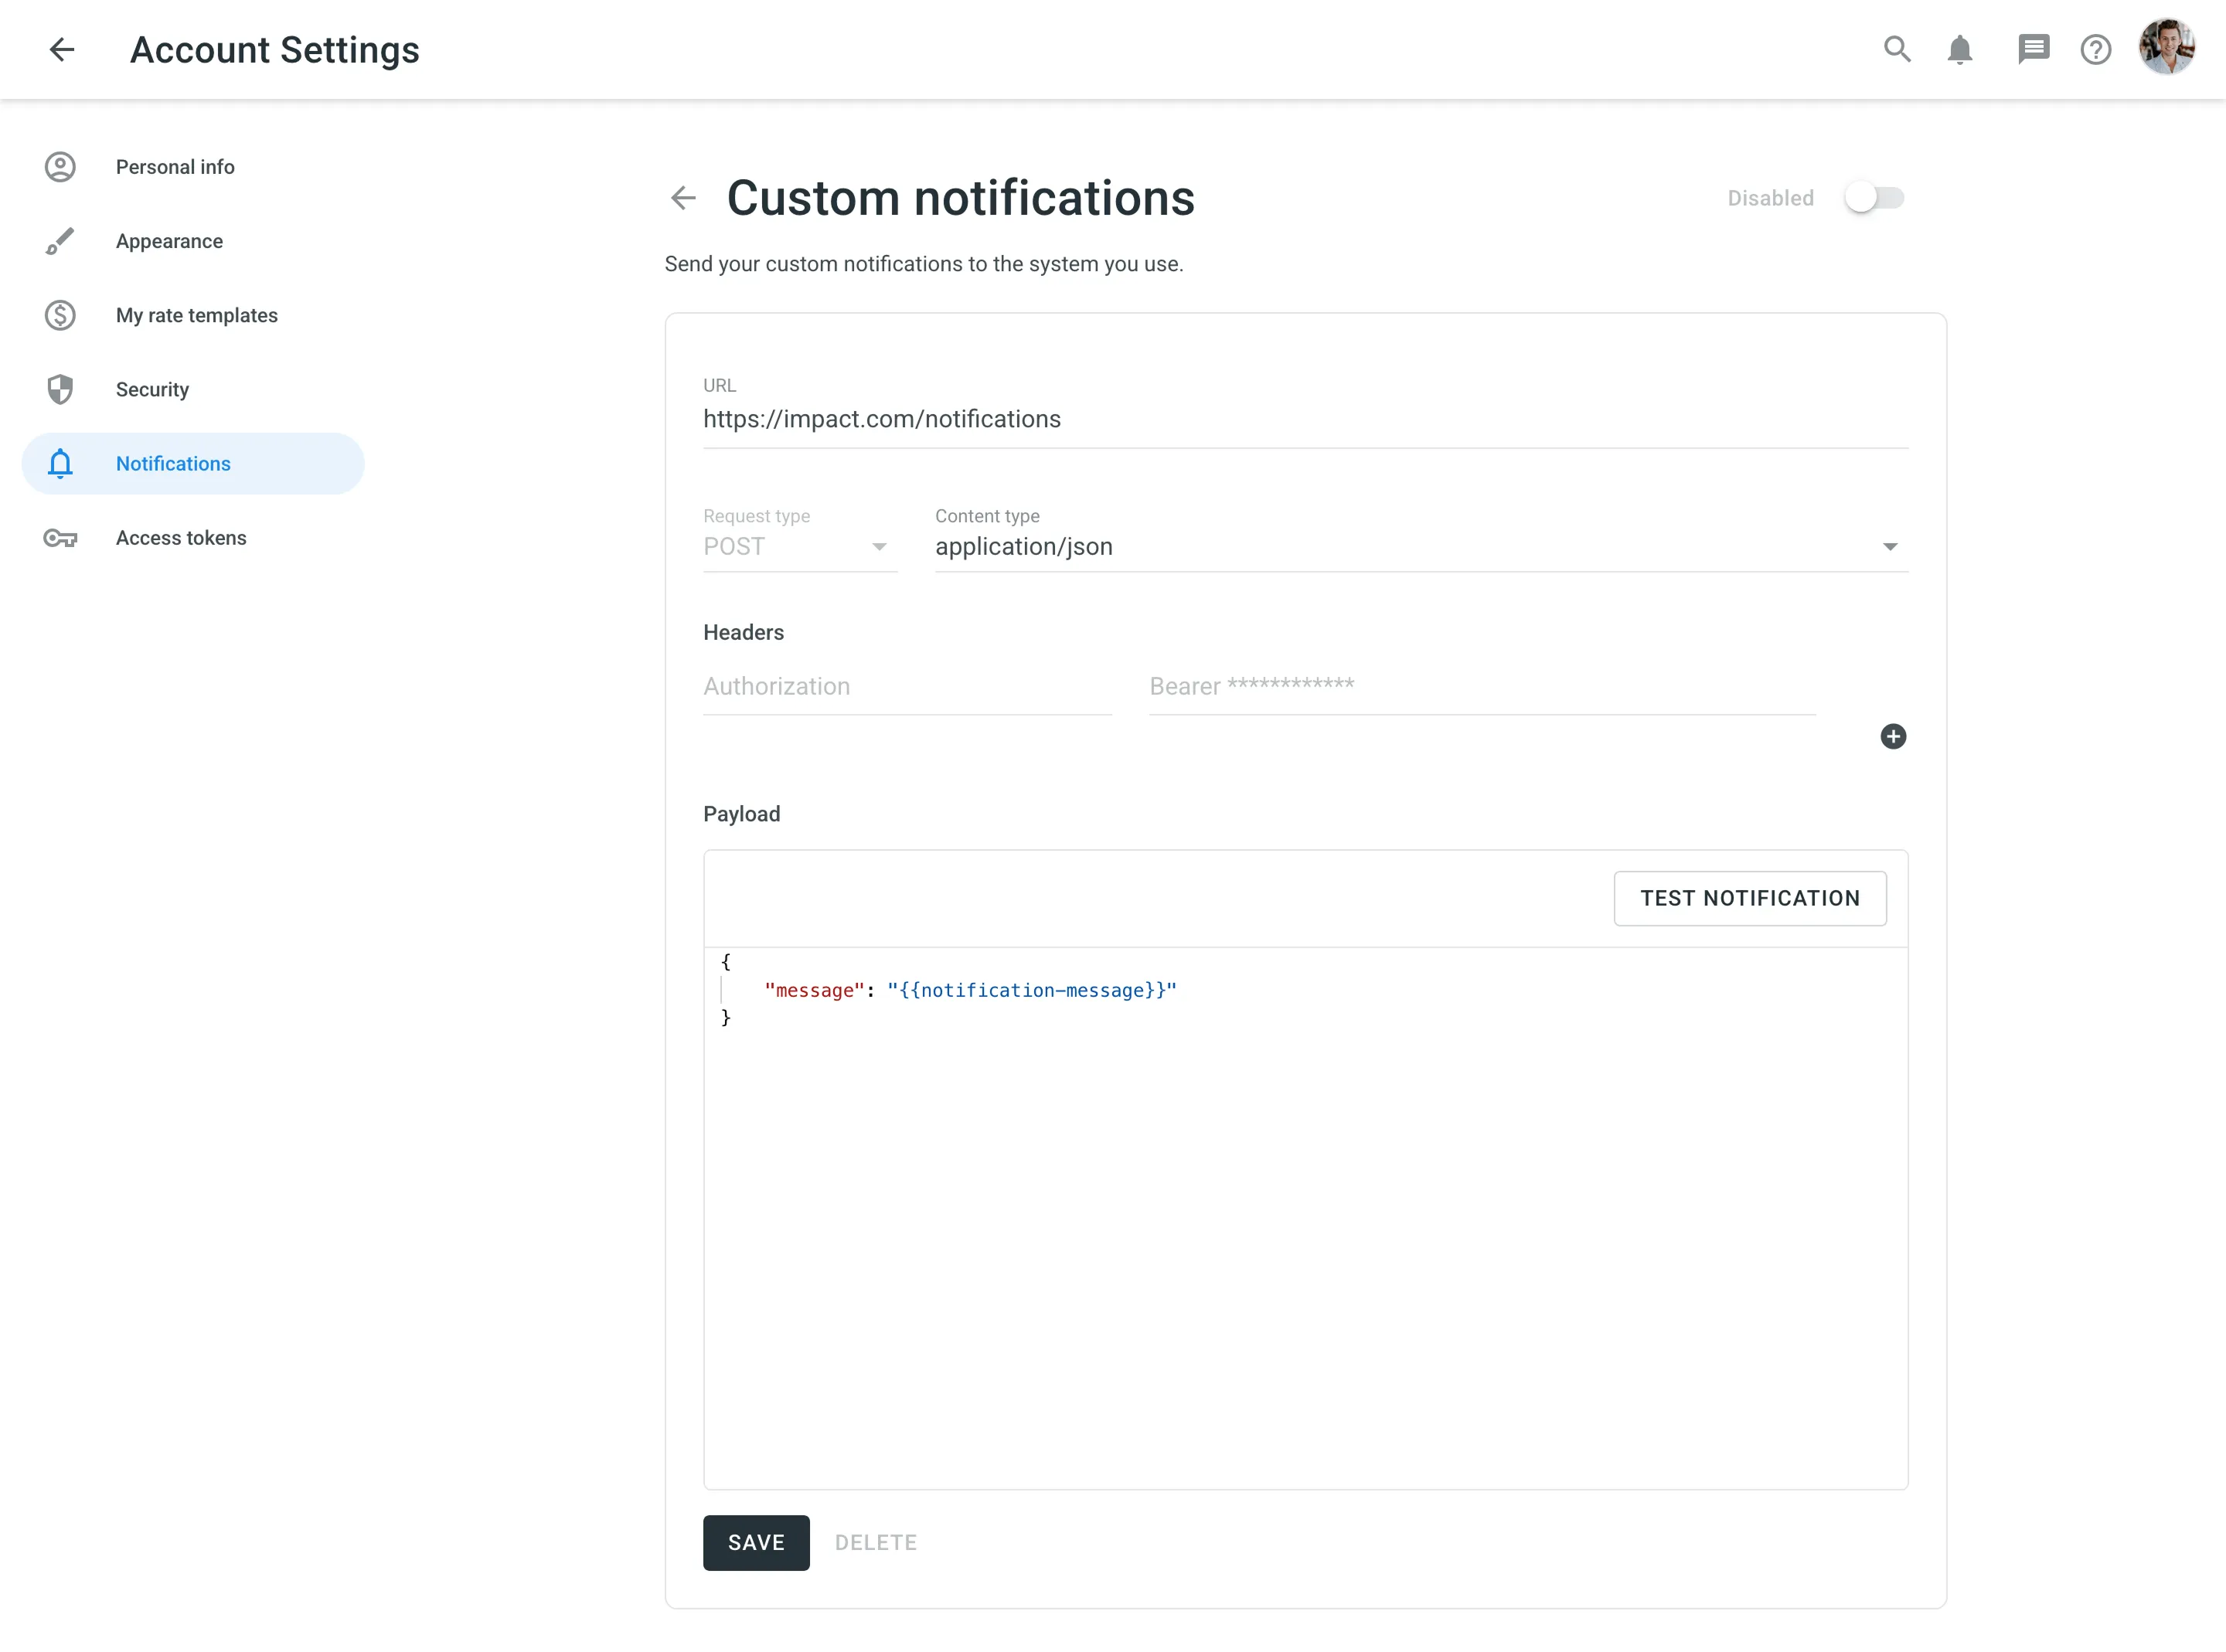
- Click Custom notifications to start configuring your custom notifications.
You will need to provide the following information to set up custom notifications:
- The URL where the callback should be sent.
- The content type for the POST request method (
multipart/form-data,application/json, orapplication/x-www-form-urlencoded).
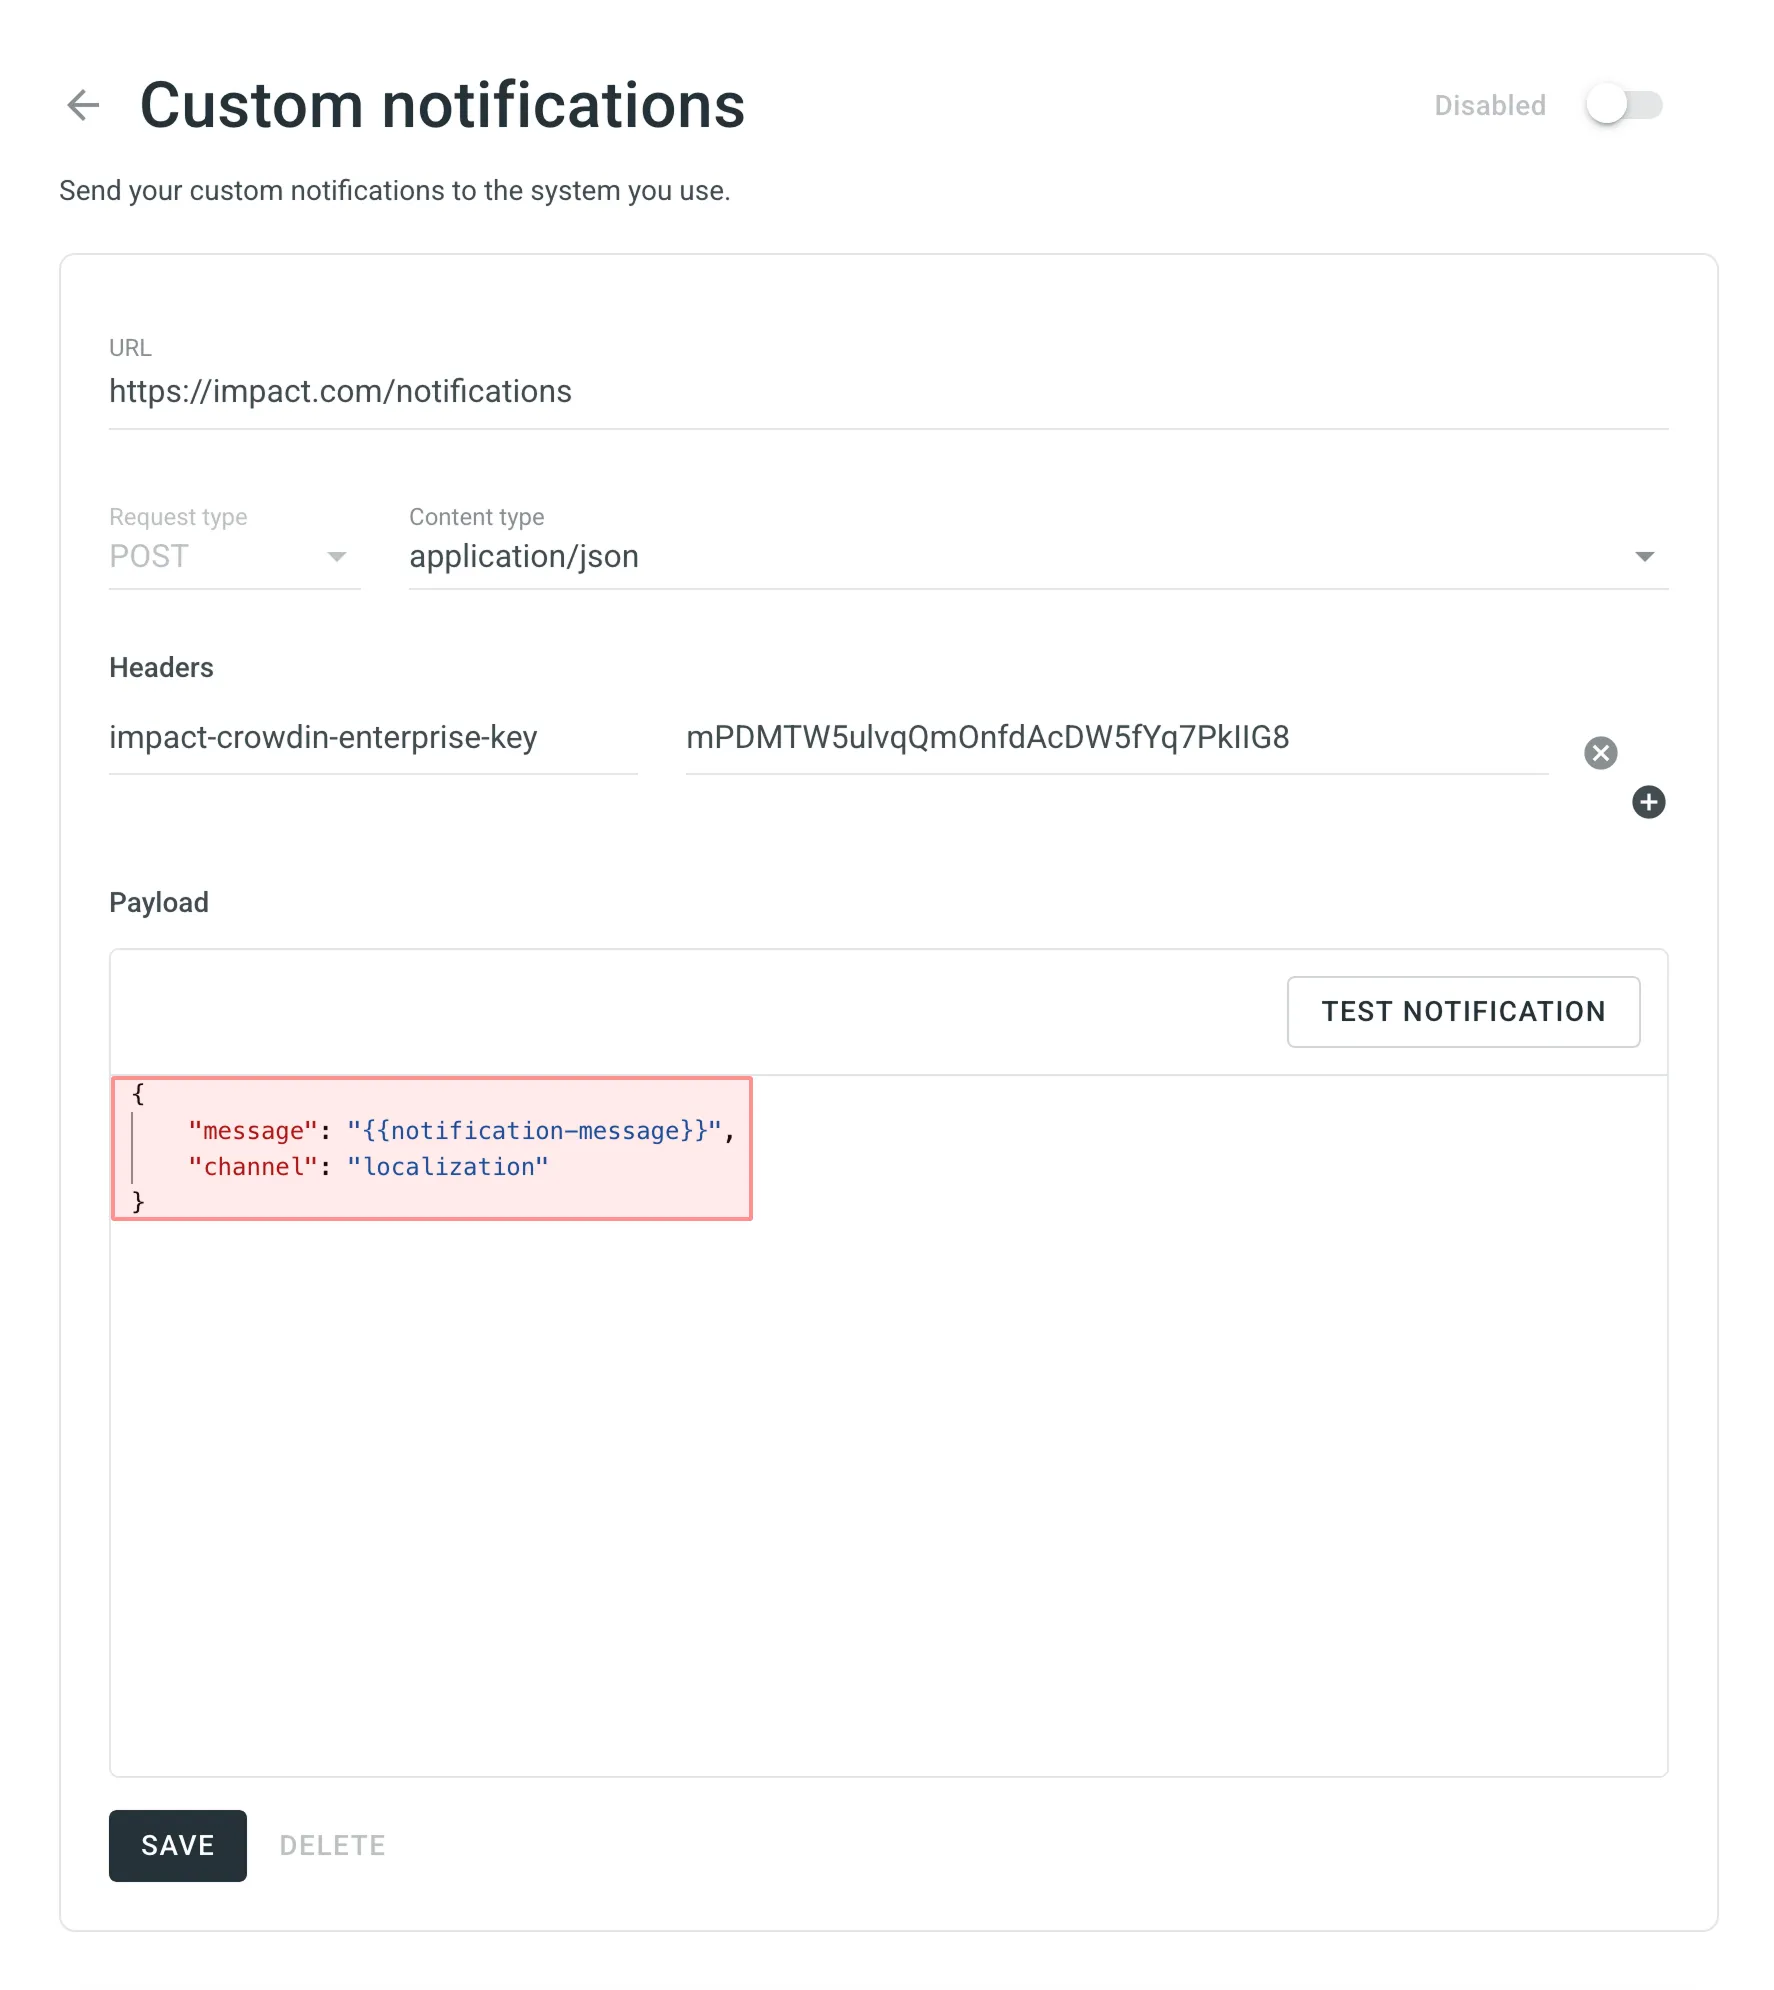
Optionally, you can add special headers to your custom notifications. They can be used for additional security, as an authorization method, and more. For example, if you add headers, your custom notification endpoint can verify them and ensure that information is coming from Crowdin Enterprise.
When configuring custom notifications, click Test notification to see how your application will react to that call. Once finished with the configuration, click Save.
Depending on your approach to custom notifications management, you might need to add dedicated Crowdin Enterprise IP addresses to your firewall to allow Crowdin Enterprise to open the pre-configured custom notification URLs.
Read more about IP Addresses.
You can modify the custom notification payload to add and organize the elements the way your system requires. To get informative and user-friendly notifications, make sure to include the {{notification-message}} placeholder in your payload.
Once you configured custom notifications, you can select the event types you’d like to receive the notifications about:
You can configure custom notifications for the following event types:
| Event type | Description |
|---|---|
| Users & Roles | Join requests, project invitations, project role updates. |
| Collaboration | Updates on collaboration between translation vendors and clients. |
| Integrations | Updates on integrations you set up. |
| New Strings | New strings added. |
| Language Progress | Translation or proofreading for a particular language is completed. |
| API-Integrated Vendors | Updates on collaboration with API-Integrated translation vendors. |
| Content Issues | All issue types created or resolved in the Editor. |
| Mentions | Updates on you being mentioned in the Editor. |
| Tasks | Created, deleted, and updated tasks, status changes, mentions and comments. |
| Messages | Private messages within Crowdin. |
| API Notifications | Notifications sent by apps, API integrations, and users via API. |
You can edit or delete custom notifications in the Custom notifications section of the Notifications page.
To set up Custom Notifications from Crowdin Enterprise in Discord, follow the steps below.
If you don’t have a Discord account already, you will need to create one.
Download and install the Discord desktop app. Alternatively, you may use the Discord web interface for further configurations.
To receive notifications in Discord, you need to create a webhook. Once finished, copy the webhook URL. You’ll need it for configurations on the Crowdin Enterprise side.
Read more about creating a Discord webhook.
- Go to Account Settings > Notifications.
- Click Custom notifications.
- In the appeared dialog, paste the Discord webhook URL in the URL field.
- Select application/json for the Content type.
- Paste the following payload in the Payload field:
{"content": "{{notification-message}}"}
- Click Test notification to receive a test message from Crowdin Enterprise to your Discord channel.
- Once finished with the configuration, click Save.
To set up Custom Notifications from Crowdin Enterprise in Google Chat, follow the steps below.
If you already have a Google account, it gives you access to many Google products, including Google Chat. If you don’t have a Google account, you will need to create one.
Download and install the Google Chat desktop app. Alternatively, you may use the Google Chat web interface for further configurations.
To receive notifications in Google Chat, you need to create a webhook. Once finished, copy the webhook URL. You’ll need it for configurations on the Crowdin Enterprise side.
Read more about creating a Google Chat webhook.
- Go to Account Settings > Notifications.
- Click Custom notifications.
- In the appeared dialog, paste the Google Chat webhook URL in the URL field.
- Select application/json for the Content type.
- Paste the following payload in the Payload field:
{"text": "{{notification-message}}"}
- Click Test notification to receive a test message from Crowdin Enterprise to your Google Chat channel.
- Once finished with the configuration, click Save.
To set up Custom Notifications from Crowdin Enterprise in Microsoft Teams, follow the steps below.
If you don’t have a Microsoft Teams account already, you will need to create one.
Download and install the Microsoft Teams desktop app. Alternatively, you may use the Microsoft Teams web interface for further configurations.
To receive notifications in Microsoft Teams, you need to create a webhook. Once finished, copy the webhook URL. You’ll need it for configurations on the Crowdin Enterprise side.
Read more about creating a Microsoft Teams webhook.
- Go to Account Settings > Notifications.
- Click Custom notifications.
- In the appeared dialog, paste the Microsoft Teams webhook URL in the URL field.
- Select application/json for the Content type.
- Paste the following payload in the Payload field:
{"text": "{{notification-message}}"}
- Click Test notification to receive a test message from Crowdin Enterprise to your Microsoft Teams channel.
- Once finished with the configuration, click Save.
Per-project notifications with the Microsoft Teams App
Section titled “Per-project notifications with the Microsoft Teams App”Custom notifications allow you to receive your account-specific notifications from Crowdin Enterprise. If you’d like to receive notifications related to some specific project you manage in Crowdin Enterprise, feel free to use our Microsoft Teams app.
To set up Custom Notifications from Crowdin Enterprise in Telegram, follow the steps below.
If you don’t have a Telegram account already, you will need to connect with a phone. Telegram uses your phone number as a primary credential which you’ll use to log into your account.
So firstly, download and install the Telegram app using Android or iOS. Once signed up, you may use the Telegram web interface with a PC or Mac to simplify further configurations, but this part is up to you.
To receive notifications in Telegram, you need to create a bot. Once finished, you will be provided with a bot’s API token. Make sure to save it; you’ll need it later.
Read more about creating a Telegram bot.
The next step is to create a public Telegram channel which will be used to get notifications from Crowdin Enterprise. Later you’ll be able to change the channel’s privacy if needed.
To create a Telegram channel, follow these steps:
- Open Telegram on your device.
- Click on the pen icon and select New Channel.
- Name your channel in the Channel name field.
- (Optional) Specify a channel description.
- (Optional) Click on the camera icon to set a display picture for your channel.
- Click Next in the top-right corner.
- Select Public channel type.
- Specify a permanent link for your channel. This link is what people would use to search and join your channel.
- Click Next in the top-right corner.
- (Optional) In this step, Telegram will ask you to add subscribers to your Telegram channel. Select contacts you’d like to add, including your new bot (provide your bot with Admin permissions). You can choose not to add any members for now since you’ll be able to do it later.
- Click Next in the top-right corner to continue and create your channel on Telegram.
- Go to Account Settings > Notifications.
- Click Custom notifications.
- In the appeared dialog, specify the URL in the following format:
https://api.telegram.org/bot{bot_API_token}/sendMessage. - Select application/json for the Content type.
- Paste the following payload in the Payload field:
where{"chat_id": "{public_chat_id}","text": "{{notification-message}}"}
{public_chat_id}– Your public chat id you specified for your channel link during the Telegram channel configuration. - Click Test notification to receive a test message from Crowdin Enterprise to your Telegram channel.
- Once finished with the configuration, click Save.
If you’d like to make your Telegram channel private and keep receiving notifications from Crowdin Enterprise, follow these steps:
- First of all you need to acquire your Telegram channel’s original chat id by visiting:
https://api.telegram.org/bot{bot_API_token}/sendMessage?chat_id={public_chat_id}&text=Test - You’ll get a response in a JSON format that will contain your Telegram channel’s original chat id.
- In Crowdin Enterprise, open your Account Settings and select Notifications on the left sidebar.
- Click Custom notifications.
- In the appeared dialog, modify the URL by replacing the chat id with the one received in the JSON response above.
- Click Save.
- In Telegram, open your channel.
- Click on your channel name and click Edit.
- Click Channel Type.
- Select Private and click Done.