Uploading Existing Translations
If you have existing translations ready to integrate into your Crowdin project, you can upload them directly.
For file-based projects, this can be done through the Translations tab or directly from a specific file in the Editor. For string-based projects, use the Upload tab or access the target language in the Editor to upload XLIFF translations.
The best practice is to upload translated files with the key-value structure.
To upload translations to your project, follow these steps:
- Open your project and go to the Translations tab.
- Click Upload existing translations to expand the respective section.
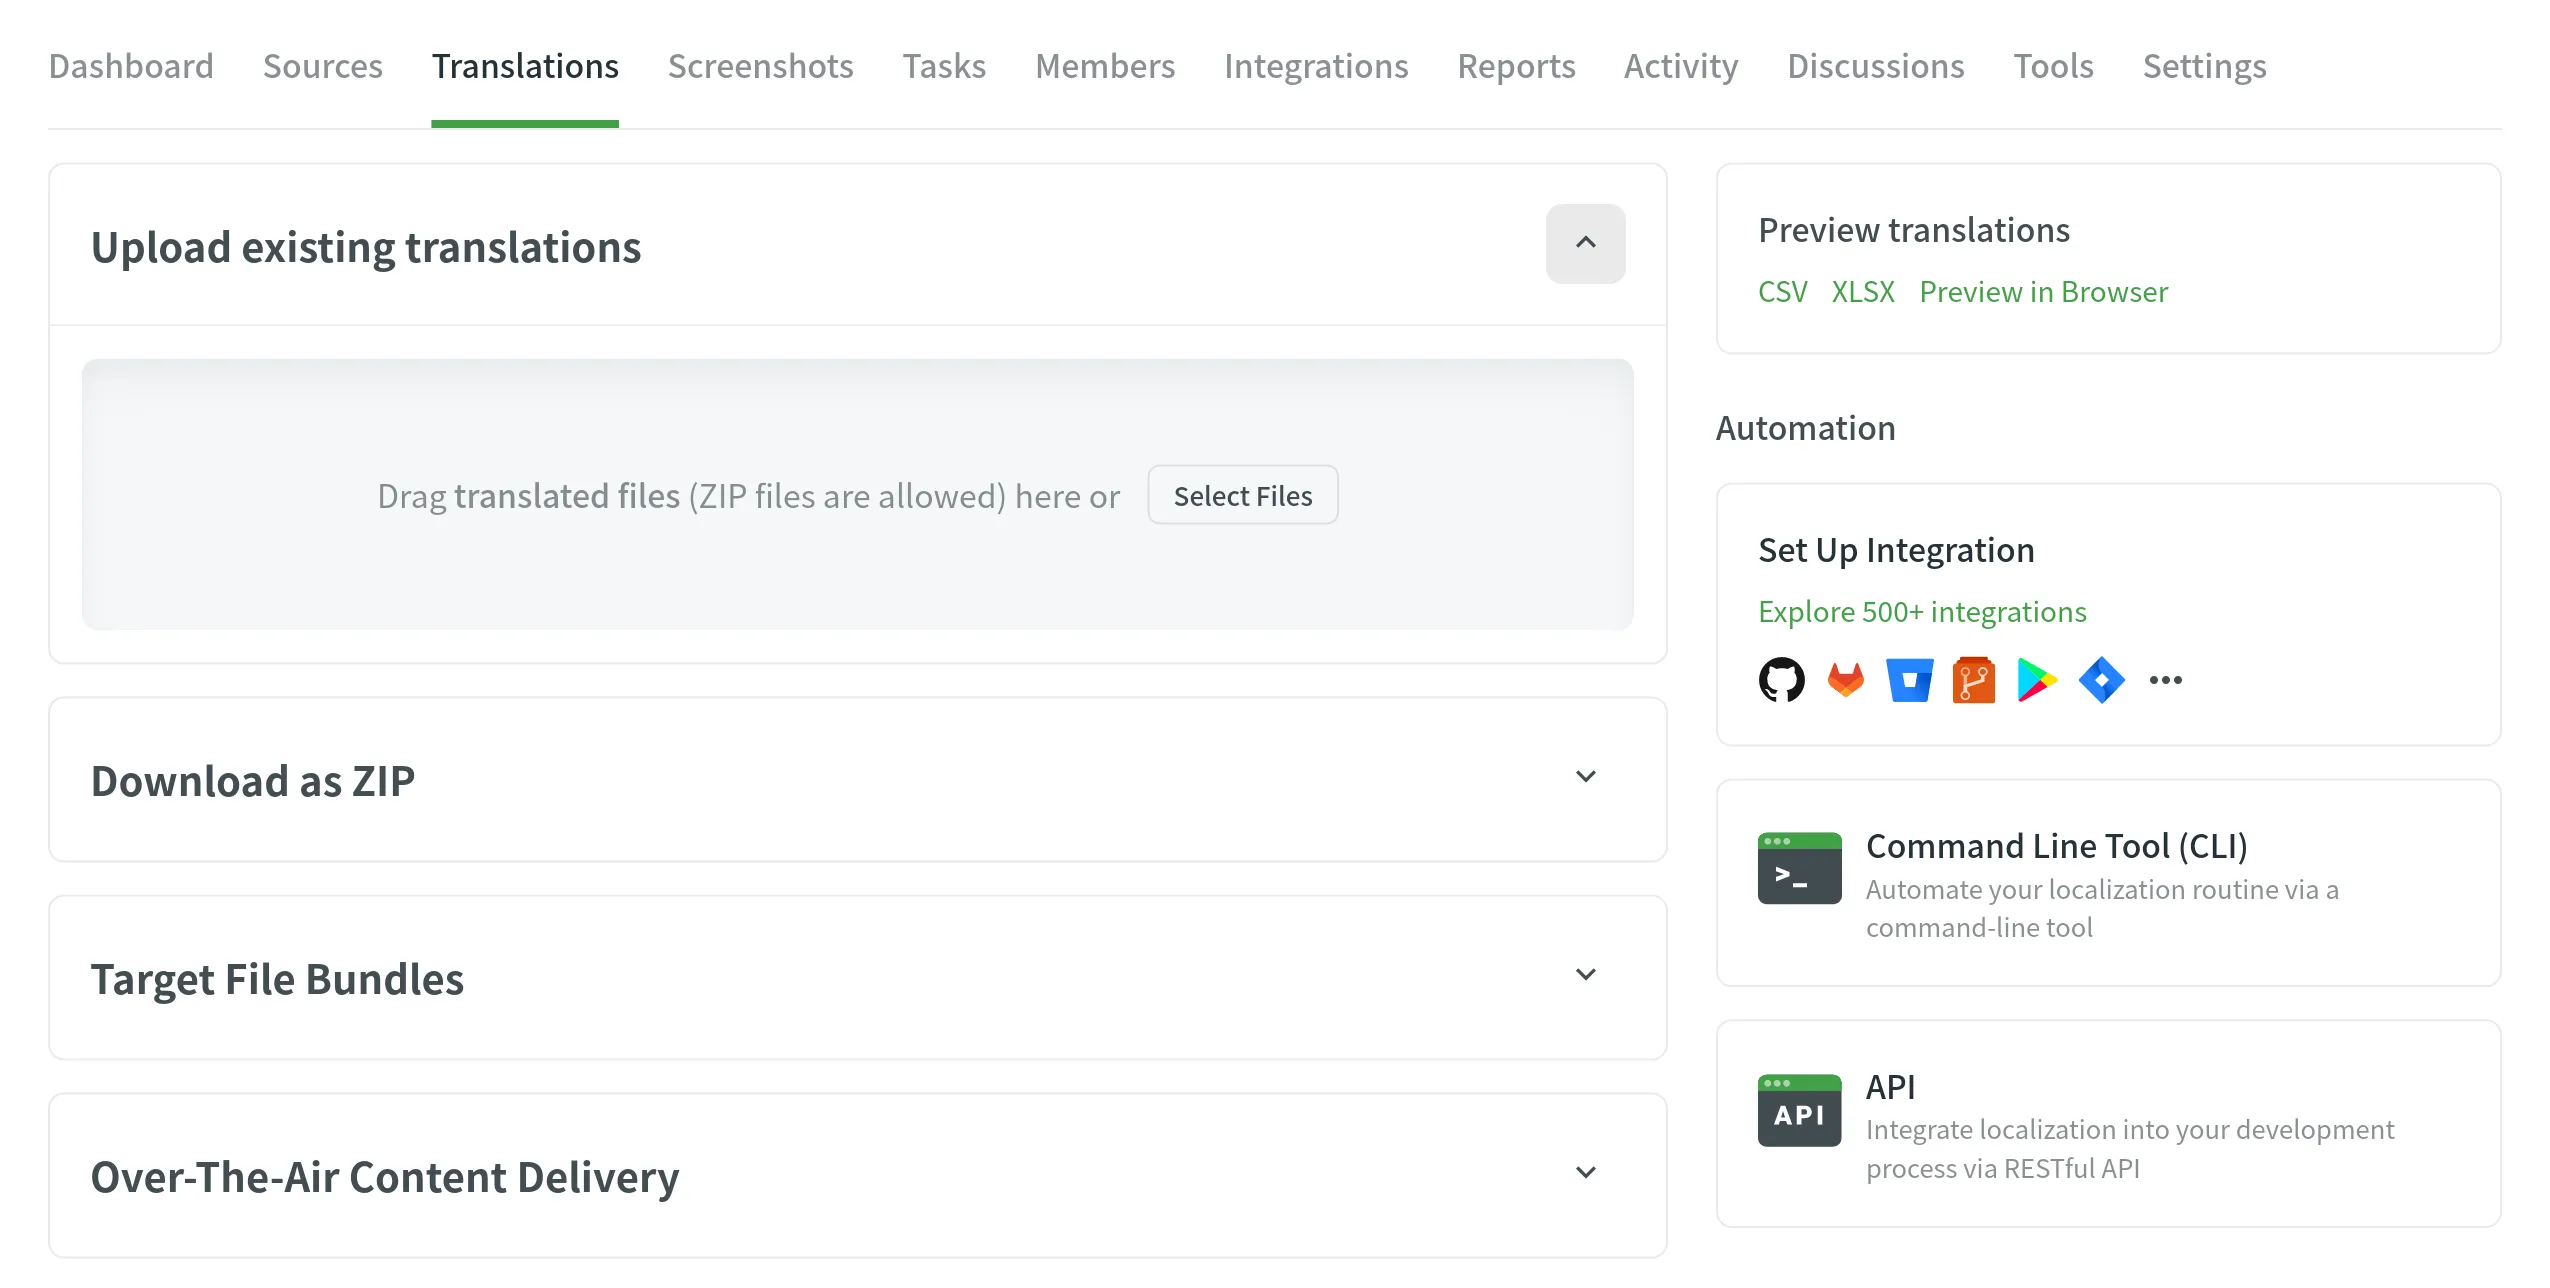
- Drag and drop files from your machine, or click Select Files. You can upload ZIP archives to add multiple folders and files.
- Crowdin automatically matches uploaded translations with appropriate source files and languages. Check it manually to make sure everything is matched correctly.
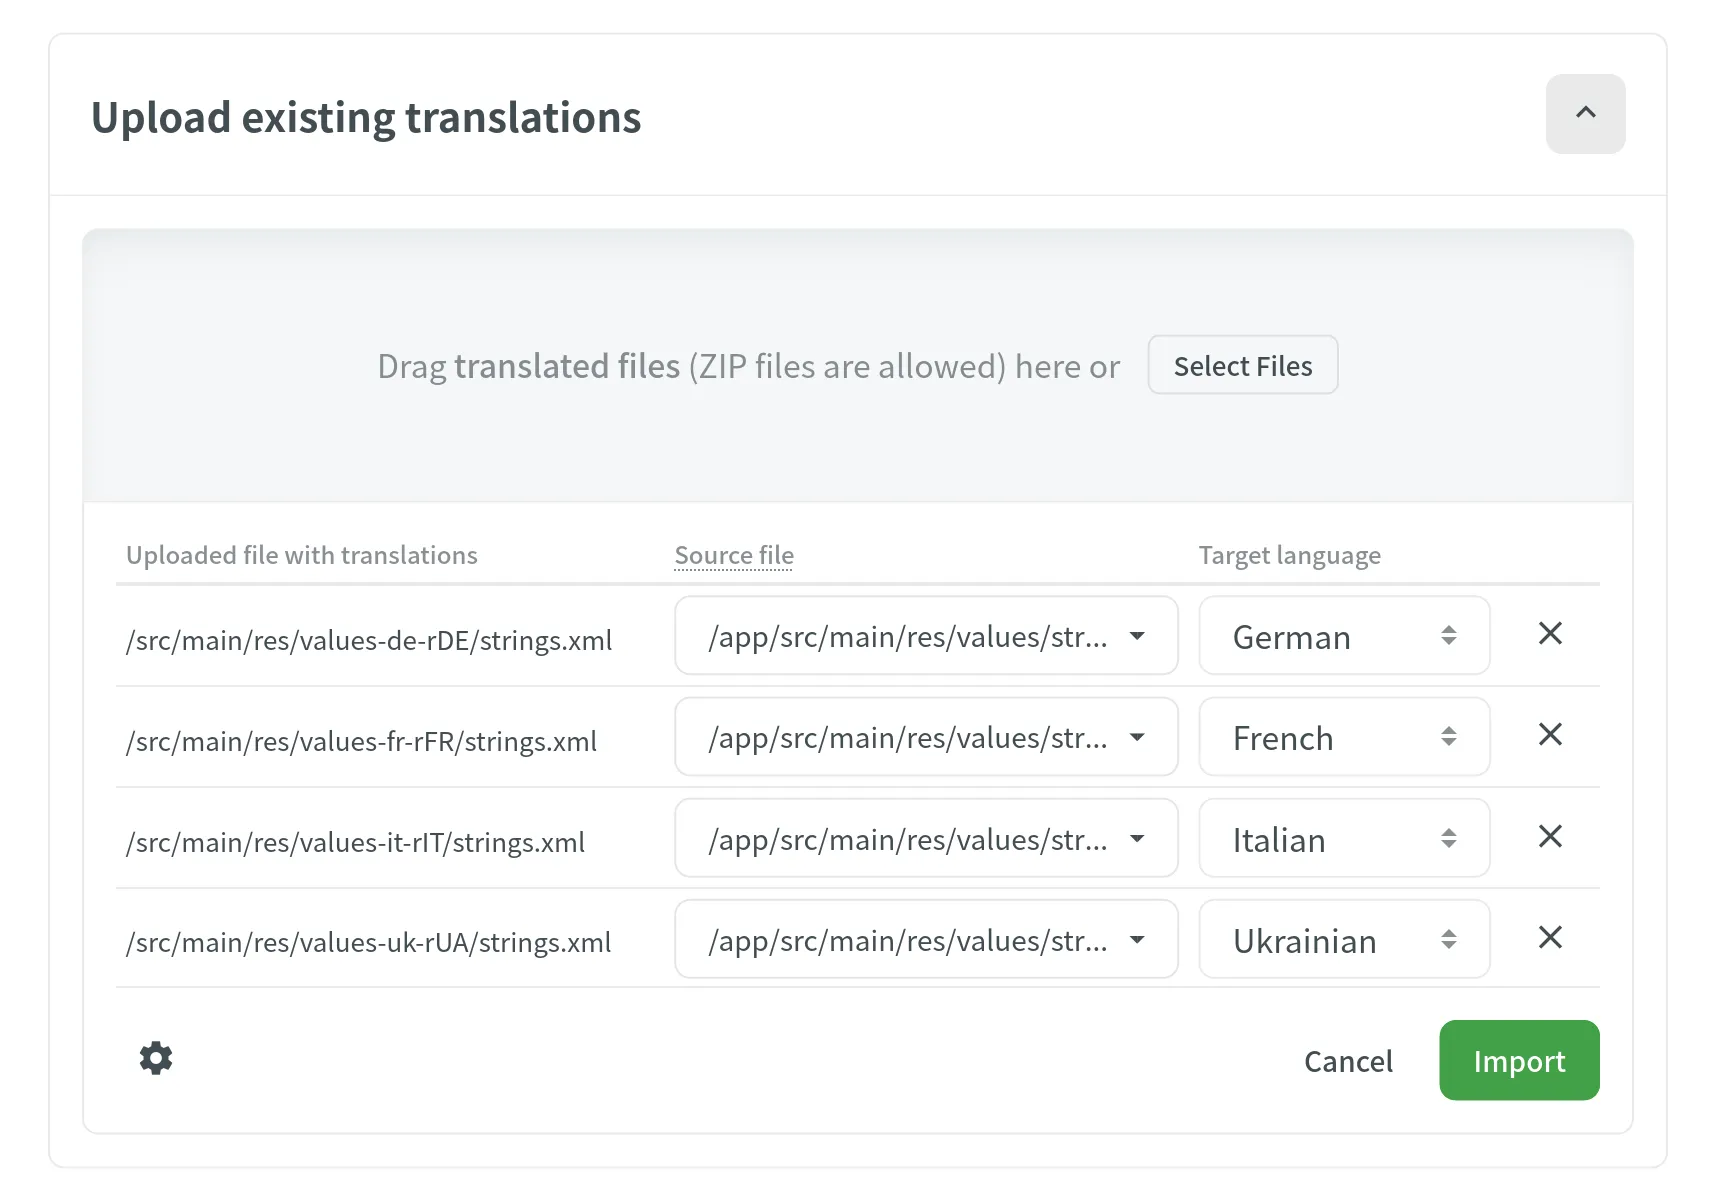
- (Optional) Click the button under the uploaded file list to view the advanced import settings.
- Click Import to apply the translations to the source files.
- Open your project and go to the Upload tab.
- Drag and drop files from your machine, or click Select Files. You can also upload ZIP archives if you want a set of files to be added.
- Crowdin automatically tries to detect the target language to which you’re uploading translations. Check it manually to make sure target languages are matched correctly towards translation files.
- (Optional) In the Translations section, to the right of the uploaded file list, configure advanced translation import settings.
- Click Upload to apply translations to the source strings.

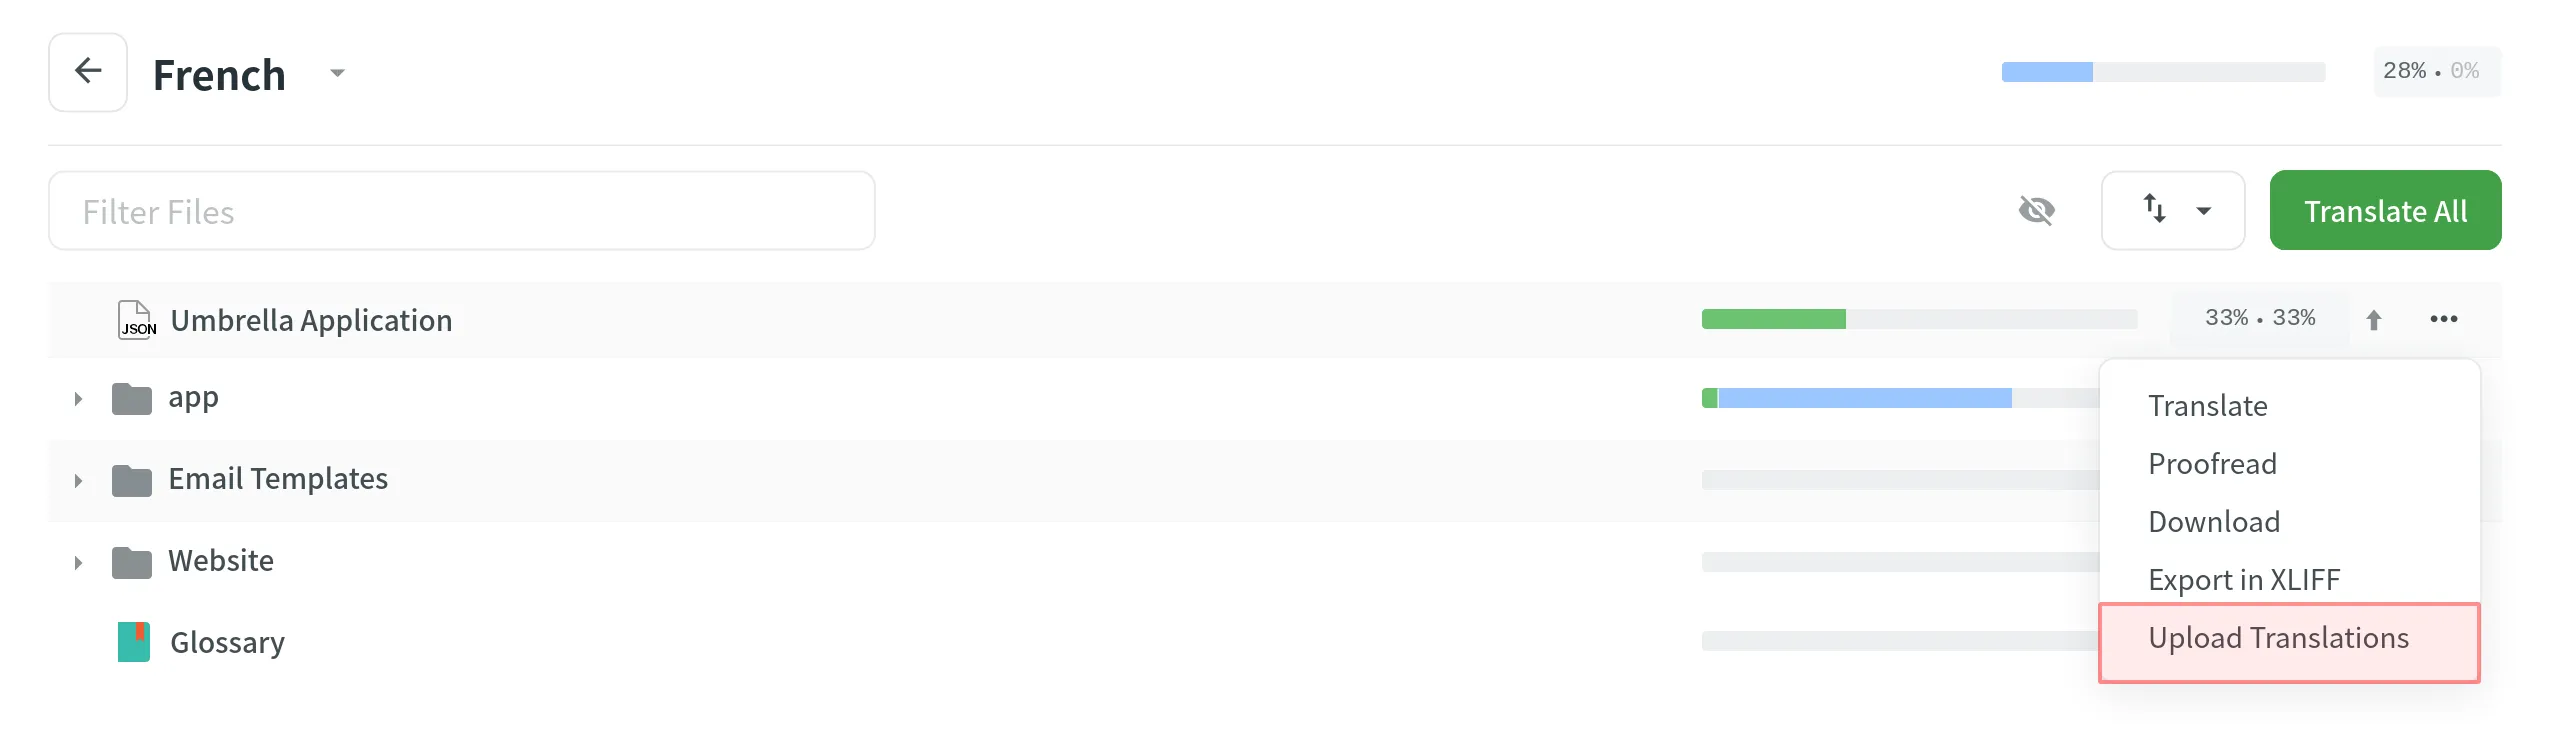
- Select the language on the project page.
- Click next to the file translations should be uploaded to.
- Select Upload Translations.
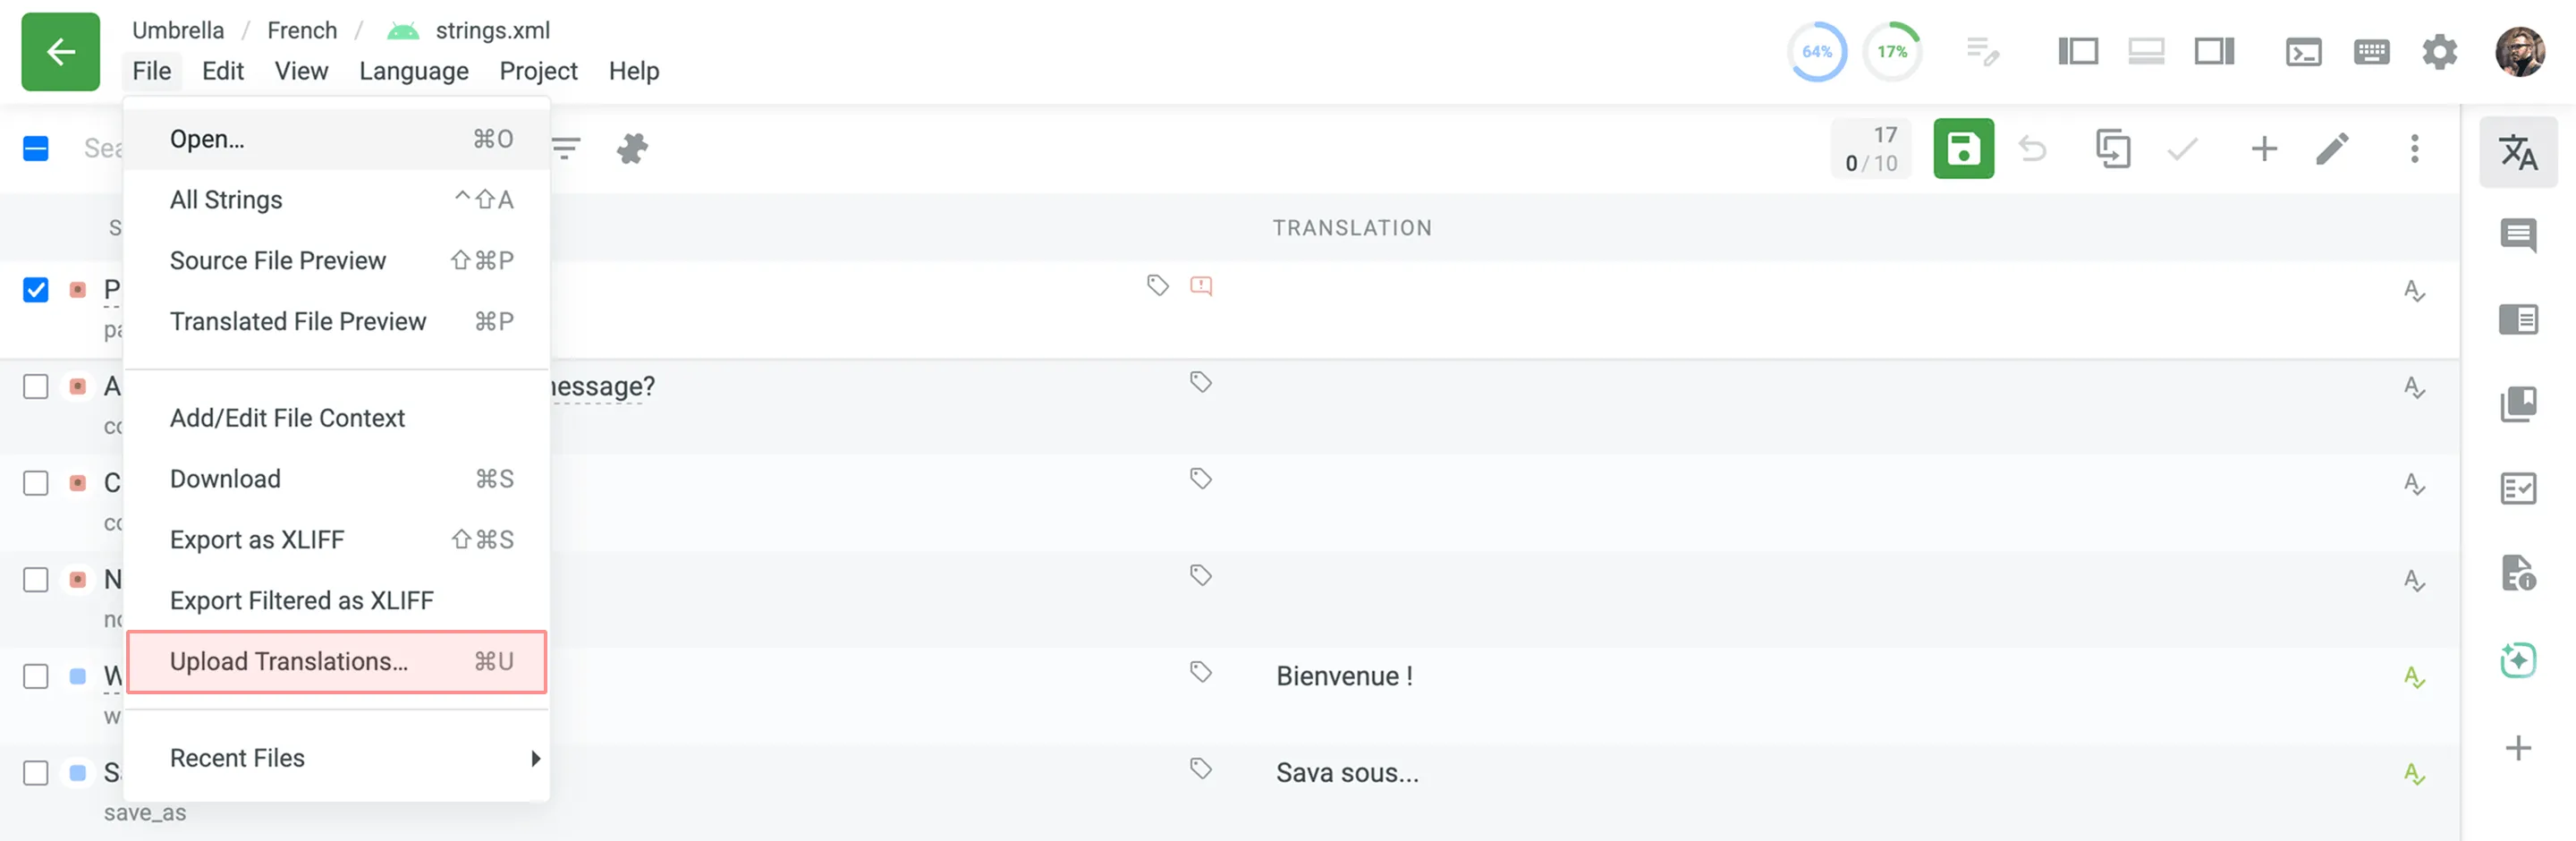
To upload a file with translations via Online Editor, go to File in the main menu, and select Upload Translations.
If you are in the Multilingual (Grid) mode of the Editor, click the drop-down arrow next to a target language’s column and select Upload Translations. 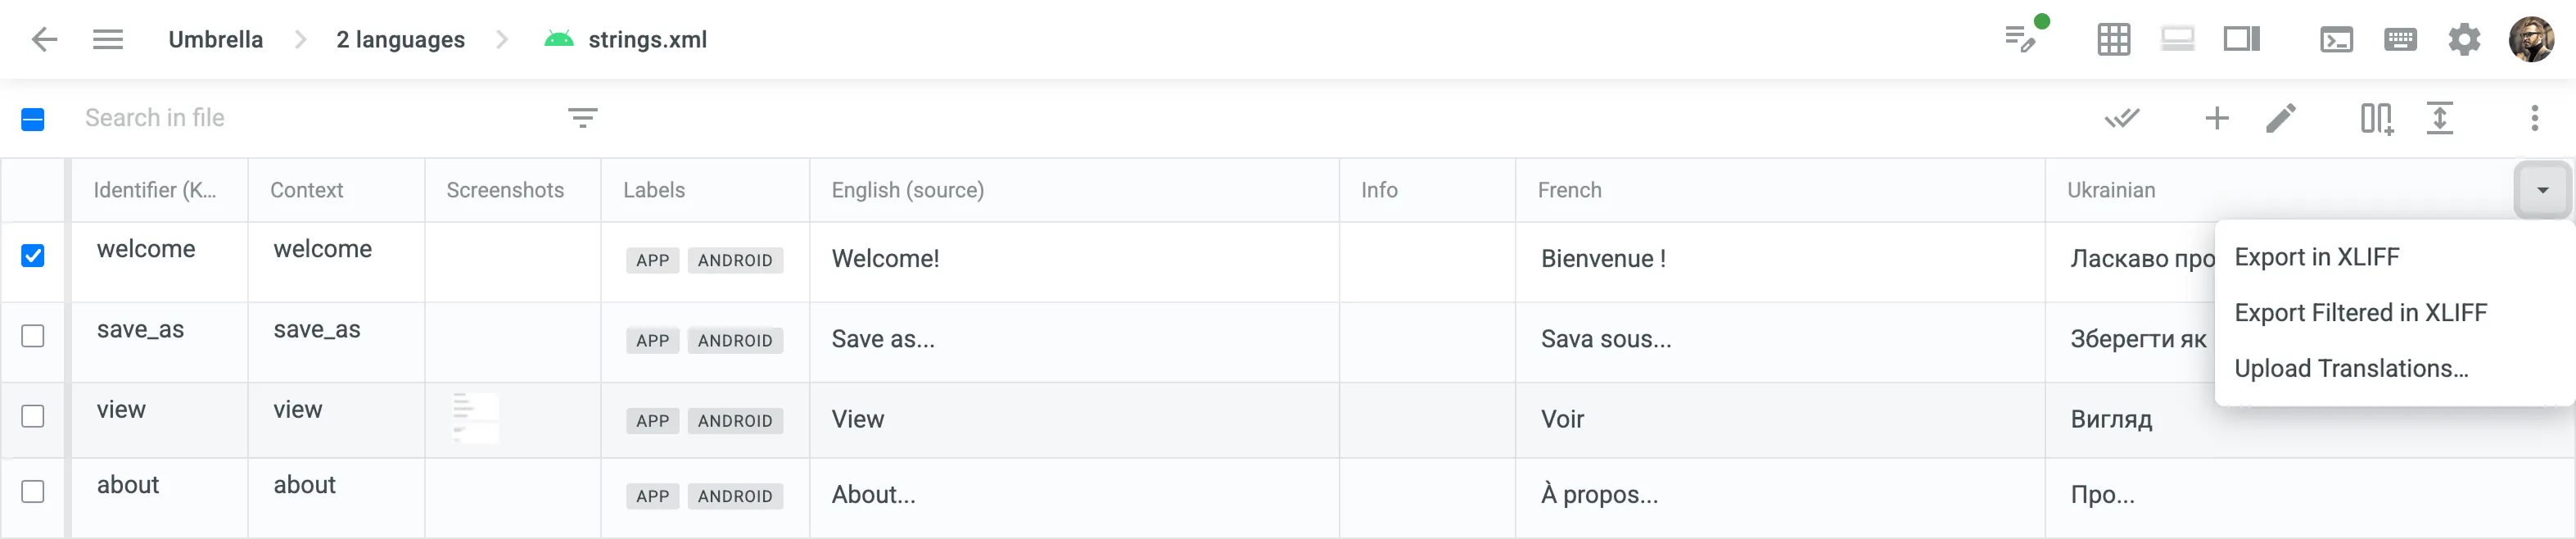
You can do the offline translation for all file formats and strings by downloading existing content in the XLIFF format; once the offline translations are finished, use Upload XLIFF Translations.
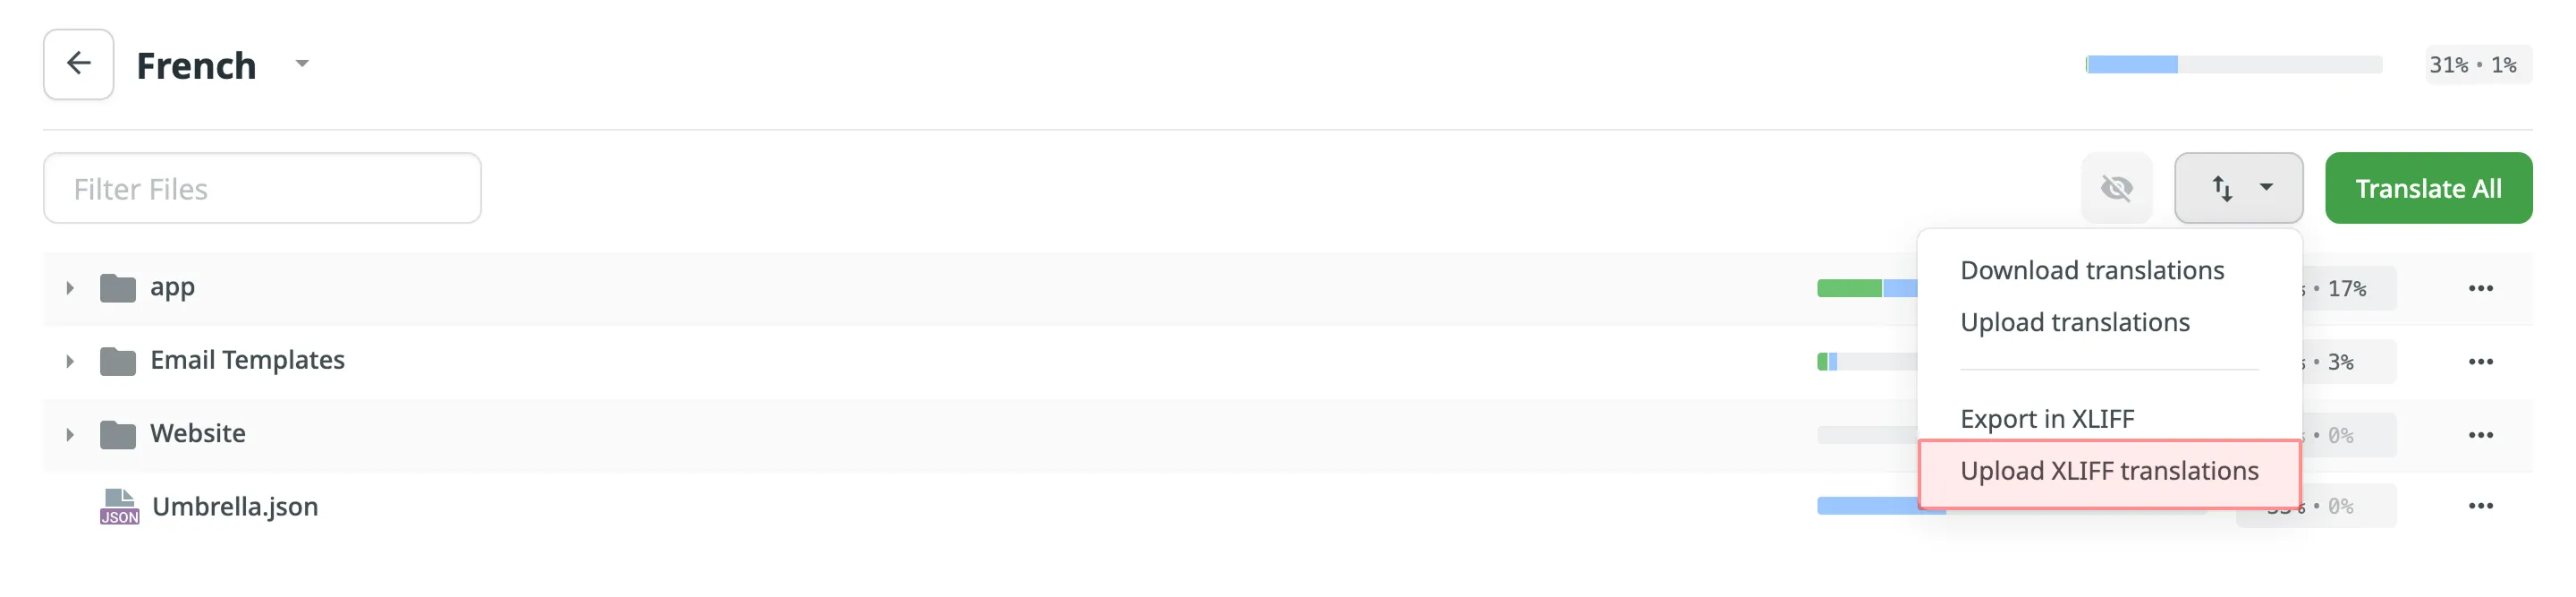
To upload XLIFF translations for a specific target language, follow these steps:
- Select the language on the project page.
- Click and select Upload XLIFF Translations.
For string-based projects, you can upload XLIFF translations using the Online Editor.
You can easily upload translations for source files with a key-value structure.
This includes the following file formats: Android XML, macOS/iOS Strings, Stringsdict, JSON, Chrome JSON, GO JSON, i18next JSON, FBT JSON, XLIFF, XLIFF 2.0, Java Properties, Play Properties, Java Properties XML, RESX, RESW, RES JSON, YAML, INI, Joomla INI, JS, FJS, PO, TS, QT TS, TOML, Coffee, XAML, SRT, VTT, VTT2, SBV, SVG, DTD, CSV, RC, WXL, Haml, XLSX, PLIST, PHP, ARB, VDF.
The system maps uploaded translations according to the string keys.
For files that do not have a defined structure, translation upload is handled by an experimental machine learning technology.
This includes the following file formats: HTML, Front Matter HTML, Markdown, Front Matter Markdown, TXT, Generic XML, Web XML, DOCX, HAML, IDML, DITA, Wiki, and ADOC.
To achieve the best results, we recommend uploading translation files with the same or as close as possible file structure as in source files.
Currently, this feature is available for the following languages (not depending on the language pair combination): Arabic, Chinese Simplified, Chinese Traditional, English, French, German, Italian, Japanese, Korean, Dutch, Polish, Portuguese, Portuguese Brazilian, Spanish, Thai, Turkish, and Russian.
After uploading a translation file, an initial summary appears showing the basic import statistics (e.g., Imported, Approved, Skipped).
Depending on where you upload the file, this initial summary will look slightly different:
- From the Translations tab: A pop-up notification will appear with a View Detailed Report button.
- From a language page or the Editor: A dialog window will appear with Close, View Detailed Report, and Reload buttons. Click Reload to update the translation progress displayed on the page.
Detailed Report (Import Translations Statistic)
Section titled “Detailed Report (Import Translations Statistic)”From the initial summary, click View Detailed Report to open the Import Translations Statistic dialog. This report provides a full breakdown of the import and is organized into three clickable tabs at the top:
- Translations added
- Translations approved
- Translations skipped
You can click on each tab to view details for the affected files and languages.
The Translations skipped tab provides a categorized breakdown of all translations that were not imported. Common reasons for skipped translations include:
- Translation equals source – The translation was identical to the source text.
- Hidden strings – The translations were for strings that are currently hidden in the project.
- QA check – The translation failed one or more quality assurance checks. The report will show a sub-list of the specific QA issue types (e.g., Duplicate translation, Numbers mismatch, etc.) based on the QA checks configured in Settings > QA Checks.
For advanced troubleshooting, click the Service Logs link in the top-right corner of the Import Translations Statistic dialog. This will redirect you to the Upload translations Log Details page (located in Tools > Service Logs), which displays the technical details of the import, including a message, date/time, and details in JSON format.