Gestione File
Here you can manually upload files for localization using various supported formats. Here you can manually upload files for localization using various supported formats. Qui puoi caricare manualmente i file per la localizzazione usando vari formati supportati.
If you want to configure an automatic files’ synchronization with your project, use the Integrations tab.
Priorità dei File
You can set a specific priority for each file by clicking an arrow icon next to the needed file. Then translators will be able to see files sorted according to their priority on the language page and in the Editor.
Files might have the following priorities:
 – low
– low – medio
 – high
Impostazioni File
To access the configurations of specific files, right-click on the necessary file or click ![]() next to it and then select Settings.
next to it and then select Settings.
Titolo come Mostrato ai Traduttori
Set more descriptive titles for the files to provide additional details for translators.
Nota: Il titolo del file è mostrato solo nell'UI di Crowdin Impresa e non rinomina il file reale.
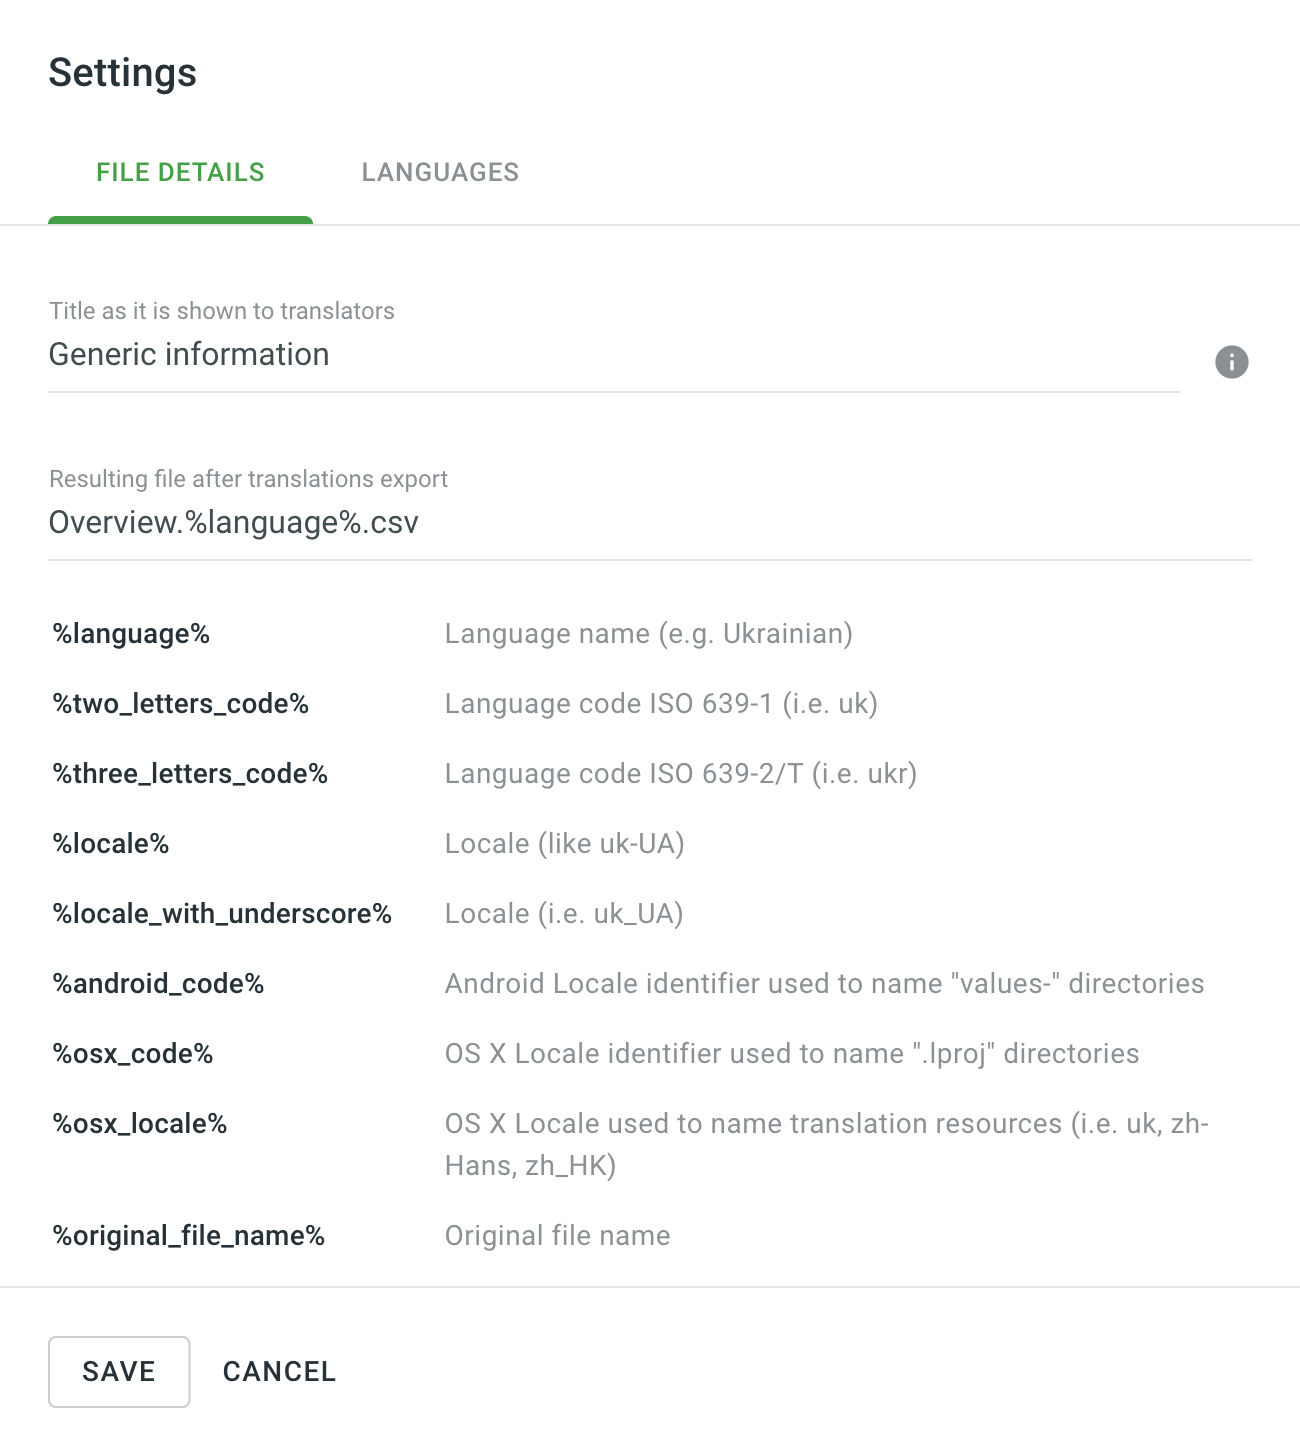
File Export
Define a file name or full path in the resulting archive, use the available placeholders to indicate the structure of exported content.
For example, you want the source file Overview.csv with Ukrainian translation to be named Overview.ukrainian.csv before integrating it with the application. In this case, you’d need to set the Resulting file after translations export to the following: Overview.%language%.csv.
By default, Crowdin Enterprise adds Crowdin language codes during the file export. To use custom ones for specific languages in the whole project, set up Language Mapping.
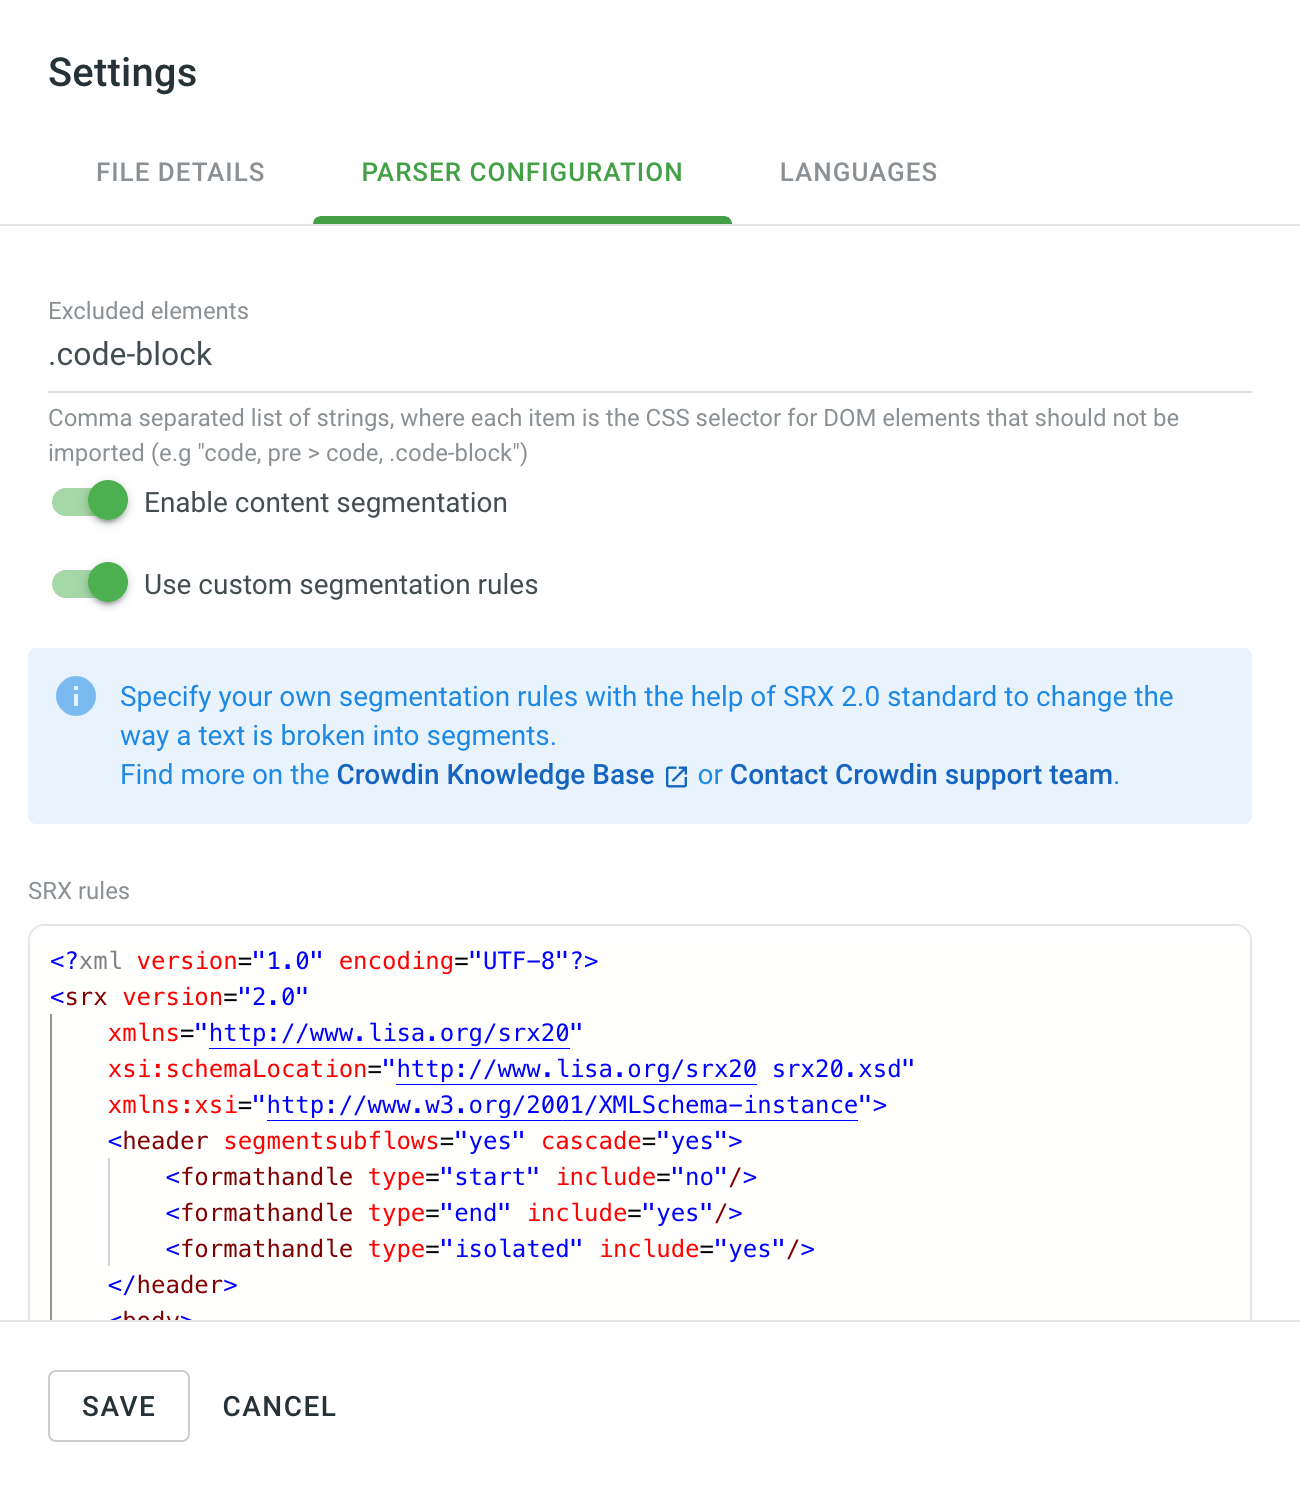
Parser Configuration
Some file formats allow you to configure import and export behavior. In this case, file’s Settings dialog will also contain the Parser configuration tab.
Read more about Parser configuration.
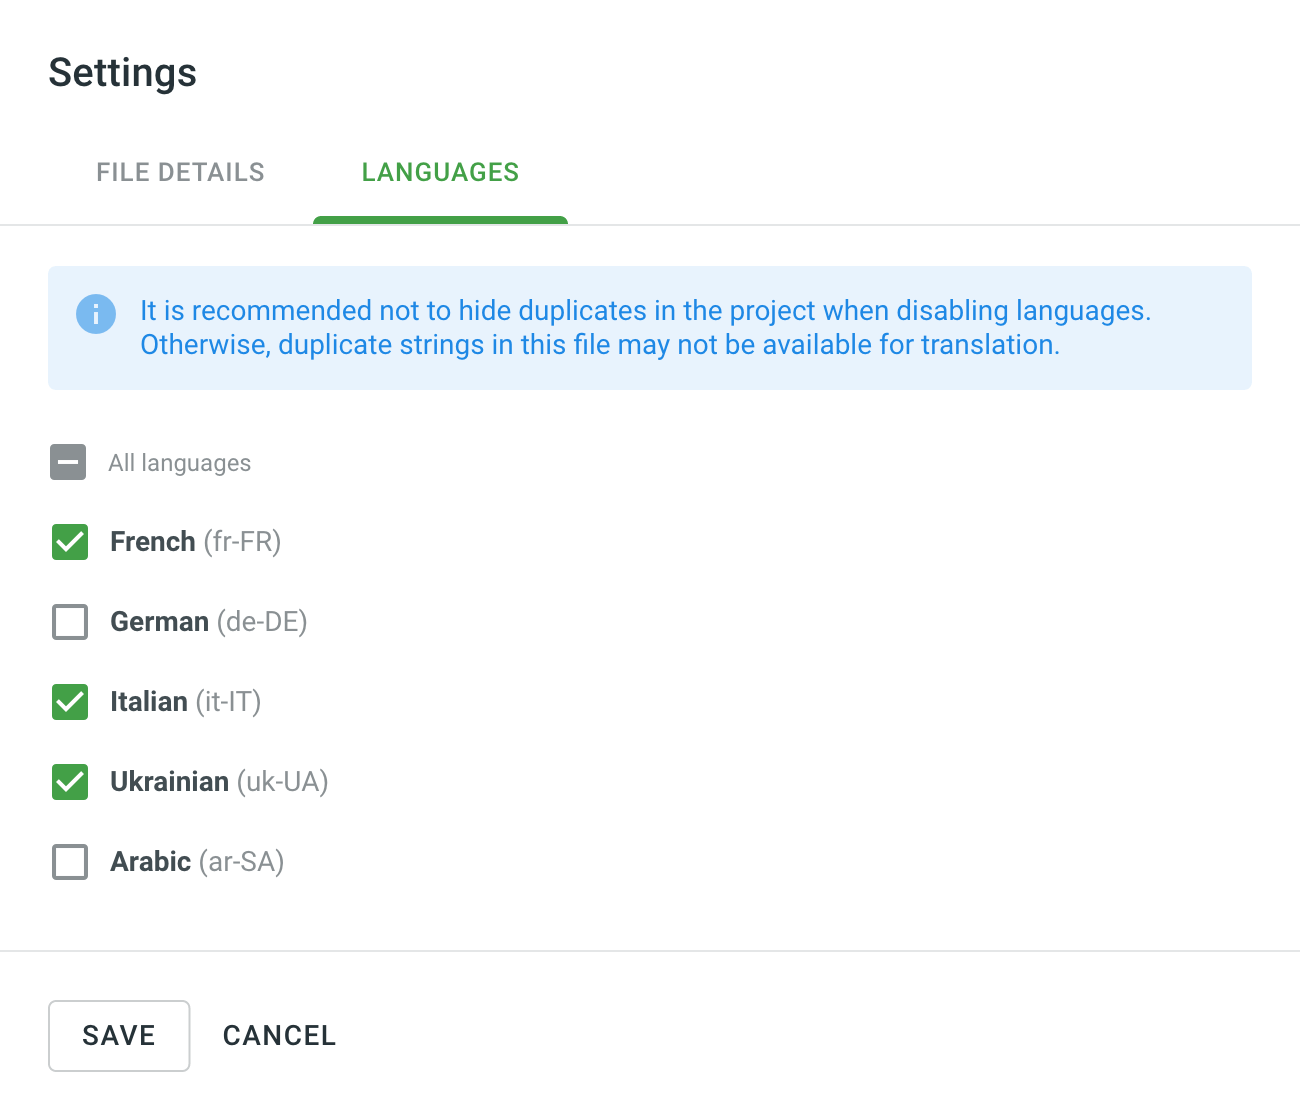
File Target Languages
By default, the source files are available for translation into all target languages of the project. Clear the checkboxes next to the languages your file shouldn’t be translated into, and click Save.
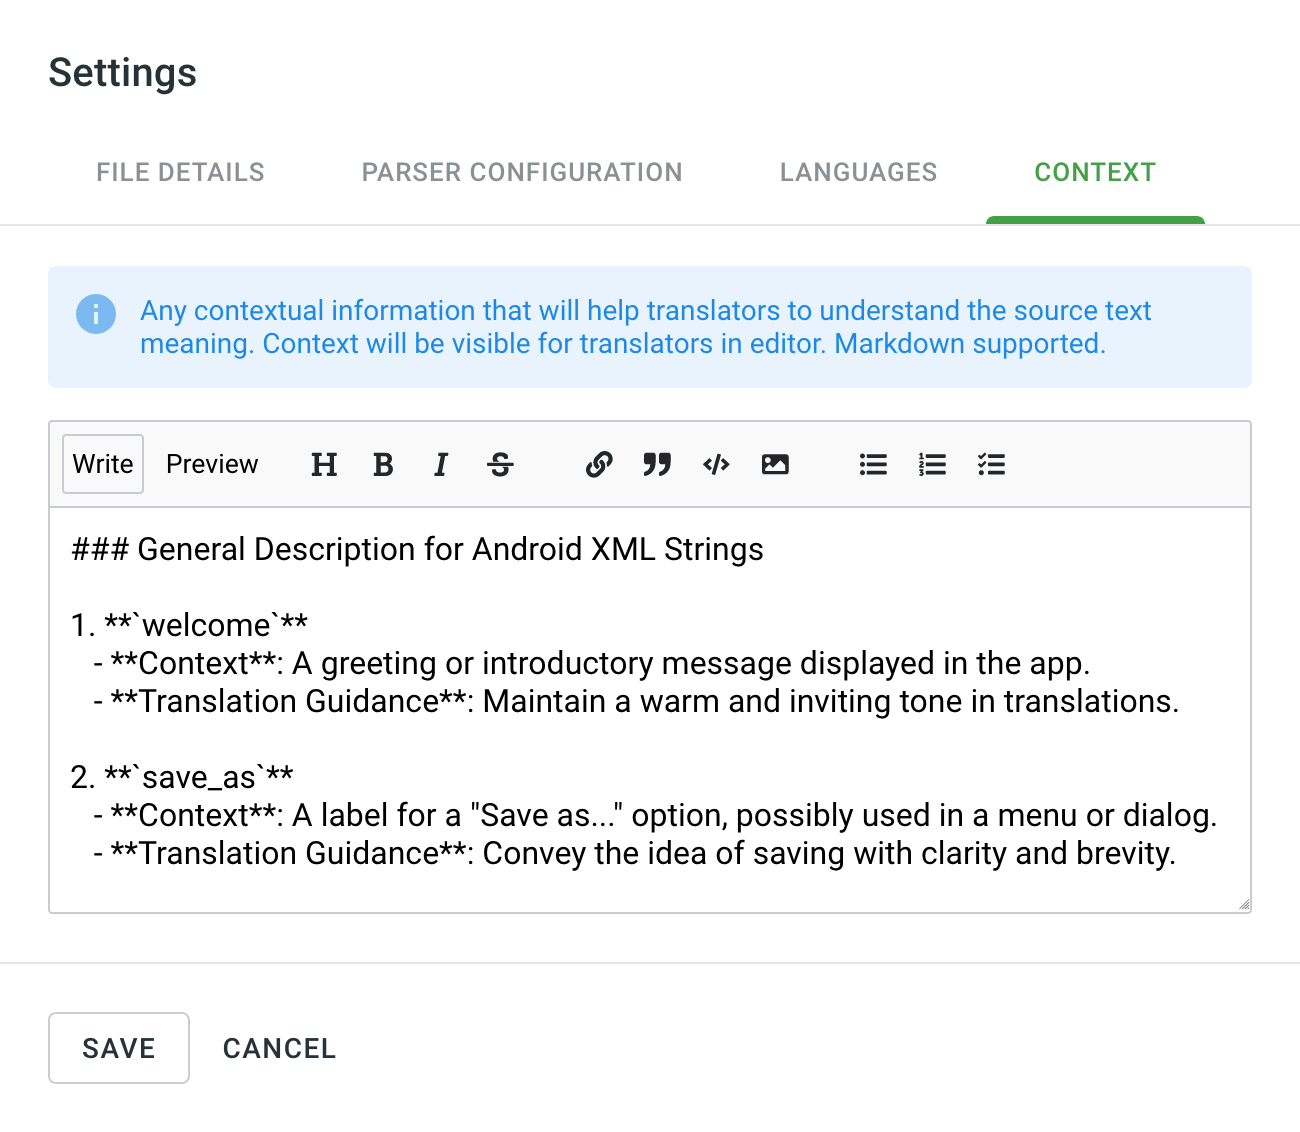
File Context
Add an additional context or instructions for translators to better understand how to translate a file. You can use either plain text or Markdown. The provided context will be visible to translators in the Editor in the File Context tab.
Note: File Context is only available for file-based projects.
Rinominare File
Per modificare il nome del file, clicca con il destro sul file necessario o clicca ![]() affianco a esso e seleziona Rinomina.
affianco a esso e seleziona Rinomina.
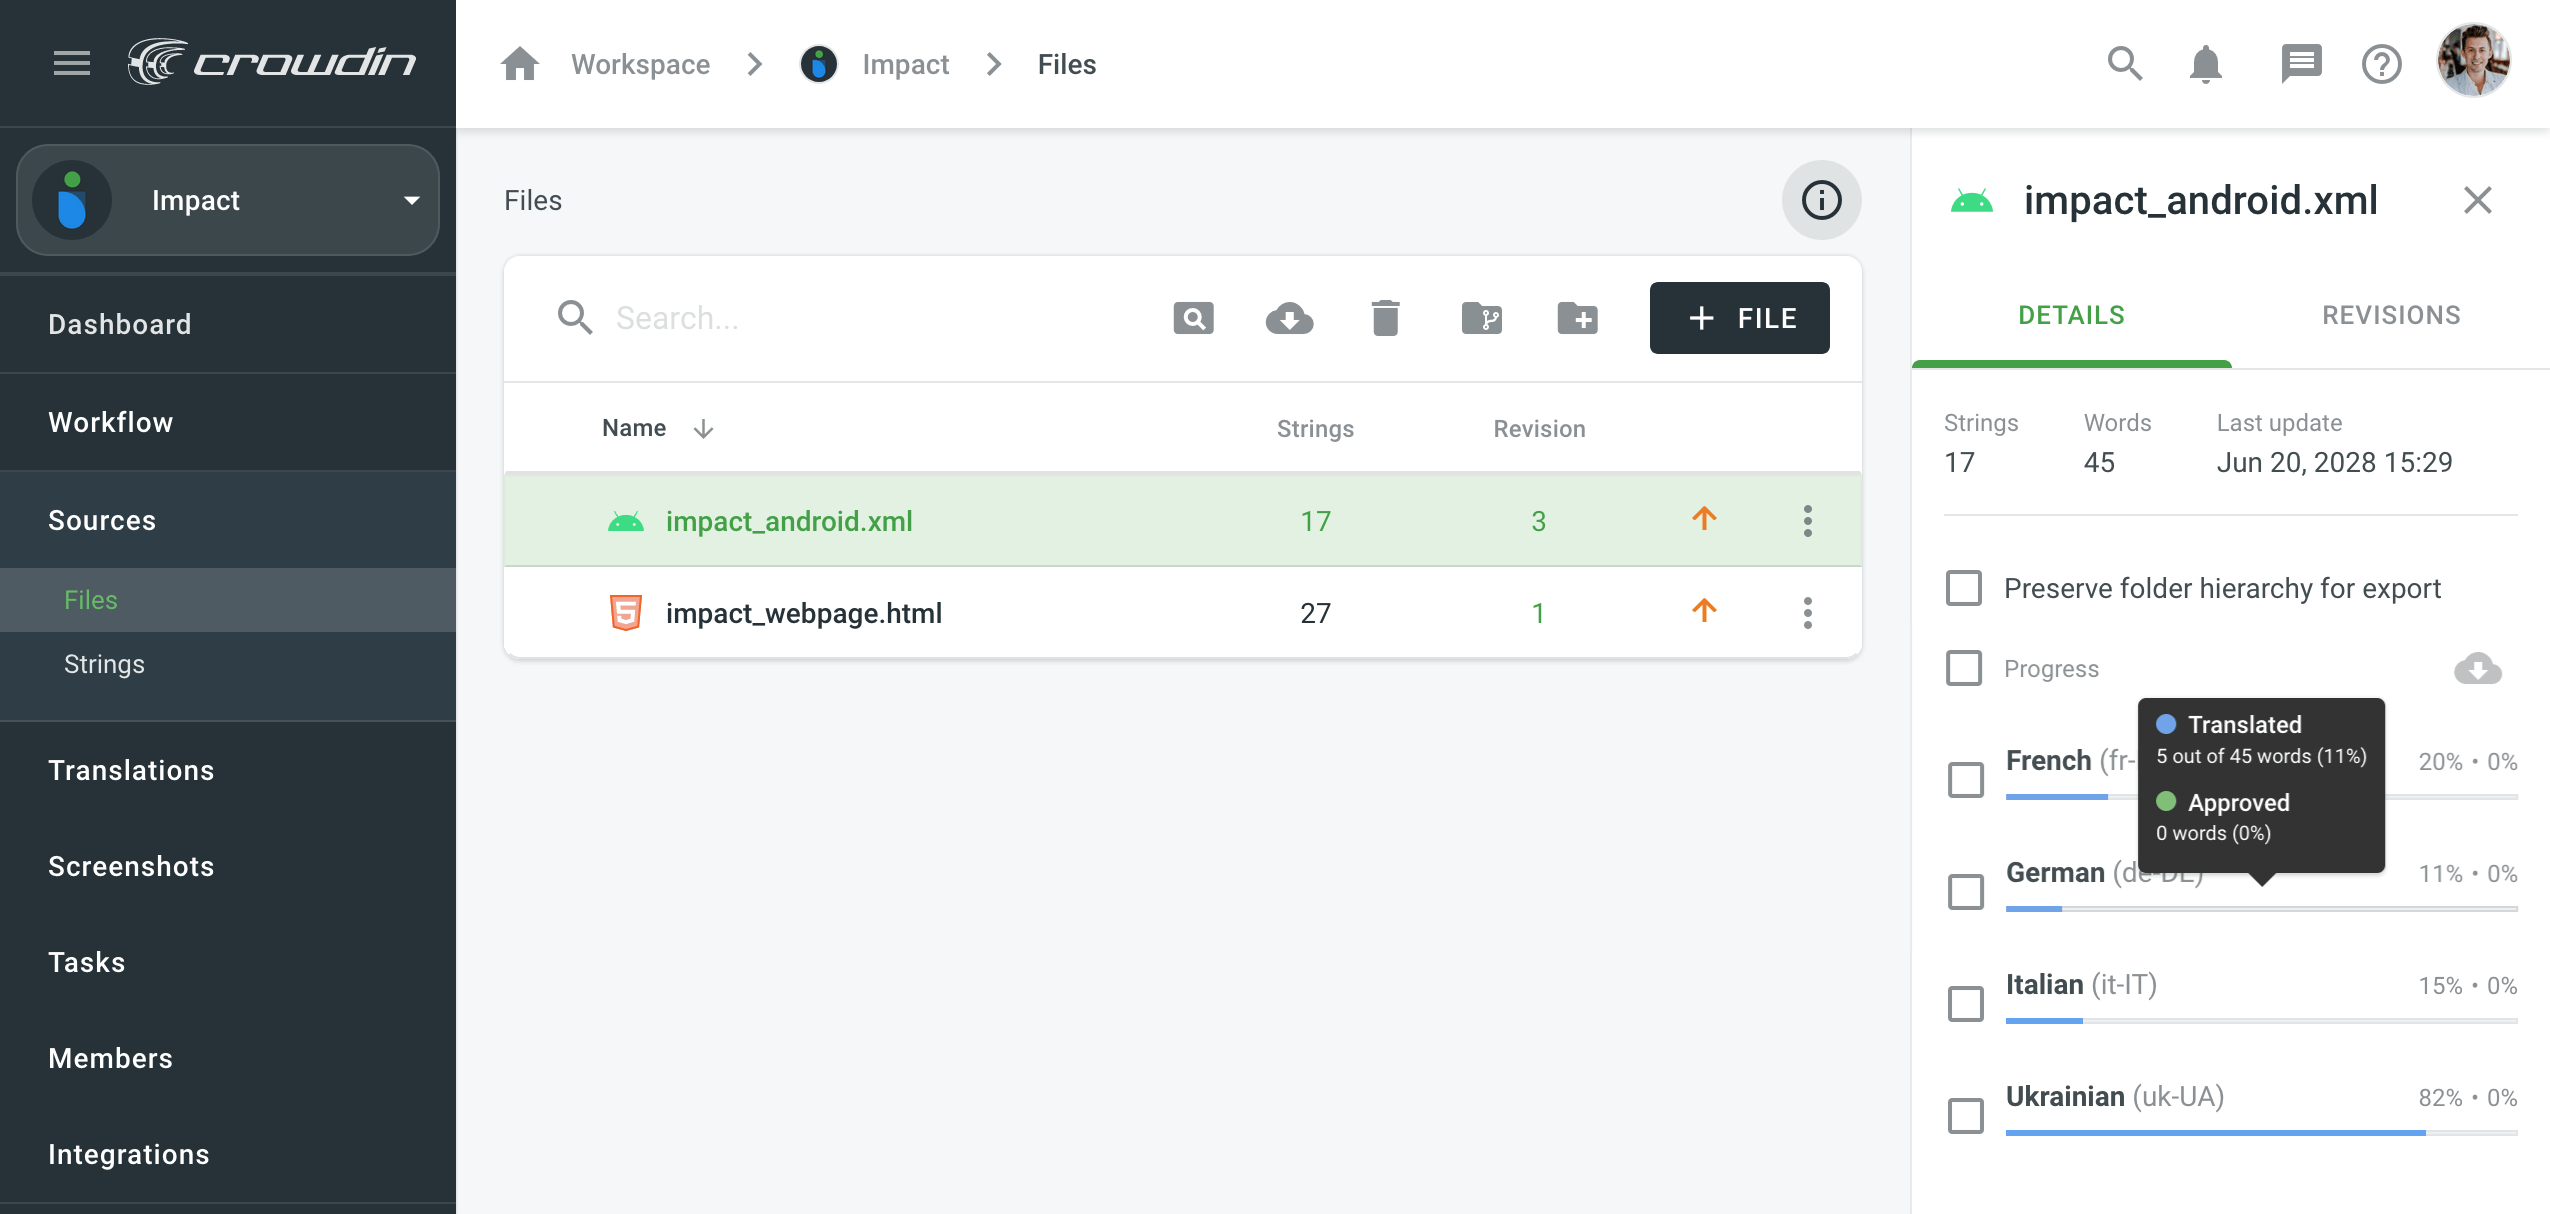
Verificare Progressi
You can check the translation and approval progress for a branch, folder, or file you need. Clicca con il destro sul ramo, la cartella o il file necessari e seleziona Visualizza progresso. To see how many words are translated and approved for each language, hover over the progress bar. To open the selected file in the Editor, click on the needed language. To download translations for the chosen file, select the required languages in the Details tab in the right-hand side menu, and click ![]() . Optionally, you can select Preserve folder hierarchy for export to export translation files along with the folders they’re stored in Crowdin Enterprise.
. Optionally, you can select Preserve folder hierarchy for export to export translation files along with the folders they’re stored in Crowdin Enterprise.
Aggiornare i File di Origine
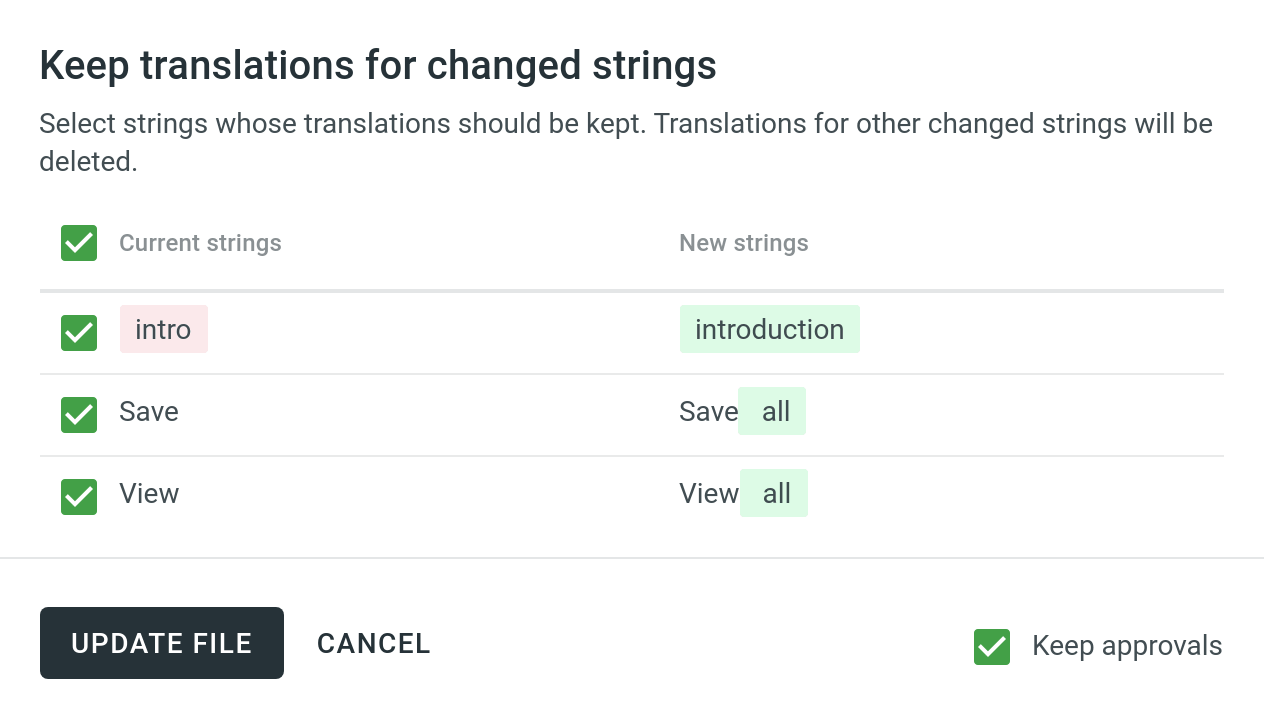
In case you have added some new strings to one of the source files, you’d want to update it to make newly added strings visible to translators. Clicca con il destro sul file necessario, seleziona Aggiorna e poi seleziona il nuovo file sulla tua macchina.
If some of the source strings were modified, the system shows a dialog with a list of edited strings. Potrai scegliere quali traduzioni esistenti vuoi mantenere senza modifiche (colonna delle Stringhe correnti) e se vuoi mantenere o rimuovere le approvazioni. The translations for other changed strings will be removed.
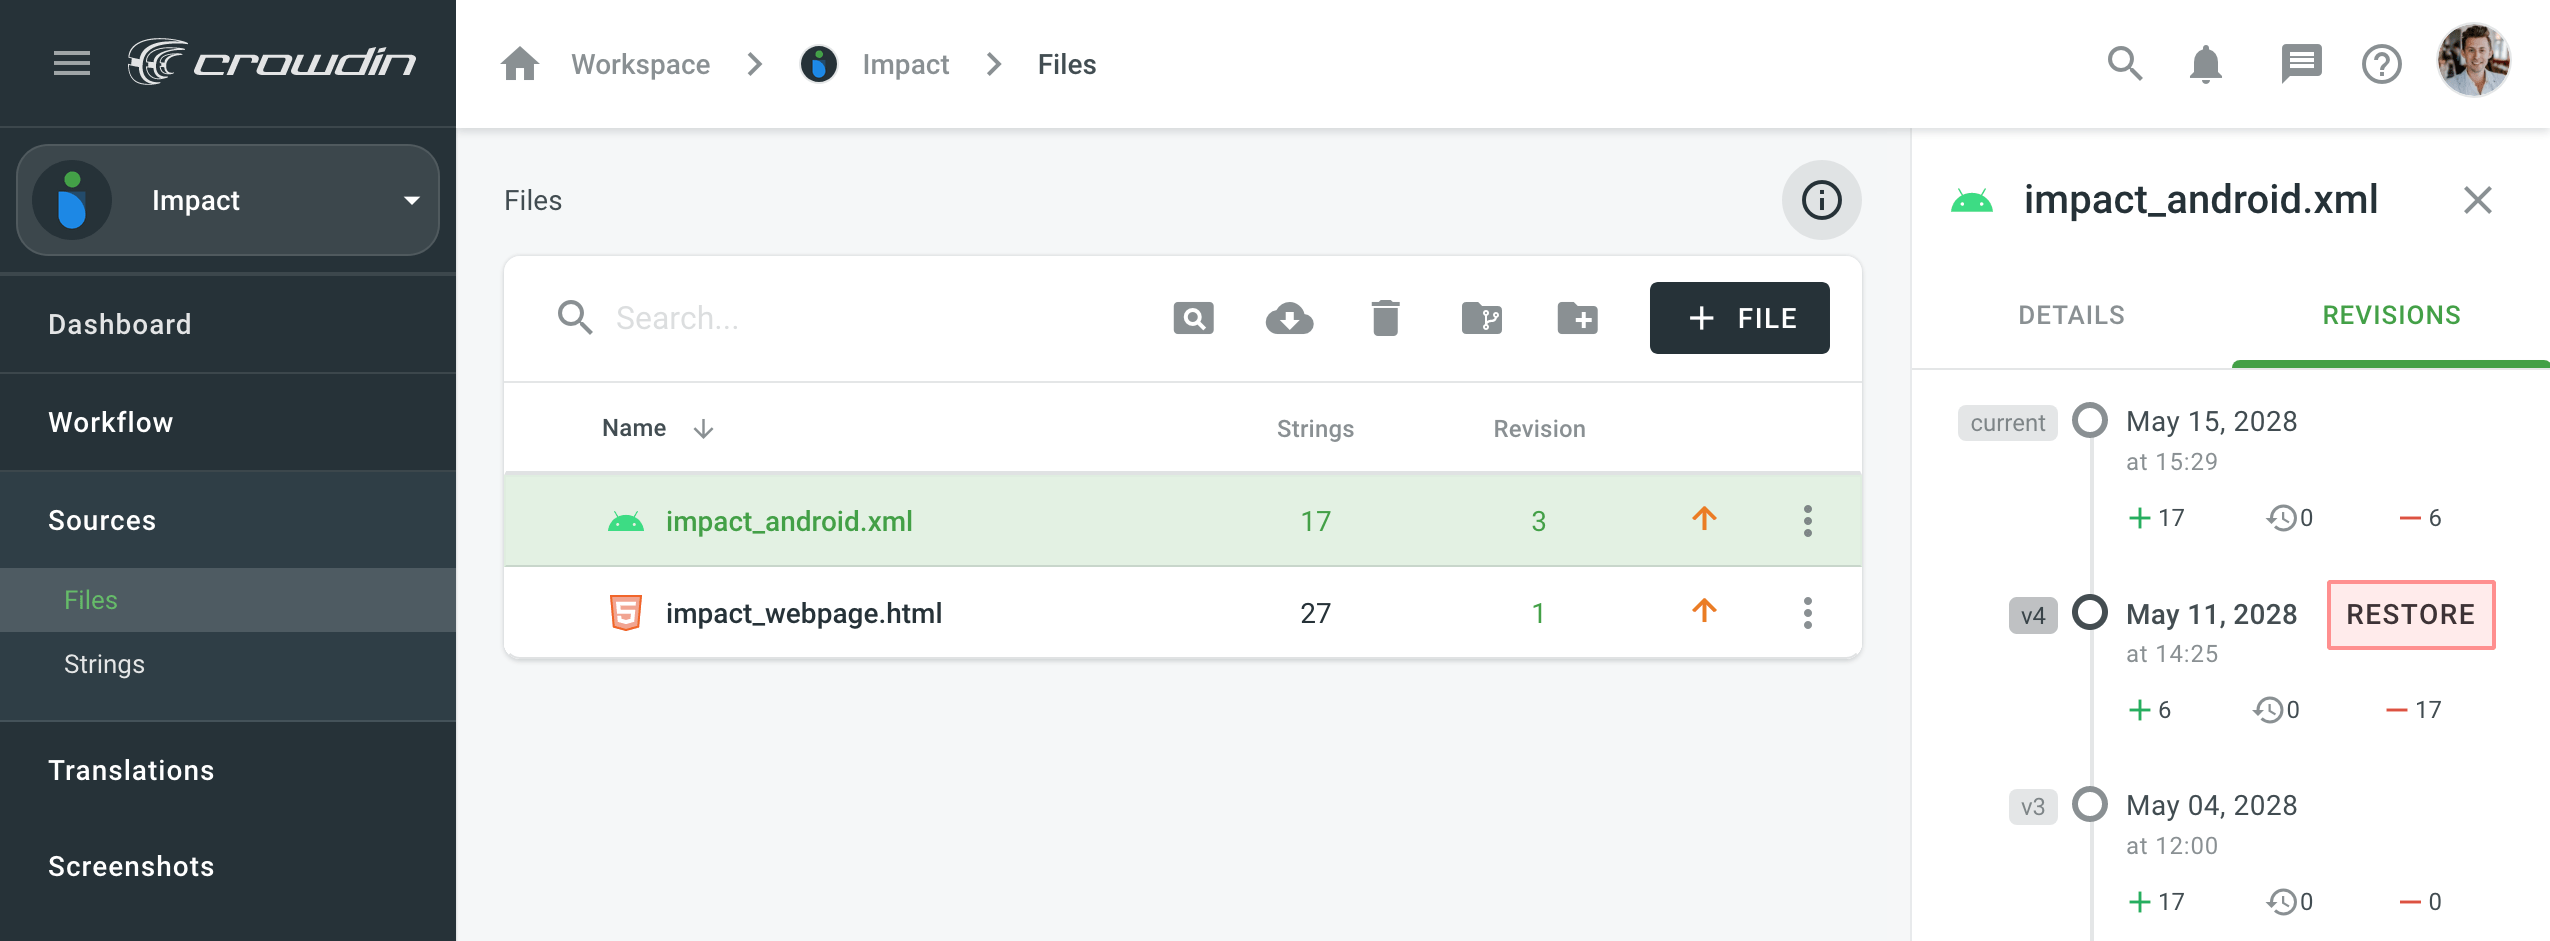
Ripristinare le Versioni Precedenti
Ogni volta che aggiorni il file di origine, viene creata una nuova revisione. To restore your file to the previous revision, click the number on the needed file in the Revision column. In the Revisions tab in the right sidebar, hover over the needed revision and click Restore next to it.
Branches and Folders
You can create folders and branches in Sources > Files with the following buttons:
 – crea cartella
 – crea ramo
Folders represent your content structure, while branches help to manage different versions of the content.
Still, if you need to create branches manually, make sure to upload the master branch first, as all the others will be considered the feature branches. Usually, branches in Crowdin Enterprise are created automatically if you use GitHub, GitLab, or other VCS integration. Duplicates might be managed in Settings > Import > Source Strings by choosing the corresponding option for Duplicates.
Gestione Stringhe
You can view all the project’s strings and manage strings settings via Sources > Strings.
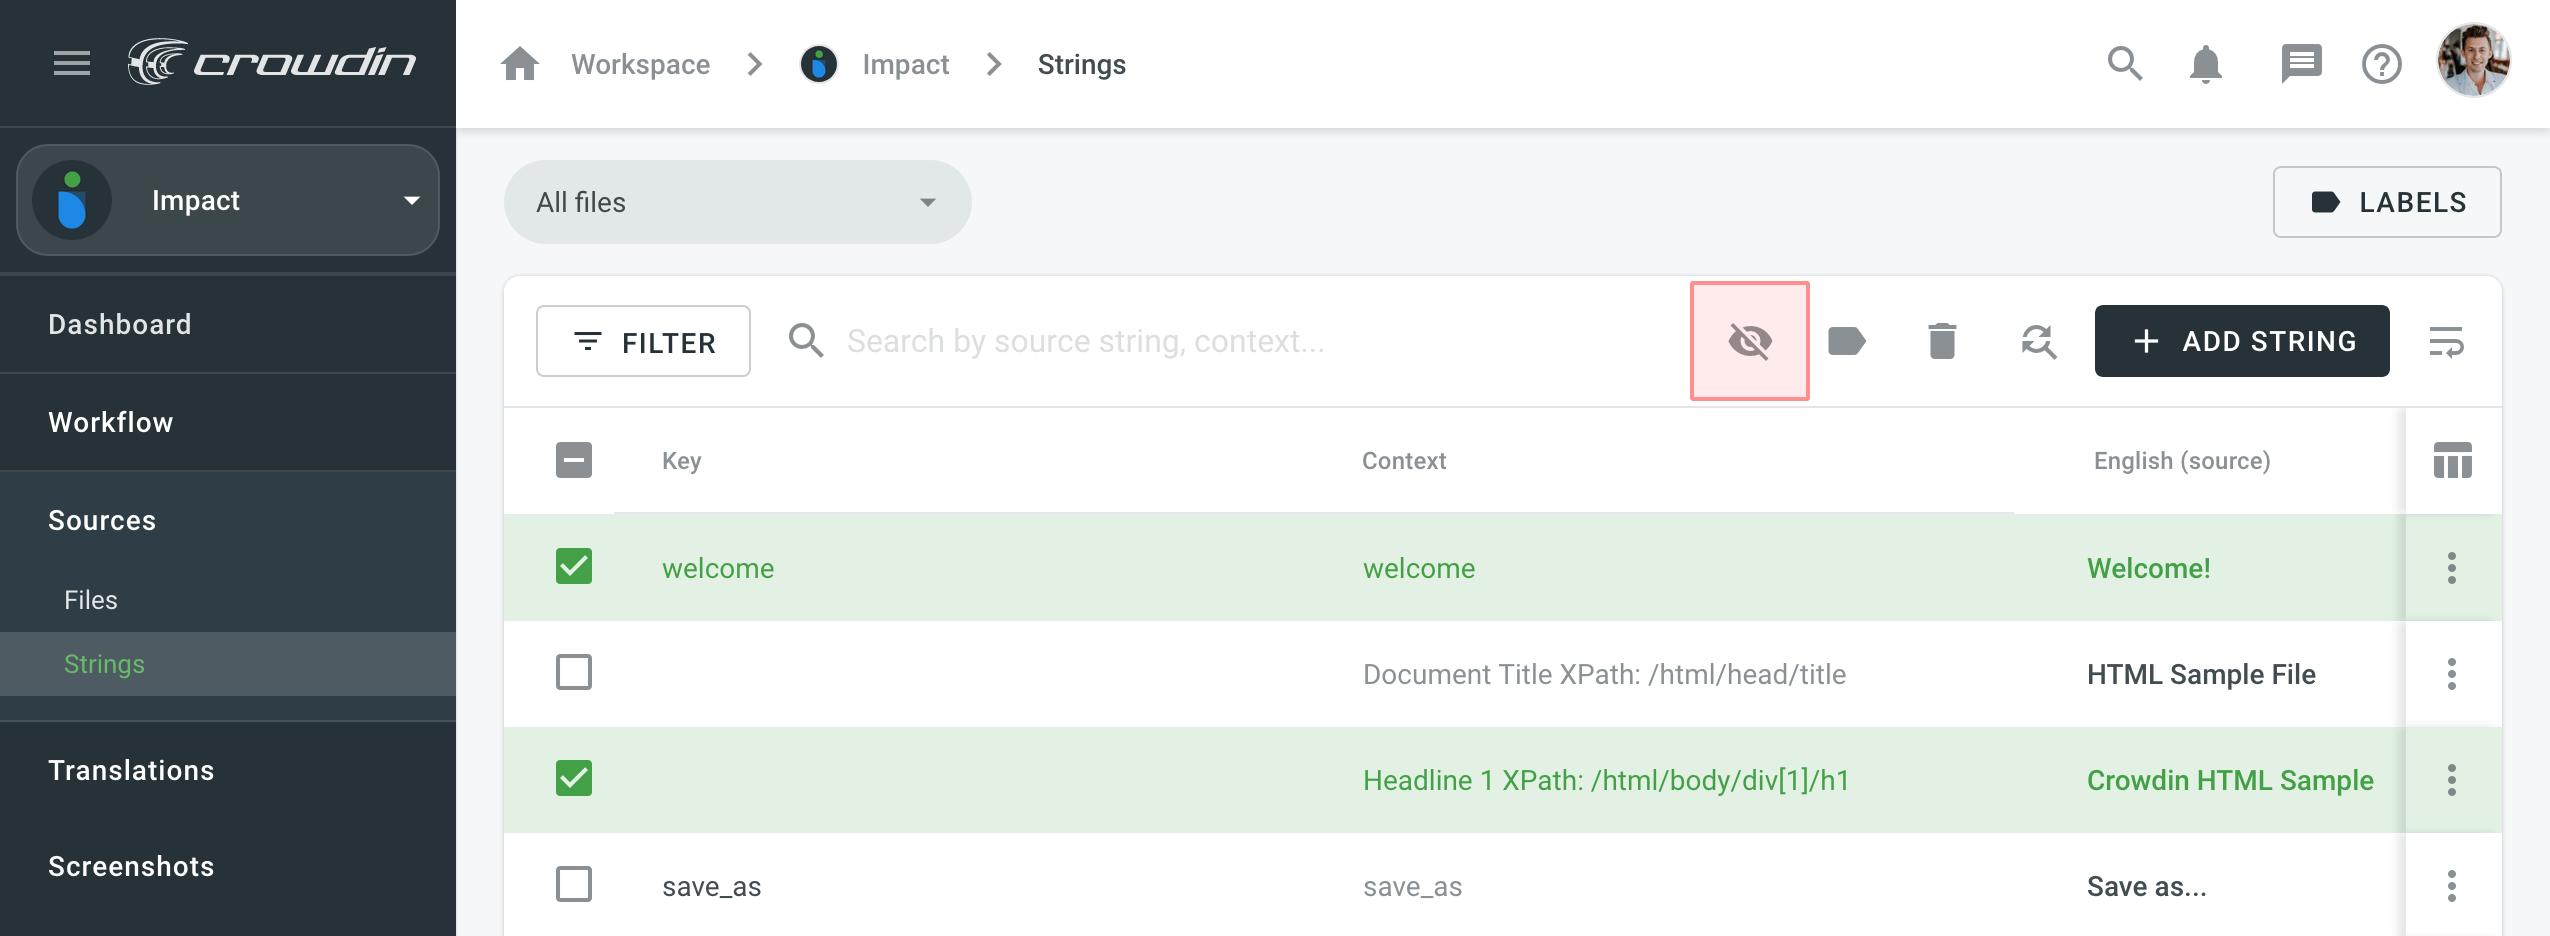
Changing Strings Visibility
If some strings contain data that is not supposed to be translated (e.g. placeholders, other technical entities), you can hide them from translators. To do this:
- Open your project and go to Sources > Strings.
- Select the necessary strings.
- Clicca
 .
.
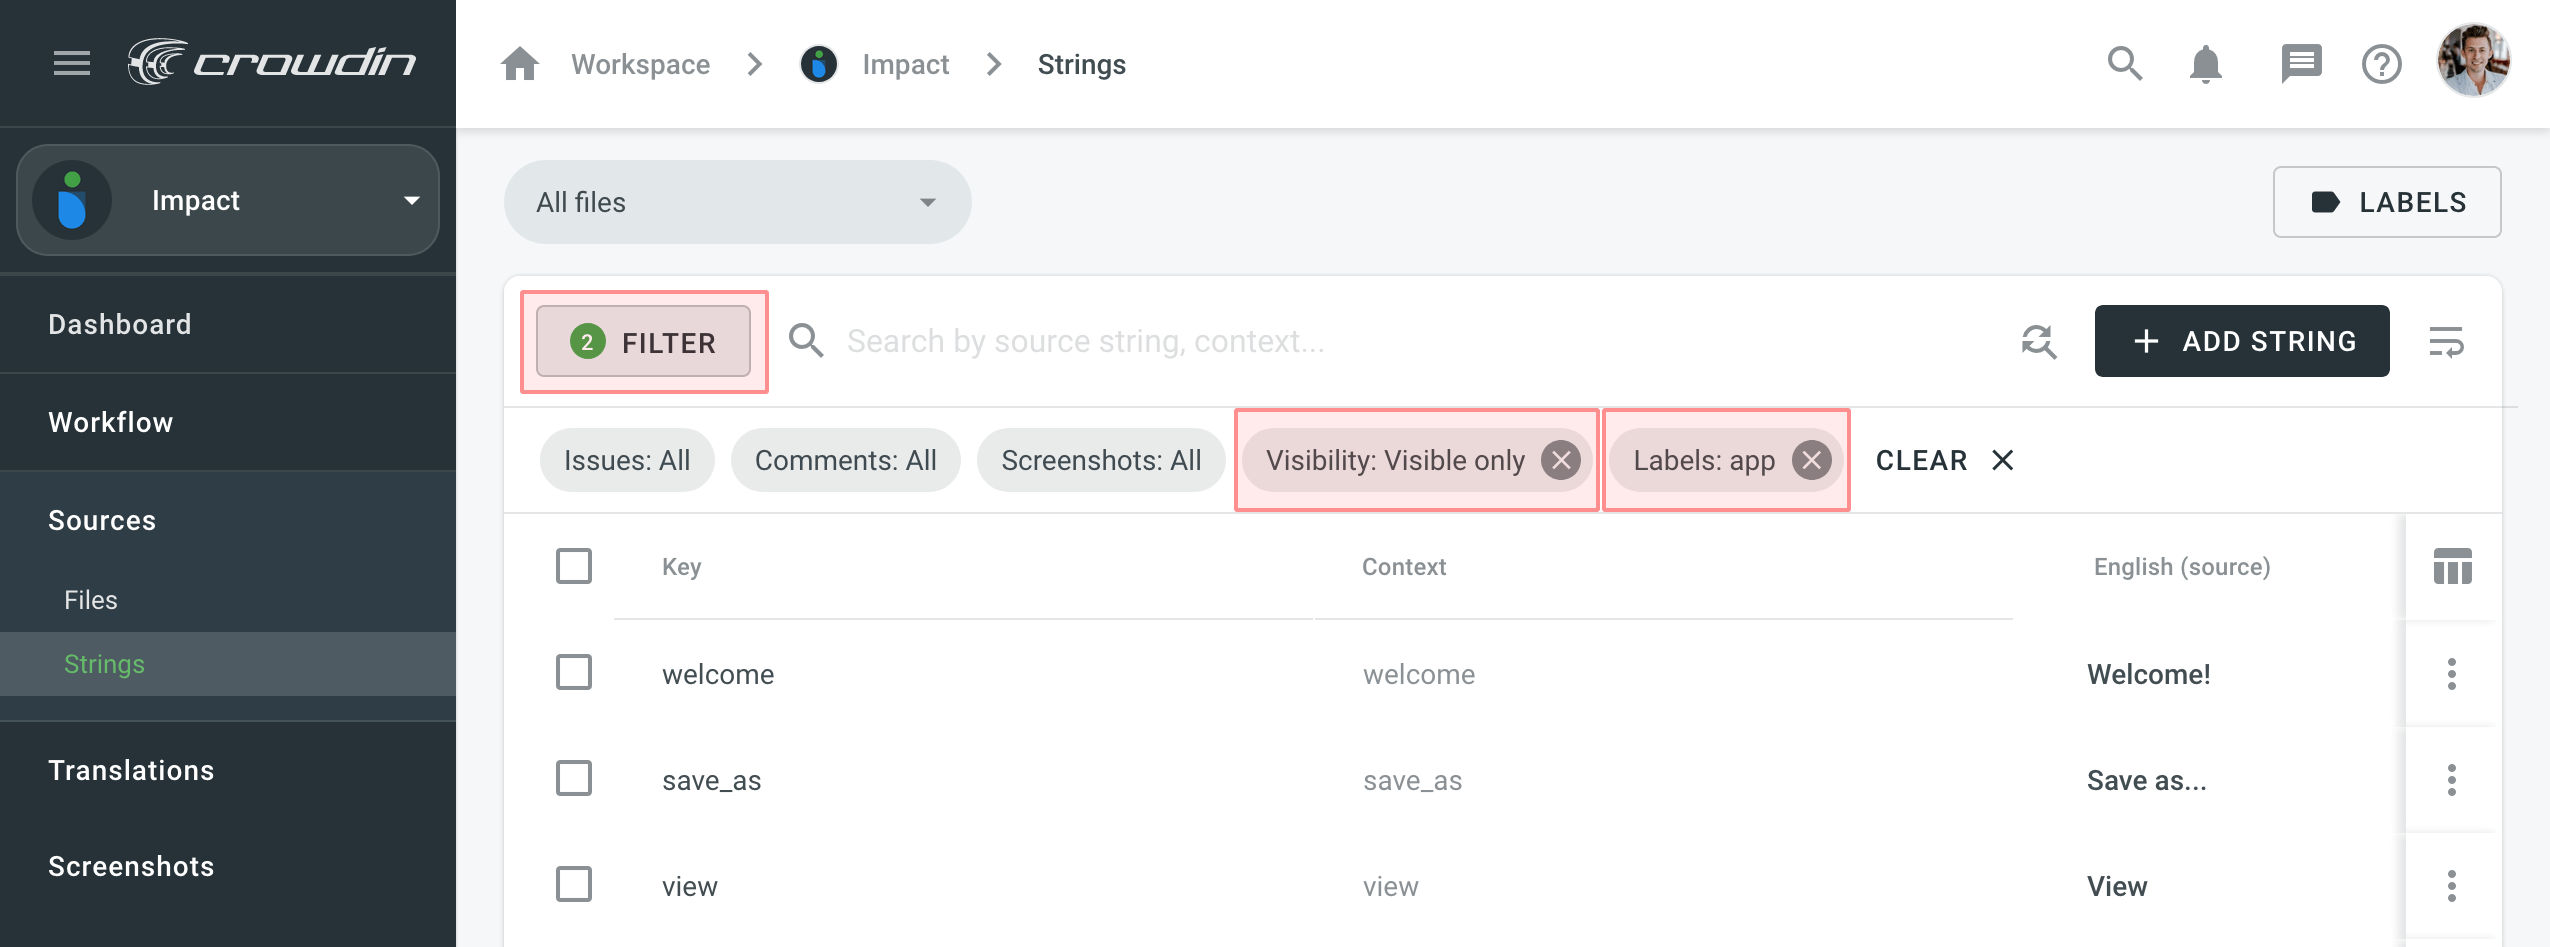
Filtering Strings
By default, all source strings of the project are displayed in Sources > Strings. If necessary, you can filter out strings using the available filter options (Issues: All, With unresolved issues, Without unresolved issues; Comments: All, With comments, Without comments; Screenshots: All, With screenshots, Without screenshots; Visibility: All, Visible only and Hidden only) and project labels.
String Editing
Puoi aggiungere contesto alla stringa e impostare la lungh. massima della traduzione.
Una volta superati i limiti di traduzione, il sistema notifica il contributore che la traduzione dovrebbe esser più breve.
Some file formats allow editing (adding, deleting, and modifying) of the source texts and string identifiers directly in Crowdin Enterprise so you can do the necessary corrections without updating the source file via Sources > Files. Check the full list below:
- XML Android
- iOS Strings
- JSON
- i18next JSON
- XLIFF 1.2
- XLIFF 2.0
- XLF Angolare
- PO Gettext di GNU
- PO di Gettext di Unreal Engine
- YAML
- RESX
- CSV
- ARB
- Proprietà di Java
- Proprietà Play
- Proprietà XML
To edit some particular word or phrase that appears in multiple source strings, you can use the ![]() Find and replace feature in Sources > Strings.
Find and replace feature in Sources > Strings.
Nota: Modificando l'identificativo di una stringa contenuto in un gruppo di stringhe (insieme di stringhe per Android XML, segmenti per XLIFF), le traduzioni esistenti saranno rimosse per tutte le stringhe del gruppo, tranne quelle modificate.
Labels
Use labels in your project for an easy way to add context to the strings or organize them by certain topics. Le etichette sono anche utili creando le attività di traduzione e revisione o cercando stringhe specifiche nell’Editor con l’aiuto del Filtro Avanzato.
Managing Project Labels
To create, edit, or remove project labels, follow these steps:
- Open your project and go to Sources > Strings.
- Click Labels.
- In the appeared dialog, add new labels, edit or remove existing ones.

Adding Labels to Strings
There are a few possible ways you can add labels to the strings.
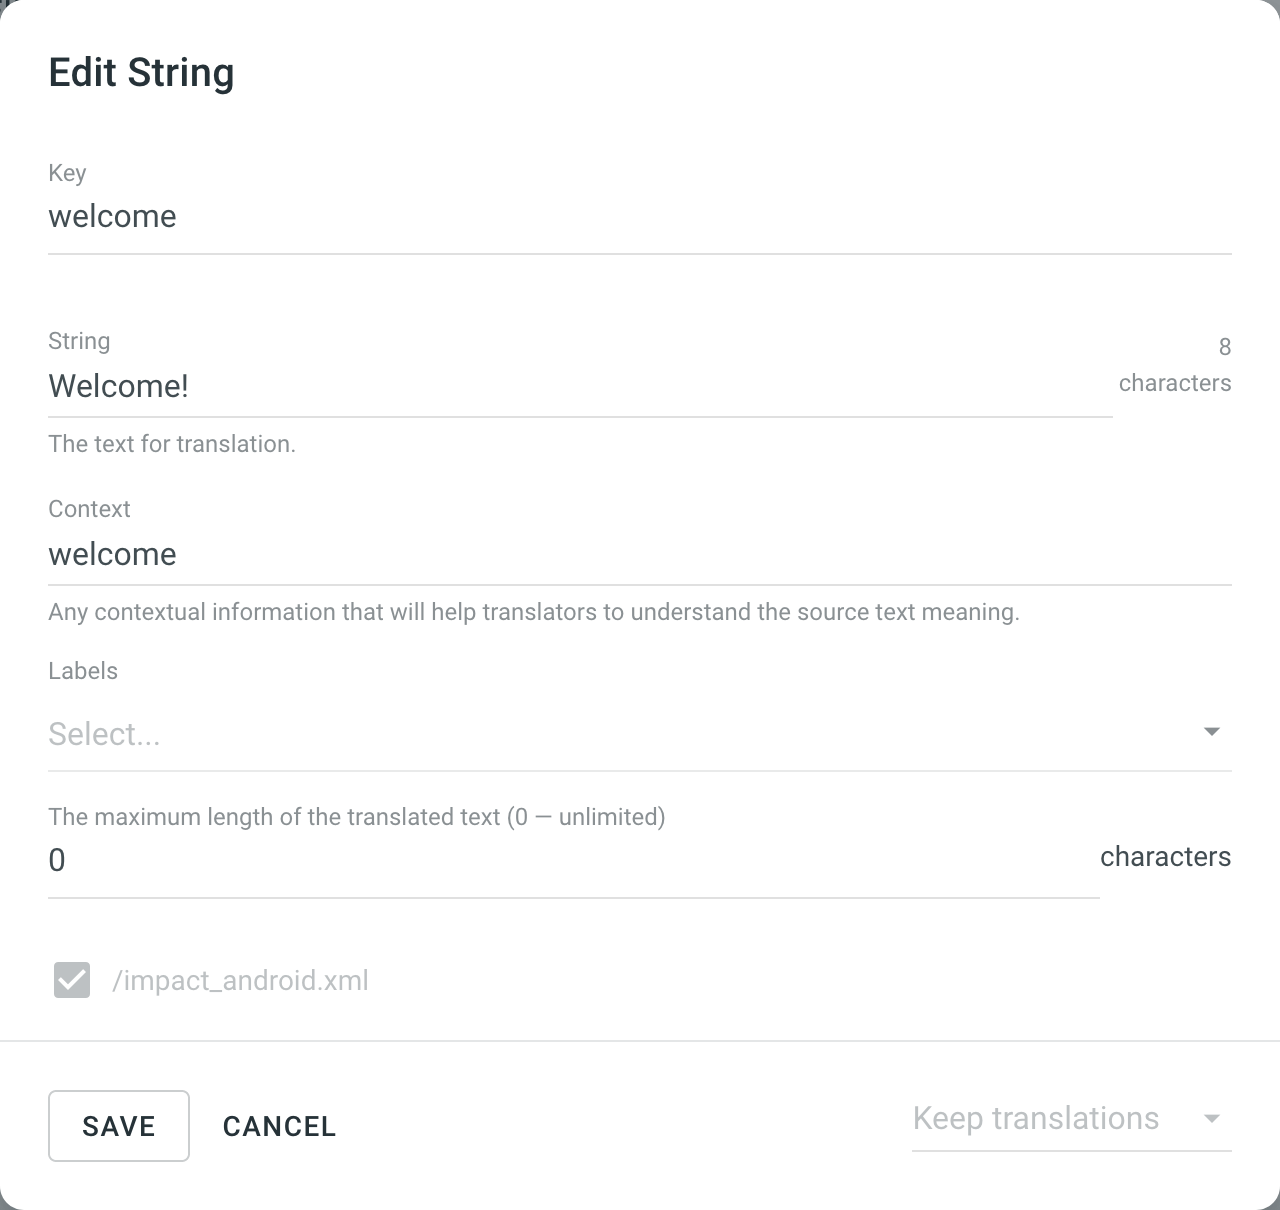
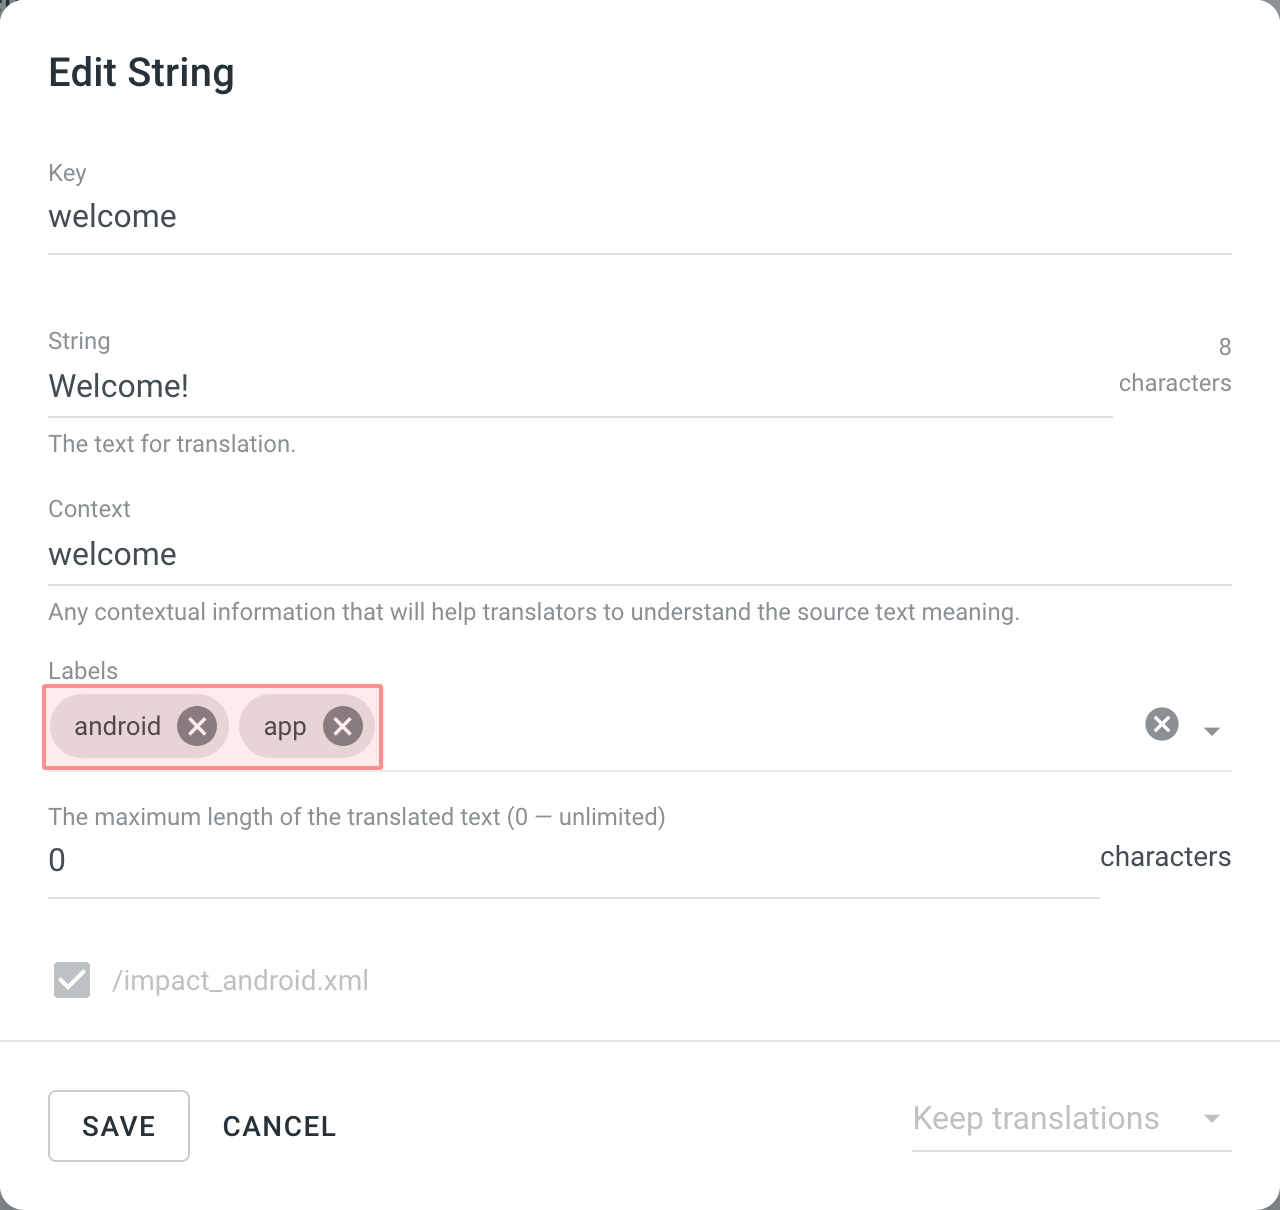
- Add labels to one string at a time via the Edit String dialog
- Clicca con il destro sulla stringa nell’elenco e seleziona Modifica
- Select needed labels in the Labels field
- Clicca Salva
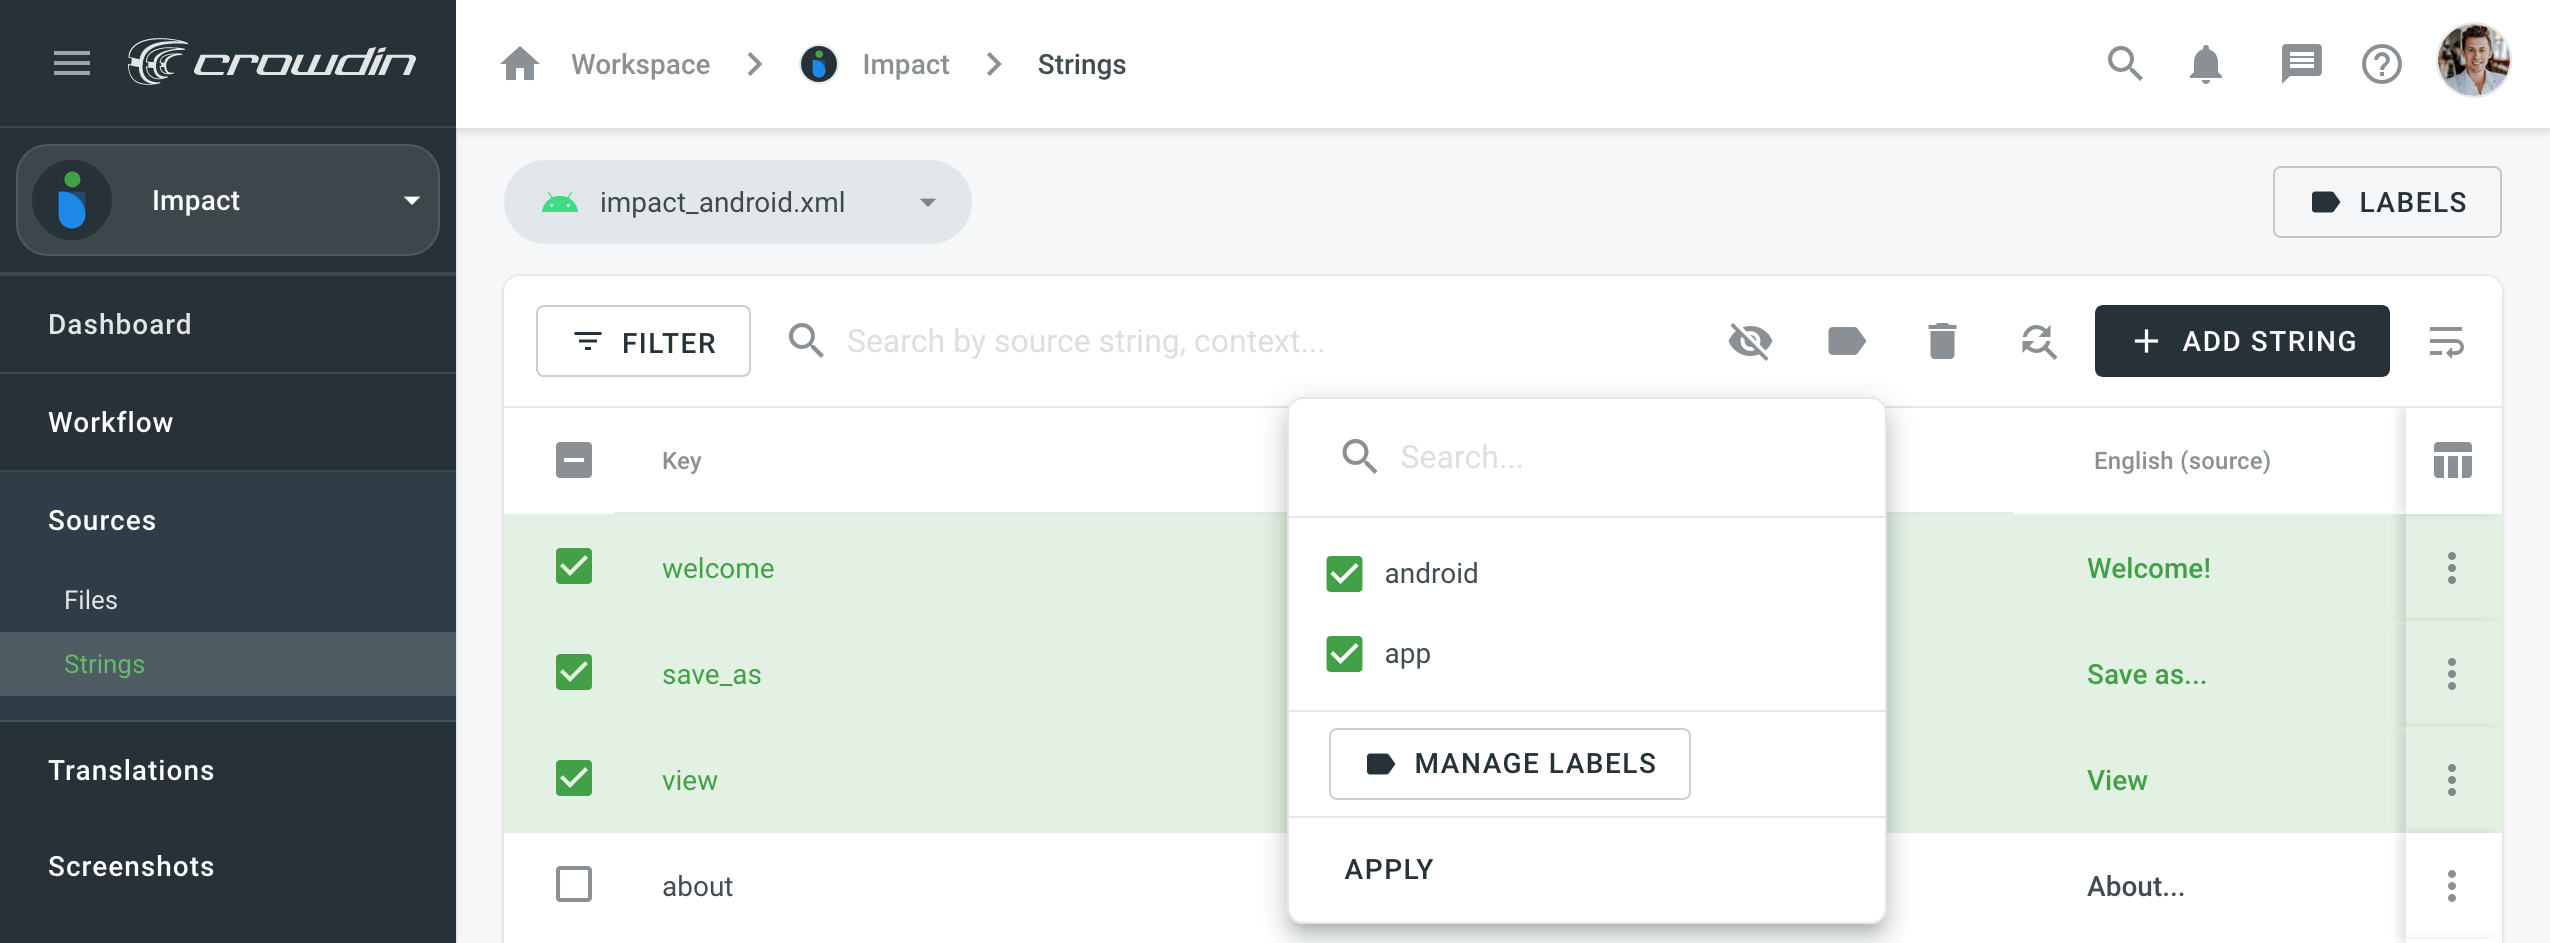
- Aggiungi etichette a più stringhe tramite la finestra Gestisci etichette delle stringhe
- Select a few strings you want to add the same labels to
- Clicca

- Select needed labels from the list
- Clicca Applica
-
Aggiungi etichette alle stringhe d’origine nei file CSV e XLSX usando una colonna dedicata alle etichette.
Leggi di più sulla Configurazione di Colonne per l’Importazione di File XLSX e CSV
Nota: Le etichette della stringa aggiunte al progetto con un caricamento di file CSV/XLSX iniziale non sono sovrascritte o rimosse durante i seguenti aggiornamenti di file.
Changing Scheme for CSV and XLSX Files
I formati di file come CSV e XLSX potrebbero richiedere la modifica dello schema inizialmente configurato. Solitamente, potrebbe esser necessario quando aggiungi una nuova lingua d’arrivo al tuo progetto di Crowdin.
Leggi di più sulla modifica dello schema per i file CSV e XLSX.