Gerenciamento de Arquivos
Você pode gerenciar todos os arquivos do projeto através de Fontes > Arquivos. Aqui você pode carregar arquivos manualmente para localização usando vários formatos suportados. Quando os arquivos forem carregados, você poderá dar uma olhada em quantos textos seus arquivos incluem e quantas revisões (mudanças) foram feitas para cada um deles.
Se você deseja configurar uma sincronização automática de arquivos com seu projeto, use a guia Integrações.
Priorização de arquivos
You can set a specific priority for each file by clicking an arrow icon next to the needed file. Then translators will be able to see files sorted according to their priority on the language page and in the Editor.
Os arquivos podem ter as seguintes prioridades:
 – baixo
 – medium
 – alto
Configurações de arquivo
To access the configurations of specific files, right-click on the necessary file or click ![]() next to it and then select Settings.
next to it and then select Settings.
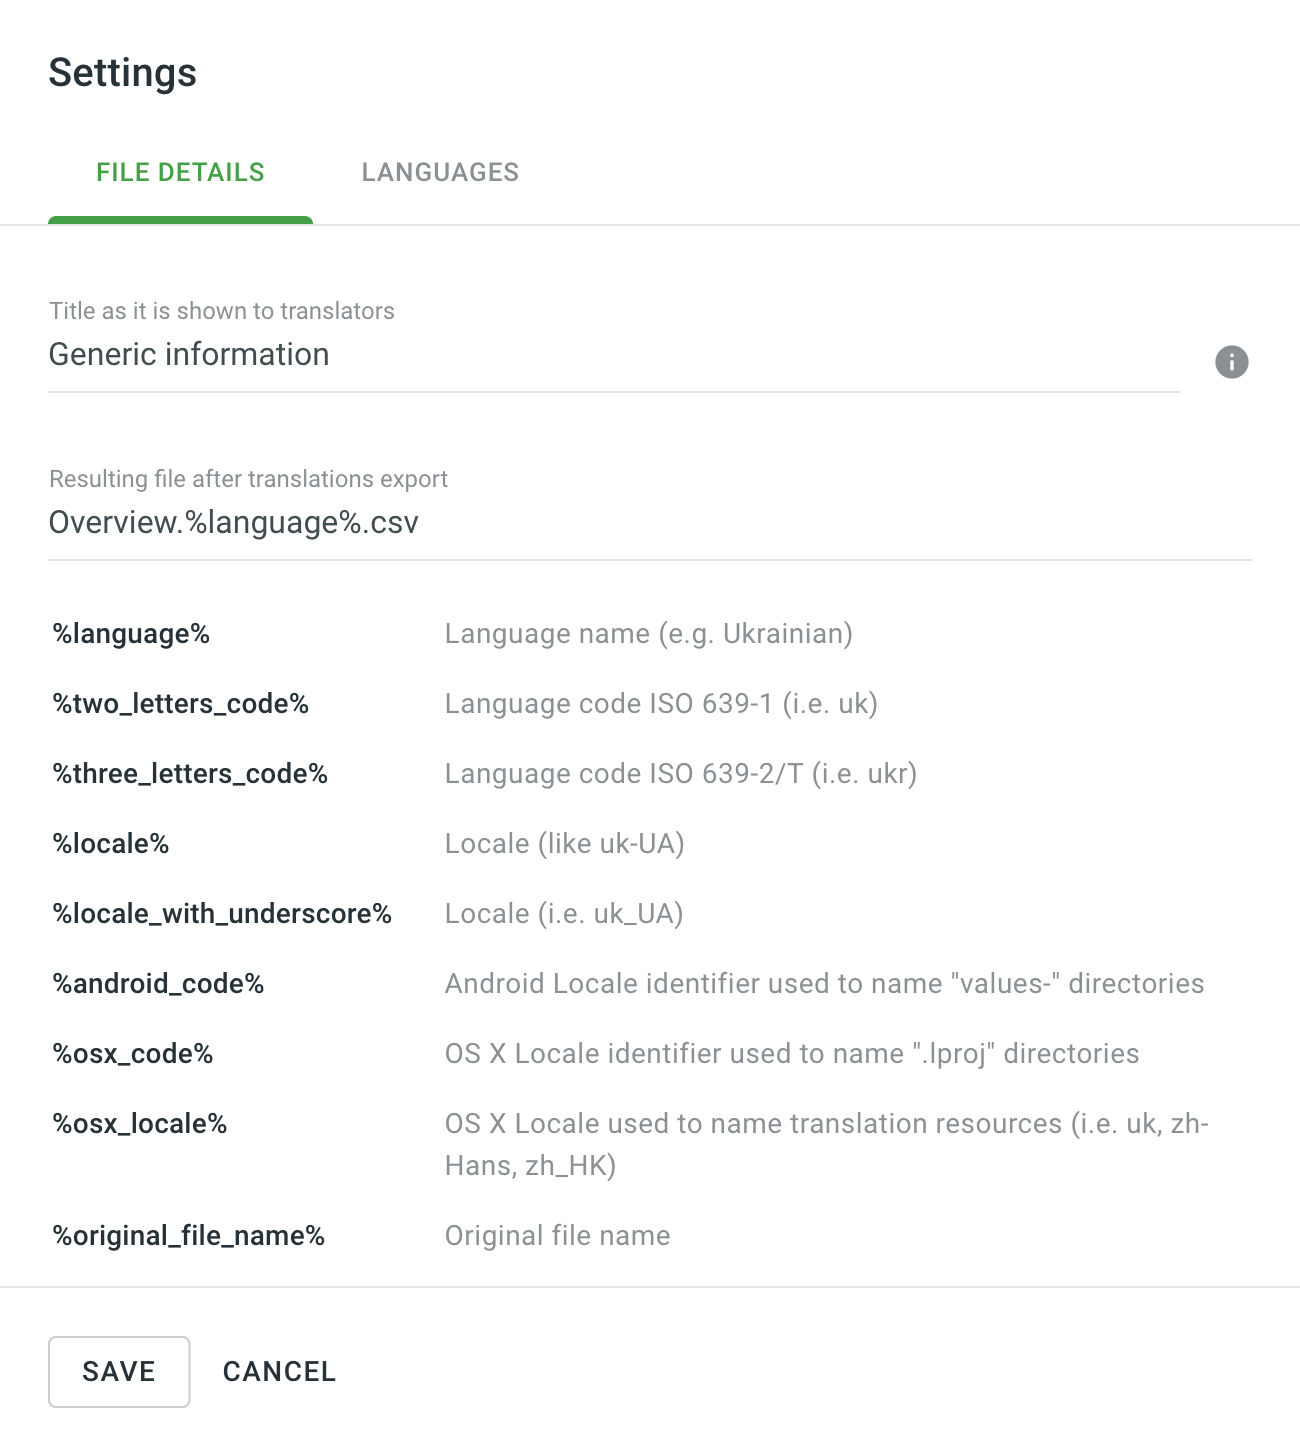
Title as it is Shown to Translators
Defina títulos mais descritivos para os arquivos para fornecer detalhes adicionais para os tradutores.
Nota: O título do arquivo é mostrado apenas na UI do Crowdin Enterprise e não renomeia o arquivo real.
File Export
Defina um nome de arquivo ou caminho completo no arquivo resultante, use os marcadores disponíveis para indicar a estrutura do conteúdo exportado.
Por exemplo, você deseja que o arquivo de origem Overview.csv com a tradução ucraniana seja denominado Overview.ukrainian.csv antes de integrá-lo ao aplicativo. Nesse caso, você precisa definir o arquivo resultante após a exportação das traduções como o seguinte: Overview.%language%.csv.
By default, Crowdin Enterprise adds Crowdin language codes during the file export. To use custom ones for specific languages in the whole project, set up Language Mapping.
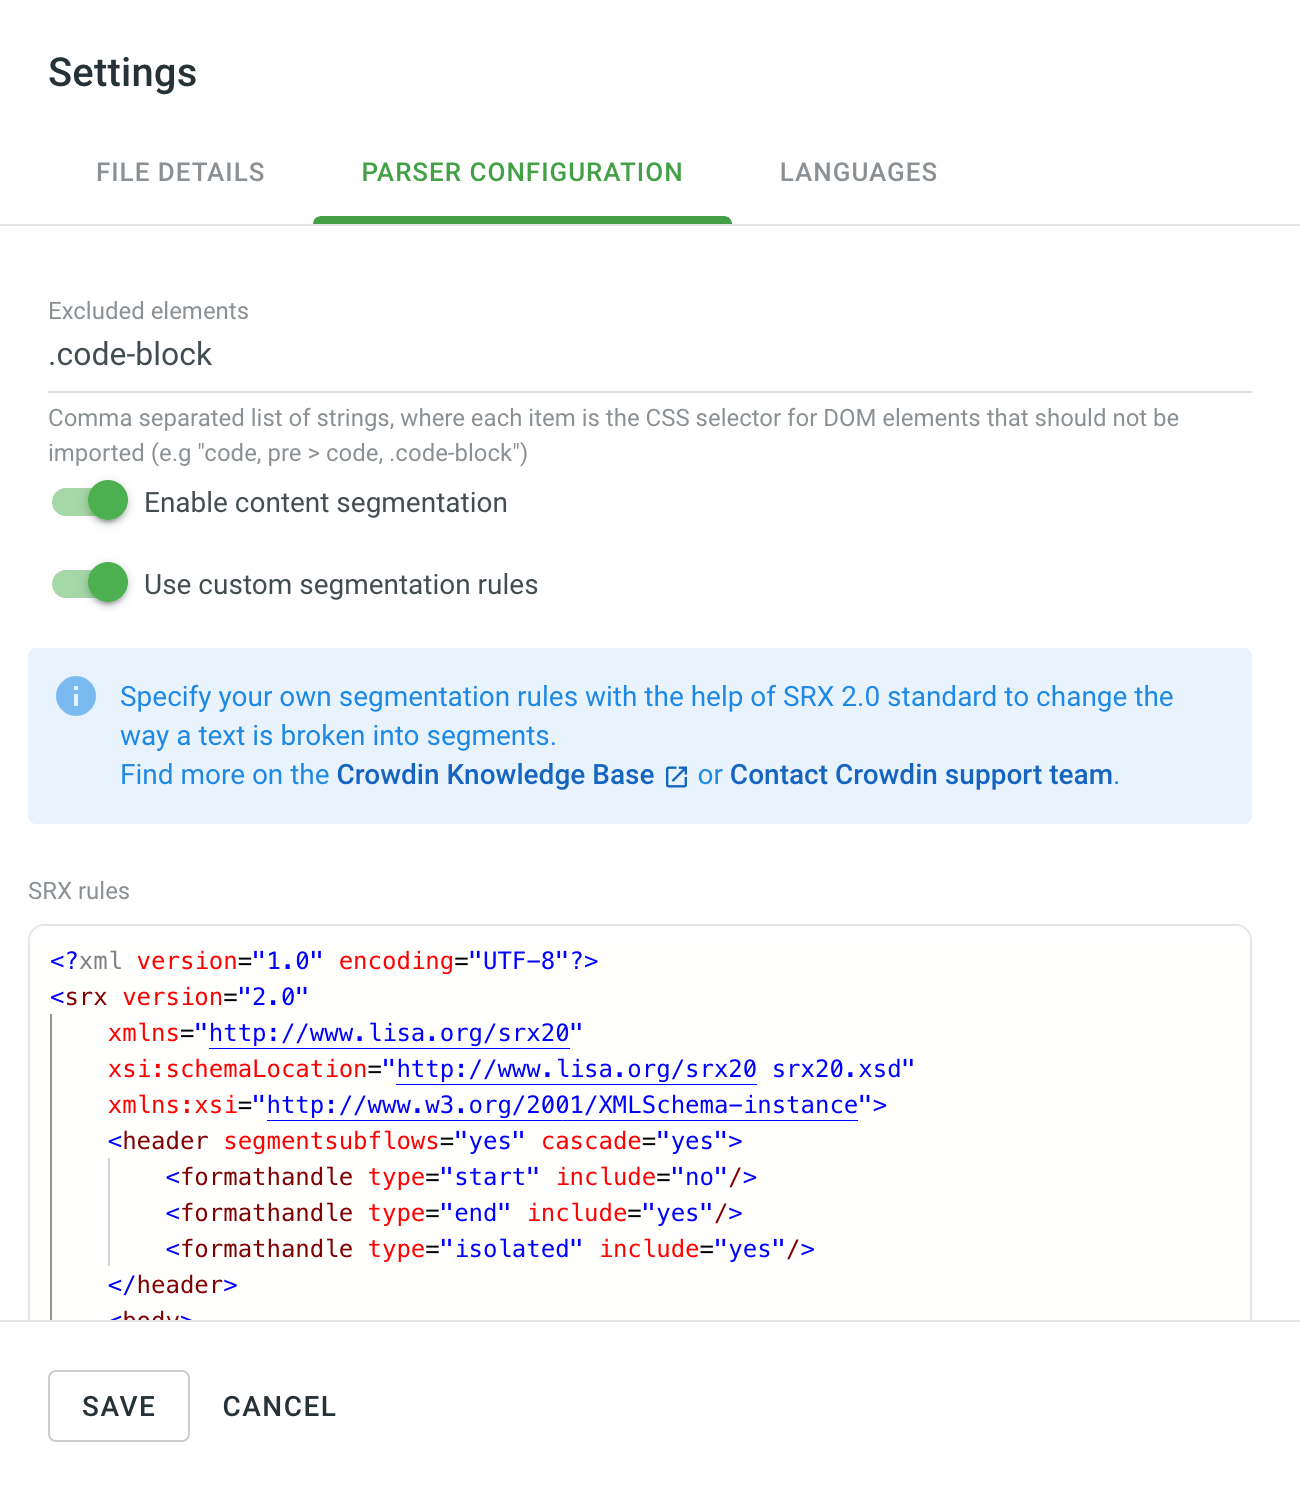
Parser Configuration
Some file formats allow you to configure import and export behavior. In this case, file’s Settings dialog will also contain the Parser configuration tab.
Read more about Parser configuration.
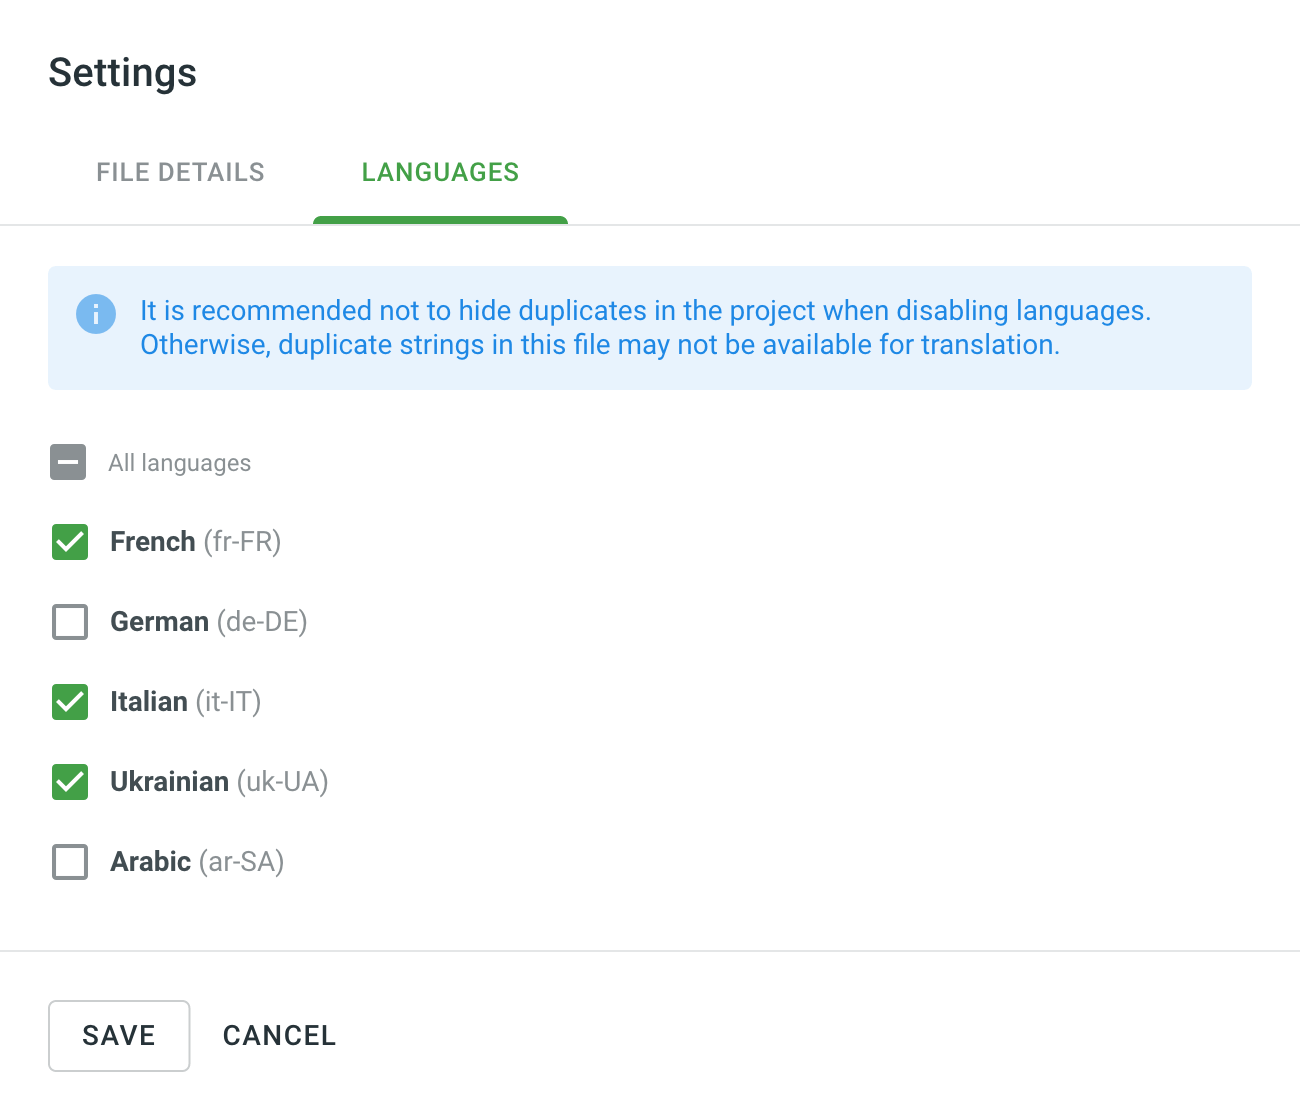
Idiomas de destino do arquivo
Por padrão, os arquivos de origem estão disponíveis para tradução em todos os idiomas de destino do projeto. Clear the checkboxes next to the languages your file shouldn’t be translated into, and click Save.
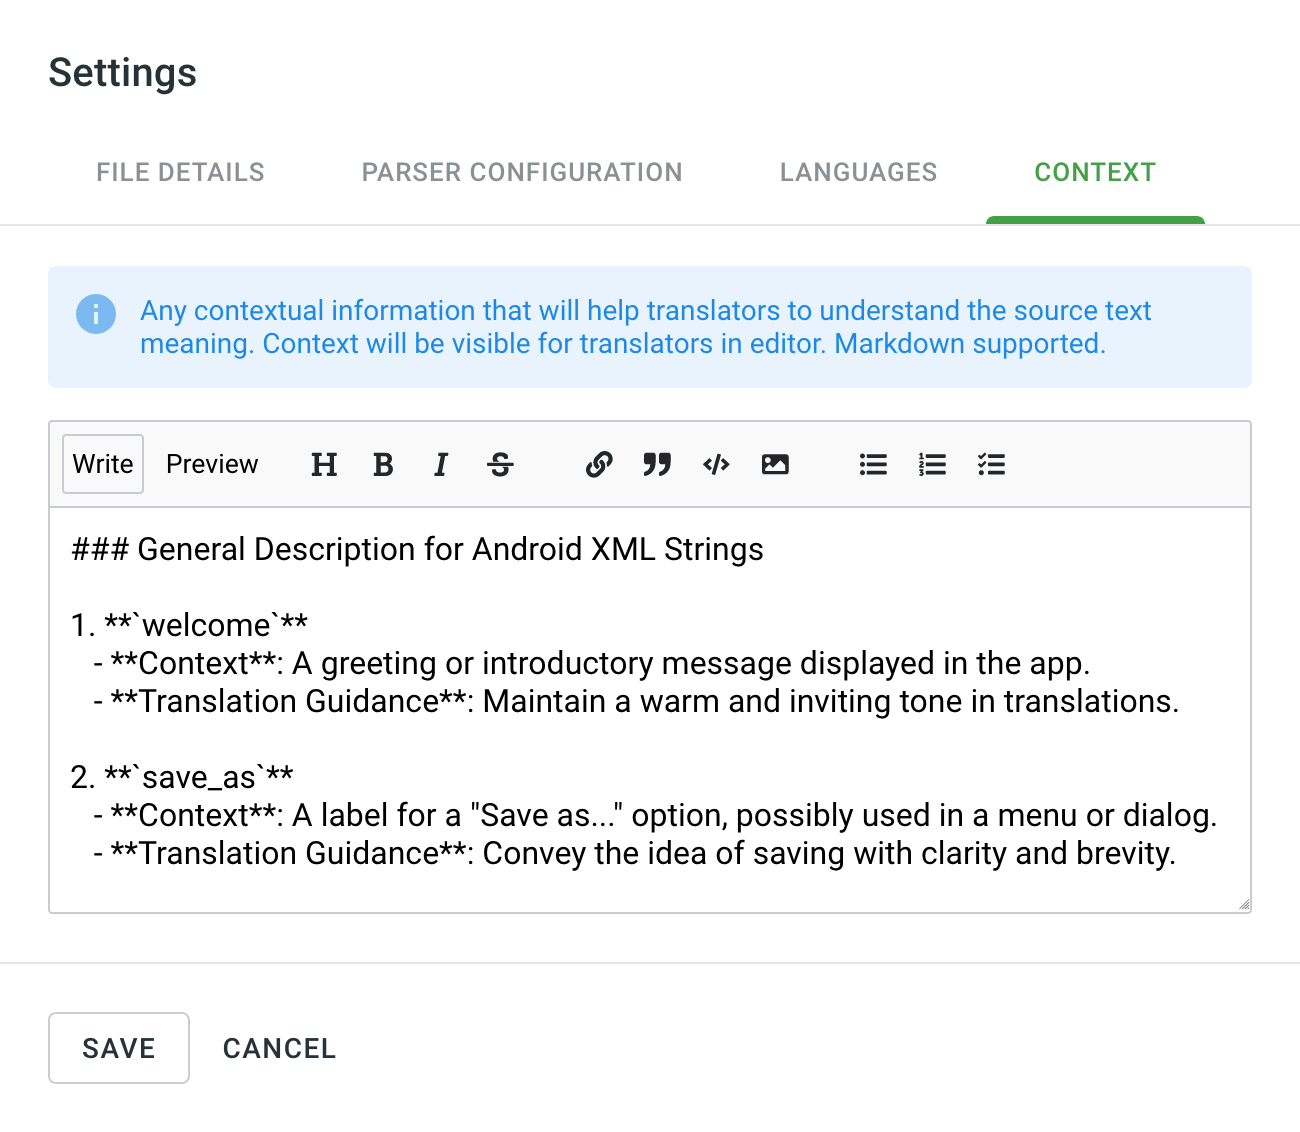
File Context
Add an additional context or instructions for translators to better understand how to translate a file. You can use either plain text or Markdown. The provided context will be visible to translators in the Editor in the File Context tab.
Note: File Context is only available for file-based projects.
Renomear arquivos
To change the file’s name, right-click on the necessary file or click ![]() next to it and select Rename.
next to it and select Rename.
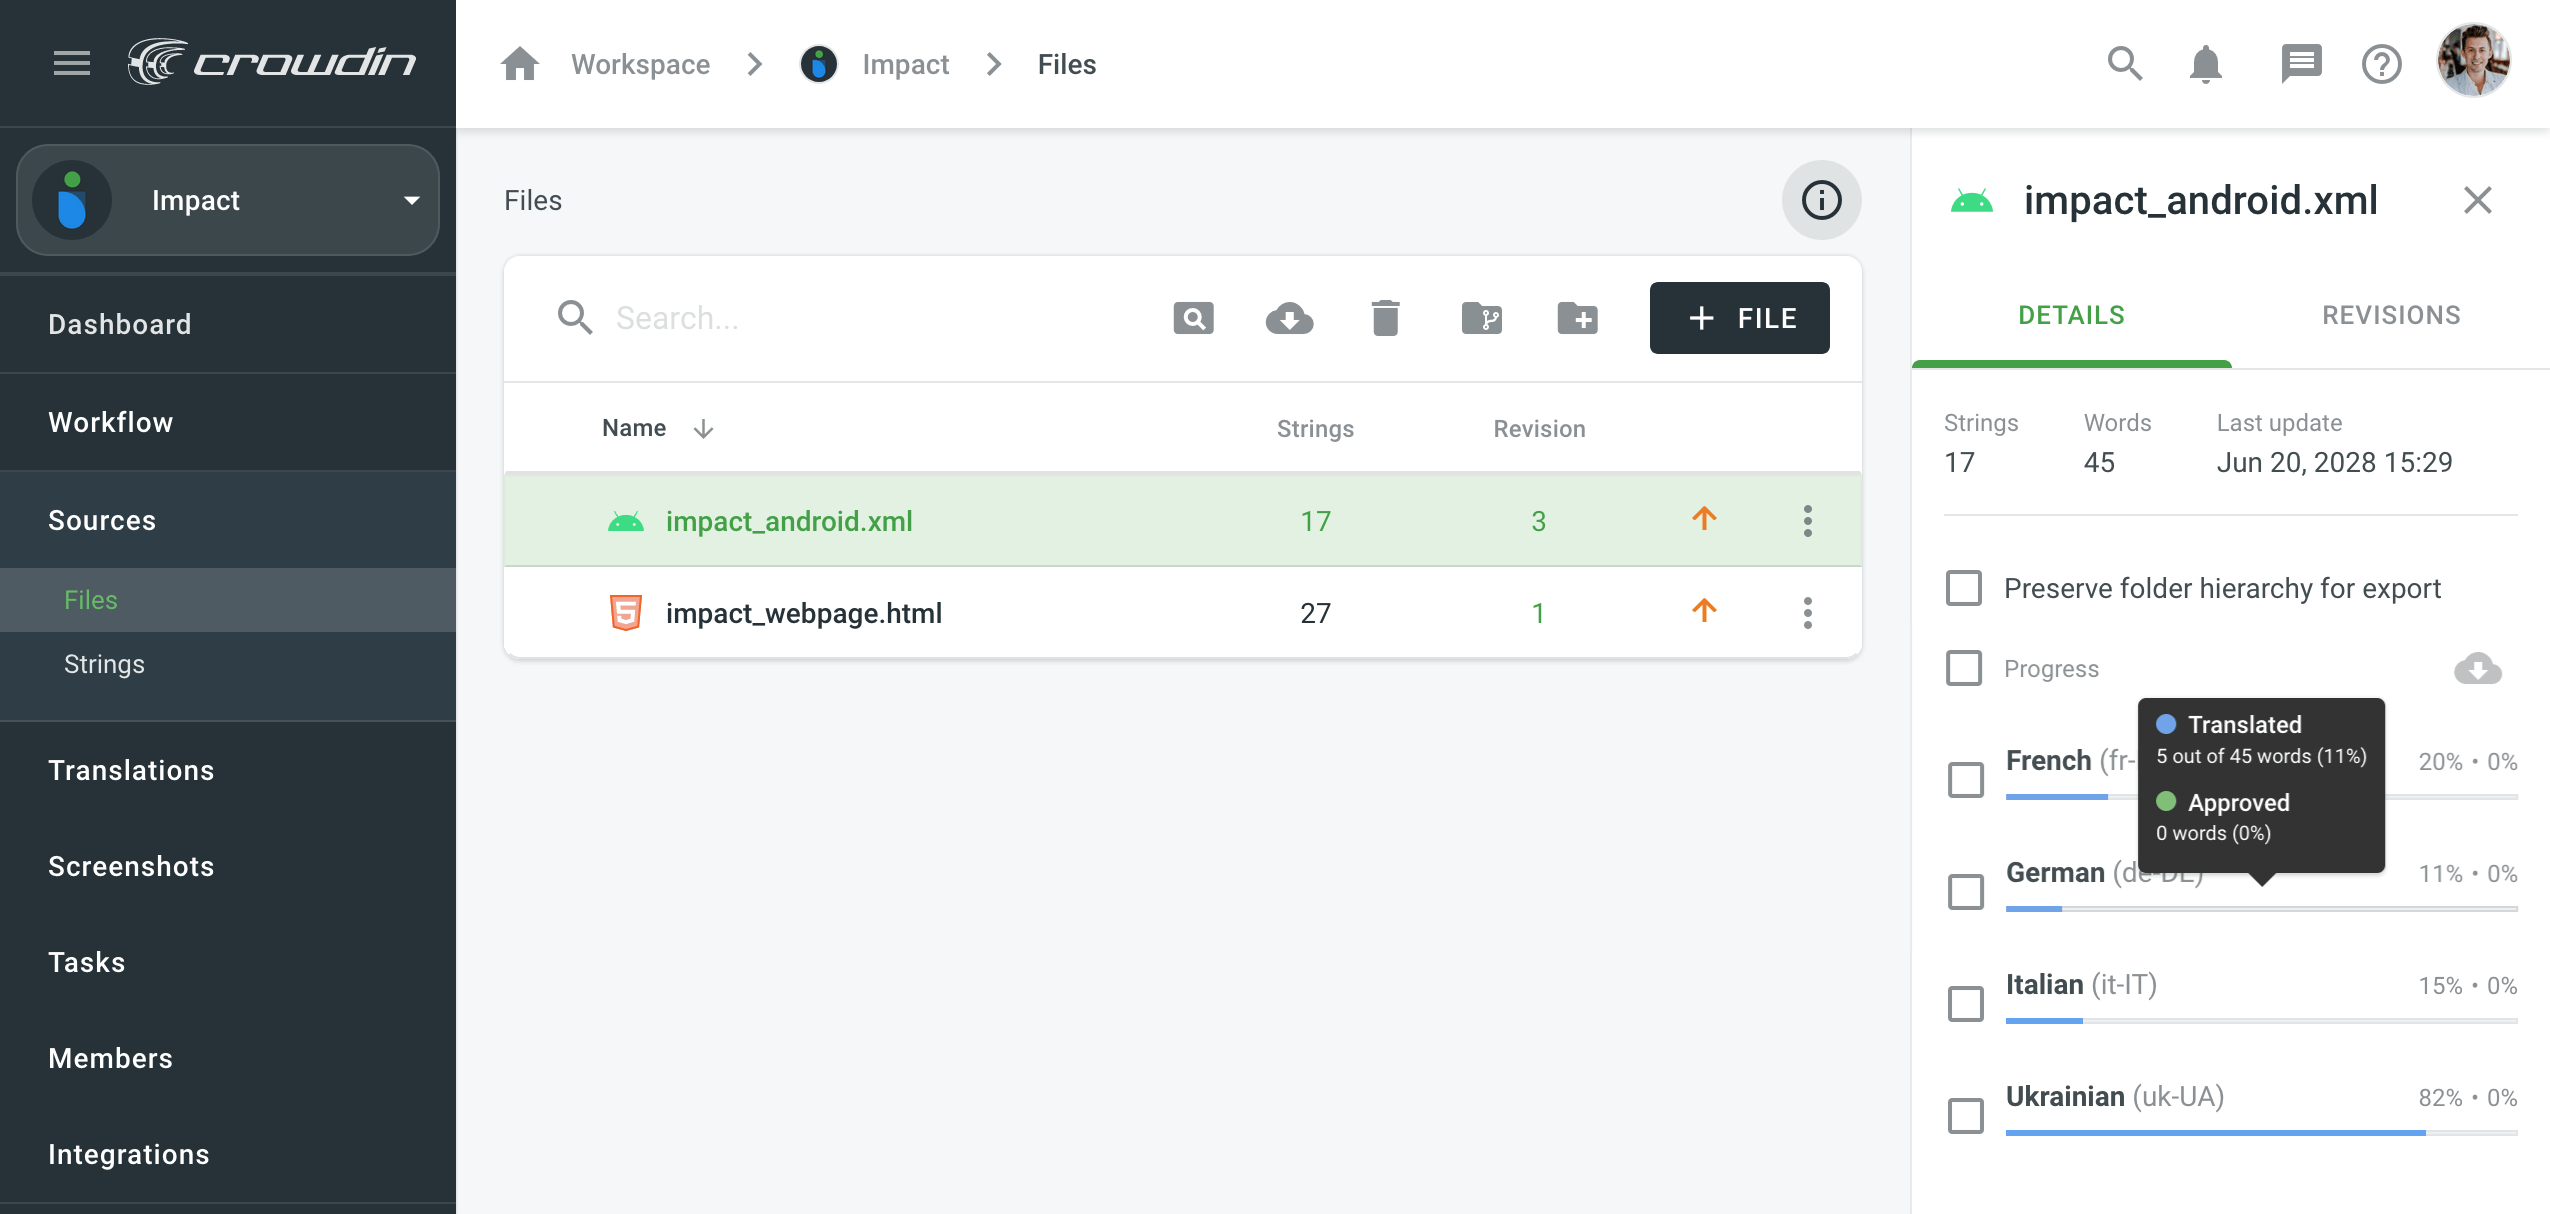
Verificar o progresso
Você pode verificar o andamento da tradução e aprovação de um ramo, pasta ou arquivo de que precisa. Right-click on the needed branch, folder or file, and select the View progress. Para ver quantas palavras foram traduzidas e aprovadas para cada idioma, passe o mouse sobre a barra de progresso. Para abrir o arquivo selecionado no Editor, clique no idioma desejado. To download translations for the chosen file, select the required languages in the Details tab in the right-hand side menu, and click ![]() . Optionally, you can select Preserve folder hierarchy for export to export translation files along with the folders they’re stored in Crowdin Enterprise.
. Optionally, you can select Preserve folder hierarchy for export to export translation files along with the folders they’re stored in Crowdin Enterprise.
Atualizar arquivos de origem
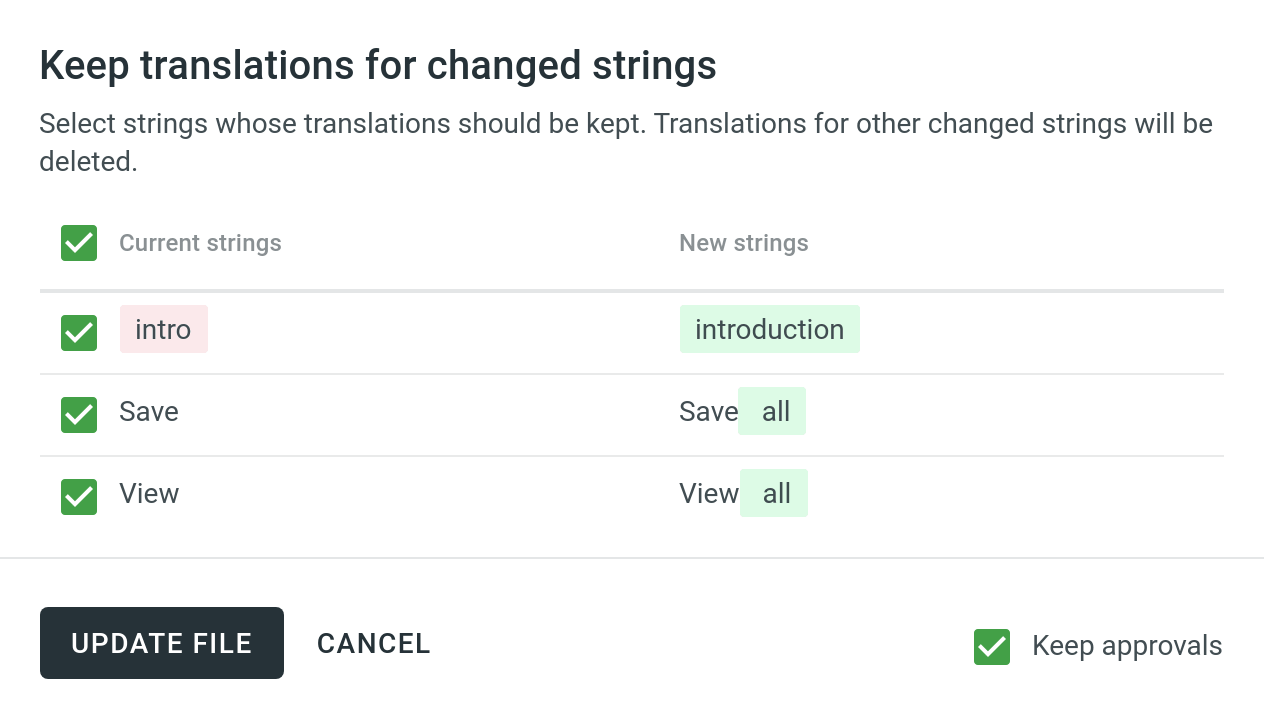
No caso de você ter adicionado algumas novas strings a um dos arquivos de origem, você deseja atualizá-lo para tornar as strings recém-adicionadas visíveis aos tradutores. Right-click on the needed file, select Update, and then select the new file on your machine.
Se algumas dos textos de origem foram modificados, o sistema mostra uma caixa de diálogo com uma lista de strings editadas. You’ll be able to choose which existing translations you want to keep without changes (Current strings column) and whether you want to keep or remove approvals. As traduções para outros textos alterados serão removidos.
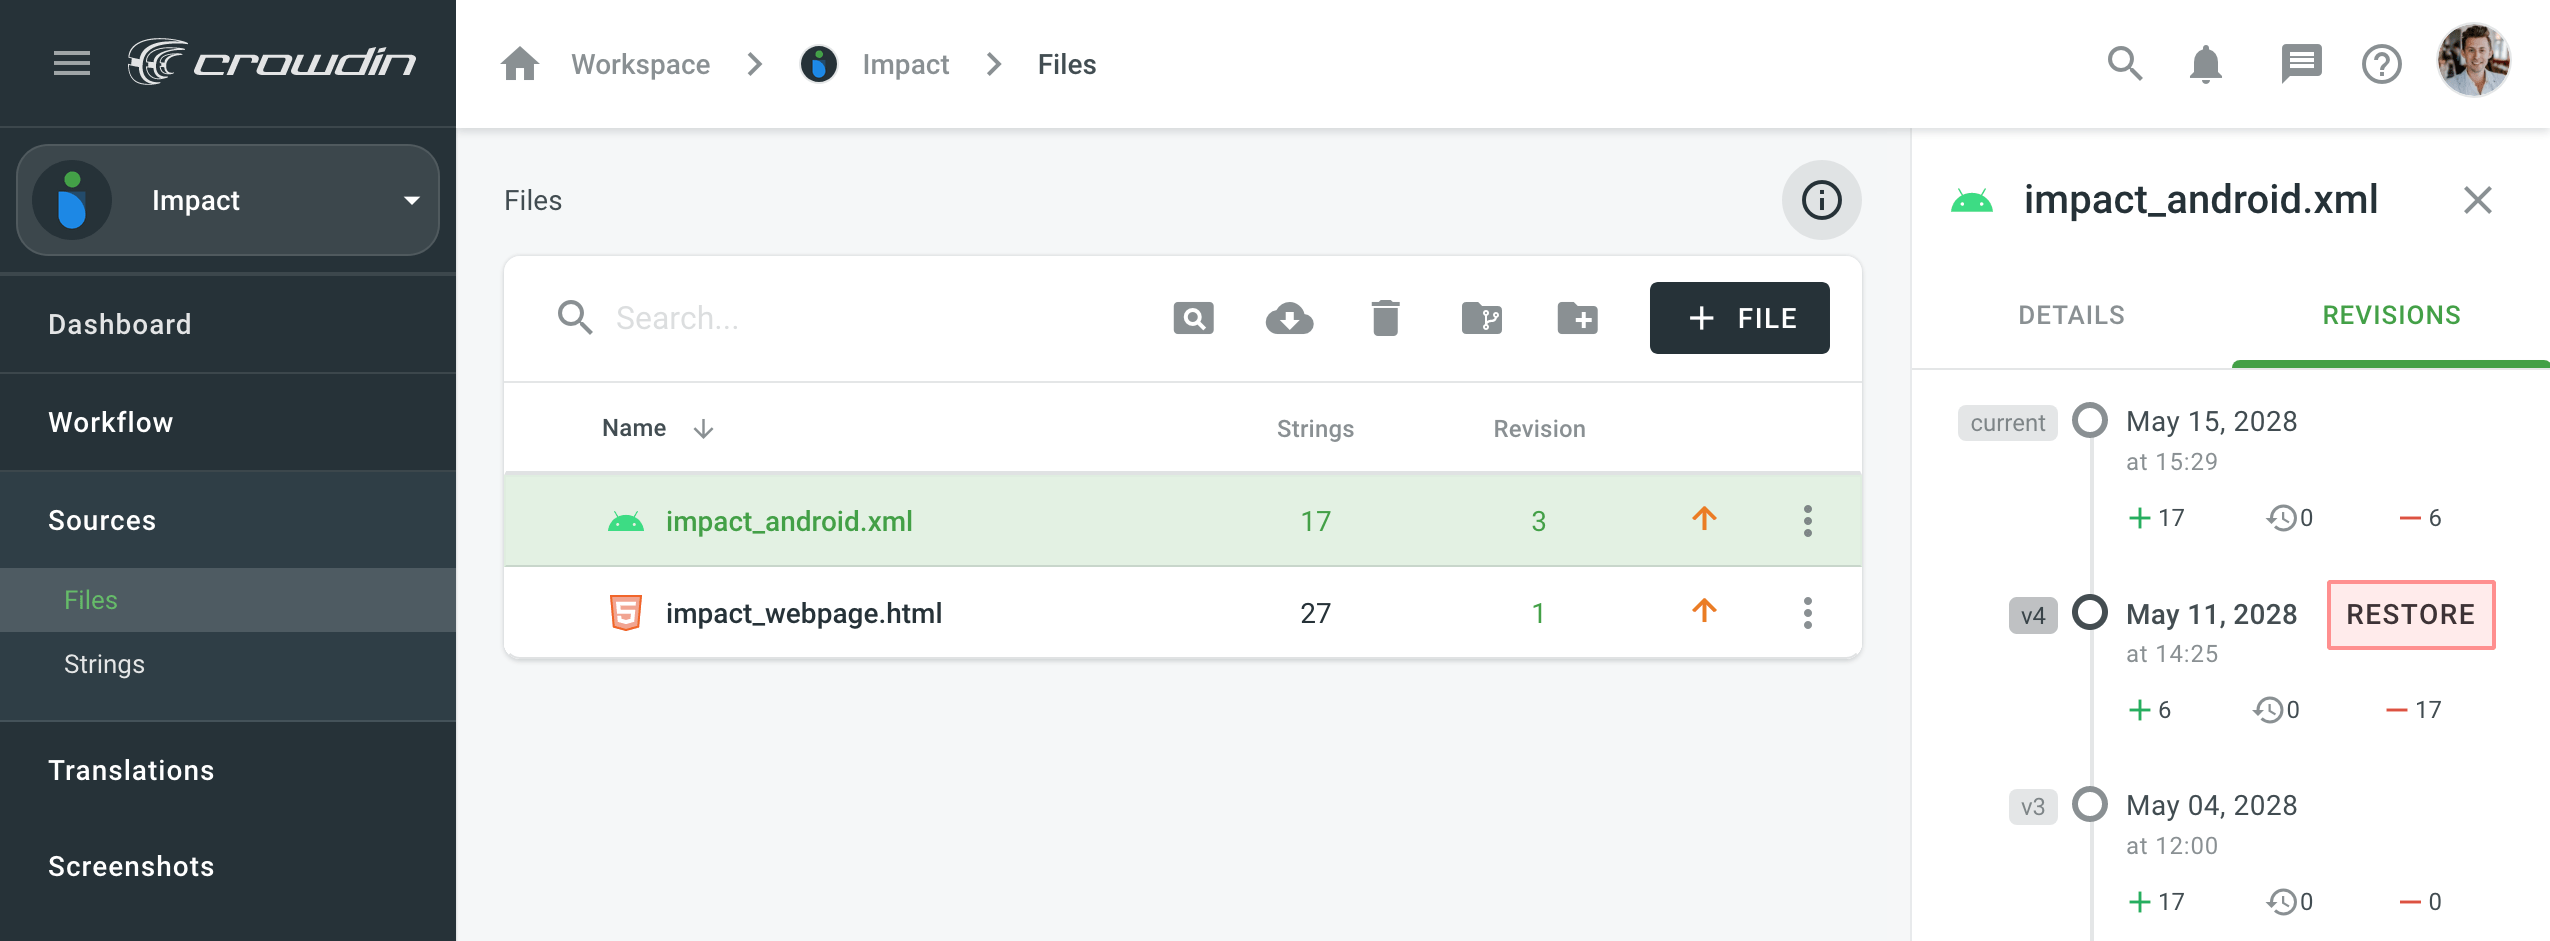
Restaurar versões anteriores
Cada vez que atualizar o arquivo de origem, uma nova revisão é criada. To restore your file to the previous revision, click the number on the needed file in the Revision column. In the Revisions tab in the right sidebar, hover over the needed revision and click Restore next to it.
Ramificações e pastas
You can create folders and branches in Sources > Files with the following buttons:
 – create folder
 – create branch
As pastas representam sua estrutura de conteúdo, enquanto os ramos ajudam a gerenciar diferentes versões do conteúdo.
Ainda assim, se você precisar criar ramificações manualmente, certifique-se de carregar a ramificação master primeiro, já que todos os outros serão considerados as ramificações do recurso. Usually, branches in Crowdin Enterprise are created automatically if you use GitHub, GitLab, or other VCS integration. Duplicates might be managed in Settings > Import > Source Strings by choosing the corresponding option for Duplicates.
Gerenciamento de textos
Você pode visualizar todas as strings do projeto e gerenciar as configurações de strings por meio de Fontes > Strings.
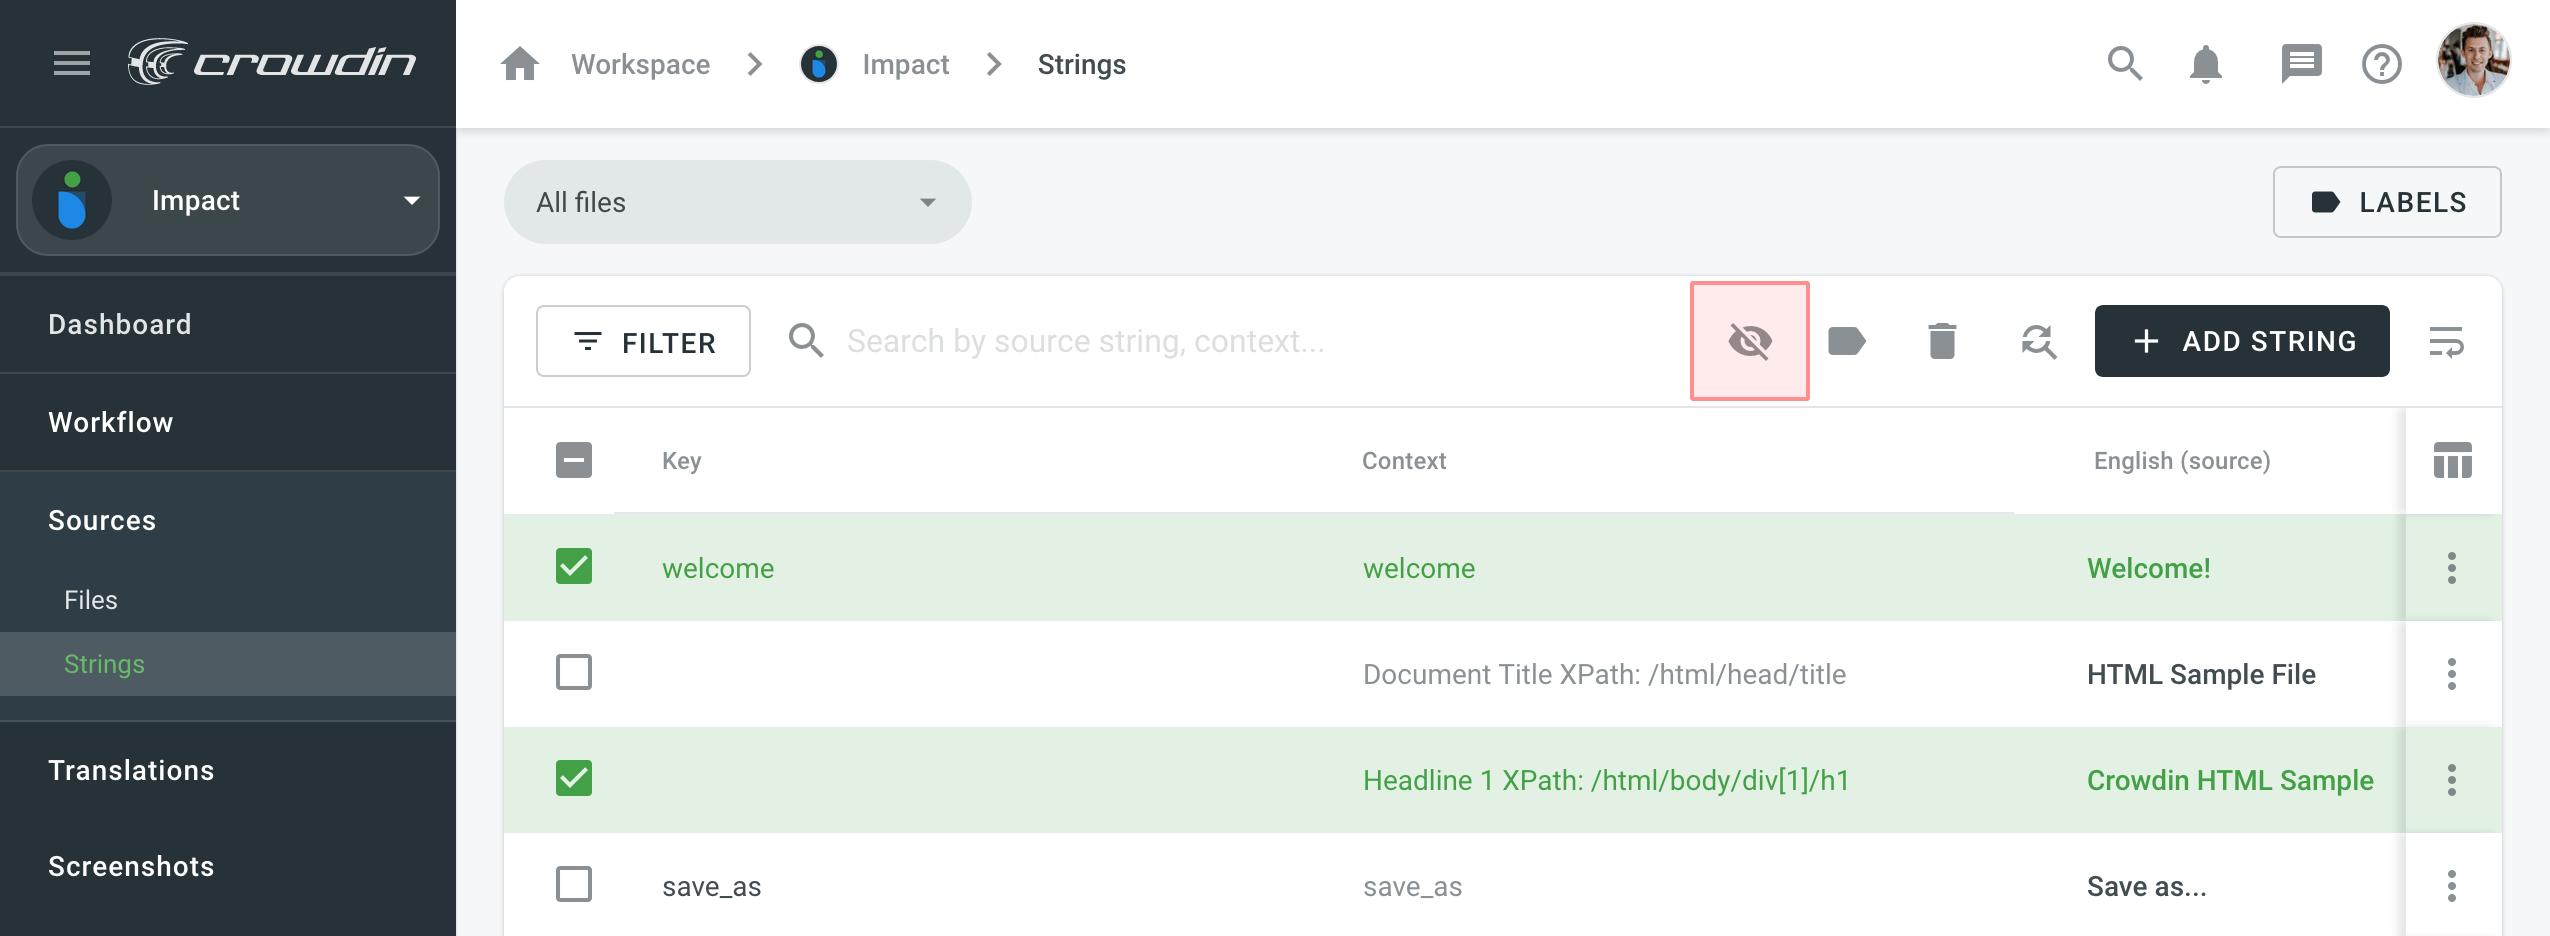
Alterando a visibilidade dos textos
Se alguns textos contiverem dados que não devem ser traduzidos (por exemplo, espaços reservados, outras entidades técnicas), você pode escondê-los dos tradutores. Para fazer isso:
- Abra seu projeto e vá para Fontes > Strings.
- Selecione os textos necessários
- Click
 .
.
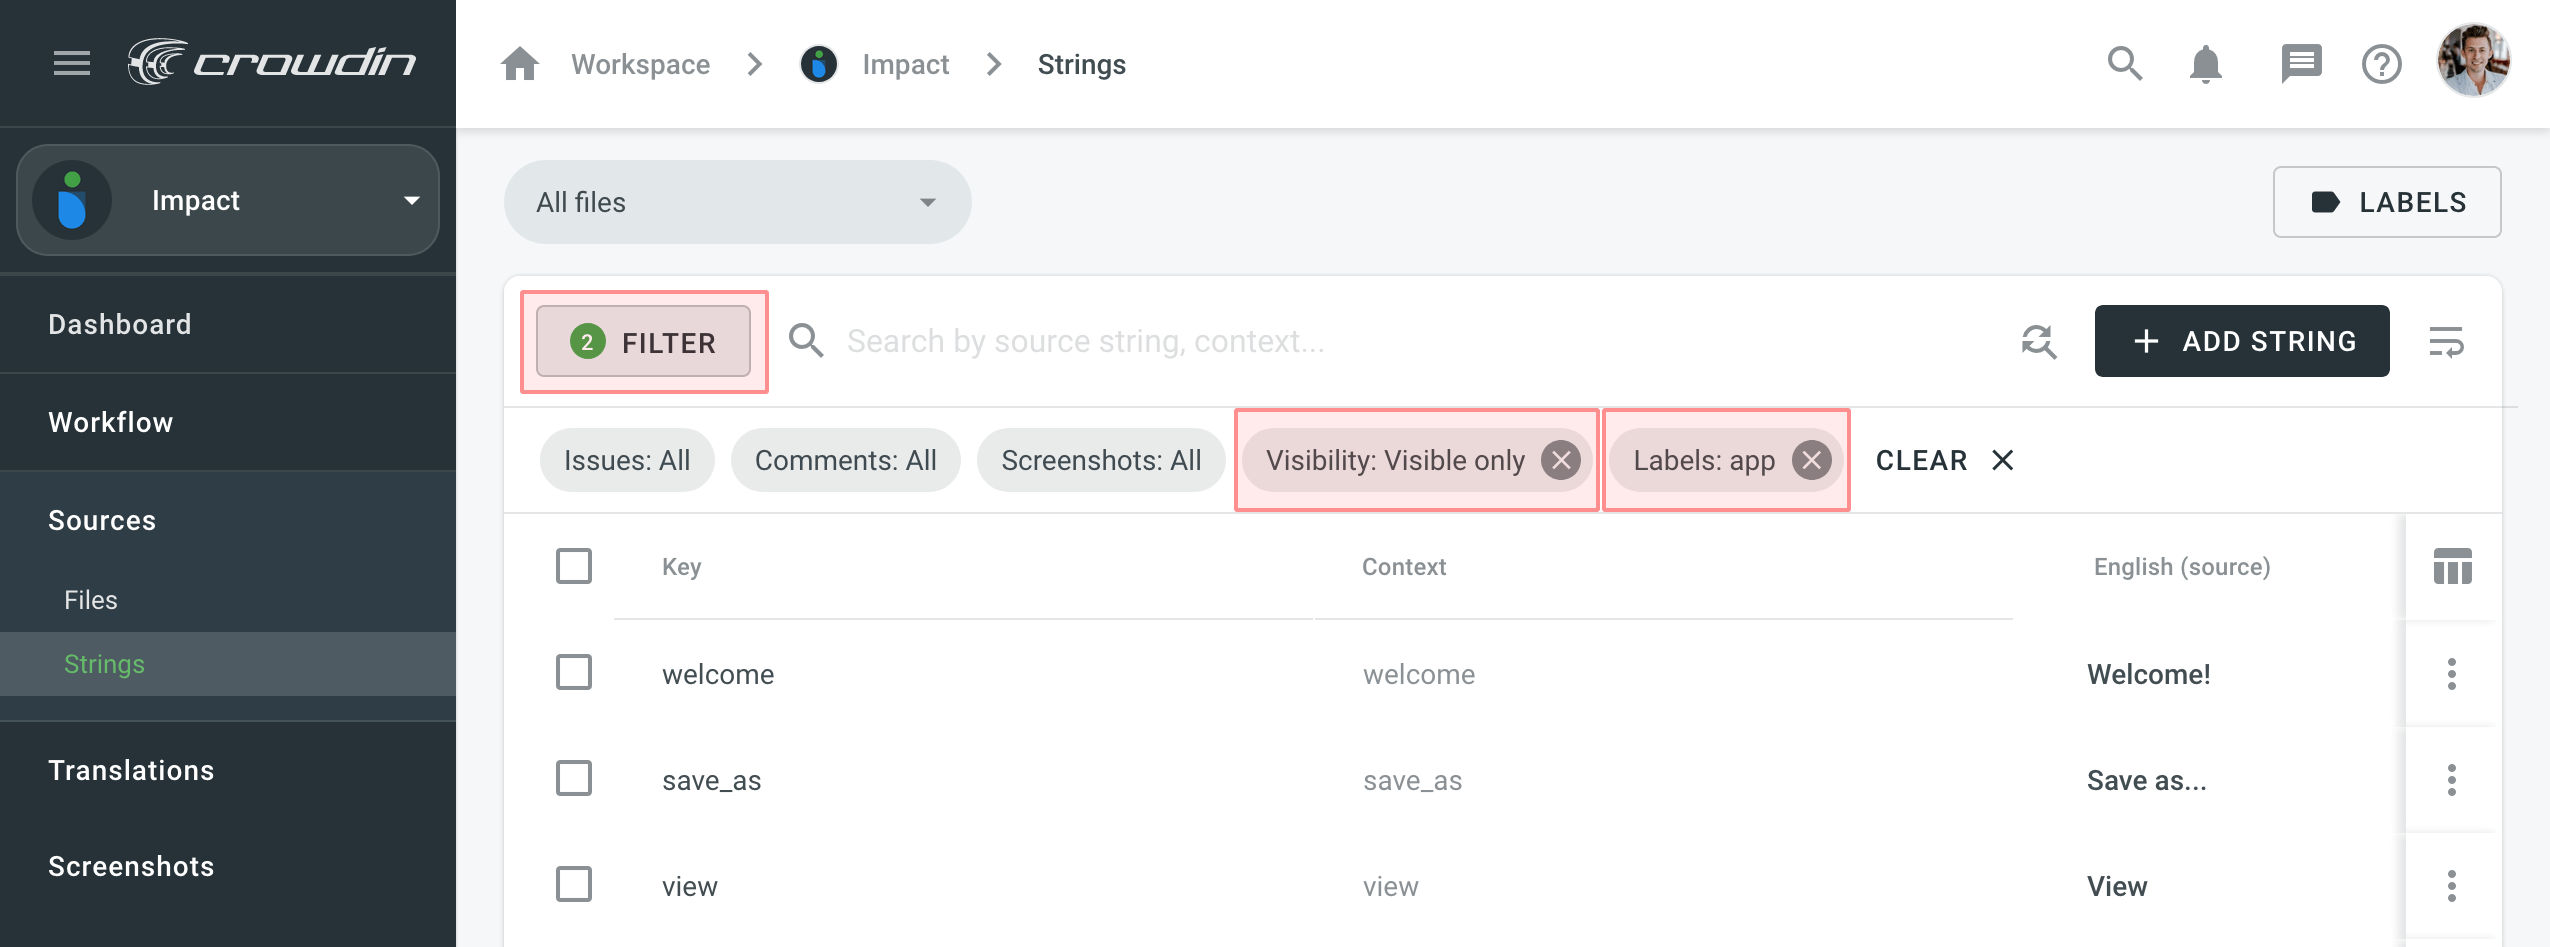
Filtrando textos
Por padrão, todas as strings de origem do projeto são exibidas em Fontes > Strings. If necessary, you can filter out strings using the available filter options (Issues: All, With unresolved issues, Without unresolved issues; Comments: All, With comments, Without comments; Screenshots: All, With screenshots, Without screenshots; Visibility: All, Visible only and Hidden only) and project labels.
Edição de texto
You can add context to the string and set the max. length of the translation.
Once the translation limits are exceeded, the system notifies the contributor that translation should be shorter.
Some file formats allow editing (adding, deleting, and modifying) of the source texts and string identifiers directly in Crowdin Enterprise so you can do the necessary corrections without updating the source file via Sources > Files. Confira a lista completa abaixo:
- Android XML
- iOS Strings
- JSON
- i18próximo JSON
- XLIFF 1.2
- XLIFF 2.0
- Angular XLF
- GNU Gettext PO
- Unreal Engine Gettext PO
- YAML
- RESX
- CSV
- ARB
- Java Properties
- Properties Play
- Properties XML
To edit some particular word or phrase that appears in multiple source strings, you can use the ![]() Find and replace feature in Sources > Strings.
Find and replace feature in Sources > Strings.
Note: When editing the identifier of a string contained in a group of strings (string array for Android XML, segments for XLIFF), the existing translations will be removed for all group strings but the edited one.
Rótulos
Use rótulos em seu projeto para uma maneira fácil de adicionar contexto às strings ou organizá-las por determinados tópicos. Os rótulos também são úteis ao criar tarefas de tradução e revisão ou pesquisar strings específicas no Editor com a ajuda de filtro avançado.
Gerenciando rótulos de projeto
Para criar, editar ou remover rótulos de projeto, siga estas etapas:
- Abra seu projeto e vá para Fontes > Strings.
- Click Labels.
- Na caixa de diálogo exibida, adicione novos rótulos, edite ou remova os existentes.

Adicionando rótulos a textos
Existem algumas maneiras possíveis de adicionar rótulos nos textos.
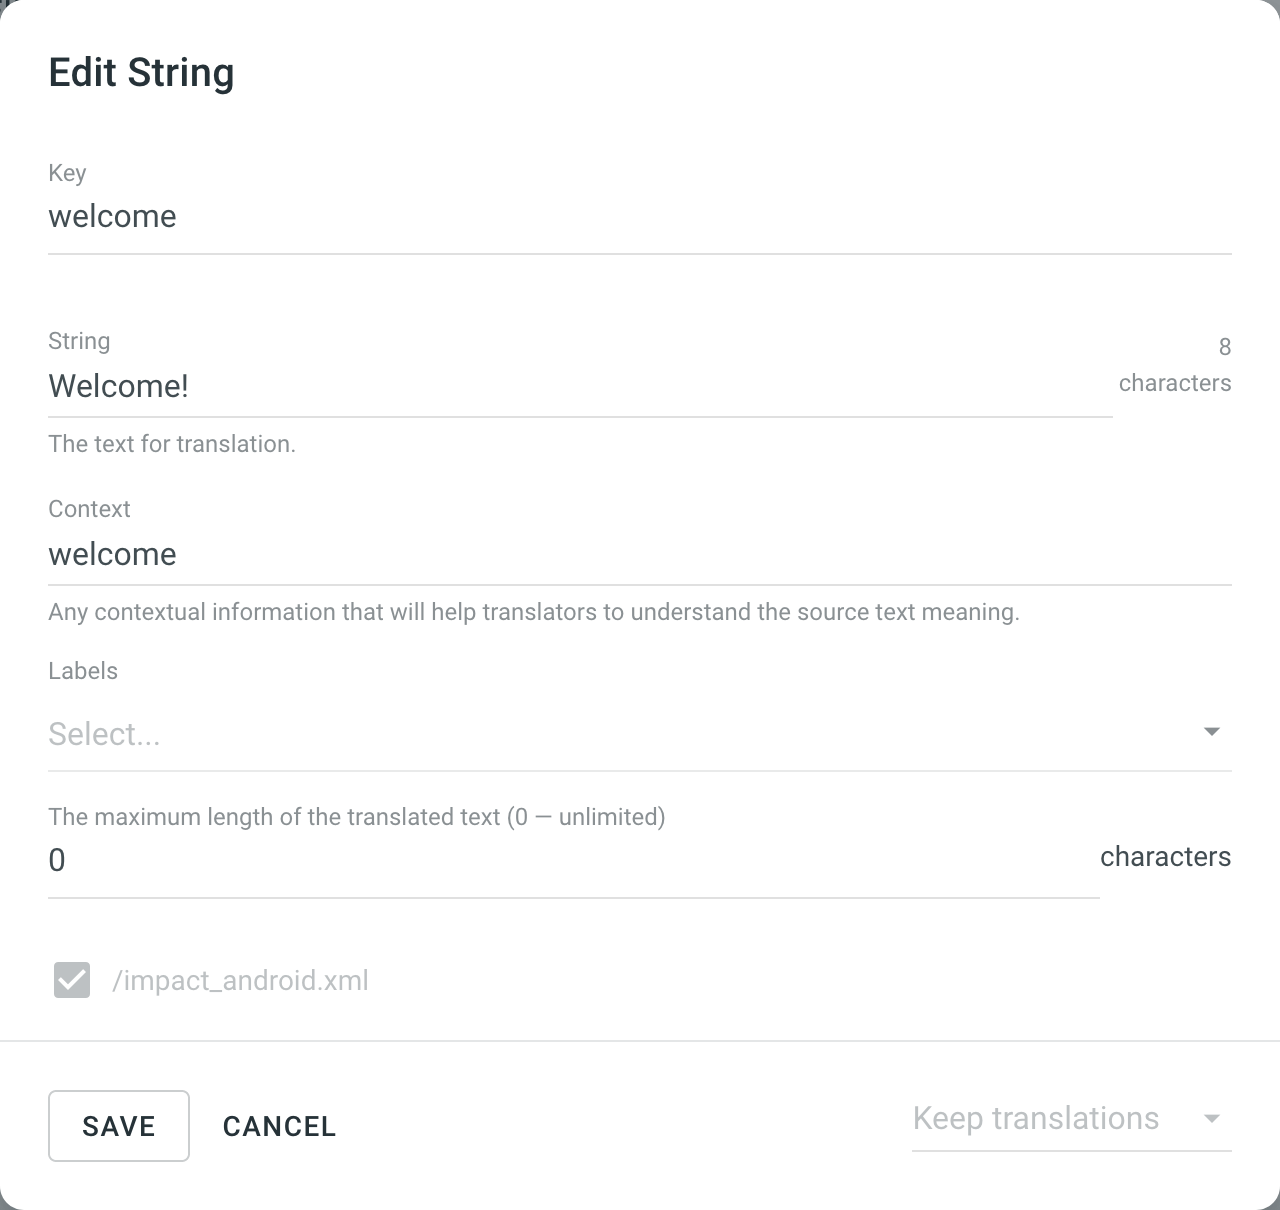
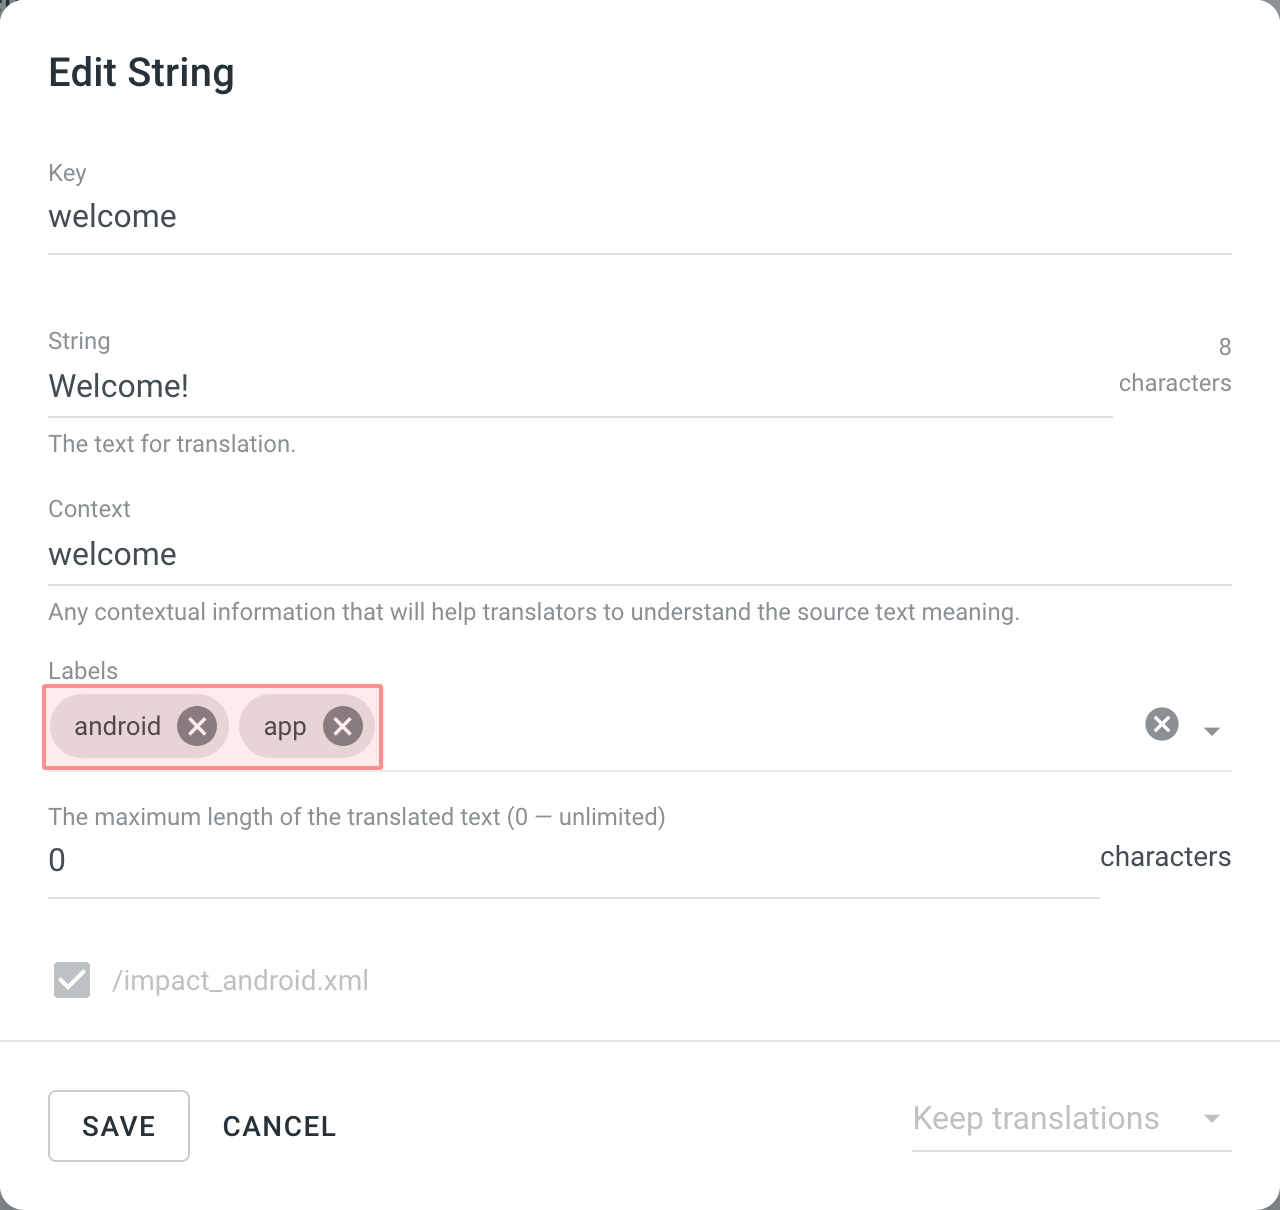
- Add labels to one string at a time via the Edit String dialog
- Right-click on the string in the list and select Edit
- Selecione os rótulos necessários no campo de rótulos
- Clique em Salvar
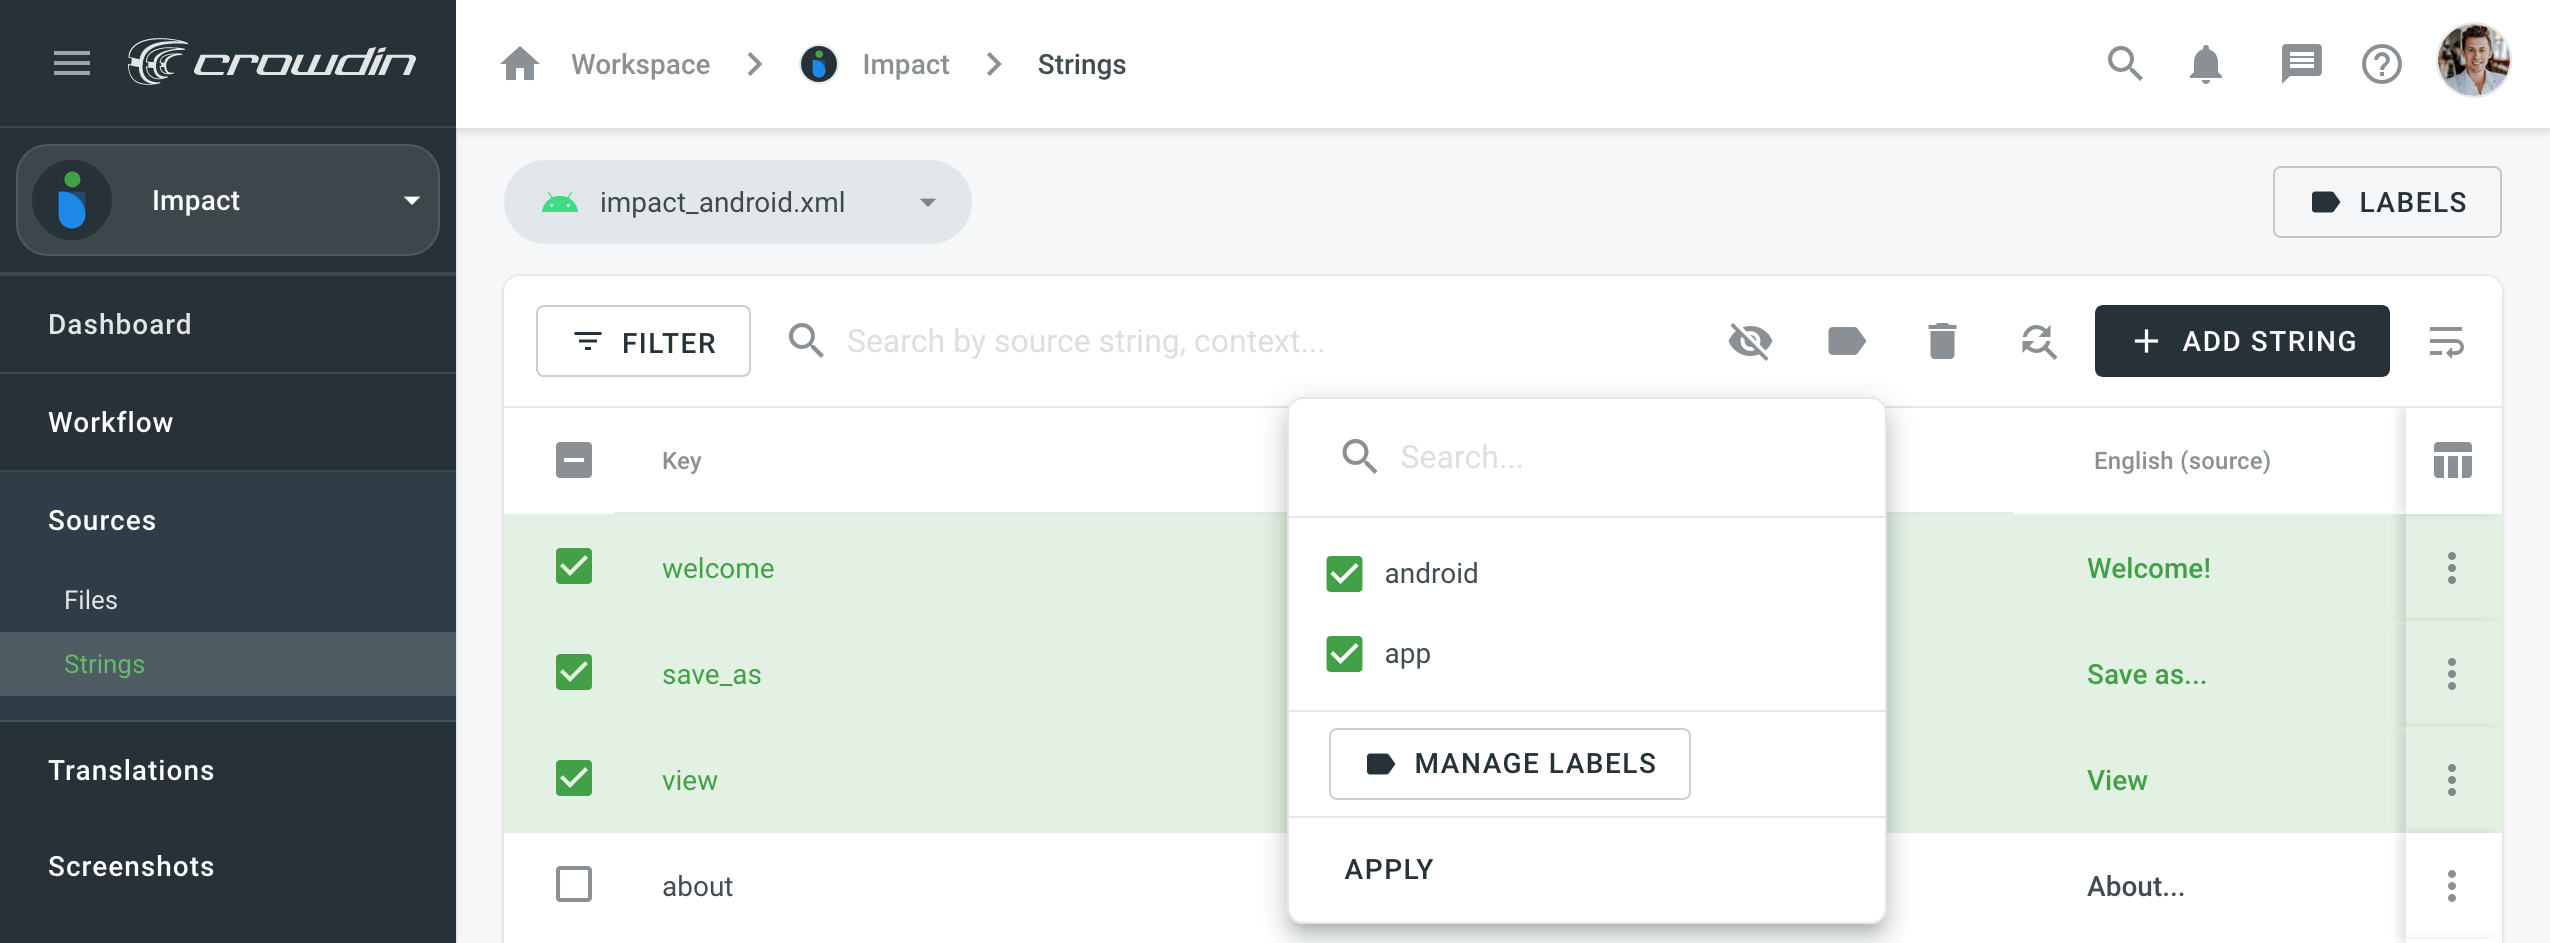
- Add labels to multiple strings via the Manage strings labels dialog
- Selecione alguns textos às quais deseja adicionar os mesmos rótulos
- Clique em

- Select needed labels from the list
- Click Apply
-
Add labels to the source strings in CSV and XLSX files using a dedicated column for labels.
Read more about Configuring Columns for Import for XLSX and CSV Files
Note: String labels added to the project with an initial CSV/XLSX file upload aren't overwritten or removed during the following file updates.
Alterando o Esquema para Arquivos CSV e XLSX
File formats like CSV and XLSX might require changing the initially configured scheme. Usually, it might be needed when you add a new target language to your Crowdin project.
Read more about changing the scheme for CSV and XLSX files.