Плагін Adobe XD
За допомогою плагіну Crowdin for Adobe XD, ви можете використовувати тексти з Crowdin Enterprise у своїх дизайнах, щоб зекономити час для дизайнерів та розробників. These could include original or translated texts. При необхідності ви можете додати нові (наприклад заголовки діалогів, підписи кнопок) і надсилати їх перекладачам у Crowdin Enterprise.
Варіанти використання
- Quickly generate multilingual creative assets.
- Перекладіть макети та протестуйте їх різними мовами перед програмуванням.
- Досить використовувати ‘Lorem Ipsum’, натомість додайте справжні тексти з Crowdin Enterprise для своїх зразків.
- Створюйте та завантажуйте рядки джерел зі своїх дизайнів у свій проєкт Crowdin Enterprise. This way, uploaded strings could be used by developers, which reduces time spent on development.
- Завантажте позначені знімки екрану до свого проєкту Crowdin Enterprise.
Installing Crowdin plugin for Adobe XD
- Sign in to Adobe XD.
- Navigate to Plugins > Browse plugins….
- Click Browse.
- Use the Search all plugins field to find Crowdin for Adobe XD plugin.
- Click Install.
Підключення Adobe XD до облікового запису Crowdin Enterprise
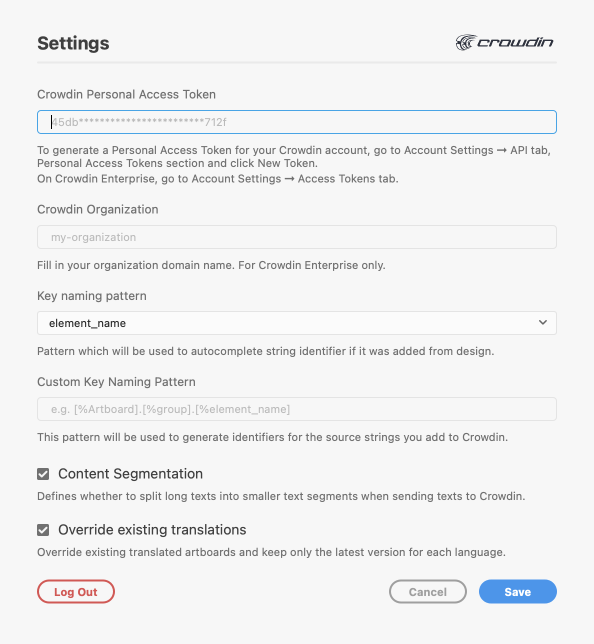
Налаштування облікових даних Crowdin Enterprise
Щоб вказати свої облікові дані Crowdin Enterprise в Adobe XD, виконайте такі дії:
- On the left panel, click Plugins > Crowdin for Adobe XD.
- Click
 .
. - Вкажіть свій особистий токен доступу.
- Вкажіть доменне ім’я вашої організації та натисніть Save.
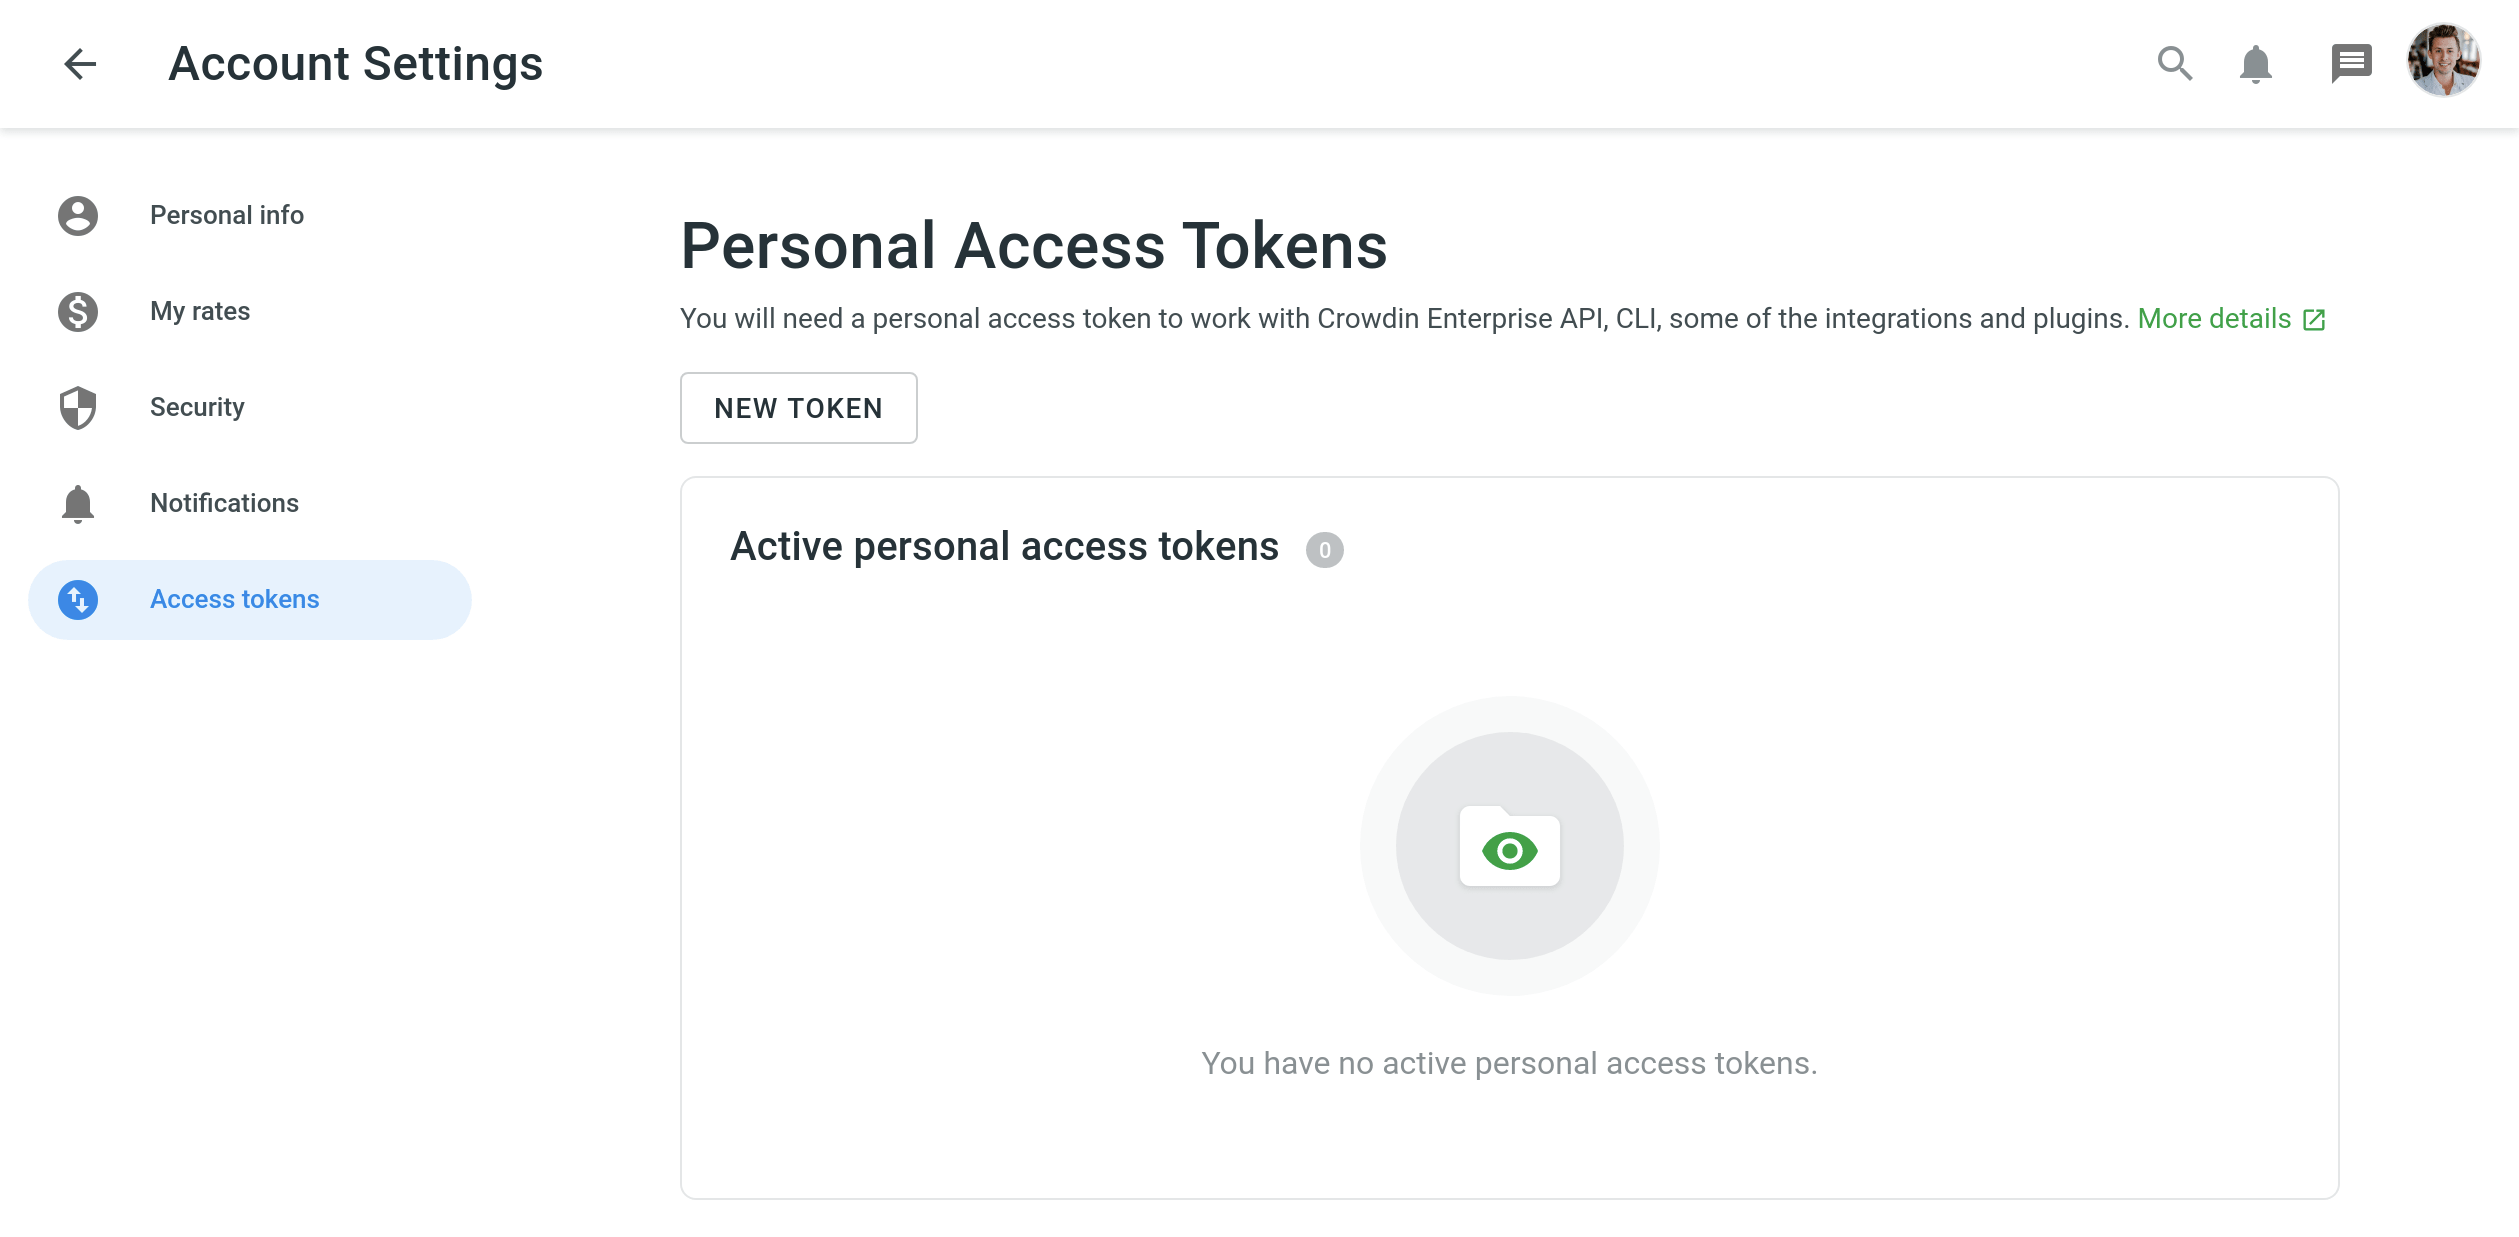
Щоб створити новий маркер у Crowdin Enterprise виконайте наступні кроки:
- Go to Account Settings, Access tokens tab and click New token.
- Зазначте Token Name, оберіть Scopes та Projects, натисніть Create.
Вибір проєкту Crowdin Enterprise
To select the project you’d like to work with, click the drop-down menu, and select a project from the list. Later, you can use the same drop-down menu to switch to another project if needed.
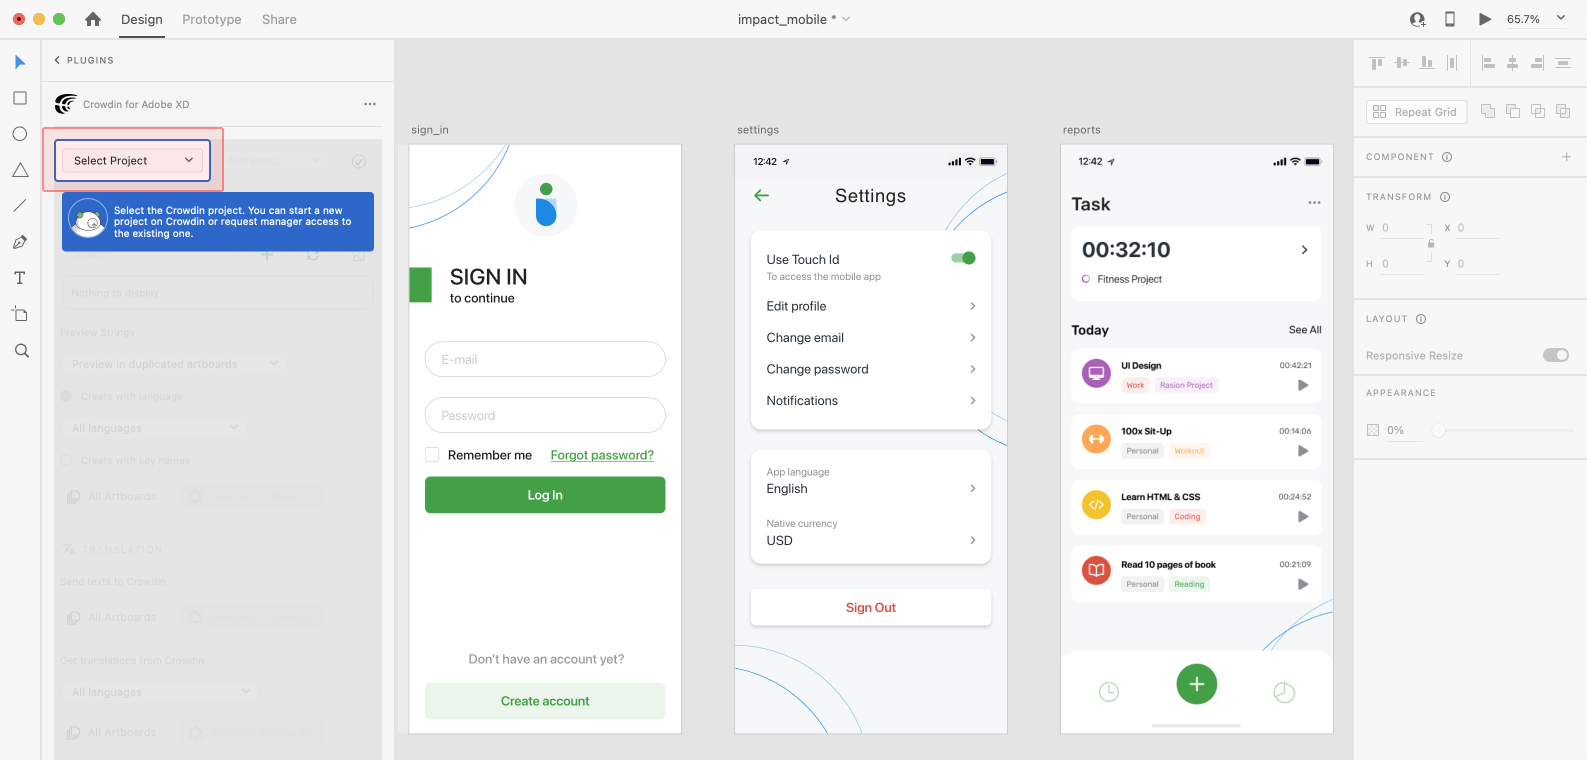
Select the specific branch your content will be uploaded to. If your Crowdin Enterprise project doesn’t have branches, leave it empty.

UI Localization
Use the Strings section when localizing UI and working on dynamic pages with your development and marketing teams. У цьому розділі ви можете додати рядки джерел з Crowdin Enterprise до своїх дизайнів у Adobe XD за одним клацанням миші. After the texts are used in the designs, you can automatically upload tagged screenshots for translators’ reference back to Crowdin Enterprise.
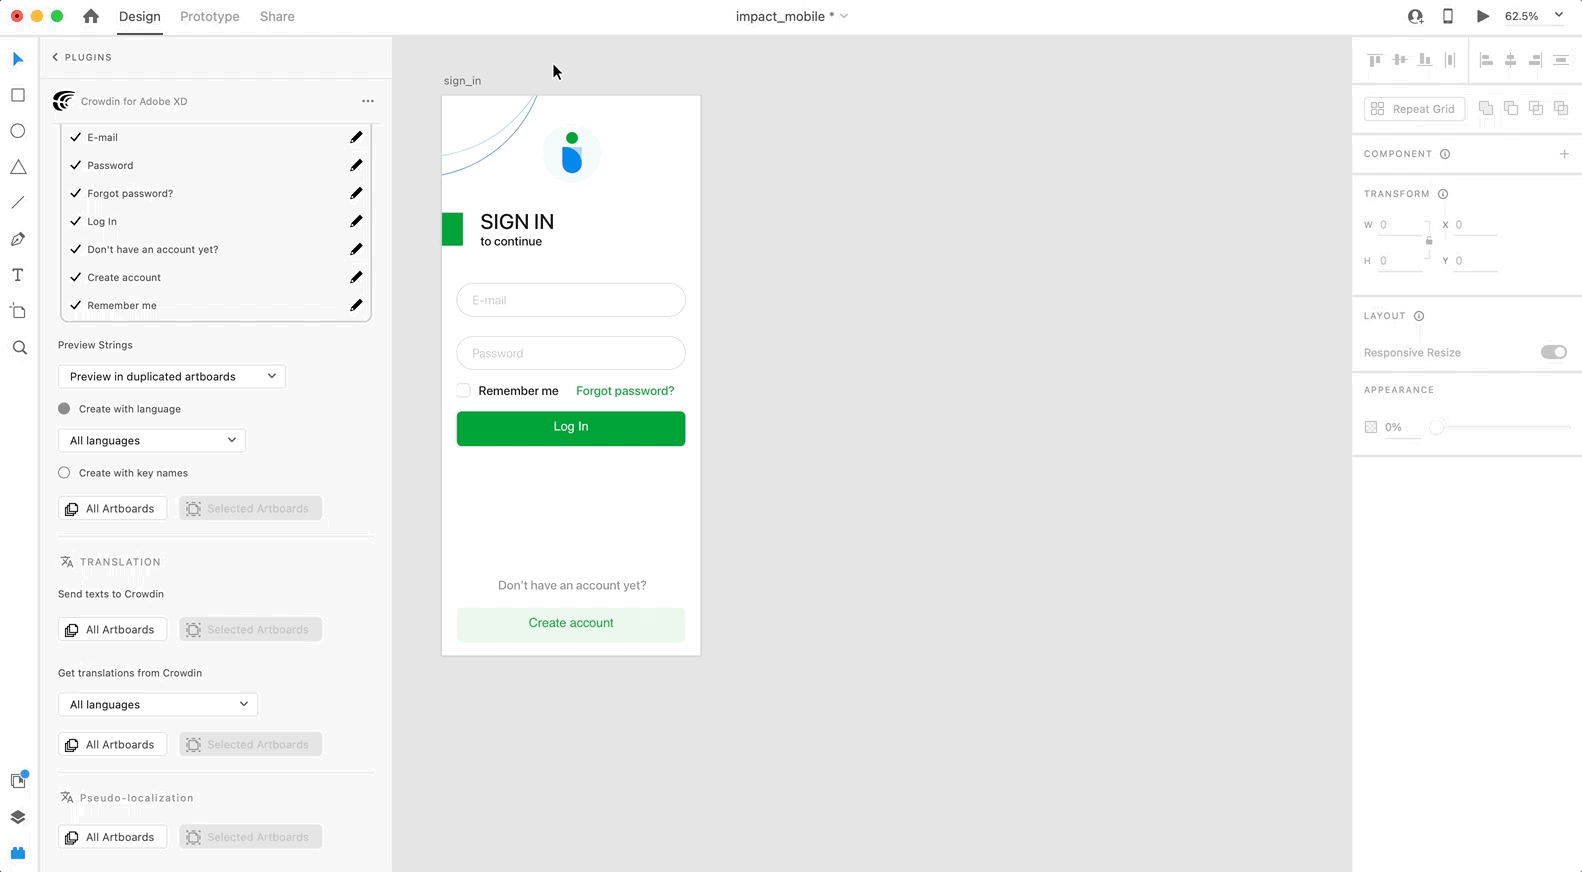
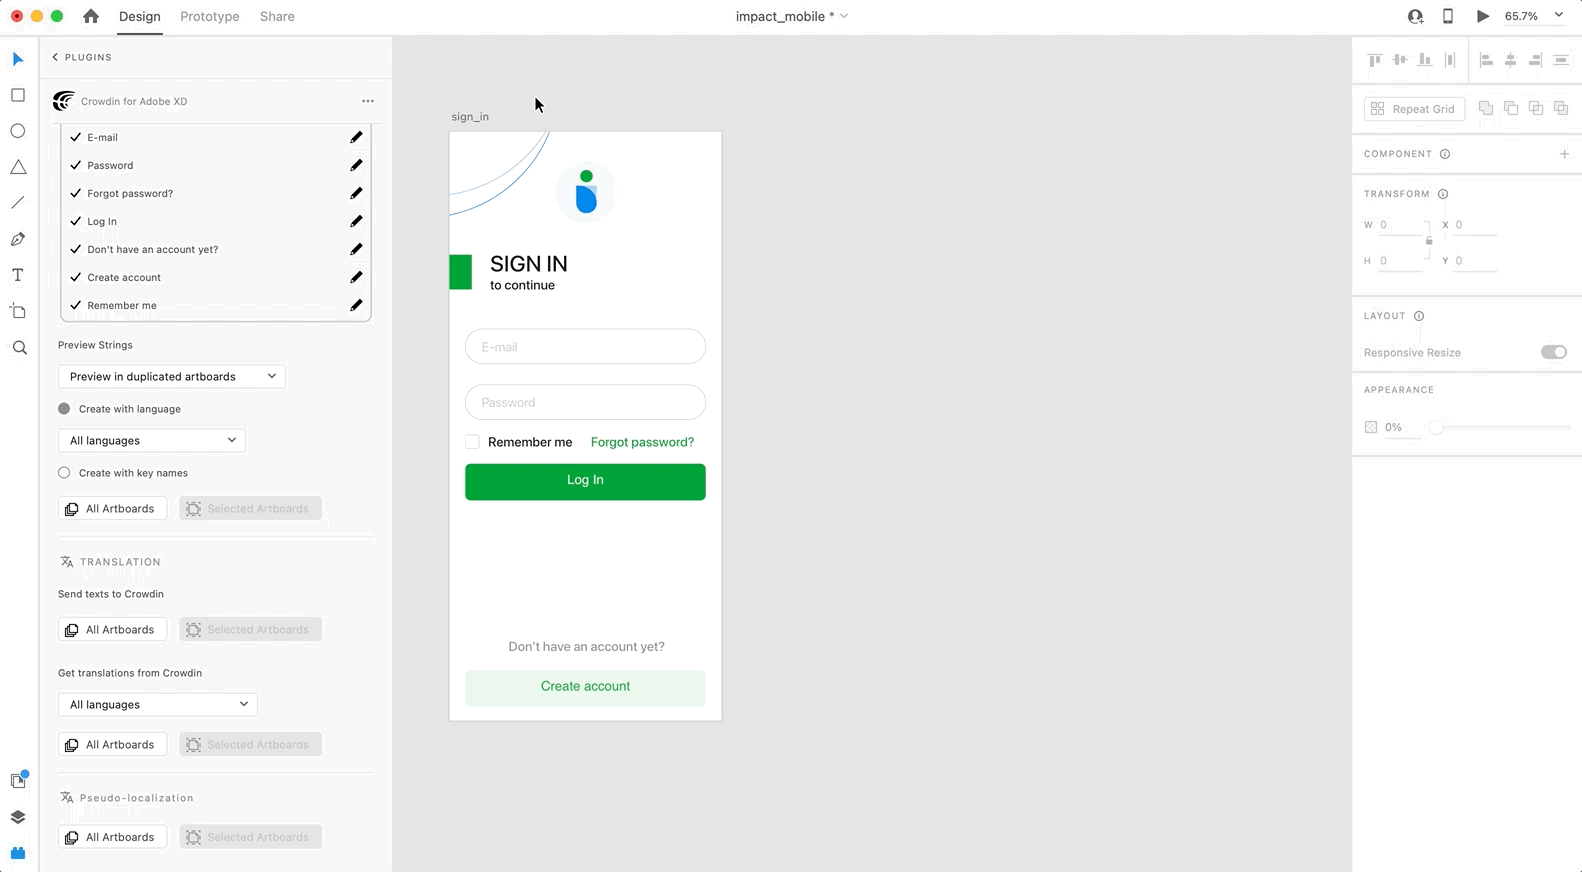
Використання вихідних рядків із Crowdin Enterprise в Adobe XD
- Open the Crowdin plugin for Adobe XD.
- In the Strings section, use the Search field to find the specific copy. You can search strings by source text, string identifier, or context.
- Select the text layer to which you want to add text and click on the needed string.

Після використання рядків джерел з Crowdin Enterprise у своїх дизайнах, вони з’єднуються з текстовими полями, і ви можете переглянути переклад для цих рядків у Adobe XD та завантажити знімки екрану для них у вашому проєкті Crowdin Enterprise.
You can link a single Crowdin string to one or multiple text fields in Adobe XD. However, one text field can be linked only to a single Crowdin string. If you link a text field with an existing connection to a new Crowdin string, the previous connection will be terminated, and a new connection will be established. If you’d like to unlink a Crowdin string from all text fields it was previously linked to, right-click on the link icon next to the needed string.
Додавання вихідних рядків з Adobe XD до Crowdin Enterprise
You can add strings already used in the designs or create and add completely new strings.
- Open the Crowdin plugin for Adobe XD.
- To add the strings used in the designs, select the whole artboard, multiple artboards, or the needed strings on the artboards. Alternatively, skip this step if you want to add a new string.
- In the Strings section, click
 .
. - In the appeared dialog, fill in the required fields.
- (Optional) To add labels to the strings, alternately select them from the Label drop-down menu and click Save.
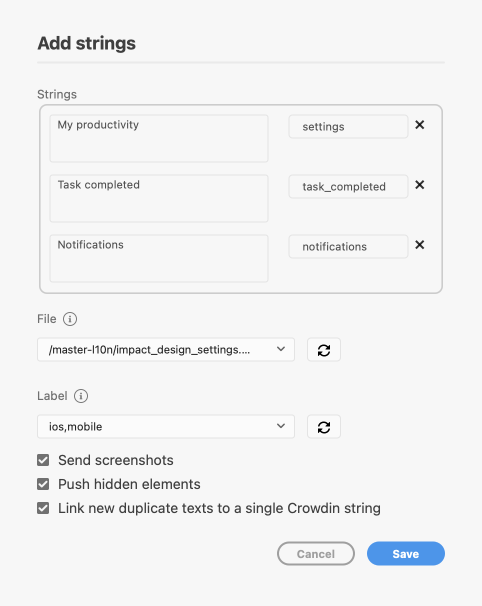
Щоб додати ті ж рядки у кілька файлів у Crowdin Enterprise по черзі обирайте потрібні файли з Файл у випадному списку.
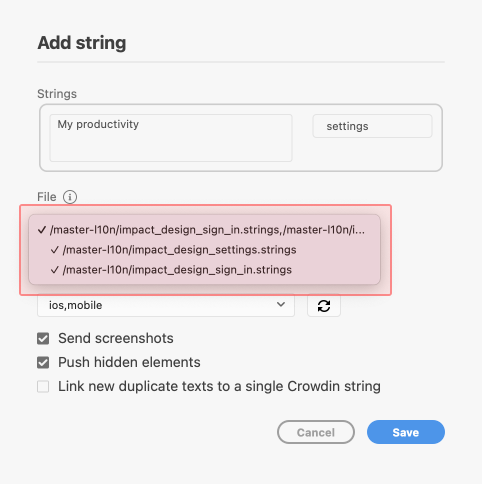
Зніміть прапорець Push hidden elements, якщо деякі аркуші містять приховані елементи, які не слід додавати до Crowdin Enterprise.
When adding multiple strings, you may want to select Link new duplicate texts to a single Crowdin string. It’s useful in the following cases:
- When adding multiple text fields with the same text, the plugin will add only one string to your Crowdin Enterprise project and link all duplicate text fields to it.
- If your Crowdin Enterprise project already contains a string with the same text you’re adding from designs, the plugin will only link the text fields to the existing string and won’t create a new one.
Додані рядки буде перенесено до вашого проєкту Crowdin Enterprise, а також показано у списку секції Strings. You can edit or delete the strings from the same list anytime. Відповідні зміни також буде застосовано до рядків у вашому проєкті Crowdin Enterprise.
Configuring ICU Source String Placeholders
When using ICU strings in your design, you can set the placeholders’ values, and after adding such strings to designs, they will be displayed in a formatted view with the preconfigured values.
Коли ви використати потрібний рядок ICU з Crowdin Enterprise у своєму дизайні, ви можете налаштувати значення його заповнювачів.
- Open the Crowdin plugin for Adobe XD.
- In the Strings tab, use the Search field to find the specific copy. You can search strings by source text, string identifier, or context.
- Click
 on the needed ICU string.
 - Click Set placeholders.
- Type the needed values for ICU string placeholders.
- Click Submit to save the entered placeholders.
- Click Edit String to update the source string text in designs.
When previewing translations for ICU strings in Adobe XD, they will also be displayed in a formatted view if the values were preconfigured beforehand.
Key Naming Pattern Settings
Щоб спростити додавання рядків з Adobe XD до проєкту Crowdin Enterprise, ви можете задати бажаний шаблон іменування клавіш для ідентифікаторів рядка джерела у налаштуваннях плагіну. The Crowdin plugin for Adobe XD will suggest the string identifiers for new strings based on the selected pattern. While adding new source strings, you can always edit the suggested identifier to the preferred look.
To select the key naming pattern, follow these steps:
- Open the Crowdin plugin for Adobe XD.
- Open the plugin Settings.
- In the Key naming pattern section, select the preferred option from the drop-down menu.
Besides the existing patterns, you can configure your own pattern. To use a custom pattern, select the Custom key naming pattern option from the drop-down list and specify your pattern in the Custom Key Naming Pattern field.
Завантаження позначених знімків екрану в Crowdin Enterprise
При додавання вихідних рядків, що використовуються у дизайні, переконайтеся, що вибрано опцію Send screenshots. As a result, the Crowdin plugin for Adobe XD will upload screenshots along with the source strings.
Also, you can update screenshots with an Update screenshots option while editing a Crowdin string that is linked to the text fields in designs.
Additionally, you can mass upload screenshots to Crowdin Enterprise for strings linked with text fields in designs.
- Open the Crowdin plugin for Adobe XD.
- Select one or more artboards with the linked strings.
- In the Strings section, click
 to upload screenshots for selected artboards.
To learn more, read the article Screenshots.
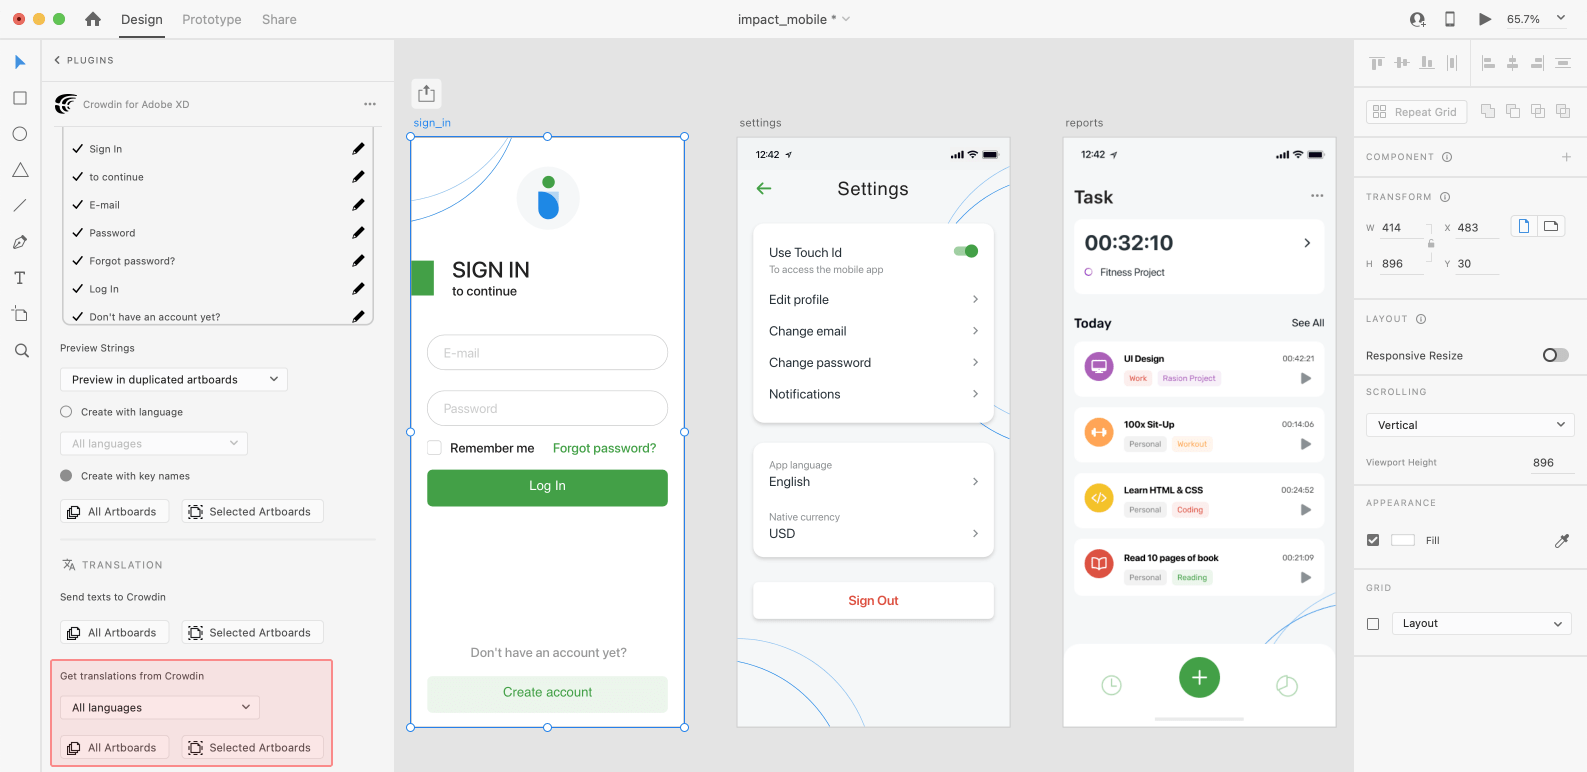
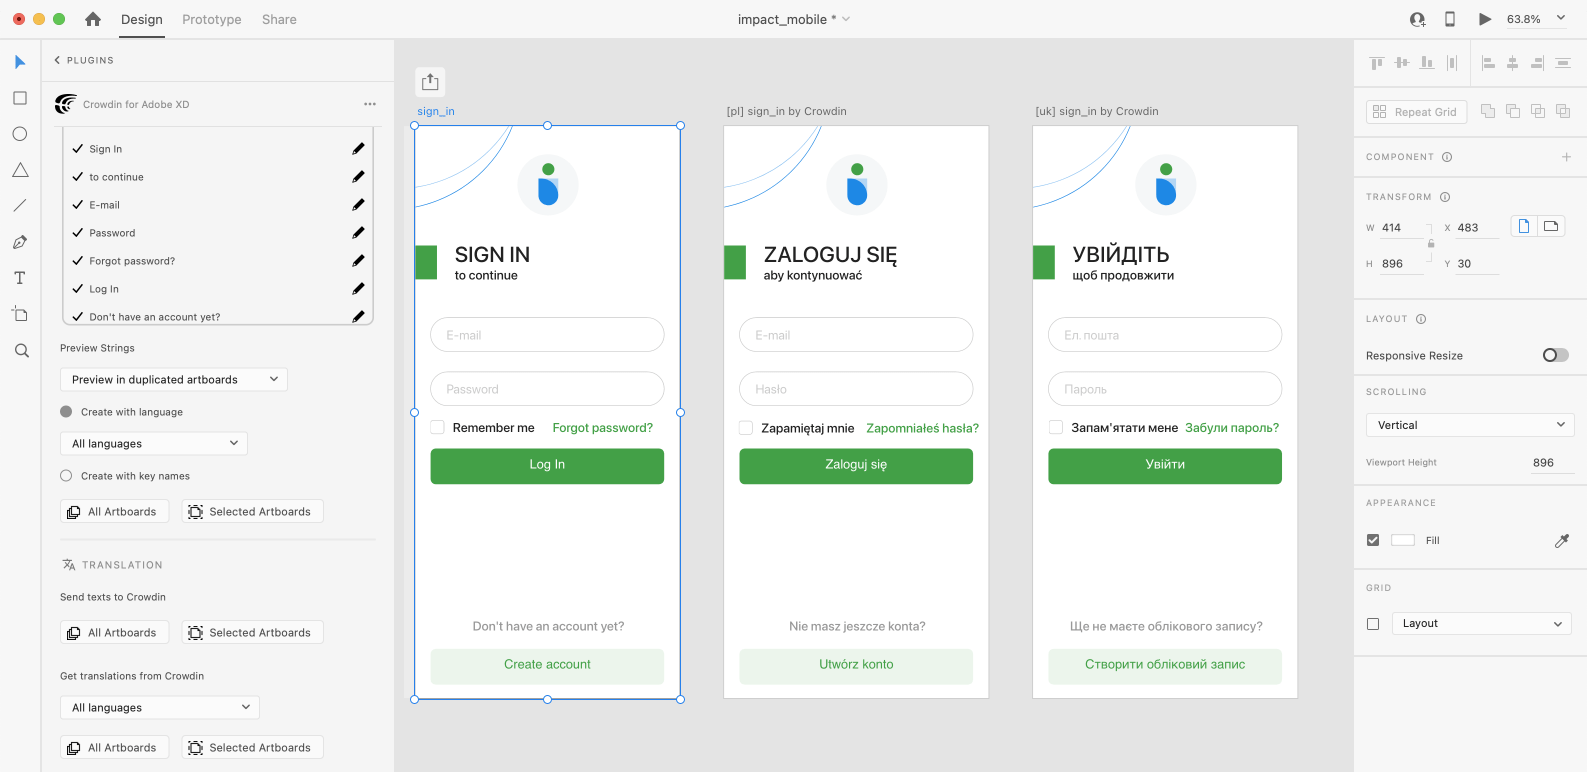
Previewing Strings
Попередній перегляд перекладів з Crowdin Enterprise для рядків використовується у дизайнах в Adobe XD. You can preview translations in the new artboards or the original ones. When previewing translations in the new artboards, you can populate them with the actual translations or with string keys for further use by developers.
To preview strings populated with translations, follow these steps:
- Open the Crowdin plugin for Adobe XD.
- In the Strings > Preview Strings section, select Preview in duplicated artboards or Preview in the current artboards.
- Select Create with language.
- Select the target language you want to preview translations for. You can also choose All languages.
- Choose the content you want to preview in Adobe XD. Select All Artboards or Selected Artboards.
To preview strings populated with key names, follow these steps:
- Open the Crowdin plugin for Adobe XD.
- In the Strings > Preview Strings section, select Preview in duplicated artboards.
- Select Create with key names.
- Choose the content you want to preview in Adobe XD. Select All Artboards or Selected Artboards.
Marketing Visuals Localization
Use the Translation section to localize static pages, like brochures and banners. У цьому розділі ви можете надсилати тексти з контекстом для перекладів в Crowdin Enterprise та завантажувати перекладені копії назад до Adobe XD.
Надсилання текстів для перекладу в Crowdin Enterprise
You can send text for translation either from selected or all artboards from an Adobe XD file. Translators will work with those texts in the list view and use designs as an additional context for even higher translation quality.
У Crowdin Enterprise буде створено кореневу теку Adobe XD plugin. It will contain a subfolder named after your XD file with HTML files for each artboard inside. This folder can also contain a free-text.html file with texts not included in any of the artboards. If needed, you can disable content segmentation in the plugin Settings so long texts will not be split into sentences.
To send Adobe XD designs for translation, follow these steps:
- Open the necessary Adobe XD file.
- Go to Plugins > Crowdin for Adobe XD.
- In the Translation > Send texts to Crowdin section, select the content you’d like to translate. Select All Artboards or Selected Artboards.

Коли вихідні файли будуть завантажені до вашого проєкту Crowdin Enterprise, ви можете запросити учасників для перекладу та коректування.
Читайте більше про стратегії перекладу.
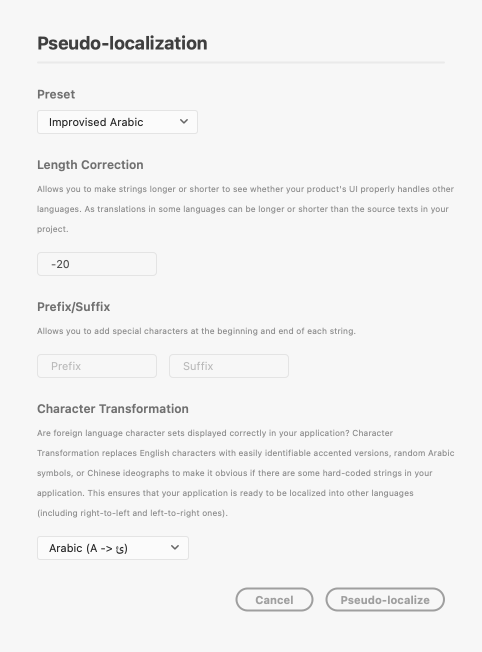
Псевдо-локалізація
Even before translations are completed, you can test whether your application is ready to be localized using pseudo-localization. This feature allows you to simulate how the application’s UI will look with different languages to check whether the source strings should be modified before the project localization starts.
Once you send your texts for translation, you can start pseudo-localization.
- Open the necessary Adobe XD file.
- Go to Plugins > Crowdin for Adobe XD.
- In the Pseudo-localization section, select the content you’d like to test with pseudo-localization. Select All Artboards or Selected Artboards.
- In the appeared dialog, configure settings according to your preferences.
- Click Pseudo-localize.
Read more about Pseudo-localization.
Завантаження перекладів з Crowdin Enterprise до Adobe XD
Ви можете синхронізувати тексти між Adobe XD та проєктами Crowdin Enterprise коли забажаєте перевірити перекладену копію всередині Adobe XD або створити багатомовні ресурси.
To upload translated copies to Adobe XD, follow these steps:
- Open the necessary Adobe XD file.
- Go to Plugins > Crowdin for Adobe XD.
- In the Translation > Get translations from Crowdin section, select the target language you want to upload translations for. You can also select All languages.
- Select the content you want to preview in Adobe XD. Select All Artboards or Selected Artboards.
After uploading translations to Adobe XD, the modified file will contain a separate artboard with translations for each target language. The newly uploaded translated versions won’t override the ones you uploaded previously. You can always delete the translated copies you no longer need.
If you’d like the newly uploaded translated versions to override the previously uploaded ones, open the plugin Settings and select Override existing translations.