Glossary
Dieser Inhalt ist noch nicht in deiner Sprache verfügbar.
In Crowdin uebersetzenWith a glossary, you can create, store, and manage all the project terminology in one place. The main aim of terminology is to explain some specific terms or the ones often used in the project to be translated properly and consistently.
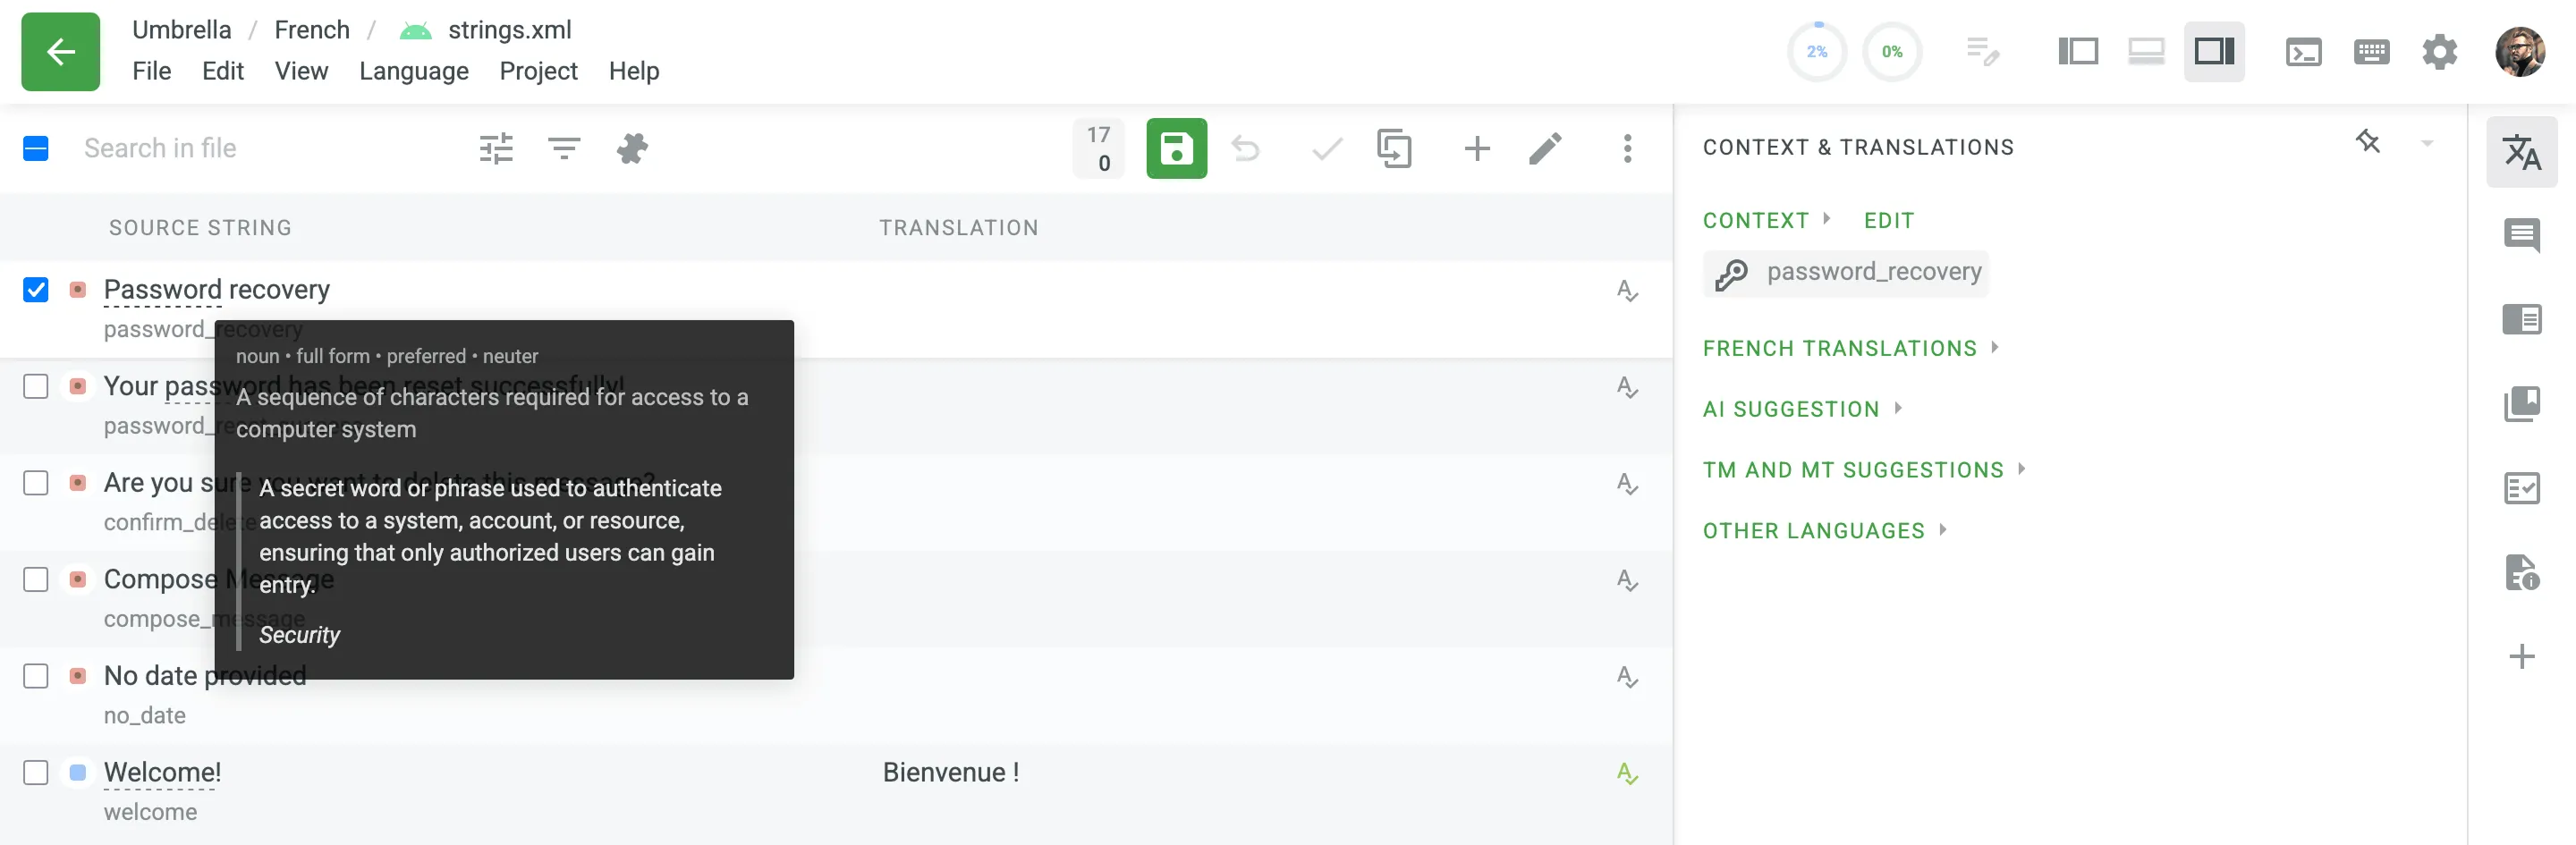
Each glossary term is displayed as an underlined word in the Editor. Hover over the underlined term to highlight it and see its translation, part of speech, and definition (if they are provided).
In addition to the project glossaries that are automatically created with each project, you can create separate glossaries and populate them with content by uploading your existing glossaries in TBX, XLSX, or CSV format. These glossaries can then be assigned to the relevant projects as needed.
To create a glossary, follow these steps:
- Open your organization’s Workspace and select Glossaries on the left sidebar.
- At the bottom right, click Create.
- In the appeared dialog, name your glossary and select a default language that will be displayed first in the table of glossary records.
- (Optional) Click Select files to upload your existing glossary. You can skip this step and upload a glossary later.
- Click Create.
Depending on your project needs, you can use a simpler approach with one term per language or make your glossary more detailed and complete using the advanced functionality that glossary concepts can offer.
Concept – the highest-level terminology element that contains concept-level data (e.g., concept definition, subject, etc.), including language-level (i.e., term language) and term-level data (e.g., term, the term’s part of speech, type, etc.). Simply put, a concept incorporates glossary terms and their variations with multiple translations and other relevant information.
You can specify the following concept and term details when adding glossary concepts.
Concept details:
- Definition – A clear explanation of the concept’s meaning.
- Subject – A branch of knowledge the concept is related to.
- Translatable – Specifies whether the concept could be translated into other languages.
- Note – Short notes about a concept that might be helpful to translators.
- URL – URL to the web page with relevant information about a concept.
- Figure – URL to the relevant image.
Term details:
- Term – Specific word or phrase that is being defined.
- Language – Specifies the language of the term.
- Part of speech – e.g., noun, verb, adjective, etc.
- Type – Classifies the term’s function (e.g., full form, acronym, abbreviation, phrase, variant).
- Status – Defines the term’s approval level (e.g., preferred, admitted, not recommended).
- Gender – The grammatical gender of the term (e.g., masculine, feminine, neuter).
- Description (context) – A brief explanation or context for the specific term (distinct from the concept’s definition).
- Note – Short notes about a term that might be helpful to translators.
- URL – URL to the web page with relevant information about a term.
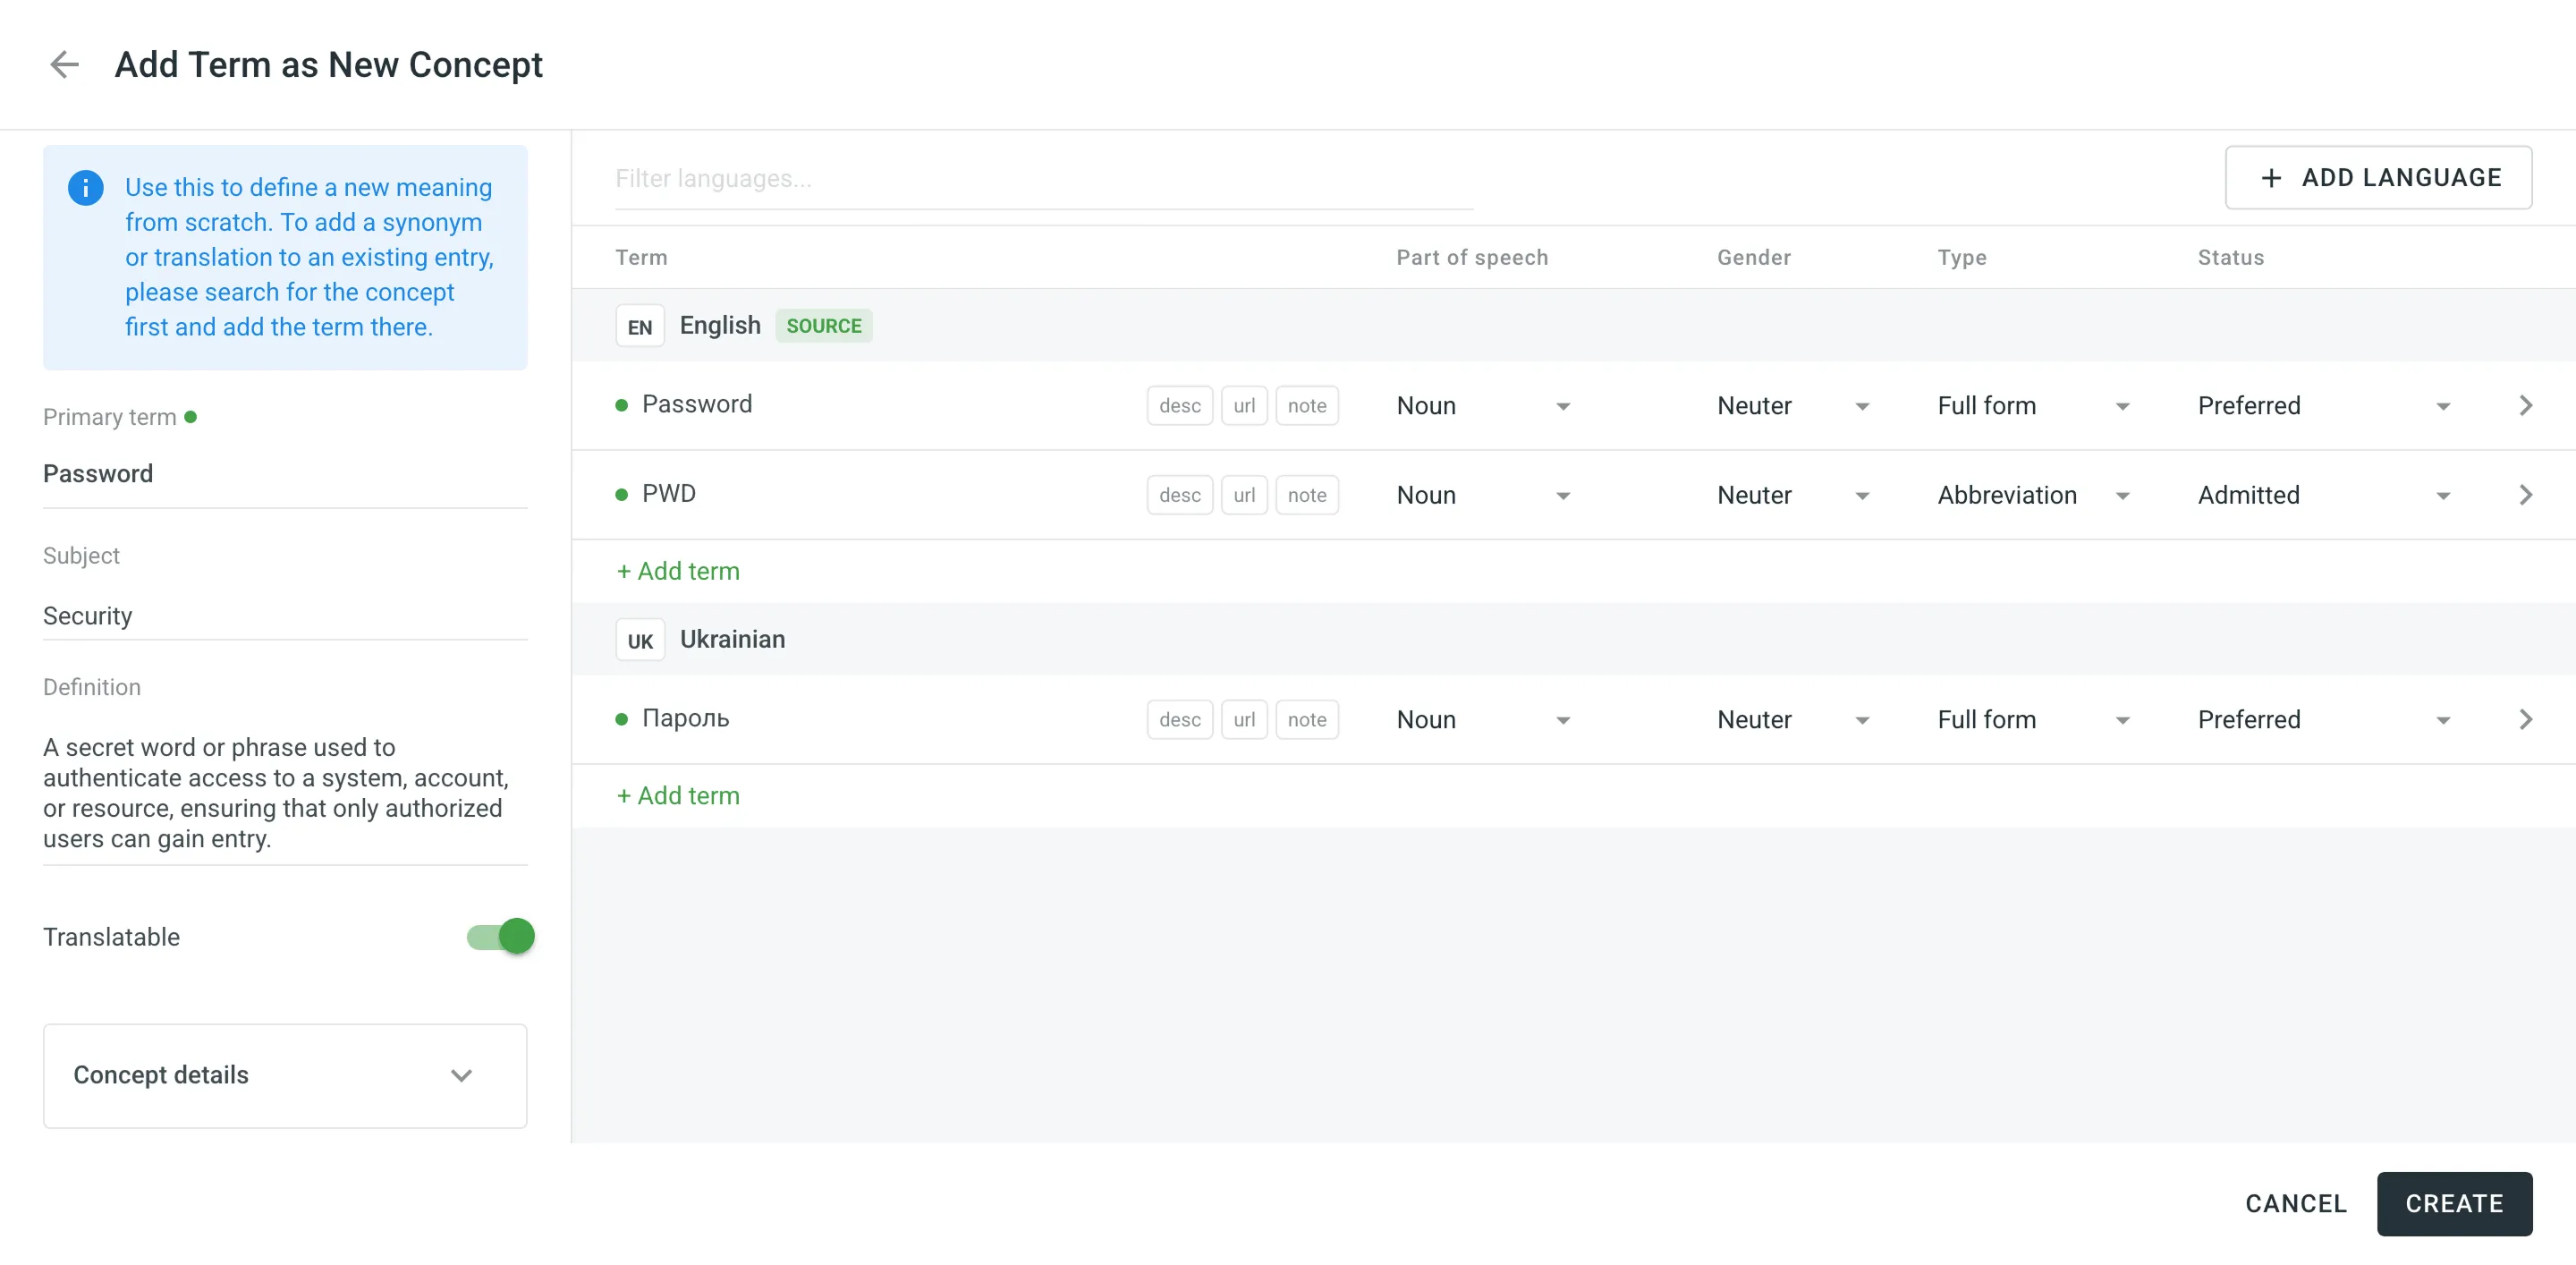
The concept dialog opens as a full-screen view with two panes:
- The left pane contains concept-level details: the Primary term (filled in automatically from the source-language term), Subject, Definition, and the Translatable toggle. The expandable Concept details section holds the concept Note, URL, and Figure.
- The right pane lists all terms across languages, grouped by language. The source language is pinned at the top and marked with a SOURCE badge. Each term row shows its Part of speech, Gender, Type, and Status, along with the desc, url, and note badges that expand the term’s Description (context), URL, and Note fields.
To add a new glossary concept, follow these steps:
- Open your organization’s Workspace and select Glossaries on the left sidebar. Alternatively, open your project and go to Settings > Glossaries.
- Click on the needed glossary.
- Click Add term.
- In the source-language row, enter the term and set its Part of speech, Gender, Type, and Status. Hover over the row and click to detect the part of speech automatically.
- (Optional) Click Add term below the language to add a term variation (e.g., acronym, short form, etc.)
- (Optional) Click Add language and search for a language to add its translation.
- Specify the concept details in the left pane (Subject, Definition, and the Concept details section).
- Click Create.
To add glossary concepts via the Editor, follow these steps:
- In the Editor, select the needed word in the source string.
- In the appeared menu, select Create Term. Alternatively, you can use the keyboard shortcut to add a concept (by default, Ctrl+G).
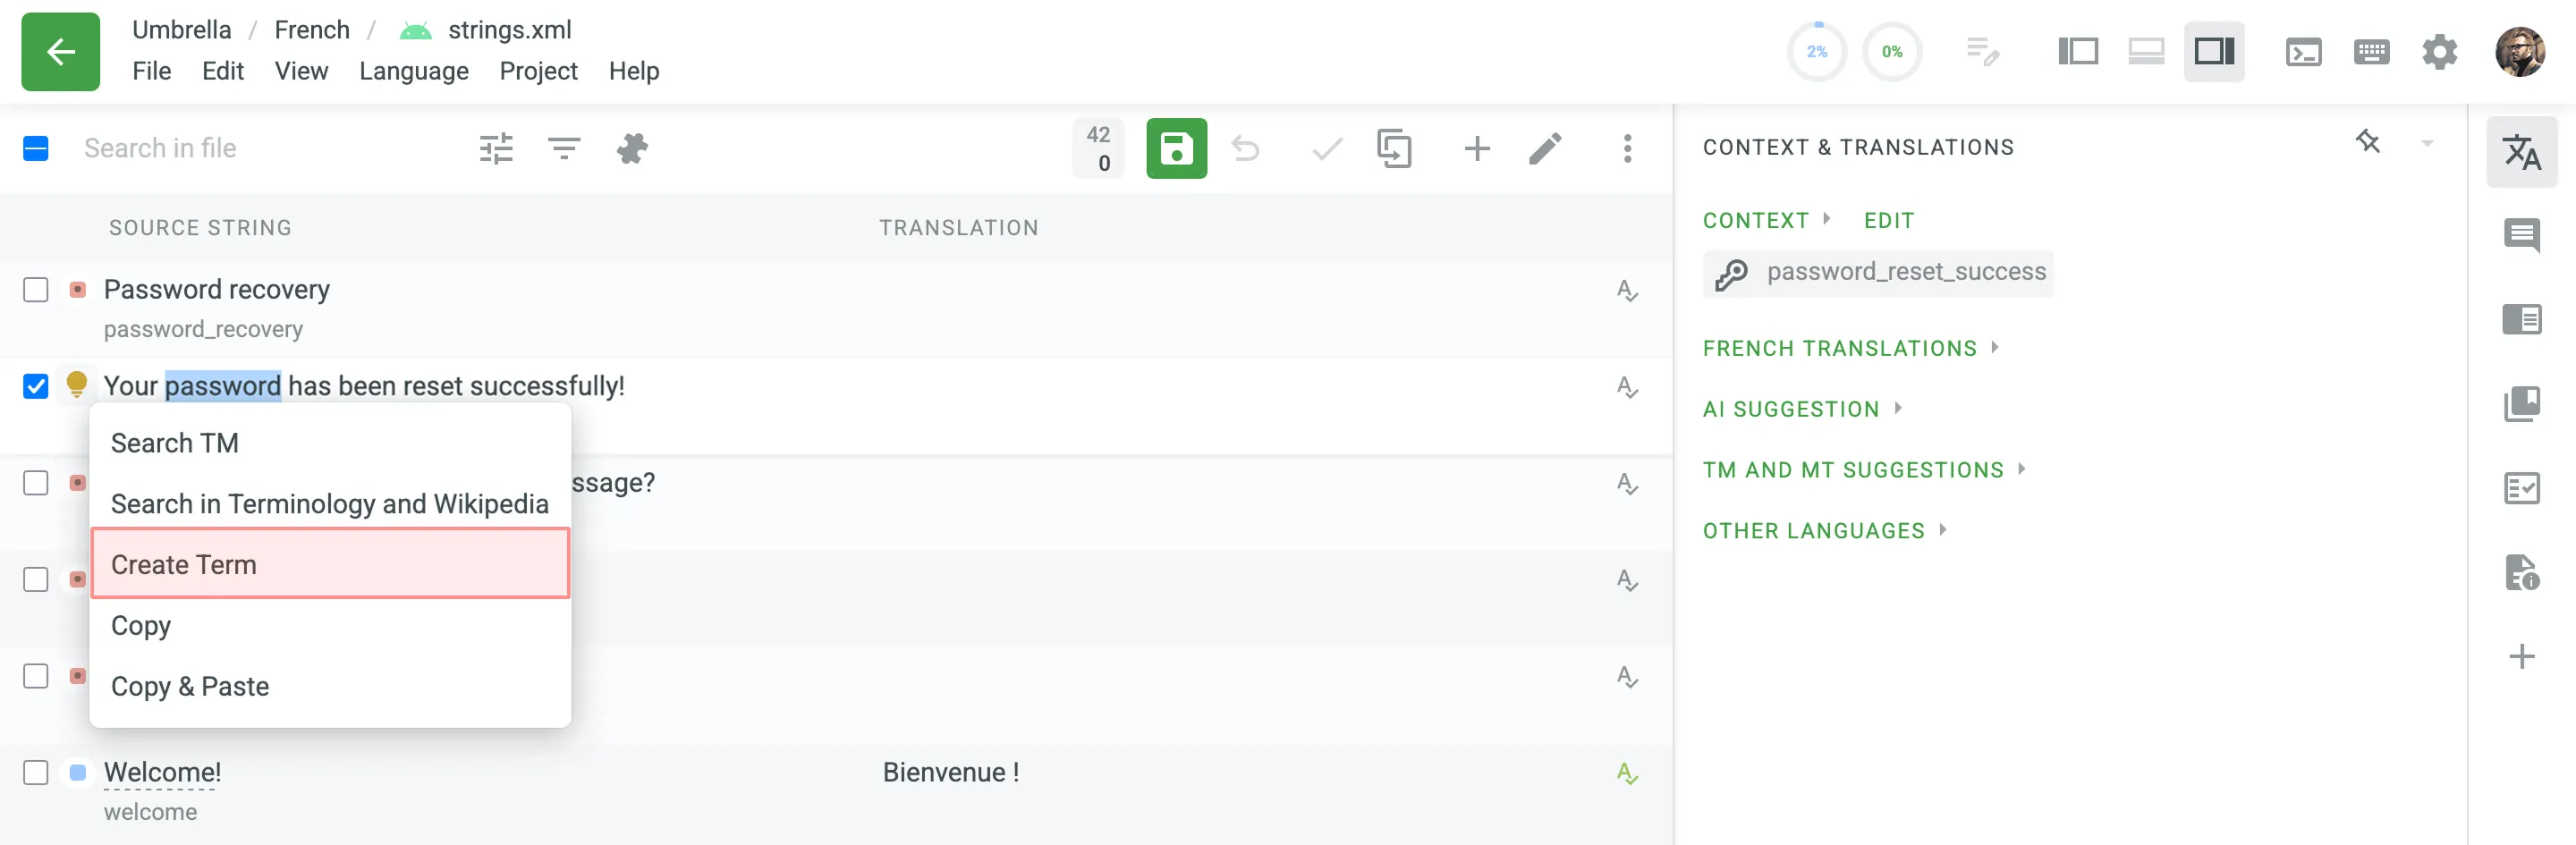
- Follow the steps described in the section above.
To allow translators and proofreaders to manage terms in the Editor, follow these steps:
- Open your project and go to Settings > Privacy.
- In the Glossary Access Settings section, select the preferred access level for project members.
You can choose to allow them to manage only draft terms. When a project member adds a draft term, project managers can filter terms by draft status, review them, and make necessary modifications or add glossary concept details.
Alternatively, you can grant full access, allowing them to manage all glossary terms and concept details with the same level of control as the project owner and managers.
Enhance terminology consistency across your project by setting up AI Alignment. This feature automatically generates draft glossary terms based on translations suggested by human translators, helping maintain preferred terminology.
Viewing, Searching, and Filtering Glossary Concepts and Terms
Section titled “Viewing, Searching, and Filtering Glossary Concepts and Terms”Once you open a glossary, you can switch between two views using the Group by concept toggle.
With Group by concept enabled, glossary content is grouped as concepts (one concept per row), with each term’s translations shown in separate language columns. Under each term, its part of speech, status, gender, and type appear as badges.
With Group by concept disabled, glossary content is shown as individual terms (one term per row) with the following details:
- Term: Contains either source or target language text.
- Language: The term’s language (e.g., French, Spanish).
- Part of speech: The term’s grammatical category (e.g., noun, verb).
- Type: The term’s classification (e.g., full form, acronym).
- Status: The term’s approval level (e.g., preferred, admitted).
- Gender: The term’s grammatical gender (e.g., masculine, feminine).
- Description (context): The specific description for that term.
- Note: Any additional note for that term.
- Concept subject: The subject field from the parent concept.
- Concept definition: The definition from the parent concept.
By default, all glossary concepts and terms are displayed. To find a specific concept or term, type in the Search field. In both views, the search matches against the following fields:
- Term text
- Term description (context)
- Concept definition
- Concept subject
To refine the search results, you can use the following options:
- Match case
- Match whole phrase
- Exact match
To filter the list of concepts or terms, click Filter and use the available options:
- Languages (available when Group by concept is disabled): Filter by All languages or a Specific language.
- Last modified: Filter by modification date (All, Custom range).
- Part of speech: Filter by grammatical category (All, Noun, Verb, etc.).
- Type: Filter by classification (All, Full form, Acronym, etc.).
- Status: Filter by approval status (All, Preferred, Draft, etc.).
- Gender: Filter by grammatical gender (All, Masculine, Feminine, etc.).
- Author: Filter by All or a particular user.
To sort concepts or terms, click a column header. By default, the list is sorted by the source-language terms. You can also sort by the Created or Last modified column. Click a column header once to sort in ascending order and click again to sort in descending order.
To customize your viewing experience, you can use the following options on the top toolbar:
- Word Wrap: Click to toggle the word wrap feature. This is useful for viewing long texts (such as definitions, subjects, or notes) without expanding the column width.
- Column Settings: Click to configure which columns are displayed in the table. Use All columns to show or hide all of them at once.
- Concepts view: You can show or hide columns such as Definition, Subject, Translatable, Note, Created, and Last modified, as well as the language columns. All columns and languages are shown by default, except Translatable and Note.
- Terms view: You can show or hide columns like Language, Part of speech, Type, Status, Gender, Description (context), Note, Concept subject, and Concept definition.
You can edit existing glossary concepts of a particular glossary.
To edit a glossary concept, follow these steps:
- Open your organization’s Workspace and select Glossaries on the left sidebar. Alternatively, open your project and go to Settings > Glossaries.
- Click on the needed glossary.
- Hover over a glossary concept and click to open it.
- In the Edit concept dialog, make the necessary edits to the concept or its terms. The dialog uses the same two-pane layout described in Creating Glossary Concepts and Terms, with an added Metadata section that lists the concept ID, creation date, and last modification details.
- Click Save.
You can delete a single term, an entire concept, or several concepts at once.
When editing a concept, you can delete individual terms or the entire concept directly in the dialog:
- Delete a single term – expand the term’s row and click Delete term.
- Delete the entire concept – click Delete concept in the bottom-left corner of the dialog.
To delete several concepts at once, follow these steps:
- Select the checkboxes next to the concepts you want to delete. To delete all concepts, select the top checkbox and confirm the selection of all concepts.
- Click .
You can manage your glossaries directly from the Glossaries page in your Workspace. This includes uploading and downloading content, editing glossary details, clearing glossary data, assigning glossaries to projects, and deleting them.
To access these management options, follow these steps:
- Open your organization’s Workspace and select Glossaries on the left sidebar.
- Click (or right-click) on the needed glossary to open the context menu.
Alternatively, you can access the Edit glossary, Clear glossary, and Delete glossary options from within a specific glossary by clicking in the top-right corner of the Concepts page.
You can upload existing glossaries to Crowdin Enterprise or download your glossary content for backup, editing, or other purposes outside Crowdin Enterprise. Glossaries can be downloaded in full or with applied filters, which is useful when you want to export only a subset of glossary concepts that meet specific criteria (e.g., by subject, status, or language).
To upload or download the glossary, follow these steps:
- Open your organization’s Workspace and select Glossaries on the left sidebar. Alternatively, open your project and go to Settings > Glossaries.
- Click on the needed glossary.
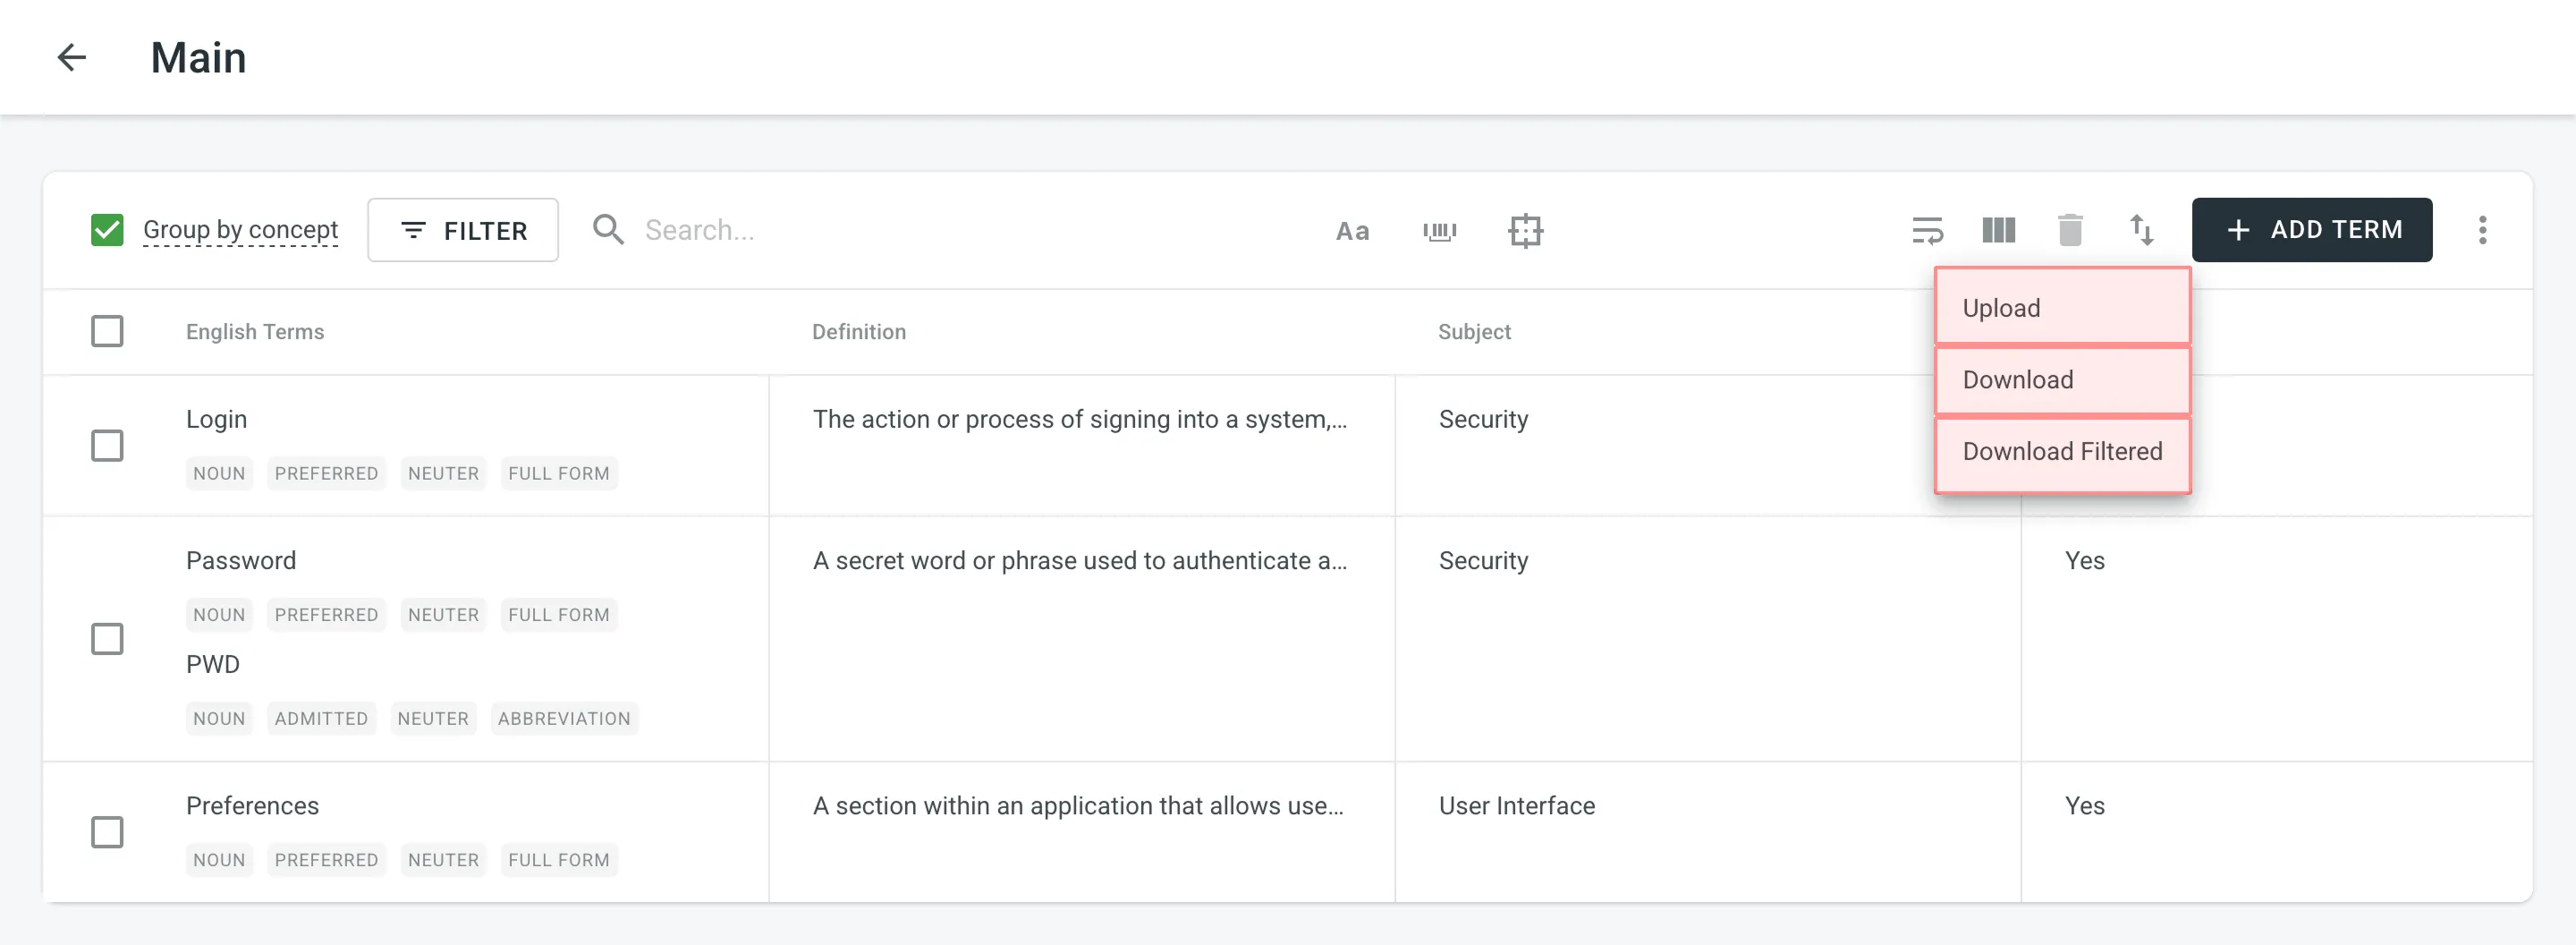
- Click and select one of the following options:
- Upload – uploads new glossary content.
- Download – downloads the full glossary.
- Download filtered – downloads only glossary concepts that match the applied filters or search criteria.
The owner, admins, and managers can upload and download the glossary in the following file formats: TBX (v2), TBX (v3), CSV, XLSX.
If you upload a glossary in CSV or XLS/XLSX file formats, select the language for each column and the column value (term, description, or part of speech) in the configuration dialog.

When downloading a glossary from Crowdin Enterprise, some browsers may add an XML extension to the downloaded file so that the file may be named sample.tbx.xml. To import such a file back to Crowdin Enterprise, rename it to sample.tbx.
Automatic Column Identification for Glossary in CSV and XLSX File Formats
Section titled “Automatic Column Identification for Glossary in CSV and XLSX File Formats”Once you upload your glossary file in CSV or XLSX formats, the system automatically detects the file scheme based on the column names specified in the first row. The identification is performed in a case-insensitive manner. Columns that weren’t detected automatically will be left as Not used/Not chosen for manual configuration. Automatic column identification is especially helpful when you upload glossary spreadsheets that contain many languages and additional columns (e.g., Status, Type, Gender, etc.).
To get the most out of the automatic column detection, we recommend that you name the columns in your CSV or XLSX glossary files using the patterns described below:
- Term details –
{column-type} [{crowdin-language-code}](e.g.,Term [en],Description [en],Part of Speech [en], etc.). - Concept details –
Concept {concept-details-type}(e.g.,Concept Definition,Concept Subject,Concept Note, etc.).
To redetect the glossary file scheme, click Detect Configuration.
You can rename your glossary or change its default language at any time.
To edit a glossary, follow these steps:
- Open your organization’s Workspace and select Glossaries on the left sidebar.
- Click (or right-click) on the needed glossary and select Edit.
- In the appeared dialog, make the necessary changes.
- Click Save.
If you need to remove all concepts and terms from a glossary but want to keep the glossary itself (along with its project assignments), you can use the Clear option.
To clear a glossary, follow these steps:
- Open your organization’s Workspace and select Glossaries on the left sidebar.
- Click (or right-click) on the needed glossary and select Clear.
- Confirm the action.
To use a glossary in a specific project, you need to assign it. You can assign a glossary to one or multiple projects simultaneously.
To assign a glossary, follow these steps:
- Open your organization’s Workspace and select Glossaries on the left sidebar.
- Click (or right-click) on the needed glossary and select Assign.
- In the appeared dialog, select the projects to which you want to assign this glossary.
- Click Assign.
Deleting a glossary will permanently remove the glossary and all its contained concepts and terms from the organization. This action cannot be undone.
To delete a glossary, follow these steps:
- Open your organization’s Workspace and select Glossaries on the left sidebar.
- Click (or right-click) on the needed glossary and select Delete.
- Confirm the deletion.
To share your glossaries between all of the projects within the organization, follow these steps:
- Open your organization’s Workspace and select Glossaries on the left sidebar.
- Select the Share Glossaries checkbox.
A client updates a glossary term translation, but the vendor doesn’t see it in the Editor. How can it be fixed?
The priority is given to the organization’s own glossaries first, followed by external (i.e., client) glossaries. To resolve this, the vendor can disable their own glossary and use only the client’s glossary to ensure they see the updated term.