This is the full developer documentation for Crowdin Docs
# Crowdin Docs
> Comprehensive guide to mastering localization and translation
## Crowdin.com
* [Get Started](/introduction/)
* [Project Setup](/creating-project/)
* [Supported File Formats](/supported-formats/)
* [Translation Strategies](/translation-strategies/)
* [Integrations](/integrations/)
## Crowdin Enterprise
* [Introduction to Enterprise](/enterprise/introduction/)
* [Crowdin vs. Enterprise](/enterprise/comparing-crowdin-and-crowdin-enterprise/)
* [Migrating to Enterprise](/enterprise/migrating-to-crowdin-enterprise/)
* [Teams Management](/enterprise/roles/)
* [Workflow Overview](/enterprise/workflows/)
## Developer Portal
* [In-Context](/developer/in-context-localization/)
* [About Crowdin Apps](/developer/crowdin-apps-about/)
* [Crowdin Apps JS](/developer/crowdin-apps-js/)
* [Configuration File](/developer/configuration-file/)
* [Dev Tools](/developer/dev-tools/)
## API
* [API Overview](/developer/api/)
* [GraphQL API](/developer/graphql-api/)
* [CroQL](/developer/croql/)
* [Language Codes](/developer/language-codes/)
## Company
* [Company Description](/company-description/)
* [Information Security Policy](/security-policy/)
* [Vulnerability Reporting Policy](/vulnerability-policy/)
* [Data Residency](/data-residency/)
* [List of Sub-processors](/sub-processors/)
* [GDPR Commitment](/gdpr/)
* [HIPAA Disclaimer](/hipaa-disclaimer/)
* [Media Kit](/using-logo/)
* [Intellectual Property Rights](/intellectual-rights-for-translations/)
## Community
* [Blog](https://crowdin.com/blog)
* [Community Forum](https://community.crowdin.com)
* [Feature Request ](https://crowdin.com/feature-request)
* [Explore Public Projects ](https://crowdin.com/projects#showcases)
# Notifications
> Get notified about the new events that happen in Crowdin
Crowdin offers several types of notifications to meet the different needs of users, such as the following:
* *Project Updates*: Notify users of changes to the project, such as new content to translate or updates to existing content.
* *Translation Activity*: Notify users of new translations, approvals, or comments on translations.
* *Task Management*: These notifications inform users about new tasks, deadlines and task completions.
* *Team Communication*: These alerts notify users of messages and discussions within the project.
To see the notifications, click on the bell icon in the top right corner of the page.
[Notification Settings ](/account-settings/#notifications)
## [Slack Integration](#slack-integration)
[Section titled “Slack Integration”](#slack-integration)
With updates sent directly to Slack, you’ll instantly know what’s happening in the Crowdin projects you manage or contribute to. After integrating your Crowdin account with Slack, select the notifications you’d like to receive, and the Crowdin bot will send them as direct messages.
Note
Slack integration for Crowdin must be configured for each individual user who wants to receive notifications in Slack.
To receive Crowdin notifications via Slack, follow these steps:
1. Click on your profile picture in the upper-right corner and select **Settings**.
2. Switch to the **Notifications** tab and click **Connect Slack**. 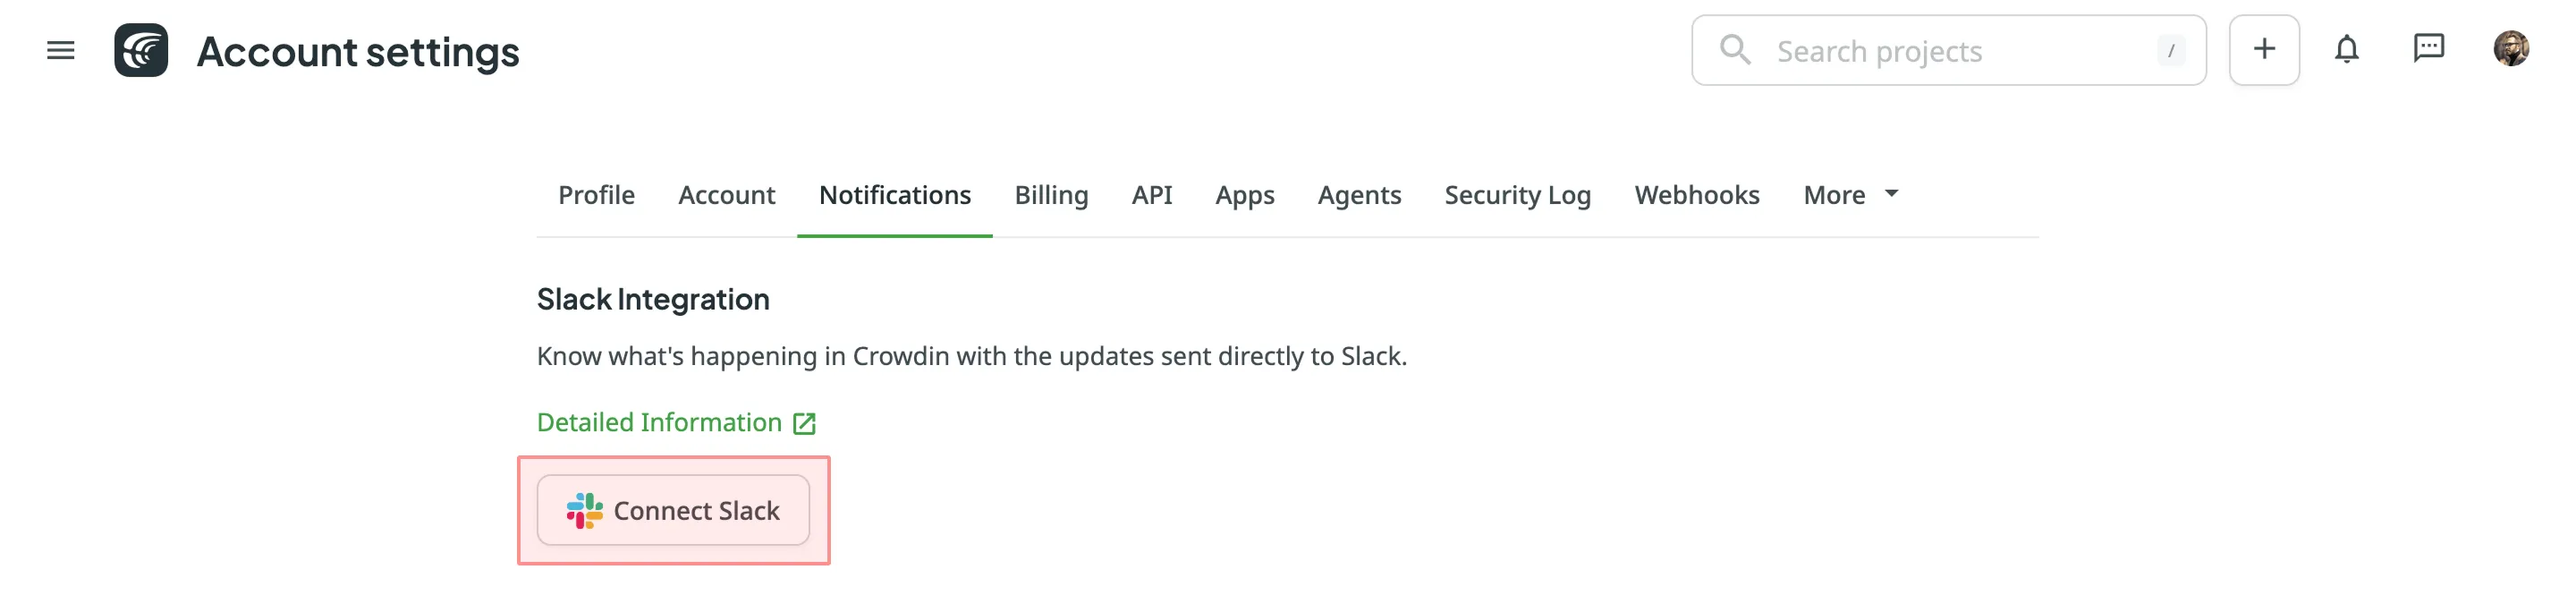
3. Authorize the connection with Crowdin on the Slack side. 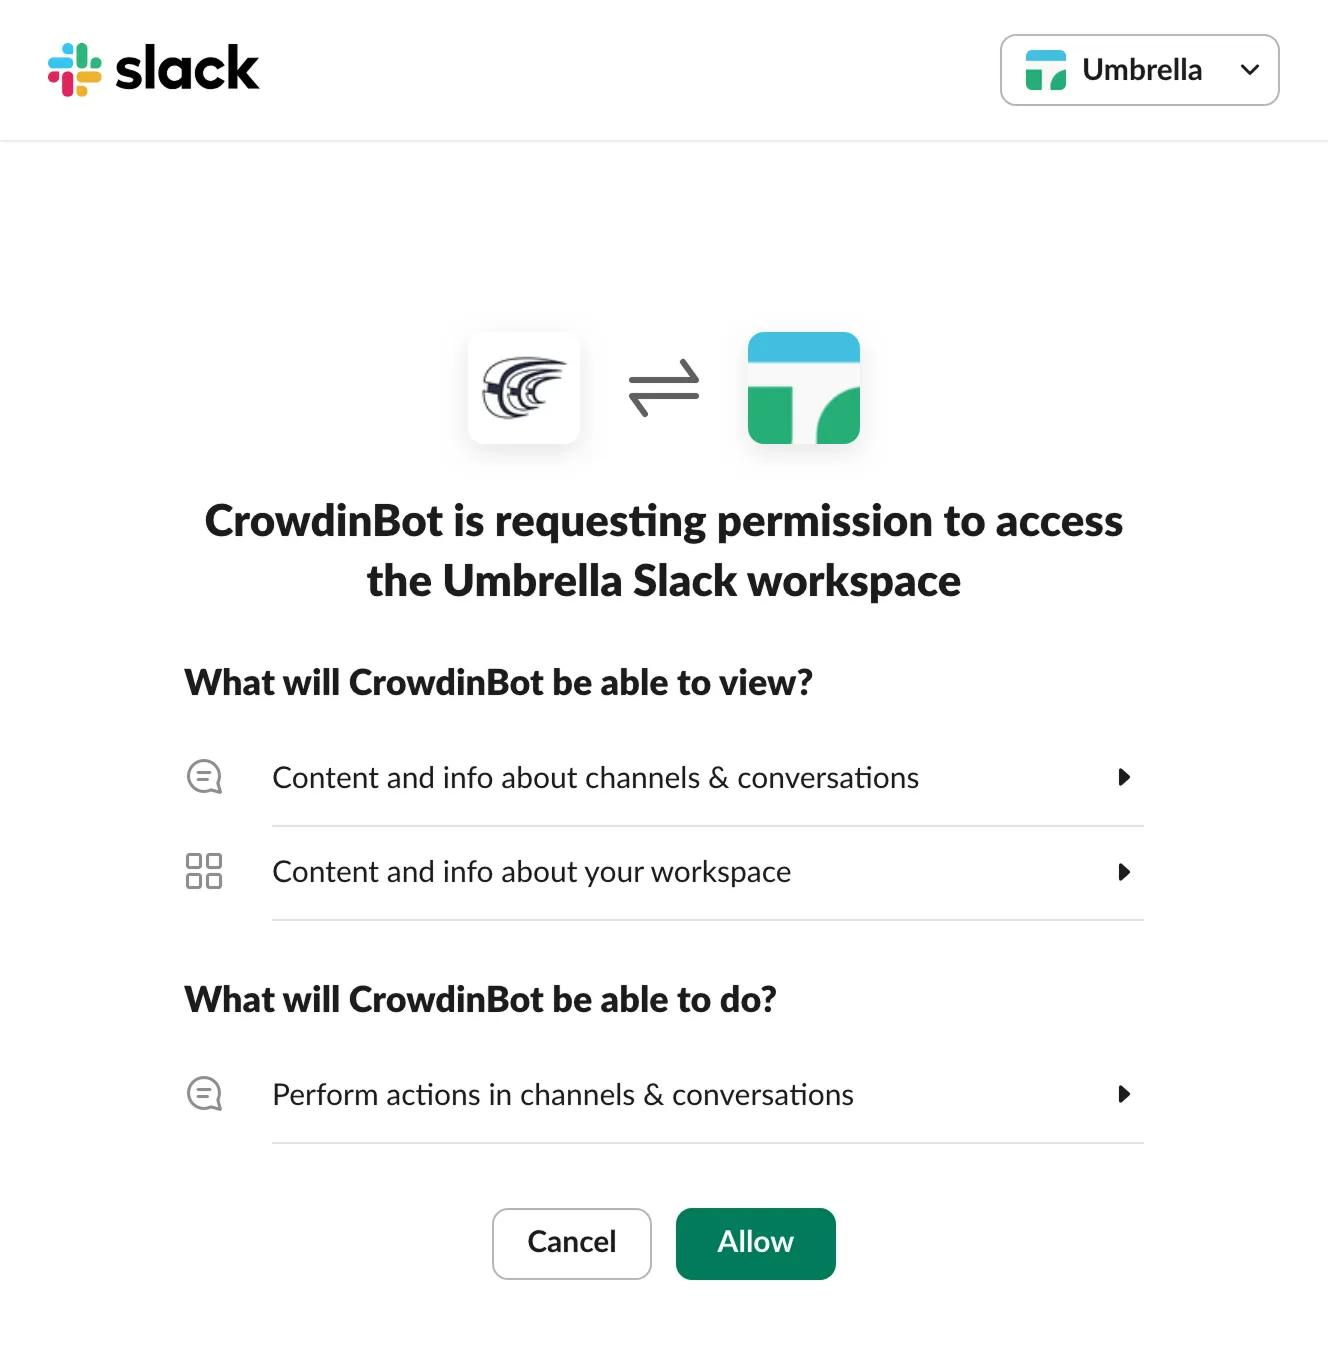
4. Go back to Crowdin and select the notifications you want to receive in Slack.
Read More about [Global Notification Settings](/account-settings/#notifications).
You will receive the selected types of notifications as direct messages from the Crowdin bot.
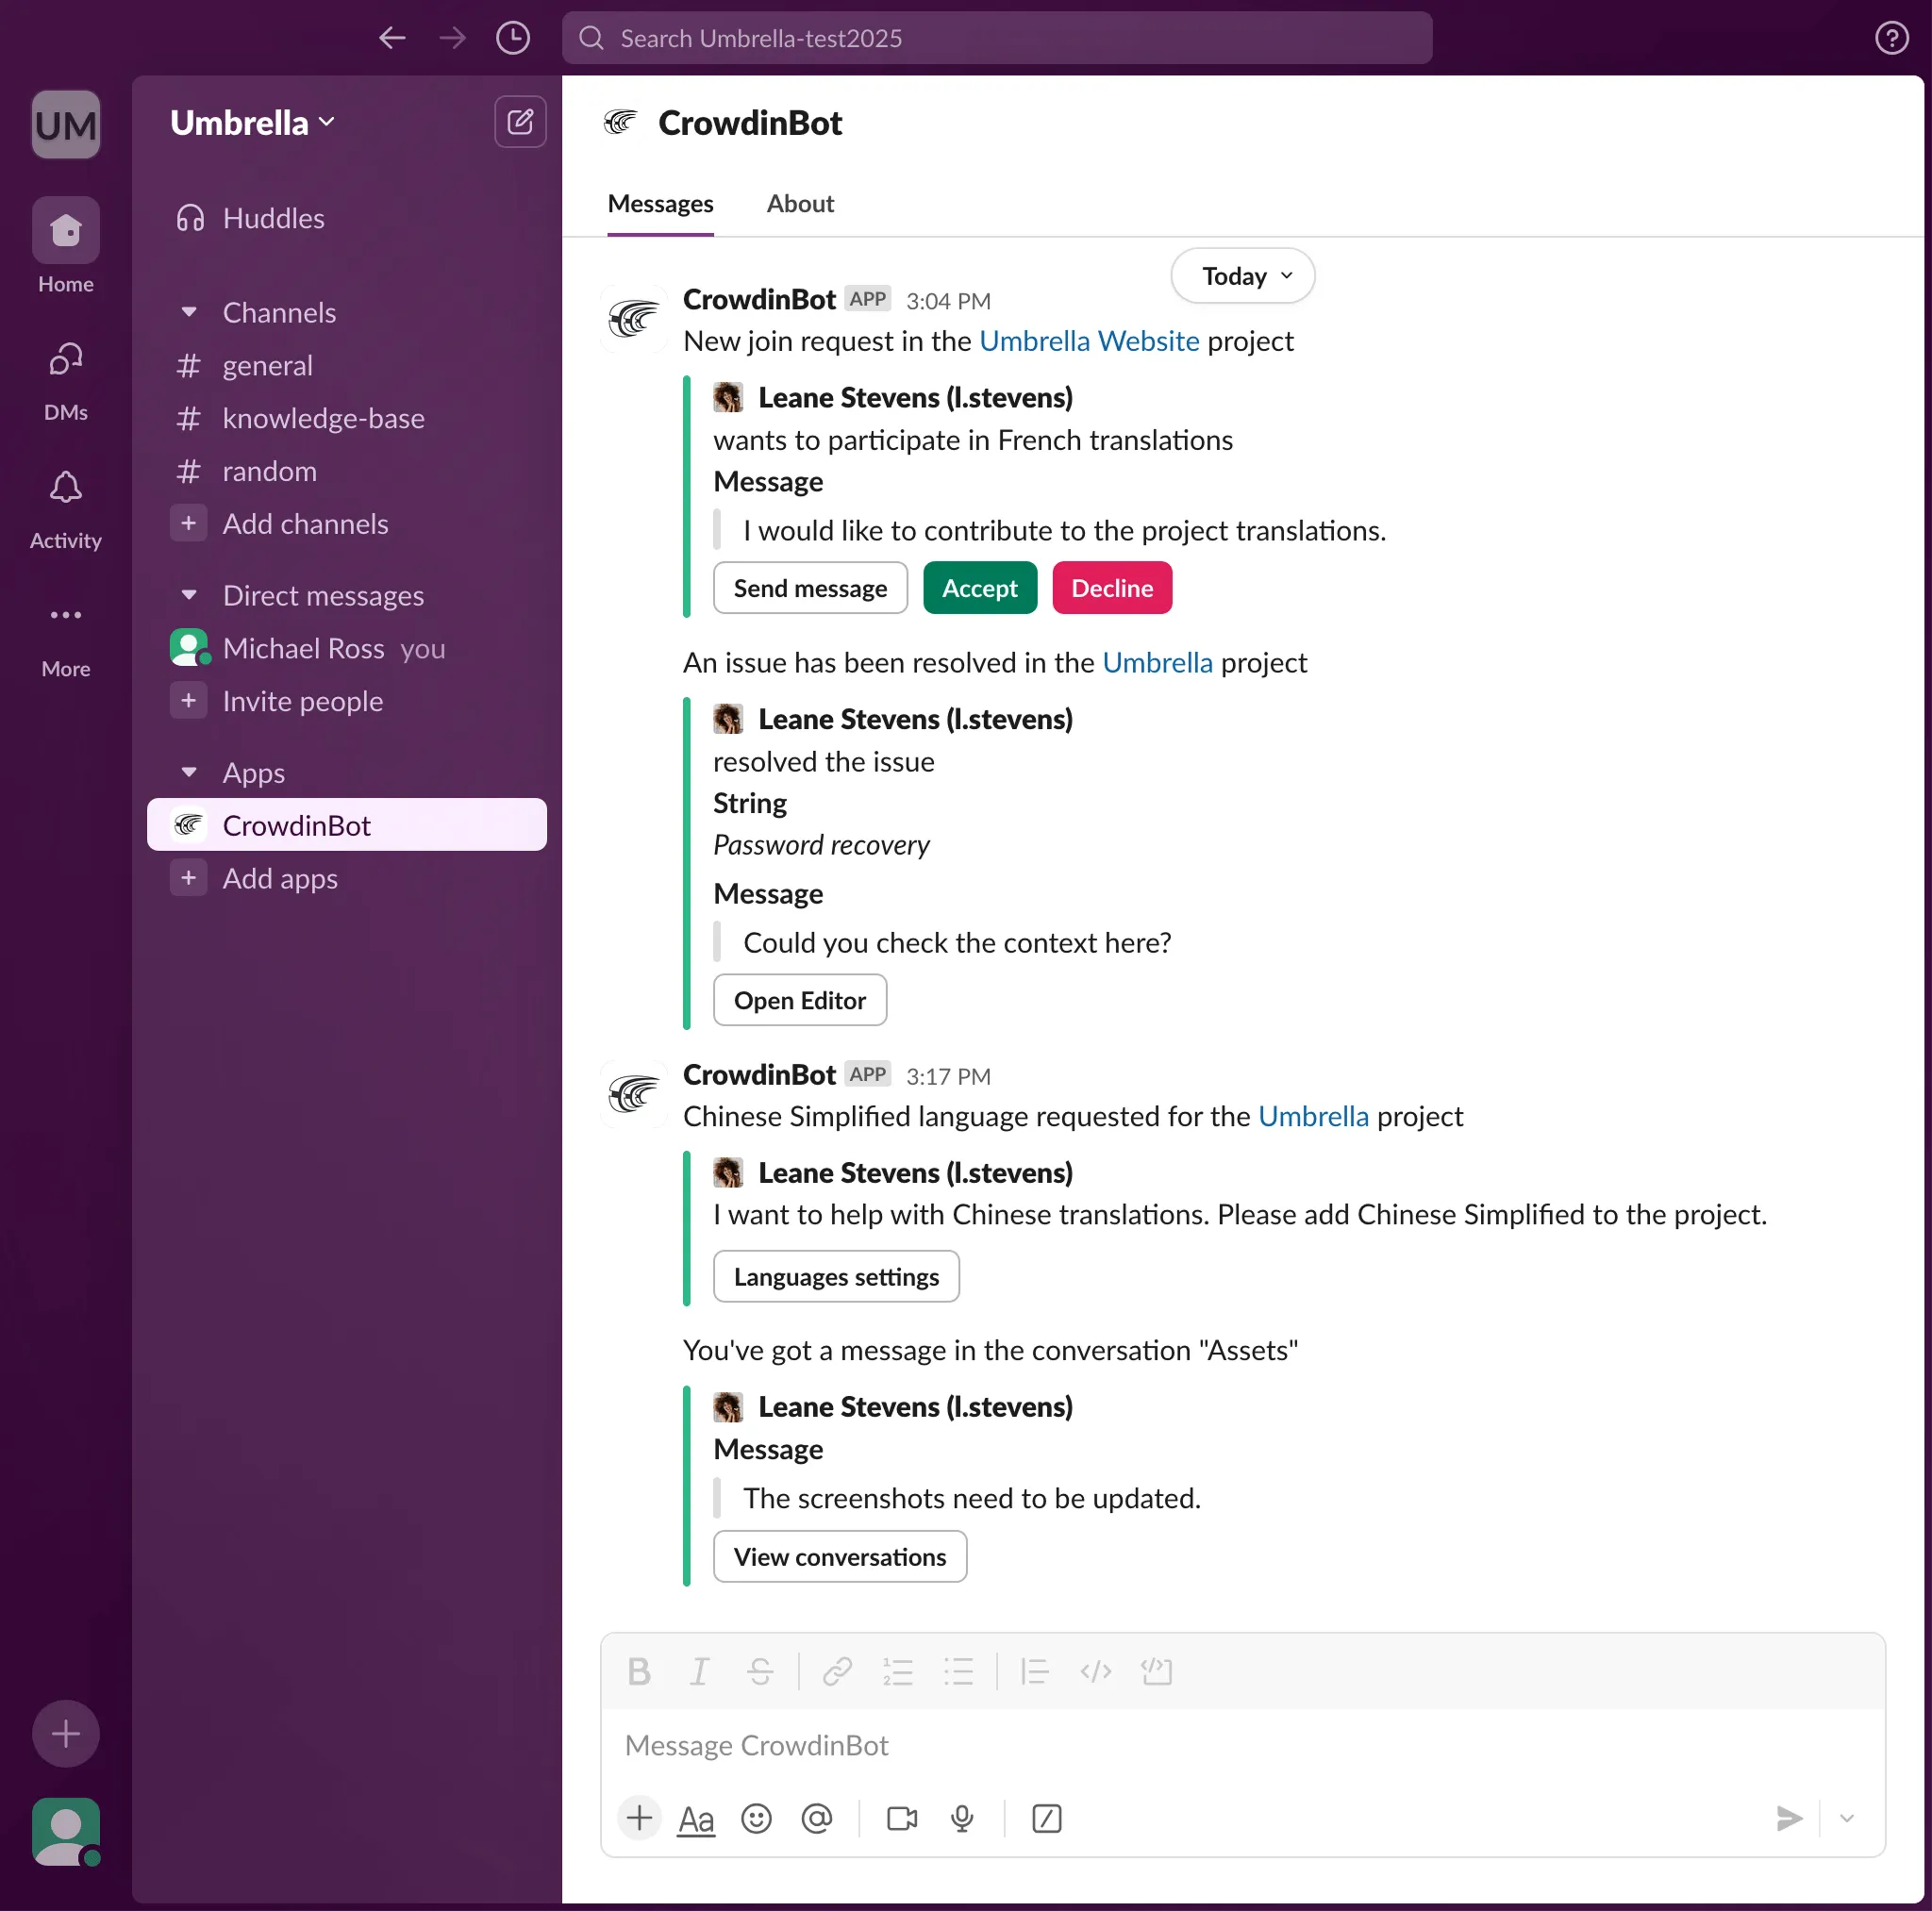
You can disable notifications and disconnect Slack from Crowdin anytime.
## [Custom Notifications](#custom-notifications)
[Section titled “Custom Notifications”](#custom-notifications)
Custom Notifications allow you to receive information about the new events that happen in Crowdin. Once you configure custom notifications for your account, Crowdin will start sending POST requests with data to the custom notification URL via HTTP.
### [Use Cases](#use-cases)
[Section titled “Use Cases”](#use-cases)
You can configure custom notifications to build integrations with the services or with your backend. For example:
* Set up custom notifications to send notifications to the system you use.
* Pass information to the third-party services with the specific request requirements (e.g., content type, headers, payload).
* Create custom integrations with Crowdin.
### [Configuring](#configuring)
[Section titled “Configuring”](#configuring)
To configure custom notifications in Crowdin, follow these steps:
1. Open your **Account Settings** and go to the **Notifications** tab.
2. In the **Notifications Custom Channel** section, click **Set Up Notifications Custom Channel** to start configuring your custom notifications.
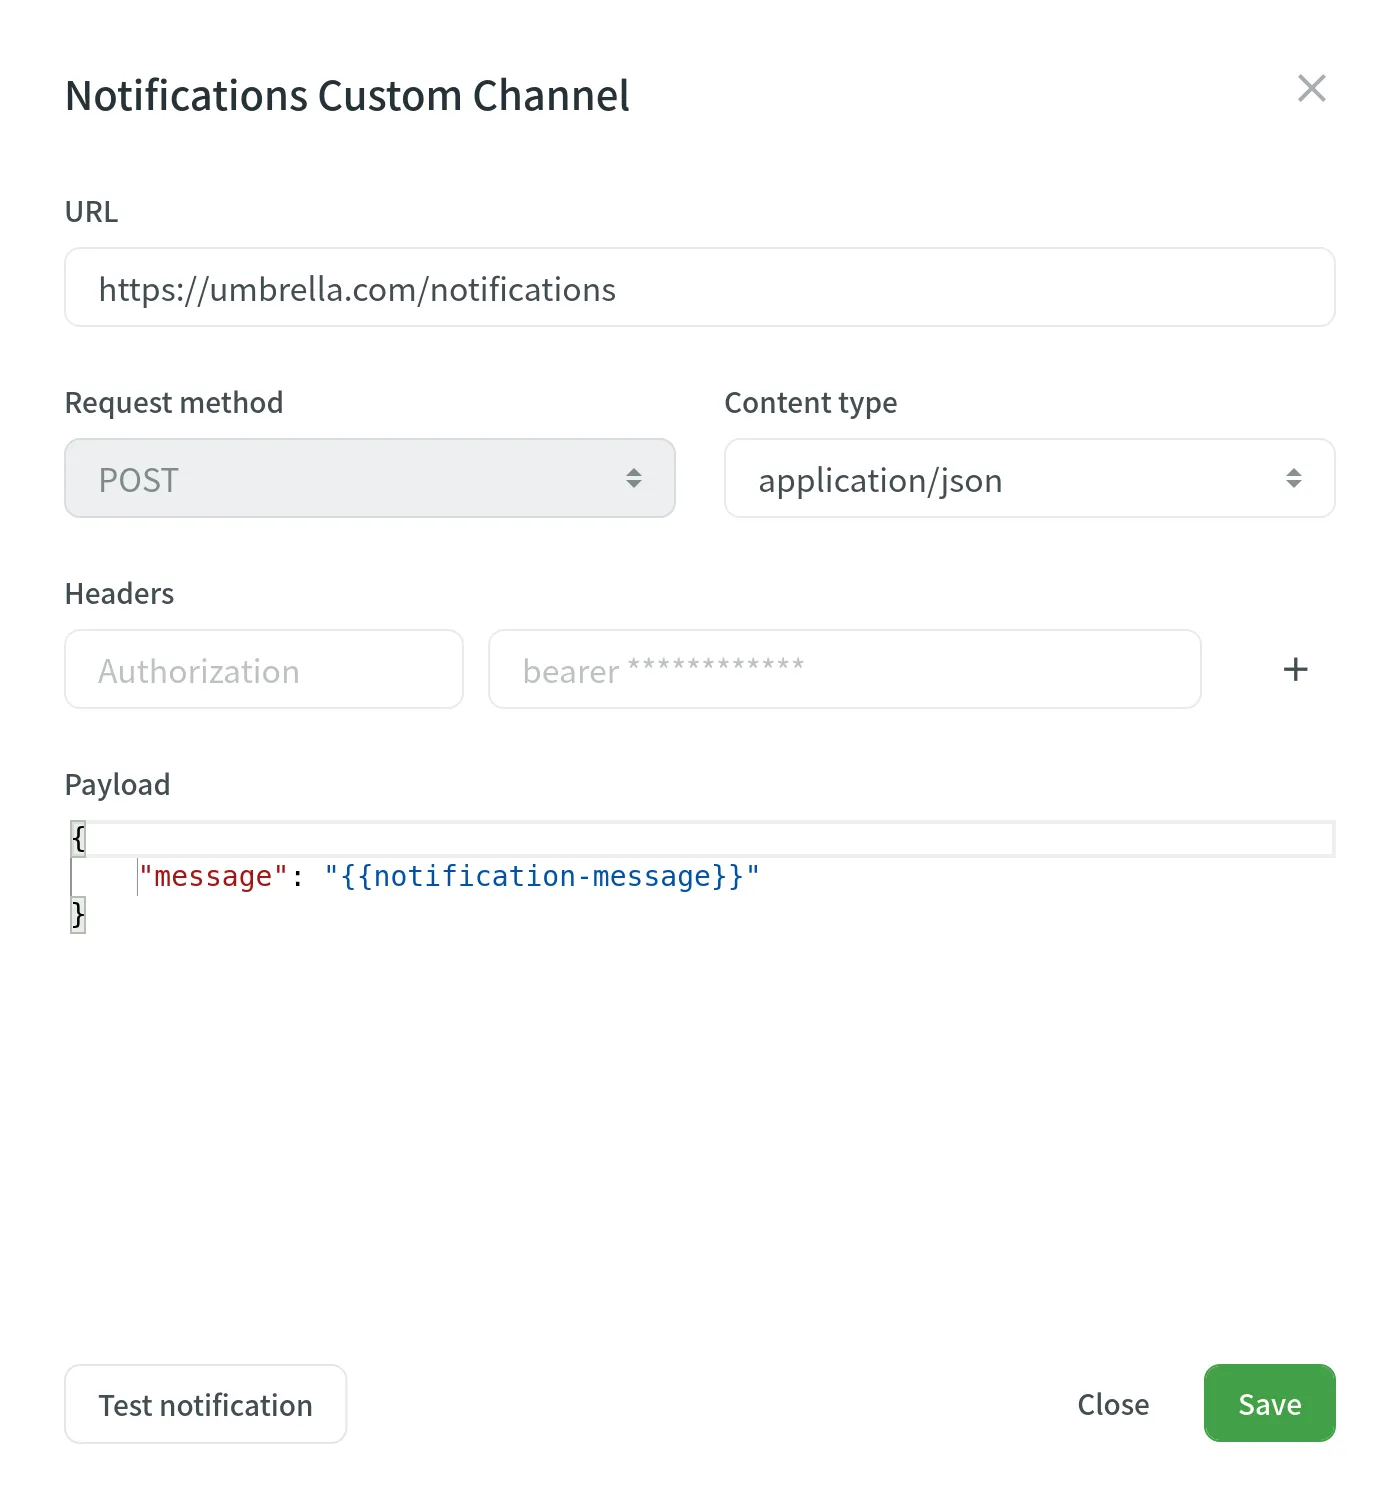
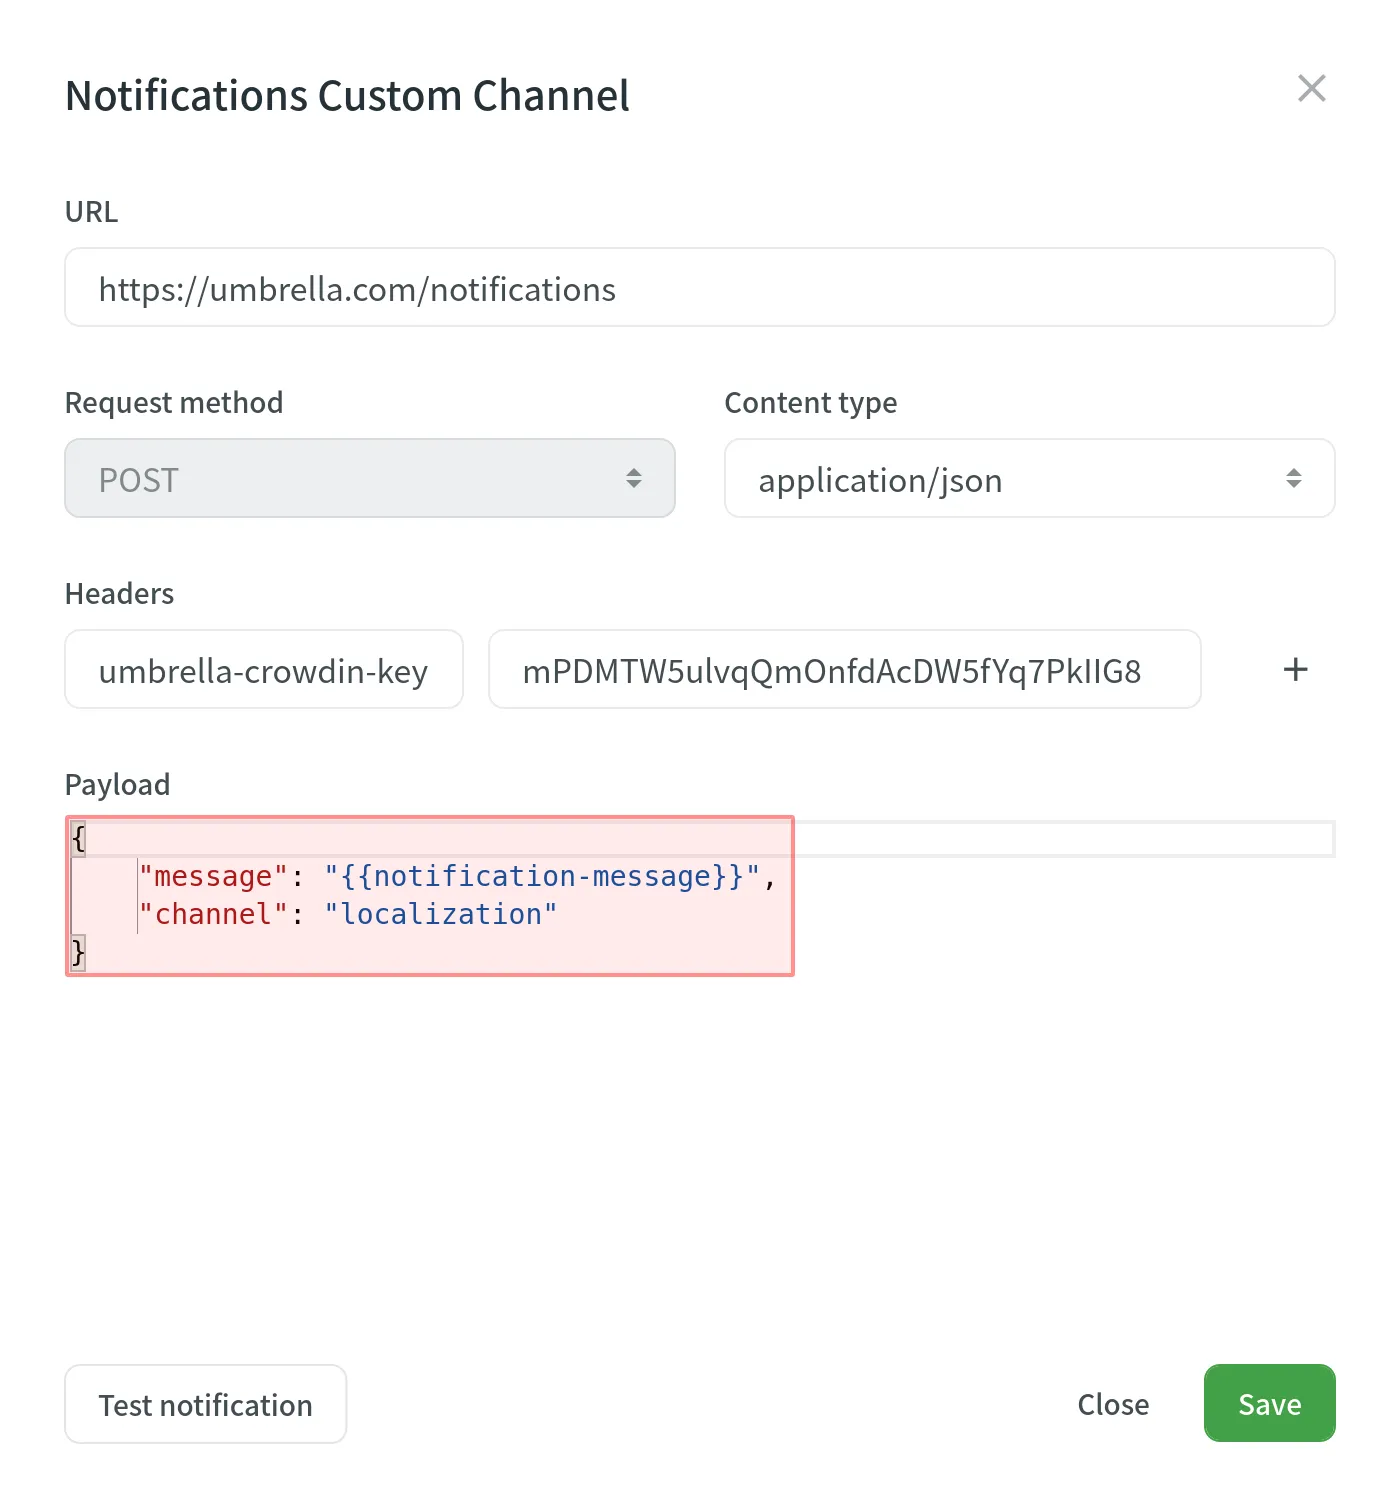
You will need to provide the following information to set up custom notifications:
* The URL where the callback should be sent.
* The content type for the POST request method (`multipart/form-data`, `application/json`, or `application/x-www-form-urlencoded`).
Optionally, you can add special headers to your custom notifications. They can be used for additional security, as an authorization method, and more. For example, if you add headers, your custom notification endpoint can verify them and ensure that information is coming from Crowdin.
When configuring custom notifications, click **Test notification** to see how your application will react to that call. Once finished with the configuration, click **Save**.
Depending on your approach to custom notification management, you might need to add dedicated Crowdin IP addresses to your firewall to allow Crowdin to open the pre-configured custom notification URLs.
Read more about [IP Addresses](/developer/ip-addresses/).
### [Custom Payloads](#custom-payloads)
[Section titled “Custom Payloads”](#custom-payloads)
You can modify the custom notification payload to add and organize the elements as your system requires. To get informative and user-friendly notifications, make sure to include the `{{notification-message}}` placeholder in your payload.
### [Event Types](#event-types)
[Section titled “Event Types”](#event-types)
Once you’ve configured custom notifications, you can select the event types you’d like to receive the notifications about in the **Custom** column.
You can configure custom notifications for the following event types:
| Event Type | Description |
| ---------------------- | --------------------------------------------------------------------------- |
| Users & Roles | Join requests, project invitations, project role updates. |
| Integrations | Updates on integrations you set up. |
| New Strings | New strings added. |
| Language Progress | Translation or proofreading for a particular language is completed. |
| API-Integrated Vendors | Updates on collaboration with API-Integrated translation vendors. |
| Content Issues | All issue types created or resolved in the Editor. |
| Mentions | Updates on you being mentioned in the Editor. |
| Tasks | Created, deleted, and updated tasks, status changes, mentions and comments. |
| Messages | Private messages within Crowdin. |
| Discussions | New topics created. Mentions in the discussions. |
| API Notifications | Notifications sent by apps, API integrations, and users via API. |
### [Manage Custom Notifications](#manage-custom-notifications)
[Section titled “Manage Custom Notifications”](#manage-custom-notifications)
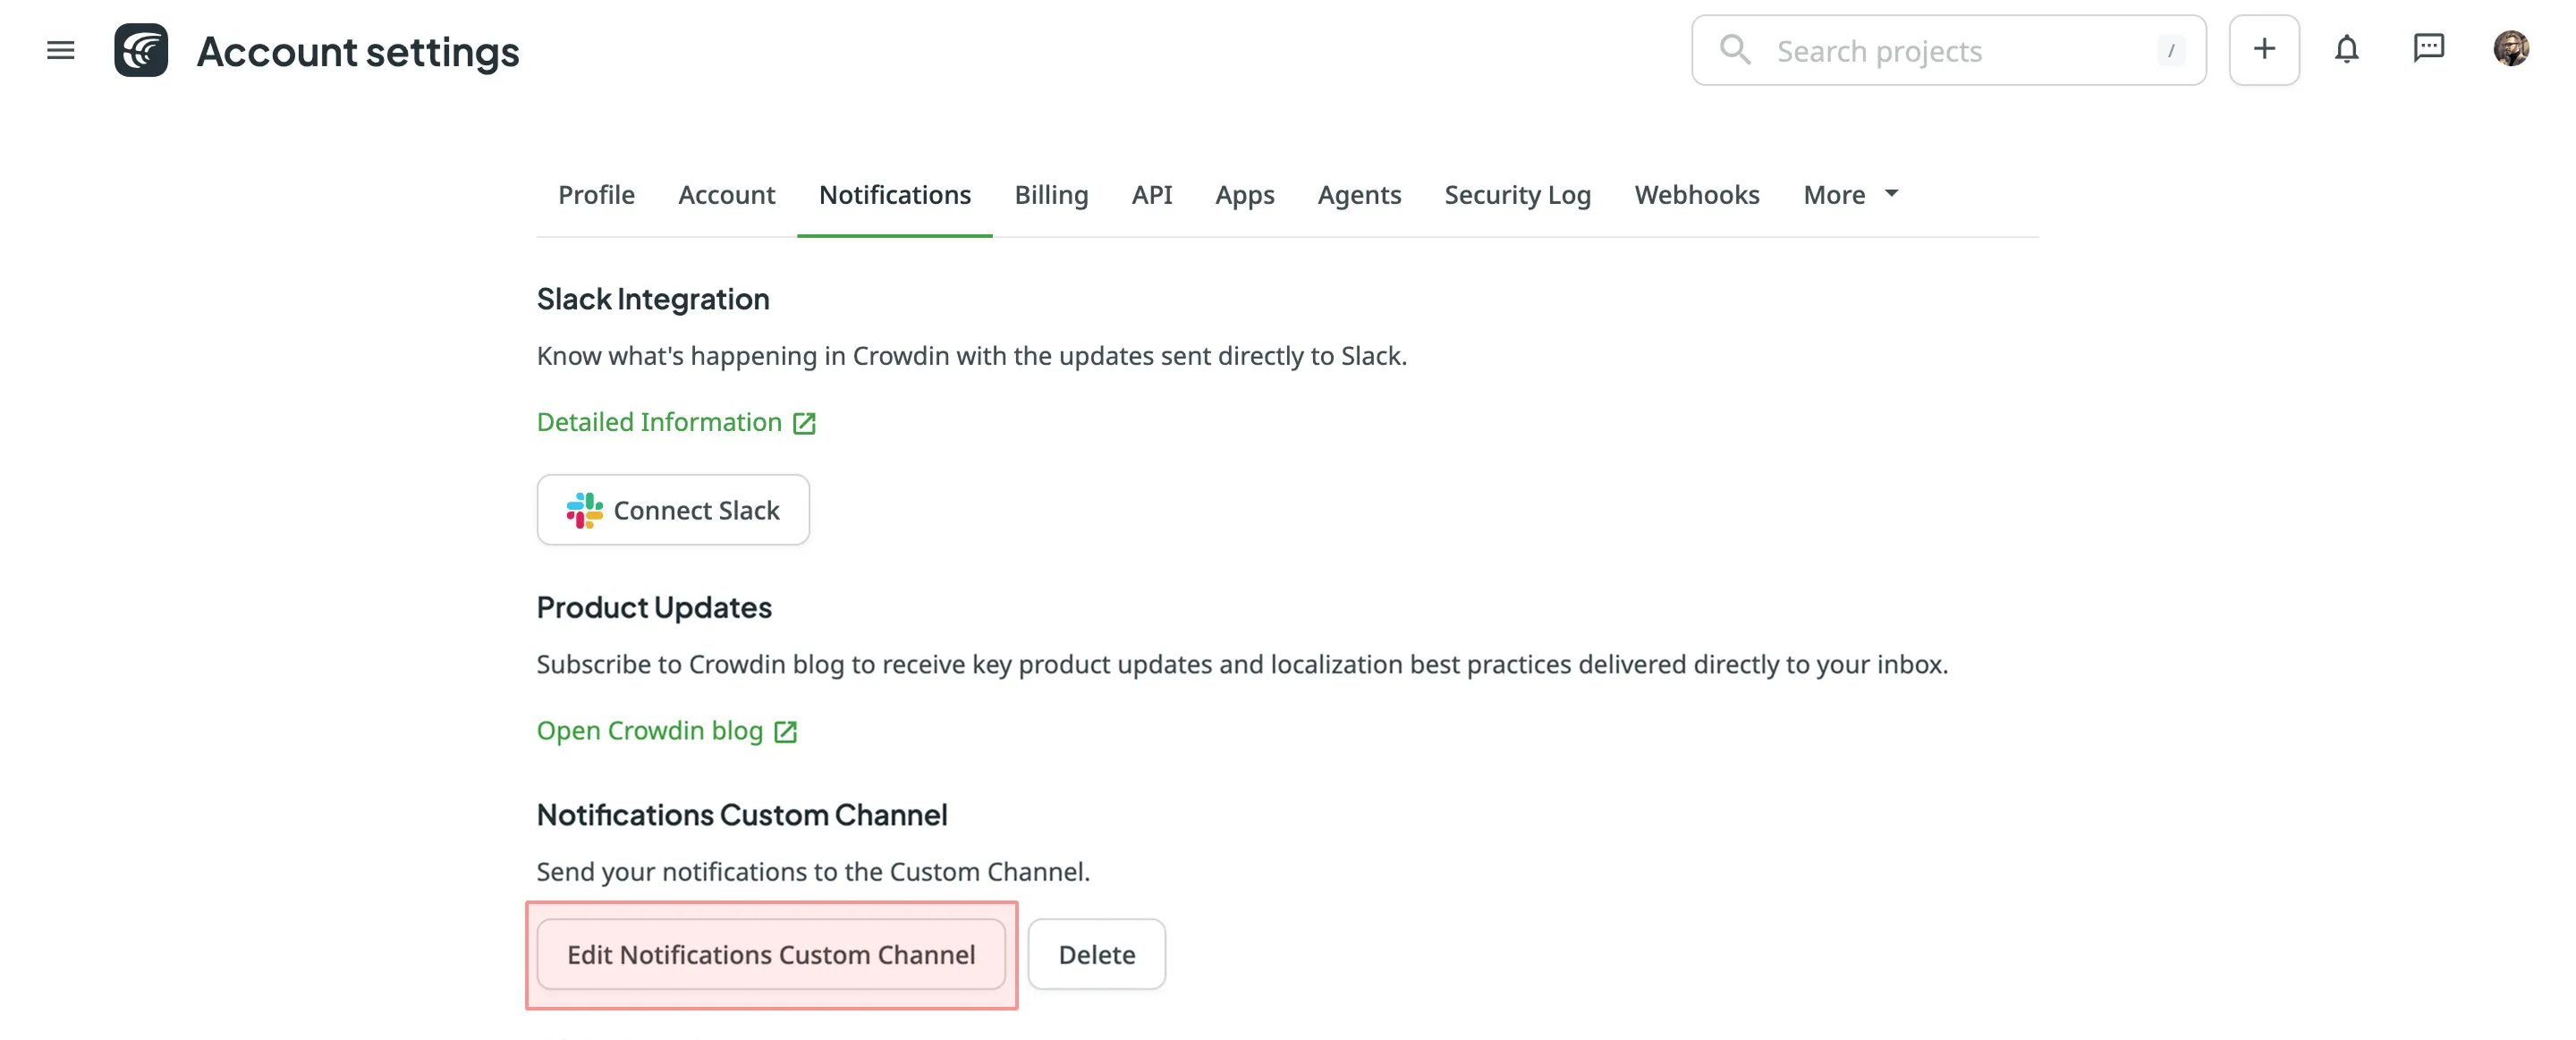
You can edit or delete custom notifications in the **Notifications Custom Channel** section of the **Notifications** tab.
### [Configuring for Discord](#discord)
[Section titled “Configuring for Discord”](#discord)
To set up Custom Notifications from Crowdin in Discord, follow the steps below.
#### [Creating Discord Account](#creating-discord-account)
[Section titled “Creating Discord Account”](#creating-discord-account)
If you don’t have a Discord account already, you will need to [create one](https://discord.com/register).
Note
You can configure custom notifications from Crowdin only via the Discord desktop app or Discord web interface. Once configured, you’ll be able to receive these notifications via Discord mobile apps as well.
Download and install the [Discord desktop app](https://discord.com/download). Alternatively, you may use the Discord web interface for further configurations.
#### [Creating Discord Webhook](#creating-discord-webhook)
[Section titled “Creating Discord Webhook”](#creating-discord-webhook)
To receive notifications in Discord, you need to create a webhook. Once finished, copy the webhook URL. You’ll need it for configurations on the Crowdin side.
Read more about [creating a Discord webhook](https://support.discord.com/hc/en-us/articles/228383668-Intro-to-Webhooks).
#### [Configuring Custom Notifications Channel](#custom-channel-discord)
[Section titled “Configuring Custom Notifications Channel”](#custom-channel-discord)
1. Open your **Account Settings > Notifications**.
2. Click **Set Up Notifications Custom Channel**.
3. In the appeared dialog, paste the Discord webhook URL in the **URL** field.
4. Select **application/json** for the **Content type**.
5. Paste the following payload in the **Payload** field:
```json
{
"content": "{{notification-message}}"
}
```
6. Click **Test notification** to receive a test message from Crowdin to your Discord channel.
7. Once finished with the configuration, click **Save**.
### [Configuring for Google Chat](#google-chat)
[Section titled “Configuring for Google Chat”](#google-chat)
To set up Custom Notifications from Crowdin in Google Chat, follow the steps below.
#### [Creating Google Account](#creating-google-account)
[Section titled “Creating Google Account”](#creating-google-account)
If you already have a Google account, it gives you access to many Google products, including Google Chat. If you don’t have a Google account, you will need to [create one](https://accounts.google.com/signup).
Download and install the [Google Chat desktop app](https://chat.google.com/download/). Alternatively, you may use the Google Chat web interface for further configurations.
#### [Creating Google Chat Webhook](#creating-google-chat-webhook)
[Section titled “Creating Google Chat Webhook”](#creating-google-chat-webhook)
To receive notifications in Google Chat, you need to create a webhook. Once finished, copy the webhook URL. You’ll need it for configurations on the Crowdin side.
Read more about [creating a Google Chat webhook](https://developers.google.com/chat/how-tos/webhooks#step_1_register_the_incoming_webhook).
#### [Configuring Custom Notifications Channel](#custom-channel-google-chat)
[Section titled “Configuring Custom Notifications Channel”](#custom-channel-google-chat)
1. Open your **Account Settings** and go to the **Notifications** tab.
2. Click **Set Up Notifications Custom Channel**.
3. In the appeared dialog, paste the Google Chat webhook URL in the **URL** field.
4. Select **application/json** for the **Content type**.
5. Paste the following payload in the **Payload** field:
```json
{
"text": "{{notification-message}}"
}
```
6. Click **Test notification** to receive a test message from Crowdin to your Google Chat channel.
7. Once finished with the configuration, click **Save**.
### [Configuring for Microsoft Teams](#microsoft-teams)
[Section titled “Configuring for Microsoft Teams”](#microsoft-teams)
To set up Custom Notifications from Crowdin in Microsoft Teams, follow the steps below.
#### [Creating Microsoft Teams Account](#creating-microsoft-teams-account)
[Section titled “Creating Microsoft Teams Account”](#creating-microsoft-teams-account)
If you don’t have a Microsoft Teams account already, you will need to [create one](https://go.microsoft.com/fwlink/p/?linkid=2123761\&lm=deeplink\&lmsrc=NeutralHomePageWeb\&cmpid=FreemiumSignUpHero).
Download and install the [Microsoft Teams desktop app](https://www.microsoft.com/en-us/microsoft-teams/download-app). Alternatively, you may use the Microsoft Teams web interface for further configurations.
#### [Creating Microsoft Teams Webhook](#creating-microsoft-teams-webhook)
[Section titled “Creating Microsoft Teams Webhook”](#creating-microsoft-teams-webhook)
To receive notifications in Microsoft Teams, you need to create a webhook. Once finished, copy the webhook URL. You’ll need it for configurations on the Crowdin side.
Read more about [creating a Microsoft Teams webhook](https://docs.microsoft.com/en-us/microsoftteams/platform/webhooks-and-connectors/how-to/add-incoming-webhook).
#### [Configuring Custom Notifications Channel](#custom-channel-microsoft-teams)
[Section titled “Configuring Custom Notifications Channel”](#custom-channel-microsoft-teams)
1. Open your **Account Settings** and go to the **Notifications** tab.
2. Click **Set Up Notifications Custom Channel**.
3. In the appeared dialog, paste the Microsoft Teams webhook URL in the **URL** field.
4. Select **application/json** for the **Content type**.
5. Paste the following payload in the **Payload** field:
```json
{
"text": "{{notification-message}}"
}
```
6. Click **Test notification** to receive a test message from Crowdin to your Microsoft Teams channel.
7. Once finished with the configuration, click **Save**.
#### [Per-project notifications with the Microsoft Teams App](#per-project-notifications-with-the-microsoft-teams-app)
[Section titled “Per-project notifications with the Microsoft Teams App”](#per-project-notifications-with-the-microsoft-teams-app)
Custom notifications allow you to receive your account-specific notifications from Crowdin. If you’d like to receive notifications related to some specific project you manage in Crowdin, feel free to use our [Microsoft Teams app](https://store.crowdin.com/teams).
### [Configuring for Telegram](#telegram)
[Section titled “Configuring for Telegram”](#telegram)
To set up Custom Notifications from Crowdin in Telegram, follow the steps below.
#### [Creating Telegram Account](#creating-telegram-account)
[Section titled “Creating Telegram Account”](#creating-telegram-account)
If you don’t have a Telegram account already, you will need to connect with a phone. Telegram uses your phone number as a primary credential which you’ll use to log into your account.
So firstly, download and install the Telegram app using [Android](https://telegram.org/dl/android) or [iOS](https://telegram.org/dl/ios). Once signed up, you may use the [Telegram web interface](https://telegram.org/dl/webogram) with a PC or Mac to simplify further configurations, but this part is up to you.
#### [Creating Telegram Bot](#creating-telegram-bot)
[Section titled “Creating Telegram Bot”](#creating-telegram-bot)
To receive notifications in Telegram, you need to create a bot. Once finished, you will be provided with a bot’s API token. Make sure to save it; you’ll need it later.
Read more about [creating a Telegram bot](https://core.telegram.org/bots#creating-a-new-bot).
#### [Configuring Telegram Channel](#configuring-telegram-channel)
[Section titled “Configuring Telegram Channel”](#configuring-telegram-channel)
The next step is to create a public Telegram channel which will be used to get notifications from Crowdin. Later you’ll be able to change the channel’s privacy if needed.
To create a Telegram channel, follow these steps:
1. Open Telegram on your device.
2. Click on the pen icon and select **New Channel**.
3. Name your channel in the **Channel name** field.
4. *(Optional)* Specify a channel description.
5. *(Optional)* Click on the camera icon to set a display picture for your channel.
6. Click **Next** in the top-right corner.
7. Select **Public** channel type.
8. Specify a permanent link for your channel. This link is what people would use to search and join your channel.
9. Click **Next** in the top-right corner.
10. *(Optional)* In this step, Telegram will ask you to add subscribers to your Telegram channel. Select contacts you’d like to add, including your new bot (provide your bot with Admin permissions). You can choose not to add any members for now since you’ll be able to do it later.
11. Click **Next** in the top-right corner to continue and create your channel on Telegram.
#### [Configuring Custom Notifications Channel](#custom-channel-telegram)
[Section titled “Configuring Custom Notifications Channel”](#custom-channel-telegram)
1. Open your **Account Settings** and go to the **Notifications** tab.
2. Click **Set Up Notifications Custom Channel**.
3. In the appeared dialog, specify the **URL** in the following format: `https://api.telegram.org/bot{bot_API_token}/sendMessage`.
4. Select **application/json** for the **Content type**.
5. Paste the following payload in the **Payload** field:
```json
{
"chat_id": "{public_chat_id}",
"text": "{{notification-message}}"
}
```
where `{public_chat_id}` – Your public chat id you specified for your channel link during the Telegram channel configuration.
6. Click **Test notification** to receive a test message from Crowdin to your Telegram channel.
7. Once finished with the configuration, click **Save**.
#### [Changing Telegram Channel Type](#changing-telegram-channel-type)
[Section titled “Changing Telegram Channel Type”](#changing-telegram-channel-type)
If you’d like to make your Telegram channel private and keep receiving notifications from Crowdin, follow these steps:
1. First of all you need to acquire your Telegram channel’s original chat id by visiting: `https://api.telegram.org/bot{bot_API_token}/sendMessage?chat_id={public_chat_id}&text=Test`
2. You’ll get a response in a JSON format that will contain your Telegram channel’s original chat id.
3. In Crowdin, open your **Account Settings** and go to the **Notifications** tab.
4. Click **Set Up Notifications Custom Channel**.
5. In the appeared dialog, modify the **URL** by replacing the chat id with the one received in the JSON response above.
6. Click **Save**.
7. In Telegram, open your channel.
8. Click on your channel name and click **Edit**.
9. Click **Channel Type**.
10. Select **Private** and click **Done**.
Note
Make sure to replace `{bot_API_token}` and `{public_chat_id}` with your actual Telegram bot API token and public chat id.
# Account Settings
> View and manage settings for your Crowdin account
Manage your Crowdin account settings, including profile details, notification preferences, security settings, and more using the **Account Settings** page. To access it, click on your profile picture in the upper-right corner and select **Settings**.
## [Profile](#profile)
[Section titled “Profile”](#profile)
In the **Profile** tab, you can manage your personal details, language preferences, appearance settings, and privacy options.
### [Profile Picture](#profile-picture)
[Section titled “Profile Picture”](#profile-picture)
Upload a profile picture by dragging a file to the designated area or selecting a file from your device. You can remove the picture anytime.
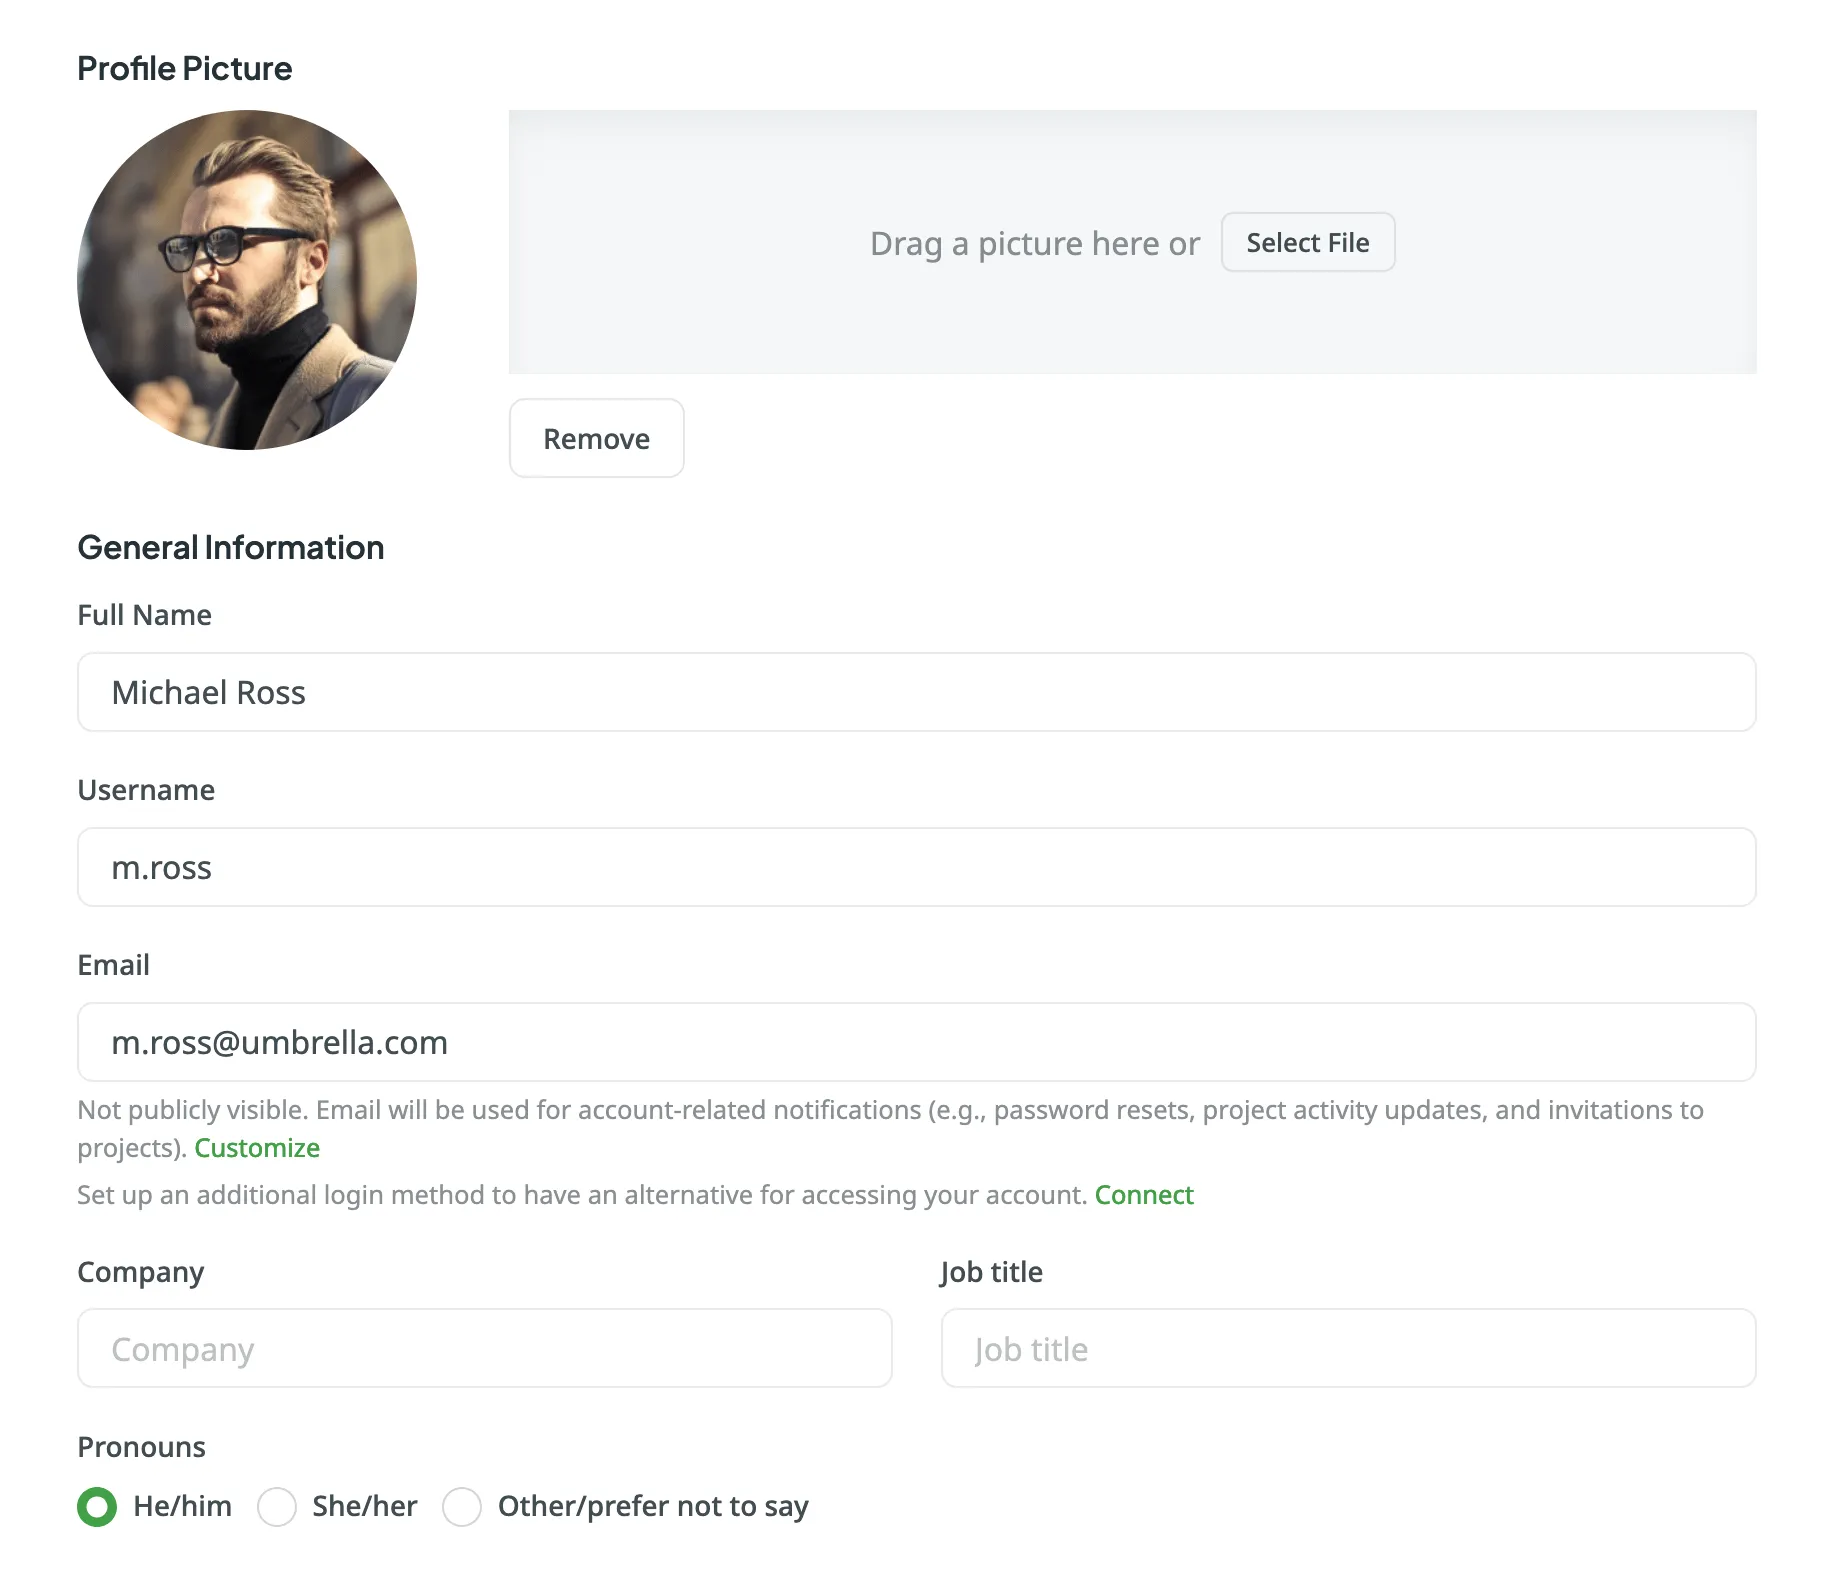
### [General Information](#general-information)
[Section titled “General Information”](#general-information)
Update your full name, username, email address, company, job title, pronouns, and a brief description about yourself.
Your email address is not publicly visible and is used for account-related notifications like password resets, project updates, and invitations. You can also set up [additional login methods](#auth-providers) for easier access to your account.
### [Language & Region](#language--region)
[Section titled “Language & Region”](#language--region)
Set your preferred Crowdin interface language, timezone, and time format (12-hour or 24-hour). Additionally, specify preferred languages for displaying project target languages, giving them priority in the target languages list.

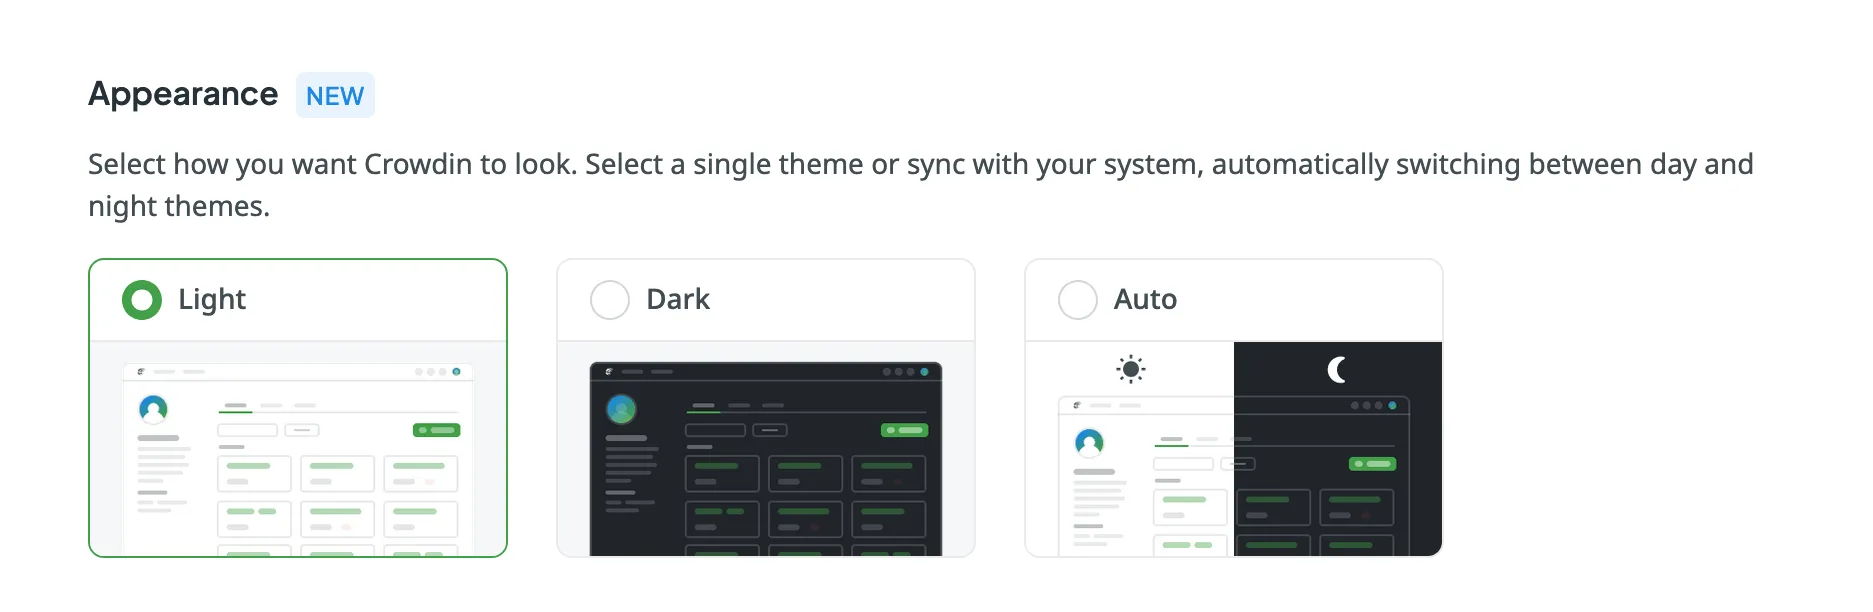
### [Appearance](#appearance)
[Section titled “Appearance”](#appearance)
Choose how Crowdin appears on your device. You can select a Light or Dark theme or sync it with your system settings to switch automatically between day and night modes.
### [Privacy](#privacy)
[Section titled “Privacy”](#privacy)
Enable **Private Profile** to hide the **Projects** and **Activity** tabs from other users visiting your profile page. When enabled, visitors will see a *This profile is private* message instead of your project list and recent actions.

To make your profile private, follow these steps:
1. Open your **Account Settings** and go to the **Profile** tab.
2. Scroll down to the **Privacy** section.
3. Select **Private Profile**.
### [Migration to Crowdin Enterprise](#migration-to-crowdin-enterprise)
[Section titled “Migration to Crowdin Enterprise”](#migration-to-crowdin-enterprise)
You can migrate your Crowdin account data, including projects, Translation Memories, and Glossaries, to a new or existing Crowdin Enterprise organization.
Read more about [Migration to Crowdin Enterprise](/enterprise/migrating-to-crowdin-enterprise/).
### [Delete Account](#delete-account)
[Section titled “Delete Account”](#delete-account)
For security reasons, we cannot delete an account on behalf of the user. You must have access to your Crowdin account to be able to delete it.
To delete your account, follow these steps:
1. Open your **Account Settings** and go to the **Profile** tab.
2. Scroll down to the **Remove Account** section.
3. Click **Remove Account**.
Danger
Deleting an account will immediately delete all projects created under your account and all associated data. Deleted accounts cannot be restored!
Once your account is deleted, your translations, comments, terms, and votes will remain in the system but will appear as added by a **Removed User**.
## [Account](#account)
[Section titled “Account”](#account)
In the **Account** tab, you can manage your password, enhance account security with security keys and passkeys, set up two-factor authentication, manage linked authentication providers, and review active sessions. You can also verify new devices and enable sudo mode for additional security during sensitive actions.
### [Password](#password)
[Section titled “Password”](#password)
In the **Password** section, you can change your current password by clicking **Change Password** and following the instructions. If your account was created through an authentication provider like Google or Facebook, you can create a new password to log in without using these providers.
##### [Password Strength](#password-strength)
[Section titled “Password Strength”](#password-strength)
To ensure the highest level of account security, Crowdin uses an [entropy score](https://en.wikipedia.org/wiki/Password_strength#Entropy_as_a_measure_of_password_strength) to evaluate how difficult it would be for a computer to guess your password. We do not rely on simple rules like *must contain one number*. Instead, we calculate complexity based on length and character unpredictability.
As you type, a colored bar below the password field fills up and changes color to indicate the password’s strength.
**Password Acceptance Policy:**
Crowdin prohibits the use of passwords categorized as **Very weak** and **Weak**.
If you attempt to save a password with one of these ratings, the system will automatically clear the password field and display the error message: **Please choose a more secure password.**
Refer to the table below to understand the security levels and visual indicators:
| Strength | Visual Indicator | Status | Description |
| :------------ | :--------------- | :----------- | :---------------------------------------------------------------------------------------------------------------------- |
| **Very weak** | Red bar | **Rejected** | **Risky.** Typically a common dictionary word that can be guessed instantly. |
| **Weak** | Orange bar | **Rejected** | **Vulnerable.** Often a common word with a simple modification. Vulnerable to standard guessing attacks. |
| **Medium** | Yellow-Green bar | **Accepted** | **Moderate.** Provides basic protection against unthrottled online attacks. |
| **Strong** | Light Green bar | **Accepted** | **High.** Difficult to guess. Offers solid protection against most attacks and standard cracking attempts. |
| **Secure** | Green bar | **Accepted** | **Highest.** Mathematically complex and very unpredictable. Provides the best protection against sophisticated attacks. |
Tip
For a **Secure** rating, we recommend using a passphrase made of multiple unrelated words or a long string of random characters generated by a password manager.
### [Security Keys and Passkey](#security-keys-and-passkey)
[Section titled “Security Keys and Passkey”](#security-keys-and-passkey)
In the **Security Keys and Passkey** section, you can register a physical security key or passkey to add an extra layer of protection to your account. This key works alongside your password to verify your identity during login.
### [Authenticator app](#authenticator-app)
[Section titled “Authenticator app”](#authenticator-app)
In the **Authenticator app** section, you can enable two-factor authentication (2FA) to add an additional layer of security to your account. Use an authenticator app on your mobile device or computer to generate one-time verification codes.
To enable two-factor authentication, follow these steps:
1. Open your **Account Settings** and go to the **Account** tab.
2. Click **Enable** in the **Authenticator app** section.
3. Using the **Google Authenticator** app on your mobile device, scan the QR code on the screen.
4. Enter the 6-digit verification code generated by your authenticator app, then click **Next**. 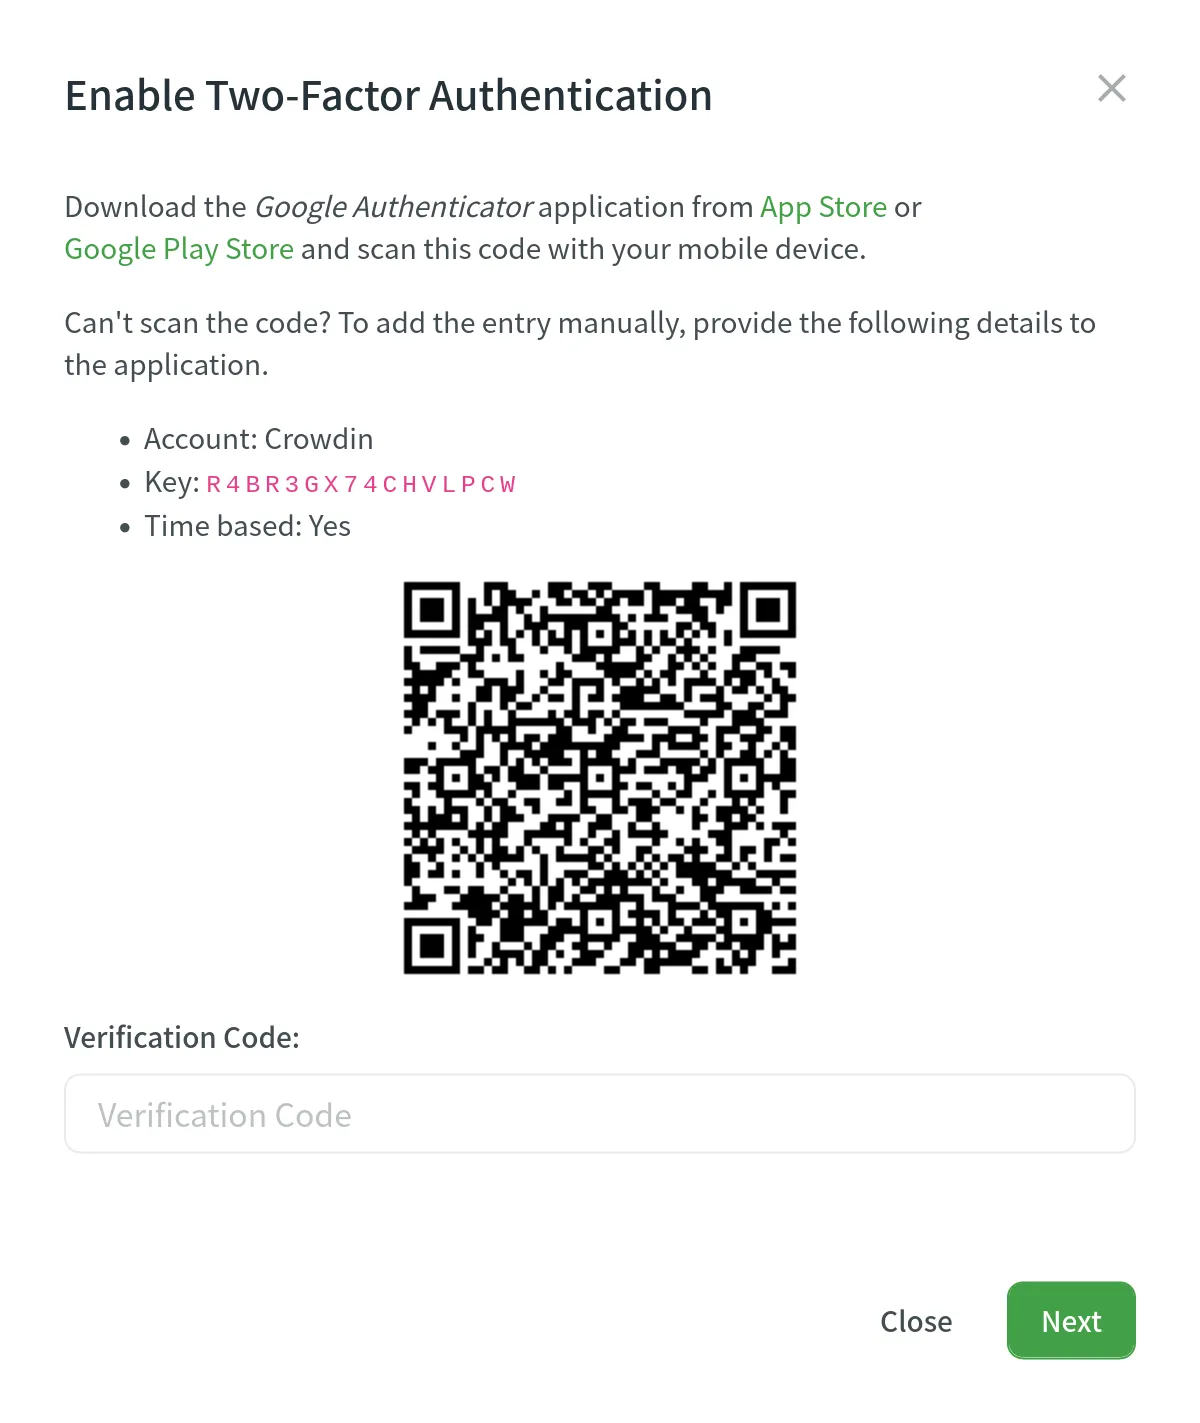
5. Download recovery codes, so you can use them if you can’t access your mobile device. 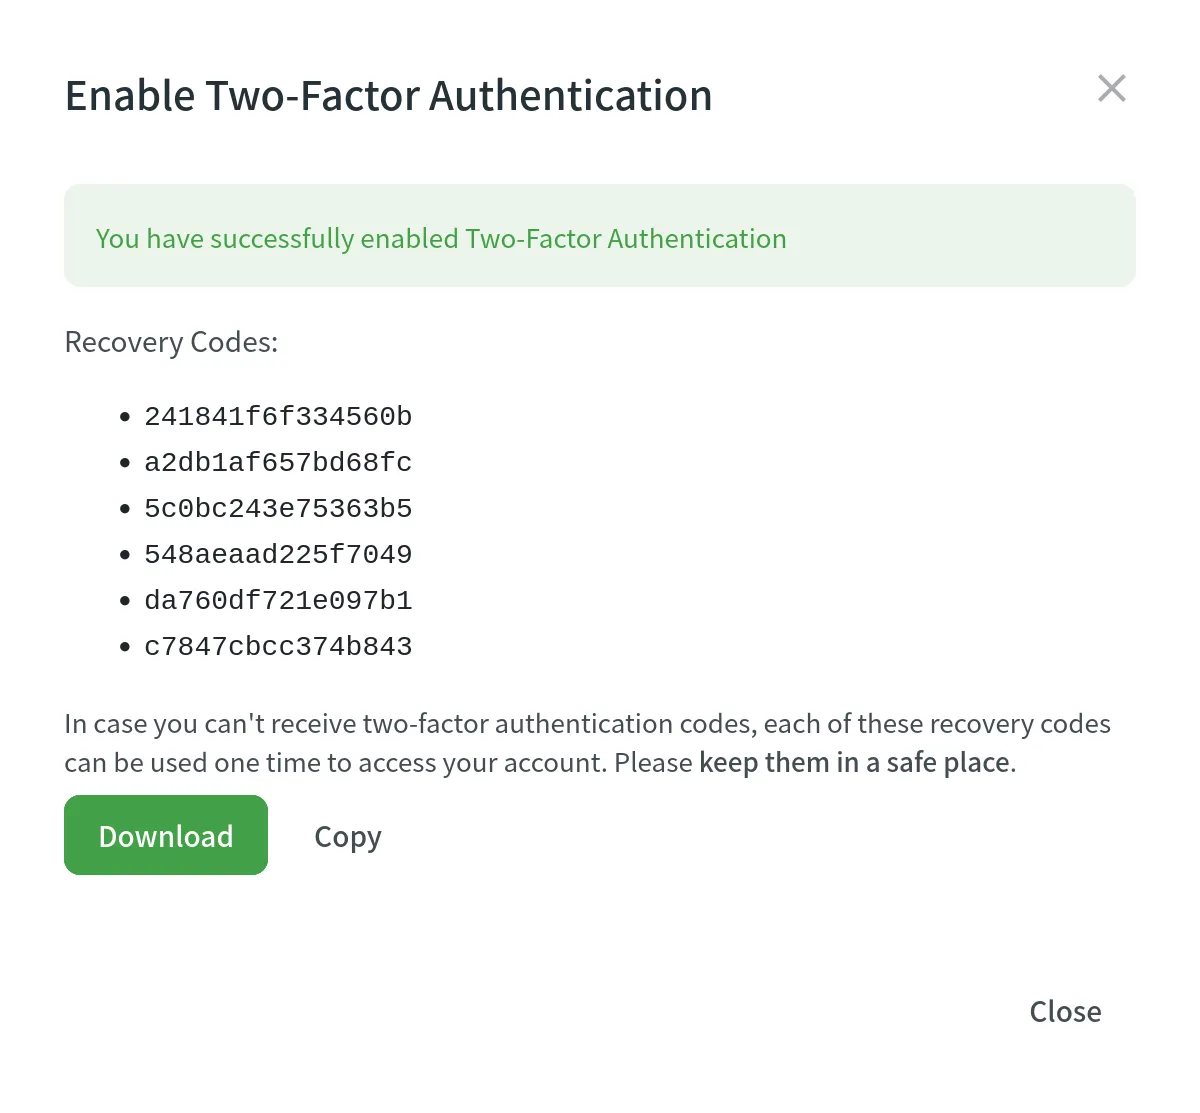
### [Resetting Two-Factor Authentication](#resetting-two-factor-authentication)
[Section titled “Resetting Two-Factor Authentication”](#resetting-two-factor-authentication)
If you’ve lost access to your authenticator app and your recovery codes, you can request a 2FA reset to regain access to your account.
To request a 2FA reset, follow these steps:
1. On the Crowdin login page, enter your email (or username) and password.
2. On the **Two-Factor Authentication** screen, click **Request two-factor authentication reset**.
3. You will be redirected to the **Reset 2FA methods** page. To verify your identity, provide as many verification factors as possible:
* **Device verification:** This step is automatic. Crowdin checks if you have previously used this browser to log into your account.
* **Verify email address:** Click **Send code**, check your email for a verification code, and enter it.
* **Verify personal access token:** If you have a Personal Access Token (PAT) saved from your account, paste it into the field.
4. Once you have provided the available verification factors, click **Submit**.
Your reset request will be sent to the Crowdin support team for review. You will receive an email confirming that your request has been received.
Note
To protect your account from fraudulent access, there is a mandatory **three working day** security waiting period before 2FA is disabled. This period begins after our support team successfully verifies your identity. For security purposes, the team might contact you to request additional details to confirm your account ownership.
Tip
Before submitting a reset request, double-check if you saved the recovery codes that were provided when you first set up 2FA.
### [New Device Verification](#new-device-verification)
[Section titled “New Device Verification”](#new-device-verification)
Enable **New Device Verification** to add an extra security step when logging in from a new device. Crowdin will send a verification code to your registered email address to confirm your identity before allowing access from the new device. Once you successfully log in, the device will be added to the list of trusted devices.
Note
You can disable this option only if you are using any 2FA, like Authenticator app or Security Keys.
After enabling this feature, you will see a list of trusted devices. You can remove any device from the list by clicking the **Remove** button. Alternatively, you can remove all trusted devices by clicking **Remove all devices**.
### [Auth Providers](#auth-providers)
[Section titled “Auth Providers”](#auth-providers)
In the **Auth Providers** section, you can manage the accounts linked to your Crowdin account. These connections allow you to log in with a single click using providers like Google, Facebook, GitHub, X, GitLab, and Crowdin Enterprise.
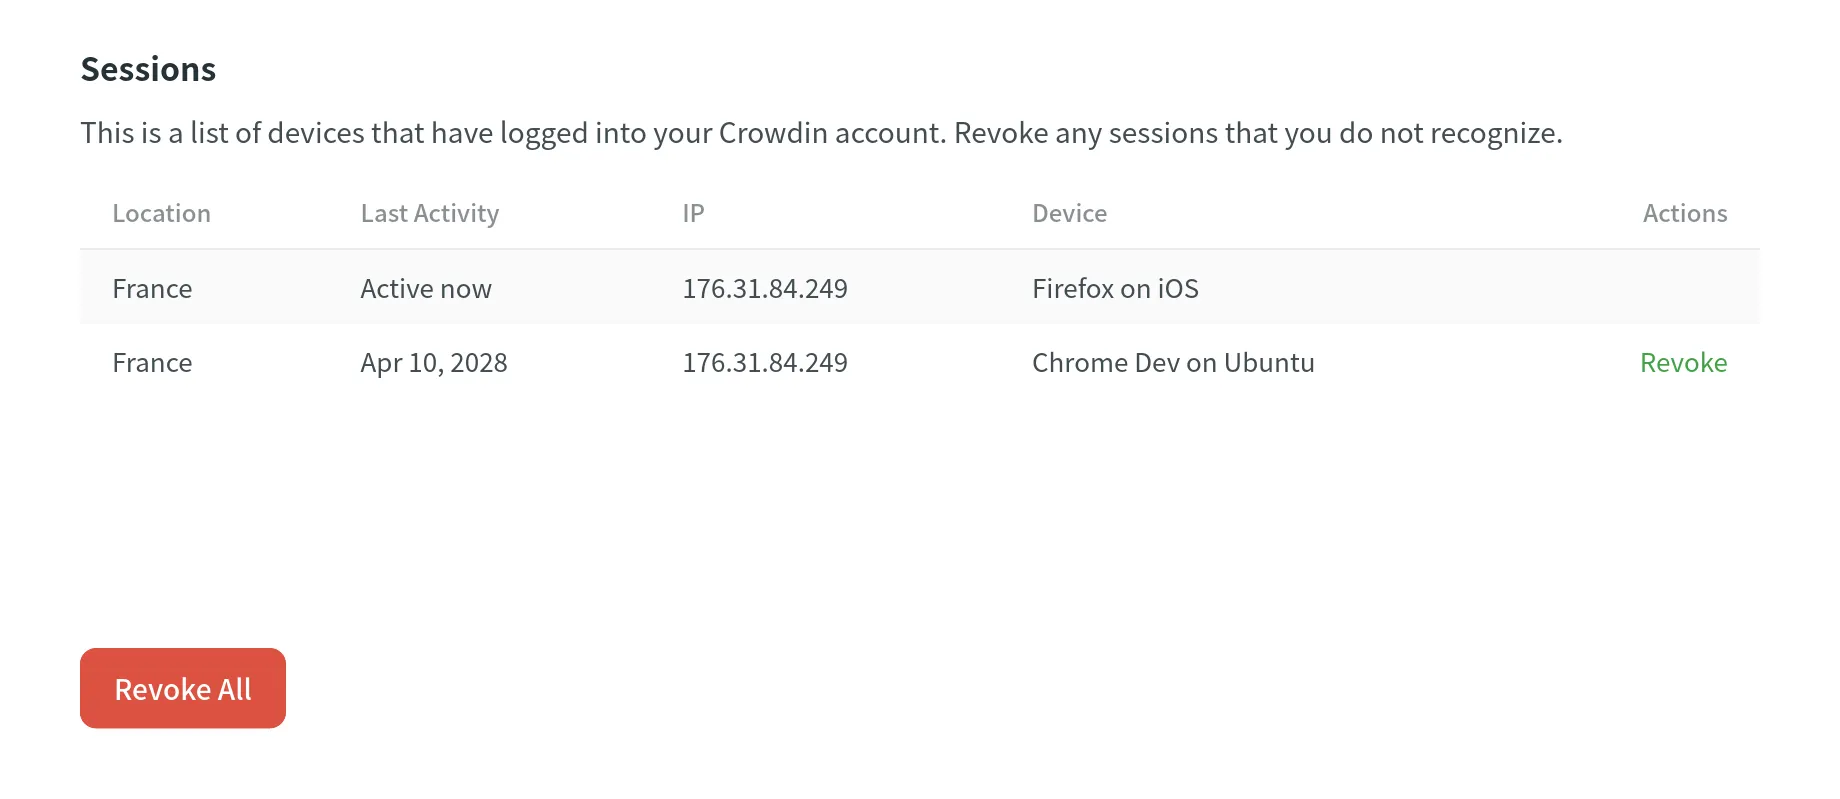
### [Sessions](#sessions)
[Section titled “Sessions”](#sessions)
In the **Sessions** section, you can view the list of devices that have accessed your Crowdin account, including details like location, last activity date, IP address, and device type. Revoke individual sessions that you don’t recognize, or revoke all except your current session by clicking **Revoke All**.
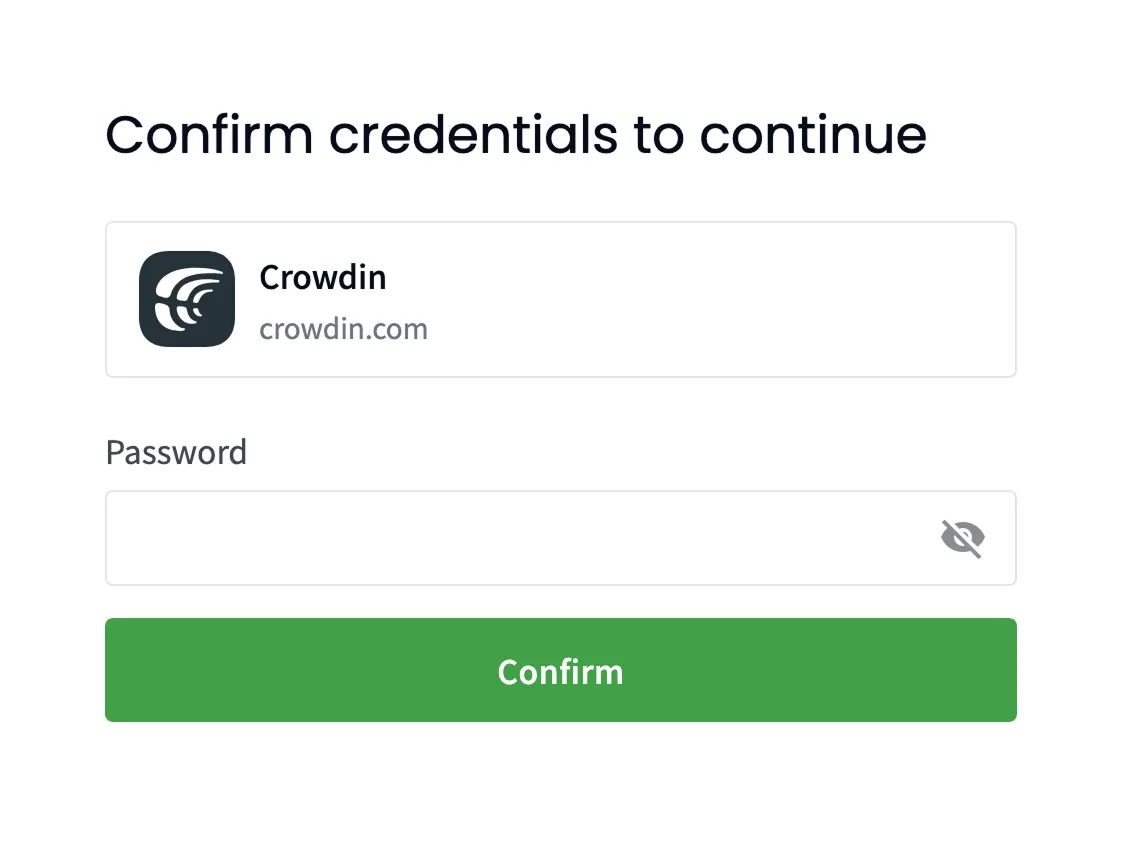
### [Sudo Mode](#sudo-mode)
[Section titled “Sudo Mode”](#sudo-mode)
Crowdin asks you to confirm your password before performing sensitive actions, such as changing your password, managing email or authentication settings, and deleting your account. Once confirmed, you can perform these actions without re-authenticating for the next five minutes.
## [Notifications](#notifications)
[Section titled “Notifications”](#notifications)
In the **Notifications** tab, you can customize which notifications you receive and how they are delivered. This includes setting preferences for different notification channels and configuring rules for specific projects.
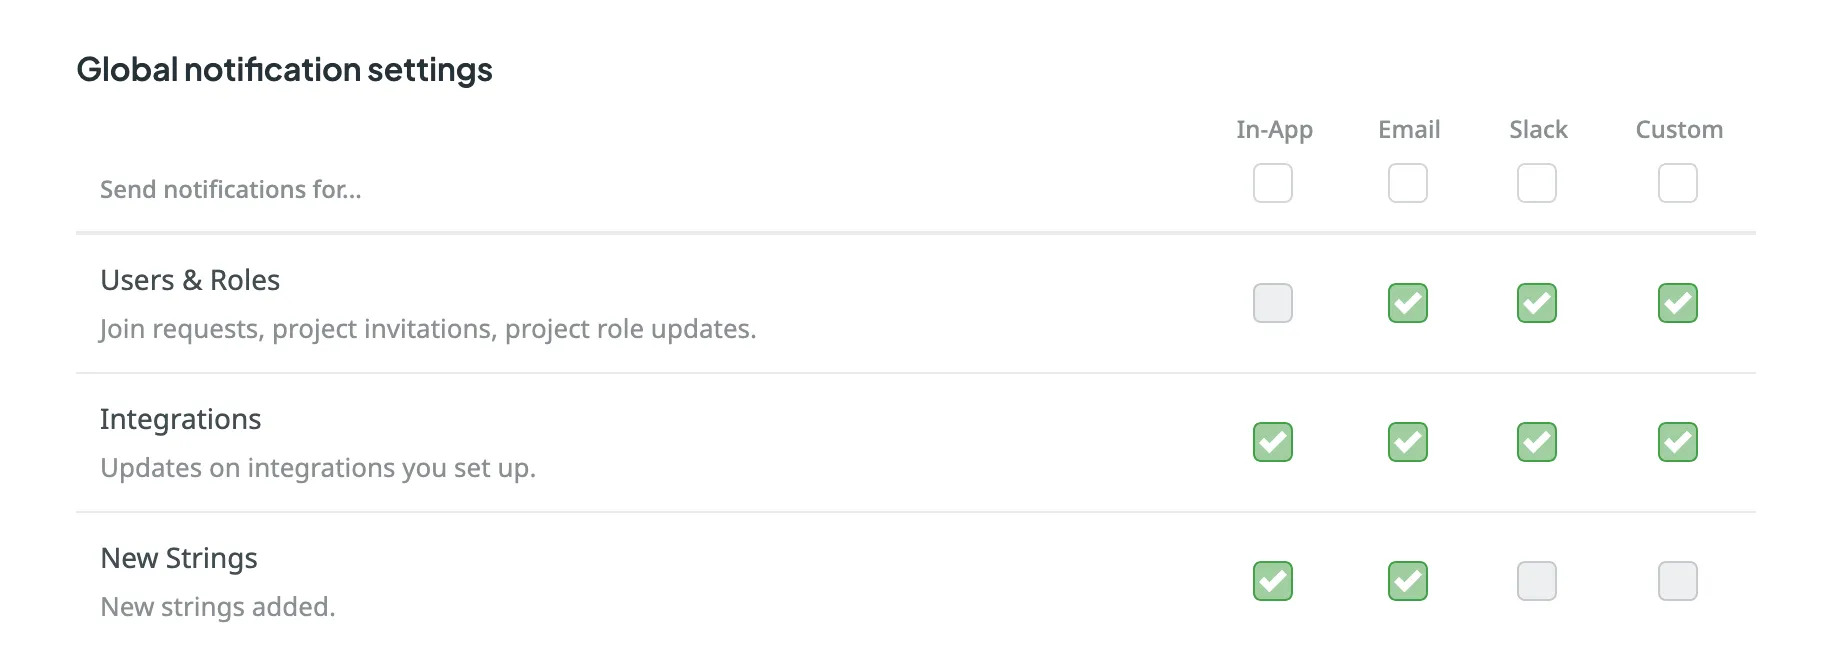
### [Channels & Events](#channels--events)
[Section titled “Channels & Events”](#channels--events)
Crowdin provides several channels for notifications:
* In-App (Crowdin)
* Email
* Slack
* Custom
To activate a channel, select the checkbox next to its name. You can then customize notifications for each channel by selecting the events you want to be notified about.
Available notification events include:
| Event Type | Description |
| ---------------------- | --------------------------------------------------------------------------- |
| Users & Roles | Join requests, project invitations, project role updates. |
| Integrations | Updates on integrations you set up. |
| New Strings | New strings added. |
| Language Progress | Translation or proofreading for a particular language is completed. |
| API-Integrated Vendors | Updates on collaboration with API-Integrated translation vendors. |
| Content Issues | All issue types created or resolved in the Editor. |
| Mentions | Updates on you being mentioned in the Editor. |
| Tasks | Created, deleted, and updated tasks, status changes, mentions and comments. |
| Messages | Private messages within Crowdin. |
| Discussions | New topics created. Mentions in the discussions. |
| API Notifications | Notifications sent by apps, API integrations, and users via API. |
### [Slack Notifications](#slack-notifications)
[Section titled “Slack Notifications”](#slack-notifications)
To use Slack for notifications, click **Connect Slack** and authorize Crowdin to integrate with Slack. After completing the setup, you can choose which notifications to receive in Slack.
Read more about [Slack Integration](/account-notifications/#slack-integration).
### [Product Updates](#product-updates)
[Section titled “Product Updates”](#product-updates)
Subscribe to the [Crowdin blog](https://crowdin.com/blog) to receive key product updates and localization best practices directly in your inbox. Stay informed about the latest features and improvements.
### [Custom Notifications](#custom-notifications)
[Section titled “Custom Notifications”](#custom-notifications)
To use a custom channel for notifications, click **Set Up Notifications Custom Channel** and follow the setup instructions to configure it. After setup, you can select which notifications to send to your custom channel.
Read more about [Custom Notifications](/account-notifications/#custom-notifications).
### [Default Notifications](#default-notifications)
[Section titled “Default Notifications”](#default-notifications)
By default, Crowdin sends updates on new events via email and in-app notifications. You can adjust these settings as needed.
### [Disable Notifications](#disable-notifications)
[Section titled “Disable Notifications”](#disable-notifications)
To disable notifications, clear the checkbox next to the notification type. You can also clear the checkbox on the channel name to disable all notification types. Once all the boxes below are cleared, you won’t receive any notifications from that channel.
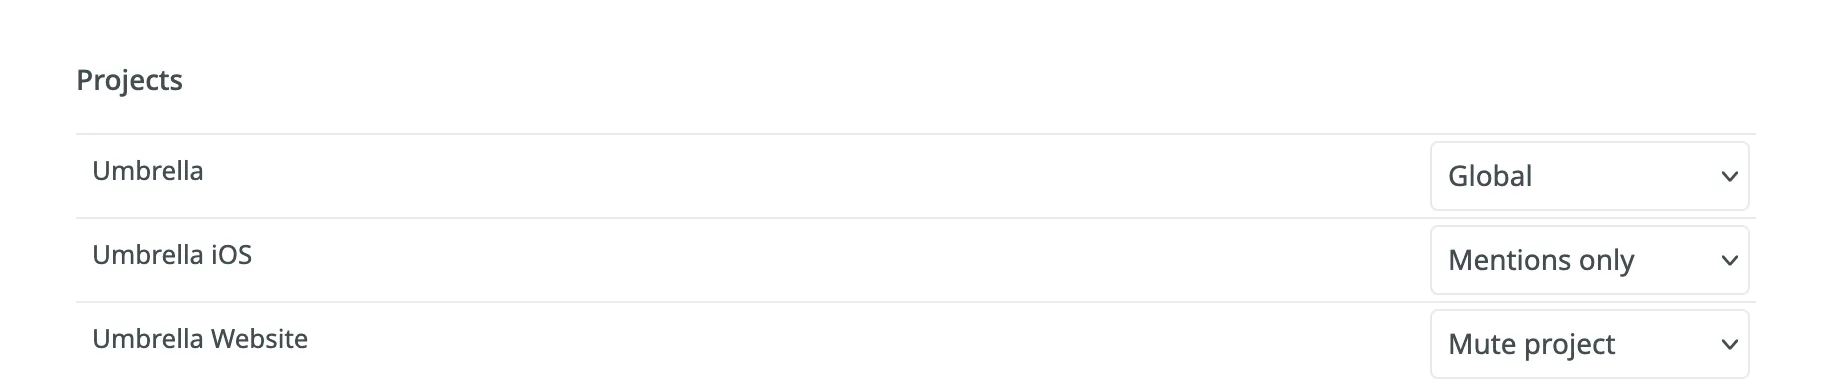
### [Notification Rules for Projects](#notification-rules-for-projects)
[Section titled “Notification Rules for Projects”](#notification-rules-for-projects)
You can also configure notification preferences on the project level:
* **Global**: Notifications selected for global settings.
* **Mentions only**: Only when @mentioned.
* **Mute project**: Turn off notifications.
## [Billing](#billing)
[Section titled “Billing”](#billing)
The **Billing** tab in your **Account Settings** becomes available as soon as you subscribe to one of Crowdin’s plans. Within this tab, you can manage your subscription plan, view payment history, handle app subscriptions, manage the balance for MT engines and AI models managed by Crowdin, and set the daily balance warning threshold for CDN Distributions.
### [Current Plan](#current-plan)
[Section titled “Current Plan”](#current-plan)
Review your current subscription plan, which includes details such as the plan name, the date of the last plan change, and your current usage limits (e.g., managers, projects, words). Additionally, you can view the next charge amount and the expiration date of your plan.
Read more about [Changing Subscription Plan](/changing-subscription-plan/).
### [App Subscription](#app-subscription)
[Section titled “App Subscription”](#app-subscription)
Crowdin Store offers various apps that you can install to extend the functionality of Crowdin, synchronize your content stored in a CMS, and more. Some of the apps are available for free, while others are paid.
Read more about [App Subscriptions](/app-subscriptions/).
### [Crowdin Managed Services](#crowdin-managed-services)
[Section titled “Crowdin Managed Services”](#crowdin-managed-services)
Top up the balance for the Crowdin Managed Services (AI models and Crowdin Language Services), set a balance warning threshold and view the usage statistics for each service.
Read more about [Crowdin Managed Services](/crowdin-managed-services/).
### [CDN Distributions](#cdn-distributions)
[Section titled “CDN Distributions”](#cdn-distributions)
Set a daily balance warning threshold for CDN Distributions and view the usage statistics.
Read more about [CDN Distributions](/cdn-distributions/).
### [Payments](#payments)
[Section titled “Payments”](#payments)
Access payment history and download invoices.
Read more about [Payments and Invoices](/payments-invoices/) and [Billing Settings](/billing-settings/).
## [API](#api)
[Section titled “API”](#api)
In the **API** tab, you can create personal access tokens for authorization when working with the Crowdin API and view your account’s API call history.
### [Personal Access Tokens](#personal-access-tokens)
[Section titled “Personal Access Tokens”](#personal-access-tokens)
Personal access tokens serve as an alternative to passwords for authorizing third-party applications and scripts in Crowdin. The token list displays each token’s **Name**, a partially masked **Token**, the **Created** date, information on its **Last Usage**, and when it **Expires**. If a token has an expiration date, it becomes inactive once the date is reached, but remains in your list for reference.

Caution
Treat personal access tokens like passwords and keep them secure. Use tokens as environment variables instead of hardcoding them into your scripts.
### [Use Cases](#use-cases)
[Section titled “Use Cases”](#use-cases)
You’ll need a personal access token for authorization in the following cases:
* Automating localization workflows via the [Crowdin API](/developer/api/).
* Managing and syncing localization resources with the [Crowdin CLI](https://crowdin.github.io/crowdin-cli/).
* Pushing design content for translation from design tools (i.e., Figma, Sketch, Adobe XD).
* Uploading and downloading content using IDE plugins (i.e., Visual Studio Code, Android Studio).
* And other integrations or tools that require secure access to your Crowdin account.
### [Creating a Personal Access Token](#creating-a-personal-access-token)
[Section titled “Creating a Personal Access Token”](#creating-a-personal-access-token)
When creating a new personal access token, you can give it a name as a reminder of what it’s used for, set an expiration date, select [specific scopes](/developer/understanding-scopes/), and, if needed, limit the visibility of resources for the selected scopes using the **Granular access** option. For example, you can create a token that should only interact with a specific project and have no access to others. As a result, only that selected project will be returned when an API request is made to retrieve a list of all projects.
To create a new personal access token, follow these steps:
1. Open your **Account Settings** and go to the **API** tab.
2. Click **New Token**.
3. In the appeared dialog, enter a name to help you identify the token later.
4. Set an expiration date for the token. By default, **Expires** is set to **Never**.
5. Select the required scopes.
6. *(Optional)* To limit access to specific resources, click **Granular access** and select the required scopes and related resources.
7. Click **Create**.
After creating a new token, be sure to copy and save it immediately. For security reasons, it will not be shown again. You can create as many personal access tokens as needed.
Caution
If a resource wasn’t selected during token creation, attempting to access it by ID will result in a `404 Not Found` error.
### [Revoking a Personal Access Token](#revoking-a-personal-access-token)
[Section titled “Revoking a Personal Access Token”](#revoking-a-personal-access-token)
Revoke a personal access token if it’s no longer needed or you suspect it was compromised.
To revoke a personal access token, follow these steps:
1. Open your **Account Settings** and go to the **API** tab.
2. Find the token in the list and click **Revoke** next to it to remove its access.
### [Calls History](#calls-history)
[Section titled “Calls History”](#calls-history)
In the **Calls History** section, you can view a list of API calls associated with your Crowdin account. Use the filter to view all, successful, or unsuccessful calls, and select specific action groups or individual actions within them. The **Application Name** field allows you to search for calls related to a particular application.
## [Apps](#apps)
[Section titled “Apps”](#apps)
In the **Apps** tab, manage the Crowdin Apps installed in your Crowdin account. You can view and manage currently installed apps, search for specific ones, and use the **Edit** or **Uninstall** options on each app.
Click **Install from store** to add apps developed by Crowdin and other developers from the Crowdin [Store](https://store.crowdin.com/). Alternatively, click **Install Private App** to manually install custom apps of your own development.
Read more about [Installing Crowdin Apps](/developer/crowdin-apps-installation/#installation-in-crowdin).
## [Bots](#bots)
[Section titled “Bots”](#bots)
Manage bots for custom applications that interact with Crowdin. Bots allow applications to perform specific actions on your behalf within the platform. You can add Bots from the [Crowdin Store](https://store.crowdin.com/tags/agent) and manage their permissions to projects and resources as needed.
## [Security Log](#security-log)
[Section titled “Security Log”](#security-log)
The **Security Log** tab lets you track important events (including event type, used device, IP address, and date) that happen with your Crowdin account.
Security log includes events like logins, password and username changes, and others.
## [Webhooks](#webhooks)
[Section titled “Webhooks”](#webhooks)
In the **Webhooks** tab, you can configure account webhooks to receive notifications about key events that happen in your Crowdin account. Once set up, Crowdin will send POST or GET requests with data to the specified webhook URL via HTTP when these events occur.
You can create account webhooks for the following event types:
* Project created
* Project deleted
Read more about [Webhooks](/webhooks/).
Limitations
You can configure up to 20 webhook endpoints for account-level events.
## [OAuth](#oauth)
[Section titled “OAuth”](#oauth)
In the **OAuth** tab, you can create an OAuth Application that could be used to make authorized requests to Crowdin API or as a Single Sign-On service and manage connected OAuth apps you’ve authorized to use your account.
Some of the most common uses for this feature include:
* OAuth apps allow you to make authorized requests to the [Crowdin API](/developer/api/).
* OAuth apps are often used as a single sign-on service. You can allow users to sign in to your service with their Crowdin accounts.
See the [Authorizing OAuth Apps](/developer/authorizing-oauth-apps/) to learn how to authorize OAuth apps to access your Crowdin account.
### [Adding a New Application](#adding-a-new-application)
[Section titled “Adding a New Application”](#adding-a-new-application)
To add a new application, follow these steps:
1. In the upper-right corner, click on your profile picture and select **Settings**.
2. Switch to the **OAuth** tab and click **New Application**.
3. In the appeared dialog, specify the following information:
* **Name** and **Description** – (optional) will be displayed to users when they authorize the app to access their Crowdin accounts.
* **Authorization callback URLs** – the URLs to which users will be sent after they authorize with Crowdin. You can add multiple URLs separated by commas (no need to use quotes).
* Select the access your app needs from the list of available [Scopes](/developer/understanding-scopes/).
4. Click **Create**. 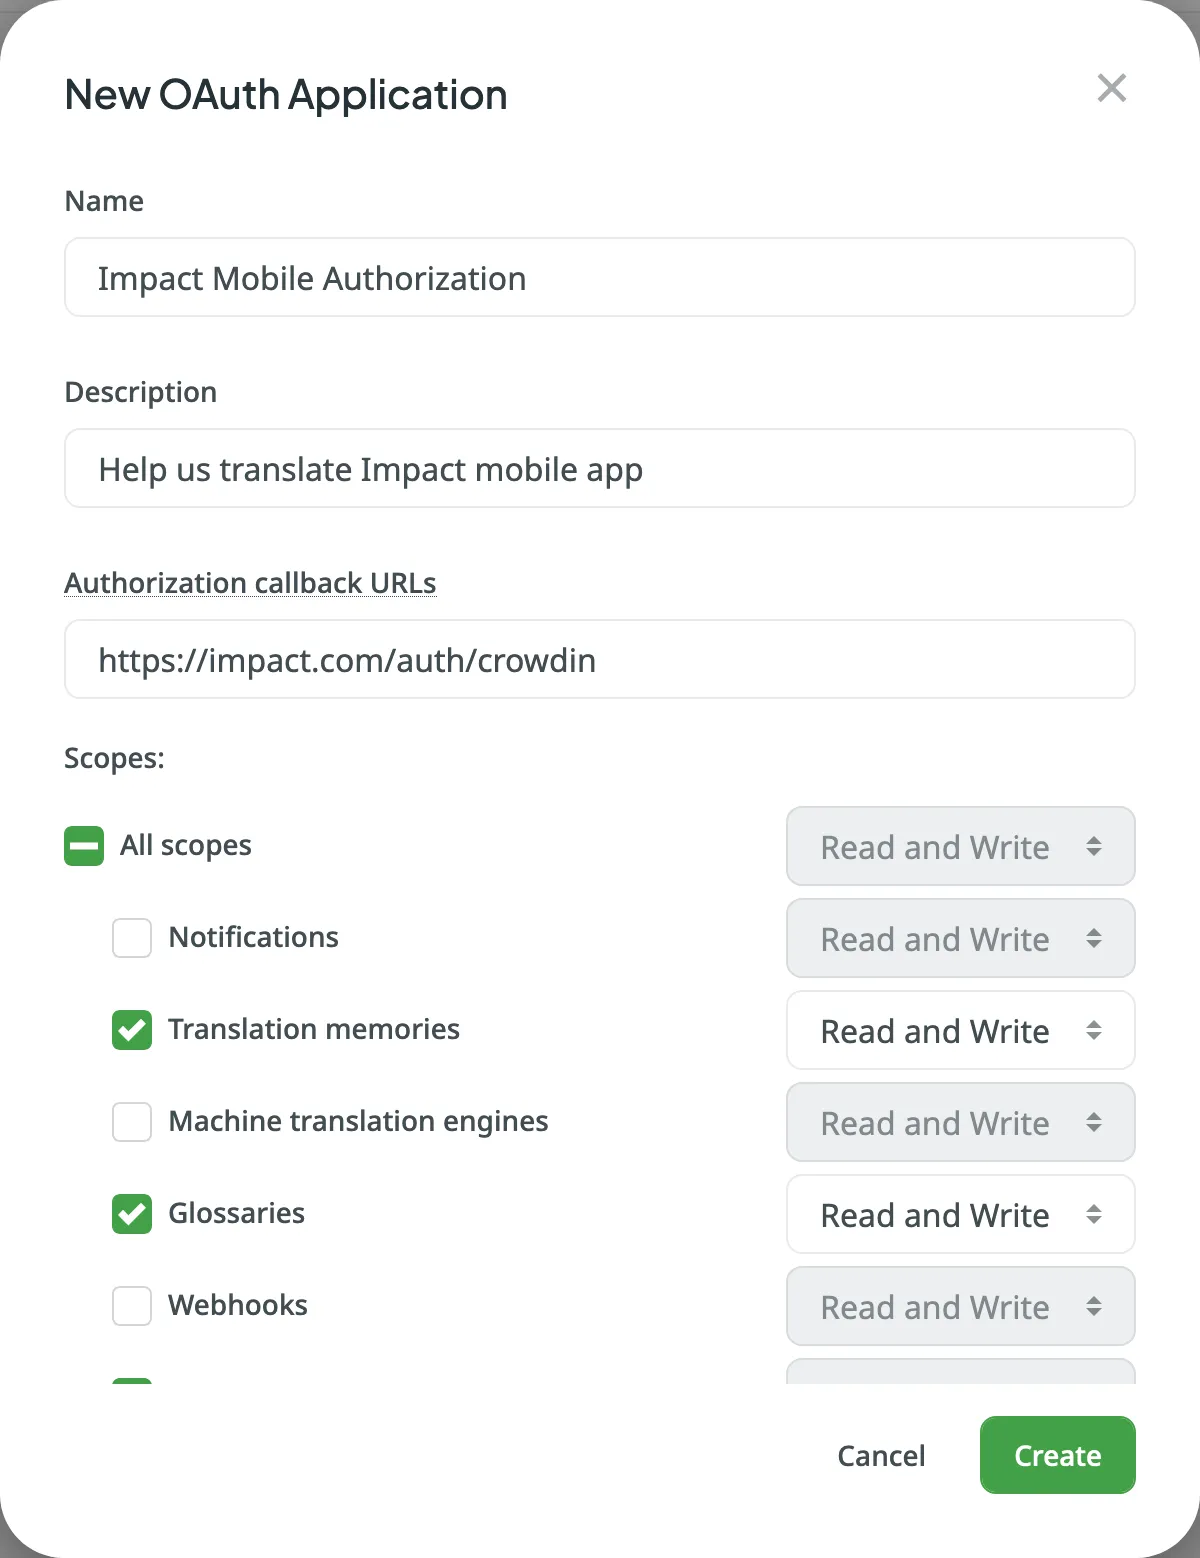
Note
By default, newly created OAuth apps are restricted to the app owner’s Crowdin projects. To make them available Crowdin-wide, [Contact Support Team](https://crowdin.com/contacts) with the respective request.
### [Modifying an OAuth App](#modifying-an-oauth-app)
[Section titled “Modifying an OAuth App”](#modifying-an-oauth-app)
After you create an OAuth application, you can make changes to it. Go to your account’s **Settings > OAuth Applications** to see the list of OAuth apps created under your account, the dates the apps were created, and how many users are using each app.
To find a specific application, type its name or Client ID in the search field at the top of the list.
Click in the *Actions* column on the necessary app to open the context menu.
Using the available options, you can do the following:
* **Edit** – update the application name, description, URLs, and scopes. Access Client ID and Client Secret of the created application.
* **Reset secret** – Reset the Client Secret for the app.
* **Revoke tokens** – Revoke all user tokens.
* **Delete** – Delete the application.
### [Managing Connected OAuth Applications](#managing-connected-oauth-applications)
[Section titled “Managing Connected OAuth Applications”](#managing-connected-oauth-applications)
In the **Connected OAuth Applications** section, you can view connected OAuth apps you’ve authorized to use your account and revoke access as needed.
## [Vendors](#vendors)
[Section titled “Vendors”](#vendors)
In the **Vendors** tab, you can manage the accounts and settings for the vendors you use for professional translations. This includes managing payment options for Crowdin Language Services, as well as connecting and disconnecting accounts for vendors like BLEND and Gengo.
**Crowdin Language Services**
You can configure payment methods for Crowdin Language Services, such as **Post payment** or **Managed by Crowdin balance**.
Read more about [Payment Options for Crowdin Language Services](/crowdin-language-services/#payment-options-for-crowdin-language-services).
**BLEND and Gengo**
For BLEND and Gengo, you can **Connect Account**, **Switch Account** to change the connected account, or **Disconnect Account** to remove the integration. Once your account is connected, you can also track your current balance on the vendor’s side directly from this tab.
Read more about [Connecting BLEND and Gengo with Crowdin](/ordering-professional-translations/#connecting-blend-and-gengo-with-crowdin).
To browse the full list of available vendors, go to **Store > Vendors** on your profile home page.

## [Beta Features](#beta-features)
[Section titled “Beta Features”](#beta-features)
In the **Beta Features** tab, you can select the **Enable beta features** option to test new experimental features.
# Additional Support Services
> Learn about the additional support services Crowdin offers
Along with services like Crowdin Customer Forum, Crowdin Documentation, Email Support, and Chat Support, Crowdin customers can also benefit from additional support services they can purchase in addition to the primary subscription plan. Below you can see the available additional support services.
Note
Additional support services are not available for the Free plan.
## [On-demand Tutorials and Onboarding Sessions](#on-demand-tutorials-and-onboarding-sessions)
[Section titled “On-demand Tutorials and Onboarding Sessions”](#on-demand-tutorials-and-onboarding-sessions)
* Customer’s team education
* Onboarding sessions after subscription purchase
## [Technical Calls and Troubleshooting](#technical-calls-and-troubleshooting)
[Section titled “Technical Calls and Troubleshooting”](#technical-calls-and-troubleshooting)
* Integration setup
* Streamlining the localization workflow
* Troubleshooting the technical cases
* Crowdin engineers can be involved if necessary
## [Dedicated Account Management](#dedicated-account-management)
[Section titled “Dedicated Account Management”](#dedicated-account-management)
Dedicated account management includes all benefits from Premium Support plus the following:
* Assigned personal account manager – Personal account manager will respond to your emails with high priority. Your team will be provided with a dedicated link to a call with a manager.
* Unlimited support calls – You can schedule an unlimited number of on-demand tutorials, onboarding sessions, technical calls, and troubleshooting sessions.
* Tracking important feature releases – Personal account manager will track and inform you about newly released features important to your team.
* Tracking subscription – Personal account manager will track and inform you about subscription-related questions.
Available for the following subscription plans: Pro, Team, Team+, and Business.
[Contact Sales ](https://crowdin.com/contact-sales)[View Pricing ](https://crowdin.com/pricing)
## [Custom Development](#custom-development)
[Section titled “Custom Development”](#custom-development)
Custom development includes the following services:
* Developing custom processors and apps
* Custom placeholders configuration
* API-related requests
* Expanding the functionality with the help of the Crowdin Apps development, etc.
Available for the following subscription plans: Pro, Team, Team+, and Business.
Price: Negotiated depending on request complexity.
# Adobe XD Plugin
> Start localizing at the design stage
With the Crowdin for Adobe XD plugin, you can use texts from Crowdin in your designs to save time for both designers and developers. These could include original or translated texts. If necessary, you can add new ones (e.g., dialog titles, button labels) and send them to translators in Crowdin.
## [Use Cases](#use-cases)
[Section titled “Use Cases”](#use-cases)
* Quickly generate multilingual creative assets.
* Translate mockups and test them in different languages before the programming starts.
* Stop using ‘Lorem Ipsum’, add real texts from Crowdin to your prototypes instead.
* Create and upload source strings from your designs to your Crowdin project. This way, uploaded strings could be used by developers, which reduces time spent on development.
* Upload tagged screenshots to your Crowdin project.
## [Installation](#installation)
[Section titled “Installation”](#installation)
1. Sign in to Adobe XD.
2. Navigate to **Plugins > Browse plugins…**.
3. Click **Browse**.
4. Use the *Search all plugins* field to find **Crowdin for Adobe XD** plugin.
5. Click **Install**.
## [Configuration](#configuration)
[Section titled “Configuration”](#configuration)
Permissions
To set up Adobe XD integration, you need to have manager or owner permissions in the Crowdin project.
### [Setting up Credentials](#setting-up-credentials)
[Section titled “Setting up Credentials”](#setting-up-credentials)
To specify your Crowdin credentials in Adobe XD, follow these steps:
1. On the left panel, click **Plugins > Crowdin for Adobe XD**.
2. Click .
3. Provide your Personal Access Token.
4. Click **Save**. 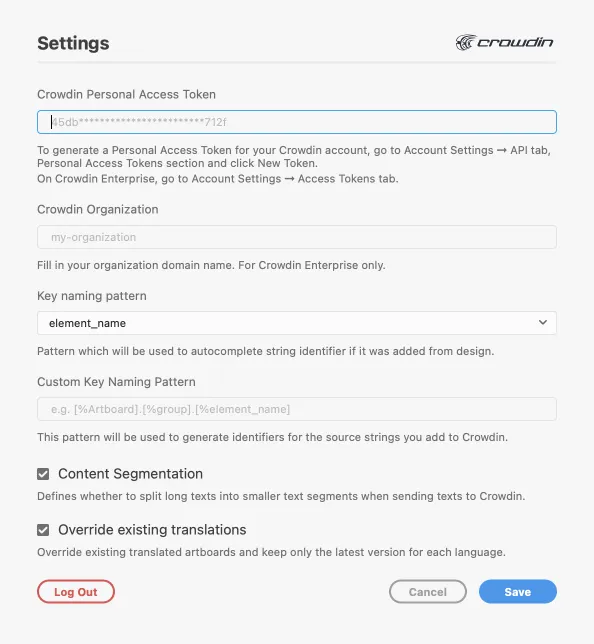
To generate a new token in Crowdin, follow these steps:
1. Go to **Account Settings > API**, *Personal Access Tokens* section, and click **New Token**.
2. Specify *Token Name* and click **Create**.
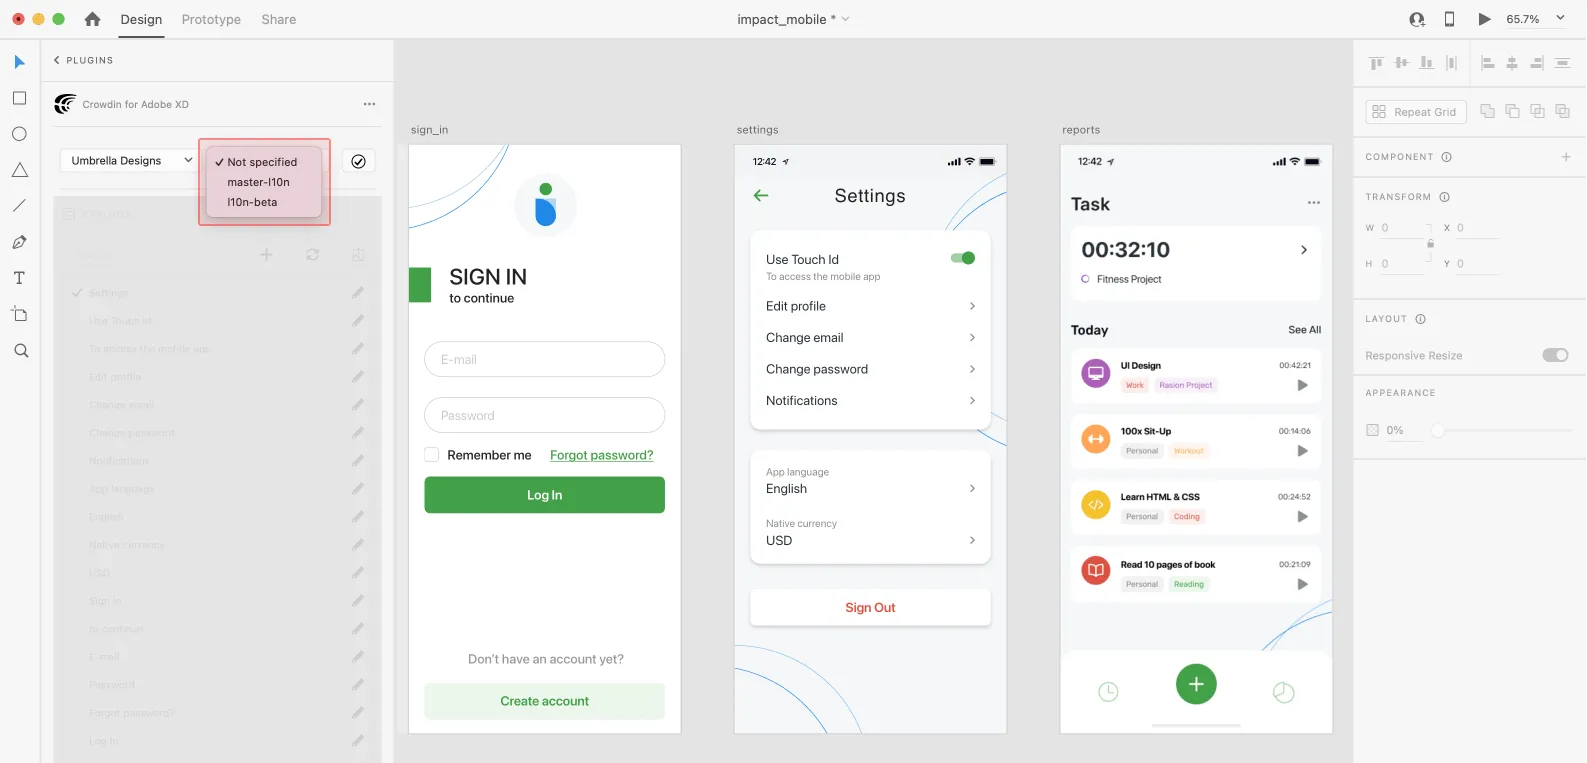
### [Selecting a Project](#selecting-a-project)
[Section titled “Selecting a Project”](#selecting-a-project)
To select the Crowdin project you’d like to work with, click the drop-down menu, and select a project from the list. Later, you can use the same drop-down menu to switch to another project if needed.
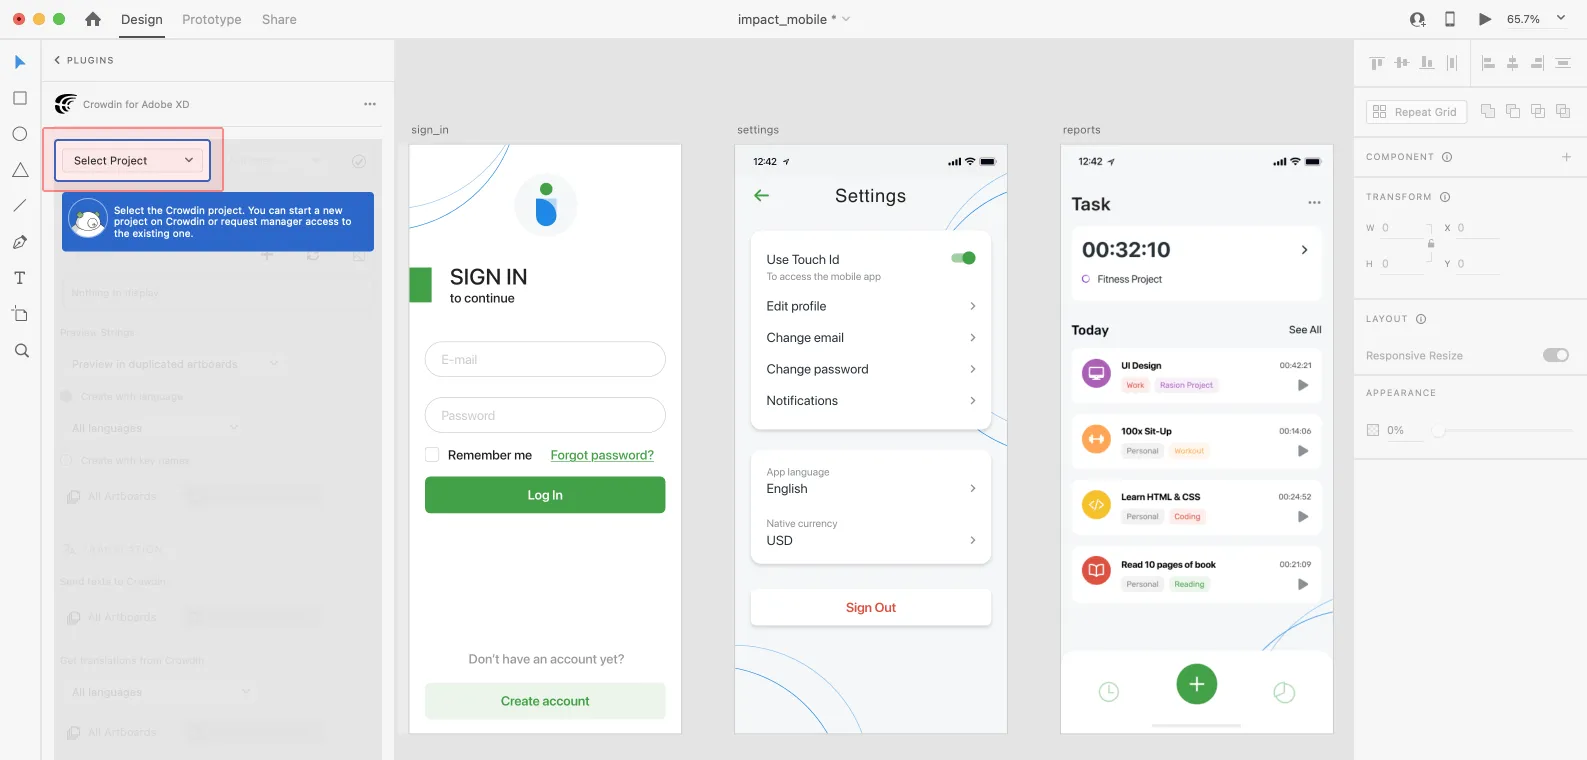
Select the specific branch your content will be uploaded to. If your Crowdin project doesn’t have branches, leave it empty.
## [UI Localization](#ui-localization)
[Section titled “UI Localization”](#ui-localization)
Use the *Strings* section when localizing UI and working on dynamic pages with your development and marketing teams. In this section, you can add source strings from Crowdin to your designs in Adobe XD in a click. After the texts are used in the designs, you can automatically upload tagged screenshots for translators’ reference back to Crowdin.
### [Using Source Strings from Crowdin in Adobe XD](#using-source-strings-from-crowdin-in-adobe-xd)
[Section titled “Using Source Strings from Crowdin in Adobe XD”](#using-source-strings-from-crowdin-in-adobe-xd)
1. Open the Crowdin plugin for Adobe XD.
2. In the *Strings* section, use the *Search* field to find the specific copy. You can search strings by source text, string identifier, or context.
3. Select the text layer to which you want to add text and click on the needed string.
After using the source strings from Crowdin in your designs, they become linked with the text fields, and you can [preview translations](#previewing-strings) for these strings in Adobe XD and [upload screenshots](#uploading-tagged-screenshots-to-crowdin) for them to your Crowdin project.
You can link a single Crowdin string to one or multiple text fields in Adobe XD. However, one text field can be linked only to a single Crowdin string. If you link a text field with an existing connection to a new Crowdin string, the previous connection will be terminated, and a new connection will be established. If you’d like to unlink a Crowdin string from all text fields it was previously linked to, right-click on the link icon next to the needed string.
### [Adding Source Strings from Adobe XD to Crowdin](#adding-source-strings-from-adobe-xd-to-crowdin)
[Section titled “Adding Source Strings from Adobe XD to Crowdin”](#adding-source-strings-from-adobe-xd-to-crowdin)
You can add strings already used in the designs or create and add completely new strings.
1. Open the Crowdin plugin for Adobe XD.
2. To add the strings used in the designs, select the whole artboard, multiple artboards, or the needed strings on the artboards. Alternatively, skip this step if you want to add a new string.
3. In the *Strings* section, click .
4. In the appeared dialog, fill in the required fields.
5. *(Optional)* To add labels to the strings, alternately select them from the **Label** drop-down menu and click **Save**.
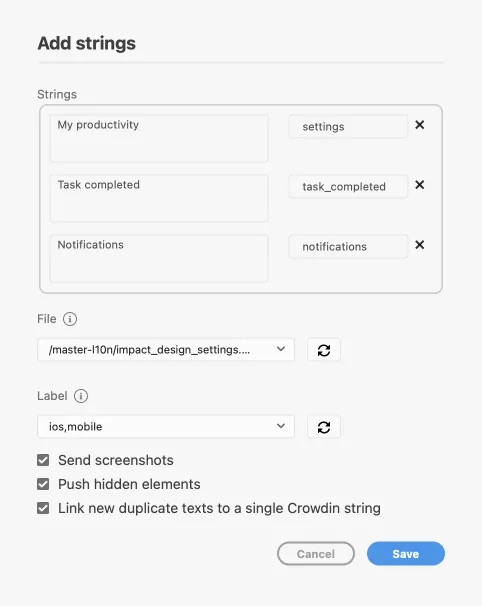
To add the same strings into multiple files in Crowdin, alternately select the needed files from the **File** drop-down menu.
Clear the **Push hidden elements** option if some artboards contain hidden elements that should not be added to Crowdin.
When adding multiple strings, you may want to select **Link new duplicate texts to a single Crowdin string**. It’s useful in the following cases:
* When adding multiple text fields with the same text, the plugin will add only one string to your Crowdin project and link all duplicate text fields to it.
* If your Crowdin project already contains a string with the same text you’re adding from designs, the plugin will only link the text fields to the existing string and won’t create a new one.
Added strings will be transferred to your Crowdin project and also displayed in the **Strings** section’s list. You can edit or delete the strings from the same list anytime. The respective changes will also be applied to the strings in your Crowdin project.
### [Configuring ICU Source String Placeholders](#configuring-icu-source-string-placeholders)
[Section titled “Configuring ICU Source String Placeholders”](#configuring-icu-source-string-placeholders)
When using ICU strings in your design, you can set the placeholders’ values, and after adding such strings to designs, they will be displayed in a formatted view with the preconfigured values.
Once you [use](#using-source-strings-from-crowdin-in-adobe-xd) the needed ICU string from Crowdin in your design, you can configure its placeholders’ values.
1. Open the Crowdin plugin for Adobe XD.
2. In the *Strings* tab, use the *Search* field to find the specific copy. You can search strings by source text, string identifier, or context.
3. Click on the needed ICU string.
4. Click **Set placeholders**.
5. Type the needed values for ICU string placeholders.
6. Click **Submit** to save the entered placeholders.
7. Click **Edit String** to update the source string text in designs.
When [previewing translations](#previewing-strings) for ICU strings in Adobe XD, they will also be displayed in a formatted view if the values were preconfigured beforehand.
### [Key Naming Pattern Settings](#key-naming-pattern-settings)
[Section titled “Key Naming Pattern Settings”](#key-naming-pattern-settings)
To simplify adding strings from Adobe XD to the Crowdin project, you can set up the desired key naming pattern for the source string identifiers in the plugin settings. The Crowdin plugin for Adobe XD will suggest the string identifiers for new strings based on the selected pattern. While adding new source strings, you can always edit the suggested identifier to the preferred look.
To select the key naming pattern, follow these steps:
1. Open the Crowdin plugin for Adobe XD.
2. Open the plugin **Settings**.
3. In the *Key naming pattern* section, select the preferred option from the drop-down menu.
Besides the existing patterns, you can configure your own pattern. To use a custom pattern, select the **Custom key naming pattern** option from the drop-down list and specify your pattern in the **Custom Key Naming Pattern** field.
### [Uploading Tagged Screenshots to Crowdin](#uploading-tagged-screenshots-to-crowdin)
[Section titled “Uploading Tagged Screenshots to Crowdin”](#uploading-tagged-screenshots-to-crowdin)
When [adding source strings used in the designs](#adding-source-strings-from-adobe-xd-to-crowdin), make sure to keep **Send screenshots** selected. As a result, the Crowdin plugin for Adobe XD will upload screenshots along with the source strings.
Also, you can update screenshots with an **Update screenshots** option while editing a Crowdin string that is linked to the text fields in designs.
Additionally, you can mass upload screenshots to Crowdin for strings linked with text fields in designs.
1. Open the Crowdin plugin for Adobe XD.
2. Select one or more artboards with the linked strings.
3. In the *Strings* section, click to upload screenshots for selected artboards.
Read more about [Screenshots](/screenshots/).
### [Previewing Strings](#previewing-strings)
[Section titled “Previewing Strings”](#previewing-strings)
Preview translations from Crowdin for the strings used in the designs in Adobe XD. You can preview translations in the new artboards or the original ones. When previewing translations in the new artboards, you can populate them with the actual translations or with string keys for further use by developers.
To preview strings populated with translations, follow these steps:
1. Open the Crowdin plugin for Adobe XD.
2. In the *Strings* > *Preview Strings* section, select *Preview in duplicated artboards* or *Preview in the current artboards*.
3. Select *Create with language*.
4. Select the target language you want to preview translations for. You can also choose *All languages*.
5. Choose the content you want to preview in Adobe XD. Select *All Artboards* or *Selected Artboards*. 
To preview strings populated with key names, follow these steps:
1. Open the Crowdin plugin for Adobe XD.
2. In the *Strings* > *Preview Strings* section, select *Preview in duplicated artboards*.
3. Select *Create with key names*.
4. Choose the content you want to preview in Adobe XD. Select *All Artboards* or *Selected Artboards*. 
## [Marketing Visuals Localization](#marketing-visuals-localization)
[Section titled “Marketing Visuals Localization”](#marketing-visuals-localization)
Use the *Translation* section to localize static pages, like brochures and banners. In this section, you can send texts with context for translators to Crowdin and upload translated copies back to Adobe XD.
### [Sending Texts for Translation to Crowdin](#sending-texts-for-translation-to-crowdin)
[Section titled “Sending Texts for Translation to Crowdin”](#sending-texts-for-translation-to-crowdin)
You can send text for translation either from selected or all artboards from an Adobe XD file. Translators will work with those texts in the list view and use designs as an additional context for even higher translation quality.
In Crowdin, a root folder *Adobe XD plugin* will be created. It will contain a subfolder named after your XD file with HTML files for each artboard inside. This folder can also contain a *free-text.html* file with texts not included in any of the artboards. If needed, you can disable content segmentation in the plugin **Settings** so long texts will not be split into sentences.
To send Adobe XD designs for translation, follow these steps:
1. Open the necessary Adobe XD file.
2. Go to **Plugins > Crowdin for Adobe XD**.
3. In the *Translation* > *Send texts to Crowdin* section, select the content you’d like to translate. Select *All Artboards* or *Selected Artboards*. 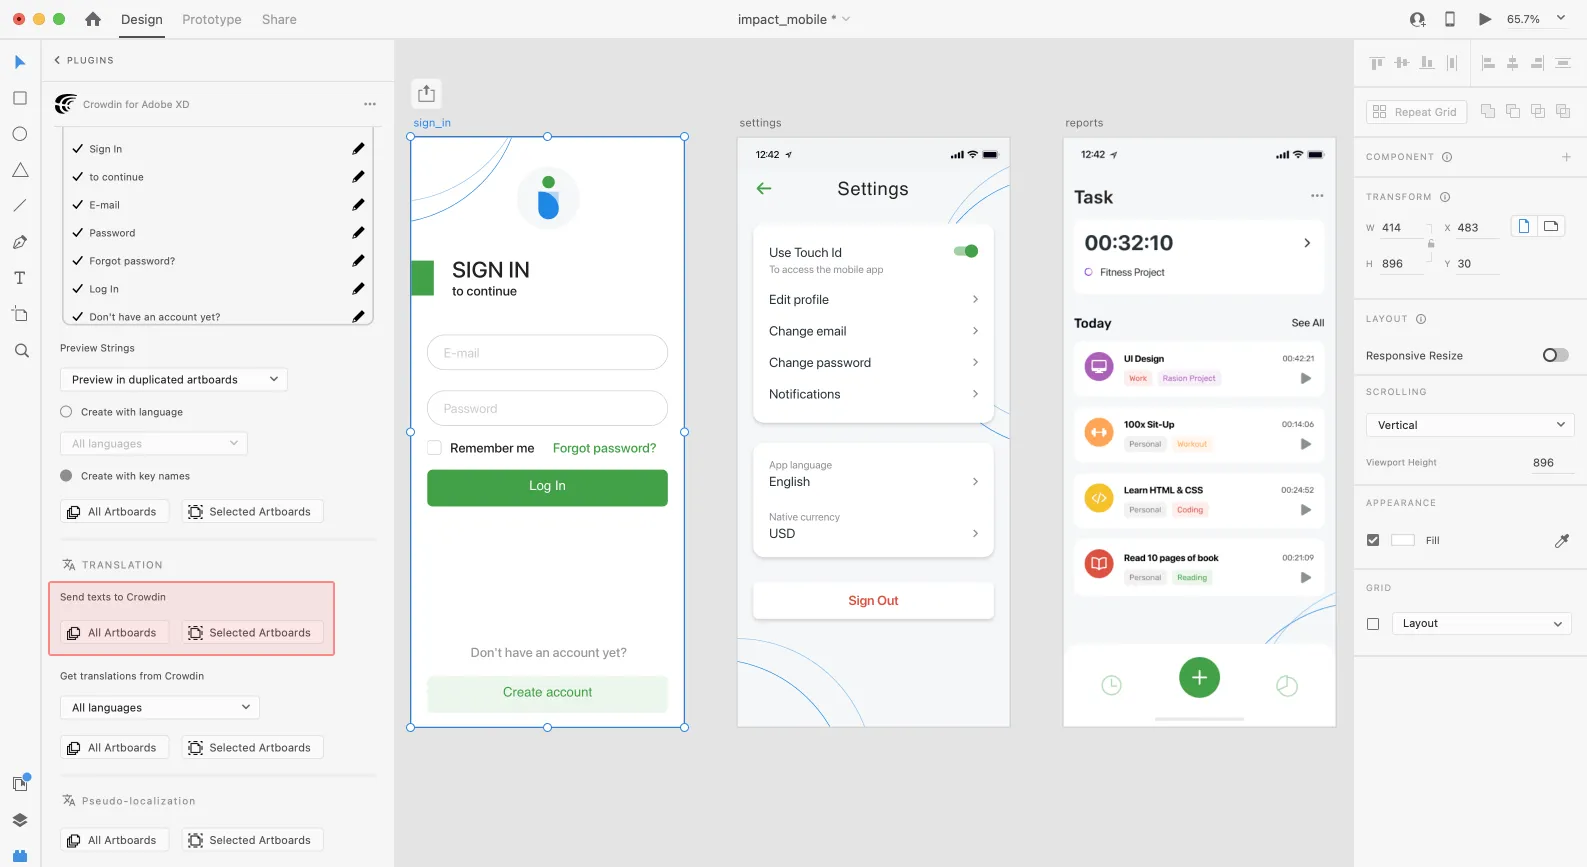
When the source files are uploaded to your Crowdin project, you can invite contributors to translate and proofread them.
Read more about [translation strategies](/translation-strategies/).
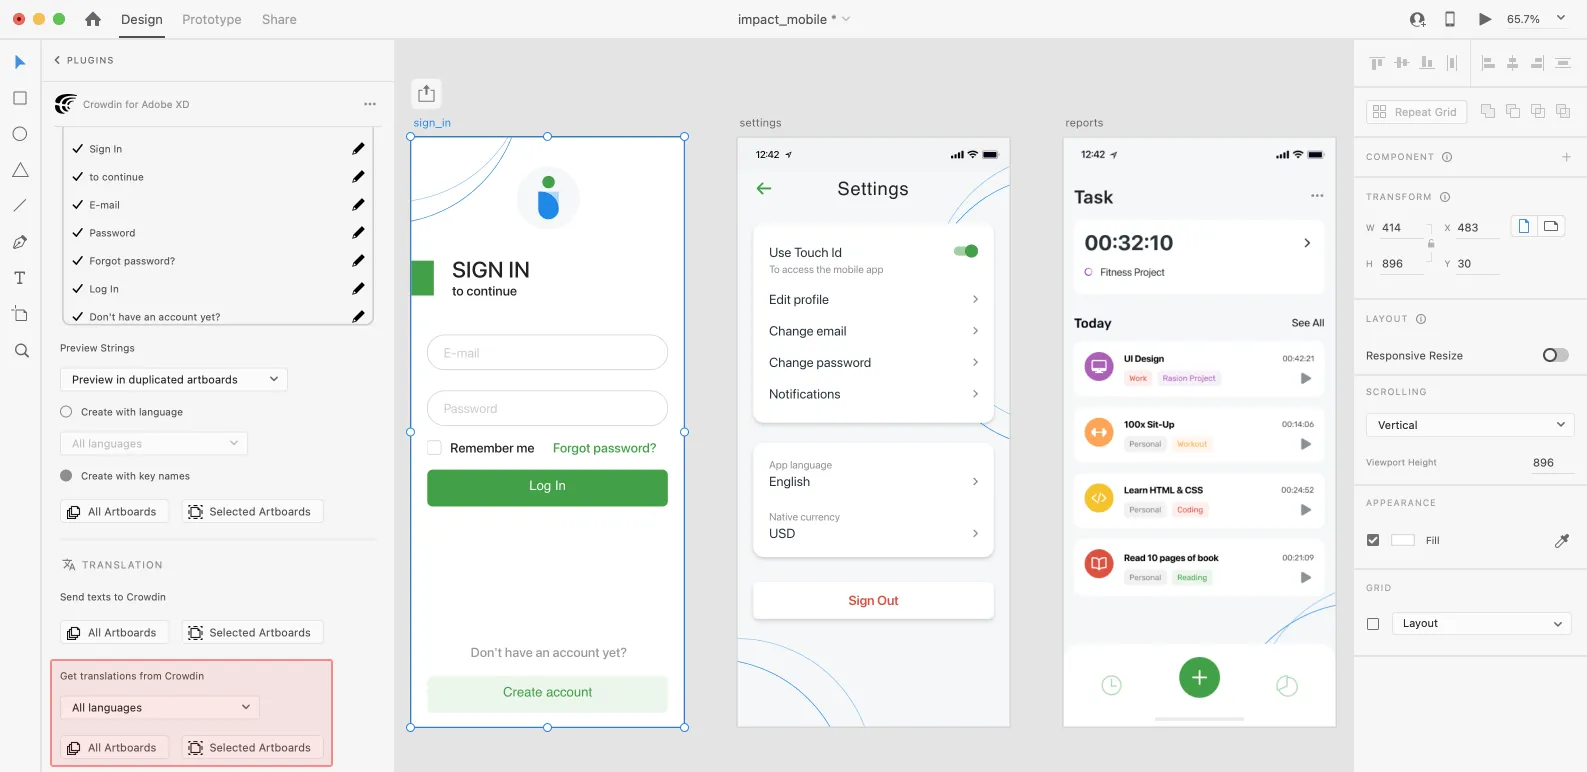
### [Uploading Translations from Crowdin to Adobe XD](#uploading-translations-from-crowdin-to-adobe-xd)
[Section titled “Uploading Translations from Crowdin to Adobe XD”](#uploading-translations-from-crowdin-to-adobe-xd)
You can synchronize texts between Adobe XD and Crowdin projects whenever you want to test the translated copy inside Adobe XD or generate multilingual assets.
To upload translated copies to Adobe XD, follow these steps:
1. Open the necessary Adobe XD file.
2. Go to **Plugins > Crowdin for Adobe XD**.
3. In the *Translation* > *Get translations from Crowdin* section, select the target language you want to upload translations for. You can also select *All languages*.
4. Select the content you want to preview in Adobe XD. Select *All Artboards* or *Selected Artboards*.
After uploading translations to Adobe XD, the modified file will contain a separate artboard with translations for each target language. The newly uploaded translated versions won’t override the ones you uploaded previously. You can always delete the translated copies you no longer need.

If you’d like the newly uploaded translated versions to override the previously uploaded ones, open the plugin **Settings** and select **Override existing translations**.
### [Pseudo-localization](#pseudo-localization)
[Section titled “Pseudo-localization”](#pseudo-localization)
Even before translations are completed, you can test whether your application is ready to be localized using pseudo-localization. This feature allows you to simulate how the application’s UI will look with different languages to check whether the source strings should be modified before the project localization starts.
Once you send your texts for translation, you can start pseudo-localization.
1. Open the necessary Adobe XD file.
2. Go to **Plugins > Crowdin for Adobe XD**.
3. In the *Pseudo-localization* section, select the content you’d like to test with pseudo-localization. Select *All Artboards* or *Selected Artboards*.
4. In the dialog box that appears, you can choose from predefined presets (French, Cyrillic, Chinese, Arabic) and configure the settings according to your preferences:
* *Length Correction* – allows you to make strings longer or shorter to see whether your product’s UI properly handles other languages. As translations in some languages can be longer or shorter than the source texts in your project.
* *Prefix/Suffix* – allows you to add special characters at the beginning and end of each string.
* *Character Transformation* – replaces English characters with easily identifiable accented versions, random Arabic symbols, or Chinese ideographs to make it obvious if there are some hard-coded strings in your application.
5. Click **Pseudo-localize**.
Read more about [Pseudo-localization](/developer/pseudolocalization/).
# AI Fine-tuning
> Refine AI models with fine-tuning for improved localization results
Fine-tuning in Crowdin enhances AI models using your project-specific data, tailoring translations to your style, tone, and terminology. By leveraging approved translations from your projects and translation memories (TMs), fine-tuning improves translation quality, reduces operational costs, and adapts AI performance to your localization workflows.
Fine-tuning is available for Pre-translate prompts that use supported AI models and providers with custom API credentials, enabling the creation of AI models tailored to your localization needs.
Note
For Pre-translate prompts using Crowdin-managed providers or models that do not support fine-tuning, you can generate and [download datasets](#downloading-datasets) for external fine-tuning.
## [Key Benefits of Fine-tuning](#key-benefits-of-fine-tuning)
[Section titled “Key Benefits of Fine-tuning”](#key-benefits-of-fine-tuning)
Fine-tuning enhances the performance of AI models, offering the following advantages:
* **Improved Accuracy** – Models trained on your data align closely with your style, tone, and domain-specific terminology.
* **Better Context Handling** – Handle edge cases and complex scenarios by training the model with real-world examples from your projects.
* **Cost Savings** – Fine-tuning reduces token usage by enabling shorter and more precise prompts.
* **Incremental Updates** – Train models on new data without starting from scratch, saving time and resources.
Tip
Start with small datasets and incrementally expand based on results to maximize efficiency and minimize costs.
## [Managing Fine-tuning Jobs](#managing-fine-tuning-jobs)
[Section titled “Managing Fine-tuning Jobs”](#managing-fine-tuning-jobs)
You can create new fine-tuning jobs, monitor their progress, and review detailed metrics for completed jobs.
### [Creating Fine-tuning Job](#creating-fine-tuning-job)
[Section titled “Creating Fine-tuning Job”](#creating-fine-tuning-job)
To create a fine-tuning job, follow these steps:
1. Open your profile and select **AI** on the left sidebar.
2. In the **Fine-tuning** tab, click **Create** to set up a new fine-tuning job.
3. Configure the [basic parameters](#basic-parameters) and optional [advanced parameters](#advanced-parameters). Advanced parameters are typically adjusted for complex datasets or when fine-tuning a model for specific domain requirements.
4. *(Optional)* [Estimate the fine-tuning cost](#estimating-fine-tuning-cost) before proceeding.
5. Click **Start fine-tuning**. 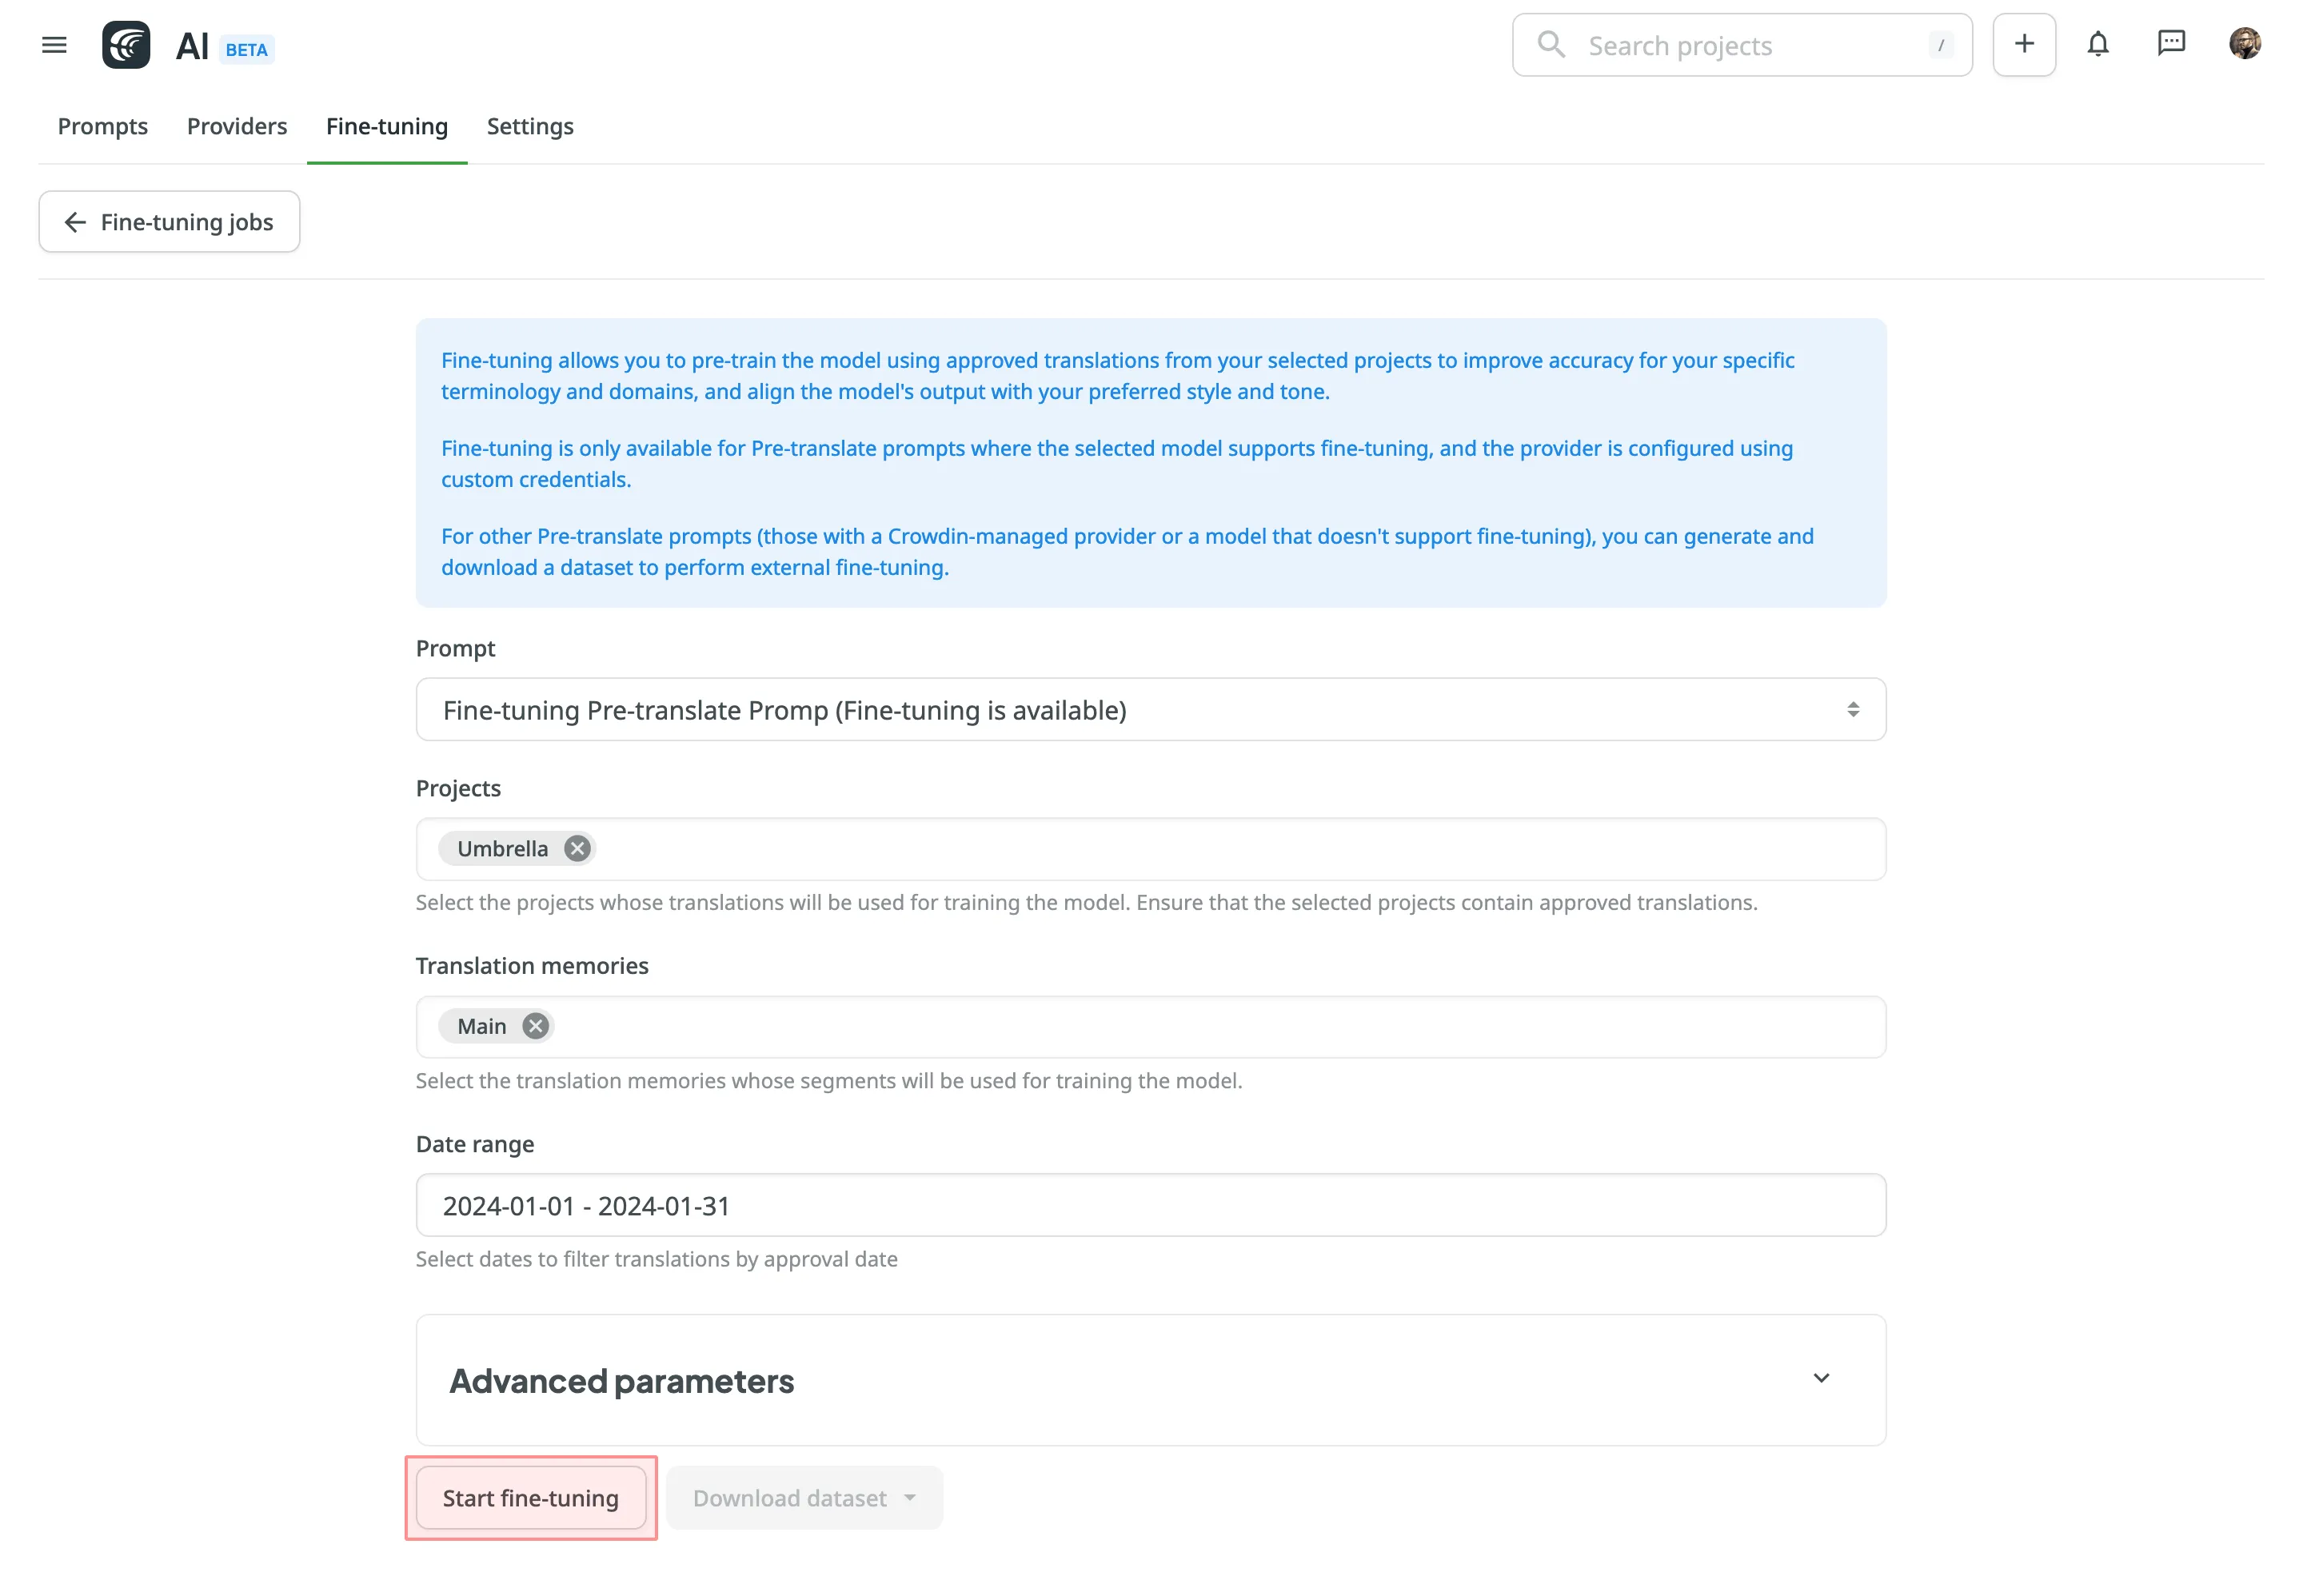
6. Monitor the fine-tuning progress in the **Fine-tuning Jobs** section and [evaluate results](#evaluating-fine-tuned-models) after completion.
### [Estimating Fine-tuning Cost](#estimating-fine-tuning-cost)
[Section titled “Estimating Fine-tuning Cost”](#estimating-fine-tuning-cost)
Estimating the cost of fine-tuning before running the process helps you ensure that the training fits within your budget and allows you to adjust parameters for optimal results. This step is particularly useful if you’re working with a large dataset or running multiple fine-tuning jobs.
To estimate the cost of fine-tuning, follow these steps:
1. Go to **Advanced Parameters** and set the **Epochs Number** to 1.
2. Click **Start fine-tuning**.
3. The system will calculate and display the approximate fine-tuning price. At this point, you can:
* Click **Proceed** to start the actual fine-tuning if the price aligns with your expectations.
* Click **Back** to adjust the parameters and refine your configuration to potentially lower the cost.
By estimating costs upfront, you avoid unnecessary expenses and can experiment with different configurations to strike the right balance between performance and budget.
### [Viewing and Filtering Fine-tuning Jobs](#viewing-and-filtering-fine-tuning-jobs)
[Section titled “Viewing and Filtering Fine-tuning Jobs”](#viewing-and-filtering-fine-tuning-jobs)
Once you open the **Fine-tuning** tab on the **AI** page, you can view and filter fine-tuning jobs to monitor their progress and results.
You can view a list of all created fine-tuning jobs with the following details:
* Job ID – the unique identifier of the fine-tuning job.
* Status – the current state of the job (e.g., In Progress, Finished, Failed).
* Created At – the date and time the job was created.
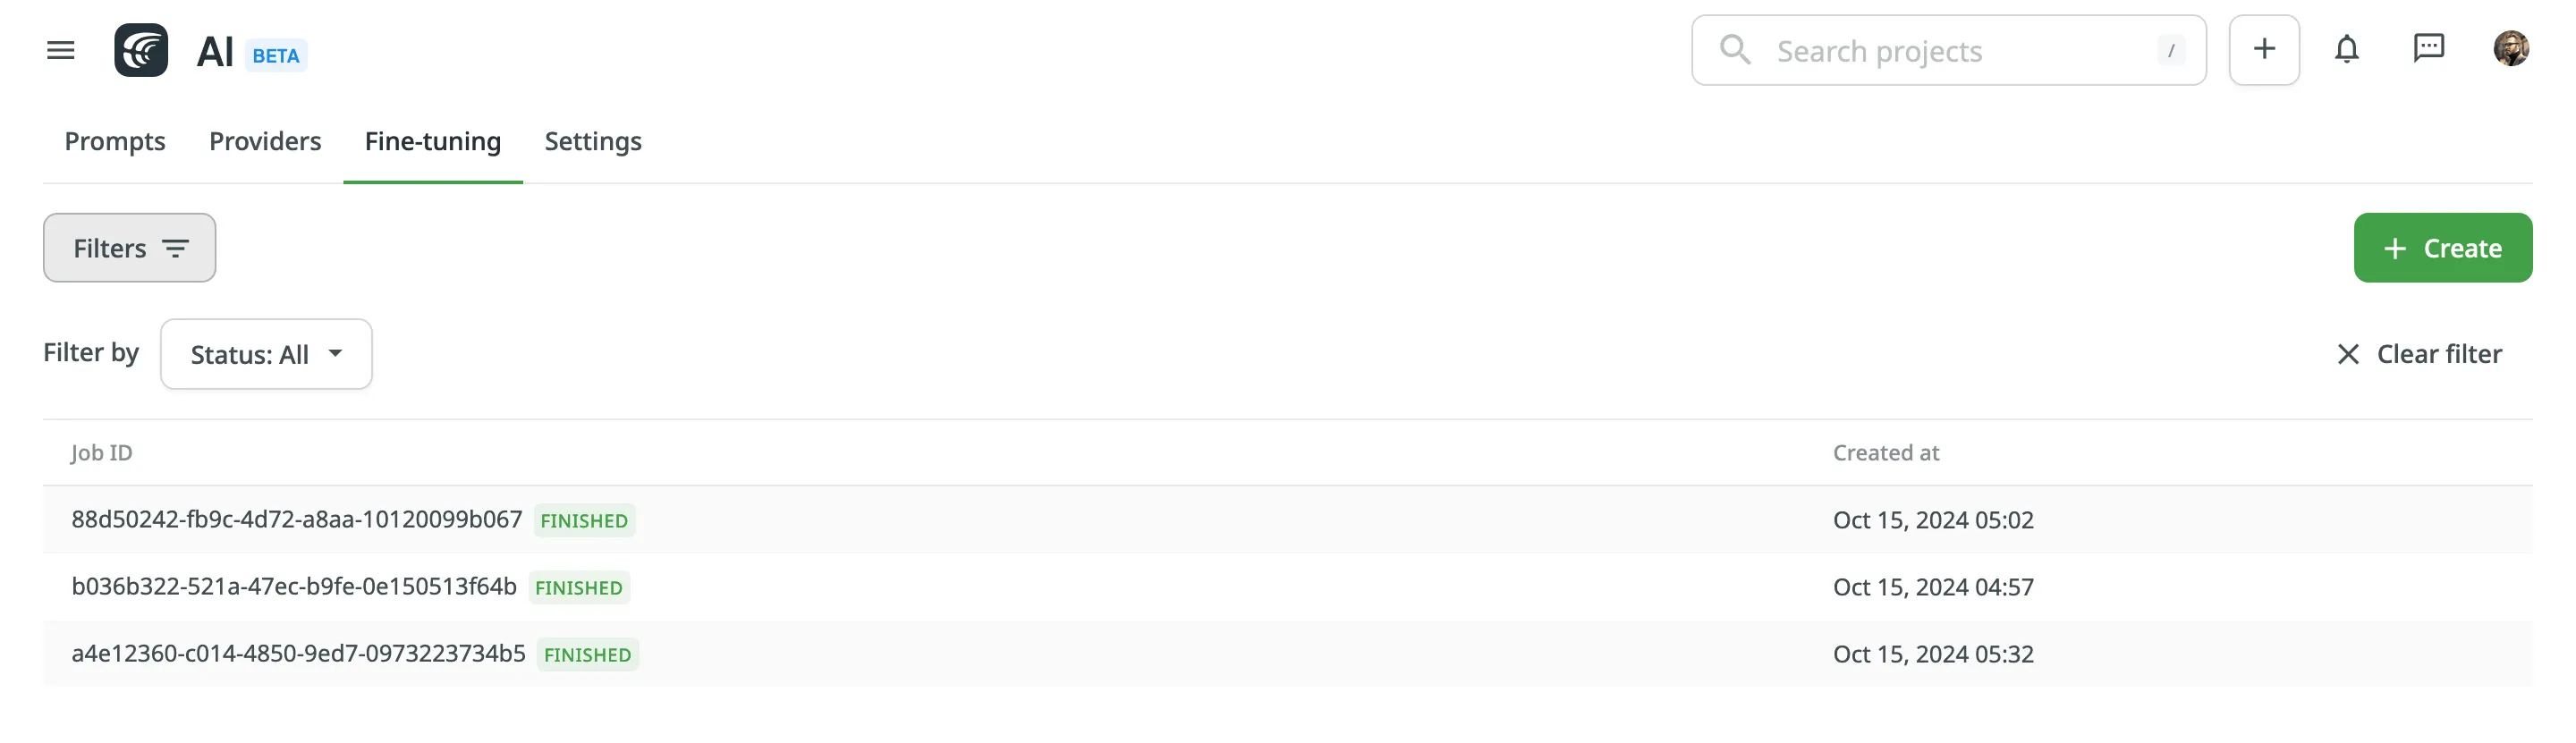
To filter jobs, click and apply the following filters:
* Status: All, Finished, In Progress, Failed.
Click **Clear Filter** to reset filters and display all jobs.
Double-clicking a job opens its detailed metrics, including parameters, results, logs, and other relevant information.
### [Fine-tuning Configuration Parameters](#fine-tuning-configuration-parameters)
[Section titled “Fine-tuning Configuration Parameters”](#fine-tuning-configuration-parameters)
You can configure a fine-tuning job using basic and advanced parameters.
#### [Basic Parameters](#basic-parameters)
[Section titled “Basic Parameters”](#basic-parameters)
The following parameters are required for initiating fine-tuning:
* **Prompt** – Choose the Pre-translate prompt to be fine-tuned.
* **Projects** – Select projects whose translations will be used for training. Ensure the selected projects contain approved translations.
* **Translation Memories** – Include TM segments for training data. Leave blank to exclude TMs.
* **Date Range** *(Optional)* – Specify the approval date range for filtering translations.
#### [Advanced Parameters](#advanced-parameters)
[Section titled “Advanced Parameters”](#advanced-parameters)
Advanced parameters provide greater control over the fine-tuning process and include options for both training and validation datasets.
##### [Training Dataset Parameters](#training-dataset-parameters)
[Section titled “Training Dataset Parameters”](#training-dataset-parameters)
Training dataset parameters control the data used to train your model. These settings determine the size and scope of the dataset, ensuring it’s sufficient for effective training:
* **Batch Size** – The number of examples in each batch during training. Larger batch sizes reduce variance but increase training time.
* **Learning Rate Multiplier** – Adjust the scaling factor for the learning rate. Smaller values help prevent overfitting, while larger values speed up learning.
* **Epochs Number** – The number of complete passes through the training dataset. Higher values improve accuracy but increase costs.
* **Dataset Size Constraints** –
* **Maximum Dataset File Size (in bytes)** – Restricts the size of the training dataset.
* **Minimum Number of Examples in Dataset** – Sets the lower limit for training data size.
* **Maximum Number of Examples in Dataset** – Sets the upper limit for training data size.
Caution
Adjust these parameters only if you fully understand their impact on the fine-tuning process and model performance.
##### [Validation Dataset Parameters](#validation-dataset-parameters)
[Section titled “Validation Dataset Parameters”](#validation-dataset-parameters)
Validation datasets are used to test how well the fine-tuned model performs on unseen data. Configuring a validation dataset is optional but recommended for assessing model performance.
* **Projects** – Select different projects from those used for training.
* **Translation Memories** – Include TM segments for validation.
* **Date Range** – Filter translations by approval dates for validation.
* **Dataset Size Constraints** –
* **Maximum Dataset File Size (in bytes)** – Restricts the size of the validation dataset.
* **Minimum Number of Examples in Dataset** – Sets the lower limit for validation data size.
* **Maximum Number of Examples in Dataset** – Sets the upper limit for validation data size.
Note
Validation datasets should differ from training datasets to accurately measure model performance.
## [Evaluating Fine-tuned Models](#evaluating-fine-tuned-models)
[Section titled “Evaluating Fine-tuned Models”](#evaluating-fine-tuned-models)
After fine-tuning is complete, a new model is generated along with detailed metrics, including training and validation losses, job parameters, and logs. Use this data to evaluate your model’s performance and determine if it’s ready to integrate into your Pre-translate prompt.
### [Model Details](#model-details)
[Section titled “Model Details”](#model-details)
Key information about your fine-tuned model includes:
* **Model**: Name of the fine-tuned model.
* **Status**: Job status (e.g., In progress, Finished, Failed).
* **Job ID**: Unique identifier for the fine-tuning job.
* **Base Model**: Initial model used as a starting point for fine-tuning.
* **Output Model**: Name of the resulting fine-tuned model.
* **Created At**: Date and time when the job was initiated.
### [Fine-tuning Parameters](#fine-tuning-parameters)
[Section titled “Fine-tuning Parameters”](#fine-tuning-parameters)
Details about the parameters configured for the fine-tuning job:
* **Trained Tokens**: Total tokens processed during training.
* **Epochs Number**: Number of full passes through the dataset.
* **Batch Size**: Number of examples in each training batch.
* **Learning Rate Multiplier**: Scaling factor for the learning rate, determining how quickly the model adjusts weights during training.
### [Fine-tuning Results](#fine-tuning-results)
[Section titled “Fine-tuning Results”](#fine-tuning-results)
Metrics and tools available for assessing your fine-tuned model’s performance:
* **Training Loss**: Indicates how well the model fits the training data. Lower values indicate better learning.
* **Validation Loss**: Assesses who well the model performs on unseen data. Available only if a validation dataset is configured.
* **Full Validation Loss**: Represents the model’s overall performance on the entire validation dataset, if applicable.
Review the results to determine whether they meet your requirements. If so, you can [integrate](/crowdin-ai/#configuring-ai-prompts) the fine-tuned model into your Pre-translate prompt for immediate use.
#### [Metrics and Graphs](#metrics-and-graphs)
[Section titled “Metrics and Graphs”](#metrics-and-graphs)
Crowdin provides multiple ways to evaluate fine-tuning results, including interactive graphs and a detailed metrics table.
* **Interactive Graphs** – Visualize fine-tuning metrics such as Training Loss, Validation Loss, and Full Validation Loss over the course of training. Hover over points on the graph for step-specific details. You can highlight or hide specific metrics by clicking their titles below the graph. 
* **Metrics Tab** – Access the same data in table format for a comprehensive overview. The table provides a step-by-step breakdown, making it easier to identify patterns or issues during fine-tuning. A steady decline in loss values across steps reflects effective training, with values closer to zero indicating better results.
Both tools are available in the Fine-tuning Job Details page, allowing you to analyze performance trends and troubleshoot any anomalies effectively.
#### [Messages Tab](#messages-tab)
[Section titled “Messages Tab”](#messages-tab)
The **Messages** tab provides logs returned by the AI provider, offering a detailed timeline of the job’s progress, including key milestones (e.g., checkpoint creation, job completion) and troubleshooting insights.
## [Incremental Fine-tuning](#incremental-fine-tuning)
[Section titled “Incremental Fine-tuning”](#incremental-fine-tuning)
Update fine-tuned models iteratively to include newly approved translations. Use the **Date Range** parameter to avoid retraining from scratch.
Example workflow:
* **Initial Fine-tuning** – Train a base model using the full dataset.
* **Subsequent Fine-tuning** – Train on newly approved translations only to create an updated model while retaining prior training data.
Incremental fine-tuning is ideal for projects with ongoing updates, allowing you to keep your model optimized without retraining from scratch.
[Continuous Fine-tuning ](https://store.crowdin.com/continuous-fine-tuning)Automate the fine-tuning process with incremental updates to your AI models based on new translations in Crowdin projects.
## [Downloading Datasets](#downloading-datasets)
[Section titled “Downloading Datasets”](#downloading-datasets)
Datasets can be downloaded for external fine-tuning, use with external tools, or local validation before training.
Read more about [Downloading Datasets](/enterprise/ai-fine-tuning/#downloading-datasets).
Note
Downloading datasets is available only for the Business [subscription plan](https://crowdin.com/pricing#enterprise-plans) on Crowdin Enterprise.
# App Subscriptions
> Learn how to subscribe to paid apps in Crowdin Store
Crowdin Store offers various apps you can install to extend Crowdin functionality, synchronize your content stored on a CMS, and more.
[Crowdin Store ](https://store.crowdin.com/)Explore 700+ apps and integrations to streamline your localization process.
Some of the apps are available for free, while others are paid. You might easily distinguish paid apps since all of them have the subscription price specified.
Once you install the paid app, the 14-day free trial will be activated for you. After the free trial, you will be asked to [subscribe](#subscribing-to-paid-app).
Depending on the date you activate the paid app subscription in relation to your primary Crowdin subscription, the first payment amount might differ from the default app subscription cost. While on the next billing cycle, the app subscription will be included in your primary Crowdin subscription in full. Information about all active paid app subscriptions will be added to your invoices.
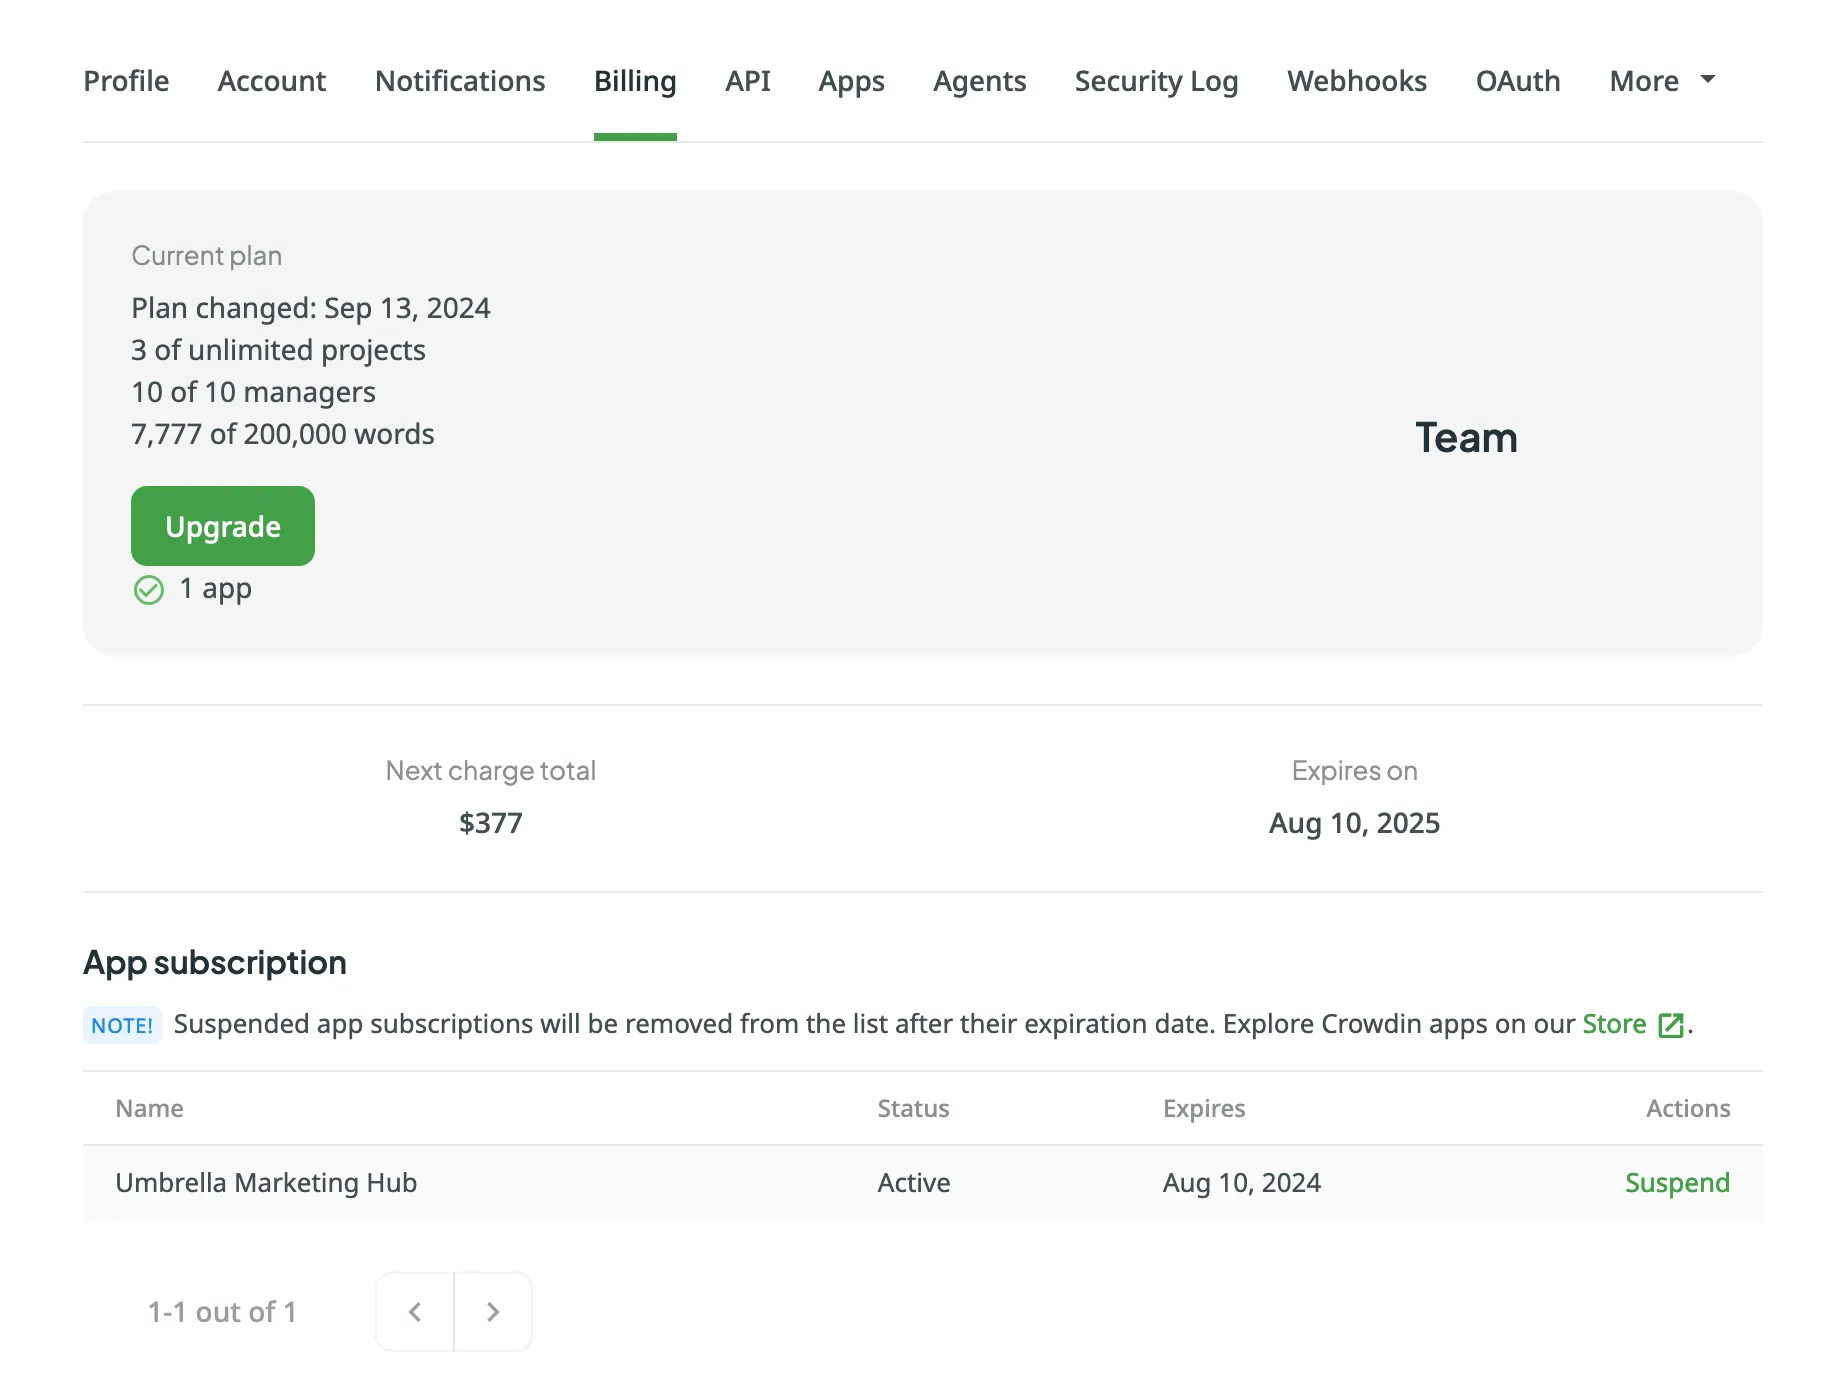
## [Subscribing to Paid App](#subscribing-to-paid-app)
[Section titled “Subscribing to Paid App”](#subscribing-to-paid-app)
Once the 14-day trial period ends, you’ll be asked to subscribe to continue using the paid app. To subscribe to the paid app, follow these steps:
1. Open the app you’d like to purchase a subscription for. Depending on the app type, it might be located in the Crowdin UI in the project’s Integrations tab, Editor, etc.
2. Click **Subscribe**.
3. You’ll be redirected to the checkout page.
4. Fill in all the required fields.
5. Click **Proceed to payment** to complete the purchase.
## [How App Subscriptions Work](#how-app-subscriptions-work)
[Section titled “How App Subscriptions Work”](#how-app-subscriptions-work)
### [Monthly Crowdin Subscription](#monthly-crowdin-subscription)
[Section titled “Monthly Crowdin Subscription”](#monthly-crowdin-subscription)
If you’ve subscribed for a monthly plan, on each new billing cycle (every month) your payment will include your primary Crowdin subscription and all your paid app subscriptions. For example, your primary Crowdin subscription is a Team plan ($179/month), and you’re subscribing to a paid app that costs $139/month, which would result in a total of $318/month.
### [Annual Crowdin Subscription](#annual-crowdin-subscription)
[Section titled “Annual Crowdin Subscription”](#annual-crowdin-subscription)
If you’ve subscribed for an annual plan, your paid app subscriptions will be deducted from your account balance along with the primary Crowdin subscription pseudo-charges. For example, your primary Crowdin subscription is a Team plan ($1,800 billed annually and deducted from your Crowdin account balance as $150/month pseudo-charges), and you’re subscribing to a paid app that costs $139/month, which would result in a total of $289 deducted from your account balance every month.
## [Managing Paid App Subscriptions](#managing-paid-app-subscriptions)
[Section titled “Managing Paid App Subscriptions”](#managing-paid-app-subscriptions)
You can view your currently active paid app subscriptions, and if needed, you can suspend any of the app subscriptions at any time.
To suspend paid app subscription, follow these steps:
1. Go to **Account Settings > Billing**.
2. Click **Suspend** toward the app name.
## [See Also](#see-also)
[Section titled “See Also”](#see-also)
[Pricing page ](https://crowdin.com/pricing)Plans, Pricing, and Free Trial.
[Payments and Invoices ](/payments-invoices/)Learn how payments work in Crowdin and how to download invoices.
[Changing Subscription Plan ](/changing-subscription-plan/)Upgrade or downgrade your subscription plan.
[Billing Settings ](/billing-settings/)Update your billing information and payment method.
# Asset Localization
> Localize project content with all the graphics in one place
Localize project content with all the graphics (pictures, logos, non-textual files) in one place. File formats that are not supported by Crowdin (e.g., .png, .psd, .jpeg) will be uploaded as assets.
Tip
There is an option to add custom formats instead of using assets. Search the [Crowdin Store](https://store.crowdin.com/) or contact our [Support Team](https://crowdin.com/contacts) for more details or available workarounds.
## [Use Cases](#use-cases)
[Section titled “Use Cases”](#use-cases)
You may upload assets and make all localization data accessible for translators in Crowdin. This helps to:
* Keep all translation data stored under the same roof
* Avoid miscommunication, as you may provide detailed translation instructions for project members by adding context
* Ease the integration of translated content back online, as the initial file formats will be preserved
## [Typical Workflow](#typical-workflow)
[Section titled “Typical Workflow”](#typical-workflow)
To work with assets, follow these steps:
1. Upload files to your Crowdin project.
2. Add necessary [references](#typical-asset-references) for the translators to understand how the translations should be done. Use *Context* for additional details.
3. Allow translators to download the files. For this, open your project and go to **Settings > Privacy & collaboration > Translations** and enable **Allow offline translation**.
Read more about [offline translation](/offline-translation/).
4. Translators will download the files, localize them offline, and upload the translated versions back.
## [Typical Asset References](#typical-asset-references)
[Section titled “Typical Asset References”](#typical-asset-references)
* Adobe Photoshop PSD file (an editable source file that translators can modify according to the localization requirements).
* Font files since some assets may use custom fonts.
* Style guide (is shown in the editor as a context or additional downloadable file).
* Manual/instruction that guides through the localization process step by step.
## [Assets in TXT Format](#assets-in-txt-format)
[Section titled “Assets in TXT Format”](#assets-in-txt-format)
Some unsupported text formats (e.g., .toc, .gitignore) will be imported to Crowdin as .txt files. Users can translate such files in Crowdin directly.
# Azure Repos Integration
> Synchronize files between your Azure Repos repository and Crowdin
The Azure Repos integration allows you to synchronize files between your Azure Repos repository and Crowdin project.
Note
You will need to [install the Azure Repos integration](https://store.crowdin.com/azure-repos) in your Crowdin account before you can set it up and use it.
In file-based projects, there are two possible Azure Repos integration modes you can choose from:
* **Source and translation files mode** – synchronize source and translation files between your Azure Repos repository and Crowdin project.
* **Target file bundles mode** – generate and push translation files to your Azure Repos repository from the Crowdin project in the selected format. In this mode, integration pushes translation files and doesn’t sync sources from your repo. In cases when you perform a source text review in your Crowdin project and want to get updated source texts to your repo, you can add a source language as a target language, which will be pushed to your repo along with translations.
In string-based projects, Azure Repos integration exclusively operates in the **Target file bundles mode**.
Read more about [project types](/creating-project/#project-types).
All translated and approved files (or target file bundles) are automatically merged into the `l10n` branch of the Azure Repos repository.
## [Connecting Azure Repos Account](#connecting-azure-repos-account)
[Section titled “Connecting Azure Repos Account”](#connecting-azure-repos-account)
1. Open your project and go to the **Integrations** tab.
2. Click on **Azure Repos** in the Integrations list.
3. Click **Set Up Integration** and select **Source and translation files mode** or **Target file bundles mode** from the drop-down list to integrate via your Azure Repos account. 
Note
In string-based projects, Azure Repos integration exclusively operates in the **Target file bundles mode**.
4. Then authorize the connection with Crowdin on the Azure Repos side: 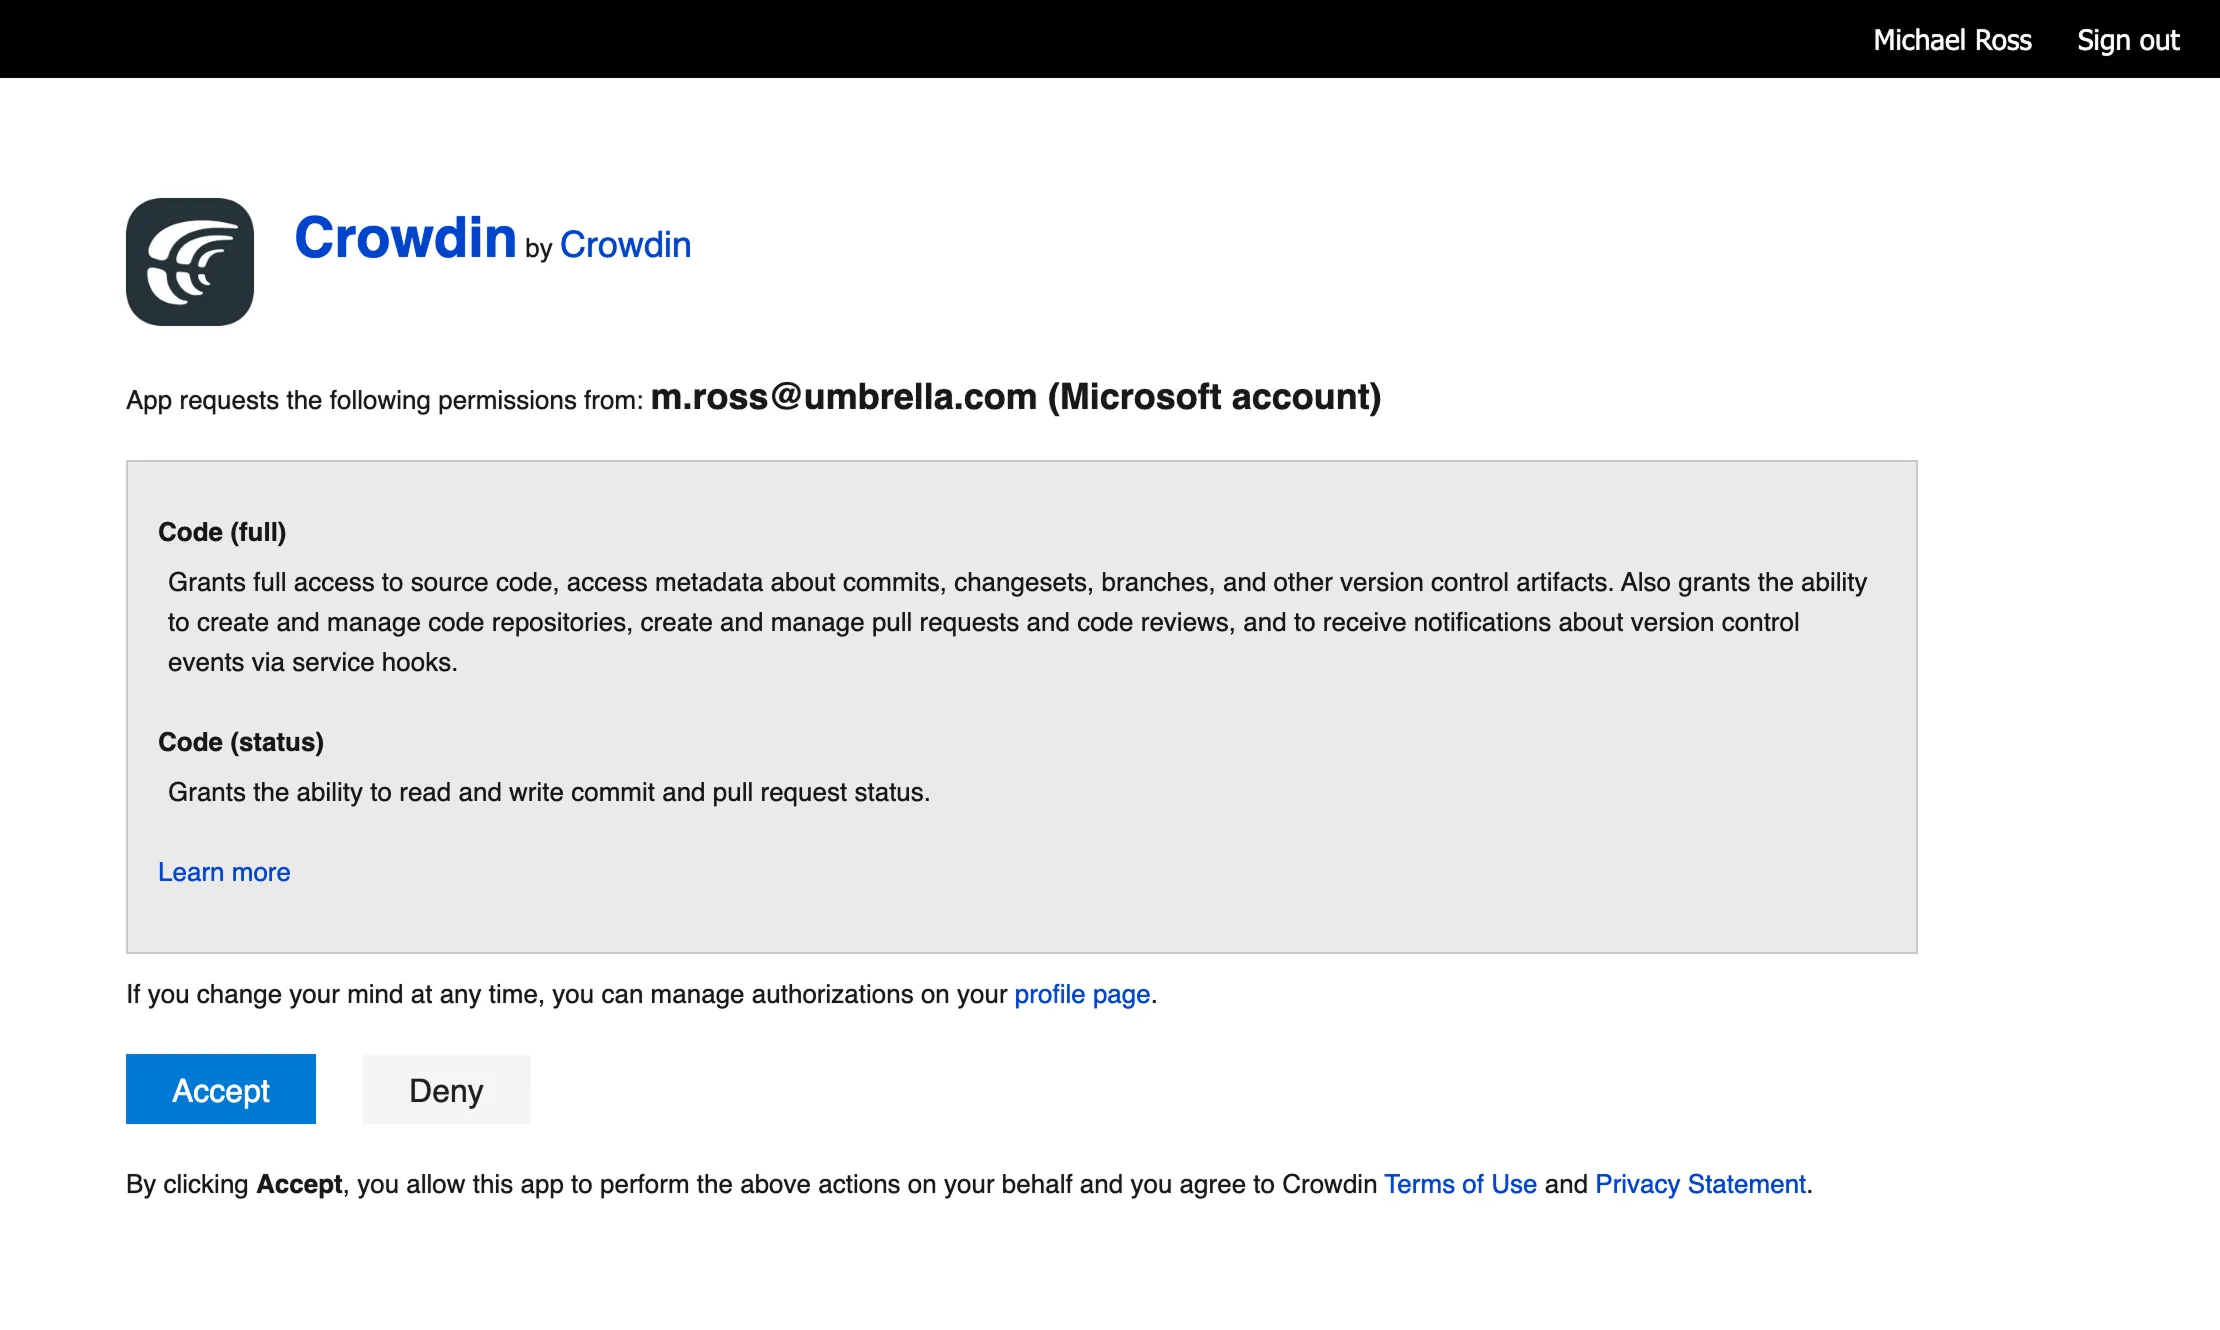
In case the repository you need is private, and you have limited or no access to it, please ask the repository owner to provide you with an access token. Afterward, click **Use personal access token** and insert the token into the *Token* field and click **Set Up Integration**.
Permissions
When setting up an integration with an access token, ensure that you have the Project Administrator level permission to the necessary repo.
### [Selecting Repository](#selecting-repository)
[Section titled “Selecting Repository”](#selecting-repository)
In the appeared dialog, select your repository and branches that should be translated.
* File-based project
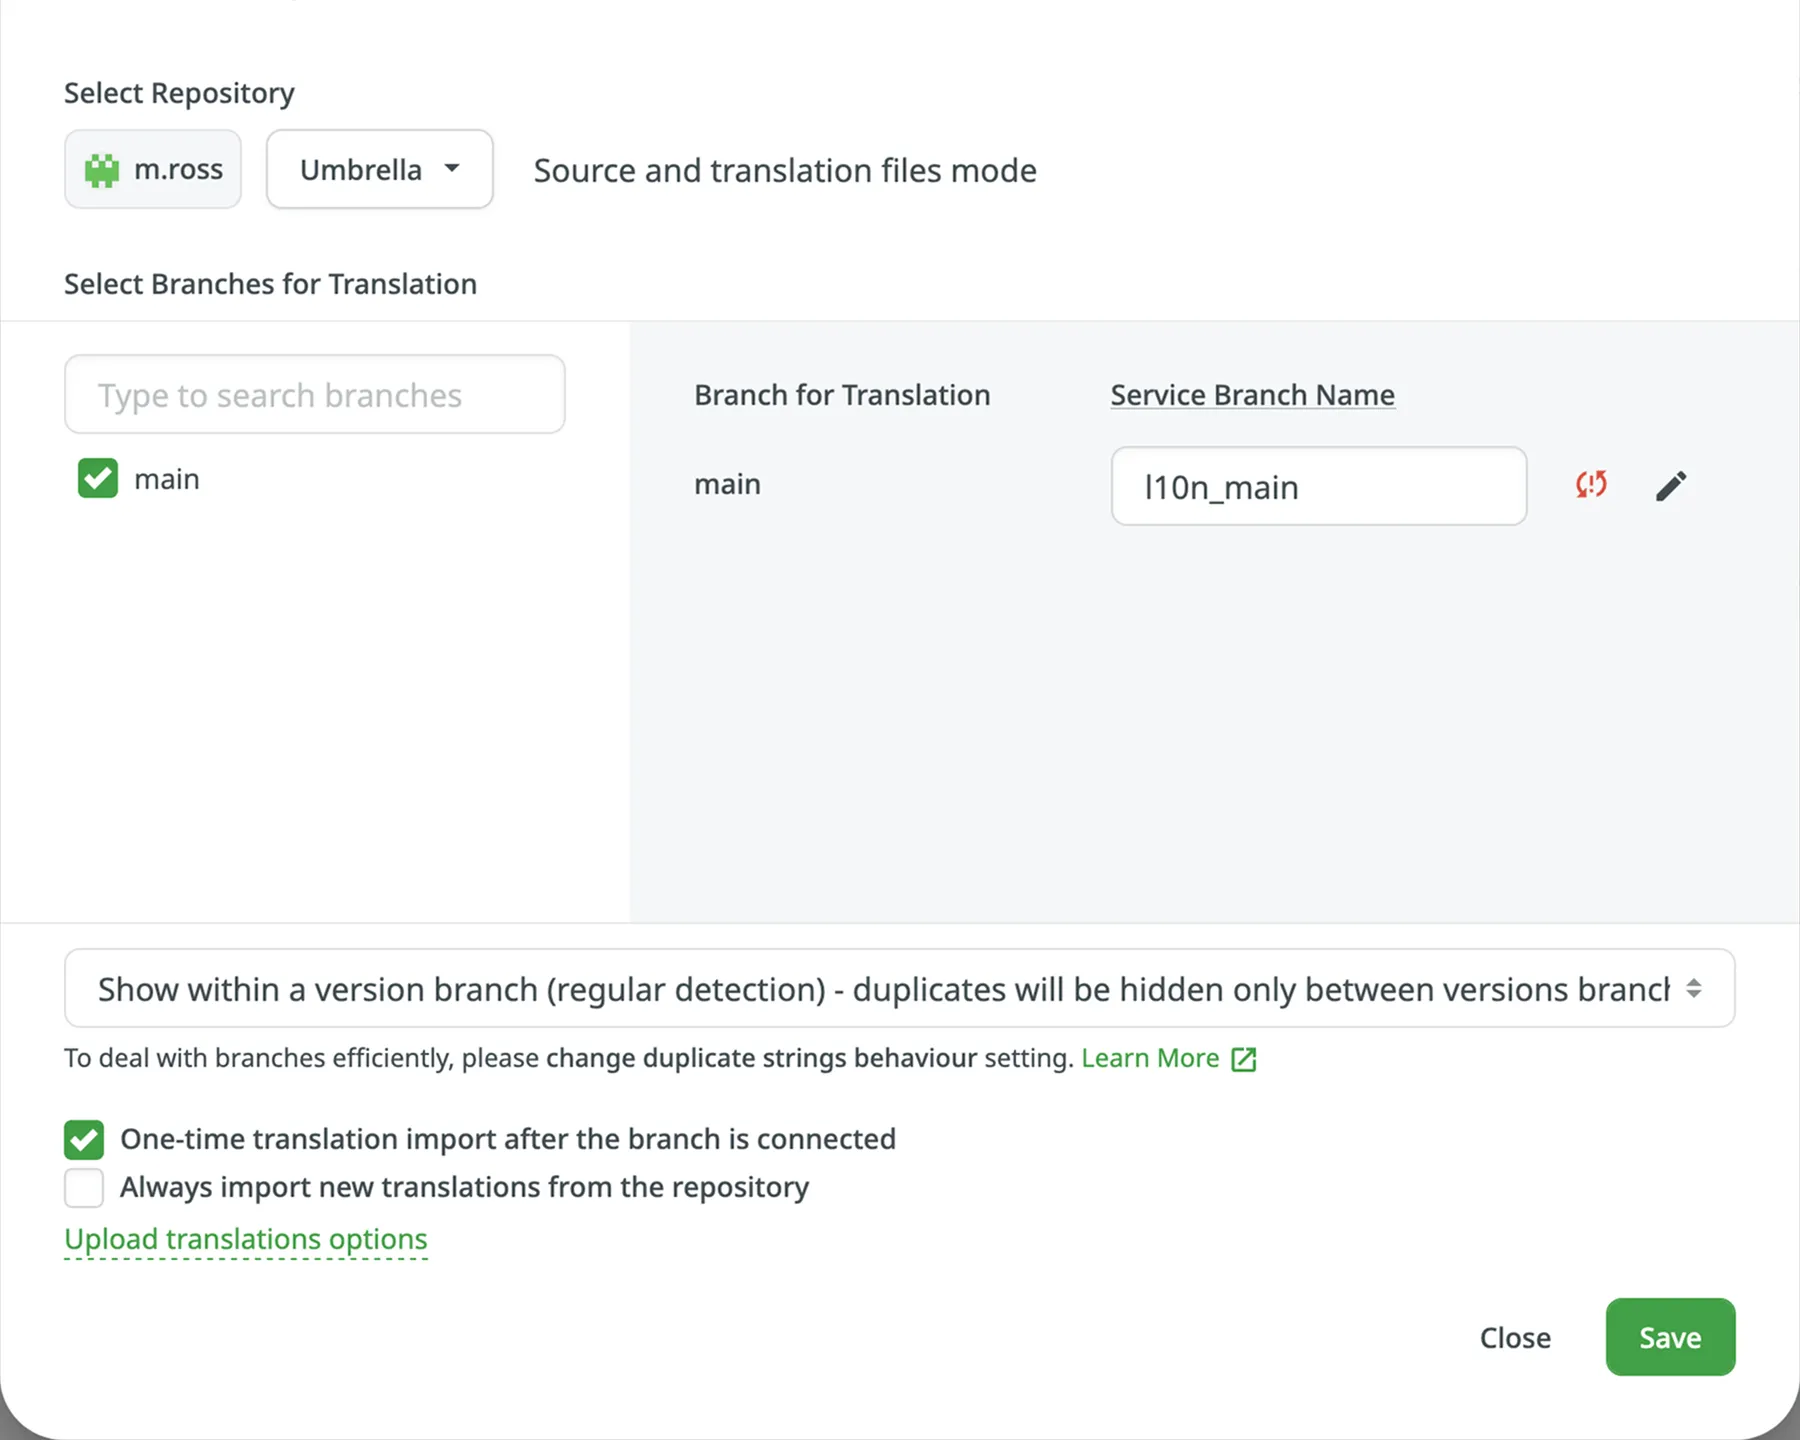
It’s recommended to switch Duplicate Strings to **Show within a version branch**, so identical strings will be hidden between branches. If your source files contain strings with apparent identifiers (keys), it’s better to use a *strict* version of this option. In other cases, feel free to use a *regular* one.
* String-based project
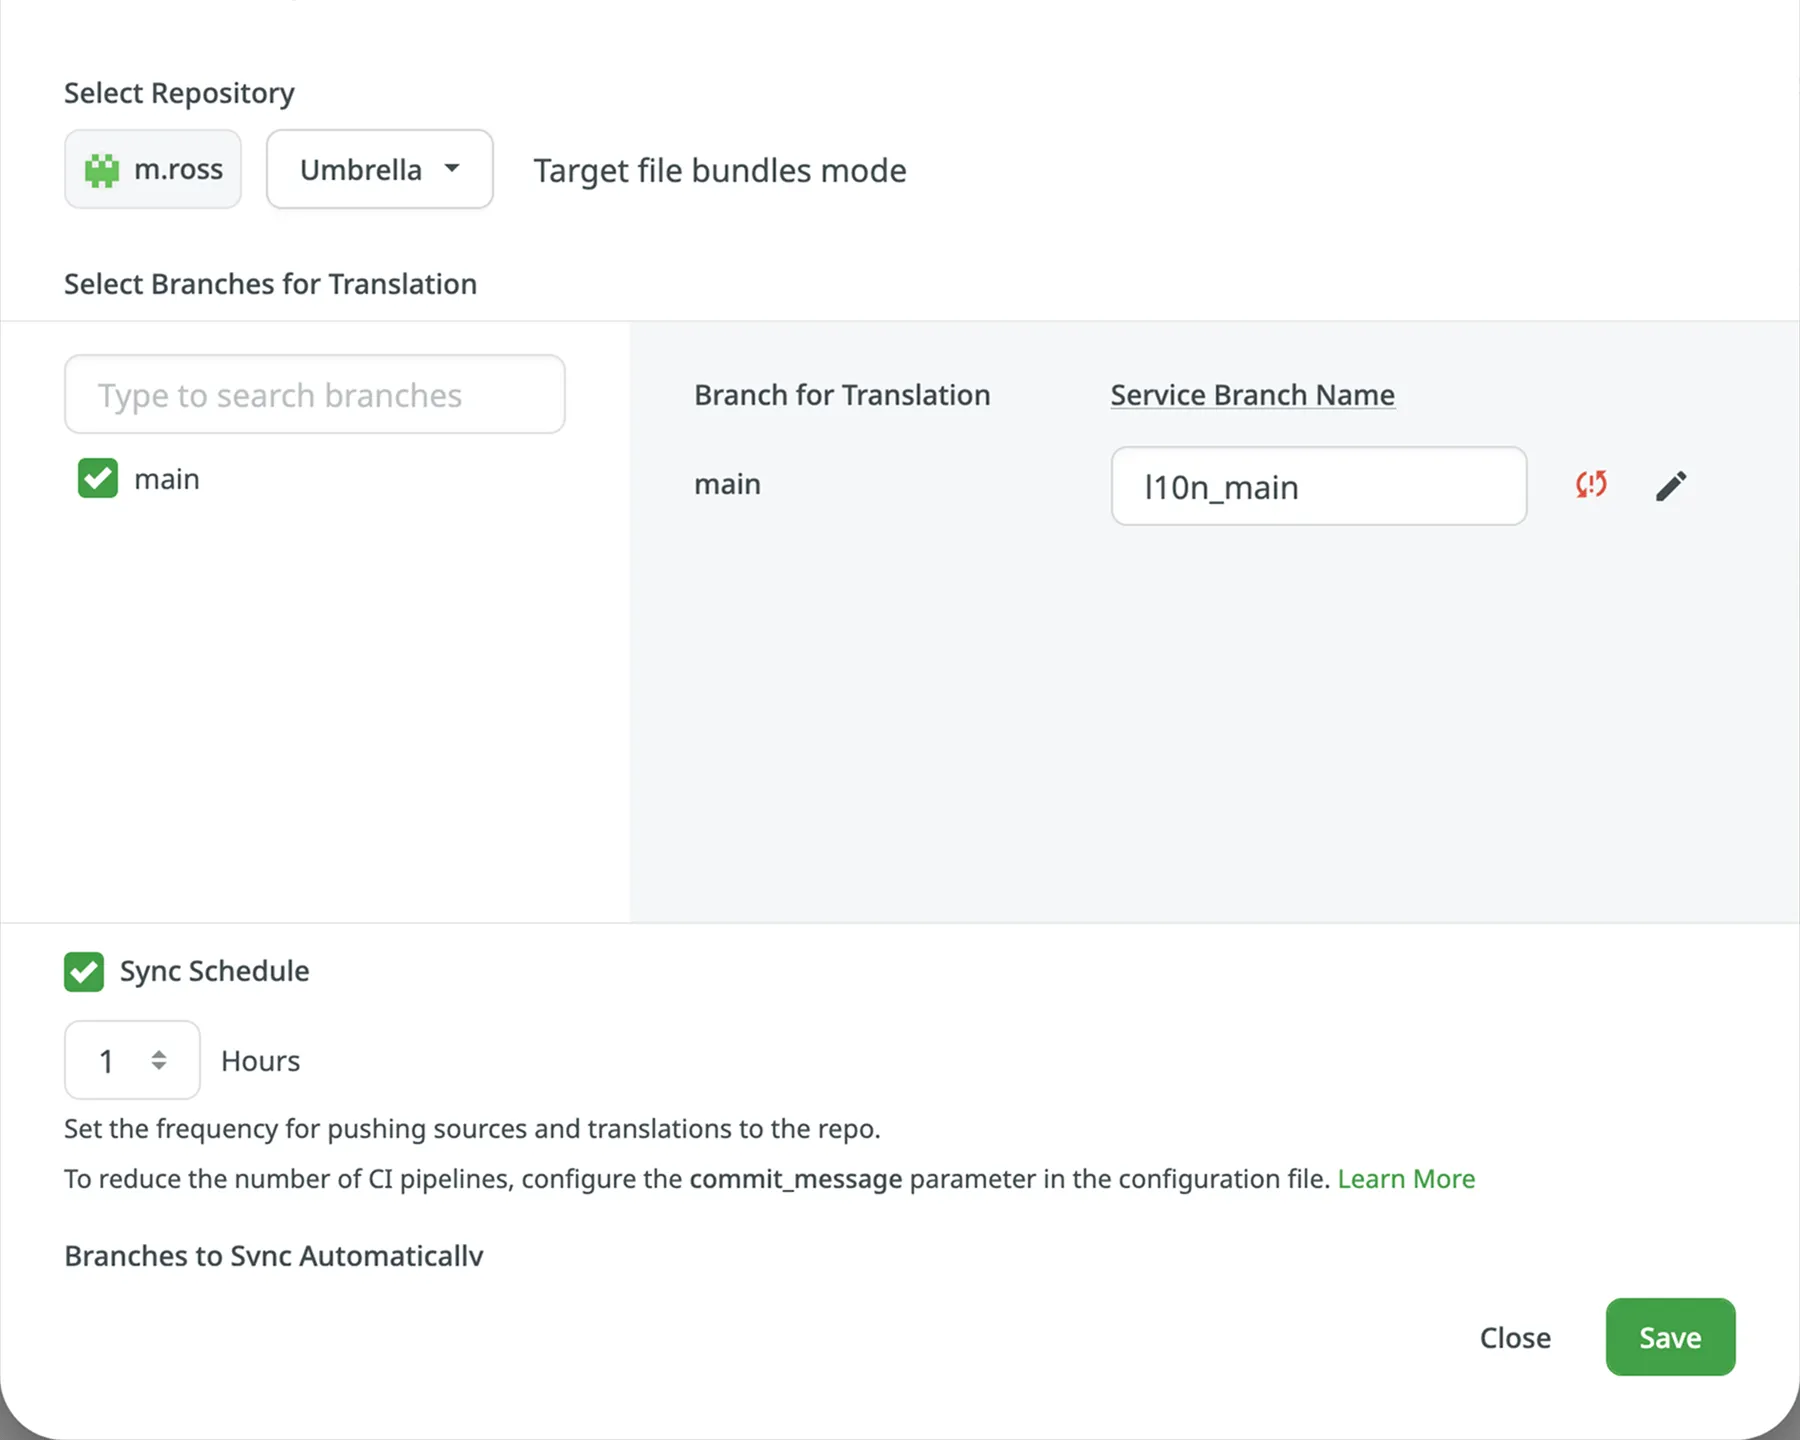
[Duplicate Strings ](/project-settings/import/#duplicate-strings)
[Version Management ](/version-management/)
When working with Azure Repos integration in the **Target File Bundles Mode**, the integration will send the completed translations from your Crowdin project without pulling sources from your repo. So when selecting a repository and branches that should be translated, you specify where the integration should put the generated bundles with translations.
Read more about [configuring target file bundles for VCS integration](/bundles/#bundles-in-vcs-integrations).
When you work with private integrations (e.g., integrations with self-hosted VCS), you need to add dedicated Crowdin IP addresses to the allowlist to ensure that it operates properly while staying secure.
Read more about [IP Addresses](/developer/ip-addresses/#integrations-and-applications).
### [Service Branches](#service-branches)
[Section titled “Service Branches”](#service-branches)
When translations are finished and your languages are ready to go live, Crowdin sends the pull request with translations to your version control system. For every branch that is under localization, Crowdin creates an additional service branch with translations. We don’t commit directly to the master branch so that you can verify translations first.
By default, `l10n_` is added to the created service branch name. If necessary, you can easily change it.
Tip
We recommend deleting the `l10n_` branch from your repository after merging the pull request to prevent potential conflicts. Crowdin will automatically recreate the service branch when new translations are ready to be synced.
### [Synchronization Settings](#synchronization-settings)
[Section titled “Synchronization Settings”](#synchronization-settings)
Configure the synchronization settings according to your needs and preferences.
Limitations
The *Import existing translations* and *Push Sources* options are only available for file-based projects.
#### [Import Existing Translations](#import-existing-translations)
[Section titled “Import Existing Translations”](#import-existing-translations)
To import existing translations from your repo, select one of the following options:
* **One-time translation import after the branch is connected**
* **Always import new translations from the repository**
By default, the first option is selected to import translations only once. Alternatively, you can clear both options if you don’t want to import translations from your repo.
Tip
We recommend importing existing translations from the repository only once during the integration setup. Afterward, treat Crowdin as the source of truth and manage translations exclusively in Crowdin to prevent overriding unapproved translations.
Click **Upload translations options** to access the following additional options:
* **Allow target translation to match source**
* **Approve added translations**
#### [Push Sources](#push-sources)
[Section titled “Push Sources”](#push-sources)
By default, sources are not pushed to the repo with translations. Although, if you perform a source text review in your Crowdin project and would like to push the changes made to your source files on Crowdin back to your repo, click **Edit**, select *Push Sources* in the integration settings, and click **Save**.
#### [Sync Schedule](#sync-schedule)
[Section titled “Sync Schedule”](#sync-schedule)
The synchronization is processed every hour automatically. If necessary, you can change the update interval in the integration settings. To configure the synchronization schedule – click **Edit**, scroll down to the *Sync Schedule*, set the preferred interval, and click **Save**.
There are cases when it’s necessary to disable translations from being pushed to the repo temporarily. In this situation, click **Edit**, clear *Sync Schedule* in the integration settings, and click **Save**. When ready to sync translations with the repo, select the *Sync Schedule*, and click **Save**.
Not depending on the synchronization settings, the source files’ changes on the repo will still be synced with Crowdin continuously.
### [Branches to Sync Automatically](#branches-to-sync-automatically)
[Section titled “Branches to Sync Automatically”](#branches-to-sync-automatically)
When you set up the integration, you select existing repository branches to be added to the Crowdin project. To add future branches from Azure Repos to Crowdin automatically, create a pattern for the branch names in the integration settings.
For example, you add a pattern \**feature* in the Azure Repos integration settings. In this case, the future branches that contain this word at the end of the title will be added to the project.
To add a pattern for branch names, follow these steps:
1. Click **Edit** in the Azure Repos integration section.
2. In the appeared dialog, scroll down to the *Branches to Sync Automatically*.
3. In the *Branches to Sync Automatically* field, use wildcard selectors such as `*`, `?`, `[set]`, `\` and others to identify the necessary branches.
4. Click **Save**.
### [Default Configuration File Name](#default-configuration-file-name)
[Section titled “Default Configuration File Name”](#default-configuration-file-name)
`crowdin.yml` is the default file name that is used for automatically synchronized branches. To change the default settings, click **Edit**, specify the preferred name in the *Default configuration file name* field in the integration settings, and click **Save**.
If you don’t specify your custom configuration file name for automatically synchronized branches, and the integration doesn’t find a configuration file with the default name `crowdin.yml` in the root of the branch, these branches will be marked in the integration settings with a red icon with an exclamation mark saying “Not Ready. Check the configuration”.
## [Selecting Content for Synchronization](#selecting-content-for-synchronization)
[Section titled “Selecting Content for Synchronization”](#selecting-content-for-synchronization)
To make integration work, you need to specify which source files should be translated and how Crowdin should structure translated files in your repository.
Tip
If you see a red icon with an exclamation mark next to the service branch name, it means that you haven’t selected any content for synchronization.
There are two ways you can specify content for synchronization:
* Configuring online
* Configuring manually by creating a configuration file
### [Configuring Online](#configuring-online)
[Section titled “Configuring Online”](#configuring-online)
This procedure is the same for all integrations with version control systems (VCS).
Check [Configuring VCS Integrations Online](/configuring-vcs-integrations-online/) to get to know how to select content for synchronization online.
### [Creating Configuration File](#creating-configuration-file)
[Section titled “Creating Configuration File”](#creating-configuration-file)
The configuration file `crowdin.yml` should be stored in the Azure Repos repository along with each separate branch that you want to translate, so Crowdin knows what files exactly should be sent for translations.
It should have the same structure as required for CLI, but your project’s credentials should not be stored in the file’s header for security reasons.
Read more about [creating a configuration file](/developer/configuration-file/).
## [Working with Multiple Repositories within One Project](#working-with-multiple-repositories-within-one-project)
[Section titled “Working with Multiple Repositories within One Project”](#working-with-multiple-repositories-within-one-project)
If you’re working with a multi-platform product that has versions for different operating systems, you may want to connect multiple repositories that contain source files for each operating system. In this case, localization resources (e.g., TMs, Glossaries) and translations could be used more efficiently, reducing the time needed for project localization.
To add another repository, follow these steps:
1. Open your project and go to the **Integrations** tab.
2. Click on **Azure Repos** in the Integrations list.
3. Click **Add Repository**.
4. Configure the integration with the new repository according to your needs and preferences.
## [Checking the Status of Synchronization](#checking-the-status-of-synchronization)
[Section titled “Checking the Status of Synchronization”](#checking-the-status-of-synchronization)
Once the integration is set up, all related information is stored in **Integrations > Azure Repos**.
After the integration is connected, the settings can be updated only by the project member who configured it. All project managers except the person who configured the integration will see the **Edit** button disabled with the following message when hovering over it: `Integration was configured by {Full Name} ({username})`.
By default, synchronization is processed every hour automatically. If you need to launch the synchronization immediately – click **Sync Now**.
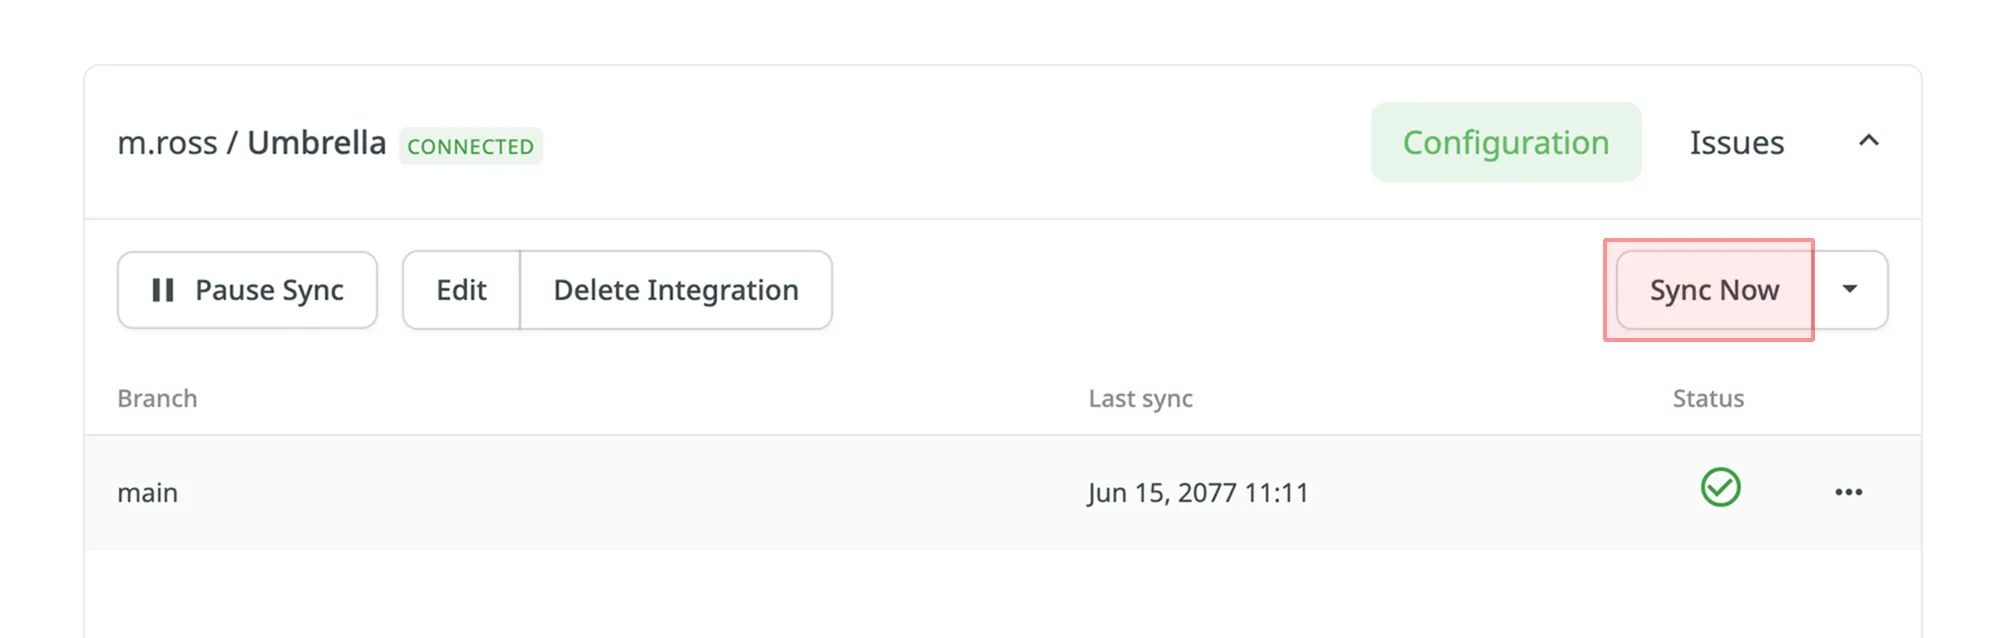
Alternatively, if you need to sync only one branch separately, click on the needed branch and select **Sync branch**.
## [Uploading Translations from Repo](#uploading-translations-from-repo)
[Section titled “Uploading Translations from Repo”](#uploading-translations-from-repo)
By default, the translations stored on the repo are uploaded to Crowdin during the first synchronization only. To upload translations to Crowdin manually, click on the drop-down toggle on the **Sync Now** button, and click **Sync Translations to Crowdin**. The integration will upload existing translations to your Crowdin project.
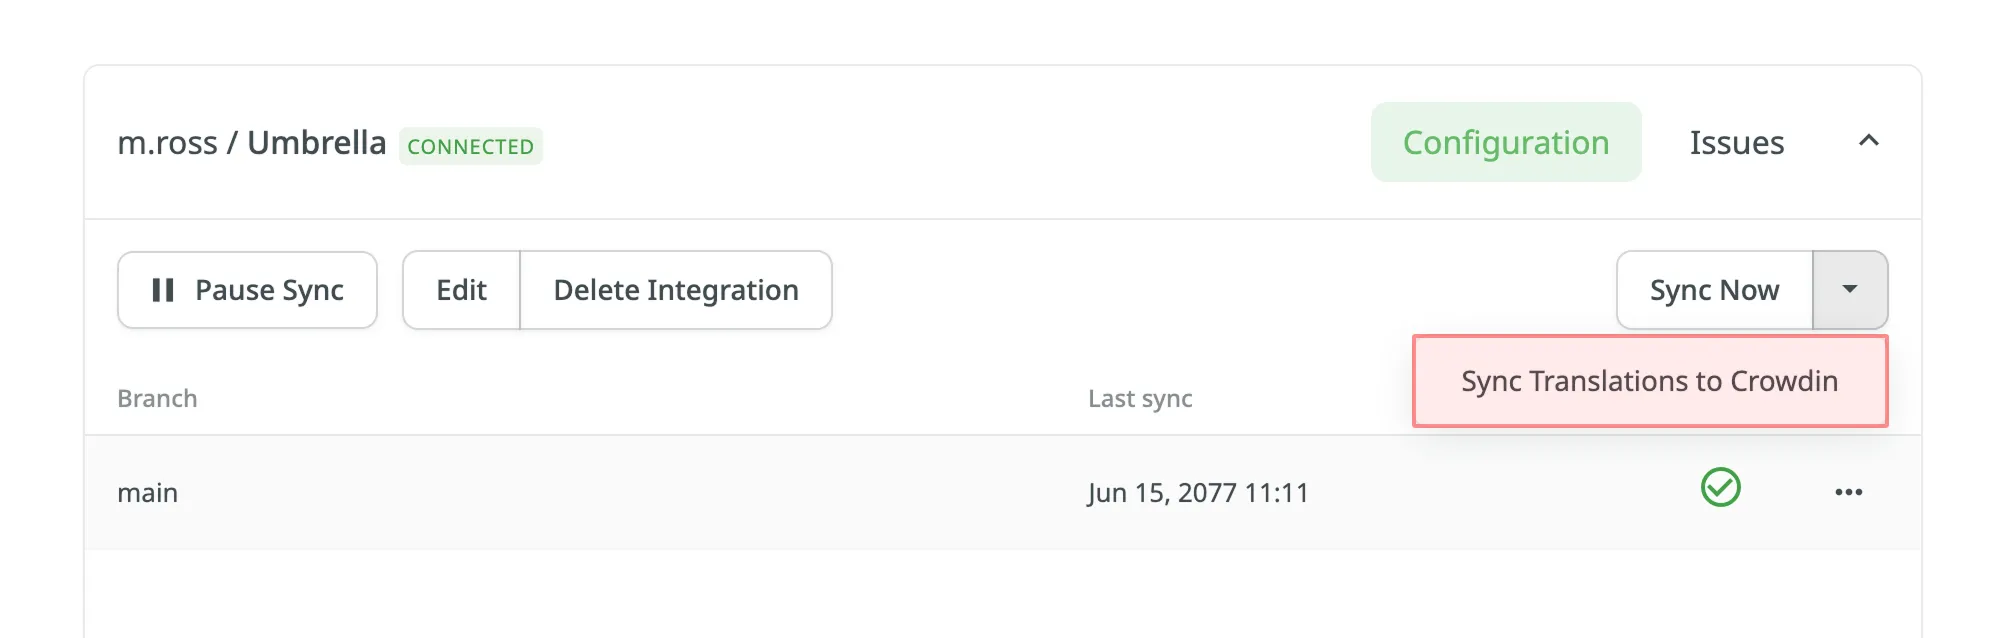
Limitations
* The **Sync Translations to Crowdin** option is available for file-based projects only.
* Use this feature with caution if translation is already in progress.\
Manually uploading translations from the repo may override unapproved translations currently in the project, similar to the [**Always import new translations from the repository**](#import-existing-translations) option.
## [Q\&A](#qa)
[Section titled “Q\&A”](#qa)
**How can I avoid unnecessary application builds triggered by commits from Crowdin?**
Since VCS integrations in Crowdin use API to commit files but not Git, each file is committed separately.
Here are a few recommendations that might help solve similar situations:
* Use the `export_languages` option to skip commits from languages you’re not interested in yet. Read more about the [Export languages parameter](/developer/configuration-file/#export-languages).
* Use the `[ci skip]` tag in the commit messages to skip unnecessary builds. Read more about the [Commit Message parameter](/developer/configuration-file/#commit-message).
* Configure the preferred sync interval using [Sync Schedule](#synchronization-settings) (e.g., set the sync once in 24 hours).
* Squash commits when merging a localization branch to keep the master branch history clean and uncluttered.
# Billing Settings
> Update your billing information and payment method
Crowdin uses the FastSpring service for payment processing. With the help of the FastSpring account management page, you can manage settings like your payment methods, your billing email, and other related information. You can also view your subscriptions, billing dates, and past invoices.
## [Updating Billing Details](#updating-billing-details)
[Section titled “Updating Billing Details”](#updating-billing-details)
To update your billing information, follow these steps:
1. Go to the [FastSpring Account Management page](https://crowdin.onfastspring.com/account).
2. To log in, specify the same email that was used to purchase your Crowdin subscription.
3. Click **Continue**.
4. Click **Edit**.
5. Change the fields with your billing information.
6. Save changes.
As a result, the updated billing information will be applied to future payments.
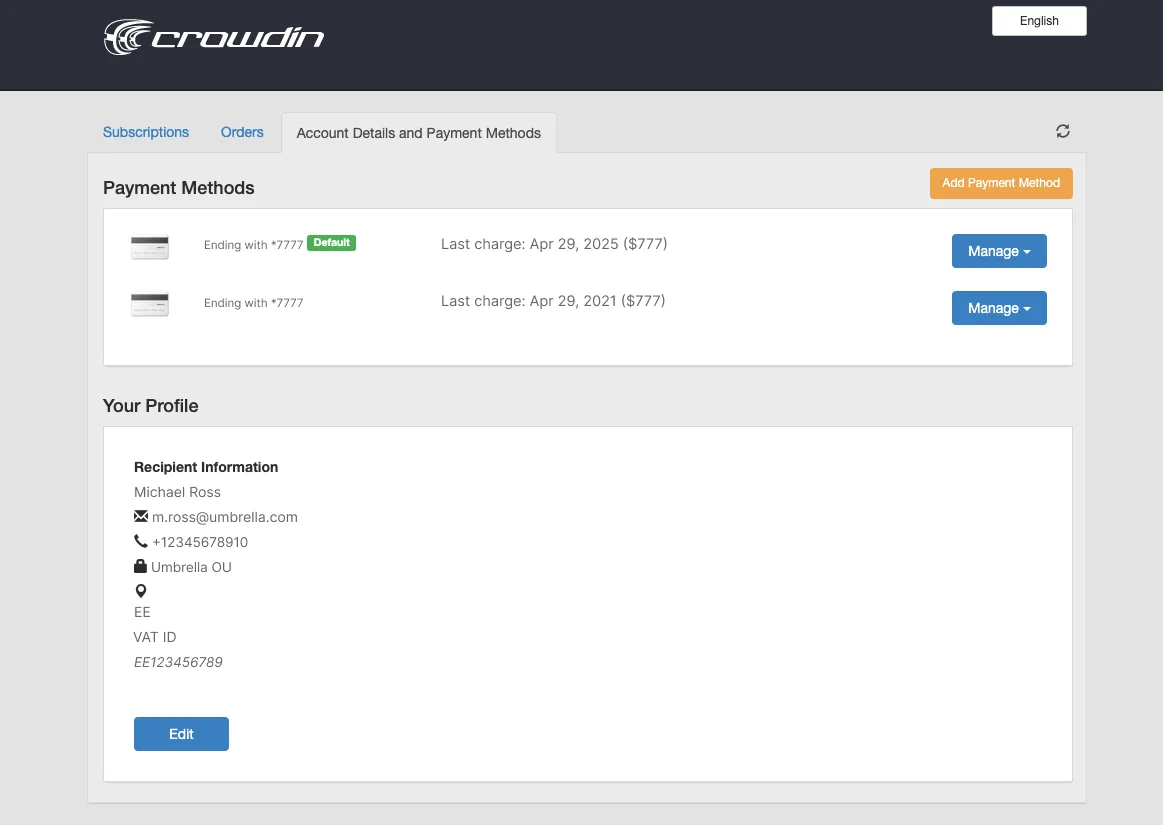
## [Updating Payment Method](#updating-payment-method)
[Section titled “Updating Payment Method”](#updating-payment-method)
You can change the payment method used for your Crowdin subscription.
To update your payment method, follow these steps:
1. Go to the [FastSpring Account Management page](https://crowdin.onfastspring.com/account).
2. To log in, specify the same email that was used to purchase your Crowdin subscription.
3. Click **Continue**.
4. Click **Add Payment Method**.
5. Specify your new credit card details.
6. Save changes.
Set your new payment method as default to make sure that it will be used for future charges.
## [See Also](#see-also)
[Section titled “See Also”](#see-also)
[Pricing page ](https://crowdin.com/pricing)Plans, Pricing, and Free Trial.
[Payments and Invoices ](/payments-invoices/)Learn how payments work in Crowdin and how to download invoices.
[Changing Subscription Plan ](/changing-subscription-plan/)Upgrade or downgrade your subscription plan.
[App Subscriptions ](/app-subscriptions/)Learn how to subscribe to paid apps in Crowdin Store.
# Bitbucket Integration
> Synchronize files between your Bitbucket repository and Crowdin
The Bitbucket integration allows you to synchronize files between your Bitbucket repo and Crowdin project.
Note
You will need to [install the Bitbucket integration](https://store.crowdin.com/bitbucket) in your Crowdin account before you can set it up and use it.
In file-based projects, there are two possible Bitbucket integration modes you can choose from:
* **Source and translation files mode** – synchronize source and translation files between your Bitbucket repository and Crowdin project.
* **Target file bundles mode** – generate and push translation files to your Bitbucket repository from the Crowdin project in the selected format. In this mode, integration pushes translation files and doesn’t sync sources from your repo. In cases when you perform a source text review in your Crowdin project and want to get updated source texts to your repo, you can add a source language as a target language, which will be pushed to your repo along with translations.
In string-based projects, Bitbucket integration exclusively operates in the **Target file bundles mode**.
Read more about [project types](/creating-project/#project-types).
All translated and approved files (or target file bundles) are automatically merged into the `l10n` branch of the Bitbucket repository.
## [Connecting Bitbucket Account](#connecting-bitbucket-account)
[Section titled “Connecting Bitbucket Account”](#connecting-bitbucket-account)
1. Open your project and go to the **Integrations** tab.
2. Click on **Bitbucket** in the Integrations list.
3. Click **Set Up Integration** and select **Source and translation files mode** or **Target file bundles mode** from the drop-down list to integrate via your Bitbucket account. 
Note
In string-based projects, Bitbucket integration exclusively operates in the **Target file bundles mode**.
4. Then authorize the connection with Crowdin on the Bitbucket side: 
### [Selecting Repository](#selecting-repository)
[Section titled “Selecting Repository”](#selecting-repository)
In the appeared dialog, select your repository and branches that should be translated.
* File-based project

It’s recommended to switch Duplicate Strings to **Show within a version branch**, so identical strings will be hidden between branches. If your source files contain strings with apparent identifiers (keys), it’s better to use a *strict* version of this option. In other cases, feel free to use a *regular* one.
* String-based project

[Duplicate Strings ](/project-settings/import/#duplicate-strings)
[Version Management ](/version-management/)
When working with Bitbucket integration in the **Target File Bundles Mode**, the integration will send the completed translations from your Crowdin project without pulling sources from your repo. So when selecting a repository and branches that should be translated, you specify where the integration should put the generated bundles with translations.
Read more about [configuring target file bundles for VCS integration](/bundles/#bundles-in-vcs-integrations).
When you work with private integrations (e.g., integrations with self-hosted VCS), you need to add dedicated Crowdin IP addresses to the allowlist to ensure that it operates properly while staying secure.
Read more about [IP Addresses](/developer/ip-addresses/#integrations-and-applications).
### [Service Branches](#service-branches)
[Section titled “Service Branches”](#service-branches)
When translations are finished and your languages are ready to go live, Crowdin sends the pull request with translations to your version control system. For every branch that is under localization, Crowdin creates an additional service branch with translations. We don’t commit directly to the master branch so that you can verify translations first.
By default, `l10n_` is added to the created service branch name. If necessary, you can easily change it.
Tip
We recommend deleting the `l10n_` branch from your repository after merging the pull request to prevent potential conflicts. Crowdin will automatically recreate the service branch when new translations are ready to be synced.
### [Synchronization Settings](#synchronization-settings)
[Section titled “Synchronization Settings”](#synchronization-settings)
Configure the synchronization settings according to your needs and preferences.
Limitations
The *Import existing translations* and *Push Sources* options are only available for file-based projects.
#### [Import Existing Translations](#import-existing-translations)
[Section titled “Import Existing Translations”](#import-existing-translations)
To import existing translations from your repo, select one of the following options:
* **One-time translation import after the branch is connected**
* **Always import new translations from the repository**
By default, the first option is selected to import translations only once. Alternatively, you can clear both options if you don’t want to import translations from your repo.
Tip
We recommend importing existing translations from the repository only once during the integration setup. Afterward, treat Crowdin as the source of truth and manage translations exclusively in Crowdin to prevent overriding unapproved translations.
Click **Upload translations options** to access the following additional options:
* **Allow target translation to match source**
* **Approve added translations**
#### [Push Sources](#push-sources)
[Section titled “Push Sources”](#push-sources)
By default, sources are not pushed to the repo with translations. Although, if you perform a source text review in your Crowdin project and would like to push the changes made to your source files on Crowdin back to your repo, click **Edit**, select *Push Sources* in the integration settings, and click **Save**.
#### [Sync Schedule](#sync-schedule)
[Section titled “Sync Schedule”](#sync-schedule)
The synchronization is processed every hour automatically. If necessary, you can change the update interval in the integration settings. To configure the synchronization schedule – click **Edit**, scroll down to the *Sync Schedule*, set the preferred interval, and click **Save**.
There are cases when it’s necessary to disable translations from being pushed to the repo temporarily. In this situation, click **Edit**, clear *Sync Schedule* in the integration settings, and click **Save**. When ready to sync translations with the repo, select the *Sync Schedule*, and click **Save**.
Not depending on the synchronization settings, the source files’ changes on the repo will still be synced with Crowdin continuously.
### [Branches to Sync Automatically](#branches-to-sync-automatically)
[Section titled “Branches to Sync Automatically”](#branches-to-sync-automatically)
When you set up the integration, you select existing repository branches to be added to the Crowdin project. To add future branches from Bitbucket to Crowdin automatically, create a pattern for the branch names in the integration settings.
For example, you add a pattern \**feature* in the Bitbucket integration settings. In this case, the future branches that contain this word at the end of the title will be added to the project.
To add a pattern for branch names, follow these steps:
1. Click **Edit** in the Bitbucket integration section.
2. In the appeared dialog, scroll down to the *Branches to Sync Automatically*.
3. In the *Branches to Sync Automatically* field, use wildcard selectors such as `*`, `?`, `[set]`, `\` and others to identify the necessary branches.
4. Click **Save**.
### [Default Configuration File Name](#default-configuration-file-name)
[Section titled “Default Configuration File Name”](#default-configuration-file-name)
`crowdin.yml` is the default file name that is used for automatically synchronized branches. To change the default settings, click **Edit**, specify the preferred name in the *Default configuration file name* field in the integration settings, and click **Save**.
If you don’t specify your custom configuration file name for automatically synchronized branches, and the integration doesn’t find a configuration file with the default name `crowdin.yml` in the root of the branch, these branches will be marked in the integration settings with a red icon with an exclamation mark saying “Not Ready. Check the configuration”.
## [Selecting Content for Synchronization](#selecting-content-for-synchronization)
[Section titled “Selecting Content for Synchronization”](#selecting-content-for-synchronization)
To make integration work, you need to specify which source files should be translated and how Crowdin should structure translated files in your repository. To make integration work in the Target file bundles mode, you need to select the required bundles that you want to push to your repository.
Tip
If you see a red icon with an exclamation mark next to the service branch name, it means that you haven’t selected any content for synchronization.
There are two ways you can specify content for synchronization:
* Configuring online
* Configuring manually by creating a configuration file
### [Configuring Online](#configuring-online)
[Section titled “Configuring Online”](#configuring-online)
This procedure is the same for all integrations with version control systems (VCS).
Check [Configuring VCS Integrations Online](/configuring-vcs-integrations-online/) to get to know how to select content for synchronization online.
### [Creating Configuration File](#creating-configuration-file)
[Section titled “Creating Configuration File”](#creating-configuration-file)
Configuration file `crowdin.yml` should be stored in the Bitbucket repository along with each separate branch that you want to translate, so Crowdin knows what files exactly should be sent for translations.
It should have the same structure as required for CLI, but your project’s credentials should not be stored in the file’s header for security reasons.
Read more about [creating a configuration file](/developer/configuration-file/).
## [Working with Multiple Repositories within One Project](#working-with-multiple-repositories-within-one-project)
[Section titled “Working with Multiple Repositories within One Project”](#working-with-multiple-repositories-within-one-project)
If you’re working with a multi-platform product that has versions for different operating systems, you may want to connect multiple repositories that contain source files for each operating system. In this case, localization resources (e.g., TMs, Glossaries) and translations could be used more efficiently, reducing the time needed for project localization.
To add another repository, follow these steps:
1. Open your project and go to the **Integrations** tab.
2. Click on **Bitbucket** in the Integrations list.
3. Click **Add Repository**.
4. Configure the integration with the new repository according to your needs and preferences.
## [Checking the Status of Synchronization](#checking-the-status-of-synchronization)
[Section titled “Checking the Status of Synchronization”](#checking-the-status-of-synchronization)
Once the integration is set up, all related information is stored in **Integrations > Bitbucket**.
After the integration is connected, the settings can be updated only by the project member who configured it. All project managers except the person who configured the integration will see the **Edit** button disabled with the following message when hovering over it: `Integration was configured by {Full Name} ({username})`.
By default, synchronization is processed every hour automatically. If you need to launch the synchronization immediately – click **Sync Now**.

Alternatively, if you need to sync only one branch separately, click on the needed branch and select **Sync branch**.
## [Uploading Translations from Repo](#uploading-translations-from-repo)
[Section titled “Uploading Translations from Repo”](#uploading-translations-from-repo)
By default, the translations stored on the repo are uploaded to Crowdin during the first synchronization only. To upload translations to Crowdin manually, click on the drop-down toggle on the **Sync Now** button, and click **Sync Translations to Crowdin**. The integration will upload existing translations to your Crowdin project.

Limitations
* The **Sync Translations to Crowdin** option is available for file-based projects only.
* Use this feature with caution if translation is already in progress.\
Manually uploading translations from the repo may override unapproved translations currently in the project, similar to the [**Always import new translations from the repository**](#import-existing-translations) option.
## [Q\&A](#qa)
[Section titled “Q\&A”](#qa)
**How can I avoid unnecessary application builds triggered by commits from Crowdin?**
Since VCS integrations in Crowdin use API to commit files but not Git, each file is committed separately.
Here are a few recommendations that might help solve similar situations:
* Use the `export_languages` option to skip commits from languages you’re not interested in yet. Read more about the [Export languages parameter](/developer/configuration-file/#export-languages).
* Use the `[ci skip]` tag in the commit messages to skip unnecessary builds. Read more about the [Commit Message parameter](/developer/configuration-file/#commit-message).
* Configure the preferred sync interval using [Sync Schedule](#synchronization-settings) (e.g., set the sync once in 24 hours).
* Squash commits when merging a localization branch to keep the master branch history clean and uncluttered.
# BLEND Integration
> Integrate your Crowdin projects with the BLEND agency
Integrate your Crowdin projects with the BLEND agency and allow BLEND translators to work with translation files in Crowdin Editor.
The integration provides:
* Instant synchronization of localization content from Crowdin to BLEND using Crowdin tasks.
* Possibility for BLEND translators to easily access and work in Crowdin Editor.
* 2-way synchronization of comments between BLEND and Crowdin.
## [Connecting BLEND with Crowdin](#connecting-blend-with-crowdin)
[Section titled “Connecting BLEND with Crowdin”](#connecting-blend-with-crowdin)
You need to have a client account in BLEND to enable integration and sufficient Credit Balance so you can use BLEND translation services. Register at [BLEND](https://app.getblend.com/auth/register) if you don’t have an account yet.
To establish the connection, follow these steps:
1. Log in to Crowdin.
2. Open your **Account Settings** and go to the **Vendors** tab.\
Alternatively, click on the BLEND’s tile in the **Store > Vendors** page.
3. In the **BLEND** section, click **Connect Account**. 
4. Enter *Public Key* and *Secret Key* from the BLEND [API keys](https://app.getblend.com/profile/#apikeys) tab. Click **Submit Keys**.
## [Creating Tasks for Content Synchronization](#creating-tasks-for-content-synchronization)
[Section titled “Creating Tasks for Content Synchronization”](#creating-tasks-for-content-synchronization)
To send the localization content to BLEND, you need to create tasks in the Crowdin project. Follow these step-by-step instructions for task creation:
1. Click [**Create Task**](/tasks/#creating-new-task) using the project’s **Tasks** tab.
2. Alternatively, you can initiate a task from the **Store**:
1. Go to **Store > Vendors** on your profile home page.
2. Click on the **BLEND** tile to open the vendor page.
3. In the **Create Task** section, select the project from the drop-down list.
4. Click **Create** to open the task creation page in a new tab. 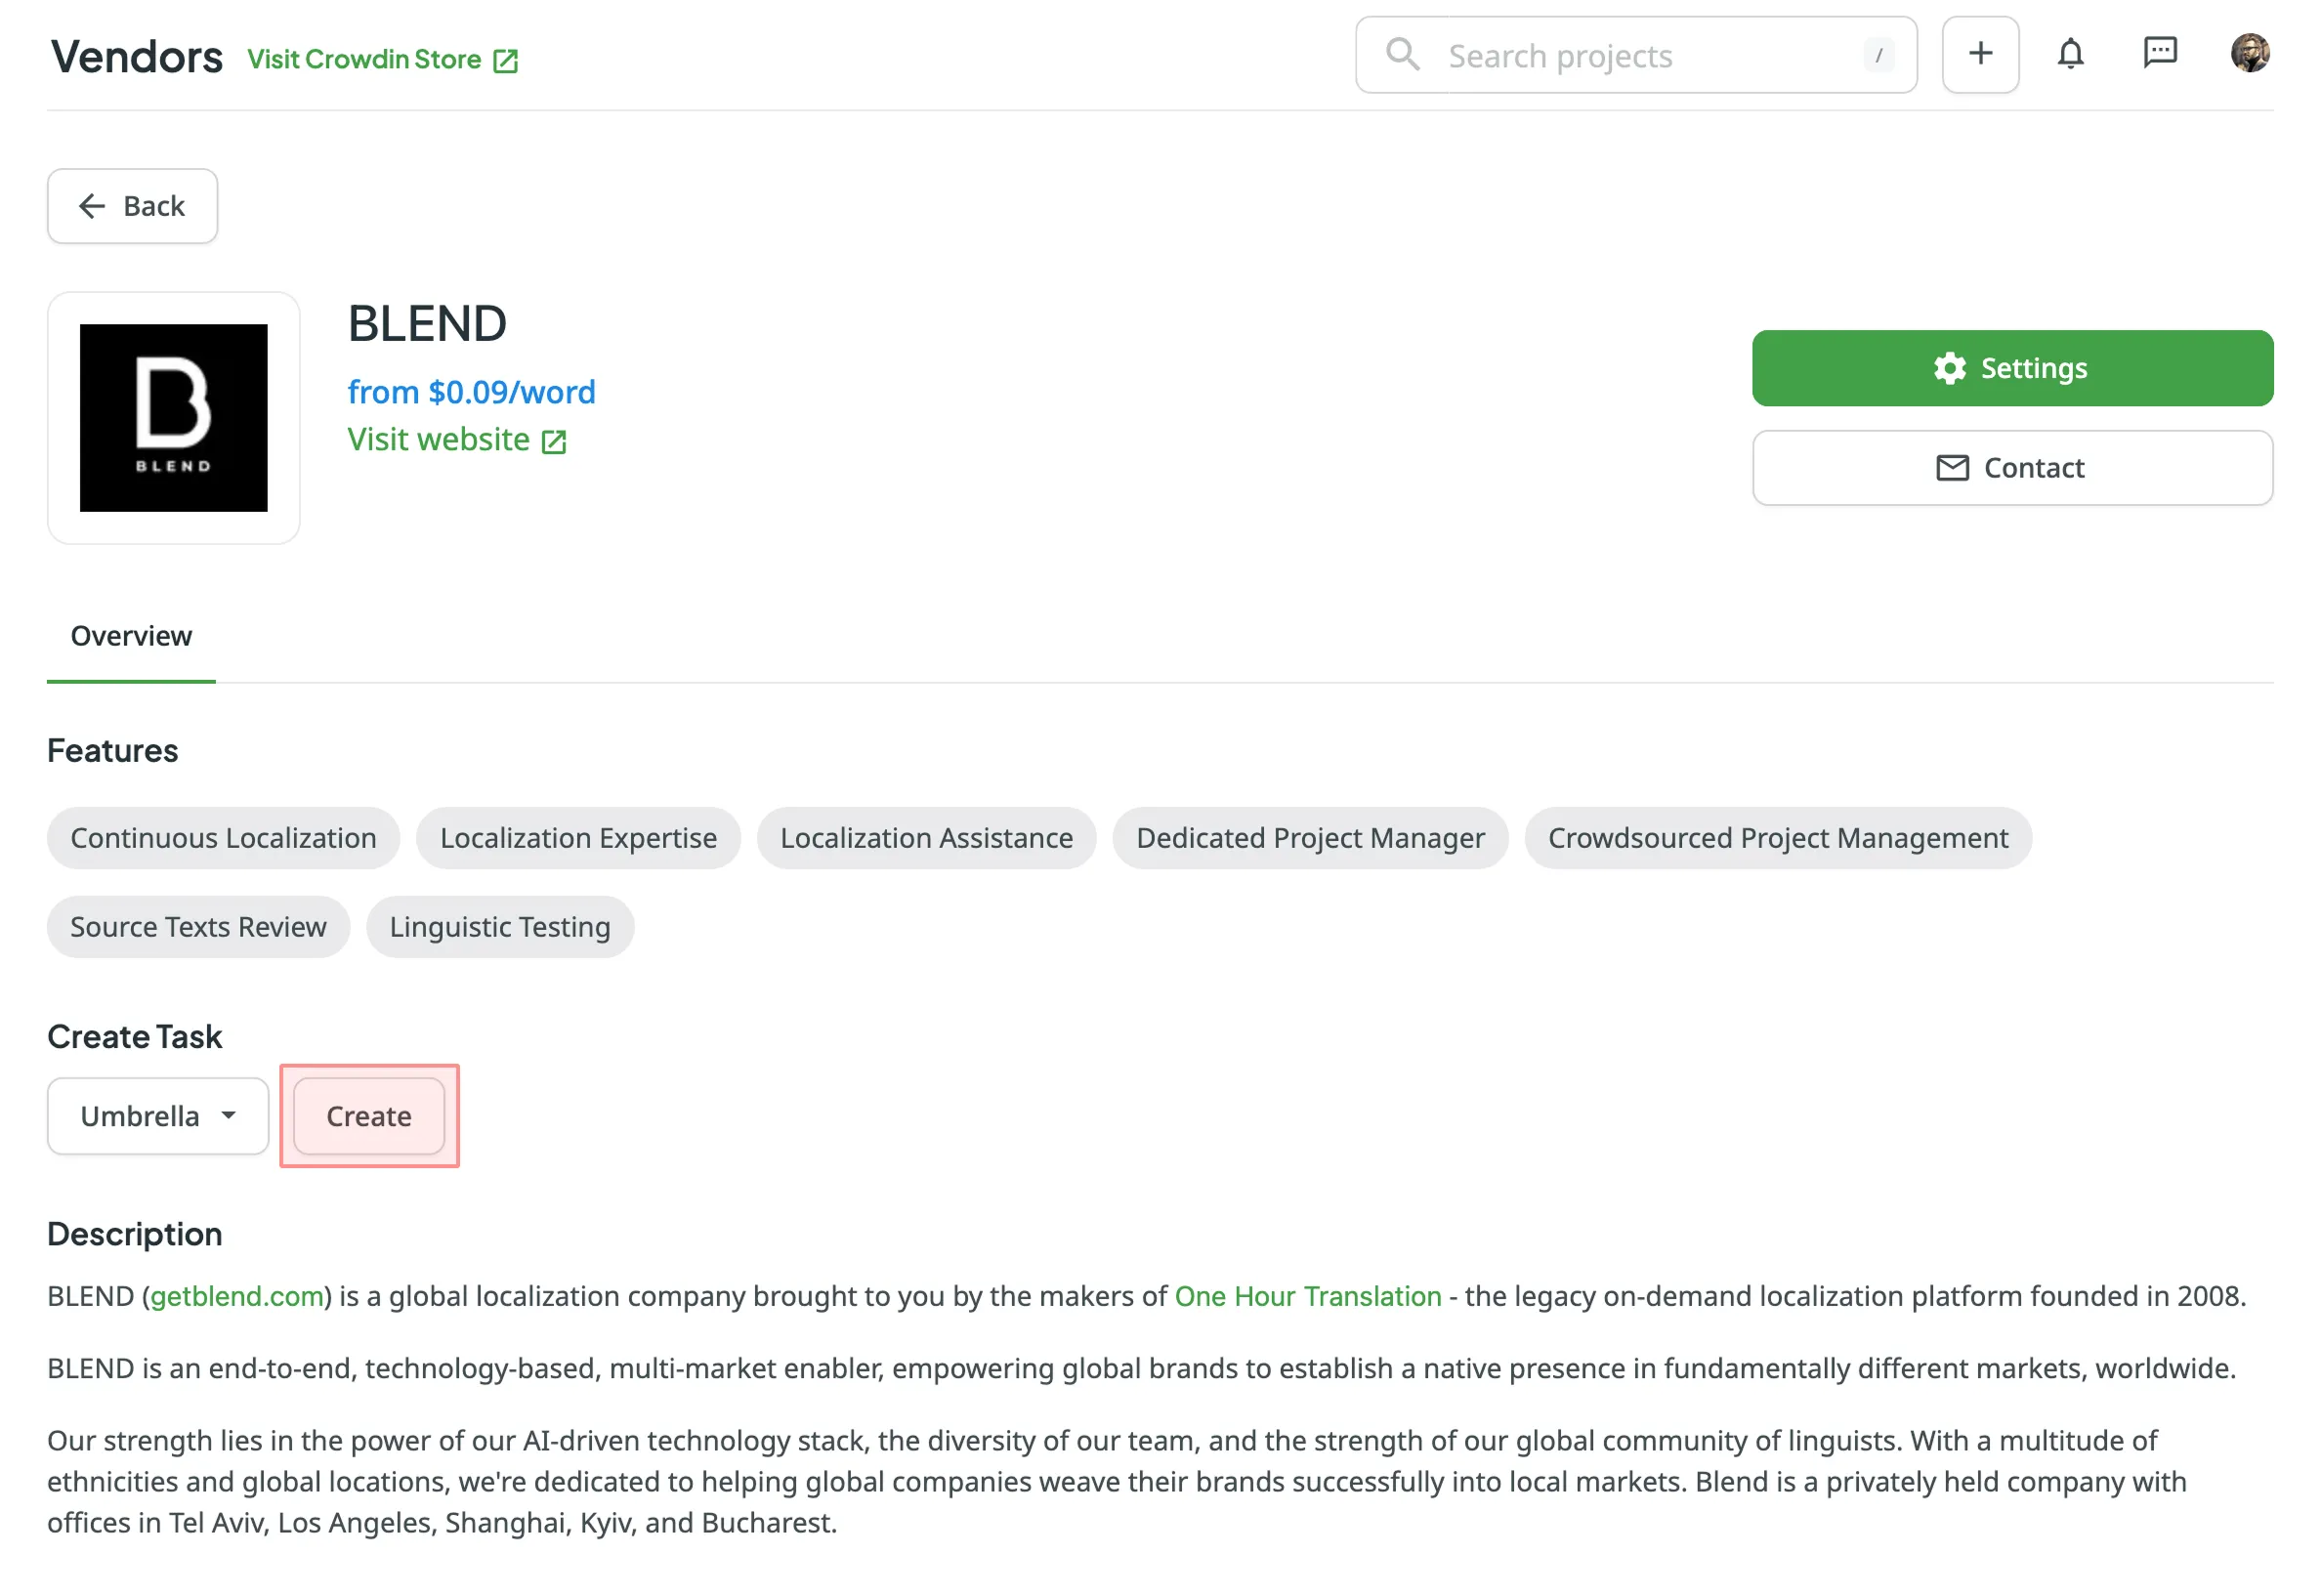
3. Set the task parameters:
* *Title* – specify the name of the task that will be visible to BLEND translators.
* *Description* (optional) – add any additional details that may be helpful for BLEND translators.
* *Type* – select either *Translate by vendor* or *Proofread by vendor*.
* *Translation Vendor* – select *BLEND* from the list.
Tip
Click next to the vendor dropdown to open **Account Settings > Vendors**, where you can manage your BLEND connection or to view the vendor in the Store.
* *Expertise* – select the required subject matter expertise (e.g., Standard, Technical, etc.).
* *Include edit service* (only for Translate by vendor) – adds an Editing project on the BLEND side for an additional linguistic review.
* *Preceding task* (only for Proofread by vendor) – link the task to a previously created translation task to inherit its scope and language settings.
* *Skip strings already included in other tasks* – skip strings that are already assigned to other tasks.
* *Create Cost Estimate Report* – automatically generate a cost estimate based on selected content and the rates template.
* *Rates template* – select the template to be used for calculating the estimate.
* *String filters* – filter which strings should be included in the task:
* *Strings* – select whether to include all untranslated strings or not approved strings, or only those modified within a specific period.
* *Filter by labels* (optional) – select one or more labels to include only strings with the specified labels. Then, select the match rule:
* *All selected labels* – includes only strings that have all selected labels (AND logic).
* *Any selected label* – includes strings that have at least one of the selected labels (OR logic).
* *Exclude by labels* (optional) – select one or more labels to exclude strings with the specified labels. Then, select the match rule:
* *All selected labels* – excludes only strings that have all selected labels (AND logic).
* *Any selected label* – excludes strings that have at least one of the selected labels (OR logic).
* *Include pre-translated strings only* (only for Proofread by vendor) – include only strings that were previously pre-translated.
* *Files* (for file-based projects) or *Branches* (for string-based projects) – select content to include in the task.
* *Languages* – select target languages (a separate task will be created for each selected language).
4. Click **Create Task** to complete the translation order and send project files to BLEND.
Read more about [BLEND Editing project](https://help.getblend.com/hc/en-us/articles/360019181260-What-is-an-editing-project-).
Note
Project managers can create tasks for vendors only using the project’s [Tasks](/tasks/) tab.
Caution
In case you change the task’s name or description or update the files selected for the existing task, it won’t be re-synchronized with BLEND.
## [Translation and Proofreading Process](#translation-and-proofreading-process)
[Section titled “Translation and Proofreading Process”](#translation-and-proofreading-process)
When the task is created, it’s automatically sent to BLEND and visible to BLEND translators/proofreaders in the *Open Projects* tab. BLEND translator/proofreader will need to **Start Project** and then use the **Open Workbench** button to access Crowdin Editor.
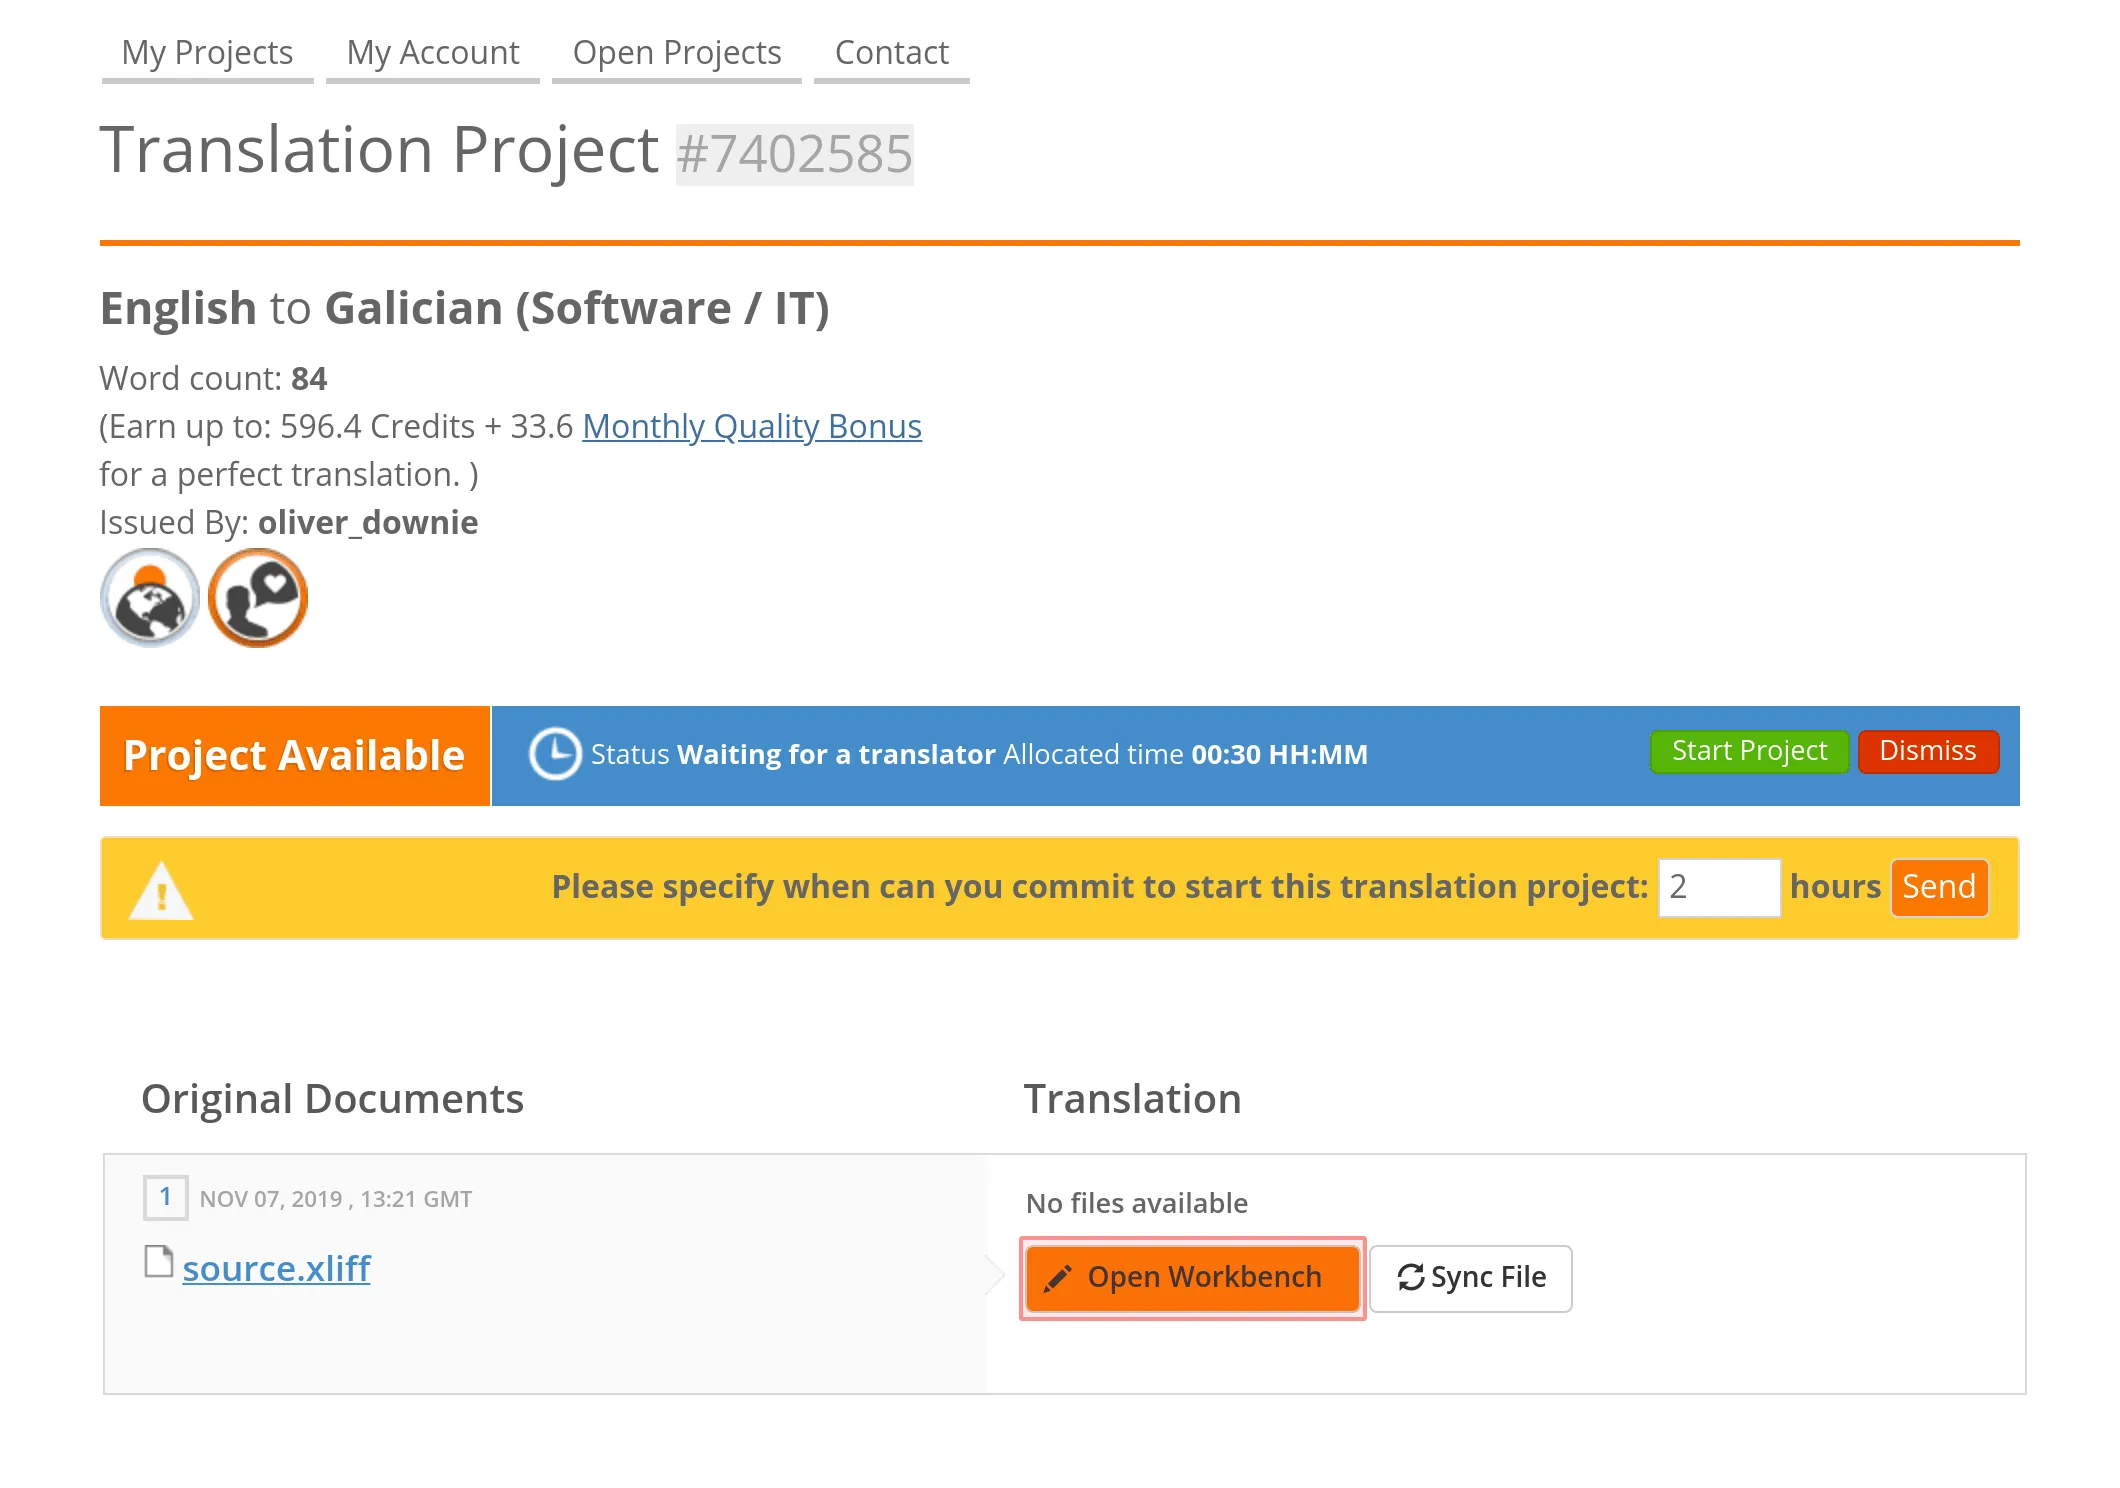
Read more about [Crowdin Editor](/online-editor/).
A translator/proofreader will be logged in Crowdin with BLEND profile data to work on content localization. When the work starts, the related task in Crowdin will automatically move to the *In Progress* status. And when the work is finished (project marked as Completed on the BLEND side), the task will gain *Done* status in Crowdin.
## [Discussions and Comments](#discussions-and-comments)
[Section titled “Discussions and Comments”](#discussions-and-comments)
If you need to add some details to an already created task, you can add *Comments*.
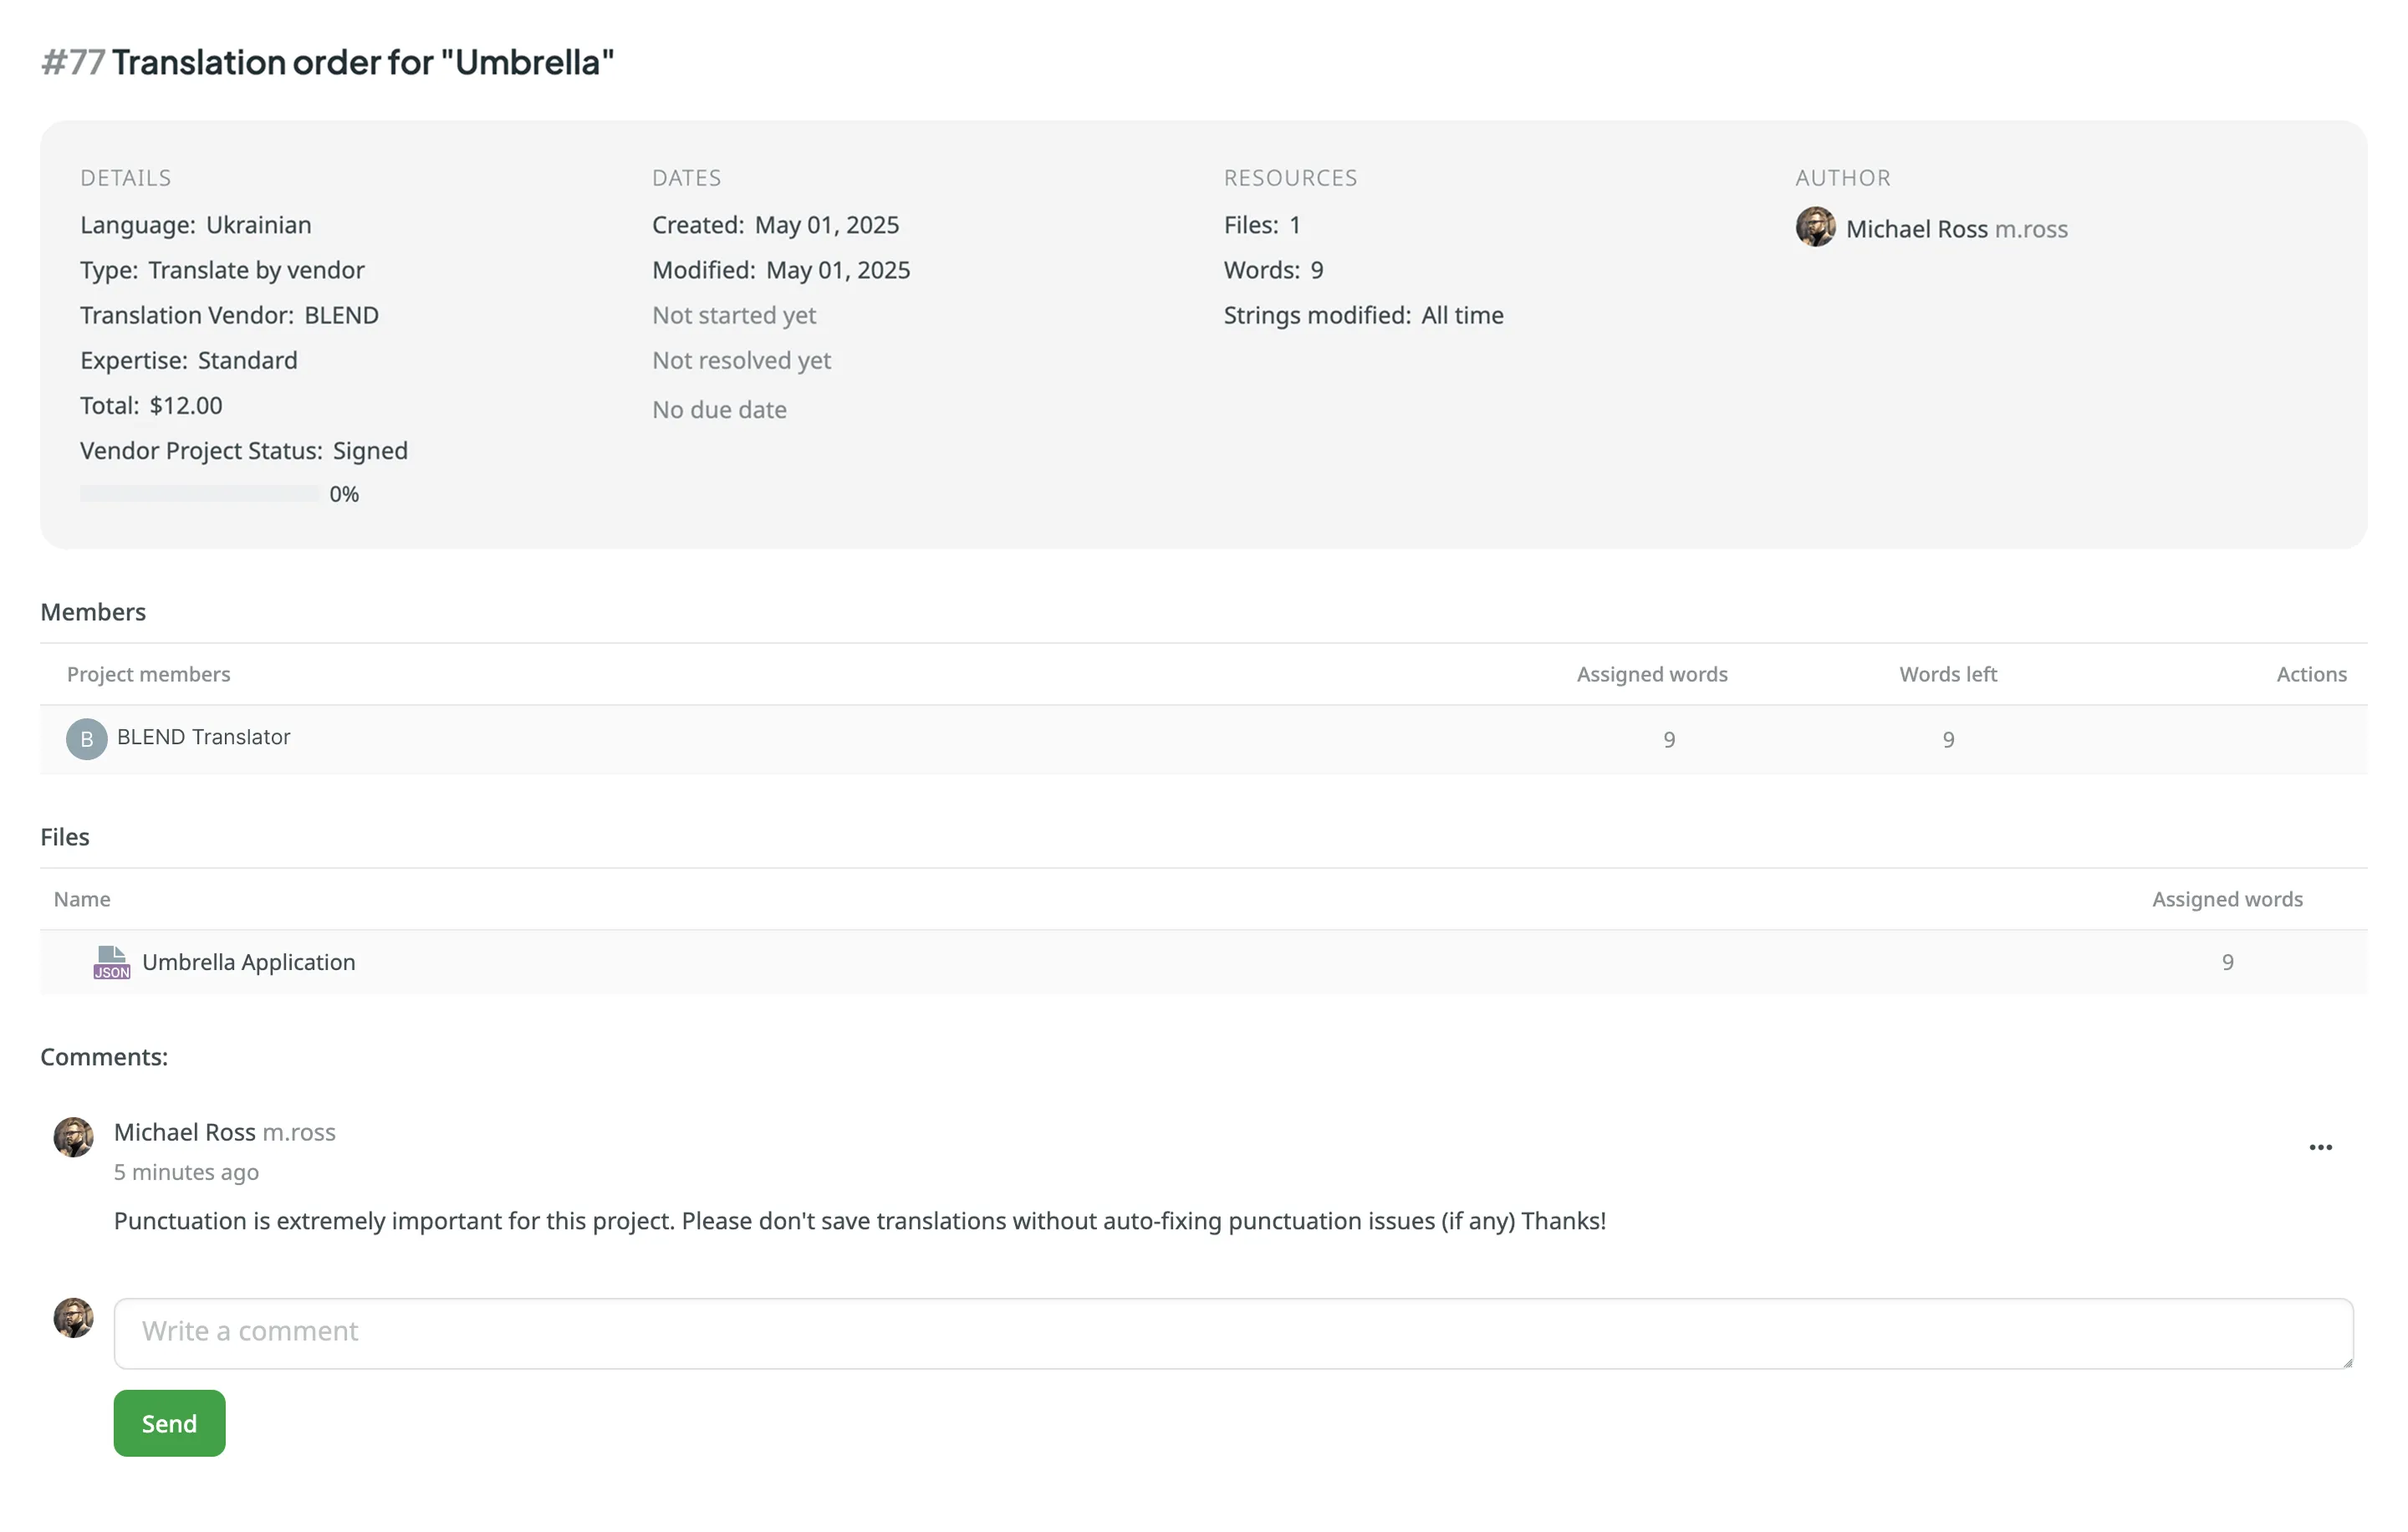
Comments are synchronized with BLEND so that a translator can see them in the *Customer Discussion* section and reply if needed. Translator messages left in the *Customer Discussion* section in the BLEND project are also automatically sent to Crowdin and shown in the *Comments* section inside the Crowdin task.
## [Managing BLEND Integration](#managing-blend-integration)
[Section titled “Managing BLEND Integration”](#managing-blend-integration)
Access integration by opening **Account Settings** and going to the **Vendors** tab. You can **Switch Account** or **Disconnect Account** if necessary.
Note
Only the project owner can connect, switch and disconnect the BLEND account. If you disable BLEND integration or switch to another BLEND account, the existing tasks (if any) will remain synchronized.
## [See Also](#see-also)
[Section titled “See Also”](#see-also)
[Tasks ](/tasks/)Create and assign tasks for translating or proofreading content.
[Ordering Professional Translations ](/ordering-professional-translations/)Order professional translations from vendors directly in Crowdin.
# Target File Bundles
> Export sets of strings or files in any format you select
Target file bundles (or simply Bundles) allow you to export sets of strings or files in the formats you select, regardless of the original file format. By default, you can choose from the following three formats: XLIFF, Android XML, and iOS Strings. You can add more target file formats by installing respective applications from the Crowdin [Store](https://store.crowdin.com/tags/string-exporter).
You can work with bundles in several ways:
* Manage bundles manually via the project’s **Downloads** section.
* Connect a VCS integration in **Target file bundles mode**.
* Manage bundles using **CDN Distributions**.
* Manage bundles using Crowdin CLI and API.
## [Use Cases](#use-cases)
[Section titled “Use Cases”](#use-cases)
The most common use cases include:
* **Cross-Platform Export:** Upload a single source file (e.g., Android XML), translate it, and export translations for multiple platforms (e.g., iOS Strings for iOS, JSON for Web) using bundles.
* **Unified Source Management:** Upload a unified spreadsheet (e.g., XLSX or CSV) with source strings for all platforms. Use bundles to export separate files for each platform by filtering strings based on labels or paths.
* **Design Tools Integration:** Send strings from design tools (Figma, Sketch, Adobe XD) directly to Crowdin and export translations in development-ready formats using bundles.
* **Offline Translation:** Export specific string sets in XLIFF format for offline translation and [upload finished translations](/offline-translation/#uploading-translations) back to Crowdin.
[Custom Bundle Generator ](https://store.crowdin.com/custom-bundle-generator)The app allows you to generate resource files from translated Crowdin strings.
[Custom Bundle Builder ](https://store.crowdin.com/custom-export)Create your own script to build files from bundles.
## [Managing Bundles in UI](#managing-bundles-in-ui)
[Section titled “Managing Bundles in UI”](#managing-bundles-in-ui)
To work with bundles manually, you can configure and download them from the **Downloads** section of your project.
### [Configuring Bundles](#configuring-bundles)
[Section titled “Configuring Bundles”](#configuring-bundles)
To configure a bundle, follow these steps:
* File-based project
1. Open your project and go to the **Translations** tab.
2. Expand the **Downloads** section and click **Add**.
3. In the **Create bundle** dialog, enter a **Bundle name**.
4. Configure the **Content** (Left Panel):
* **Select files/directories**: Browse your project tree. You can select specific files, folders, or the **Root folder** to include the entire project. Select **Include new files added to selected folders** to automatically include future files.
* **Use pattern (Advanced)**: Define a **Source files path** pattern (e.g., `*.xml`) to dynamically include files. You can also specify **Ignore files or folders** to exclude specific items.
5. *(Optional)* Set **String filters**:
* **Include labels**: Only export strings containing specific labels.
* **Exclude labels**: Skip strings containing specific labels.
* You can adjust the logic for multiple labels (e.g., *All selected labels* (AND) vs *Any selected label* (OR)).
6. Configure **Languages**:
* **All target languages**: Selected by default. This option is dynamic and will automatically include any new languages added to the project in the future.
* **Source language**: Select to include the source language content in the bundle.
* **In-context pseudo-language**: Select to export your files with the metadata required for the [In-Context](/developer/in-context-localization/) integration.
* **Specific languages**: Remove the *All target languages* chip to select specific languages manually.
7. Configure **Target files** (Right Panel):
* **File format**: Select the format you want to export. You can select **Original format** to export files as-is, or choose a target format like iOS Strings, XLIFF, etc.
* **Add more formats**: To add other target formats, install the respective applications from the [Crowdin Store](https://store.crowdin.com/tags/string-exporter).
* *(Optional)* **Format configuration**: Some formats (e.g., XLIFF, Android XML) support advanced options configured in **[Settings > Parser configuration](#configuring-format-settings)**.
* **Export pattern**:
* **For Original format**: This field is optional. Leave it empty to use the default export pattern defined in your file settings. Enter a pattern to override the default path or name.
* **For other formats**: This field is required.
* *Single file per language*: Use language placeholders (e.g., `%two_letters_code%.xliff`) to create one translation file for each language.
* *Multi-file export*: Use placeholders like `%file_name%` or `%original_path%` to export translations separated by files, matching the source file structure.
* *(Optional)* Set a **Source language export pattern**.
8. Check the **Preview** panel to ensure the structure looks correct.
9. Click **Save**. 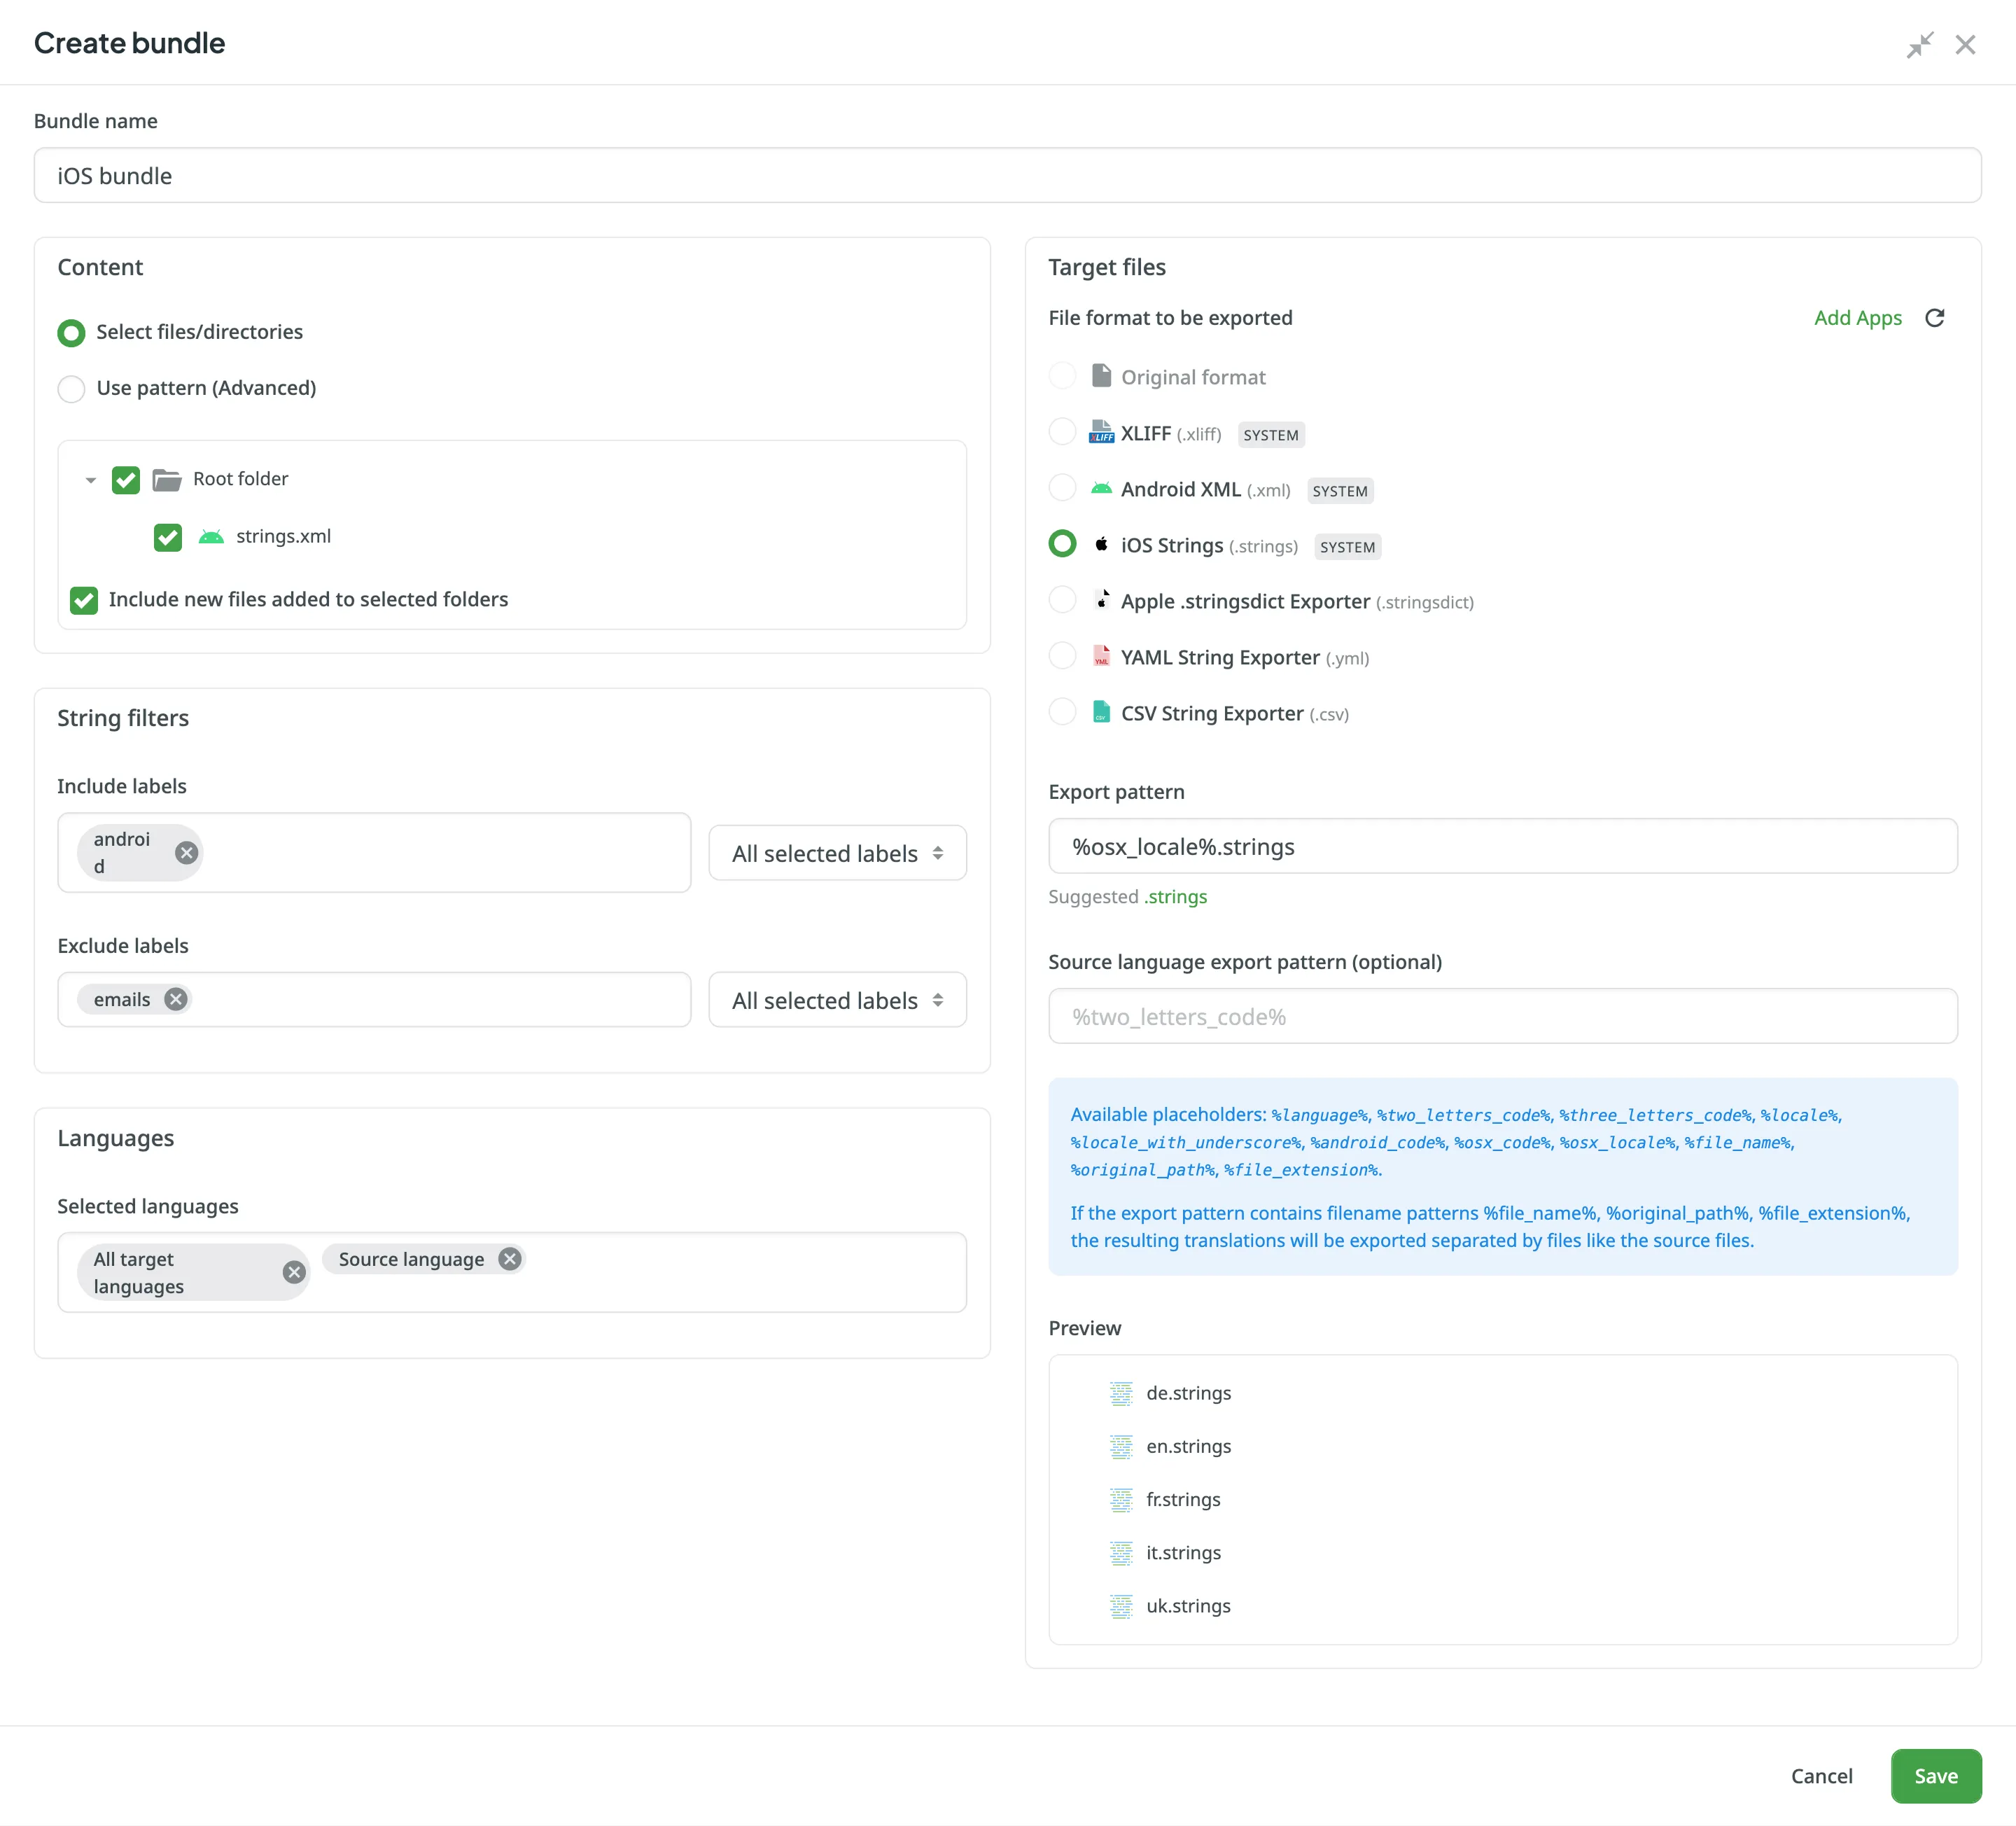
* String-based project
1. Open your project and go to the **Download** tab.
2. Expand the **Downloads** section and click **Add**.
3. In the **Create bundle** dialog, enter a **Bundle name**.
4. Configure the **Content** (Left Panel):
* **Select branches**: Select specific source branches to include. Select **Include new branches** to automatically include future branches.
* **Use pattern (Advanced)**: Define a **Source branches path** pattern (e.g., `main`, `feat/*`) to dynamically include branches.
5. *(Optional)* Set **String filters**:
* **Include labels**: Only export strings containing specific labels.
* **Exclude labels**: Skip strings containing specific labels.
* You can adjust the logic for multiple labels (e.g., *All selected labels* (AND) vs *Any selected label* (OR)).
Read more about [Labels](/string-management/#labels).
6. Configure **Languages**:
* **All target languages**: Selected by default. This option is dynamic and will automatically include any new languages added to the project in the future.
* **Source language**: Select to include the source language content in the bundle.
* **In-context pseudo-language**: Select to export your files with the metadata required for the [In-Context](/developer/in-context-localization/) integration.
* **Specific languages**: Remove the *All target languages* chip to select specific languages manually.
7. Configure **Target files** (Right Panel):
* **File format**: Select the format you want to export (e.g., Android XML, iOS Strings).
* **Add more formats**: To add other target formats, install the respective applications from the [Crowdin Store](https://store.crowdin.com/tags/string-exporter).
* *(Optional)* **Format configuration**: Some formats (e.g., XLIFF, Android XML) support advanced options configured in **[Settings > Parser configuration](#configuring-format-settings)**.
* **Export pattern**: Define the resulting file name using language placeholders (e.g., `%two_letters_code%.strings`). This will create one file per language.
* *(Optional)* Set a **Source language export pattern**.
8. Check the **Preview** panel to ensure the structure looks correct.
9. Click **Save**. 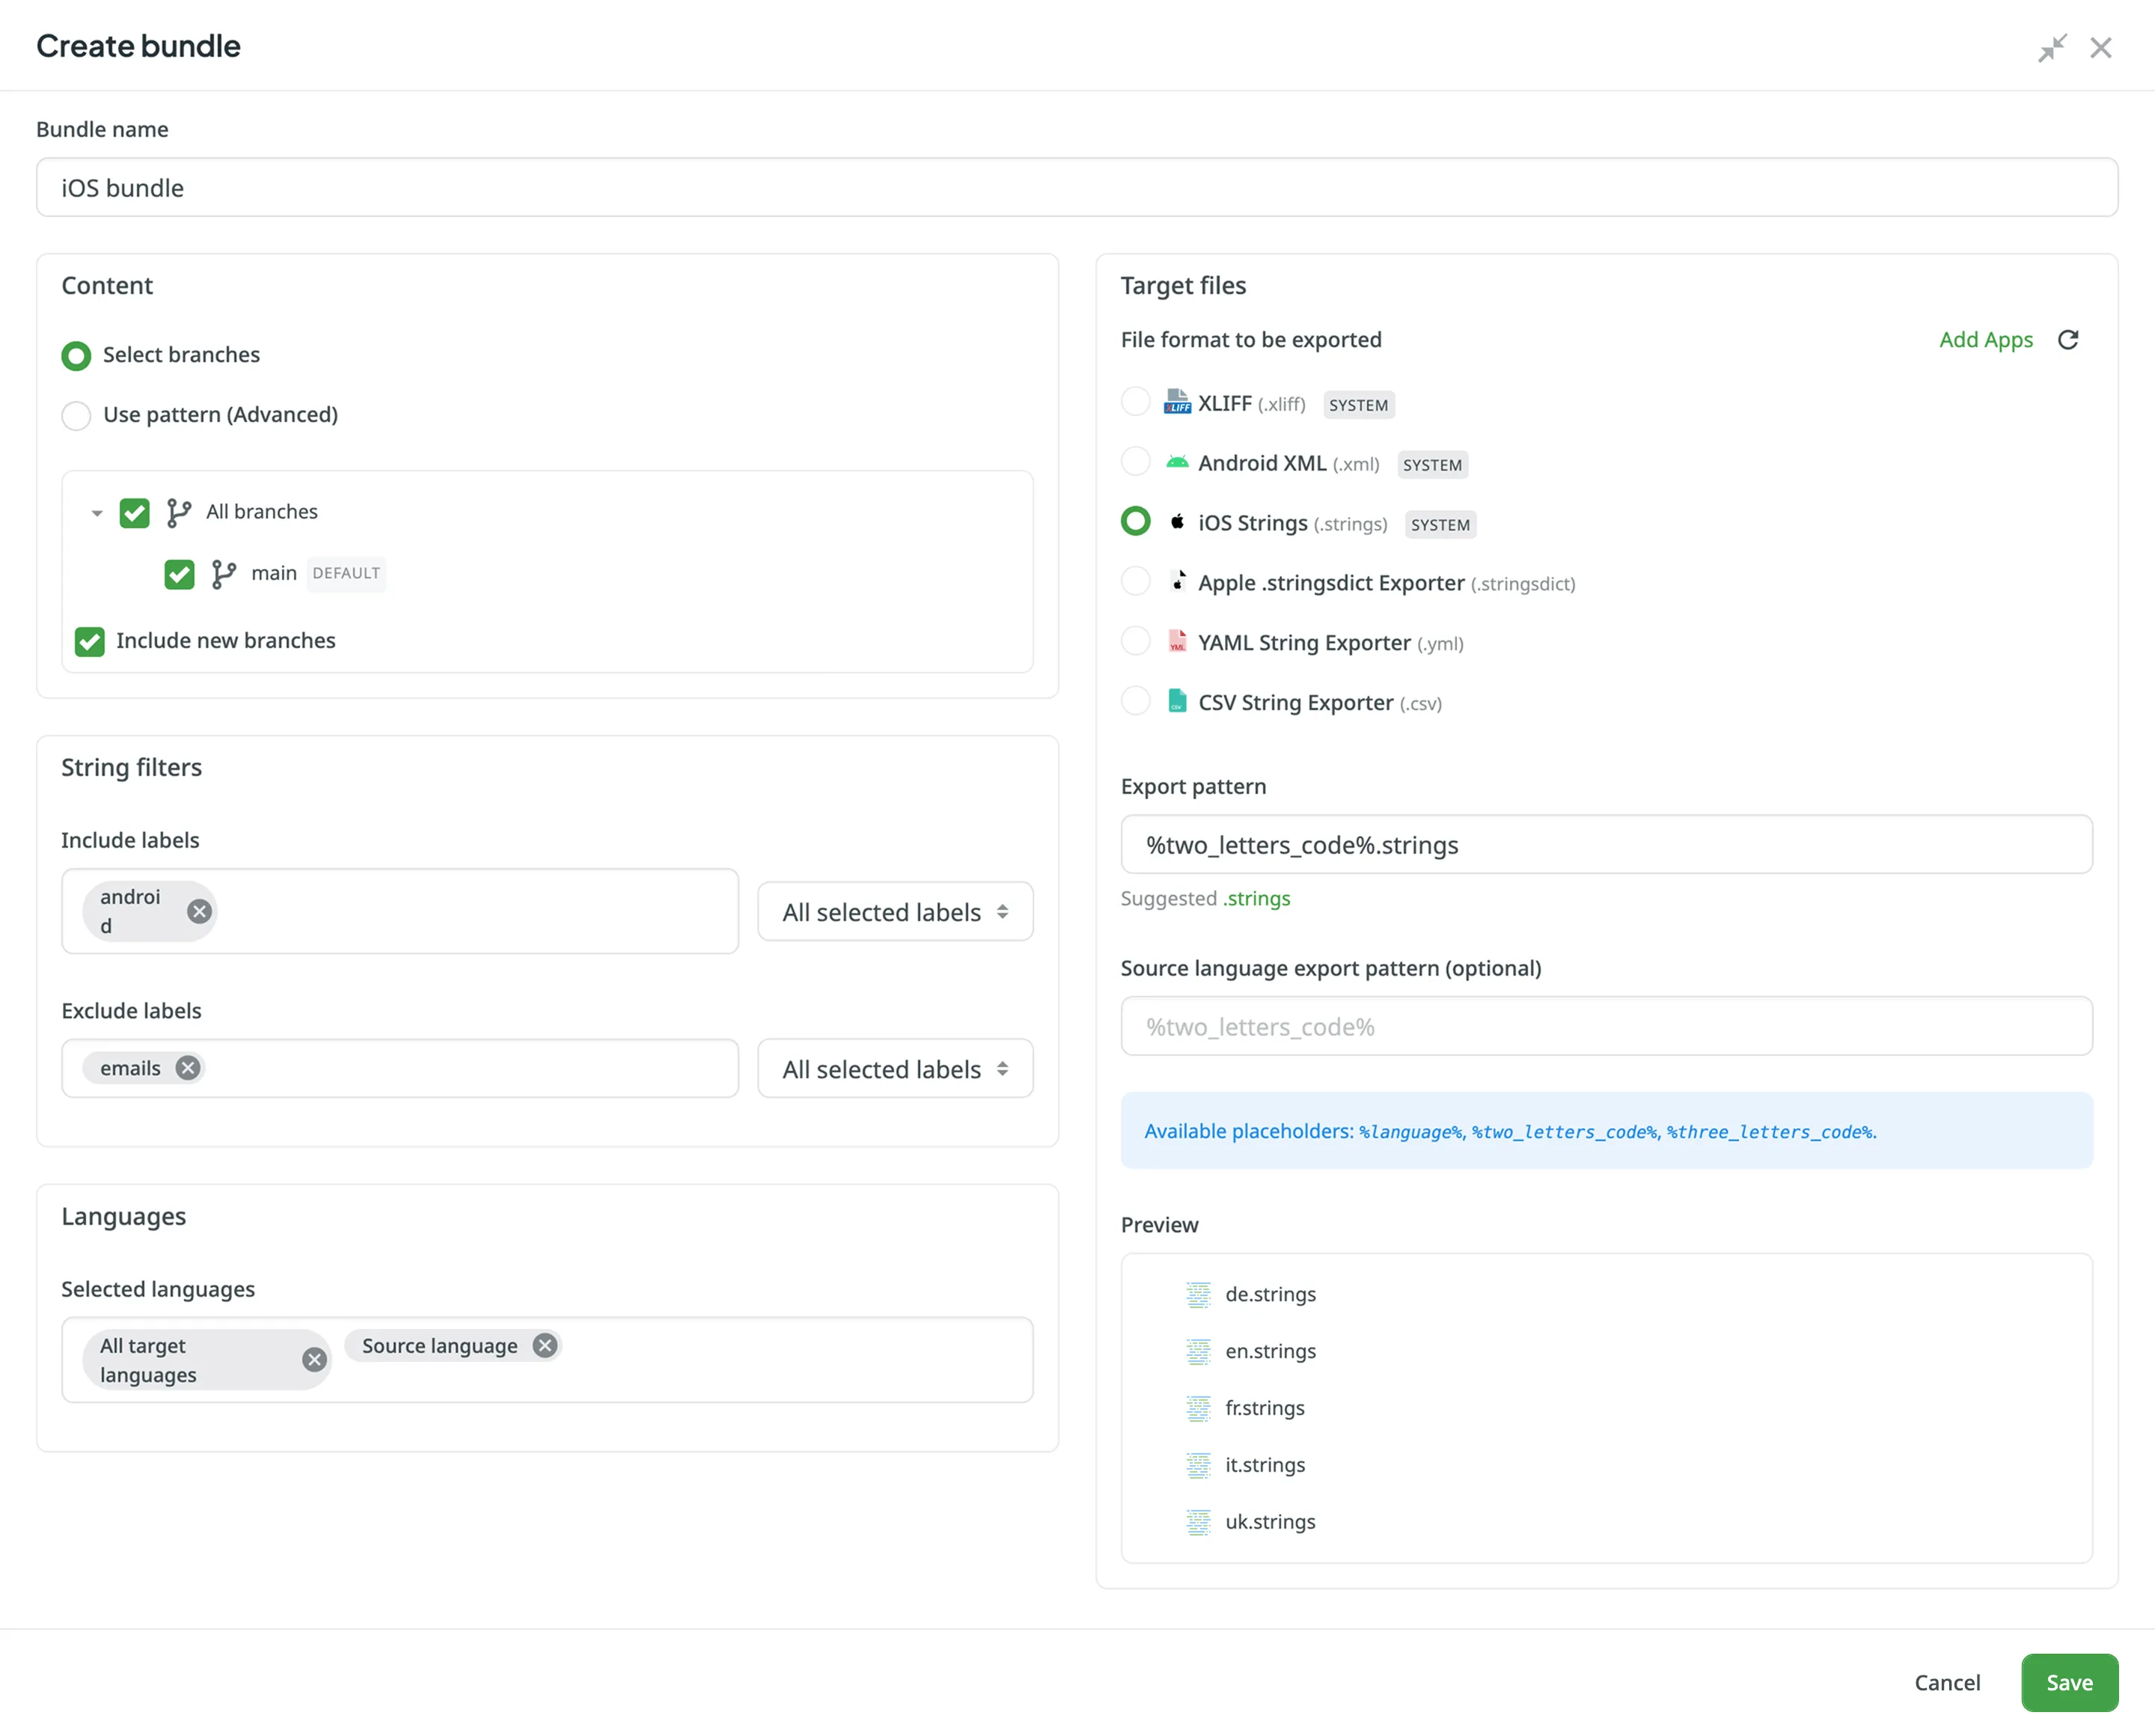
Limitations
* **Single Format Selection:** You can select only one format at once within a single bundle.
* **Original Format Constraints:** If you select **Original format**, the **String filters** (Include/Exclude labels) will be disabled. To filter content by labels, you must select a specific target format (e.g., Android XML, iOS Strings).
### [Configuring Format Settings](#configuring-format-settings)
[Section titled “Configuring Format Settings”](#configuring-format-settings)
Some file formats (e.g., XLIFF, Android XML) have additional configuration options, such as **Copy source to empty target** or **Convert placeholders**.
You can manage these settings globally for the project in the **Parser configuration**.
To configure these options, follow these steps:
1. Open your project and go to **Settings > Parser configuration**.
2. Locate the format marked with the **Exporter** badge (e.g., **Android XML** or **XLIFF**). These are the specific formats used for bundle generation.
3. Click next to the format you want to configure and select **Edit**. Alternatively, just double-click on the needed format.
4. Adjust the file format exporter settings by selecting the needed options.
5. Click **Save**.
### [Searching, Filtering, and Sorting Bundles](#searching-filtering-and-sorting-bundles)
[Section titled “Searching, Filtering, and Sorting Bundles”](#searching-filtering-and-sorting-bundles)
By default, all bundles are displayed in the **Downloads** section. To find a specific bundle, you can use the **Search bundles** field.
To filter the list of bundles, click **Filters** and use the available options:
* **Format**: Filter by file format (**All**, **Original format**, or specific target formats like **macosx**, **xml**, etc.).
* **Last modified**: Filter by modification date (**All**, **Today**, **Yesterday**, **Last 7 days**, **Last 30 days**, **This month**, **Last month**, **Custom Range**).
To sort bundles, click the column header you want to sort by:
* **Bundle name**
* **Format**
* **Last modified**
Click once to sort in ascending order and click again to sort in descending order.
If a bundle is used in one or more [CDN Distributions](#bundles-in-cdn-distributions), a **cloud** icon will appear next to its name. Click this icon to automatically navigate to the **CDN Distributions** section with a filter applied to show only the distributions containing that bundle.
### [Downloading Bundles](#downloading-bundles)
[Section titled “Downloading Bundles”](#downloading-bundles)
To download bundles, follow these steps:
* File-based project
1. Open your project and go to the **Translations** tab.
2. Expand the **Downloads** section.
3. *(Optional)* Use the search or filters to locate the bundles you need.
4. Download the bundles using one of the following methods:
* **Single bundle**: Click **Download** next to the specific bundle.
* **Multiple bundles**: Select the checkboxes next to the bundles you want to download, then click **Download** in the upper-right corner of the list. 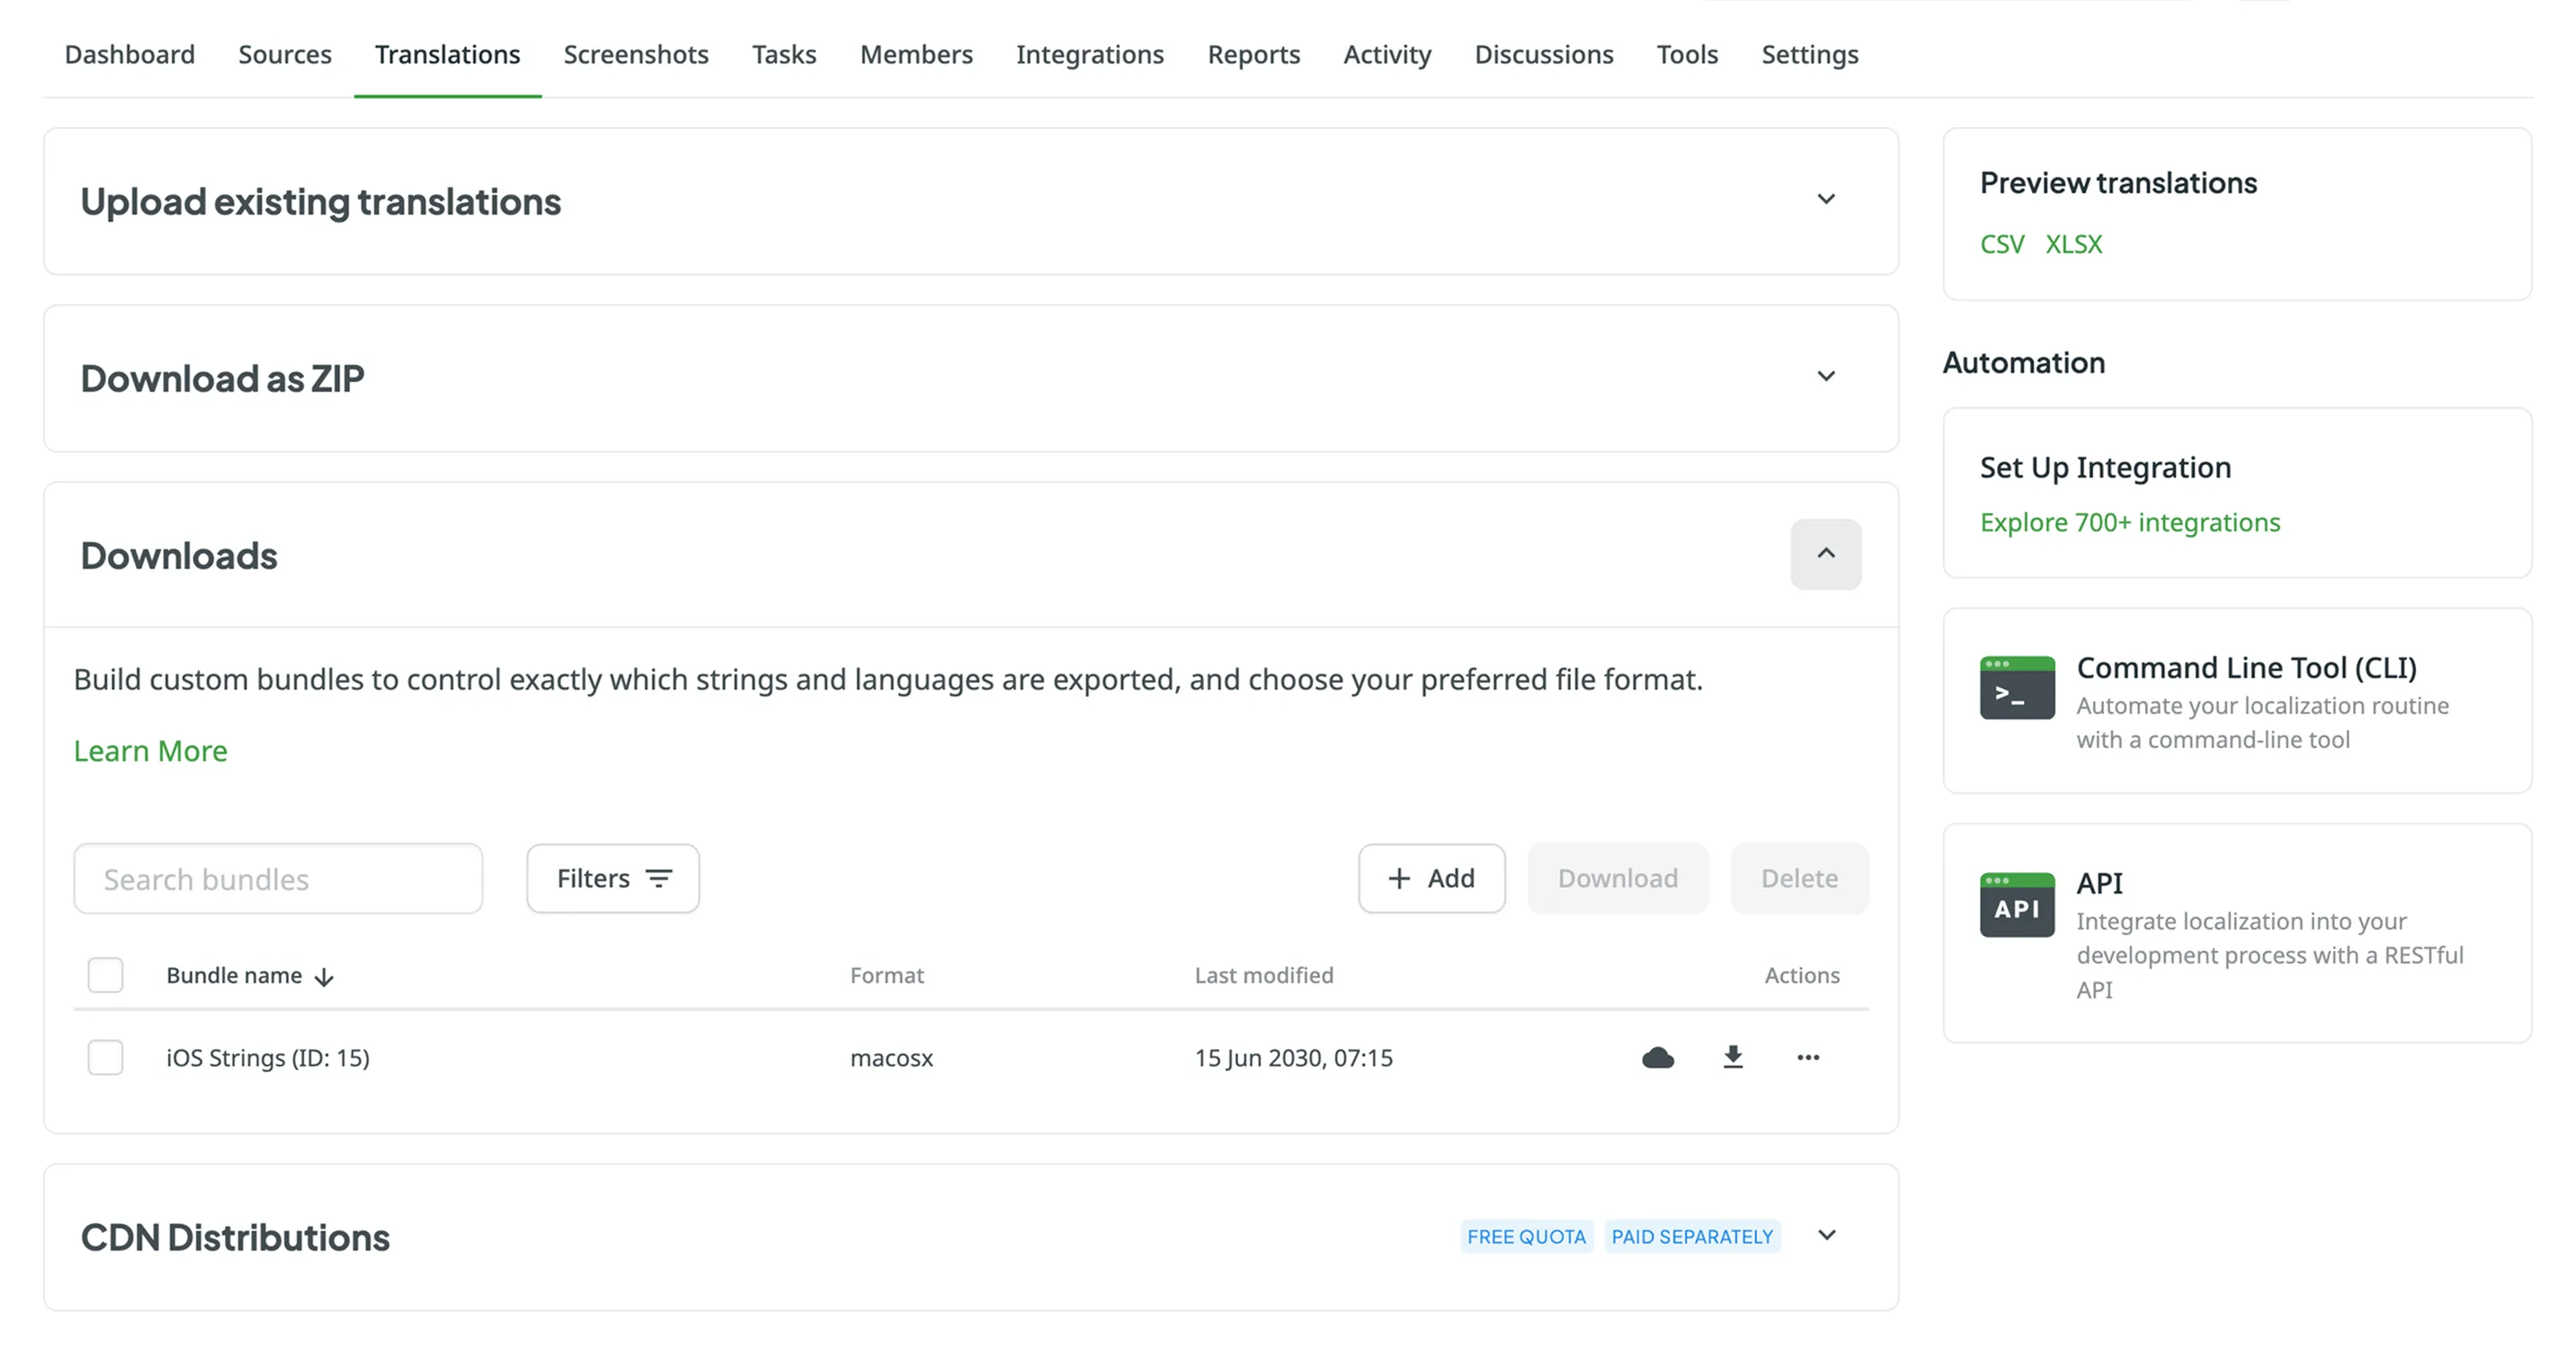
* String-based project
1. Open your project and go to the **Download** tab.
2. Expand the **Downloads** section.
3. *(Optional)* Use the search or filters to locate the bundles you need.
4. Download the bundles using one of the following methods:
* **Single bundle**: Click **Download** next to the specific bundle.
* **Multiple bundles**: Select the checkboxes next to the bundles you want to download, then click **Download** in the upper-right corner of the list. 
The system will build and download a ZIP archive containing folders for each selected language with the translation files in your chosen format.
Note
Bundle downloads work independently of the full project build download.
### [Editing Bundles](#editing-bundles)
[Section titled “Editing Bundles”](#editing-bundles)
To edit a bundle, follow these steps:
* File-based project
1. Open your project and go to the **Translations** tab.
2. Expand the **Downloads** section.
3. Click next to the bundle and select **Edit**. Alternatively, just double-click on the needed bundle.
4. Make your changes in the configuration dialog and click **Save**.
* String-based project
1. Open your project and go to the **Download** tab.
2. Expand the **Downloads** section.
3. Click next to the bundle and select **Edit**. Alternatively, just double-click on the needed bundle.
4. Make your changes in the configuration dialog and click **Save**.
### [Deleting Bundles](#deleting-bundles)
[Section titled “Deleting Bundles”](#deleting-bundles)
To delete bundles, follow these steps:
* File-based project
1. Open your project and go to the **Translations** tab.
2. Expand the **Downloads** section.
3. Delete the bundles using one of the following methods:
* **Single bundle**: Click next to the bundle and select **Delete**.
* **Multiple bundles**: Select the checkboxes next to the bundles you want to delete, then click **Delete** in the upper-right corner of the list.
4. Confirm the deletion in the confirmation dialog.
* String-based project
1. Open your project and go to the **Download** tab.
2. Expand the **Downloads** section.
3. Delete the bundles using one of the following methods:
* **Single bundle**: Click next to the bundle and select **Delete**.
* **Multiple bundles**: Select the checkboxes next to the bundles you want to delete, then click **Delete** in the upper-right corner of the list.
4. Confirm the deletion in the confirmation dialog.
## [Bundles in VCS Integrations](#bundles-in-vcs-integrations)
[Section titled “Bundles in VCS Integrations”](#bundles-in-vcs-integrations)
In file-based projects, VCS integrations allow you to work with bundles using **Target file bundles mode**.
To configure a VCS integration in **Target file bundles mode**, follow these steps:
1. Select **Target file bundles mode** when setting up your VCS integration and authorize the connection.
2. Select the repository and branches where you want to send translations.
3. Click to configure the selected branch.
4. In the **Branch Configuration** dialog, enter the preferred name for your configuration file or keep the default. Click **Continue**.
5. Select the bundles you want to sync from the list. You can use the **Search bundles** field to find specific ones, or click **Create new** to set up a new bundle.
6. Click **Save** in the **Branch Configuration** dialog.
7. Click **Save** in the main integration dialog to complete the VCS integration setup. 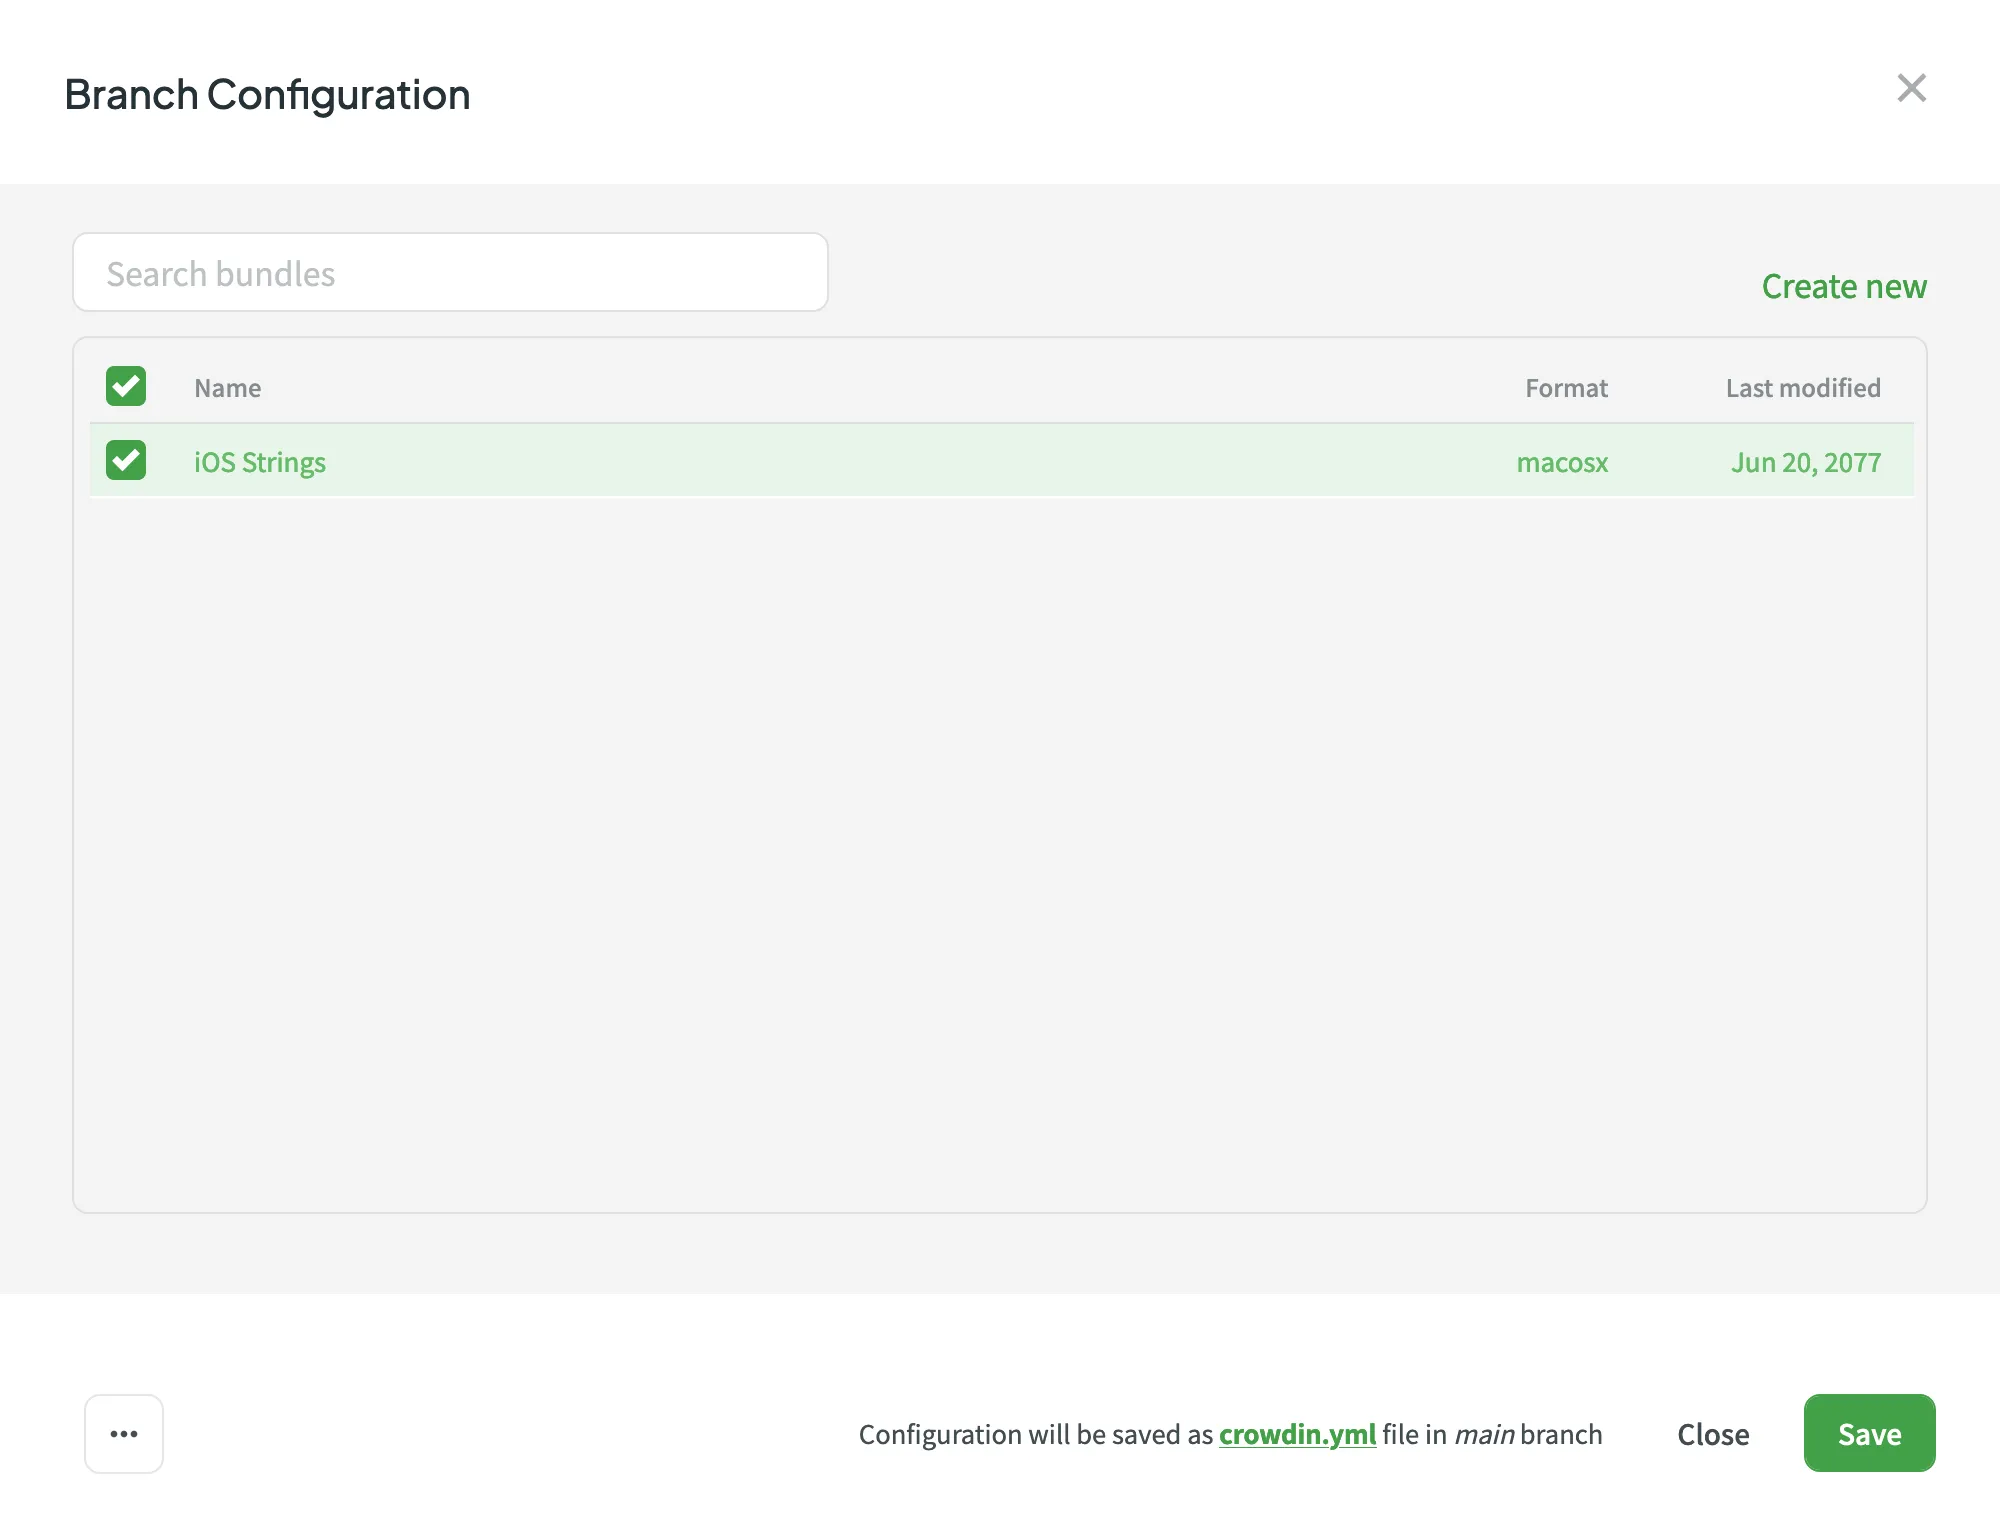
Caution
In string-based projects, VCS integrations exclusively operate in **Target file bundles mode**.
Read more about [configuring VCS integrations online](/configuring-vcs-integrations-online/).
## [Bundles in CDN Distributions](#bundles-in-cdn-distributions)
[Section titled “Bundles in CDN Distributions”](#bundles-in-cdn-distributions)
In both file-based and string-based projects, **CDN Distributions** allow you to deliver translated content to your application via a Content Delivery Network (CDN). Distributions work by using bundles to package and serve your files.
[Configuring CDN Distributions ](/cdn-distributions/)Learn how to create distributions, manage releases, and check usage statistics.
## [Bundles in CLI/API](#bundles-in-cliapi)
[Section titled “Bundles in CLI/API”](#bundles-in-cliapi)
You can also export translations using bundles when working with Crowdin CLI and API.
[Bundles in CLI ](https://crowdin.github.io/crowdin-cli/commands/crowdin-bundle/)
[Bundles in API ](/developer/api/v2/#tag/Bundles)
# CDN Distributions
> Deliver translated content to your app instantly via CDN
CDN Distributions allow you to instantly update sources and translations in your mobile, server, desktop, or web apps with a single click without preparing a new release.
## [How It Works](#how-it-works)
[Section titled “How It Works”](#how-it-works)
The following illustrations provide a visual representation of how source and translation content delivery works for different types of applications.
* Mobile, Server and Desktop Apps

* Web Apps
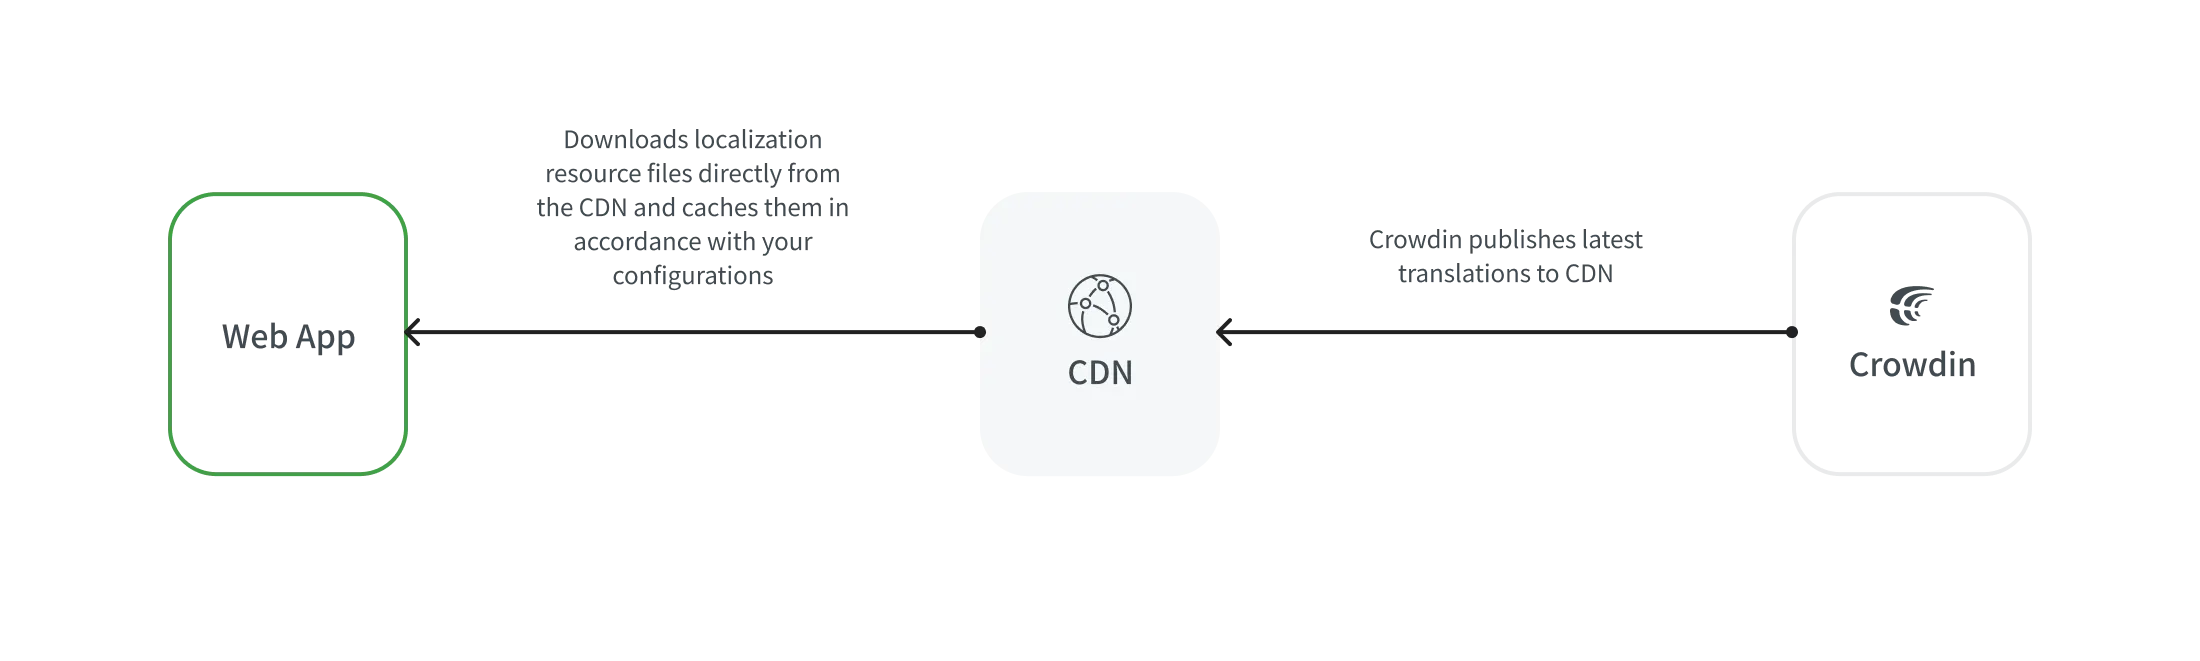
## [Distribution Setup](#distribution-setup)
[Section titled “Distribution Setup”](#distribution-setup)
A distribution is a CDN vault that mirrors your project’s translated content and is required for integration with your apps. Distributions work by using [Bundles](/bundles/) to package and serve your files.
To configure a distribution, follow these steps:
* File-based project
1. Open your project and go to the **Translations** tab.
2. Expand the **CDN Distributions** section.
3. Click **Add**.
4. In the **Add distribution** dialog, enter the preferred name for your distribution.
5. Select the bundles you want to include in this distribution or click **Add bundle** to create one from scratch. You can use the **Search bundles** field to quickly find specific bundles by name.
6. Click **Create**.
7. Copy the **Distribution Hash** and **Distribution Manifest**. The manifest is a JSON file containing key distribution details (e.g., files, languages, paths) that can be used in your integration.
* String-based project
1. Open your project and go to the **Download** tab.
2. Expand the **CDN Distributions** section.
3. Click **Add**.
4. In the **Add distribution** dialog, enter the preferred name for your distribution.
5. Select the bundles you want to include in this distribution or click **Add bundle** to create one from scratch. You can use the **Search bundles** field to quickly find specific bundles by name.
6. Click **Create**.
7. Copy the **Distribution Hash** and **Distribution Manifest**. The manifest is a JSON file containing key distribution details (e.g., files, languages, paths) that can be used in your integration.
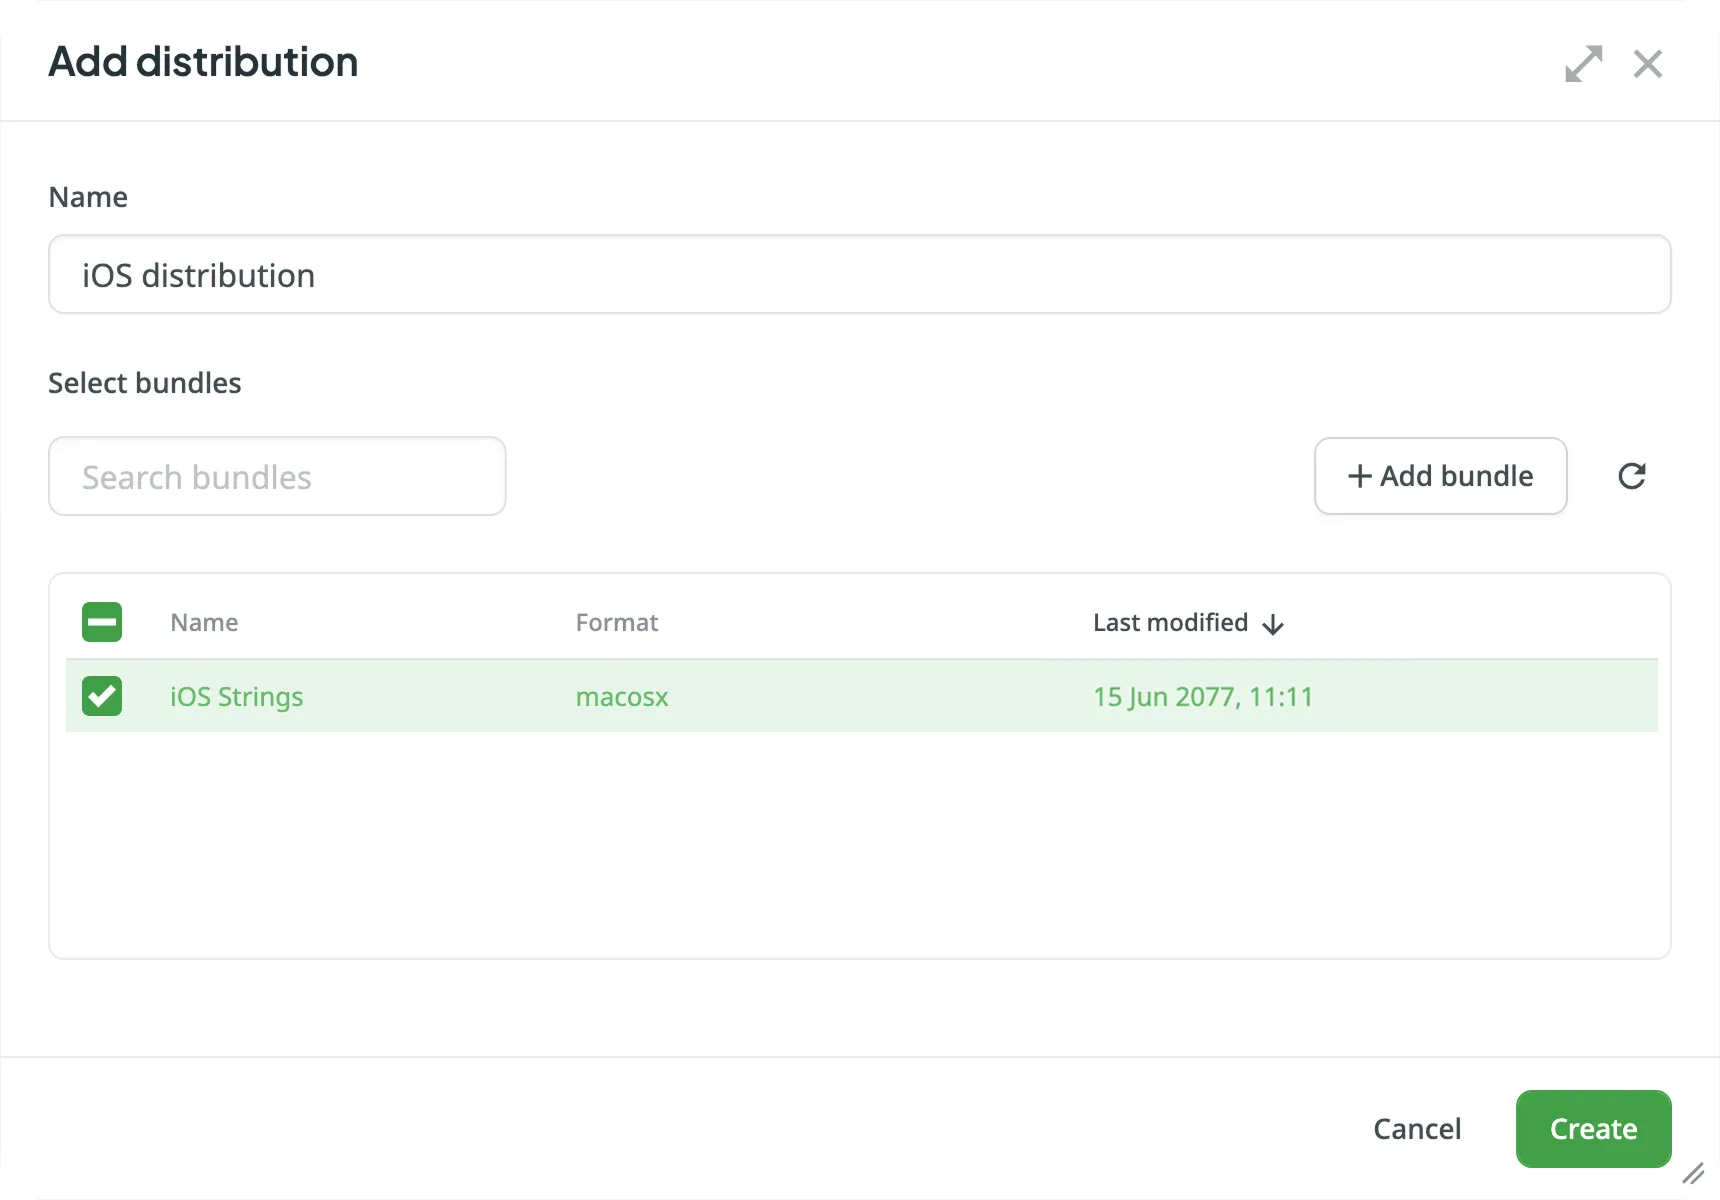
Note
The CDN caches all the translations in release for up to 1 hour, so even after new translations are released in Crowdin, the CDN may return them with a delay.
## [For Mobile Applications](#for-mobile-applications)
[Section titled “For Mobile Applications”](#for-mobile-applications)
To send the translated content to your mobile apps via CDN Distributions, use the Crowdin SDKs.
[iOS SDK ](https://crowdin.github.io/mobile-sdk-ios/)
[Android SDK ](https://crowdin.github.io/mobile-sdk-android/)
[Flutter SDK ](https://store.crowdin.com/flutter)
[React Native SDK ](https://store.crowdin.com/react-native-sdk)
## [For Web Applications](#for-web-applications)
[Section titled “For Web Applications”](#for-web-applications)
To send the translated content to your web apps via CDN Distributions, use the Crowdin OTA JavaScript client.
Read more about the [Crowdin OTA JavaScript client](https://crowdin.github.io/ota-client-js/).
To manage the translated content delivery to your web apps manually, you can either:
* Use the **Distribution Manifest URL**, which displays a JSON file containing distribution details (files, languages, etc.), or
* Form each file URL with the **distribution hash**, as shown below.
Form the URL to the translation file as follows:
```shell
https://distributions.crowdin.net/{distribution_hash}/content/{path_to_file}
```
`{path_to_file}` will match the path used in your regular translation build. If your files don’t have export patterns including language code placeholders (e.g., `%locale%`, `%two_letters_code%`, etc.), Crowdin automatically adds the Crowdin language code at the beginning of the path.
To see all available files and languages for your distribution, copy the Distribution Manifest URL (provided in the Crowdin UI) and open it in your browser.
You’ll see a JSON structure like:
```json
{
"files": ["/crowdin_sample_android.xml"],
"languages": ["fr","de","uk"],
"language_mapping": [],
"custom_languages": [],
"timestamp": 1234567890,
"content": {
"fr": ["/content/fr/crowdin_sample_android.xml"],
"de": ["/content/de/crowdin_sample_android.xml"],
"uk": ["/content/uk/crowdin_sample_android.xml"]
},
"mapping": ["/mapping/en/crowdin_sample_android.xml"]
}
```
This JSON includes the exact paths to use with the distribution.
## [Pricing](#pricing)
[Section titled “Pricing”](#pricing)
| **Pricing Component** | **Free Quota** | **Price** |
| --------------------- | -------------- | ---------- |
| Request Count | 1M/month | $3.00/1M |
| Data Transfer | 10GB/month | $2.00/10GB |
A request is considered any single query to a CDN (e.g., a request to a distribution manifest, a request to a distribution file, etc.).
Data transfer is the amount of data transferred over the network (including headers). The system delivers your language packages via CDN, containing all the existing translations.
If the distribution contains content divided into multiple files, a request to download each file is counted as a separate request. Additionally, the volume of files is also counted as a data transfer.
For example, if a distribution contains 20 files, each of which is 5MB, the download is counted as 20 requests and 100MB of data transfer.
To reduce requests to the CDN, you can put all the necessary content into one file (using Bundles), and when it is downloaded, the system counts one request instead of 20 separate ones. Additionally, caching configuration can be made on the app’s side.
In our statistics, we use data provided by AWS. If 1,000,001 (1 million and 1) requests are made in a month, the price for requests will be $6. If 10GB and 1 byte are transferred in a month, the price for data transfer will be $4. The combined total will be $10 per month for requests and data transfer.
## [Managing Your CDN Usage](#managing-your-cdn-usage)
[Section titled “Managing Your CDN Usage”](#managing-your-cdn-usage)
You can manage your CDN usage price and set up notifications for daily usage limits in the **Account Settings > Billing > CDN Distributions**.
### [CDN Usage Price](#cdn-usage-price)
[Section titled “CDN Usage Price”](#cdn-usage-price)
In the **CDN Distributions** usage section, you can see the total amount spent during the current billing cycle (one month). This includes a detailed breakdown of requests and data transfer with their respective prices. CDN usage fees are included in your primary Crowdin subscription and charged during the next billing cycle.
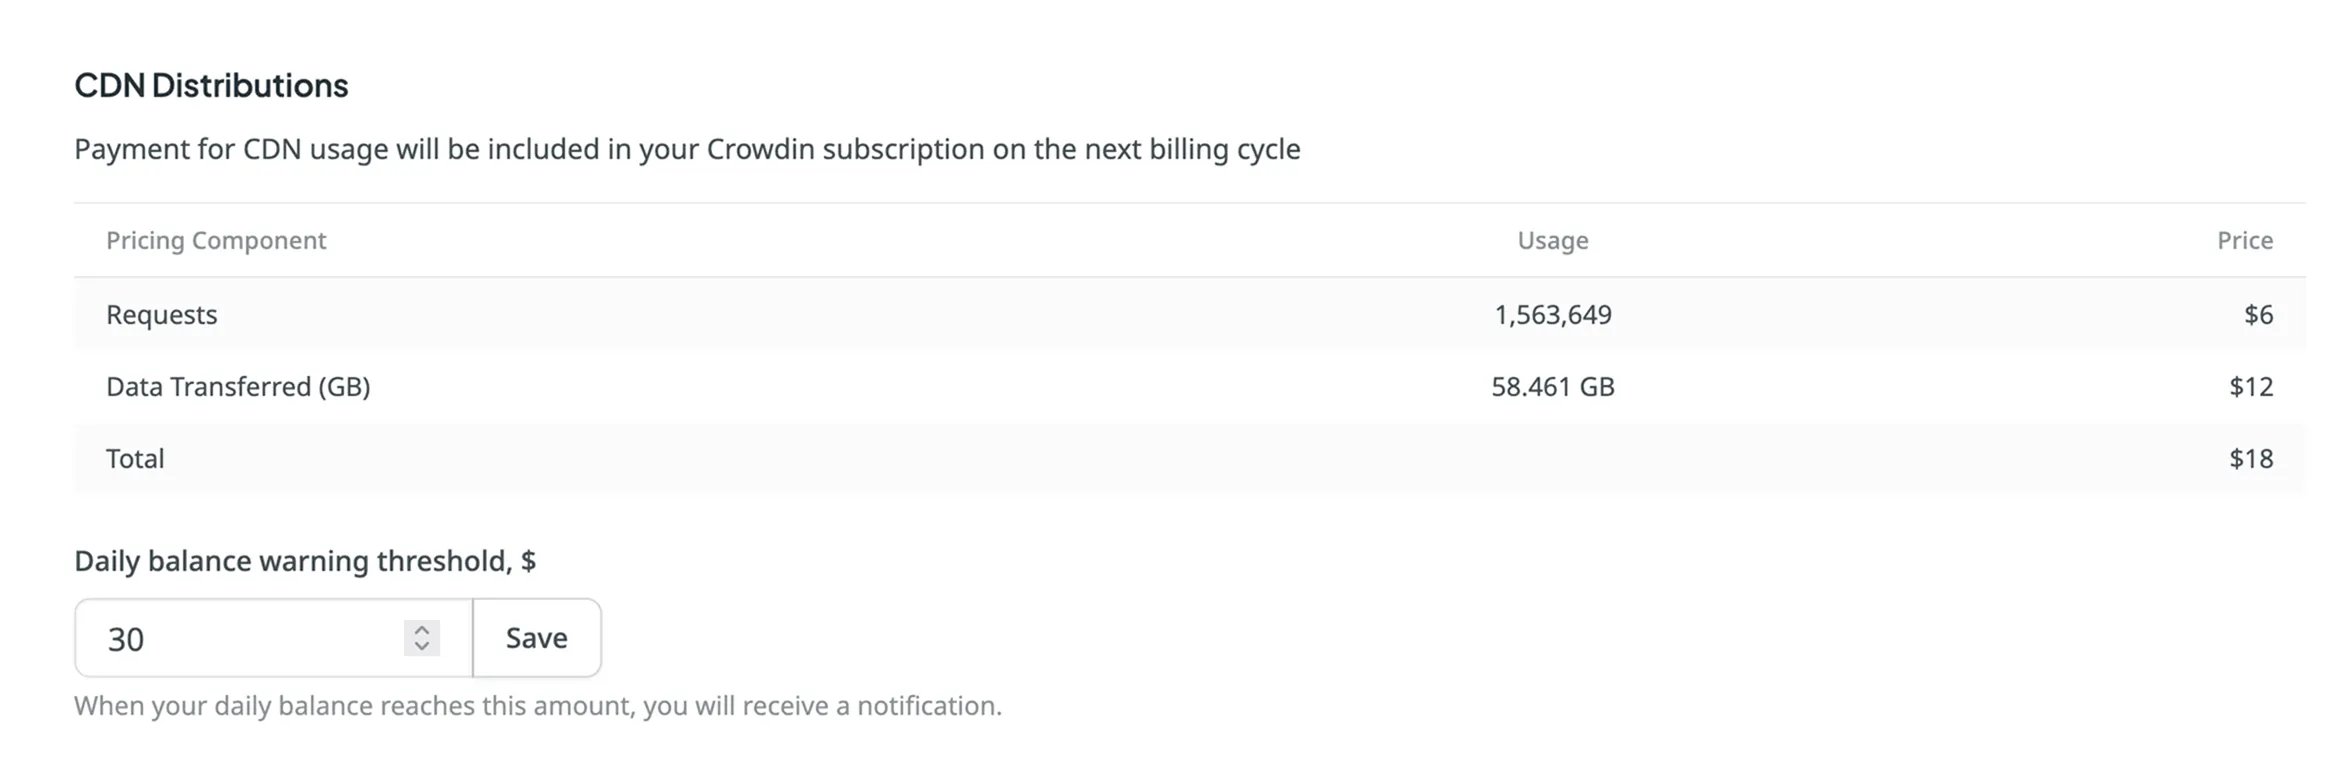
### [Setting Daily Balance Warning Threshold](#setting-daily-balance-warning-threshold)
[Section titled “Setting Daily Balance Warning Threshold”](#setting-daily-balance-warning-threshold)
You can set a daily CDN usage limit, and when this threshold is exceeded, you’ll receive a notification. By default, the limit is set to $30 per day. This feature helps you stay informed of your usage and avoid unexpected overages. You can update the limit anytime. Additionally, if your free quota (1M requests and 10GB of data transfer) is exceeded, a one-time notification will be sent.
To set up usage notifications, follow these steps:
1. Open your **Account Settings** and go to the **Billing** tab.
2. Locate the **CDN Distributions** section.
3. Enter your desired threshold amount in the **Daily balance warning threshold, $** field.
4. Click **Save** to confirm your settings.
### [Usage Statistics](#usage-statistics)
[Section titled “Usage Statistics”](#usage-statistics)
The **Usage Statistics** section provides a visual analysis of your CDN usage via an interactive graph, showing detailed statistics for the month. You can view data for all distributions or focus on specific ones.
The graph displays three lines simultaneously: request quantity, transfer costs, and data transferred. Hover over the data points to see daily totals for each category.
You can also focus on a specific category by hovering over its title under the graph. To hide a certain category from the graph, click on its title.
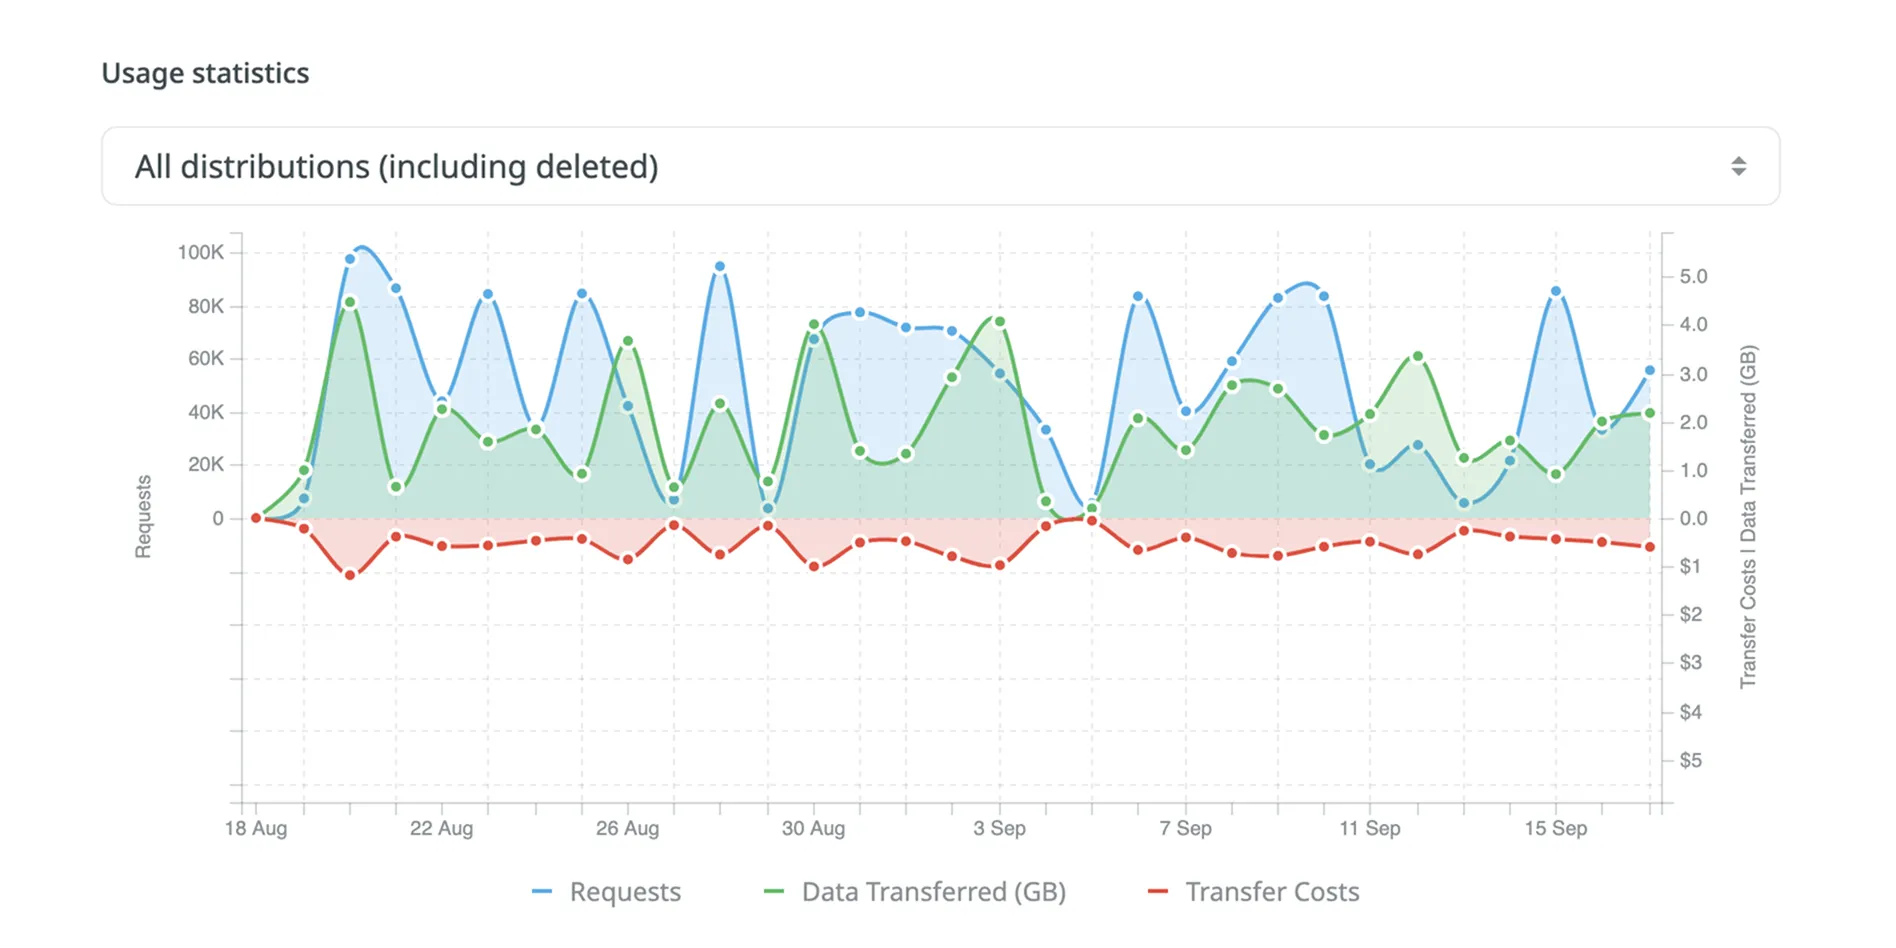
### [Project Statistics](#project-statistics)
[Section titled “Project Statistics”](#project-statistics)
The **Project Statistics** section, located below the graph, provides a detailed breakdown of your CDN usage grouped by project. This table helps you track which projects are consuming the most resources during the selected period.
Each row in the table represents a single project and includes the following information:
* **Project**: The name of the project.
* **Requests**: The total number of requests made by the project.
* **Data Transferred (GB)**: The total data transferred by the project.
* **Price**: The approximate cost for the project’s usage.
Note
The costs shown in the usage graph and project statistics table are estimates. The final billed amount may vary slightly.
# Changing Subscription Plan
> Upgrade or downgrade your subscription plan in Crowdin
You can upgrade or downgrade your subscription plan at any time. Visit the [Pricing page](https://crowdin.com/pricing) to compare available plans and choose the most suitable one.
There are two types of upgrades:
* Within the plan – the customization by adding managers and hosted words within a subscription plan.
* Between the plans – the switch to a different subscription plan.
A similar principle is also applicable to downgrades.

## [Enabling Advanced Features](#enabling-advanced-features)
[Section titled “Enabling Advanced Features”](#enabling-advanced-features)
Depending on your current subscription plan, some features might not be available. In such cases, you might notice the respective message in Crowdin UI informing you that to be able to use the feature, it’s necessary to upgrade to a higher plan.
[View Pricing ](https://crowdin.com/pricing)
For example, if your current subscription plan is Pro, features like Advanced reports and Custom domain name will become available once you upgrade to the Team subscription plan or higher.
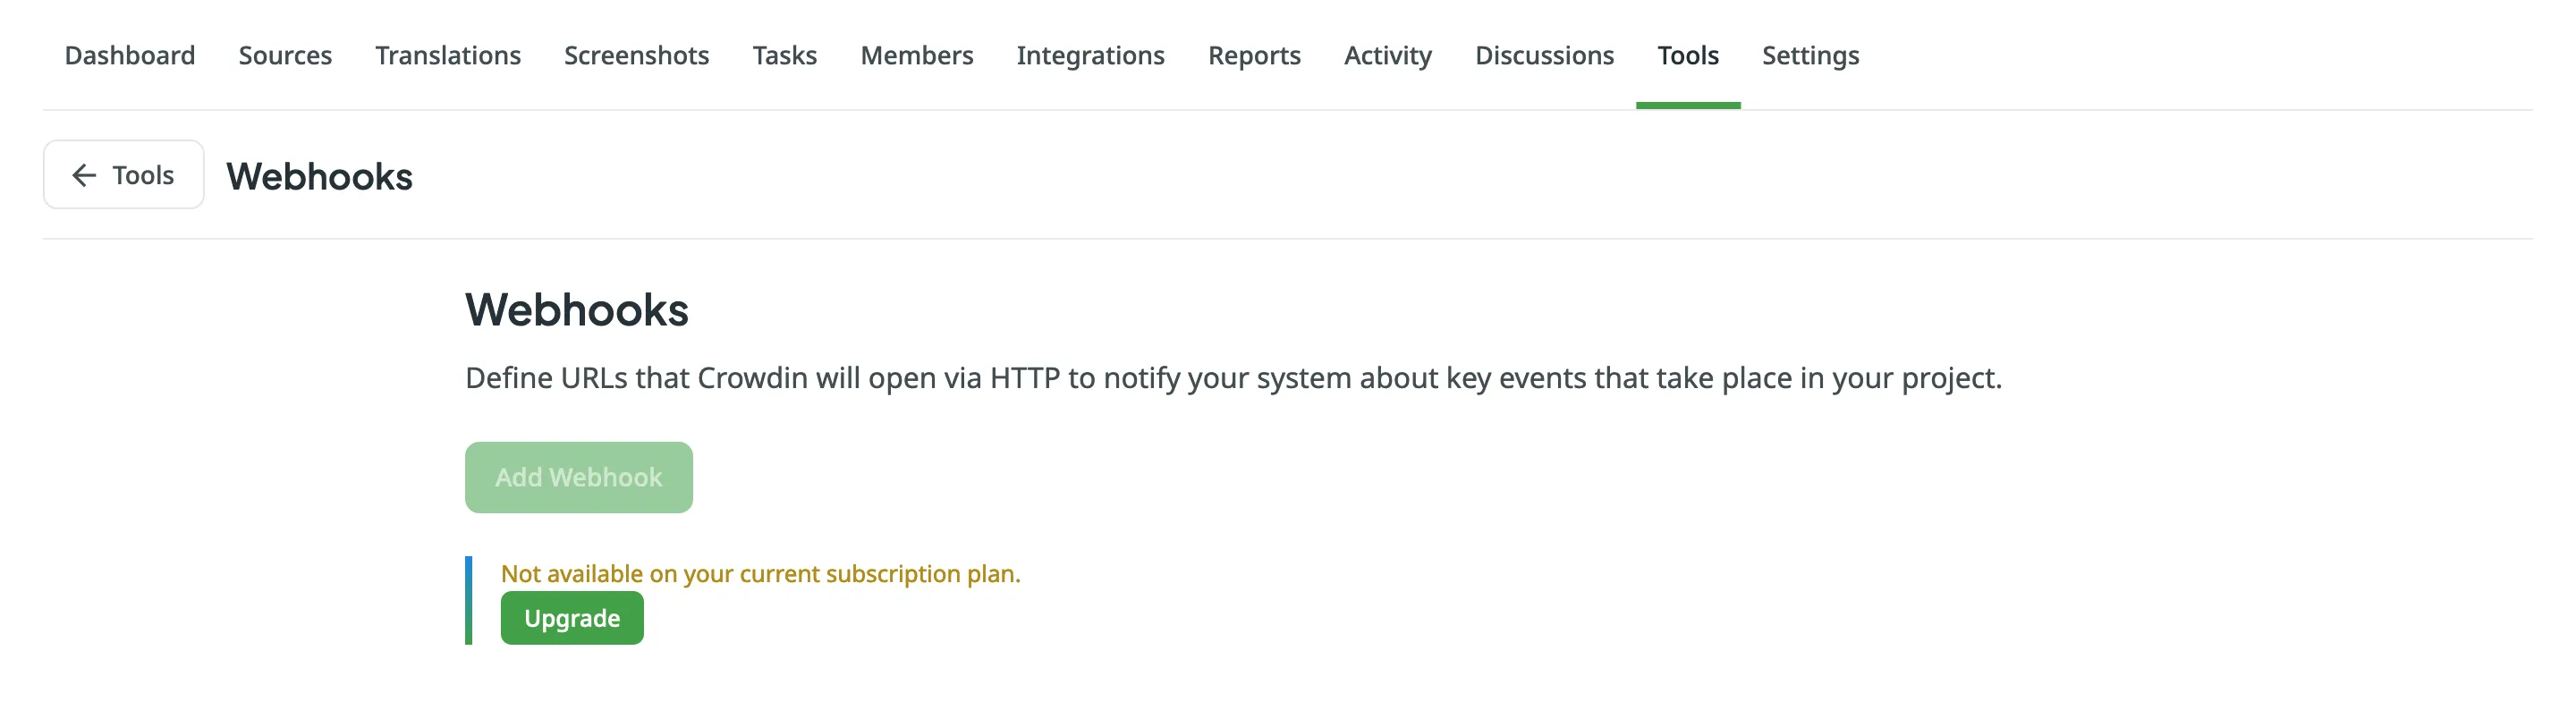
## [What Happens if You Exceed Your Plan Quota](#what-happens-if-you-exceed-your-plan-quota)
[Section titled “What Happens if You Exceed Your Plan Quota”](#what-happens-if-you-exceed-your-plan-quota)
When you exceed your hosted words quota, you will receive an email from us asking to upgrade. After exceeding the limit of your plan quota, you have 10 more days to upgrade the subscription. Otherwise, your project will be suspended for translators. However, you will still be able to access your account and project settings. Moreover, all data will remain as is until the subscription is updated.
We recommend upgrading the subscription plan beforehand if you expect to have more hosted words uploaded soon.
## [Upgrading the Subscription](#upgrading-the-subscription)
[Section titled “Upgrading the Subscription”](#upgrading-the-subscription)
If your current subscription plan is Pro and you’d like to upgrade it by adding more hosted words, follow these steps:
1. Go to the [Pricing page](https://crowdin.com/pricing).
2. Customize the subscription plan according to your needs.
3. Click **Upgrade**.
To upgrade to the Team subscription plan, follow these steps:
1. Go to the [Pricing page](https://crowdin.com/pricing).
2. Click **Upgrade** on the Team plan.
## [Changing the Subscription from Monthly to Annual](#changing-the-subscription-from-monthly-to-annual)
[Section titled “Changing the Subscription from Monthly to Annual”](#changing-the-subscription-from-monthly-to-annual)
If you decide to switch from monthly billing to annual billing, follow these steps:
1. Go to the [Pricing page](https://crowdin.com/pricing).
2. Switch the plan type to **Annual**.
3. Select a suitable plan.
4. Click **Subscribe**.
As a result, your previous monthly subscription will be automatically cancelled, and the expiration date will be updated, considering your monthly subscription’s remainder. For example, if you switched to the annual subscription in the middle of the billing cycle, the 15 days that remained will be added to your current annual subscription.
Read more about [Annual subscription plans](/payments-invoices/#annual-plans).
## [See Also](#see-also)
[Section titled “See Also”](#see-also)
[Pricing page ](https://crowdin.com/pricing)Plans, Pricing, and Free Trial.
[Payments and Invoices ](/payments-invoices/)Learn how payments work in Crowdin and how to download invoices.
[App Subscriptions ](/app-subscriptions/)Learn how to subscribe to paid apps in Crowdin Store.
[Billing Settings ](/billing-settings/)Update your billing information and payment method.
# Company Description
> Learn more about Crowdin as a company
Crowdin is a cloud-based localization management software that helps teams go global and stay agile.
## [About Crowdin](#about-crowdin)
[Section titled “About Crowdin”](#about-crowdin)
Crowdin is a product-based company founded in 2009 and has since grown to 3M+ user accounts.
Crowdin software is a localization management solution for agile teams. We empower companies of all shapes and sizes to grow by reaching people who speak different languages. Millions of users from around the world have registered to deliver their websites, mobile apps, games, documents, and other content in the language of their customers.
Crowdin aims to provide the latest technology solutions that make translation and localization as easy as possible.
## [Company Address](#company-address)
[Section titled “Company Address”](#company-address)
**Headquarters**\
Liivalaia tn 36\
Tallinn, Harju maakond, 10132, Republic of Estonia
[View on Google Maps](https://maps.app.goo.gl/BfLufSKBNKtWTw7A9)
**Legal Address**\
OÜ Crowdin\
Mustamäe tee 44/1, Kristiine linnaosa\
Tallinn, Harju maakond, 10621, Republic of Estonia
For general inquiries, email us at
## [Crowdin Facts](#crowdin-facts)
[Section titled “Crowdin Facts”](#crowdin-facts)
* over 3 million registered users all over the world
* over 200K localization projects on the platform
* over 700 apps and integrations on the Crowdin Store
* free for open source non-profit projects
* used daily as a primary TMS and CAT tool by LSPs over the globe
* hosts projects with over 35,000 contributors
## [Our Commitment to Quality and Safety](#our-commitment-to-quality-and-safety)
[Section titled “Our Commitment to Quality and Safety”](#our-commitment-to-quality-and-safety)
* we are committed to providing innovative, high-quality solutions
* we continuously improve, experiment, and search for new translation technologies and approaches
* we implement the best localization and translation practices for the most efficient localization workflow
* we claim no intellectual property rights over the resources customers upload or create at Crowdin
## [Customers](#customers)
[Section titled “Customers”](#customers)
Visit our [Customer Testimonials](https://crowdin.com/page/customer-testimonials) page.
## [See Also](#see-also)
[Section titled “See Also”](#see-also)
* [Using the Crowdin Logo](/using-logo/)
# Configuring VCS Integrations Online
> Learn how to configure a DVCS integration online in Crowdin
To configure a version control system integration, specify the source files you’d like to translate and how Crowdin should structure the translated files in your repository.
## [Branch Configuration](#branch-configuration)
[Section titled “Branch Configuration”](#branch-configuration)
Once you’ve selected your repository and branch for translation, the next step is to configure the selected branch. Click to open the **Branch Configuration** dialog and start the configuration. In the **Branch Configuration** dialog, you can either load the existing configuration file stored in your repository or create a new configuration from scratch.
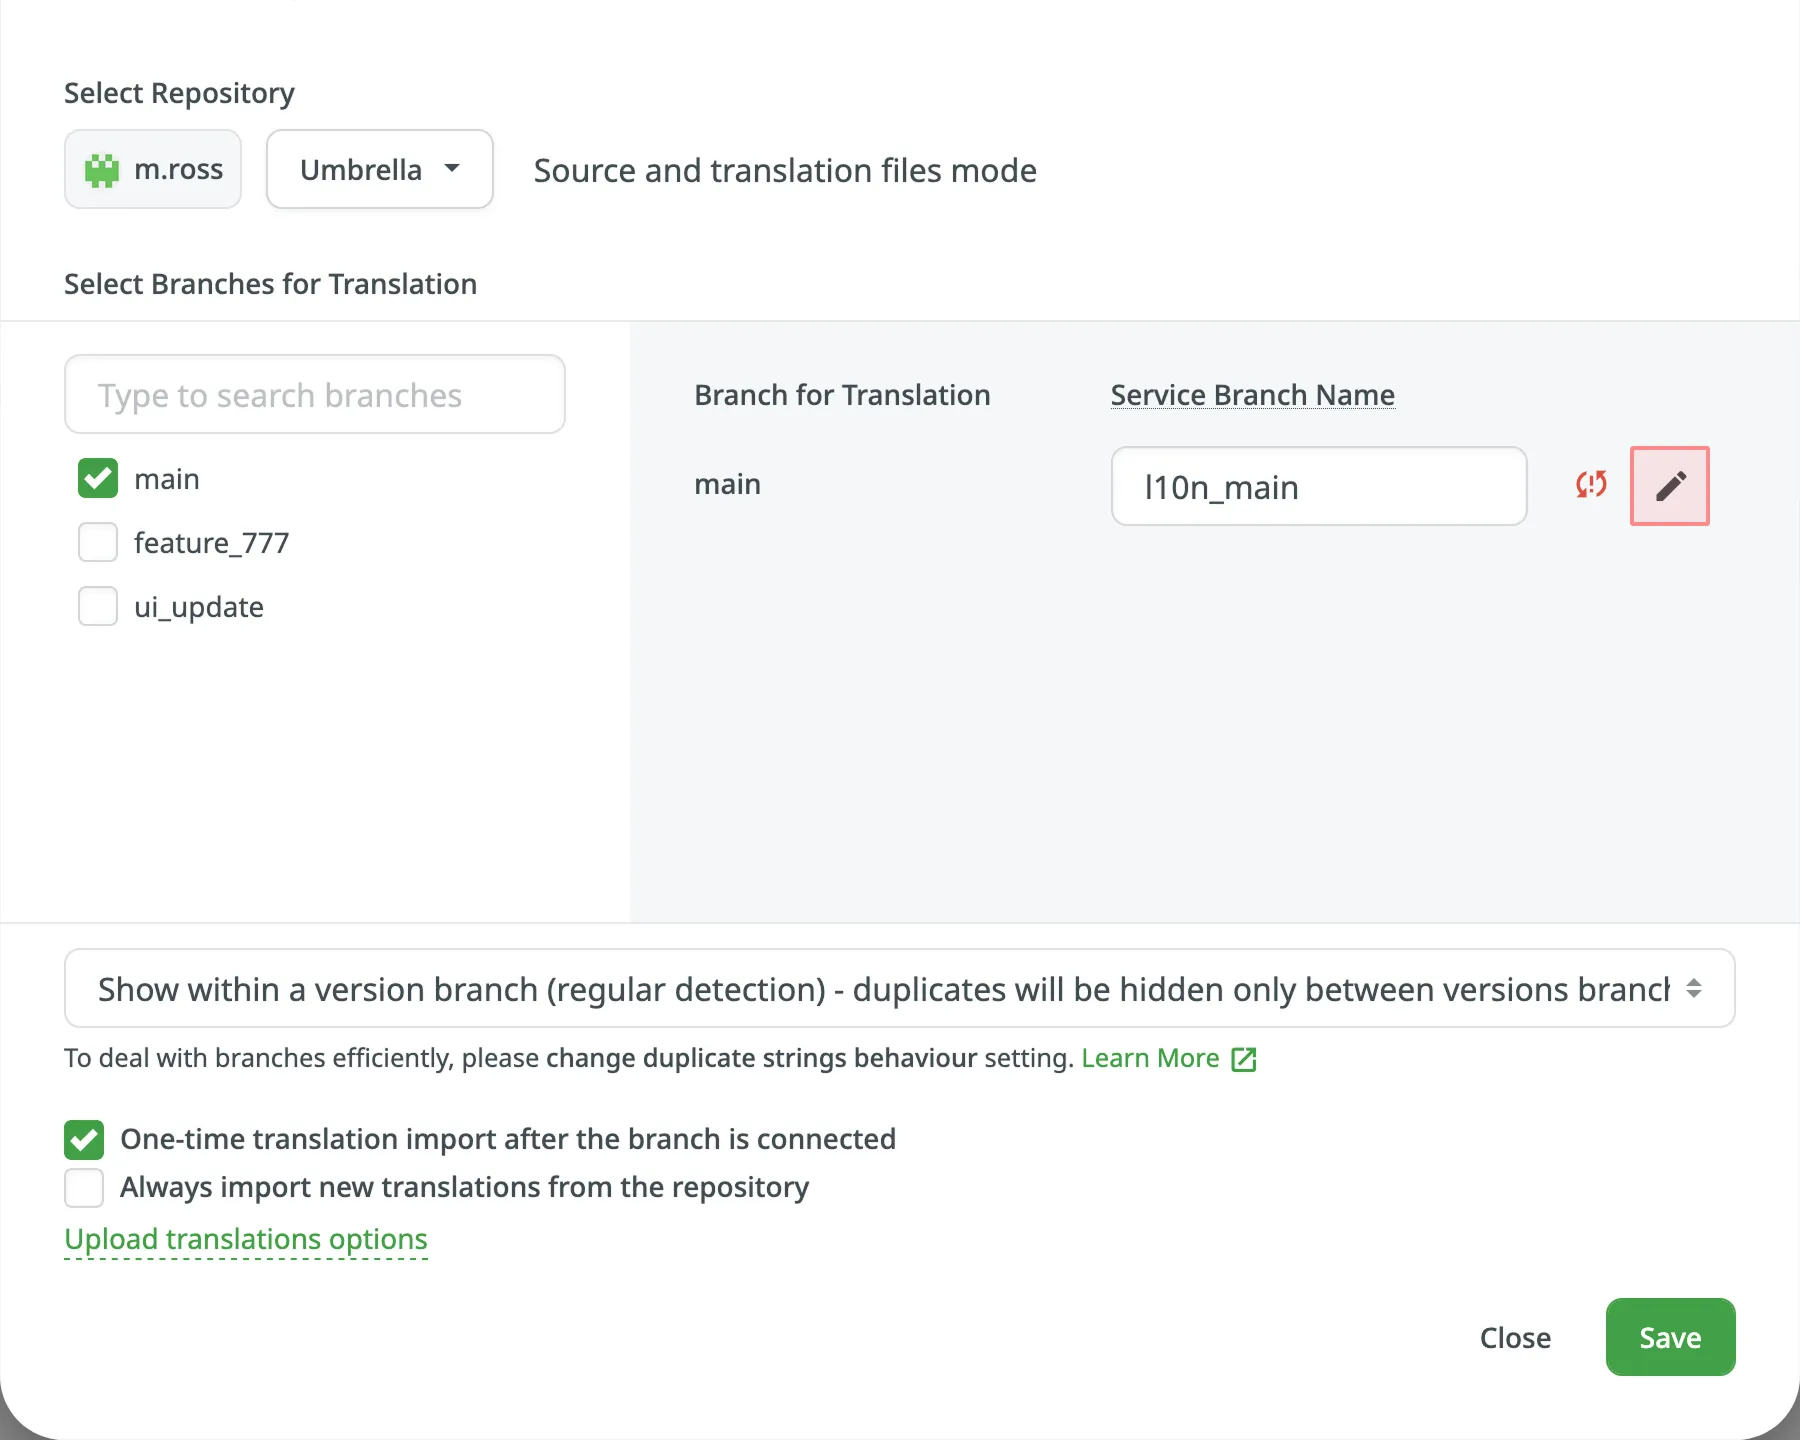
If you want your VCS integration to work in the **Target File Bundles Mode**, you need to configure target file bundles for each branch you have selected for translation.
Read more about [configuring target file bundles for VCS integration](/bundles/#bundles-in-vcs-integrations).
## [Loading a Configuration](#loading-a-configuration)
[Section titled “Loading a Configuration”](#loading-a-configuration)
To load the existing configuration file stored in your repository, follow these steps:
1. Click and select **Load configuration**.
2. Specify the name of the configuration file in your repository.
3. Click **Continue**. 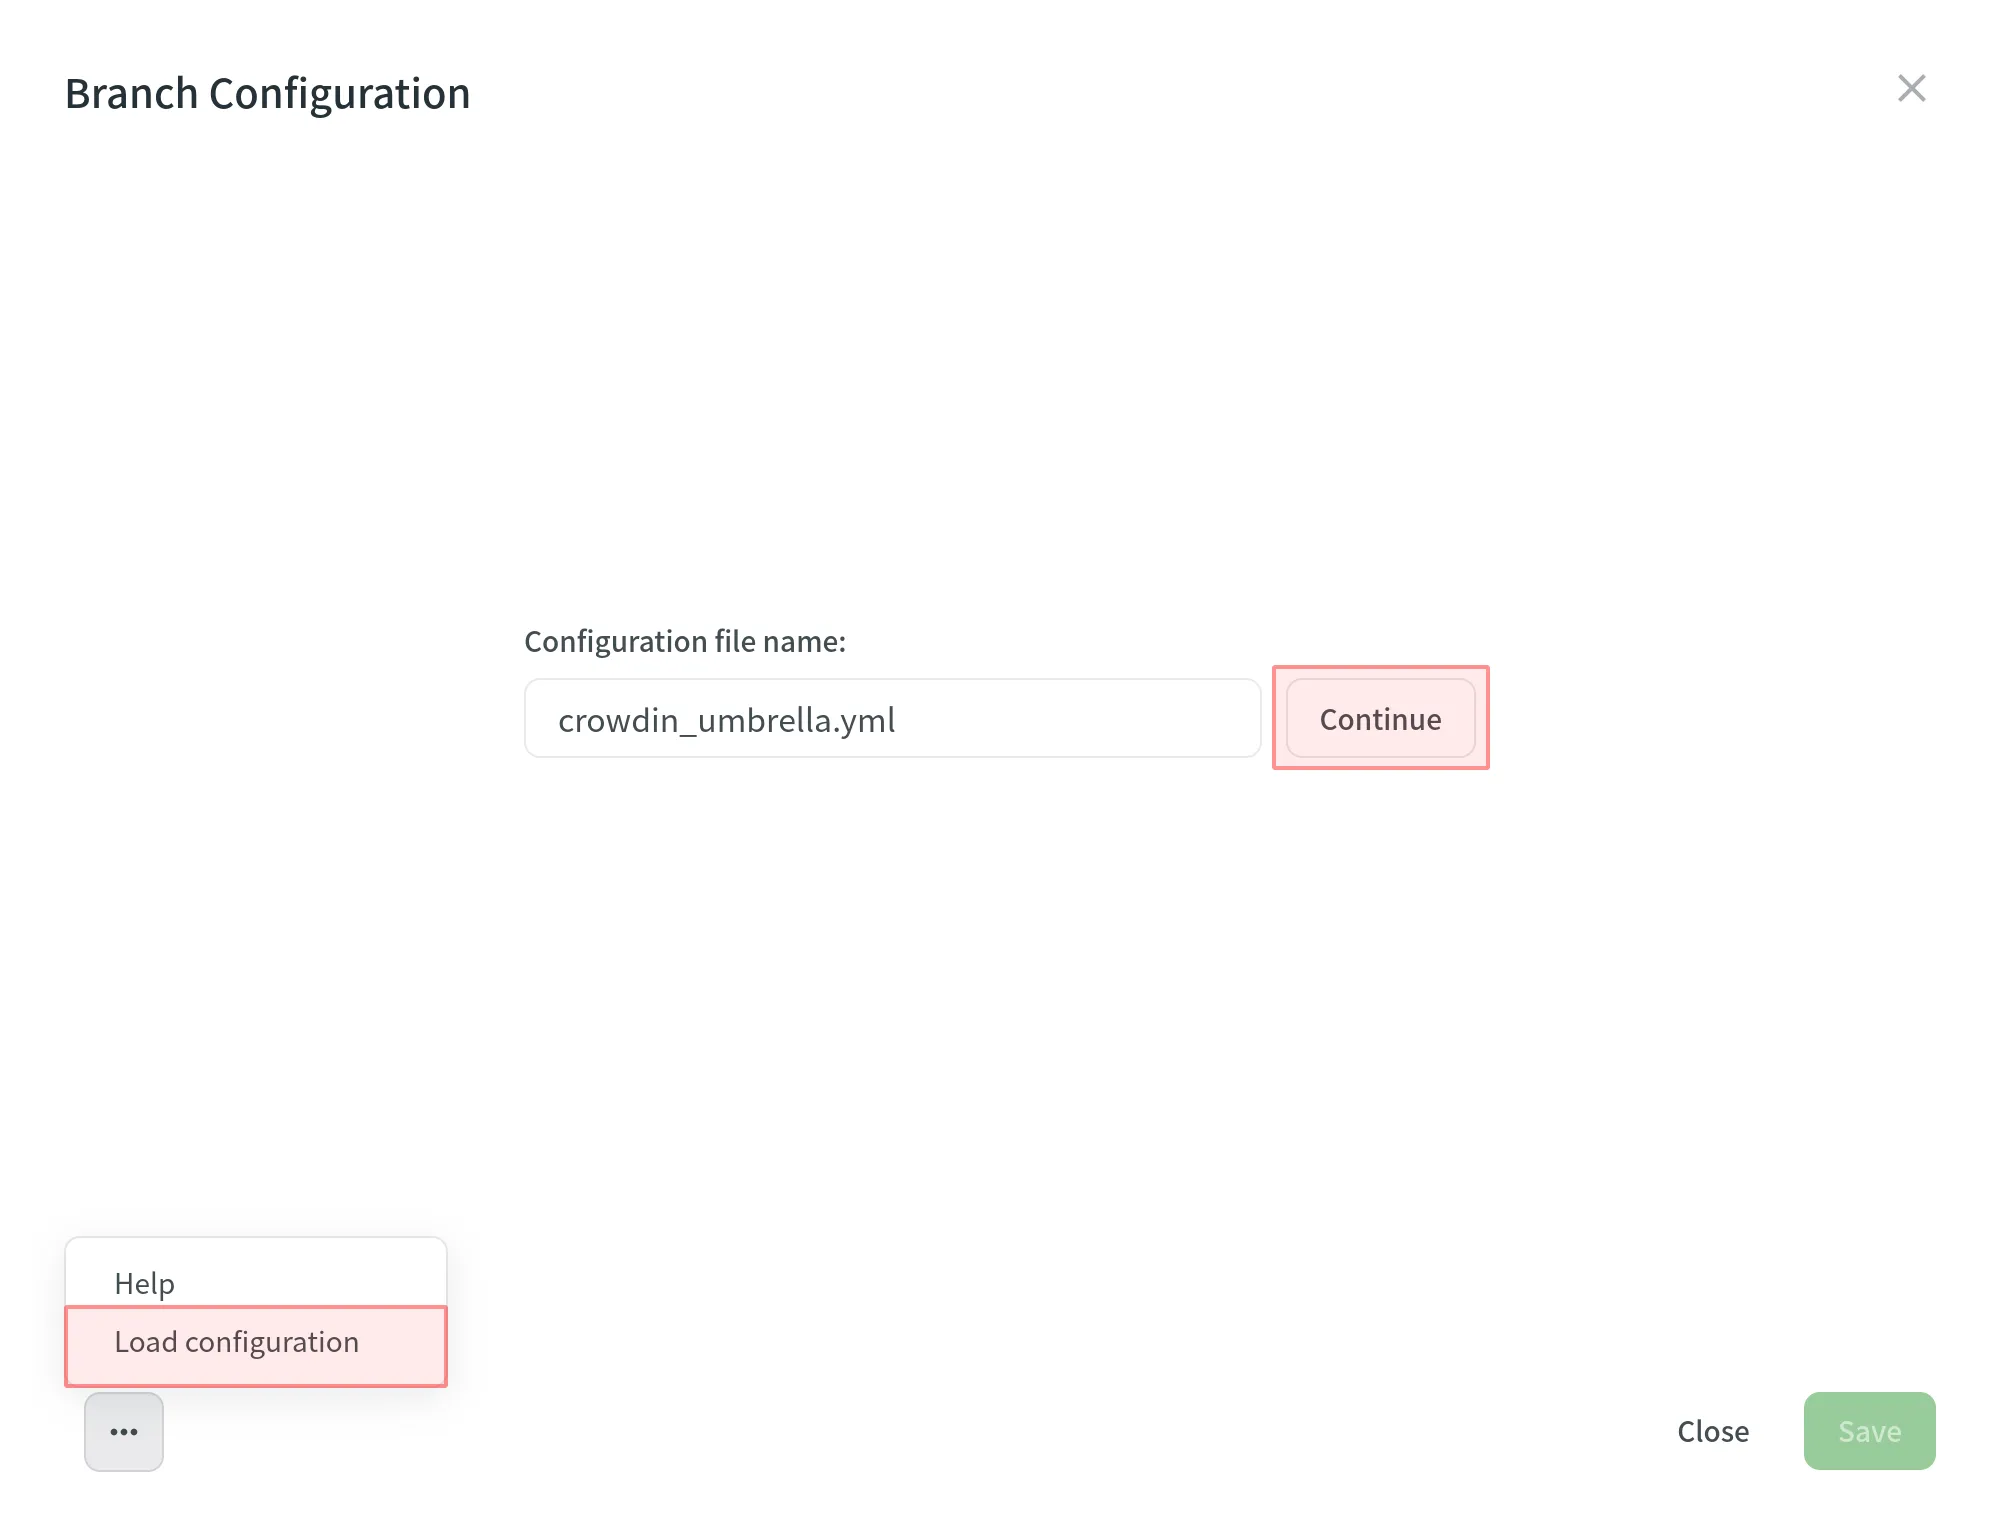
The configuration will be displayed in the **Branch Configuration** dialog. You can use it as is or modify it if necessary.
## [Creating a Configuration](#creating-a-configuration)
[Section titled “Creating a Configuration”](#creating-a-configuration)
To create a new configuration file to be used by the integration, specify the preferred name and click **Continue** in the **Branch Configuration** dialog.
Then specify the source and translated file paths using the patterns and placeholders listed below. In the right panel, you can preview the structure of the source files that will be uploaded for translation and the structure of the translated files based on the specified paths.
Once you’ve finished setting up the configuration for the selected branch and saved the changes, the configuration file will be saved in the root of the translation branch in your repository.
### [Patterns](#patterns)
[Section titled “Patterns”](#patterns)
You can use wildcard (`*`, `**`, `?`, `[set]`, `\`) patterns to specify which files should be uploaded for translation.
Read more about [wildcard patterns](/developer/configuration-file/#general-configuration).
### [Placeholders](#placeholders)
[Section titled “Placeholders”](#placeholders)
Use placeholders to specify where translated files will be placed and how they will be named:
| **Name** | **Description** |
| -------------------------- | ----------------------------------------------------------------------------------------------------- |
| `%original_file_name%` | Original file name |
| `%original_path%` | Take parent folder names in the Crowdin Enterprise project to build file path in the resulting bundle |
| `%file_extension%` | Original file extension |
| `%file_name%` | File name without extension |
| `%language%` | Language name (e.g., Ukrainian) |
| `%two_letters_code%` | Language code ISO 639-1 (e.g., uk) |
| `%three_letters_code%` | Language code ISO 639-2/T (e.g., ukr) |
| `%locale%` | Locale (e.g., uk-UA) |
| `%locale_with_underscore%` | Locale (e.g., uk\_UA) |
| `%android_code%` | Android Locale identifier used to name “values-” directories |
| `%osx_code%` | OS X Locale identifier used to name “.lproj” directories |
| `%osx_locale%` | OS X locale used to name translation resources (e.g., uk, zh-Hans, zh\_HK) |
## [Advanced Settings](#advanced-settings)
[Section titled “Advanced Settings”](#advanced-settings)
The advanced settings provide more control over the integration’s behavior. You can specify files to be excluded from translation, map custom language codes, and configure parsing options for structured file formats, such as spreadsheets and XML. This section also covers additional parameters that can be configured by manually editing the `crowdin.yml` file in your repository.
### [Ignoring Files](#ignoring-files)
[Section titled “Ignoring Files”](#ignoring-files)
If you don’t want some files to be translated, click **Add ignored pattern**, specify the pattern for those files, and Crowdin will not upload those files for translation.
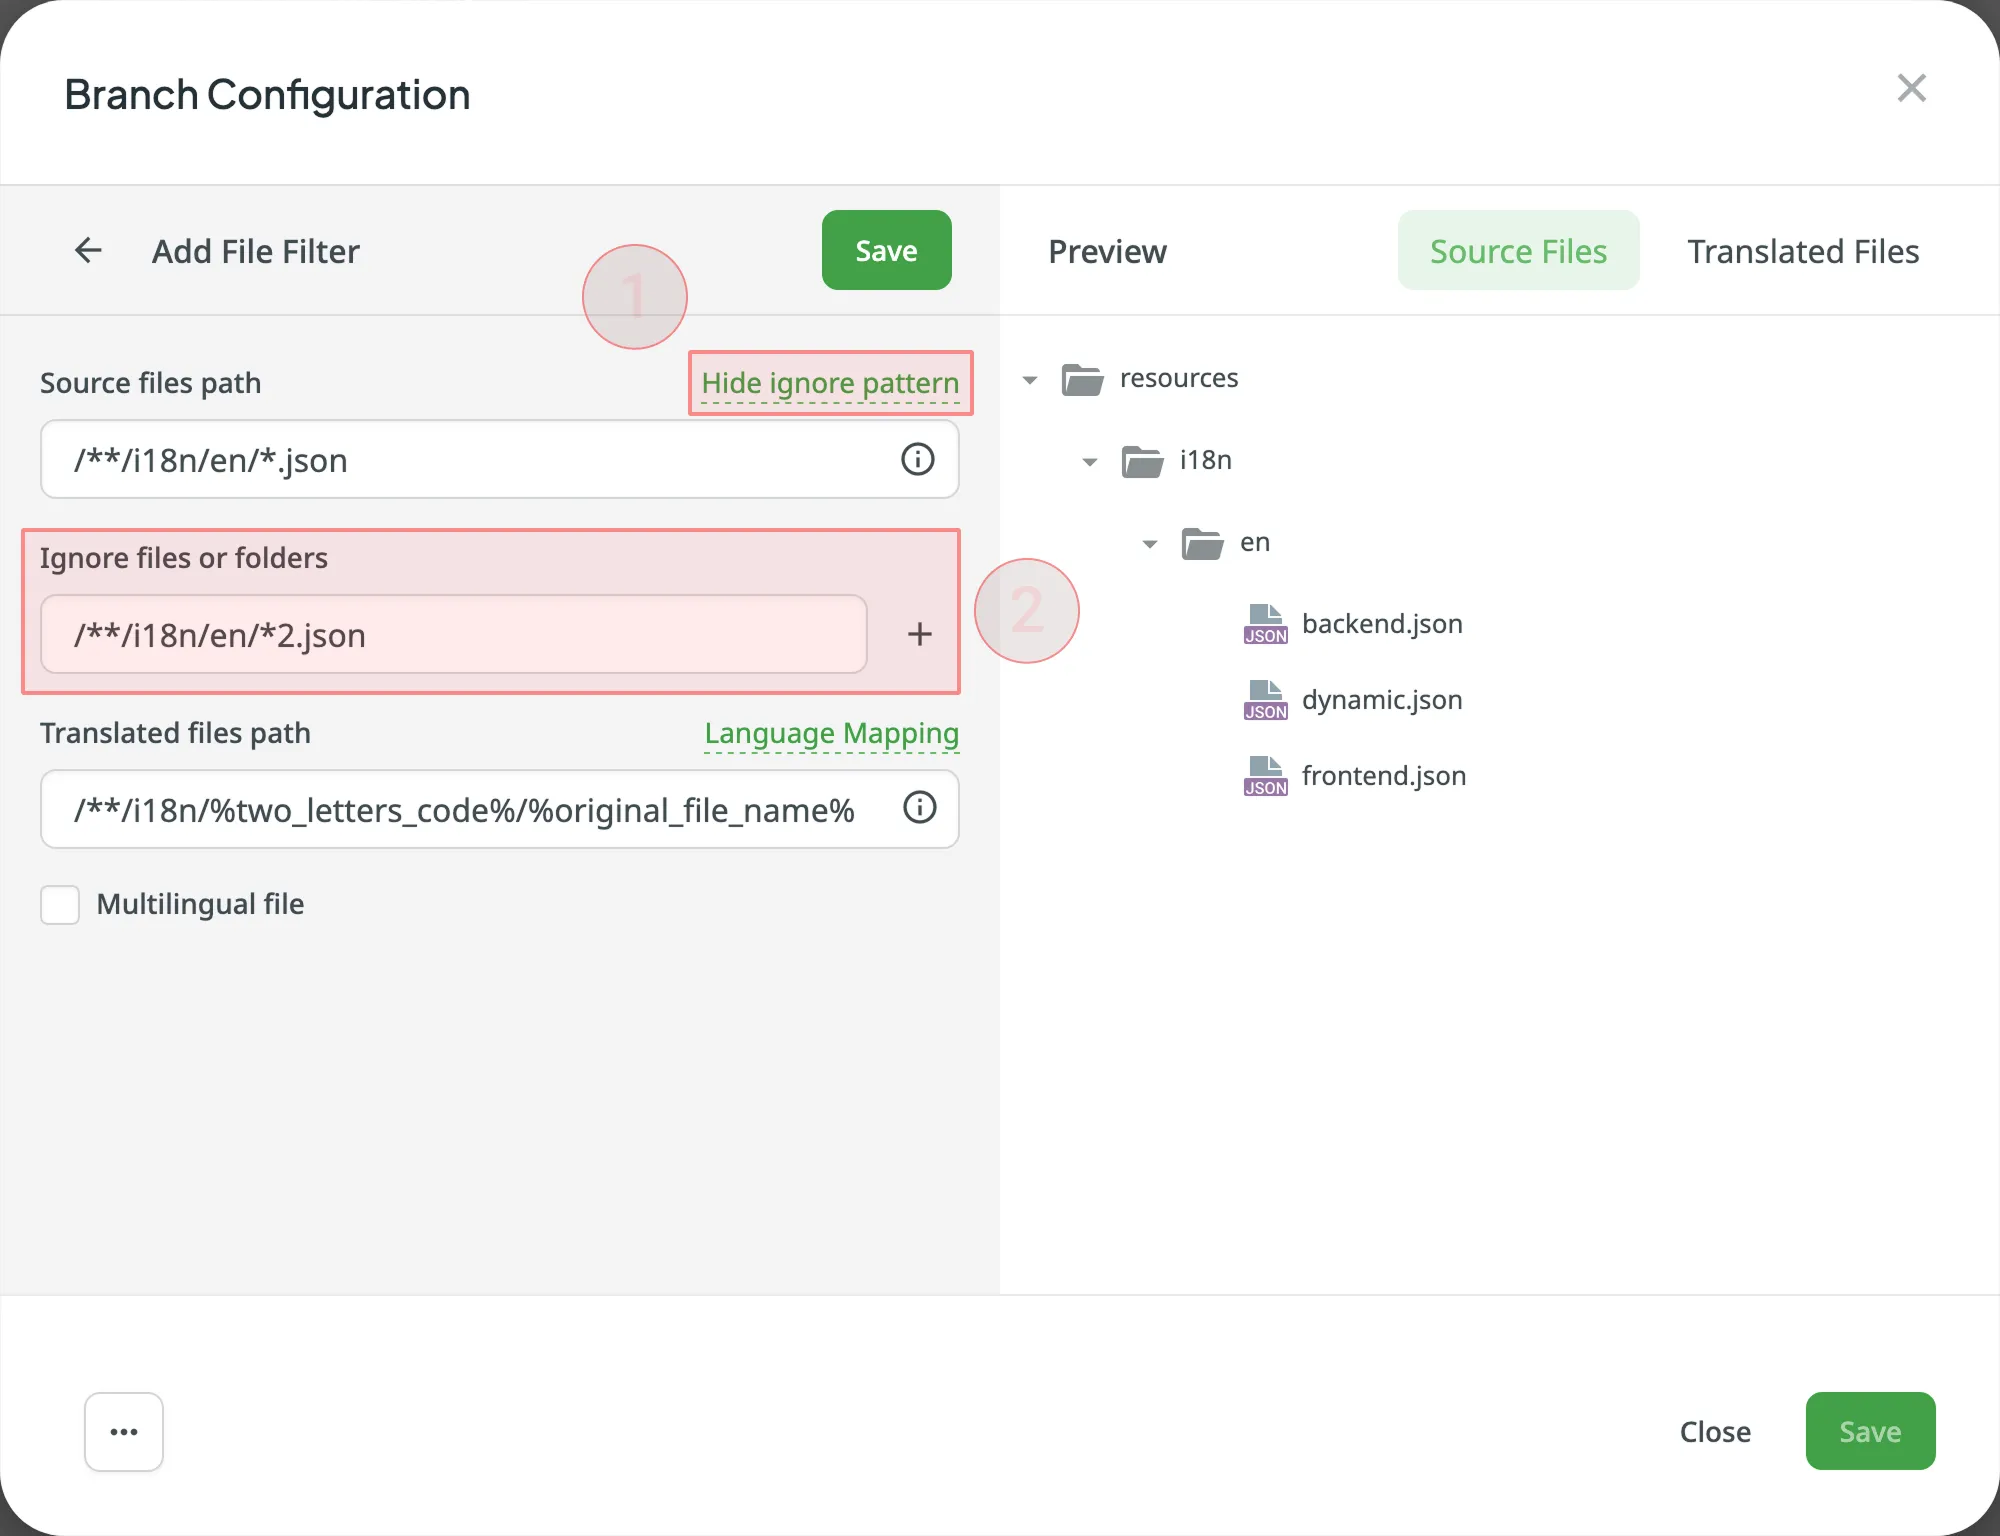
### [Language Mapping](#language-mapping)
[Section titled “Language Mapping”](#language-mapping)
If your project uses custom names for locale directories, you can use language mapping to map your own languages to be recognized by Crowdin.
To add a language mapping, follow these steps:
1. Click **Language Mapping**. 
2. Select the necessary language and a placeholder.
3. Specify your custom code.
4. Click **Add Mapping** to add another custom code. 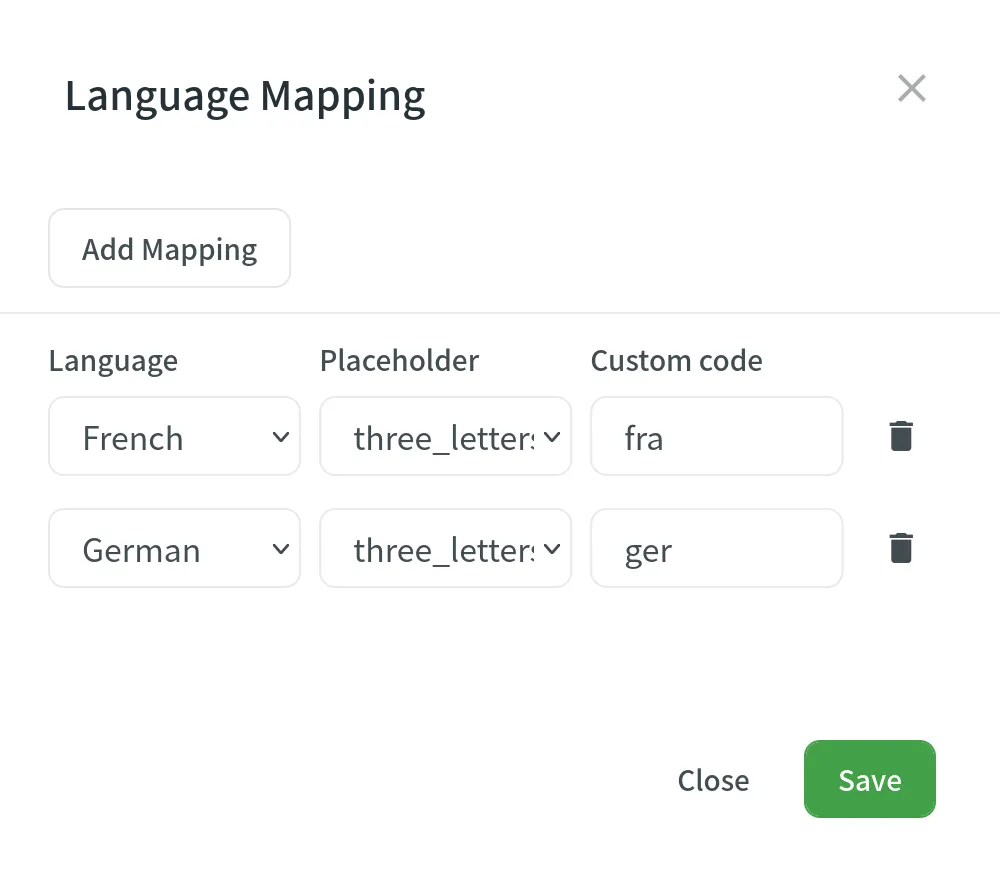
5. Click **Save**.
### [Configuring Spreadsheets](#configuring-spreadsheets)
[Section titled “Configuring Spreadsheets”](#configuring-spreadsheets)
You can specify the scheme of your spreadsheet file in the **Scheme** field. To create the scheme for your CSV or XLS/XLSX file, use the following constants:
* `identifier` – column contains string identifiers.
* `source_phrase` – column contains source strings.
* `source_or_translation` – column contains source strings, but the same column will be filled with translations when the file is exported. If you upload existing translations, the values from this column will be used as translations.
* `translation` – column contains translations.
* `context` – column contains comments or context information for the source strings.
* `max_length` – column contains max.length limit values for the string translations.
* `labels` – column contains labels for the source strings.
* `none` – column that will be skipped during import.
**Scheme example**: `identifier,source_phrase,context,fr,de,it,uk` ([Language Codes](/developer/language-codes/)).
If a spreadsheet contains the translations for several target languages, select **Multilingual file**. If you don’t want to translate the text stored in the first row, select **Import first line as a header**.
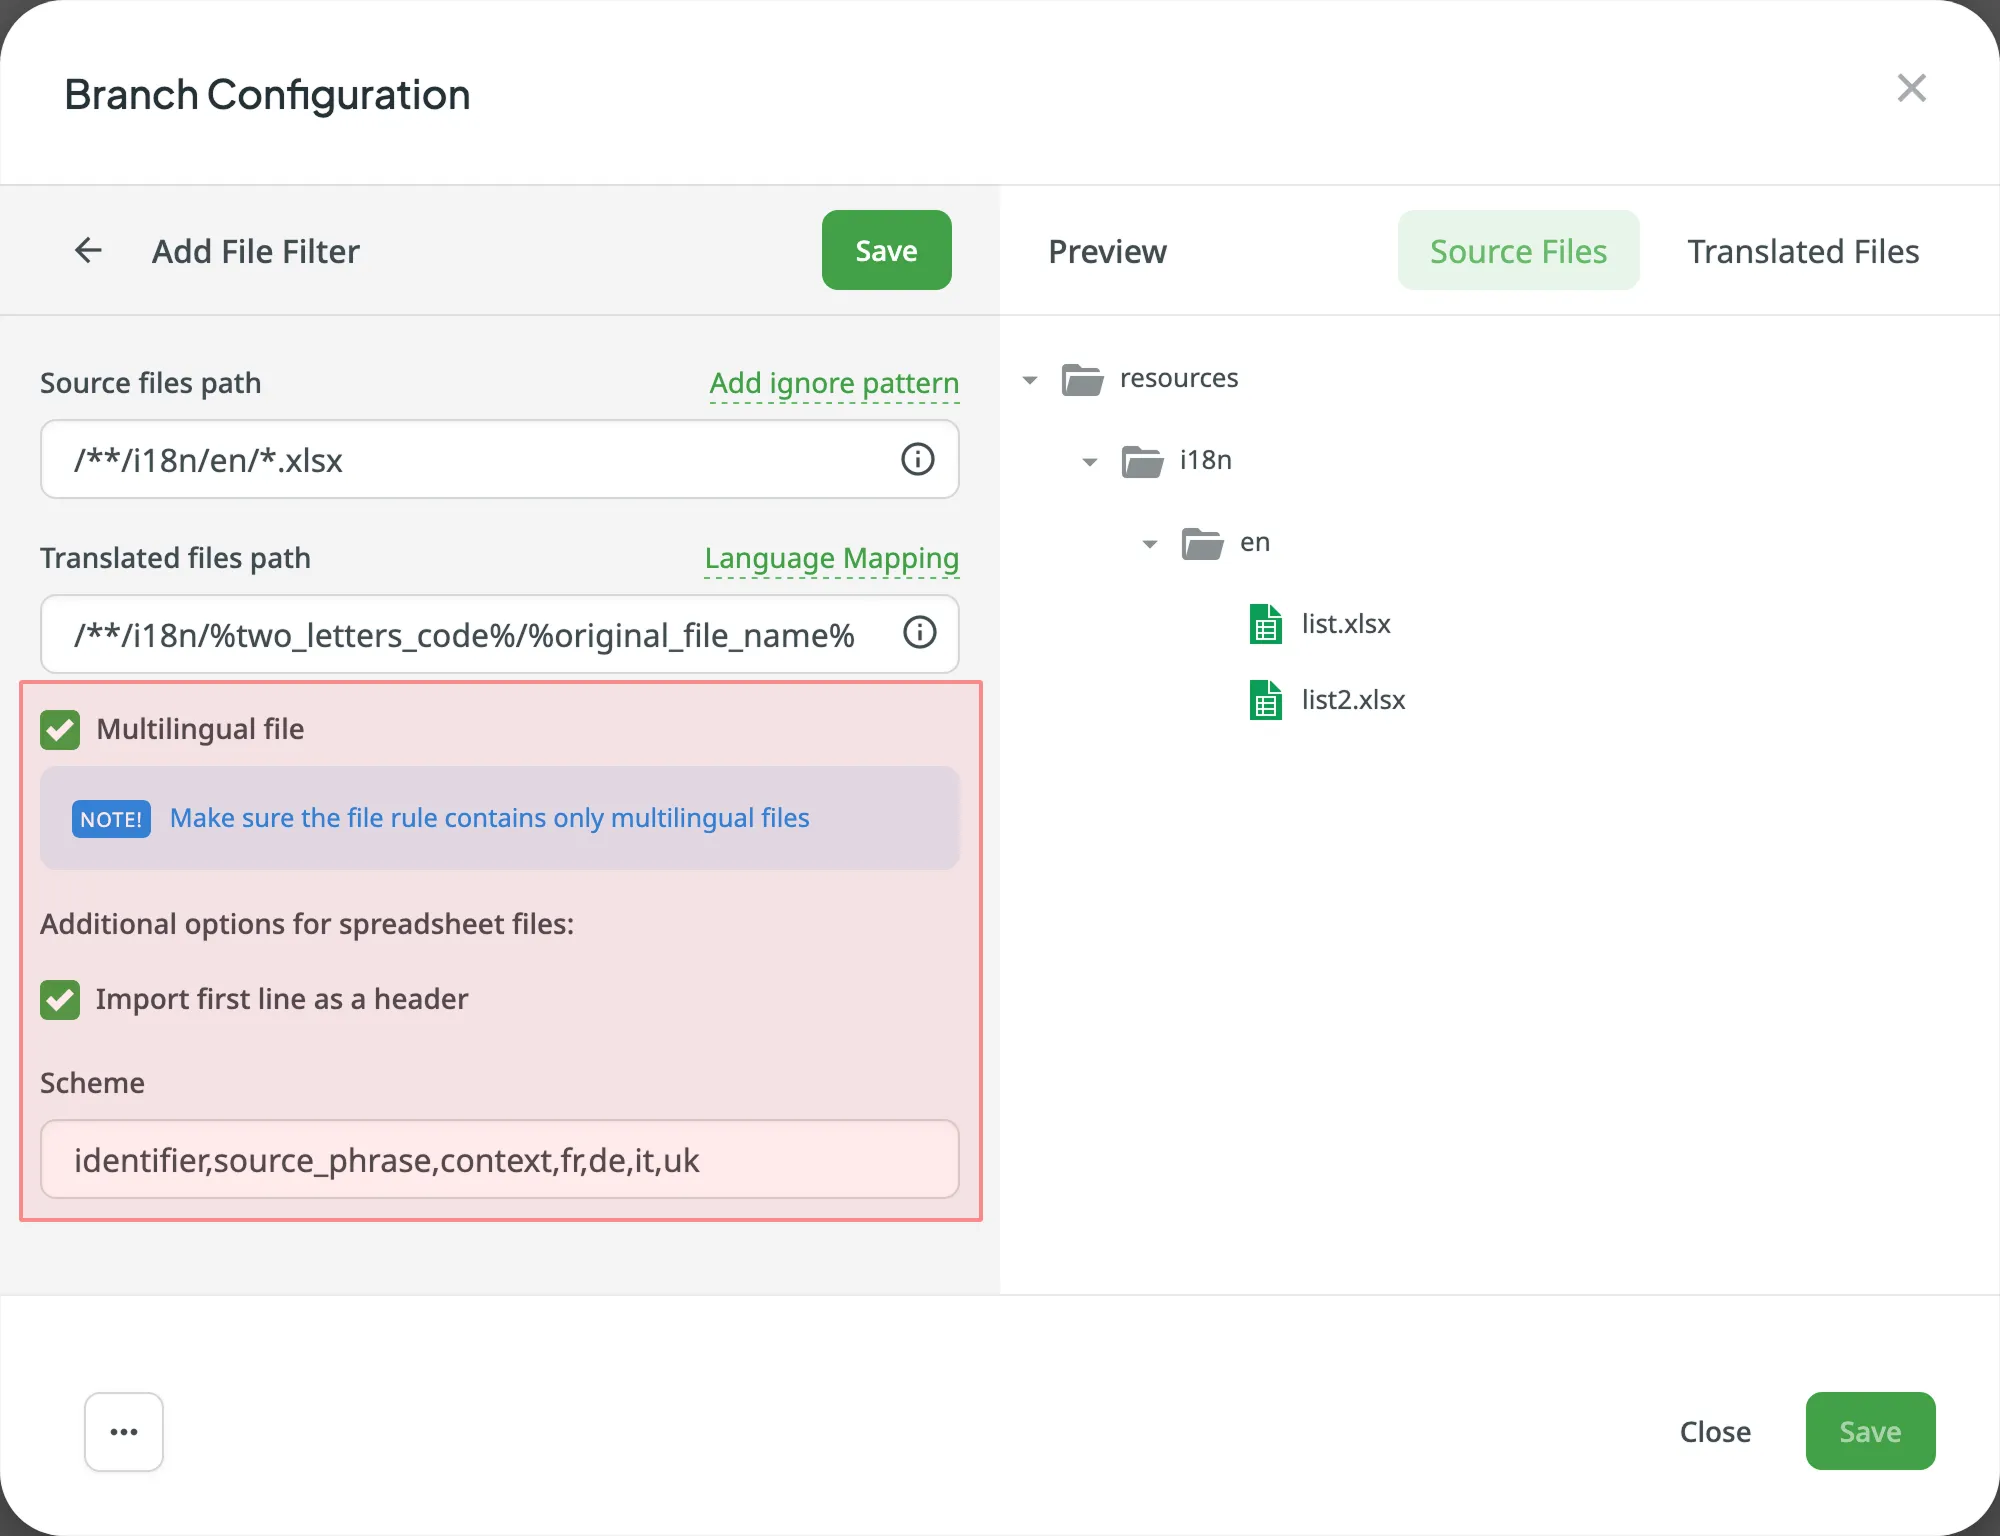
### [Configuring XML Files](#configuring-xml-files)
[Section titled “Configuring XML Files”](#configuring-xml-files)
You can configure the XML file import settings to specify how Crowdin should handle the XML files.
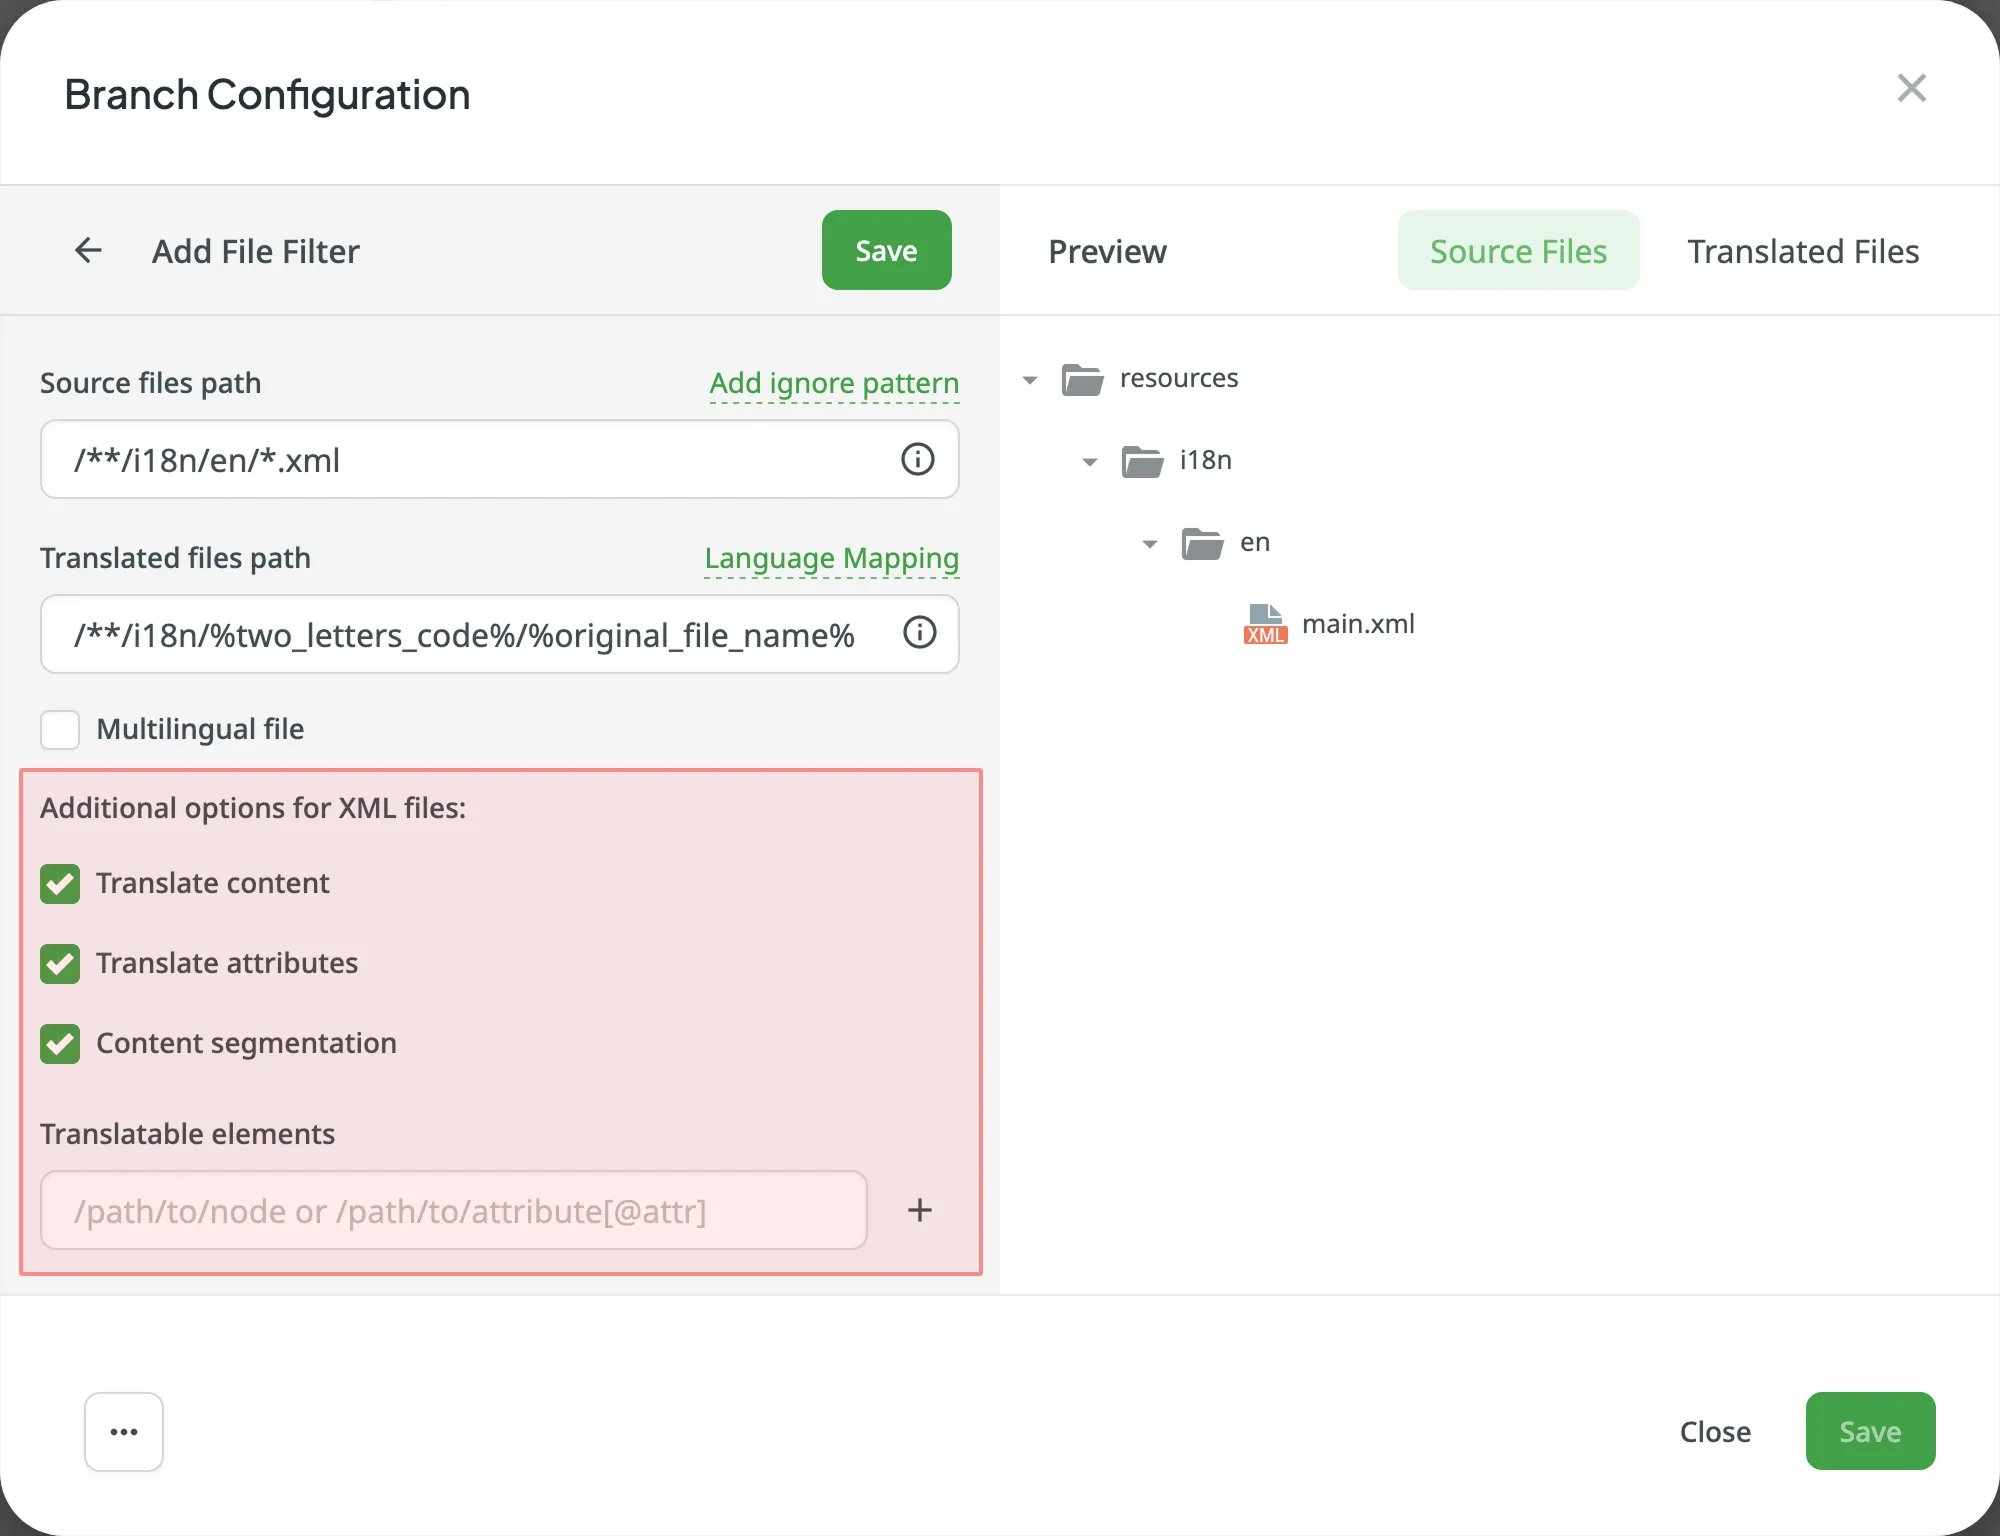
| **Option** | **Description** |
| ------------------------- | ------------------------------------------------------------------------------------------------------------------------------------------------------------------ |
| **Translate Content** | Select to translate texts stored inside the tags. |
| **Translate Attributes** | Select to translate tag attributes. |
| **Content Segmentation** | Select to split the XML source file’s content into shorter text segments. |
| **Translatable Elements** | This is an array of strings, where each item is the XPaths to the DOM element that should be imported. Sample path: `/path/to/node` or `/path/to/attribute[@attr]` |
Note
When Content segmentation is enabled, the translation upload is handled by an experimental machine learning technology.
### [Additional Parameters](#additional-parameters)
[Section titled “Additional Parameters”](#additional-parameters)
The following parameters can’t be configured online:
* `preserve_hierarchy` - preserves the directory structure in Crowdin
* `dest` - allows you to specify a file name in Crowdin
* `type` - allows you to specify a file type in Crowdin
* `update_option` - keeps translations and keeps/removes approvals of changed strings during a file update
* `commit_message` - additional commit message that can include Git tags
* `export_languages` - export translations for the specified languages
Once you save the online configuration, a `crowdin.yml` file is saved in the root of the configured branch in your repository. You can edit this file manually to add the necessary parameters.
Read more about the [configuration file](/developer/configuration-file/#configuration-file-for-vcs-integrations).
## [Saving Configuration](#saving-configuration)
[Section titled “Saving Configuration”](#saving-configuration)
1. Click **Save** to preview the created configuration. 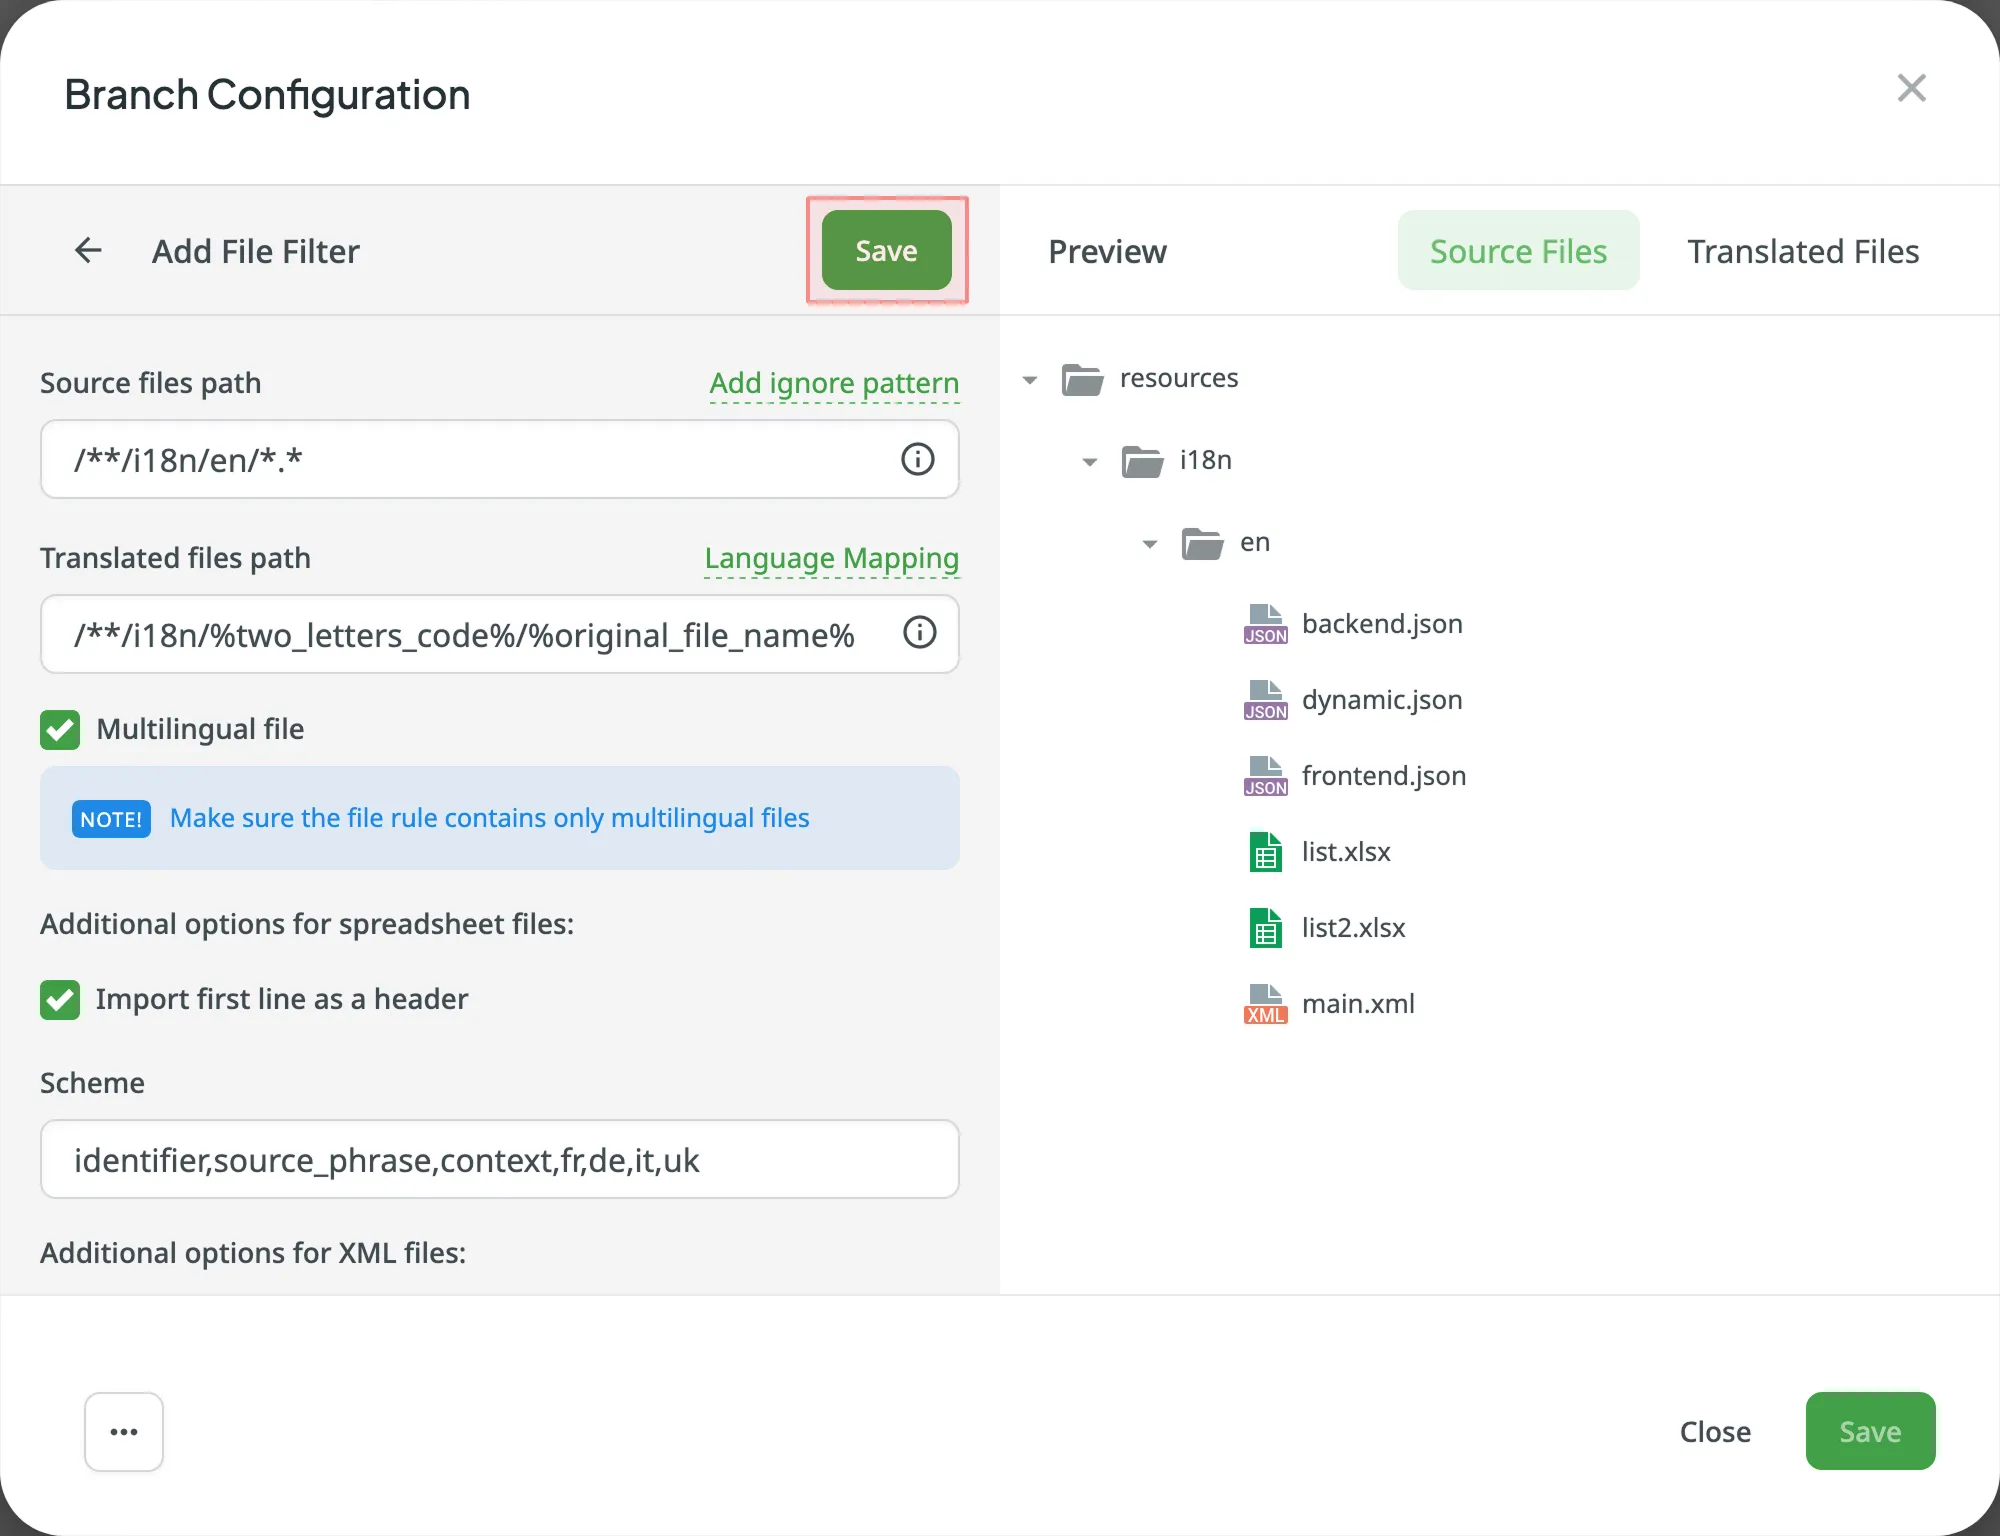
2. Click **Add File Filter** if you have multiple file groups with different configurations.\
If several branches in the project have the same configuration, and you want the same filters to be applied to them, select **Apply filters to all translatable branches**.
3. Click **Save** to save the created configuration. 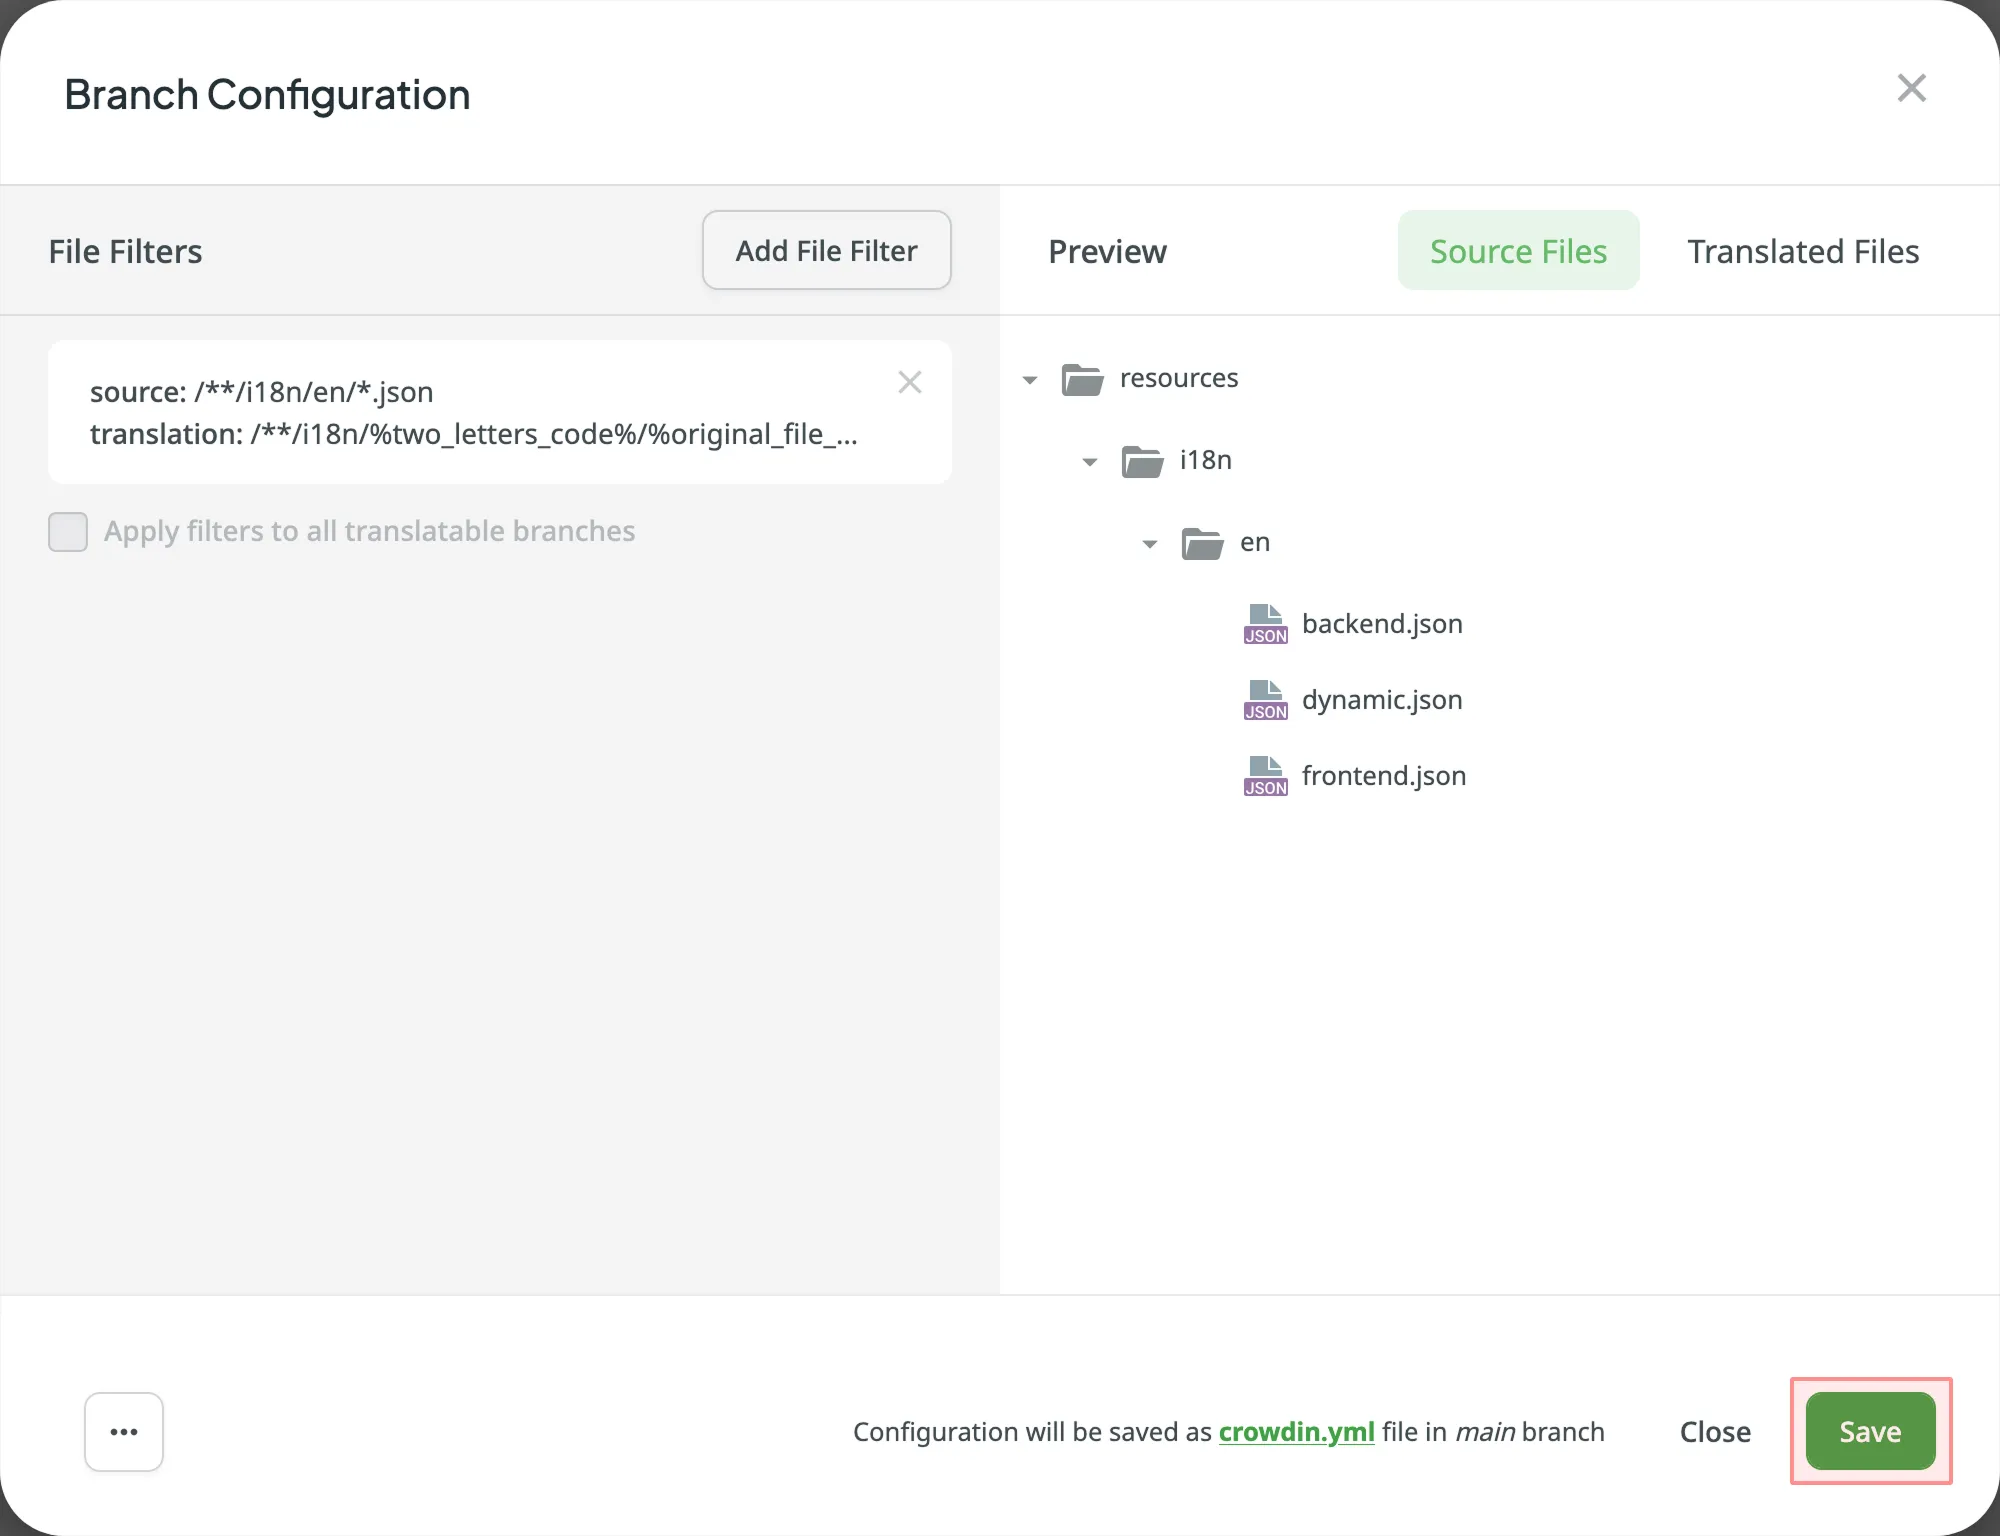
Once the configuration is saved, the localizable files will start uploading to your Crowdin project.
## [See Also](#see-also)
[Section titled “See Also”](#see-also)
[GitHub ](/github-integration/)
[GitLab ](/gitlab-integration/)
[Bitbucket ](/bitbucket-integration/)
[Azure Repos ](/azure-repos-integration/)
# Contributor Reports
> Estimate and count the price of your contribution to the project
As a translator or a proofreader, you can estimate and count the price of your contribution to the project and view your position in the Top Members list. You can also view the progress of the project and track contributions over a specific period of time. For this, open the project and go to the **Reports** tab.

## [Project Overview](#project-overview)
[Section titled “Project Overview”](#project-overview)
Use this section to get a summary of the project’s volume and monitor translation and proofreading activities over selected time periods. In the upper-right corner, you can select a report unit (*words*, *strings*, *characters*, or *characters with spaces*) that will apply to all reports in this section. The comparisons shown in percentage are counted by comparing the chosen period of time to the same previous period of time (e.g., if you select a month, the current month is compared to the previous one).
To download reports for further analysis or record-keeping, click **Export** and select the preferred format (CSV, XLSX, or JSON).
In the reports that feature interactive graphs, you can hover over data points for more detailed information, such as daily or monthly totals for each category.
The top of the page displays the primary statistics for the project’s volume:
* *Translatable*: The total amount of text available for translation.
* *Hidden*: The total amount of text in hidden strings.
* *Total*: The total amount of text in the project (*Translatable* + *Hidden*).
* *Translation to*: The number of target languages in the project.
Below the main statistics, the **Overview** section contains the following report:
### [Activity Summary](#activity-summary)
[Section titled “Activity Summary”](#activity-summary)
This report tracks the overall translation and proofreading activity in the project. You can filter the data by **Date Range** and **Language**. The report is split into two main parts: **Translation** and **Proofreading**.
Each part displays the total work completed during the selected period with a percentage comparison to the previous period. You can expand the **Breakdown by Language** section in each part to view a table of the same metrics broken down by target language.
Note
The Activity Summary shows information about all the translations made in the project (including duplicate translations made by the same translator, removed translations, etc.).
#### [Translation](#translation)
[Section titled “Translation”](#translation)
This section shows the volume of translated text, broken down by the following key metrics:
* *Total (end of period)*
* *Human Translation*
* *Translation Memory*
* *Machine Translation*
* *AI*
The **Translation** graph below the metrics displays multiple lines simultaneously for each translation type. By hovering over the data points, you can view daily or monthly totals for each category.
#### [Proofreading](#proofreading)
[Section titled “Proofreading”](#proofreading)
This section shows the volume of approved text and voting activity. The main metric displayed is *Approved* words.
The **Proofreading** graph visualizes the approval and voting activity over time, showing two distinct lines: *Approved Words* and *Votes*. By hovering over the data points, you can view the daily or monthly totals for both approved texts and votes cast.
## [Cost Estimate](#cost-estimate)
[Section titled “Cost Estimate”](#cost-estimate)
The Cost Estimate report allows you to calculate the approximate price of your contribution (i.e., translation or proofreading) to the project based on all or specific tasks to which you were assigned.
Note
You can select from tasks with To Do or In Progress status.
Set the translation and approval rates to see the cost for untranslated and not approved strings within selected tasks.
You can generate a Cost Estimate report based on the following filter parameters:
* Task: All tasks, or a specific task.
Note
Final translation cost might differ due to various factors such as added or deleted texts, multiple people translating the same string into the same language, and others.
### [Generating a Report](#generating-cost-estimate)
[Section titled “Generating a Report”](#generating-cost-estimate)
To generate the Cost Estimate report, follow these steps:
1. Select the preferred currency and the report unit (words, strings, characters without spaces, or characters with spaces).
2. Set your [rates](#rates-cost-estimate) for translations and approvals.
3. Use the available filter parameters to specify the report data you’re interested in.
4. Click **Generate**.
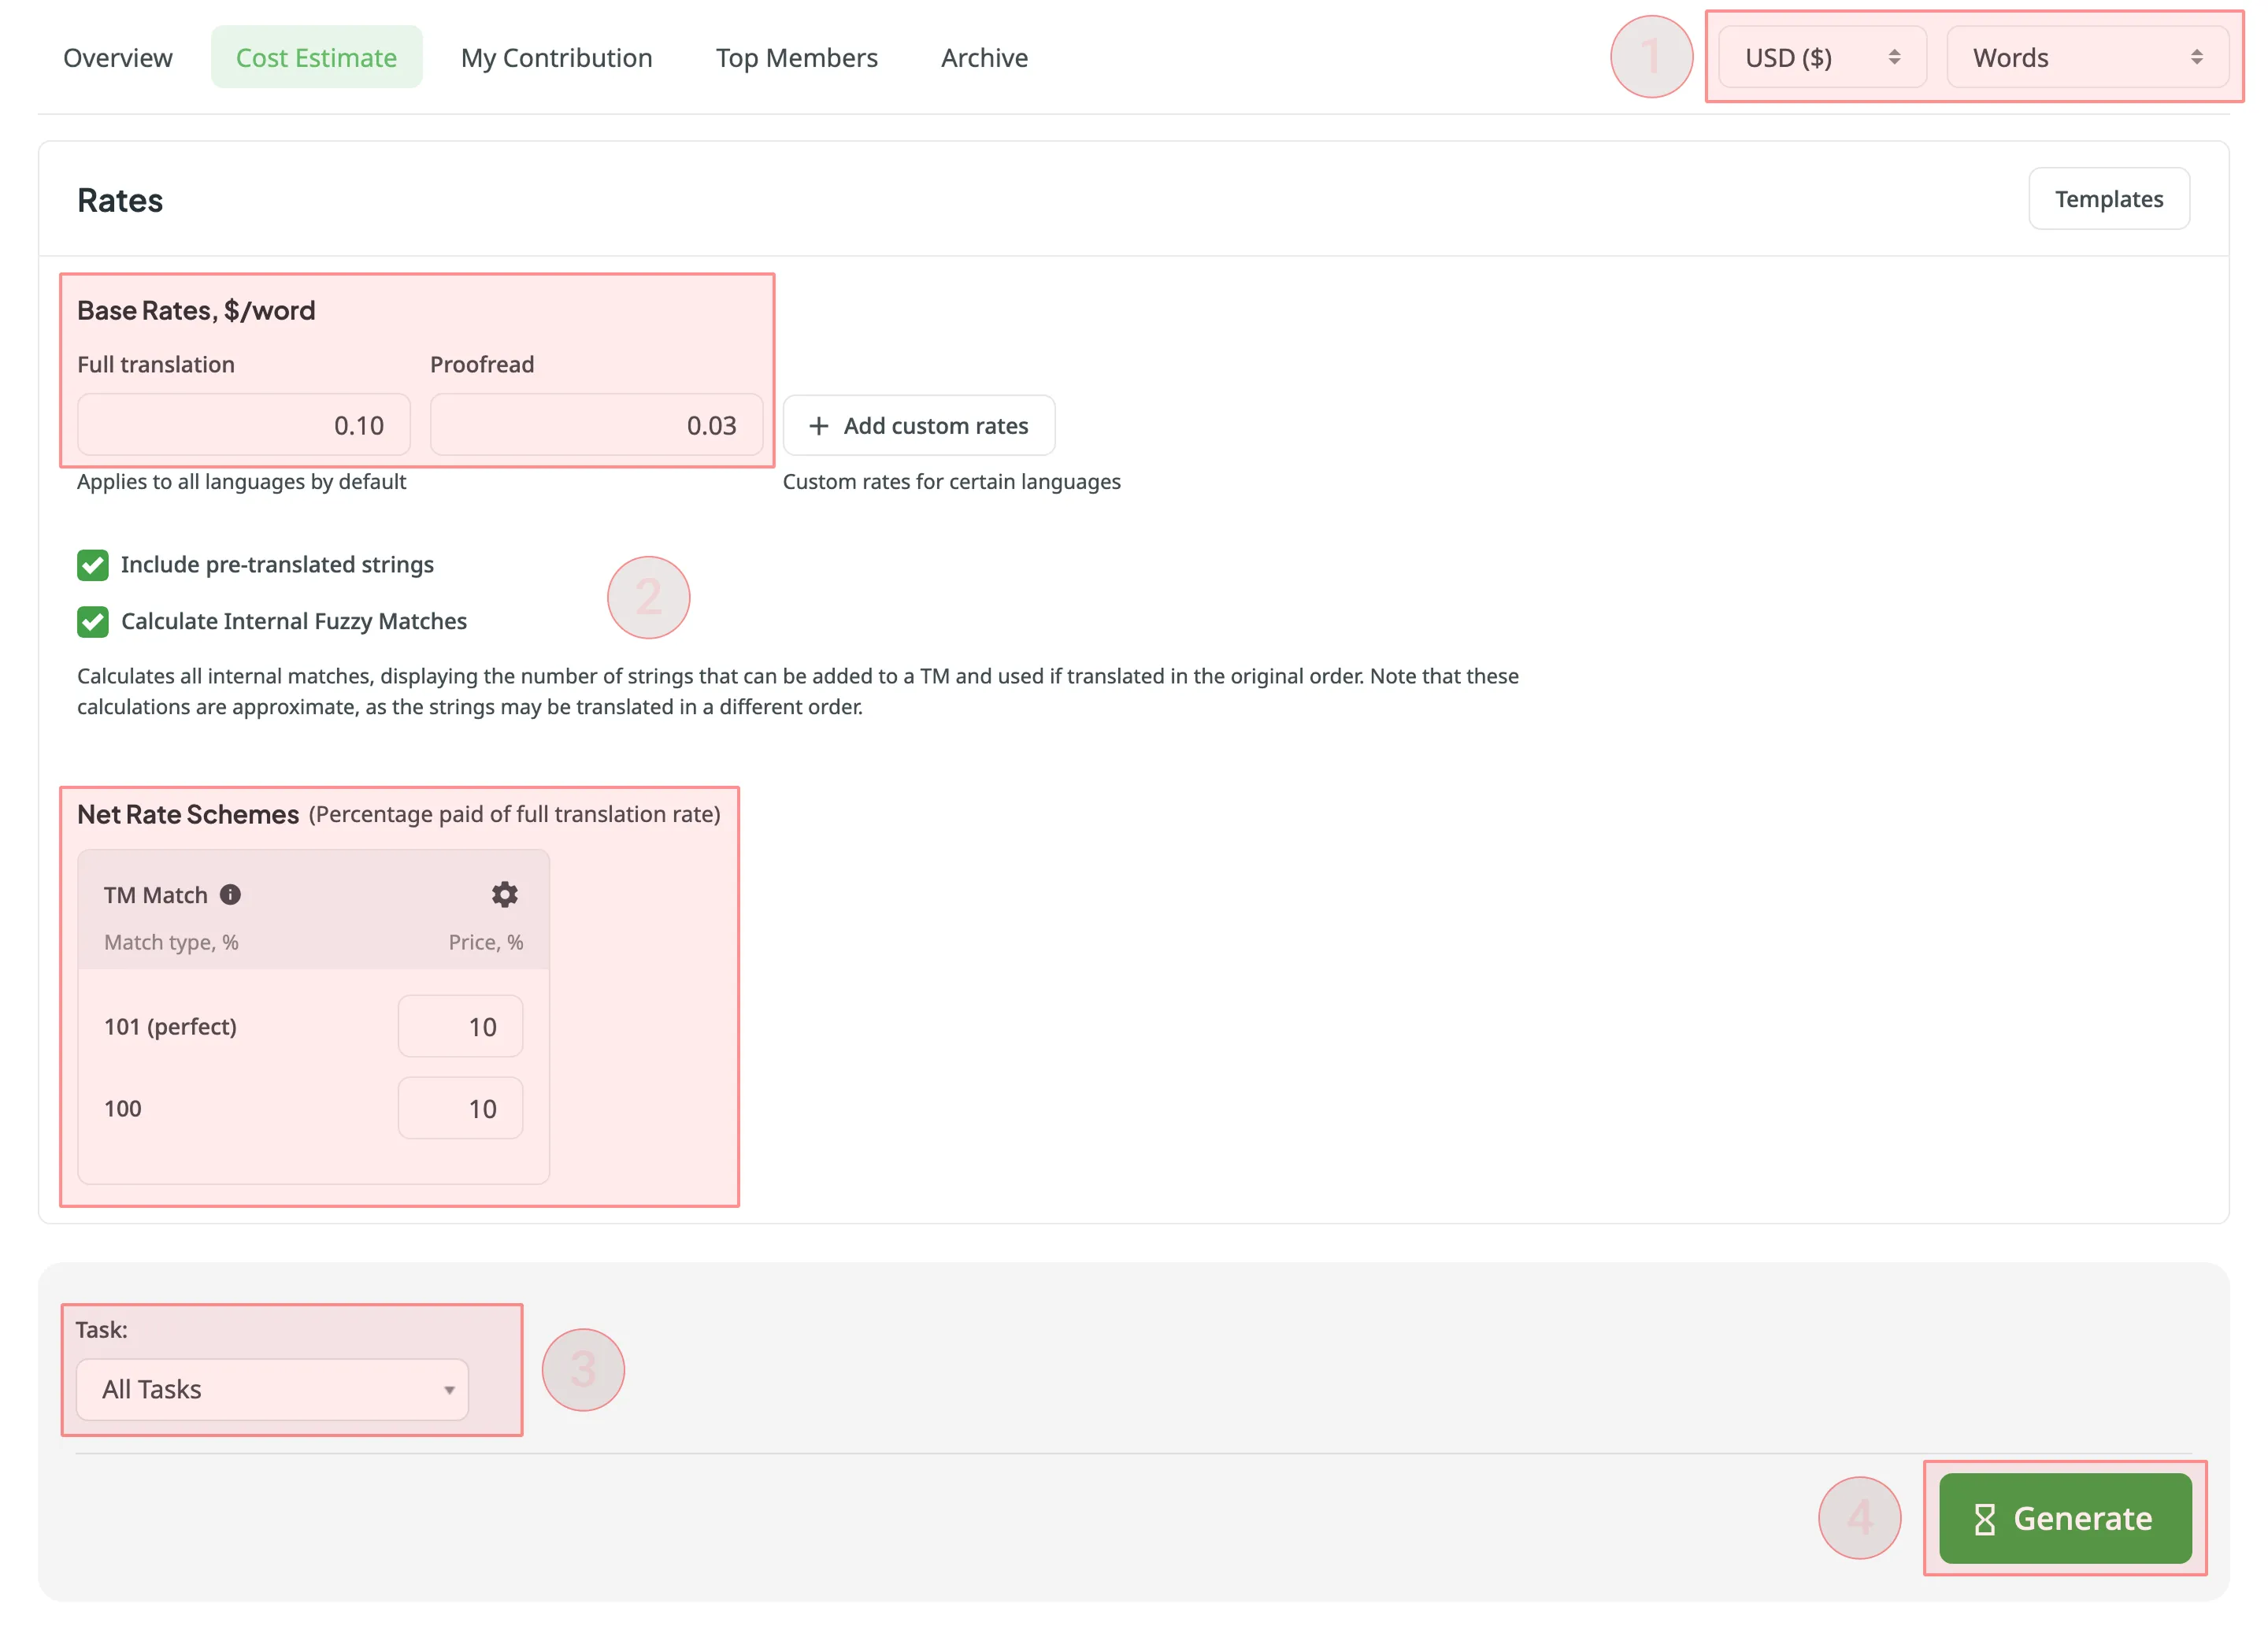
Note
Rates are automatically saved after you click *Generate*.
#### [Cost Estimate Queue](#queue-cost-estimate)
[Section titled “Cost Estimate Queue”](#queue-cost-estimate)
After you click **Generate**, the Cost Estimate report is added to a shared report queue for the project and processed in the background. This ensures that multiple reports generated with different filters don’t override one another. Each report is generated separately and appears in the **Reports > Archive** section once completed.
Reports generated by managers have higher priority in the queue. If a manager starts generating a report while a contributor’s report is still in the queue, the manager’s report will be processed first.
When a report is added to the queue, a notification appears confirming that the report generation has been queued, with quick access to view the queue or close the message.
While the report is being generated, a pop-up in the lower-right corner of the screen shows the queue status. The status updates automatically as the report progresses:
* **Pending** – the report is waiting in the queue and has not started processing yet.
* **In progress** – the report generation has started. A progress bar shows the current percentage.
* **Completed** – the report has been generated successfully and can be accessed via the [Archive](#archive).
* **Failed** – an error occurred during report generation.
Each report runs independently, so you can safely generate multiple Cost Estimate reports with different filters without affecting those that might have been started earlier and are still in progress.
### [Rates](#rates-cost-estimate)
[Section titled “Rates”](#rates-cost-estimate)
You can set the prices for Base rates (full translation, proofread) and configure Net Rate Schemes (percentage of the full translation rate paid for translation using TM suggestions).
#### [Base Rates](#base-rates-cost-estimate)
[Section titled “Base Rates”](#base-rates-cost-estimate)
In the Base Rates section, you can set rates for the following types of work:
* **Full translation** – for each translation made by a person.
Note
If the string has multiple translations made by the same person, only one is counted. If the string has several translations made by different people, each is counted for a specific translator.
* **Proofread** – for each approved translation.
#### [Net Rate Schemes](#net-rate-schemes-cost-estimate)
[Section titled “Net Rate Schemes”](#net-rate-schemes-cost-estimate)
In the Net Rate Schemes section, in addition to the base rates, you can set the percentage of the full translation rate to be paid for translations made using TM suggestions of various TM Match types. By default, you can configure the percentage of the full translation rate for the following TM Match types:
* **101 (perfect)** – for translations made using Perfect match TM suggestions (source strings are identical to TM suggestion by text and context).
* **100** – for translations made using 100% match TM suggestions (source strings are identical to TM suggestion only by text).
You can also add your own TM match types, specifying the preferred percentage of text similarity and the percentage of the full translation rate to be paid for such a translation.
To add your own TM match types, follow these steps:
1. Click in the Net Rate Schemes section.
2. Click on the appeared button.
3. Specify the TM match range and the percentage of the full translation rate.
4. Click to save the settings.
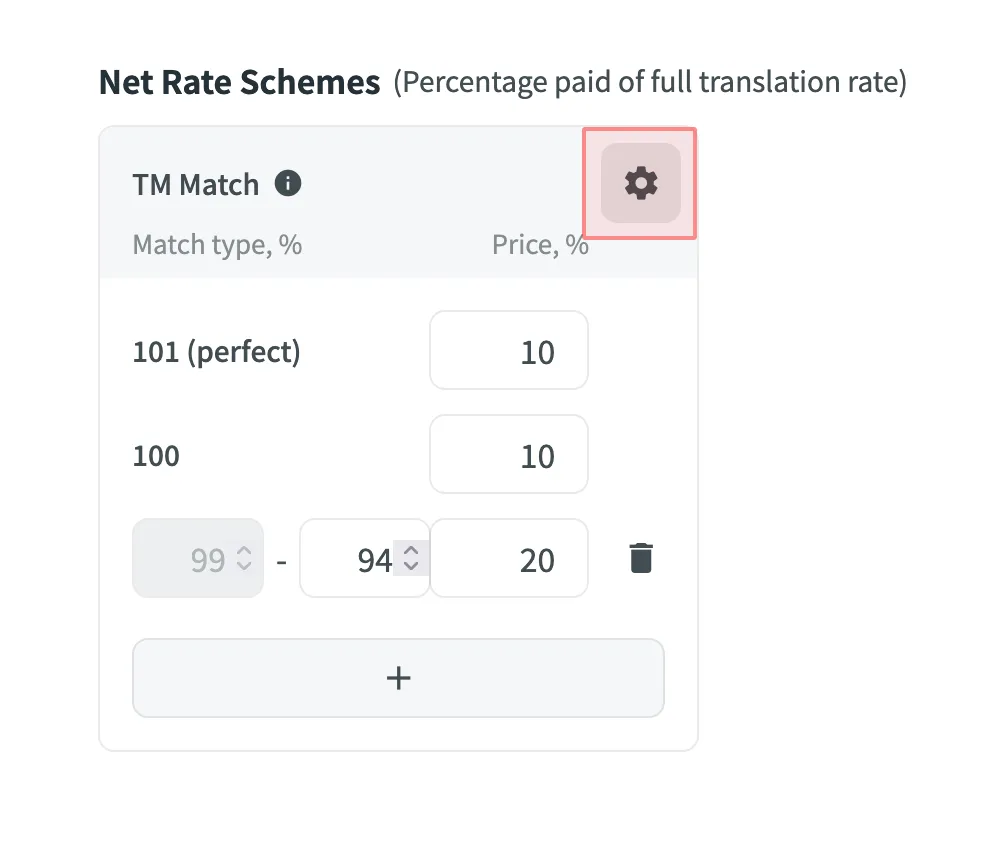
#### [Adding Custom Rates](#custom-rates-cost-estimate)
[Section titled “Adding Custom Rates”](#custom-rates-cost-estimate)
If you are multilingual and work with different languages, in addition to base rates that are applied to all languages by default, you can add custom rates for specific languages. To add custom rates, click **Add custom rates**.
To select the languages for custom rates, click **Edit Languages** and select the ones you need. You can create as many custom rates as you need.
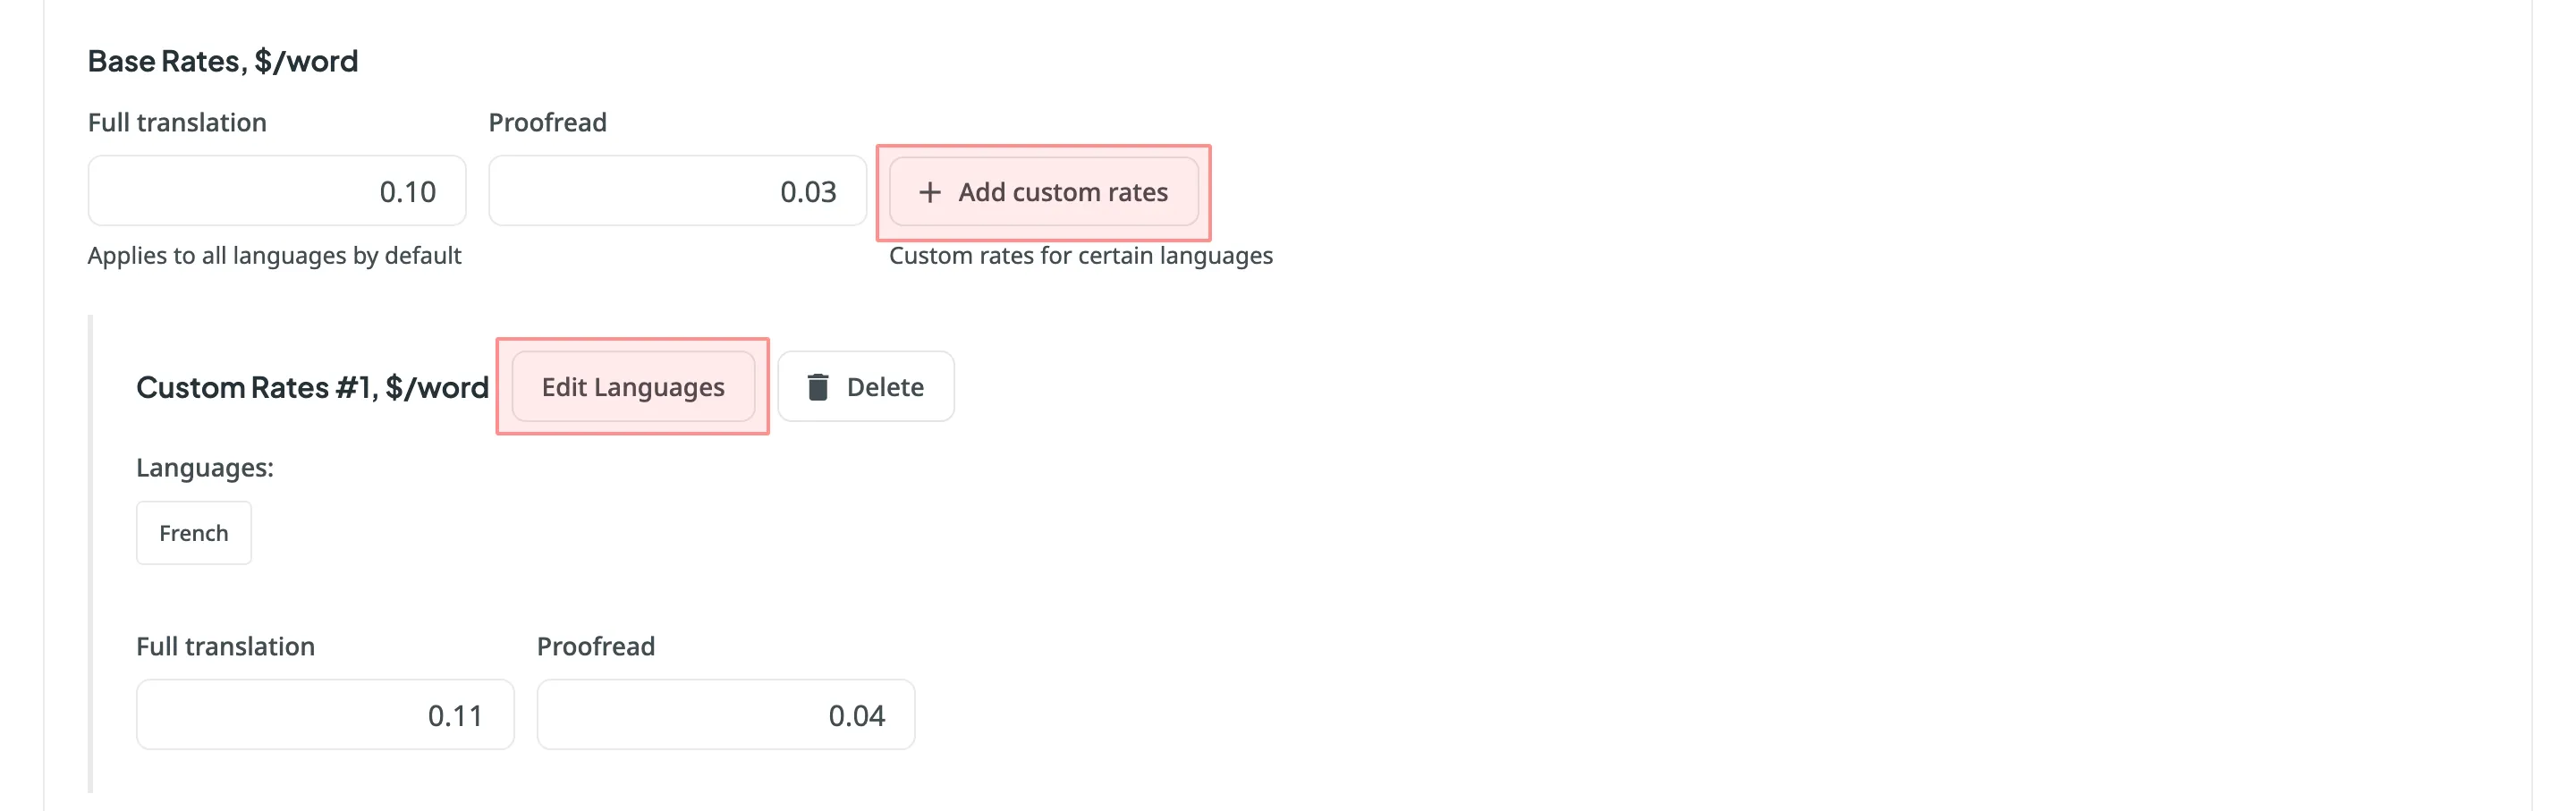
#### [Rate Templates](#rate-templates)
[Section titled “Rate Templates”](#rate-templates)
If project managers saved multiple rate configurations, you can use them for report generation. Saved templates allow you to quickly switch between different configurations.
Click **Templates** to view and select saved rate templates.
### [Include Pre-translated Strings](#include-pre-translated-strings)
[Section titled “Include Pre-translated Strings”](#include-pre-translated-strings)
Select **Include pre-translated strings** if you want to include pre-translated strings in a Cost Estimate report. By default, this option is selected.
For example, there is an untranslated string `Validate your username` in the project. You generate a Cost Estimate report with the **Include pre-translated strings** option selected. This string will be included in the Cost Estimate. Then a project manager pre-translates this string via TM or MT engine and you once again generate a Cost Estimate report with the **Include pre-translated strings** option selected. This time, the pre-translated string `Validate your username` won’t be included in the Cost Estimate report.
On the other hand, with the **Include pre-translated strings** option cleared, the string `Validate your username` will be included in the Cost Estimate report both times, when untranslated and when pre-translated via TM or MT engine.
### [Calculate Internal Fuzzy Matches](#calculate-internal-fuzzy-matches)
[Section titled “Calculate Internal Fuzzy Matches”](#calculate-internal-fuzzy-matches)
Internal Fuzzy Matches are partial (fuzzy) TM matches found among untranslated strings in your project that can potentially be added to the Translation Memory. For example, if the first string in a file is `Validate your username` and the last one is `Validate your username again`, there is an internal fuzzy match.
To include fuzzy (99% and less) internal matches, as well as perfect (101%) and 100% matches, in your Cost Estimate report and get a more comprehensive prediction of how many strings can be added to the TM if translated in sequence, select **Calculate Internal Fuzzy Matches**. Note that these calculations are approximate because the actual translation order may differ.
If you clear **Calculate Internal Fuzzy Matches**, the Cost Estimate report will only show perfect (101%) and 100% internal matches (repetitions), and will not include any fuzzy matches.
Note
Internal Fuzzy Matches are counted according to the [Net Rate Schemes](#net-rate-schemes-cost-estimate) configurations.
### [Result Analysis](#result-analysis-cost-estimate)
[Section titled “Result Analysis”](#result-analysis-cost-estimate)
When the report is generated, you will see the following amounts:
* **Total** - General cost estimate for all tasks.
* **Subtotals** - Cost estimate for each task:
* **Translation** – Cost for strings requiring new or updated translations (no high–percentage match leverage).
* **Proofreading** – Cost for reviewing translations.
* **TM Savings** – Savings from existing translations (in TM or within the project).
* **Weighted Words / Strings / Characters / Characters with Spaces** – Final word count for cost calculations after applying TM/internal match discounts.
* The main table with details on match categories and statuses.
* The second table showing data for each folder or file included in the task.
To download the Cost Estimate report, click **Export** and select the preferred export format (CSV, XLSX, or JSON).
Note
The generated Cost Estimate report is available for viewing in the [Archive](#archive) section.
## [Top Members](#top-members)
[Section titled “Top Members”](#top-members)
The Top Members report allows you to check your position on the list of project members and see who contributed the most to the project’s translation over time. This list includes all users who have ever contributed, even if they are no longer current project members.
Default parameters:
* *Text unit*: words
* *Time period*: Last 30 days
* *Sorted by*: translated text units. A member who translated the most is placed at the top of the list.
* *Languages*: all languages
* *Contributors*: all
The **YOU** label appears next to your own username in the report table, making it easier to identify your personal contribution.
Re-sort the members by clicking on the needed parameter. For example, if you are a proofreader, you might want to know who approved most of the strings. For this, click on the *Approved* parameter to redo sorting.
### [Generating a Custom List of Top Members](#generating-a-custom-list-of-top-members)
[Section titled “Generating a Custom List of Top Members”](#generating-a-custom-list-of-top-members)
To generate a custom list of top members, follow these steps:
1. Select the preferred report unit (words, strings, characters with or without spaces).
2. Select the time period for which you want to see the activity of contributors.
3. To make a list of contributors for a specific language, select the language you need from the drop-down menu above the list. Alternatively, select **All languages**.
4. Click **Generate**.
To look for your account or account of any other contributor, use the search field.
The Top Members list includes the following columns:
* *Rank* – contributor’s position in the list based on the currently selected sorting criteria (e.g., *Translated*, *Approved*, etc.).
* *Name* – contributor’s first name, last name and username.
* *Languages* – project languages.
* *Translated* – the number of translated source content units.
* *Target* – the number of translated content units in a target language.\
This parameter is not available for the *Strings* content unit because the number of source and translated strings is always the same.
* *Approved* – the number of approved content units.
* *Voted* – the number of votes a contributor made.
* *”+” votes received* – the number of upvotes a contributor received for translations.
* *”-” votes received* – the number of downvotes a contributor received for translations.
* *Winning* – the number of approvals a contributor received for translations.
* *Given access* – indicates when a member was granted access to a project.
To customize the visibility of columns in the report, click at the upper-right side of the table and select the preferred ones.
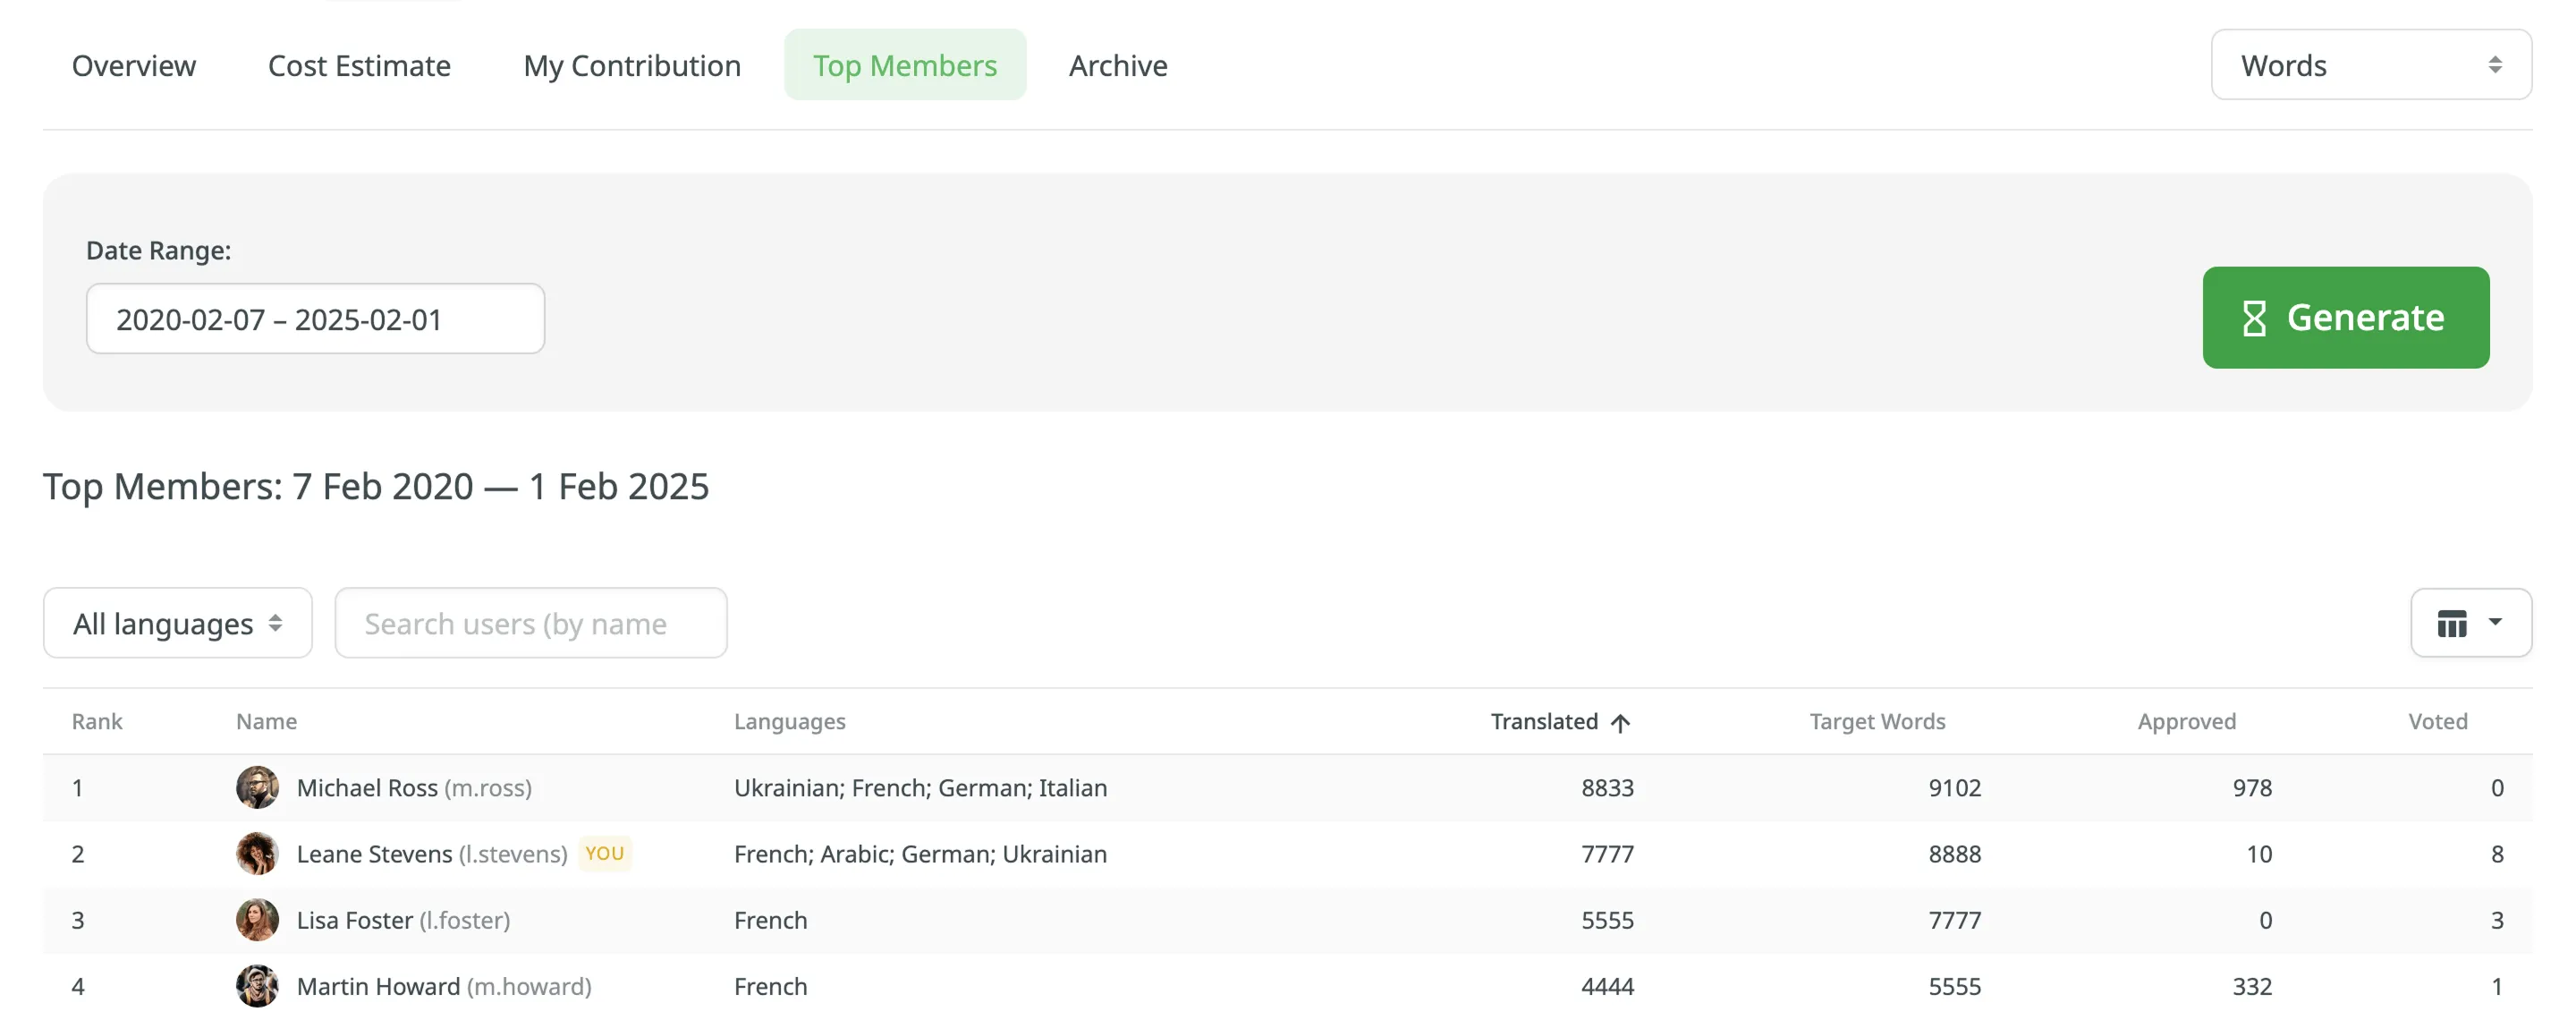
## [My Contribution](#my-contribution)
[Section titled “My Contribution”](#my-contribution)
The My Contribution report allows you to calculate the price of your contribution (i.e., translation or proofreading) to the project.
You can generate a My Contribution report based on the following filter parameters:
* Task: Not selected, All Tasks, or specific task.
* Date Range: Today, Yesterday, Last 7 days, Last 30 days, This month, Last month, All time, or Custom range.
* Files: All files (including deleted files and strings) or Selected files (including deleted strings).
### [Generating a Report](#generating-my-contribution)
[Section titled “Generating a Report”](#generating-my-contribution)
To generate the My Contribution report, follow these steps:
1. Select the preferred currency and the report unit (words, strings, characters without spaces, or characters with spaces).
2. Set your [rates](#rates-my-contribution) for translations and approvals.
3. Use the available filter parameters to specify the report data you’re interested in.
4. Click **Generate**.
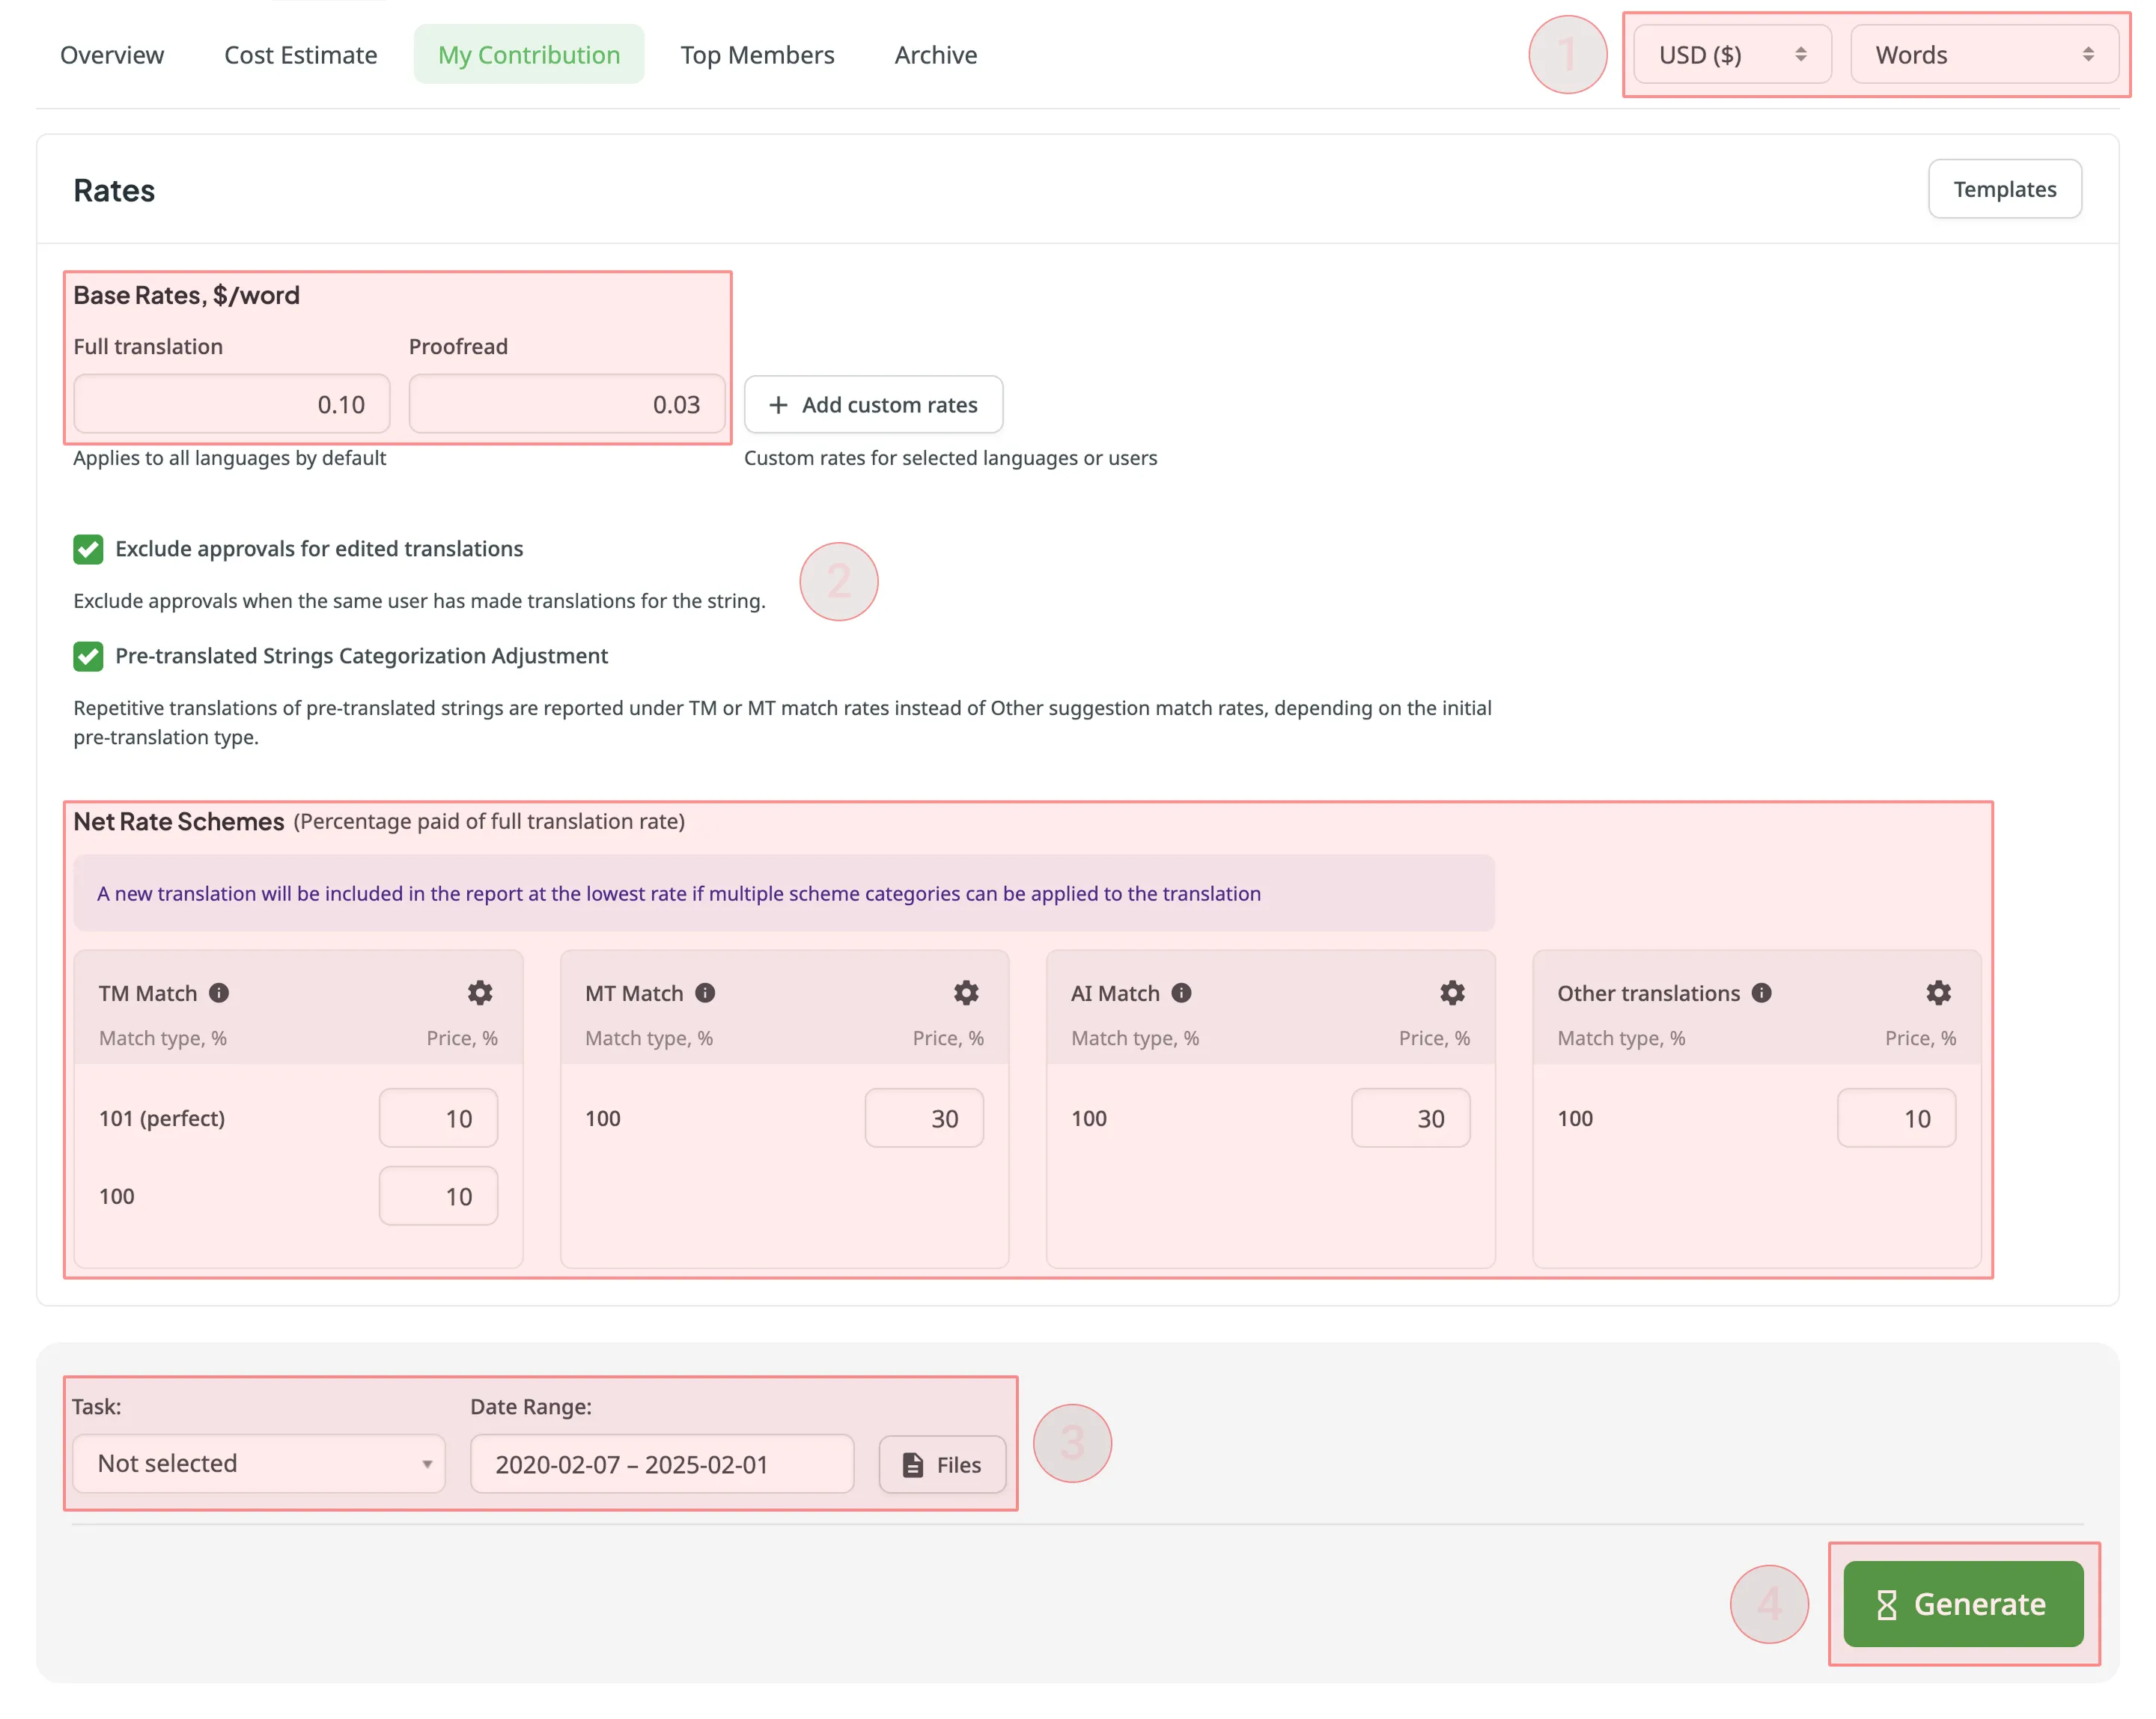
Note
Rates are automatically saved after you click **Generate**.
Note
If the scope of a task changes after contributions have already been made (e.g., if some strings were removed from the task), these contributions will still be included when generating a My Contribution report for **All Tasks** or a **specific task**.
### [Rates](#rates-my-contribution)
[Section titled “Rates”](#rates-my-contribution)
You can set the prices for Base rates (full translation, proofread) and configure Net Rate Schemes (percentage of the full translation rate paid for translation using TM suggestions, MT suggestions, and existing translations).
#### [Base Rates](#base-rates-my-contribution)
[Section titled “Base Rates”](#base-rates-my-contribution)
In the Base Rates section, you can set rates for the following types of work:
* **Full translation** – for each translation you made.
Note
If the string has multiple translations made by the same person, only one is counted. If the string has several translations made by different people, each is counted for a specific translator.
* **Proofread** – for each approved translation.
#### [Net Rate Schemes](#net-rate-schemes-my-contribution)
[Section titled “Net Rate Schemes”](#net-rate-schemes-my-contribution)
In the Net Rate Schemes section, in addition to the base rates, you can set the percentage of the full translation rate to be paid for translations made using TM suggestions, MT suggestions, and other translations of various Match types.
By default, you can configure the percentage of the full translation rate for the following match type categories:
**TM Match types:**
* **101 (perfect)** – for translations made using Perfect match TM suggestions (source strings are identical to TM suggestion by text and context).
* **100** – for translations made using 100% match TM suggestions (source strings are identical to TM suggestion only by text).
**MT Match types:**
* **100** – for translations made using 100% match MT suggestions (new suggested translations are identical to MT suggestion).
**AI Match types:**
* **100** – for translations made using 100% match AI suggestions (new suggested translations are identical to AI suggestion).
**Other translations types:**
* **100** – for translations made using existing translations (new suggested translations are identical to the existing translations).
If a string has a combination of TM and MT suggestions and existing translations, the new translation is counted at the lowest Net Rate Scheme value. For example, if a string has a 101% (perfect) TM match suggestion (10% of the full translation rate) and a 100% MT match suggestion (5% of the full translation rate), the new translation added to this string will be counted at a 5% of the full translation rate.
You can also add your own TM, MT, and Other translations match types, specifying the preferred percentage of text similarity and the percentage of the full translation rate to be paid for such a translation.
To add your own match types, follow these steps:
1. Click in the Net Rate Schemes section.
2. Click on the appeared button.
3. Specify the match range and the percentage of the full translation rate.
4. Click to save the settings.
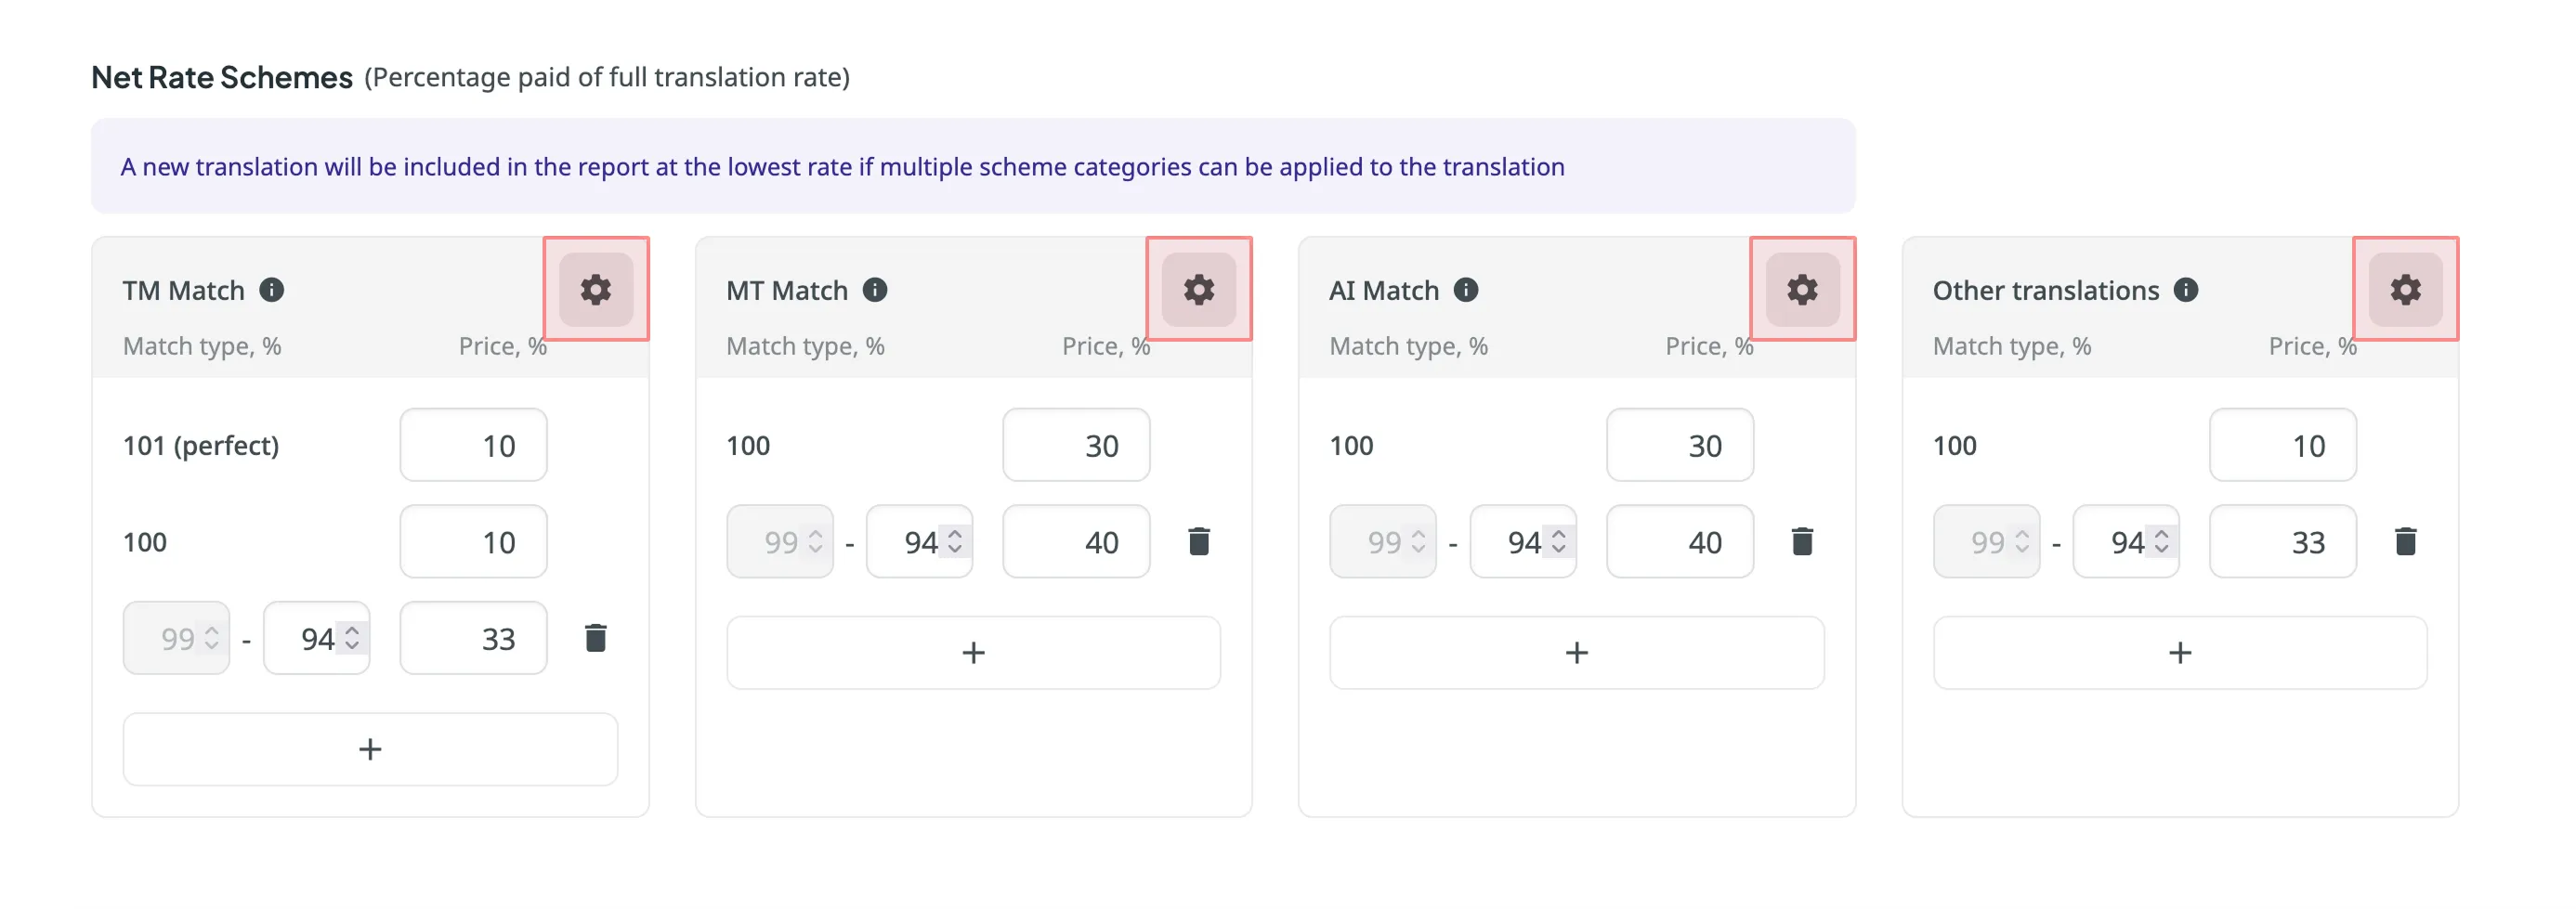
#### [Adding Custom Rates](#custom-rates-my-contribution)
[Section titled “Adding Custom Rates”](#custom-rates-my-contribution)
If you are multilingual and work with different languages, in addition to base rates that are applied to all languages by default, you can add custom rates for specific languages. To add custom rates, click **Add custom rates**.
To select the languages for custom rates, click **Edit Languages** and select the ones you need. You can create as many custom rates as you need.

### [Using Additional My Contribution Options](#using-additional-my-contribution-options)
[Section titled “Using Additional My Contribution Options”](#using-additional-my-contribution-options)
* **Exclude Approvals for Edited Translations:** select this option to exclude approvals when the same user has translated the string.
* **Pre-Translated Strings Categorization Adjustment:** select this option to have repetitive translations of pre-translated strings categorized under TM or MT match rates, rather than the default Other suggestion match rates.
### [Result Analysis](#result-analysis-my-contribution)
[Section titled “Result Analysis”](#result-analysis-my-contribution)
When the report is generated, you will see the following amounts:
* **User Information** - profile picture, full name, and username.
* **Total** - General cost for all contributions.
* **Language Subtotals** - A breakdown of costs for each target language:
* **Savings** - The amount saved with leveraged matches from TM, MT, or AI.
* **Weighted Words / Strings / Characters / Characters with Spaces** – Shows the adjusted metric after applying repetitions and fuzzy matches, reflecting the actual translation effort.
* **Pre-translated Words / Strings / Characters / Characters with Spaces** - Shows how many units were pre-translated.
* The table containing a further breakdown of work types (Translation & Post-editing and Proofreading) and match types (No Match, TM Match, MT Match, AI Match, Other translations Match).
To download the My Contribution report, click **Export** and select the preferred export format (CSV, XLSX, or JSON).
If you want to regenerate the report with other rates, edit the rates and follow the procedure again.
## [Time Spent](#time-spent)
[Section titled “Time Spent”](#time-spent)
The **Time Spent** report allows you to calculate the price of your contribution (i.e., translation or proofreading) to the project based on the time you spend on tasks.
The report uses the [time you logged](/user-tasks/#logging-time-spent-on-a-task) directly in a task’s comments.
You can generate a **Time Spent** report based on the following filter parameters:
* **Task**: Not selected, All Tasks, or multiple specific tasks.
* **Date Range**: Today, Yesterday, Last 7 days, Last 30 days, This month, Last month, All time, or Custom range.
* **Language**: All or specific target language.
* **Task Type**: All types, Translate, Proofread, Translate by vendor, or Proofread by vendor.
* **Group by**: Member, Language, or Task.
### [Generating a Report](#generating-time-spent)
[Section titled “Generating a Report”](#generating-time-spent)
To generate the **Time Spent** report, follow these steps:
1. Select the preferred currency.
2. Set your [rates](#rates-time-spent).
3. Use the available filter parameters to specify the report data you’re interested in.
4. Click **Generate**.
Note
Rates are automatically saved after you click **Generate**.
### [Rates](#rates-time-spent)
[Section titled “Rates”](#rates-time-spent)
You can set the hourly prices for your work. Unlike the **My Activity** report, the unit for the **Time Spent** report is fixed to **hour**.
#### [Base Rate](#base-rate-time-spent)
[Section titled “Base Rate”](#base-rate-time-spent)
In the **Base Rate** section, you can set the hourly rate that will be applied to all work types (translation and proofreading) you do in the project.
#### [Adding Custom Rates](#custom-rates-time-spent)
[Section titled “Adding Custom Rates”](#custom-rates-time-spent)
If you are multilingual and work with different languages, you can add custom rates for specific languages. To add custom rates, click **Add custom rates**.
To select the languages for custom rates, click **Edit Languages** and select the ones you need. You can create as many custom rates as you need.
#### [Rate Templates](#rate-templates-time-spent)
[Section titled “Rate Templates”](#rate-templates-time-spent)
If project managers have saved multiple rate configurations, you can use them for report generation. Click **Templates** to view and select saved rate templates.
Note
Templates saved for the **Time Spent** report can’t be applied to other reports, and consequently, rate templates saved for other reports can’t be applied here.
### [Result Analysis](#result-analysis-time-spent)
[Section titled “Result Analysis”](#result-analysis-time-spent)
When the report is generated, you will see the following amounts:
* **User Information** - profile picture, full name, and username.
* **Total** - The total calculated cost and total time spent for your contribution during the selected time period.
* **Language Subtotals** - The report shows a breakdown of costs for each target language:
* **Time Spent** - The total time you logged for the work in a specific language.
* **Rate per hour** - The hourly rate applied (based on your configured [Base Rate](#base-rate-time-spent) and [Custom Rates](#custom-rates-time-spent)).
* **Price** - The total cost calculated for the work in that language.
To download the **Time Spent** report, click **Export** and select the preferred format (CSV, XLSX, or JSON) for further analysis or record-keeping.
Note
Reports generated by contributors are not added to the project’s shared archive.
## [Archive](#archive)
[Section titled “Archive”](#archive)
The Archive section allows you to access the records of previously generated Cost estimate and My Contribution reports, providing a convenient way to review historical data.
This section also eliminates the need to wait for a report generation to complete. You can initiate a report generation and return to it later at your convenience. Within the Archive, you can review the report summary and, if necessary, download it in various supported file formats.
Each project has its own independent archive section. As a contributor, you can view, export, and delete only the reports you generated yourself.
### [Viewing Previously Generated Reports](#viewing-previously-generated-reports)
[Section titled “Viewing Previously Generated Reports”](#viewing-previously-generated-reports)
To view the summary of the previously generated reports (i.e., archive records), follow these steps:
1. Open the project and go to **Reports > Archive**.
2. Click on the name of the needed archive record.
3. Once you open the archive report record, you can view all the needed data.
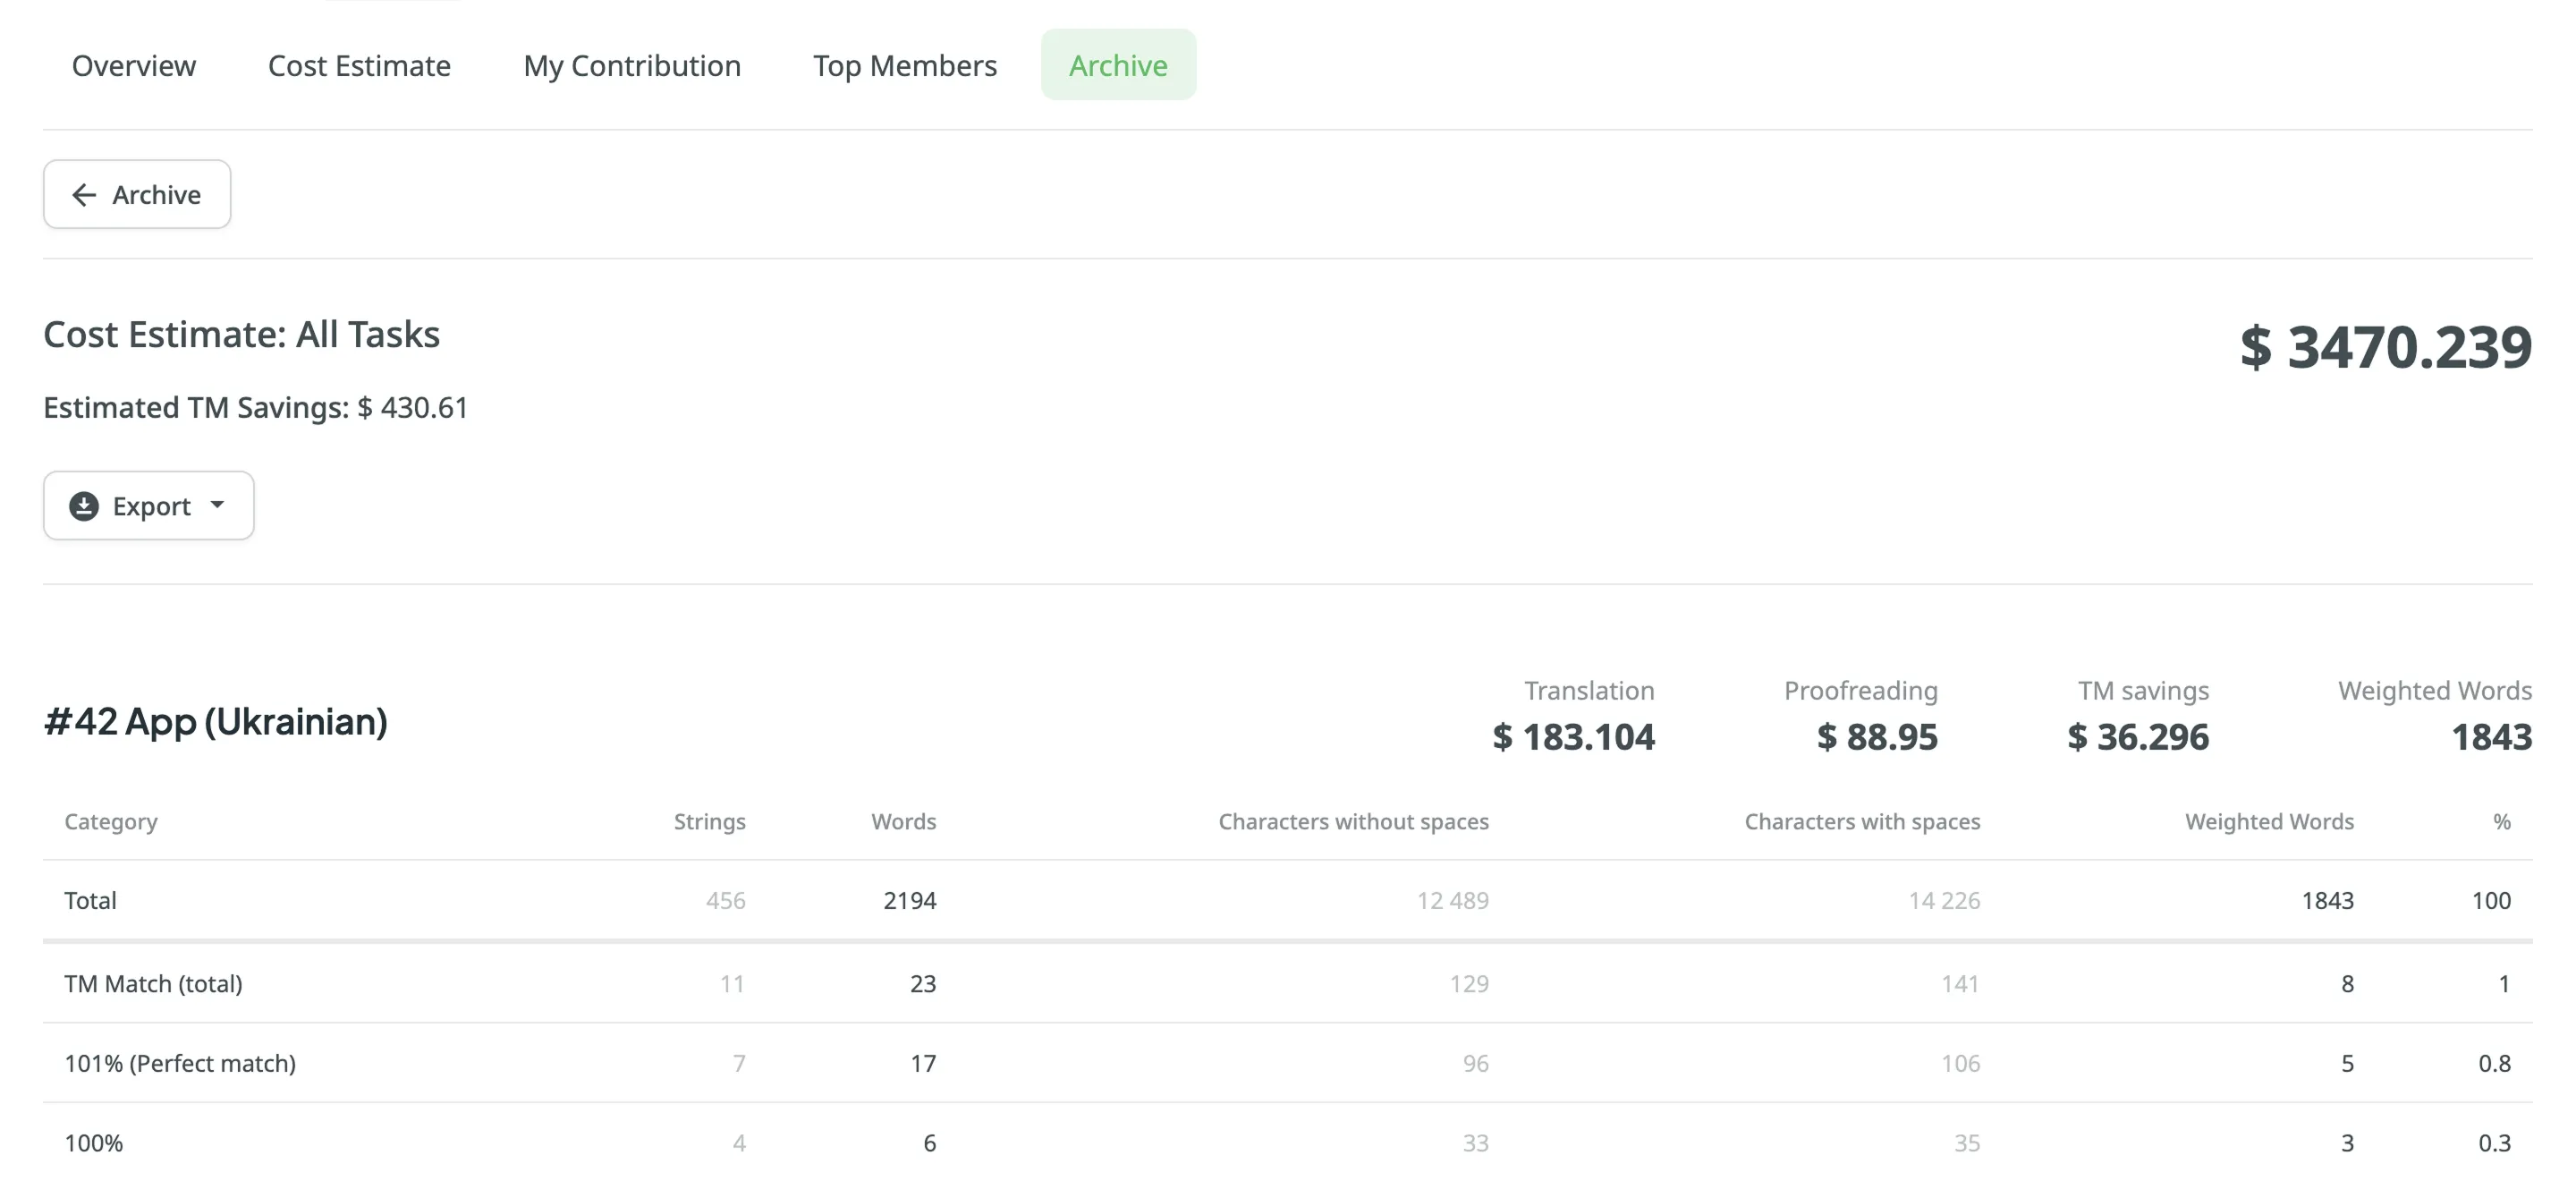
### [Exporting Previously Generated Reports](#exporting-previously-generated-reports)
[Section titled “Exporting Previously Generated Reports”](#exporting-previously-generated-reports)
To export the previously generated reports, follow these steps:
1. Open the project and go to **Reports > Archive**.
2. Click on the needed report in the list.
3. Click on the preferred file format to export.
### [Deleting Previously Generated Reports](#deleting-previously-generated-reports)
[Section titled “Deleting Previously Generated Reports”](#deleting-previously-generated-reports)
To delete the previously generated reports, follow these steps:
1. Open the project and go to **Reports > Archive**.
2. Click on the needed report in the list.
3. Click **Delete**.
# Cookie Statement
> Crowdin Cookie Policy
Last Updated on September 29, 2023
## [What are cookies?](#what-are-cookies)
[Section titled “What are cookies?”](#what-are-cookies)
This Cookie Policy explains what cookies are and how we use them, the types of cookies we use i.e, the information we collect using cookies and how that information is used, and how to manage the cookie settings.
Cookies are small text files that are used to store small pieces of information. They are stored on your device when the website is loaded on your browser. These cookies help us make the website function properly, make it more secure, provide better user experience, and understand how the website performs and to analyze what works and where it needs improvement.
## [How do we use cookies?](#how-do-we-use-cookies)
[Section titled “How do we use cookies?”](#how-do-we-use-cookies)
As most of the online services, our website uses first-party and third-party cookies for several purposes. First-party cookies are mostly necessary for the website to function the right way, and they do not collect any of your personally identifiable data.
The third-party cookies used on our website are mainly for understanding how the website performs, how you interact with our website, keeping our services secure, providing advertisements that are relevant to you, and all in all providing you with a better and improved user experience and help speed up your future interactions with our website.
## [Types of Cookies we use](#types-of-cookies-we-use)
[Section titled “Types of Cookies we use”](#types-of-cookies-we-use)
## [Manage cookie preferences](#manage-cookie-preferences)
[Section titled “Manage cookie preferences”](#manage-cookie-preferences)
[Cookie Settings]()
You can change your cookie preferences any time by clicking the above button. This will let you revisit the cookie consent banner and change your preferences or withdraw your consent right away.
In addition to this, different browsers provide different methods to block and delete cookies used by websites. You can change the settings of your browser to block/delete the cookies. Listed below are the links to the support documents on how to manage and delete cookies from the major web browsers.
* Chrome:
* Safari:
* Firefox:
* Internet Explorer:
If you are using any other web browser, please visit your browser’s official support documents.
# Creating a Project
> Learn how to create a project in Crowdin
To be able to upload your content for localization, you first need to create a project.
## [Project Visibility](#project-visibility)
[Section titled “Project Visibility”](#project-visibility)
When creating a project, you can select the preferred *project visibility*:
Public project
Visible to everyone. The project will appear in the global Crowdin search results and be indexed by search engines. You can configure collaboration and access settings after the project is created.
Private project
Visible only to the invited project members.
## [Project Types](#project-types)
[Section titled “Project Types”](#project-types)
Crowdin offers flexibility in how you organize and manage your localization process. There are two main project types: *File-based* and *String-based*. Choose the one that best fits how your content is structured and how you plan to manage translations.
### [File-based Project](#file-based-project)
[Section titled “File-based Project”](#file-based-project)
A file-based project is the standard localization setup in Crowdin, ideal for translating apps and documents. In this project type, you upload source files containing translatable content. Crowdin scans these files, identifies text for translation, and retains the original files within the project. After translation, you can export the files, preserving the original structure and format.
This project type is ideal when maintaining the original file structure upon export is crucial, and when integrating with version control systems (e.g., GitHub, GitLab, Bitbucket, Azure Repos) and external data sources.
Crowdin supports [a wide range of formats](/supported-formats/) used in software development and documentation, including Android XML, iOS Strings, JSON, XLIFF, Markdown, DOCX, and more.
#### [Use Cases](#use-cases)
[Section titled “Use Cases”](#use-cases)
* Translate app strings and documents stored in structured files.
* Maintain the original folder and file structure when exporting translations.
* Keep source files in sync with code repositories.
* Align localization with development and release workflows.
* Suitable for version-controlled content or structured documents.
### [String-based Project](#string-based-project)
[Section titled “String-based Project”](#string-based-project)
A string-based project in Crowdin is designed for managing dynamic content through a centralized string repository. Instead of storing source files, Crowdin extracts individual translatable strings and maintains them within the platform. This setup is ideal for content that changes frequently, such as UI text and other modular content blocks.
With this approach, you can update source strings directly in Crowdin without needing to re-upload files. Translated strings can then be exported in various formats, including JSON, iOS Strings, or Android XML, facilitating reuse across multiple platforms like web, mobile, and desktop.
#### [Use Cases](#use-cases-1)
[Section titled “Use Cases”](#use-cases-1)
* Manage and translate app or website UI text in a centralized location.
* Let content writers update source strings online without developer involvement.
* Translate database content without needing to manage source files.
* Avoid duplicate translation effort for strings reused across platforms (e.g., Android, iOS, Web).
* Export translations in your preferred format, including JSON, iOS Strings, or Android XML.
* Ideal for teams working with dynamic content and frequent updates.
Limitations
Some connectors have limited support, and certain features may not be available in string-based projects.
## [Creating a Project](#creating-a-project)
[Section titled “Creating a Project”](#creating-a-project)
To create a project, follow these steps:
1. [Log in](https://crowdin.com/login) to your Crowdin account or [Sign up](https://crowdin.com/join) to create one.
2. Click **Create Project**. 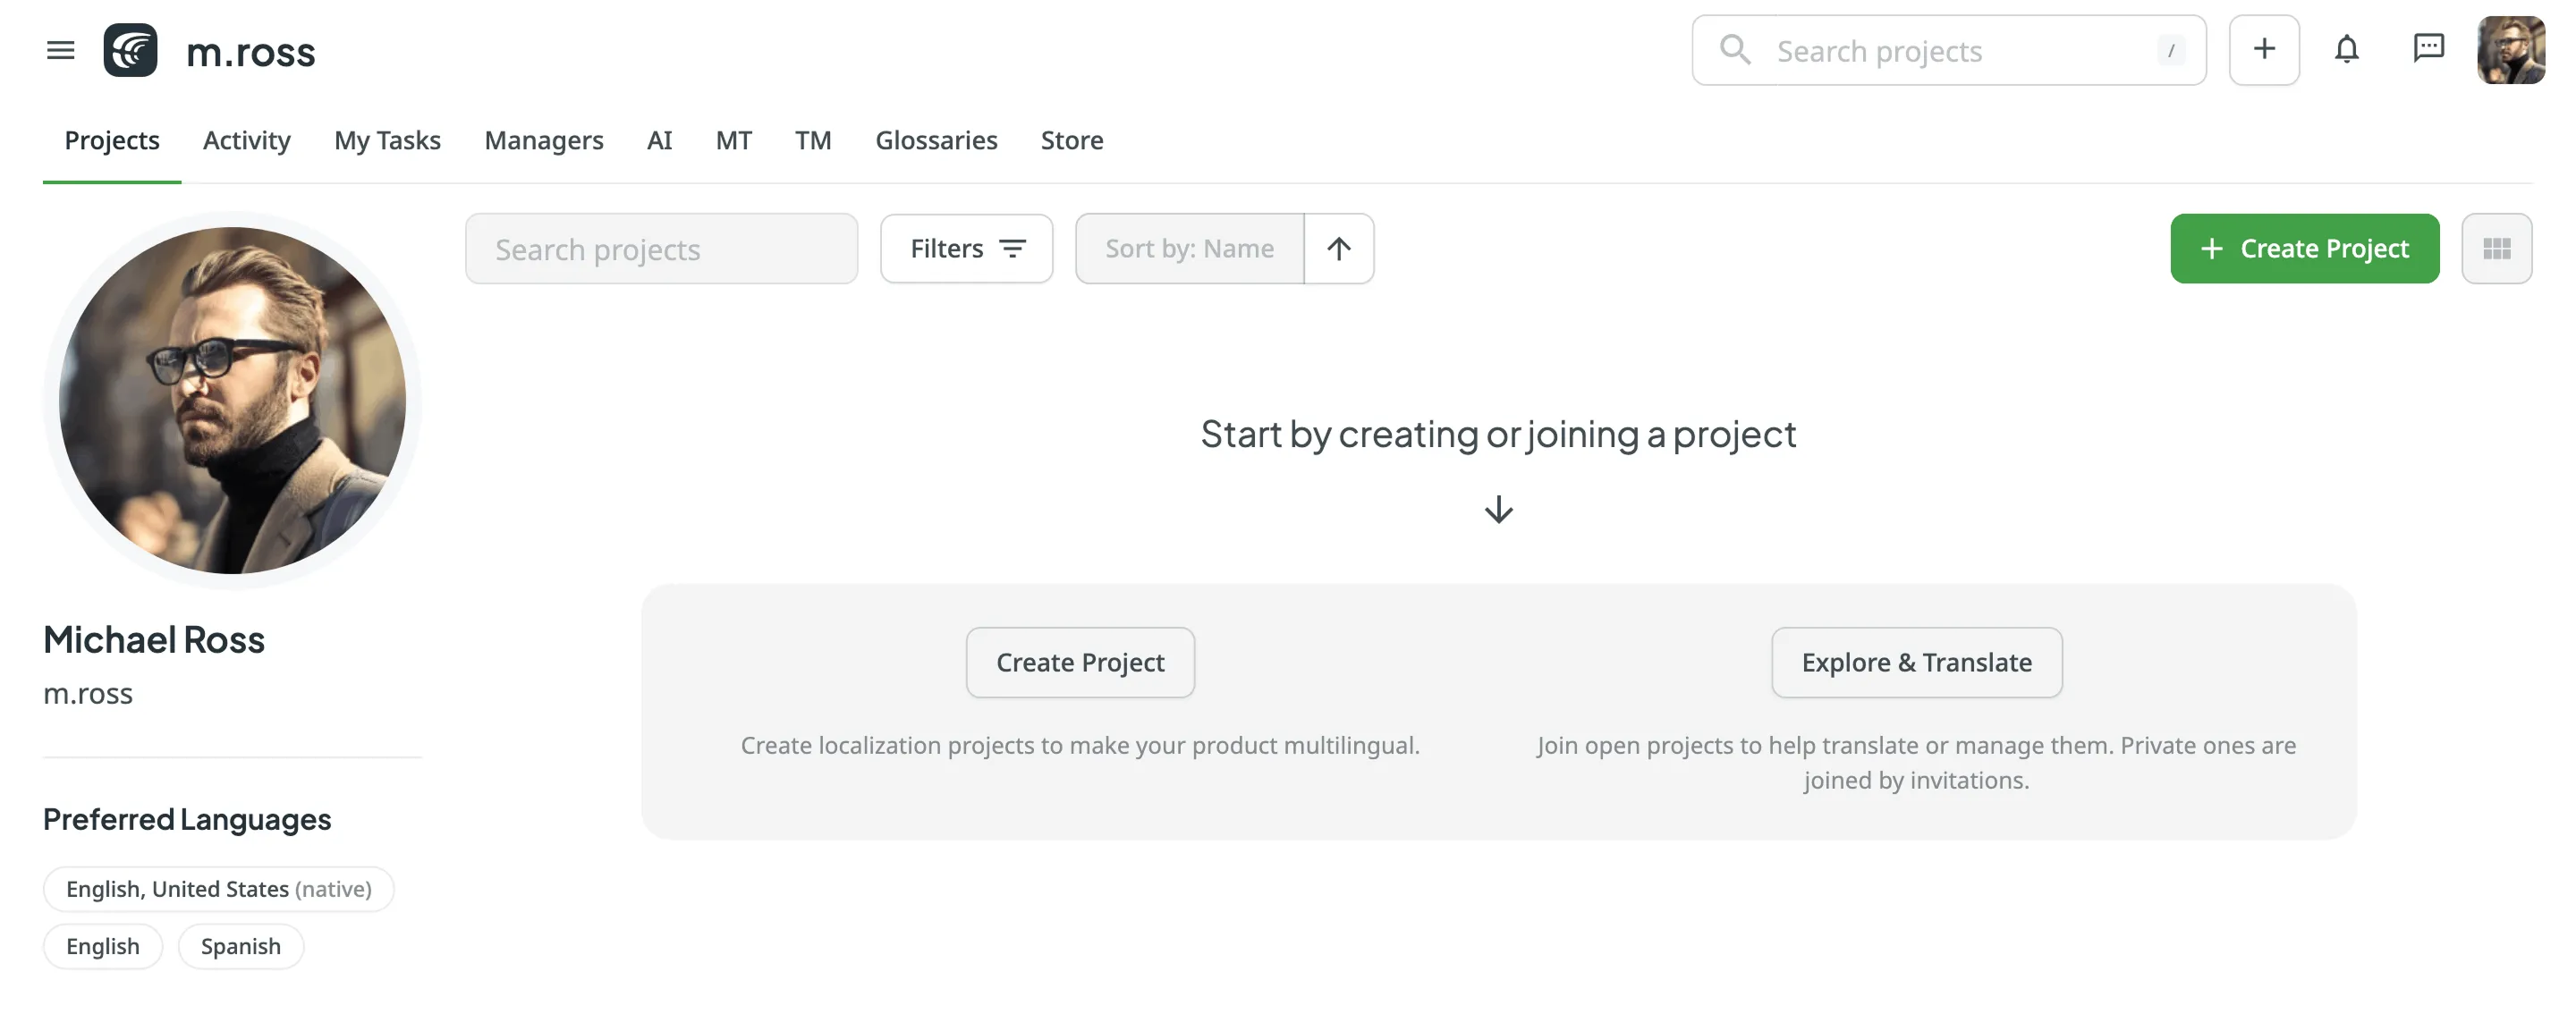
3. Enter a **Project name**.
4. Customize your **Project address** if needed. This will be the public URL for your project.
5. Select the **Project visibility**. You can choose between a **Public project** (visible to anyone) or a **Private project** (visible only to invited members). Further access controls can be configured in the [project settings](/project-settings/privacy-collaboration/) after creation. 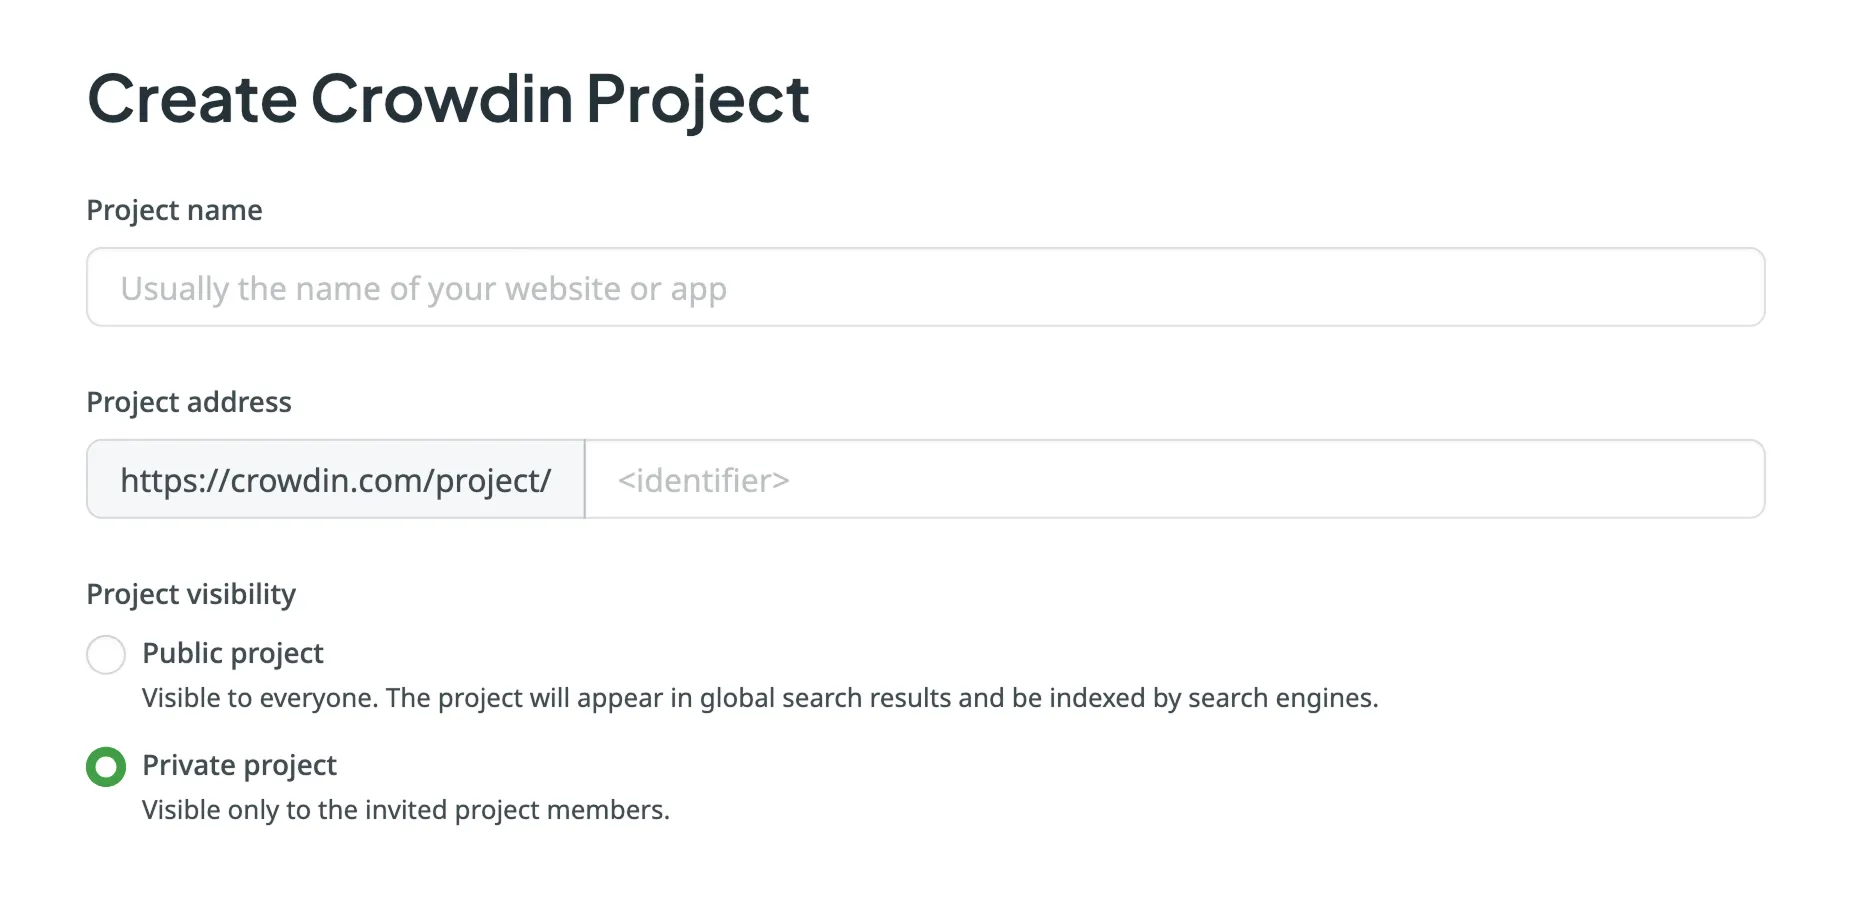
6. Select the **Source language** and **Target languages** for your project. The source language is the language you’re translating from, and the target languages are the ones you’re translating into.
7. Choose the project type that best fits your content and localization workflow: [**File-based Project**](#file-based-project) or [**String-based Project**](#string-based-project).
Tip
You can select target languages manually or use the **Pre-fill** option to [copy target languages](/project-settings/languages/#copying-target-languages) from another project under your account or select the top 30 most common languages. To translate into languages not officially supported, you can add them as [custom languages](/project-settings/languages/#adding-custom-languages).
8. *(Optional)* Select **Install Onboarding App** for a guided introduction to Crowdin’s features. After project creation, the Onboarding App will launch automatically to help you with initial setup steps.
9. *(Optional)* Under **Advanced settings**, you can select an existing **Translation Memory** and **Glossary** to be used as defaults for your new project. By default, a new empty TM and Glossary will be created for the project. You can change the [default TM](/project-settings/translation-memories/#changing-default-tm) and [default glossary](/project-settings/glossaries/#changing-default-glossary) in the project’s **Settings**.
10. Click **Create Project**.
Caution
The project address and type cannot be changed once the project is created.
## [See Also](#see-also)
[Section titled “See Also”](#see-also)
[Uploading Source Files ](/uploading-files/)Learn how to upload source files to your project for translation
[Uploading Existing Translations ](/uploading-translations/)Learn how to upload existing translations to your project
[Project Settings ](/project-settings/)Configure project settings according to your needs
[Inviting People to Project ](/inviting-people/)Learn how to invite people to your project
# Crowdin AI
> Powerful AI capabilities to improve localization workflows
Crowdin integrates with top AI providers, including OpenAI, Google Gemini, Microsoft Azure OpenAI, and more, allowing you to leverage advanced AI-powered translations that consider additional context at different levels. These translations can be applied to your content with a few clicks using [pre-translation via AI](#pre-translation-via-ai). Additionally, AI in Crowdin can be used as an [assistant in the Editor](#using-ai-in-the-editor) for translation, proofreading, and more.
You can expand your AI provider options by installing respective applications from the Crowdin [Store](https://store.crowdin.com/tags/ai).
## [Configuring AI](#configuring-ai)
[Section titled “Configuring AI”](#configuring-ai)
Crowdin AI integration provides powerful capabilities for enhancing localization workflows. Configuring AI involves [setting up providers](#configuring-ai-providers) and [creating prompts](#configuring-ai-prompts).
Tip
Configure Crowdin AI in a few quick steps using the AI Quick Start Guide.
### [Configuring AI Prompts](#configuring-ai-prompts)
[Section titled “Configuring AI Prompts”](#configuring-ai-prompts)
Prompt engineering is crucial for guiding AI in understanding context and providing accurate translations. Customizing prompts within Crowdin ensures that AI algorithms comprehend the nuances of your project, resulting in improved translation quality.
* **Contextual Prompts** – customize prompts to provide contextual information, such as project-specific terminology, style preferences, and target audience considerations. For example, include instructions on translating technical terms consistently or maintaining brand tone across languages.
* **Placeholder Utilization** – incorporate placeholders to dynamically insert context-specific information into prompts, enabling AI to generate translations aligned with project requirements.
* **File-Level Context** – use file-level context to provide instructions and contextual insights, enhancing AI’s understanding of content nuances. Include file descriptions, summaries, or references to glossaries and style guides.
To configure AI prompts, follow these steps:
1. Open your profile and select **AI** on the left sidebar.
2. In the **Prompts** tab, click **Add prompt**. If no prompts have been created yet, you can click **Create Default Prompts** to quickly set up pre-configured samples which can be customized to your personal preferences.
3. In the appeared dialog, set the prompt parameters:
* Select the prompt type (i.e., [Pre-translation & AI Suggestion](#pre-translation-via-ai), [AI Chat](#using-ai-in-the-editor), [QA check](#ai-qa-check), or Create custom type)
* Custom type name (Specific to the custom prompt type)
* Use this prompt as the default prompt for AI Suggestion in editor (Specific to Pre-translation & AI Suggestion prompt type)
* Use this prompt as the default prompt for AI Assistant in editor (Specific to the AI Chat prompt type)
* Title
* Model (this also includes the AI Provider)
* Advanced settings:
* Visibility – Select projects where a prompt can be used:
* All Projects – The prompt is available in all projects.
* Selected Projects – The prompt is available only in the projects you select. If no projects are selected, or if all assigned projects are later deleted, the prompt will not be available in any project.
* Auto-retry on QA issues – Allows automatically send an additional request to the AI if the received translation fails the QA checks.
* Prompt editor mode (i.e., Basic or Advanced)
* Additional context (Basic mode) – specify which data will be included in the prompt using the following fields:
Note
Context included by default: string context, string identifier (key), translation max. length.
* Other languages translations – select specific language translations to be considered by AI as additional context or leave this field as is to use translations from all languages.
* Glossary terms – allows AI to consider domain glossary terms.
* TM suggestions – allows AI to consider TM suggestions.
* Previous and next strings – allows AI to consider previous and next strings for additional context.
* Filtered strings (Specific to the AI Chat prompt type) – allows AI to consider strings that match the current filter in the Editor to increase translation efficiency.
* File context – allows AI to consider a textual description of the file added in the [file settings](/file-management/#file-context) or in the [Editor](/online-editor/#file-context).
* AI-Generated File Context – automatically generate file context when it’s missing. If the file context isn’t provided manually, AI will analyze the source content and generate a contextual summary. This summary is used both during pre-translation and as reference material in the Editor.
Caution
This option is only available in file-based projects and requires the File context option to be enabled.
* File content (Specific to the AI Chat prompt type) – allows AI to access the full file content during chat communication with the AI Assistant. The file content is added to context only when requested by AI.
* Screenshots – allows AI to consider visual context from screenshots where the strings are tagged. This enhances accuracy and context awareness.
Read more about [Screenshots](/screenshots/).
* Public project description – allows AI to consider the public project description.
* Snippets – select reusable content previously created in your Crowdin account’s **AI > Snippets** to quickly insert standard text snippets into your prompt.
* Evaluation steps (Specific to the QA check prompt type) – define the criteria the AI uses to evaluate translations. You can customize, remove, or create new steps tailored to your quality requirements.
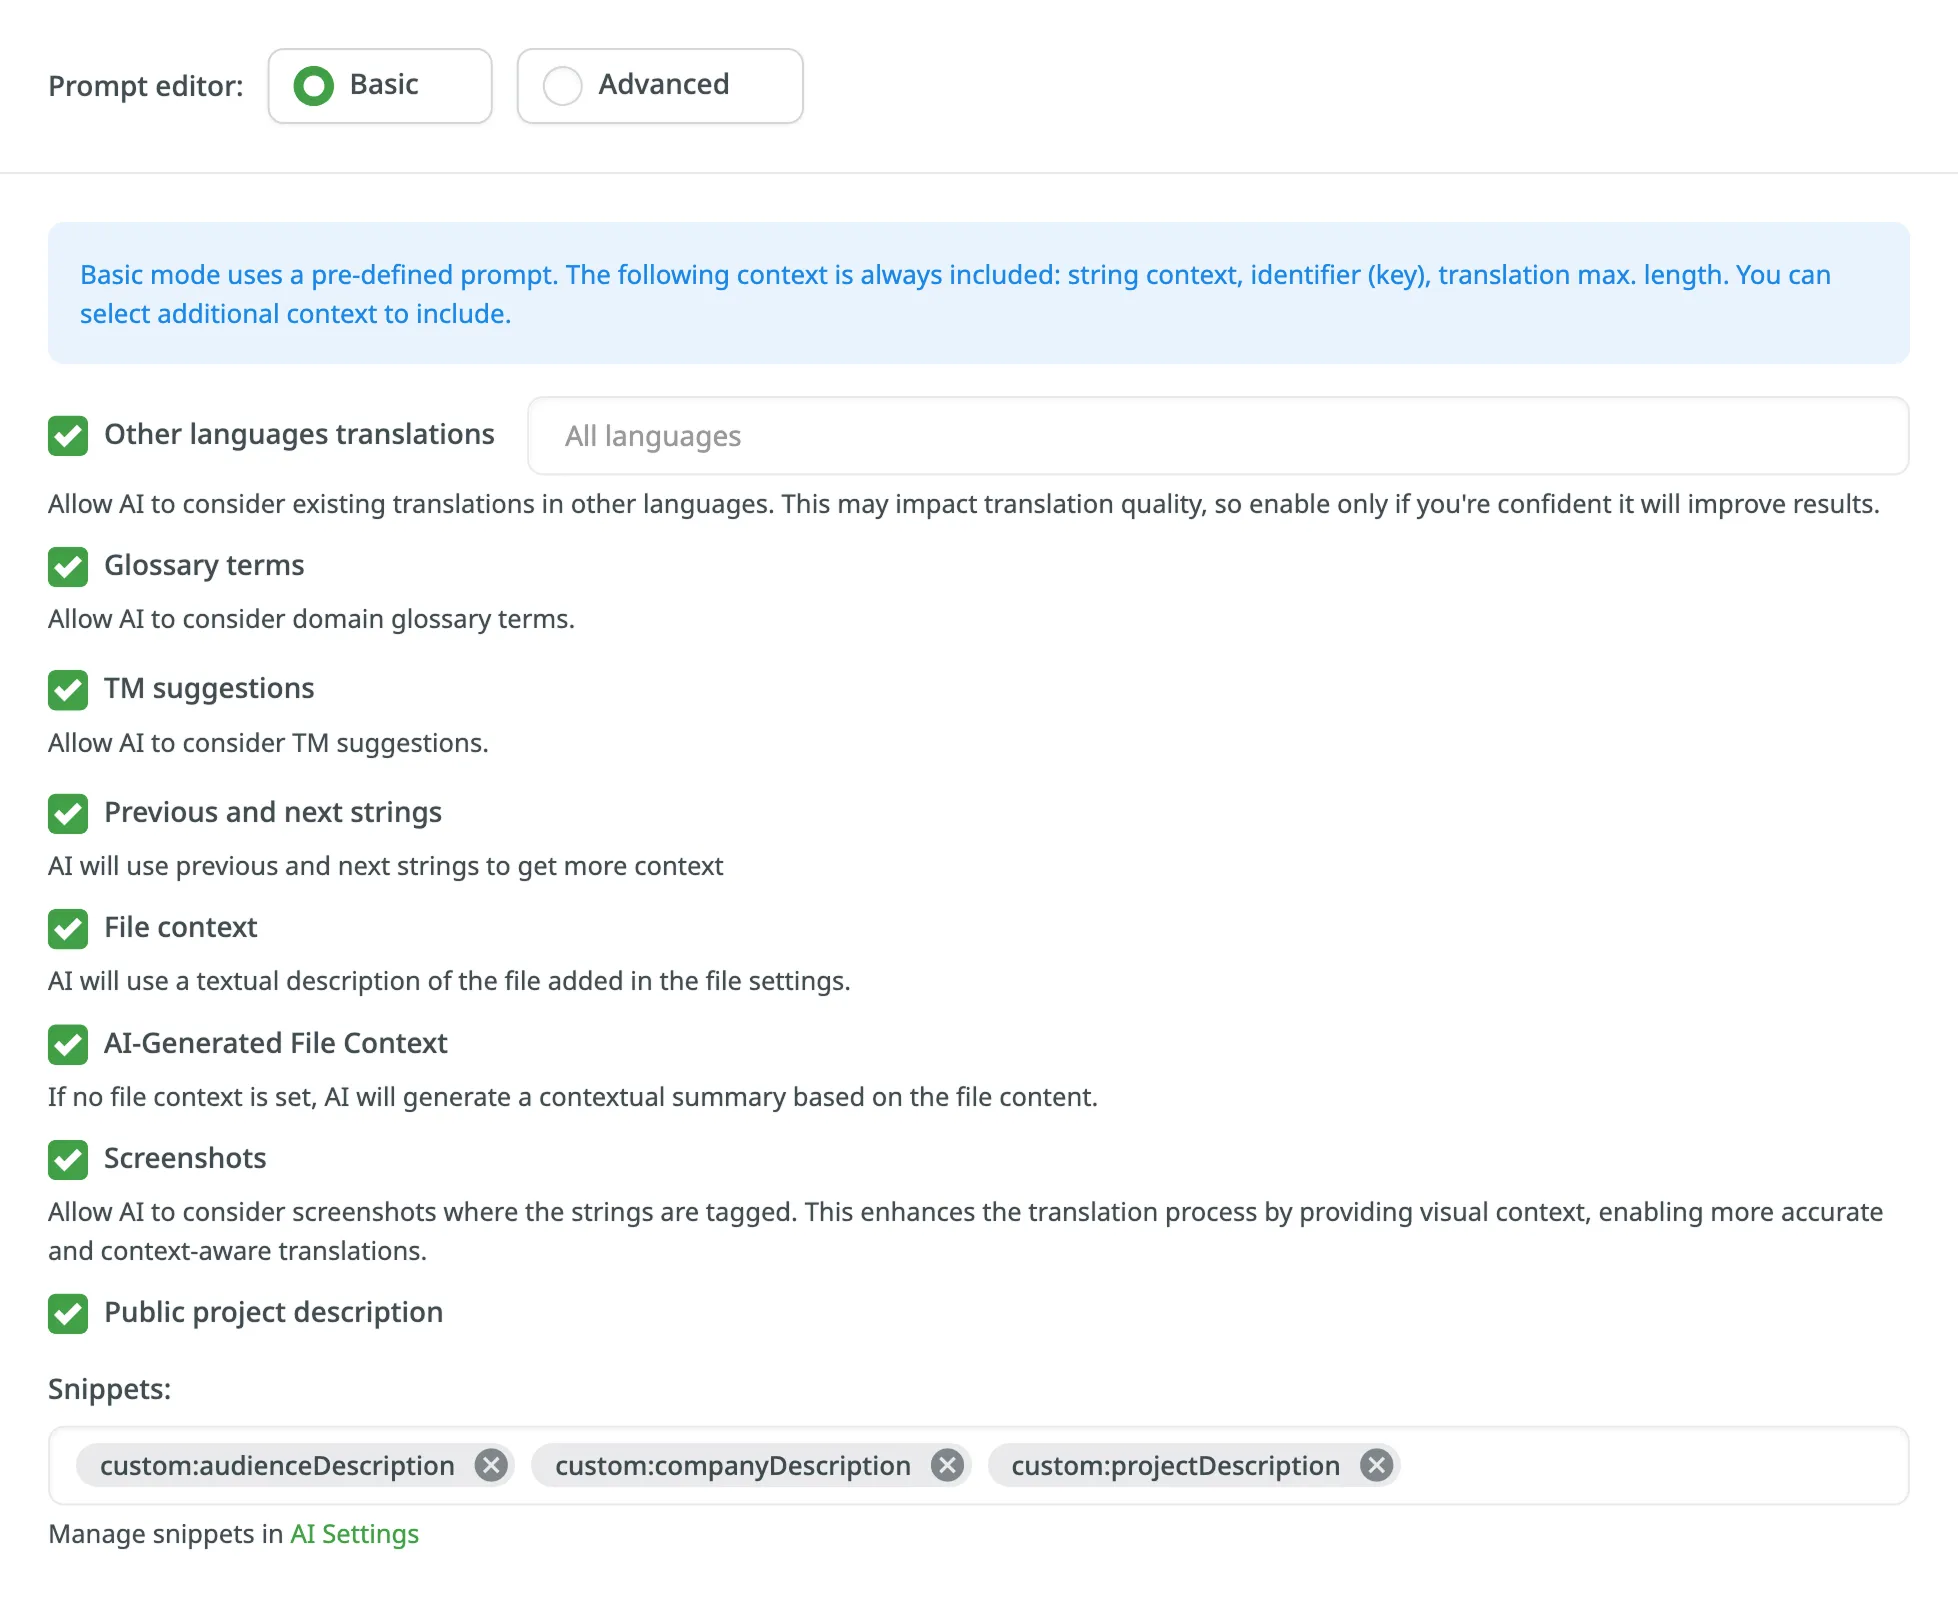
* Advanced mode – click **Advanced mode** to compose your prompt with a higher degree of precision. Use the following placeholders to insert context:
Tip
Click on the placeholder to copy it for further pasting into the prompt field.
* `%sourceLanguage%` – The source language of the project.
* `%targetLanguages%` – A list of all the project’s target languages.
* `%targetLanguage%` – The language the content is translated into.
* `%pluralForms%` – A list of plural forms for the target language.
* `%strings%` – A collection of strings for the current segment, including the string identifier (key), context, text, maximum length, and translations to other languages (if the translations placeholder is specified).
* `%translationUnits%` – A list of translation units (source and translation) for the AI to evaluate during QA checks.
* `%fileName%` – The file name of the current segment.
* `%fileContext%` – The file context of the current segment (provided via the file settings modal in the ‘Files’ tab).
* `%siblingsStrings%` – The previous and next segments in the file, allowing for contextual translation.
* `%filteredStrings%` – Strings that match the current filter in the Editor, provided to AI for improved evaluation accuracy and efficiency.
* `%projectName%` – Crowdin project name.
* `%projectPublicDescription%` – Project public description.
* Snippets – insert reusable content previously defined in your Crowdin account’s **AI > Snippets** by using the `%custom:snippetName%` format.
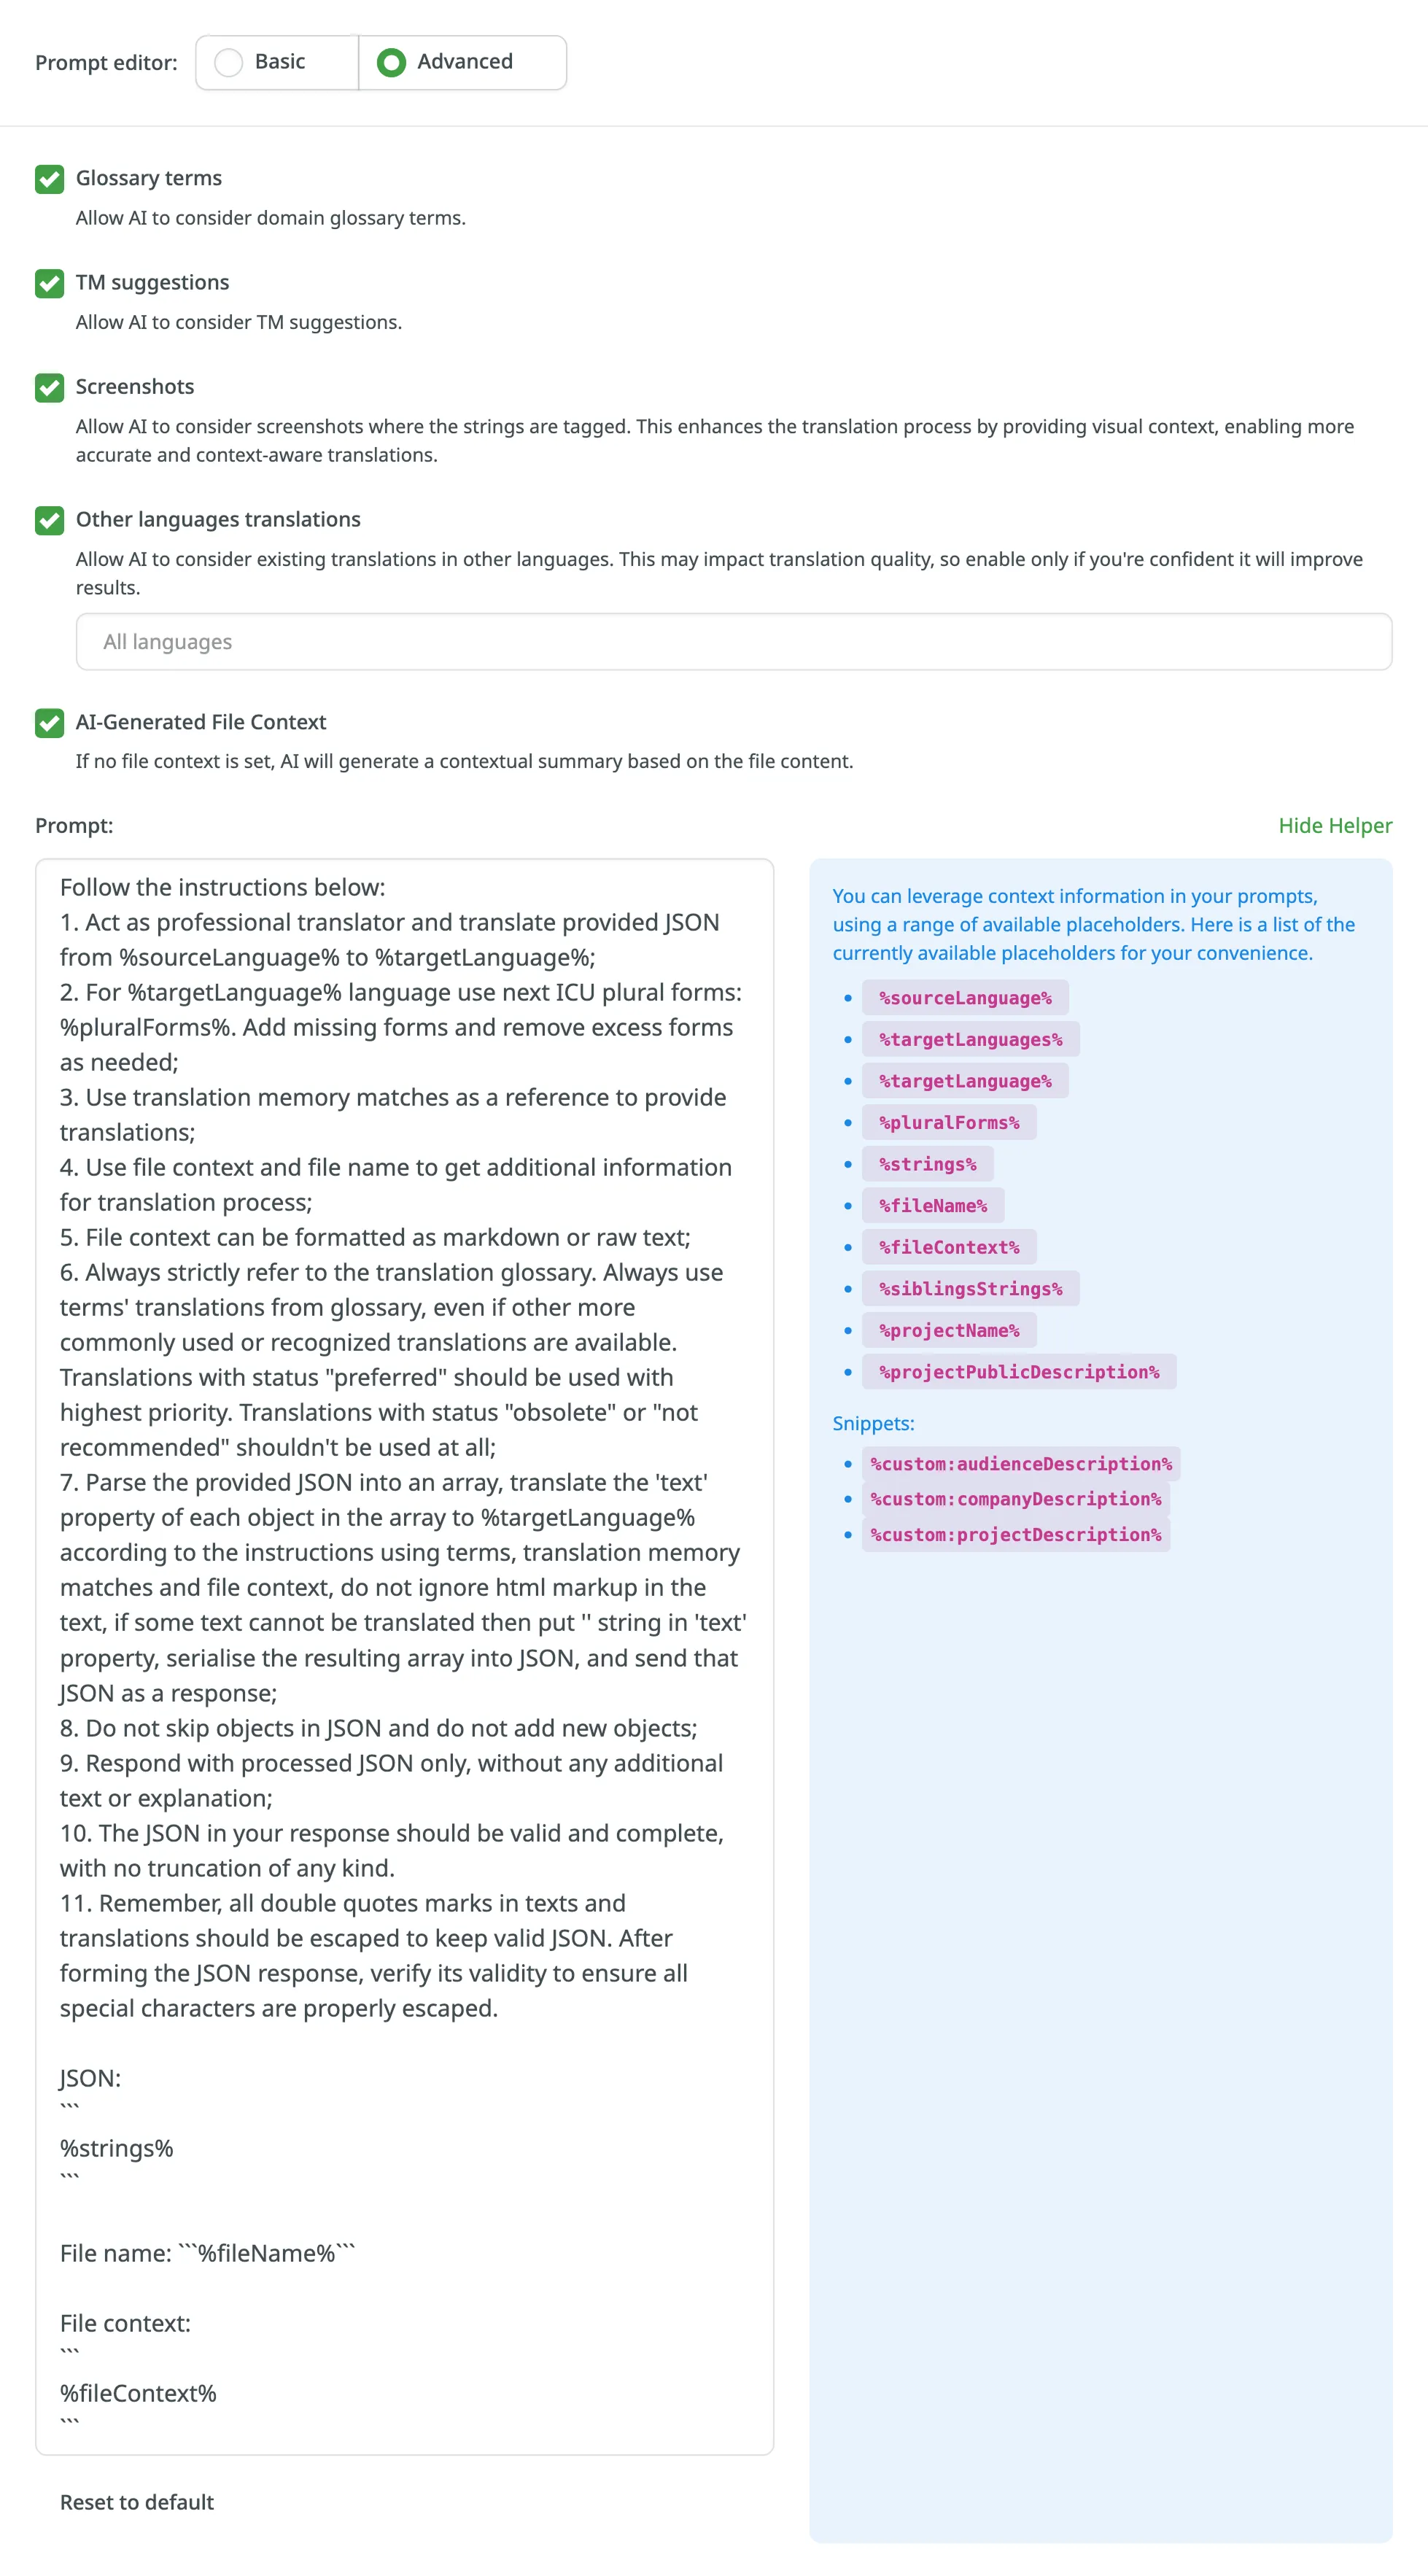
Tip
Use the **Reset to default** button to restore the original Crowdin default prompt content and placeholders. This is useful if you’d like to discard changes and start from scratch before saving.
4. Click **Create**.
#### [Creating Prompts in Project Settings](#creating-prompts-in-project-settings)
[Section titled “Creating Prompts in Project Settings”](#creating-prompts-in-project-settings)
You can also create prompts directly from a project’s **Settings > AI** section. Prompts created this way will have their visibility set only to that specific project by default.
Read more about [AI Settings in a project](/project-settings/ai/).
### [Managing AI Prompts](#managing-ai-prompts)
[Section titled “Managing AI Prompts”](#managing-ai-prompts)
Managing AI prompts in Crowdin involves various operations such as filtering and searching, editing, cloning, and deleting AI prompts. Below you can find instructions for each operation.
#### [Viewing and Filtering AI Prompts](#viewing-and-filtering-ai-prompts)
[Section titled “Viewing and Filtering AI Prompts”](#viewing-and-filtering-ai-prompts)
Once you open the **AI** page, you can view and search for prompts in the **Prompts** tab.
You can view the list of added prompts with the following details:
* **Name** – The name of the prompt.
* **Visibility** – Shows a counter of how many projects the prompt is available in with the list of projects (with clickable links).
* **Type** – The prompt’s type (e.g., Pre-translation & AI Suggestion, AI Chat).
* **Model** – The AI model used by the prompt. A status indicator next to the model name shows if the prompt is ready to use:
* A **green dot** indicates the prompt is configured correctly and ready for use.
* A **red dot** indicates an issue with the prompt’s configuration (e.g., the selected provider is disabled). Hover over the model name to see the specific error message.
* **Created** – The date the prompt was created.
* **Created by** – The user who created the prompt.
* **Last modified** – The date the prompt was last updated.
* **Modified by** – The user who last modified the prompt.
* **Last used by** – The user who last used the prompt.
* **Last used** – The date the prompt was last used.
* **Usage count** – The total number of times the prompt has been used.
Tip
Some columns like **Created by**, **Last modified**, and **Usage count** are hidden by default. Click the column selector icon to choose which columns to display.
To find a specific prompt, use the **Search** field. To narrow down the list, click the **Filters** button, which allows you to filter by **Type**, **Created** date, **Created by** user, **Last modified** date, **Modified by** user, **Last used by** user, and **Last used** date.
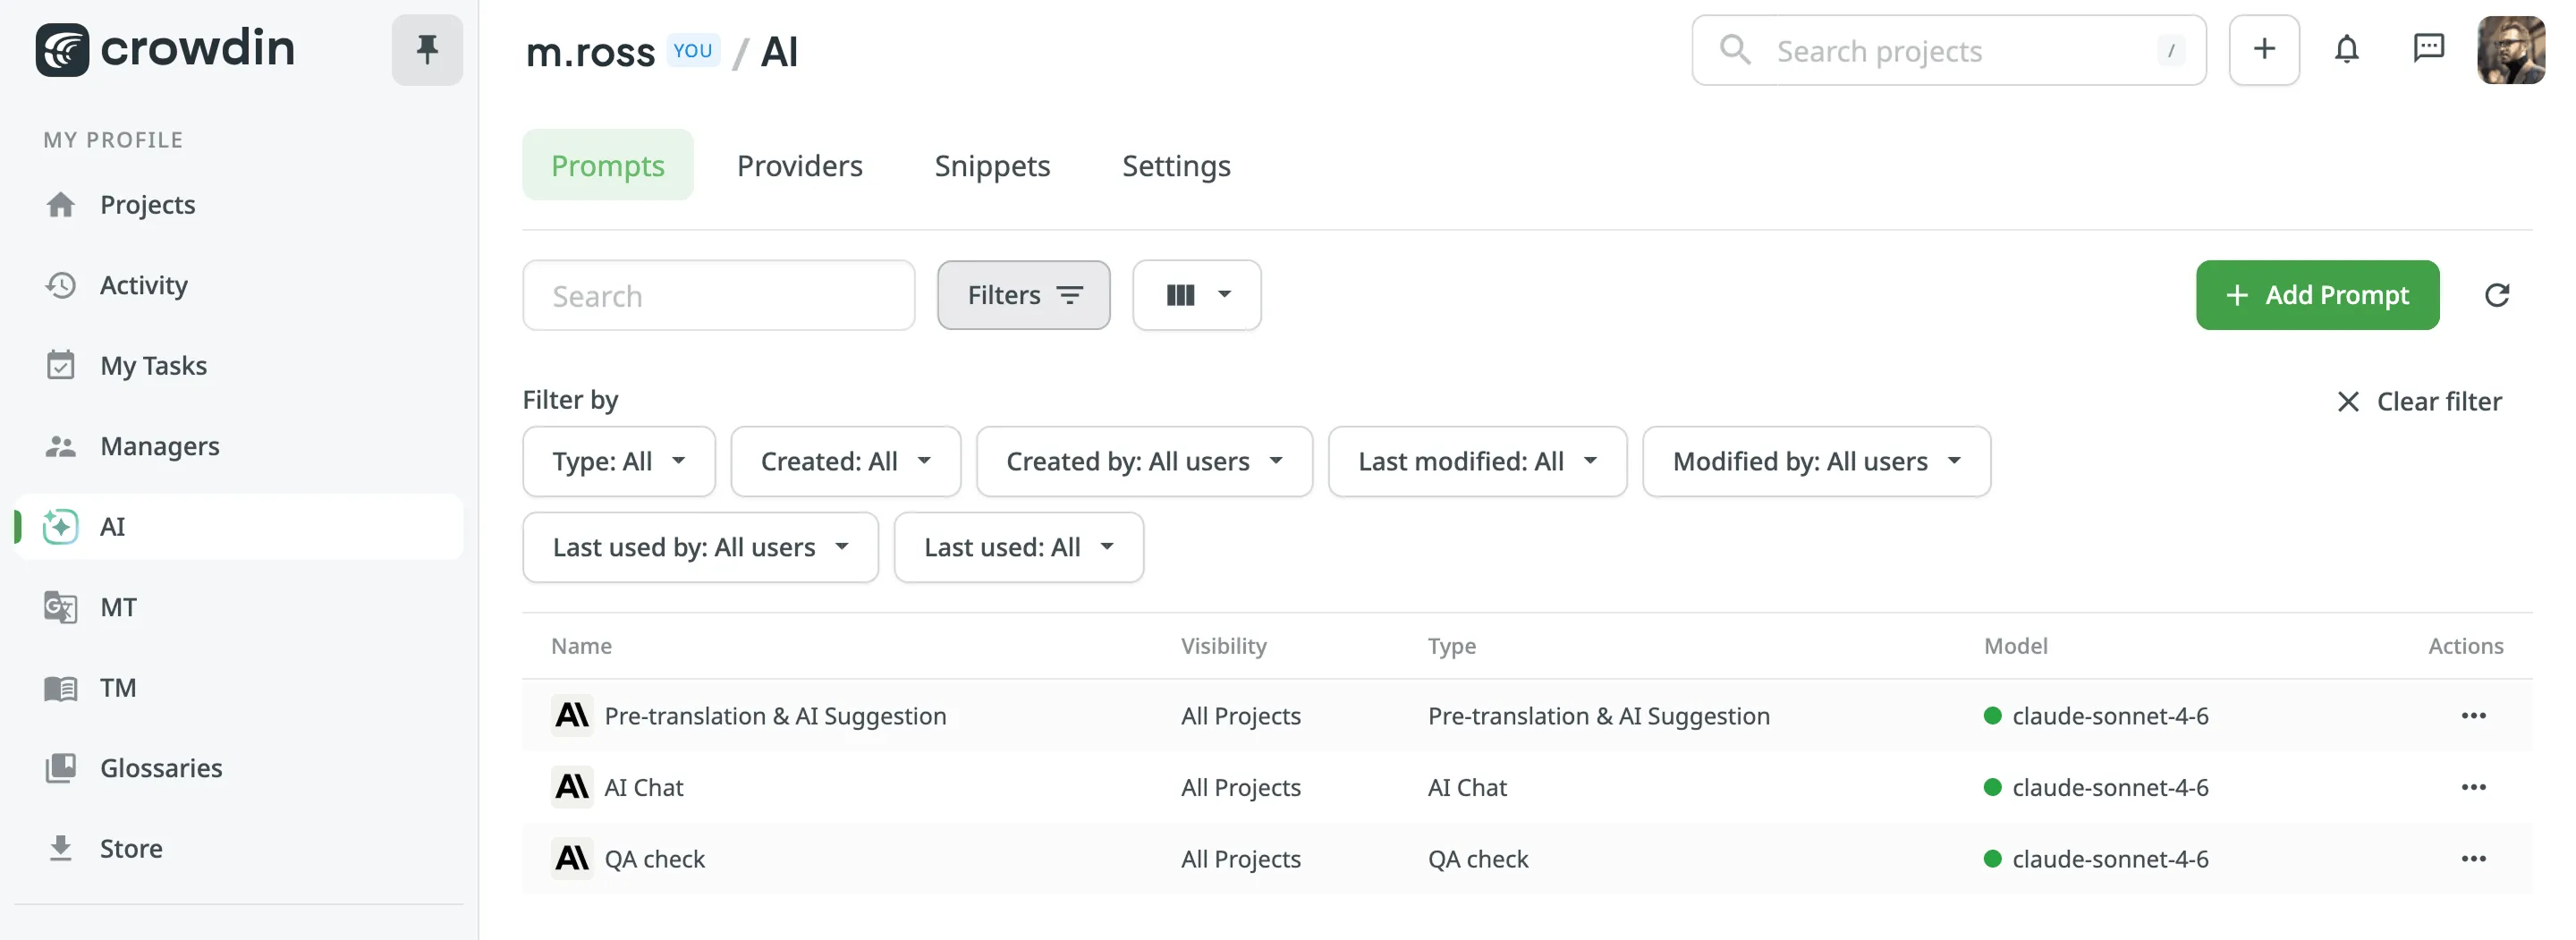
#### [Editing AI Prompts](#editing-ai-prompts)
[Section titled “Editing AI Prompts”](#editing-ai-prompts)
If you need to adjust your already configured prompt, you can simply edit it.
To edit AI prompts, follow these steps:
1. Open your profile and select **AI** on the left sidebar.
2. In the **Prompts** tab, click toward the needed prompt and select **Edit**.
3. Modify the prompt as needed and click **Update** to save changes.
When editing a prompt, you’ll find the **Prompt metadata** section. This information provides a clear audit trail for collaboration and troubleshooting. By tracking creation, modification, and usage data, you can understand which prompts are most effective, identify popular prompts for optimization, and manage costs more efficiently. The section contains the following read-only details:
* **Created by** – The user who created the prompt.
* **Created** – The date and time the prompt was created.
* **Modified by** – The user who last modified the prompt.
* **Last modified** – The date and time the prompt was last modified.
* **Last used by** – The user who last used the prompt.
* **Last used** – The date and time the prompt was last used.
* **Usage count** – The total number of requests made to the AI using this prompt.
Editing prompts allows you to update and improve them as needed to ensure they remain effective and aligned with your requirements. If you don’t want to lose the current prompt configuration and are uncertain about the changes, consider [cloning](#cloning-ai-prompts) your prompt and experimenting with the copy.
#### [Cloning AI Prompts](#cloning-ai-prompts)
[Section titled “Cloning AI Prompts”](#cloning-ai-prompts)
Cloning AI prompts allows you to experiment with and refine prompt configurations without altering the original. This feature is particularly useful for testing improved versions of prompts while preserving the initial setup.
To clone AI prompts, follow these steps:
1. Open your profile and select **AI** on the left sidebar.
2. In the **Prompts** tab, click toward the needed prompt and select **Clone**.
3. As a result, a copy of the prompt will appear in the prompt list.
You can then [edit](#editing-ai-prompts) the cloned prompt to experiment with different configurations. This allows you to safely test enhancements and optimize performance without risking the loss of the original prompt configuration.
#### [Deleting AI Prompts](#deleting-ai-prompts)
[Section titled “Deleting AI Prompts”](#deleting-ai-prompts)
Deleting AI prompts is a straightforward process, but it should be done with caution to avoid losing valuable configurations. This action is useful when you no longer need a specific prompt or want to clean up unused prompts.
To delete AI prompts, follow these steps:
1. Open your profile and select **AI** on the left sidebar.
2. In the **Prompts** tab, click toward the needed prompt and select **Remove**.
3. Confirm the deletion.
Note
Be sure to review the prompt before deletion to ensure it is no longer needed, as this action is irreversible and deleted prompts cannot be restored.
### [Configuring AI Providers](#configuring-ai-providers)
[Section titled “Configuring AI Providers”](#configuring-ai-providers)
Crowdin supports various AI providers, each offering unique models and features for translation tasks. By configuring providers, you can tailor AI functionality to suit your specific localization needs. Whether using managed by Crowdin services or integrating your own API keys, Crowdin enables seamless integration with AI services.
In the **Providers** tab, you can view the list of providers with the following details:
* **Name**
* **Status**: Enabled, Disabled.
* **Managed by Crowdin**: yes, no.
* **Prompts count**: if there are one or more prompts configured with a particular provider, you’ll see the actual number of prompts, otherwise you’ll see the **Create** button that redirects to the prompt creation dialog.
Crowdin AI providers are categorized into two types. System providers (e.g., OpenAI, Microsoft Azure OpenAI, Google Gemini) are built-in and available for immediate configuration. Additionally, you can expand your options by installing other AI providers from the Crowdin Store.
Currently, Crowdin supports the following AI providers:
* OpenAI System
* Microsoft Azure OpenAI System
* Google Gemini System
* Mistral AI System
* Anthropic System
* xAI System
* IBM Watsonx System
* DeepSeek System
* [Groq](https://store.crowdin.com/groq)
* [Cloudflare Workers AI](https://store.crowdin.com/cloudflare-workers-ai)
* [Fireworks AI](https://store.crowdin.com/fireworks-ai)
* [Together AI](https://store.crowdin.com/together-ai)
* [OpenRouter](https://store.crowdin.com/openrouter)
* [Cohere](https://store.crowdin.com/cohere)
* [Replicate](https://store.crowdin.com/replicate)
* [Credal](https://store.crowdin.com/credal)
* [AWS Bedrock](https://store.crowdin.com/aws-bedrock)
* [Alibaba Cloud Model Studio](https://store.crowdin.com/alibaba-cloud-model-studio)
New AI providers are added regularly.
When configuring AI providers, you can choose from two possible options:
* **Use your own API keys** – Crowdin recommends this option if data security is a concern and for enhanced privacy and ownership. This option requires an external registration for getting API keys/credentials from AI providers.
* **Use Managed by Crowdin service** – simplified AI integration without the need to manage your own API keys. Allows you to leverage Crowdin’s default settings and infrastructure to access AI capabilities in a convenient way. Ideal for straightforward, quick tasks. To start using AI providers managed by Crowdin, you just need to add funds to your balance.
To configure an AI provider, follow these steps:
1. Open your profile and select **AI** on the left sidebar.
2. In the **Providers** tab, click toward the needed provider and select **Edit**. Alternatively, just double-click on the needed provider.
3. Select **Enabled**.
4. Choose your credential type:
* To use the [Managed by Crowdin service](/crowdin-managed-services/), select **{Provider} managed by Crowdin**. In this case, you’ll need to [add funds to your account balance](#adding-funds-to-account-balance).
* To use your own account, select **Use my own API key** and enter the required credentials. For instructions on generating an API key, please refer to your AI provider’s official documentation. Some AI providers may also require additional specific credentials. See the [Provider-Specific Credentials](#provider-specific-credentials) section below for details.
5. *(Optional)* Click **Advanced settings** to access additional options:
* **Override Base URL** – Allows you to direct AI provider requests to a custom or region-specific endpoint instead of the default URL. This is useful if you are using a proxy or consuming the AI from a third-party service that provides a custom endpoint. Otherwise, you can leave this field blank.
Note
* This option is not available when using the **Managed by Crowdin** service.
* For Microsoft Azure OpenAI, Crowdin expects the default Azure URL structure. For example: `https://{baseUrl}/deployments/{deploymentName}/chat/completions`
6. Click **Update**.
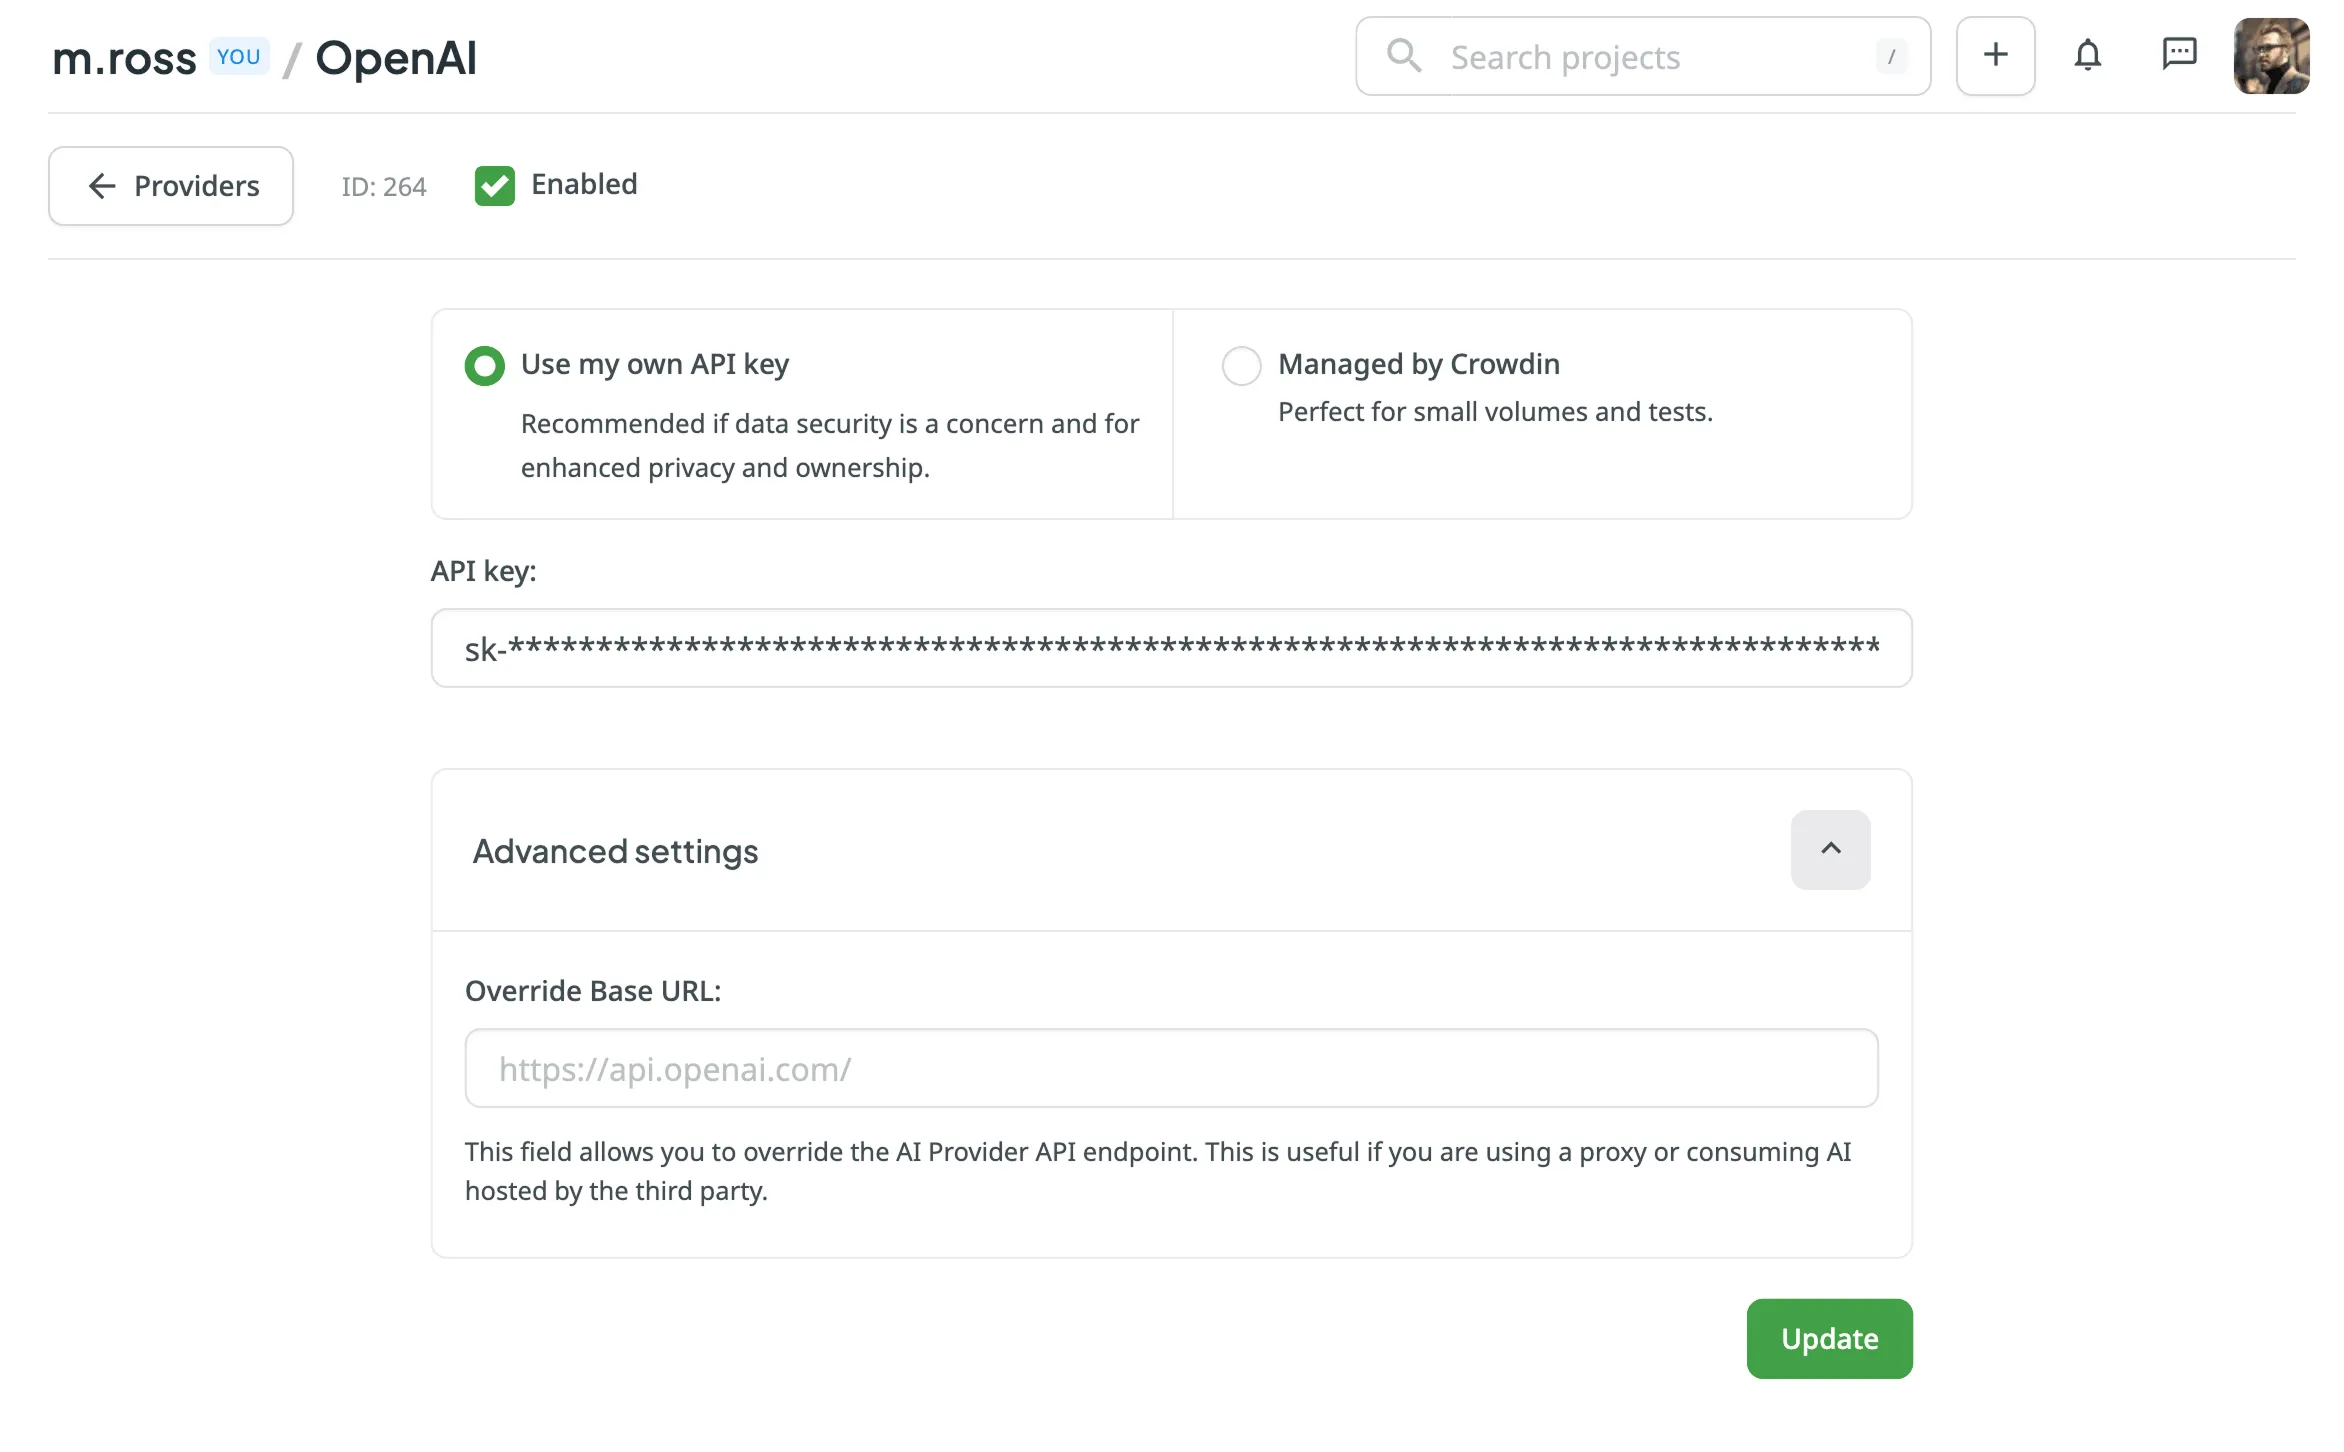
#### [Provider-Specific Credentials](#provider-specific-credentials)
[Section titled “Provider-Specific Credentials”](#provider-specific-credentials)
Some AI providers require additional information beyond a standard API key for authentication when you use your own credentials.
##### [Google Gemini](#google-gemini)
[Section titled “Google Gemini”](#google-gemini)
When configuring Google Gemini, you will need to provide the following credentials:
* **Project ID**: Your unique Google Cloud Project ID. You can find this on the dashboard of your Google Cloud Console.
* **Region**: The region where your model is hosted. Ensure the model you plan to use is available in the selected region. You can find this on your Vertex AI dashboard. See the official Google Cloud documentation for a list of [available Gemini models and regions](https://cloud.google.com/vertex-ai/generative-ai/docs/learn/locations).
* **Service Account Key**: A JSON file used for authentication. To get this file:
1. In your Google Cloud project, go to **IAM & Admin > Service Accounts**.
2. Create a new service account or select an existing one.
3. Grant it the **Vertex AI User** role (`roles/aiplatform.user`).
4. Go to the **Keys** tab for that service account, click **Add Key > Create new key**, select **JSON**, and click **Create**. The key will be downloaded automatically.
5. In Crowdin, click **Choose file** to upload this JSON key.
##### [Microsoft Azure OpenAI](#microsoft-azure-openai)
[Section titled “Microsoft Azure OpenAI”](#microsoft-azure-openai)
When configuring Microsoft Azure OpenAI, you will need to provide the following credentials:
* **Resource name**: The name of your Azure OpenAI service resource, which you can find in your main Azure portal.
* **Deployment name**: The name you assigned to your deployment.
* **API Version**: The API version required for your model. You can typically find the recommended version in the deployment’s properties or in the code samples provided by Azure. For example: `2024-02-01`.
##### [IBM Watsonx](#ibm-watsonx)
[Section titled “IBM Watsonx”](#ibm-watsonx)
When configuring IBM Watsonx, you will need to provide the following credentials:
* **Project ID**: Your Watsonx.ai project ID. To find it, navigate to your project, go to the **Manage** tab, and copy the **Project ID** from the *General* section.
* **Region**: The region where your Watsonx project is located. You can find this on your project dashboard. See the official IBM Cloud documentation for a list of [available regions for watsonx.ai](https://dataplatform.cloud.ibm.com/docs/content/wsj/getting-started/regional-datactr.html).
### [Disabling AI Providers](#disabling-ai-providers)
[Section titled “Disabling AI Providers”](#disabling-ai-providers)
If needed, you can disable any of the previously enabled providers at any time.
To disable the AI provider, follow these steps:
1. Open your profile and select **AI** on the left sidebar.
2. In the **Providers** tab, click toward the needed provider and select **Disable**. Alternatively, double-click on the needed provider and clear **Enabled** in the provider’s settings.
### [Adding Funds to Account Balance](#adding-funds-to-account-balance)
[Section titled “Adding Funds to Account Balance”](#adding-funds-to-account-balance)
MT engines and AI models managed by Crowdin are separately paid services. To use them, you first need to add funds to your Crowdin account balance.
Read more about [Adding Funds to Account Balance](/crowdin-managed-services/#adding-funds-to-account-balance).
### [Snippets for AI Prompts](#snippets-for-ai-prompts)
[Section titled “Snippets for AI Prompts”](#snippets-for-ai-prompts)
Snippets are reusable pieces of information that help AI understand your project better. They provide context about your company, product, or specific requirements like brand voice and target audience. Managing this information as snippets saves time and helps generate better, more consistent translations.
In the **Snippets** tab, you can view snippets with the following details:
* **Name** – the unique identifier used to insert the snippet into prompts.
* **Description** – a brief explanation of the snippet’s purpose.
* **Created at** – date the snippet was created.
Use the **Search** field to quickly find specific snippets.
#### [Creating Snippets](#creating-snippets)
[Section titled “Creating Snippets”](#creating-snippets)
To create a new snippet, follow these steps:
1. Click **Add Snippet** in the **Snippets** tab.
2. In the **Add Snippet** dialog, fill in the following fields:
* **Name** – A unique identifier for your snippet (e.g., `company-description` or `target-audience`).
* **Description** – A brief summary of the snippet’s purpose for easy identification.
* **Content** – The actual text that will be inserted into prompts when the snippet is used.
3. Click **Create**.
#### [Using Snippets in Prompts](#using-snippets-in-prompts)
[Section titled “Using Snippets in Prompts”](#using-snippets-in-prompts)
Once created, snippets can be inserted into any AI prompt:
* In **Basic mode**, select one or more snippets from the dropdown menu in the **Snippets** section.
* In **Advanced mode**, insert a snippet using its placeholder format: `%custom:snippetName%`. For example, a snippet with the name `company-description` would be inserted as `%custom:company-description%`.
#### [Managing Existing Snippets](#managing-existing-snippets)
[Section titled “Managing Existing Snippets”](#managing-existing-snippets)
To edit or delete a snippet, click in the *Actions* column on the desired snippet and select **Edit** or **Delete**. Alternatively, just double-click it to edit.
### [AI Settings for the Account](#ai-settings-for-the-account)
[Section titled “AI Settings for the Account”](#ai-settings-for-the-account)
To configure default AI settings for your Crowdin account, open your profile and go to **AI > Settings**. These global settings will be applied by default to all new projects but can be overridden for each project in its **Settings > AI** section.
For each setting, you can either select an existing prompt from the drop-down menu or click to create a new one. Clicking the plus icon will open the prompt creation dialog with the appropriate prompt type pre-selected.
#### [Pre-translation](#pre-translation)
[Section titled “Pre-translation”](#pre-translation)
Select a default prompt with the **Pre-translation & AI Suggestion** type. This prompt will be automatically selected when you run pre-translation via AI in any project, speeding up the configuration process. You can still choose a different prompt before running the pre-translation.
#### [Editor AI Assistant](#editor-ai-assistant)
[Section titled “Editor AI Assistant”](#editor-ai-assistant)
This section allows you to configure the default AI behavior in the Editor across all projects in your Crowdin account.
* **Prompt for AI chat** – Select the default prompt that will be used for all interactions with the AI Assistant chat.
* **Prompt for AI suggestion** – Select the default prompt that will be used to generate AI suggestions in the Editor. If no prompt is selected here, AI suggestions will not be displayed.
Caution
Using the **Editor AI Assistant** may increase token usage.
##### [AI chat default shortcuts](#ai-chat-default-shortcuts)
[Section titled “AI chat default shortcuts”](#ai-chat-default-shortcuts)
Shortcuts are predefined actions that appear as buttons in the Editor, allowing users to quickly start a conversation with the AI. Crowdin provides three default shortcuts: **REPHRASE**, **SHORTEN**, and **TRANSLATE ALL**. These shortcuts are global, applying to all projects, although individual users can create their own in the **Editor Settings > AI** tab.
To create a new shortcut, follow these steps:
1. Click in the **AI chat default shortcuts** section.
2. In the **Create shortcut** dialog, provide a name and the prompt instructions.
3. Click **Create**.
To modify or delete an existing shortcut, follow these steps:
1. Click on the respective shortcut button.
2. In the **Update shortcut** dialog, you can do the following:
* change shortcut’s name and prompt and click **Update**.
* **Delete** the shortcut.
#### [AI QA Check](#ai-qa-check-account-settings)
[Section titled “AI QA Check”](#ai-qa-check-account-settings)
Select the default **QA check** type prompt to be used for AI-powered quality assurance across all projects. If no account-wide prompt is configured, the AI-powered check will not be applied unless a prompt is selected in a specific project’s Settings.
[AI Prompts in the Project Settings ](/project-settings/ai/)Configure and manage AI Prompts for use in a project.
## [Pre-translation via AI](#pre-translation-via-ai)
[Section titled “Pre-translation via AI”](#pre-translation-via-ai)
Pre-translation via AI allows you to use AI Models to pre-translate your content with high-quality, context-aware translations.
[Pre-translation ](/pre-translation/)Explore various pre-translation options to speed up your project localization.
Tip
You can also [configure an automatic AI Pre-translate](/project-settings/pre-translate/#ai-pre-translate) for new content in your project.
## [Using AI in the Editor](#using-ai-in-the-editor)
[Section titled “Using AI in the Editor”](#using-ai-in-the-editor)
After configuring a prompt with the **AI Chat** type, Crowdin AI can be used in the Editor as an AI Assistant for translators and proofreaders. The AI Assistant works in a chat format, allowing you to send prompts and receive replies.
The AI Assistant is context-aware, meaning it automatically considers the string the translator is working on, the related glossaries, TM matches, the maximum acceptable length of the translation, the related screenshots, and more. This contextual awareness enables the AI Assistant to provide more accurate and relevant assistance.
Here are some tasks the AI Assistant can help with:
* **Correcting TM suggestions** - If you get a 60% match, the AI Assistant can improve the remaining 40%, ensuring consistency with your terminology and previous translations.
* **Serving as an advanced dictionary** - The AI Assistant can provide term definitions, translation variants, synonyms, and more.
* **Suggesting translations** - Similar to other MT tools, the AI Assistant can suggest translations that you can refine based on your specific needs or save as is.
* **Summarizing content** – For example, when translating knowledge base articles, it can generate short summaries to help you understand the content before translating.
To start using the AI Assistant, click the **AI Assistant** section in the right sidebar of the Editor.
You can also interact with the AI Assistant faster using context-aware shortcuts. When you hover over an AI, TM, or MT suggestion in the Context and Translations section, the **Discuss suggestion with AI** button appears. Click it to open the chat with the suggestion already prefilled.
To see what context is passed to the AI, click the **Show AI context** button in the AI Assistant panel header. This opens a modal that displays the full scope of context available to the AI, including the selected string, TM matches, glossary terms, file name, surrounding strings, filtered strings, project description, plural forms, and more.
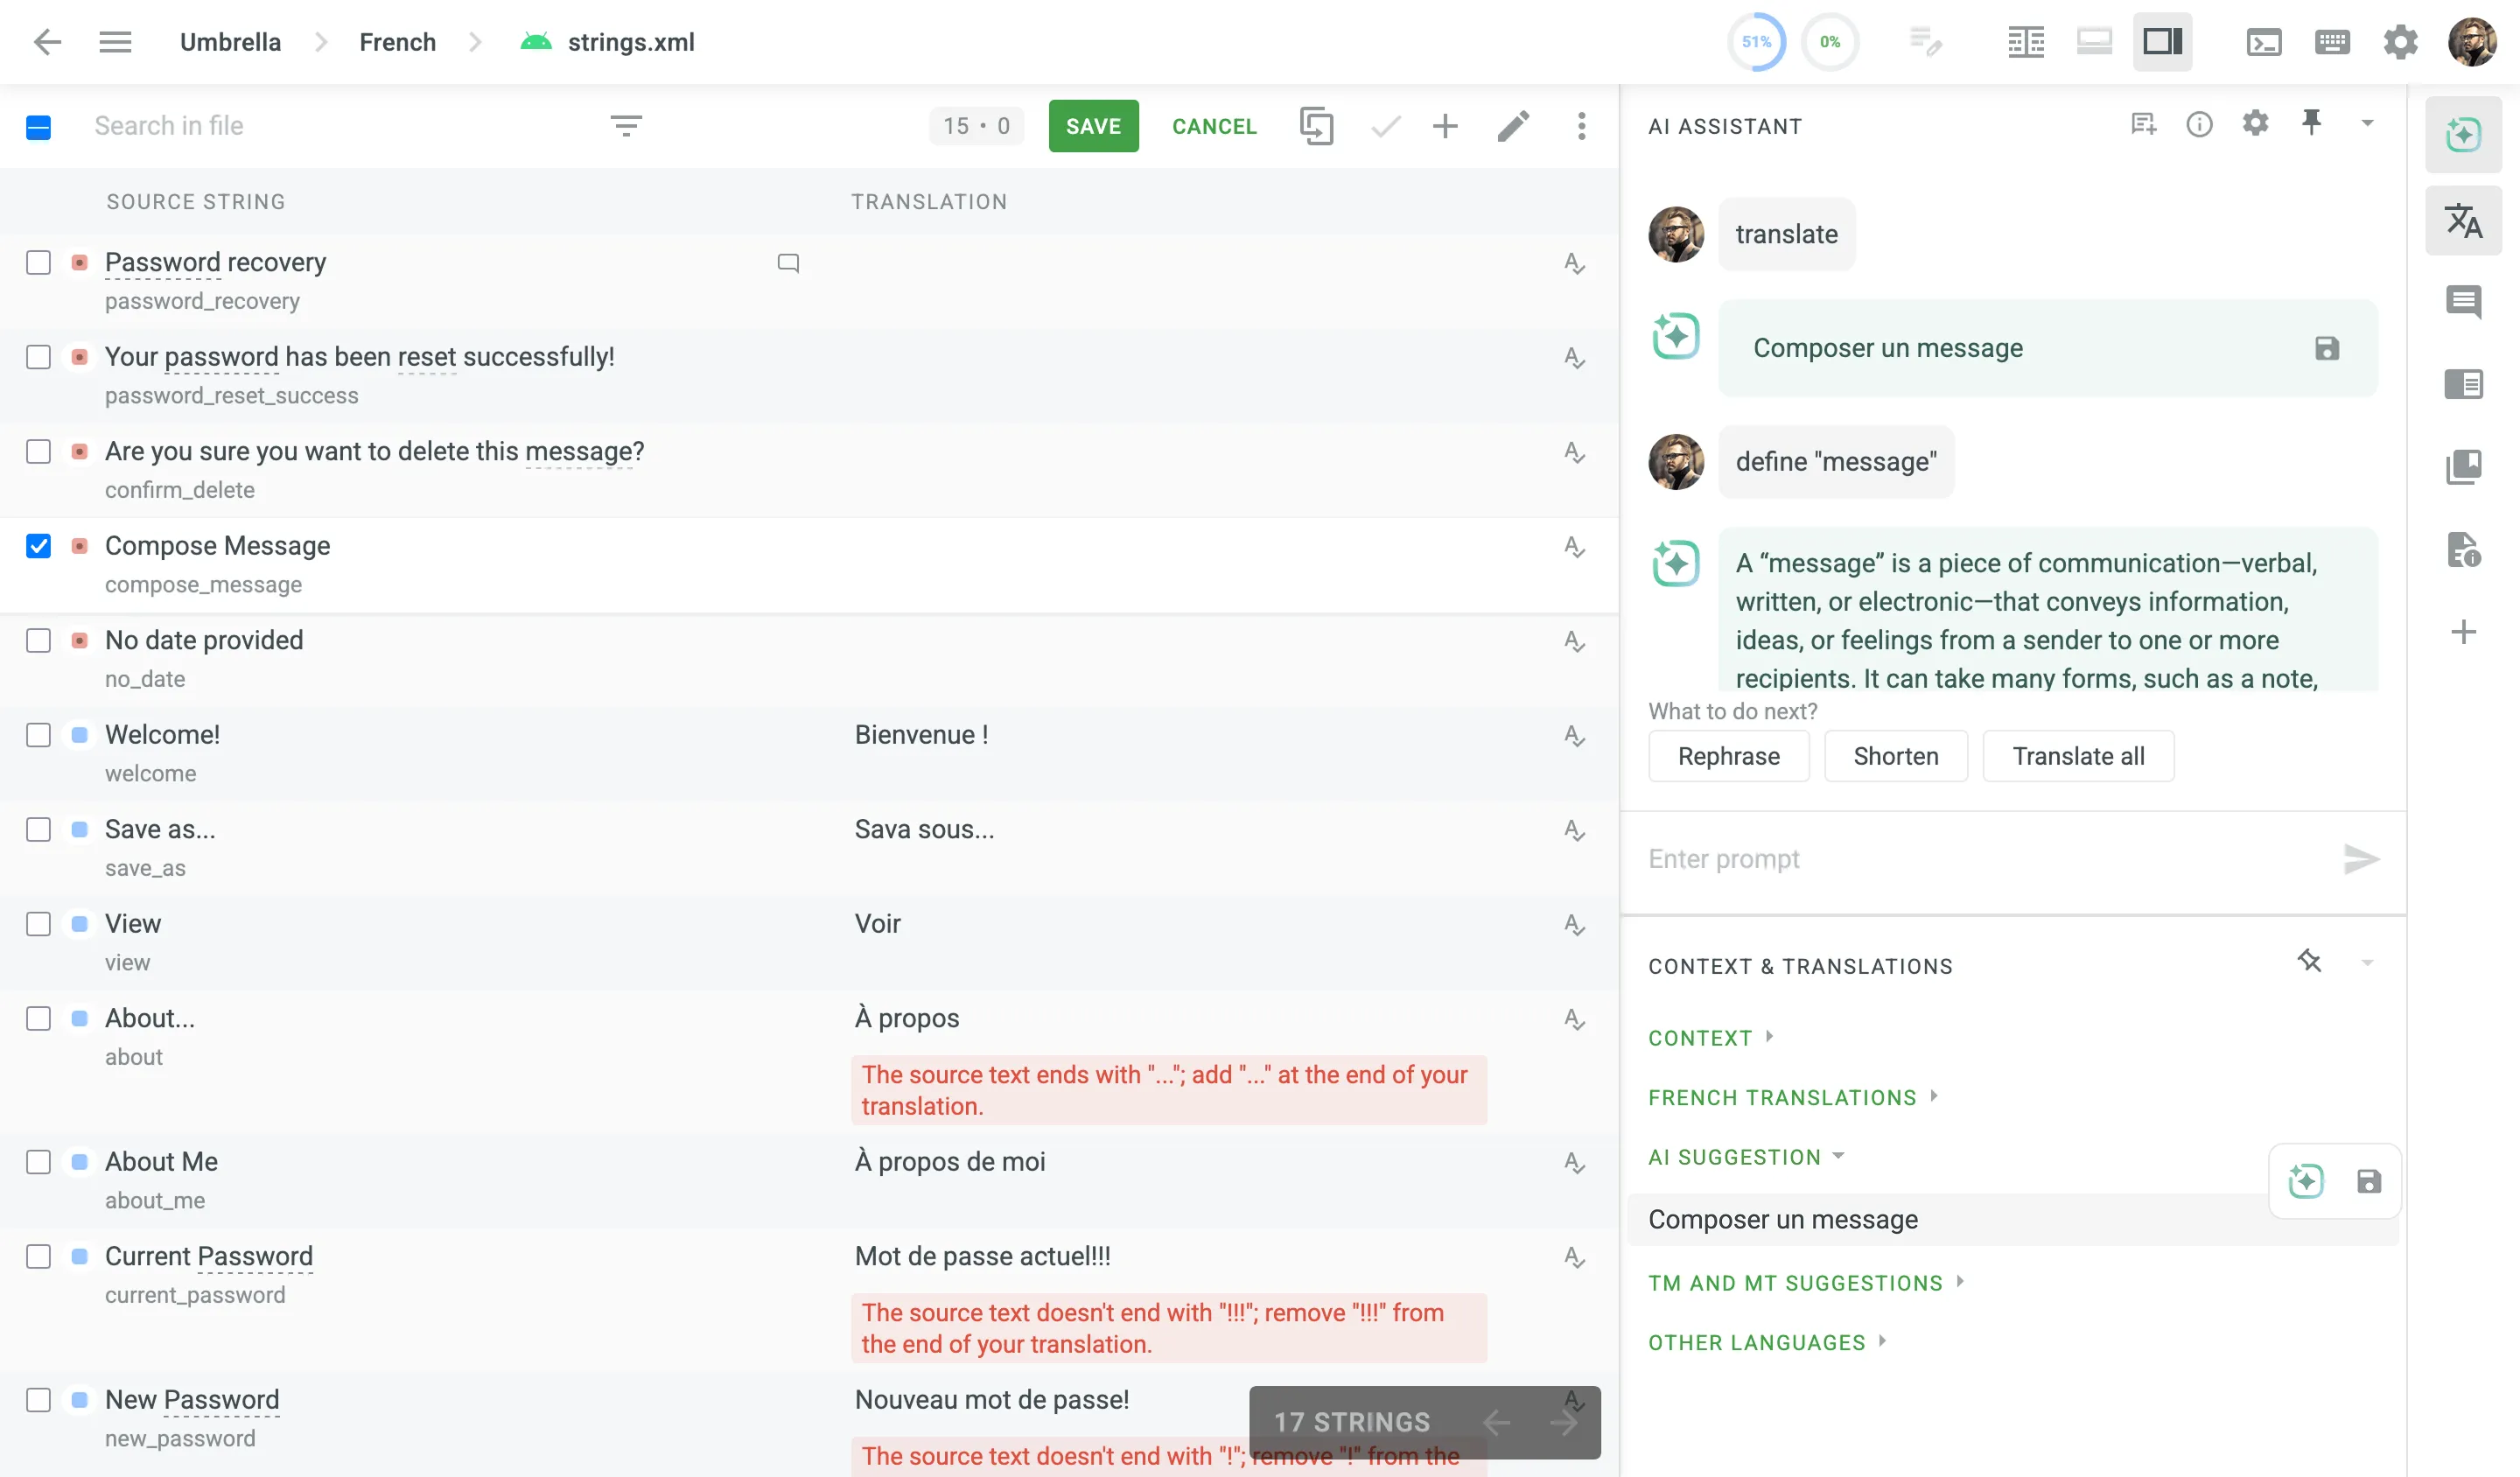
For even faster and more efficient interaction with the AI Assistant, you can use prompt shortcuts. By default, three prompt shortcuts are available:
* Rephrase
* Shorten
* Translate all
To add your own prompt shortcuts, follow these steps:
1. Click in the upper-right corner to open the AI settings.
2. Click **Add shortcut**.
3. Specify a shortcut name and a prompt it will use.
4. Click **Save**.
Additionally, in the **Editor Settings > AI** tab, you can create a custom prompt to provide the AI Assistant with a specific set of instructions that are sent each time you make a request. Note that the custom prompt is project-specific.
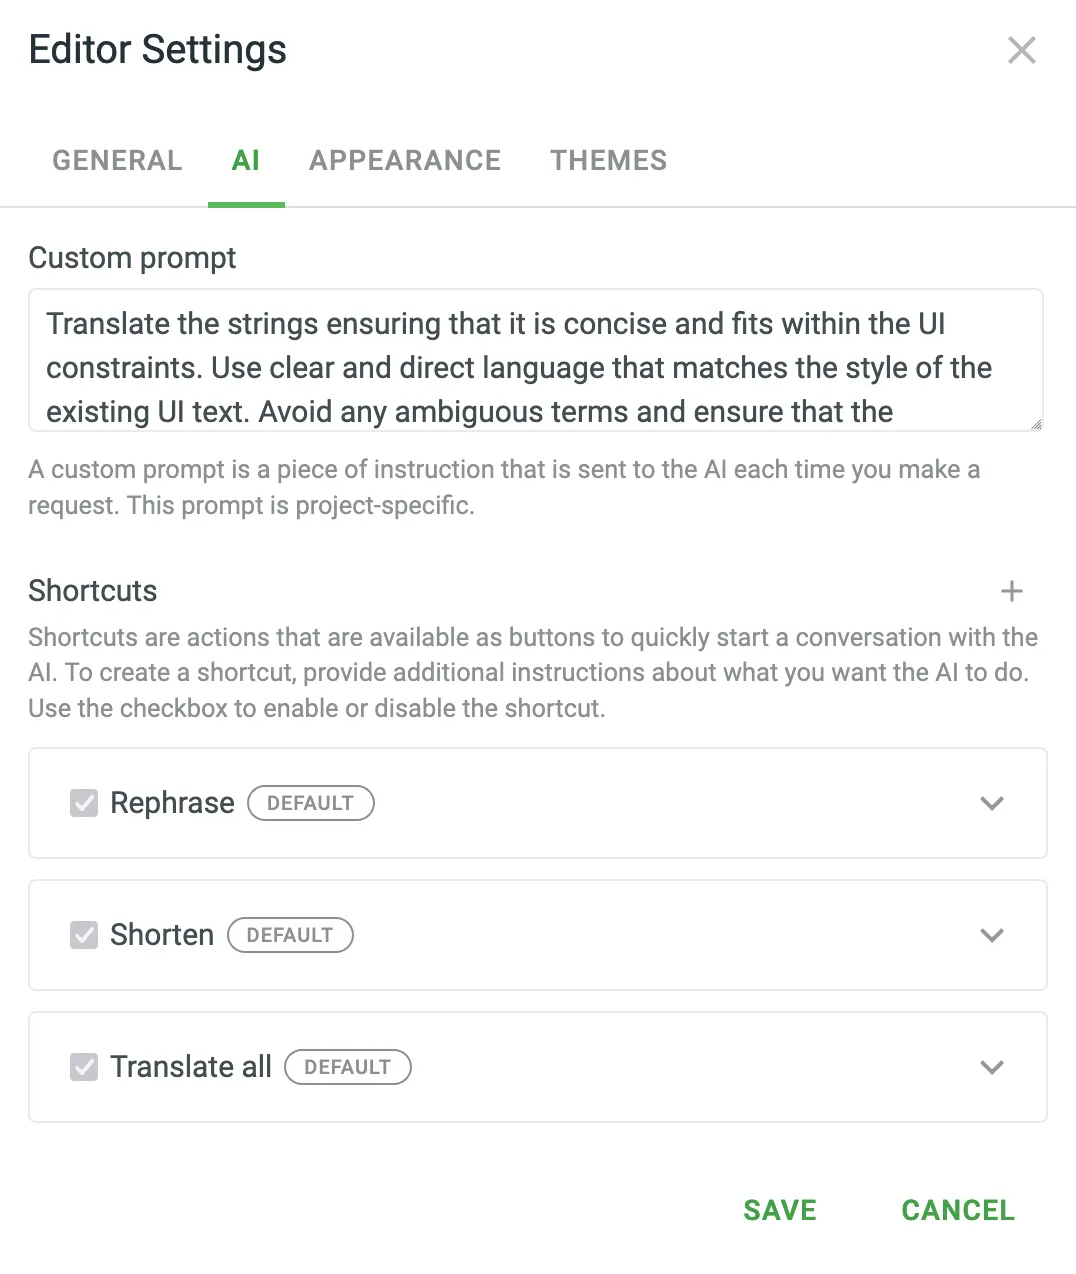
When sending prompts to the AI Assistant, the instruction priorities are considered in the following order:
1. Instructions specified in the [**AI Chat** prompt settings](#configuring-ai-prompts).
2. Instructions specified in the custom prompt settings.
3. Instructions specified in the prompt shortcut or manually entered in the AI Assistant chat.
## [AI QA Check](#ai-qa-check)
[Section titled “AI QA Check”](#ai-qa-check)
AI QA Check uses AI to automatically evaluate translations against defined quality standards. It helps translators quickly identify and resolve issues, ensuring accuracy, consistency, and compliance with project-specific requirements. AI QA Check complements and extends default QA Checks by providing comprehensive flexibility, reducing manual review efforts, and enhancing overall translation quality.
### [How AI QA Check Works](#how-ai-qa-check-works)
[Section titled “How AI QA Check Works”](#how-ai-qa-check-works)
When enabled, AI QA Check evaluates each submitted translation against a set of customizable evaluation criteria (Evaluation steps) defined in the configured QA Check prompt. Issues detected by the AI appear directly within the Editor as warnings, along with concise suggestions for corrections.
Evaluation steps may include:
* **Accuracy** – Ensuring no content is omitted, added, or incorrectly translated.
* **Fluency** – Checking grammar, spelling, punctuation, and readability.
* **Terminology** – Confirming consistent and correct use of project-specific terms.
* **Style** – Verifying translations align with defined stylistic guidelines.
* **Design** – Ensuring translations fit design constraints, including length and markup.
* **Locale Convention** – Adapting formats for dates, currencies, addresses, and more.
* **Cultural Adaptation (Verity)** – Localizing culture-specific references appropriately.
* **General Issues** – Identifying other miscellaneous quality issues.
For example, if a translation deviates from established glossary terms or fails to meet local formatting standards, the AI will highlight this and offer recommendations, guiding translators to achieve compliance and consistency.
### [Setting Up AI QA Check](#setting-up-ai-qa-check)
[Section titled “Setting Up AI QA Check”](#setting-up-ai-qa-check)
To use AI QA Check, create and configure a [QA Check prompt](#configuring-ai-prompts). Each QA Check prompt contains clearly defined evaluation steps the AI follows to detect translation issues. Unlike other AI prompts, the QA Check prompt includes a dedicated **Evaluation steps** section, allowing you to customize, edit, or expand upon predefined checks.
You can also enhance the accuracy of the AI’s analysis by including various types of additional context relevant to your project’s content.
After configuration, you can assign a QA Check prompt as the default for either your entire organization or individual projects.
### [Applying AI QA Check in Projects](#applying-ai-qa-check-in-projects)
[Section titled “Applying AI QA Check in Projects”](#applying-ai-qa-check-in-projects)
To enable AI QA Check in your projects, follow these steps:
1. [Create and enable a QA Check prompt](#configuring-ai-prompts).
2. Set it as the default QA prompt in the project’s **Settings > AI > Settings**.
3. Enable the **AI-powered check** in the project’s **Settings > QA Checks**.
Once set, the AI continuously checks submitted translations, ensuring consistent compliance with your project’s quality guidelines.
## [See Also](#see-also)
[Section titled “See Also”](#see-also)
[How to Get the Most from the AI Translations ](https://crowdin.com/blog/2024/04/24/how-to-get-the-most-from-the-ai-translations)Discover how AI revolutionizes the localization process and workflow by enhancing translation accuracy through contextual understanding.
# Crowdin Language Services
> Order professional translations and proofreading services
Crowdin Language Services is an integrated solution that allows you to order professional translations and proofreading services for your Crowdin project in a few clicks.
The benefits of ordering translations from Crowdin Language Services include:
* **Integrated payment service** – all payments are securely processed by Crowdin’s payment processing partner.
* **Ease of start** – you can order professional translations directly in your Crowdin project without searching for translators and comparing agencies.
* **Discussions and Comments** – the translations and proofreading are done directly in your Crowdin project so that you can discuss any possible questions.
## [Creating Tasks for Translation and Proofreading](#creating-tasks-for-translation-and-proofreading)
[Section titled “Creating Tasks for Translation and Proofreading”](#creating-tasks-for-translation-and-proofreading)
To order translation or proofreading of your content from Crowdin Language Services, follow these steps:
1. Open your project and click **Buy Translations**: 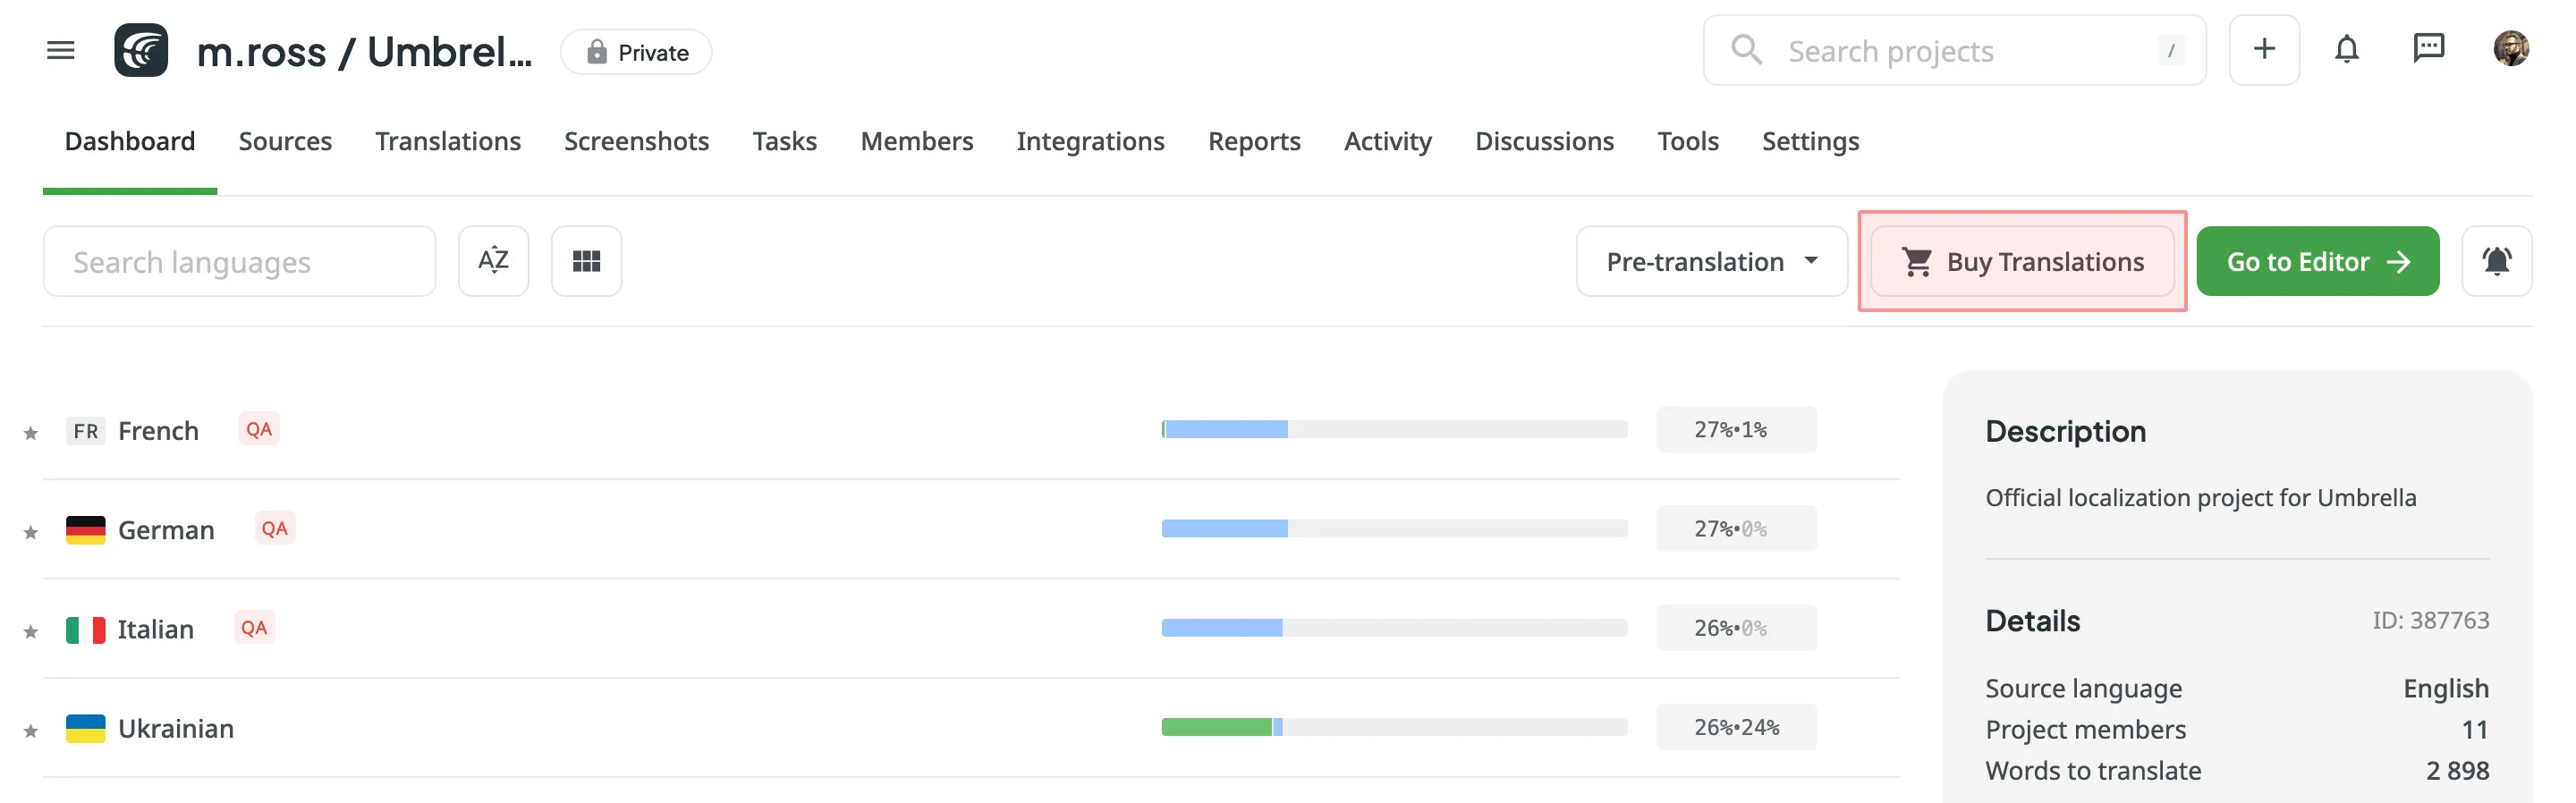\
Alternatively, click [**Create Task**](/tasks/#creating-new-task) using the **Tasks** tab in your project.
2. You can also initiate a task from the **Store**:
1. Go to **Store > Vendors** on your profile home page.
2. Click on the **Crowdin Language Services** tile to open the vendor page. 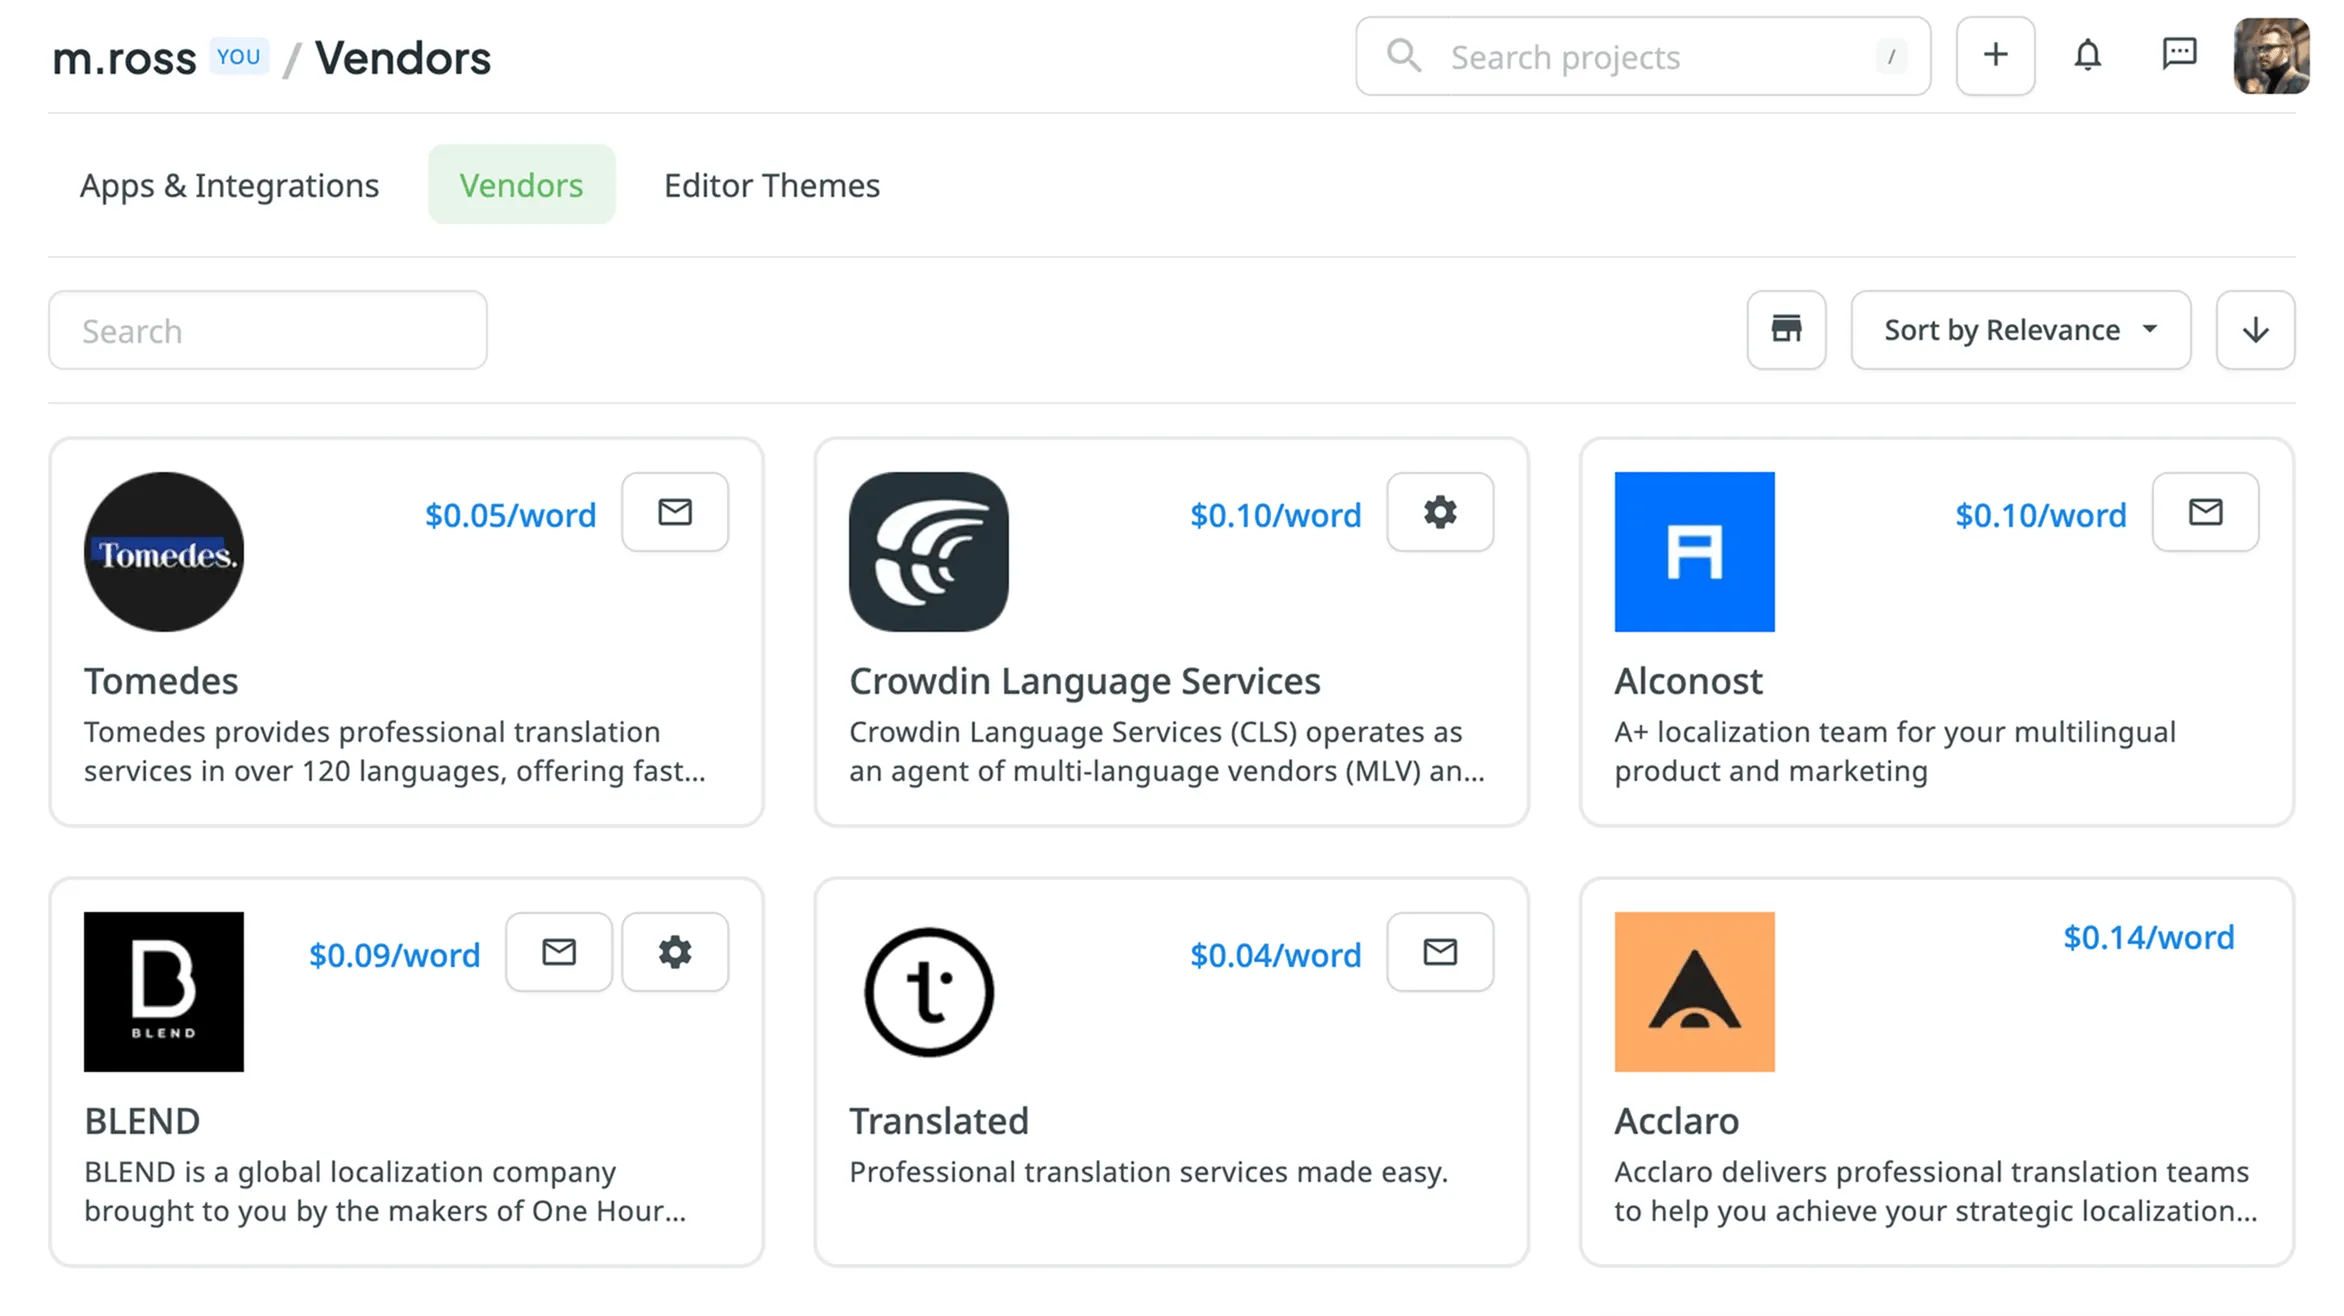
3. In the **Create Task** section, select the project from the drop-down list.
4. Click **Create** to open the task creation page in a new tab.
3. Set the task parameters:
* *Title* – specify the name of the task that will be visible to Crowdin Language Services translators.
* *Description* (optional) – add any additional details that may be helpful for Crowdin Language Services translators.
* *Type* – select either *Translate by vendor* or *Proofread by vendor*.
* *Translation Vendor* – select *Crowdin Language Services* from the list.
Tip
Click next to the vendor dropdown to open **Account Settings > Vendors**, where you can manage your payment settings or to view the vendor in the Store.
* *Create a pending proofreading task* (only for Translate by vendor) – creates a separate proofreading task that starts once the translation is completed.
* *Preceding task* (only for Proofread by vendor) – link the task to a previously created translation task to inherit its scope and language settings.
* *Skip strings already included in other tasks* – skip strings that are already assigned to other tasks.
* *Create Cost Estimate Report* – automatically generate a cost estimate based on selected content and the rates template.
* *Rates template* – select the template to be used for calculating the estimate.
* *String filters* – filter which strings should be included in the task:
* *Strings* – select whether to include all untranslated or not approved strings, or only those modified within a specific period.
* *Filter by labels* (optional) – select one or more labels to include only strings with the specified labels. Then, select the match rule:
* *All selected labels* – includes only strings that have all selected labels (AND logic).
* *Any selected label* – includes strings that have at least one of the selected labels (OR logic).
* *Exclude by labels* (optional) – select one or more labels to exclude strings with the specified labels. Then, select the match rule:
* *All selected labels* – excludes only strings that have all selected labels (AND logic).
* *Any selected label* – excludes strings that have at least one of the selected labels (OR logic).
* *Include pre-translated strings only* (only for Proofread by vendor) – include only strings that were previously pre-translated.
* *Files* (for file-based projects) or *Branches* (for string-based projects) – select content to include in the task.
* *Languages* – select target languages (a separate task will be created for each selected language).
4. *(Optional)* Select [**Post Payment**](#post-payment) or [**Managed by Crowdin balance**](#managed-by-crowdin-balance) as your payment options.
5. Confirm that you agree to the terms of service.
6. Click **Buy translations** to send your project files to Crowdin Language Services.
7. If you do not use **Post Payment** or **Managed by Crowdin balance**, you can select your preferred payment method at the [checkout page](#direct-payment-at-checkout).
## [Payment Options for Crowdin Language Services](#payment-options-for-crowdin-language-services)
[Section titled “Payment Options for Crowdin Language Services”](#payment-options-for-crowdin-language-services)
When ordering translation or proofreading, you can choose from the following payment options. You can configure **Post Payment** and **Managed by Crowdin balance** settings in **Account Settings > Vendors**.
By enabling the **Do not ask for payment details** option in the settings, your selected payment method will be applied automatically each time you create a task for the Crowdin Language Services vendor.
Tip
You can quickly access these settings by opening **Store > Vendors** and clicking on the **Crowdin Language Services** tile.
### [Post Payment](#post-payment)
[Section titled “Post Payment”](#post-payment)
This option allows you to pay for tasks after they are completed. If you select **Post Payment**, payments will be processed by the vendor (i.e., Alconost Inc.). This option is only available if the total value of the tasks to be created is $3000 or more.
### [Managed by Crowdin Balance](#managed-by-crowdin-balance)
[Section titled “Managed by Crowdin Balance”](#managed-by-crowdin-balance)
With this option, you can use your dedicated Crowdin Managed Services balance to pay for translation or proofreading tasks. Crowdin Managed Services allows you to manage various localization resources and expenses from one central balance, simplifying your workflow. You can easily add funds to this balance and track your usage, ensuring easy access to translation vendors, machine translation engines, and AI models without creating separate accounts. To activate this option, ensure you have sufficient funds in your Crowdin Managed Services balance when creating tasks.
Read more about [Crowdin Managed Services](/crowdin-managed-services/).
### [Direct Payment at Checkout](#direct-payment-at-checkout)
[Section titled “Direct Payment at Checkout”](#direct-payment-at-checkout)
If you are not using the **Post Payment** or **Managed by Crowdin balance** options, you can pay directly at checkout using your preferred payment method. In this case, the payment will be processed by Fastspring, Crowdin’s payment processing partner.
Caution
For the Wire Transfer payment method, processing may take up to 3 business days.
### [Credit Returns for Proofreading](#credit-returns-for-proofreading)
[Section titled “Credit Returns for Proofreading”](#credit-returns-for-proofreading)
When you order proofreading from Crowdin Language Services, you can receive a credit return based on the quality of the initial translations. This system is designed to reward your efforts in improving translation quality from the start. For example, taking the time to properly configure [Crowdin AI](/crowdin-ai/) and enrich your source content with context like [screenshots](/screenshots/) and [glossaries](/glossary/) can produce excellent automated translations. The higher the quality of your pre-translated content—whether from AI, your Translation Memory (TM), or a Machine Translation (MT) engine—the less post-editing is required, and the more you save.
Here’s how it works: You pay the standard rate when creating a proofreading task. After the proofreader completes the work, they calculate the **Credit Return** based on the editing effort required for each string. This amount is then automatically added to your [Crowdin Managed Services balance](#managed-by-crowdin-balance) once the task is complete. Please note that this is a credit return, not a refund to your original payment method. Think of this balance as your virtual wallet in Crowdin, ready to be used for other services, such as future proofreading tasks, translations, or AI usage.
For example, if the pre-translations are of high quality and require no edits, the proofreading cost is only 30% of the standard rate. Conversely, for translations with match percentages below the ranges specified in the tables, the proofreading cost is 100% of the standard rate.
The calculation is based on the following net rate schemes:
#### [TM Match](#tm-match)
[Section titled “TM Match”](#tm-match)
| Match Type, % | % of Base Price |
| :------------ | :-------------- |
| 101 (perfect) | 30 |
| 100 | 30 |
| 99-90 | 40 |
| 89-80 | 50 |
#### [MT Match](#mt-match)
[Section titled “MT Match”](#mt-match)
| Match Type, % | % of Base Price |
| :------------ | :-------------- |
| 100 | 30 |
| 99-90 | 35 |
| 89-80 | 50 |
| 79-70 | 75 |
| 69-60 | 90 |
| 59-50 | 95 |
#### [AI Match](#ai-match)
[Section titled “AI Match”](#ai-match)
| Match Type, % | % of Base Price |
| :------------ | :-------------- |
| 100 | 30 |
| 99-90 | 35 |
| 89-80 | 50 |
| 79-70 | 75 |
| 69-60 | 90 |
| 59-50 | 95 |
#### [Other translations](#other-translations)
[Section titled “Other translations”](#other-translations)
| Match Type, % | % of Base Price |
| :------------ | :-------------- |
| 100 | 30 |
| 99-90 | 40 |
| 89-80 | 50 |
## [Task Status](#task-status)
[Section titled “Task Status”](#task-status)
To track the localization progress of the created tasks, follow these steps:
1. Open your project and go to the **Tasks** tab.
2. Click on the task’s name to open it.
3. In the **Details** section, you can see the Vendor Project Status:
* Waiting for payment – the localization services weren’t paid
* Payment in process – the payment is being processed by the Fastspring (Crowdin’s payment processing partner)
* In progress – the payment is processed, and the Crowdin Language Services representatives are working on the task
* Completed – The work on the task was completed in full
## [Translation and Proofreading Process](#translation-and-proofreading-process)
[Section titled “Translation and Proofreading Process”](#translation-and-proofreading-process)
Once the payment is processed, the Crowdin Language Services manager will receive a notification about new tasks and will be added to your project members to manage the localization process. Crowdin Language Services translators work directly in Crowdin Editor, so all the context information (e.g., [Screenshots](/screenshots/), [Labels](/project-settings/labels/), etc.) you added to the source files will be accessible to them as well.
Read more about [Crowdin Editor](/online-editor/).
A translator will be logged in to Crowdin with Crowdin Language Services profile to work on content localization. So in your Crowdin project, you will see translation activities made by the Crowdin Language Services profile. When the work starts, the related task in Crowdin will automatically get the *In progress* status, and when the work is finished, the task will get the Completed Vendor Project Status.
## [Discussions and Comments](#discussions-and-comments)
[Section titled “Discussions and Comments”](#discussions-and-comments)
If needed, you can add some details to an already created task in the **Comments** section. The comments will be visible to a translator who works on the task, and they will be able to reply in the **Comments** section if needed.
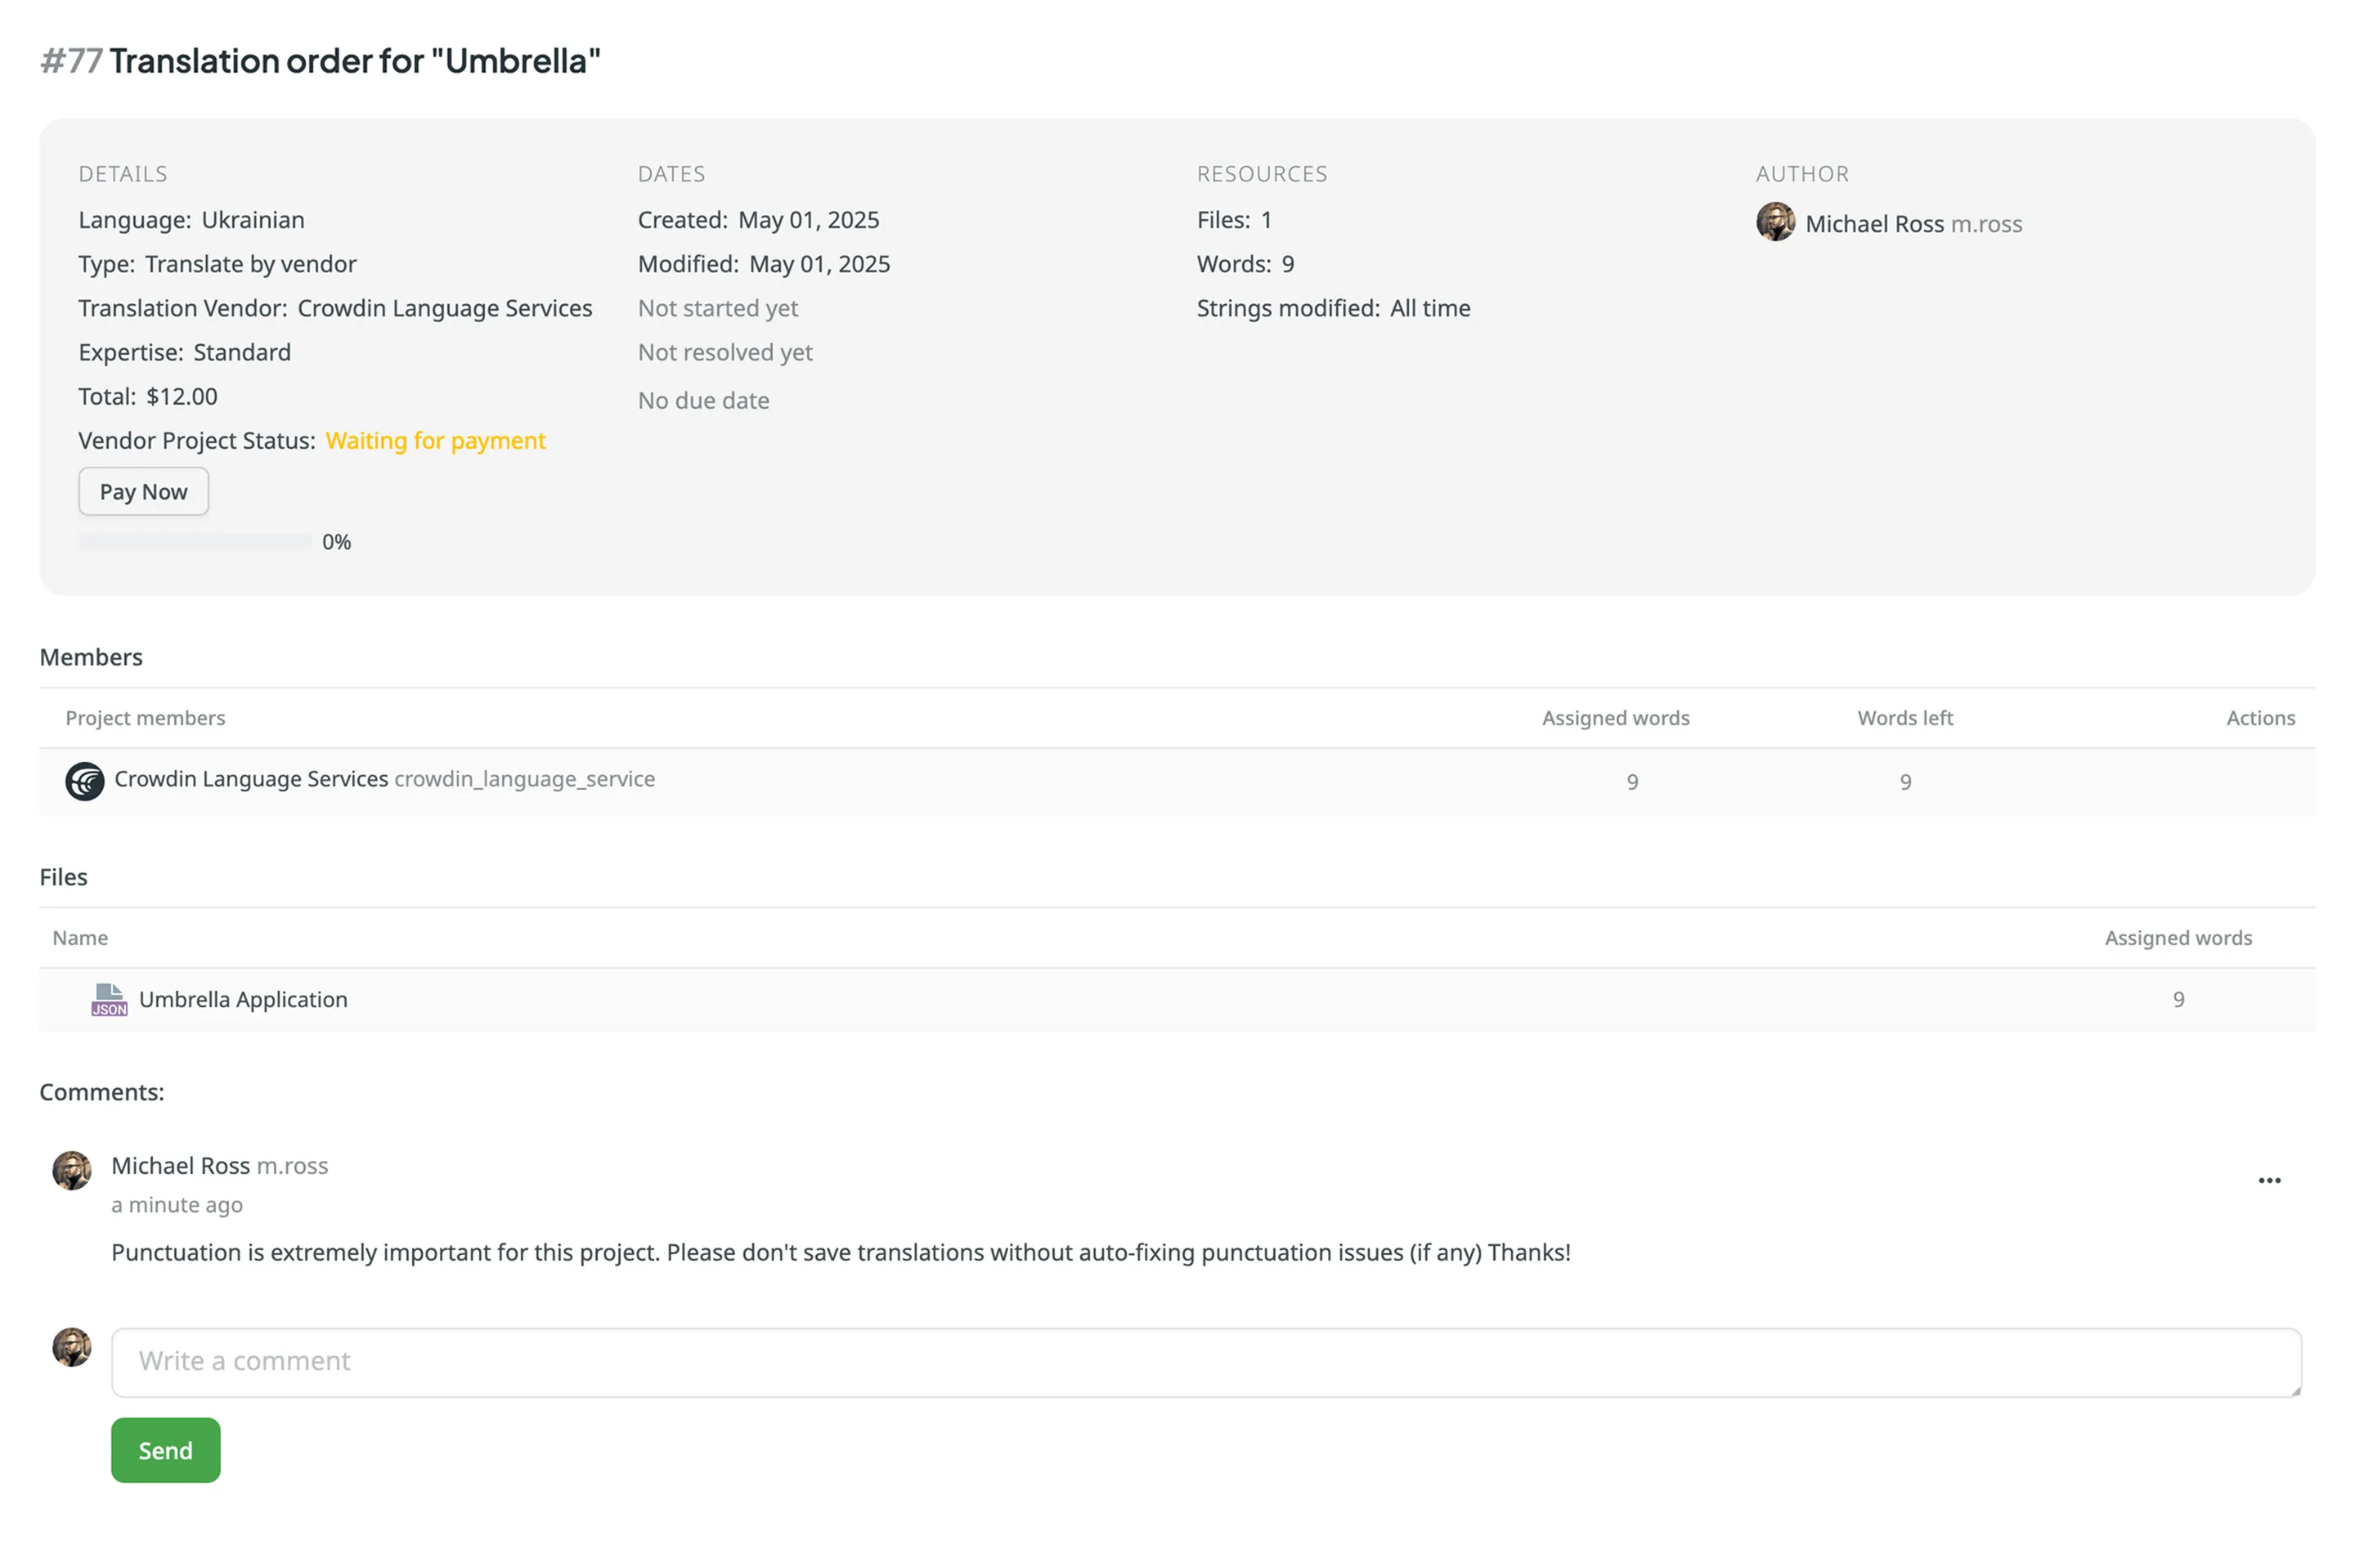
## [See Also](#see-also)
[Section titled “See Also”](#see-also)
[Tasks ](/tasks/)Create and assign tasks for translating or proofreading content.
[Ordering Professional Translations ](/ordering-professional-translations/)Order professional translations from vendors directly in Crowdin.
# Crowdin Managed Services
> Learn how to use Crowdin Managed Services
Crowdin offers a range of additional services that can significantly improve your localization workflow while simplifying payment and service management. These services are managed directly through your Crowdin account using a dedicated balance separate from your primary subscription. This means you don’t need to register additional accounts to access AI models or translation vendors, such as Crowdin Language Services. By consolidating payments in one place, you gain greater control over your localization resources and expenses, ensuring seamless workflow integration.
## [Available Services](#available-services)
[Section titled “Available Services”](#available-services)
Crowdin can manage the following paid services without the need to register separate accounts.
AI Models
Improve localization workflow by using OpenAI, Google Gemini, and other providers.
[Read More ](/crowdin-ai/)
Translation Vendors
Order professional translation and proofreading services with Crowdin Language Services.
[Read More ](/crowdin-language-services/)
## [Using Crowdin Managed Services](#using-crowdin-managed-services)
[Section titled “Using Crowdin Managed Services”](#using-crowdin-managed-services)
Crowdin Managed Services simplifies the use of paid tools like AI models and translation vendors by handling payments through a dedicated balance within your Crowdin account. This centralizes balance management and provides a clear overview of your spending.
In the **Crowdin Managed Services** section, you can:
* **Manage Balance**: Add funds to your dedicated balance for the Crowdin Managed Services you use.
* **Set Balance Warnings**: Receive notifications when your balance is low.
* **Track Usage**: View spending with detailed usage statistics.
To start using Crowdin Managed Services, [add funds to your account balance](#adding-funds-to-account-balance) and activate the **managed by Crowdin** option for the services you want to use in your projects.
## [Managing Your Dedicated Balance](#managing-your-dedicated-balance)
[Section titled “Managing Your Dedicated Balance”](#managing-your-dedicated-balance)
You can manage your Crowdin Managed Services balance by adding funds and setting up notifications about low balance.
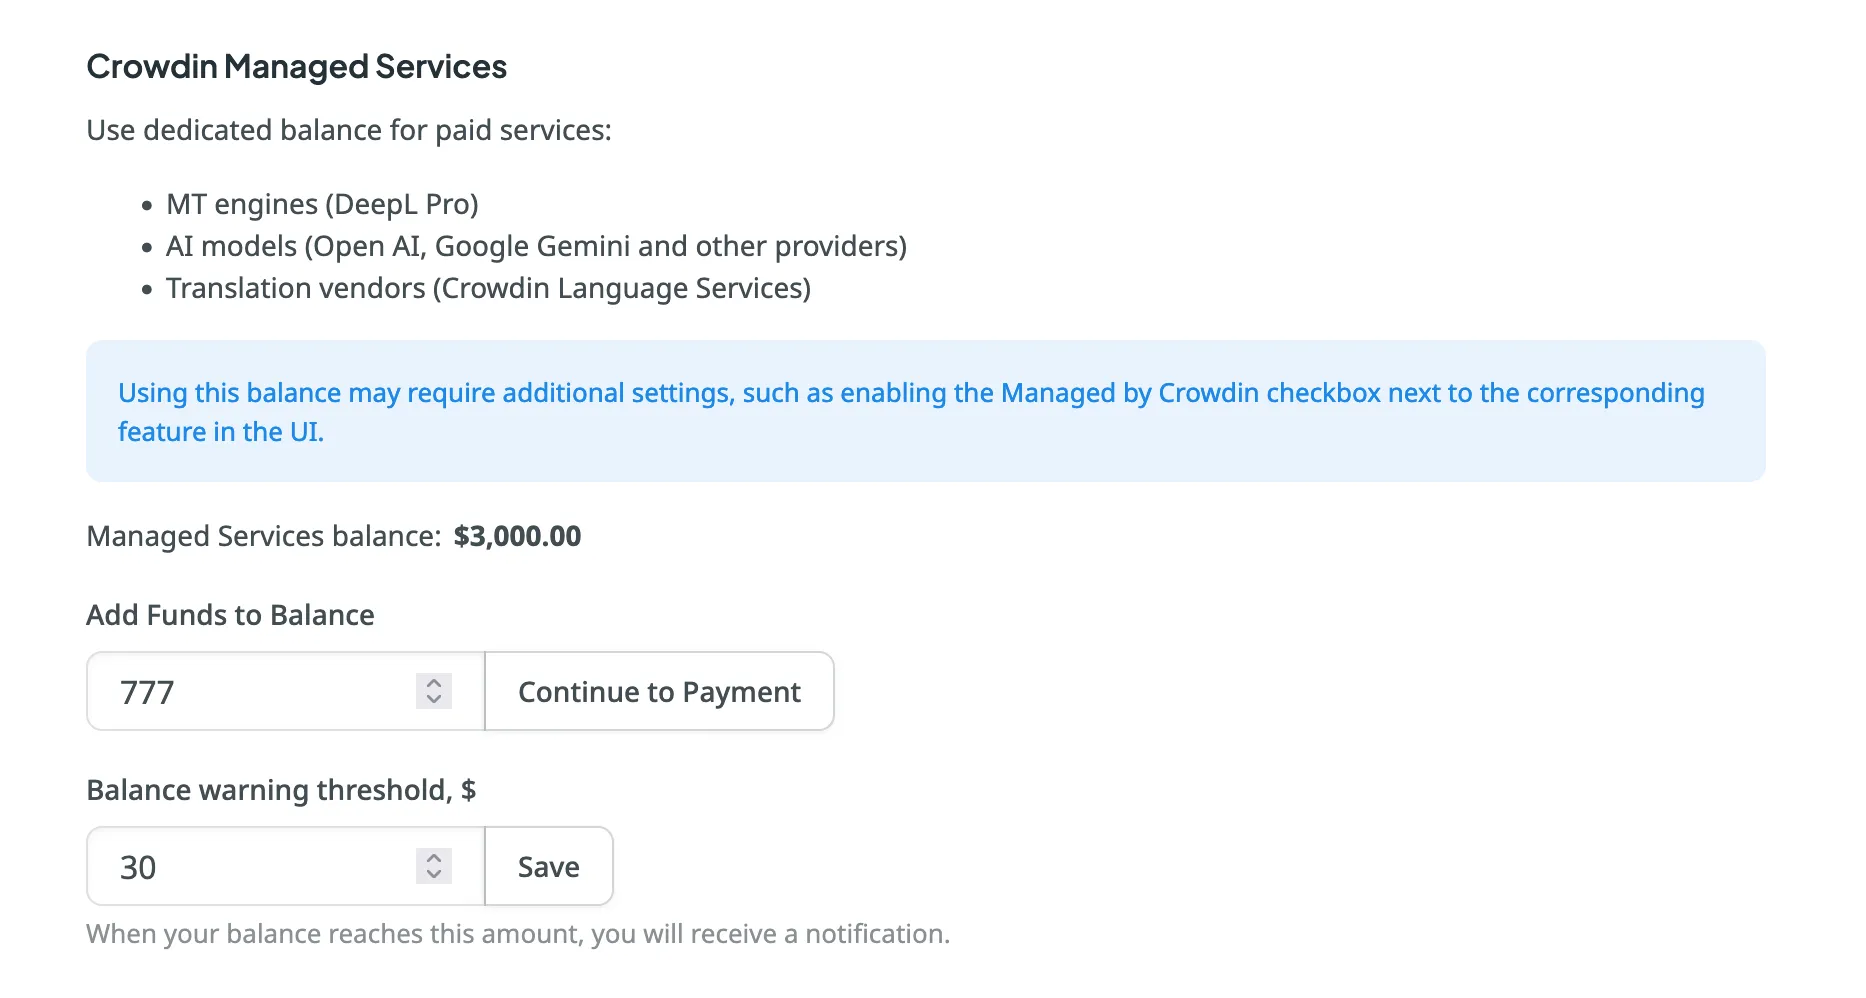
### [Adding Funds to Account Balance](#adding-funds-to-account-balance)
[Section titled “Adding Funds to Account Balance”](#adding-funds-to-account-balance)
To add funds to your balance, follow these steps:
1. Open your **Account Settings** and go to the **Billing** tab.
2. Locate the **Crowdin Managed Services** section.
3. Enter the desired amount in the **Add Funds to Balance** field.
4. Click **Continue to Payment** to proceed to the checkout page, where you can complete the payment.
### [Setting Balance Warning Threshold](#setting-balance-warning-threshold)
[Section titled “Setting Balance Warning Threshold”](#setting-balance-warning-threshold)
To ensure the uninterrupted operation of the Crowdin Managed Services, you can set the preferred amount in the **Balance warning threshold** field so that when your balance reaches this point, you’ll automatically receive a notification.
To set up low-balance notifications, follow these steps:
1. Open your **Account Settings** and go to the **Billing** tab.
2. Locate the **Crowdin Managed Services** section.
3. Enter your desired threshold amount in the **Balance warning threshold, $** field.
4. Click **Save** to confirm your settings.
## [Usage Statistics](#usage-statistics)
[Section titled “Usage Statistics”](#usage-statistics)
The **Usage Statistics** section provides a comprehensive visual analysis of your usage costs through an interactive graph, allowing you to review detailed statistics and track spending on each service based on your selected time period. In addition to the graph, the **Used during the selected time period** field shows the total amount spent during the chosen period.
The graph displays usage costs for each service from the [available categories](#available-services). Hover over any bar to see a breakdown of the expenses per service for that day, month, or year.
Depending on the selected date range, each stacked bar represents:
* **One day** for ranges up to **2 months**.
* **One month** for ranges up to **24 months**.
* **One year** for ranges over **24 months**.
You can also focus on specific services by hovering over the service titles under the graph. To hide certain services from the graph, click on their names.
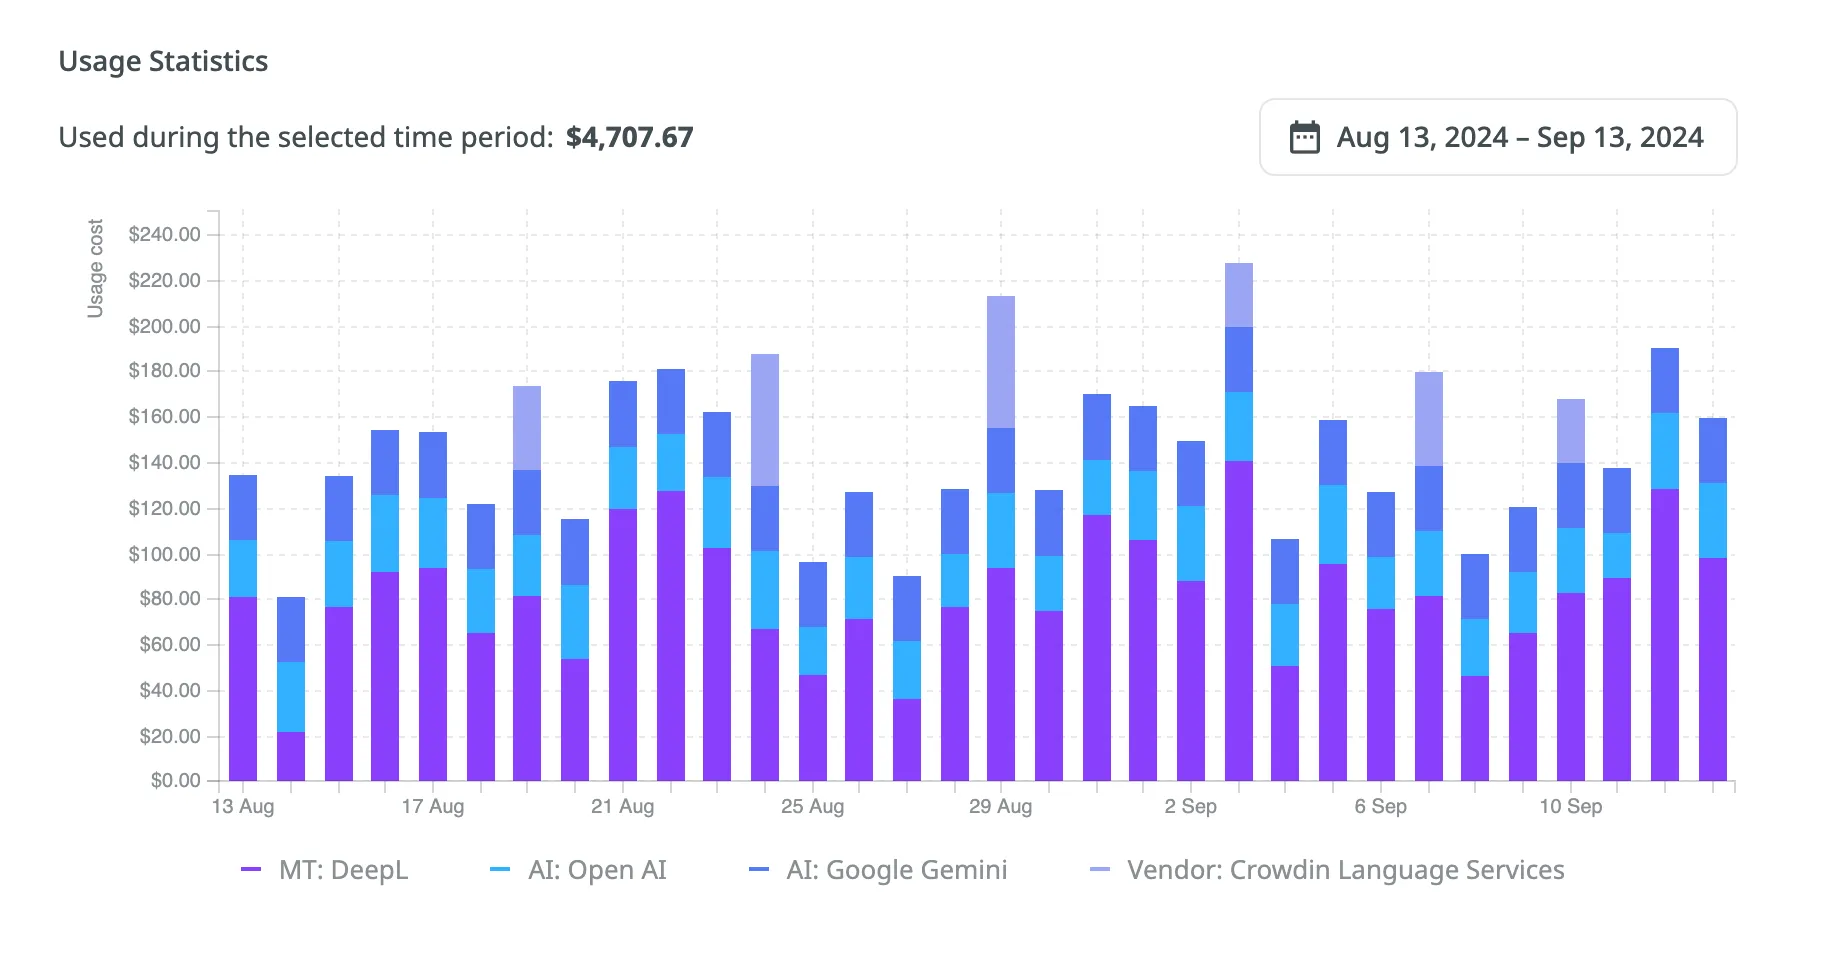
## [See Also](#see-also)
[Section titled “See Also”](#see-also)
[Payments and Invoices ](/payments-invoices/)Learn how payments work in Crowdin and how to download invoices.
[Changing Subscription Plan ](/changing-subscription-plan/)Upgrade or downgrade your subscription plan.
[App Subscriptions ](/app-subscriptions/)Learn how to subscribe to paid apps in the Crowdin Store.
[Billing Settings ](/billing-settings/)Update your billing information and payment method.
# CSV / XLSX File Configuration
> Configure CSV or XLSX files before importing their contents
After CSV or XLSX files are uploaded to the project, they require configuration before the system can correctly parse and import their content.
## [File Configuration](#file-configuration)
[Section titled “File Configuration”](#file-configuration)
To start the configuration, follow these steps:
* File-based project
1. Open your project and go to **Sources > Files**.
2. Click **Configure** next to the file to open the configuration dialog.
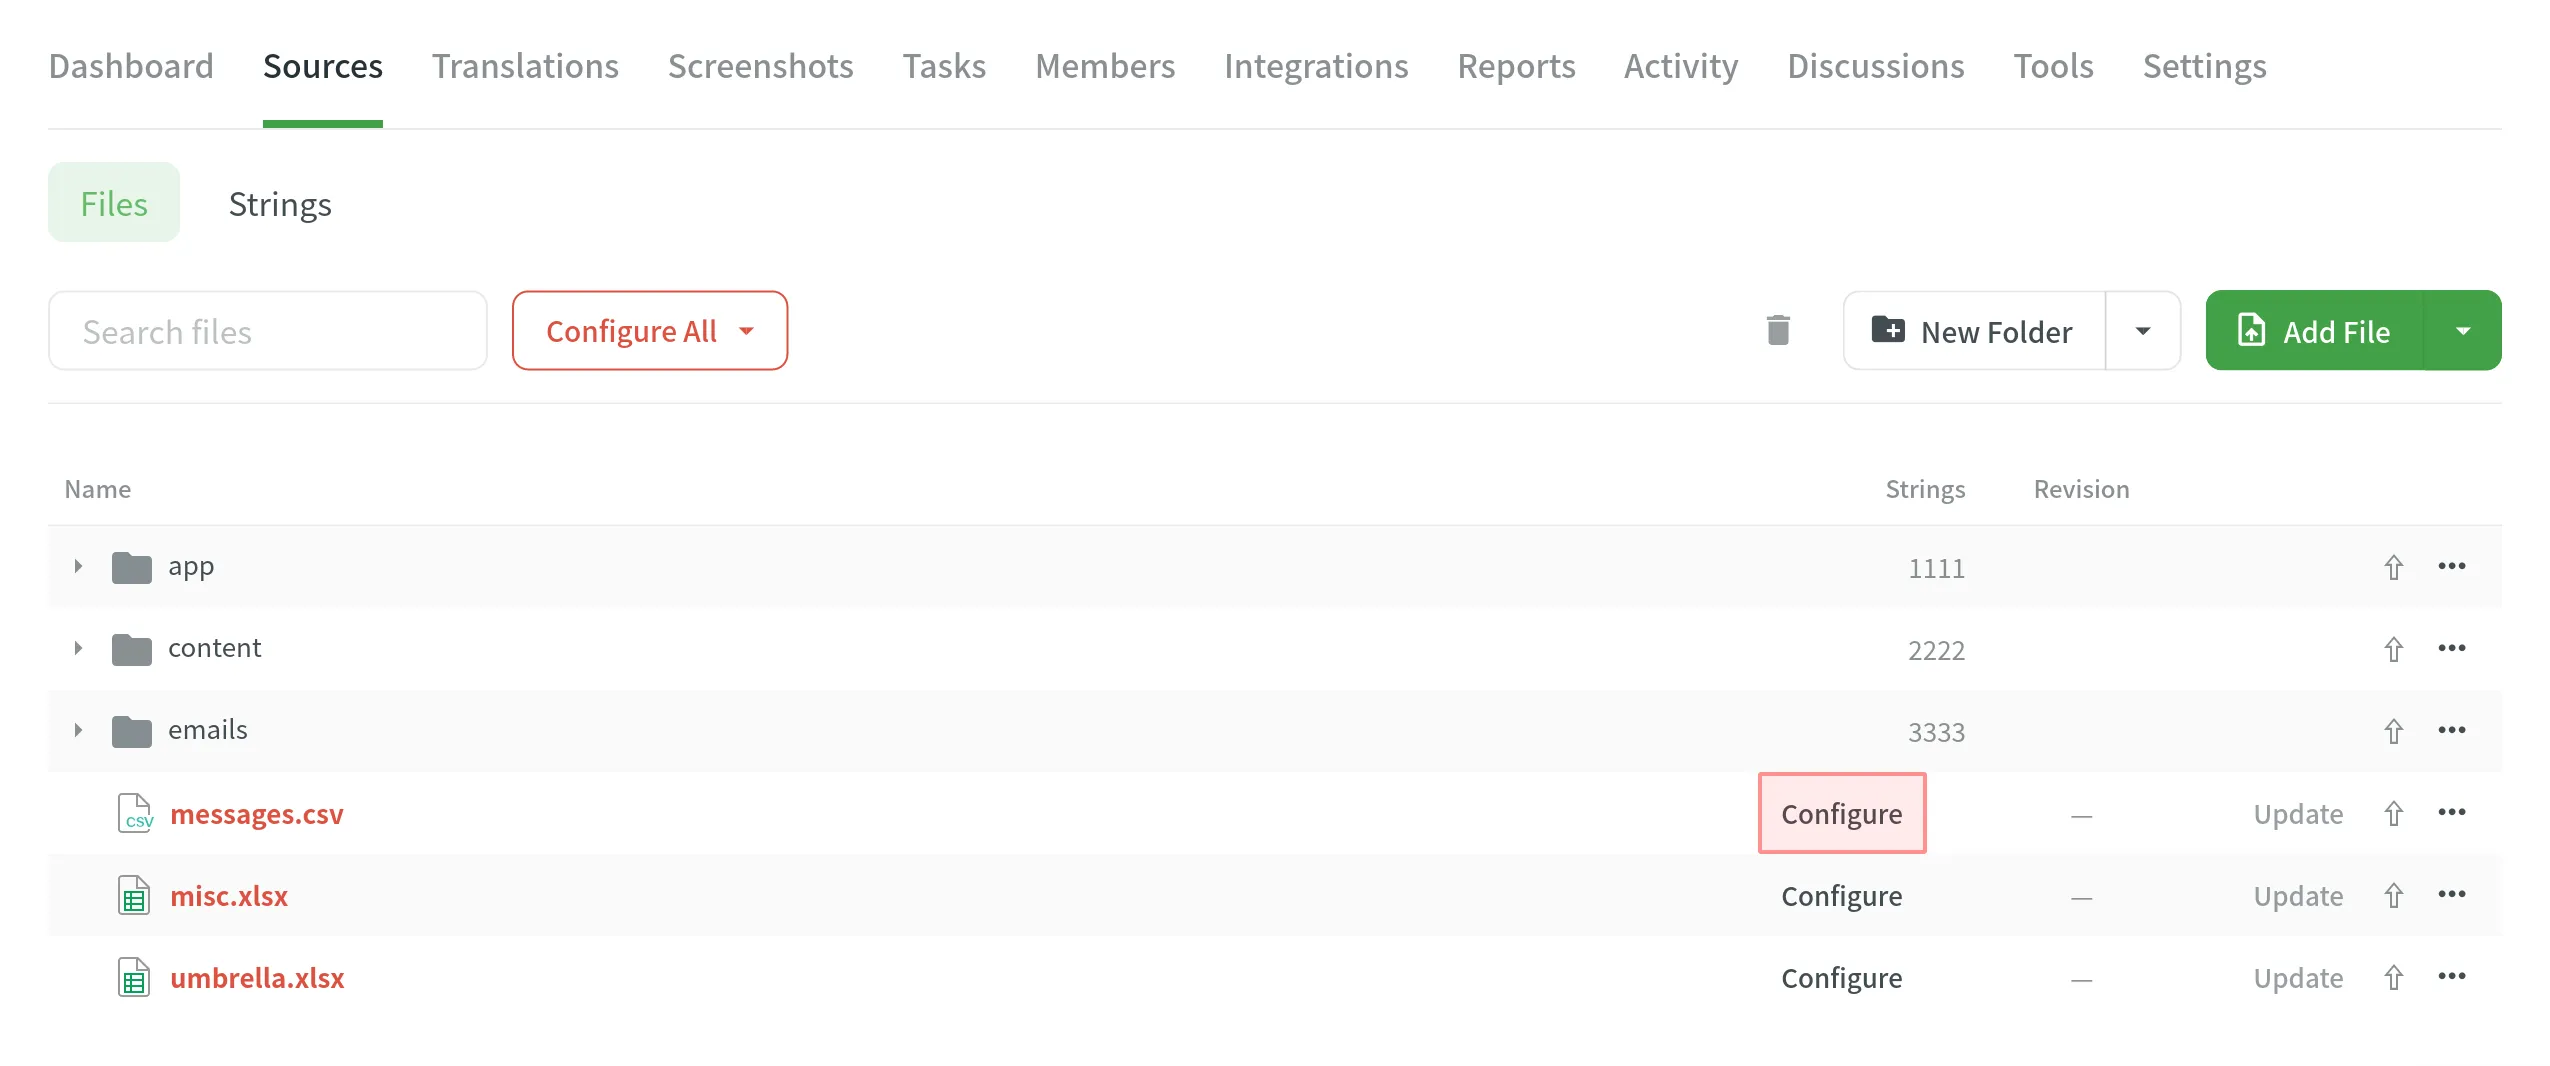
Tip
You can configure multiple files at once in a few ways:
* **To configure specific files:** Select the desired files, right-click, and choose **Configure Files**.
* **To configure all files of one type:** Click **Configure All** to set up all CSV or all XLSX files at once.
* String-based project
1. Open your project and go to the **Upload** tab.
2. Drag and drop your files or click **Select Files**.
3. Click **Configure** next to the file you wish to set up.
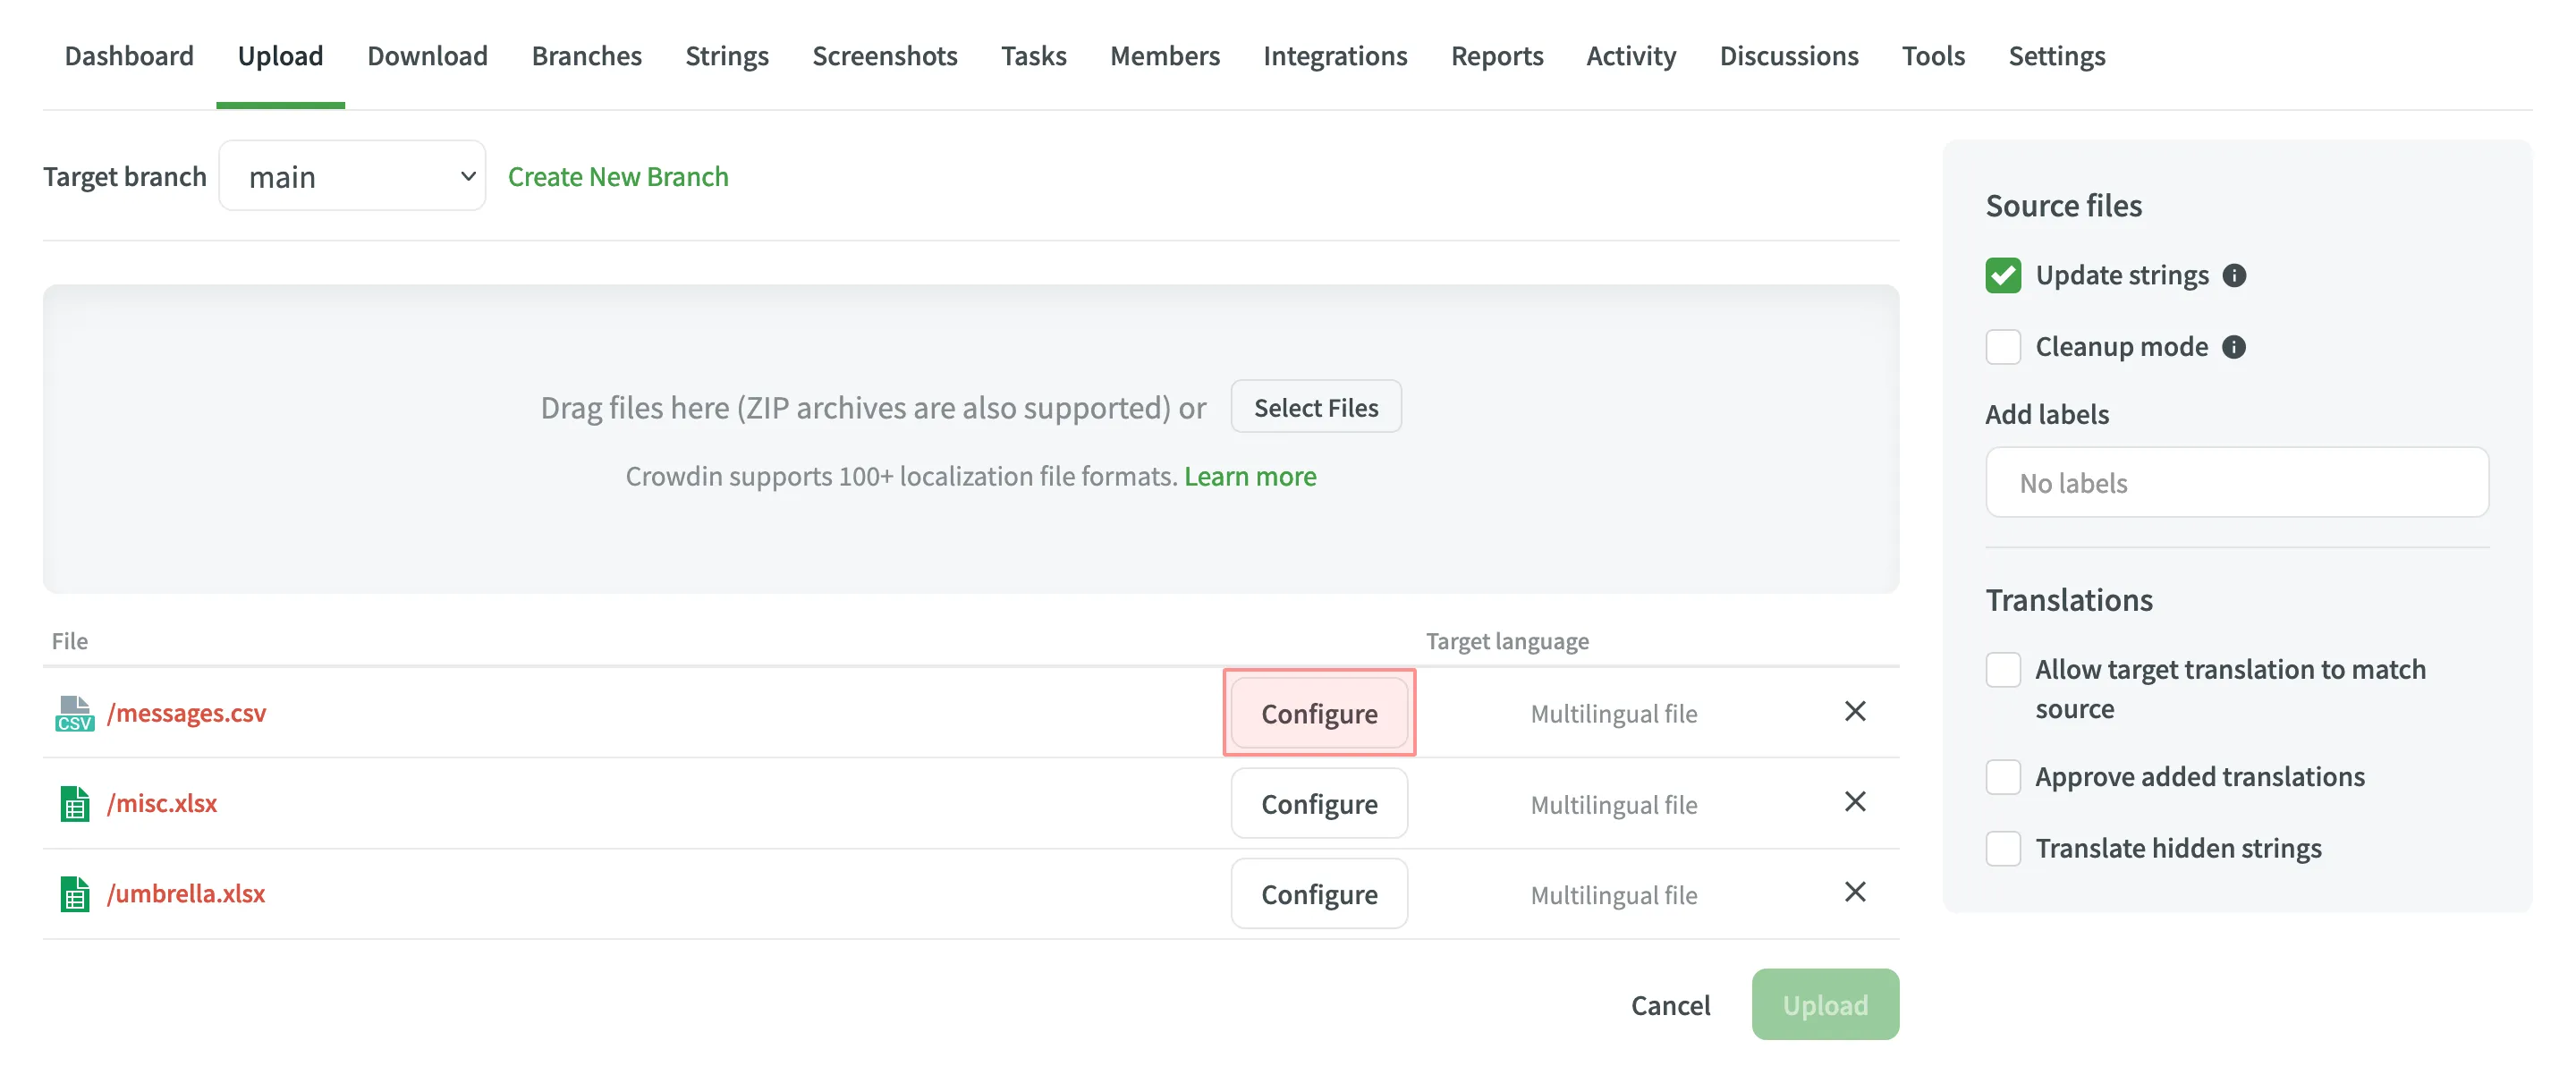
The same configurations mentioned in this article are also applicable to the TSV file format. The main difference between CSV and TSV files is that they use different delimiters between columns (commas in CSV and tabs in TSV).
### [Initial Setup for XLSX Files](#initial-setup-for-xlsx-files)
[Section titled “Initial Setup for XLSX Files”](#initial-setup-for-xlsx-files)
When configuring an XLSX file, you will first see a dialog with two primary options that determine how the file is processed:
* **Import all cells** - Imports the content of each cell as a separate source string. If you select this option, you can also enable **Content segmentation** to automatically split text into smaller translation units, such as sentences or short paragraphs. This is helpful when translating content units consisting of several sentences because it will be easier to translate smaller pieces of text. Segmentation Rules eXchange (SRX) are used for automatic content segmentation.
* **Configure columns for import** - This option opens the detailed configuration dialog, allowing you to manually map columns for sources, translations, context, and more.
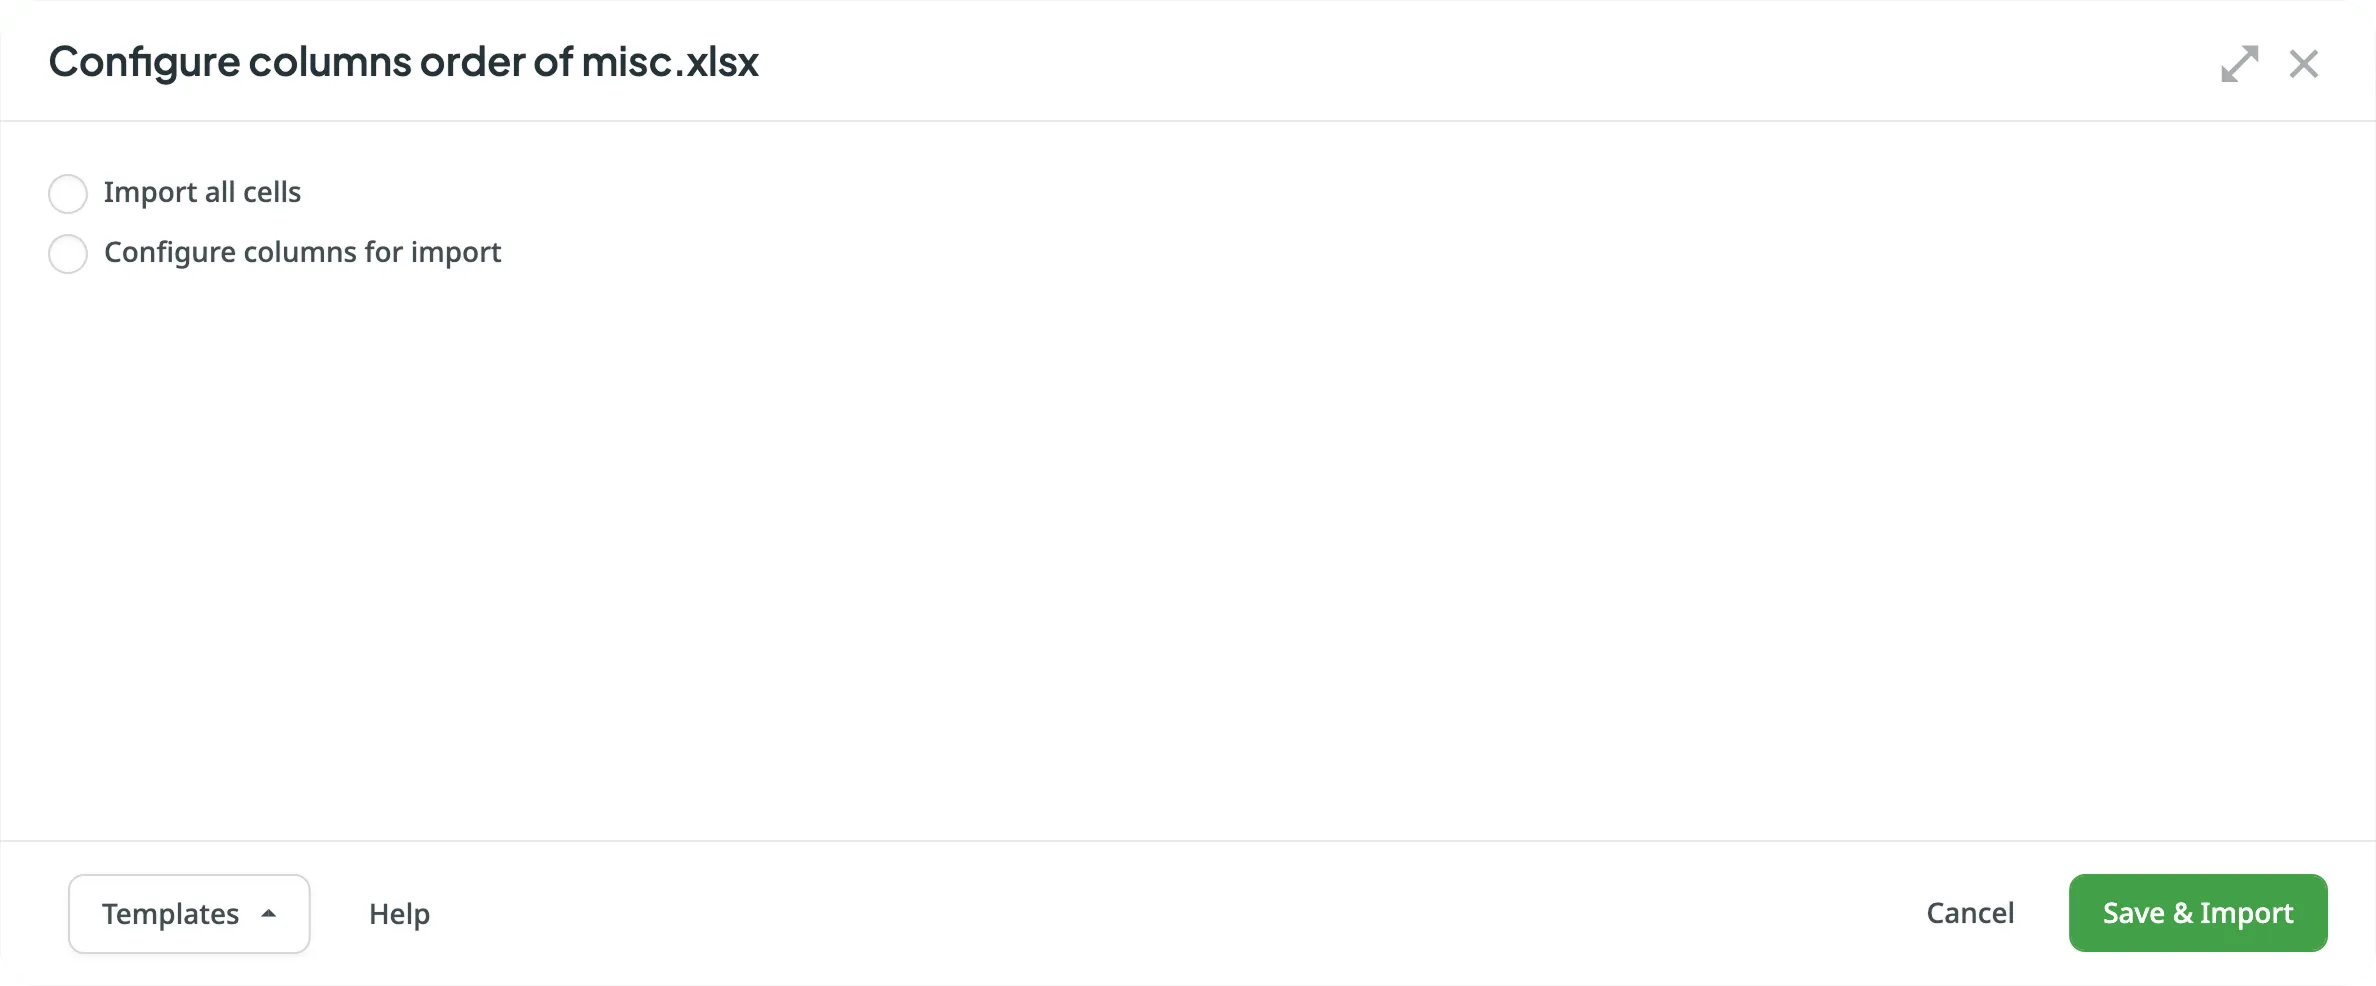
The detailed configuration dialog appears immediately for CSV files, or for XLSX files after you select **Configure columns for import**.
### [Columns Configuration](#columns-configuration)
[Section titled “Columns Configuration”](#columns-configuration)
The main area of the dialog is for mapping the columns from your file to the appropriate data type in Crowdin. The interface includes the following controls directly above the column mapping:
* **Detect** - Re-runs the [automatic detection of the column scheme](#automatic-column-detection) based on the headers in the first row.
* **Reset** - Clears the current column configuration and resets all columns to **Not selected**.
* and - Use these buttons to add a new language column or remove a selected one. This is useful if your multilingual source file is missing columns for some of your project’s target languages. These buttons are active only when you select the **Multilingual spreadsheet** option in the **Import Options** section.
You can define the purpose of each column by assigning a type from the dropdown menu above it. The available column types are:
* *Key* – Column contains string identifiers. Typically, an alphanumeric value.
* *Source string* – Column contains source strings that should be translated.
* *Source string/Translation* – Column contains source strings, but the same column will be filled with translations when the file is exported. When uploading existing translations, the values from this column will be used as translations.
* *Translation* – Column for resulting translations added on export. On import and when uploading existing translations, the system will check this column for existing translations and upload them to the project.
* *Context* – Column contains comments or context information for the source strings.
* *Labels* – Column contains labels for the source strings. You can add multiple labels to each string, separating them with commas.
* *Max. Length* – Column contains max.length limit values for the translations of the strings.
* *Not selected* – Column will be skipped on import.
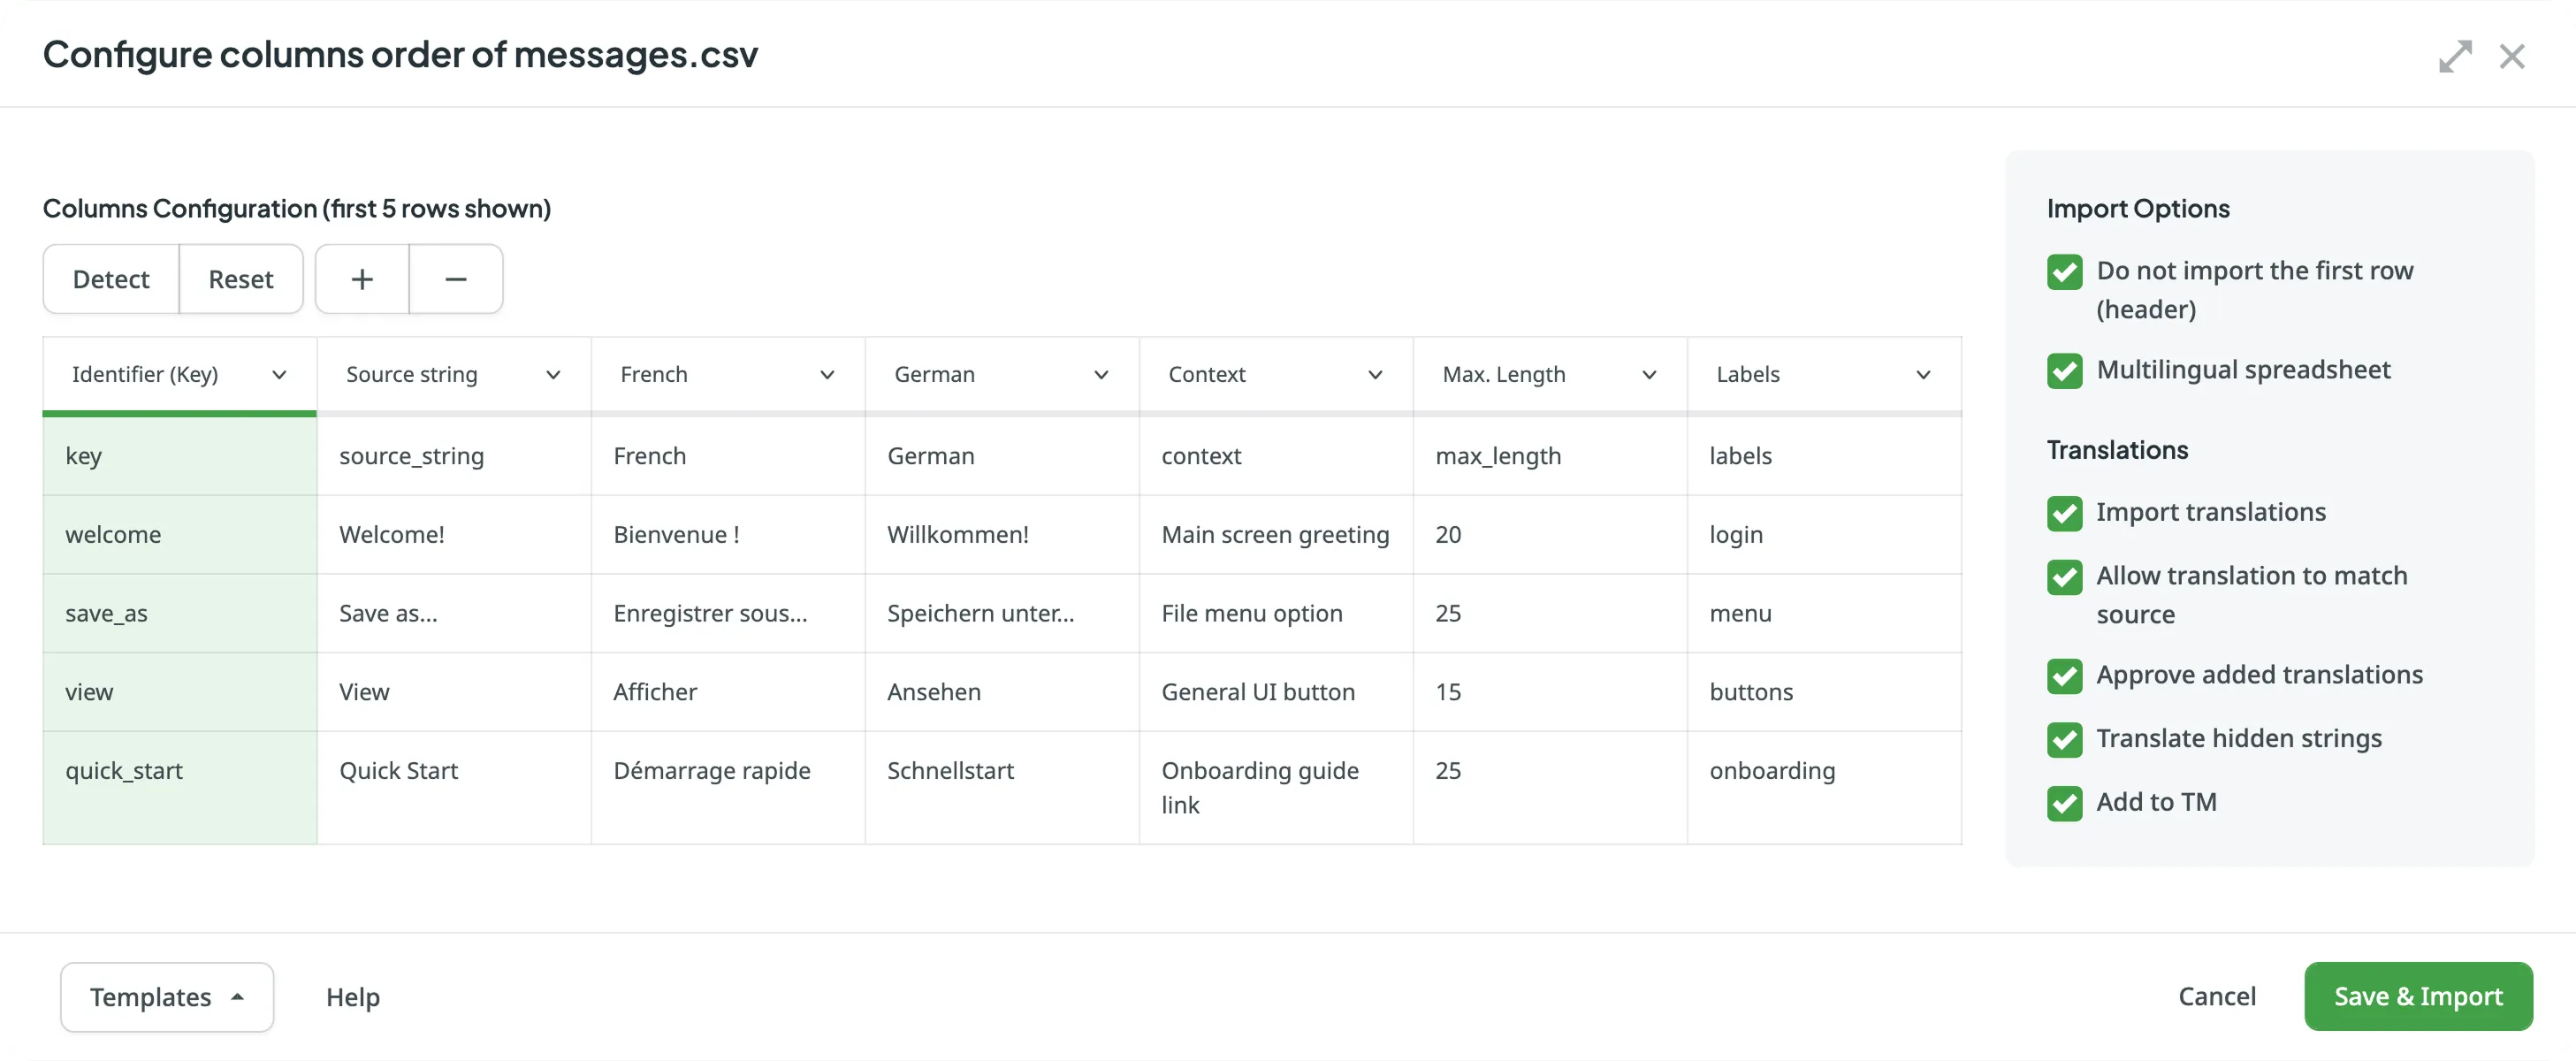
#### [Automatic Column Detection](#automatic-column-detection)
[Section titled “Automatic Column Detection”](#automatic-column-detection)
When you open the configuration dialog, the system automatically detects the file scheme based on the column names in the first row. The identification is case-insensitive. Columns that aren’t detected automatically will be left as **Not selected** for manual configuration.
Automatic column detection is especially helpful when you upload multiple multilingual spreadsheets that contain many languages and additional columns (e.g., Context, Labels, Max. Length).
By default, the system initially treats spreadsheets as monolingual. To correctly autodetect columns containing translations for multiple languages, select **Multilingual spreadsheet** in the [**Import Options**](#import-options) section, and then click **Detect**.
To get the most out of automatic column detection, name the columns in your CSV or XLSX files using the values from the table below:
| Column type | Expected value |
| --------------------------------- | ------------------------------------------------------------------------------------------------------------------------------------------------------------------------------------------------------------ |
| Key | `identifier`, `key` |
| Source String | `source phrase`, `source_phrase`, `source string`, `source_string` |
| Source String/Translation | `source or translation`, `source_or_translation`, `source/translation` |
| Translation | `translation` |
| Context | `context` |
| Labels | `labels` |
| Max. Length | `max. length`, `max_length` |
| Language (for multilingual files) | Language name (e.g., Ukrainian), Crowdin language code (e.g., uk-UA), Locale (e.g., uk-UA), Locale with underscore (e.g., uk\_UA), Language code ISO 639-1 (e.g., uk), Language code ISO 639-2/T (e.g., ukr) |
Tip
Visit the [Crowdin Language Codes](/developer/language-codes/) page to find all the supported languages and their various codes (e.g., Locale, Two-letters, Three-letter).
### [Import Options](#import-options)
[Section titled “Import Options”](#import-options)
The sidebar on the right allows you to define how the file structure is handled.
* **Do not import the first row (header)** - Select this option if the first row of your file contains column headers that should not be imported for translation.
* **Multilingual spreadsheet** - Select this option if your file contains source texts in one column and translations into different languages in other columns. This enables the system to correctly map languages to the appropriate columns and unlocks the **Translations** section.
* **Import hidden sheets** (XLSX only) - Import content from hidden sheets within your XLSX file.
* **Import hidden rows** (XLSX only) - Import content from hidden rows within your XLSX file.
### [Translations](#translations)
[Section titled “Translations”](#translations)
This set of options, also in the right sidebar, allows you to fine-tune how existing translations from your file are processed. These options become available when **Multilingual spreadsheet** is selected.
* **Import translations** - By default, Crowdin imports any translations present in the file. Clear this checkbox if you only want to import source strings.
* **Allow translation to match source** – Enable this if a translation is intentionally the same as the source text (e.g., for product names, brands, or code terms).
* **Approve added translations** – Automatically approve the uploaded translations. This is useful when you are confident in the accuracy of the translations in your file.
* **Translate hidden strings** – Import translations for strings that are marked as hidden in Crowdin. Hidden strings are typically not visible to translators in the Editor and are used for system purposes or placeholders.
* **Add to TM** - Add the imported translations to the project’s primary Translation Memory (TM).
Note
In string-based projects, some of the translation settings described above (**Allow translation to match source**, **Approve added translations**, and **Translate hidden strings**) are located in the right-hand sidebar of the Upload tab, rather than within the configuration dialog itself.
### [Configuration Templates](#configuration-templates)
[Section titled “Configuration Templates”](#configuration-templates)
Located at the bottom of the dialog, this option allows you to manage configurations for files with the same column structure.
* To save your current setup as a template, click **Templates** > **Save as template**, specify a template name, and click **Save**.
* You can then apply this template to newly imported files. To find a specific template from a long list, use the **Search** field available in the templates dropdown.
## [Changing Scheme for CSV and XLSX Files](#changing-scheme-for-csv-and-xlsx-files)
[Section titled “Changing Scheme for CSV and XLSX Files”](#changing-scheme-for-csv-and-xlsx-files)
You might want to update CSV or XLSX files and change the initially configured scheme. The scheme update might be needed when you add a new target language to your Crowdin project.
To change the scheme for your source file, follow these steps:
1. Right-click on the needed files and select **Change scheme**.
2. Select the new file on your machine.
3. Set the new configuration/template for the file correspondingly.
Limitations
You can’t edit the existing configuration template. Instead, you can remove it or create a new one.
## [See Also](#see-also)
[Section titled “See Also”](#see-also)
[Uploading Source Files ](/uploading-files/)Learn how to upload source files to your project for translation.
[File Management ](/file-management/)Manage and configure source files in your project.
# Custom Segmentation
> Define your own segmentation rules for each source file individually
Each time you upload XML, HTML, MD, or any other source files without a key-value structure, the predefined segmentation rules (SRX 2.0) are used for automatic content segmentation. Although, there might be situations when the default segmentation rules segment source files in contrast to the desired expectations.
In this case, you can define your own segmentation rules for each source file individually using the [SRX 2.0 standard](https://www.gala-global.org/srx-20-april-7-2008).
## [Change Segmentation](#change-segmentation)
[Section titled “Change Segmentation”](#change-segmentation)
You can change segmentation in **Sources > Files**.
1. Open the project where you’d like to adjust the segmentation rules and go to **Sources > Files**.
2. Click (or right-click) on the needed file and select **Settings**. 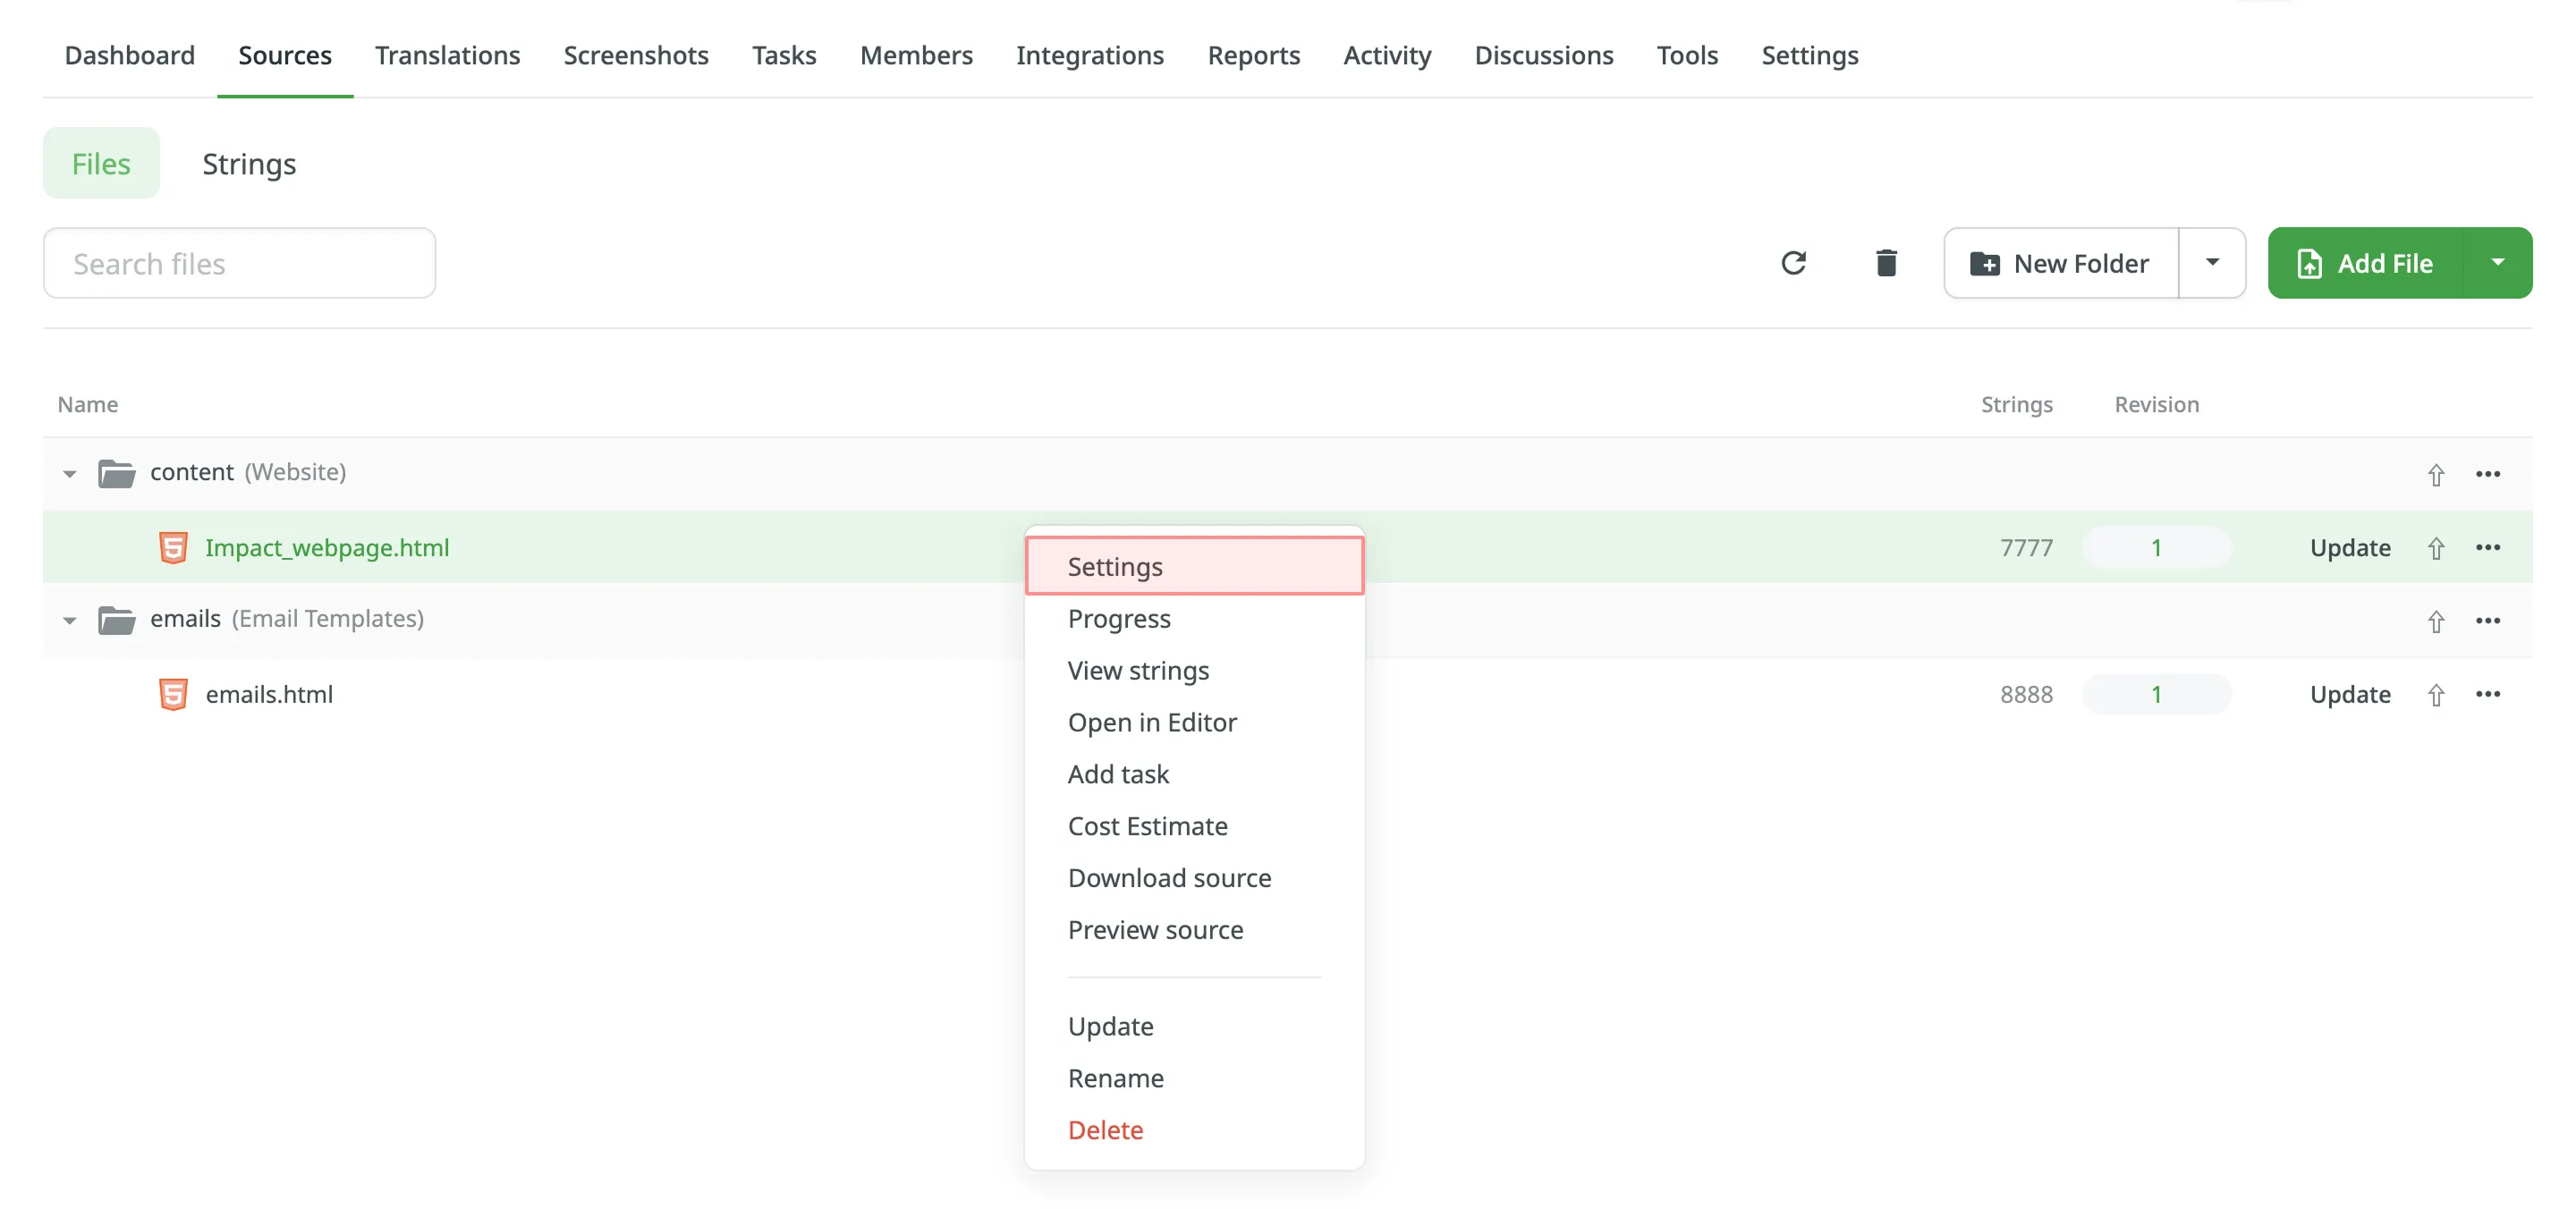
3. In the appeared dialog, switch to the **Parser configuration** tab.
4. Select **Enable content segmentation** and **Use custom segmentation rules**.
5. Paste your SRX segmentation rules and click **Save**. 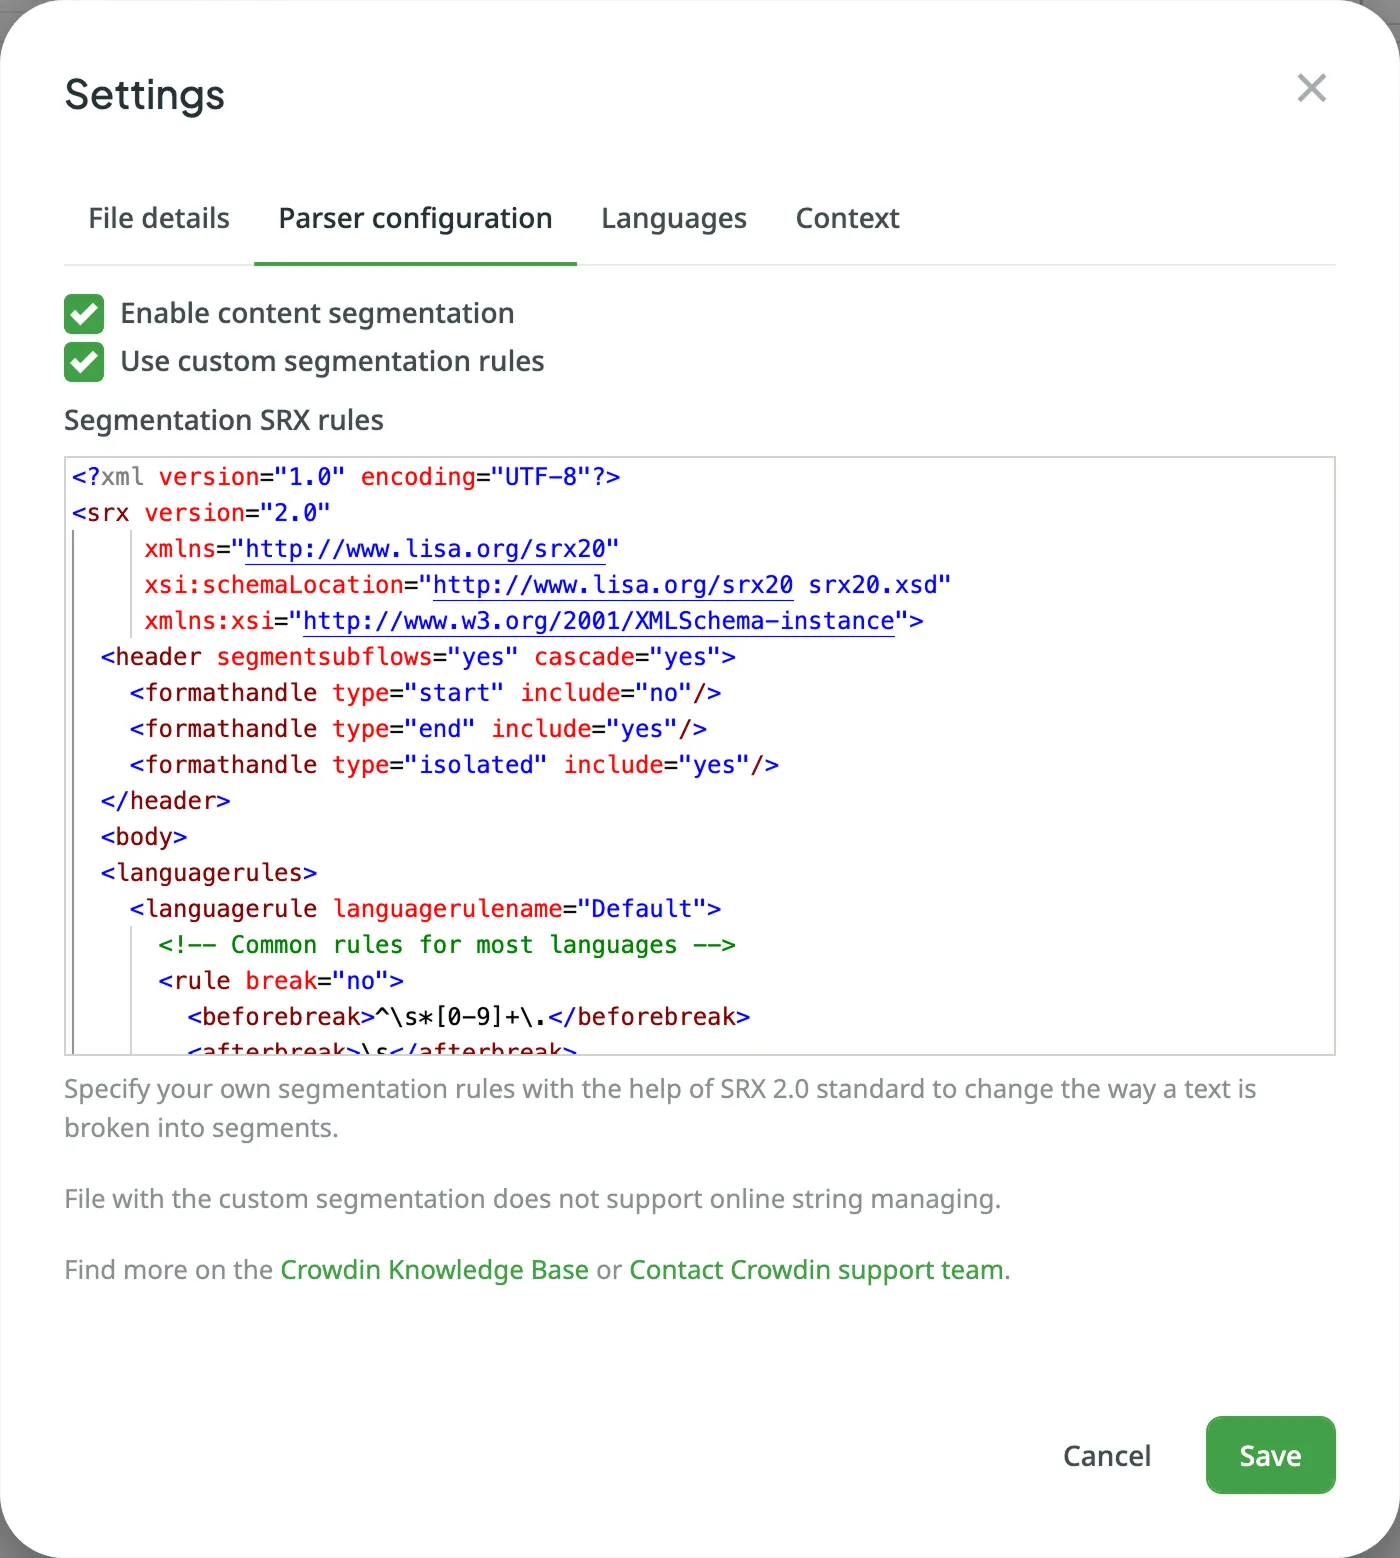
After you save your new segmentation rules, your source file will be automatically reimported and segmented according to these new rules.
## [Segmentation Examples](#segmentation-examples)
[Section titled “Segmentation Examples”](#segmentation-examples)
Note
Regular expressions used in SRX rules must be compatible with PHP (PCRE2) and Node.js.
A typical SRX file looks similar to the following:
```xml
^\s*[0-9]+\.
\s
\n
[\.\?!]+
\s
```
### [Change Sentence Separator for Asian Languages](#change-sentence-separator-for-asian-languages)
[Section titled “Change Sentence Separator for Asian Languages”](#change-sentence-separator-for-asian-languages)
Usually, the full stop is used as a sentence separator. Although, for some Asian languages, it’s not the case. For example, the typical sentence separator in Chinese is an ideographic full stop (`。`). For such cases, you may want to use the following ruleset:
```xml
[\x3002]+
```
### [Break Text into Smaller Parts](#break-text-into-smaller-parts)
[Section titled “Break Text into Smaller Parts”](#break-text-into-smaller-parts)
In the following simple sentence, we’ll break down a case when segmenting one text piece into two (or more) strings is necessary.
Text with default segmentation rules:
`This is the first part of the sample sentence and this is the second part.`
Text with new segmentation rules:
`This is the first part of the sample sentence`
`and this is the second part.`
For this particular case, the following ruleset will break the initial sentence into two parts:
```xml
sentence
\u0020
```
## [Create Segmentation Rules with SRX Editors](#create-segmentation-rules-with-srx-editors)
[Section titled “Create Segmentation Rules with SRX Editors”](#create-segmentation-rules-with-srx-editors)
The SRX segmentation rules can be created and maintained with the help of tools like [Ratel](http://okapiframework.org/wiki/index.php?title=Ratel). It has a visual interface where you can generate segmentation rules from scratch or edit your existing ones.
[Segmentation Rules Generator ](https://store.crowdin.com/segmentation)Create and test the new segmentation rules on your Crowdin projects.
[SRX Playground ](https://store.crowdin.com/srx-playground)AI-powered SRX Rules Editor.
# Data Residency
> Learn how data residency works in Crowdin and Crowdin Enterprise
Crowdin provides data residency options to help organizations comply with internal policies and regional data protection laws. Data residency determines where certain types of customer data are stored at rest, which is especially important for organizations subject to legal or regulatory frameworks such as the GDPR.
This article explains how data residency is applied in Crowdin and Crowdin Enterprise, what types of data are stored in the selected region, and what data may still be processed elsewhere as part of Crowdin’s global infrastructure.
## [Data Residency in Crowdin](#data-residency-in-crowdin)
[Section titled “Data Residency in Crowdin”](#data-residency-in-crowdin)
In Crowdin, customer data is stored in the **US Data Center** by default. This includes translation-related content such as files, source strings, translations, translation memories, glossaries and other resources. This setup is designed to provide reliable infrastructure and consistent performance for all users.
Note
Data center selection is not available in Crowdin.
## [Data Residency in Crowdin Enterprise](#data-residency-in-crowdin-enterprise)
[Section titled “Data Residency in Crowdin Enterprise”](#data-residency-in-crowdin-enterprise)
When creating a new organization in Crowdin Enterprise, you can choose where your data will be stored, either in the US or the EU data center. This option is available to all Crowdin Enterprise users during the [organization creation](/enterprise/organization/#creating-an-organization) process.
### [Selecting a Data Center](#selecting-a-data-center)
[Section titled “Selecting a Data Center”](#selecting-a-data-center)
During sign-up, select your preferred region:
* **US Data Center** - hosted on AWS in the US-east-1 region (N. Virginia)
* **EU Data Center** - hosted on AWS in the EU-west-1 region (Ireland)
This selection determines where your organization’s data will be stored at rest. Data stored at rest refers to information saved to persistent storage systems such as databases and file storage, including all translation content and project assets created after the organization is set up. All newly created resources will be stored in the selected region. Backups are also stored in the same region.
Caution
Once an organization is created, the selected data region cannot be changed.
### [Data Stored in the Selected Region](#data-stored-in-the-selected-region)
[Section titled “Data Stored in the Selected Region”](#data-stored-in-the-selected-region)
If you choose the EU or US data center, the following types of organization data will be stored in that region:
* Source files and translations
* Strings and their metadata
* Translation memories and glossaries
* Screenshots and visual context
* Project-level resources and reports
* User profiles and team membership info
### [Data Stored Outside the Selected Region](#data-stored-outside-the-selected-region)
[Section titled “Data Stored Outside the Selected Region”](#data-stored-outside-the-selected-region)
Some categories of operational data may be stored or processed outside your selected region, depending on the service architecture. These include:
* User email addresses and authentication-related data (shared infrastructure)
* Global Translation Memory
* Billing and usage analytics
* System logs and identifiers
* Data from Crowdin Store apps and third-party integrations
Caution
Crowdin-developed apps are hosted in the US. For apps built by other developers, data storage locations may vary depending on the provider.
### [Limitations and Migration](#limitations-and-migration)
[Section titled “Limitations and Migration”](#limitations-and-migration)
Crowdin Enterprise provides full functionality regardless of the selected data center. However, some collaboration features, such as inviting an existing organization as a vendor or participating in vendor-client project workflows, require both organizations to be hosted in the same data center.
Data center selection is only available when creating a new organization. Migration of an existing organization’s data to a different region is not supported.
### [Compliance Considerations](#compliance-considerations)
[Section titled “Compliance Considerations”](#compliance-considerations)
Crowdin’s EU data center can help organizations align with regional requirements such as the General Data Protection Regulation (GDPR). Storing data in the EU helps enhance compliance by ensuring that customer data remains within EU jurisdiction.
Crowdin is certified under ISO / IEC 27001: 2022 and maintains internal policies and processes that support secure and compliant data handling.
## [See Also](#see-also)
[Section titled “See Also”](#see-also)
* [Privacy Policy](/privacy-policy/)
* [GDPR Commitment](/gdpr/)
* [Security Policy](/security-policy/)
# API
> Learn how to use Crowdin's API to integrate localization into your process
Crowdin’s API is a full-featured RESTful API that helps you integrate localization into your development process. The endpoints we use allow you to easily make calls to retrieve information and perform necessary actions.
Most of the functionality of Crowdin is available through the API. It allows you to create projects for translations, add and update files, download translations, and much more. In this way, you can script the complex actions that your situation requires.
[Crowdin API Reference ](/developer/api/v2/)File-based projects
[Enterprise API Reference ](/developer/enterprise/api/v2/)File-based projects
[Crowdin API Reference ](/developer/api/v2/string-based/)String-based projects
[Enterprise API Reference ](/developer/enterprise/api/v2/string-based/)String-based projects
[GraphQL API ](/developer/graphql-api/)GraphQL API is a tool that allows you to retrieve exactly the data you need using more specific and flexible queries.
## [API Clients](#api-clients)
[Section titled “API Clients”](#api-clients)
The Crowdin API clients are lightweight, open-source interfaces developed for the Crowdin API. They offer common services for making API requests.
[Official ](https://github.com/crowdin/crowdin-api-client-js)
[](https://github.com/crowdin/crowdin-api-client-js)
##### [Crowdin JavaScript client](https://github.com/crowdin/crowdin-api-client-js)
[View and Install](https://github.com/crowdin/crowdin-api-client-js)
[Official ](https://github.com/crowdin/crowdin-api-client-php)
[](https://github.com/crowdin/crowdin-api-client-php)
##### [Crowdin PHP client](https://github.com/crowdin/crowdin-api-client-php)
[View and Install](https://github.com/crowdin/crowdin-api-client-php)
[Official ](https://github.com/crowdin/crowdin-api-client-java)
[](https://github.com/crowdin/crowdin-api-client-java)
##### [Crowdin Java client](https://github.com/crowdin/crowdin-api-client-java)
[View and Install](https://github.com/crowdin/crowdin-api-client-java)
[Official ](https://github.com/crowdin/crowdin-api-client-python)
[](https://github.com/crowdin/crowdin-api-client-python)
##### [Crowdin Python client](https://github.com/crowdin/crowdin-api-client-python)
[View and Install](https://github.com/crowdin/crowdin-api-client-python)
[Official ](https://github.com/crowdin/crowdin-api-client-ruby)
[](https://github.com/crowdin/crowdin-api-client-ruby)
##### [Crowdin Ruby client](https://github.com/crowdin/crowdin-api-client-ruby)
[View and Install](https://github.com/crowdin/crowdin-api-client-ruby)
[Official ](https://github.com/crowdin/crowdin-api-client-dotnet)
[](https://github.com/crowdin/crowdin-api-client-dotnet)
##### [Crowdin .NET client](https://github.com/crowdin/crowdin-api-client-dotnet)
[View and Install](https://github.com/crowdin/crowdin-api-client-dotnet)
[Official ](https://github.com/crowdin/crowdin-api-client-go)
[](https://github.com/crowdin/crowdin-api-client-go)
##### [Crowdin Go client](https://github.com/crowdin/crowdin-api-client-go)
[View and Install](https://github.com/crowdin/crowdin-api-client-go)
## [AI Agents and API](#ai-agents-and-api)
[Section titled “AI Agents and API”](#ai-agents-and-api)
AI agents can integrate with Crowdin via the REST API or MCP (Model Context Protocol). AI-focused integration surfaces include LLM-friendly API specs (`llms.txt`) and MCP tool access to Crowdin capabilities.
[API specs (llms.txt) ](/_llms-txt/api.txt)LLM-friendly index of Crowdin API endpoints.
[Crowdin MCP Server ](/developer/crowdin-mcp-server/)MCP tools that expose Crowdin operations to AI clients.
## [See Also](#see-also)
[Section titled “See Also”](#see-also)
[Language Codes ](/developer/language-codes/)A list of language codes used in Crowdin and Crowdin Enterprise.
# Mobile Apps Localization
> Manage localization for iOS and Android apps without translating the same strings twice
Effectively manage localization for iOS and Android apps without translating the same strings twice.
## [Localization Management within a Single Project](#localization-management-within-a-single-project)
[Section titled “Localization Management within a Single Project”](#localization-management-within-a-single-project)
Translate iOS and Android files within one Crowdin project. Use one of the options suggested below, depending on your project specifications.
Recommendations:
* Upload iOS (iOS Strings, iOS XLIFF) and Android (Android XML) app files into different locations (folders) in the Crowdin project.
* Connect both Android and iOS repos to your Crowdin project to automate the synchronization of the source and translation files.
* Use the **Duplicate Strings** option to manage duplicates.
* Use the **Unify Placeholders** option to manage Android and iOS placeholders.
### [Hide Duplicates](#hide-duplicates)
[Section titled “Hide Duplicates”](#hide-duplicates)
Upload iOS and Android app files to one Crowdin project and select the **Hide** option in the project’s **Settings > Import > Source Strings**.
Usually, the app developed for iOS and Android platforms share most of the source strings for iOS and Android files. So once you select the **Hide** option, the system will detect the duplicate strings for both types of files (iOS and Android) and hide them while keeping visible only the strings in the files uploaded first.
Once the string that was uploaded first is translated, the hidden duplicate will get this translation automatically due to the selected **Hide** option. This way, translators will translate only the unique visible texts. When the translation of the visible string is updated, its hidden duplicates will also get the updated translation.
Read more about [Duplicate Strings](/project-settings/import/#duplicate-strings).
### [Unify Placeholders](#unify-placeholders)
[Section titled “Unify Placeholders”](#unify-placeholders)
If some source strings for iOS and Android are the same but differ only in placeholders, we recommend selecting the **Unify Placeholders** option in the project’s **Settings > Import > Source Strings**.
For example, you added the iOS string `Hello, %@!` and a similar one to Android `Hello, %s!`. The **Unify Placeholders** option will convert both to `Hello, [%s]!`, so translation from the Android file can migrate to iOS. On export, you will get translations with the original placeholders.
It’s also possible to add/modify new strings online in the project for Android XML and iOS Strings files via the **Strings** section of the project.
Read more about [String Editing](/string-management/#string-editing).
## [Localization Management within a Single Project with Bundles](#localization-management-within-a-single-project-with-bundles)
[Section titled “Localization Management within a Single Project with Bundles”](#localization-management-within-a-single-project-with-bundles)
Recommendations:
* Upload either iOS (iOS Strings, iOS XLIFF) or Android (Android XML) app files to your Crowdin project.
* Configure bundles to be able to export translations in the needed file format.
Read more about [Bundles](/bundles/).
### [Translation Export using Bundles](#translation-export-using-bundles)
[Section titled “Translation Export using Bundles”](#translation-export-using-bundles)
Localize the resources of just one application within Crowdin, and download different file formats for both your Android and iOS apps.
For example, you can upload an XML file to Crowdin for [Android localization](https://crowdin.com/blog/2022/08/10/android-app-localization-tutorial) and receive two files on export: XML for Android and Strings for iOS. You might need to make some slight adjustments to the exported files (translation keys will remain the same as in the Android file, so they might need adjustments for the iOS file). However, the localization time and expenses for translation services can be significantly reduced using this approach.
## [Next Steps in Mobile Apps Localization](#next-steps-in-mobile-apps-localization)
[Section titled “Next Steps in Mobile Apps Localization”](#next-steps-in-mobile-apps-localization)
Here are the next steps you might consider while localizing your mobile apps. As an alternative to a more traditional approach when dealing with source files, you can send strings for translation directly from your design tools with the help of Crowdin plugins. Another good option is to use CDN Distributions to update translated strings of your mobile apps instantly without a need to roll out a new version on the App Store or Google Play.
Read more about [Android](https://crowdin.com/blog/2022/08/10/android-app-localization-tutorial) or iOS [mobile app localization](https://crowdin.com/blog/2021/02/11/smart-ways-to-approach-mobile-app-localization) on our blog.
# Authorizing OAuth Apps
> Learn how to enable organization members to authorize your OAuth app
You can enable organization members to authorize your OAuth app.
When you build an OAuth app, implement the web application flow described below to obtain an authorization code and then exchange it for a token.
## [Request Authorization Code](#request-authorization-code)
[Section titled “Request Authorization Code”](#request-authorization-code)
You should redirect the user to the `/oauth/authorize` endpoint with the following GET parameters:
```bash
https://accounts.crowdin.com/oauth/authorize
```
This will ask the user to approve the app access to their account based on the scopes specified in `REQUESTED_SCOPES` and then redirect back to the `REDIRECT_URI` you provided when creating an app.
Tip
For enhanced security, we strongly recommend using the Proof Key for Code Exchange (PKCE) extension for a more secure token exchange.
### [Parameters](#request-authorization-code-parameters)
[Section titled “Parameters”](#request-authorization-code-parameters)
| Name | Value | Description |
| ----------------------- | ------ | ---------------------------------------------------------------------------------------------------------------------------------------------------------------------------------------------------------------------------------------------------------------- |
| `client_id` | string | **Required.** You receive Client ID for the app when you register it. |
| `redirect_uri` | string | **Required.** The URL in your application where users will be sent after authorization. |
| `response_type:``code` | string | **Required.** The parameter is used for the flow specification of an OAuth app. |
| `scope` | string | **Required.** Select the access your app requires from the list of scopes available. You can add multiple [scopes](/developer/understanding-scopes/) separated by spaces (no need to use quotation marks). |
| `state` | string | **Strongly recommended.** An unguessable random string. Use it for extra protection against cross-site request forgery attacks. |
| `code_challenge` | string | **Strongly recommended.** A Base64-URL-encoded SHA-256 hash of the `code_verifier`. Used to secure the authorization flow with PKCE. Required if `code_challenge_method` is provided. Read more about [PKCE RFC](https://datatracker.ietf.org/doc/html/rfc7636). |
| `code_challenge_method` | string | **Strongly recommended.** The method used to derive the `code_challenge`. Crowdin supports `S256` and `plain`. Required if `code_challenge` is provided. |
The following Authorization Url will be created:
```bash
https://accounts.crowdin.com/oauth/authorize?client_id=m50YenPpqac8u5D4dnK&redirect_uri=https://impact-mobile.com/auth/crowdin&response_type=code&scope=project+tm&state=d131dd02c5e6eec4
```
After successful authorization users are redirected back to your site:
```bash
https://impact-mobile.com/auth/crowdin/?code=def50200df1fbb5ebac05f9288850d9e...0835bd3cf42&state=d131dd02c5e6eec4
```
If authorization has been declined, users are redirected to your website with an error:
```bash
https://impact-mobile.com/auth/crowdin/?error=access_denied&state=d131dd02c5e6eec4
```
## [Users Are Redirected Back to Your Site by Crowdin](#users-are-redirected-back-to-your-site-by-crowdin)
[Section titled “Users Are Redirected Back to Your Site by Crowdin”](#users-are-redirected-back-to-your-site-by-crowdin)
If a user authorizes the app, Crowdin redirects back to your site and you can exchange the code received for an access token:
```bash
POST https://accounts.crowdin.com/oauth/token
```
### [Parameters](#redirect-parameters)
[Section titled “Parameters”](#redirect-parameters)
| Name | Value | Description |
| ---------------------------------- | ------ | ------------------------------------------------------------------------------------------------------------------------------------------------------------------------- |
| `grant_type:` `authorization_code` | string | **Required.** The parameter is used for the flow specification of an OAuth app. |
| `client_id` | string | **Required.** You receive Client ID for the app when you register it. |
| `client_secret` | string | **Required.** You receive Client Secret for the app when you register it. This parameter is not required if you’re using PKCE (i.e., providing a `code_verifier`). |
| `redirect_uri` | string | **Required.** The URL in your application where users will be sent after authorization. |
| `code` | string | **Required.** Code received from the callback query string. |
| `code_verifier` | string | **Strongly recommended.** The original random string used to generate the `code_challenge`. Required if a `code_challenge` was sent in the initial authorization request. |
For example, a request in curl takes the following form:
```bash
curl -X POST \
https://accounts.crowdin.com/oauth/token \
-H "content-type: application/json" \
-d "{
\"grant_type\":\"authorization_code\",
\"client_id\":\"m50YenPpqac8u5D4dnK\",
\"client_secret\":\"yz35kYtjox...YE9Am\",
\"redirect_uri\":\"https://impact-mobile.com/auth/crowdin\",
\"code\":\"def50200df1fbb5ebac05f9288850d9e...0835bd3cf42\"
}"
```
### [Response](#redirect-response)
[Section titled “Response”](#redirect-response)
By default, the response takes the following form:
```json
{
"access_token":"eyJ0eXAiOiJKV1QiLCJhbGciOiJS...lag1e_Zk4EdJ5diYfz0",
"token_type":"bearer",
"expires_in": 7200,
"refresh_token": "b213c684ccaa7db1217e946e6ad...fff7ae"
}
```
## [Make Requests to the API with the Access Token Returned](#make-requests-to-the-api-with-the-access-token-returned)
[Section titled “Make Requests to the API with the Access Token Returned”](#make-requests-to-the-api-with-the-access-token-returned)
The access token now allows you to make requests to Crowdin API on behalf of the authorized user.
For example, in curl you can set the following Authorization header:
```bash
curl -H "Authorization: Bearer ACCESS_TOKEN" https://api.crowdin.com/api/v2/projects
```
Crowdin Enterprise:
```bash
curl -H "Authorization: Bearer ACCESS_TOKEN" https://.api.crowdin.com/api/v2/projects
```
Note
To obtain the Crowdin Enterprise `organization_domain`, parse the access token structured according to JWT specifications, and extract the required `organization_domain` from it.
Read more about [JWT Token Structure](/developer/crowdin-apps-security/).
## [Refresh Token](#refresh-token)
[Section titled “Refresh Token”](#refresh-token)
The access token received after a user authorizes the app has an expiration time. The access token expires in the number of seconds defined in the response.
To refresh a token without requiring the user to be redirected, send a POST request with the following body parameters to the authorization server:
```bash
POST https://accounts.crowdin.com/oauth/token
```
### [Parameters](#refresh-token-parameters)
[Section titled “Parameters”](#refresh-token-parameters)
| Name | Value | Description |
| ----------------------------- | ------ | ------------------------------------------------------------------------------- |
| `grant_type:` `refresh_token` | string | **Required.** The parameter is used for the flow specification of an OAuth app. |
| `client_id` | string | **Required.** You receive Client ID for the app when you register it. |
| `client_secret` | string | **Required.** You receive Client Secret for the app when you register it. |
| `refresh_token` | string | **Required.** Refresh token received from the last authorization response. |
For example, a request in curl takes the following form:
```bash
curl -X POST \
https://accounts.crowdin.com/oauth/token \
-H "content-type: application/json" \
-d "{
\"grant_type\":\"refresh_token\",
\"client_id\":\"m50YenPpqac8u5D4dnK\",
\"client_secret\":\"yz35kYtjox...YE9Am\",
\"refresh_token\":\"b213c684ccaa7db1217e946e6ad...fff7ae\"
}"
```
### [Response](#refresh-token-response)
[Section titled “Response”](#refresh-token-response)
By default, the response takes the following form:
```json
{
"access_token":"eyJ0eXAiOiJKV1QiLCJhbGciOiJS...ZjFkMWI4OWFlIiwiaWF",
"token_type":"bearer",
"expires_in": 7200,
"refresh_token": "ea506ea4c37aa152f0a91ed2482...4a0c567"
}
```
## [Redirect URLs](#redirect-urls)
[Section titled “Redirect URLs”](#redirect-urls)
You can register one or more redirect URLs when you create an OAuth Application on Crowdin.
For security reasons, if the URL is not included in the Application info, you won’t be able to redirect users to this URL after authorization.
# Automating Screenshot Management
> Learn how to automate screenshot creation and updates with Crowdin In-Context and Playwright
This guide explains how to automate generating and updating screenshots in Crowdin [In-Context](/developer/in-context-localization/).
By automating screenshot creation, translators gain accurate and up-to-date visual context, improving the localization process and translation quality. The guide covers prerequisites, setup instructions, capturing screenshots across web pages, and uploading them to Crowdin via API.
## [Prerequisites](#prerequisites)
[Section titled “Prerequisites”](#prerequisites)
Before proceeding, ensure that your website integrates [Crowdin In-Context functionality](/developer/in-context-localization/#integration).
### [Account Setup](#account-setup)
[Section titled “Account Setup”](#account-setup)
To configure your account for automation to function properly, follow these steps:
1. **Enable 2FA in Crowdin**: Open your project and go to **Settings > Privacy & collaboration > Privacy** to set up Two-factor authentication for login.
2. **Disable Device Verification**: Device verification ensures account security but can interrupt automated workflows. Disabling it for testing environments ensures uninterrupted automation.
* For Crowdin: Go to **Account Settings > Account > New device verification** and disable the setting.
* For Crowdin Enterprise: Go to **Account Settings > Security > Device Verification** and disable the setting.
3. **Generate a Secret Key**: Obtain the secret key for generating 2FA tokens. This key is required for programmatically creating one-time passwords (OTPs) using the `otplib` library.
### [Dependencies](#dependencies)
[Section titled “Dependencies”](#dependencies)
This guide uses the following dependencies for browser automation and OTP generation:
* [Playwright](https://playwright.dev/): A modern testing framework for browser automation, ideal for navigating and interacting with web pages.
* [`otplib`](https://www.npmjs.com/package/otplib): A library for generating one-time passwords (OTPs) programmatically, essential for bypassing 2FA in automated workflows.
Run the following command to install the dependencies:
* npm
```bash
npm install -D @playwright/test otplib
```
* Yarn
```bash
yarn add -D @playwright/test otplib
```
* pnpm
```bash
pnpm add -D @playwright/test otplib
```
## [Capturing Screenshots with Crowdin In-Context](#capturing-screenshots-with-crowdin-in-context)
[Section titled “Capturing Screenshots with Crowdin In-Context”](#capturing-screenshots-with-crowdin-in-context)
Crowdin provides the `window.jipt.capture_screenshot(name: string, options: object | null)` method to automate screenshot generation. In addition to screenshots, this method collects metadata to provide translators with detailed and accurate context for their work. The following sections explain how to implement this functionality using Playwright.
### [Code Example](#code-example)
[Section titled “Code Example”](#code-example)
The following script illustrates navigating a website, logging in, capturing screenshots, and uploading them to Crowdin for translators’ reference:
```js
// @ts-check
const { test, expect } = require('@playwright/test');
const { authenticator } = require('otplib');
test('Capture Crowdin Screenshots', async ({ page }) => {
const siteUrl = 'https://example.com';
// Navigate to the application
await page.goto(siteUrl);
// Log in
await page.locator('#jipt-login-panel iframe').contentFrame().getByRole('button', { name: 'Log In' }).click();
await page.getByLabel('Email or Username').fill('username');
await page.getByLabel('Password').fill('password');
await page.getByRole('button', { name: 'Log In' }).click();
// Handle Two-Factor Authentication (if applicable)
const token = authenticator.generate('KEY'); // Replace 'KEY' with your 2FA secret
await page.getByLabel('Verification Code').fill(token);
await page.getByRole('button', { name: 'Log In' }).click();
// Confirm login and start capturing screenshots
await page.getByRole('button', { name: 'Keep Me Logged In' }).click();
// Capture the first screenshot
await page.goto(siteUrl);
await page.locator('#crowdin-jipt-mask').click();
await expect(page.locator('h1')).toContainText('Crowdin HTML Sample');
await page.evaluate(() => {
return new Promise((resolve, reject) => {
window.jipt.capture_screenshot('HTML Sample File', { success: resolve, error: reject });
});
});
// Capture a second screenshot on another page
await page.goto(`${siteUrl}/second`);
await expect(page.locator('h1')).toContainText('Second Crowdin HTML Sample');
await page.evaluate(() => {
return new Promise((resolve, reject) => {
window.jipt.capture_screenshot('Second HTML Sample File', { override: false, success: resolve, error: reject });
});
});
});
```
### [Key Code Implementation Details](#key-code-implementation-details)
[Section titled “Key Code Implementation Details”](#key-code-implementation-details)
* **Navigating Pages**: Use `page.goto(url)` to navigate to specific pages in your application.
* **Logging In**: Simulate user actions, such as filling out forms and clicking buttons, using Playwright’s locators like `getByRole()` and `getByLabel()`.
* **Capturing Screenshots**: Use `window.jipt.capture_screenshot()` to generate and upload screenshots to Crowdin. The method accepts the following parameters:
* `name: string`: The name of the screenshot.
* `options: object | null`: Custom settings:
* `override: boolean`: The `override` parameter determines how Crowdin handles screenshots with duplicate names. Use `true` (default) to overwrite the first matching screenshot or `false` to create a new one, even if the name matches.
* `success: function`: A callback function triggered on successful upload. It receives an object with `{msg_type: 'make_screenshot_data', screenshot_name: string}`, which provides the type of the message and the name of the uploaded screenshot.
* `error: function`: A callback function triggered on upload failure. It receives an object with `{msg_type: 'make_screenshot_error', response: object}` or an `Error`, containing details about the failure.
* **Two-Factor Authentication**: Use the `otplib` library to programmatically generate OTP tokens when 2FA is enabled. Replace `'KEY'` with your project’s secret key for valid OTP generation.
# Configuration File
> Explore the possibilities of the crowdin.yml configuration file
The various Crowdin tools use a `crowdin.yml` configuration file that specifies the resources to be managed, including the files to be uploaded to Crowdin and the locations of the corresponding translations.
[VCS Integrations ](/integrations/#vcs-integrations)GitHub, GitLab, Bitbucket, Azure Repos.
[Console Client (CLI) ](https://crowdin.github.io/crowdin-cli/)Cross-platform command-line tool.
[Visual Studio Code Plugin ](https://marketplace.visualstudio.com/items?itemName=Crowdin.vscode-crowdin)
[Android Studio Plugin ](https://github.com/crowdin/android-studio-plugin#readme)
## [Configuration File Structure](#configuration-file-structure)
[Section titled “Configuration File Structure”](#configuration-file-structure)
A valid `crowdin.yml` configuration file has the following structure, so please ensure that you fill out all the needed information:
* Head of the file with project credentials, preferences, and access information.
* One files array element that describes a set of source and translation files you will manage.
* Required fields in the files array: `source` that defines filters for the source files and `translation` with instructions on where to store the translated files or where to look for translations you already have if you want to upload them while setting up the CLI.
## [Writing a Simple Configuration File](#writing-a-simple-configuration-file)
[Section titled “Writing a Simple Configuration File”](#writing-a-simple-configuration-file)
A typical configuration file looks similar to the following:
crowdin.yml
```yml
"project_id": "projectId"
"api_token": "personal-access-token"
"base_path": "."
"base_url": "https://api.crowdin.com"
"preserve_hierarchy": true
"files": [
{
"source": "/locale/en/folder1/[0-2].txt",
"translation": "/locale/%two_letters_code%/folder1/%original_file_name%"
},
]
```
| Name | Description |
| ---------------------------- | ---------------------------------------------------------------------------------------------------------------------------------------- |
| `project_id` | Crowdin Project numeric ID |
| `api_token` | Crowdin Personal Access Token. The token owner should have at least Manager permissions in the project |
| `base_path`optional | Path to your project directory on a local machine relative to the `crowdin.yml` configuration file |
| `base_url` optional | Crowdin API base URL. Optional for crowdin.com. For Crowdin Enterprise use the `https://{organization-name}.api.crowdin.com` |
| `preserve_hierarchy`optional | If set to `true`, the directory structure will be preserved on the server. If set to `false`, the directory structure will be flattened. |
| `source` | Filter for the source files. Wildcards are supported. |
| `translation` | Path to store the translated files. Wildcards are supported. |
## [API Credentials from Environment Variables](#api-credentials-from-environment-variables)
[Section titled “API Credentials from Environment Variables”](#api-credentials-from-environment-variables)
You could load the API Credentials from an environment variable, for example:
crowdin.yml
```yml
"project_id_env": "CROWDIN_PROJECT_ID"
"api_token_env": "CROWDIN_PERSONAL_TOKEN"
"base_path_env": "CROWDIN_BASE_PATH"
"base_url_env": "CROWDIN_BASE_URL"
```
If mixed, *api\_token* and *project\_id* are prioritized:
crowdin.yml
```yml
"project_id_env": "CROWDIN_PROJECT_ID" # Low priority
"api_token_env": "CROWDIN_PERSONAL_TOKEN" # Low priority
"base_path_env": "CROWDIN_BASE_PATH" # Low priority
"base_url_env": "CROWDIN_BASE_PATH" # Low priority
"project_id": "projectId" # High priority
"api_token": "personal-access-token" # High priority
"base_path": "." # High priority
"base_url": "https://api.crowdin.com" # High priority
```
## [General Configuration](#general-configuration)
[Section titled “General Configuration”](#general-configuration)
The sample configuration provided above has source and translation attributes containing standard wildcards (also known as globbing patterns) to make it easier to work with multiple files.
Here are patterns you can use:
***
**\*** (asterisk)
Matches any character in the file or directory name. If you specify `*.json`, it will include all files like `messages.json`, `about_us.json`, and anything that ends with `.json`.
***
**\*\*** (doubled asterisk)
Matches any string recursively (including subdirectories). Note that you can use `**` in both the source and translation patterns. When you use `**` in the translation pattern, it always includes a sub-path from the source for a given file. For example, you can use source: `/en/**/*.po` to recursively upload all `*.po` files to Crowdin Enterprise. The translation pattern will be `/%two_letters_code%/**/%original_file_name%`.
***
**?** (question mark)
Matches any single character.
***
**\[set]**
Matchesany single character in a set. Behaves exactly like character sets in Regexp, including set negation (`[^a-z]`).
***
**\\** (backslash)
Escapes the next metacharacter.
## [Placeholders](#placeholders)
[Section titled “Placeholders”](#placeholders)
Crowdin CLI allows to use the following placeholders to put appropriate variables into the resulting file name:
| **Name** | **Description** |
| -------------------------- | ----------------------------------------------------------------------------------------------------- |
| `%original_file_name%` | Original file name |
| `%original_path%` | Take parent folder names in the Crowdin Enterprise project to build file path in the resulting bundle |
| `%file_extension%` | Original file extension |
| `%file_name%` | File name without extension |
| `%language%` | Language name (e.g., Ukrainian) |
| `%two_letters_code%` | Language code ISO 639-1 (e.g., uk) |
| `%three_letters_code%` | Language code ISO 639-2/T (e.g., ukr) |
| `%locale%` | Locale (e.g., uk-UA) |
| `%locale_with_underscore%` | Locale (e.g., uk\_UA) |
| `%android_code%` | Android Locale identifier used to name “values-” directories |
| `%osx_code%` | OS X Locale identifier used to name “.lproj” directories |
| `%osx_locale%` | OS X locale used to name translation resources (e.g., uk, zh-Hans, zh\_HK) |
You can also define the path for files in the resulting archive by putting a slash (`/`) at the beginning of the pattern.
## [Usage of Wildcards](#usage-of-wildcards)
[Section titled “Usage of Wildcards”](#usage-of-wildcards)
Structure of files and directories on the local machine:
* base\_path
* folder
* 1.xml
* 1.txt
* 123.txt
* 123\_test.txt
* a.txt
* a1.txt
* crowdin?test.txt
* crowdin\_test.txt
* 1.xml
* 1.txt
* 123.txt
* 123\_test.txt
* a.txt
* a1.txt
* crowdin?test.txt
* crowdin\_test.txt
* 3.txt
Example 1. Usage of wildcards in the source path:
crowdin.yml
```yml
"files": [
{
"source": "/**/?[0-9].txt", # upload a1.txt, folder/a1.txt
"translation": "/**/%two_letters_code%_%original_file_name%"
},
{
"source": "/**/*\\?*.txt", # upload crowdin?test.txt, folder/crowdin?test.txt
"translation": "/**/%two_letters_code%_%original_file_name%"
},
{
"source": "/**/[^0-2].txt", # upload 3.txt, folder/3.txt, a.txt, folder/a.txt (ignore 1.txt, folder/1.txt)
"translation": "/**/%two_letters_code%_%original_file_name%"
}
]
```
Example 2. Usage of wildcards for ignoring files:
crowdin.yml
```yml
"files": [
{
"source": "/**/*.*", #upload all files that the base_path contains
"translation": "/**/%two_letters_code%_%original_file_name%",
"ignore": [
"/**/%two_letters_code%_%original_file_name%", #ignore the translated files
"/**/?.txt", #ignore 1.txt, a.txt, folder/1.txt, folder/a.txt
"/**/[0-9].txt", #ignore 1.txt, folder/1.txt
"/**/*\\?*.txt", #ignore crowdin?test.txt, folder/crowdin?test.txt
"/**/[0-9][0-9][0-9].txt", #ignore 123.txt , folder/123.txt
"/**/[0-9]*_*.txt" #ignore 123_test.txt, folder/123_test.txt
]
}
]
```
## [Renaming Translations File](#renaming-translations-file)
[Section titled “Renaming Translations File”](#renaming-translations-file)
If you need to rename a file with translations or replace parts of the path after export, you can use the `translation_replace` parameter.
For example, if the file is named `strings_en.po`, it can be renamed to `strings.po`, or you can replace folder names in the translation path:
crowdin.yml
```yml
"files": [
{
"source": "/locale/**/*_en.po",
"translation": "/locale/**/%original_file_name%_%two_letters_code%",
"translation_replace": {
"_en": "",
"de/locale": "de/lokalisierung",
"fr/locale": "fr/paramètres"
}
}
]
```
In this case, `_en` will be erased from the file name, and the folder names `de/locale` and `fr/locale` will be replaced with `de/lokalisierung` and `fr/paramètres` respectively.
## [Ignoring Files and Directories](#ignoring-files-and-directories)
[Section titled “Ignoring Files and Directories”](#ignoring-files-and-directories)
From time to time, there are files and directories you don’t need to translate in Crowdin. In such cases, local per-file rules can be added to the config file in your project.
crowdin.yml
```yml
"files": [
{
"source": "/**/*.properties",
"translation": "/**/%file_name%_%two_letters_code%.%file_extension%",
"ignore": [
"/test/file.properties",
"/example.properties"
]
},
{
"source": "/locale/en/**/*.po",
"translation": "/locale/%two_letters_code%/**/%original_file_name%",
"ignore": [
"/locale/en/templates",
"/locale/en/workflow"
]
}
]
```
You can also use [wildcards](#usage-of-wildcards) to ignore files.
## [Excluding Target Languages for Source Files](#excluding-target-languages-for-source-files)
[Section titled “Excluding Target Languages for Source Files”](#excluding-target-languages-for-source-files)
By default, the source files are available for translation into all target languages of the project. If some source files shouldn’t be translated into specific target languages, you can exclude them with the help of the parameter `excluded_target_languages`.
Configuration file example:
crowdin.yml
```yml
"files": [
{
"source": "/resources/en/*.json",
"translation": "/resources/%two_letters_code%/%original_file_name%",
"excluded_target_languages": [
"uk",
"fr"
]
}
]
```
## [Export Languages](#export-languages)
[Section titled “Export Languages”](#export-languages)
By default, all the languages are exported. If you need to export some specific languages, use the `export_languages` parameter to specify them.
crowdin.yml
```yml
"export_languages": [
"uk",
"ja"
]
```
## [Multilingual Spreadsheet](#multilingual-spreadsheet)
[Section titled “Multilingual Spreadsheet”](#multilingual-spreadsheet)
If a CSV or XLS/XLSX file contains the translations for all target languages, you should specify appropriate language codes in the scheme.
CSV file example:
```csv
identifier,source_phrase,context,Ukrainian,Spanish (Mexico),French
ident1,Source 1,Context 1,,,
ident2,Source 2,Context 2,,,
ident3,Source 3,Context 3,,,
```
Configuration file example:
crowdin.yml
```yml
"files": [
{
"source": "multicolumn.csv",
"translation": "multicolumn.csv",
"first_line_contains_header": true,
"scheme": "identifier,source_phrase,context,uk,es-MX,fr"
}
]
```
If your CSV or XLS/XLSX file contains columns that should be skipped on import, use `none` for such columns in the scheme, for example:
crowdin.yml
```yml
"scheme" : "identifier,source_phrase,context,uk,none,es-MX,none,fr"
```
##### [Scheme Constants](#scheme-constants)
[Section titled “Scheme Constants”](#scheme-constants)
To form the scheme for your CSV or XLS/XLSX file, use the following constants:
* `identifier` – Column contains string identifiers.
* `source_phrase` – Column contains source strings.
* `source_or_translation` – Column contains source strings, but the same column will be filled with translations when the file is exported. When uploading existing translations, the values from this column will be used as translations.
* `translation` – Column contains translations.
* `context` – Column contains comments or context information for the source strings.
* `max_length` – Column contains max.length limit values for the translations of the strings.
* `labels` – Column contains labels for the source strings.
* `none` – Column that will be skipped on import.
## [Saving Directory Structure on Server](#saving-directory-structure-on-server)
[Section titled “Saving Directory Structure on Server”](#saving-directory-structure-on-server)
You can use the `preserve_hierarchy` option to preserve or flatten the directory structure of your source files in the Crowdin project.
Example of the configuration file using the `preserve_hierarchy` option:
crowdin.yml
```yml
"preserve_hierarchy": true
"files": [
{
"source": "/locale/en/**/*.po",
"translation": "/locale/%two_letters_code%/**/%original_file_name%"
}
]
```
Let’s say the file/folder structure on your machine looks like this:
* locale
* en
* emails/
* …
* app
* foo.po
* bar.po
If you don’t use the `"preserve_hierarchy": true` option in your configuration file at all or use it with the `false` value, all shared directories will be skipped, and the file structure in Crowdin will be represented as follows:
* (root)/
* foo.po
* bar.po
Note
For VCS integrations, the default value of the preserve hierarchy option is `true`. The `false` value works only if your source files have a shared root directory.
Using the `"preserve_hierarchy": true` option, the file structure in Crowdin will be represented as follows:
* locale
* en
* app
* foo.po
* bar.po
The directories that don’t contain any files for translation won’t be created in Crowdin (i.e., as the `emails` directory in the example above).
## [Uploading Files to Specified Path with Specified Type](#uploading-files-to-specified-path-with-specified-type)
[Section titled “Uploading Files to Specified Path with Specified Type”](#uploading-files-to-specified-path-with-specified-type)
This feature adds support for two optional parameters in the yml file section: `dest` and `type`. It’s typically used for projects where the uploaded name must be different so that Crowdin can detect the type correctly.
The `dest` parameter allows you to specify a file name in Crowdin. It works for multiple files at once and supports the following placeholders: `%original_file_name%`, `%original_path%`, `%file_extension%`, `%file_name%`.
Caution
If you use the `dest` parameter, the configuration file should include the `preserve_hierarchy` parameter with the `true` value.
Example of the configuration file with both parameters:
crowdin.yml
```yml
"files": [
{
"source": "/conf/**/*.txt",
"dest": "/conf/**/%file_name%.properties",
"translation": "/conf/**/%two_letters_code%/%file_name%.properties",
"type": "properties"
},
{
"source": "/app/*.txt",
"dest": "/app/%file_name%.xml",
"translation": "/res/values-%android_code%/%original_file_name%",
"type": "android"
}
]
```
## [Changed Strings Update](#changed-strings-update)
[Section titled “Changed Strings Update”](#changed-strings-update)
You can use the `update_option` parameter to preserve translations for changed strings during the file update. If it is not set, translations for changed strings will be lost. Useful for typo fixes and minor changes in source strings.
Depending on the value, `update_option` is used to preserve translations and preserve/remove validations of changed strings during file update.
Acceptable values:
* `update_as_unapproved` - preserve translations of changed strings and remove validations of those translations if they exist
* `update_without_changes` - preserve translations and validations of changed strings
Example of the configuration with the `update_option` parameter:
crowdin.yml
```yml
"files": [
{
"source": "/*.csv",
"translation": "/%three_letters_code%/%file_name%.csv",
"first_line_contains_header": true,
"scheme": "identifier,source_phrase,translation,context",
"update_option": "update_as_unapproved"
},
{
"source": "/**/*.xlsx",
"translation": "/%three_letters_code%/folder/%file_name%.xlsx",
"update_option": "update_without_changes"
}
]
```
## [Custom Segmentation](#custom-segmentation)
[Section titled “Custom Segmentation”](#custom-segmentation)
Upload your XML, HTML, MD, or any other source files without a key-value structure with your own segmentation rules. If not specified, the pre-defined segmentation rules (SRX 2.0) are used for automatic content segmentation.
Example of the configuration file custom segmentation:
crowdin.yml
```yml
"files": [
{
"source": "/emails/sample1.html",
"translation": "/emails/%locale%/%original_file_name%",
"custom_segmentation": "/rules/sample.srx.xml"
}
]
```
## [Import Options](#import-options)
[Section titled “Import Options”](#import-options)
You can use additional parameters to customize the import process for specific file types.
### [XML Files Import Options](#xml-files-import-options)
[Section titled “XML Files Import Options”](#xml-files-import-options)
| Option | Type | Description |
| -------------------------------- | ----- | ---------------------------------------------------------------------------------------------------------------------------------------------------------------------------------------------------------------------------------------------------------------------------------------------- |
| `translate_content` optional | bool | Defines whether to translate texts placed inside the tags. Acceptable values are 0 or 1. Default is 1. |
| `translate_attributes`optional | bool | Defines whether to translate tags’ attributes. Acceptable values are 0 or 1. Default is 1. |
| `content_segmentation`optional | bool | Defines whether to split long texts into smaller text segments. Acceptable values are 0 or 1. Default is 1. **Note!** When Content segmentation is enabled, the translation upload is handled by an experimental machine learning technology. |
| `translatable_elements` optional | array | This is an array of strings, where each item is the XPaths to DOM element that should be imported. Sample path: `/path/to/node` or `/path/to/attribute[@attr]` **Note!** If defined, the parameters `translate_content` and `translate_attributes` are not taken into account while importing. |
Example of the configuration with additional parameters:
crowdin.yml
```yml
"files": [
{
"source": "/app/sample1.xml",
"translation": "/app/%locale%/%original_file_name%",
"translate_attributes": 1,
"translate_content": 0
},
{
"source": "/app/sample2.xml",
"translation": "/app/%locale%/%original_file_name%",
"translatable_elements": [
"/content/text", # translatable texts are stored in 'text' nodes of parent node 'content'
"/content/text[@value]" # translatable texts are stored in 'value' attribute of 'text' nodes
]
}
]
```
### [Other Files Import Options](#other-files-import-options)
[Section titled “Other Files Import Options”](#other-files-import-options)
| Option | Type | Description |
| ------------------------------- | ---- | ------------------------------------------------------------------------------------------------------------------------------------------------------------------------------------------------------------------------------------------------------------------------------------------------------------------------------------------------------------------------ |
| `content_segmentation` optional | bool | Defines whether to split long texts into smaller text segments. Only for TXT, DOCX, DITA, IDML, MEDIAWIKI, HTML, Front Matter HTML, Markdown, Front Matter Markdown, XML, XLIFF, XLIFF 2.0 Acceptable values are 0 or 1. Default is 1. **Note:** When Content segmentation is enabled, the translation upload is handled by an experimental machine learning technology. |
Example of the configuration with additional parameters:
crowdin.yml
```yml
"files": [
{
"source": "/emails/sample1.html",
"translation": "/emails/%locale%/%original_file_name%",
"content_segmentation": 1
}
]
```
## [Export Options](#export-options)
[Section titled “Export Options”](#export-options)
You can use additional parameters to customize the export process for specific file types.
### [Java .properties File Format](#java-properties-file-format)
[Section titled “Java .properties File Format”](#java-properties-file-format)
##### [Escape Quotes](#escape-quotes)
[Section titled “Escape Quotes”](#escape-quotes)
Defines whether a single quote should be escaped by another single quote or backslash in exported translations. You can add the `escape_quotes` per-file option.
Acceptable values:
* `0` - do not escape single quote
* `1` - escape single quote with another single quote
* `2` - escape single quote with a backslash
* `3` - escape single quote with another single quote only in strings containing variables (default)
##### [Escape Special Characters](#escape-special-characters)
[Section titled “Escape Special Characters”](#escape-special-characters)
Defines whether any special characters (`=`, `:`, `!` and `#`) should be escaped by a backslash in exported translations. You can add the `escape_special_characters` per-file option.
Acceptable values:
* `0` - do not escape special characters
* `1` - escape special characters by a backslash (default)
Example of the configuration:
crowdin.yml
```yml
"files": [
{
"source": "/en/strings.properties",
"translation": "/%two_letters_code%/%original_file_name%",
"escape_quotes": 1,
"escape_special_characters": 0
}
]
```
## [Configuration File for VCS Integrations](#configuration-file-for-vcs-integrations)
[Section titled “Configuration File for VCS Integrations”](#configuration-file-for-vcs-integrations)
VCS integrations require the same configuration file as the CLI tool, meaning the same structure is supported. The only difference is that you should not store the project credentials in the file header for security reasons. Also, you can use a few additional parameters.
### [Pull Request Title and Labels](#pull-request-title-and-labels)
[Section titled “Pull Request Title and Labels”](#pull-request-title-and-labels)
The default pull request title is `New Crowdin updates`. To specify your custom pull request title and add labels to the pull request, you can use the following parameters in the configuration file: `pull_request_title`, `pull_request_labels`.
crowdin.yml
```yml
"pull_request_title": "Custom PR title"
"pull_request_labels": [
"crowdin",
"l10n"
]
```
Limitations
Pull request labels are not supported by the Bitbucket integration.
### [Commit Message](#commit-message)
[Section titled “Commit Message”](#commit-message)
Each time translations are committed the default message is shown `New translations {fileName} ({languageName})`. You can use the `commit_message` parameter to add Git tags (e.g., to skip builds).
crowdin.yml
```yml
"commit_message": "[ci skip]"
```
To replace the default commit message, use the `append_commit_message` parameter with the `false` value. You can also add two optional placeholders: `%original_file_name%` and `%language%` to use the appropriate file name and language variables accordingly.
crowdin.yml
```yml
"commit_message": "Fix: New translations %original_file_name% from Crowdin"
"append_commit_message": false
```
### [Pull Request Assignee](#pull-request-assignee)
[Section titled “Pull Request Assignee”](#pull-request-assignee)
If you need to assign a pull request to particular users, use the `pull_request_assignees` parameter to specify them.
**GitHub/GitHub Server:**
crowdin.yml
```yml
"pull_request_assignees": [
"login1",
"login2"
]
```
**GitLab/GitLab Self-Managed:**
crowdin.yml
```yml
"base_path": "."
"pull_request_assignees": [
"user_id1", # numeric ID
"user_id2" # numeric ID
]
```
Limitations
Pull request assignee parameter is not supported by the Bitbucket, Bitbucket Server, and Azure Repos integrations.
### [Pull Request Reviewer](#pull-request-reviewer)
[Section titled “Pull Request Reviewer”](#pull-request-reviewer)
If you need to request a pull request review from particular users, use the `pull_request_reviewers` parameter to specify them.
**GitHub/GitHub Server:**
crowdin.yml
```yml
"pull_request_reviewers": [
"login1",
"login2"
]
```
**GitLab/GitLab Self-Managed:**
crowdin.yml
```yml
"pull_request_reviewers": [
"user_id1", # numeric ID
"user_id2" # numeric ID
]
```
**Bitbucket:**
crowdin.yml
```yml
"pull_request_reviewers": [
"uuid1", # user uuid
"uuid2" # user uuid
]
```
**Bitbucket Server:**
crowdin.yml
```yml
"pull_request_reviewers": [
"username1",
"username2"
]
```
**Azure Repos:**
crowdin.yml
```yml
"pull_request_reviewers": [
"guid1", # user ID
"guid2" # user ID
]
```
## [Adding Labels to Source Strings](#adding-labels-to-source-strings)
[Section titled “Adding Labels to Source Strings”](#adding-labels-to-source-strings)
To add existing or new labels to the source strings, use the `labels` parameter. Labels will be added to the source strings only during the initial upload to the Crowdin project.
The strings uploaded to the Crowdin project before the use of the `labels` parameter won’t be labeled. If you remove the label added during the initial upload directly in Crowdin, it won’t be re-added on the next syncs.
Example:
crowdin.yml
```yml
"files": [
{
"source" : "/resources/en/*.json",
"translation" : "/resources/%two_letters_code%/%original_file_name%",
"labels" : [
"android",
"emails"
]
}
]
```
Limitations
Label names can contain any special character except `,`.
Read more about [Labels](/project-settings/labels/).
## [Language Mapping](#language-mapping)
[Section titled “Language Mapping”](#language-mapping)
Often software projects have custom names for locale directories. Crowdin allows you to map your own languages to be recognizable in your projects.
Let’s say your locale directories are named `en`, `uk`, `fr`, `de`. All of them can be represented by the `%two_letters_code%` placeholder. Still, you have one directory named `zh_CH`. You can also override language codes for other placeholders like `%android_code%`, `%locale%`, etc.
Read more about [Language Mapping configuration for CLI](https://crowdin.github.io/crowdin-cli/advanced#languages-mapping-configuration).
To make it work with Crowdin without changes in your project, you can set up Language Mapping via UI.
* [Language mapping in Crowdin](/project-settings/export/)
* [Language mapping in Crowdin Enterprise](/enterprise/project-settings/export/)
## [Using One Configuration File for VCS Integrations and CLI](#using-one-configuration-file-for-vcs-integrations-and-cli)
[Section titled “Using One Configuration File for VCS Integrations and CLI”](#using-one-configuration-file-for-vcs-integrations-and-cli)
There are cases when it’s necessary to use VCS integration and CLI for one project. Mostly, in this kind of situation, you’d need to have two separate configuration files, one for VCS integration and another for CLI. However, you can use a single configuration file for both cases.
Since the VCS integration configuration file doesn’t contain `project_id` and `api_token` credentials required for CLI, you can pass them directly in the command using the following parameters: `-i/--project-id`, `-T/--token`.
As a result, your command for downloading translations via CLI will look like the following:
```shell
crowdin download -i {your-project-id} -T {your-token}
```
Alternatively, you may use [Environment Variables](#api-credentials-from-environment-variables) or [Split Project Configuration and API Credentials](https://crowdin.github.io/crowdin-cli/configuration#split-project-configuration-and-api-credentials).
## [Example Configurations](#example-configurations)
[Section titled “Example Configurations”](#example-configurations)
##### [Uploading CSV files](#uploading-csv-files)
[Section titled “Uploading CSV files”](#uploading-csv-files)
crowdin.yml
```yml
"project_id": "projectId"
"api_token": "personal-access-token"
"base_path": "."
"base_url": "https://api.crowdin.com"
"files": [
{
"source": "/*.csv",
"translation": "/%two_letters_code%/%original_file_name%",
# Specifies whether first line should be imported or it contains columns headers
"first_line_contains_header": true,
# Used only when uploading CSV file to define data columns mapping
"scheme": "identifier,source_phrase,translation,context,max_length"
}
]
```
##### [GetText Project](#gettext-project)
[Section titled “GetText Project”](#gettext-project)
crowdin.yml
```yml
"project_id": "projectId"
"api_token": "personal-access-token"
"base_path": "."
"base_url": "https://api.crowdin.com"
"files" : [
{
"source" : "/locale/en/**/*.po",
"translation" : "/locale/%two_letters_code%/LC_MESSAGES/%original_file_name%",
"languages_mapping" : {
"two_letters_code" : {
"zh-CN" : "zh_CH",
"fr-QC": "fr"
}
}
}
]
```
##### [Android Project](#android-project)
[Section titled “Android Project”](#android-project)
crowdin.yml
```yml
"project_id": "projectId"
"api_token": "personal-access-token"
"base_path": "."
"base_url": "https://api.crowdin.com"
"files" : [
{
"source" : "/res/values/*.xml",
"translation" : "/res/values-%android_code%/%original_file_name%",
"languages_mapping" : {
"android_code" : {
"de" : "de"
}
}
}
]
```
# Crowdin Query Language (CroQL)
> Retrieve needed localization resources based on specific conditions
Crowdin Query Language (CroQL) is a tool for Crowdin Editor and Crowdin Enterprise Editor and Crowdin and Crowdin Enterprise API that allows you to retrieve needed localization resources based on specific conditions. Using CroQL, you can filter source strings and their translations for a specific target language, TM segments, and Glossary Terms.
You can use CroQL with the following API methods:
* Crowdin
* [List Strings](/developer/api/v2/#tag/Source-Strings/operation/api.projects.strings.getMany)
* [List Strings](/developer/api/v2/string-based/#tag/Source-Strings/operation/api.projects.strings.getMany) String-based
* [List Language Translations](/developer/api/v2/#tag/StringAsset-Translations/operation/api.projects.languages.translations.getMany)
* [List Language Translations](/developer/api/v2/string-based/#tag/String-Translations/operation/api.projects.languages.translations.getMany) String-based
* [List TM Segments](/developer/api/v2/#tag/Translation-Memory/operation/api.tms.segments.getMany)
* [List TM Segments](/developer/api/v2/string-based/#tag/Translation-Memory/operation/api.tms.segments.getMany) String-based
* [List Terms](/developer/api/v2/#tag/Glossaries/operation/api.glossaries.terms.getMany)
* [List Terms](/developer/api/v2/string-based/#tag/Glossaries/operation/api.glossaries.terms.getMany) String-based
* Crowdin Enterprise
* [List Strings](/developer/enterprise/api/v2/#tag/Source-Strings/operation/api.projects.strings.getMany)
* [List Strings](/developer/enterprise/api/v2/string-based/#tag/Source-Strings/operation/api.projects.strings.getMany) String-based
* [List Language Translations](/developer/enterprise/api/v2/#tag/StringAsset-Translations/operation/api.projects.languages.translations.getMany)
* [List Language Translations](/developer/enterprise/api/v2/string-based/#tag/String-Translations/operation/api.projects.languages.translations.getMany) String-based
* [List TM Segments](/developer/enterprise/api/v2/#tag/Translation-Memory/operation/api.tms.segments.getMany)
* [List TM Segments](/developer/enterprise/api/v2/string-based/#tag/Translation-Memory/operation/api.tms.segments.getMany) String-based
* [List Terms](/developer/enterprise/api/v2/#tag/Glossaries/operation/api.glossaries.terms.getMany)
* [List Terms](/developer/enterprise/api/v2/string-based/#tag/Glossaries/operation/api.glossaries.terms.getMany) String-based
## [Operators](#operators)
[Section titled “Operators”](#operators)
Main CroQL operators are listed below. Use and combine them to set specific conditions for retrieving the needed content from Crowdin. To form your CroQL query, you can use the elements from the tables below.
### [Arithmetic Operators](#arithmetic-operators)
[Section titled “Arithmetic Operators”](#arithmetic-operators)
The arithmetic operators are used to perform mathematic operations with any numeric data types.
| Name | Symbol | Example |
| -------------- | ------ | ------- |
| Addition | + | 1 + 9 |
| Subtraction | - | 11 - 1 |
| Division | / | 20 / 2 |
| Multiplication | \* | 2 \* 5 |
| Negation | - | -10 |
### [Comparison Operators](#comparison-operators)
[Section titled “Comparison Operators”](#comparison-operators)
The comparison operators are used to compare values and return `true` or `false`.
| Name | Symbol | Aliases | Example |
| ---------------- | ---------------------------------------------------------- | ------- | ----------------------------------------------------------------------------------------------------------------------- |
| Between | `{{expression}} between {{expression}} and {{expression}}` | | 5 between 1 and 10 |
| Equal | = | | 10 = 10 |
| Not equal | != | ≠ | 1 != 10; 1 ≠ 10 |
| Greater | > | | 10 > 1 |
| Greater or equal | >= | ≥ | 10 >= 1; 10 ≥ 1 |
| Less | < | | 1 < 10 |
| Less or equal | <= | ≤ | 1 <= 10; 1 ≤ 10 |
| Contains | `{{string}} contains {{string}}` | | `"Hello World" contains "Hello"`; `"Hello World" contains text`; `text contains "Hello World"`; `context contains text` |
### [Logical Operators](#logical-operators)
[Section titled “Logical Operators”](#logical-operators)
The logical operators are used to combine multiple boolean expressions or values and provide a single boolean output.
| Name | Symbol | Example |
| ---- | ------ | ----------------- |
| And | and | 1 < 10 and 10 > 1 |
| Or | or | 1 < 10 or 10 > 1 |
| Xor | xor | 1 < 10 xor 10 > 1 |
| Not | not | not 1 < 10 |
### [Filtration Operators](#filtration-operators)
[Section titled “Filtration Operators”](#filtration-operators)
The filtration operators are used to filter the objects based on the specified condition.
| Name | Symbol | Example |
| ------ | ------------------------------------ | ----------------------------------------- |
| Filter | `{{collection}} where {{predicate}}` | `translations where (count of votes > 0)` |
| Match | `{{object}} with {{predicate}}` | `user with (login = "crowdin")` |
### [Conditional (Ternary) Operator](#conditional-ternary-operator)
[Section titled “Conditional (Ternary) Operator”](#conditional-ternary-operator)
The ternary operator is used to check a condition specified in the first value, and if it’s `true` it returns the second value, but if it’s `false` it returns the third value.
| Name | Symbol | Example |
| ------- | ---------------------------------------------------------- | -------------------------------------- |
| Ternary | `If {{condition}} then {{expression}} else {{expression}}` | `If 1 < 10 then "less" else "greater"` |
### [Fetch Operators](#fetch-operators)
[Section titled “Fetch Operators”](#fetch-operators)
The fetch operators are used for retrieving data from the objects.
| Name | Symbol | Example |
| ---------- | ------------------------------------------ | ----------------------------------- |
| Mention | `@user:{{string}}`; `@language:{{string}}` | `@user:"crowdin"`; `@language:"en"` |
| Member | `{{member}} of {{object}}` | `count of translations` |
| Identifier | `{{identifier}}` | `text`; `identifier` |
### [Scalar Operators](#scalar-operators)
[Section titled “Scalar Operators”](#scalar-operators)
The scalar operators are used to declare values for further processing.
| Name | Symbol | Example |
| -------- | -------------- | ------------------------------ |
| Integer | `{{integer}}` | 10 |
| Float | `{{float}}` | 10.01 |
| String | `{{string}}` | ”crowdin” |
| Datetime | `{{datetime}}` | ’today’; ‘2021-03-16 00:00:00’ |
### [Group Operator](#group-operator)
[Section titled “Group Operator”](#group-operator)
The group operator is used to determine the execution order of operators.
| Name | Symbol | Example |
| ----- | ------ | ------------------------------ |
| Group | ( ) | 1 < 10 and (20 > 10 or 10 > 5) |
## [CroQL Query Examples](#croql-query-examples)
[Section titled “CroQL Query Examples”](#croql-query-examples)
In this section, you can find practical examples of CroQL queries that will help you understand and use the querying capabilities within Crowdin. These examples can help you learn how to create your own queries to retrieve specific sets of data based on various criteria, such as translation status, user activity, and string properties.
[CroQL Tester - CroQL expression editor and tester ](https://store.crowdin.com/croql-tester)Try out your CroQL queries in the CroQL Tester.
### [Strings Queries](#strings-queries)
[Section titled “Strings Queries”](#strings-queries)
These queries are used to retrieve information about source strings.
* Strings that have no Ukrainian translations with approvals or votes:
```graphql
count of translations where ( language = @language:"uk" and ( count of approvals > 0 or count of votes > 0 ) ) = 0
```
* Strings that have only one translation:
```graphql
count of translations = 1
```
* Strings that have translations from only one specific user:
```graphql
count of translations > 0 and count of translations = count of translations where (user = @user:"crowdin")
```
* Strings that have at least one translation not from specific users:
```graphql
count of translations where (user != @user:"crowdin") > 0
```
* Strings that have all translations not from specific users:
```graphql
count of translations > 0 and count of translations = count of translations where (user != @user:"crowdin")
```
* Strings filtered by identifier and numeric id of a file in your Crowdin project:
```graphql
identifier = "key" and id of file = 777
```
* Strings that have unresolved issues filtered by numeric id of a file in your Crowdin project:
```graphql
id of file = 777 and count of comments where (has unresolved issue) > 0
```
* Hidden strings that are not duplicates and have one or more translations:
```graphql
is hidden and not is duplicate and count of translations > 0
```
* Strings that have one or more approvals:
```graphql
count of languages summary where (approvalsCount >= 1) > 0
```
* Strings that have comments made by the user with a `crowdin` username:
```graphql
count of comments where (user = @user:"crowdin") > 0
```
* Strings that contain “ABC” in the source text but don’t contain “ABC” in their translations:
```graphql
text contains "ABC" and (count of translations where (text contains "ABC") = 0)
```
#### [Field Queries](#field-queries)
[Section titled “Field Queries”](#field-queries)
These queries are used to retrieve information about source strings based on the [Fields](/enterprise/fields/) assigned to them.
* Strings with a specific field name and an exact field value:
*Use case: Find strings where the “Priority” field is set to “High”.*
```graphql
count of fields where (name = "Priority" and value = "High") > 0
```
* Strings with a specific field slug and a value containing a specific word:
*Use case: Find strings where the “category” slug contains the word “mobile”.*
```graphql
count of fields where (slug = "field-category" and value contains "mobile") > 0
```
* Strings that have a specific field applied by its name:
*Use case: Find all strings that have a “Department” field assigned, regardless of the value.*
```graphql
count of fields where (name = "Department") > 0
```
* Strings that have a specific field applied by its slug:
*Use case: Find strings using a specific system identifier for an “Owner” field.*
```graphql
count of fields where (slug = "field-internal-owner") > 0
```
* Strings that have a field whose name contains a specific word:
*Use case: Find strings that have any “Status” related fields (e.g., Legal Status, Review Status).*
```graphql
count of fields where (name contains "Status") > 0
```
* Strings that have any field with a non-empty value:
*Use case: Find strings that have any metadata filled in.*
```graphql
count of fields where (value != "") > 0
```
* Strings that have a text-type field with a non-empty value:
*Use case: Useful for ensuring metadata comments or descriptions are actually filled in.*
```graphql
count of fields where (type = "text" and value != "") > 0
```
* Strings matching multiple specific field names where the value contains a specific word:
*Use case: Check if either “Platform” or “Environment” fields contain the word “Production”.*
```graphql
count of fields where ((name = "Platform" or name = "Environment") and value contains "Production") > 0
```
**Using String and Field Queries in Crowdin API**
Use your query in the following Crowdin API endpoints:
Crowdin
```shell
GET https://api.crowdin.com/api/v2/projects/{projectId}/strings?croql={croql}
```
Crowdin Enterprise
```shell
GET https://{organization_domain}.api.crowdin.com/api/v2/projects/{projectId}/strings?croql={croql}
```
| Parameter | Details |
| ------------- | -------------------------------------------------------------------------------- |
| `{projectId}` | **Type:** `integer` **Description:** Numeric identifier of your Crowdin project. |
| `{croql}` | **Type:** `string` **Description:** CroQL expression. |
Caution
Before executing the request, ensure to URL encode your CroQL expression.
### [Translation Queries](#translation-queries)
[Section titled “Translation Queries”](#translation-queries)
These queries are used to retrieve information about translations.
* Translations made by the user with a `crowdin` username or ones with ≥ 100 upvotes:
```graphql
user = @user:"crowdin" or count of votes where ( is up ) >= 100
```
**Using Translation Queries in Crowdin API**
Use your query in the following Crowdin API endpoints:
Crowdin
```shell
GET https://api.crowdin.com/api/v2/projects/{projectId}/languages/uk/translations?croql={croql}
```
Crowdin Enterprise
```shell
GET https://{organization_domain}.api.crowdin.com/api/v2/projects/{projectId}/languages/uk/translations?croql={croql}
```
| Parameter | Details |
| ------------- | -------------------------------------------------------------------------------- |
| `{projectId}` | **Type:** `integer` **Description:** Numeric identifier of your Crowdin project. |
| `{croql}` | **Type:** `string` **Description:** CroQL expression. |
Caution
Before executing the request, ensure to URL encode your CroQL expression.
### [Translation Memory Segment Queries](#translation-memory-segment-queries)
[Section titled “Translation Memory Segment Queries”](#translation-memory-segment-queries)
These queries are used to retrieve information about TM segments.
* Translation memory segments containing at least one record used one or more times:
```graphql
count of records where (usageCount > 0) > 0
```
* Translation memory segments containing at least one record created by the user with a `crowdin` username:
```graphql
count of records where (createdBy = @user:"crowdin") > 0
```
**Using Translation Memory Segment Queries in Crowdin API**
Use your query in the following Crowdin API endpoints:
Crowdin
```shell
GET https://api.crowdin.com/api/v2/tms/{tmId}/segments?croql={croql}
```
Crowdin Enterprise
```shell
GET https://{organization_domain}.api.crowdin.com/api/v2/tms/{tmId}/segments?croql={croql}
```
| Parameter | Details |
| ------------- | -------------------------------------------------------------------------------- |
| `{projectId}` | **Type:** `integer` **Description:** Numeric identifier of your Crowdin project. |
| `{croql}` | **Type:** `string` **Description:** CroQL expression. |
Caution
Before executing the request, ensure to URL encode your CroQL expression.
### [Glossary Term Queries](#glossary-term-queries)
[Section titled “Glossary Term Queries”](#glossary-term-queries)
These queries are used to retrieve information about glossary terms.
* Terms created by the user with a `crowdin` username for Ukrainian:
```graphql
user = @user:"crowdin" and language = @language:"uk"
```
* Terms that contain “ABC” and have part of speech set to noun:
```graphql
text contains "ABC" and partOfSpeech = "noun"
```
* Terms marked as not recommended or obsolete:
```graphql
status = "not_recommended" or status = "obsolete"
```
* Terms that are of type abbreviation and have a note:
```graphql
type = "abbreviation" and note contains "tooltip"
```
* Terms added after a specific date:
```graphql
createdAt > '2024-12-01 00:00:00'
```
* Terms with lemma equal to “cancel” and in English:
```graphql
lemma = "cancel" and language = @language:"en"
```
* Terms that include a reference URL:
```graphql
url contains "https://"
```
**Using Glossary Term Queries in Crowdin API**
Use your query in the following Crowdin API endpoints:
Crowdin
```shell
GET https://api.crowdin.com/api/v2/glossaries/{glossaryId}/terms?croql={croql}
```
Crowdin Enterprise
```shell
GET https://{organization_domain}.api.crowdin.com/api/v2/glossaries/{glossaryId}/terms?croql={croql}
```
| Parameter | Details |
| -------------- | ------------------------------------------------------------------------------------- |
| `{glossaryId}` | **Type:** `integer` **Description:** Numeric identifier of your Crowdin glossary. |
| `{croql}` | **Type:** `string` **Description:** CroQL expression to filter glossary term entries. |
Caution
Before executing the request, ensure to URL encode your CroQL expression.
### [Examples based on the Editor Advanced Filter Options](#examples-based-on-the-editor-advanced-filter-options)
[Section titled “Examples based on the Editor Advanced Filter Options”](#examples-based-on-the-editor-advanced-filter-options)
Note
To use the following queries in Crowdin API, ensure to specify the needed target language (e.g., `count of languages summary where (language = @language:"uk" and is translated) > 0`) in your CroQL query.
#### [Strings](#strings)
[Section titled “Strings”](#strings)
* Strings added:
```graphql
added between '2023-12-06 13:44:14' and '2023-12-07 13:44:14'
```
* Strings updated:
```graphql
updated between '2023-12-06 13:44:14' and '2023-12-07 13:44:14'
```
* String Type:
```graphql
type is plain or type is icu
```
* Comments:
```graphql
count of comments > 0
```
* Screenshots:
```graphql
count of screenshots > 0
```
* QA Issues:
```graphql
count of languages summary where (has qa issues) > 0
```
#### [Translations](#translations)
[Section titled “Translations”](#translations)
* Untranslated:
```graphql
count of languages summary = 0
```
* Partially translated (plurals):
```graphql
count of languages summary where (is partially translated) > 0
```
* Translated:
```graphql
count of languages summary where (is translated) > 0
```
* Translated by:
```graphql
count of translations where (user = @user:"crowdin") > 0
```
* Not Translated by:
```graphql
count of translations where (user != @user:"crowdin") > 0
```
* Same as source string:
```graphql
count of languages summary where (has translation as source) > 0
```
* Modified source String:
```graphql
count of languages summary where (is source changed after translation) > 0
```
* Translations updated:
```graphql
count of languages summary where ( translation updated between '2023-12-06 13:44:14' and '2023-12-07 13:44:14') > 0
```
* Votes:
```graphql
count of languages summary where (rating > 0) > 0
```
#### [Duplicates](#duplicates)
[Section titled “Duplicates”](#duplicates)
* Master strings:
```graphql
not is duplicate
```
* Duplicates only:
```graphql
is duplicate
```
* Duplicates with shared translations:
```graphql
is duplicate and count of languages summary where (has shared translation) > 0
```
* Duplicates with own translations:
```graphql
is duplicate and count of languages summary where (not has shared translation and is translated) > 0
```
#### [Approvals](#approvals)
[Section titled “Approvals”](#approvals)
* Translated, not approved:
```graphql
count of languages summary where (is translated and not is approved) > 0
```
* Partially approved (plurals):
```graphql
count of languages summary where (is partially approved) > 0
```
* Approved:
```graphql
count of languages summary where (is approved) > 0
```
* Approved by:
```graphql
count of translations where (count of approvals where (user = @user:"crowdin") > 0) > 0
```
* Not Approved by:
```graphql
count of translations where (count of approvals where (user != @user:"crowdin") > 0) > 0
```
* Has translations after approval:
```graphql
count of languages summary where (has translation after approval) > 0
```
#### [TM and MT](#tm-and-mt)
[Section titled “TM and MT”](#tm-and-mt)
* Translated by MT:
```graphql
count of languages summary where (is translated by mt) > 0
```
* Translated by TM:
```graphql
count of languages summary where (is translated by tm) > 0
```
* Translated by TM or MT:
```graphql
count of languages summary where (is auto translated) > 0
```
#### [Other](#other)
[Section titled “Other”](#other)
* Pre translation:
* Used: Not available
* Not used: Not available
* Sort by: Not available
* Verbal Expressions: Not available
* Verbal Expression Scope: Not available
## [Context](#context)
[Section titled “Context”](#context)
CroQL can be used in the following contexts: source string context, translation context, and translation memory (TM) segment context. Use the following examples as a basis for building your CroQL queries.
### [Source String Context](#source-string-context)
[Section titled “Source String Context”](#source-string-context)
```json
{
"type is plain": true,
"type is plural": false,
"type is icu": false,
"type is asset": false,
"text": "Quick Start",
"identifier": "quick_start",
"context": "quick_start",
"max length": 0,
"is visible": true,
"is hidden": false,
"is duplicate": false,
"isPassedWorkflow": true,
"fields": {
"priority": "High",
"legal-status": "approved"
},
"file": {
"id": 32,
"name": "sample.csv",
"title": "Sample",
"type": "csv",
"context": "Some useful context information"
},
"branch": {
"id": 7,
"name": "main",
"title": "Main"
},
"comments": [
{
"has issue": false,
"has unresolved issue": false,
"user": 1
}
],
20 collapsed lines
"screenshots": [],
"translations": [
{
"text": "Швидкий старт",
"plural form": "none",
"is pre translated": true,
"provider": "tm",
"language": "uk",
"user": 1,
"votes": [
{
"is up": true,
"is down": false,
"user": 2,
"added": "2021-04-09 13:44:14"
}
],
"approvals": [
{
"user": 2,
"added": "2021-04-09 13:44:14"
}
],
"updated": "2021-04-09 10:23:17"
}
31 collapsed lines
],
"languages summary": [
{
"language": "en",
"is translated": false,
"is partially translated": false,
"is approved": false,
"is partially approved": false,
"translation updated": false,
"is auto translated": false,
"is translated by tm": false,
"is translated by mt": false,
"is source changed after translation": false,
"has translation as source": false,
"has translation after approval": false,
"has shared translation": false,
"has qa issues": false,
"has empty translation qa issues": false,
"has translation length qa issues": false,
"has tags mismatch qa issues": false,
"has spaces mismatch qa issues": false,
"has variables mismatch qa issues": false,
"has punctuation mismatch qa issues": false,
"has character case mismatch qa issues": false,
"has special characters mismatch qa issues": false,
"has incorrect translation qa issues": false,
"has spelling qa issues": false,
"has icu syntax qa issues": false,
"has terms qa issues": false,
"has duplicate translation qa issues": false,
"has ftl syntax qa issues": false,
"has android syntax qa issues": false,
"has custom qa issues": false,
"rating": 1,
"approvalsCount": 1
}
],
"labels": [
{
"id": 1,
"title": "label title",
"is system": false
}
],
"added": "2021-04-08 12:33:27",
"updated": "2021-04-08 12:33:27"
}
```
| | |
| ------------------------------------------- | ----------------------------------------------------------------------------------------------------------------------------------------------------------------------------------------------------------------------------------------------------------- |
| `type is plain` | **Type:** `boolean`**Description:** The source string with plain text. |
| `type is plural` | **Type:** `boolean`**Description:** The source string with plural forms. |
| `type is icu` | **Type:** `boolean`**Description:** The source string with ICU. |
| `type is asset` | **Type:** `boolean`**Description:** The source string is an asset. |
| `text` | **Type:** `string`**Description:** The source string text. |
| `identifier` | **Type:** `string`**Description:** The source string identifier (key). |
| `context` | **Type:** `string`**Description:** The source string context. |
| `max length` | **Type:** `integer`**Description:** The source string max.length. |
| `is visible` | **Type:** `boolean`**Description:** The source string is visible. |
| `is hidden` | **Type:** `boolean`**Description:** The source string is hidden. |
| `is duplicate` | **Type:** `boolean`**Description:** The source string is duplicate. |
| `isPassedWorkflow` | **Type:** `boolean`**Description:** Crowdin Enterprise only. The source string passed through a project workflow. |
| `fields` | **Type:** `object`**Description:** Crowdin Enterprise only. An object containing custom properties ([Fields](/enterprise/fields/)) assigned to a string. You can filter these by `name`, `slug`, `value`, and `type`. |
| `file` | **Type:** `object`**Description:** The source string file. |
| `branch` | **Type:** `object`**Description:** The source string branch. |
| `comments` | **Type:** `array`**Description:** The source string comments. |
| `has issue` | **Type:** `boolean`**Description:** The source string has an issue. |
| `has unresolved issue` | **Type:** `boolean`**Description:** The source string has an unresolved issue. |
| `user` | **Type:** `integer`**Description:** Numeric identifier of the user who added a comment. |
| `screenshots` | **Type:** `array`**Description:** The source string screenshots. |
| `translations` | **Type:** `array`**Description:** Translations of the source string. |
| `text` | **Type:** `string`**Description:** Translation text. |
| `plural form` | **Type:** `string`**Description:** Translation plural form. |
| `is pre translated` | **Type:** `boolean`**Description:** Translation added via pre-translation. |
| `provider` | **Type:** `string`**Allowed values:** `tm`, `global_tm`, `google`, `google_automl`, `microsoft`, `crowdin`, `deepl`, `modernmt`, `amazon`, `watson`, `custom_mt`**Description:** Translation provided via translation memory or machine translation engine. |
| `language` | **Type:** `string`**Description:** Language identifier specified as a string. Use the [language codes](/developer/language-codes/), for example, `“uk”` for Ukrainian. To specify in queries, use the format: `@language:“uk”`. |
| `user` | **Type:** `integer`**Description:** Numeric identifier of the user who added a translation. |
| `votes` | **Type:** `array`**Description:** Array of the votes added to the translation. |
| `is up` | **Type:** `boolean`**Description:** Upvote. |
| `is down` | **Type:** `boolean`**Description:** Downvote. |
| `user` | **Type:** `integer`**Description:** Numeric identifier of the user who added a vote for translation. |
| `added` | **Type:** `datetime`**Description:** Date when a vote for translation was added. |
| `approvals` | **Type:** `array`**Description:** Array of the added translation approvals. |
| `user` | **Type:** `integer`**Description:** Numeric identifier of the user who approved a translation. |
| `added` | **Type:** `datetime`**Description:** Date when a translation approval was added. |
| `updated` | **Type:** `datetime`**Description:** Date when a translation was updated. |
| `languages summary` | **Type:** `array`**Description:** The source string top translations (the translations with the highest priority). |
| `language` | **Type:** `string`**Description:** Language identifier specified as a string. Use the [language codes](/developer/language-codes/), for example, `“uk”` for Ukrainian. To specify in queries, use the format: `@language:“uk”`. |
| `is translated` | **Type:** `boolean`**Description:** The source string is translated. |
| `is partially translated` | **Type:** `boolean`**Description:** The source string is partially translated. |
| `is approved` | **Type:** `boolean`**Description:** The source string is approved. |
| `is partially approved` | **Type:** `boolean`**Description:** The source string is partially approved. |
| `translation updated` | **Type:** `boolean`**Description:** The source string translation is updated. |
| `is auto translated` | **Type:** `boolean`**Description:** The source string is translated by TM or MT. |
| `is translated by tm` | **Type:** `boolean`**Description:** The source string is translated by TM. |
| `is translated by mt` | **Type:** `boolean`**Description:** The source string is translated by MT. |
| `is source changed after translation` | **Type:** `boolean`**Description:** The source string changed after translation. |
| `has translation as source` | **Type:** `boolean`**Description:** The source string has translation equal to source text. |
| `has translation after approval` | **Type:** `boolean`**Description:** The source string has translation after approval. |
| `has shared translation` | **Type:** `boolean`**Description:** The source string duplicate has shared translations from a master string. |
| `has qa issues` | **Type:** `boolean`**Description:** The source string has QA issues. |
| `has empty translation qa issues` | **Type:** `boolean`**Description:** The source string has empty translation QA issues. |
| `has translation length qa issues` | **Type:** `boolean`**Description:** The source string has translation length QA issues. |
| `has tags mismatch qa issues` | **Type:** `boolean`**Description:** The source string has tags mismatch QA issues. |
| `has spaces mismatch qa issues` | **Type:** `boolean`**Description:** The source string has spaces mismatch QA issues. |
| `has variables mismatch qa issues` | **Type:** `boolean`**Description:** The source string has variables mismatch QA issues. |
| `has punctuation mismatch qa issues` | **Type:** `boolean`**Description:** The source string has punctuation mismatch QA issues. |
| `has character case mismatch qa issues` | **Type:** `boolean`**Description:** The source string has character case mismatch QA issues. |
| `has special characters mismatch qa issues` | **Type:** `boolean`**Description:** The source string has special characters mismatch QA issues. |
| `has incorrect translation qa issues` | **Type:** `boolean`**Description:** The source string has incorrect translation QA issues. |
| `has spelling qa issues` | **Type:** `boolean`**Description:** The source string has spelling QA issues. |
| `has icu syntax qa issues` | **Type:** `boolean`**Description:** The source string has ICU syntax QA issues. |
| `has terms qa issues` | **Type:** `boolean`**Description:** The source string has terms QA issues. |
| `has duplicate translation qa issues` | **Type:** `boolean`**Description:** The source string has duplicate translation QA issues. |
| `has ftl syntax qa issues` | **Type:** `boolean`**Description:** The source string has FTL syntax QA issues. |
| `has android syntax qa issues` | **Type:** `boolean`**Description:** The source string has Android syntax QA issues. |
| `has custom qa issues` | **Type:** `boolean`**Description:** The source string has Custom QA issues. |
| `rating` | **Type:** `integer`**Description:** The source string translation rating. |
| `approvalsCount` | **Type:** `integer`**Description:** The number of translation approvals. |
| `labels` | **Type:** `array`**Description:** The source string labels. |
| `id` | **Type:** `integer`**Description:** Numeric identifier of the label. |
| `title` | **Type:** `string`**Description:** Label title. |
| `is system` | **Type:** `boolean`**Description:** System label (label with source file name that is automatically added to strings in string-based projects). |
| `added` | **Type:** `datetime`**Description:** Date when a source string was added. |
| `updated` | **Type:** `datetime`**Description:** Date when a source string was updated. |
### [Translation Context](#translation-context)
[Section titled “Translation Context”](#translation-context)
```json
{
"text": "Швидкий старт",
"plural form": "none",
"is pre translated": true,
"provider": "tm",
"user": 1,
"votes": [
{
"is up": true,
"is down": false,
"user": 2,
"added": "2021-04-09 13:44:14"
}
],
"approvals": [
{
"user": 2,
"added": "2021-04-09 13:44:14"
}
],
"updated": "2021-04-09 10:23:17"
}
```
| | |
| ------------------- | ----------------------------------------------------------------------------------------------------------------------------------------------------------------------------------------------------------------------------------------------------------- |
| `text` | **Type:** `boolean`**Description:** Translation text. |
| `plural form` | **Type:** `string`**Description:** Translation plural form. |
| `is pre translated` | **Type:** `boolean`**Description:** Translation added via pre-translation. |
| `provider` | **Type:** `string`**Allowed values:** `tm`, `global_tm`, `google`, `google_automl`, `microsoft`, `crowdin`, `deepl`, `modernmt`, `amazon`, `watson`, `custom_mt`**Description:** Translation provided via translation memory or machine translation engine. |
| `user` | **Type:** `integer`**Description:** Numeric identifier of the user who added a translation. |
| `votes` | **Type:** `array`**Description:** Array of the votes added to the translation. |
| `is up` | **Type:** `boolean`**Description:** Upvote. |
| `is down` | **Type:** `boolean`**Description:** Downvote. |
| `user` | **Type:** `integer`**Description:** Numeric identifier of the user who added a vote for translation. |
| `added` | **Type:** `datetime`**Description:** Date when a vote for translation was added. |
| `approvals` | **Type:** `array`**Description:** Array of the added translation approvals. |
| `user` | **Type:** `integer`**Description:** Numeric identifier of the user who approved a translation. |
| `added` | **Type:** `datetime`**Description:** Date when a translation approval was added. |
| `updated` | **Type:** `datetime`**Description:** Date when a translation was updated. |
### [Translation Memory (TM) Segment Context](#translation-memory-tm-segment-context)
[Section titled “Translation Memory (TM) Segment Context”](#translation-memory-tm-segment-context)
```json
{
"records": [
{
"id": 1,
"text": "Перекладений текст",
"usageCount": 77,
"createdBy": 1,
"updatedBy": 1,
"createdAt": "2027-09-16T13:48:04+00:00",
"updatedAt": "2027-09-16T13:48:04+00:00"
}
]
}
```
| | |
| ------------ | ----------------------------------------------------------------------------------------------------------- |
| `records` | **Type:** `array`**Description:** Array of translation memory segment records. |
| `id` | **Type:** `integer`**Description:** Numeric identifier of a record. |
| `text` | **Type:** `string`**Description:** Translation text of a record. |
| `usageCount` | **Type:** `integer`**Description:** The number of times a translation memory record has been used. |
| `createdBy` | **Type:** `integer`**Description:** Numeric identifier of the user who created a translation memory record. |
| `updatedBy` | **Type:** `integer`**Description:** Numeric identifier of the user who updated a translation memory record. |
| `createdAt` | **Type:** `datetime`**Description:** Date when a translation memory record was created. |
| `updatedAt` | **Type:** `datetime`**Description:** Date when a translation memory record was updated. |
### [Glossary Concept Context](#glossary-concept-context)
[Section titled “Glossary Concept Context”](#glossary-concept-context)
```json
{
"id": 101,
"user": 12,
"subject": "User Interfact",
"definition": "A command used to save user progress in the application.",
"url": "https://example.com/concept/save",
"note": "Commonly used in forms and toolbars.",
"translatable": true,
"createdAt": "2027-09-16T13:48:04+00:00",
"updatedAt": "2027-09-16T13:48:04+00:00"
}
```
| | |
| -------------- | -------------------------------------------------------------------------------------------------------------------------- |
| `id` | **Type:** `integer`**Description:** Numeric identifier of the glossary concept. |
| `user` | **Type:** `integer`**Description:** Numeric identifier of the user who created the concept. |
| `subject` | **Type:** `string`**Description:** Domain or area of knowledge the concept belongs to (e.g., UI, development, healthcare). |
| `definition` | **Type:** `string`**Description:** General explanation or definition of the concept. |
| `url` | **Type:** `string`**Description:** URL linking to a resource with more information about the concept. |
| `note` | **Type:** `string`**Description:** Additional information or clarification for translators. |
| `translatable` | **Type:** `boolean`**Description:** Indicates whether the concept can be translated into other languages. |
| `createdAt` | **Type:** `datetime`**Description:** Date and time when the concept was created. |
| `updatedAt` | **Type:** `datetime`**Description:** Date and time when the concept was last updated. |
### [Glossary Term Context](#glossary-term-context)
[Section titled “Glossary Term Context”](#glossary-term-context)
```json
{
"id": 301,
"text": "Cancel",
"description": "A command to stop or abort an operation.",
"language": "en",
"user": 42,
"partOfSpeech": "verb",
"status": "admitted",
"type": "abbreviation",
"gender": "neuter",
"note": "Often used in confirmation dialogs.",
"lemma": "cancel",
"url": "https://example.com/term/cancel",
"concept": 101,
"createdAt": "2027-09-16T13:48:04+00:00",
"updatedAt": "2027-09-16T13:48:04+00:00"
}
```
| | |
| -------------- | ------------------------------------------------------------------------------------------------------------------------------------------------------------------------------------------------------------------------------- |
| `id` | **Type:** `integer`**Description:** Numeric identifier of the glossary term. |
| `text` | **Type:** `string`**Description:** The term itself, in the specified language. |
| `description` | **Type:** `string`**Description:** Additional explanation or meaning of the term. |
| `language` | **Type:** `string`**Description:** Language identifier specified as a string. Use the [language codes](/developer/language-codes/), for example, `“uk”` for Ukrainian. To specify in queries, use the format: `@language:“uk”`. |
| `user` | **Type:** `integer`**Description:** Numeric identifier of the user who added the term. |
| `partOfSpeech` | **Type:** `string`**Allowed values:** `noun`, `verb`, `adj`, `pron`, `propn`, `det`, `adv`, `adp`, `cconj`, `sconj`, `num`, `intj`, `aux`, `prt`, `sym`, `x`**Description:** The grammatical category of the term. |
| `status` | **Type:** `string`**Allowed values:** `preferred`, `admitted`, `not_recommended`, `obsolete`, `draft`**Description:** Indicates the approval or usage level of the term. |
| `type` | **Type:** `string`**Allowed values:** `full_form`, `acronym`, `abbreviation`, `short_form`, `phrase`, `variant`**Description:** Classification of the term by structure or usage. |
| `gender` | **Type:** `string`**Allowed values:** `masculine`, `feminine`, `neuter`, `common`, `other`**Description:** Grammatical gender of the term, if applicable. |
| `note` | **Type:** `string`**Description:** Additional translator guidance or term-related notes. |
| `lemma` | **Type:** `string`**Description:** The base form of the term. |
| `url` | **Type:** `string`**Description:** Reference link for the term. |
| `concept` | **Type:** `integer`**Description:** ID of the concept the term belongs to. |
| `createdAt` | **Type:** `datetime`**Description:** Date and time the term was created. |
| `updatedAt` | **Type:** `datetime`**Description:** Date and time the term was last updated. |
# About Crowdin Apps
> Join the growing localization management platform! Build apps for all the teams already using Crowdin or Crowdin Enterprise to customize and extend localization experience.
3M+
Registered users
200k+
Projects
15k+
Active project owners
By creating Crowdin apps, developers can integrate existing services with Crowdin, add new features, upload and manage content.
Crowdin apps are web applications that function remotely via HTTP. To an end user, an app appears as a fully integrated part of Crowdin. Once your app is installed, its features are delivered straight to the Crowdin UI.
You can develop a Crowdin app using any of the preferred programming languages and web frameworks, and deploy it in many different ways. From massive SaaS services to static apps served right from a code repo, Crowdin apps are designed to let you connect anything to Crowdin.

## [Creating Crowdin Apps](#creating-crowdin-apps)
[Section titled “Creating Crowdin Apps”](#creating-crowdin-apps)
The development of Crowdin App starts with creating an app descriptor. The app descriptor is a JSON file that describes the interaction of the app with Crowdin. The descriptor includes general information for the app, as well as the modules that the app will be using or extending. Basically, the descriptor is a middle ground between the remote app and Crowdin. When a Crowdin account owner installs an app, what they are really doing is installing this descriptor file, which contains pointers to your app.
Read more about [App Descriptor](/developer/crowdin-apps-app-descriptor/).
The next step would be to implement the app functionality according to the app descriptor which implies the following steps:
Step 1
Event listeners implementation – the usage of webhooks which are triggered by Crowdin to perform certain actions on the app side (installation of the app, app removal, etc).
Step 2
Modules implementation – module usage in the Crowdin apps. Modules are the functional parts integrated into the apps with help of which apps extend Crowdin and interact with it.
Read more about [UI Modules](/developer/crowdin-apps-modules-ui/) and [File Processing Modules](/developer/crowdin-apps-modules-file-processing/).
Interested in developing Crowdin Apps?
Check out our [Crowdin Apps SDK](https://crowdin.github.io/app-project-module/) to create apps in just a few lines of code.
## [Using Crowdin APIs in Crowdin Apps](#using-crowdin-apis-in-crowdin-apps)
[Section titled “Using Crowdin APIs in Crowdin Apps”](#using-crowdin-apis-in-crowdin-apps)
Crowdin Apps communicate with Crowdin using our RESTful APIs. You can use the Crowdin APIs in Crowdin apps you develop for Crowdin, as well as in scripts, API clients, or other methods of making calls.
Our APIs allow you to manage Crowdin TMs, glossaries, source content (files and strings), translations, branches, etc. You can use the APIs to upload source files, export translations, as well as for user management, generating reports, and more.
[API Overview ](/developer/api/)Explore the Crowdin API documentation to learn more about the available endpoints and how to use them.
Need Help?
We support all developers who help us improve our product and add interesting developments to our community.
[Contact Support ](https://crowdin.com/contacts)
## [Using JS API in Crowdin Apps](#using-js-api-in-crowdin-apps)
[Section titled “Using JS API in Crowdin Apps”](#using-js-api-in-crowdin-apps)
For improved interaction between the Crowdin app and Crowdin, you can use our library that provides cross-window communication. The library simplifies the interaction with the Crowdin interface, allows you to get additional information from the page where the application was opened, or manipulate certain UI elements of the page directly from the application.
Read more about [Crowdin Apps JS](/developer/crowdin-apps-js/).
## [Publishing Your App](#publishing-your-app)
[Section titled “Publishing Your App”](#publishing-your-app)
After creating and testing your app, the next thing you need to do is to publish it into the cloud or any public server so that it’s always accessible to Crowdin and other users.
Read more about [Publishing Your App](/developer/crowdin-apps-publishing/).
When you’re ready to share your app you can submit your app to the [Crowdin Store](https://store.crowdin.com). This allows other users to install and run your app(s).
## [Examples of Crowdin Apps](#examples-of-crowdin-apps)
[Section titled “Examples of Crowdin Apps”](#examples-of-crowdin-apps)
Before you start developing your own Crowdin apps, you can take a look at a few examples. They showcase the integration between Crowdin Enterprise and external services like Mailchimp and SendGrid. Read more about [Crowdin Mailchimp Example](https://github.com/crowdin-community/crowdin-mailchimp-example) and [Crowdin SendGrid Example](https://github.com/crowdin-community/crowdin-sendgrid-example).
## [Assistance from Our Team](#assistance-from-our-team)
[Section titled “Assistance from Our Team”](#assistance-from-our-team)
Our team is ready to help you with the technical implementation of your app. Once your app is ready we’ll discuss how we can help you with exposure to our customers. For any guidance from our team contact us at [](mailto:support@crowdin.com).
## [Case Study](#case-study)
[Section titled “Case Study”](#case-study)
[Play](https://youtube.com/watch?v=V1tS-GeriIA)
# App Descriptor
> Learn how to define the app descriptor
The app descriptor is one of the essential building blocks of Crowdin apps. The app descriptor is a JSON file (for example, `manifest.json`) that includes general information for the app, as well as the modules that the app wants to operate with or extend.
It describes how the application will work, what resources will be used, etc.
Interested in developing Crowdin Apps?
Check out our [Crowdin Apps SDK](https://crowdin.github.io/app-project-module/) to create apps in just a few lines of code.
## [App Descriptor Structure](#app-descriptor-structure)
[Section titled “App Descriptor Structure”](#app-descriptor-structure)
The app descriptor is a JSON object with the following structure:
manifest.json
```json
{
"identifier": "your-application-identifier",
"name": "Your Application",
"description": "Application description",
"logo": "/assets/logos/app-logo.png",
"baseUrl": "http://example.com",
"authentication": {
"type": "crowdin_app",
"clientId": "your-client-id"
},
"events": {
"installed": "/hooks/installed"
},
"scopes": [
"project"
],
"modules": {
"project-integrations": [
{
"key": "your-module-key",
"name": "Module Name",
"description": "Module description",
"logo": "/assets/logos/module-logo.png",
"url": "/page/integration",
"environments": [
"crowdin", "crowdin-enterprise"
]
}
]
}
}
```
| Property | Description |
| ---------------- | --------------------------------------------------------------------------------------------------------------------------------------------------------------------------------------------------------------------------------------------------------------------------------------------------------------------------------------------------------------------------------------------------------------------------------------------------------------------------------------------------------------------------------------------------------------------------------------------------------------------------------------------------- |
| `identifier` | **Type:** `string` (`^[a-z0-9-._]+$`)**Required:** yes**Description:** A unique key to identify the app. This identifier must be <= 255 characters.CautionDon’t use uppercase in the app identifier. |
| `name` | **Type:** `string`**Required:** yes**Description:** The human-readable name of the app. |
| `baseUrl` | **Type:** `string` (`uri`)**Required:** yes**Description:** The base URL of the remote app, which is used for all communications back to the app instance. Once the app is installed in a workspace, the app’s baseUrl can’t be changed without uninstalling the app beforehand.**This is important:** choose your baseUrl wisely before making your app public. The baseUrl must start with `https://` to ensure that all data is sent securely between our cloud instances and your app.NoteEach app must have a unique `baseUrl`. If you would like to serve multiple apps from the same host, consider adding a path prefix into the `baseUrl`. |
| `authentication` | **Type:** `Authentication`**Required:** yes**Description:** Specifies the authentication type to use when signing requests between the host application and the Crowdin app. |
| `description` | **Type:** `string`**Description:** The human-readable description of what the app does. The description will be visible in the Crowdin UI. |
| `logo` | **Type:** `string` (`relativeUri`)**Description:** The image URL relative to the app’s base URL which will be displayed in the Crowdin UI. |
| `events` | **Type:** `Events`**Description:** Allow the app to register for app event notifications. |
| `scopes` | **Type:** \[`string`, … ]**Description:** Set of [scopes](/developer/understanding-scopes/) requested by this app.```json
"scopes": [
"project",
"tm"
]
``` |
| `modules` | **Type:** `object`**Description:** The list of modules this app provides. |
| `environments` | **Type:** \[`string`, … ]**Allowed values:** `crowdin`, `crowdin-enterprise`**Description:** Set of environments where a module could be installed.```json
"environments": [
"crowdin-enterprise"
]
``` |
## [Authentication](#authentication)
[Section titled “Authentication”](#authentication)
Specifies the authentication type to use when signing requests from the host application to the Crowdin app. Crowdin Apps support two types of authentication:
* using OAuth app (`crowdin_app` value)
* without OAuth app (`none` value)
In case your Crowdin app requires access to Crowdin API at any time, it’s recommended to use the `crowdin_app`, in other cases feel free to use the `none`. The authentication type `none` grants access to Crowdin API as well as the `crowdin_app`, but only when the Crowdin app is executed on the user side, for example, when the iframe opens.
Example:
manifest.json
```json
{
"authentication": {
"type": "crowdin_app",
"clientId": "your-client-id"
}
}
```
| Property | Description |
| ---------- | ------------------------------------------------------------------------------------------------------------------------------------- |
| `type` | **Type:** `string`**Defaults to:** `none`**Allowed values:** `none`, `crowdin_app`**Description:** The type of authentication to use. |
| `clientId` | **Type:** `string`**Description:** OAuth client id for authorization via the `crowdin_app` type. |
## [Modules](#modules)
[Section titled “Modules”](#modules)
Modules are how apps extend Crowdin and interact with it. Using modules your app can do the following things:
* Extend the Crowdin UI.
* Create integrations with external services.
* Add support for new custom file formats.
* Customize processing for supported file formats.
Read more about [UI Modules](/developer/crowdin-apps-modules-ui/) and [File Processing Modules](/developer/crowdin-apps-modules-file-processing/).
## [Events](#events)
[Section titled “Events”](#events)
Allow an app to register callbacks for events that occur in the workspace. When an event is fired, a POST request will be made to the appropriate URL registered for the event. The installed callback is an integral part of the installation process of an app, whereas the remaining events are essentially webhooks. Each property within this object is a URL relative to the app’s base URL.
Example:
manifest.json
```json
{
"events": {
"installed": "/hook/installed",
"uninstall": "/hook/uninstall"
}
}
```
| Property | Description |
| ----------- | ----------------------------------------------------------------------------------------------------------------------------------------------------------------------------------------------------------------- |
| `installed` | **Type:** `string`**Description:** The event that is sent to an app after a user installed the app in Crowdin.This event is required if you use `crowdin_app`. Read more about [Authentication](#authentication). |
| `uninstall` | **Type:** `string`**Description:** The event that is sent to an app before the app uninstallation from Crowdin. |
### [Installed Event Payload](#installed-event-payload)
[Section titled “Installed Event Payload”](#installed-event-payload)
The Installed event is sent from Crowdin to the remote app when a user installs the app in Crowdin. The Installed event contains the information about the Crowdin workspace or profile the Crowdin App was installed to, the information about the app itself, as well as the credentials to fetch an API token.
Read more about [Installed Event Flow](/developer/crowdin-apps-installation/#installed-event-communication-flow).
Payload example:
```json
{
"appId": "your-application-identifier",
"appSecret": "dbfg....asdffgg",
"clientId": "your-client-id",
"userId": 1,
"organizationId": 1,
"domain": null,
"baseUrl": "https://crowdin.com"
}
```
```json
{
"appId": "your-application-identifier",
"appSecret": "dbfg....asdffgg",
"clientId": "your-client-id",
"userId": 1,
"organizationId": 1,
"domain": "{domain}",
"baseUrl": "https://{domain}.crowdin.com"
}
```
Properties:
| Property | Description |
| ---------------- | ------------------------------------------------------------------------------------------------------------------------------------------------------------------------------------ |
| `appId` | **Type:** `string`**Description:** The identifier of the app that is declared in the app descriptor file. |
| `appSecret` | **Type:** `string`**Description:** The unique secret used for authorization of your Crowdin app. |
| `clientId` | **Type:** `string`**Description:** The OAuth client identifier that is declared in the app descriptor file. |
| `userId` | **Type:** `integer`**Description:** The numeric identifier of the user that installed the app in Crowdin Enterprise. |
| `organizationId` | **Type:** `integer`**Description:** The numeric identifier of the organization the app was installed to. |
| `domain` | **Type:** `string`**Description:** The name of the organization in Crowdin Enterprise the app was installed to. For Crowdin the domain value is always null |
| `baseUrl` | **Type:** `string`**Description:** The `baseUrl` of the organization in Crowdin Enterprise the app was installed to. For Crowdin the `baseUrl` value is always `https://crowdin.com` |
### [Uninstall Event Payload](#uninstall-event-payload)
[Section titled “Uninstall Event Payload”](#uninstall-event-payload)
The uninstall event is sent from Crowdin Enterprise to the remote Crowdin app when a user uninstalls the app from Crowdin Enterprise. The Uninstall event, like the install event, contains the information about the Crowdin workspace or account the Crowdin App was installed to, and the information about the app itself. After receiving the uninstall event, it’s necessary to find and remove all of the data related to the Crowdin workspace or account the app is removed from.
Payload example:
```json
{
"appId": "your-application-identifier",
"clientId": "your-client-id",
"organizationId": 1,
"domain": null,
"baseUrl": "https://crowdin.com"
}
```
```json
{
"appId": "your-application-identifier",
"clientId": "your-client-id",
"organizationId": 1,
"domain": "{domain}",
"baseUrl": "https://{domain}.crowdin.com"
}
```
Properties:
| Property | Description |
| ---------------- | ---------------------------------------------------------------------------------------------------------------------------------------------------------------------------------- |
| `appId` | **Type:** `string`**Description:** The identifier of the app that is declared in the app descriptor file. |
| `clientId` | **Type:** `string`**Description:** The OAuth client identifier that is declared in the app descriptor file. |
| `organizationId` | **Type:** `integer`**Description:** The numeric identifier of the organization the app uninstalled from. |
| `domain` | **Type:** `string`**Description:** The name of the organization in Crowdin Enterprise the app uninstalled from. For Crowdin the domain value is always null |
| `baseUrl` | **Type:** `string`**Description:** The baseUrl of the organization in Crowdin Enterprise the app uninstalled from. For Crowdin the `baseUrl` value is always `https://crowdin.com` |
# App Installation
> Learn how to install and configure Crowdin Apps from the Crowdin Store or manually
You can install Crowdin Apps either from the [Crowdin Store](https://store.crowdin.com) or manually, depending on whether the app is already published or not.
## [Installation in Crowdin](#installation-in-crowdin)
[Section titled “Installation in Crowdin”](#installation-in-crowdin)
To install the app that is already published on the Crowdin Store, follow these steps:
1. Open your profile home page and select **Store** on the left sidebar.
2. Click **Install** on the needed app. 
3. In the appeared dialog, configure preferred permissions and click **Install**.
To install a private app, follow these steps:
1. Go to **Account Settings > Apps** and click **Install Private App**.
2. In the appeared dialog, paste in the Crowdin app Manifest URL and click **Install**.
3. In the **Install Application** dialog, configure preferred permissions and click **Install**.
## [Installation in Crowdin Enterprise](#installation-in-crowdin-enterprise)
[Section titled “Installation in Crowdin Enterprise”](#installation-in-crowdin-enterprise)
To install the app that is already published on the Crowdin Store, follow these steps:
1. Open your organization’s **Workspace** and select **Store** on the left sidebar.
2. Click **Install** on the needed app. 
3. In the appeared dialog, configure preferred permissions and click **Install**.
To install a private app, follow these steps:
1. Go to **Organization Settings > Apps** and click **Install Private App**.
2. In the appeared dialog, paste in the Crowdin app Manifest URL and click **Install**.
3. In the **Install Application** dialog, configure preferred permissions and click **Install**.
## [Crowdin Apps Permission Configuration](#crowdin-apps-permission-configuration)
[Section titled “Crowdin Apps Permission Configuration”](#crowdin-apps-permission-configuration)
Configure preferred permissions for each app during the installation process. This step allows you to define who can access and use the app across its various modules and specifying in which projects of your Crowdin account (for Crowdin) or Crowdin organization (for Crowdin Enterprise) it can be used.
If you restrict access to certain projects by using the **Selected projects** option, the app will not be able to communicate via the API with projects that are not included in the selected list. Also, the app will only be displayed in the UI of the selected projects. This ensures that the app’s functionality and access are precisely tailored to the specific needs and security requirements of your organization.
You can configure these access permissions at the time of installation or adjust them at any time for already installed apps. This flexibility allows you to respond to changes in your project requirements or security policies by updating the access settings to either expand or restrict the app’s functionality and visibility within your Crowdin projects.
### [User Access Categories](#user-access-categories)
[Section titled “User Access Categories”](#user-access-categories)
You can define which user categories are allowed to use the app. This setting is applied to each app module independently.
Available options for Crowdin:
* Only me (i.e., project owner)
* Me, project managers and developers
* All project members
* Custom Access (selected users)
* Guests (unauthenticated users)

Note
Project owner will always have access to all modules of the app.
Available options for Crowdin Enterprise:
* Only organization admins
* Organization admins, project managers and developers
* All project members
* Custom Access (selected users)
* Guests (unauthenticated users)

Note
Organization owner will always have access to all modules of the app.
### [Project Access Configuration](#project-access-configuration)
[Section titled “Project Access Configuration”](#project-access-configuration)
In addition to user access, you can also specify the projects in which the app can be used (these settings apply across all app modules).
Project access options:
* Projects you own (for Crowdin) or All projects (for Crowdin Enterprise)
* Selected projects
This targeted approach allows for enhanced security and customization, ensuring that the app is only used where it’s really needed.
## [Installed Event Communication Flow](#installed-event-communication-flow)
[Section titled “Installed Event Communication Flow”](#installed-event-communication-flow)
When a Crowdin App is installed in the Account Settings the authorization flow takes place during which Crowdin and Crowdin App exchange the authorization data (the authorization code is being exchanged for an access token). In the following illustration, you can see the events that take place during this process.

Note
Installed Event is used only for `authorization.type: "crowdin_app"`.
Let’s examine in detail each step that happens in the illustration:
1. Installation of the Manifest URL - the user pastes in the Manifest URL in the *Account Settings* > *Crowdin Applications* and clicks **Install**.
2. Fetching content from the Manifest URL - the request is sent to Crowdin App.
3. Response: manifest JSON - Crowdin App returns the Manifest JSON that contains the data about the app.
4. Manifest Data Validation - the received content is validated according to the structure and data of the Manifest JSON.
5. Prompt to install - the information about the Crowdin App, as well as the list of permissions and the **Install** button is displayed to the user.
6. Confirmation of the installation - the user confirms the installation of the Crowdin App.
7. The Installed event - Crowdin sends the Installed event with the authorization code to the Crowdin App for API token generation.
8. Token request - Crowdin App sends the request for API token acquiring:
```plaintext
POST https://accounts.crowdin.com/oauth/token
```
9. Access Token - authorization service returns the API access token and the refresh token.
10. Success Code Response - Crowdin App returns the success status code (2xx) which confirms that the application installation was successfully finished. In case the status code is different, the application will be removed from the Crowdin account.
**Token request parameters (step 8):**
| | |
| ------------------------- | ------------------------------------------------------------------------------------------------------------------------------------------------------------------------ |
| `grant_type: crowdin_app` | **Type:** `string`**Required:** yes**Description:** The parameter is used for the flow specification of an OAuth app. |
| `client_id` | **Type:** `string`**Required:** yes**Description:** Client ID for the app is received when the app is registered. |
| `client_secret` | **Type:** `string`**Required:** yes**Description:** Client Secret for the app is received when the app is registered. |
| `app_id` | **Type:** `string`**Required:** yes**Description:** Crowdin app identifier from the app descriptor. |
| `app_secret` | **Type:** `string`**Required:** yes**Description:** The unique secret used for authorization of your Crowdin app. This value is retrieved from the installed event. |
| `domain` | **Type:** `string\|null`**Required:** yes**Description:** The name of the organization from which the app is accessed. This value is retrieved from the installed event. |
| `user_id` | **Type:** `integer`**Required:** yes**Description:** The identifier of the user who installed the app. This value is retrieved from the installed event. |
# Crowdin Apps JS
> Utilize the Crowdin Apps JS library to interact with Crowdin
The Crowdin Apps JS is a JavaScript library that enables communication between your app and the Crowdin UI. Since all Crowdin Apps run inside a sandboxed `