HTML preview of the file
| Key: | Text: |
|---|---|
| Key 1 | Source Text 1 |
| Key 2 | Source Text 2 |
Error rendering preview for ${fileName}
`; } } /** * Translates the file content * @param fileContent The file content * @param translations Translations * @param languageId The language ID * @returns Translated file content */ function translateFileContent( fileContent: RecordFile Preview: {fileName}
{Object.keys(strings).length > 0 ? (- {Object.entries(strings).map(([key, value]) => (
- {key}: {value.text} ))}
No strings to display.
)} ); }; export default FilePreview; ``` These helpers let your app: * Read the uploaded file’s content * Find the right translations for export * Generate an inline preview using React * Return a static HTML preview to display inside Crowdin In the next step, you’ll optionally add support for large file handling using blob storage. ### [Handling Large Files with Blob Storage](#handling-large-files-with-blob-storage) [Section titled “Handling Large Files with Blob Storage”](#handling-large-files-with-blob-storage) If the processed file data (either strings or preview HTML) exceeds Crowdin’s inline payload size limit (around 5 MB), your app should upload the content to a temporary location and return a download link instead. First, add the Vercel Blob Storage token to your environment variables: .env.local ```ini # Vercel Blob Storage token (for handling large files) BLOB_READ_WRITE_TOKEN=Hello World!` => `\Hello World!` => `\Hello World!
` * If the order is reversed, with the tag verification module running first, the output will be: * `Hello World!` => `Hello World!
` => `\Hello World!\<\/h1\>` Caution When multiple file-processing modules of the same type (e.g., `file-post-export`) share identical order value, unexpected behavior may occur. In such cases, the system selects which module to execute first based on the installation date of file-processing apps, potentially disrupting the intended processing sequence. Therefore, it is recommended to adjust the identical order values to ensure that files are processed in the desired sequence. ### [Editing File Processor settings](#editing-file-processor-settings) [Section titled “Editing File Processor settings”](#editing-file-processor-settings) To Edit the File Processor settings, follow these steps: 1. Open your project and go to **Settings > File Processors**. 2. Click toward the needed processor and select **Edit**. 3. Make the necessary changes and click **Submit**. The processor settings may vary depending on the processor you are using.
# Glossary Settings
> Configure and manage glossaries for your project
With a glossary, you can create, store, and manage all the project terminology in one place. The main aim of terminology is to explain some specific terms or the ones often used in the project to be translated properly and consistently. Read more about [Glossary](/enterprise/glossary/). ## [Assigning Glossary](#assigning-glossary) [Section titled “Assigning Glossary”](#assigning-glossary) To assign a glossary to your project, in the **Glossaries** section, select the needed glossaries from the list. 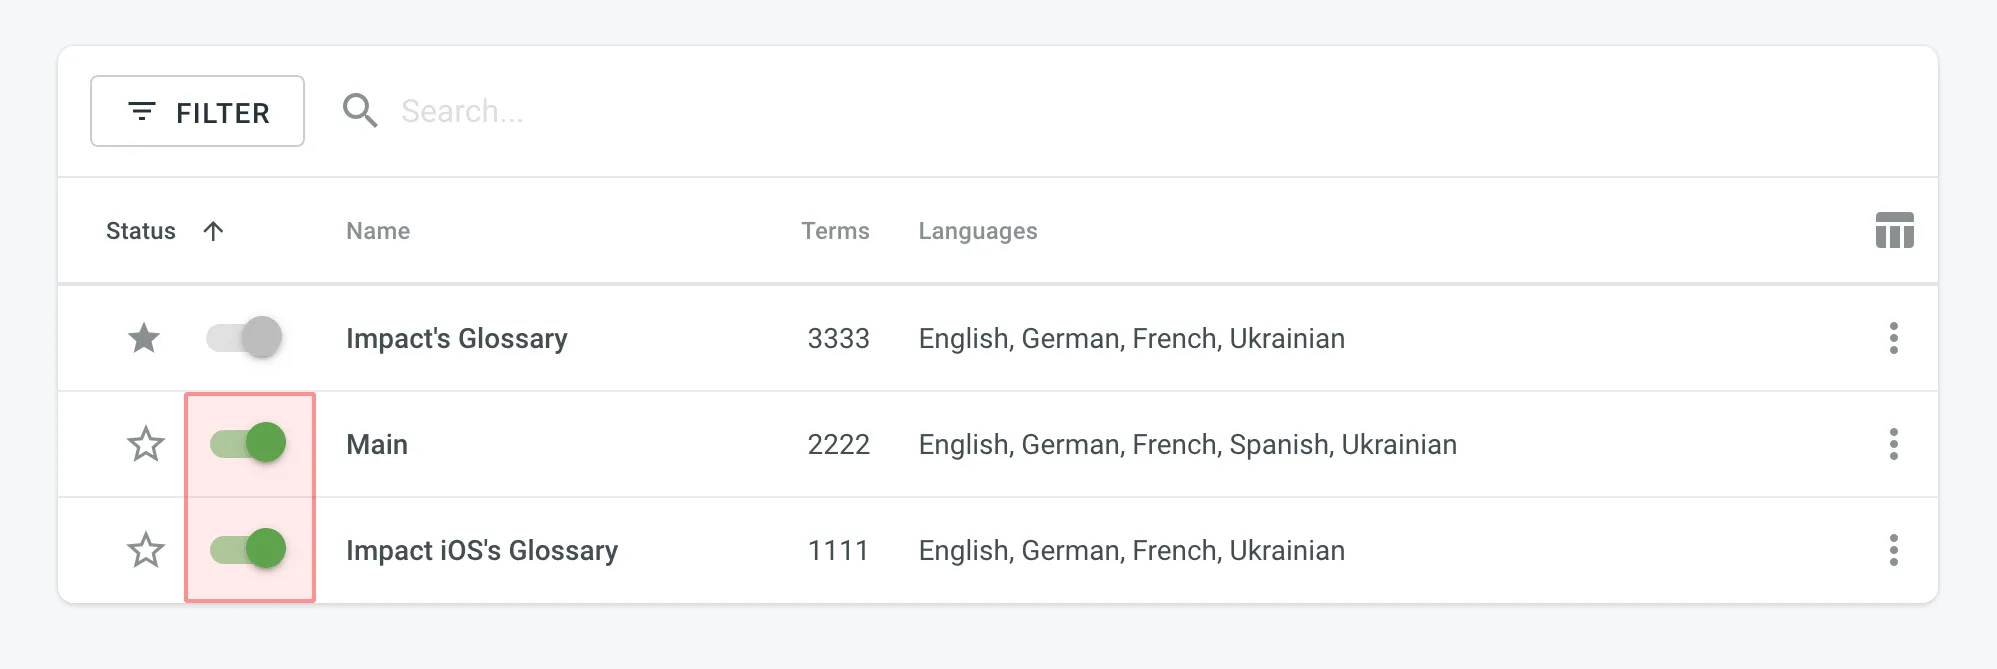 ## [Changing Default Glossary](#changing-default-glossary) [Section titled “Changing Default Glossary”](#changing-default-glossary) To change your project’s default glossary, in the **Glossaries** section, click the icon next to the needed glossary in the list.
# Import Settings
> Configure how placeholders, duplicates, and word counts are handled
In the **Import** section of the Project Settings, you can configure how Crowdin should handle placeholders, duplicate strings, and word counts in your project. ## [Source Strings](#source-strings) [Section titled “Source Strings”](#source-strings) Improve the translation consistency and streamline your workflow by unifying placeholders and handling duplicate strings. ### [Unify Placeholders](#unify-placeholders) [Section titled “Unify Placeholders”](#unify-placeholders) Enable the transformation of the placeholders to the unified format to improve the work with TM suggestions. On export, the placeholders in translations are transformed back to the original format. If your project contains iOS strings, iOS XLIFF, and Android XML files, you can enable the **Unify placeholders** option, and the system will transform placeholders into a unified look. For example, Crowdin Enterprise will make the Android string `Hello, %s!`, and the iOS string `Hello, %@!` look in the Editor this way: `Hello, [%s]!`. This option is beneficial when you work with TM since TM suggestions from iOS strings, iOS XLIFF, and Android XML will be completely interchangeable. Crowdin Enterprise will transform the translation placeholders back to the original format on export. This option only applies to iOS strings, iOS XLIFF, and Android XML formats. ### [Duplicate Strings](#duplicate-strings) [Section titled “Duplicate Strings”](#duplicate-strings) You can save time by translating all duplicates with the same translation and hiding these instances from translators. This can affect accuracy. Crowdin’s localization process is based on translating source strings to the defined target languages. Source strings are uploaded to the system in localization files. Each unique source string first uploaded or added (for CSV and other formats supporting [string editing](/enterprise/string-management/#string-editing)) in Crowdin is considered a master string. All other strings that are identical to the master string but were uploaded or created later are considered duplicate strings. #### [Duplicate Strings Management](#duplicate-strings-management) [Section titled “Duplicate Strings Management”](#duplicate-strings-management) If your project contains duplicated strings, you can choose how the system should treat them using the following options: * **Show** – translators will translate each instance (string) separately. Duplicate strings won’t be hidden. * **Show, but auto-translate them** – duplicate strings will be automatically translated but remain visible to translators. Once the master string is translated, its translation is automatically shared with all duplicates. Translators can review and re-translate each duplicate with their own translation as needed. If a unique translation is provided for a specific duplicate, it will override the shared translation for that string alone, allowing for precise context-specific translations without affecting the other duplicates. If a translator removes a duplicate’s unique translation, it will be automatically translated with a translation from a master string. * **Show within a version branch (regular detection)** – duplicates will be hidden only between [version branches](/enterprise/version-management/). * **Show within a version branch (strict detection)** – duplicates will be hidden only between version branches. * **Hide (regular detection)** – all duplicates will share the same translation. * **Hide (strict detection)** – all duplicates will share the same translation. Regular duplicate detection – when comparing strings, Crowdin considers only source texts. Strict duplicate detection – when comparing strings, Crowdin considers both string identifiers (keys) and source texts. #### [Show all duplicates](#show-all-duplicates) [Section titled “Show all duplicates”](#show-all-duplicates) When this option is selected, all duplicate strings will be visible to translators. Each duplicate will require a separate translation. 💡 **Use case**: works perfectly for projects where the same words might have various meanings depending on the context. #### [Show, but auto-translate duplicates](#show-but-auto-translate-duplicates) [Section titled “Show, but auto-translate duplicates”](#show-but-auto-translate-duplicates) When this option is selected, all duplicate strings are shown and automatically translated. Once the master string is translated, its translation is automatically shared among all duplicates. This allows translators to review and re-translate duplicate strings if necessary. 💡 **Use case**: works excellently if you want to save time but still require automatic translations to be reviewed. To better illustrate how the **Show, but auto-translate them** option works, consider the following five-string JSON file: two strings are unique, and three strings have identical source text. ```json { "hello": "Hello", "welcome": "Welcome!", "save1": "Save", "save2": "Save", "save3": "Save" } ``` Upon importing this file, the system marks the first of these identical strings (`"save1": "Save"`) as the master string with the “Master” marking, while the subsequent two identical strings (`"save2": "Save"` and `"save3": "Save"`) are labeled as duplicates of this master string with the “Duplicate” marking. Once you set the Duplicate strings option to **Show, but auto-translate them**, the system keeps all five strings visible to translators and for the master string and its two duplicates, automatic translation propagation is enabled. This means that translations are automatically shared from the master string to its duplicates. Let’s consider the following scenarios: * *Master string is translated first* – the system immediately propagates the translation of the master string to its duplicates. As a result, all three identical strings (the master string and its two duplicates) are displayed with translations. However, translators can review and re-translate each duplicate with their own translation as needed. If a unique translation is provided for a specific duplicate, it will override the shared translation for that string alone, allowing for precise context-specific translations without affecting the other duplicates. If a translator removes a duplicate’s unique translation, it will be automatically translated with a translation from a master string. * *One of the duplicates is translated first* – the system does not propagate the translation of the duplicate to the master string or the other duplicate. Consequently, one duplicate string is displayed with a translation, while the master string and the other duplicate remain untranslated. #### [Show within a version branch. Duplicates will be hidden only between version branches](#show-within-a-version-branch-duplicates-will-be-hidden-only-between-version-branches) [Section titled “Show within a version branch. Duplicates will be hidden only between version branches”](#show-within-a-version-branch-duplicates-will-be-hidden-only-between-version-branches) When this option is selected, only the master strings that were originally uploaded to the system will be available for translation. All duplicate strings will automatically get the translations of the original strings and will be hidden in all version branches. This option is available in two versions: regular duplicate detection, strict duplicate detection. If your source files contain strings with apparent identifiers (keys), it’s better to use a *strict* version of this option. In other cases, feel free to use a *regular* one. Here are a few things to keep in mind: * The system always checks the path to the string throughout the branches. For example, even if the strings are the same in different version branches (`branch1` and `branch2`), but their paths are different (branch1 - `/localization/android.xml` and branch2 - `/localization/apps/android.xml`), they won’t be recognized as duplicates. * This option works only for the strings located in the files that have the same format. For example, if there is the same string in `android.xml` and `ios.strings` files, it won’t be recognized as a duplicate. 💡 **Use case**: works perfectly for continuous projects with various version branches. Allows translators to work with unique strings in separate branches. #### [Hide all duplicates](#hide-all-duplicates) [Section titled “Hide all duplicates”](#hide-all-duplicates) When this option is selected, the system spots the duplicate strings in all files. Only the master strings that were originally uploaded are visible and should be translated. The hidden duplicate strings will automatically share the translations from the corresponding master strings. This option is available in two versions: regular duplicate detection, strict duplicate detection. If your source files contain strings with apparent identifiers (keys), it’s better to use a *strict* version of this option. In other cases, feel free to use a *regular* one. 💡 **Use case**: works great for projects with narrow scopes where all duplicates share the same context. ## [Word count](#word-count) [Section titled “Word count”](#word-count) You can set the preferred way Crowdin Enterprise should count words in your project. Specifically, it applies to whether HTML tags should be counted as regular words or not. By default, Crowdin Enterprise considers HTML tags as regular words for most of the supported formats, excluding the following ones: HTML, Front Matter HTML, HAML, MD, Front Matter MD, XML, WEBXML, IDML, XLIFF, XLIFF 2.0, ADOC, DOCX, DITA. * **Auto (default)** – HTML tags will be counted as regular words or skipped depending on the source file format. * **Count tags** – all HTML tags will be counted as regular words. * **Skip tags** – all HTML tags won’t be counted. More information about Crowdin [Word Counter](/enterprise/word-counter/). ## [Assign custom placeholder](#assign-custom-placeholder) [Section titled “Assign custom placeholder”](#assign-custom-placeholder) To assign the created custom placeholder to a project, follow these steps: 1. Open your project and go to **Settings > Import**. 2. Click **Assign Custom placeholder**. 3. In the appeared dialog, select a placeholder from the **Placeholder** drop-down list and specify the desired order of placeholder execution (useful when you’d like to use multiple custom placeholders within one project), select whether you’d like your custom placeholders to be executed before the default placeholders, whether to allow your project participants to save translations without a placeholder, assign to all or specified formats. 4. Click **Save**. 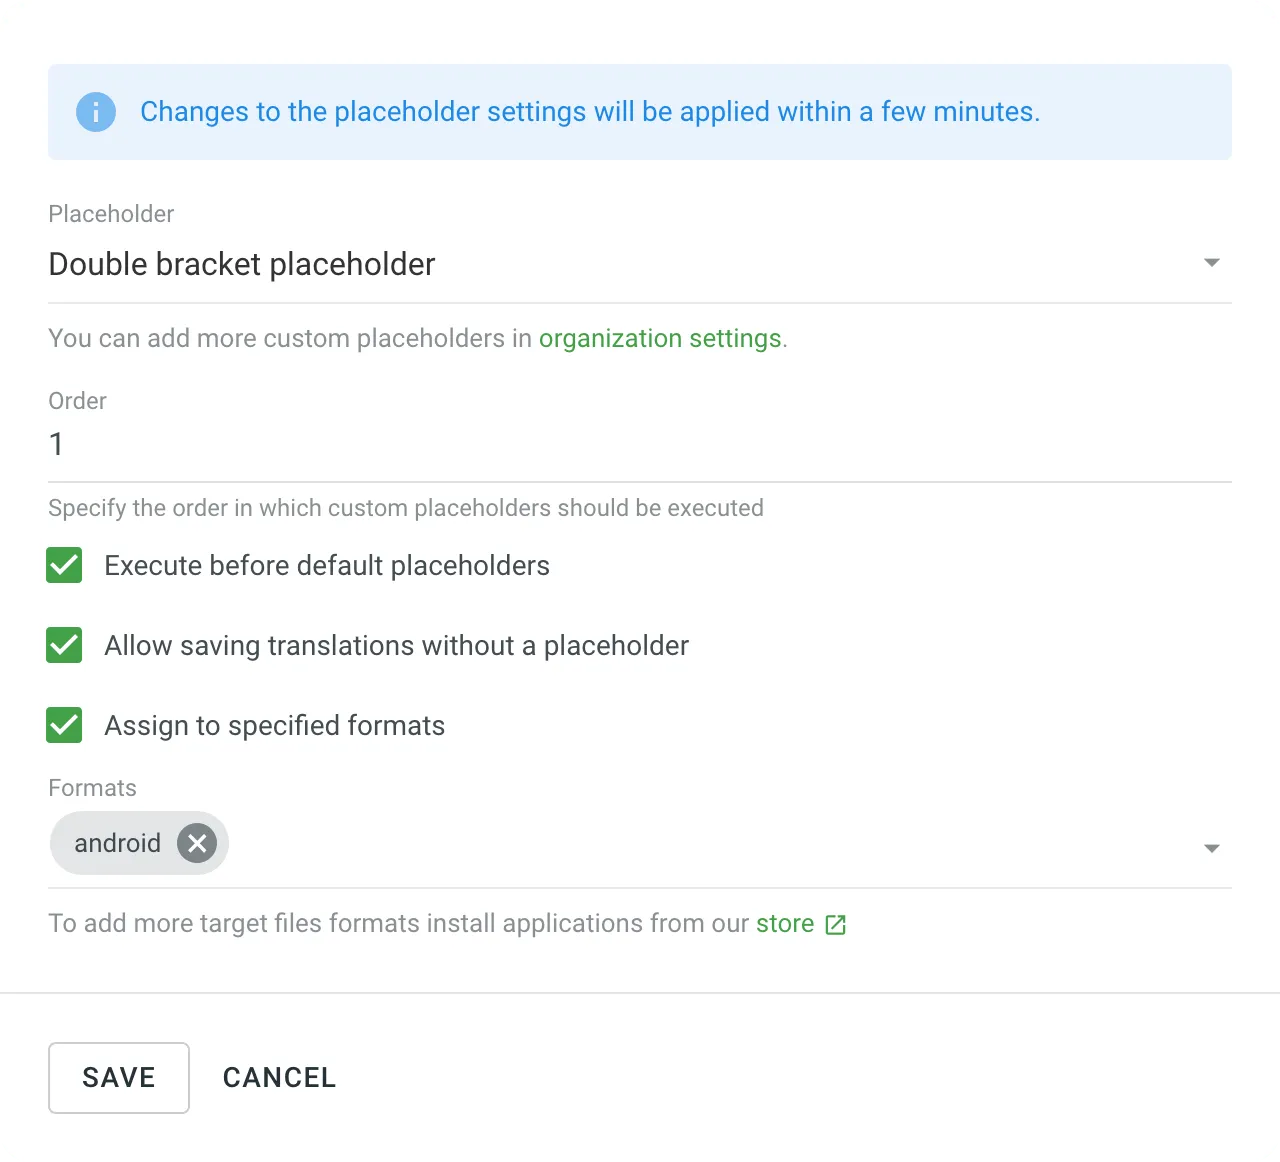 Read more about [Custom Placeholders](/enterprise/custom-placeholders/).
# Label Settings
> Use labels in your project to easily organize your resources
Use labels in your project to easily organize resources (e.g., screenshots, strings, etc.) by specific topics. Once you add labels, you can filter items by those labels. If you already use labels for your source strings, you can use the same labels for screenshots. ## [Managing Project Labels](#managing-project-labels) [Section titled “Managing Project Labels”](#managing-project-labels) To create, edit, or remove project labels, follow these steps: 1. Open your project **Settings** and navigate to the **Labels** section. 2. In the appeared screen, add new labels and edit or remove existing ones. 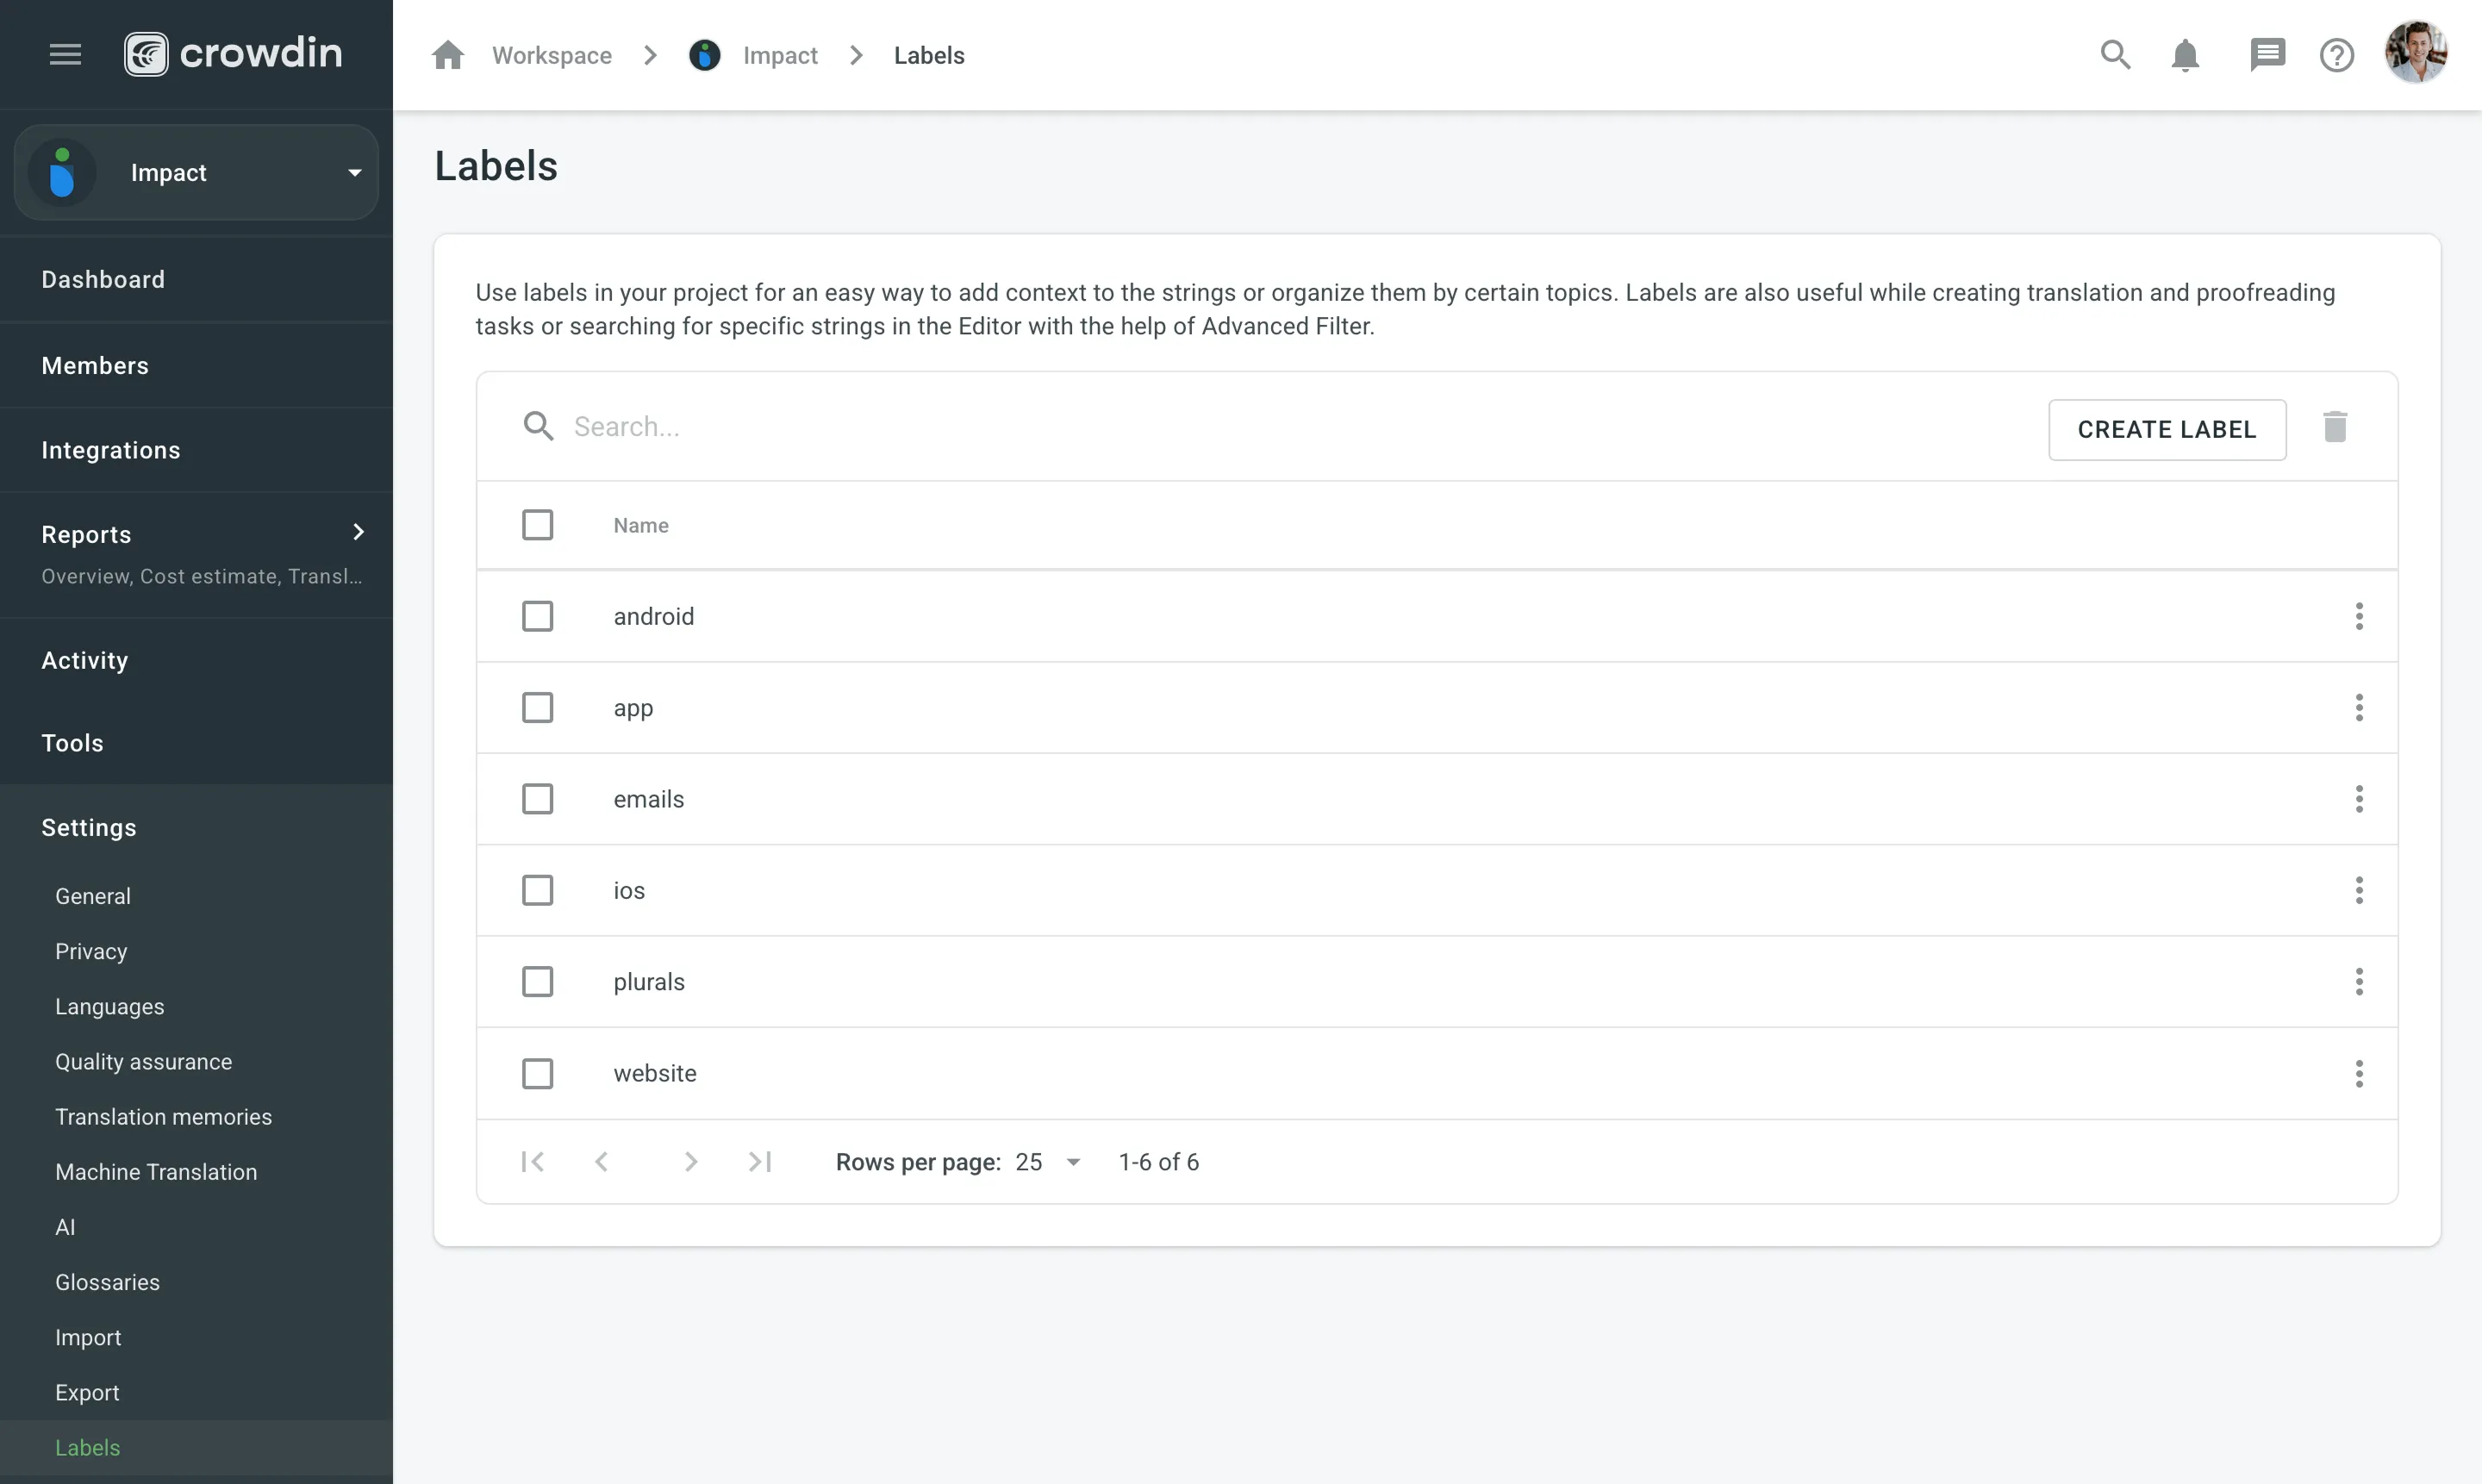 To edit or remove a label, click (or right-click) on the label you want to edit or remove and select the appropriate action. Use the **Search** field above the label list to quickly find specific labels. Caution Labels are case insensitive (e.g., `Label` and `label` are treated as identical). ## [See Also](#see-also) [Section titled “See Also”](#see-also) [Adding Labels to Strings ](/enterprise/string-management/#labels) [Adding Labels to Screenshots ](/enterprise/screenshots/#labels)
# Language Settings
> Manage your project source and target languages
In the **Languages** section, you can manage your project source and target languages and configure language mapping to use custom language codes. ## [Source Language](#source-language) [Section titled “Source Language”](#source-language) The source language is the language you’re translating from. If you want to change the source language for your project, select a new language from the drop-down list and click **Save**. Here are a few points you should be aware of when changing the project’s source language: * Please note that there might be a plural form mismatch for imported strings depending on the new source language. For example, some plural forms might not be displayed in the Editor, or some plural form translations might be used in other ones on translation export. We recommend updating the source files if the new source language has different plural forms than the initial one. * If you had an opened browser tab with the Editor during the source language update, you might need to refresh it for changes to take effect and continue translating from the new source language. ## [Target Languages](#target-languages) [Section titled “Target Languages”](#target-languages) The **Target Languages** section allows you to add or remove target languages in your project. You can update your target languages anytime. To add or remove target languages in your project, follow these steps: 1. Open your project and go to **Settings > Languages**. 2. In the **Target Languages** section, you can make the following changes: * Select the languages you want to add to the project in the left panel. * Click on the languages you want to remove from the project in the right panel. 3. Click **Update**. 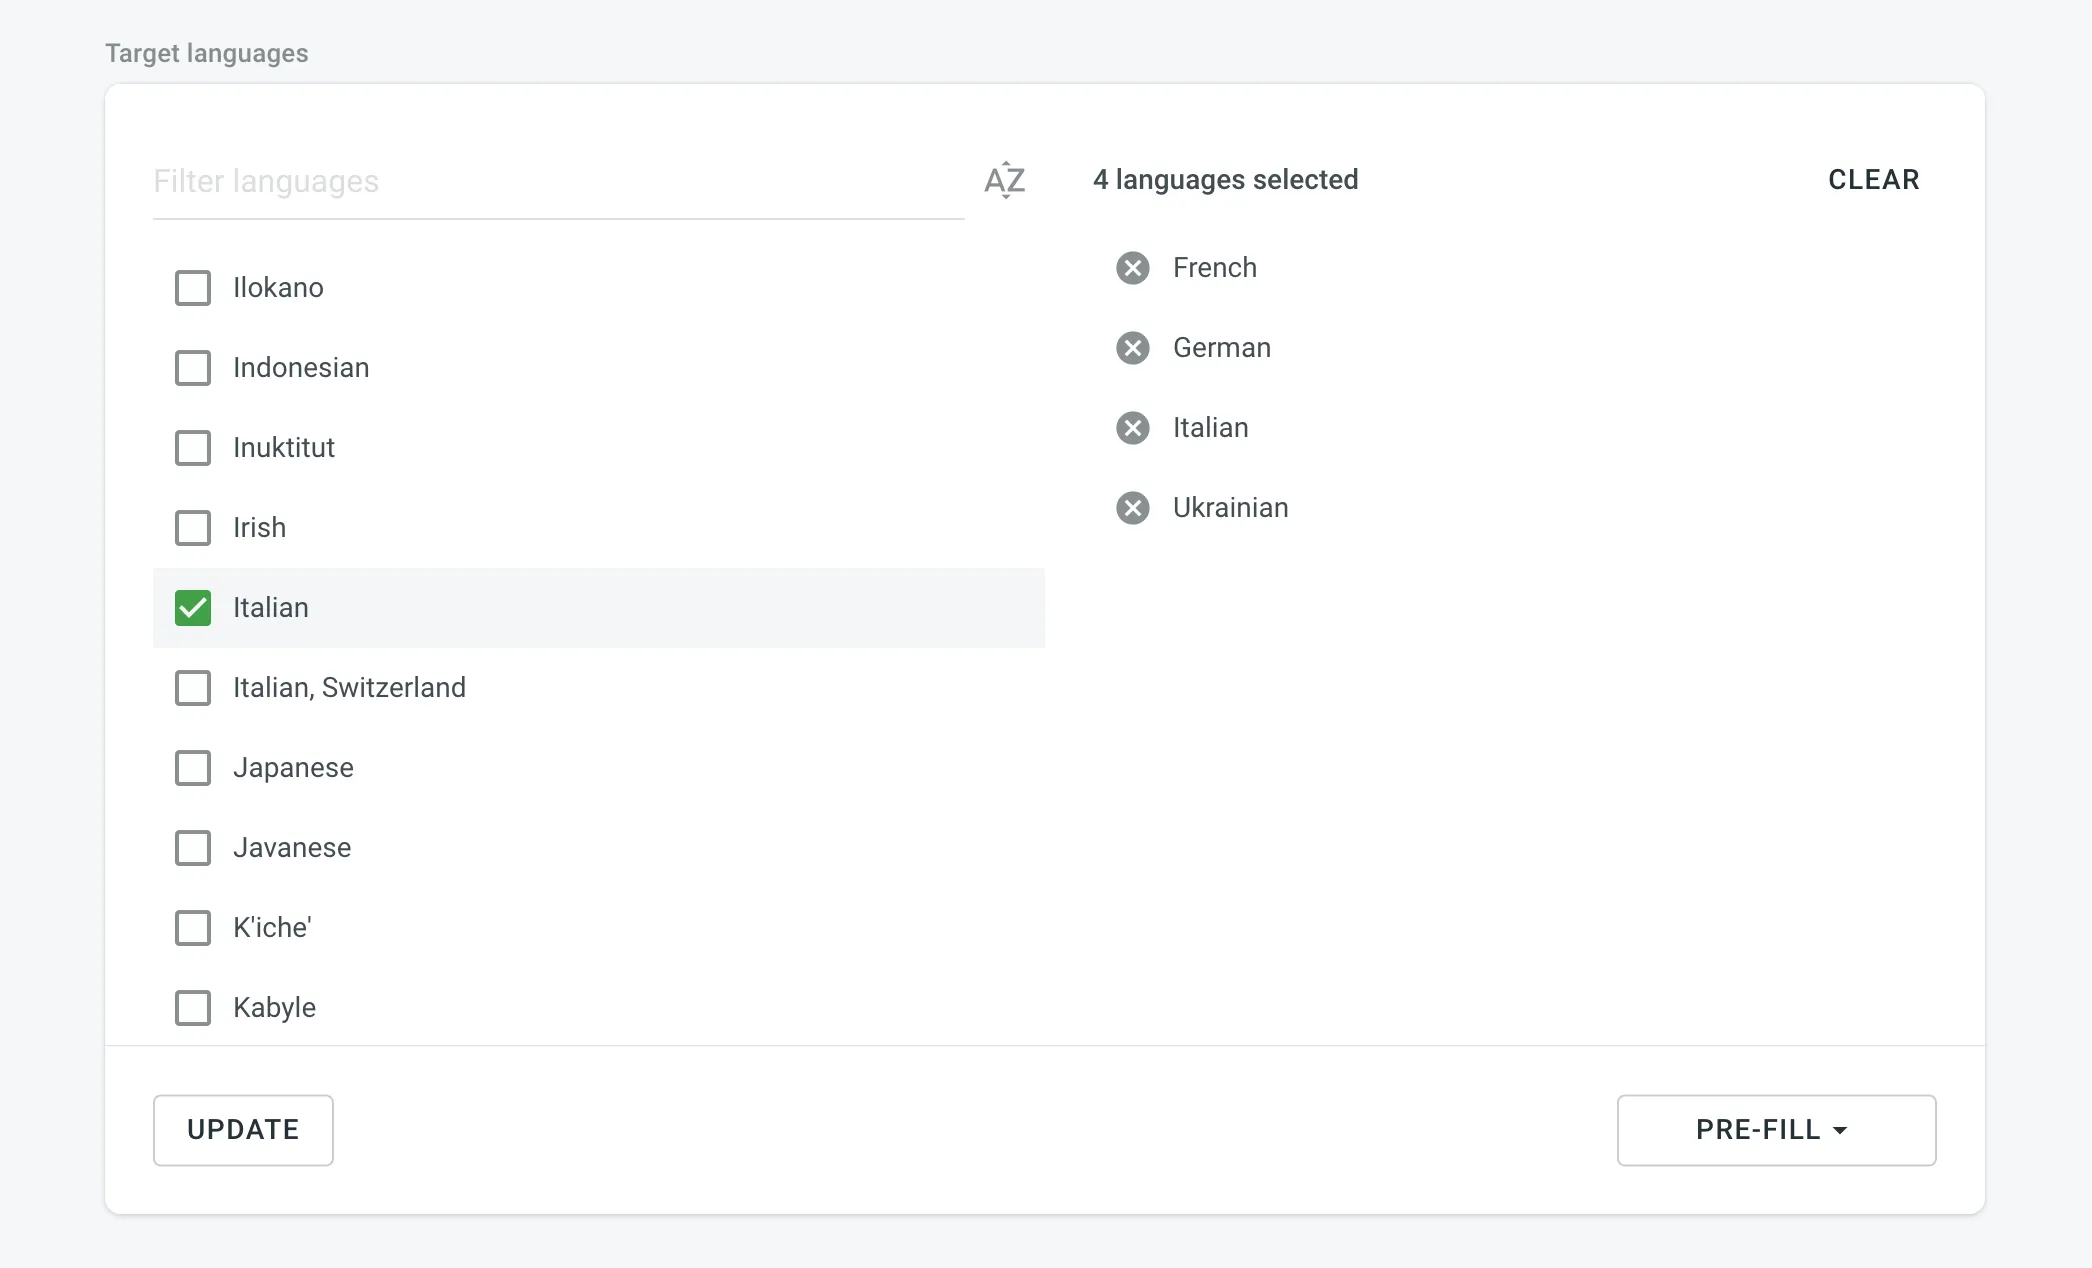 ## [Language Mapping](#language-mapping) [Section titled “Language Mapping”](#language-mapping) Add custom language codes and use them for translation files export. This will keep the structure of exported files consistent. For example, in the screenshot below two custom codes are set for French and German languages. If any of custom placeholders (3 letters codes) is used during [file export](/enterprise/file-management/#file-export) the file name will include these specific language codes (fra, ger). 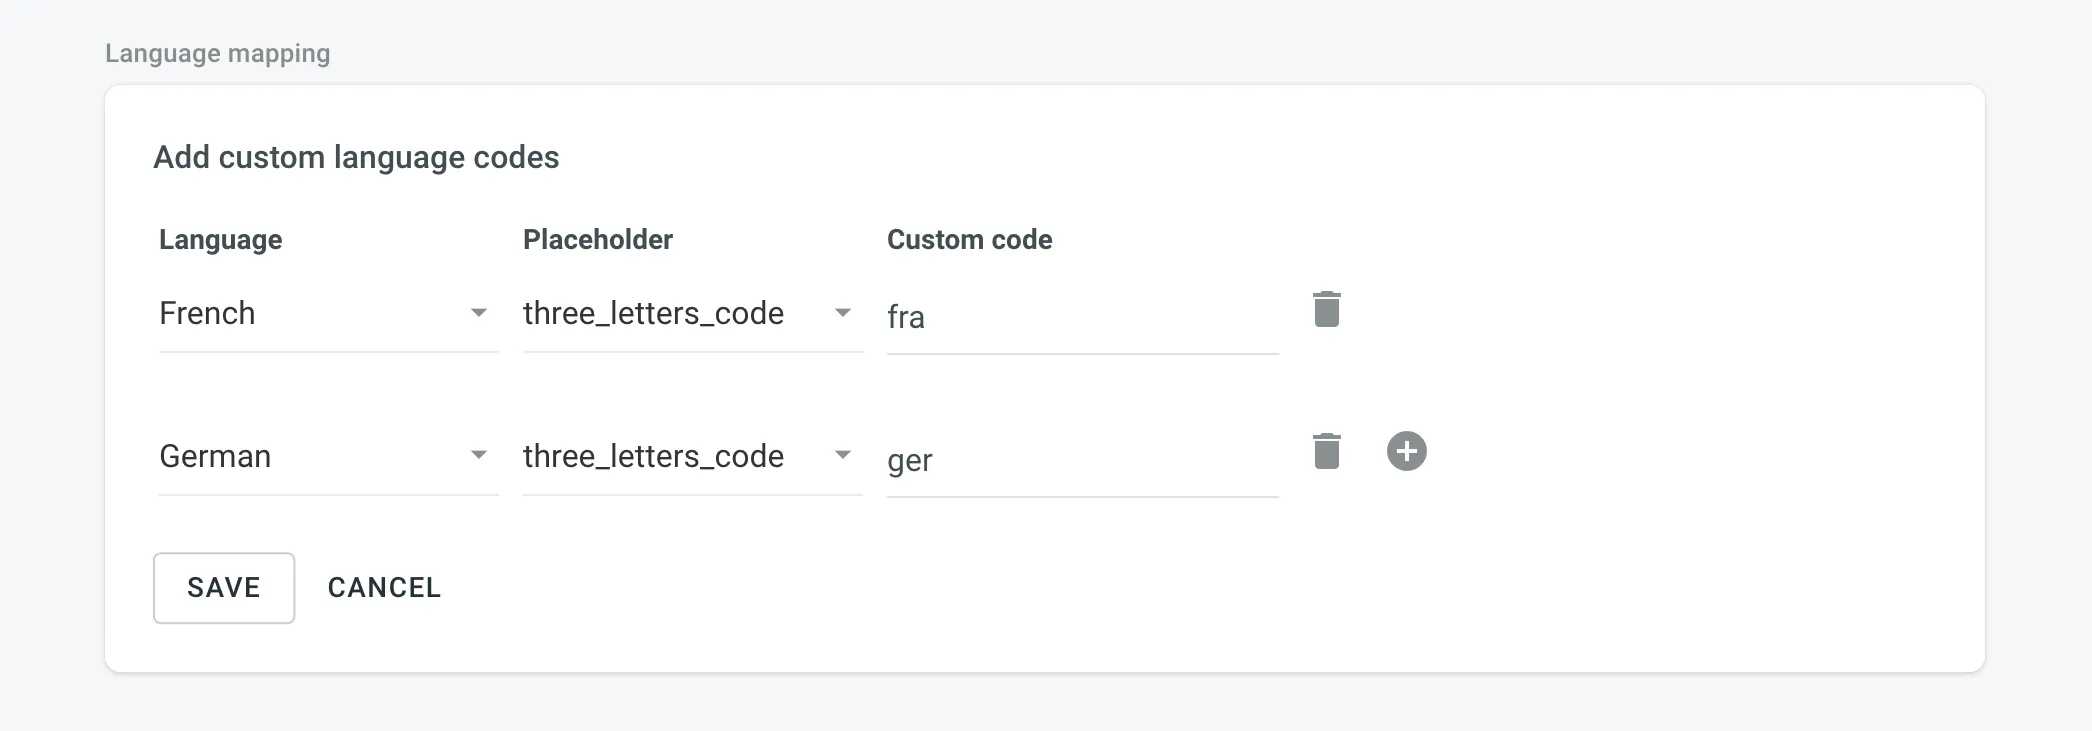 ## [Adding Custom Languages](#adding-custom-languages) [Section titled “Adding Custom Languages”](#adding-custom-languages) Custom languages are managed at the Organization level. See the [Organization Settings](/enterprise/organization-settings/) section for more information. ## [See Also](#see-also) [Section titled “See Also”](#see-also) [Supported Languages ](/developer/language-codes/)Explore the list of languages supported by Crowdin Enterprise.
# Machine Translation Settings
> Configure machine translation settings for your project
In the **Machine Translation** section, you can manage the following settings: * **Show machine translation suggestions** – enable MT suggestions from machine translation engines such as Microsoft Translator, Google Translate, and others to be displayed in the Editor. ## [See Also](#see-also) [Section titled “See Also”](#see-also) [MT Engines ](https://store.crowdin.com/categories/machine-translation)Explore the list of supported machine translation engines and learn how to configure them. [Machine Translation ](/enterprise/machine-translation/)Learn how to configure machine translation engines. [Pre-Translation ](/enterprise/pre-translation/)Speed up the translation process and ease the work of translators.
# Parser Configuration Settings
> Configure import and export behavior for supported file formats
By default, Crowdin Enterprise uses a predefined set of import and export parameters for each supported file format. The Parser configuration feature lets you change the default import and export behavior predefined for file formats supported by Crowdin Enterprise. Parser configuration in a specific project is applied only to files stored in this project. You can set the parser configuration for all files of a certain format or single files. Once you save the parser configuration for some file format, you can upload source files to your project, and Crowdin Enterprise will apply your settings accordingly. You can configure import and export behavior for the following formats: Java Properties, Generic XML, DITA, AsciiDoc, Plain text, MadCap Flare, HTML, Office documents, Adobe FrameMaker, Adobe InDesign, Markdown, and MediaWiki.  Caution Some parser settings may be unavailable in [string-based](/enterprise/creating-project/#string-based-project) projects. ## [Parser Configuration Parameters](#parser-configuration-parameters) [Section titled “Parser Configuration Parameters”](#parser-configuration-parameters) Some parameters are common to all formats, while others are format-specific. In the table below, you can see the available parser parameters and formats they could be configured for. | Parameter | Description | Format | | --------------------------------- | -------------------------------------------------------------------------------------------------------------------------------------------------------------------------------------------------------------------------------------------------------------------------------------------------------------------------------------------------------------------------------------------------- | ------------------------------------------------------------------------------------------------------------------------------------ | | Content segmentation | On import, the source file’s content will be split into shorter text segments using predefined segmentation rules (SRX 2.0). | Generic XML, DITA, AsciiDoc, MadCap Flare, HTML, Office documents, Adobe FrameMaker, Adobe InDesign, Markdown | | Custom segmentation rules | Defines your own segmentation rules.Read more about [Custom Segmentation](/custom-segmentation/). | Generic XML, DITA, AsciiDoc, Plain text, MadCap Flare, HTML, Office documents, Adobe FrameMaker, Adobe InDesign, Markdown, MediaWiki | | Excluded elements | Defines a list of CSS style selectors for elements that should not be available for translation (e.g., code, pre > code, .code-block). Applicable only to block elements. Inline elements are ignored. | HTML, HTML with Front Matter | | Excluded front matter elements | Defines a list of front matter elements that should not be available for translation (e.g., keywords, “internal.description”, tags). The path elements should be delimited by a period. The keys containing a period must be enclosed in quotation marks. | HTML with Front Matter, MDX | | Exclude code blocks | Defines whether to import code blocks. Applicable only to code blocks. Inline elements with code are ignored. | MDX | | Translate content | Texts stored inside the tags will be available for translation. | Generic XML | | Translate attributes | Tag attributes will be available for translation. | Generic XML | | Translatable elements | Defines the specific nodes and attributes to be available for translation. | Generic XML | | Escape single quote | Defines the behavior regarding a single quote escaping in exported translations. Available options:- Do not escape single quote - Escape single quote by backslash (`It's okay`⇒`It\'s okay`) - Escape single quote by another single quote (`It's okay`⇒`It''s okay`) - Escape single quote by another single quote only in strings containing variables `{0}` (`{0} it's okay`⇒`{0} it''s okay`) | Java Properties | | Escape special characters | Any special characters (i.e., `=`, `:`, `!`, `#`) will be escaped by a backslash `\` in exported translations. | Java Properties | | Clean tags aggressively | Additional formatting tags related to text spacing will be removed on import. Useful when translating Office documents converted from other formats (e.g., PDF, etc.), and the conversion introduced lots of unnecessary formatting tags. | Office documents | | Translate hyperlink URLs | Hyperlink URLs will be available for translation. | Office documents | | Translate hidden text | The hidden text will be available for translation. | Office documents | | Translate hidden rows and columns | The hidden rows and columns will be available for translation. | Office documents | | Import hidden slides | The hidden slides will be available for translation. | Office documents | | Import notes | The slide notes will be available for translation. | Office documents | ## [Parser Configuration for All Project Files of a Specific Format](#parser-configuration-for-all-project-files-of-a-specific-format) [Section titled “Parser Configuration for All Project Files of a Specific Format”](#parser-configuration-for-all-project-files-of-a-specific-format) To set the preferred parser configuration for all files of a specific format, follow these steps: 1. Open your project and go to **Settings > Parser configuration**. 2. Choose the needed file format and click Edit. 3. Set the preferred settings. 4. Click **Save**. To add a new file format, click **Add Apps** and install the required format. ## [Parser Configuration for a Single File](#parser-configuration-for-a-single-file) [Section titled “Parser Configuration for a Single File”](#parser-configuration-for-a-single-file) In some cases, you might need to set the parser configuration not for all files of some file format but just for a single file. To set the parser configuration for a single file, follow these steps: 1. Open your project and go to **Sources > Files**. 2. Double-click on the needed file. 3. In the appeared dialog, switch to the **Parser configuration** tab. 4. Set the preferred settings. 5. Click **Save**. Once you save the file parser configuration, Crowdin Enterprise will reimport this file and apply your settings. Read more about [file management](/enterprise/file-management/) in Crowdin Enterprise.
# Privacy Settings
> Configure the content visibility and notifications
In the **Privacy** section of the Project Settings, you can manage the visibility of your project and its contents. You can also configure the notifications sent to project participants. ## [Translations](#translations) [Section titled “Translations”](#translations) * **Allow Offline Translation** – allow translators to download source files to their machines for offline translation and upload translations back into the project. The project owner and managers can always download sources and upload translations, not depending on the option status. * **Allow proofreaders to access hidden strings** – allow proofreaders to work with hidden strings. Members with manager permissions or higher can always work with hidden strings, not depending on the option status. * **Task-based access control** – allow project members to work with tasks they are assigned to, even if they do not have full access to the language in the project. ## [Glossary Access Settings](#glossary-access-settings) [Section titled “Glossary Access Settings”](#glossary-access-settings) Control the level of access that project members have over glossary terms. Members with manager permissions or higher always have full control over glossary terms, regardless of these settings. Configure the preferred glossary access level with the following options: * **Read only** – allow members to view existing glossary terms without the possibility to modify them. This option provides access for reference only. * **Manage drafts** – allow members to view, add, edit, and delete draft glossary terms, and view approved terms. This option allows members to contribute to drafts without altering approved terms. * **Full access** – allow members to view, add, edit, and delete glossary terms, as well as edit concept details. This option provides members with full control over glossary terms and their details. ## [Task Cross-Review New](#task-cross-review) [Section titled “Task Cross-Review ”New](#task-cross-review) Require approval from selected managers or the owner before contributors can start working on a task. This feature adds an additional review step, helping maintain accountability and oversight in task workflows. Read more about [Task Cross-Review](/enterprise/tasks/#task-cross-review). ### [Configuring Task Cross-Review](#configuring-task-cross-review) [Section titled “Configuring Task Cross-Review”](#configuring-task-cross-review) To enable and configure Task Cross-Review, follow these steps: 1. Enable the **Task Cross-Review** option in the **Tasks** section. 2. Select at least one manager responsible for approving tasks. You can search for managers by name, username, or email. 3. Click **Save** to apply the changes. New tasks created after enabling **Task Cross-Review** will require approval, while existing tasks remain unaffected. ## [Notifications](#notifications) [Section titled “Notifications”](#notifications) Project notifications are disabled by default. Enable the necessary notifications for an agile translation process. Such approach helps to avoid creating additional tasks for every contributor. * **Notify translators about new strings** – translators will receive an email notification about newly added content for translation each time after the update. The **Receive emails** option should be activated in the translator’s profile. * **Notify project managers and developers about new strings** – project managers will receive an email notification about newly added content for translation each time after the update. * **Notify project managers and developers about language translation/proofreading completion** – project managers will receive the notification when some target language (all source files) is fully translated or fully proofread.
# Quality Assurance Settings
> Configure QA checks to ensure the quality of translations
The main aim of quality assurance (QA) checks is to help you efficiently handle different language-specific aspects in translations and ensure they are formatted the same way as the source strings and will fit the UI just as well. Some typical QA check issues include missed commas, extra spaces, or typos. With QA checks, issues that should be fixed will be highlighted on the Proofread workflow step. QA checks help to detect some common mistakes easily and quickly. It’s recommended to review and resolve all QA check issues before building your project and downloading translations. 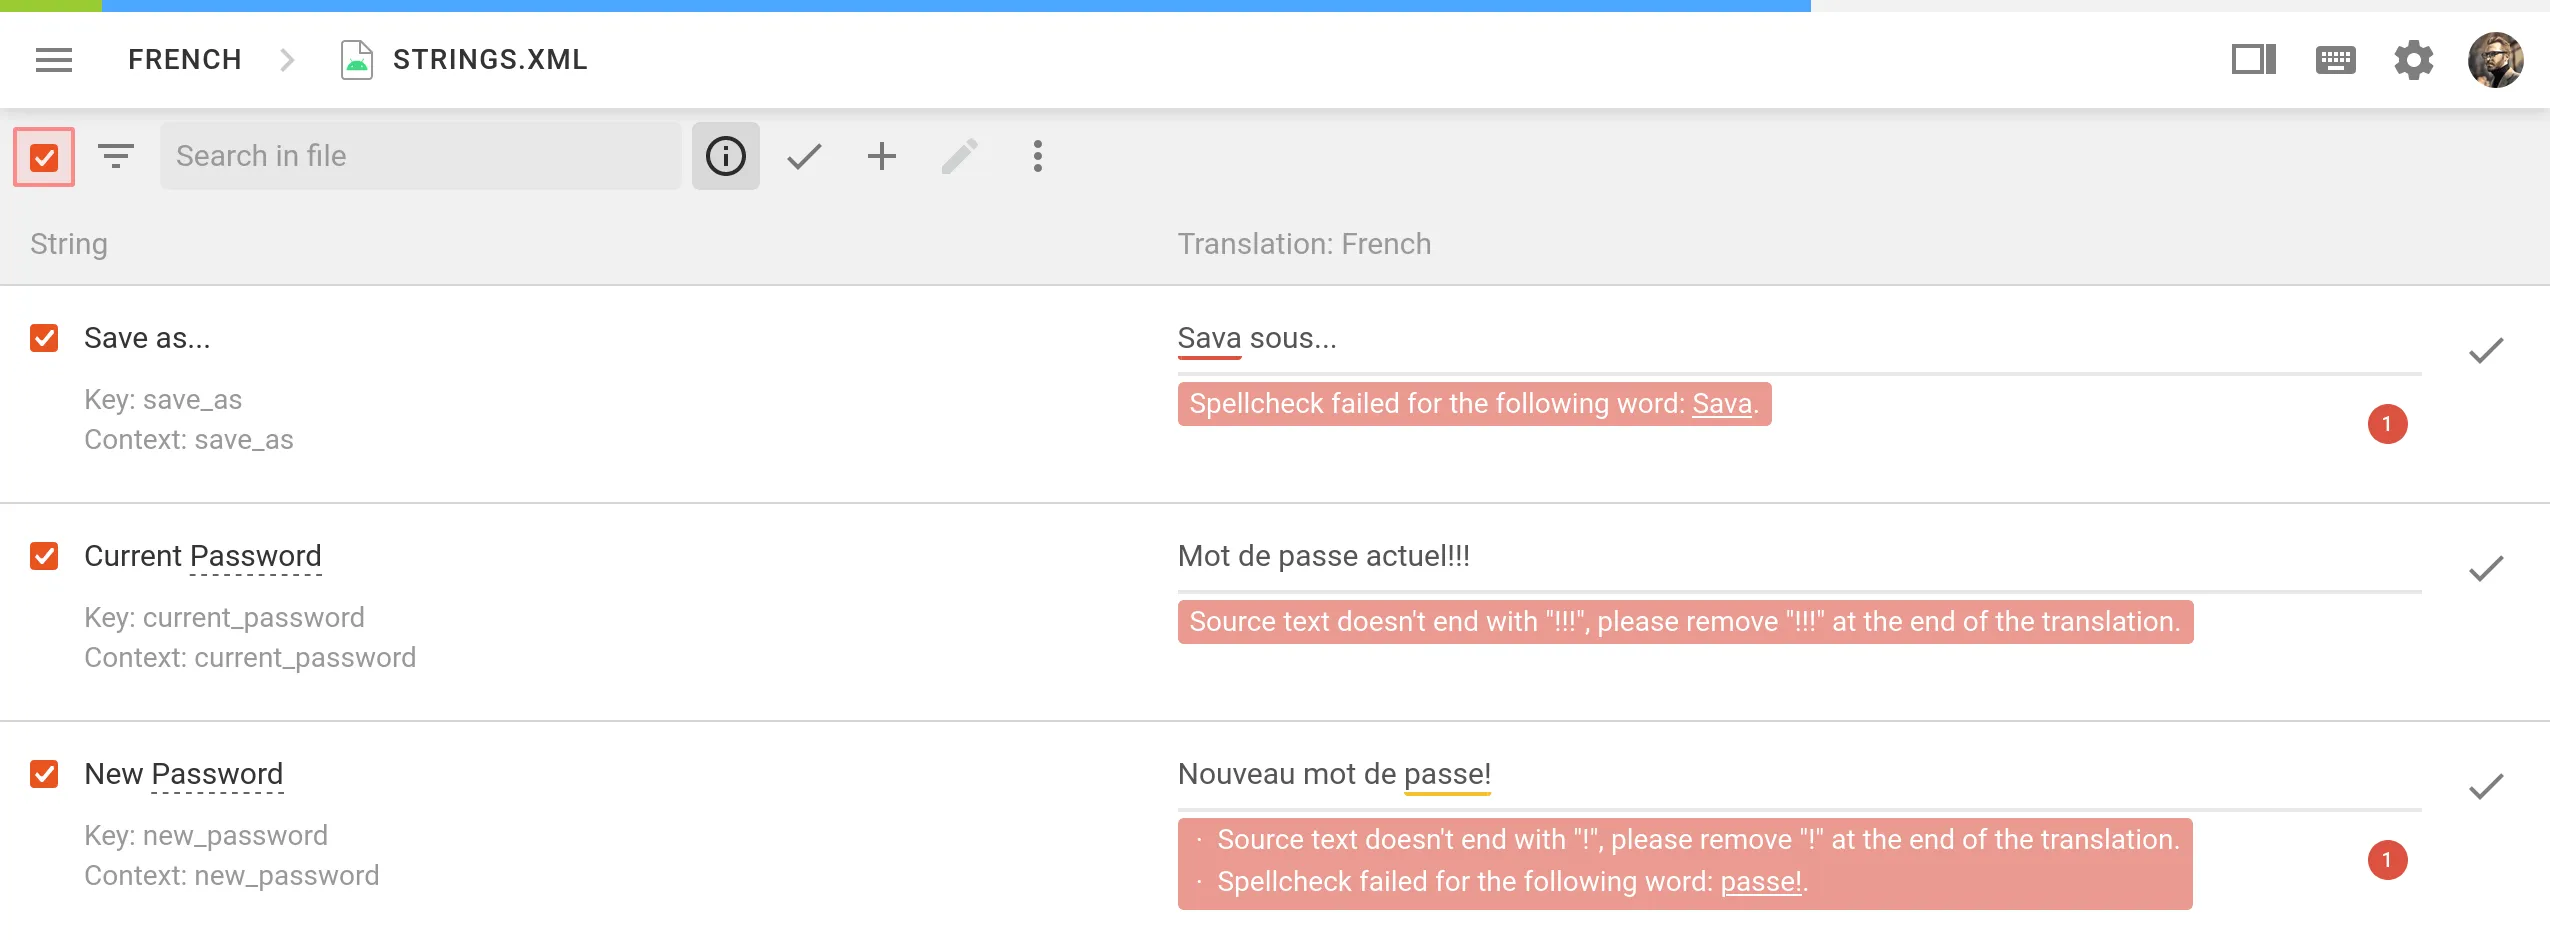 In the **Quality Assurance** section, you can manage the types of QA issues to be highlighted in the Editor during the translation process. ## [Configure QA Checks](#configure-qa-checks) [Section titled “Configure QA Checks”](#configure-qa-checks) By default, QA checks are enabled. To select the needed QA checks in your project, follow these steps: 1. Open your project and go to **Settings > Quality assurance**. 2. Select the QA check types according to your preferences. 3. For each selected QA check type, choose whether it should be possible to save translations with QA issues by selecting one of two options: **Error** and **Warning**. **Warning** – translators are notified about QA issues with suggestions for fixes, but they can still save the translation using the **Save anyway** button. **Error** – translators are notified about QA issues with suggestions for fixes, and they cannot save the translation until all issues are resolved. 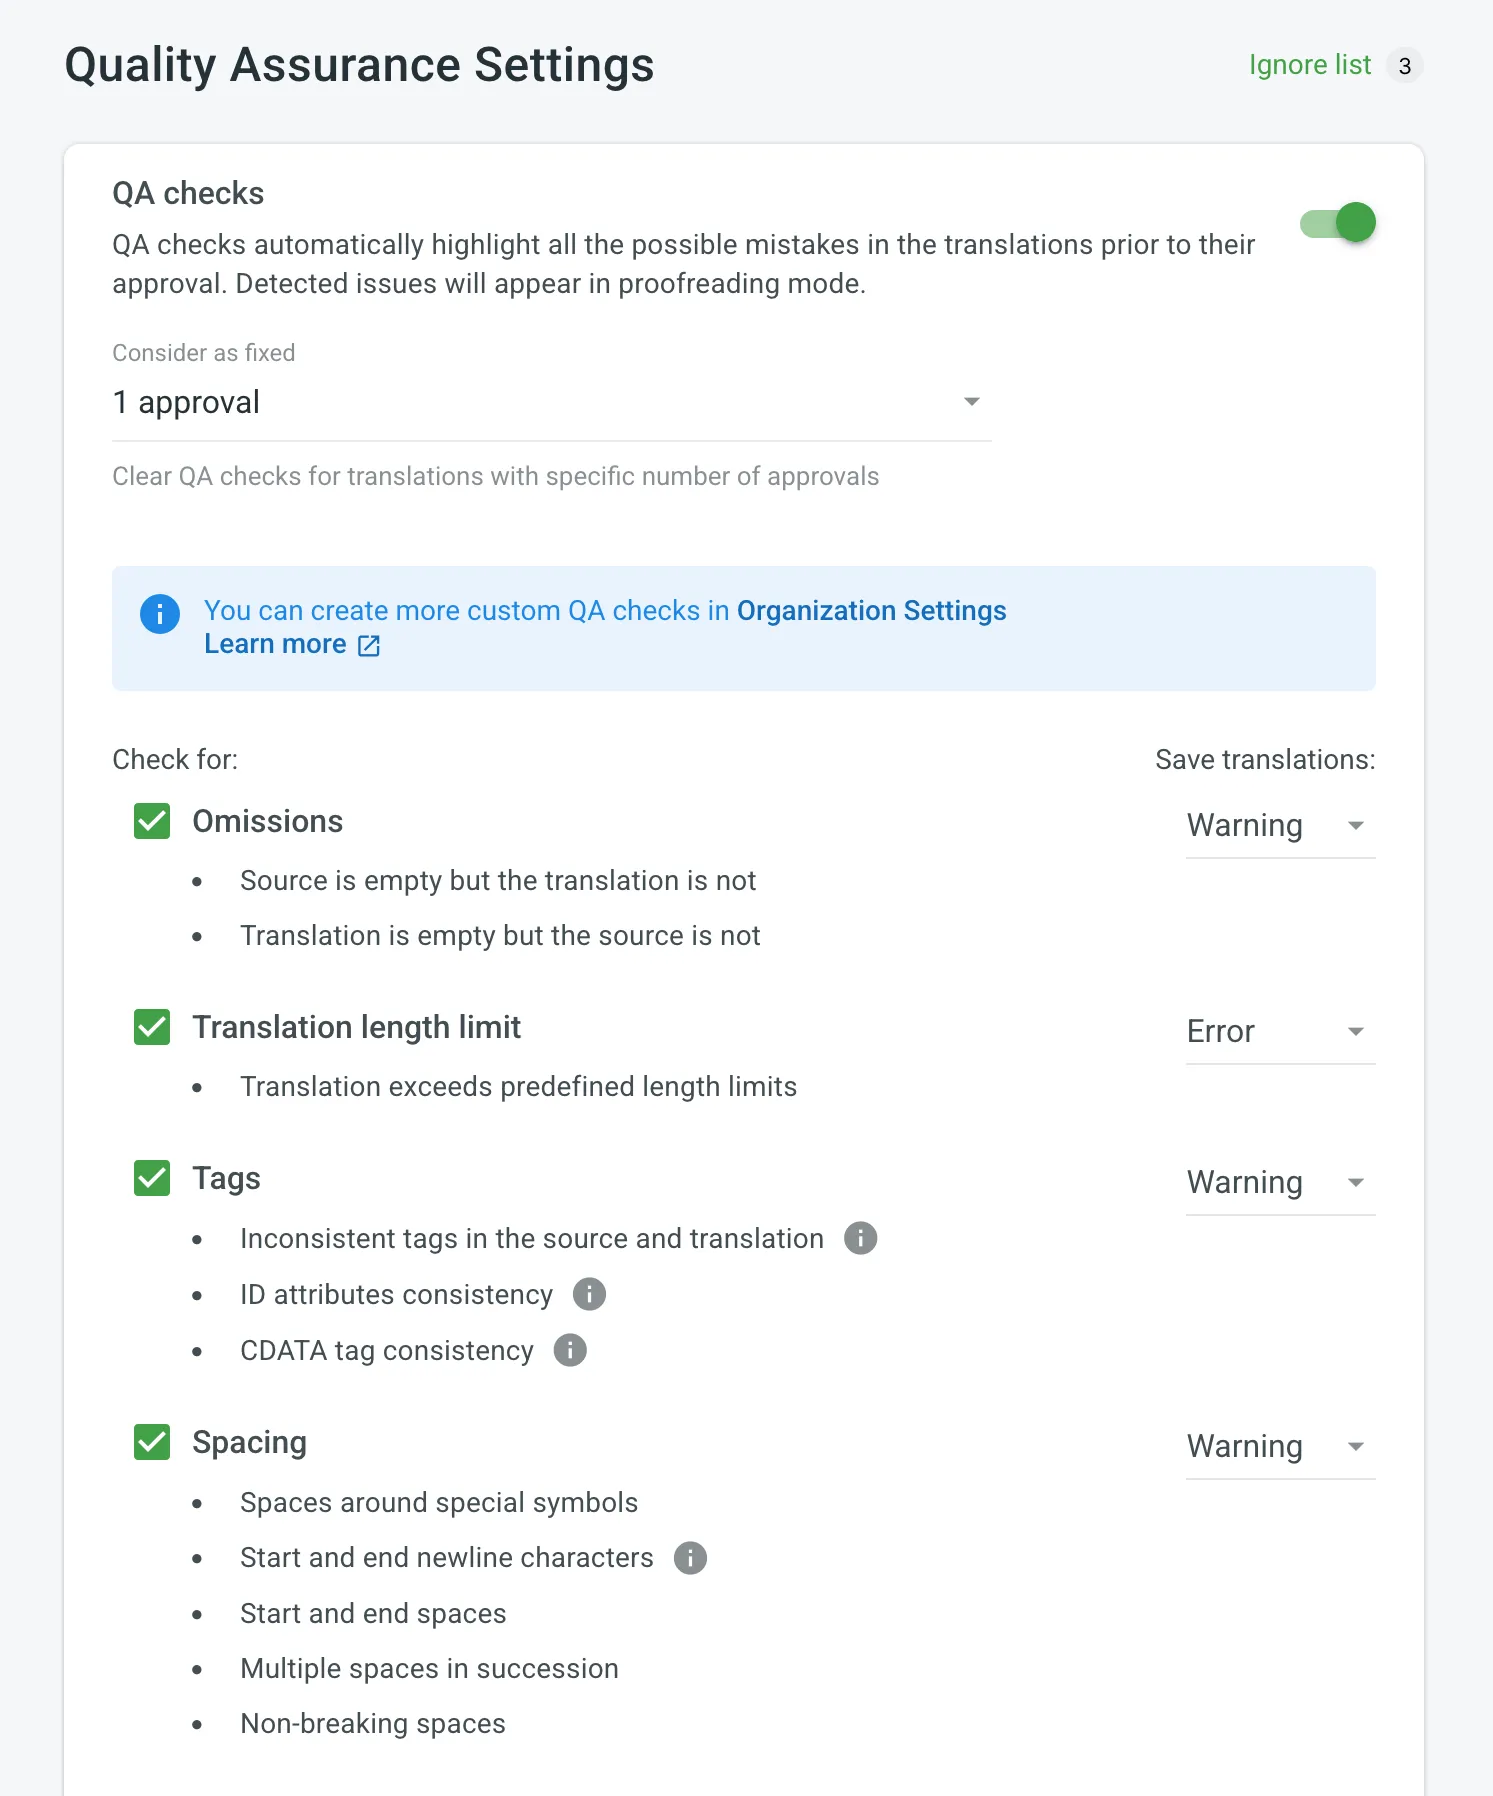 Use the **Consider as fixed** option to define how many approvals a translation must have before its QA issues are automatically treated as resolved. When a translation reaches the specified number of approvals, Crowdin Enterprise clears any flagged QA issues for that string. Once enabled, QA checks will work in the background and scan the translations for potential QA issues. [Custom Quality Assurance Checks ](/enterprise/custom-qa-checks/)Learn how to create custom QA checks. ## [Spell Checker Ignore List](#spell-checker-ignore-list) [Section titled “Spell Checker Ignore List”](#spell-checker-ignore-list) If your project contains some uncommon words that are not recognized by the Spell checker, you can add them to the Ignore list to exclude them from being checked. 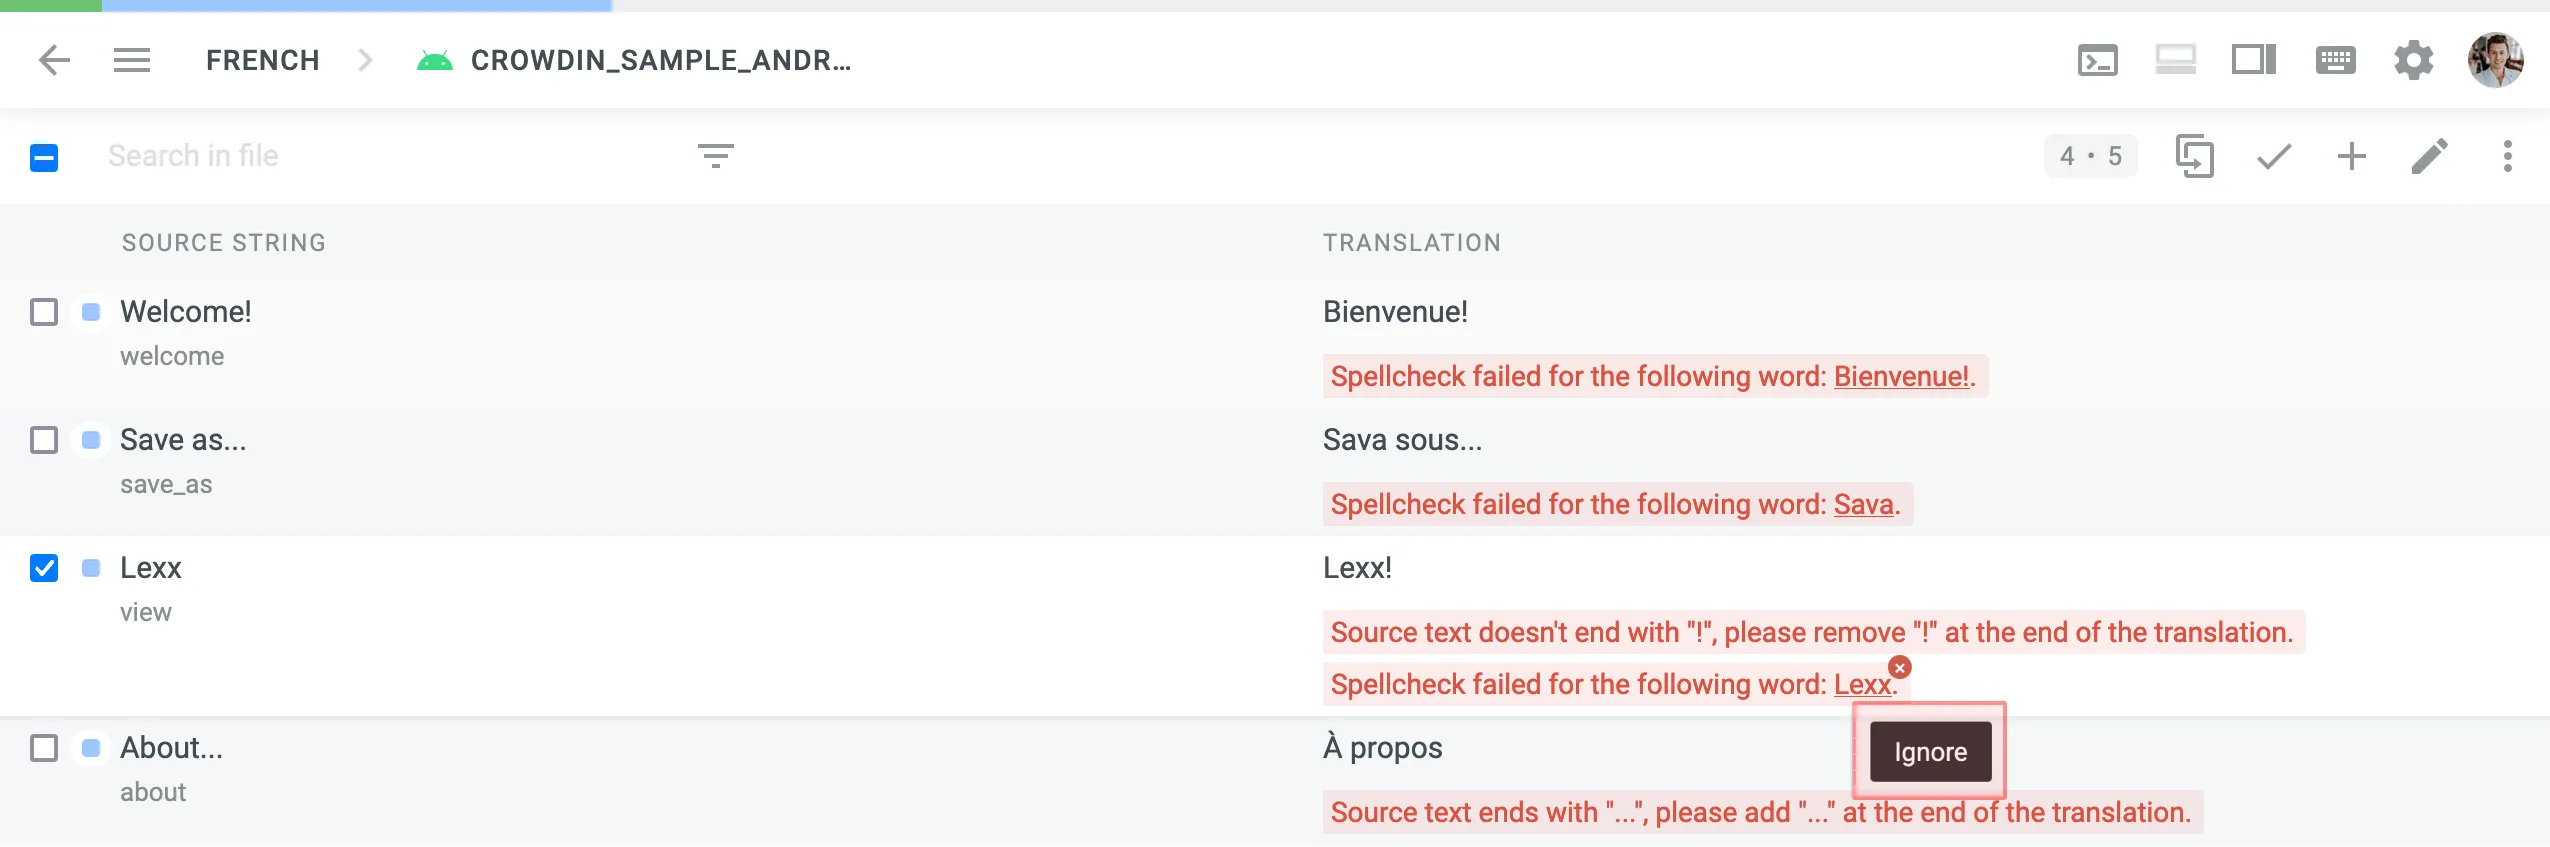 To review the words added to the Ignore list for the Spell checker, follow these steps: 1. Open your project and go to **Settings > Quality assurance**. 2. Click *Ignore list* on the top right side. In the opened window you can see the list of words added to the ignore list. You can filter or remove them from the list if necessary. ## [QA Check Parameters](#qa-check-parameters) [Section titled “QA Check Parameters”](#qa-check-parameters) **Omissions** – strings that lack or have excessive translations. * Source is empty but the translation is not * Translation is empty but the source is not **Translation length limit** – translations that are longer than the limit of characters you set. **Tags** – strings that use HTML might lack some opening or closing tags in translations. * Inconsistent tags in the source and translation * ID attributes consistency * CDATA tag consistency **Spacing** – multiple spaces in a row, missing spaces. * Spaces around special symbols * Start and end newline characters * Start and end spaces * Multiple spaces in succession * Non-breaking spaces **Variables** – placeholders used in a translation match placeholders used in the source string. * Common variables * Python, Java, .NET, C/C++, Ruby on Rails, Twig, PHP, Freemaker variable placeholders * Custom variables (per request) **Punctuation** – punctuation mistakes or differences in the punctuation marks. * Inconsistent punctuation in source and translation * Spacing before and after punctuation marks **Character case** – the lower or upper case that used differently in source and translated strings. * Initial capitalization * Unexpected multiple capitalized characters in succession **Special characters** – new paragraphs, currency signs, and other special characters that used differently in translated strings. * Bracket consistency * Markup language entities * Quotes and quote escapes **Open translation issues by project members** – show reported translation issues on the Proofread workflow step. **Spelling mistakes** – underline misspelled words. Limitations Currently available for specific languages only. **ICU Markup syntax check** – the correct usage of the ICU message syntax in translations. **Consistent terminology** – checks whether the source words are translated accordingly to the respective glossary terms. Limitations Currently available for English, German, Spanish, French, Italian, Dutch, Norwegian, Norwegian Bokmal, Polish, Russian, Swedish, Ukrainian, Japanese, Korean, Chinese Simplified, and Turkish. **Duplicate** – translations that duplicate already existing translations. **FTL Markup syntax check** – the correct usage of the FTL syntax in translations. **Android Markup syntax check** – the correct usage of the Android syntax in translations. **Numbers mismatch** – checks for inconsistencies or missing numbers between the source and translations. **AI-powered check** – uses AI to detect translation issues, improving accuracy and ensuring translations meet project-specific quality standards. Requires configuring an AI prompt with defined evaluation criteria. Read more about [Configuring AI-powered check](/enterprise/crowdin-ai/#setting-up-ai-qa-check).
# Translation Memory Settings
> Configure and assign Translation Memories for your project
The project TM is automatically created for each project. By default, every approved or last added translation is saved to the project TM. This behavior can be customized to save only approved translations. * **Auto-substitution** – the feature substitutes the non-translatable elements (such as tags, HTML entities, placeholders, numbers, and more) in TM translation suggestions with the ones used in the source text. The feature improves the TM suggestions applied during pre-translation and those shown as translation suggestions in the Editor. Improved suggestions are included in the Translation Costs report, and improvable ones are included in the Costs Estimation report. * **TM Suggestions for Dialects** – the feature allows you to enable the displaying and use of TM suggestions from the primary language for dialects if no dialect-specific suggestions are available. * **Save only approved suggestion to Translation Memory** – when selected, translations are saved to the project default TM only after they are approved. This option is especially useful for crowdsourced projects where you want to ensure only reviewed translations are stored in the TM. * **TM Match Context Type** – the feature allows you to choose what should be considered as string context when suggesting Perfect (101%) match Translation Memory (TM) suggestions. You can choose between the following options: * Key and Context – when selected, the system considers both the key and context of strings for suggesting Perfect match TM suggestions. This mode is particularly useful for key-value file formats. * Auto – when selected, the system automatically applies the most suitable context consideration mode based on your file format. * Previous and next segment – when selected, the system considers the segments immediately preceding and following the current segment for context. Most applicable to HTML-based and other formats without a defined key-value structure. Read more about [TM Auto-Substitution](/enterprise/translation-memory/#tm-auto-substitution). ## [Penalties](#penalties) [Section titled “Penalties”](#penalties) In the **Penalties** section, you can configure penalties that decrease the match percentage of TM suggestions based on specific conditions. This feature helps when you want to fine-tune the relevance of TM suggestions to your specific requirements. 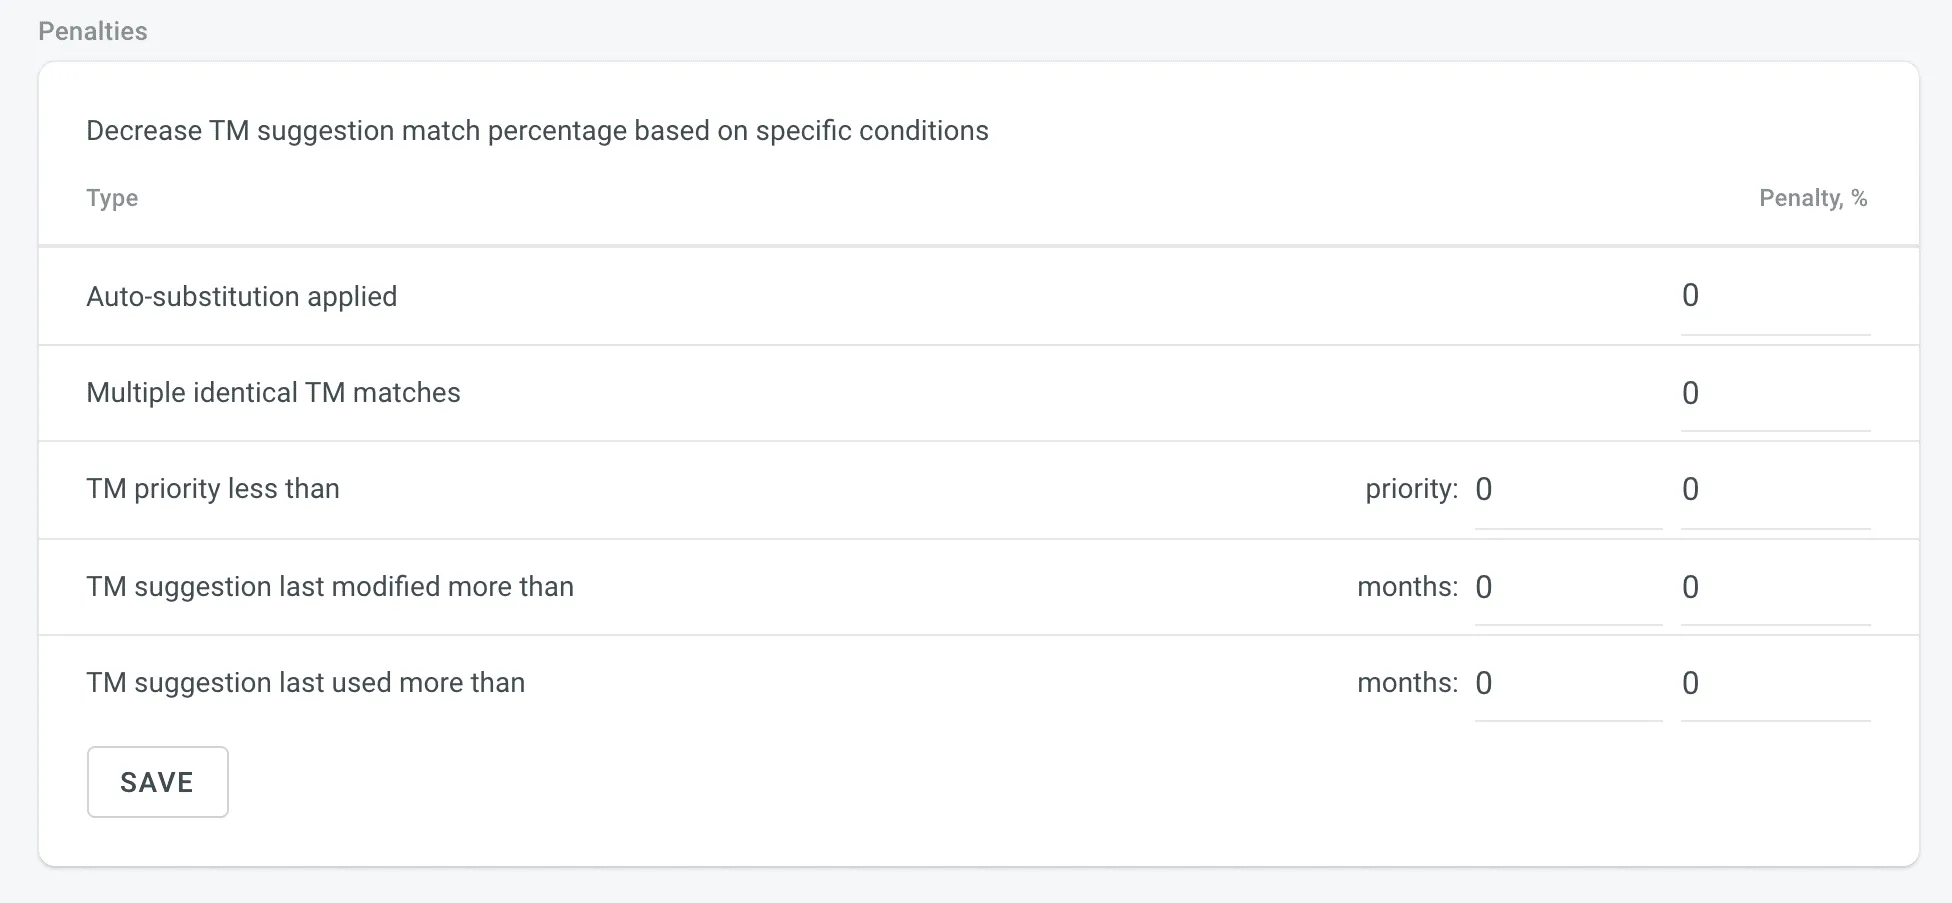 You can configure the penalties using the following options: * **Auto-substitution Applied** – penalize TM suggestions to which an auto-substitution was applied. * **Multiple Identical TM Matches** – penalize TM suggestions where multiple identical TM matches are found. * **TM Priority Less Than** – penalize TM suggestions that originate from a TM with a priority lower than a specified value. Besides a penalty value, you can also set the preferred TM priority threshold. * **TM Suggestion Last Modified More Than** – penalize TM suggestions that were last modified more than a specified number of months ago. Besides a penalty value, you can also set the threshold in months. * **TM Suggestion Last Used More Than** – penalize TM suggestions that were last used more than a specified number of months ago. Besides a penalty value, you can also set the threshold in months. ## [Assigning TM](#assigning-tm) [Section titled “Assigning TM”](#assigning-tm) To assign a TM to your project, in the **Assigned Translation Memories** section, select the needed TMs from the list. 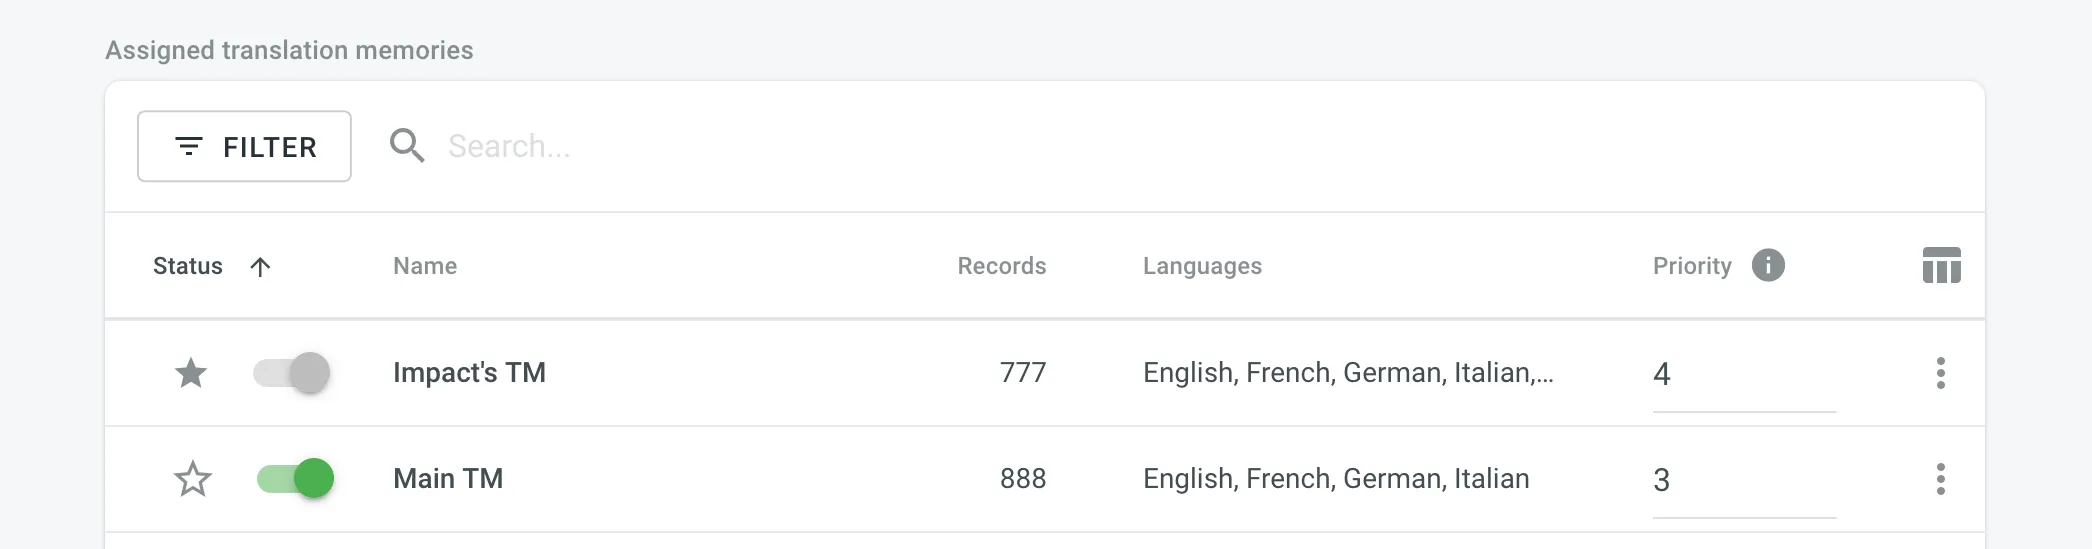 ## [Prioritizing TM](#prioritizing-tm) [Section titled “Prioritizing TM”](#prioritizing-tm) When you assign a few TMs to the project, you can set the needed priority for each of them. As a result, TM suggestions from the TM with the higher priority will be displayed in the first place. The default TM priority value is set to 1. A higher number has a higher priority (for example, 5 has a higher priority than 1). For example, if you assigned four TMs to your project, you can set the priority of 4 to the most important TM, the one that should be used in the first place. And respectively set lower priorities to other TMs. To set the priority for TMs, in the **Assigned Translation Memories** section, set the preferred priority for assigned TMs from the respective drop-down list. 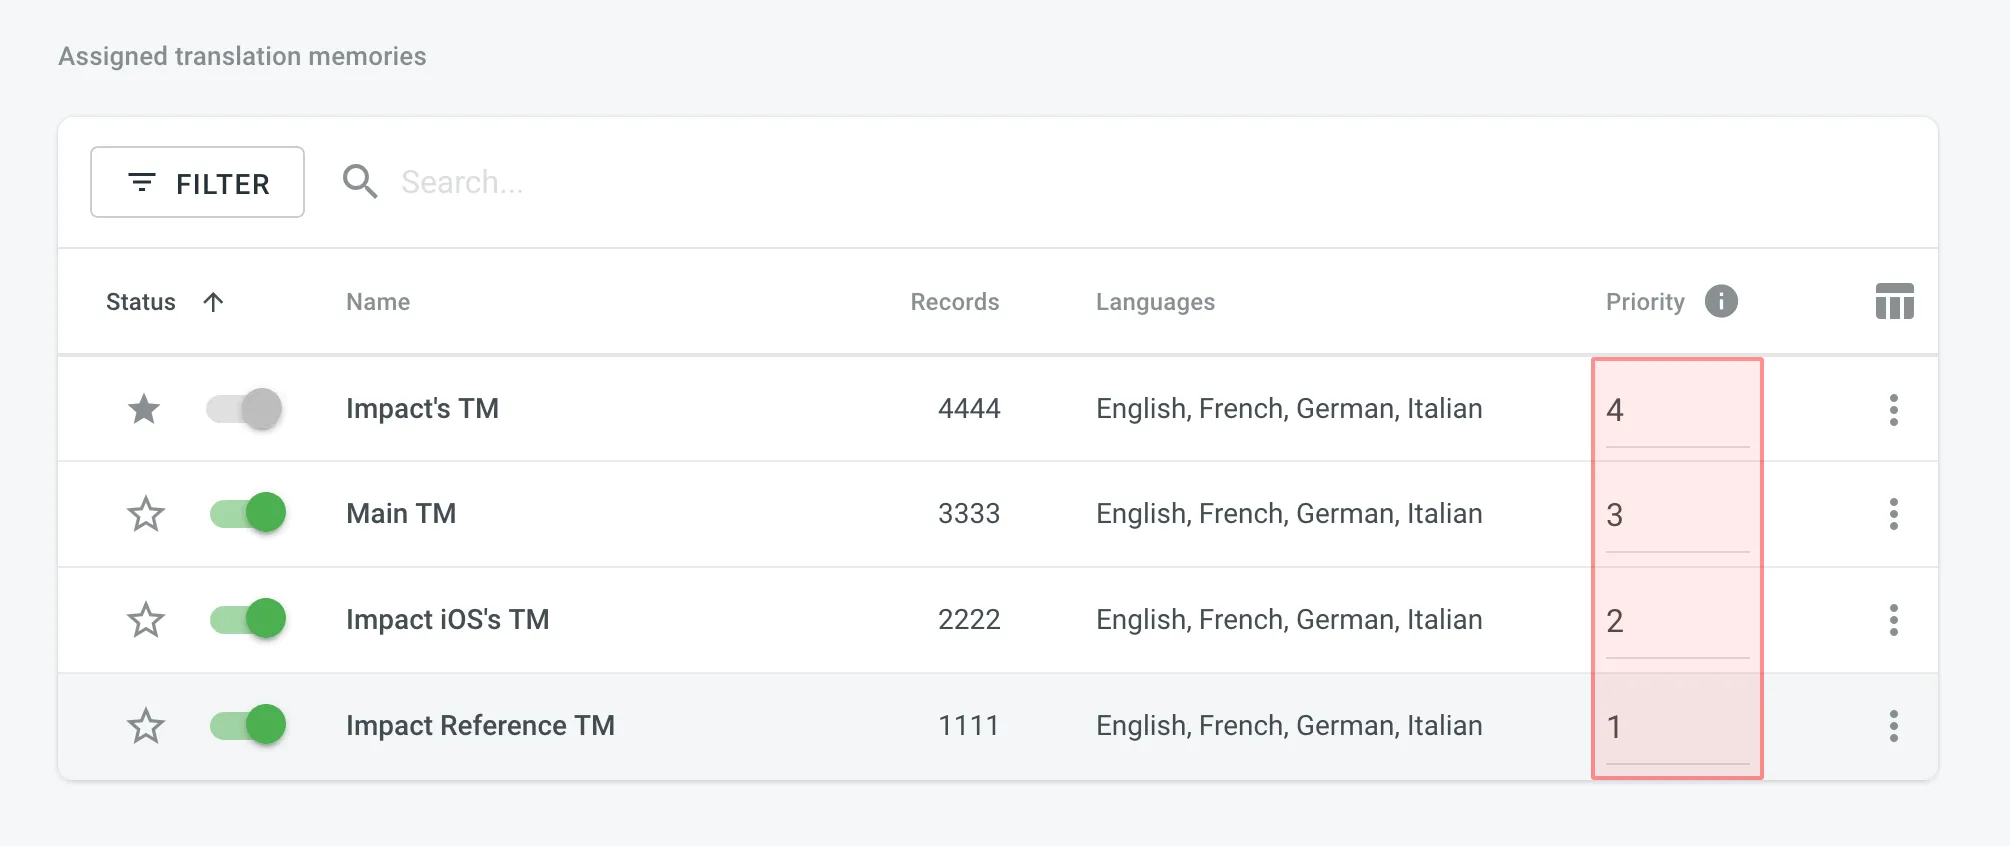 ## [Changing Default TM](#changing-default-tm) [Section titled “Changing Default TM”](#changing-default-tm) To change your project’s default TM, in the **Assigned Translation Memories** section, click the icon next to the needed TM in the list.
# Roles
> Learn about the roles and permissions that users can have in Crowdin Enterprise
Roles in Crowdin Enterprise define the level of access and control users have within the platform. By assigning roles, you can manage user permissions across the Editor, project settings, and organization settings. Below you can find descriptions of each role and its associated permissions. ## [Owner](#owner) [Section titled “Owner”](#owner) Owner is the user who created the organization and has complete control over it. The owner can invite users to the organization and manage their access, configure organization settings, manage vendors, create projects and groups, work with source and translation files, set up integrations, and more. ## [Admin](#admin) [Section titled “Admin”](#admin) Admin has similar rights to the organization owner, with full access to the organization, including inviting and managing users, configuring organization settings, and creating and managing projects and groups. Admin can’t delete the organization or transfer ownership. **Use case:** Suitable for trusted team members who need full access to manage the organization, its projects, and settings, without the ability to delete the organization. ## [Manager](#manager) [Section titled “Manager”](#manager) Manager has a more focused scope of control that depends on their assignment at various levels. Based on the [Permission granularity](/enterprise/permissions-granularity-mode/#permissions) settings, Managers can be assigned at the organization, group, subgroup, or project levels. They inherit access to all child entities within their assigned parent entity (i.e., organization, group, or subgroup). Managers can’t manage vendors, invite or manage users at the organization level, or configure organization settings. ### [Workspace Manager](#workspace-manager) [Section titled “Workspace Manager”](#workspace-manager) Workspace Manager can create and manage projects across the entire organization (including inviting people to projects and managing resources). They also have access to all groups and subgroups. **Use case:** Suitable for users responsible for maintaining consistency across multiple projects in the organization. If permission granularity is disabled, Workspace Manager can be assigned using the **Workspace manager** toggle in the **User details**. If enabled, the organization’s workspace is treated as a root group, and the role is granted by assigning the user to manage the root group from the **Groups** tab in the **User details**. ### [Group Manager](#group-manager) [Section titled “Group Manager”](#group-manager) Group Manager can create and manage projects within a specific group (including inviting people to projects and managing resources). They also inherit manager access to all subgroups within the assigned group. **Use case:** Suitable for users responsible for managing a group of projects and ensuring consistency within that group. Group managers can be assigned only when permission granularity is enabled. In that case, organization owners and admins can assign users to manage specific groups or subgroups from the **Groups** tab in the **User details**. ### [Project Manager](#project-manager) [Section titled “Project Manager”](#project-manager) Project Managers are responsible for the management of individual projects. Within those projects, they can manage project members, tasks, and resources, etc., but do not have access to settings or resources outside of their assigned projects. **Use case:** Suitable for users who need to focus only on managing specific projects without broader organizational responsibilities. ### [Developer](#developer) [Section titled “Developer”](#developer) Developer can upload source files, edit translatable text, connect integrations, and access the API. They don’t have permissions to manage project members, tasks, or reports. **Use case:** Suitable for users handling the technical aspects of localization, such as file management, integration setup, or automation. ### [Language Coordinator](#language-coordinator) [Section titled “Language Coordinator”](#language-coordinator) Language Coordinator can manage certain project features only for their assigned languages. They can translate and approve strings, manage project members and teams, generate project reports, create tasks, and pre-translate content. Language Coordinators cannot access other project settings such as source files, integrations, or project configurations. **Use case:** Suitable for users coordinating translations across specific project languages. ## [Contributor](#contributor) [Section titled “Contributor”](#contributor) Contributor is a general term for both Translators and Proofreaders who primarily work in the Editor. They can view projects, tasks, and workflow steps they are assigned to, access the Editor on corresponding workflow steps, generate personal translation reports, and communicate with other project members. ### [Proofreader](#proofreader) [Section titled “Proofreader”](#proofreader) Proofreader can translate and approve strings within assigned projects. They do not have access to project settings or management functions. **Use case:** Suitable for users focused on finalizing translations and ensuring quality. ### [Translator](#translator) [Section titled “Translator”](#translator) Translator can add translations and vote on suggestions made by others. They do not have the ability to approve translations or access project settings. **Use case:** Suitable for users responsible for providing translations without additional management responsibilities. ## [Vendor](#vendor) [Section titled “Vendor”](#vendor) Vendors are separate organizations that provide professional translation services. After you invite a vendor to your project, their organization receives a copy of the assigned workflow step in the *Incoming Projects* section of their workspace. This setup is commonly used when outsourcing translations to external teams while keeping the workflow and quality control within Crowdin Enterprise.
# SAML single sign-on
> Learn how to set up SAML SSO for your organization
SAML single sign-on (SSO) gives users access to Crowdin Enterprise through an identity provider (IDP) of your choice. The benefits of SAML authentication include: * **Standardization:** SAML is a standard format that allows seamless interoperability between systems, independent of implementation. * **Improved user experience:** Users can access Crowdin Enterprise using your organization’s identity provider without additional authentication, allowing them to use only one set of login details. * **Increased security:** SAML is a security standard for logging into applications, which provides a single point of authentication, keeping user credentials within the firewall boundary. ## [Configure your identity provider](#configure-your-identity-provider) [Section titled “Configure your identity provider”](#configure-your-identity-provider) To get started, you’ll need to set up a connection (or connector) for Crowdin Enterprise with your IDP (for example, [Auth0](https://auth0.com/docs/protocols/saml/saml-idp-generic#2-configure-auth0-as-idp), [Google Workspace (SAML)](https://support.google.com/a/answer/6087519?hl=en), [Okta](https://developer.okta.com/docs/guides/saml-application-setup/overview/), and others). [Configure SAML for Google Workspace ](#google-workspace) [Configure SAML for Microsoft Azure ](#microsoft-azure) [Configure SAML for Okta ](#okta) [Configure SAML for OneLogin ](#onelogin) [Configure SAML for Auth0 ](#auth0) ## [Set up SAML SSO for Crowdin Enterprise](#set-up-saml-sso-for-crowdin-enterprise) [Section titled “Set up SAML SSO for Crowdin Enterprise”](#set-up-saml-sso-for-crowdin-enterprise) Once you configured your identity provider, an Organization admin can enable the SAML SSO feature in Crowdin Enterprise **Organization Settings**. 1. Click on your profile picture in the upper-right corner and select **Organization Settings**. 2. Switch to the **Authentication** section on the left sidebar and click on the **SAML** authentication method at the bottom of the page. 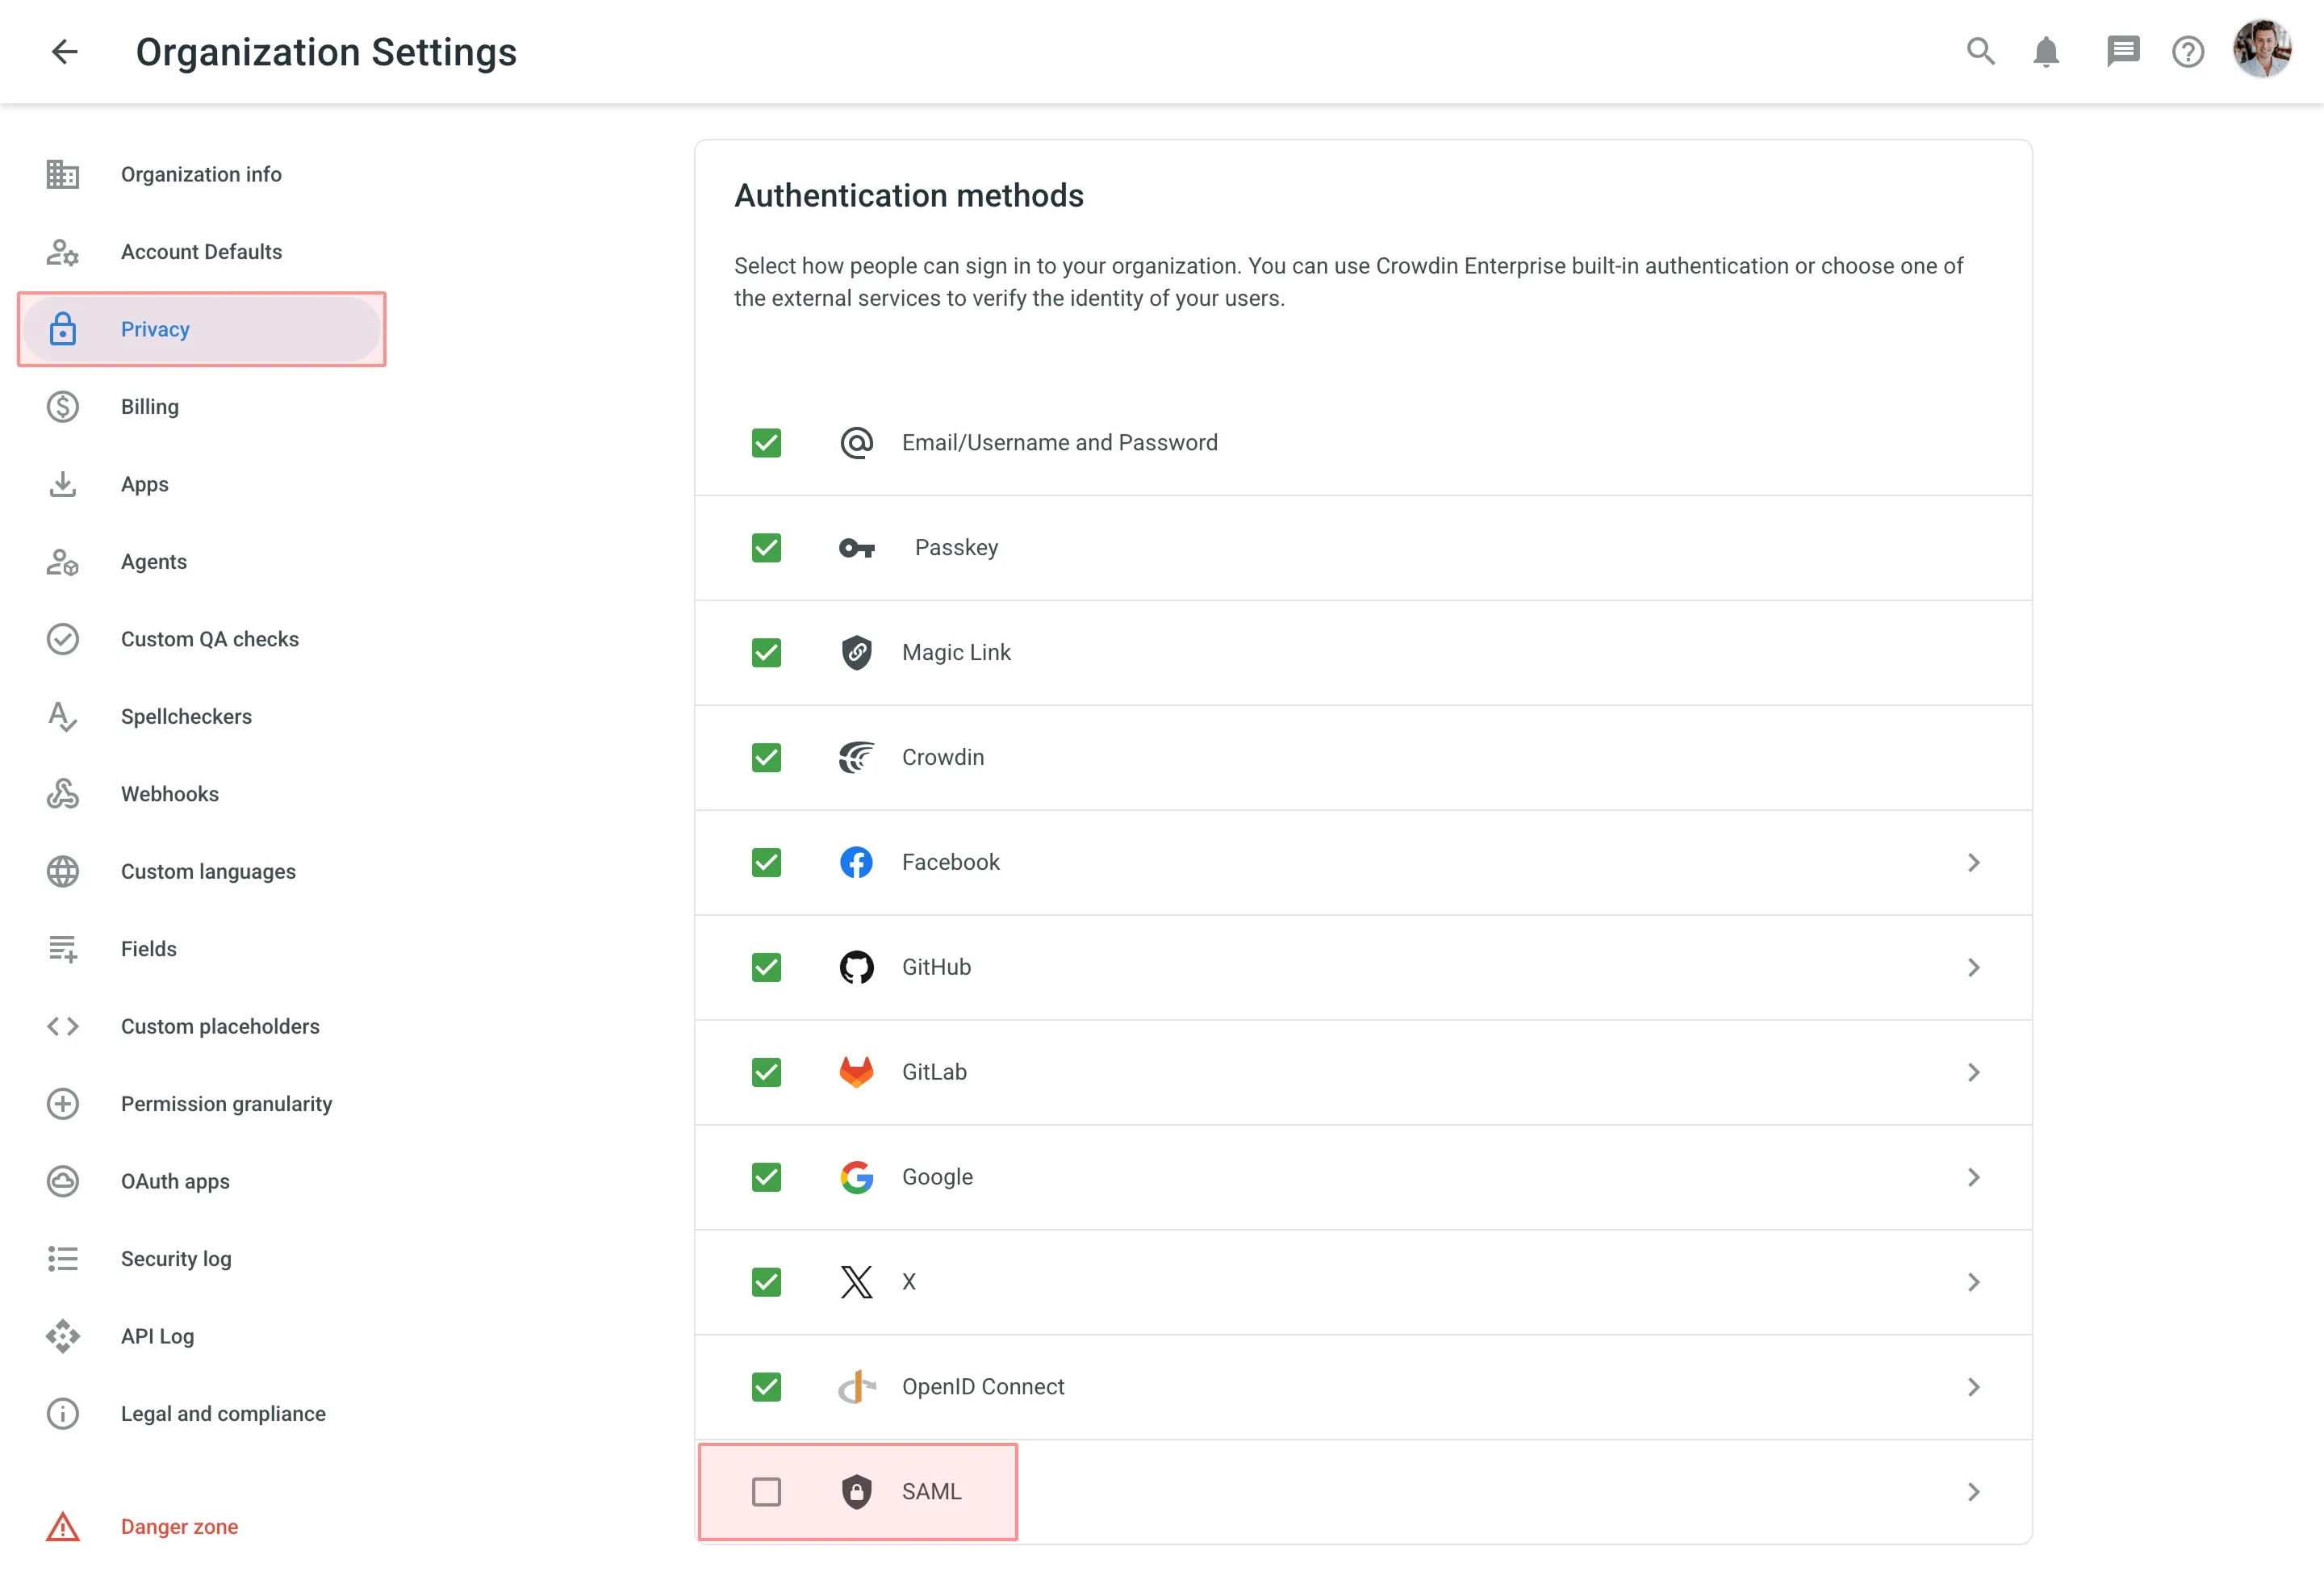 3. Paste your credentials from your IDP and click **Save**. 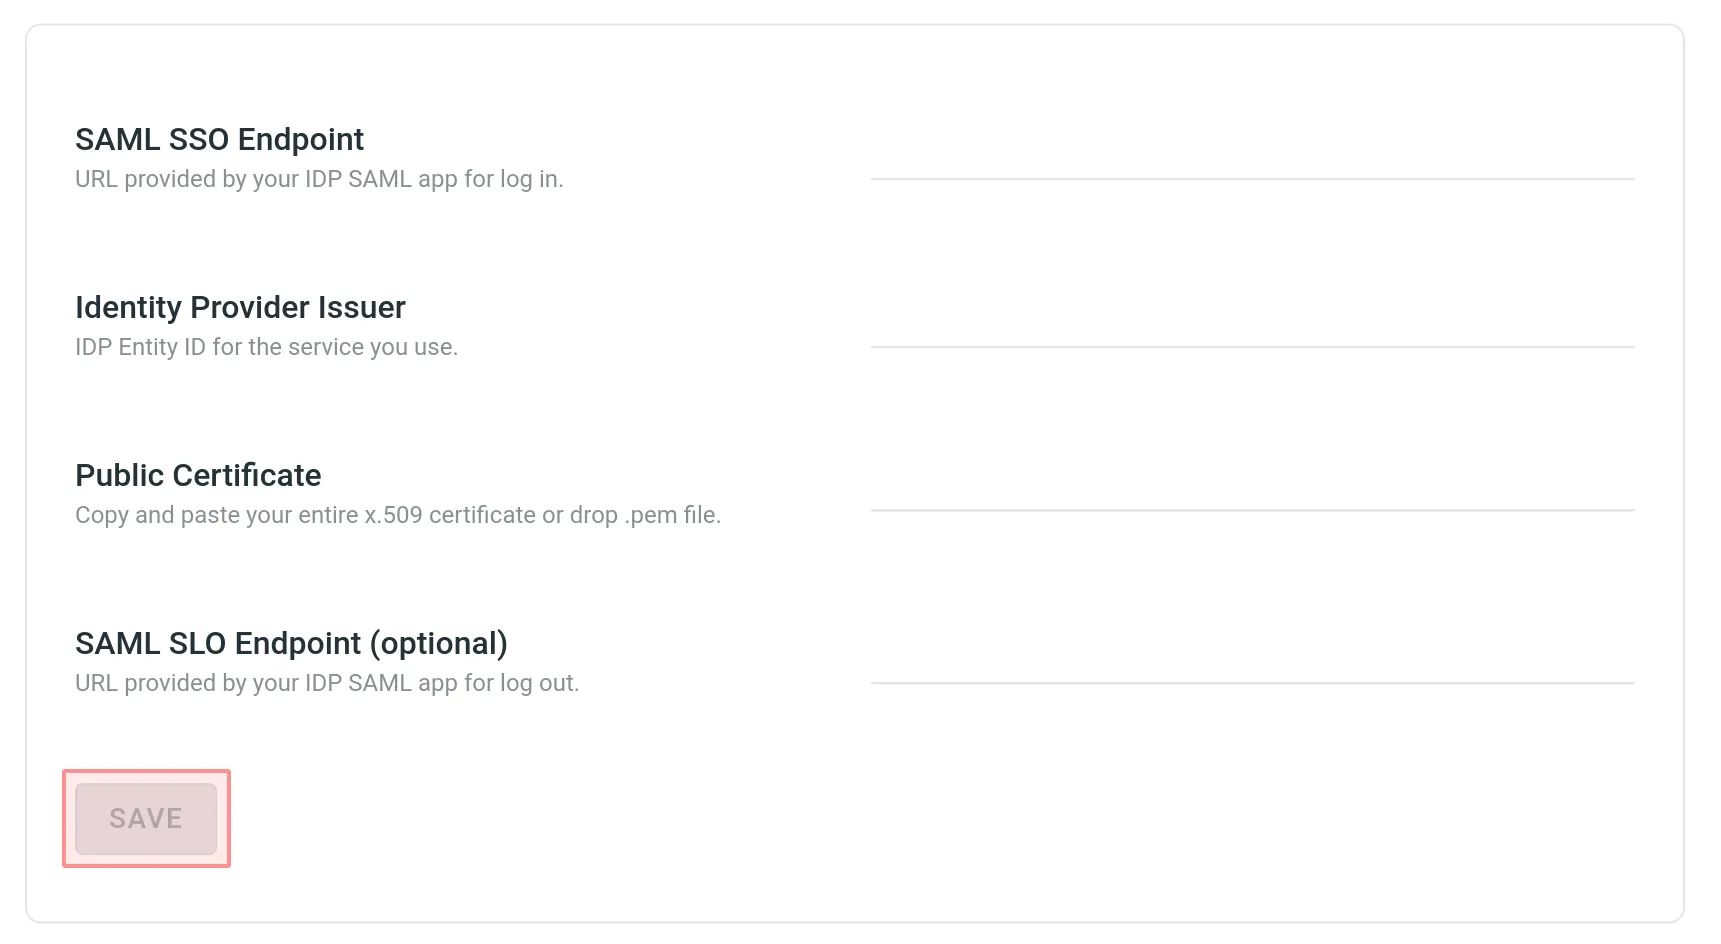 4. Take the credentials from the **SAML Single Sign-On** page and paste them into the IDP settings. 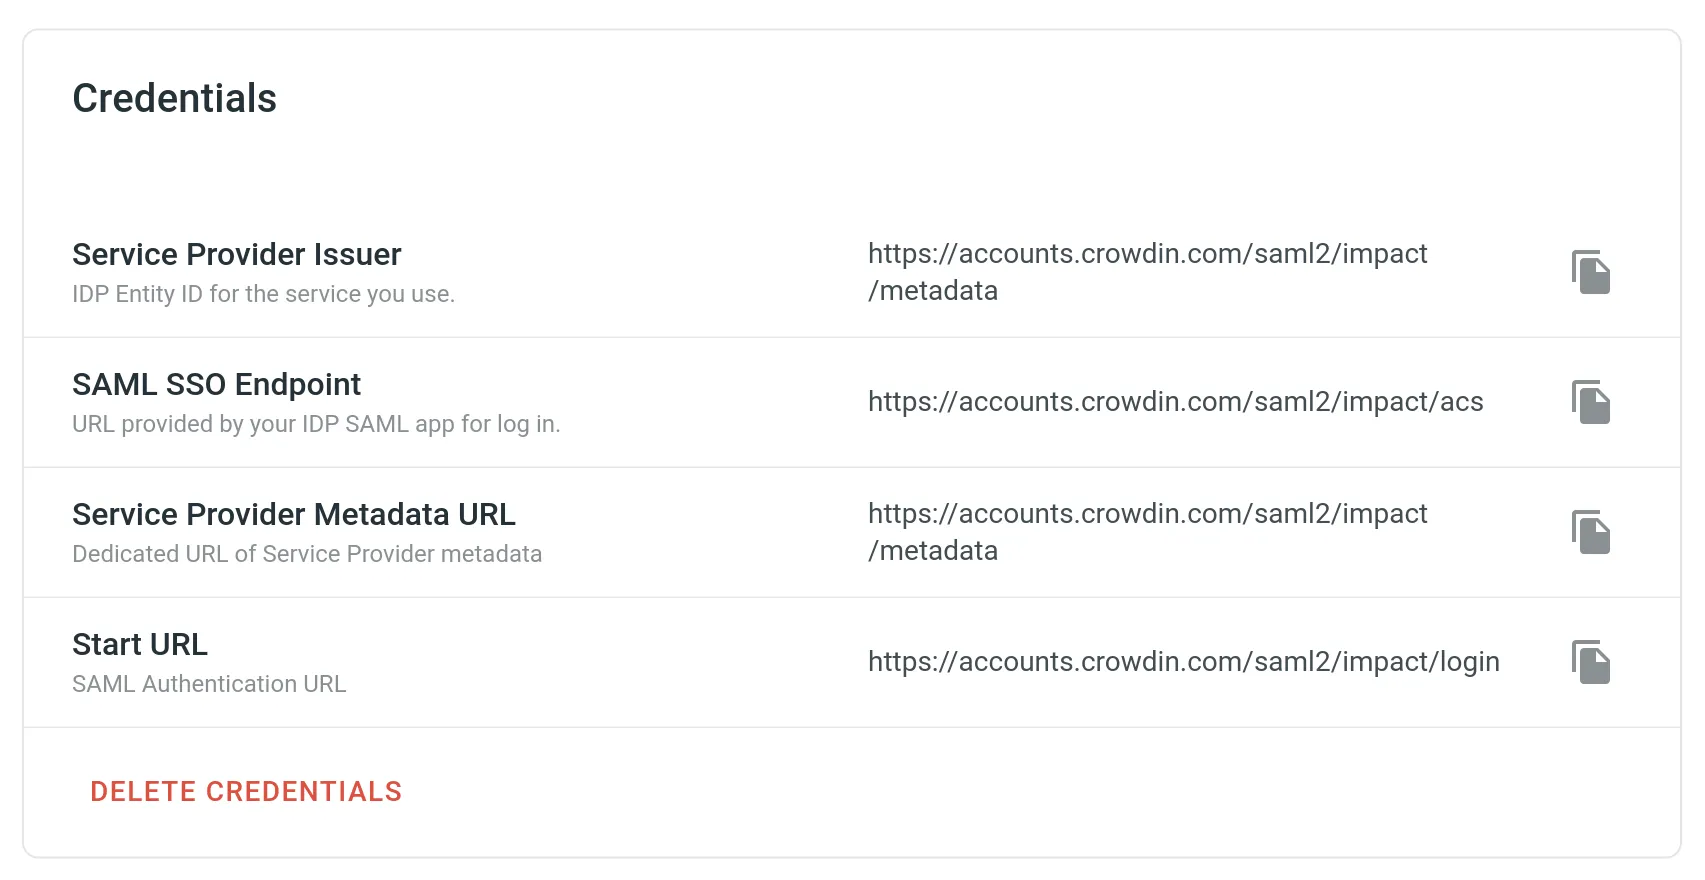 5. Set the preferred configurations in the [Settings](#saml-settings) and [Advanced options](#saml-advanced-options) sections depending on the configurations on the IDP side and click **Save**. 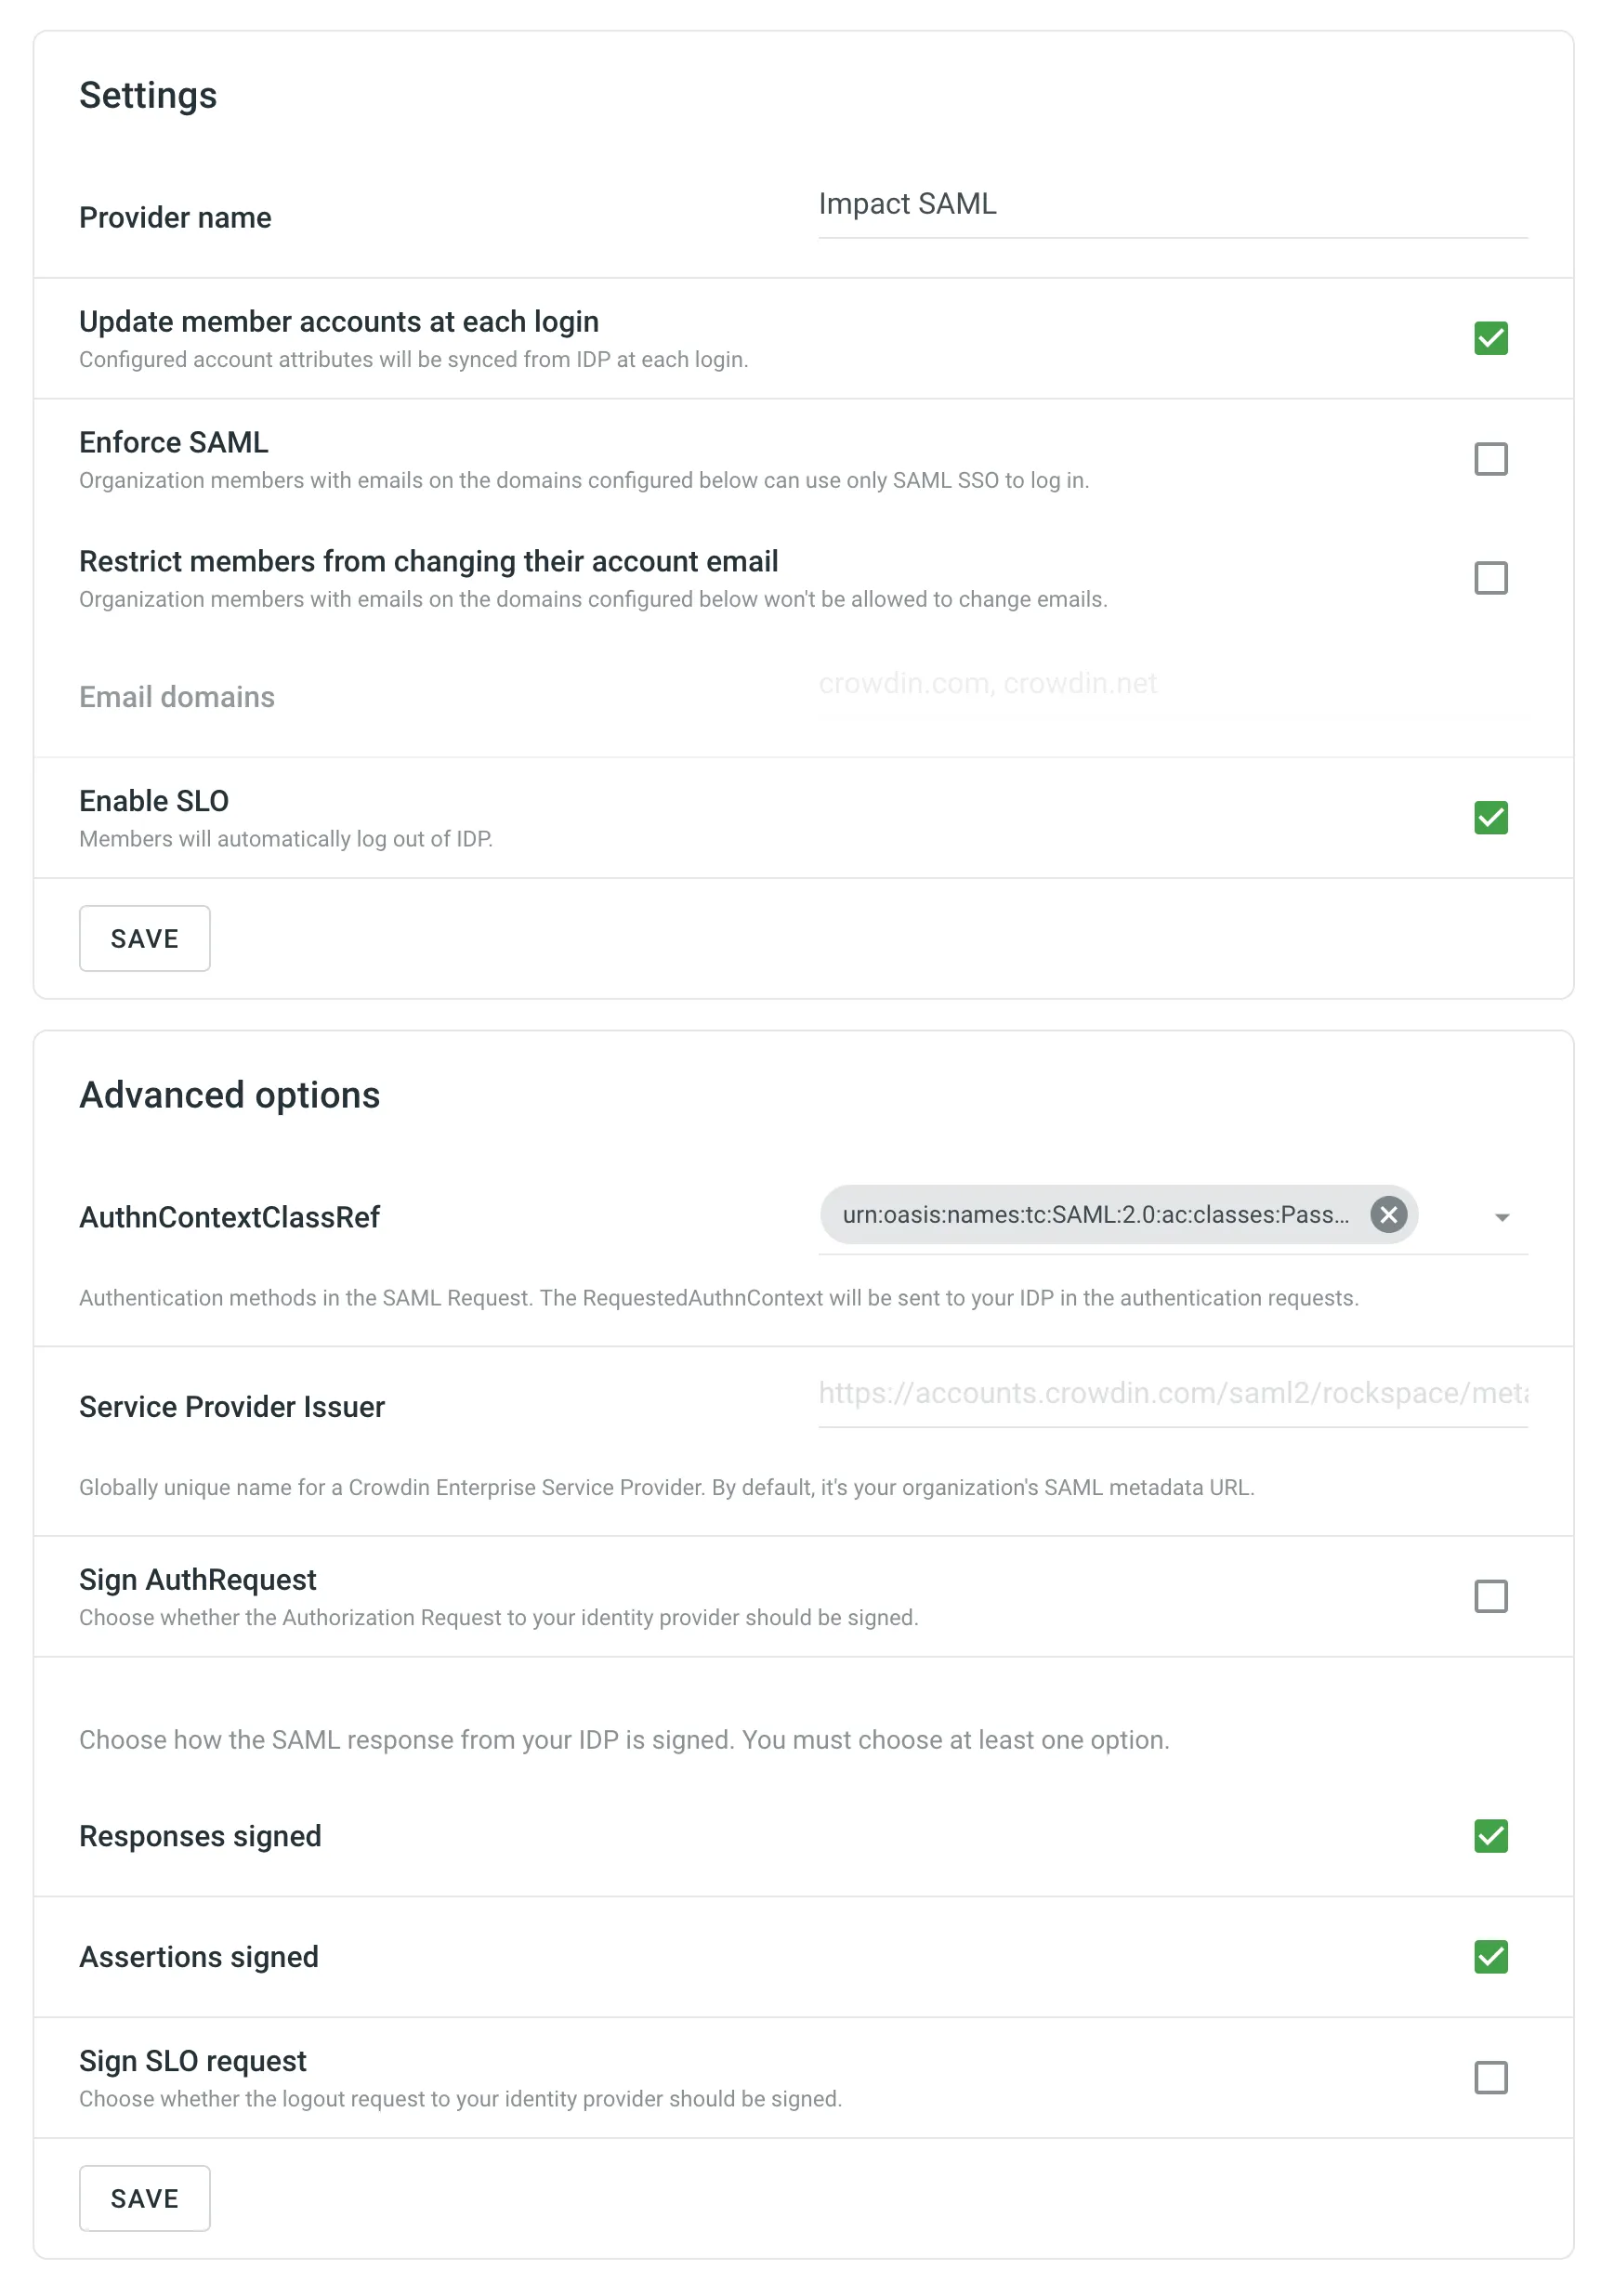 6. Go back to the **Authentication** page and enable the SAML authentication method. 7. As a result, on the login page, users will be able to use SAML for logging into your Crowdin Enterprise organization. ## [SAML Settings](#saml-settings) [Section titled “SAML Settings”](#saml-settings) The SAML **Settings** section provides you with different options that let you fine-tune your SAML behavior. * **Provider name** – the name of the SAML authentication method that will be displayed on your Crowdin Enterprise login page. * **Update member accounts at each login** – select whether you’d like the configured account attributes to be synced from IDP at each login of the organization member. These attributes are synced from IDP during the account creation. * **Enforce SAML** – select whether organization members with emails on the domains configured in the **Email domains** can use only SAML SSO to log in. * **Restrict members to change their account email** – select whether you’d like to restrict members to change their Crowdin Enterprise emails. * **Email domains** – email domains related to organization members that use SAML SSO to log in. * **Enable SLO** – select whether organization members should be logged out of IDP when logging out of your Crowdin Enterprise organization. ## [SAML Advanced Options](#saml-advanced-options) [Section titled “SAML Advanced Options”](#saml-advanced-options) * **AuthnContextClassRef** – authentication method used in SAML request. By default, it’s authentication via username and password over a protected session. * **Service Provider Issuer** – globally unique name for a Crowdin Enterprise Service Provider. By default, it’s your organization’s SAML metadata URL. * **Sign AuthRequest** – select whether to sign the authorization request to your IDP. The following options allow you to choose how the SAML response from your IDP is signed. Use at least one option. * **Responses signed** - Indicates a requirement for the SAML Responses received by Crowdin Enterprise to be signed. * **Assertions signed** - Indicates a requirement for the SAML Assertions received by Crowdin Enterprise to be signed. * **Sign SLO request** - Indicates a requirement for the Single Logout (SLO) requests sent to your identity provider to be signed. ## [Mapping SAML Attributes](#mapping-saml-attributes) [Section titled “Mapping SAML Attributes”](#mapping-saml-attributes) You can map attributes in the IDP response to user attributes used in Crowdin Enterprise. See the available attributes in the following table. | Parameter | Details | | ----------- | --------------------------------------------------------------------------------- | | `firstName` | **Type:** `string` **Description:** The first name of the user stored on the IDP. | | `lastName` | **Type:** `string` **Description:** The last name of the user stored on the IDP. | | `timeZone` | **Type:** `string` **Description:** The timezone of the user. | | `avatar` | **Type:** `string` **Description:** The absolute URL to user’s profile picture. | ## [What you get when SAML SSO is enabled](#what-you-get-when-saml-sso-is-enabled) [Section titled “What you get when SAML SSO is enabled”](#what-you-get-when-saml-sso-is-enabled) Any users already logged in after you’ve set up and enabled the SAML SSO will remain logged in. Further on, users that chose SAML as their login method will log into your Crowdin Enterprise organization with their IDP account. If there is no account for some user in your organization, an account will be created automatically during the login process into your Crowdin Enterprise organization. ## [Configuring SAML SSO for Google Workspace](#google-workspace) [Section titled “Configuring SAML SSO for Google Workspace”](#google-workspace) To set up Crowdin Enterprise SAML SSO in your Google Workspace, follow the steps below. #### [Set up Crowdin Enterprise SAML app](#setup-google) [Section titled “Set up Crowdin Enterprise SAML app”](#setup-google) 1. Open the Google Admin console using an administrator account. 2. From the Admin console *Home* page, go to **Apps > SAML apps**. 3. Click **Add** at the bottom right. 4. Click **Set up my own custom app**. The *Google IdP Information* window opens and the *SSO URL* and *Entity ID* fields automatically populate. 5. Copy the *SSO URL*, *Entity ID*, and download the certificate. 6. In a separate browser tab or window, log in to your Crowdin Enterprise Organization, open the *Organization Settings* > *Authentication* page, and click on SAML at the bottom of the *Authentication methods* list. 7. Enter the information you copied in Step 5 (paste the *SSO URL* in the *SAML SSO Endpoint* field, *Entity ID* in the *Identity Provider Issuer* field, and drag and drop your certificate file to the *Public Certificate* field), click **Save** and then return to the Google Admin console. 8. Click **Next**. 9. In the *Basic information* window, add an application name (for example *Crowdin Enterprise*) and optionally add a description. 10. *(Optional)* Upload a PNG or GIF file to serve as an icon for your Crowdin Enterprise SSO app. The icon image should be 256 pixels square. You can find the Crowdin icon on the [Using the Crowdin Logo](/using-logo/) page. 11. Click **Next**. 12. In the *Service Provider Details* window, you need to enter an *ACS URL*, *Entity ID*, leave the *Start URL* empty, leave the *Signed Response* box cleared, and set the *Name ID Format* to *PERSISTENT*. 13. Switch to your Crowdin Enterprise *Organization Settings* > *Authentication* > SAML where all the values for Step 12 could be found. 14. Copy and paste the *SAML SSO Endpoint* in the *ACS URL* field, *Service Provider Issuer* in the *Entity ID* field in your Google Admin console, clear the *Responses signed* option, and click **Save**. 15. Select SAML in the *Authentication methods* list so that your users could use it as the desired authentication method to log in to your Crowdin Enterprise organization from the login page. 16. Switch to your Google Admin console and click **Next**. 17. Click **Finish** on the *Attribute Mapping* page. 18. In the *Setting up SSO for Crowdin Enterprise* window, click **OK**. #### [Enable Crowdin Enterprise SAML app](#enable-google) [Section titled “Enable Crowdin Enterprise SAML app”](#enable-google) 1. From the Admin console *Home* page, go to **Apps > SAML apps**. 2. Select your new Crowdin Enterprise SAML app. 3. At the top right of the gray box, click **Edit Service** . 4. To turn service on or off for everyone in your organization, click **On for everyone** or **Off for everyone**, and then click **Save**. 5. To turn service on or off only for users in an organizational unit: * On the left, select the organizational unit. * Select **On** or **Off** and then click **Save**. Read more about the [organizational structure of Google Workspace](https://support.google.com/a/answer/4352075). 6. To turn service on for a set of users across or within organizational units, select an access group. For details, go to [turn on a service for a group](https://support.google.com/a/answer/9050643). 7. Ensure that the email addresses your users use to log in to the SAML app match the email addresses they use to log in to your Google domain. #### [Test SSO](#test-sso-google) [Section titled “Test SSO”](#test-sso-google) 1. Open the single sign-on URL for your new Crowdin Enterprise SAML app by clicking on the Crowdin Enterprise in the Google apps menu. Crowdin Enterprise could be found in the app list along with Google Drive, Gmail, and others. You should be automatically redirected to the Google login page. 2. Enter your login credentials. After your login credentials are authenticated, you’re automatically redirected to Crowdin Enterprise. ## [Configuring SAML SSO for Microsoft Azure](#microsoft-azure) [Section titled “Configuring SAML SSO for Microsoft Azure”](#microsoft-azure) To set up Crowdin Enterprise SAML SSO in your Microsoft Azure, follow the steps below. #### [Add Confluence SAML SSO by Microsoft from the Gallery](#add-confluence-saml-sso-by-microsoft-from-the-gallery) [Section titled “Add Confluence SAML SSO by Microsoft from the Gallery”](#add-confluence-saml-sso-by-microsoft-from-the-gallery) 1. Open the [Azure portal](https://portal.azure.com/) using an administrator account. 2. On the left navigation panel, select the *Microsoft Entra ID* service. 3. Click on the *Manage* section and select *Enterprise applications* from the list. You’ll be redirected to *Enterprise applications > All applications*. 4. To add a new application, click New application. 5. In the *Search application* field, type **Confluence SAML SSO by Microsoft**. 6. Select **Confluence SAML SSO by Microsoft** from the results panel and then click **Create**. Wait a few seconds while the app is being added. #### [Configure Microsoft Entra ID SSO](#configure-microsoft-entra-id-sso) [Section titled “Configure Microsoft Entra ID SSO”](#configure-microsoft-entra-id-sso) ##### [Configurations on the Azure Portal](#configurations-on-the-azure-portal) [Section titled “Configurations on the Azure Portal”](#configurations-on-the-azure-portal) Follow these steps to set up Microsoft Entra ID SSO in the Azure portal: 1. As soon as the application is added, you’ll be redirected to its *Overview* page. On the **Confluence SAML SSO by Microsoft** application *Overview* page, find the *Manage* section and select *Single sign-on*. 2. On the *Select a single sign-on method* page, select **SAML**. 3. You are now on the *Set up single sign-on with SAML* page. The following configurations will be happening in the different sections of this page. ###### [Basic SAML Configuration](#basic-saml-configuration) [Section titled “Basic SAML Configuration”](#basic-saml-configuration) 1. Click on the *Basic SAML Configuration* section. 2. Enter your Crowdin Enterprise service provider details here and click **Save**. * *Identifier (Entity ID)*: `https://accounts.crowdin.com/saml2/{your-organization-name}/metadata` * *Reply URL (Assertion Consumer Service URL)*: `https://accounts.crowdin.com/saml2/{your-organization-name}/acs` * *Sign on URL*: `https://accounts.crowdin.com/saml2/{your-organization-name}/login` ###### [Attributes & Claims](#attributes--claims) [Section titled “Attributes & Claims”](#attributes--claims) 1. Click on the *Attributes & Claims* section. 2. Click on the claim in the *Required claim* section. 3. On the *Manage claim* page, select **Persistent** for the *Name identifier format* and select **user.mail** for the *Source attribute*, click **Save**. ###### [SAML Certificates](#saml-certificates) [Section titled “SAML Certificates”](#saml-certificates) 1. Click on the *SAML Certificates* section. 2. Select **Sign SAML response and assertion** for the *Signing Option* and click **Save**. 3. Click **Download** toward the *Certificate (Base64)* from the *SAML Certificates* section. ###### [Set up Confluence SAML SSO by Microsoft](#set-up-confluence-saml-sso-by-microsoft) [Section titled “Set up Confluence SAML SSO by Microsoft”](#set-up-confluence-saml-sso-by-microsoft) 1. Go to the *Set up Confluence SAML SSO by Microsoft* section. 2. Copy the *Login URL*, *Microsoft Entra Identifier*, *Logout URL*. ##### [Configurations in Crowdin Enterprise](#configurations-in-crowdin-enterprise) [Section titled “Configurations in Crowdin Enterprise”](#configurations-in-crowdin-enterprise) 1. In a separate browser tab or window, log in to your Crowdin Enterprise Organization, open the *Organization Settings* > *Authentication* page, and click on SAML at the bottom of the *Authentication methods* list. 2. Enter the information you copied in the Azure portal and click **Save**. * Paste the *Login URL* in the *SAML SSO Endpoint* field. * Paste *Microsoft Entra Identifier* in the *Identity Provider Issuer* field. * Paste *Logout URL* in the *SAML SLO Endpoint* field. * Drag and drop your certificate file to the *Public Certificate* field. 3. You’ll be redirected back to the *Organization Settings* > *Authentication* page. Select the checkbox next to the SAML in the bottom of the *Authentication methods* list so that your users could use it as the desired authentication method to log in to your Crowdin Enterprise organization from the login page. ##### [Authentication Method Settings](#authentication-method-settings) [Section titled “Authentication Method Settings”](#authentication-method-settings) Depending on the authentication method you use in the Azure portal, in some cases, it might be necessary to change the default value for the `AuthnContextClassRef` parameter on the *SAML Single Sign-On* page in Crowdin Enterprise. To allow all possible authentication methods, change `AuthnContextClassRef` parameter to the `unspecified` value. #### [Assign Users](#assign-users-azure) [Section titled “Assign Users”](#assign-users-azure) In this section, you’ll enable users to use Azure single sign-on by granting access to your Crowdin Enterprise Organization. 1. In the Azure portal, select Enterprise Applications, and then select All applications. 2. In the applications list, select **Confluence SAML SSO by Microsoft**. 3. In the app’s overview page, find the *Manage* section, and select *Users and groups*. 4. Click **Add user/group**, then on the *Add Assignment* pane, click *None Selected* under *Users and groups*. 5. In the *Users and groups* dialog, select your own account from the *Users* list to be able to test the SAML SSO, then click the **Select** button at the bottom of the screen, then click **Assign**. In the same way, you’ll be able to assign more users anytime. #### [Test SSO](#test-sso-azure) [Section titled “Test SSO”](#test-sso-azure) 1. On the **Confluence SAML SSO by Microsoft** application *Overview* page, find the *Manage* section and select *Single sign-on*. 2. Scroll down to the *Test single sign-on with Confluence SAML SSO by Microsoft* section and click **Test**. 3. On the right-side pane, click **Sign in as current user**. After your login credentials are authenticated, you’re automatically redirected to Crowdin Enterprise. ## [Configuring SAML SSO for Okta](#okta) [Section titled “Configuring SAML SSO for Okta”](#okta) To set up Crowdin Enterprise SAML SSO in your Okta, follow the steps below. #### [Set up Crowdin Enterprise SAML App](#setup-okta) [Section titled “Set up Crowdin Enterprise SAML App”](#setup-okta) 1. Open the Okta Dashboard using an administrator account. 2. From the Dashboard page, go to **Applications**. 3. Click **Add Application**. 4. Click **Create New App**. 5. In the *Create a New Application Integration* dialog, set *Platform* to *Web* and *Sign on method* to *SAML 2.0*, click **Create**. 6. On the *Create SAML Integration* page, add an application name (for example *Crowdin Enterprise*) on the *General Settings* step. 7. *(Optional)* Upload a PNG, JPG, or GIF file to serve as a logo for your Crowdin Enterprise SSO app. The image should have dimensions less than 1400x400px and be less than 100k in size. You can find the Crowdin icon on the [Using the Crowdin Logo](/using-logo/) page. 8. Keep the *App visibility* options cleared, click **Next**. 9. On the *Configure SAML* step > *SAML Settings* section, you need to enter *Single sign on URL*, *Audience URI (SP Entity ID)*, leave the *Default RelayState* empty, set the *Name ID Format* to *Persistent*, *Application username* to *Email*, click **Next**.*Single sign on URL*: `https://accounts.crowdin.com/saml2/{your-organization-name}/acs`\ *Audience URI (SP Entity ID)*: `https://accounts.crowdin.com/saml2/{your-organization-name}/metadata` 10. On the *Feedback* step, select the **I’m an Okta customer adding an internal app** option, click **Finish**. 11. After you finished setting up the app on the Okta’s side, you’ll be redirected to the app’s *Sign On* tab. In the *Settings* section, click **View SAML setup instructions**. 12. In the new browser tab, you’ll see the credentials that need to be specified in your Crowdin Enterprise *Organization Settings* > *Authentication* page > SAML. 13. Copy the *Identity Provider Single Sign-On URL*, *Identity Provider Issuer*, and download the certificate. 14. In a separate browser tab or window, log in to your Crowdin Enterprise Organization, open the *Organization Settings* > *Authentication* page, and click on SAML at the bottom of the *Authentication methods* list. 15. Enter the information you copied in Step 13 (paste the *Identity Provider Single Sign-On URL* in the *SAML SSO Endpoint* field, *Identity Provider Issuer* in the *Identity Provider Issuer* field, and drag and drop your certificate file to the *Public Certificate* field), click **Save**. 16. Select the checkbox next to SAML in the *Authentication methods* list so that your users could use it as the desired authentication method to log in to your Crowdin Enterprise organization from the login page. #### [Assign Users](#assign-users-okta) [Section titled “Assign Users”](#assign-users-okta) In this section, you’ll enable users to use Okta single sign-on by granting access to your Crowdin Enterprise Organization. 1. Open your Okta Dashboard using an administrator account and go to **Applications**. 2. Click on your new Crowdin Enterprise SAML app. 3. Switch to the *Assignments* tab, click **Assign**, and select **Assign to Groups**. 4. In the *Assign Crowdin Enterprise to Groups* dialog, click **Assign** on **Everyone** to enable Crowdin Enterprise SAML app to all users in your organization, click **Done**. Alternatively, you can assign separate groups or individual users. #### [Test SSO](#test-sso-okta) [Section titled “Test SSO”](#test-sso-okta) 1. On the Crowdin Enterprise [login page](https://accounts.crowdin.com/), select your organization and click **Log in**. 2. Click on **SAML**. You should be automatically redirected to the Okta login page. 3. Enter your login credentials. After your login credentials are authenticated, you’re automatically redirected to Crowdin Enterprise. ## [Configuring SAML SSO for OneLogin](#onelogin) [Section titled “Configuring SAML SSO for OneLogin”](#onelogin) To set up Crowdin Enterprise SAML SSO in your OneLogin, follow the steps below. #### [Add OneLogin SAML Test (IdP) from the App Catalog](#add-onelogin-saml-test-idp-from-the-app-catalog) [Section titled “Add OneLogin SAML Test (IdP) from the App Catalog”](#add-onelogin-saml-test-idp-from-the-app-catalog) 1. Open the OneLogin Admin Console using an administrator account. 2. From the Admin Console page, go to *Applications*. 3. To add a new application, click **Add App**. 4. On the *Find Applications* page, type **OneLogin SAML Test (IdP)** in the search box. 5. Select **OneLogin SAML Test (IdP)** from the search results list. Wait a few seconds while the app is being added. 6. Update or rename the *Display Name* (for example to *Crowdin Enterprise*). 7. (Optional) Replace default app icons with a PNG or SVG file for your Crowdin Enterprise SSO app. You can find the Crowdin icon on the [Using the Crowdin Logo](/using-logo/) page, click **Save**. 8. You are now in the *Info* tab. Click the *Configuration* tab. Enter your Crowdin Enterprise service provider details here and click **Save** to proceed.*SAML Consumer URL*: `https://accounts.crowdin.com/saml2/{your-organization-name}/acs`\ *SAML Audience*: `https://accounts.crowdin.com/saml2/{your-organization-name}/metadata`\ *SAML Recipient*: `https://accounts.crowdin.com/saml2/{your-organization-name}/acs`\ *SAML Single Logout URL*: `https://accounts.crowdin.com/saml2/{your-organization-name}/slo`\ *ACS URL Validator*: `^https:\/\/accounts\.crowdin\.com\/saml2\/{your-organization-name}\/acs$` 9. Navigate to the *SSO* tab in OneLogin and copy the *Issuer URL*, *SAML 2.0 Endpoint (HTTP)*, and X.509 Certificate. To copy the X.509 certificate, click **View Details**. 10. In a separate browser tab or window, log in to your Crowdin Enterprise Organization, open the *Organization Settings* > *Authentication* page, at the bottom of the *Authentication methods* list click on SAML. 11. Enter the information you copied in Step 8 (paste the *Issuer URL* in the *Identity Provider Issuer* field, *SAML 2.0 Endpoint (HTTP)* in the *SAML SSO Endpoint* field, and X.509 certificate to the *Public Certificate* field), click **Save**. 12. Select the checkbox next to SAML in the *Authentication methods* list so that your users could use it as the desired authentication method to log in to your Crowdin Enterprise organization from the login page. #### [Assign Users](#assign-users-onelogin) [Section titled “Assign Users”](#assign-users-onelogin) In this section, you’ll grant users access to your new Crowdin Enterprise SAML SSO app. 1. Open the OneLogin Admin Console using an administrator account. 2. From the Admin Console page, go to *Applications*. 3. Click on your new Crowdin Enterprise SAML SSO app. 4. Navigate to the *Access* tab and specify the roles that should have access to this app. If you don’t have the necessary role you can add a new role via *Users* > *Roles* specifying access to the needed apps. You can assign users to a new role via *Users* page. #### [Test SSO](#test-sso-onelogin) [Section titled “Test SSO”](#test-sso-onelogin) 1. On the Crowdin Enterprise [login page](https://accounts.crowdin.com/), select your organization and click **Log in**. 2. Click on **SAML**. You should be automatically redirected to the OneLogin login page. 3. Enter your login credentials. After your login credentials are authenticated, you’re automatically redirected to Crowdin Enterprise. ## [Configuring SAML SSO for Auth0](#auth0) [Section titled “Configuring SAML SSO for Auth0”](#auth0) To set up Crowdin Enterprise SAML SSO in your Auth0, follow the steps below. #### [Set up Crowdin Enterprise SAML App](#setup-auth0) [Section titled “Set up Crowdin Enterprise SAML App”](#setup-auth0) 1. Open the Auth0 Management Dashboard using an administrator account. 2. From the *Dashboard*, go to *Applications*. 3. Click **+ CREATE APPLICATION** on the right. 4. In the **Name** field, specify an application name (for example *Crowdin Enterprise*), select the **Regular Web Applications** application type, click **CREATE**. 5. Go back to *Dashboard* > *Applications*. 6. Find the row for the application you just created, and click on the Settings icon to the right of the application name. 7. *(Optional)* Specify the URL for your Crowdin Enterprise SSO app logo in the **Application Logo** field. You can find the Crowdin icon on the [Using the Crowdin Logo](/using-logo/) page. 8. Switch to the **Addons** tab. 9. Click on **SAML2 WEB APP**. 10. In the appeared dialog, specify the **Application Callback URL**.*Application Callback URL*: `https://accounts.crowdin.com/saml2/{your-organization-name}/acs` 11. In the **Settings** paste the following snippet ```json { "nameIdentifierProbes": [ "http://schemas.xmlsoap.org/ws/2005/05/identity/claims/emailaddress" ] } ``` This way the **NameID** would be set to the user email address. 12. Scroll down and click **ENABLE**. 13. Scroll up and switch to the **Usage** tab. 14. In the **Usage** tab, you’ll see the credentials that need to be specified in your Crowdin Enterprise *Organization Settings* > *Authentication* page > SAML. 15. Copy the *Issuer*, *Identity Provider Login URL*, and download the certificate. 16. In a separate browser tab or window, log in to your Crowdin Enterprise Organization, open the *Organization Settings* > *Authentication* page, and click on SAML at the bottom of the *Authentication methods* list. 17. Enter the information you copied in Step 14 (paste the *Issuer* in the *Identity Provider Issuer* field, *Identity Provider Login URL* in the *SAML SSO Endpoint* field, and drag and drop your certificate file to the *Public Certificate* field), click **Save**. 18. Select the checkbox next to SAML in the *Authentication methods* list so that your users could use it as the desired authentication method to log in to your Crowdin Enterprise organization from the login page. #### [Manage Access to Crowdin Enterprise SAML App](#manage-access-to-crowdin-enterprise-saml-app) [Section titled “Manage Access to Crowdin Enterprise SAML App”](#manage-access-to-crowdin-enterprise-saml-app) By default, all users associated with a single Auth0 tenant are shared between the tenant’s applications (and therefore have access to the applications). If necessary you can restrict some users’ access to the application using [rules](https://auth0.com/docs/rules). See [this rule as an example](https://github.com/auth0/rules/blob/aeaf93bc058408e260192d0941a688963449d6be/src/rules/simple-user-whitelist-for-app.js). #### [Test SSO](#test-sso-auth0) [Section titled “Test SSO”](#test-sso-auth0) 1. On the Crowdin Enterprise [login page](https://accounts.crowdin.com/), select your organization and click **Log in**. 2. Click on **SAML**. You should be automatically redirected to the Auth0 login page. 3. Enter your login credentials. After your login credentials are authenticated, you’re automatically redirected to Crowdin Enterprise.
# Screenshots
> Provide translators with additional context for the source strings
Screenshots are a great way to provide translators with additional context for the source strings in your project and, as a result, get more relevant and consistent translations. With screenshots, your team can see which strings are used together on the same page, whether short texts stand for titles, buttons, etc. Tag source strings to the screenshots to display them to translators in the Editor in the context section below the source string. 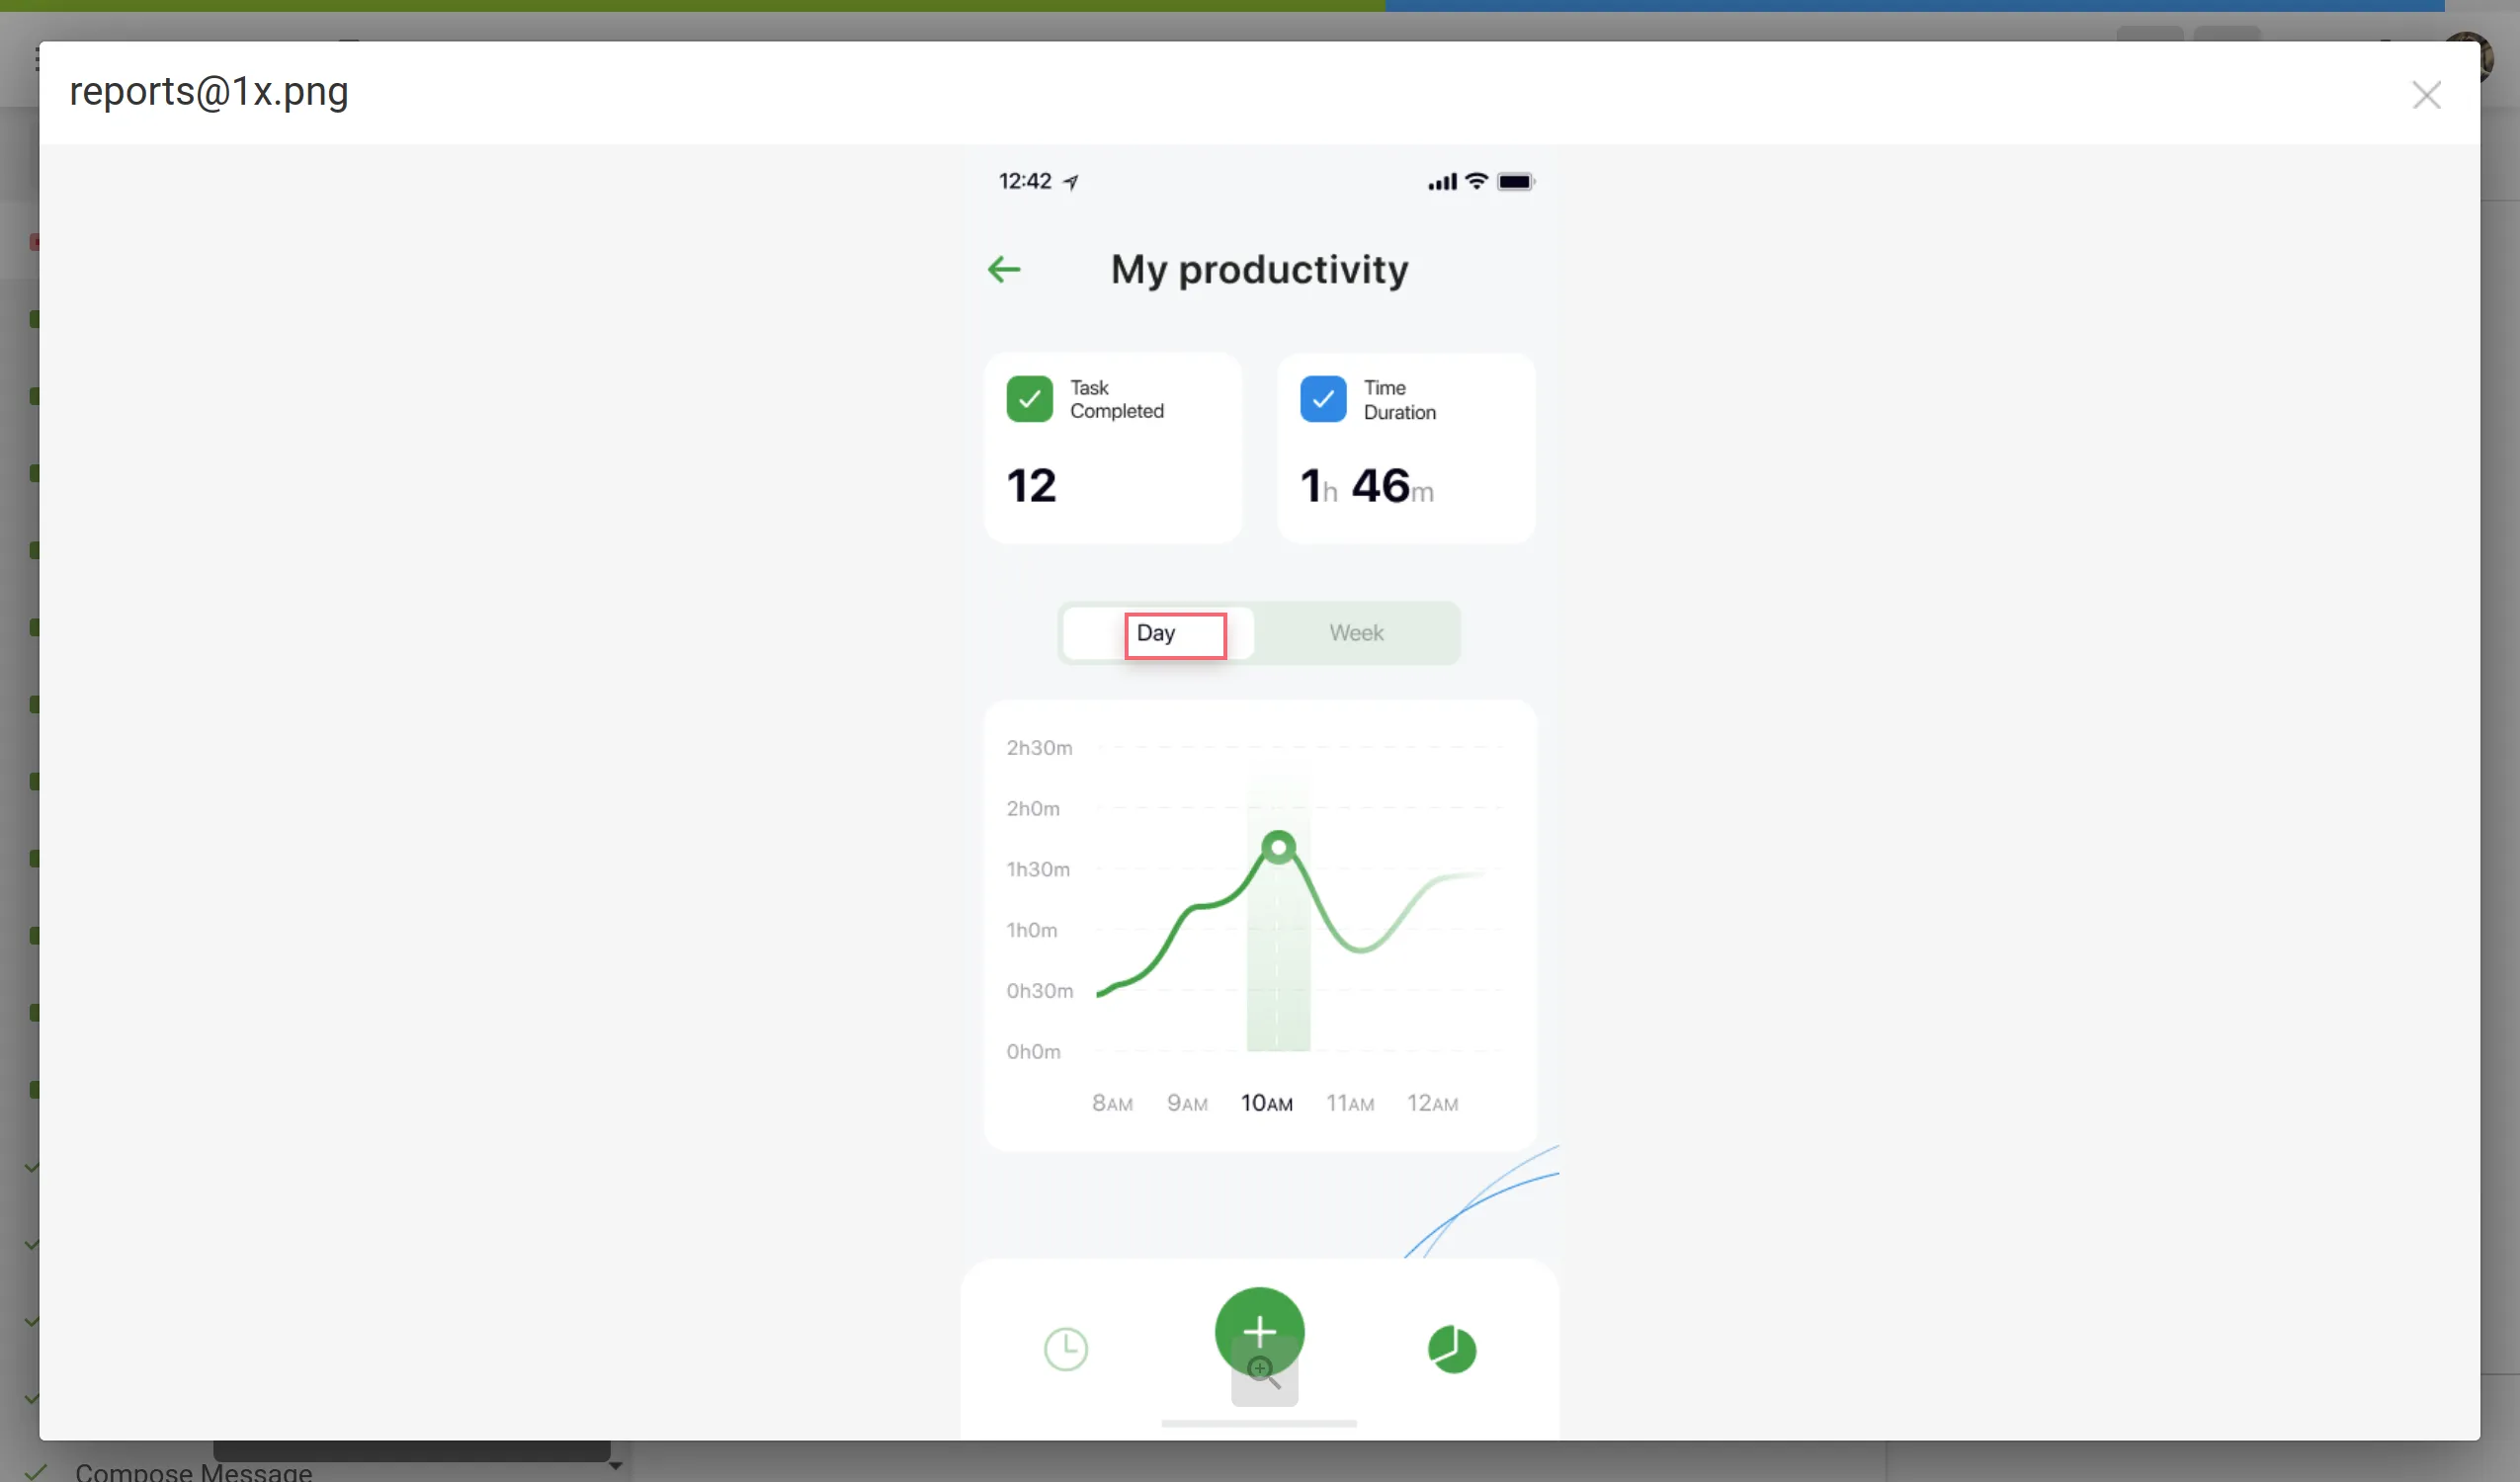 ## [Upload Screenshots](#upload-screenshots) [Section titled “Upload Screenshots”](#upload-screenshots) To upload screenshots into your project, follow these steps: 1. Open your project and select **Screenshots** on the left sidebar. 2. Drag images from your machine, or click **Upload**. 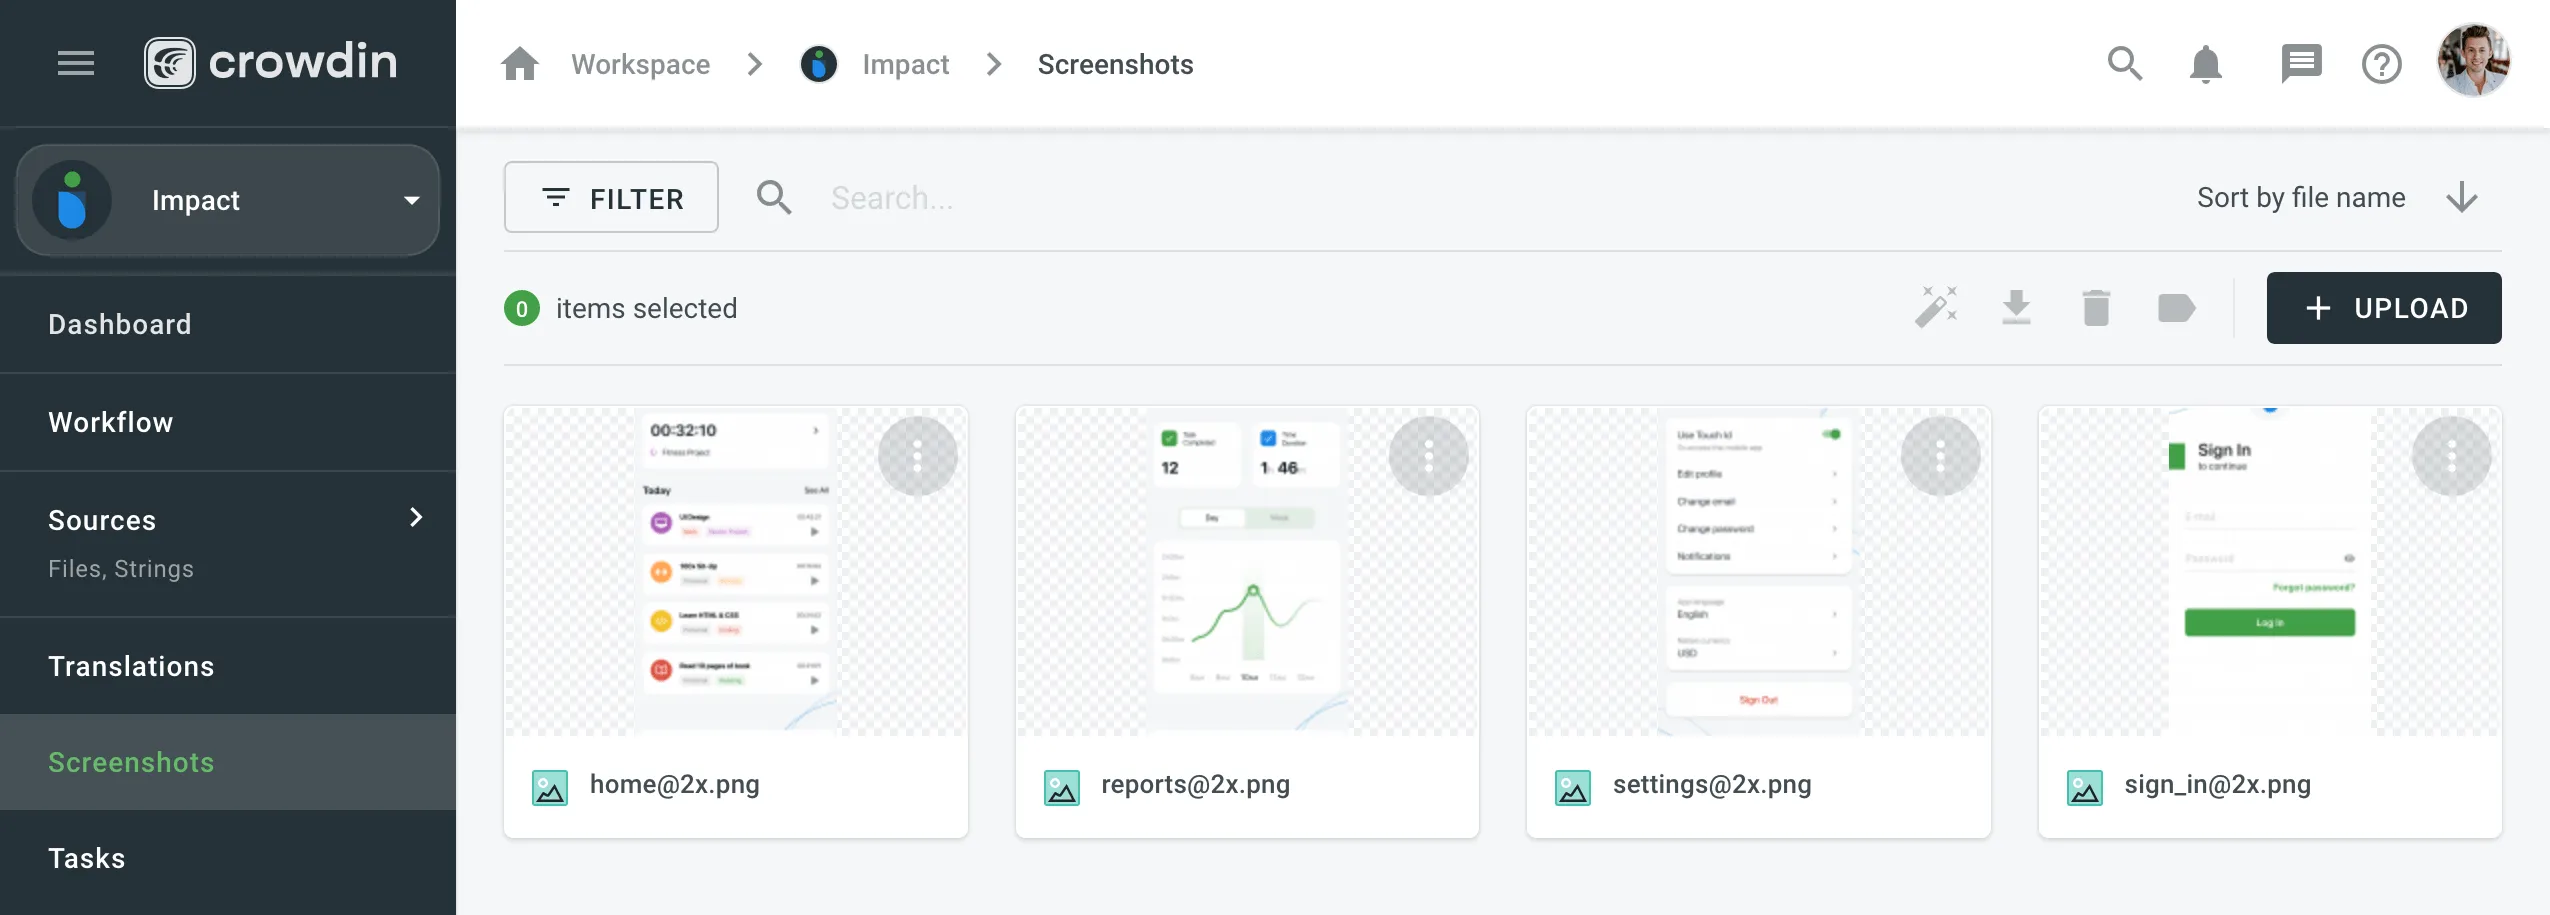 ## [Tag Strings](#tag-strings) [Section titled “Tag Strings”](#tag-strings) To show translators where certain strings are located in the UI tag strings on the screenshots. In Crowdin Enterprise, you can tag strings using the following methods: * Auto tag * Text recognition * Drag and drop ### [Tag Strings Automatically](#tag-strings-automatically) [Section titled “Tag Strings Automatically”](#tag-strings-automatically) Texts within an image will be detected automatically. Then the matching strings will be searched in the project according to the selected filter. As a result, the ones found will be tagged on the screenshot. 1. Open the screenshot with a double click or right-click on the screenshot and select **Edit**. 2. Click . 3. Once the strings are added, click **Save**. 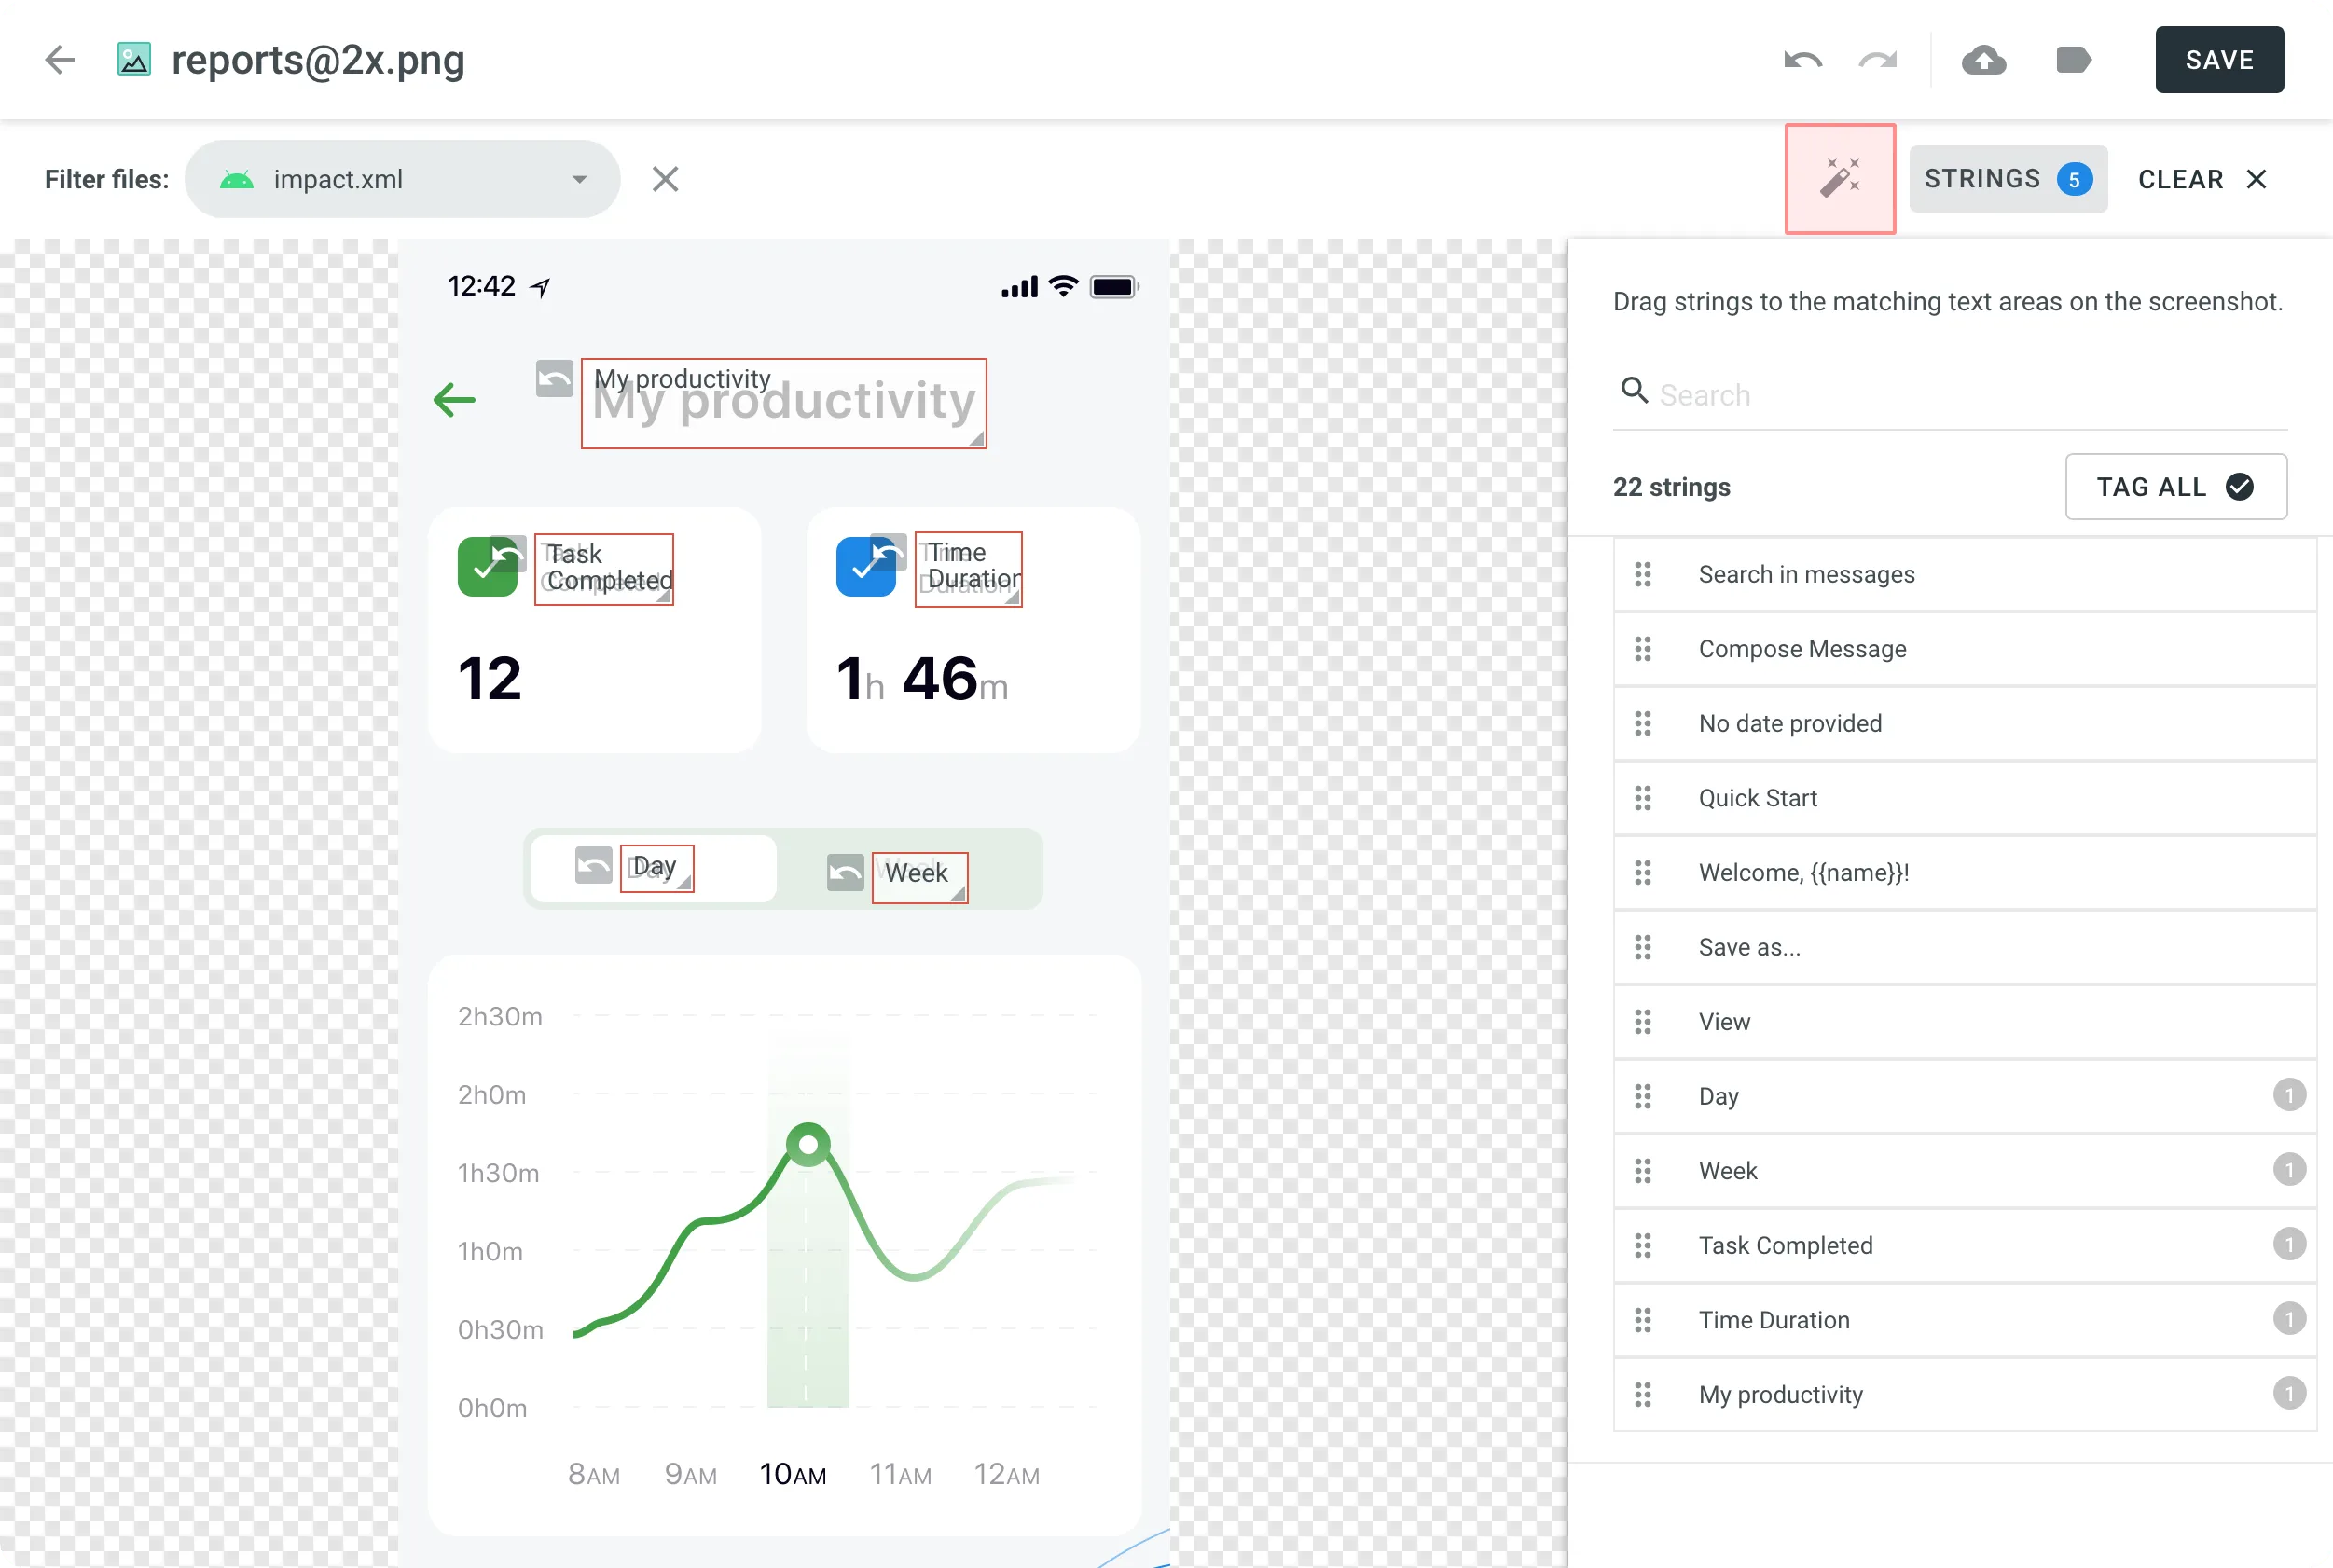 To tag strings automatically on a single screenshot without opening it: 1. Right-click on the needed screenshot. 2. Select **Auto tag**. You can also tag strings automatically on multiple screenshots at once: 1. Select multiple screenshots by holding `Ctrl` or `Shift` . 2. Click . If you use In-Context, you might find helpful its integrated feature for taking screenshots of the website pages. [Adding Screenshots via In-Context ](/developer/in-context-localization/#adding-screenshots-via-in-context)In-Context Localization is a feature that allows you to preview your website or application in Crowdin and translate strings directly in the context. ### [Tag Strings with Text Recognition](#tag-strings-with-text-recognition) [Section titled “Tag Strings with Text Recognition”](#tag-strings-with-text-recognition) The system will search for a string that matches the text you select among all the strings in your project. If several similar strings are found, you will see all of them and be able to select the best-matching one. 1. Open the screenshot with a double click or right-click on the screenshot and select **Edit**. 2. Highlight the text on the screenshot. 3. Once finished tagging all the strings, click **Save**. 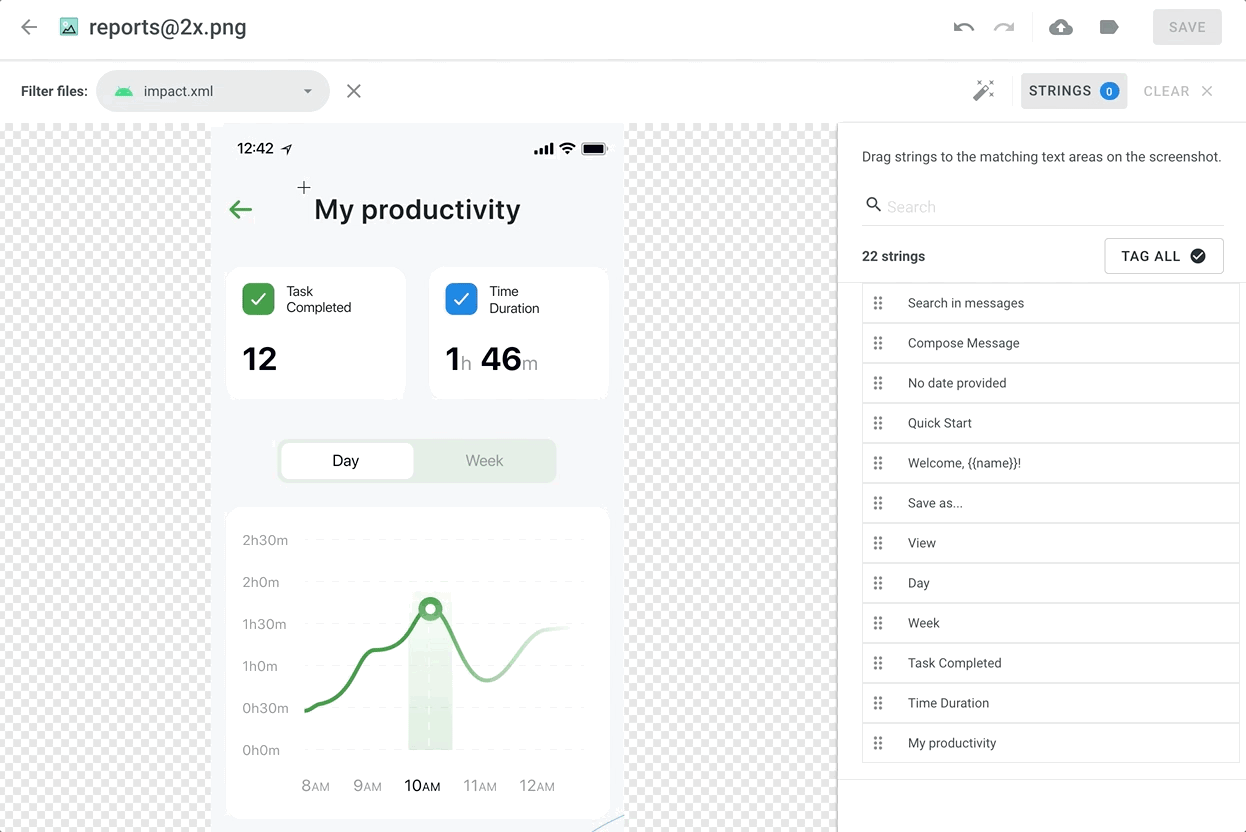 ### [Tag Strings Manually](#tag-strings-manually) [Section titled “Tag Strings Manually”](#tag-strings-manually) Drag the listed strings to the text on the screenshot manually. 1. Open the screenshot with a double click or right-click on the screenshot and select **Edit**. 2. Sort and filter the listed strings. You can select all or specific files and search strings by text or context. 3. Drag the needed string from the list in the right panel to the corresponding text on the screenshot. Alternatively, click on the strings to tag them in the screenshot without specifying the exact place where they should appear. 4. *(Optional)* To view additional string details or edit them: * Click the button above the string list to show more details (file name and string context). * Hover over a string and click the to open the **Edit String** dialog. You can: * Update the identifier. * Update the source text. * Add or update the context. * Add or update the labels. * Set the **Max. length of the translated text**. * Click **Save** after making the changes. 5. Click **Save** when you finish tagging. Read more about [String Editing](/enterprise/string-management/#string-editing). To tag all the strings from the selected file to your screenshot, follow these steps: 1. Select the file you need. 2. Click **Tag All** > **Save**. ### [Drag and Scroll Screenshots](#drag-and-scroll-screenshots) [Section titled “Drag and Scroll Screenshots”](#drag-and-scroll-screenshots) When tagging high-resolution screenshots, you can hold `Ctrl` to drag and scroll the screenshot with a mouse revealing the remaining part. ### [Removing Tagged Strings from Screenshot](#removing-tagged-strings-from-screenshot) [Section titled “Removing Tagged Strings from Screenshot”](#removing-tagged-strings-from-screenshot) If you need to remove all the strings tagged on the screenshot, click **Clear**. ## [Labels](#labels) [Section titled “Labels”](#labels) Use labels in your project for an easy way to organize screenshots by certain topics. Once you add labels to your screenshots, you can filter them by added labels. If you already use labels for your source strings, you can also use the same labels for screenshots. [Managing Project Labels ](/enterprise/project-settings/labels/)Learn how to make your Crowdin Enterprise project labels. ### [Adding Labels to Screenshots](#adding-labels-to-screenshots) [Section titled “Adding Labels to Screenshots”](#adding-labels-to-screenshots) There are a few possible ways you can add labels to the screenshots. ##### [Add labels to one screenshot at a time](#add-labels-to-one-screenshot-at-a-time) [Section titled “Add labels to one screenshot at a time”](#add-labels-to-one-screenshot-at-a-time) 1. Open the screenshot with a double-click. 2. Click . 3. Select needed labels in the **Labels** field. 4. Click **Save**. 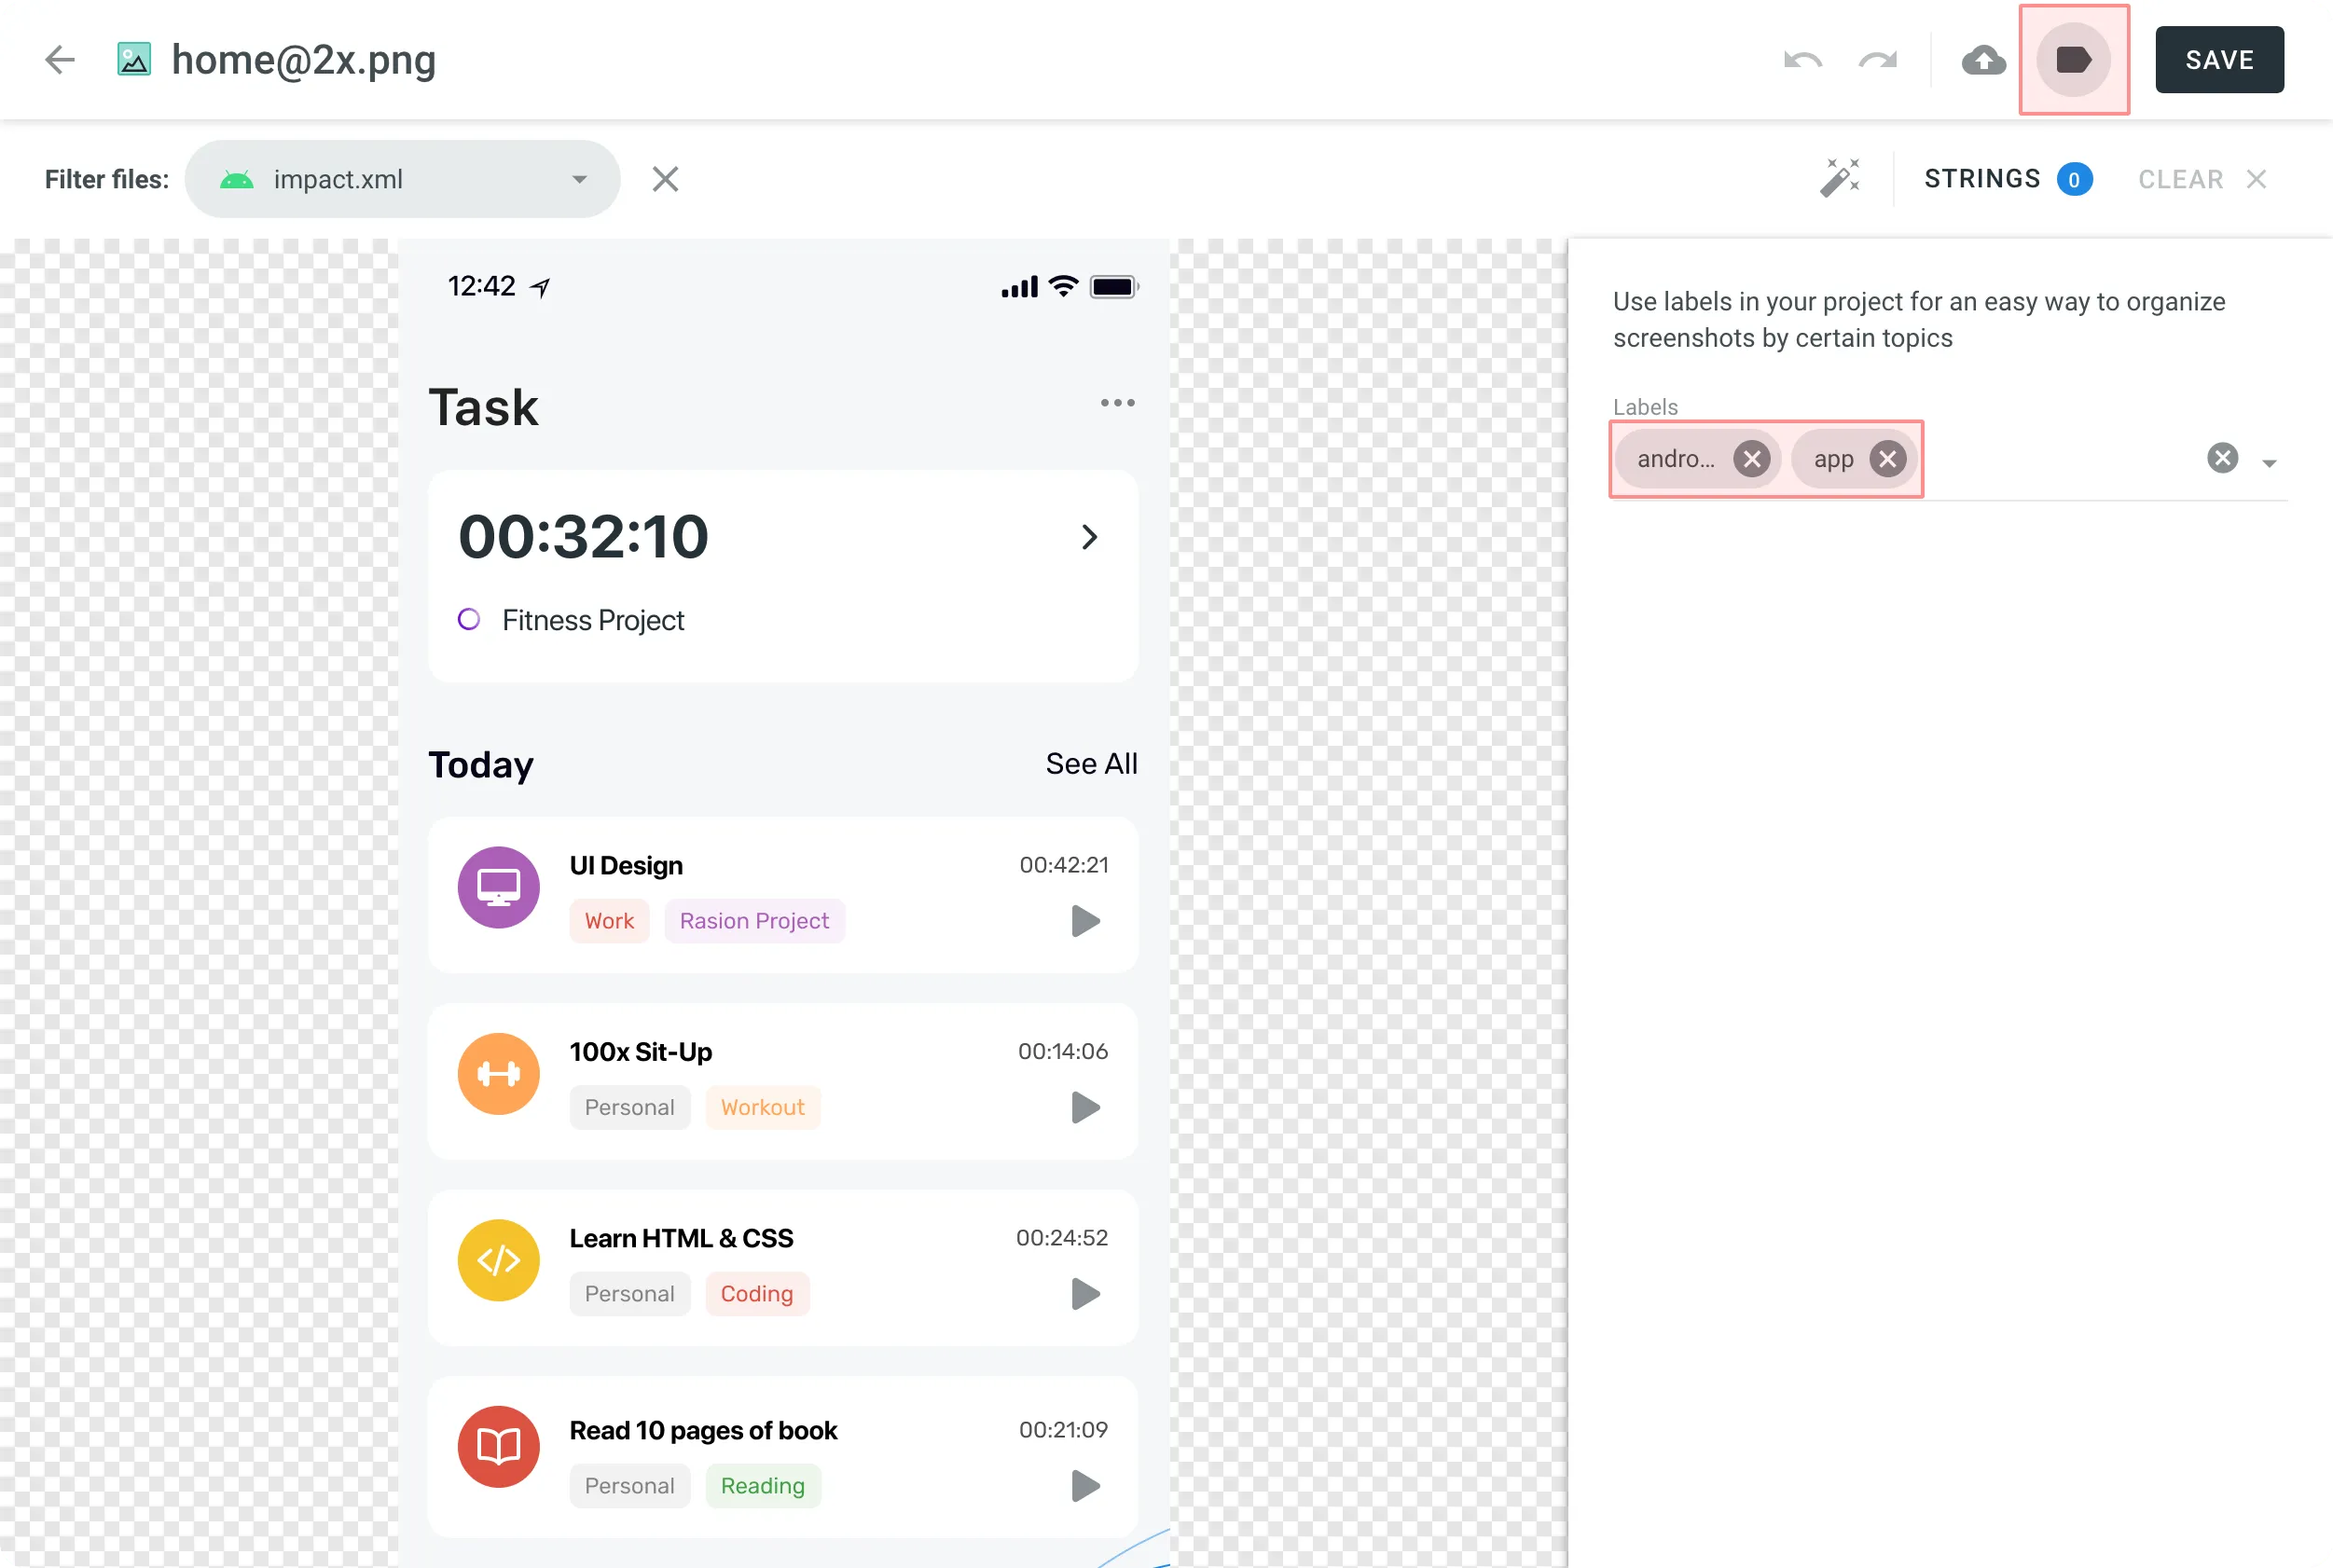 ##### [Add labels to multiple screenshots](#add-labels-to-multiple-screenshots) [Section titled “Add labels to multiple screenshots”](#add-labels-to-multiple-screenshots) 1. Select multiple screenshots you want to add the same labels to holding `Ctrl` or `Shift` . 2. Click . 3. Select needed labels in the list. 4. Click **Apply**. 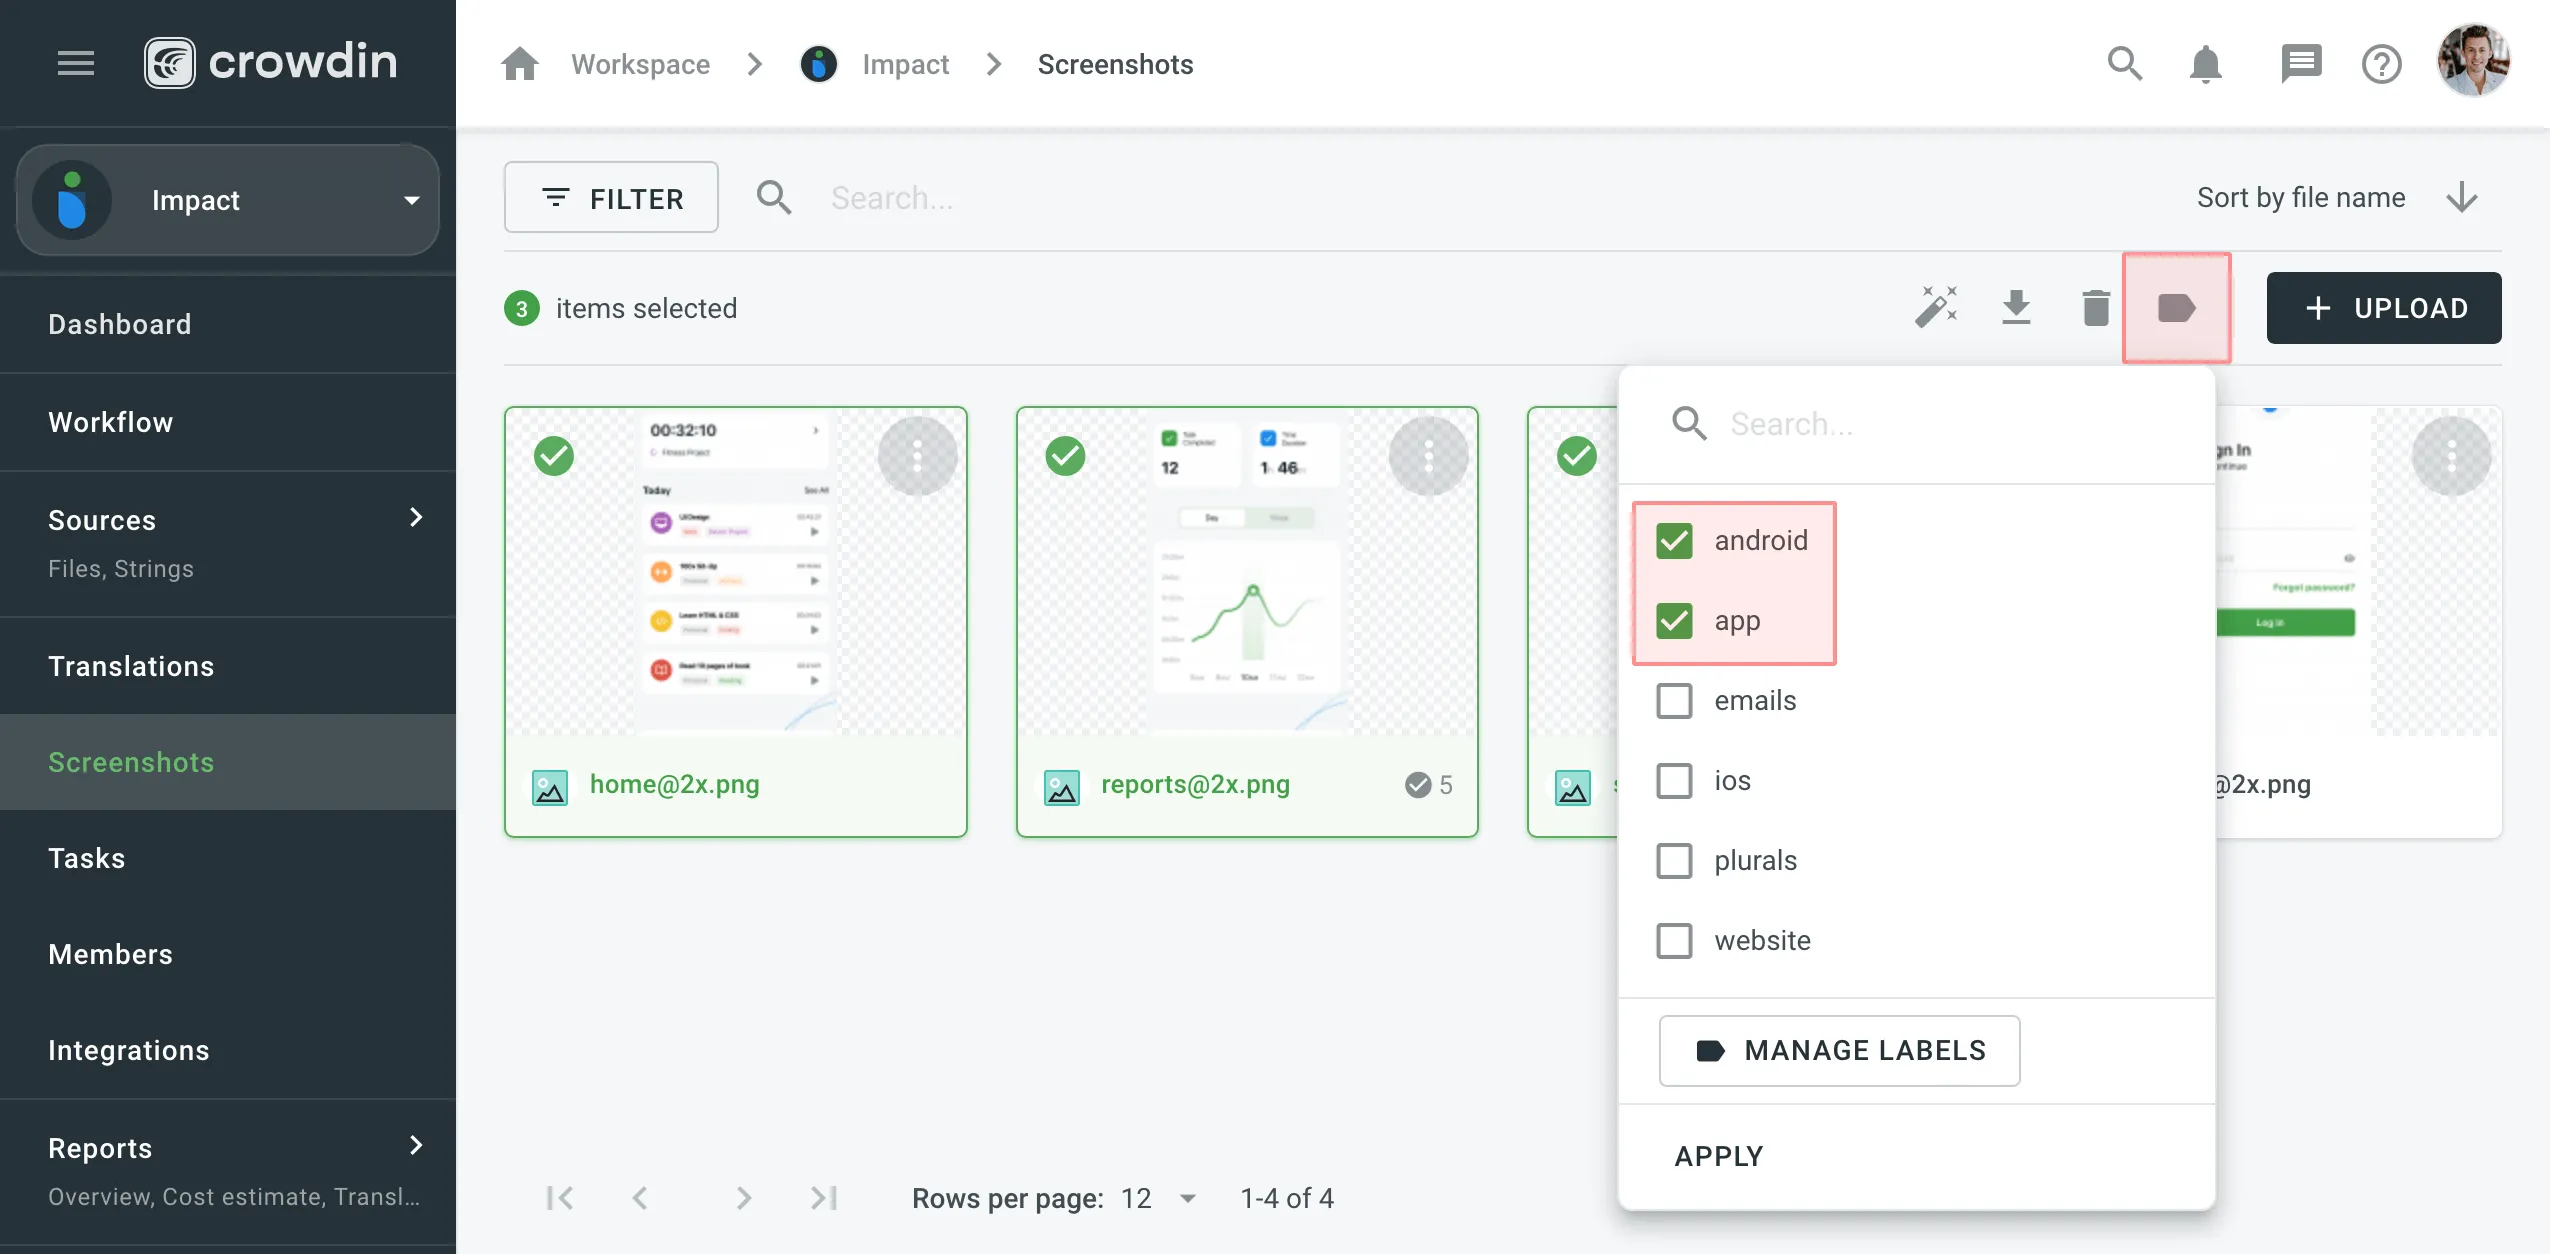 ## [Update Screenshots](#update-screenshots) [Section titled “Update Screenshots”](#update-screenshots) You can upload a new screenshot that will replace the current one. The already tagged strings that are relevant would remain tagged. If the text on the screenshot changed its location, strings would remain tagged but on the new locations. To update the screenshot, follow these steps: 1. Open the screenshot with a double click or right-click on the screenshot and select **Edit**. 2. Click and select a new screenshot from your machine or use Drag\&Drop. 3. Click **Save**. ## [Rename Screenshots](#rename-screenshots) [Section titled “Rename Screenshots”](#rename-screenshots) To rename a screenshot, follow these steps: 1. Right-click on the needed screenshot and select **Rename**. 2. Specify a new name. 3. Click **Save**. ## [Download Screenshots](#download-screenshots) [Section titled “Download Screenshots”](#download-screenshots) You can download screenshots and reuse them in other projects or elsewhere. To download screenshots, follow these steps: 1. Select one or multiple screenshots holding `Ctrl` or `Shift` . 2. Click **Download**. Alternatively, right-click on the needed screenshot and select **Download**. ## [Delete Screenshots](#delete-screenshots) [Section titled “Delete Screenshots”](#delete-screenshots) To delete a screenshot, follow these steps: 1. Select one or multiple screenshots holding `Ctrl` or `Shift` . 2. Click **Delete**.
# Sketch Plugin
> Start localizing at the design stage
With the Crowdin plugin for Sketch, you can use texts from Crowdin Enterprise in your designs to save time for both designers and developers. These could include original or translated texts. If necessary, you can add new ones (e.g., dialog titles, button labels) and send them to translators in Crowdin Enterprise. ## [Use Cases](#use-cases) [Section titled “Use Cases”](#use-cases) * Quickly generate multilingual creative assets. * Translate mockups and test them in different languages before the programming starts. * Stop using ‘Lorem Ipsum’, add real texts from Crowdin Enterprise to your prototypes instead. * Create and upload source strings from your designs to your Crowdin Enterprise project. This way, uploaded strings could be used by developers, which reduces time spent on development. * Upload tagged screenshots to your Crowdin Enterprise project. ## [Installation](#installation) [Section titled “Installation”](#installation) You can [download the latest release](https://github.com/crowdin/sketch-crowdin) from our GitHub repository. 1. Download the installation file. 2. Unzip it. 3. Double-click on the *sketch-crowdin.sketchplugin* file for auto installation. Crowdin plugin for Sketch can also be installed with [Sketch Runner](https://sketchrunner.com/). ## [Configuration](#configuration) [Section titled “Configuration”](#configuration) ### [Setting up Credentials](#setting-up-credentials) [Section titled “Setting up Credentials”](#setting-up-credentials) To specify your Crowdin Enterprise credentials in Sketch, follow these steps: 1. Click **Plugins > Crowdin**. 2. Switch to **Settings**. 3. Provide your Personal Access Token. 4. Specify your organization domain name. 5. Click **Connect to Crowdin**.  To generate a new token in Crowdin Enterprise, follow these steps: 1. Go to **Account Settings > Access tokens**, and click **New Token**. 2. Specify *Token Name* select *Scopes* and *Projects*, click **Create**. ### [Selecting a Project](#selecting-a-project) [Section titled “Selecting a Project”](#selecting-a-project) To select the Crowdin Enterprise project you’d like to work with, click the **Select Project** drop-down menu in **Settings**, and select a project from the list. Later on, you can use the same drop-down menu to switch to another project if needed. Additionally, you can select the specific branch your content will be uploaded to.  ## [UI Localization](#ui-localization) [Section titled “UI Localization”](#ui-localization) Use the *Strings* tab when localizing UI and working on dynamic pages with your development and marketing teams. In this tab, you can add source strings from Crowdin Enterprise to your designs in Sketch in a click. After the texts are used in the designs, you can automatically upload tagged screenshots for translators’ reference back to Crowdin Enterprise. ### [Using Source Strings from Crowdin in Sketch](#using-source-strings-from-crowdin-in-sketch) [Section titled “Using Source Strings from Crowdin in Sketch”](#using-source-strings-from-crowdin-in-sketch) 1. Open the Crowdin plugin for Sketch. 2. In the *Strings* tab, use the *Search* field to find the specific copy. You can search strings by source text, string identifier, or context. 3. Select the text layer you want to add text to and click on the needed string. 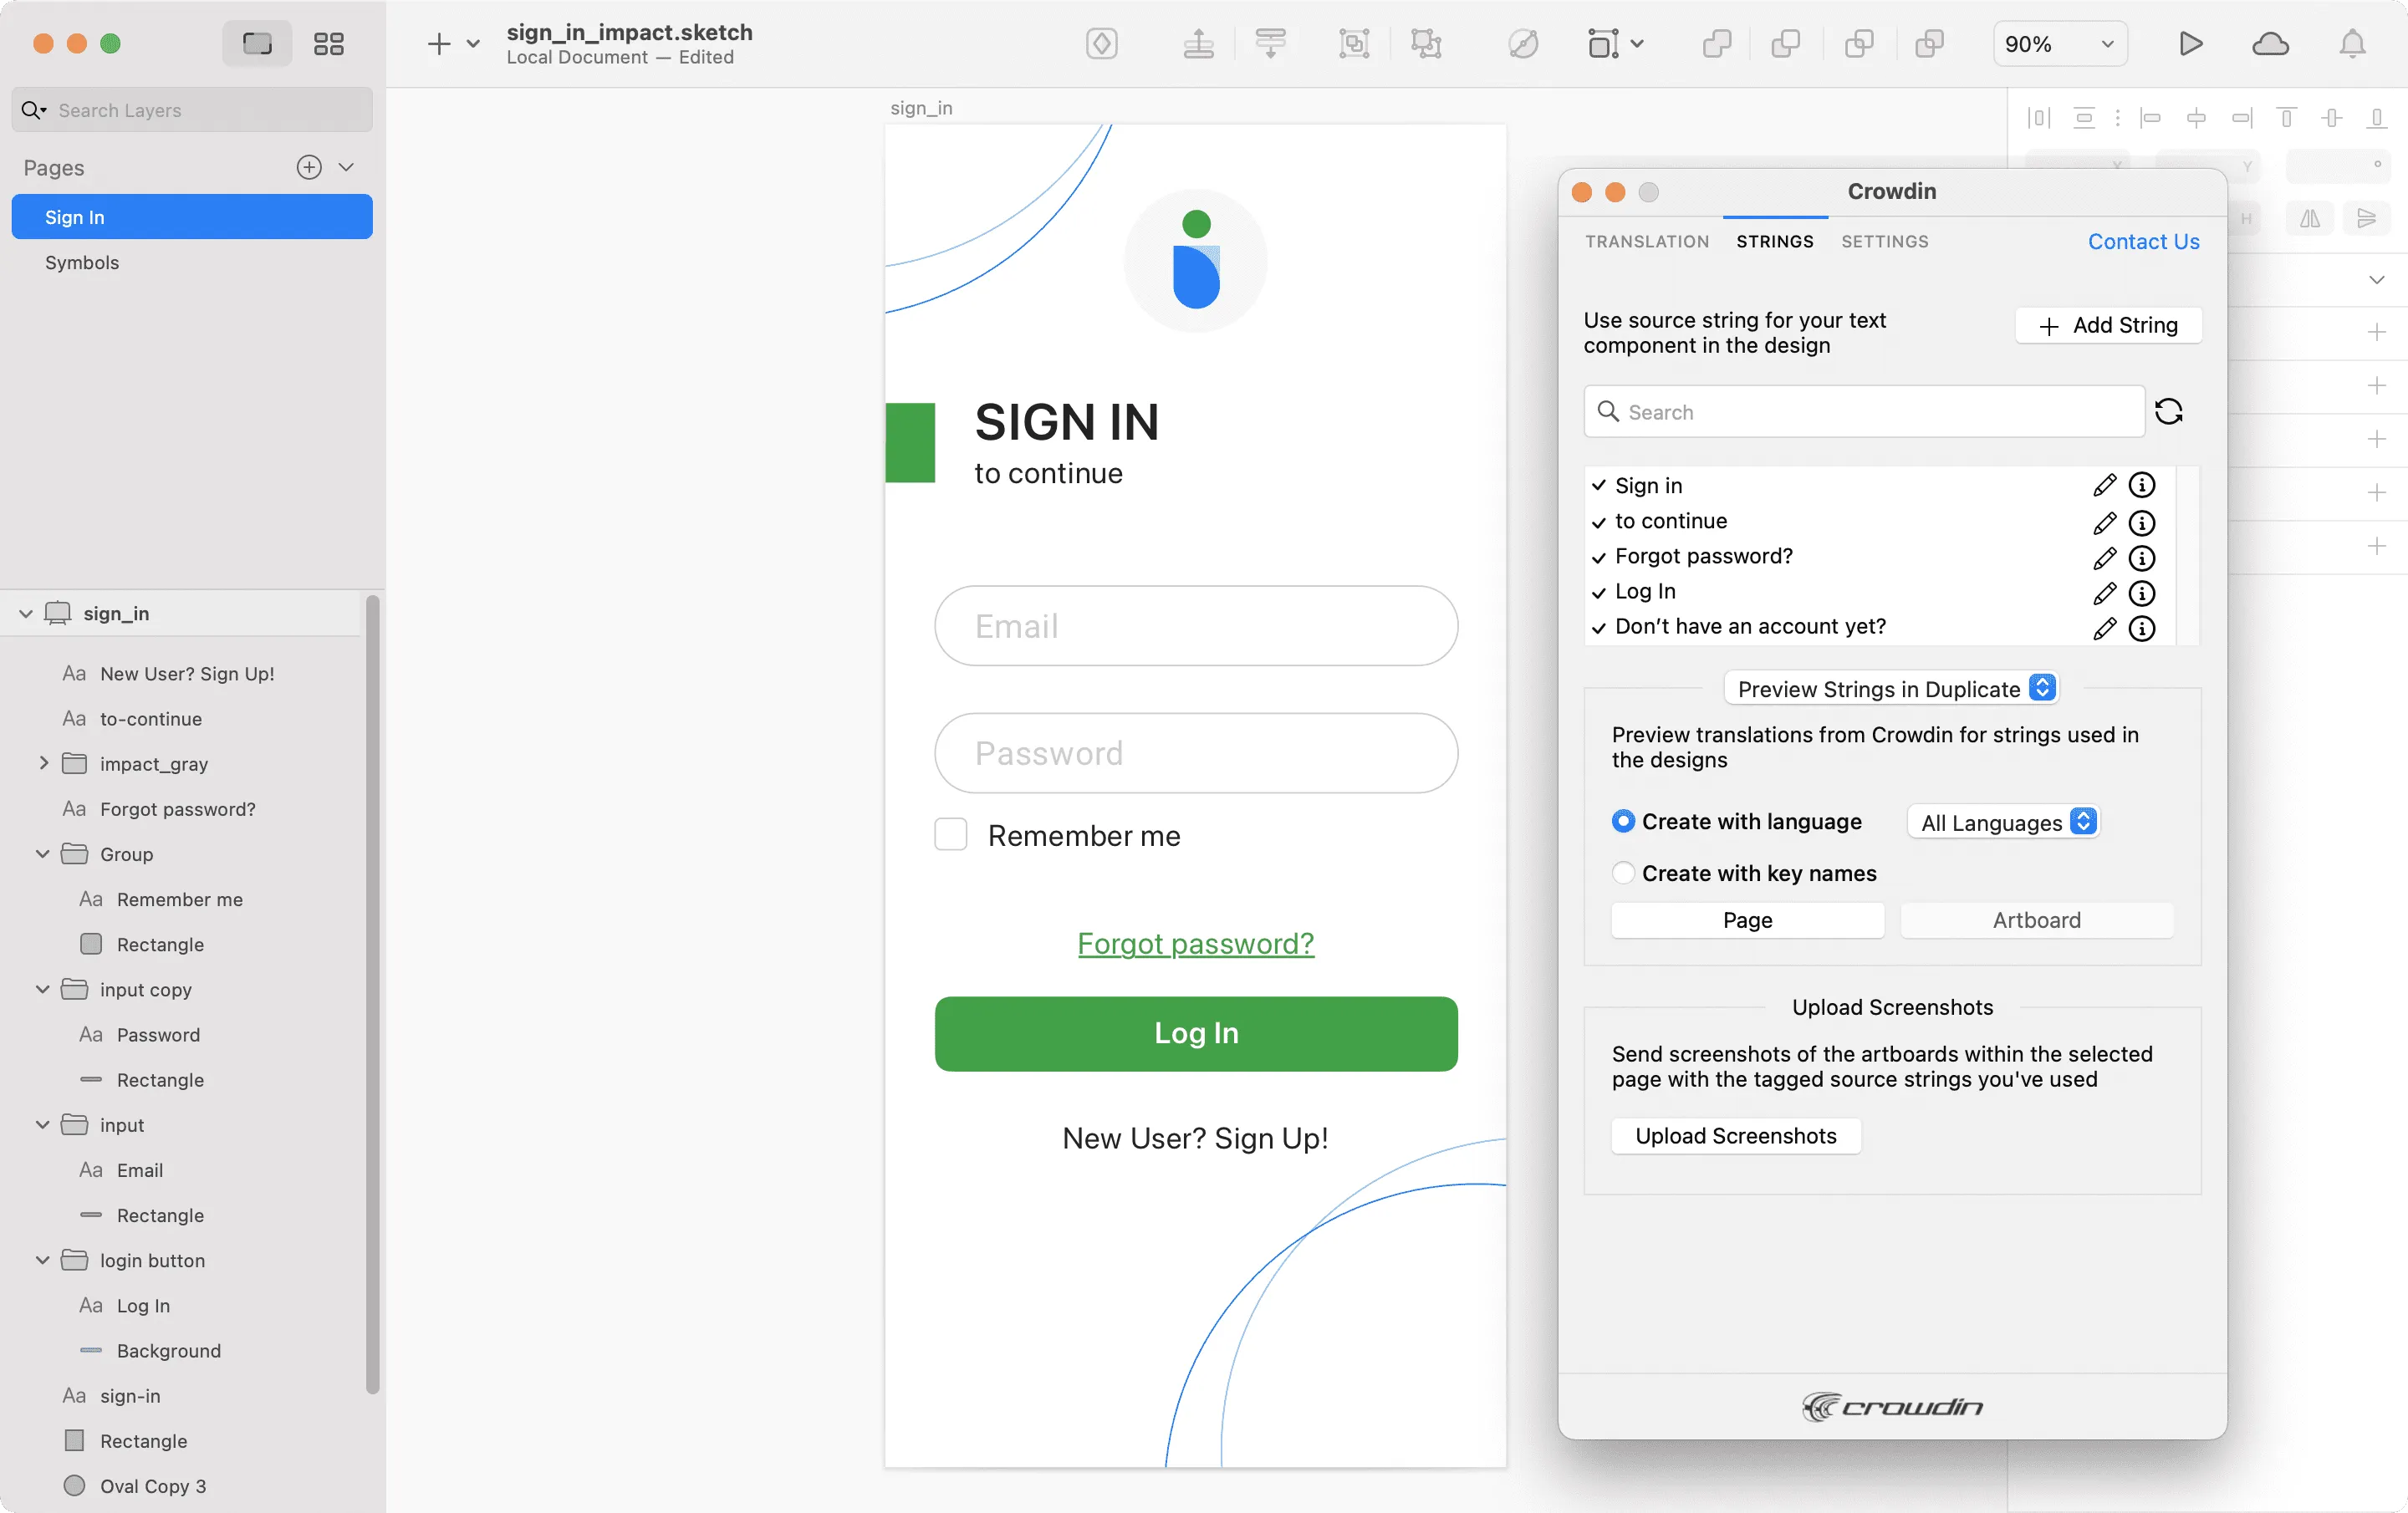 After using the source strings from Crowdin Enterprise in your designs, you can [preview translations](#previewing-strings) for these strings in Sketch and [upload screenshots](#uploading-tagged-screenshots-to-crowdin) for them to your Crowdin Enterprise project. ### [Adding Source Strings from Sketch to Crowdin](#adding-source-strings-from-sketch-to-crowdin) [Section titled “Adding Source Strings from Sketch to Crowdin”](#adding-source-strings-from-sketch-to-crowdin) You can add the strings that are already used in the designs or create and add completely new strings. 1. Open the Crowdin plugin for Sketch. 2. To add the strings used in the designs, select the whole artboard, multiple artboards, or the needed strings on the artboards. Alternatively, skip this step if you want to add a new string. 3. In the *Strings* tab, click **Add String**. 4. In the appeared dialog, fill in the required fields. 5. (Optional) To add labels to the strings, alternately select them from the **Label** drop-down menu and click **Save**. 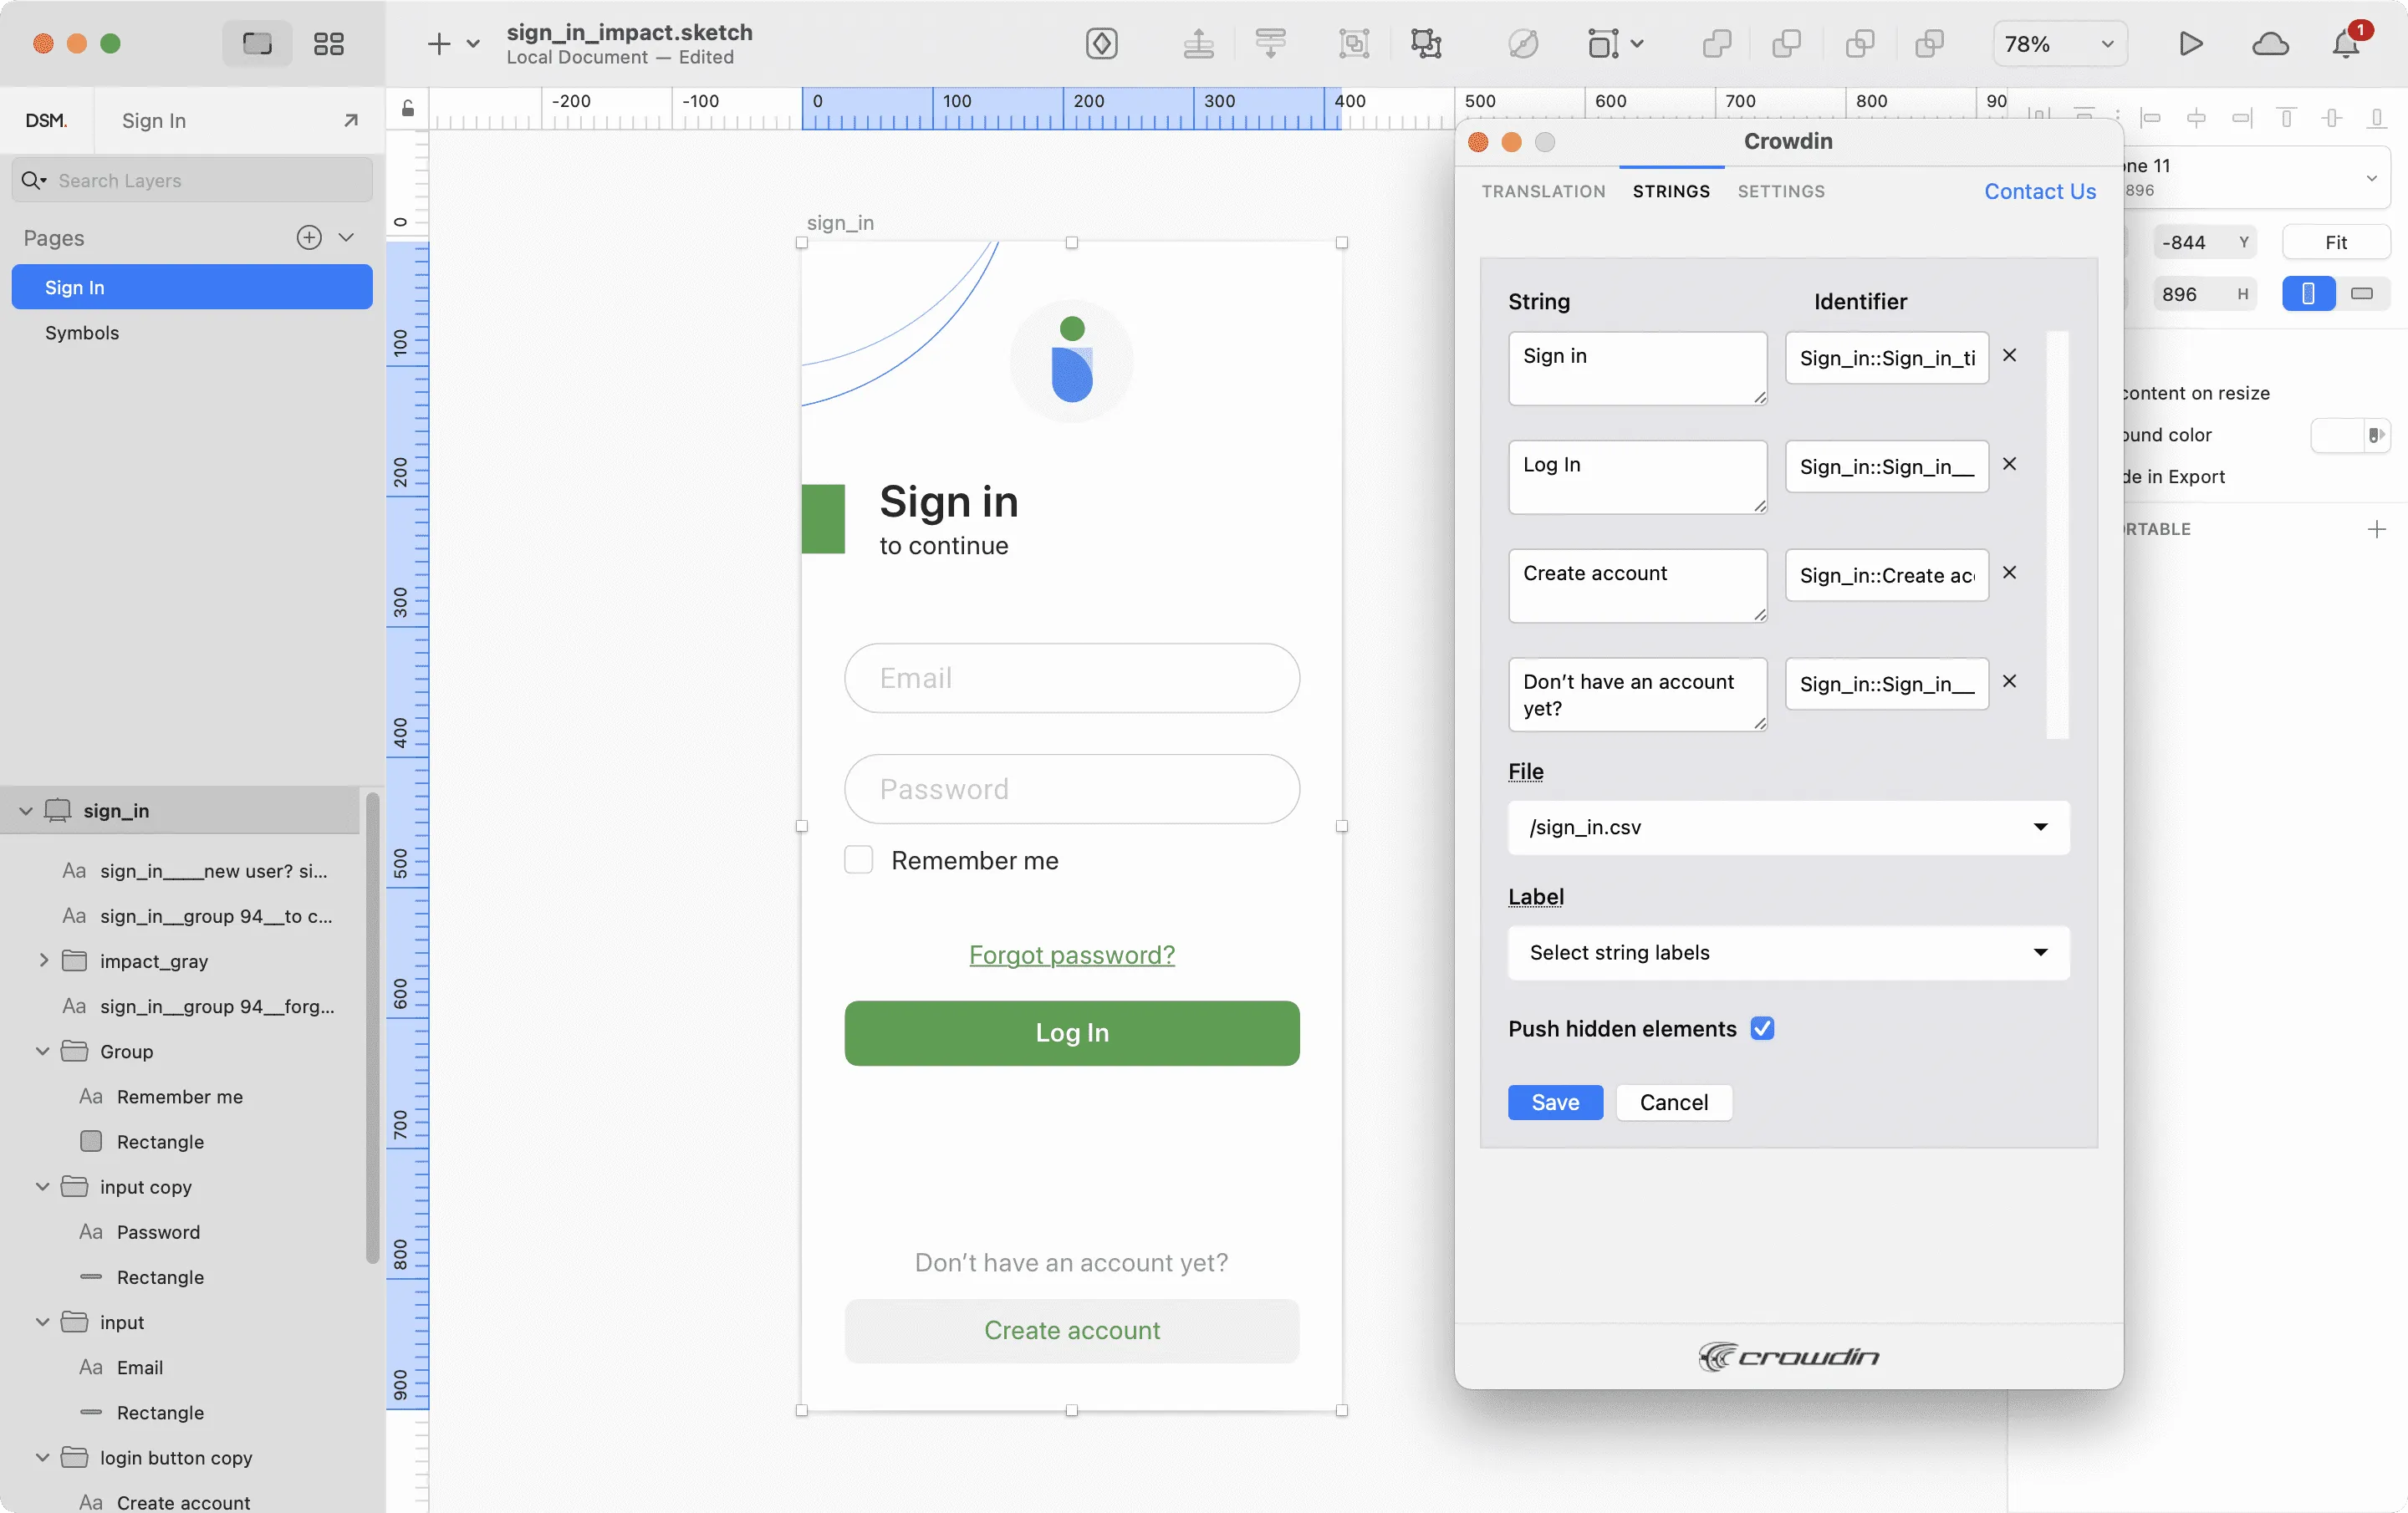 To add the same strings into multiple files in Crowdin Enterprise, alternately select the needed files from the **File** drop-down menu. If some artboards contain hidden elements that should not be added to Crowdin Enterprise, clear the **Push hidden elements** option. Added strings will be transferred to your Crowdin Enterprise project and also will be displayed in the list of the **Strings** tab. You can edit or delete the strings from the same list anytime. The respective changes will also be applied to the strings in your Crowdin Enterprise project. ### [Key Naming Pattern Settings](#key-naming-pattern-settings) [Section titled “Key Naming Pattern Settings”](#key-naming-pattern-settings) To simplify adding strings from Sketch to the Crowdin Enterprise project, you can set up the desired key naming pattern for the source string identifiers in the plugin settings. The Crowdin plugin for Sketch will suggest the string identifiers for new strings based on the selected pattern. While adding new source strings, you can always edit the suggested identifier to the preferred look. To select the key naming pattern, follow these steps: 1. Open the Crowdin plugin for Sketch. 2. Switch to **Settings**. 3. In the *Key naming pattern* section, select the preferred option from the drop-down menu. ### [Uploading Tagged Screenshots to Crowdin](#uploading-tagged-screenshots-to-crowdin) [Section titled “Uploading Tagged Screenshots to Crowdin”](#uploading-tagged-screenshots-to-crowdin) 1. Open the Crowdin plugin for Sketch. 2. In the *Strings* tab, use texts from the Crowdin Enterprise project in your designs. Click **Upload Screenshots** to upload screenshots of the artboards that include the used texts. 3. To update screenshots on Crowdin Enterprise, click **Upload Screenshots** again. 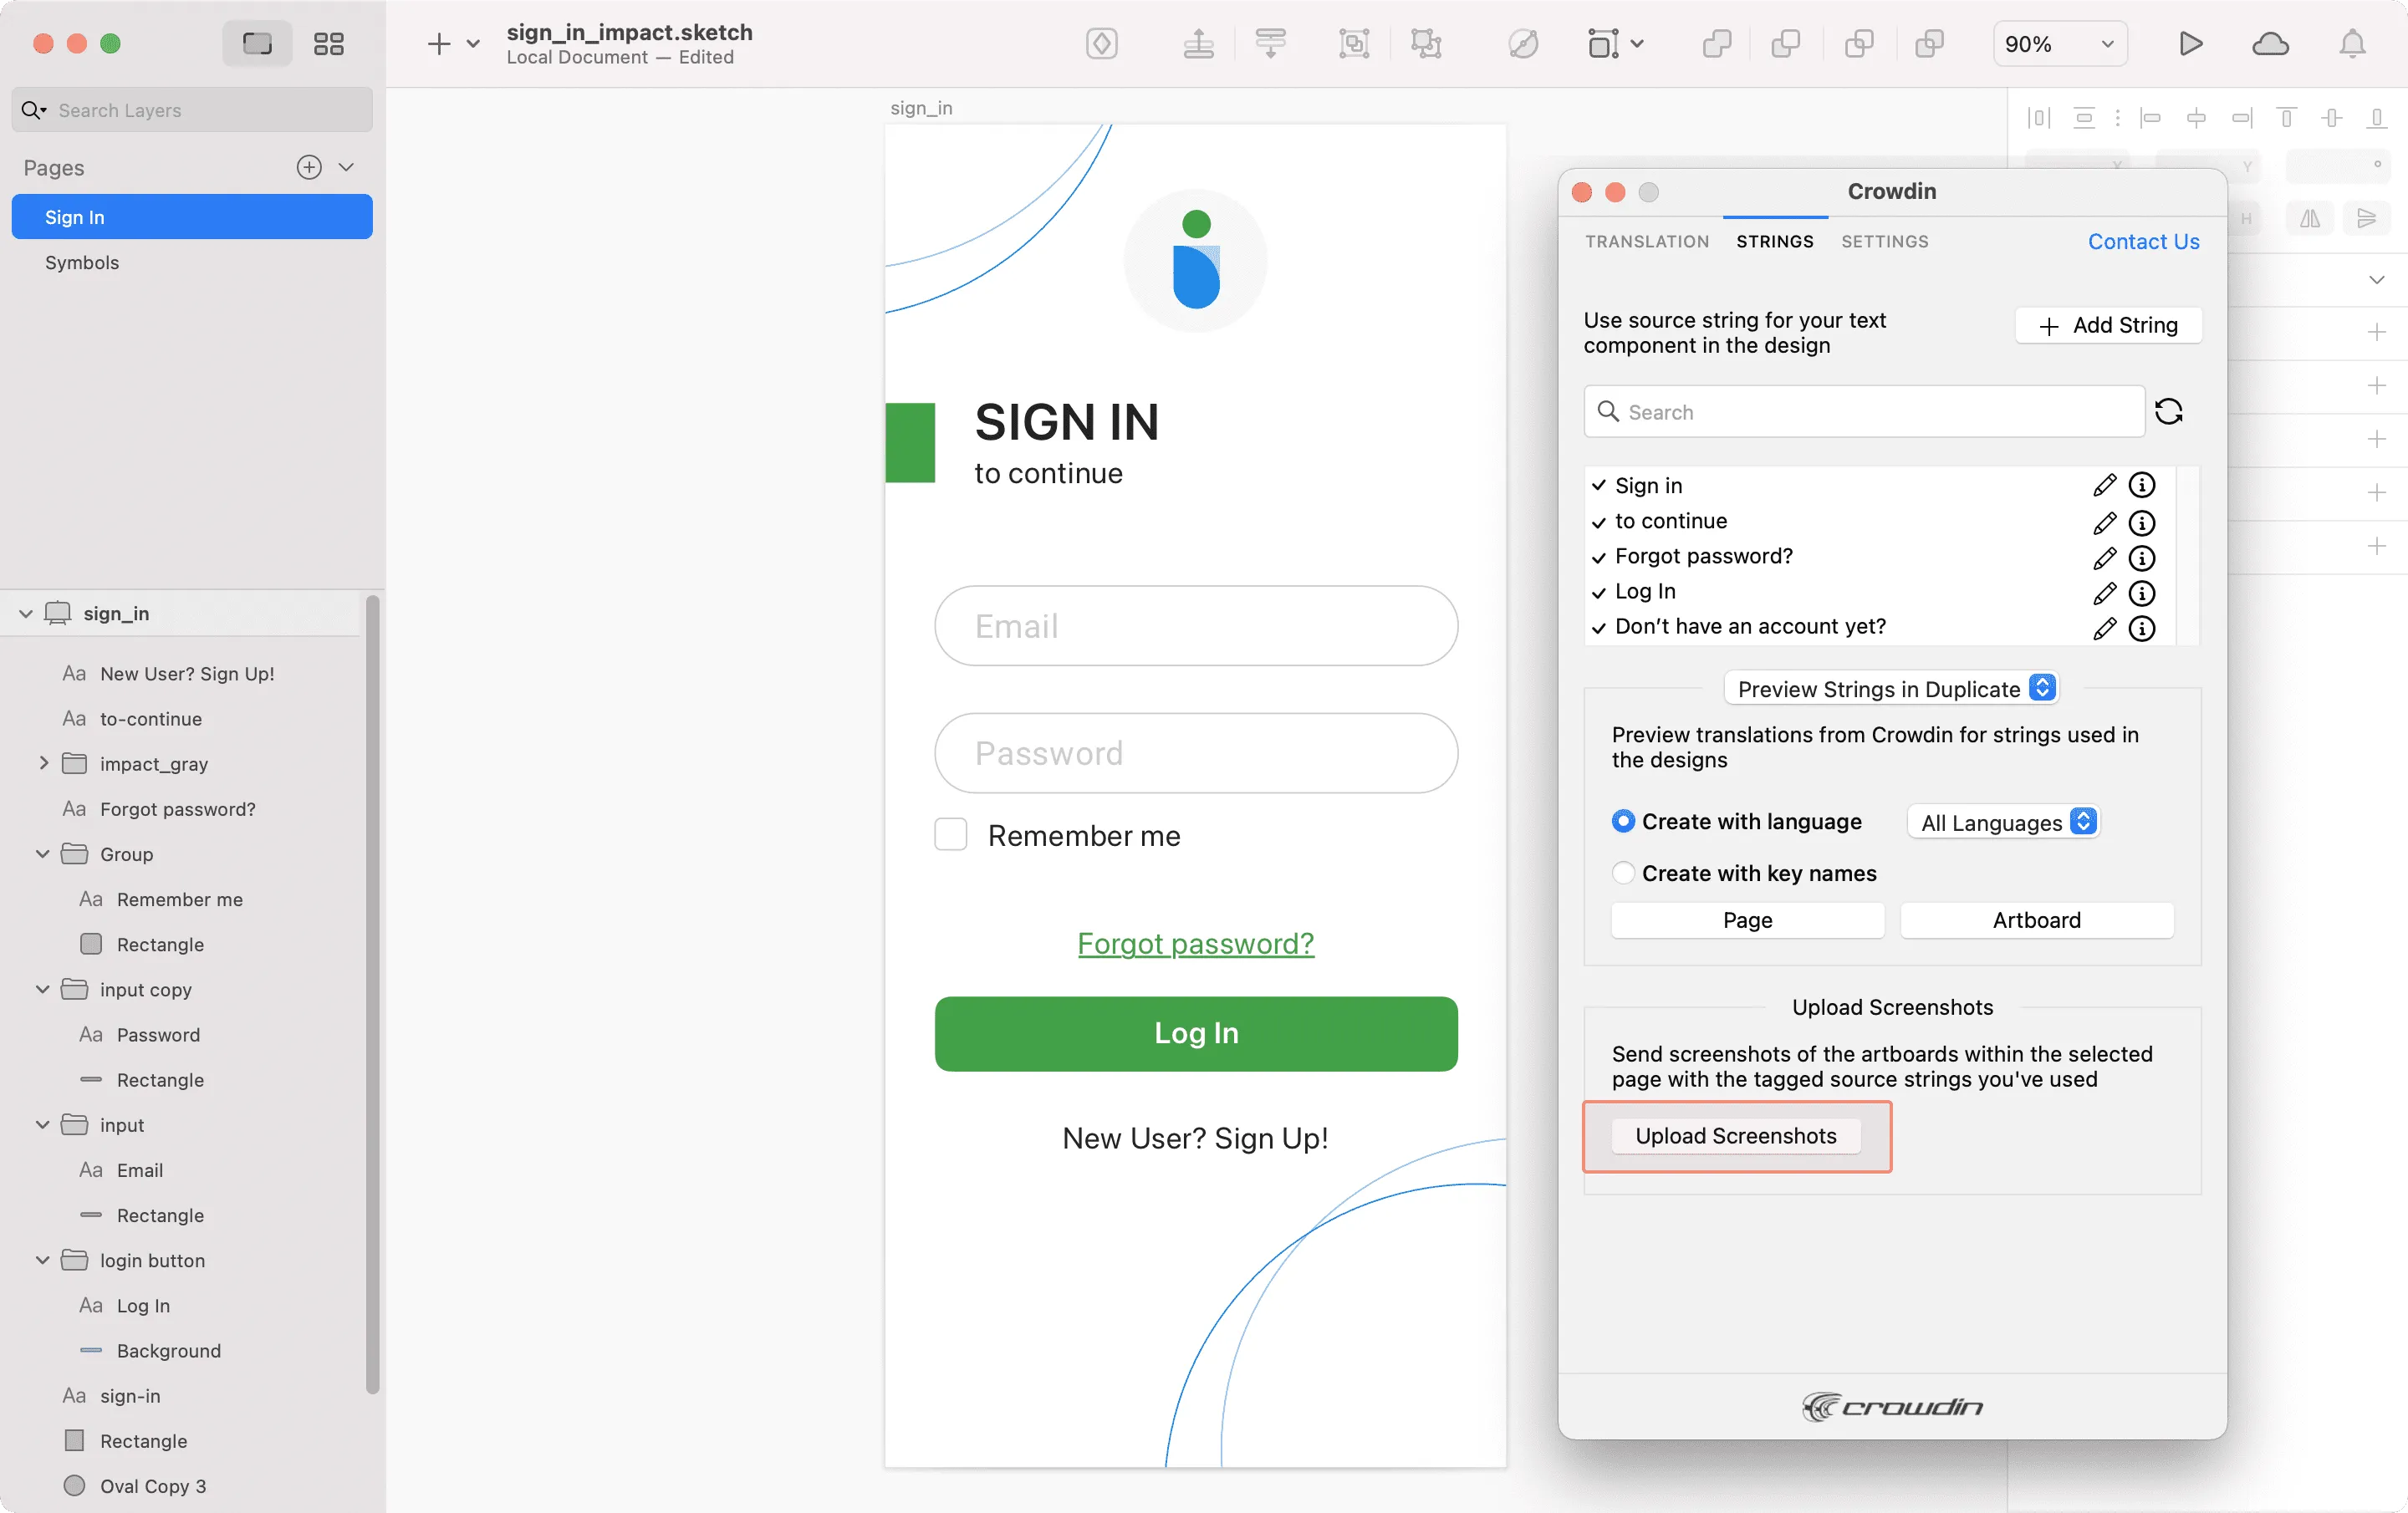 Read more about [Screenshots](/enterprise/screenshots/). ### [Previewing Strings](#previewing-strings) [Section titled “Previewing Strings”](#previewing-strings) Preview translations from Crowdin Enterprise for the strings used in the designs in Sketch. You can preview translations in the new frames or the original ones. When previewing translations in the new frames, you can populate them with the actual translations or with string keys for further use by developers. To preview strings populated with translations, follow these steps: 1. Open the Crowdin plugin for Sketch. 2. In the *Strings* tab, *Preview Strings* section, select *Preview in duplicated artboards* or *Preview in the current artboards*. 3. Select *Create with language*. 4. Select the target language you want to preview translations for. You can also choose *All languages*. 5. Choose the content you want to preview in Sketch. Select *Page* or *Artboard*. 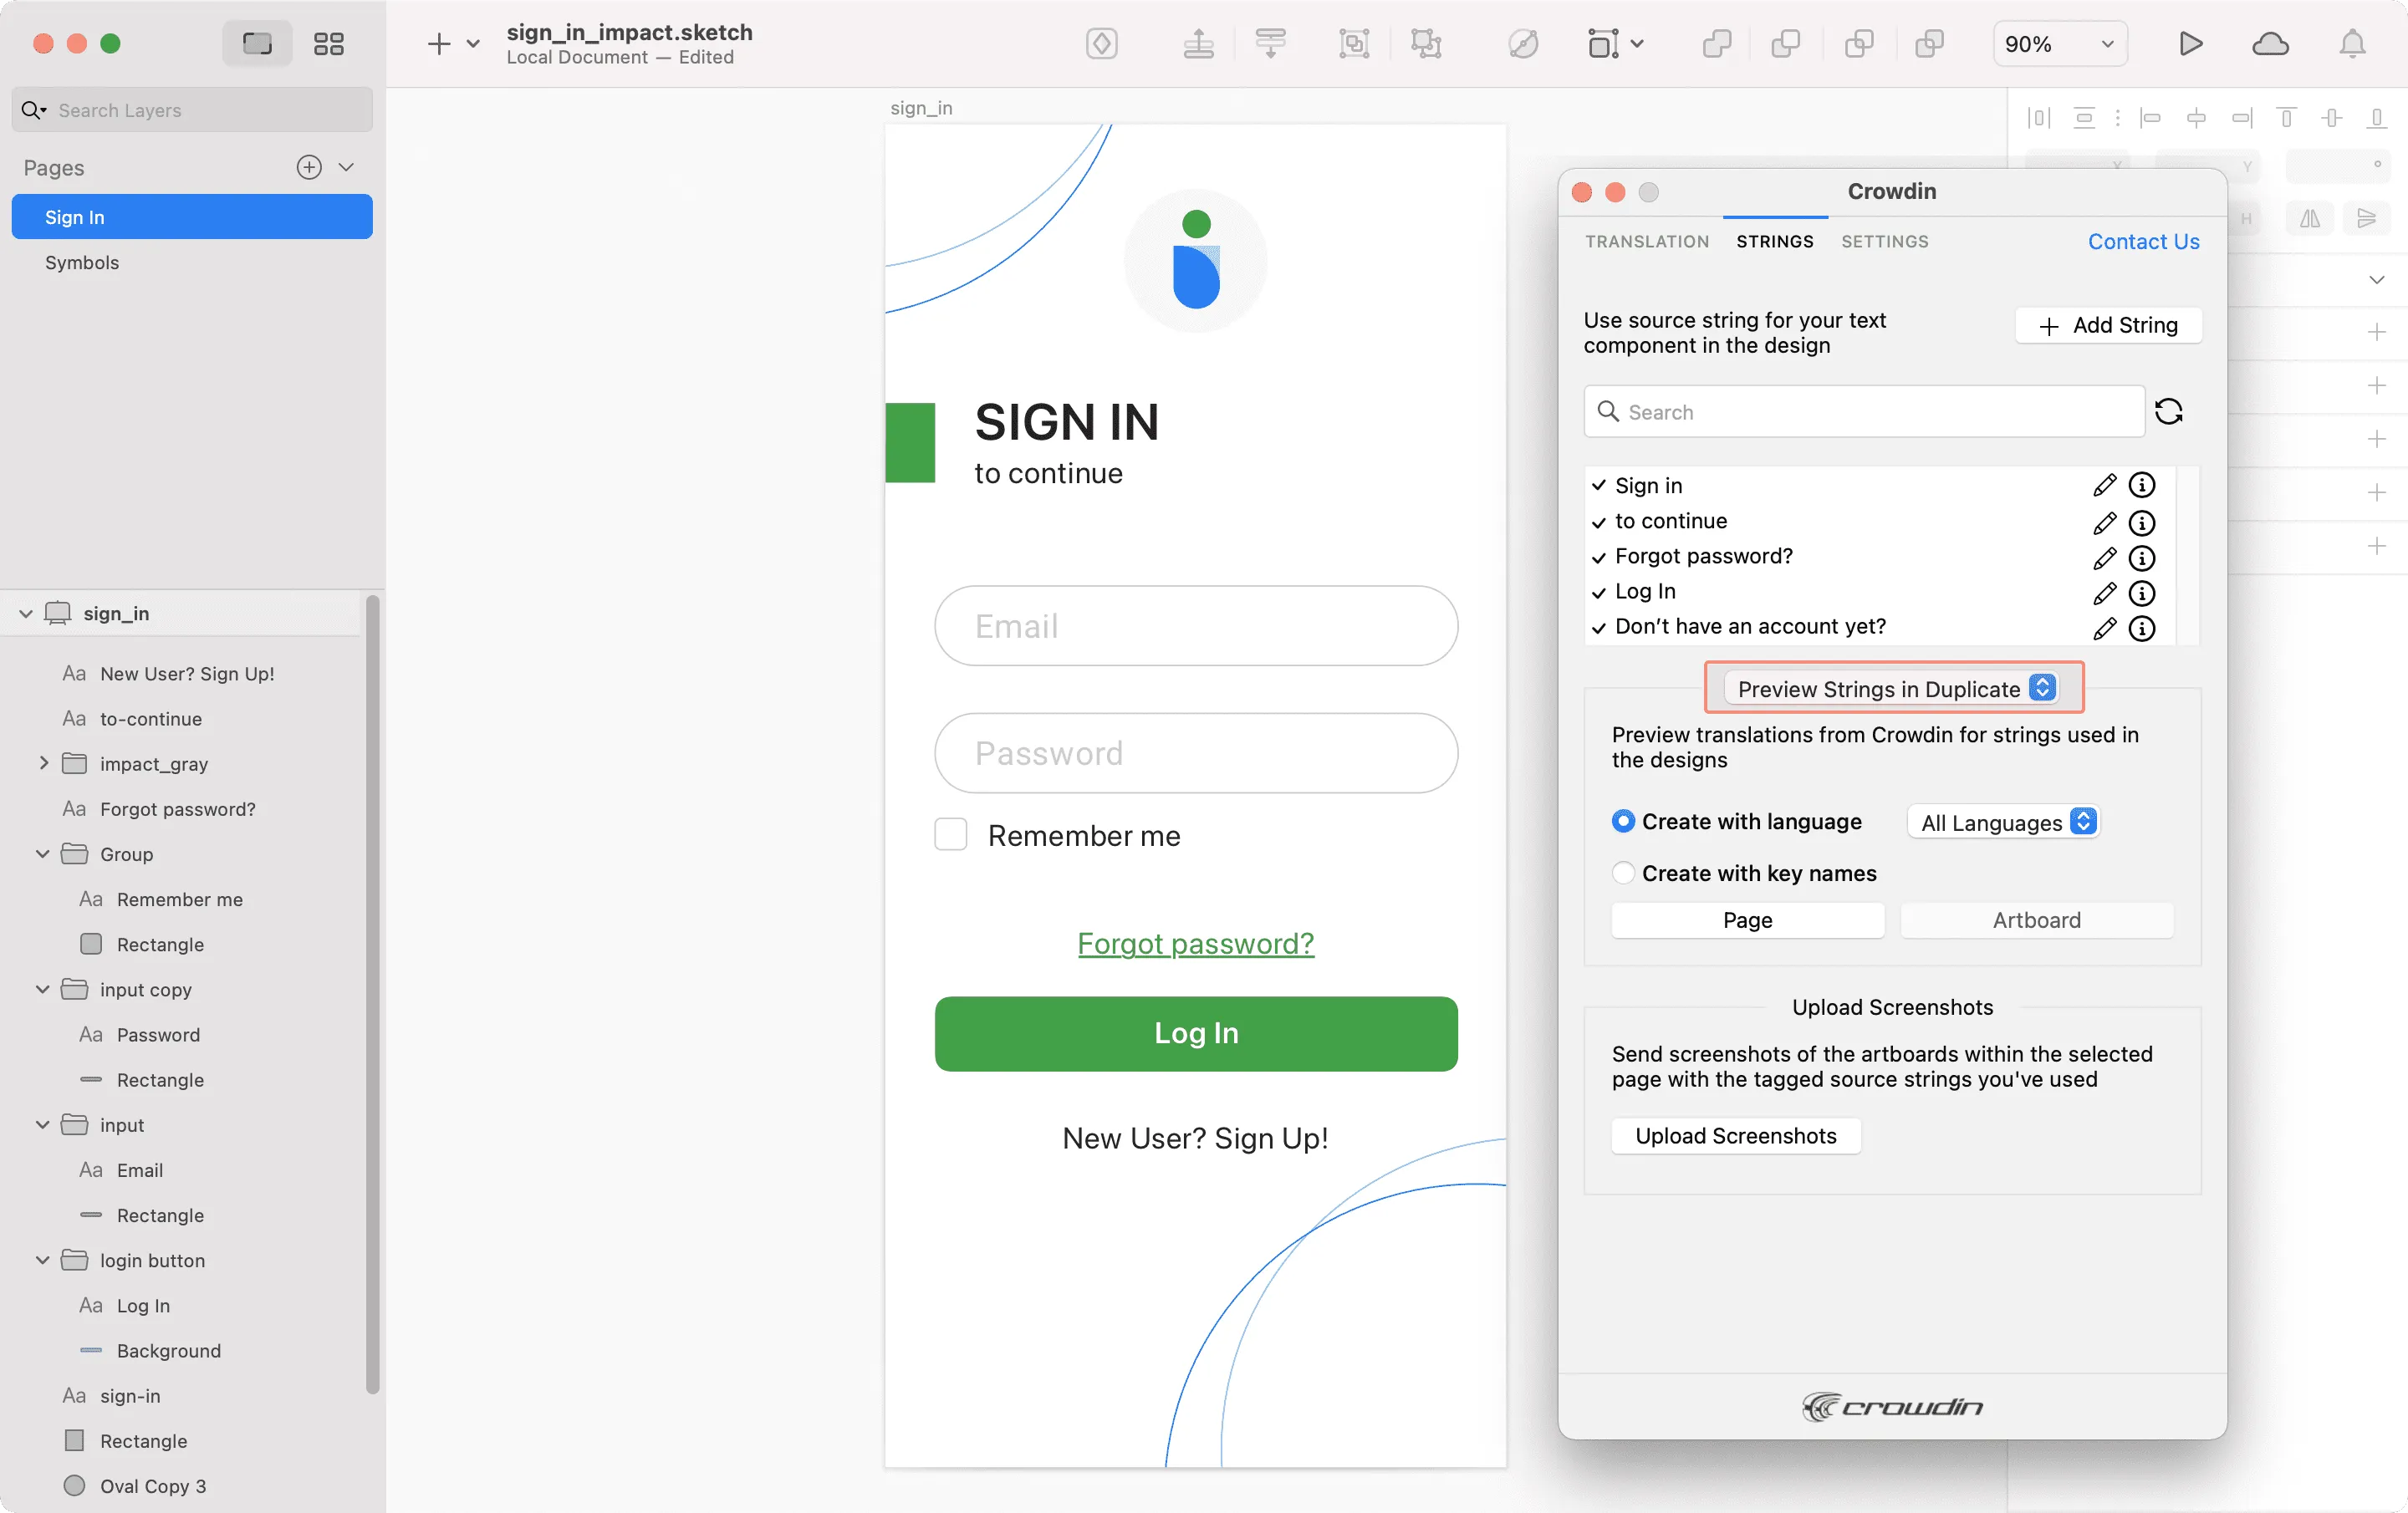 To preview strings populated with key names, follow these steps: 1. Open the Crowdin plugin for Sketch. 2. In the *Strings* tab, *Preview Strings* section, select *Preview in duplicated artboards*. 3. Select *Create with key names*. 4. Choose the content you want to preview in Sketch. Select *Page* or *Artboard*. 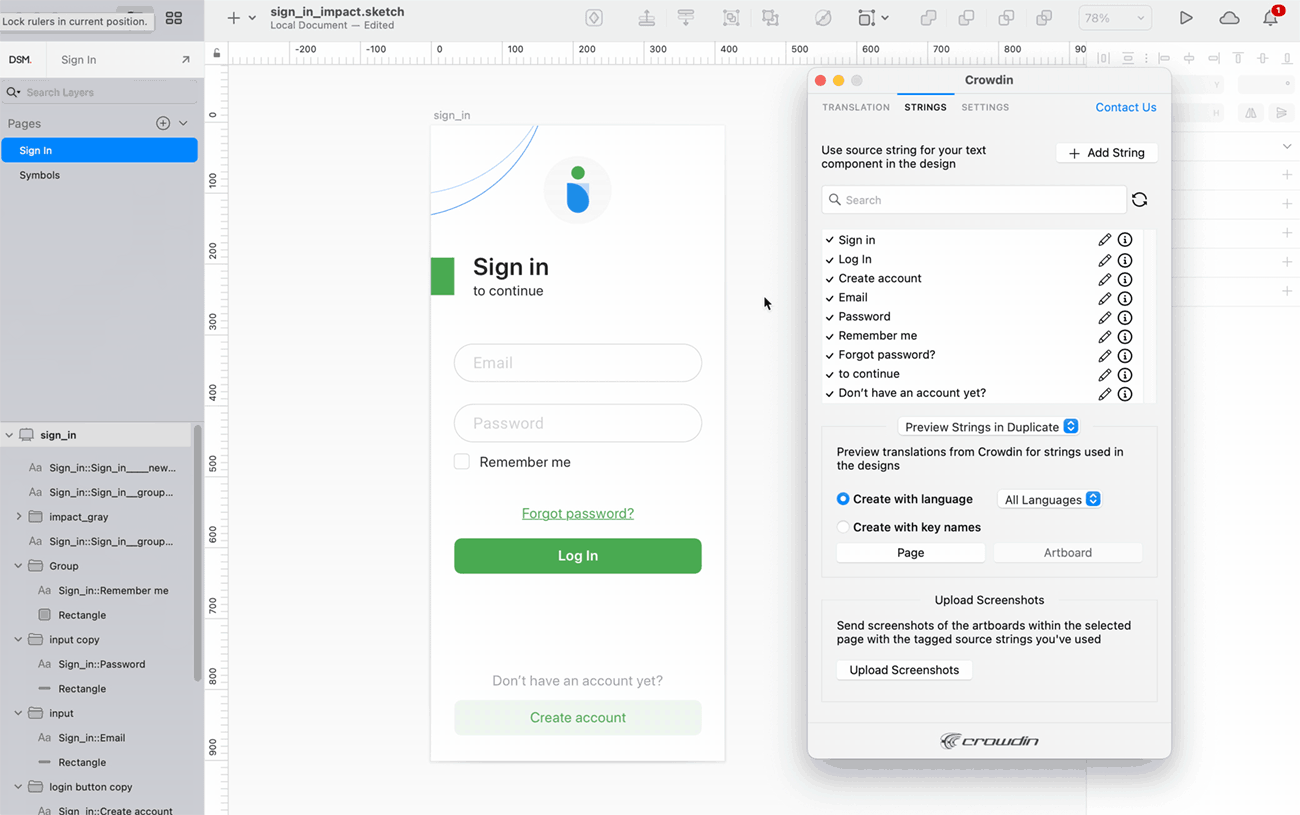 ## [Marketing Visuals Localization](#marketing-visuals-localization) [Section titled “Marketing Visuals Localization”](#marketing-visuals-localization) Use the *Translation* tab to localize static pages, like brochures and banners. In this tab, you can send texts with context for translators to Crowdin Enterprise and upload translated copies back to Sketch. ### [Sending Texts for Translation to Crowdin](#sending-texts-for-translation-to-crowdin) [Section titled “Sending Texts for Translation to Crowdin”](#sending-texts-for-translation-to-crowdin) You can send text for translation either from selected or all artboards from a Sketch file. Translators will work with those texts in the list view and use designs as an additional context for even higher translation quality. In Crowdin Enterprise, a root folder *Sketch plugin* will be created. It will contain a subfolder named after your Sketch file with HTML files for each artboard inside. If needed, you can disable content segmentation in the plugin **Settings** so the long texts will not be split into sentences. To send Sketch designs for translation, follow these steps: 1. Open the necessary Sketch file. 2. Go to **Plugins > Crowdin**. 3. In the *Translation* tab, *Send Texts* section, select content you’d like to translate. Select *Page* or *Artboard*. 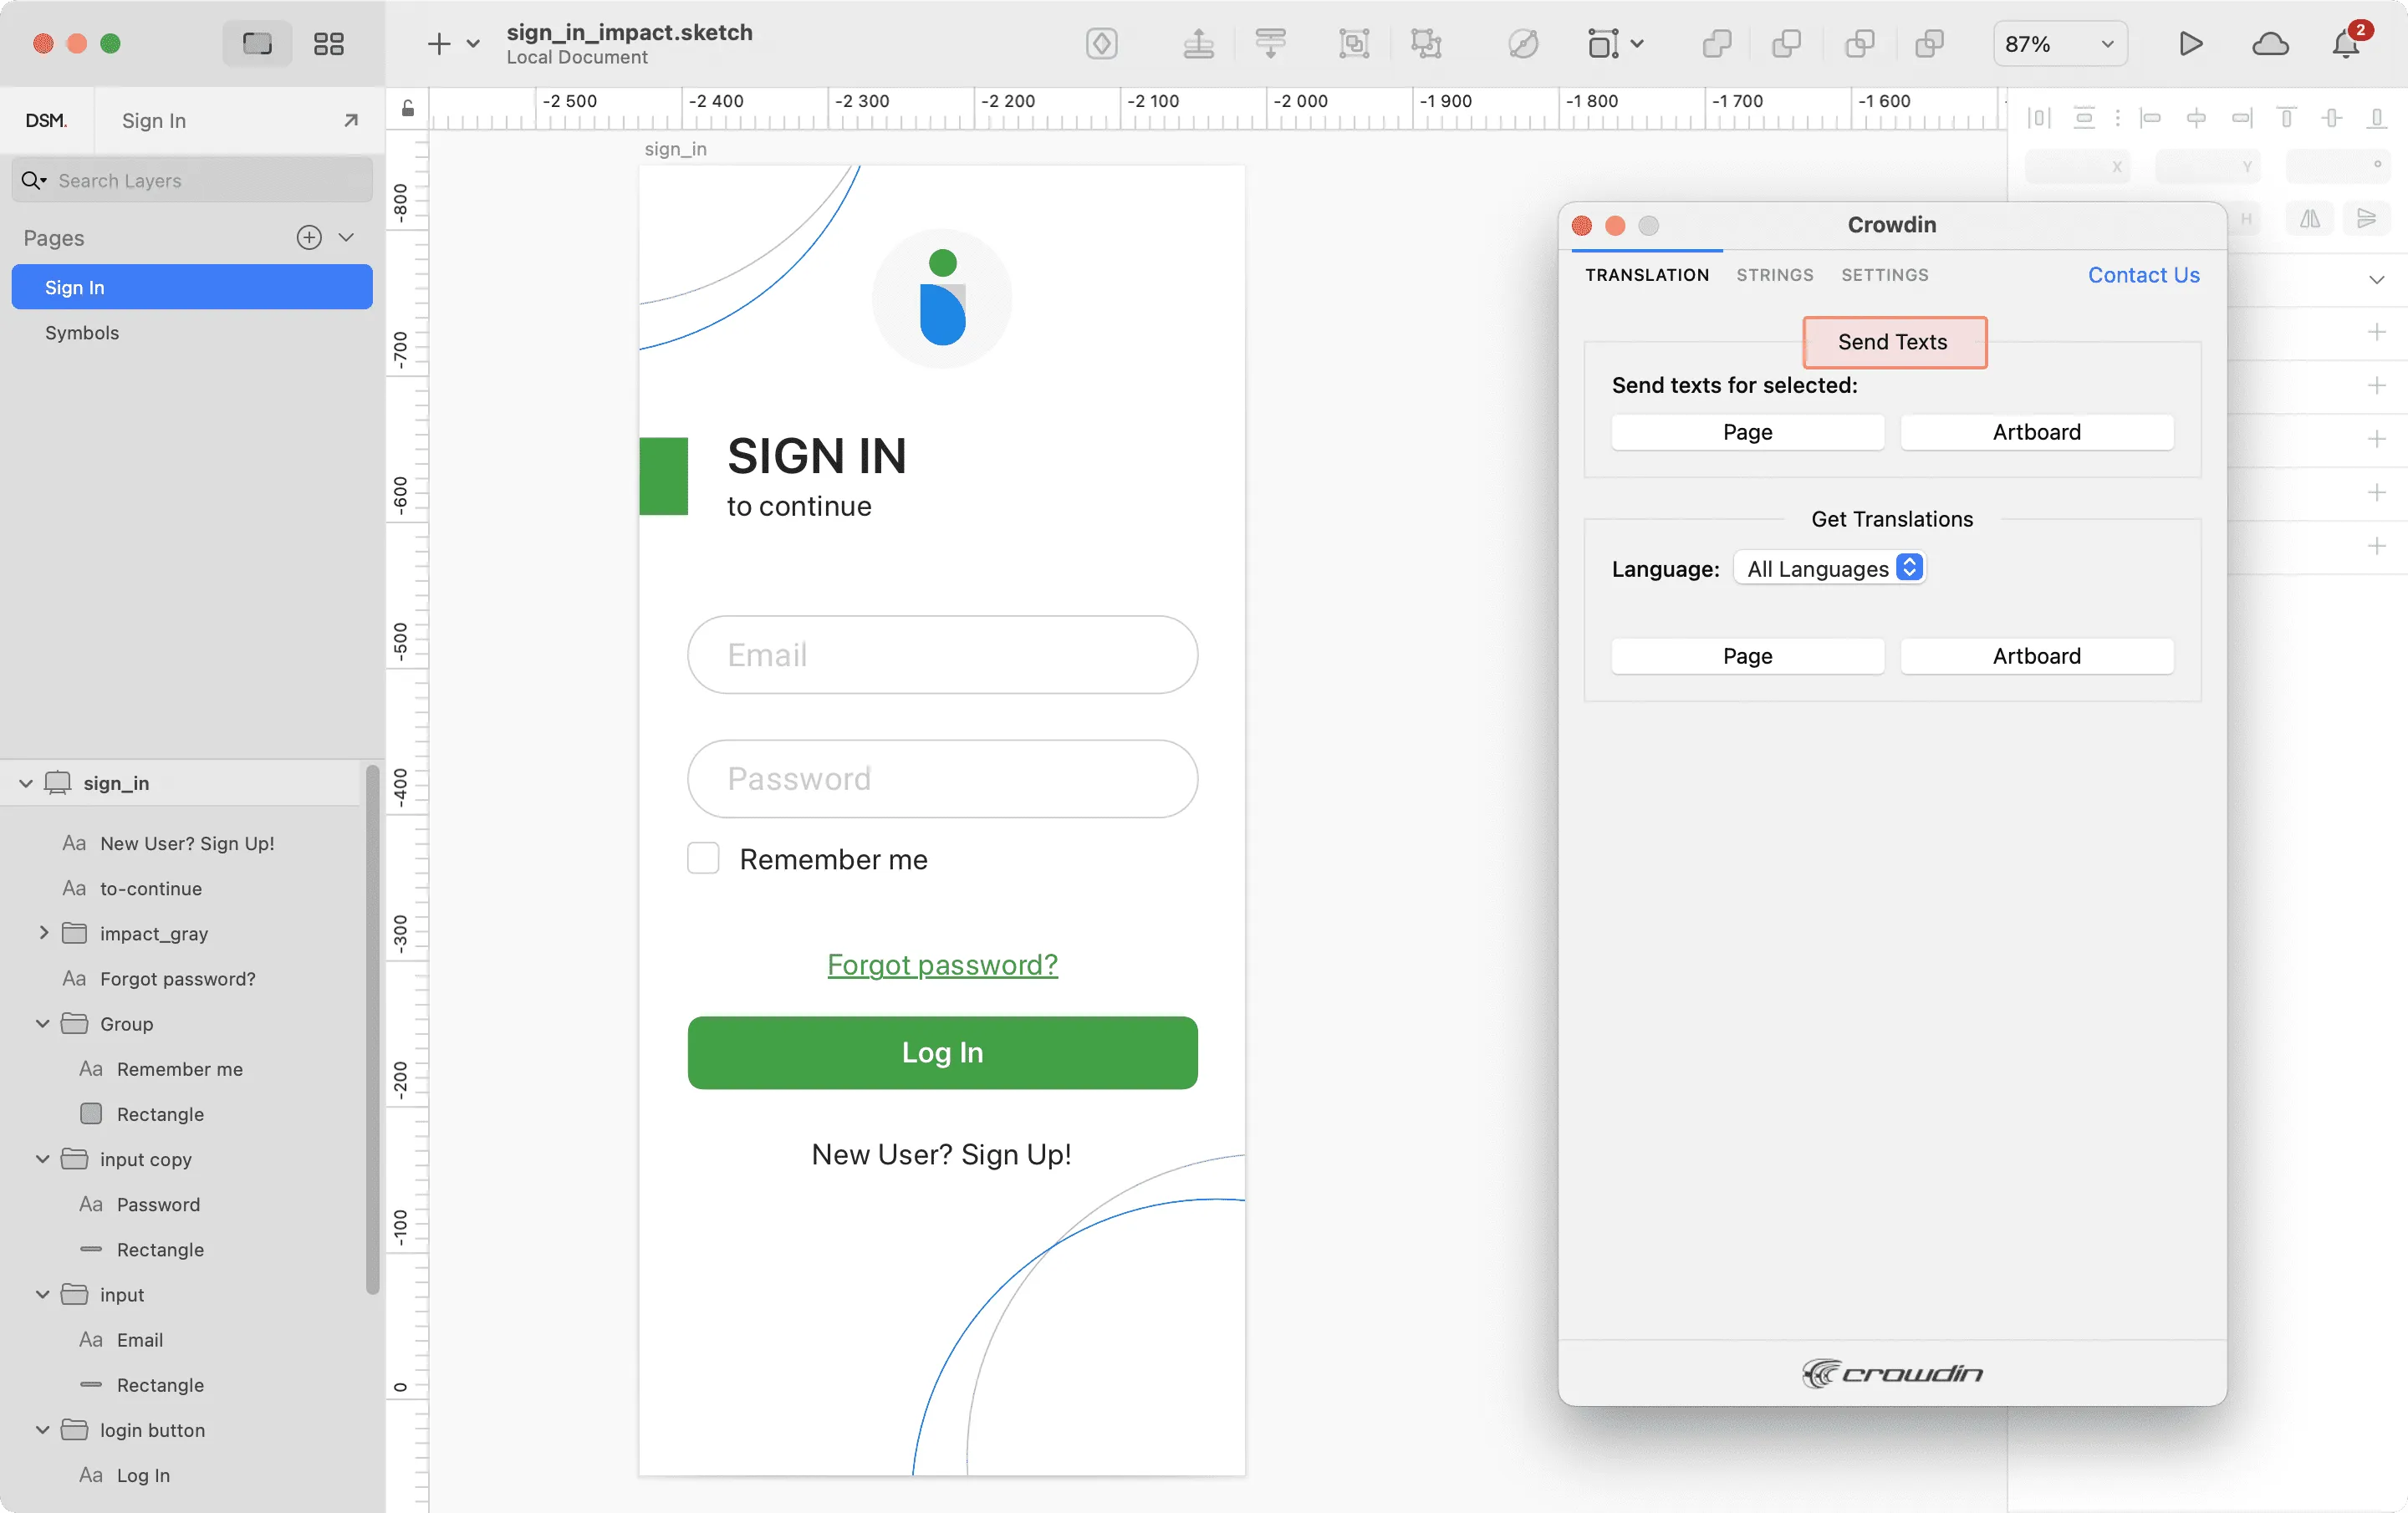 When the source files are uploaded to your Crowdin Enterprise project, you can invite contributors to translate and proofread them. Read more about [translation strategies](/enterprise/translation-strategies/). ### [Uploading Translations from Crowdin to Sketch](#uploading-translations-from-crowdin-to-sketch) [Section titled “Uploading Translations from Crowdin to Sketch”](#uploading-translations-from-crowdin-to-sketch) You can synchronize texts between Sketch and Crowdin Enterprise projects whenever you want to test the translated copy inside Sketch or generate multilingual assets. To upload translated copies to Sketch, follow these steps: 1. Open the necessary Sketch file. 2. Go to **Plugins > Crowdin**. 3. In the *Translation* tab, *Get Translations* section, select the target language you want to upload translations for. You can also Select *All languages*. 4. Select the content you want to preview in Sketch. Select *Page* or *Artboard*. 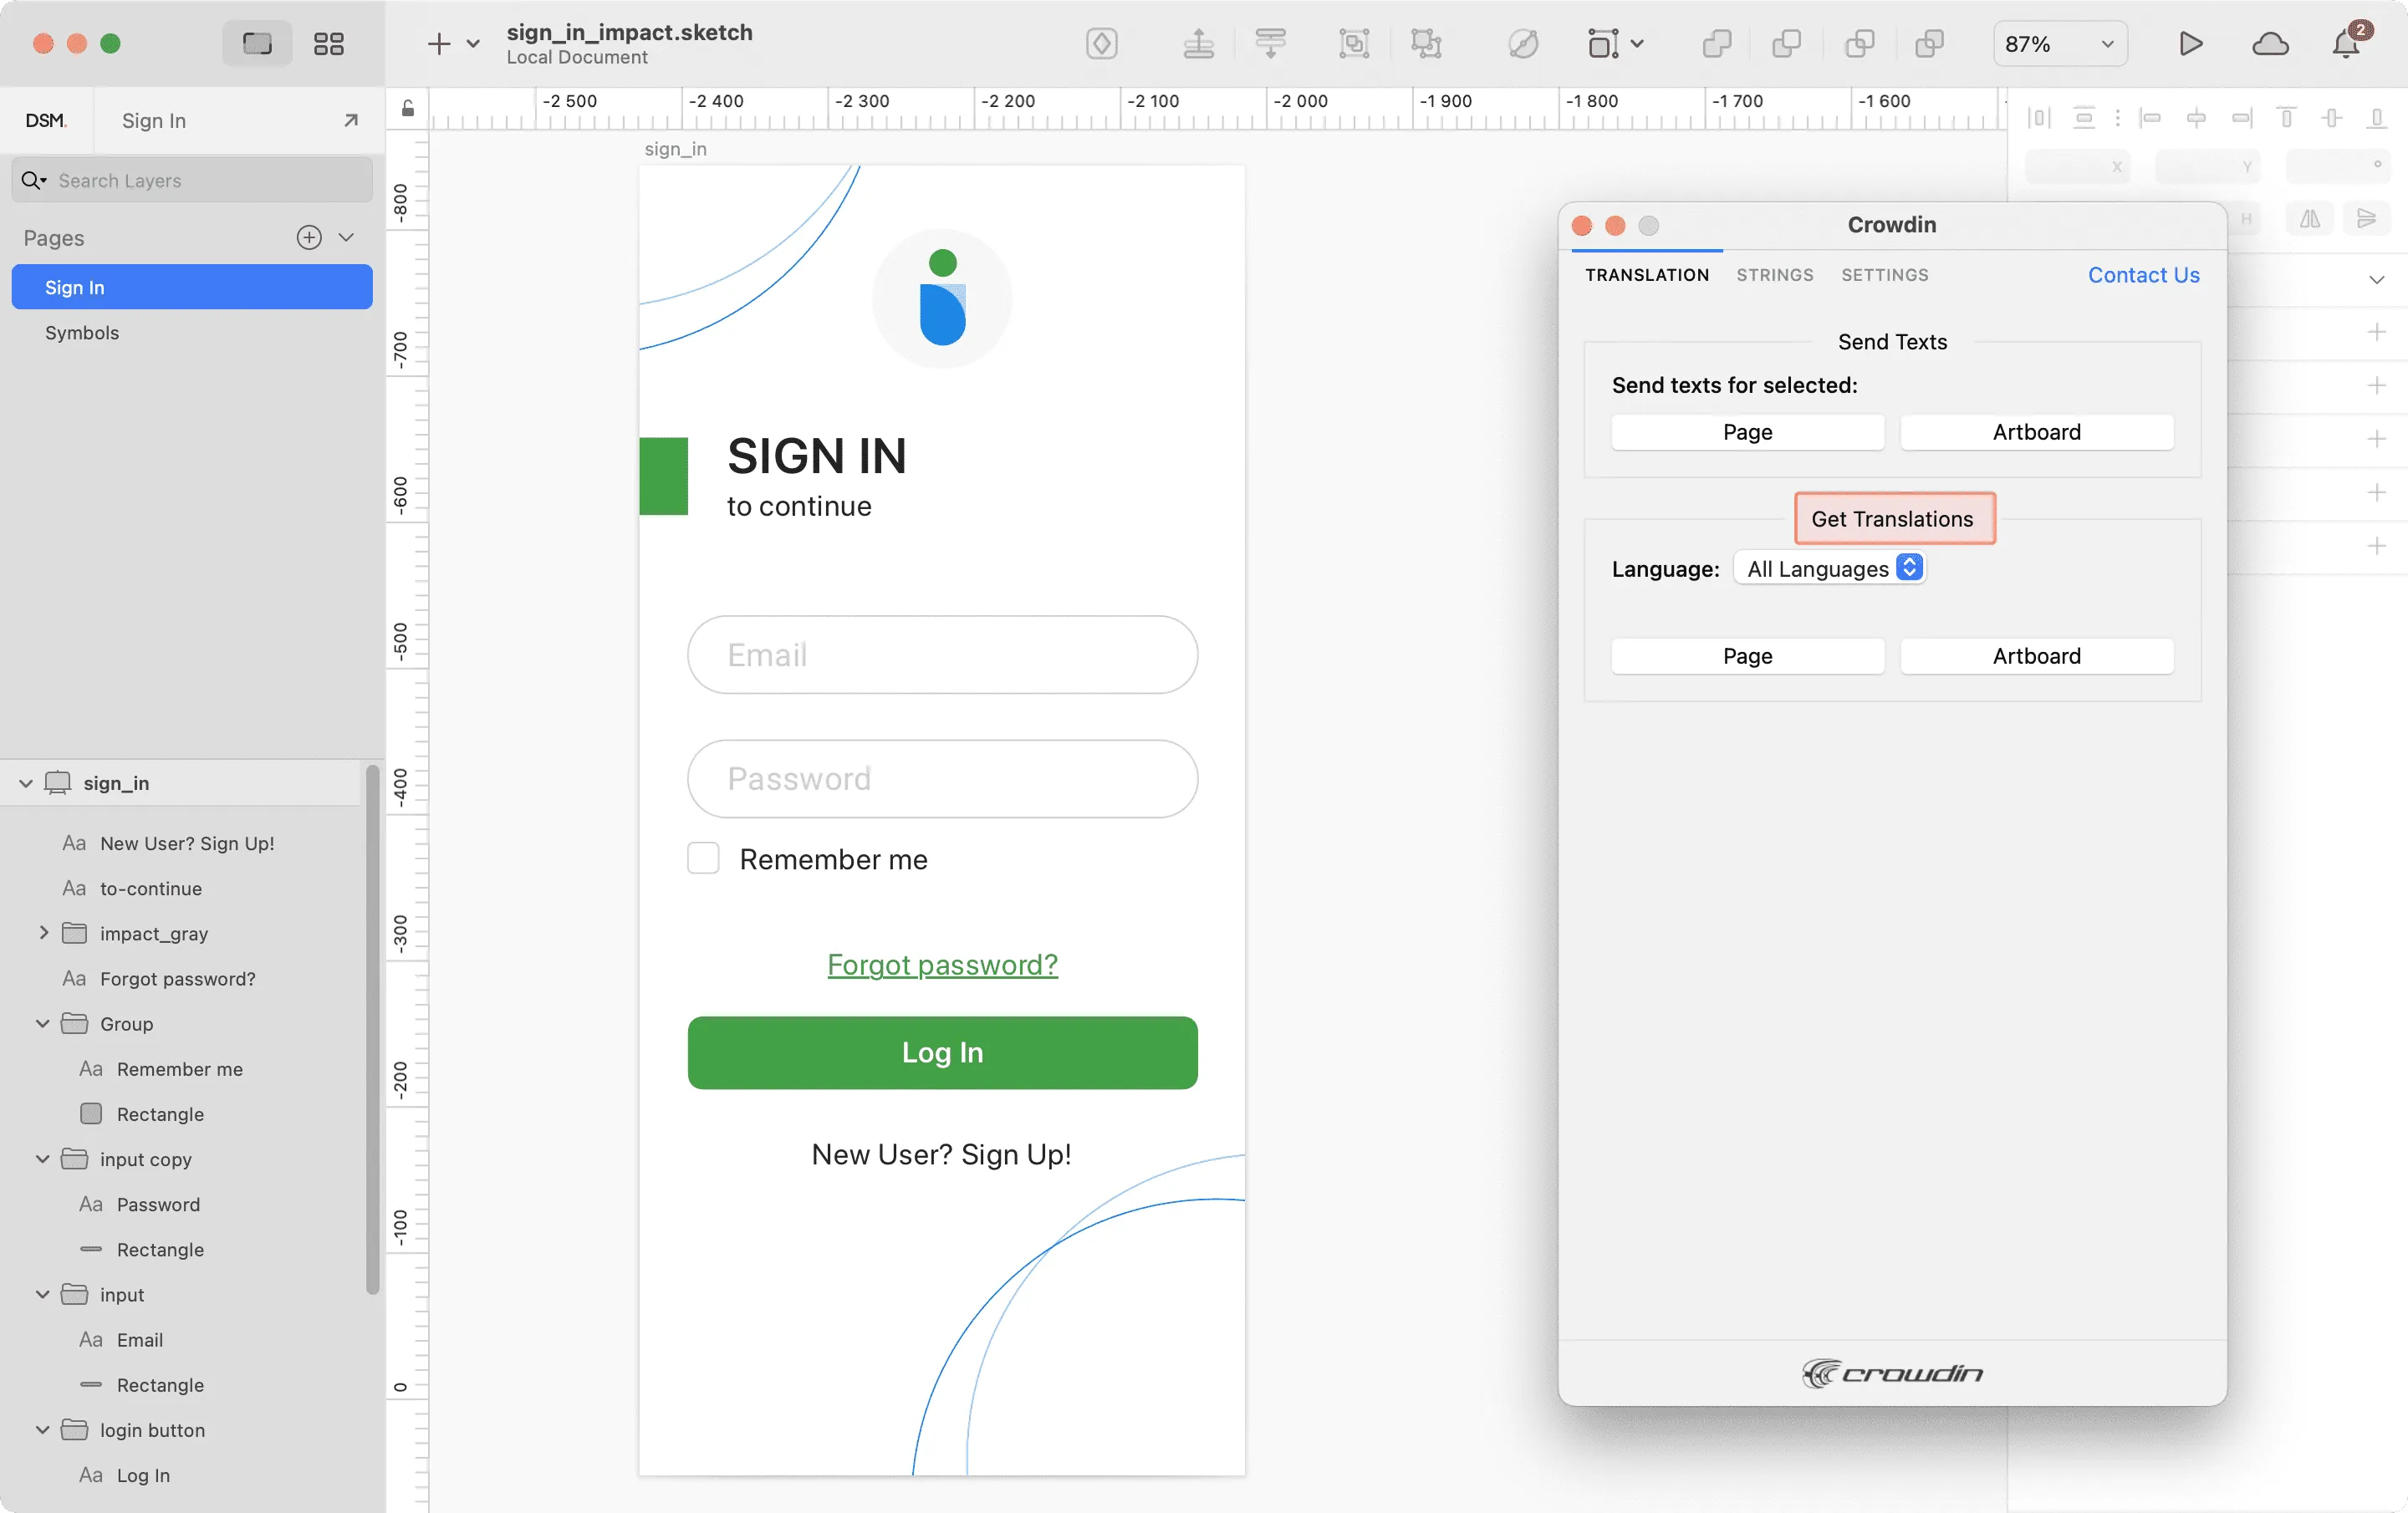 After uploading translations to Sketch, the modified file will contain a separate artboard with translations for each target language. The newly uploaded translated versions won’t override the ones you uploaded previously. You can always delete the translated copies you no longer need. If you’d like the newly uploaded translated versions to override the previously uploaded ones, open the plugin **Settings** and select **Override existing translations**.
# Source Text Review
> Review and correct source texts before the start of translation
Source Text Review is a workflow step used to review and correct source texts for grammar, consistency, formatting, and style before translation begins. This step is particularly useful when your [translation strategy](/enterprise/translation-strategies/) involves hired professional translators, as reviewed and corrected source texts help prevent unnecessary translation costs and improve the overall quality. [Workflow Overview ](/enterprise/workflows/) ## [Adding Source Text Review Step to Your Workflow](#adding-source-text-review-step-to-your-workflow) [Section titled “Adding Source Text Review Step to Your Workflow”](#adding-source-text-review-step-to-your-workflow) Source Text Review is available as a workflow step that can be added in the Workflow Editor or in the Workflow template editor. Once added, the step becomes available to all managers working on the project. 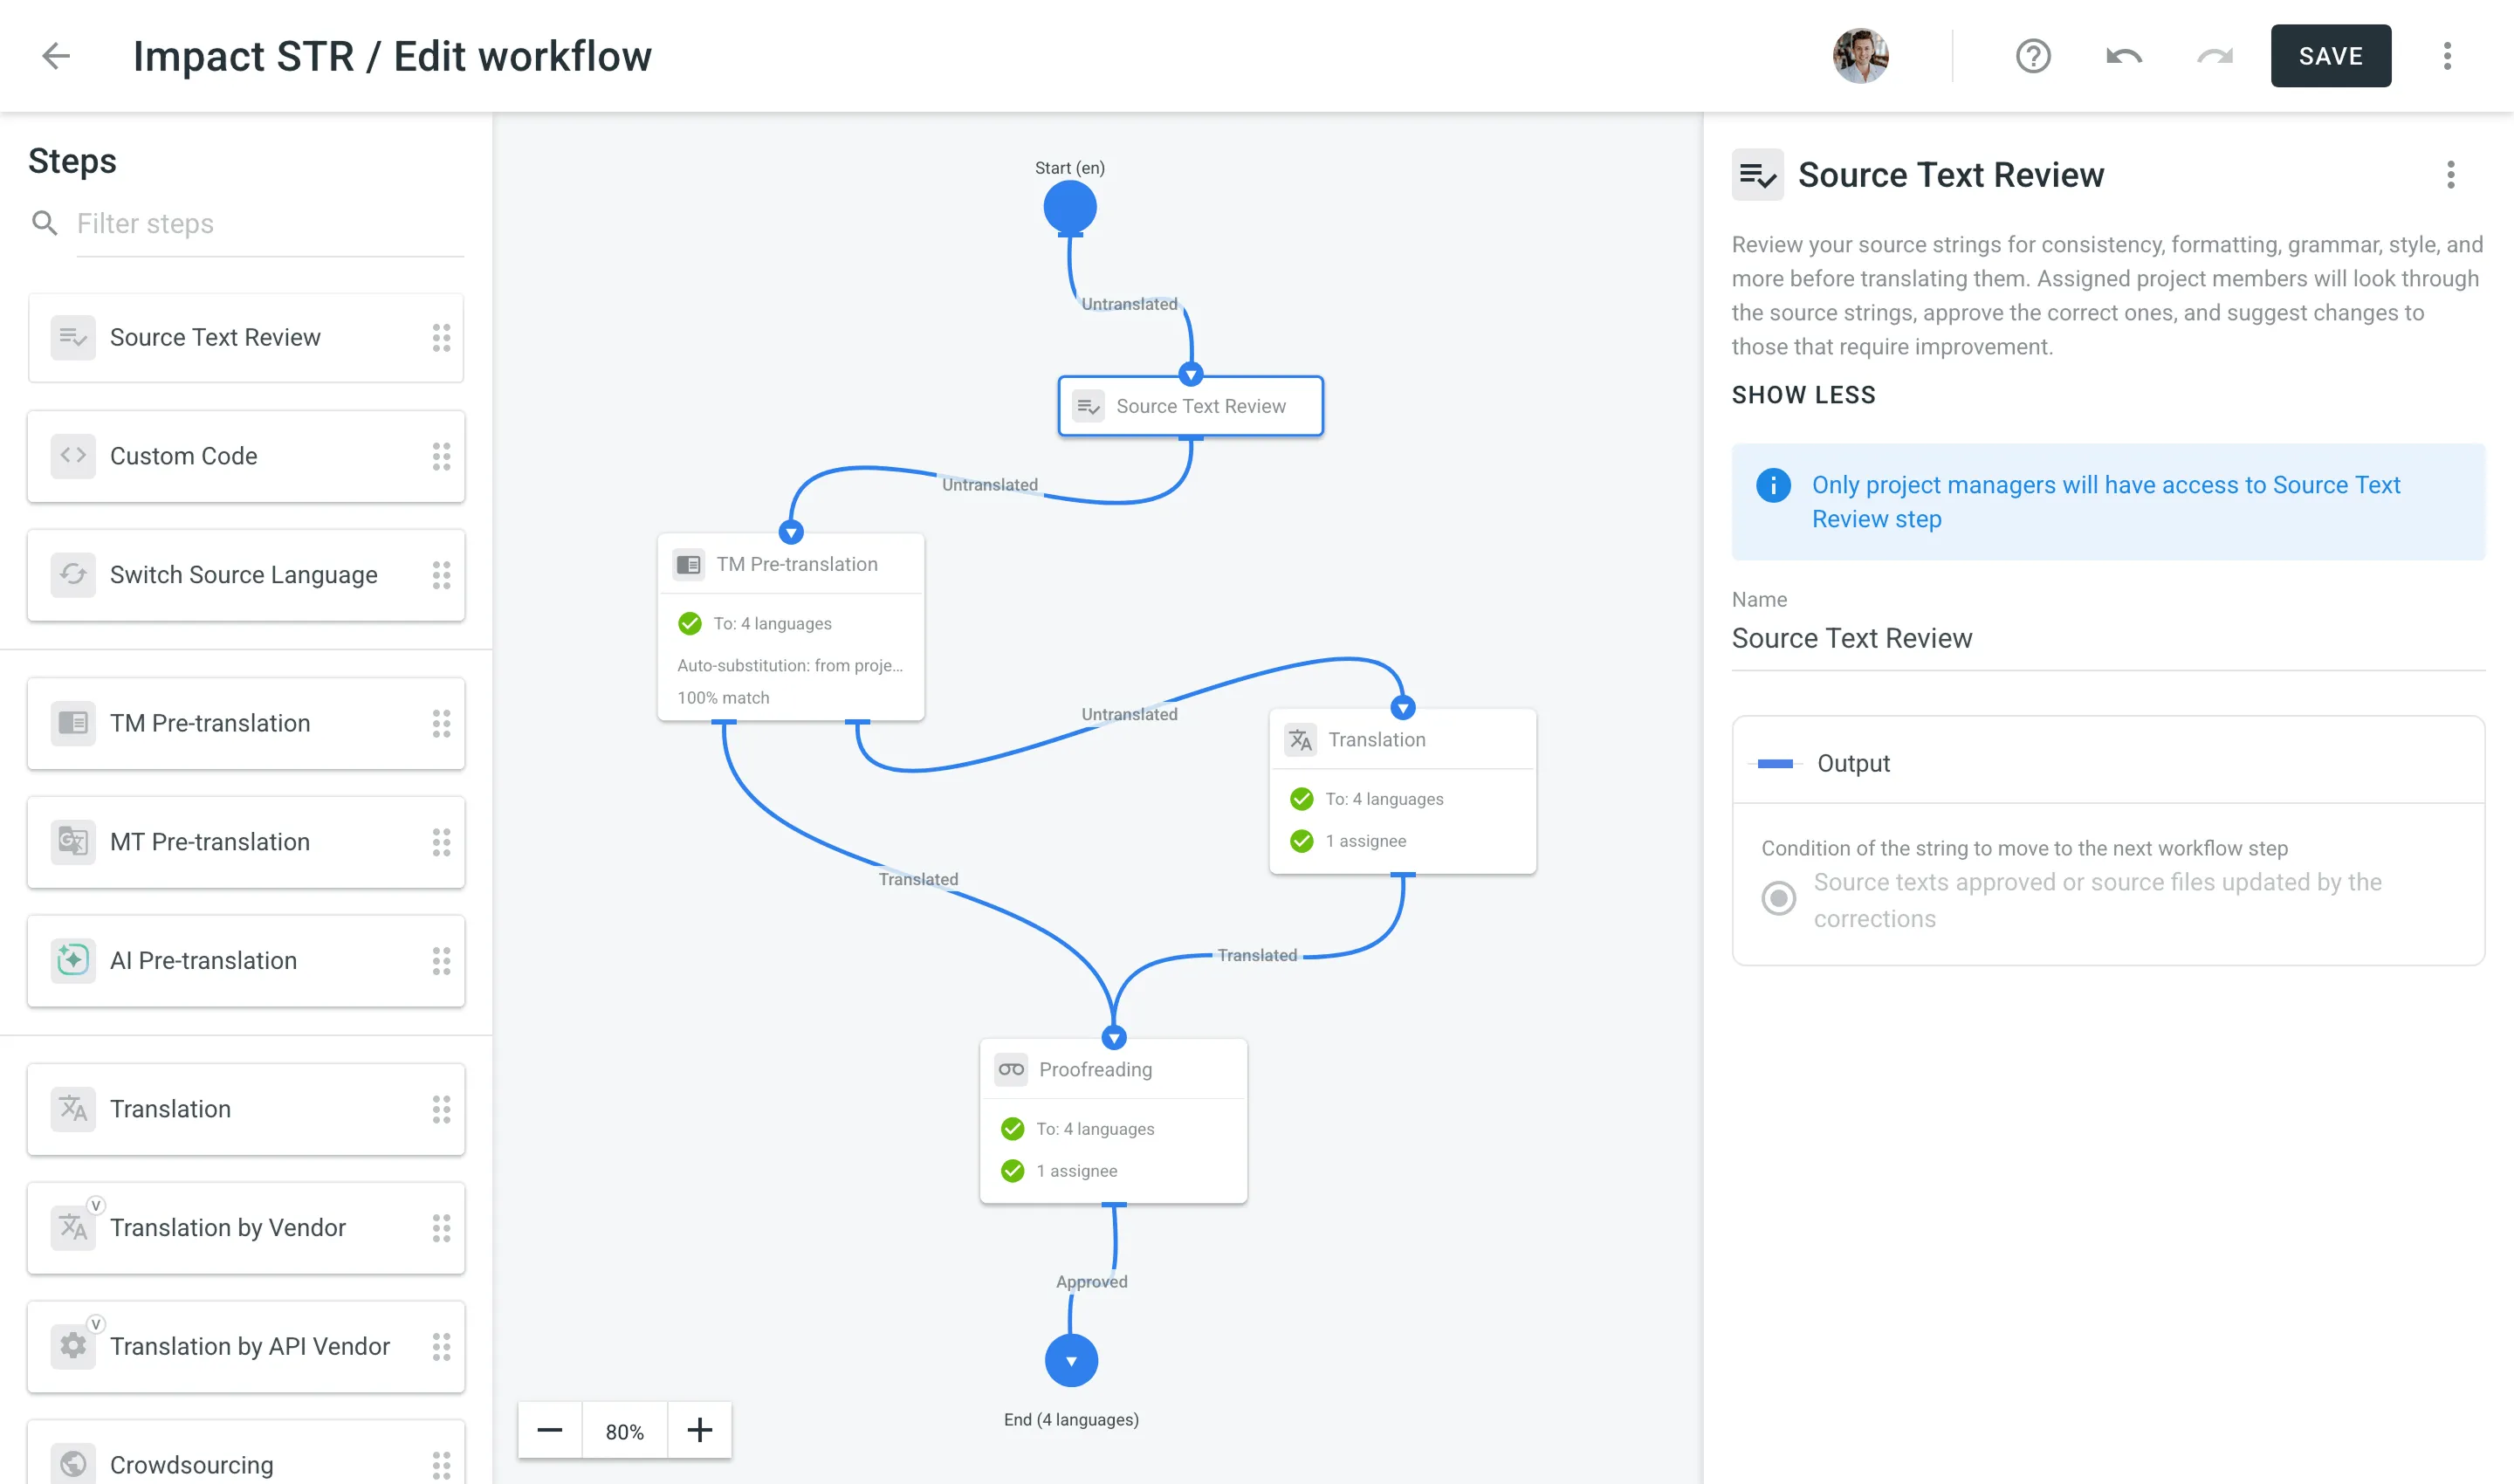 ## [Reviewing Source Texts in Your Project](#reviewing-source-texts-in-your-project) [Section titled “Reviewing Source Texts in Your Project”](#reviewing-source-texts-in-your-project) Once you add the Source Text Review step to your project’s workflow, a corresponding section appears on the project’s **Dashboard** page. Click **Review** to open the Editor in Review mode. 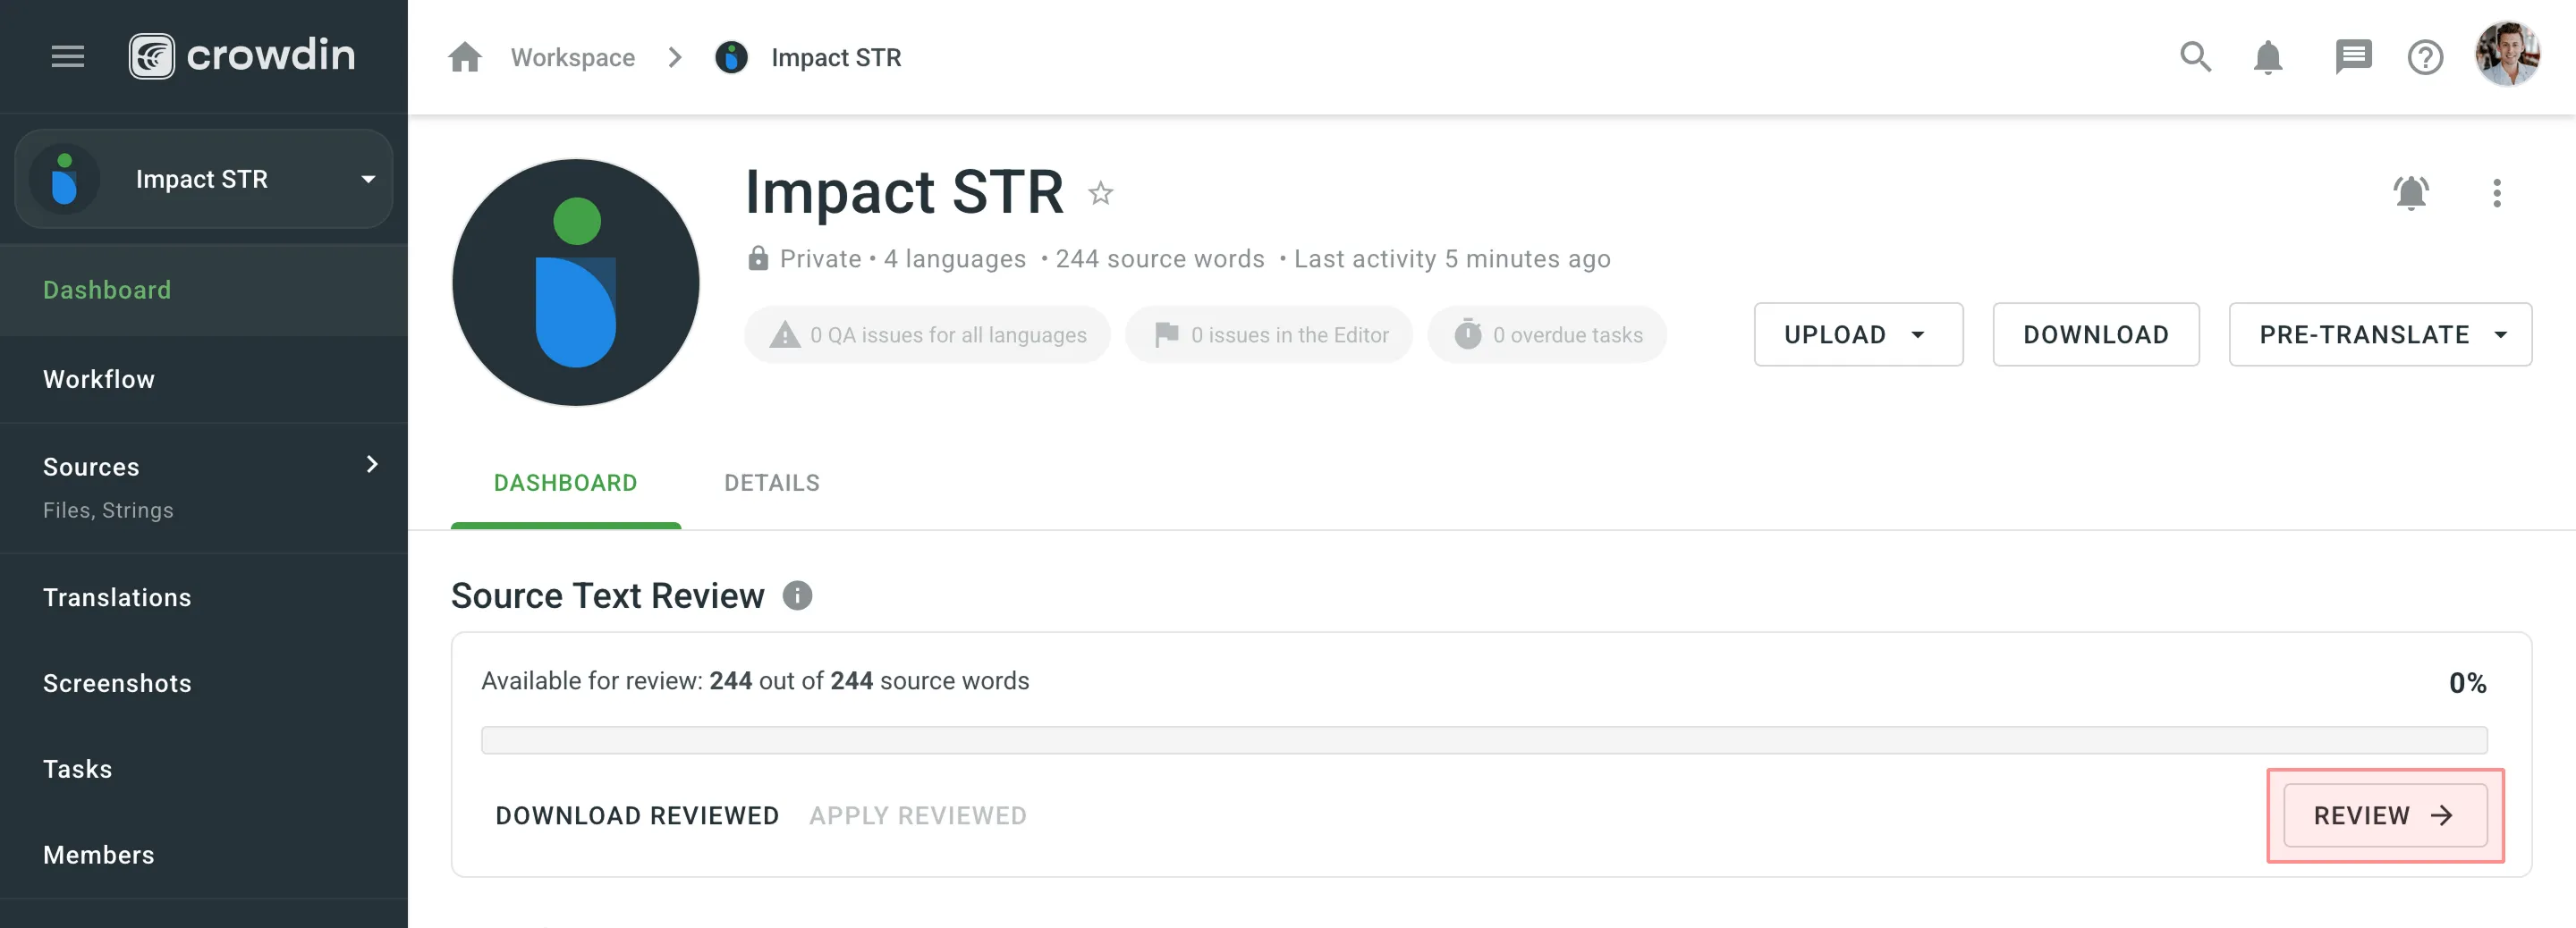 In Review mode, go through the source texts and make corrections where needed. If the source text is correct, click **Approve**. The string will be marked *Done* and will immediately appear on the next workflow step. If the source text requires edits, enter the corrected version and click **Save**. The string will get approved automatically and be marked *ToDo*, meaning the source file requires an update with the reviewed texts. 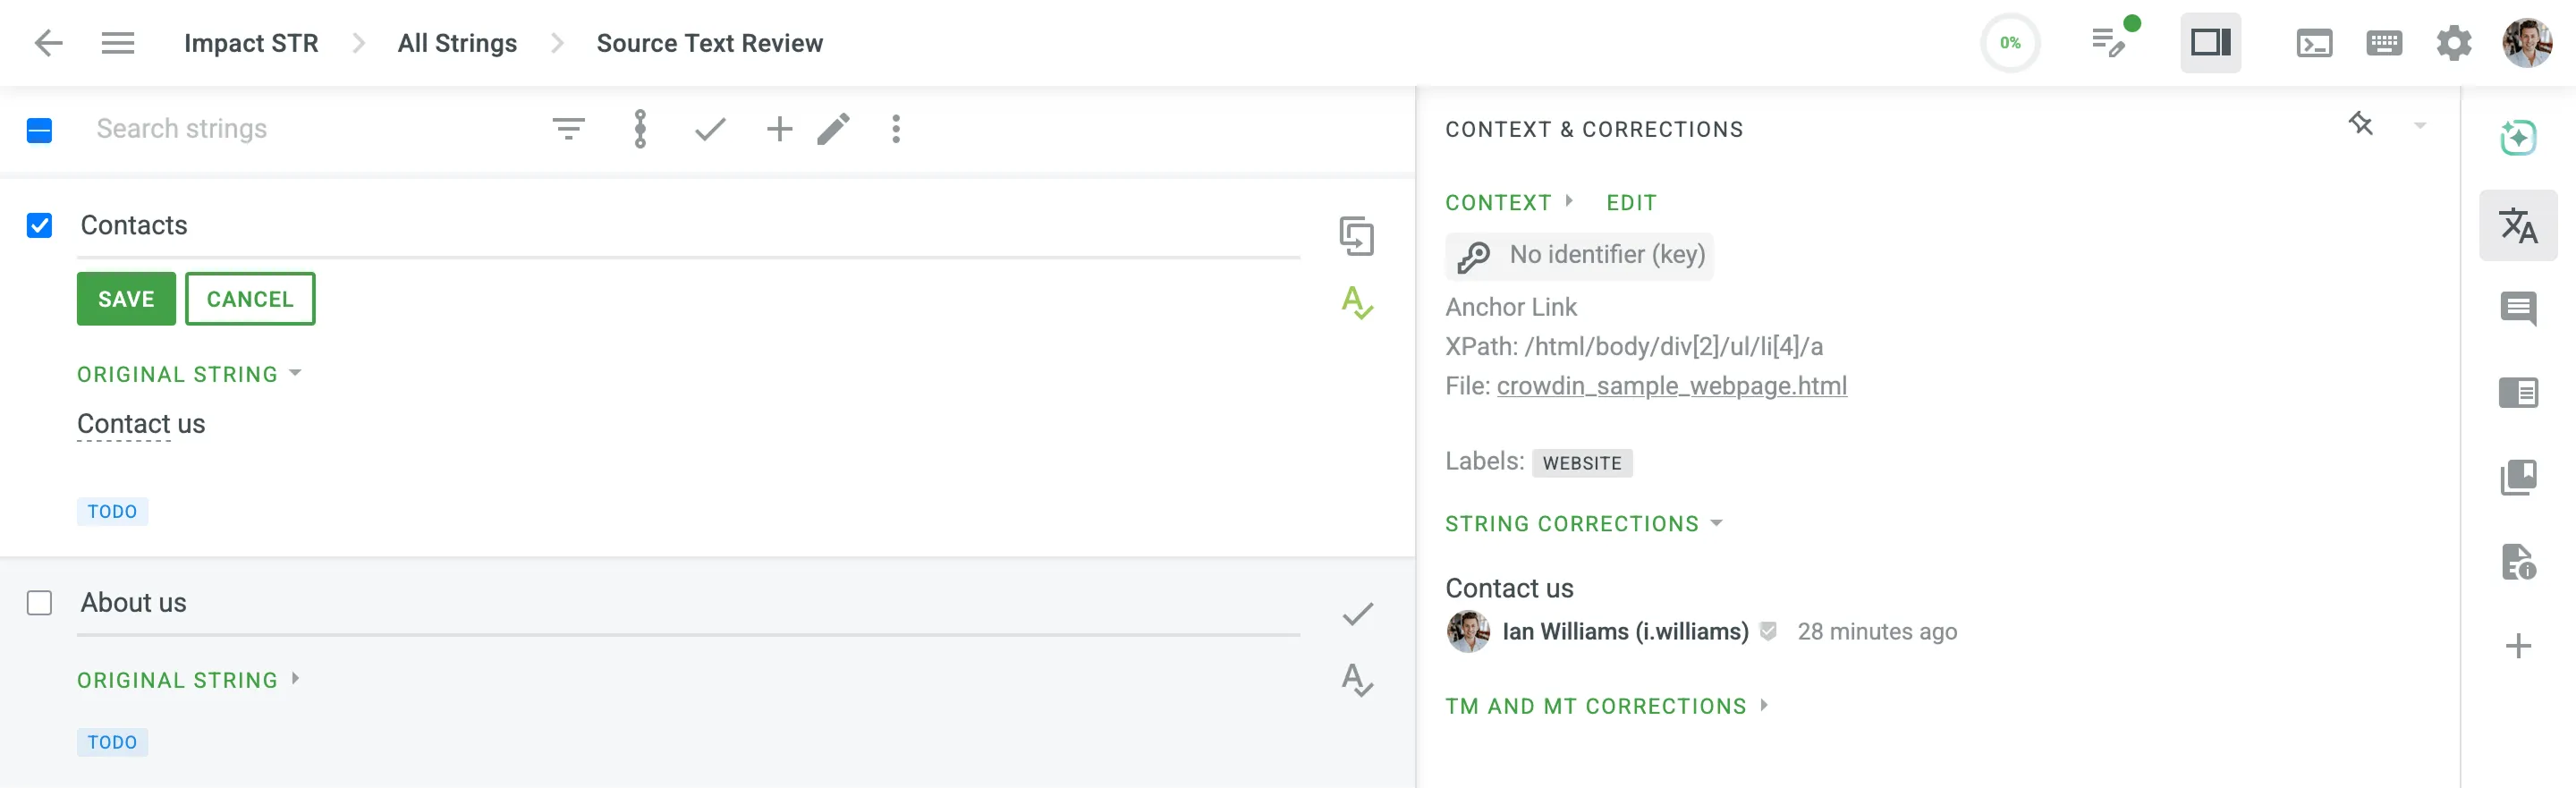 To apply all reviewed texts to the source files, go to the **Dashboard** page and click **Apply reviewed**. After the source file update, the corrected strings will be marked *Done* and be available on the next workflow step. When all strings are reviewed, the Source Text Review progress reaches 100%. Optionally, click **Download reviewed** on the **Dashboard** page to export the reviewed source file and update your local version if needed.
# String Management
> Manage source strings in your translation project
You can view all the project’s strings and manage strings settings via **Sources > Strings**. ## [Changing Strings Visibility](#changing-strings-visibility) [Section titled “Changing Strings Visibility”](#changing-strings-visibility) If some strings contain data that is not supposed to be translated (e.g., placeholders, other technical entities), you can hide them from translators. To do this: 1. Open your project and go to **Sources > Strings**. 2. Select the necessary strings by clicking the checkbox next to each one. 3. Click . 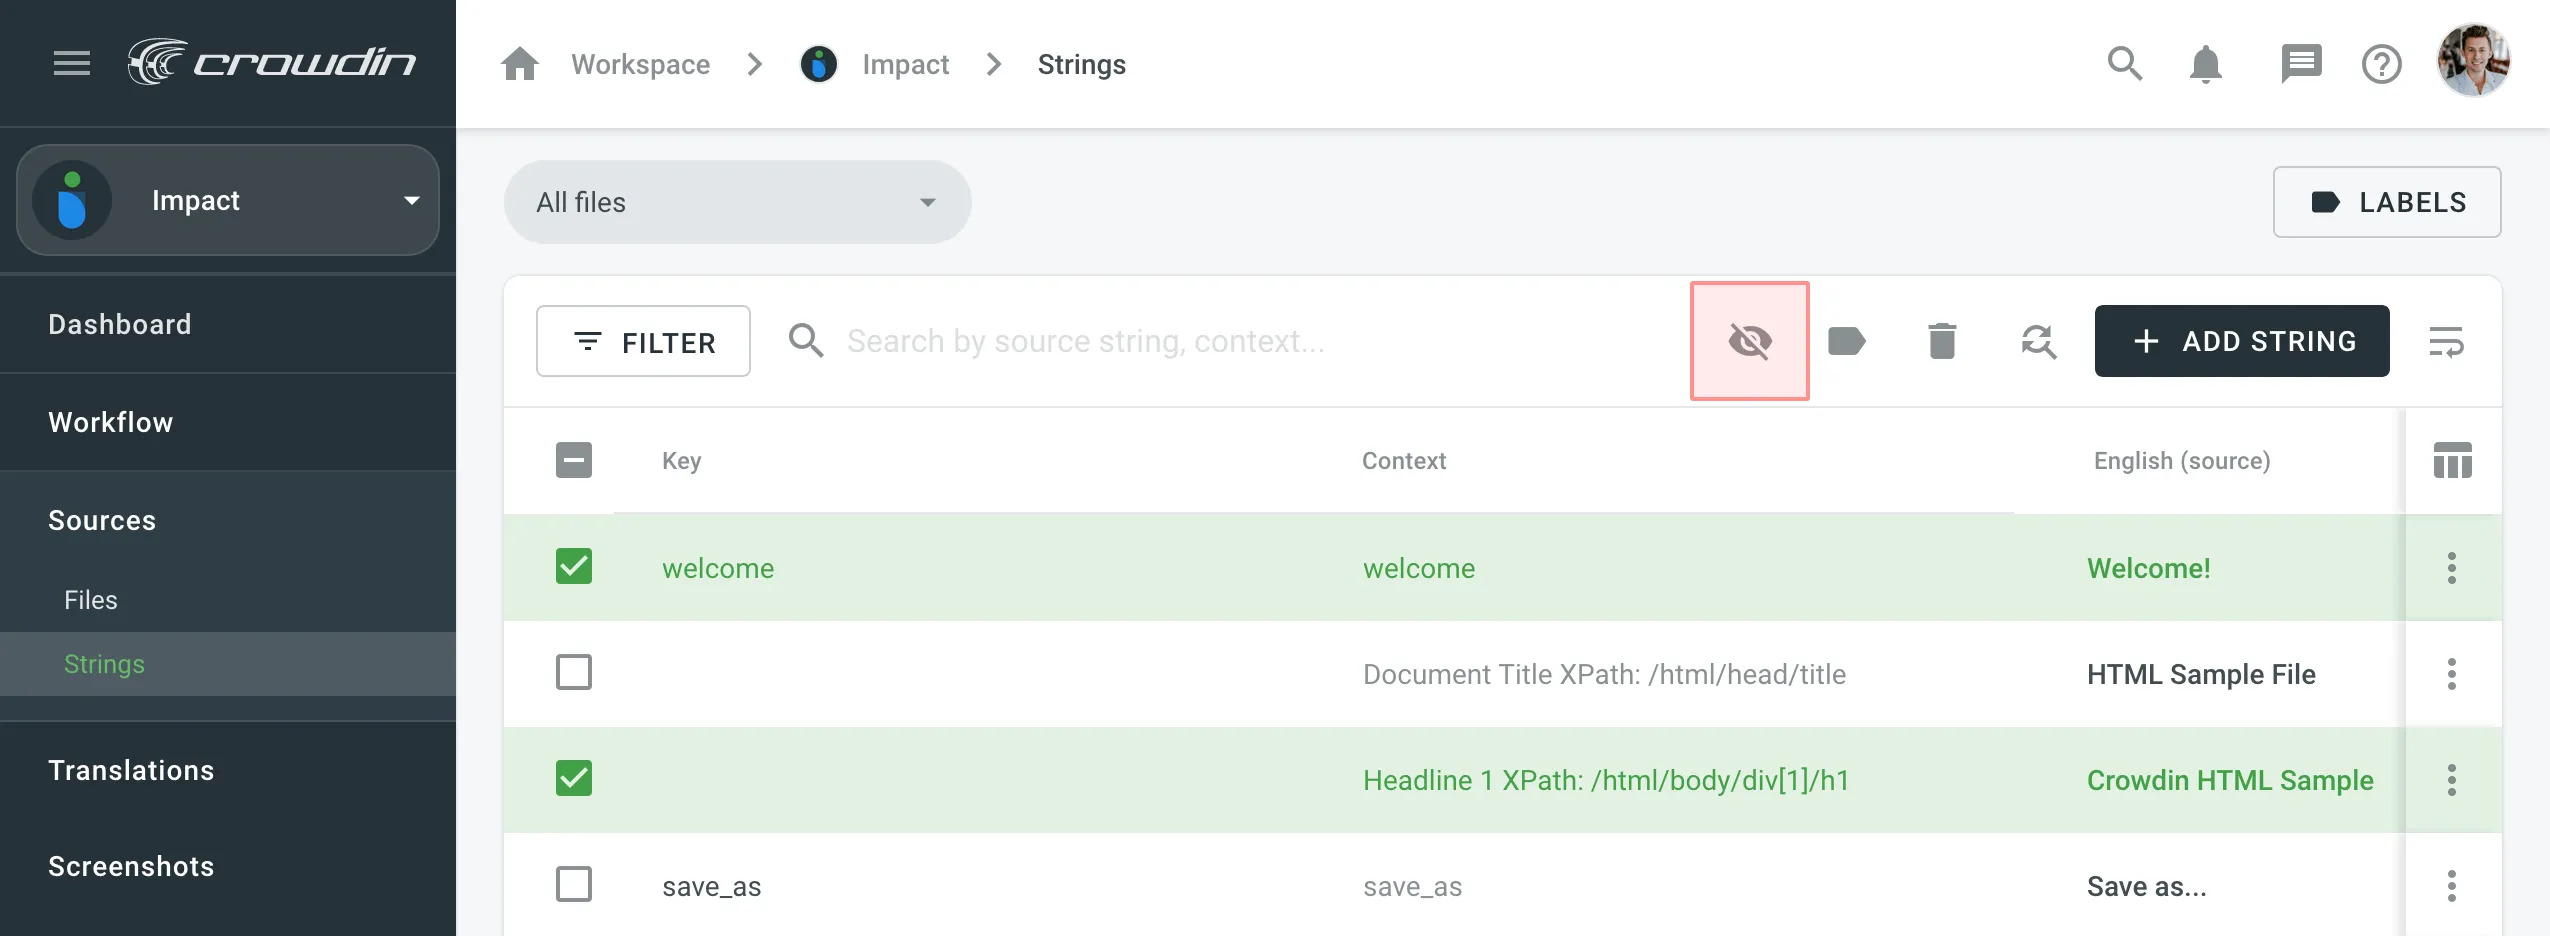 ## [Filtering Strings](#filtering-strings) [Section titled “Filtering Strings”](#filtering-strings) By default, all source strings of the project are displayed in **Sources > Strings**. If necessary, you can filter out strings using the available filter options (Issues: All, With unresolved issues, Without unresolved issues; Comments: All, With comments, Without comments; Screenshots: All, With screenshots, Without screenshots; Visibility: All, Visible only and Hidden only) and project labels. 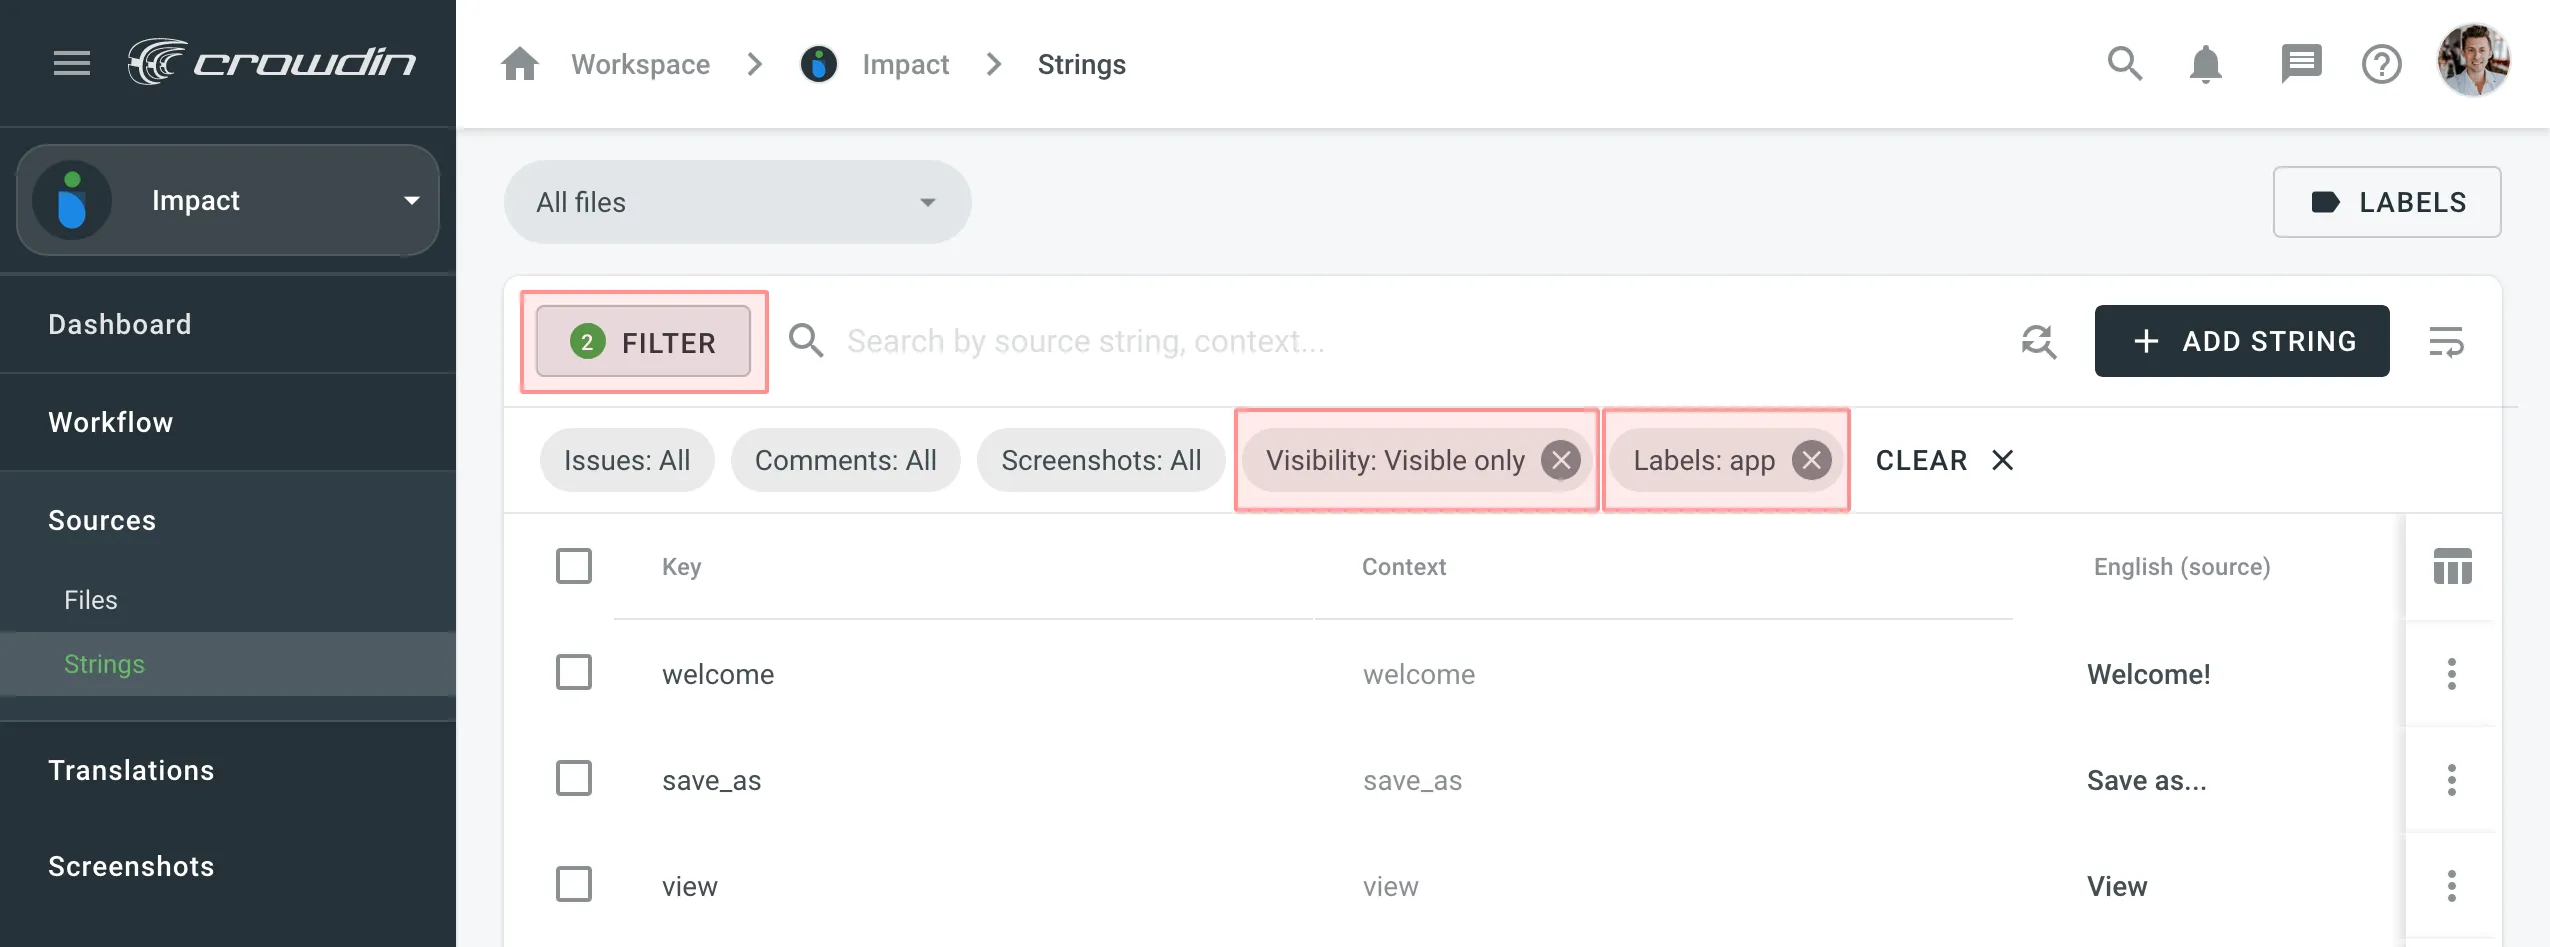 ## [Adding Strings](#adding-strings) [Section titled “Adding Strings”](#adding-strings) You can add strings to your projects directly in Crowdin Enterprise. To add a new string, follow these steps: * File-based project 1. Open your project and go to **Sources > Strings**. 2. Click **Add String**. 3. In the appeared dialog, enter the necessary details for the string: * *String* – specify the text that needs translation. * *(Optional)* *Plurals* – select this option to add plural forms and enter the text for each form based on the project’s source language requirements. * *Identifier* – specify a unique key for the string, often used for referencing the translated text in the application. * *(Optional)* *Context* – add additional information to help translators understand the intended meaning. * *(Optional)* [*Labels*](#labels) – specify labels to organize strings or provide extra context. * *(Optional)* *Maximum Translation Length* – set a character limit for the translation. * *(Optional)* File-specific identifiers – specify unique keys for each file format when adding the string to multiple files. This ensures that the string meets the different identifier requirements based on the file formats it will be used in. * *Files* – choose the source files where this string should be added. 4. Click **Add** to add the new string to your project. * String-based project 1. Open your project and go to the **Strings** tab. 2. Click **Add String**. 3. In the appeared dialog, enter the necessary details for the string: * *Branches* – choose the branches where this string should be added. * *String* – specify the text that needs translation. You can leave this field empty to create placeholder strings for future content or development purposes. * *(Optional)* *Plurals* – select this option to add plural forms and enter the text for each form based on the project’s source language requirements. * *Identifier* – specify a unique key for the string, often used for referencing the translated text in the application. * *(Optional)* *Context* – add additional information to help translators understand the intended meaning. * *(Optional)* [*Labels*](#labels) – specify labels to organize strings or provide extra context. * *(Optional)* *Maximum Translation Length* – set a character limit for the translation. * *(Optional)* File-specific identifiers – specify unique keys for each branch when adding the string to multiple branches. This ensures that the string meets the different identifier requirements based on the file formats it will be used in. 4. Click **Add** to add the new string to your project. Read more about [project types](/enterprise/creating-project/#project-types). Limitations The maximum identifier length is 512 characters. ## [String Editing](#string-editing) [Section titled “String Editing”](#string-editing) You can add context to the string, add or remove labels, set the max. length of the translation. Once the translation limits are exceeded, the system notifies the contributor that the translation should be shorter. 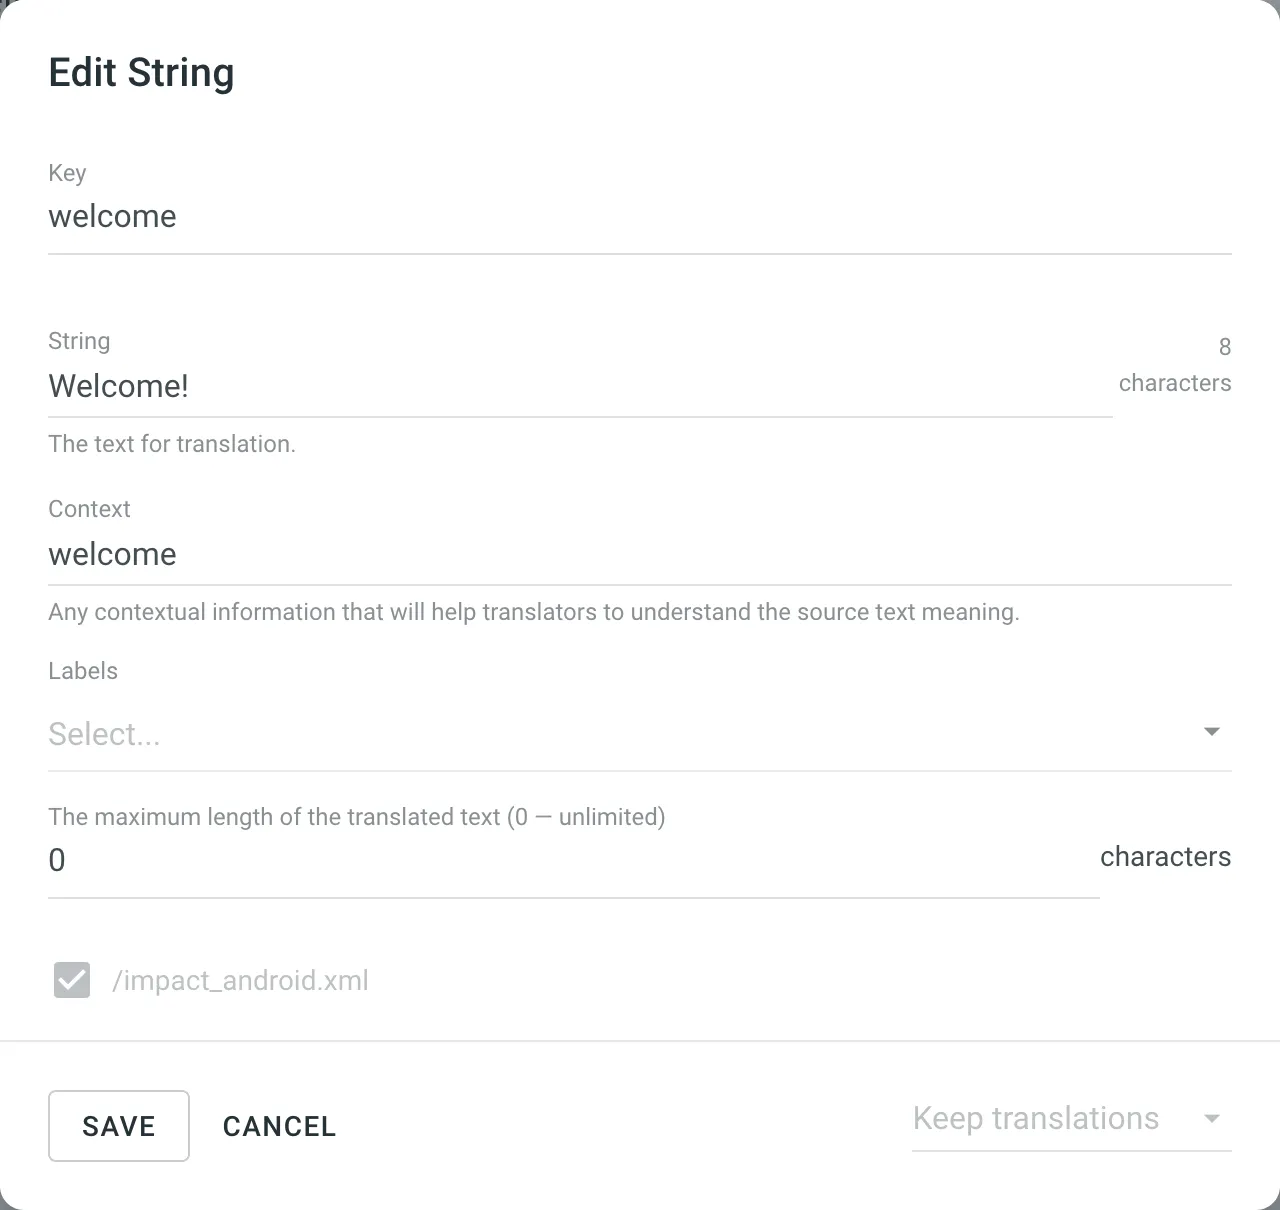 To edit some particular word or phrase that appears in multiple source strings, you can use the **Find and replace** feature in **Sources > Strings**. Caution When editing the identifier of a string contained in a group of strings (string array for Android XML, segments for XLIFF), the existing translations will be removed for all group strings but the edited one. ### [Formats That Support Online Editing](#formats-that-support-online-editing) [Section titled “Formats That Support Online Editing”](#formats-that-support-online-editing) Some file formats allow editing (adding, deleting, and modifying) of the source text and string identifiers directly in Crowdin Enterprise, so you can make the necessary corrections without having to update the source file via **Sources > Files**. The following file formats support editing the source text and string identifiers directly in Crowdin: * [Android XML](https://store.crowdin.com/android-xml) * [iOS Strings](https://store.crowdin.com/strings) * [Apple Strings Catalog](https://store.crowdin.com/string_catalog) * [JSON](https://store.crowdin.com/json) * [i18next JSON](https://store.crowdin.com/i18next-json) * [Chrome JSON](https://store.crowdin.com/chrome-json) * [XLIFF 1.2](https://store.crowdin.com/xliff) * [XLIFF 2.0](https://store.crowdin.com/xliff2.0) * [Angular XLF](https://store.crowdin.com/angular) * [GNU Gettext PO](https://store.crowdin.com/gnu-gettext) * [Unreal Engine Gettext PO](https://store.crowdin.com/gettext-unreal) * [YAML](https://store.crowdin.com/yaml) * [RESX](https://store.crowdin.com/resx) * [CSV](https://store.crowdin.com/csv) * [XLSX](https://store.crowdin.com/xlsx-excel) * [ARB](https://store.crowdin.com/arb) * [Java Properties](https://store.crowdin.com/java-properties) * [Properties Play](https://store.crowdin.com/properties-play) * [Properties XML](https://store.crowdin.com/properties-xml) ### [Labels](#labels) [Section titled “Labels”](#labels) Use labels in your project for an easy way to add context to the strings or organize them by certain topics. Labels are also useful while creating translation and proofreading tasks or searching for specific strings in the Editor with the help of [Advanced Filter](/enterprise/online-editor/#advanced-filter). [Managing Project Labels ](/enterprise/project-settings/labels/)Learn how to make your Crowdin project labels. There are a few possible ways you can add labels to the strings. ##### [Add labels to one string at a time via the *Edit String* dialog](#add-labels-to-one-string-at-a-time-via-the-edit-string-dialog) [Section titled “Add labels to one string at a time via the Edit String dialog”](#add-labels-to-one-string-at-a-time-via-the-edit-string-dialog) 1. Right-click on the string in the list and select **Edit**. 2. Select needed labels in the *Labels* field. 3. Click **Save**. 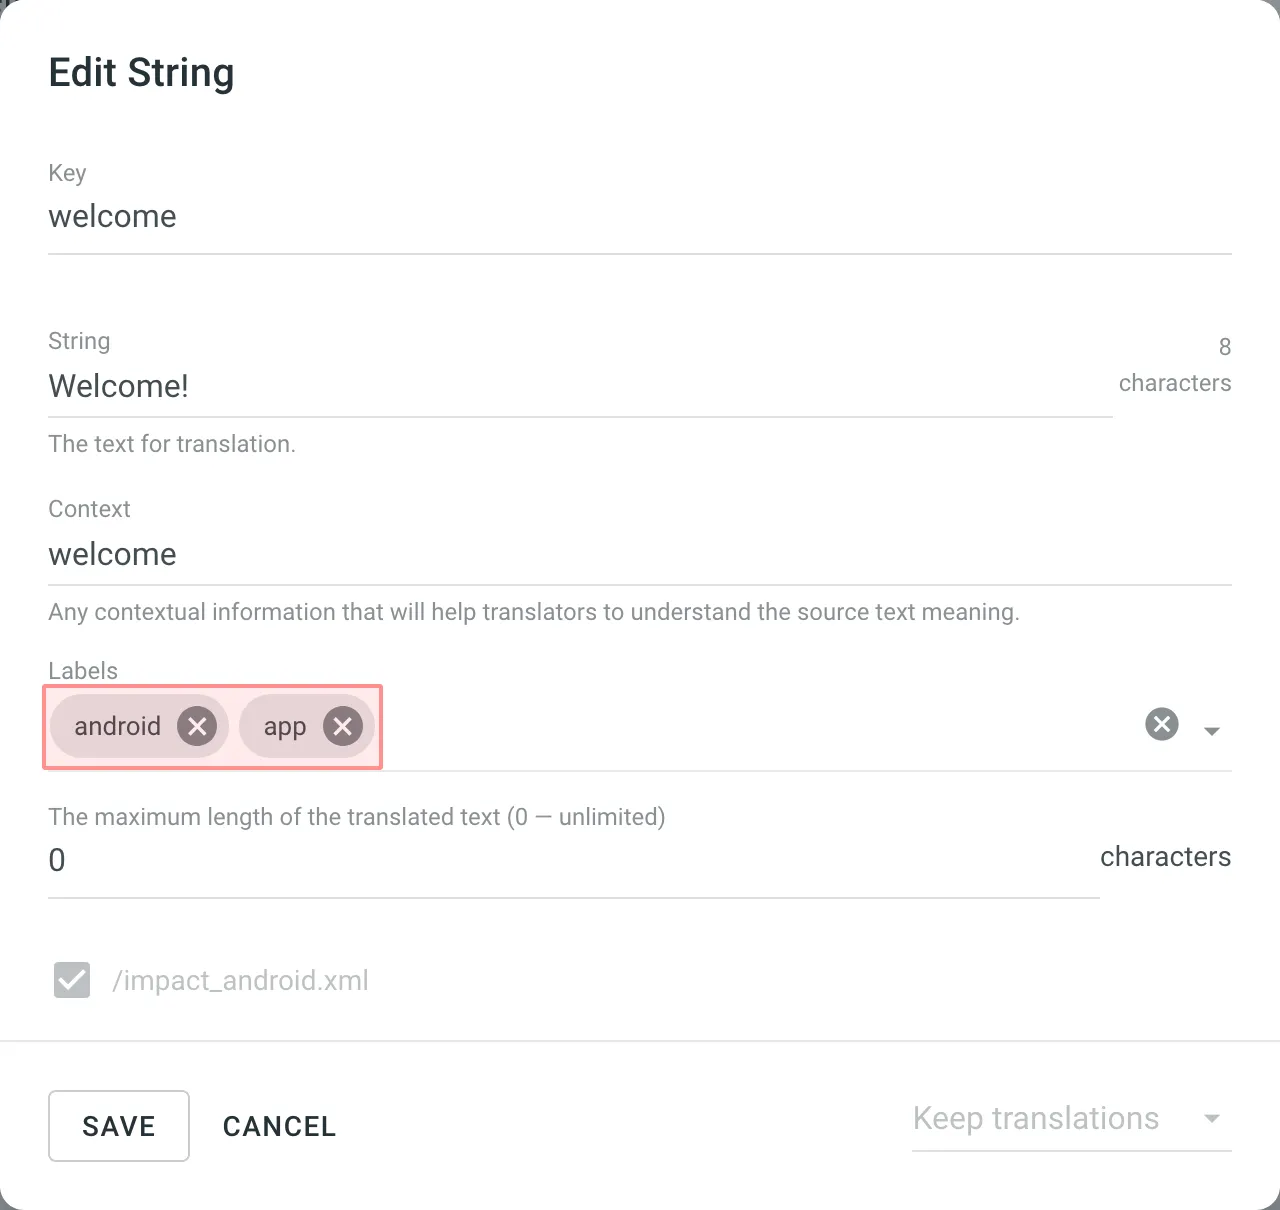 ##### [Add labels to multiple strings via the *Manage Strings Labels* dialog](#add-labels-to-multiple-strings-via-the-manage-strings-labels-dialog) [Section titled “Add labels to multiple strings via the Manage Strings Labels dialog”](#add-labels-to-multiple-strings-via-the-manage-strings-labels-dialog) 1. Select a few strings you want to add the same labels to. 2. Click . 3. Select needed labels from the list. 4. Click **Apply**. 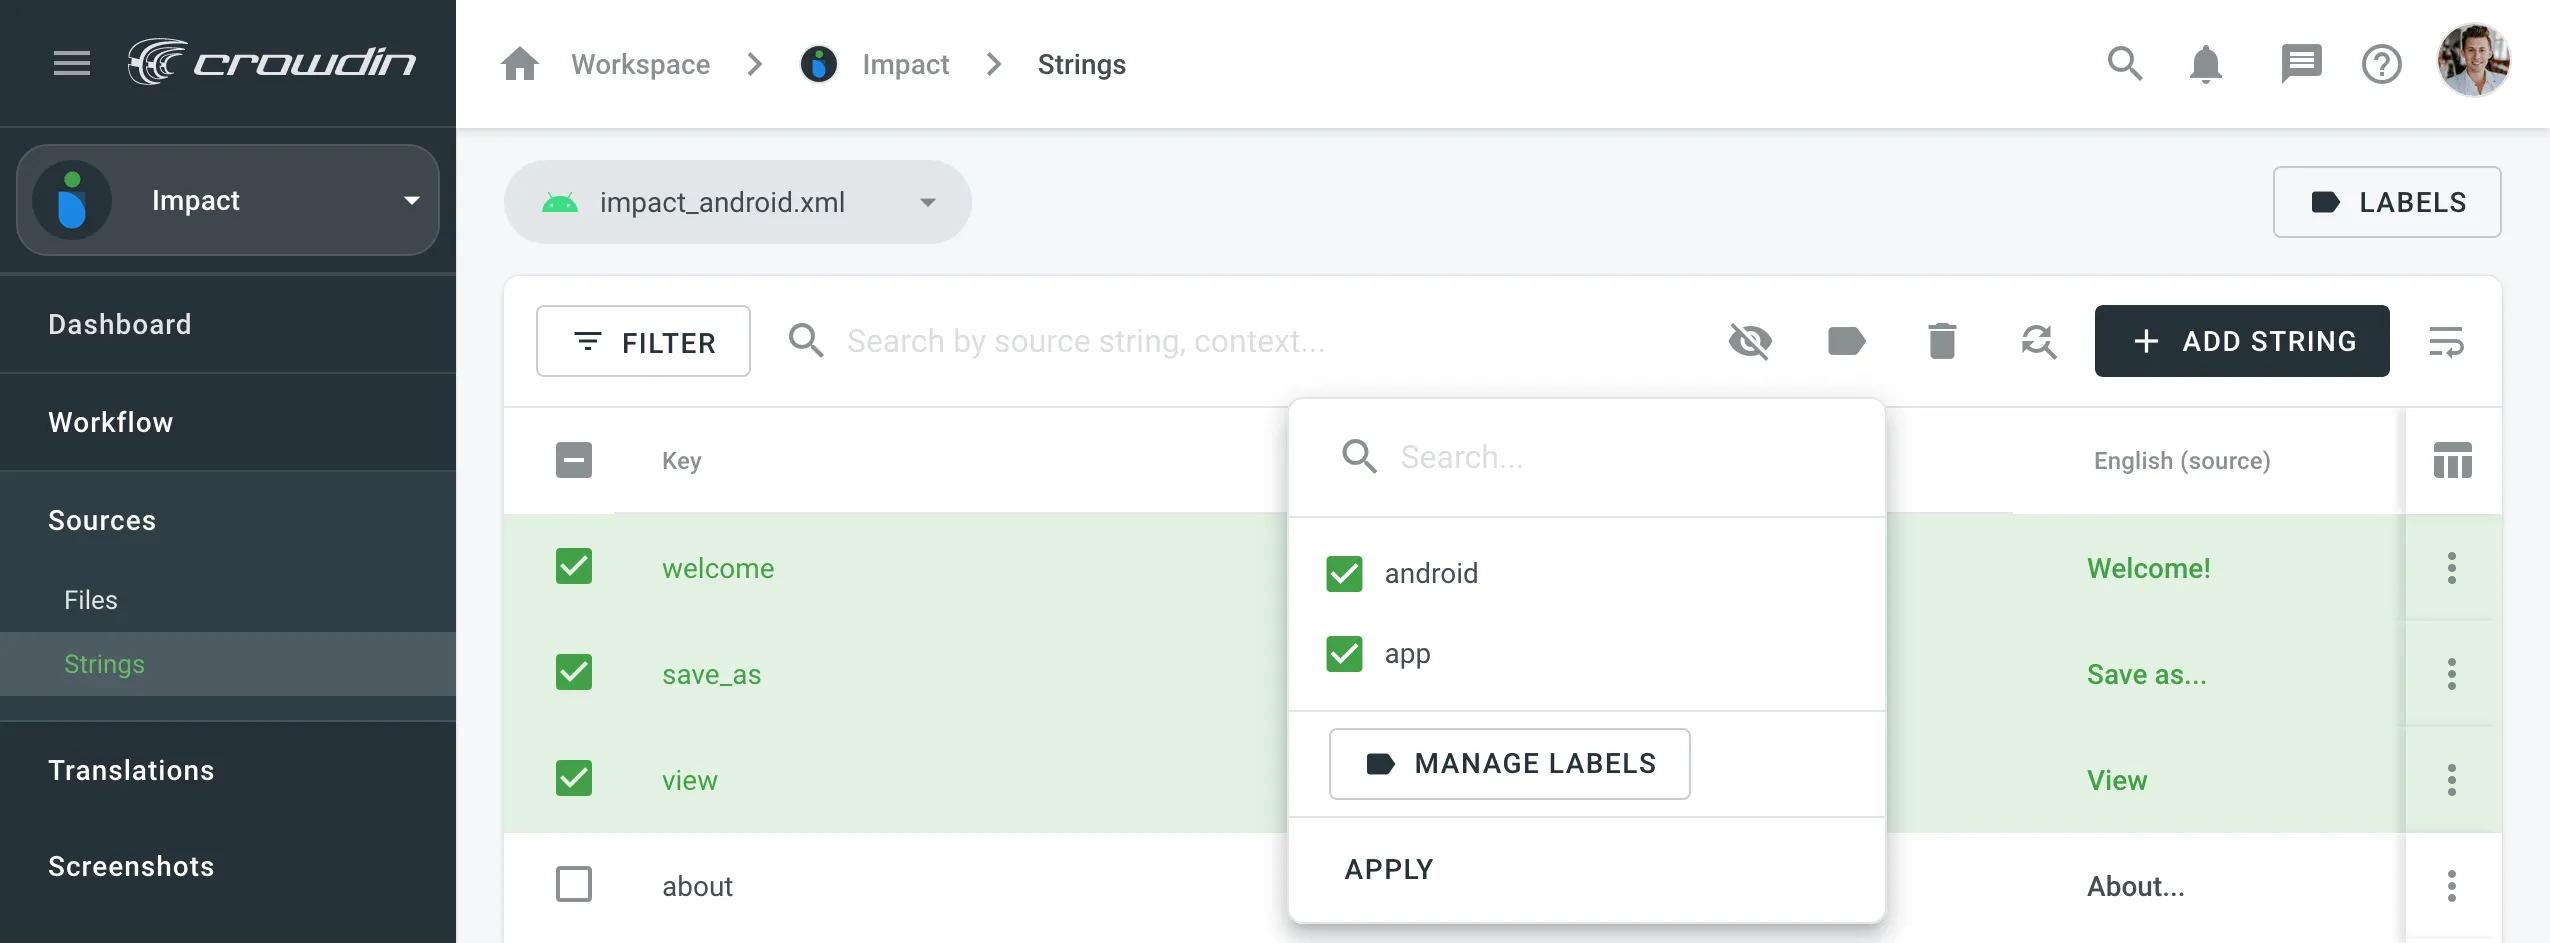 ##### [Add labels to the source strings in CSV and XLSX files using a dedicated column for labels](#add-labels-to-the-source-strings-in-csv-and-xlsx-files-using-a-dedicated-column-for-labels) [Section titled “Add labels to the source strings in CSV and XLSX files using a dedicated column for labels”](#add-labels-to-the-source-strings-in-csv-and-xlsx-files-using-a-dedicated-column-for-labels) Read more about [Configuring Columns for Import](/enterprise/csv-xlsx-configuration/#configuring-columns-for-import).
# Supported Formats
> Explore the list of localization formats supported by Crowdin
Crowdin supports a wide range of localization formats, including but not limited to files for mobile, software, documents, subtitles, and graphic assets. ## [Localization Formats and Documents](#localization-formats-and-documents) [Section titled “Localization Formats and Documents”](#localization-formats-and-documents) * Mobile application formats * Web and desktop software formats * Documentation and video subtitles  50 Supported Formats [View on Store ](https://store.crowdin.com/categories/file-formats) ## [Graphics and Assets](#graphics-and-assets) [Section titled “Graphics and Assets”](#graphics-and-assets) Localize images associated with your product to improve your product’s user experience. 1. Upload graphics to Crowdin. 2. Add all the necessary references for a translator to understand how these graphics should be handled. 3. Wait for translators to upload localized files. 4. Download the localized graphics and use them in production. 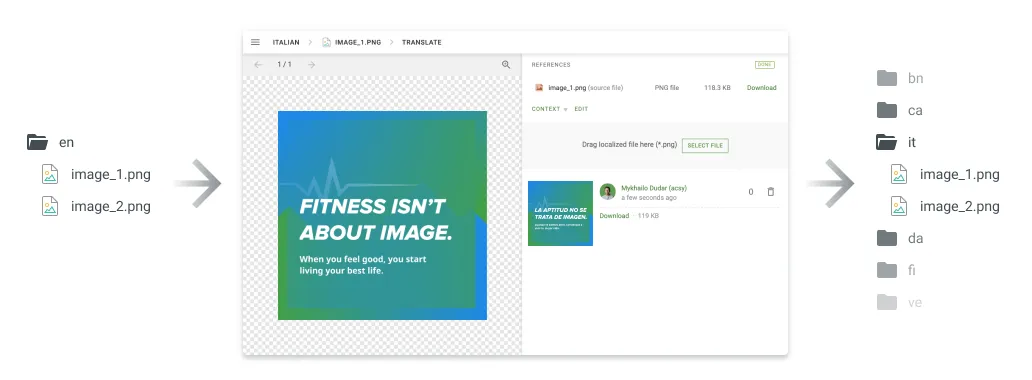 ## [Converted File Formats](#converted-file-formats) [Section titled “Converted File Formats”](#converted-file-formats) On import, some file formats are automatically converted into other formats to be further parsed and processed. You can see the list of the initial file formats and the file formats they’re being converted into in the table below. | Initial file format | Converted file format | | ------------------- | --------------------- | | DOC | DOCX | | PPT | PPTX | | RTF | DOCX | | PDF | DOCX | ## [Custom Services](#custom-services) [Section titled “Custom Services”](#custom-services) ## [Custom File Formats](#custom-file-formats) [Section titled “Custom File Formats”](#custom-file-formats) File formats that are not officially supported will be recognized as plain text files (if they contain text) or as graphic assets. Our team can add special code to support your original file formats and ensure that translators see only translatable text rather than the entire file content. This approach allows you to manage custom file formats more effectively. [Contact](https://crowdin.com/contacts) our support team to start working with custom file formats in your project. Alternatively, you can implement support for a custom format yourself by developing a [Crowdin app](/developer/crowdin-apps-about/) incorporating the [Custom File Format](/developer/crowdin-apps-module-custom-file-format/) module. ## [Custom File Export](#custom-file-export) [Section titled “Custom File Export”](#custom-file-export) By default, we export the translations in the same format as the source files. For example, if you upload an XML file to Crowdin, you’ll have the XML file exported. Our developers can create a special processor if you want to configure custom settings for your file export. For example, you upload a key-value file that doesn’t support [string editing](/enterprise/string-management/) by default and want to modify it directly in Crowdin. We can temporarily convert your file to CSV file format to allow you to add strings online. The exported file will remain in the original format. [Contact](https://crowdin.com/contacts) our support team, and we’ll gladly help you set custom export options based on your needs. ## [Custom Placeholders](#custom-placeholders) [Section titled “Custom Placeholders”](#custom-placeholders) Crowdin supports all the placeholders typical for the supported file formats. They are all automatically highlighted in the Editor, so translators know that they shouldn’t be translated. Even if the translator tries to save the translation with some modified or missing placeholder, enabled QA checks will notify the translator about the mistake. As various file formats allow the creation of custom placeholders, we can also add support for the custom ones you use in your project. To request the support of your custom placeholders, [contact](https://crowdin.com/contacts) our support team.
# Project Tasks
> Create and assign tasks for translating or proofreading content
Create and assign tasks for translating or proofreading content to specific project members or vendors. You can set due dates, split words among assignees, receive notifications about task changes and updates, and discuss tasks with other project members in the comments. ## [Creating New Task](#creating-new-task) [Section titled “Creating New Task”](#creating-new-task) To create a new task, follow these steps: * File-based project 1. Open your project and select **Tasks** on the left sidebar. 2. Click **New task**. 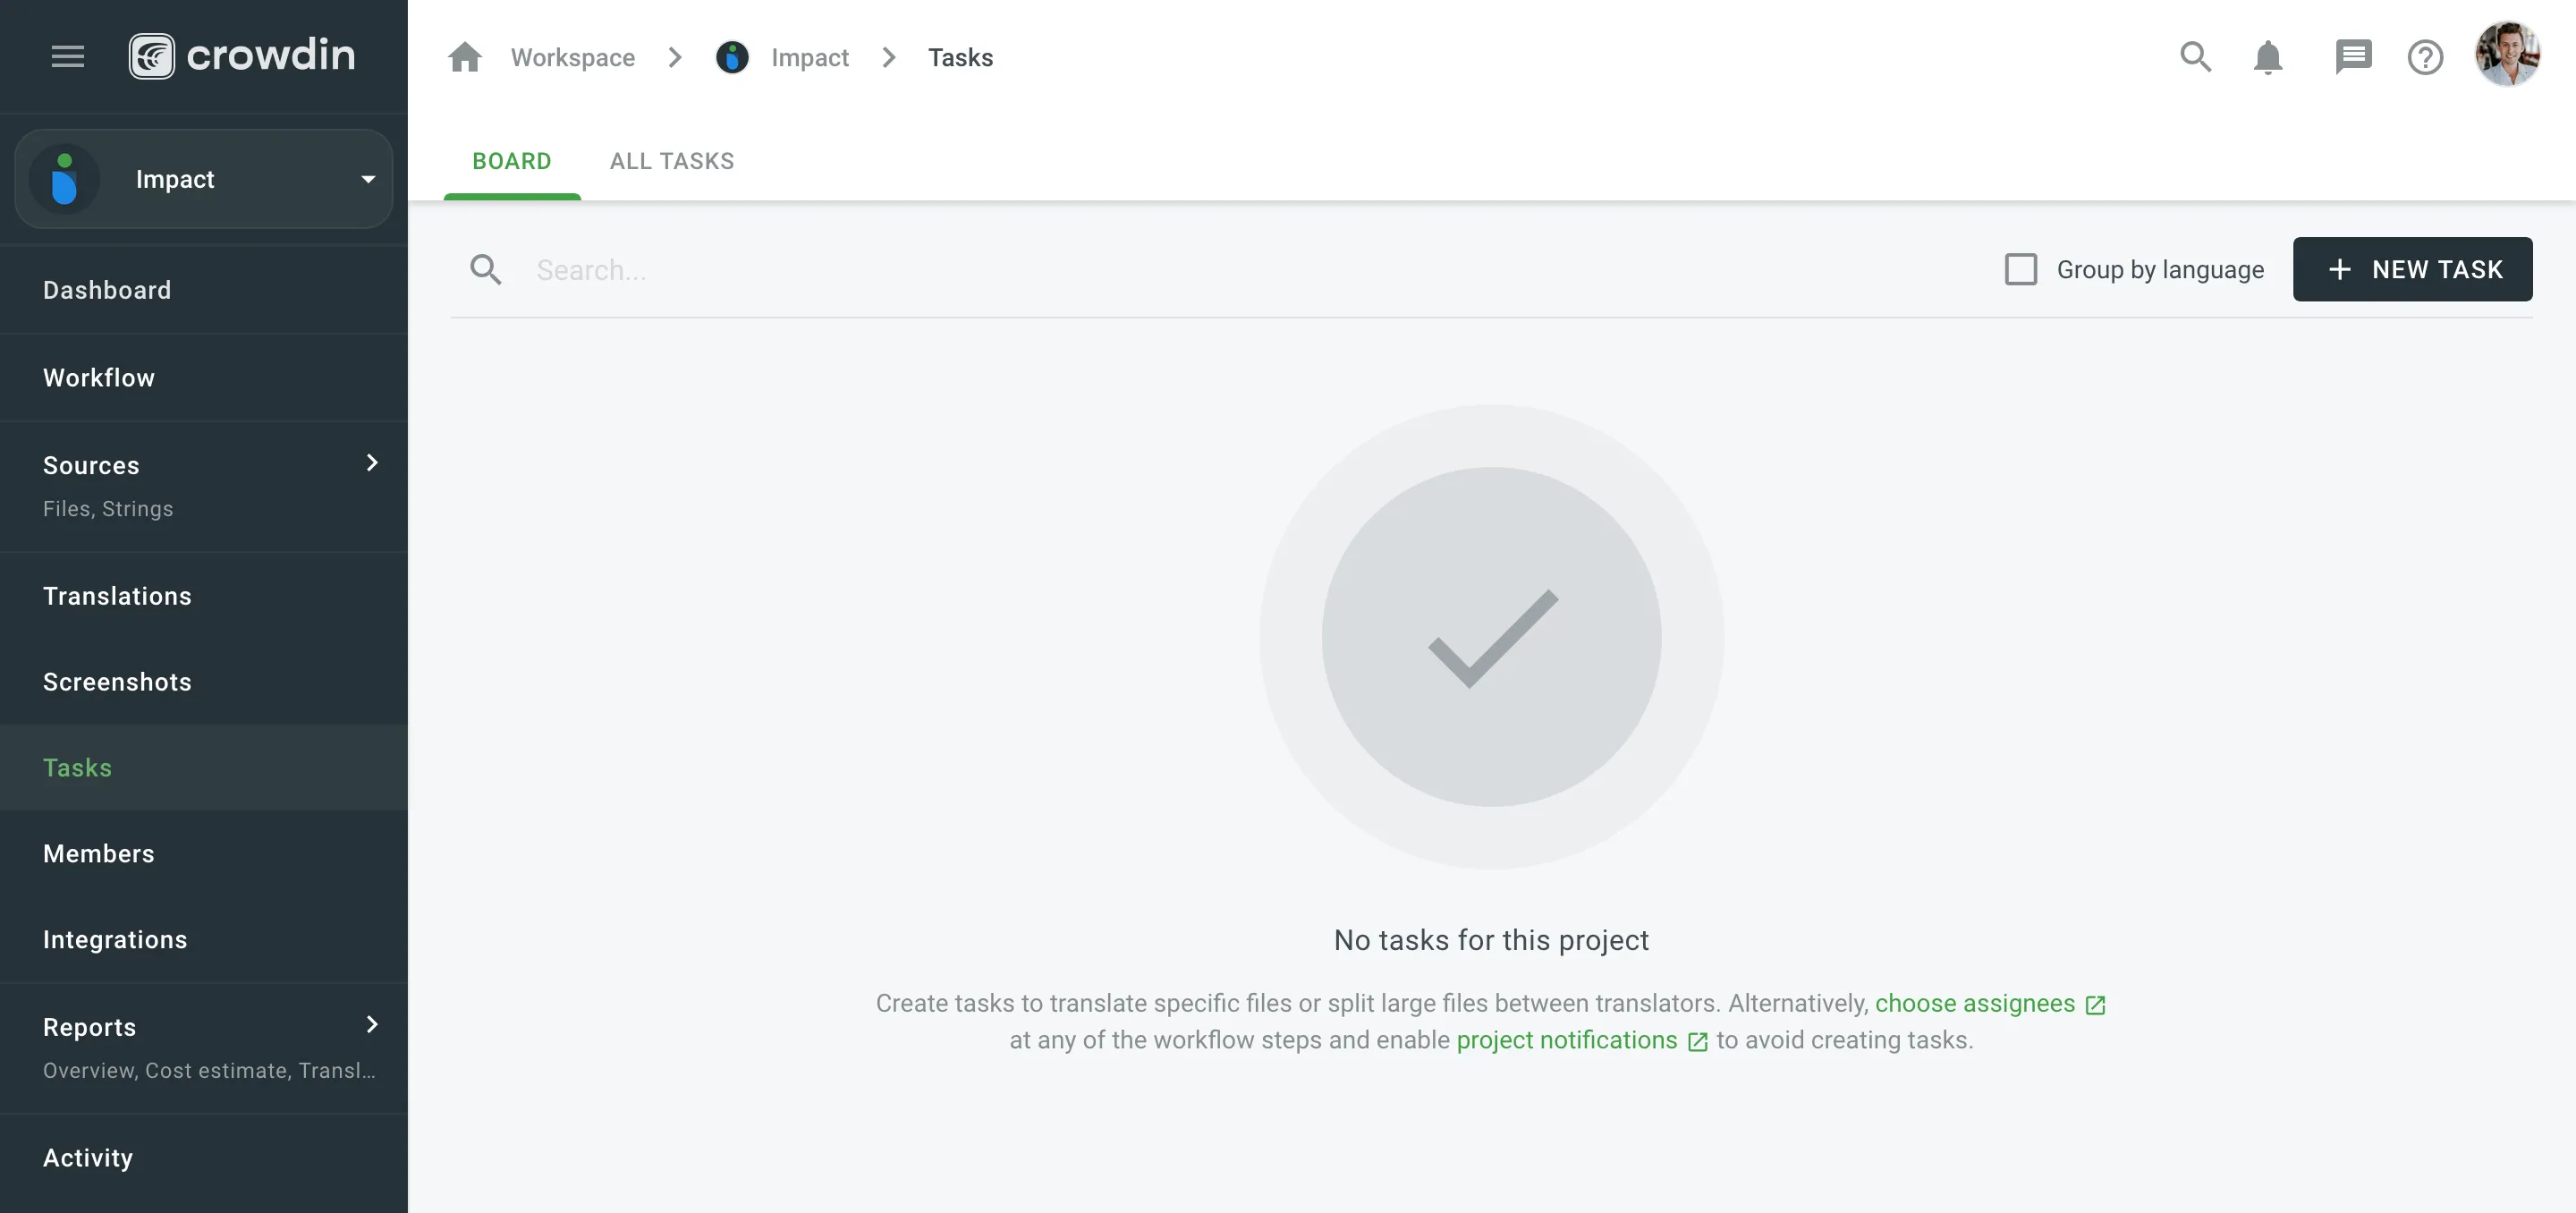 3. Set the task parameters: * *Type* – select between Translate by own translators, Proofread by own proofreads, Translate by vendor, and Proofread by vendor. * *Workflow step* – select the necessary step from the project workflow. * *String filters* – filter which strings should be included in the task: * *Strings* – select whether to include *All ToDo strings on the selected step*, or only those modified within a specific period. * *Filter by labels* (optional) – include only strings with specified labels. Additionally, choose how selected labels should be matched: * *All selected labels* – includes only strings that have all selected labels (AND logic). * *Any selected label* – includes strings that have at least one of the selected labels (OR logic). * *Exclude by labels* (optional) – exclude strings with specified labels. Additionally, choose how selected labels should be matched: * *All selected labels* – excludes only strings that have all selected labels (AND logic). * *Any selected label* – excludes strings that have at least one of the selected labels (OR logic). * *Skip strings already included in other tasks* – select or clear this option depending on your preferences. * *Due Date* (optional) – set a deadline. * *Files* – select files that should be translated or require proofreading. * *Languages* – select target languages (a separate task will be created for each selected language). The *Words to do* column shows the total number of words added to the task. 4. Click **Assign** to assign users to the task for each language separately. 5. Name the task and add a description (optional). 6. Click **Create**. 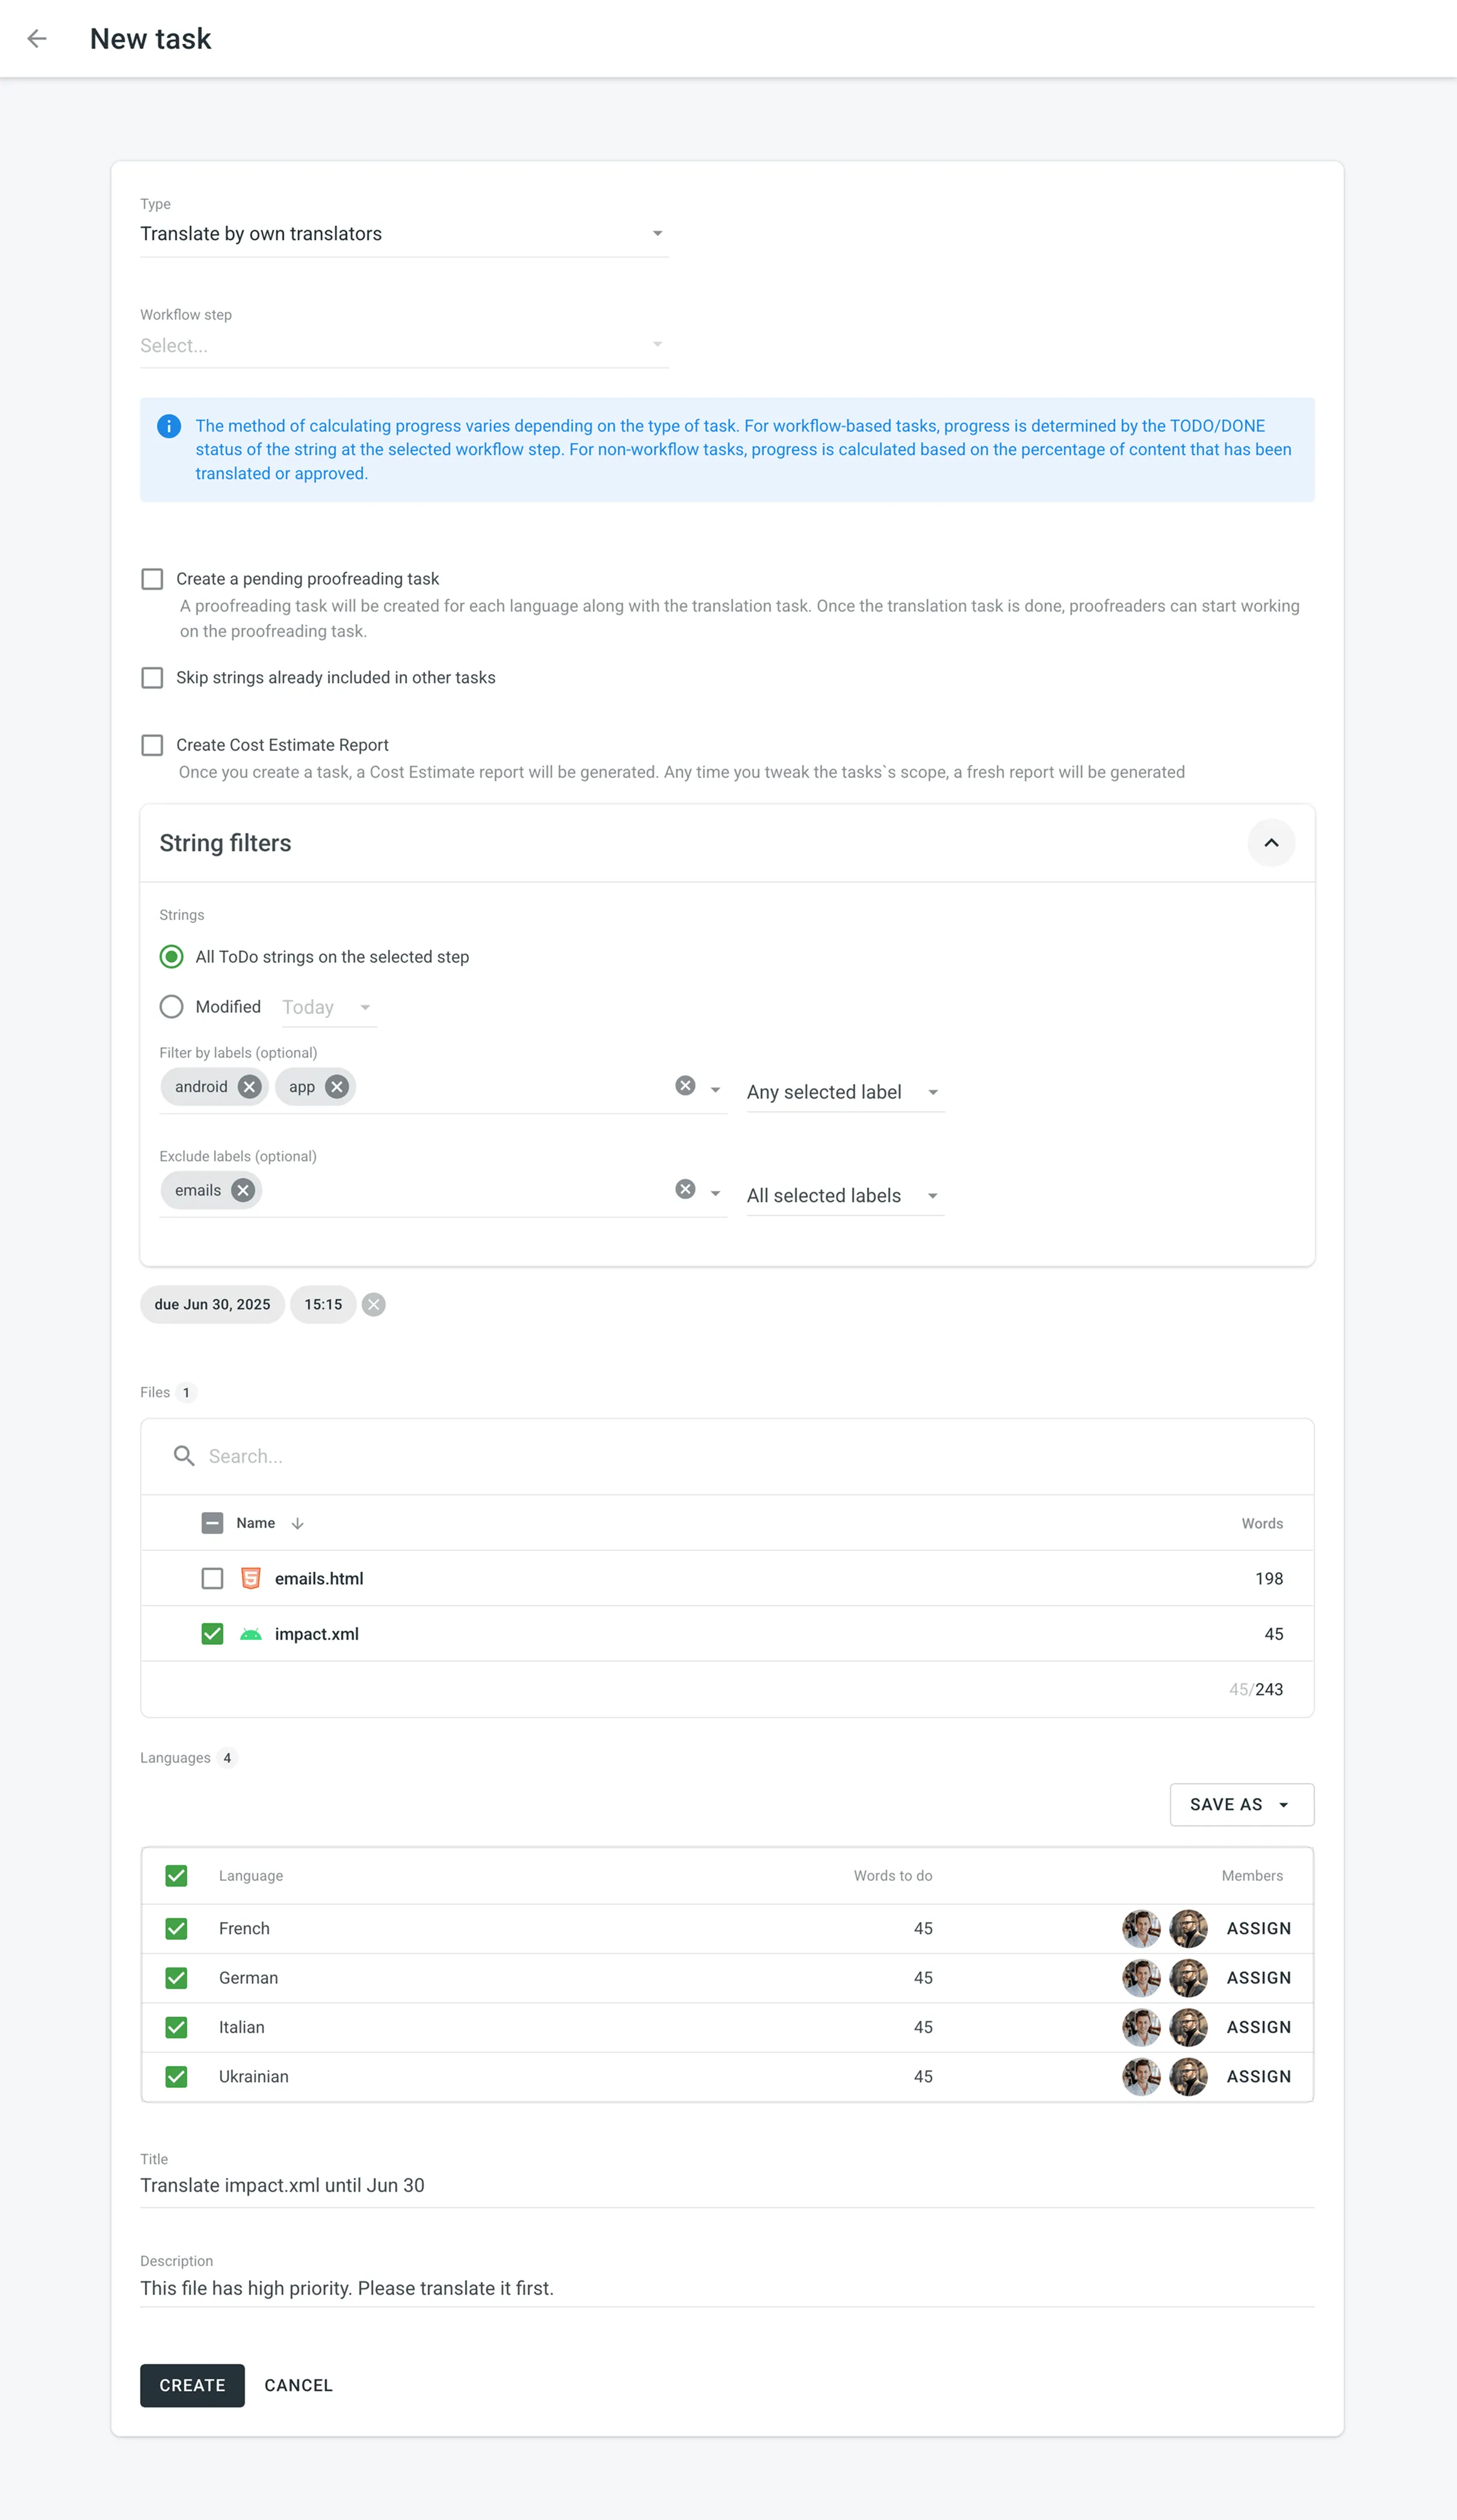 * String-based project 1. Open your project and select **Tasks** on the left sidebar. 2. Click **New task**. 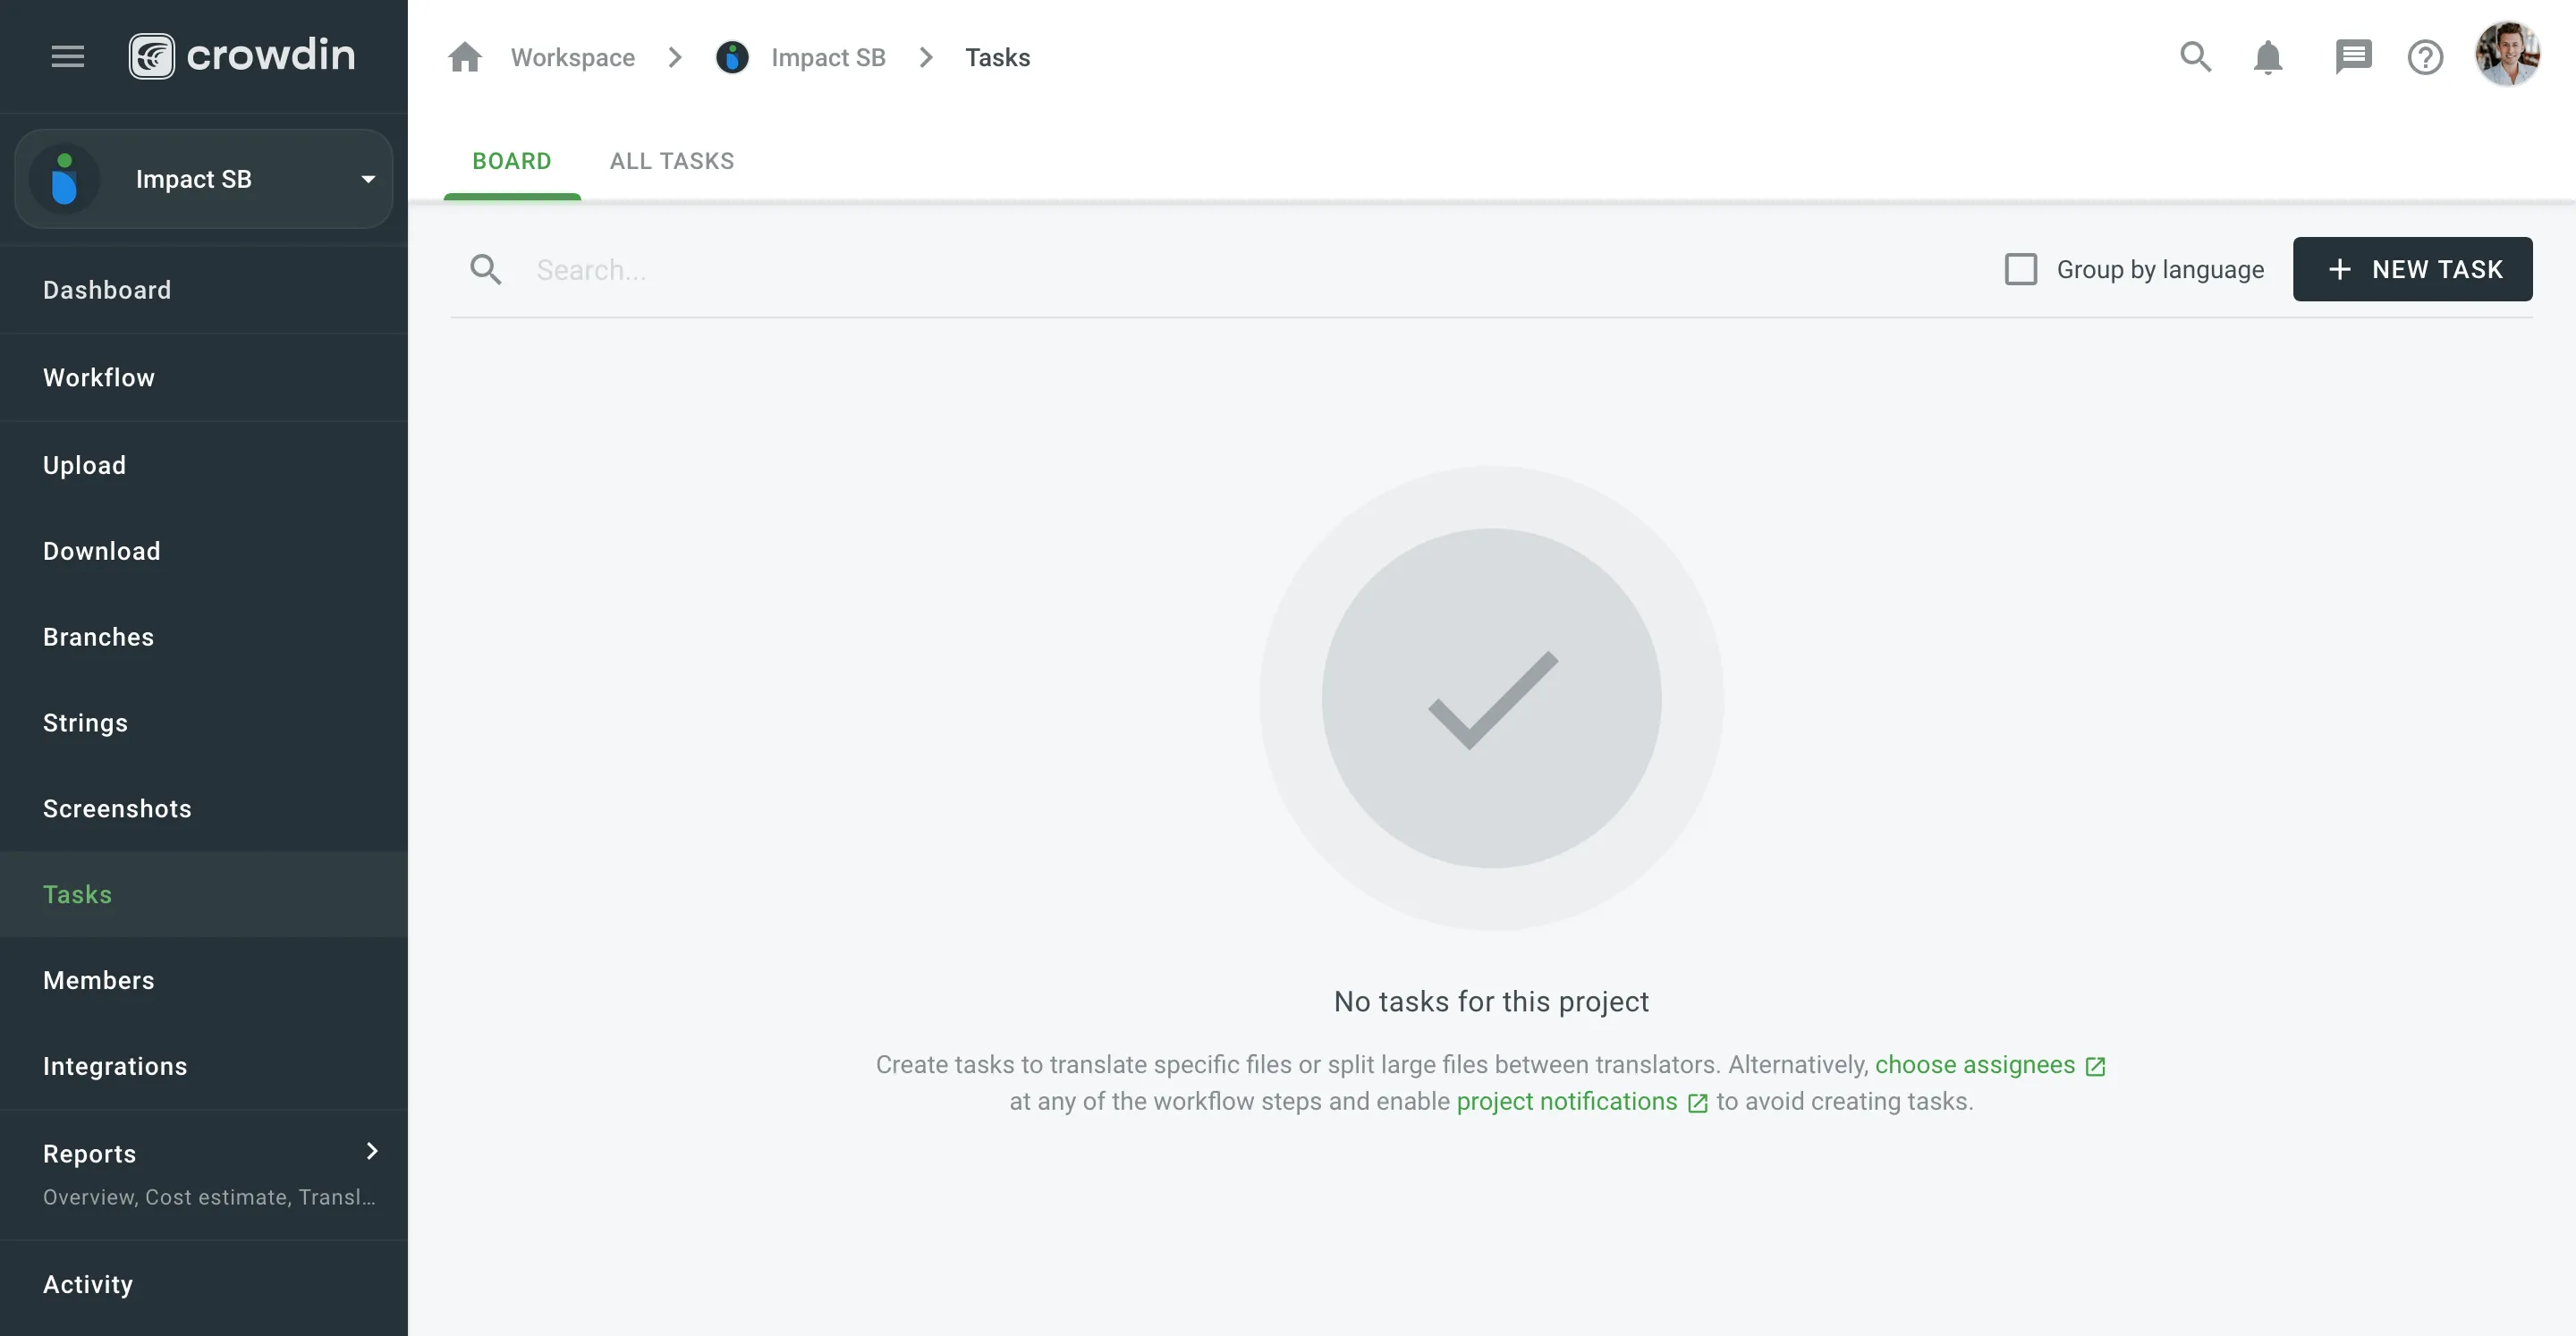 3. Set the task parameters: * *Type* – select between Translate by own translators, Proofread by own proofreads, Translate by vendor, and Proofread by vendor. * *Workflow step* – select the necessary step from the project workflow. * *String filters* – filter which strings should be included in the task: * *Strings* – select whether to include *All ToDo strings on the selected step*, or only those modified within a specific period. * *Filter by labels* (optional) – include only strings with specified labels. Additionally, choose how selected labels should be matched: * *All selected labels* – includes only strings that have all selected labels (AND logic). * *Any selected label* – includes strings that have at least one of the selected labels (OR logic). * *Exclude by labels* (optional) – exclude strings with specified labels. Additionally, choose how selected labels should be matched: * *All selected labels* – excludes only strings that have all selected labels (AND logic). * *Any selected label* – excludes strings that have at least one of the selected labels (OR logic). * *Skip strings already included in other tasks* – select or clear this option depending on your preferences. * *Due Date* (optional) – set a deadline. * *Branches* – select branches that should be translated or require proofreading. * *Languages* – select target languages (a separate task will be created for each selected language). The *Words to do* column shows the total number of words added to the task. 4. Click **Assign** to assign users to the task for each language separately. 5. Name the task and add a description (optional). 6. Click **Create**. 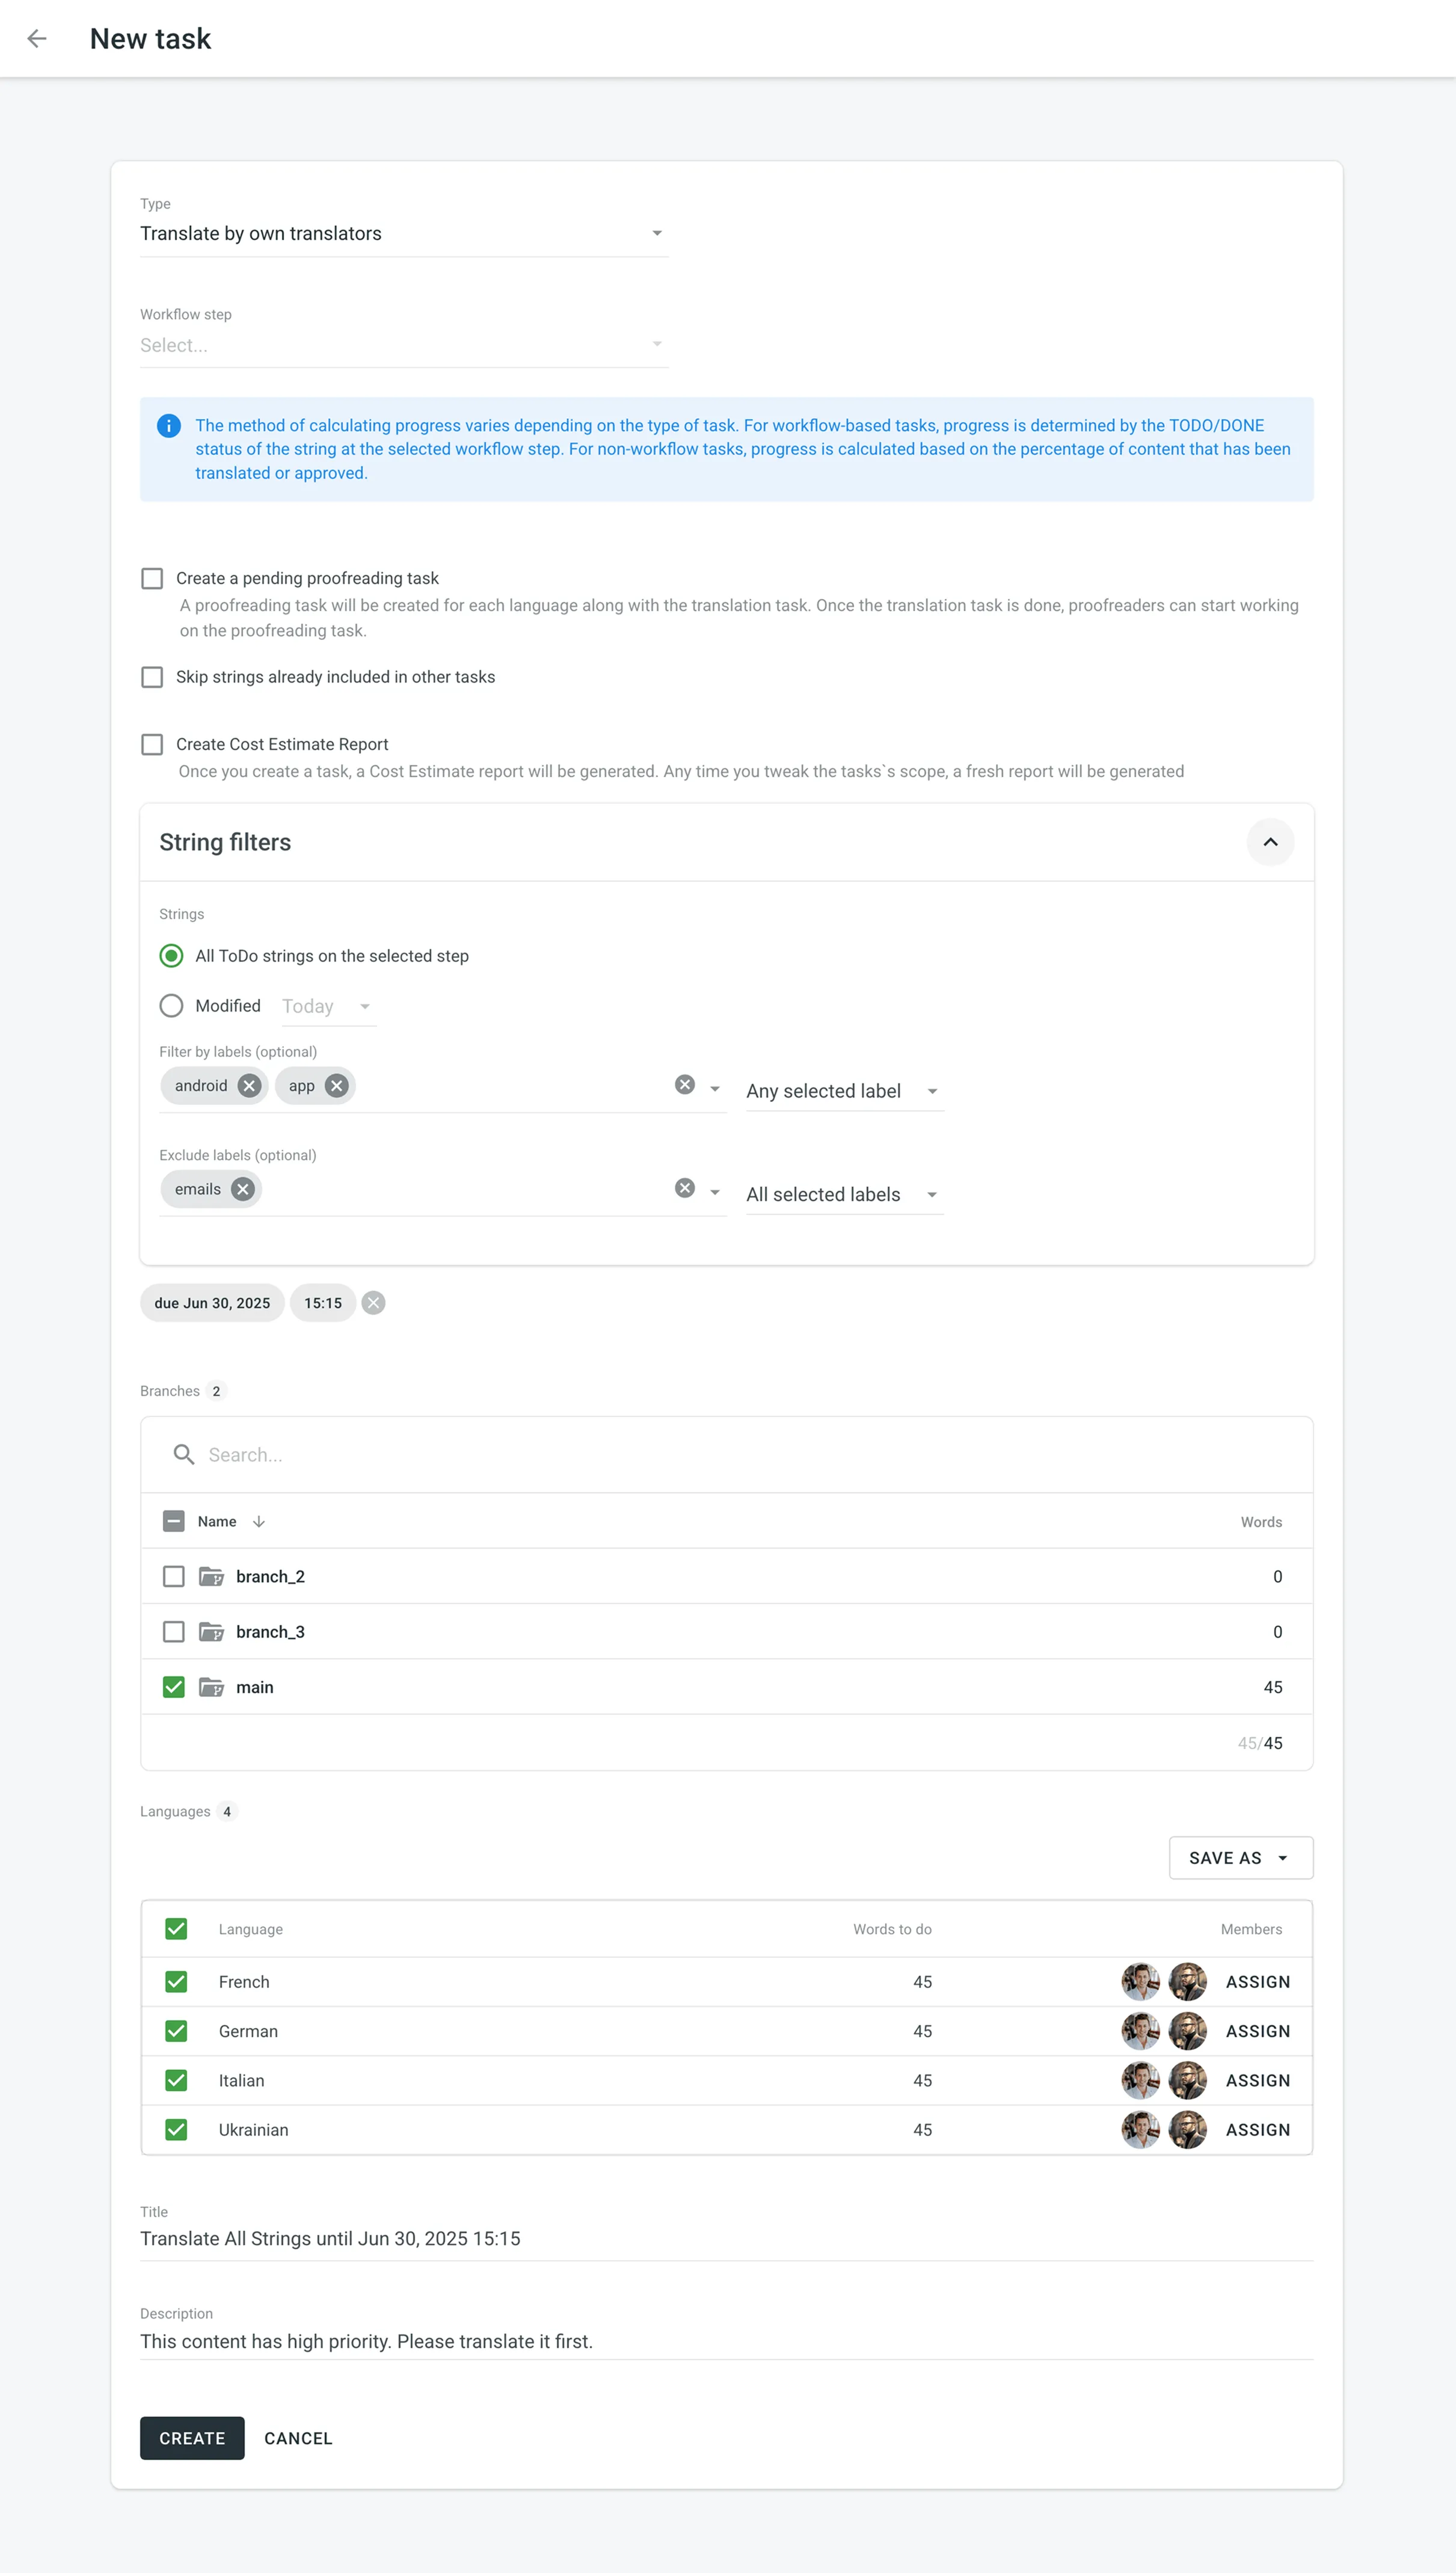 Read more about [project types](/enterprise/creating-project/#project-types). ### [Splitting Content](#splitting-content) [Section titled “Splitting Content”](#splitting-content) Splitting content between several members allows you to speed up the translation or proofreading process. While in string-based and file-based projects this option is called differently (i.e., **Split strings** and **Split files**), the basic principle of its behavior remains the same. To split content between several members select **Split files** (in file-based project) or **Split strings** (in file-based project) in the **Assign users** dialog. You can set the approximate amount of words for each assignee. 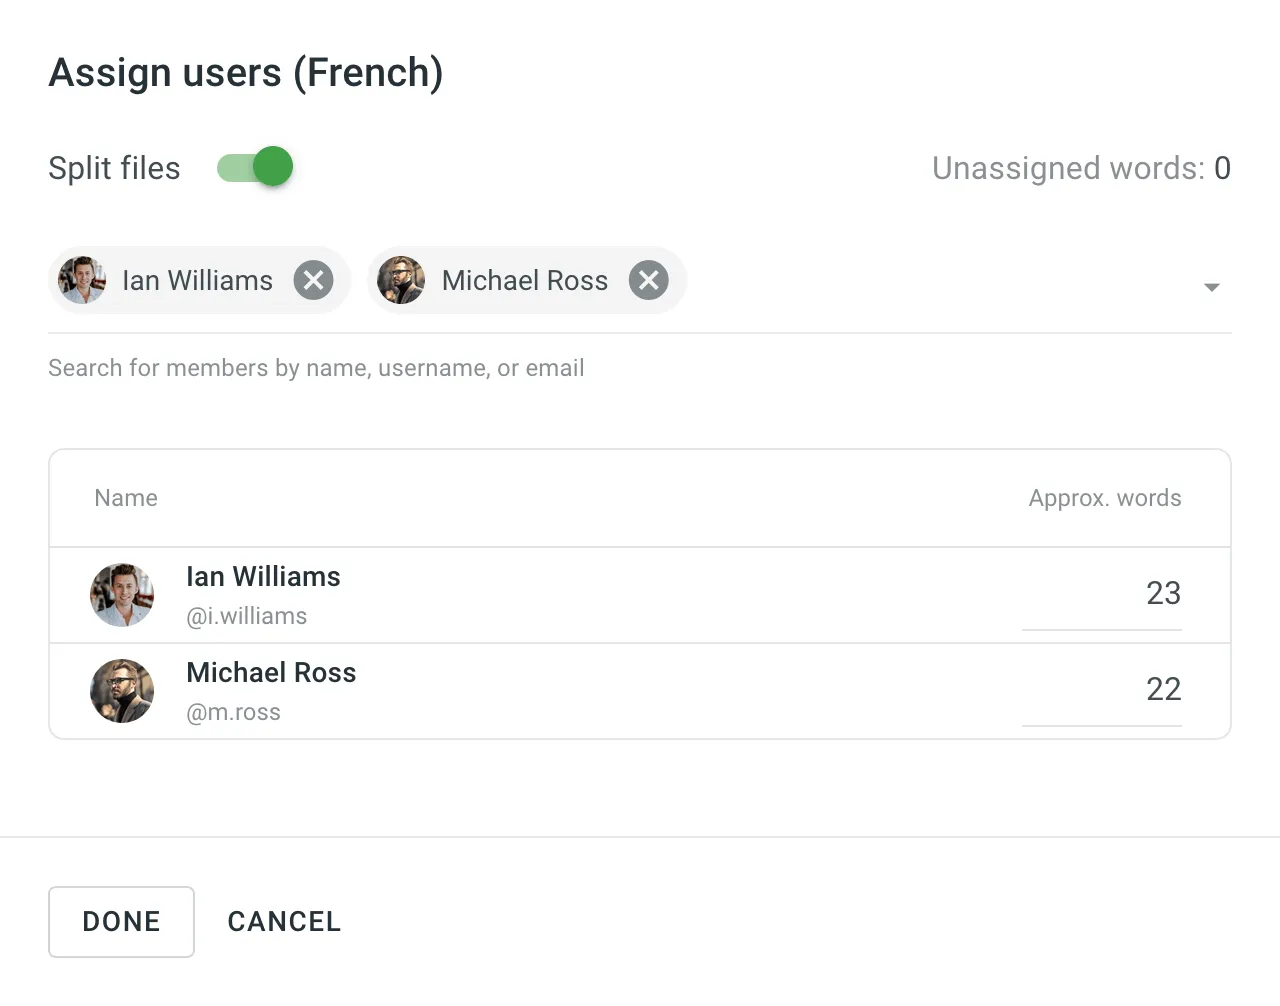 ### [Generating Cost Estimate Report for Tasks](#generating-cost-estimate-report-for-tasks) [Section titled “Generating Cost Estimate Report for Tasks”](#generating-cost-estimate-report-for-tasks) To automatically estimate the cost of translation or proofreading for a task, select the **Create Cost Estimate Report** option during task creation. Once selected, a required [**Rates Template**](/enterprise/project-reports/#rate-templates) drop-down will appear. Choose a saved template to calculate the cost estimate based on the selected strings or files. After the task is created, a Cost Estimate report will be generated automatically and become available in the [Archive](/enterprise/project-reports/#archive) section. The estimated cost will also be displayed on the task card in the Board section. You can open the task to view the **Estimated Cost** section, which includes the following details: * The calculated cost based on the selected rates template * A clickable report title (e.g., Report #123) that links to the full report in the Archive section * The report generation date If the task scope changes (e.g., files or strings are modified), a new Cost Estimate report will be generated automatically to reflect the updated estimate. ### [Task Templates](#task-templates) [Section titled “Task Templates”](#task-templates) Use task templates to save the configuration of the **Languages** section, including target languages and member assignments. Templates help you quickly apply these configurations when creating new tasks, saving time and ensuring consistency. #### [Saving Templates](#saving-templates) [Section titled “Saving Templates”](#saving-templates) To save the language and member assignment settings as a template, follow these steps: 1. In the **Languages** section, click **Save as**. 2. Select **New template** from the drop-down menu. 3. In the dialog that appears, enter a name for your template. 4. Click **Save**. Your template is now saved and available for future tasks. 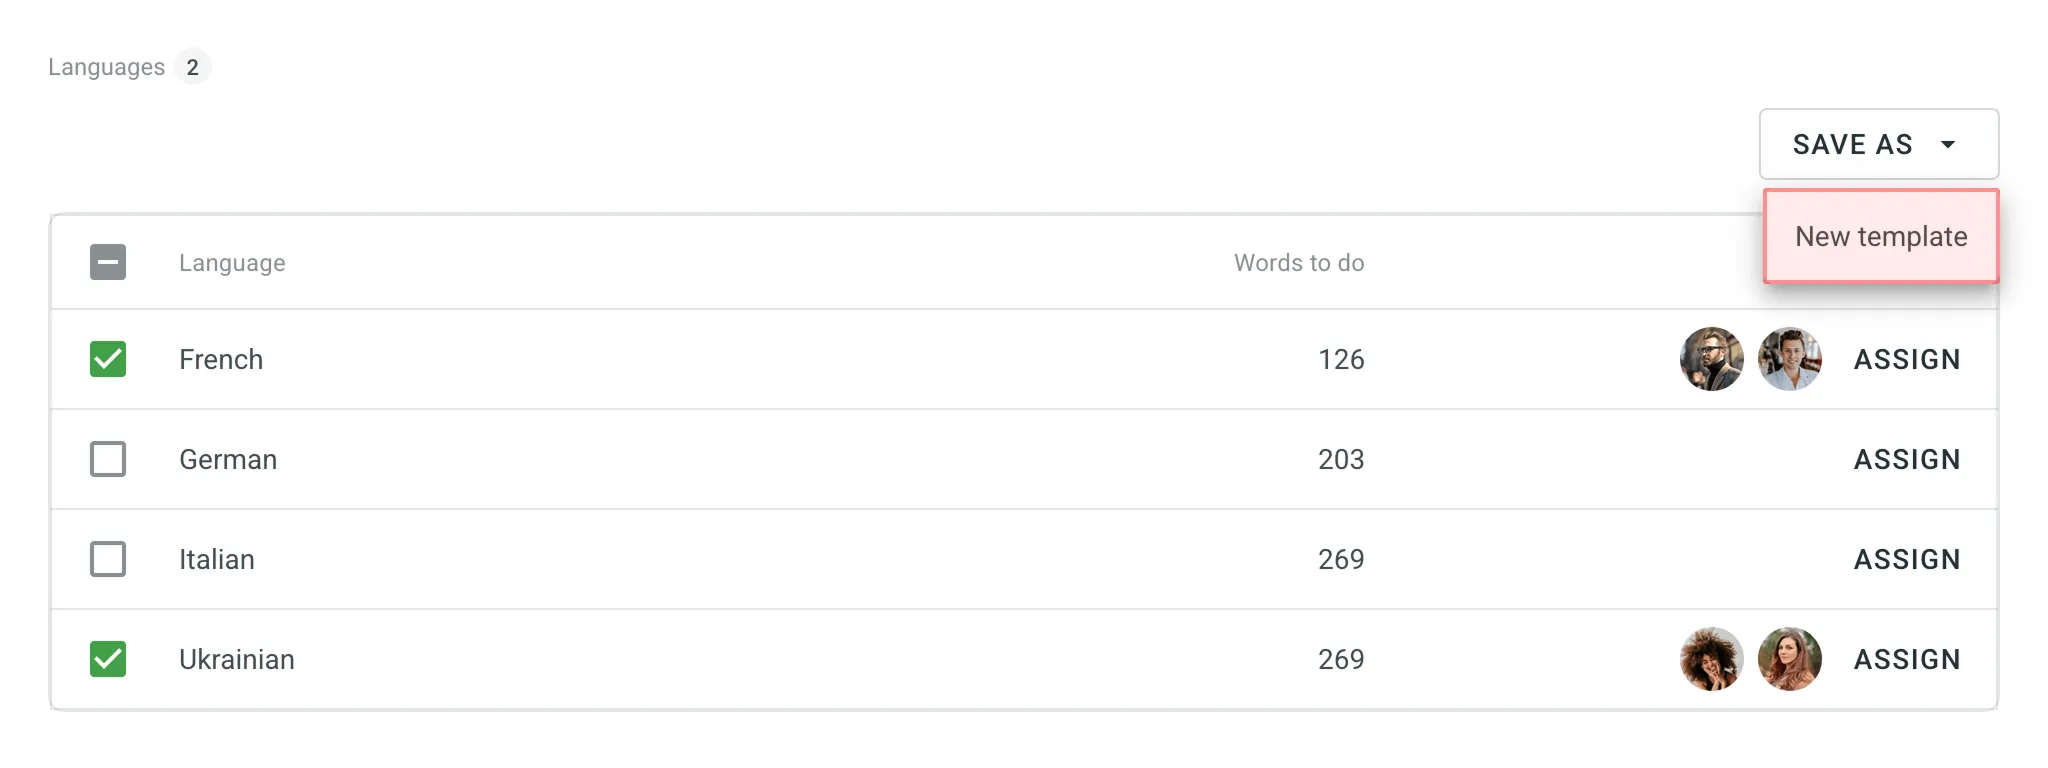 #### [Applying Templates](#applying-templates) [Section titled “Applying Templates”](#applying-templates) To apply a saved template to a new task, follow these steps: 1. In the **Languages** section, click on the template name to apply it immediately. 2. Alternatively, click next to the template name and select **Apply**. #### [Managing Templates](#managing-templates) [Section titled “Managing Templates”](#managing-templates) To rename or delete a saved template, follow these steps: 1. In the **Languages** section, click next to the template name. 2. Select one of the following options: * **Rename** – Enter a new name for your template. * **Delete** – Permanently remove the template. 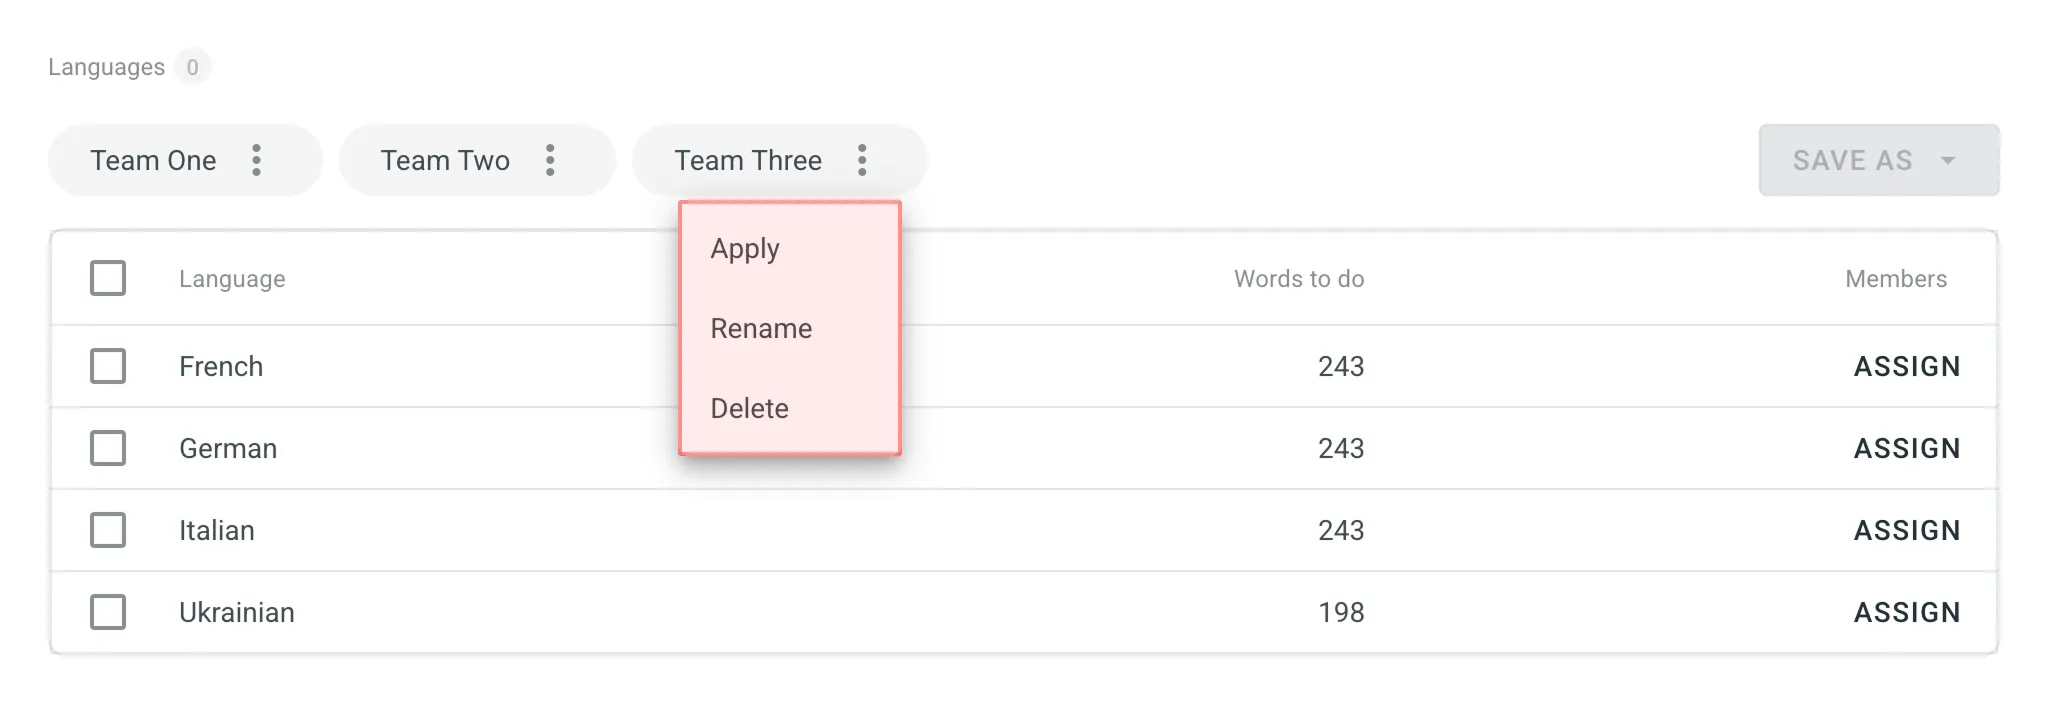 ## [Project Tasks](#project-tasks) [Section titled “Project Tasks”](#project-tasks) In the **Tasks** section, you can view all the project tasks in the following two sections: *Board*, *All Tasks*. ### [Board](#board) [Section titled “Board”](#board) In the *Board* section, tasks are organized into three columns: To Do, In Progress, and Done. This layout provides a clear view and visualization of the current status of all tasks. Within each column, tasks are further grouped by target languages. Each target language group can be collapsed to hide task cards or expanded to display them. This feature is particularly useful for decluttering the view and focusing on specific languages. Use the **Search** field to search for tasks by name or [filter tasks](#filtering-tasks) using various filter options. To view the task details, open it by clicking on the task name. 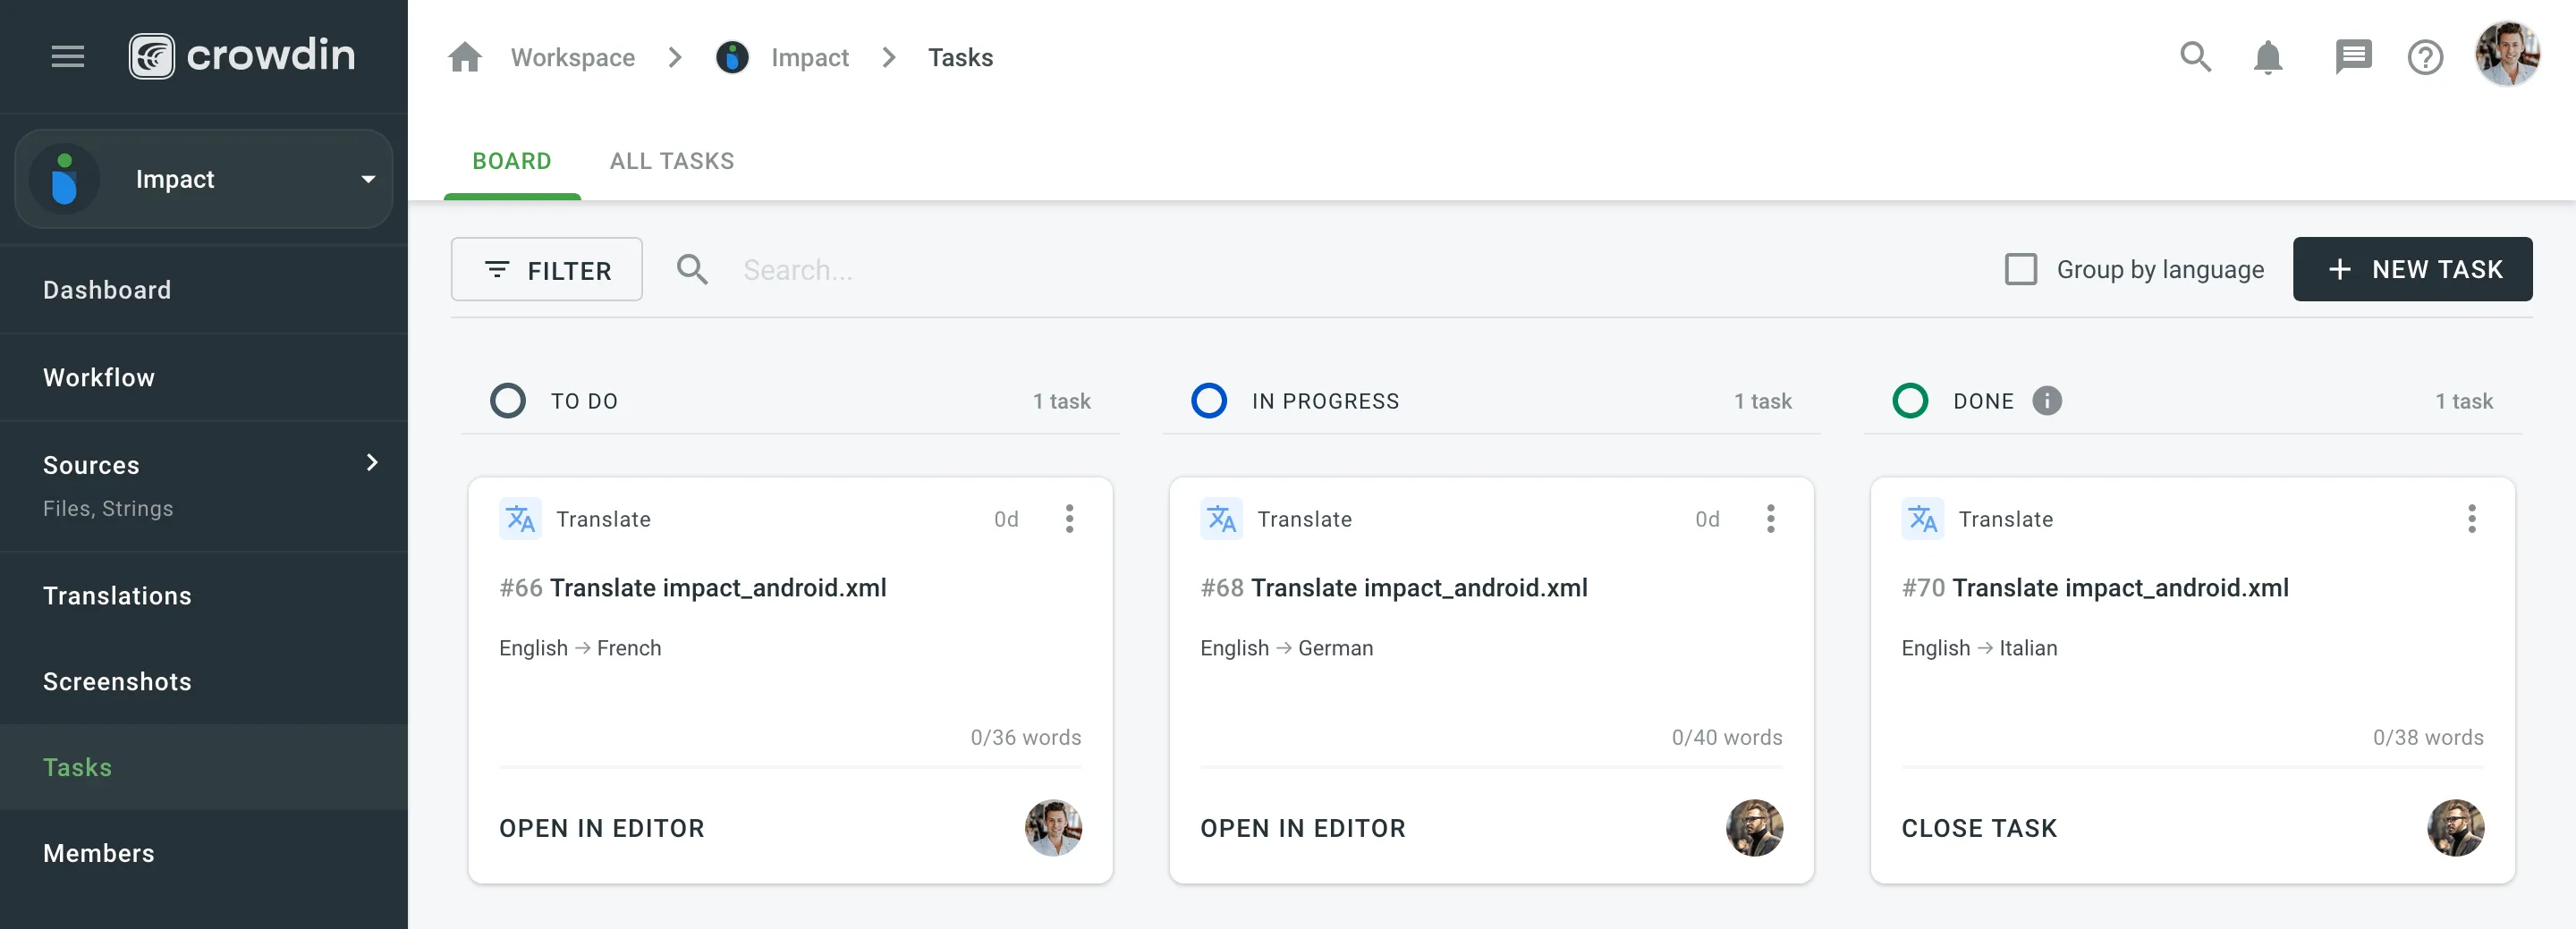 ### [All Tasks](#all-tasks) [Section titled “All Tasks”](#all-tasks) The All Tasks section provides a list view of all project tasks. It is particularly useful for efficiently managing large volumes of tasks. The All Tasks section also allows you to select multiple tasks and perform bulk actions. These include changing the assignee, updating the status, or deleting tasks in a single operation. Similar to the Board section, the All Tasks also allows you to use the **Search** field and [filter](#filtering-tasks). Additionally, you can sort the task list in ascending or descending order using the available sort options (ID, Date created, Resolve date, Due date). ### [Editing Task](#editing-task) [Section titled “Editing Task”](#editing-task) To change the task details, follow these steps: 1. Open your project and select **Tasks** on the left sidebar. 2. In the Board or All tasks section, click (or right-click) on the task you want to change and select **Edit**. 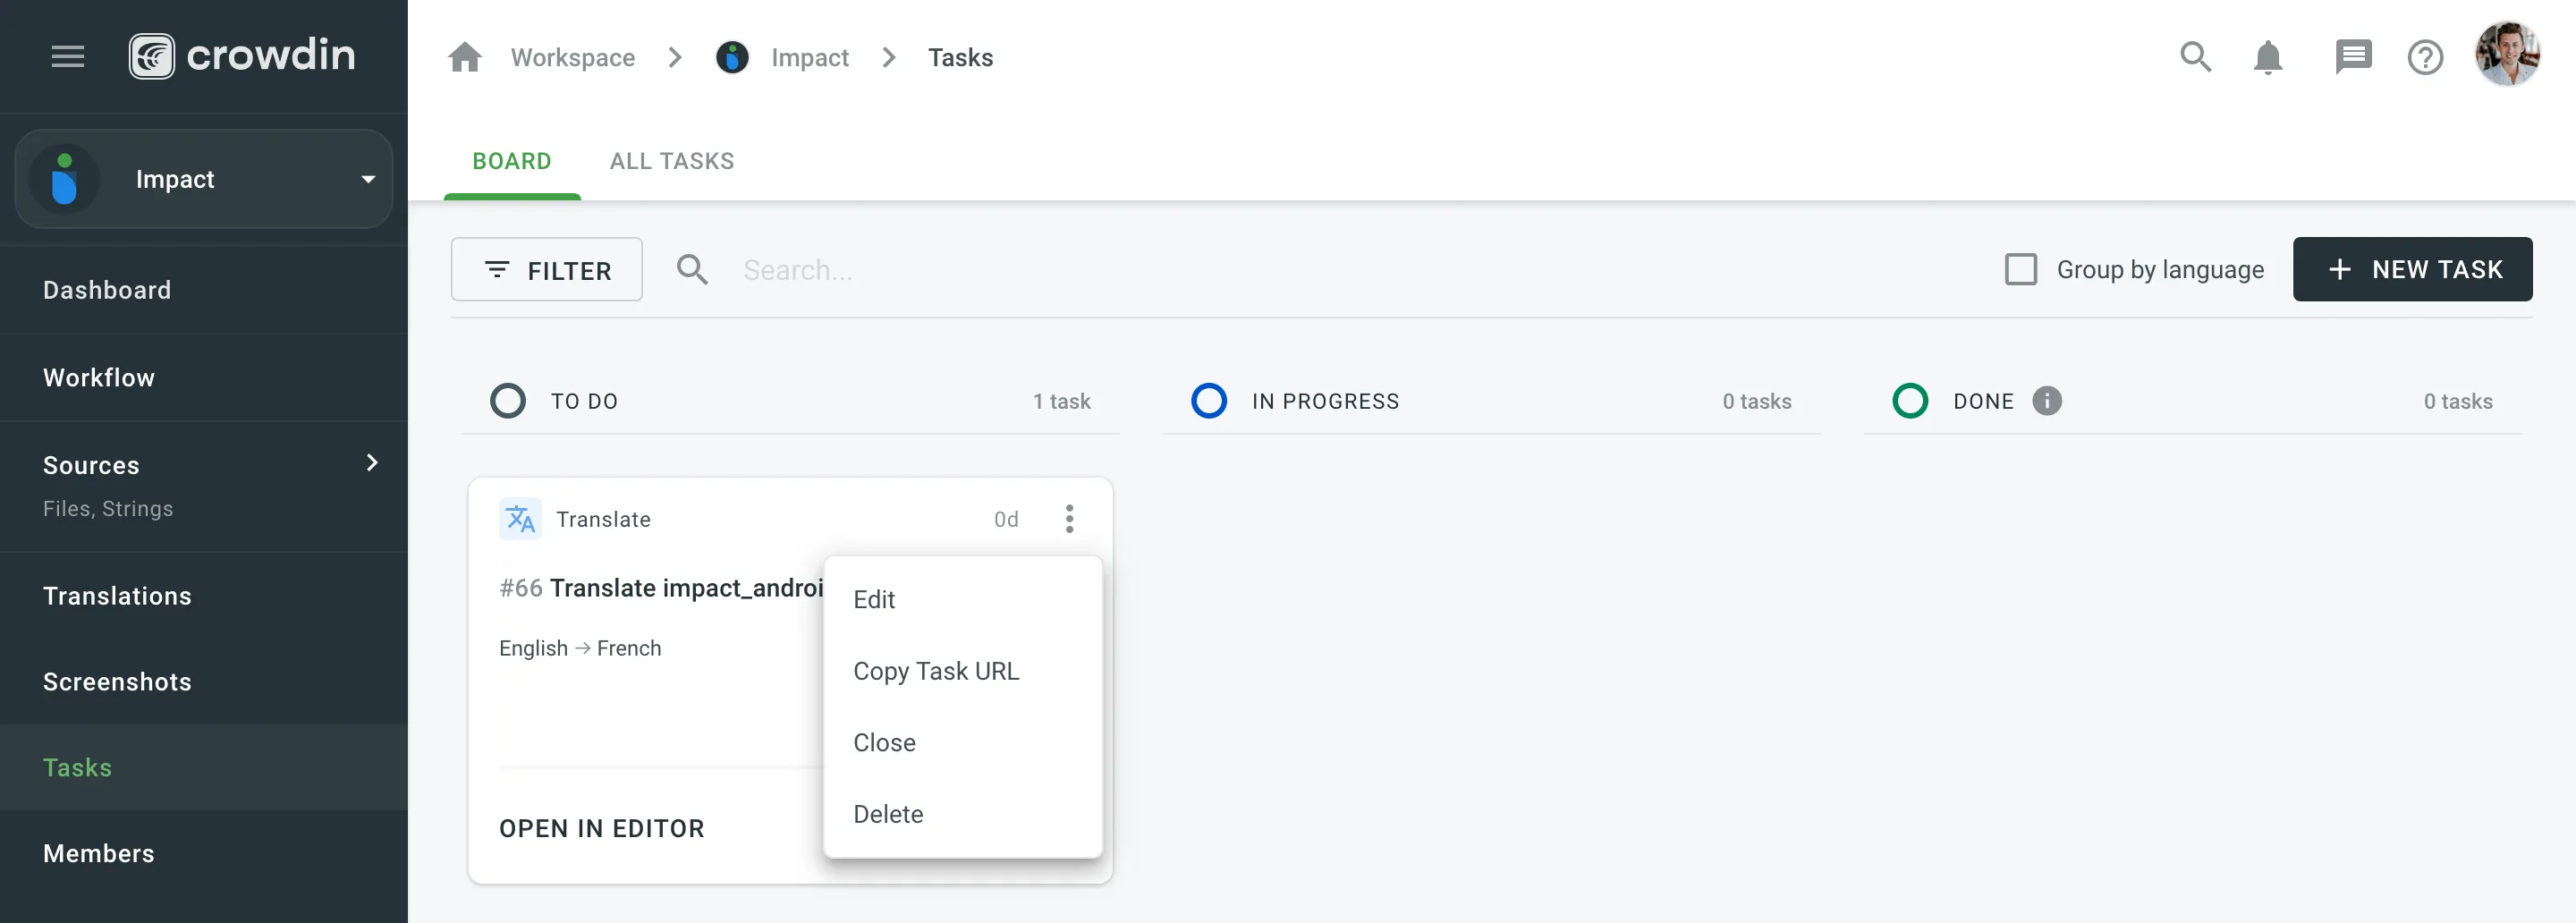 3. Make the necessary edits and click **Save**. ### [Filtering Tasks](#filtering-tasks) [Section titled “Filtering Tasks”](#filtering-tasks) By default, all project tasks are displayed in the **Tasks** section either in the Board or All Tasks sections. If necessary, you can filter tasks using the available filter options: * Language: All languages or particular language. * Assignee: All users or particular user. * Created by: All users or particular user. * Due date: All, Overdue now, Custom Range. * Type: All types, Translate by own translators, Proofread by own proofreaders, Translate by vendor, Proofread by vendor. * Workflow step: All, No workflow step, or particular workflow step. * File: All files or particular file or folder. * Status: All statuses, To Do, In Progress, Done, Closed. 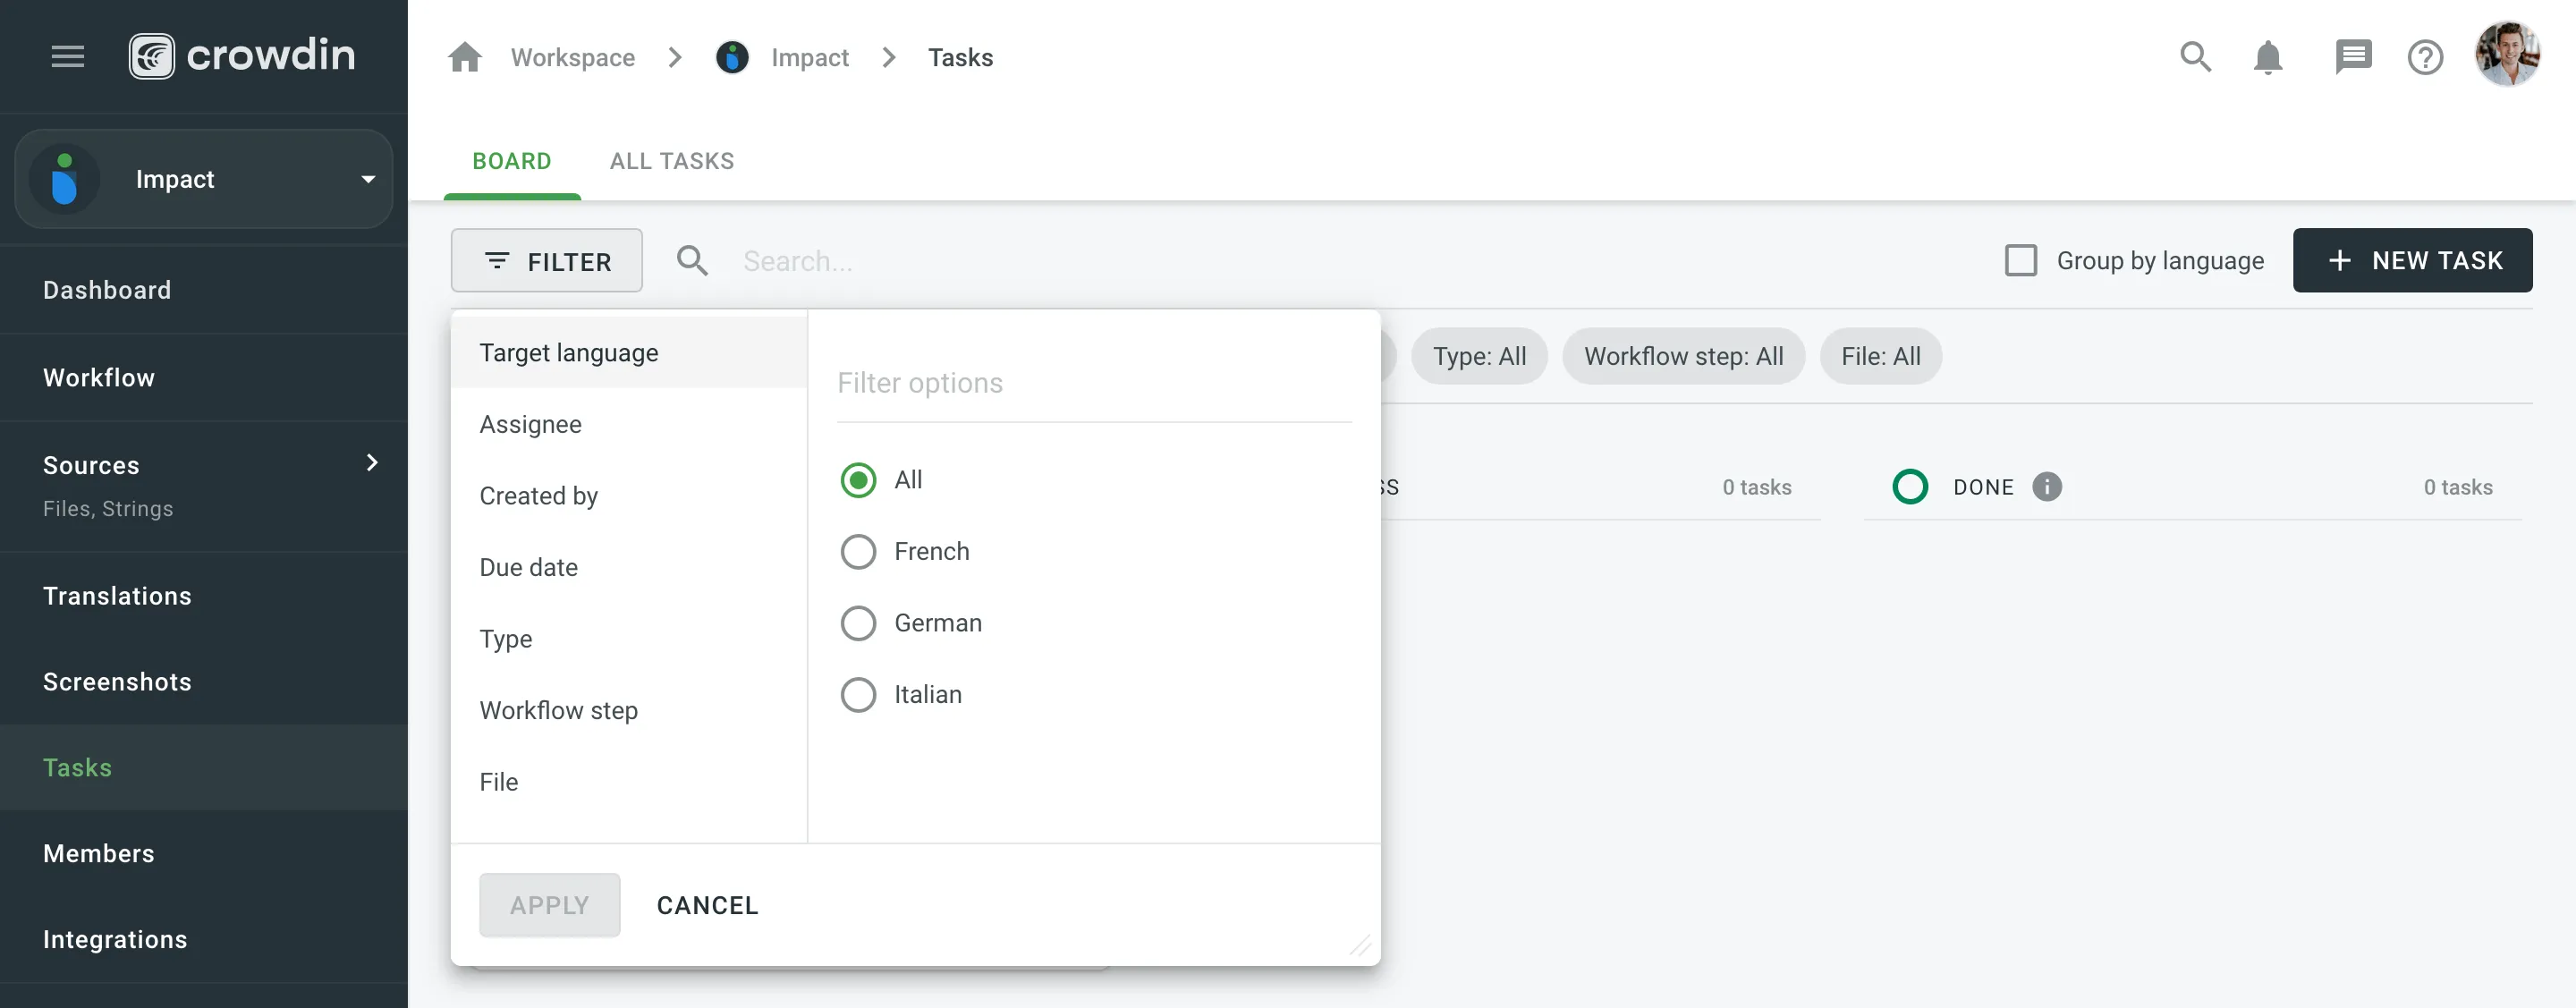 ### [Changing Task Status](#changing-task-status) [Section titled “Changing Task Status”](#changing-task-status) To change the task status in the Board section, select the task assigned to you and drag it to the column with the status you need. 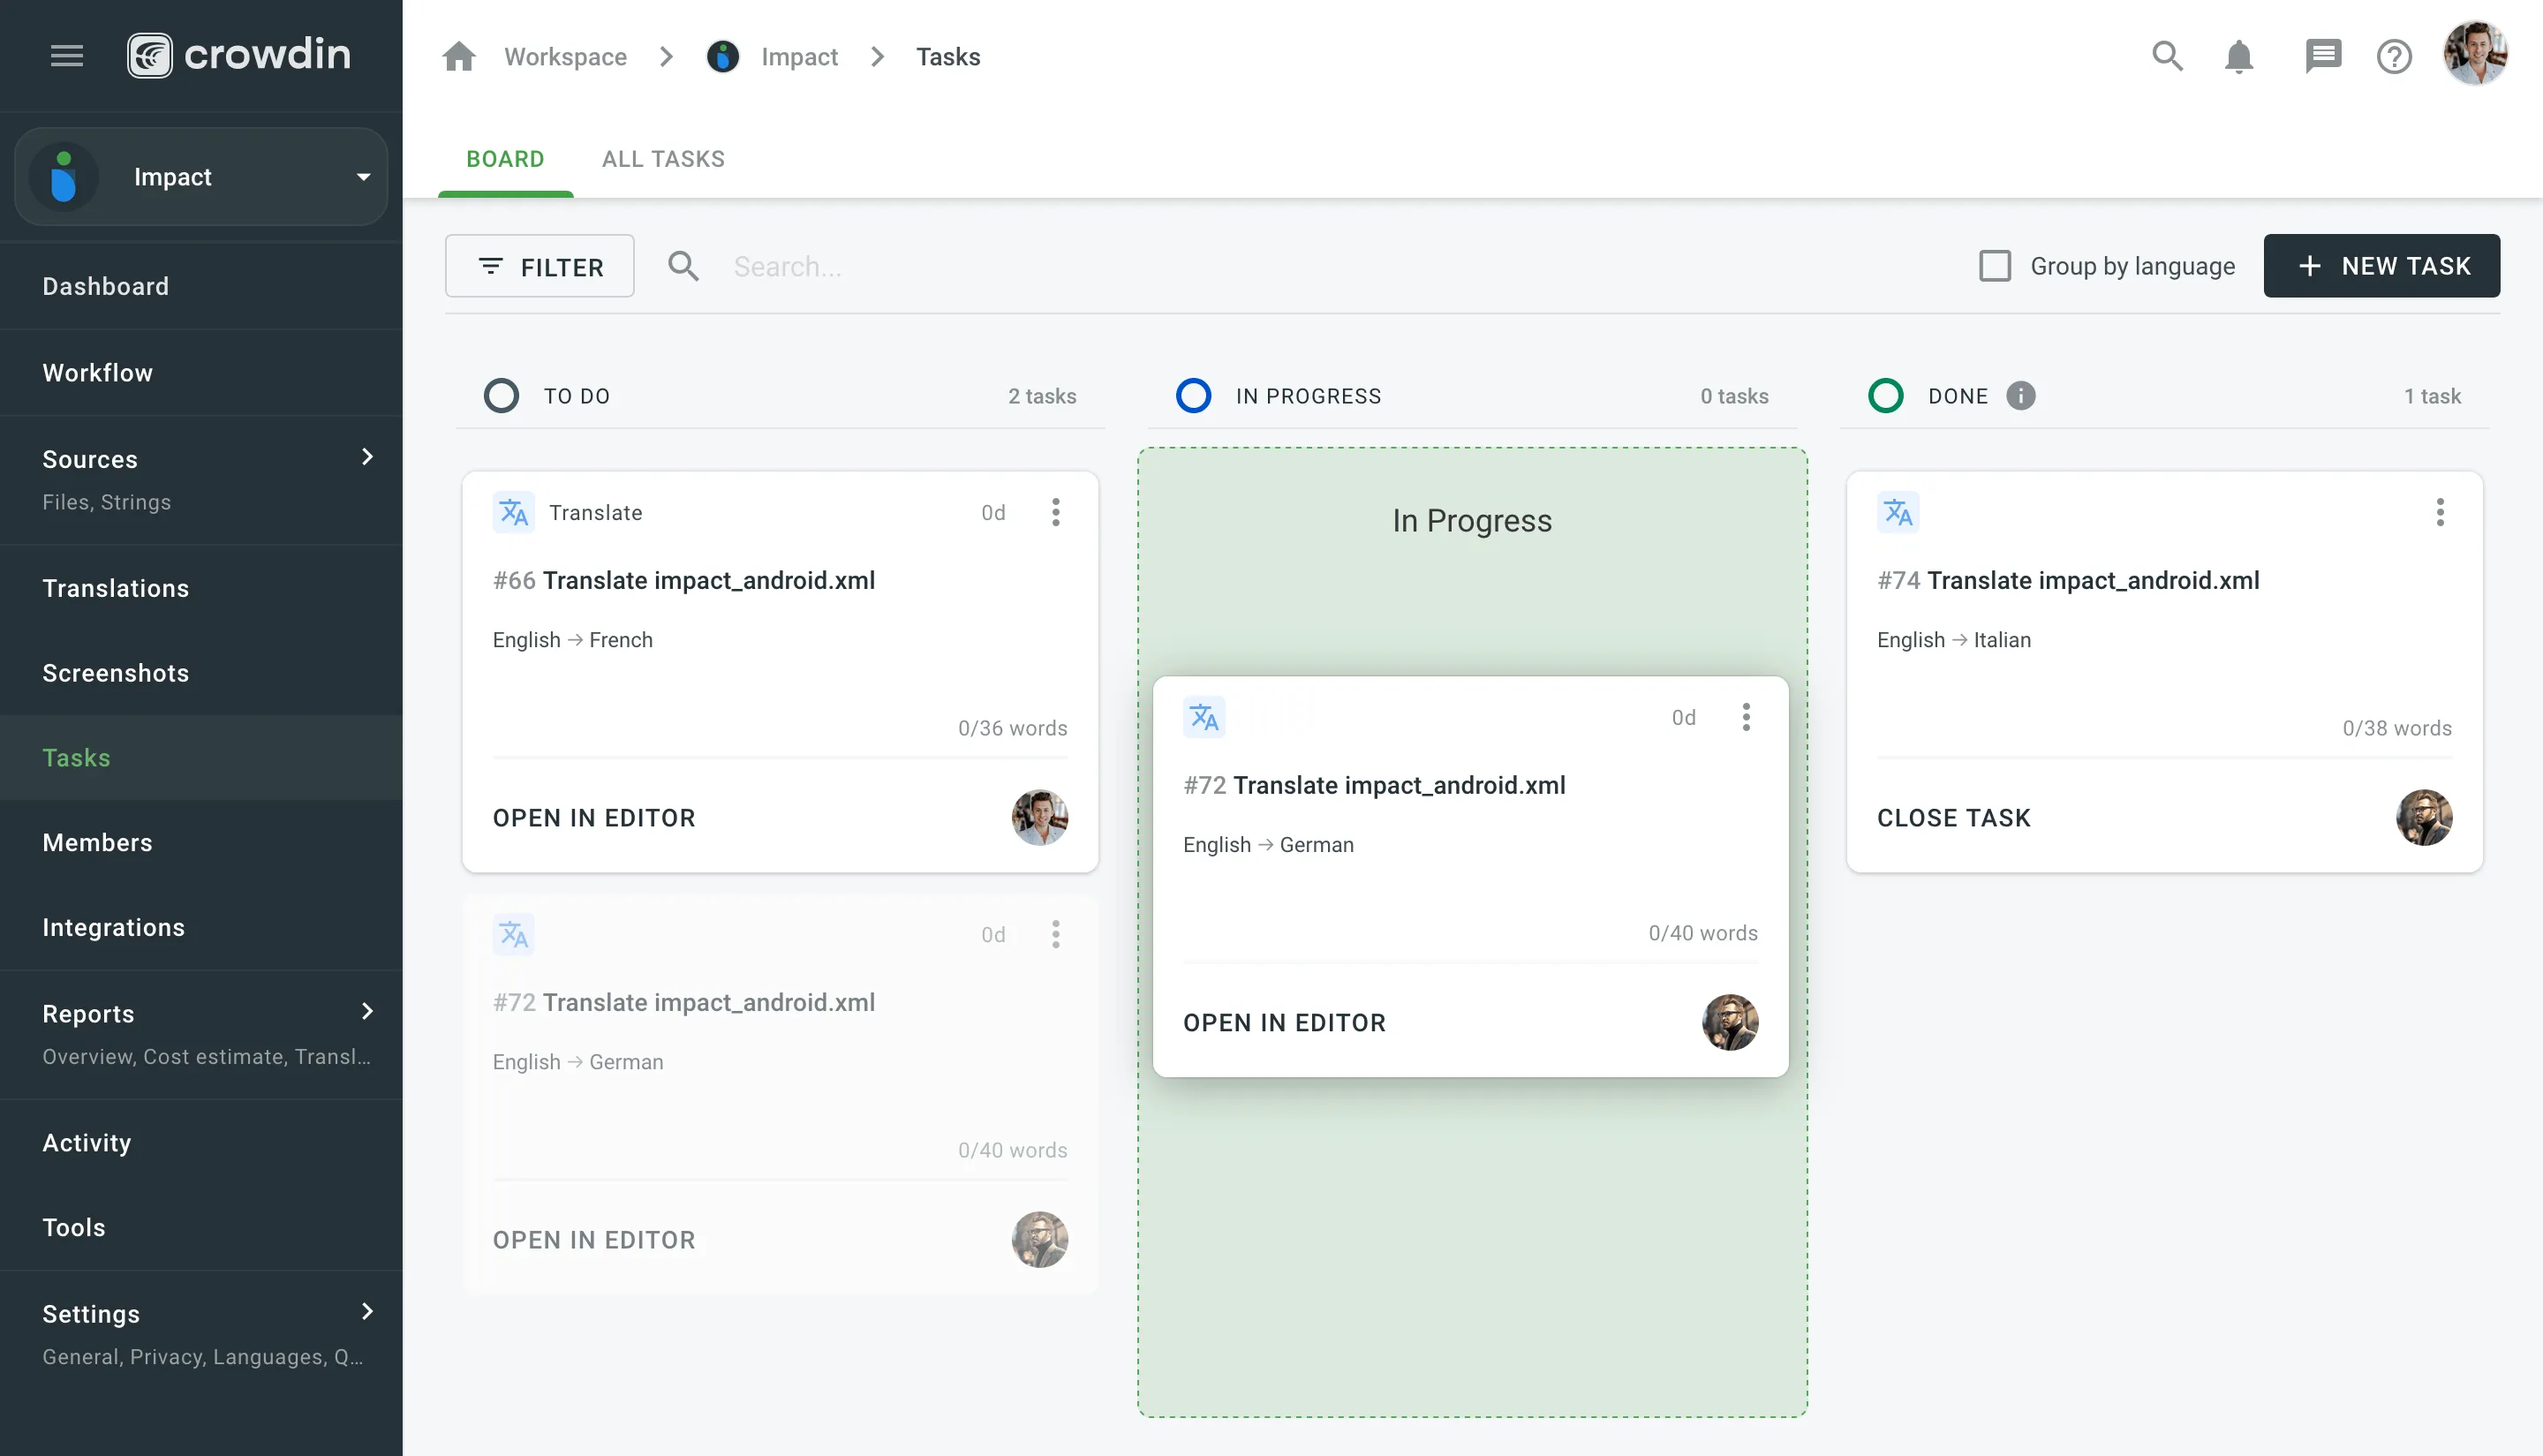 To change the task status in the All Tasks section, select the needed task, click **Change status**, and select the new status. Alternatively, in either of the two sections, you can change the task status directly in the task itself using the **Status** drop-down menu and selecting needed statuses. ### [Closing Task](#closing-task) [Section titled “Closing Task”](#closing-task) To close the task when it’s finished, move it to the **Done** column and click **Close Task**. 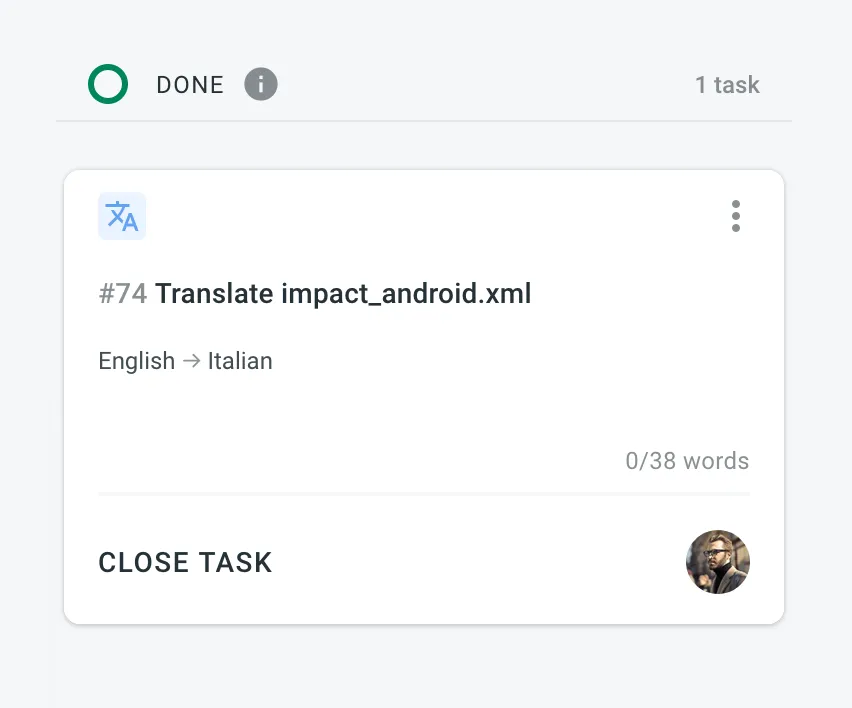 To view the list of closed tasks, open the All Tasks section and use the filter **Status: Closed**. ## [Sequential Tasks](#sequential-tasks) [Section titled “Sequential Tasks”](#sequential-tasks) Sequential tasks streamline the management of translation and proofreading processes in a structured, step-by-step manner. This feature is particularly useful for managing content that requires translation followed by proofreading, ensuring a smooth workflow. Once created, sequential tasks are represented on the Tasks Board, displaying both the translation task and its linked pending proofreading task. 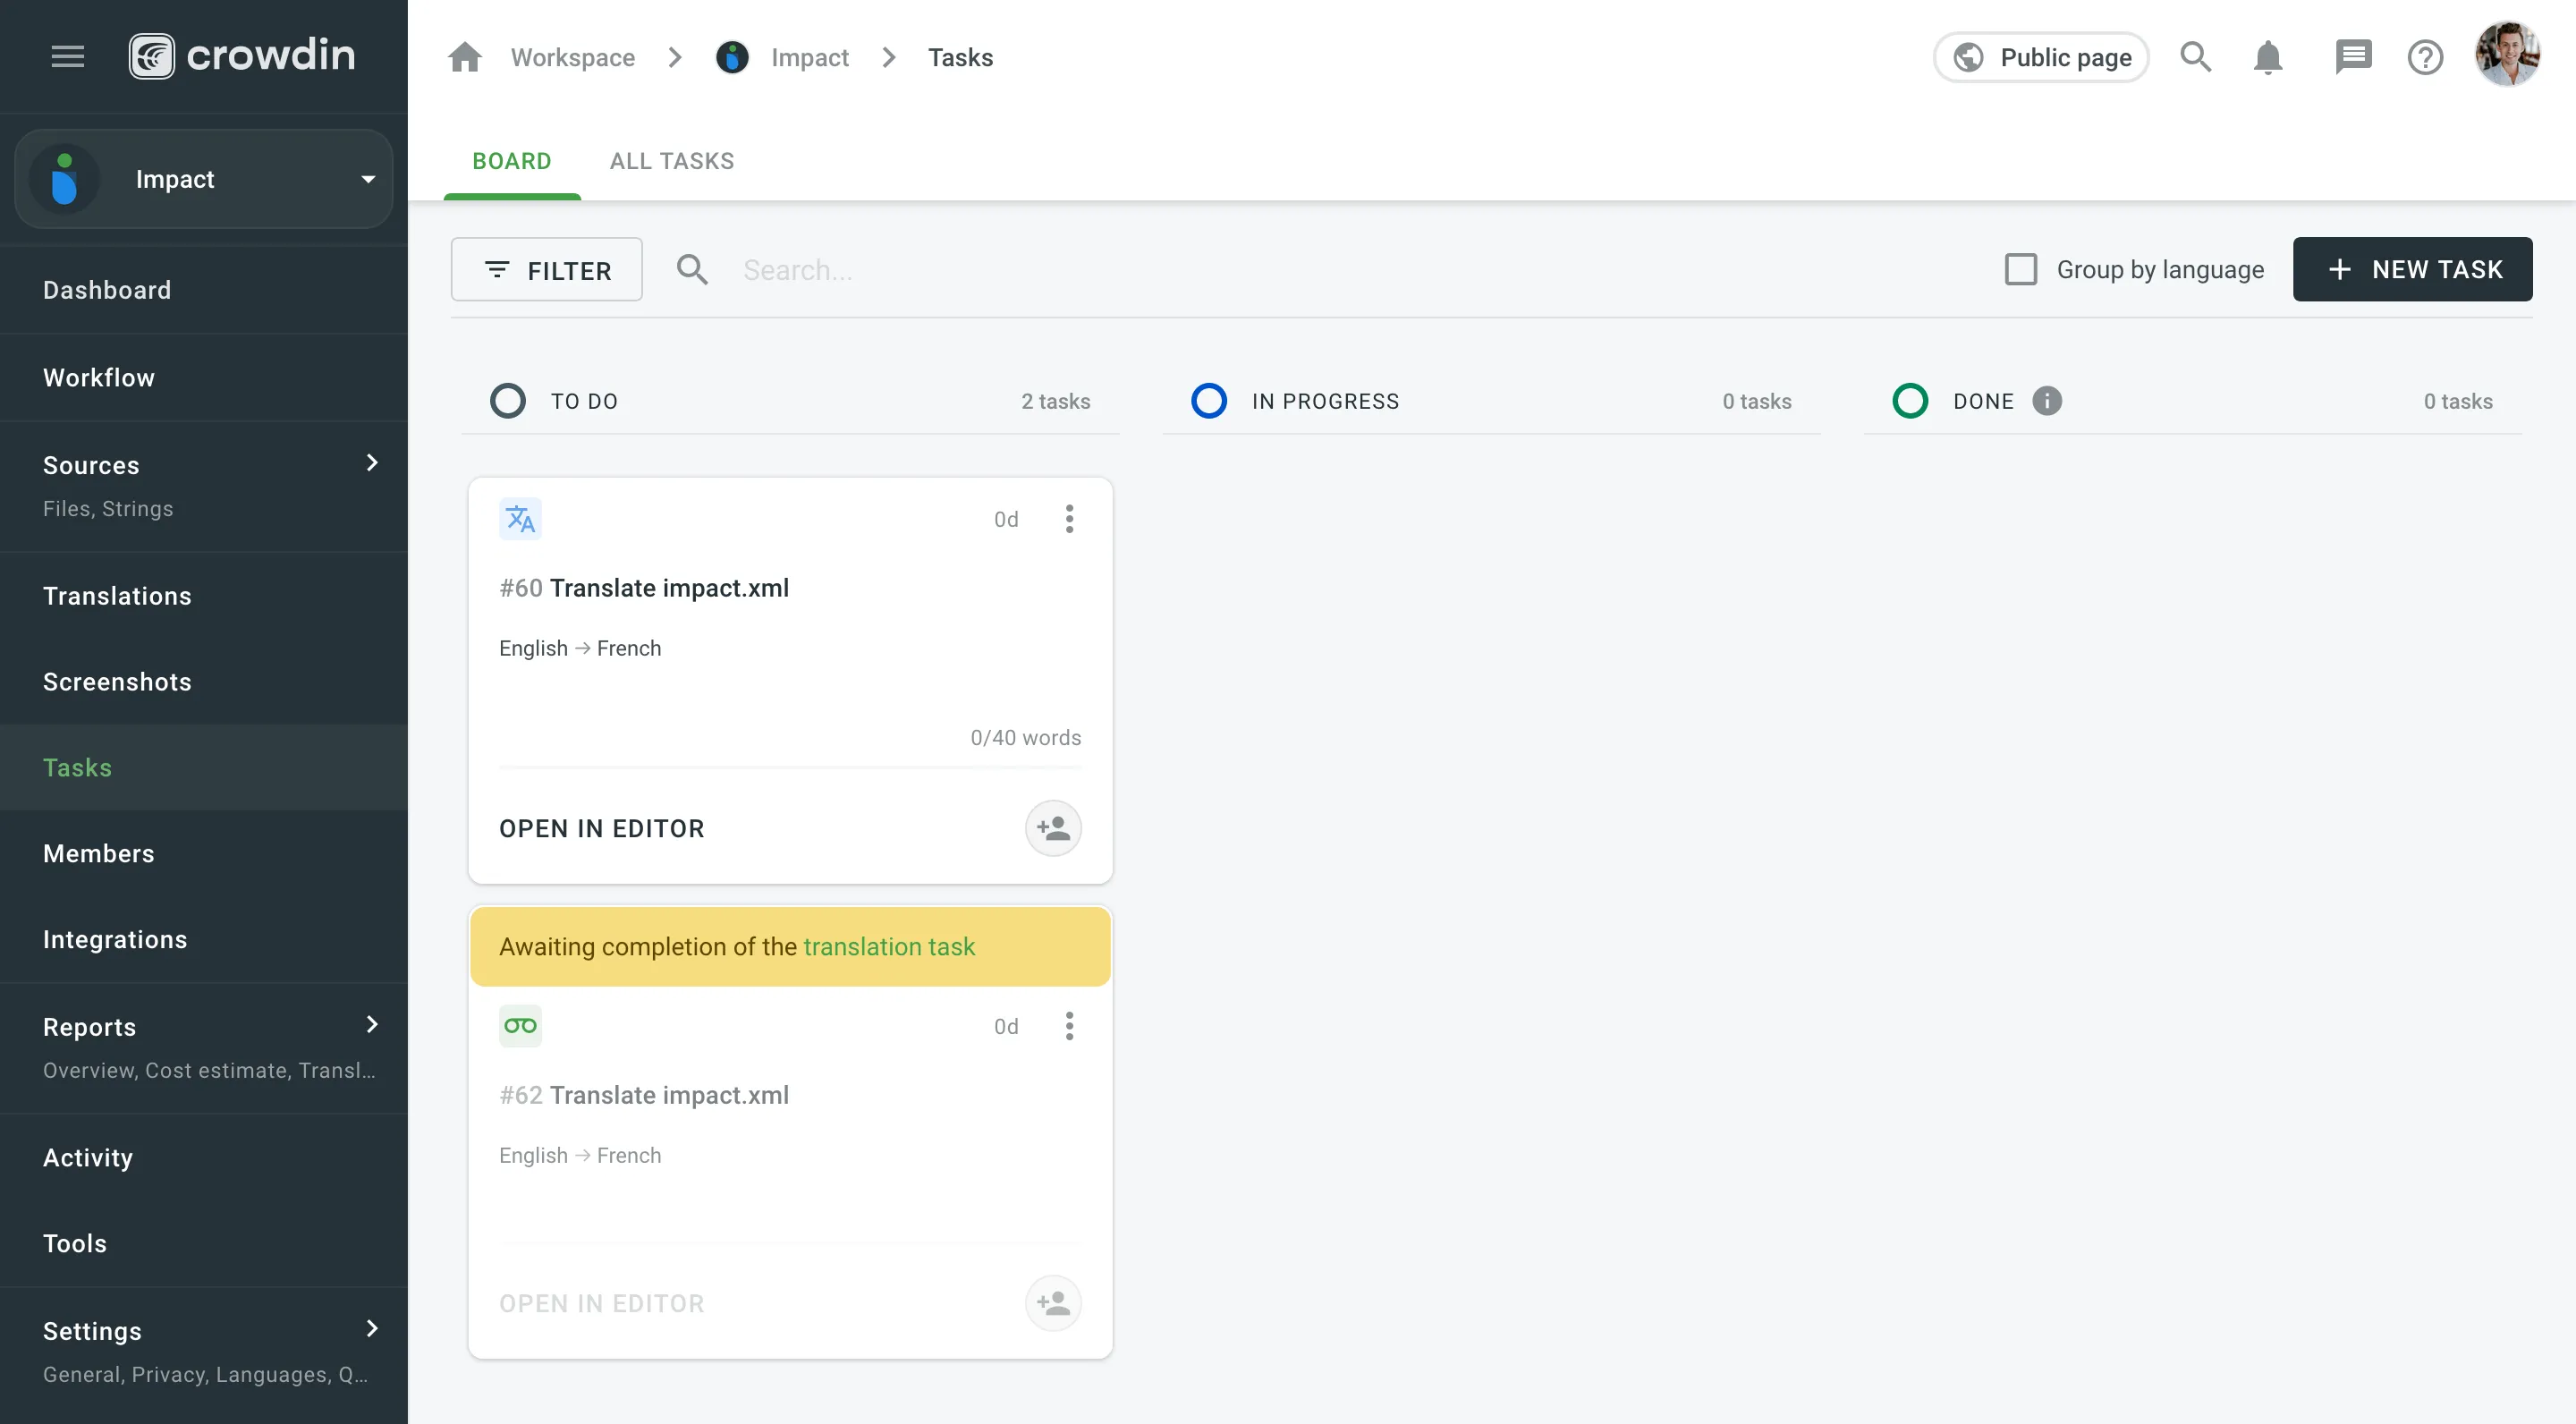 ### [Key Approaches](#key-approaches) [Section titled “Key Approaches”](#key-approaches) The concept of sequential tasks is based on two primary approaches: * **Creating a translation task with its associated pending proofreading task:** * Start by creating a translation task and specifying the target languages and work scope. * Select **Create a pending proofreading task** to generate the associated proofreading task. You can set separate due dates for the translation and proofreading tasks if needed. 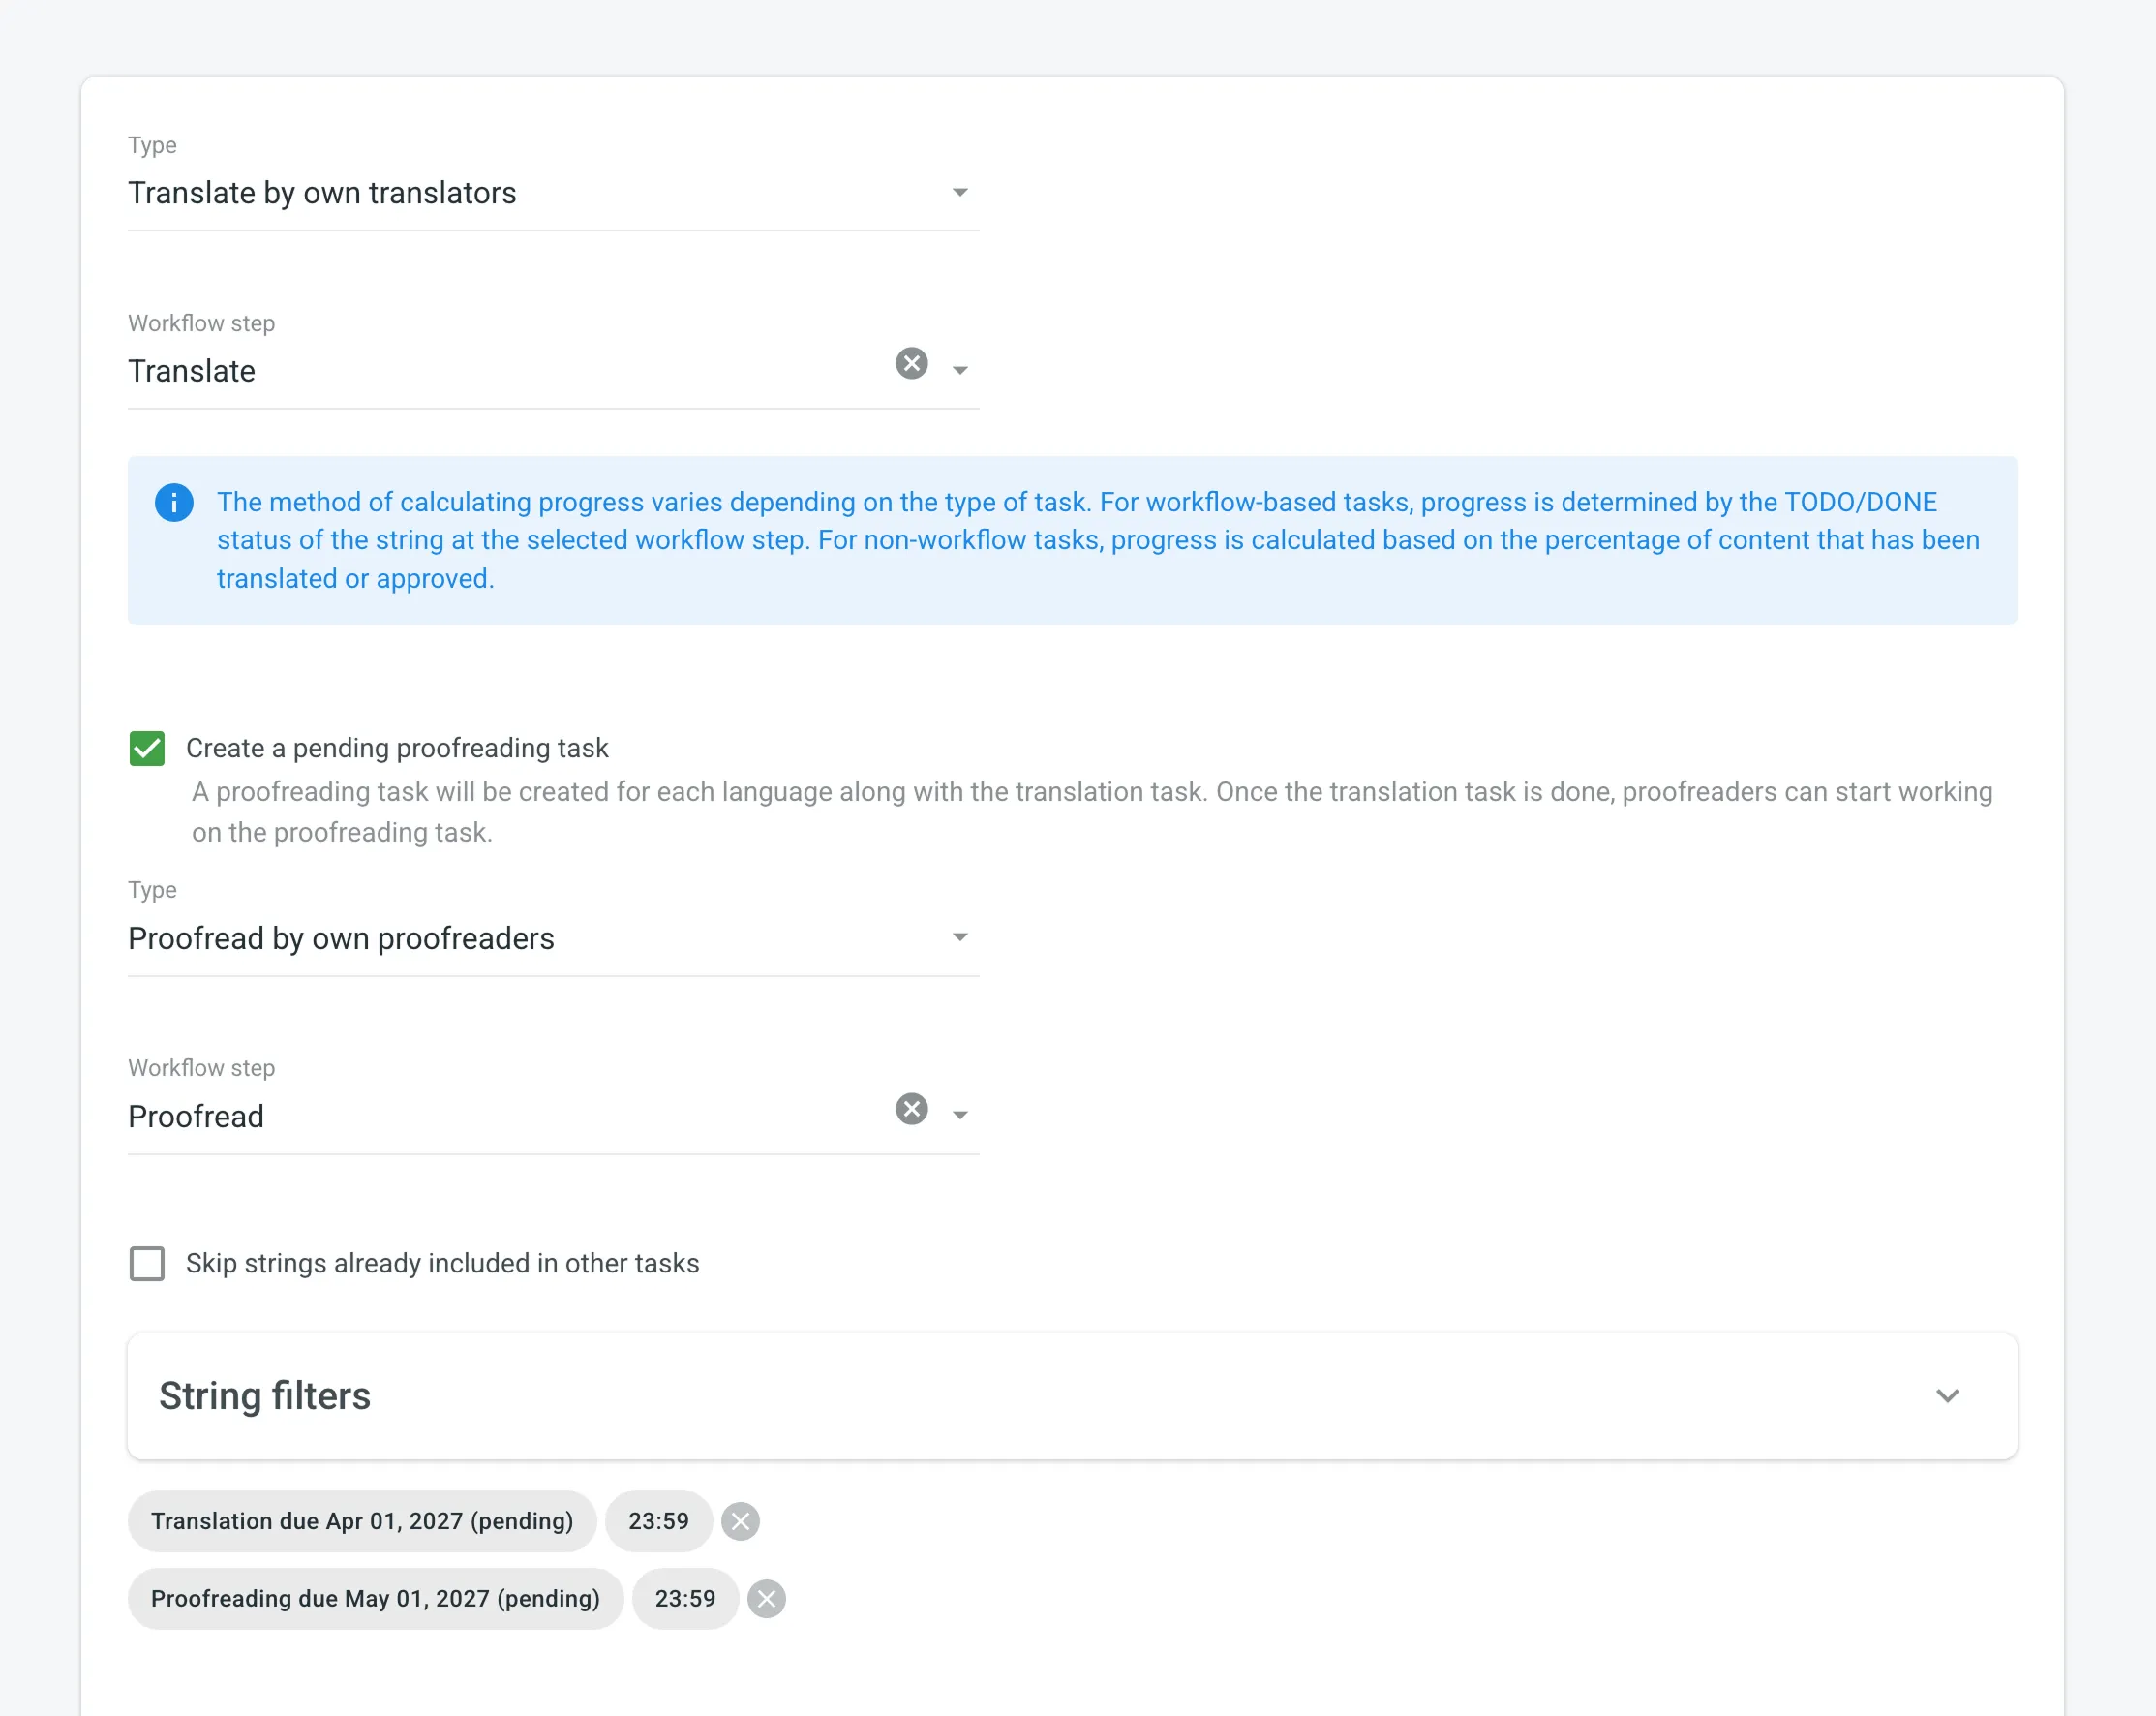 * While translators work on the translation task, the linked proofreading task remains pending. * When the translation task is completed, the status of the associated proofreading task changes from Pending to To Do. Proofreaders will then receive notifications that it’s ready for review. * **Creating a proofreading task and linking it to a translation task:** * Create a proofreading task and select the translation task you want to link it with from the **Preceding task** drop-down menu. You can link it to either a completed or an active translation task.  * The languages and work scope are automatically inherited from the linked translation task. * The proofreading task remains pending until the linked translation task is completed. * As with the first approach, proofreaders receive notifications when the proofreading task is ready for review. ### [Task Types Supported](#task-types-supported) [Section titled “Task Types Supported”](#task-types-supported) Sequential tasks are available for the following task types: * Translate by own translators * Proofread by own translators * Translate by vendor * Proofread by vendor ### [Sequential Task Management](#sequential-task-management) [Section titled “Sequential Task Management”](#sequential-task-management) * When editing a pending proofreading task, changes are limited to fields that do not affect the scope of the task. * Pending proofreading tasks can be deleted if necessary. In this case, linked translation tasks are preserved. * Deleting a translation task with an associated sequential proofreading task results in the deletion of both tasks simultaneously. ## [Task Cross-Review New](#task-cross-review) [Section titled “Task Cross-Review ”New](#task-cross-review) The **Task Cross-Review** feature helps ensure proper oversight in task workflows by requiring approval before contributors can start working. It’s especially beneficial for teams with internal approval processes, such as budget approvals, where tasks must be reviewed and approved by designated managers or the owner. By adding an extra layer of accountability, this feature ensures tasks don’t move forward without proper review. 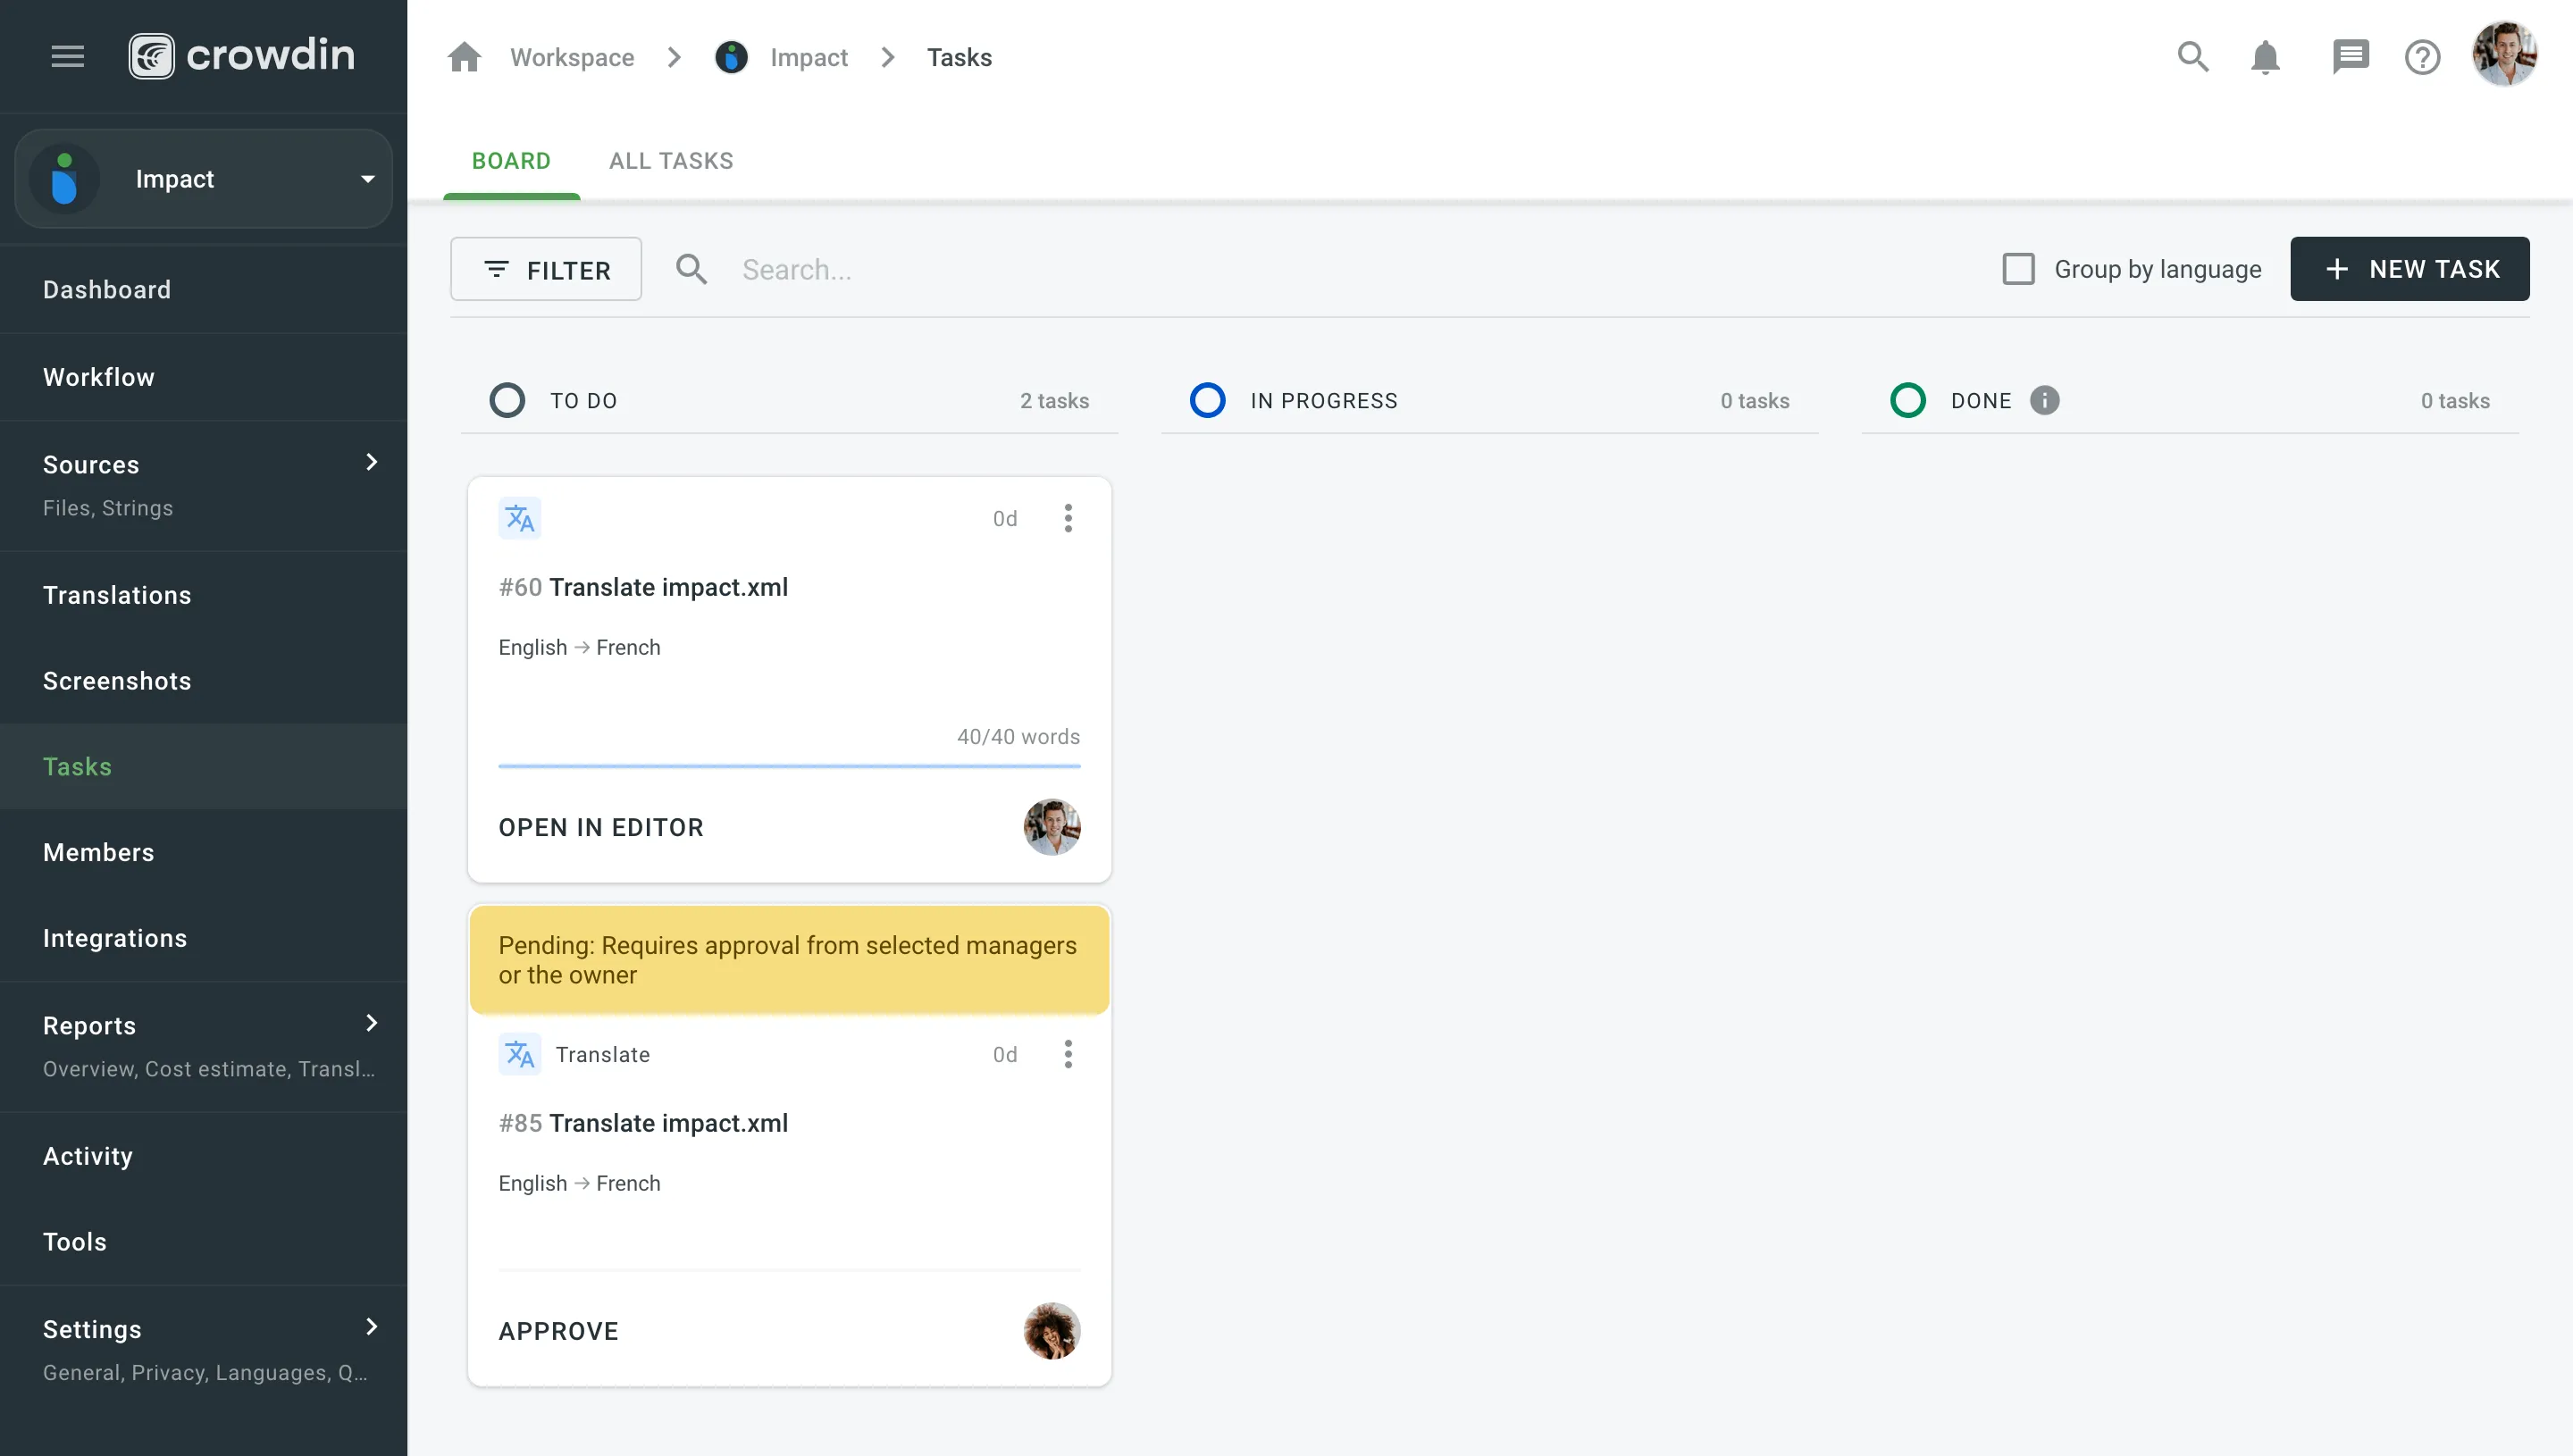 ### [How Task Cross-Review Works](#how-task-cross-review-works) [Section titled “How Task Cross-Review Works”](#how-task-cross-review-works) When **Task Cross-Review** is enabled: * During task creation, a notification informs the user that the task will require approval from eligible project members (selected managers or the owner) before assigned members can start working. * On the Board, tasks awaiting approval display an alert indicating they are pending review from selected managers or the owner, making them easy to identify. * In the task details view, an alert states, *“The task is currently pending review from selected managers or the owner,”* and the task is labeled with the status **For Approval**. Only selected managers or the owner can approve the task. The manager who created the task cannot approve it, but the owner can always approve their own tasks. Once approved, the task status changes to **To Do**, indicating that contributors can begin work. Read more about [configuring Task Cross-Review](/enterprise/project-settings/privacy/#configuring-task-cross-review). ## [See Also](#see-also) [Section titled “See Also”](#see-also) [Task-based access control ](/enterprise/project-settings/privacy/#translations)Allow project members to work with tasks they are assigned to, even if they do not have full access to the language in the project. [User Tasks ](/enterprise/user-tasks/)Learn how to view, filter, and manage tasks assigned to you.
# Teams
> Organize members of your organization into teams to simplify user management
Organize members of your organization into teams to simplify people management in projects, workflow steps, and tasks. Teams help you invite tens or even hundreds of members to the project in a few clicks. So inviting a team to the project becomes as easy as inviting a single person. ## [Use Cases](#use-cases) [Section titled “Use Cases”](#use-cases) * Create language-specific teams of members. You’ll be able to assign a whole team to the needed target language on the workflow steps of your projects. * Assign teams to translation or proofreading tasks. * Add a member to the team to automatically grant access to all projects the team participates in. ## [Creating Teams](#creating-teams) [Section titled “Creating Teams”](#creating-teams) To create a team, follow these steps: 1. Open your organization’s **Workspace** and select **Users** on the left sidebar. 2. Switch to the **Teams** tab. 3. Click **Create** in the lower-right corner.  4. Name your team and select the needed members. 5. Click **Create**. 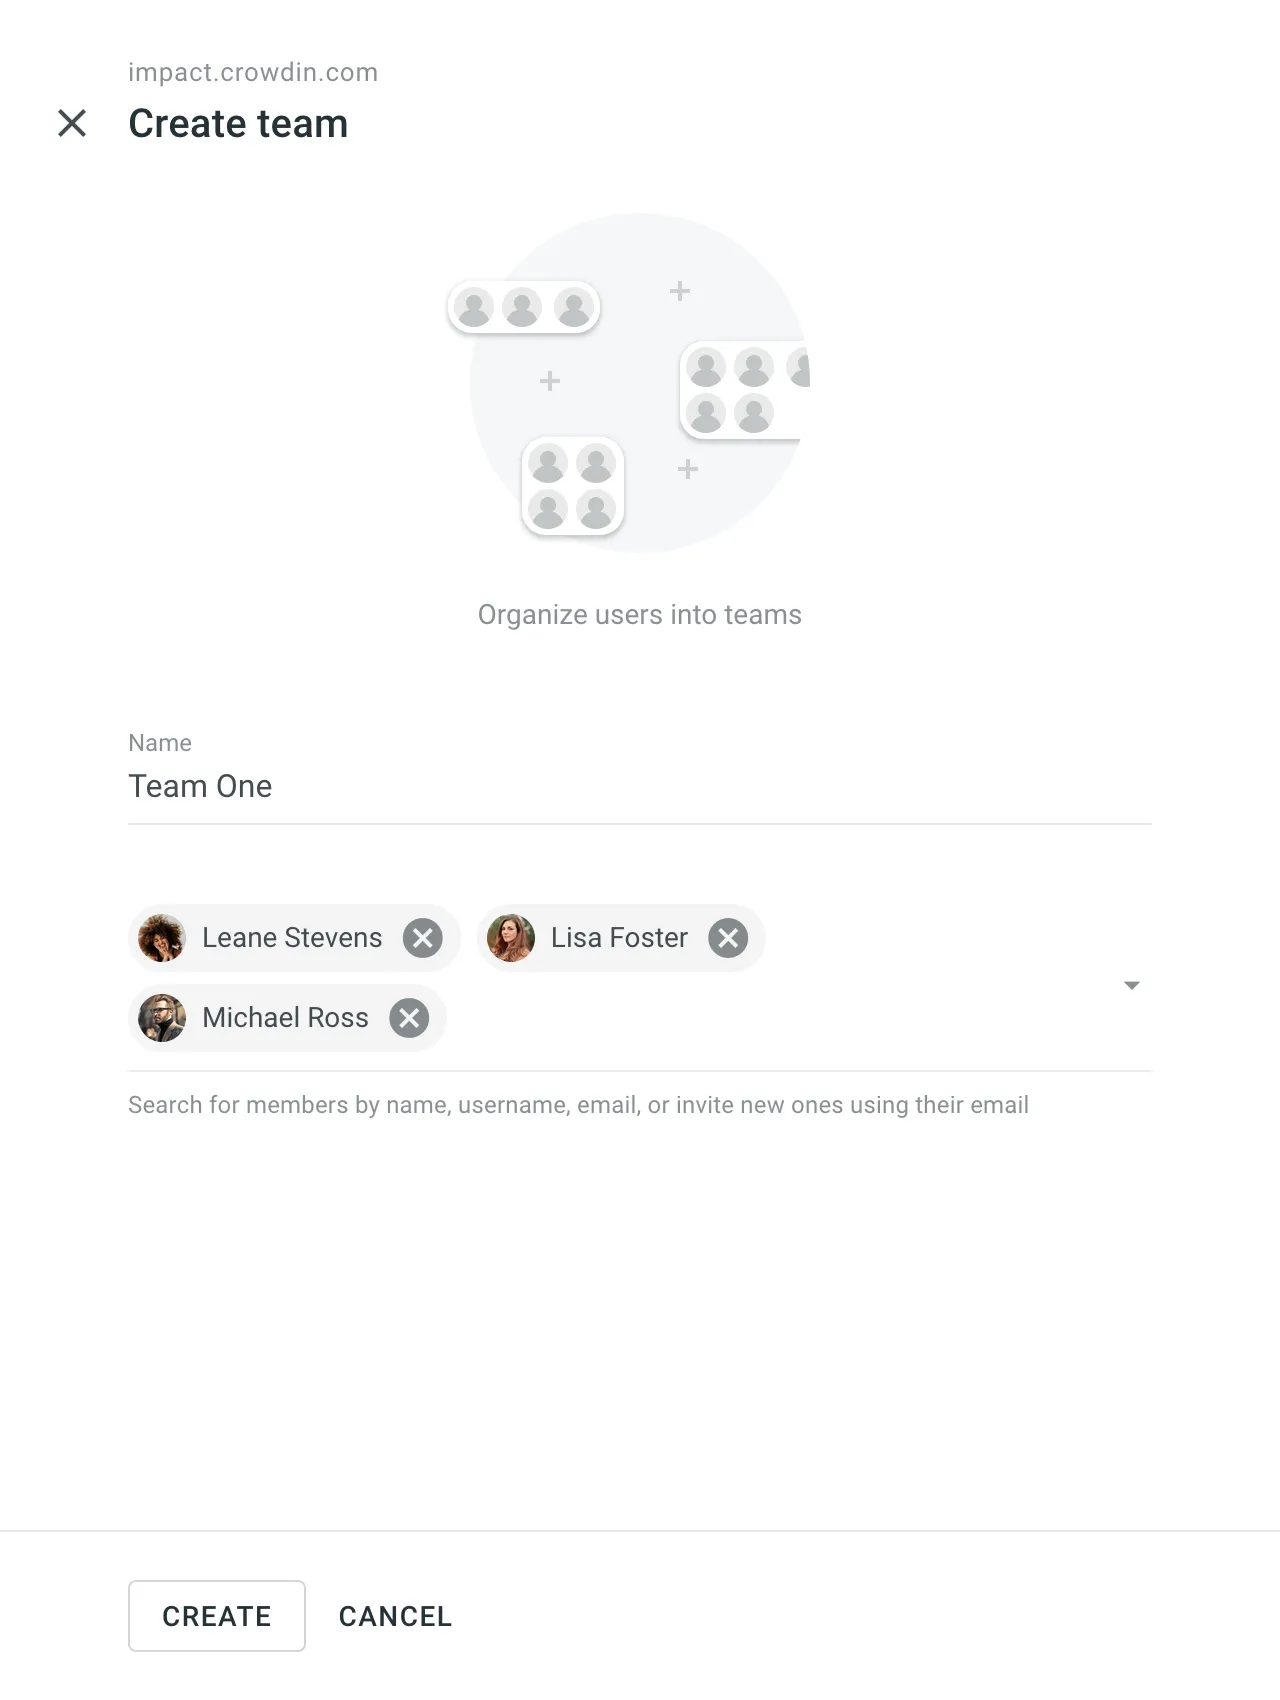 ## [Managing Teams](#managing-teams) [Section titled “Managing Teams”](#managing-teams) Managing organization teams in Crowdin Enterprise involves various operations such as managing permissions and team members, contacting teams, and deleting teams. Below you can find instructions for each operation. ### [Viewing and Searching Teams](#viewing-and-searching-teams) [Section titled “Viewing and Searching Teams”](#viewing-and-searching-teams) Once you open the **Users** page, you can switch to the **Teams** tab to view and search for teams. You can view the list of existing organization teams (one team per row). To search for a particular team, type the team name in the **Search** field. To change the sorting order, click on the **Name** column heading. 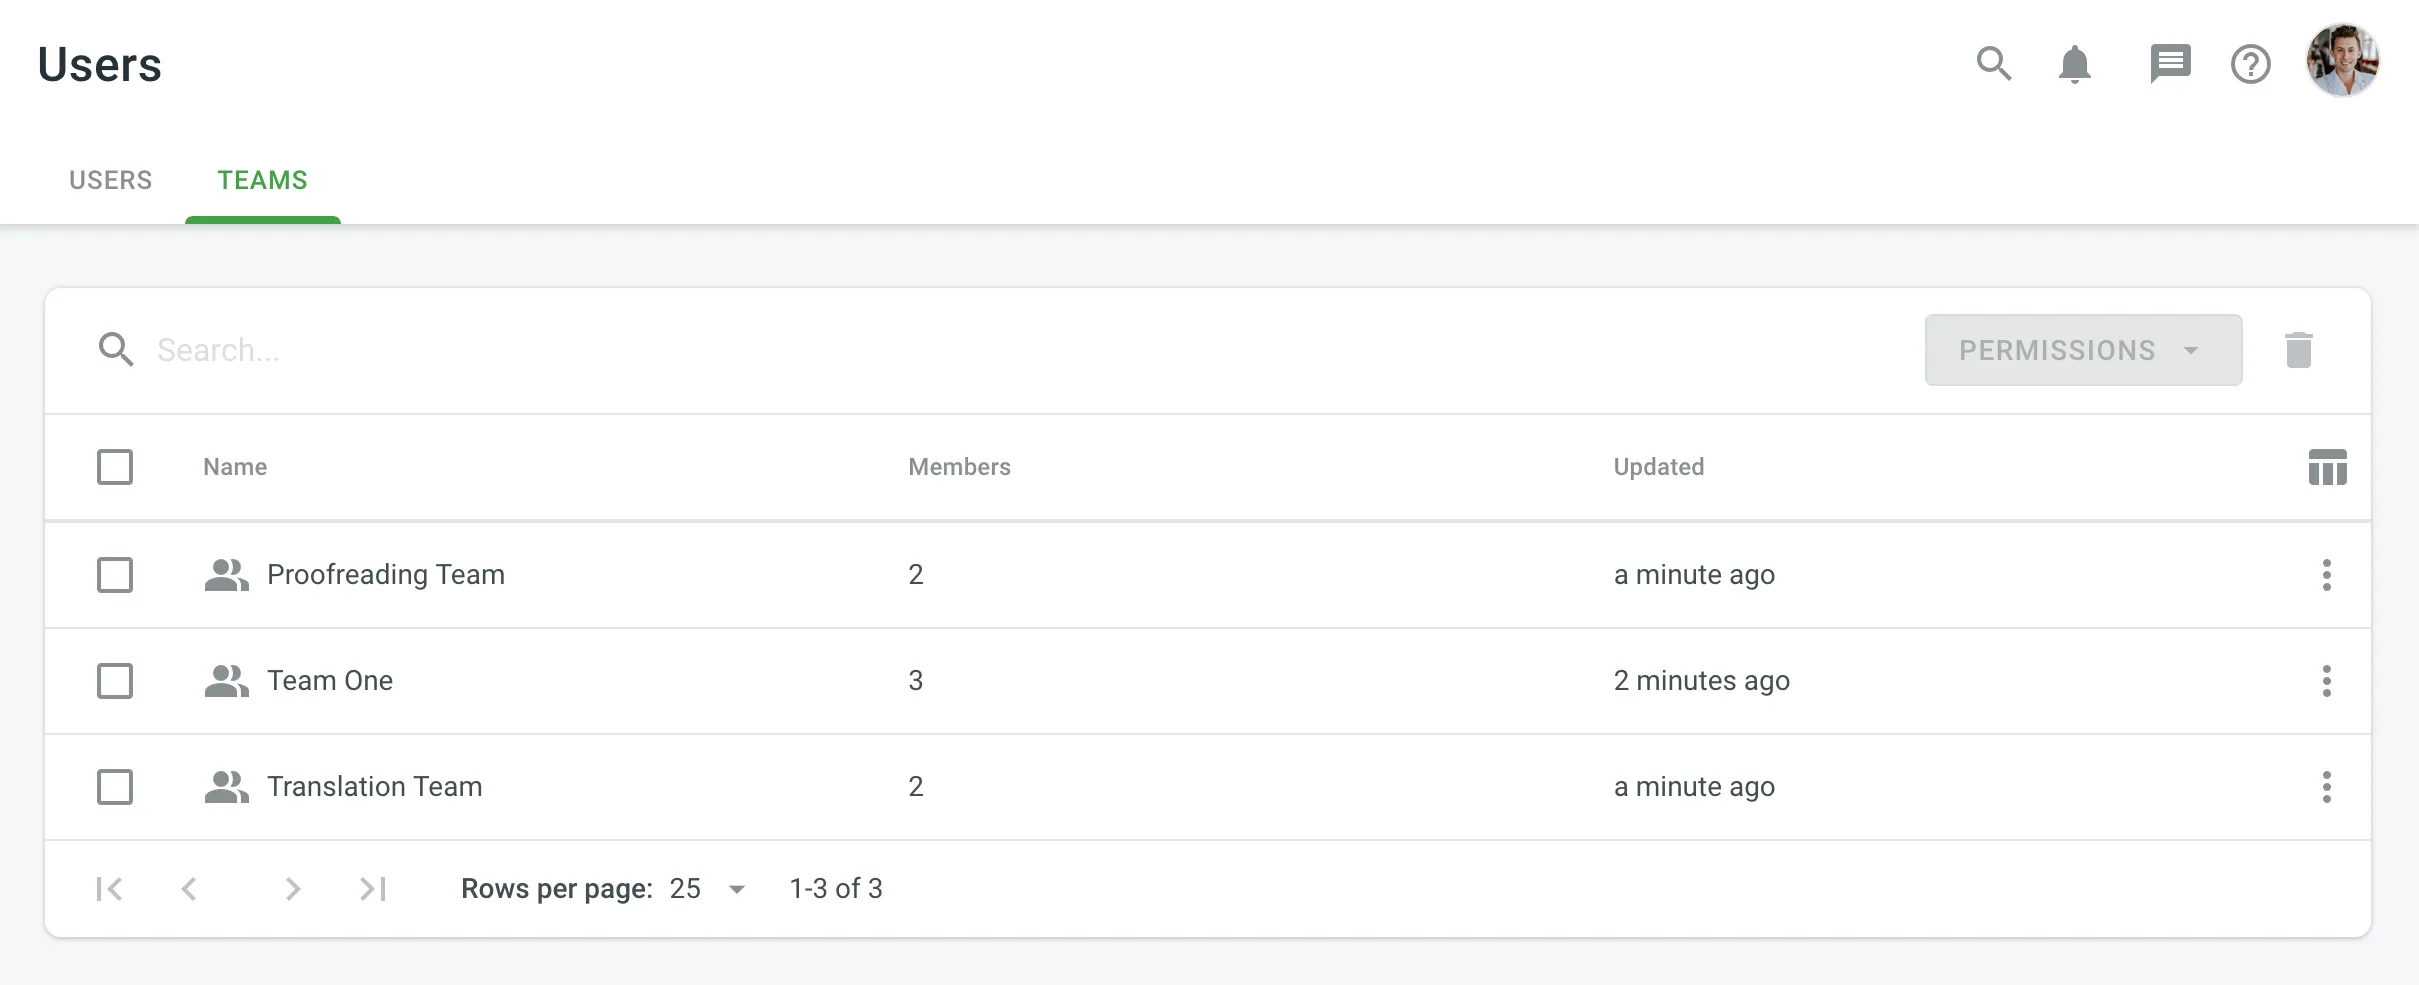 ### [Viewing Team Details](#viewing-team-details) [Section titled “Viewing Team Details”](#viewing-team-details) To view and manage team details, follow these steps: 1. Open your organization’s **Workspace** and select **Users** on the left sidebar. 2. Switch to the **Teams** tab. 3. Double-click on the team or right-click and select **Open** from the menu. 4. In the team details, you can perform various actions: * **Members**: view and manage team members. * **Projects and Roles**: view and manage team participation in organization projects and their roles in these projects. * **Groups**: (only for [Permission granularity](/enterprise/permissions-granularity-mode/#permissions) mode) view and manage the groups which are managed by a team. * Use the left panel to rename the team, view basic information, team members number, creation date, and add new members. 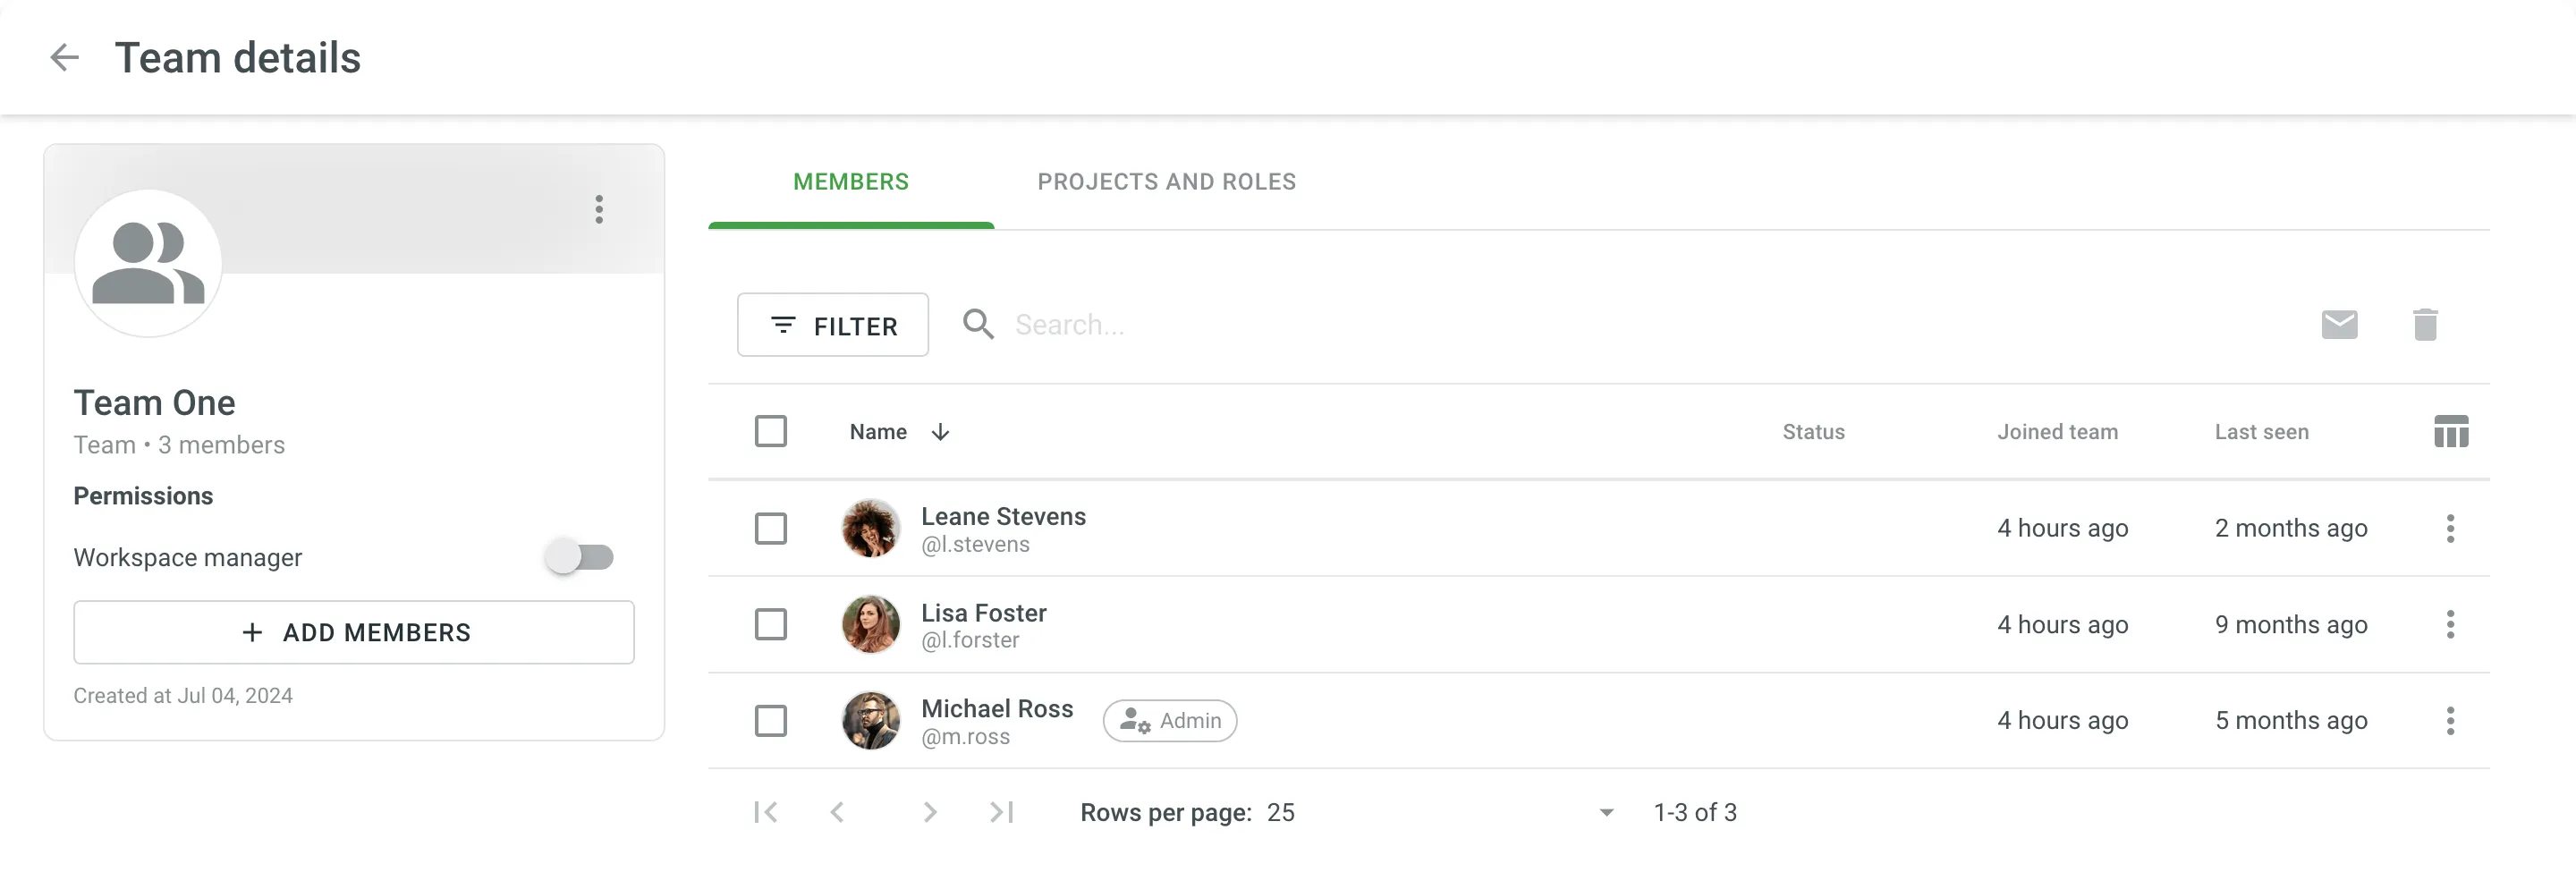 ### [Changing Permissions](#changing-permissions) [Section titled “Changing Permissions”](#changing-permissions) To change team permissions, follow these steps: 1. Open your organization’s **Workspace** and select **Users** on the left sidebar. 2. Switch to the **Teams** tab. 3. Select one or multiple teams for which you want to change the permissions. 4. Click **Permissions** in the upper-right corner or right-click on the team and change **Permissions** from the menu. 5. Select either **Add project permissions** or **Remove project permissions**. 6. In the appeared dialog, configure the permissions you want to add or remove and confirm the changes. ### [Editing Teams](#editing-teams) [Section titled “Editing Teams”](#editing-teams) To edit (e.g., rename a team, add new or remove current team members) a team, follow these steps: 1. Open your organization’s **Workspace** and select **Users** on the left sidebar. 2. Switch to the **Teams** tab. 3. Right-click on the needed team and select the option from the context menu. Once you edit a team (add a new member or remove one of the current ones), the changes will be applied automatically to all the projects this team participates in. ### [Deleting Teams](#deleting-teams) [Section titled “Deleting Teams”](#deleting-teams) To delete teams from the organization, follow these steps: 1. Open your organization’s **Workspace** and select **Users** on the left sidebar. 2. Switch to the **Teams** tab. 3. Select one or multiple teams that you want to delete. 4. Click or right-click on the selected teams and select **Delete** from the menu. 5. Confirm the deletion. Once you delete a team, all its members will also be deleted from all projects this team participated in. ## [Assigning Teams](#assigning-teams) [Section titled “Assigning Teams”](#assigning-teams) ### [Assigning Teams to Workflow Step](#assigning-teams-to-workflow-step) [Section titled “Assigning Teams to Workflow Step”](#assigning-teams-to-workflow-step) You can assign a team to the workflow step of your project in the workflow editor or the Workflow template editor. Read more about [Workflows](/enterprise/workflows/). ### [Inviting Teams to the Project](#inviting-teams-to-the-project) [Section titled “Inviting Teams to the Project”](#inviting-teams-to-the-project) You can invite a team to the project via the **Members** section and provide the necessary access level the same way as you do it for a single person. Read more about [inviting people to the project](/enterprise/inviting-people/#inviting-people-to-a-project). After you invited a team to the project, you can remove one or few people from the project members list. In this case, the deleted member will remain in the team and on next invitations to the projects will be listed among project participants. ### [Assigning Team to the Task](#assigning-team-to-the-task) [Section titled “Assigning Team to the Task”](#assigning-team-to-the-task) While creating a translation or proofreading task, you can assign it to the team. Optionally, you can use the *Split files* option to split translatable content between team members. Read more about [Creating a Task](/enterprise/tasks/#creating-new-task). ## [Team Permissions](#team-permissions) [Section titled “Team Permissions”](#team-permissions) When you invite an individual member to a project who also participates in a team, and later on, you invite this team to the project as well, the personal permissions of this member might be overridden by the team permissions. For example, if the member initially had permissions only for the translation step of French, and then the whole team was granted permissions for the translation and proofreading steps of French, German, and Italian, this particular member will also receive the higher permissions.
# Translation by API Vendor
> Order professional translations from vendors integrated via API
Translation by API Vendor is a workflow step used to order translations from vendors integrated with Crowdin Enterprise via API. It helps automate the translation process by enabling manual or scheduled order placement, with translations delivered directly to your project. [Workflow Overview ](/enterprise/workflows/) [Vendors ](/enterprise/vendors/) ## [Adding API Vendor to the Organization](#adding-api-vendor-to-the-organization) [Section titled “Adding API Vendor to the Organization”](#adding-api-vendor-to-the-organization) To use this workflow step, first add a supported API vendor (e.g., Gengo) to your organization. 1. Open your organization’s **Workspace** and select **Store** on the left sidebar. 2. Switch to the **Vendors** tab and click **Invite** for Gengo. 3. In the appeared dialog, keep **Vendor as organization** selected and click **Invite**. 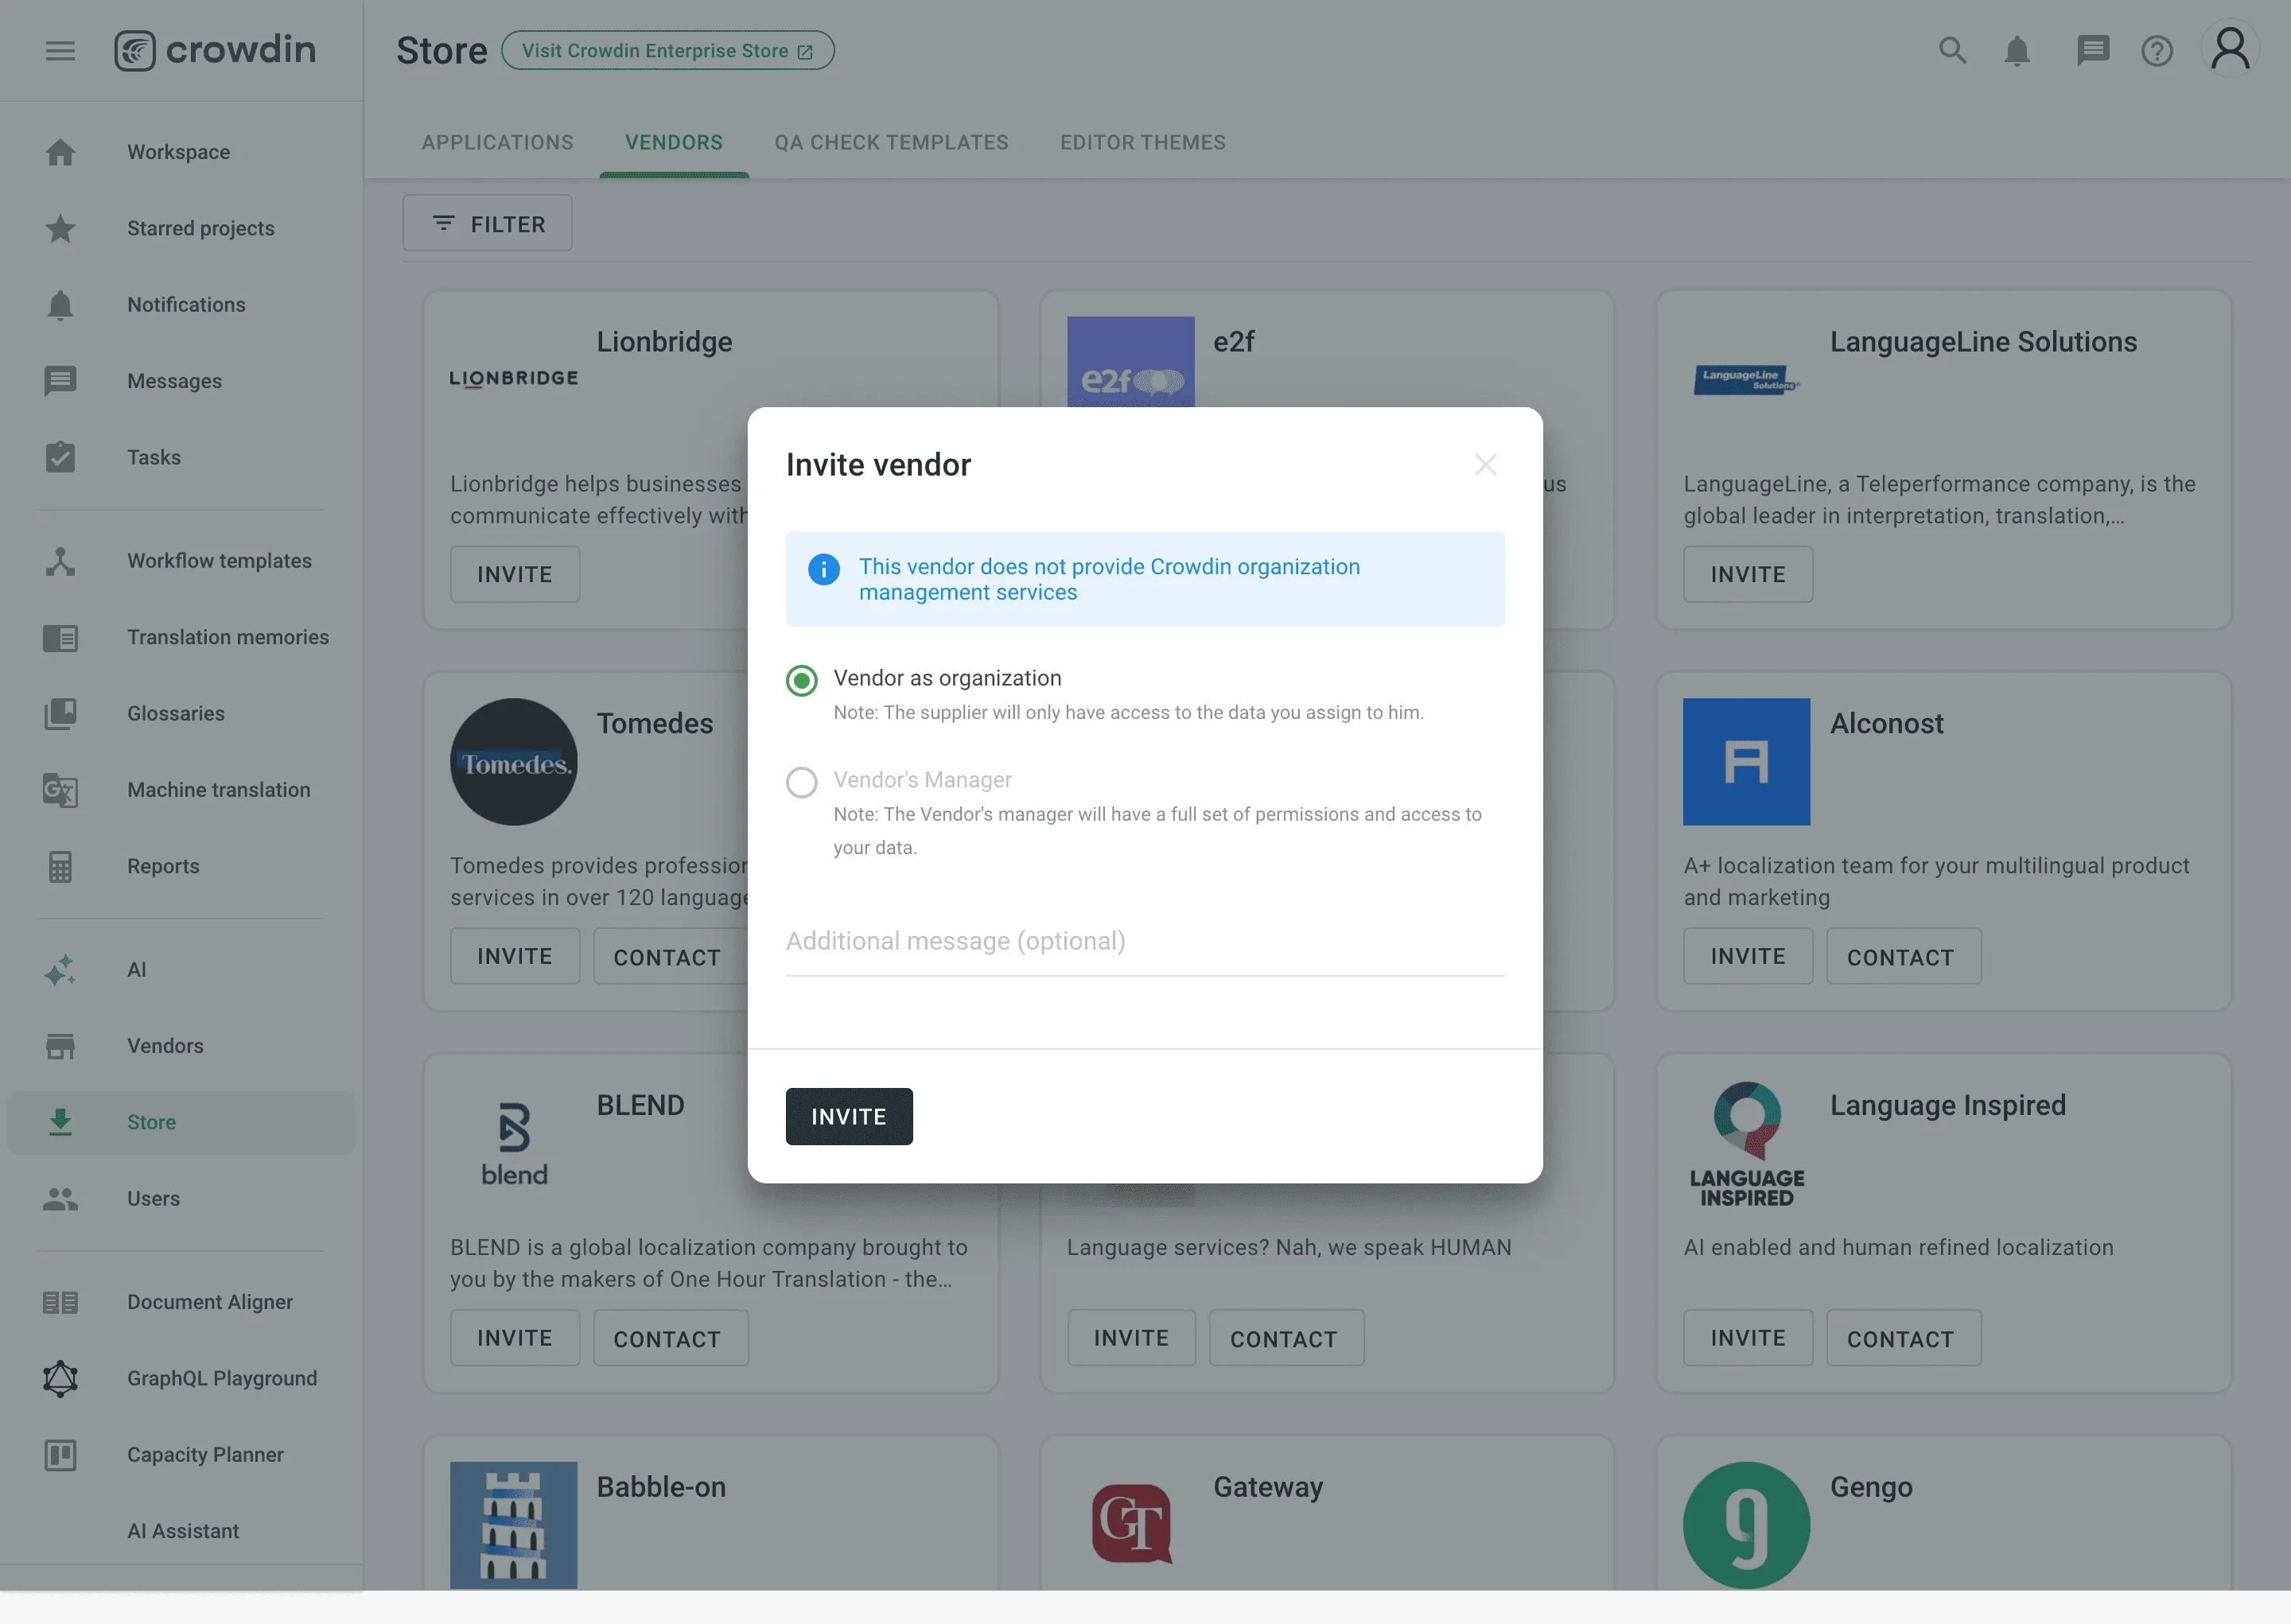 4. Go back to your **Workspace**, select **Vendors** on the left sidebar, and click **Gengo**. 5. Click **Set up account**. 6. In the appeared dialog, paste your Gengo API keys from your Gengo [Account settings > API settings](https://gengo.com/account/api_settings/) and click **Done**. ## [Adding Translation by API Vendor Step to Your Workflow](#adding-translation-by-api-vendor-step-to-your-workflow) [Section titled “Adding Translation by API Vendor Step to Your Workflow”](#adding-translation-by-api-vendor-step-to-your-workflow) You can add the *Translation by API Vendor* step in the workflow editor or the workflow template editor. In the step settings, select the vendor (e.g., Gengo) from the *Vendor* drop-down. If needed, adjust additional options like *Expertise*, *Tone*, and *Purpose* to match your requirements. 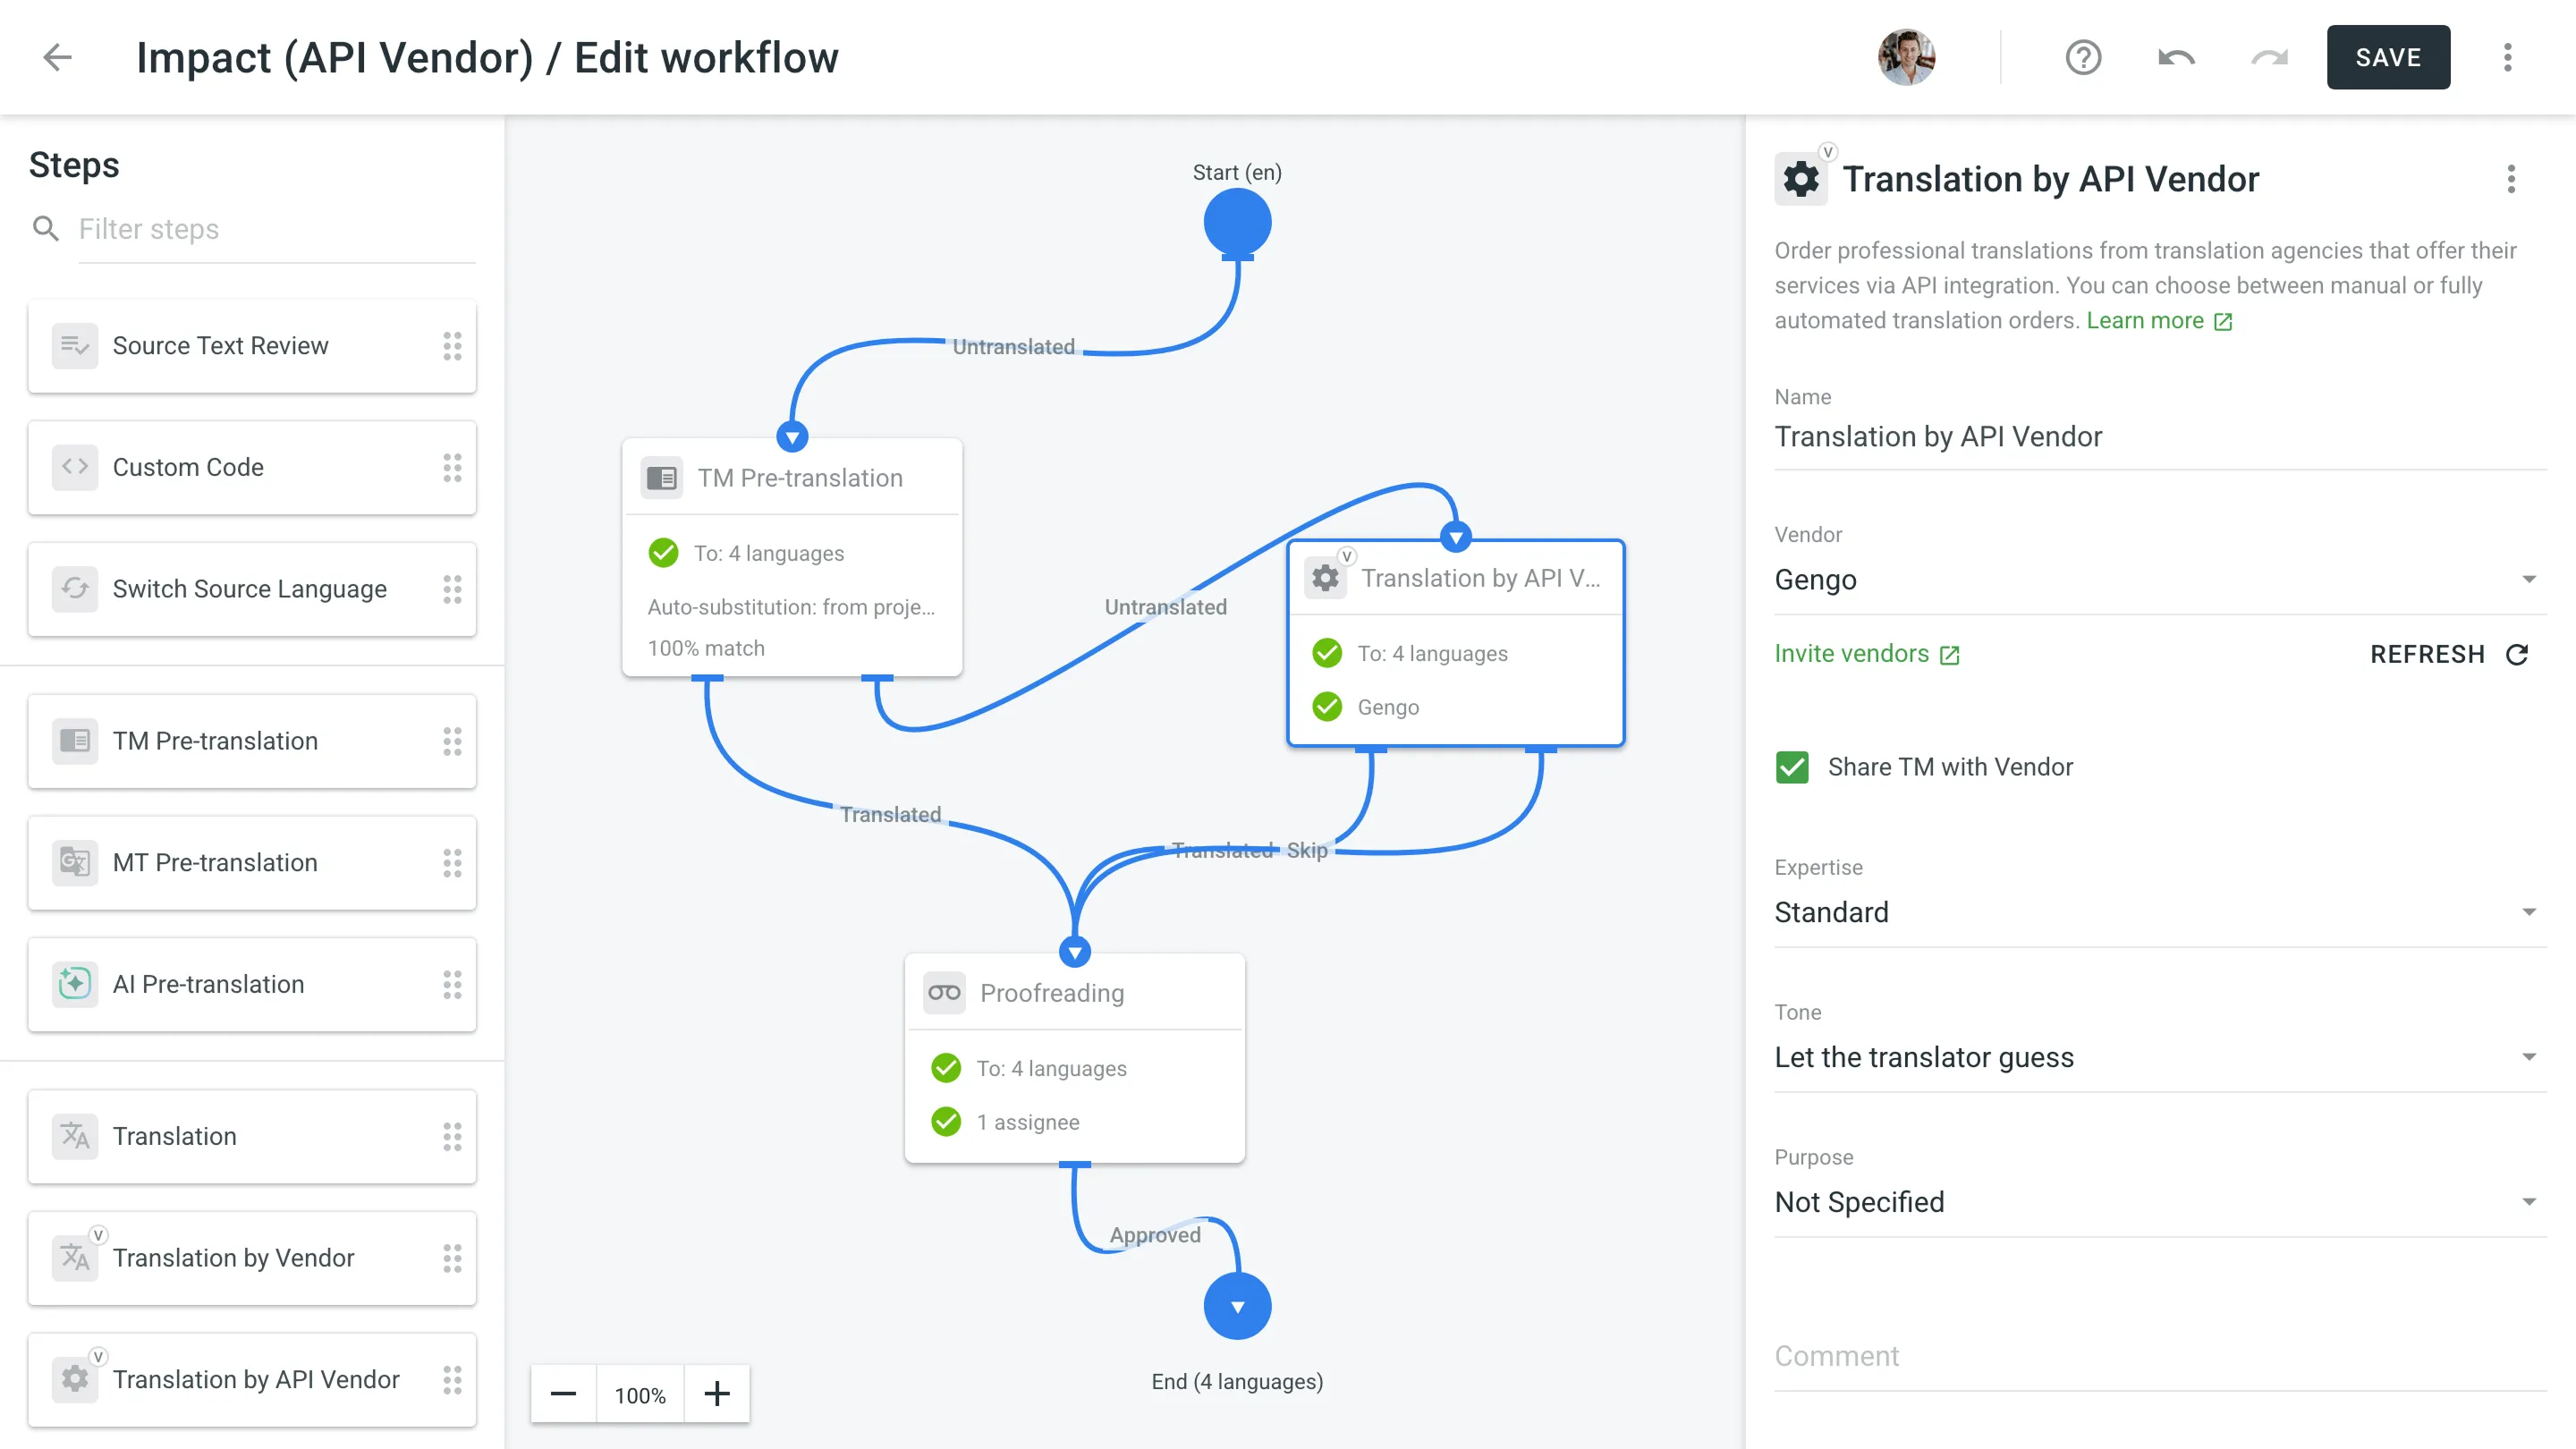 ## [Ordering Translations from API Vendor](#ordering-translations-from-api-vendor) [Section titled “Ordering Translations from API Vendor”](#ordering-translations-from-api-vendor) Once the step is added to your project workflow, the *API Vendor* tab becomes available in the **Workflow** section of the project. To order translations, follow these steps: 1. Open your project and go to **Workflow > API Vendor**. 2. Choose the target languages. 3. Click **Create order**. 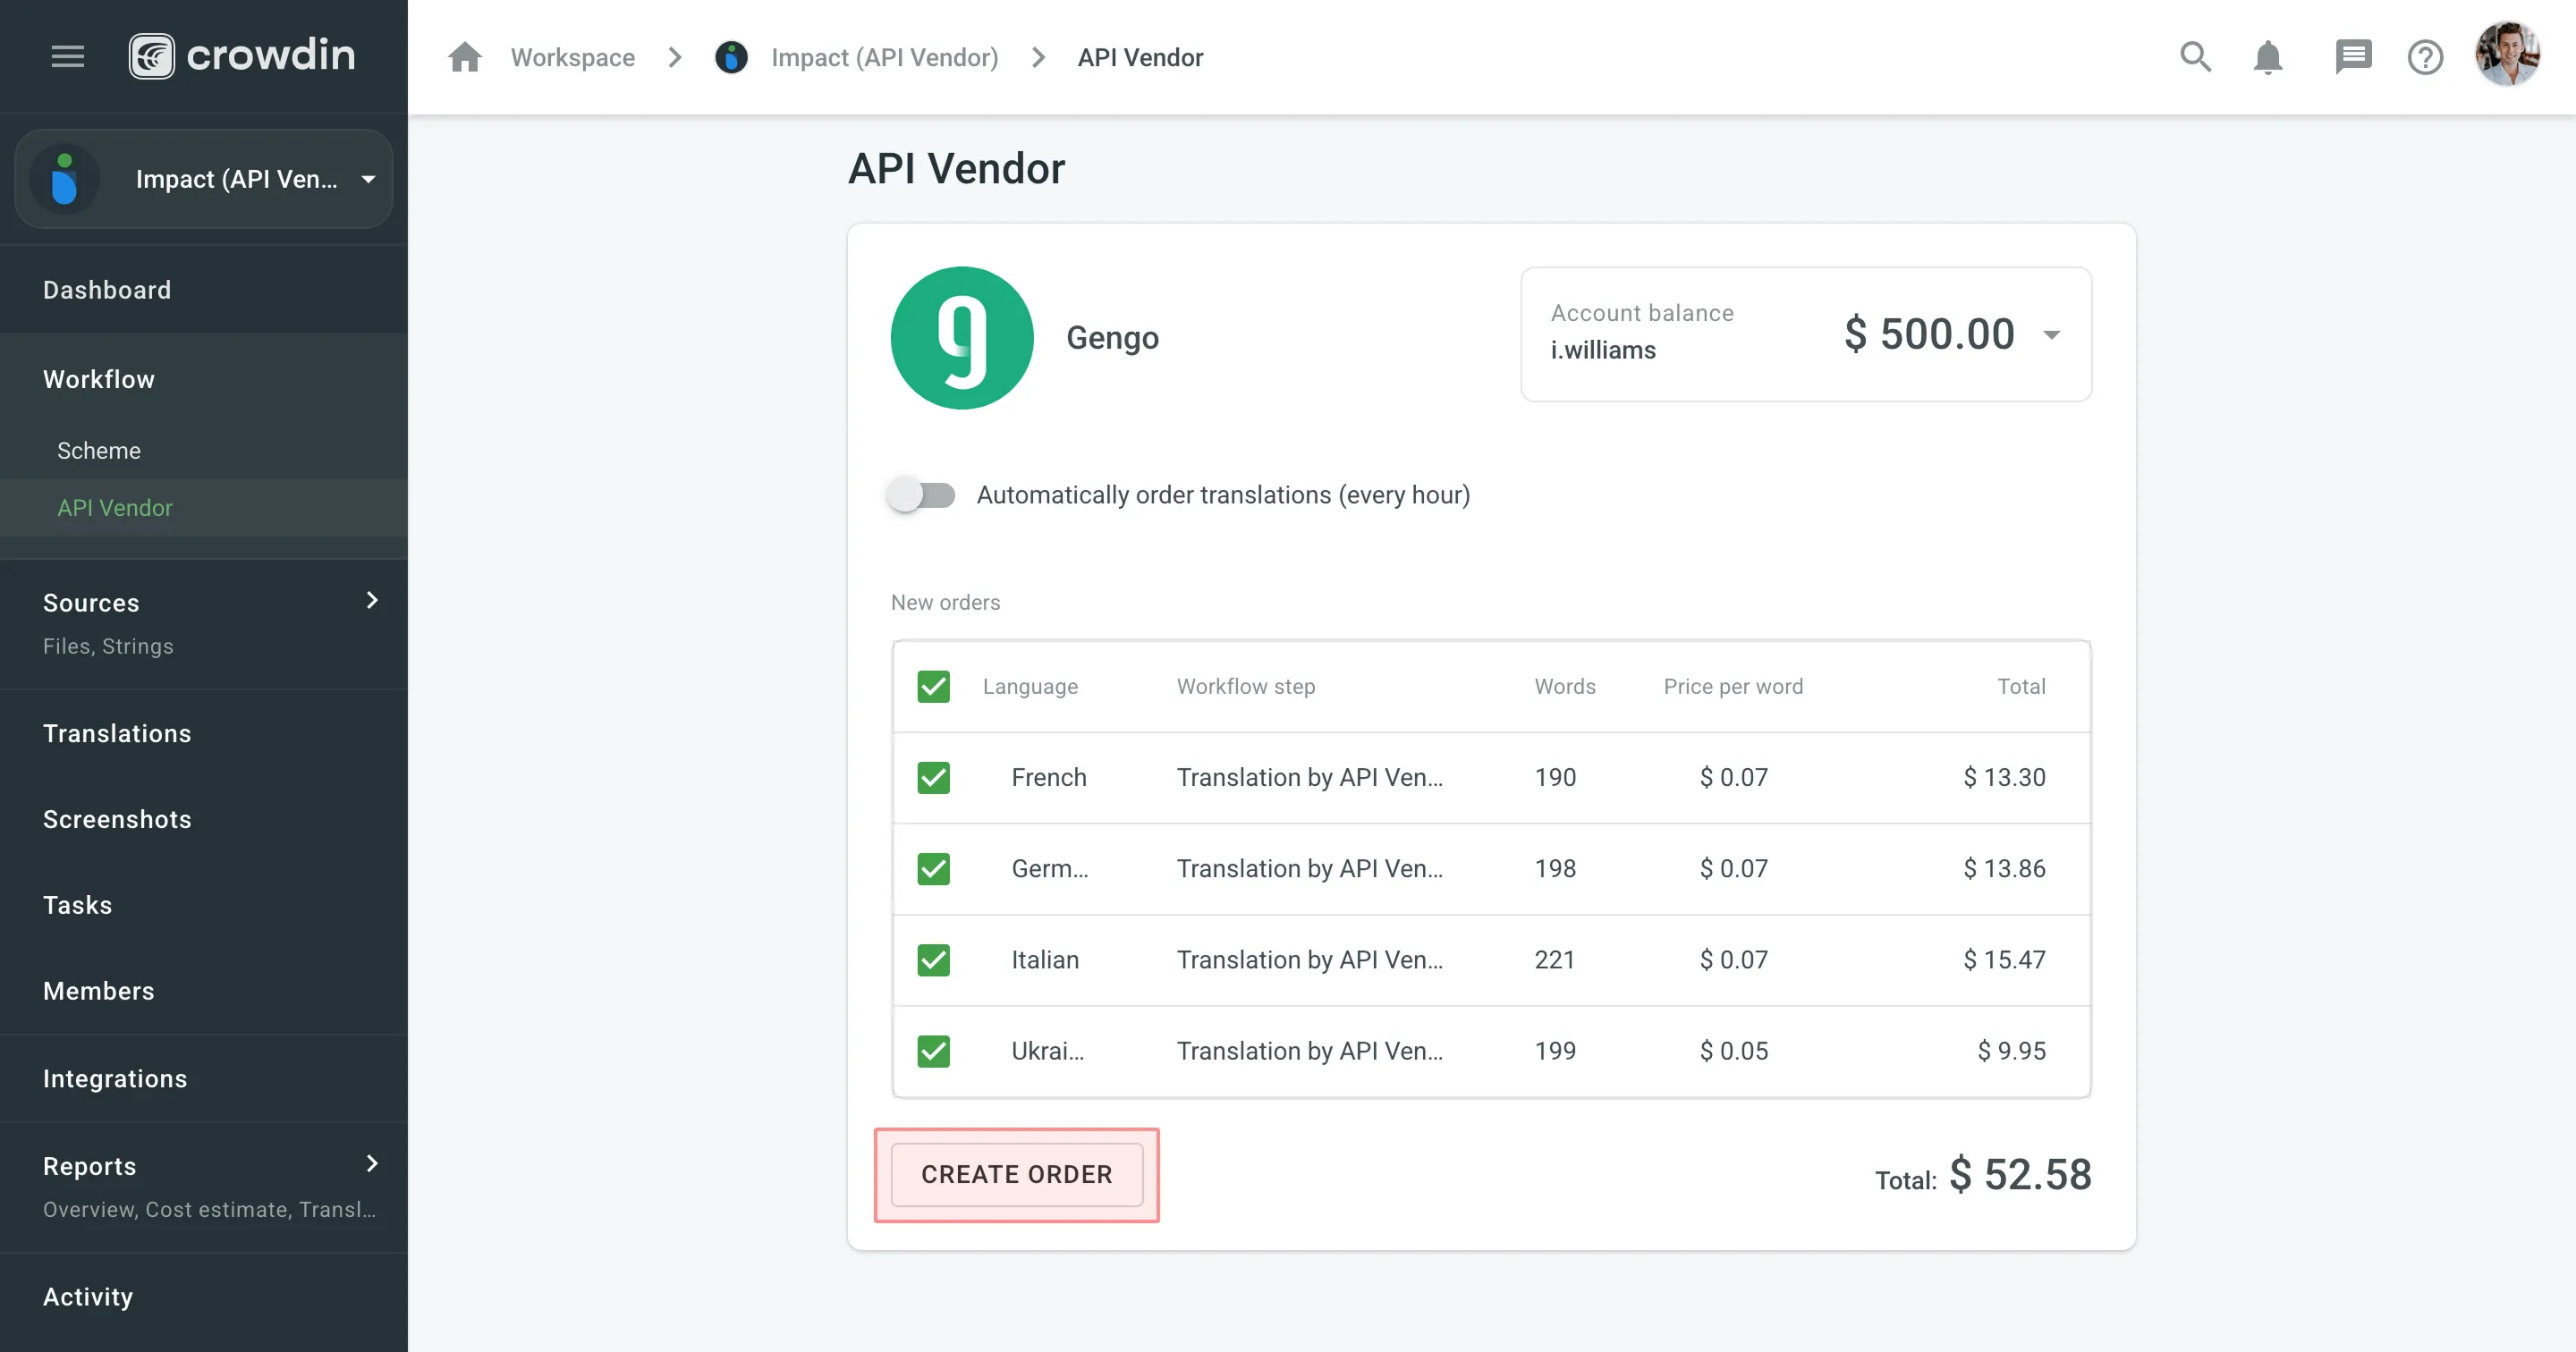 4. *(Optional)* Enable **Automatically order translations (every hour)** if you want translation orders to be sent periodically without manual action. As soon as the translations are completed by the vendor, they will be delivered back into the project automatically. ## [Orders History](#orders-history) [Section titled “Orders History”](#orders-history) To track past orders, scroll down to the **Orders history** section on the **Workflow > API Vendor** page. This section shows each order’s language, word count, status, and price. For more detailed order information, click the specific order entry.  You can also view orders across all your projects by going to **Workspace > Vendors** and selecting the needed vendor (e.g., Gengo). On the **Orders** tab, use the available filters (e.g., Project, Language, Status, Created) to narrow down the results and check relevant order details.
# Translation Consistency
> Hints regarding how the source words were previously translated
Translation consistency is a feature designed to provide translators with informative hints regarding how the source words were previously translated. These hints show previous translations for individual words and the number indicating how many times each translation was used in the project. As the feature’s name states, its main task is to improve the consistency of translations within the project. As a result, you get higher-quality translations that will be used in your applications, websites, etc. ## [Overview](#overview) [Section titled “Overview”](#overview) Translation consistency is handled by an experimental machine learning technology. As soon as you start translating your project, machine learning algorithms engage, and the system shows previous translations for the source words and how often they were used in the project. The previous translation lists are formed based on the translations with the highest priority (approved, most voted, or last added ones) within the project. ## [Using Translation Consistency in Editor](#using-translation-consistency-in-editor) [Section titled “Using Translation Consistency in Editor”](#using-translation-consistency-in-editor) Hover over the source words underlined with the light dashed line to see the previous translations formed by the translation consistency feature. You can also search previous translations for specific source words using the *Search TM* tab. 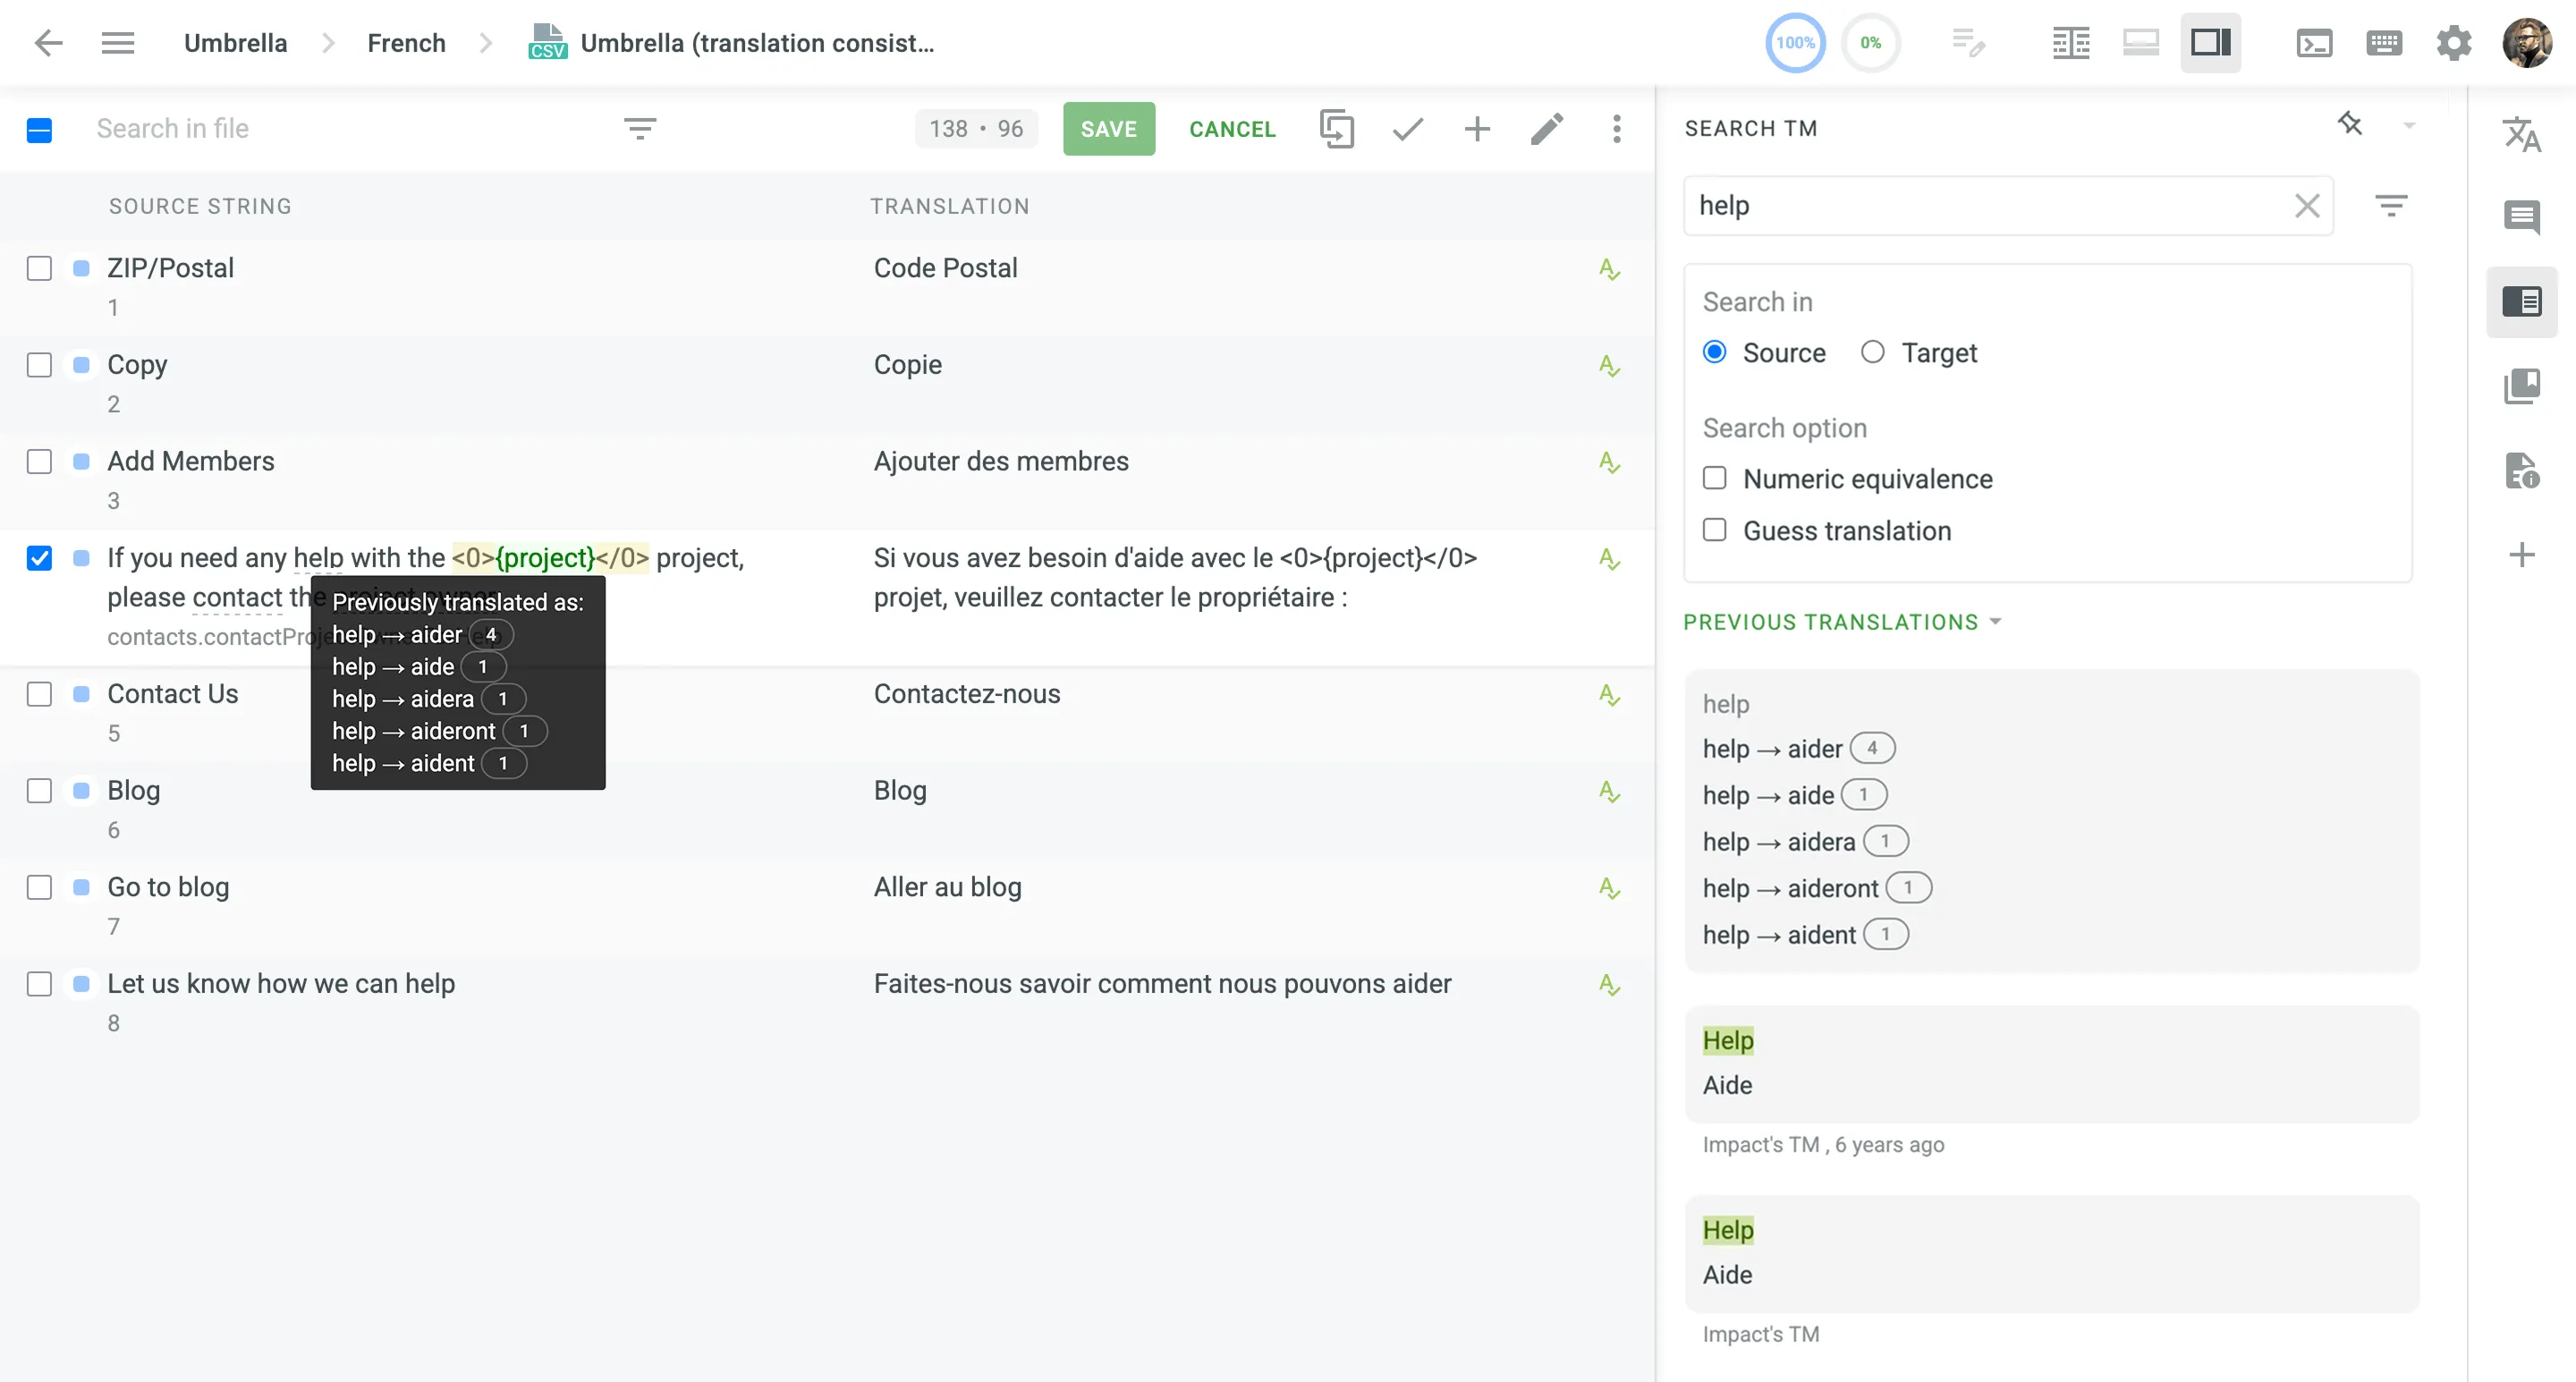 ## [Supported Languages](#supported-languages) [Section titled “Supported Languages”](#supported-languages) Currently, translation consistency is available for the following source and target languages: **Source languages** * English * English, United States * English, United Kingdom **Target Languages** * Czech * Danish * Dutch * Finnish * French * German * Italian * Norwegian * Norwegian Bokmal * Polish * Portuguese * Romanian * Russian * Spanish * Swedish * Ukrainian New languages are added regularly.
# Translation Memory
> Learn how to manage Translation Memories in Crowdin Enterprise
A Translation Memory (TM) is a database that stores translation units, which are segments of source text paired with their corresponding translations in different languages. It improves and speeds up the translation process by providing suggestions for identical or similar strings in your projects. A project TM is created automatically for each Crowdin Enterprise project. By default, each translation made within the project is automatically added to the project’s TM. This behavior can be customized in the [project settings](/enterprise/project-settings/translation-memories/) to save only approved translations. ## [Creating TM](#creating-tm) [Section titled “Creating TM”](#creating-tm) In addition to the project TMs that are automatically created with each project, you can create separate TMs and populate them with content by uploading your existing TMs in TMX, XLSX, or CSV formats. These TMs can then be assigned to the relevant projects as needed. To create a TM, follow these steps: 1. Open your organization’s **Workspace** and select **Translation memories** on the left sidebar. 2. At the bottom right, click **Create**.  3. In the appeared dialog, name your TM and select a default language that will be displayed first in the table of translation units. 4. *(Optional)* Click **Select files** to upload your existing TM. You can skip this step and upload a TM later. 5. Click **Create**.  [Assigning TM ](/enterprise/project-settings/translation-memories/#assigning-tm) [Prioritizing TM ](/enterprise/project-settings/translation-memories/#prioritizing-tm) [Changing Default TM ](/enterprise/project-settings/translation-memories/#changing-default-tm) ## [Managing Translation Units and Segments](#managing-translation-units-and-segments) [Section titled “Managing Translation Units and Segments”](#managing-translation-units-and-segments) You can create translation units from scratch, edit and delete existing translation units or segments of a particular TM or all available TMs. [Translation Memory Generator ](https://store.crowdin.com/tmg)Use this app to create a TM based on the translated Crowdin Enterprise project. ### [Creating Translation Units](#creating-translation-units) [Section titled “Creating Translation Units”](#creating-translation-units) To create a translation unit, follow these steps: 1. Open your organization’s **Workspace** and select **Translation memories** on the left sidebar. Alternatively, open your project and go to **Settings > Translation memories**. 2. Select the needed TM and click **View Records**. 3. Click **Add Translation Unit**. 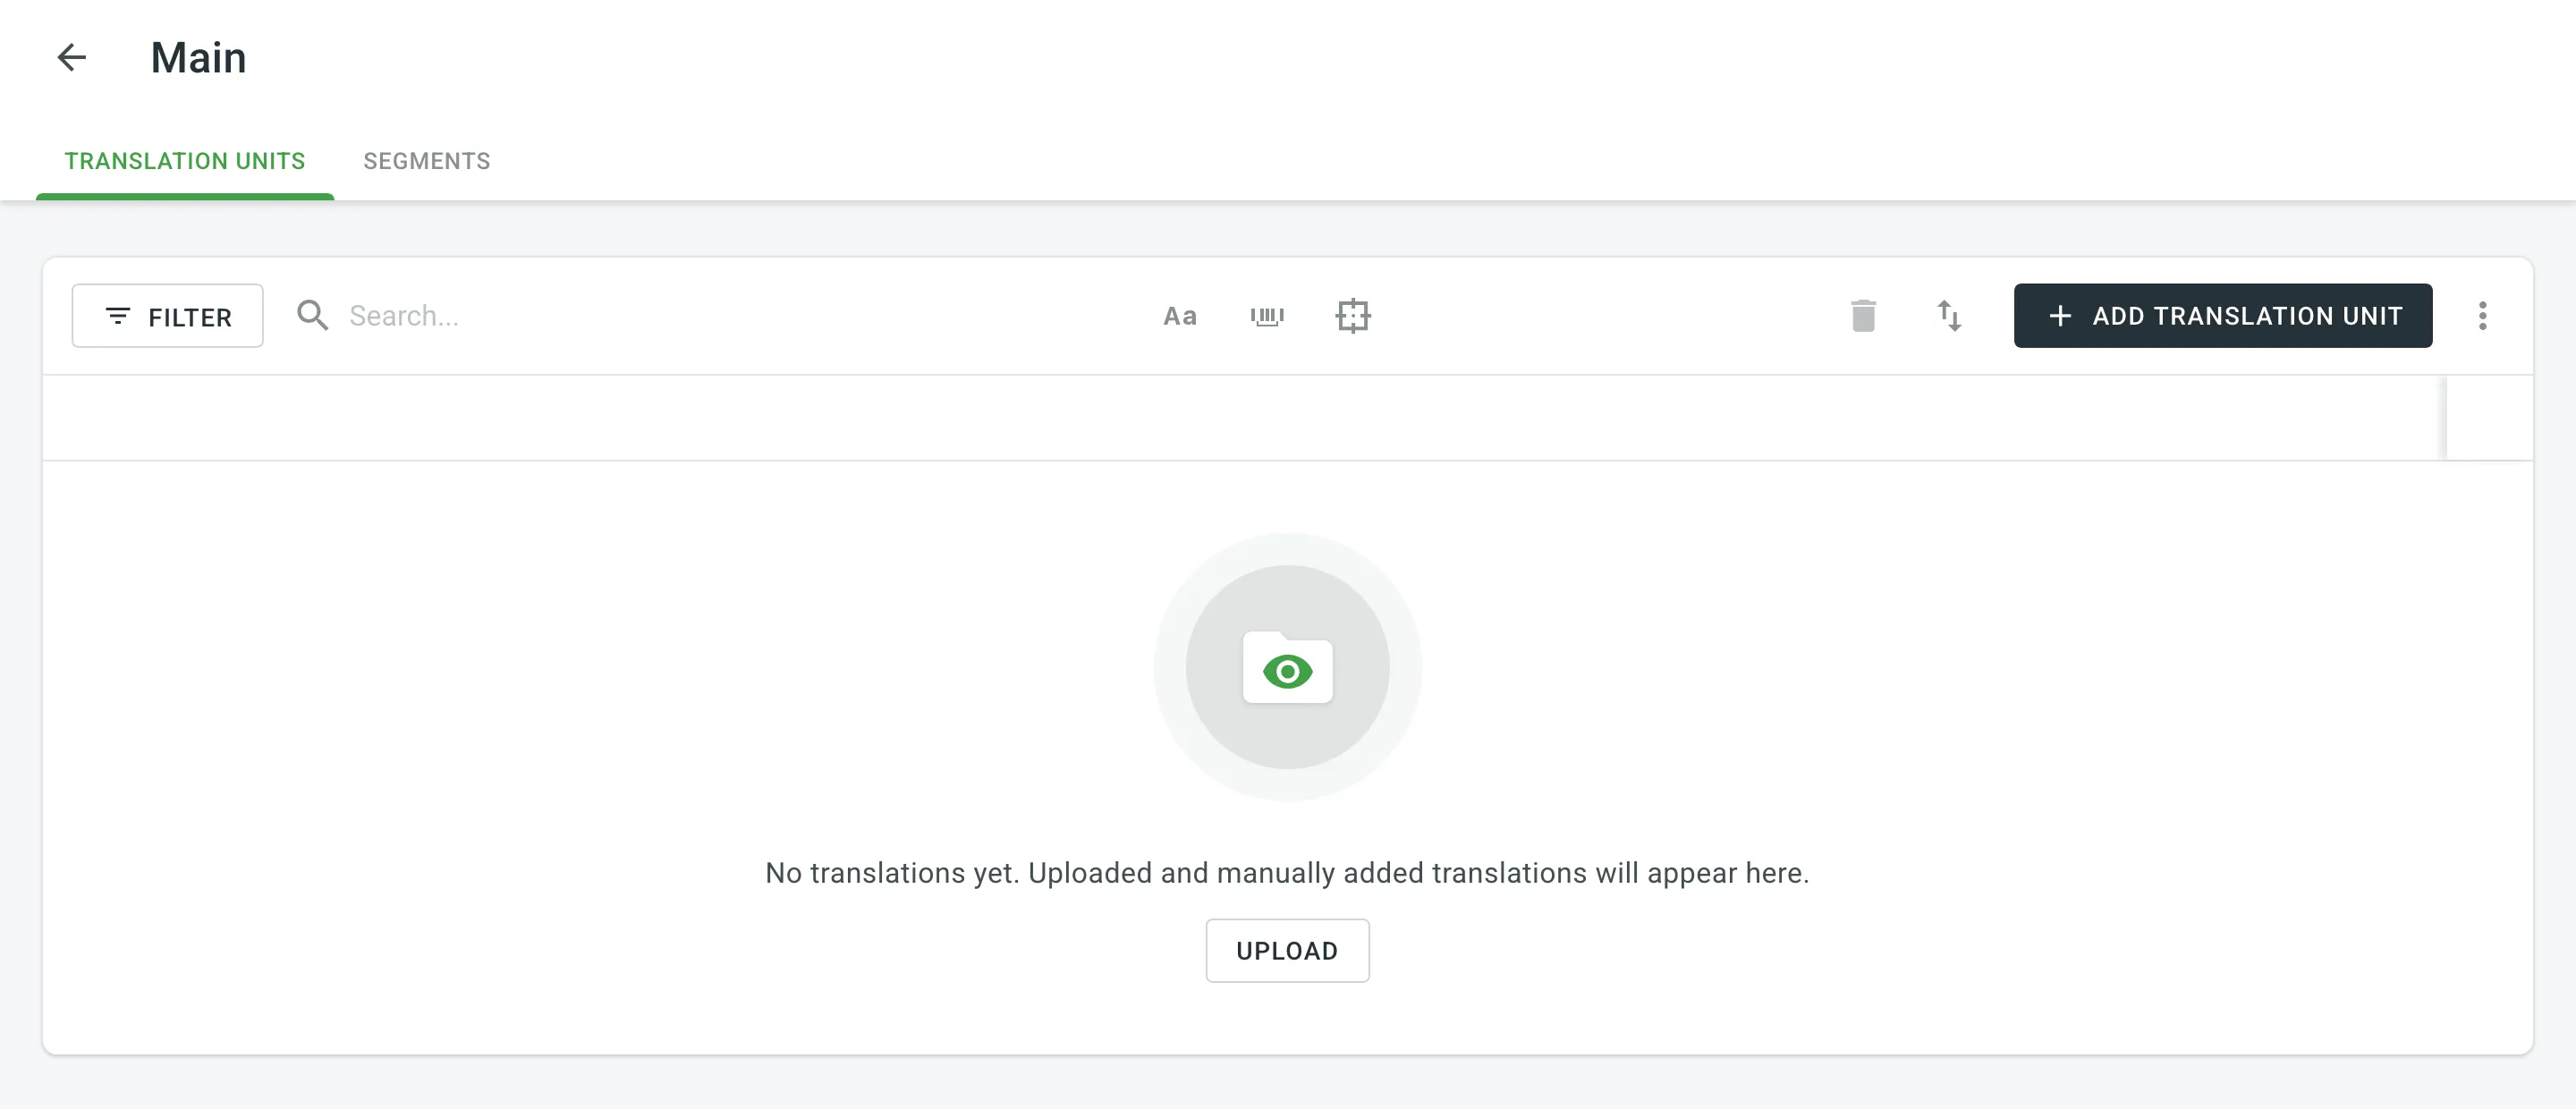 4. In the appeared dialog, select the language from the drop-down menu and type the translation of the segment. 5. Click **Add segment** to add more translations for the translation unit. 6. Click **Save**. 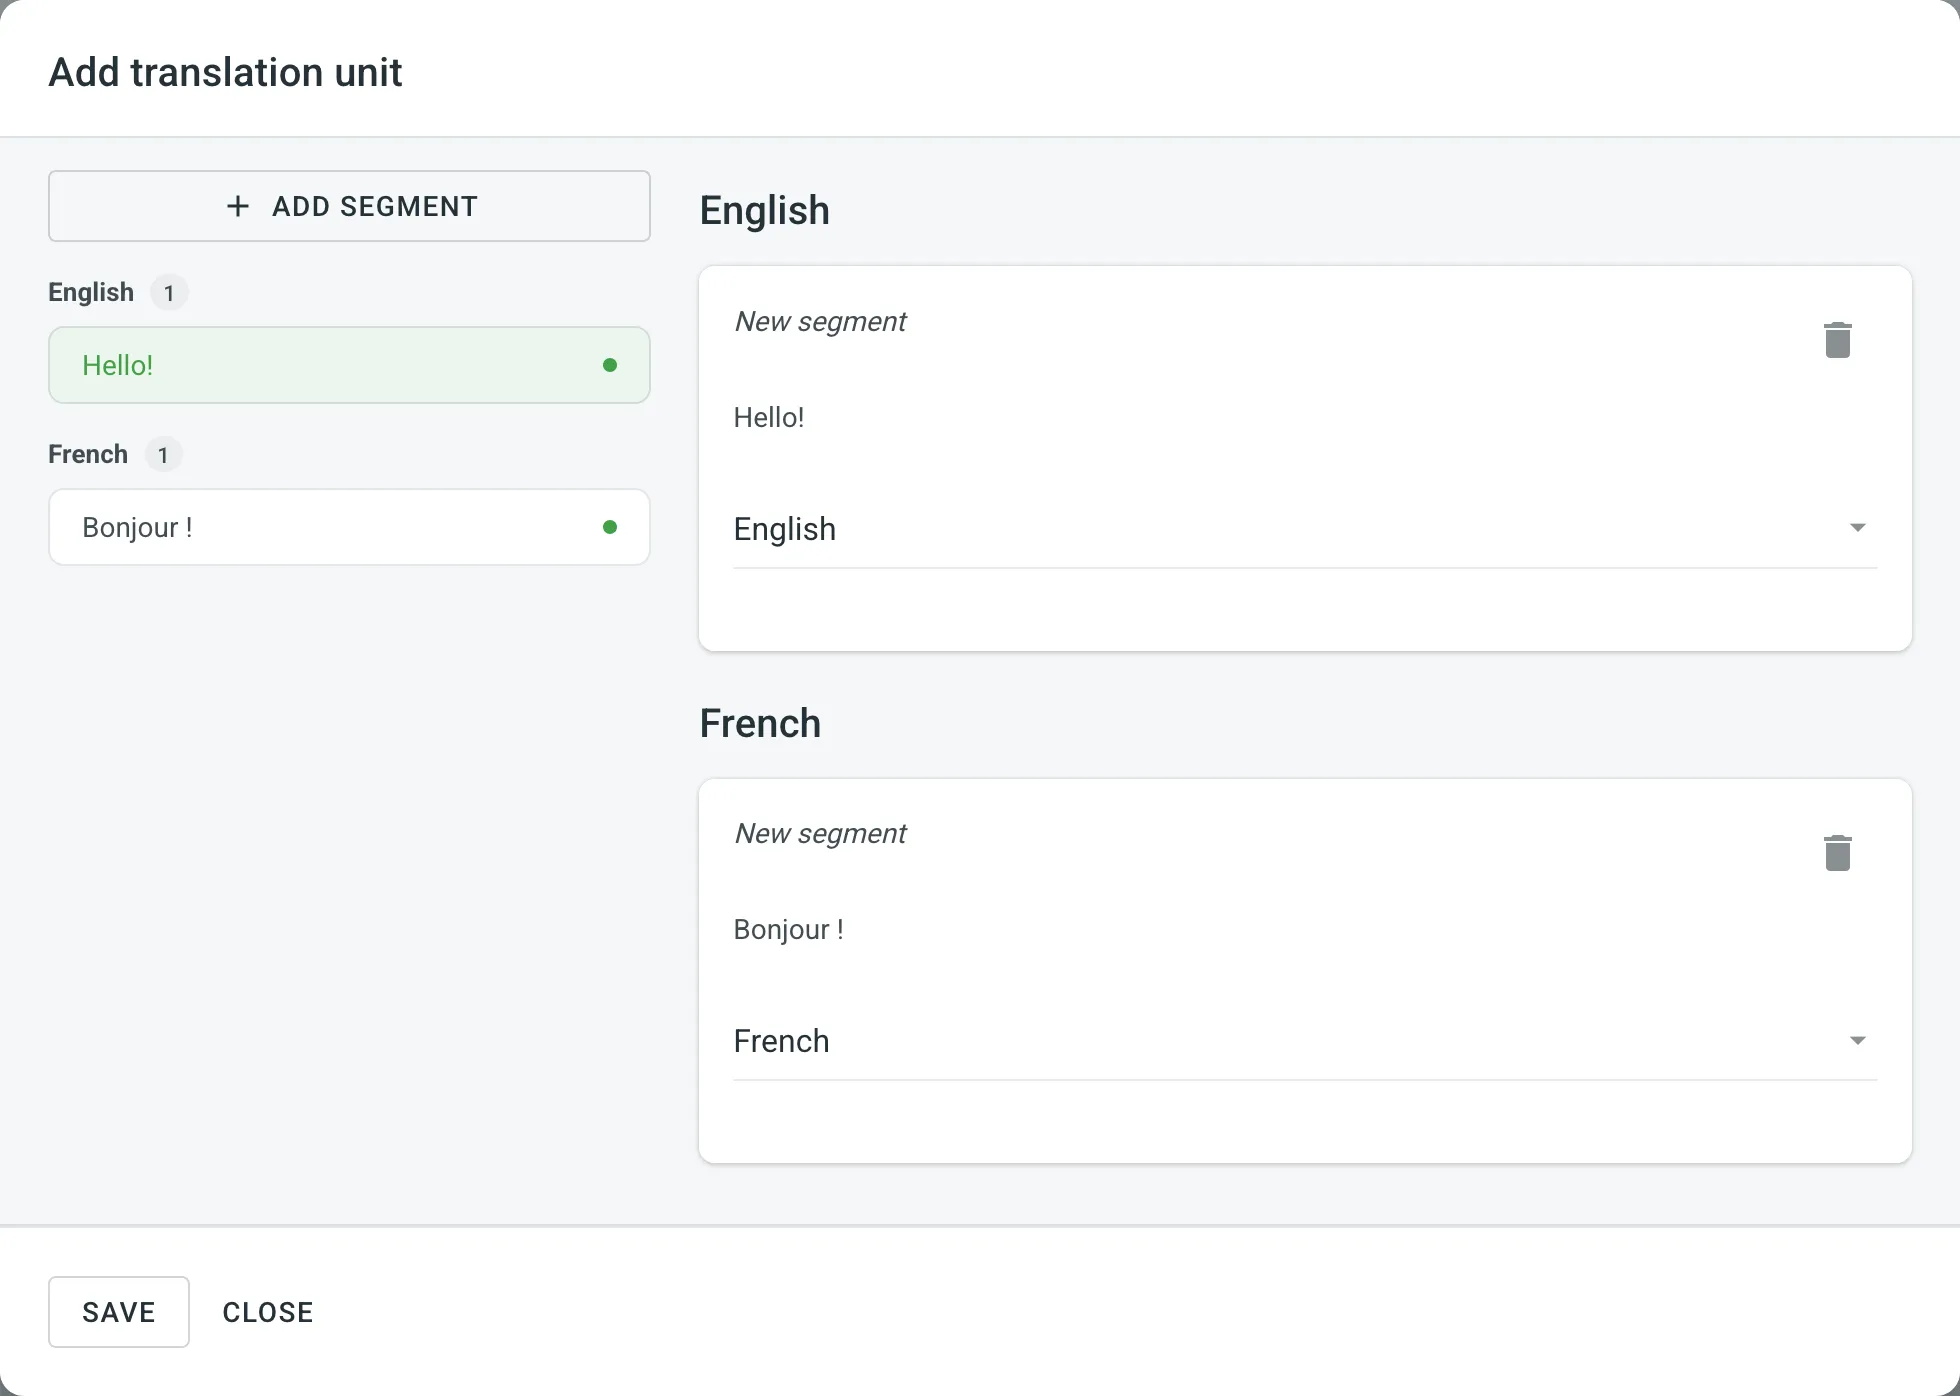 ### [Viewing and Filtering Translation Units and Segments](#viewing-and-filtering-translation-units-and-segments) [Section titled “Viewing and Filtering Translation Units and Segments”](#viewing-and-filtering-translation-units-and-segments) Once you open a translation memory, you can view and filter its translation units and segments using either the Translation Units or Segments pages. On the Translation Units page, you can view TM content grouped as translation units (one translation unit per row, each segment displayed in a separate language column). 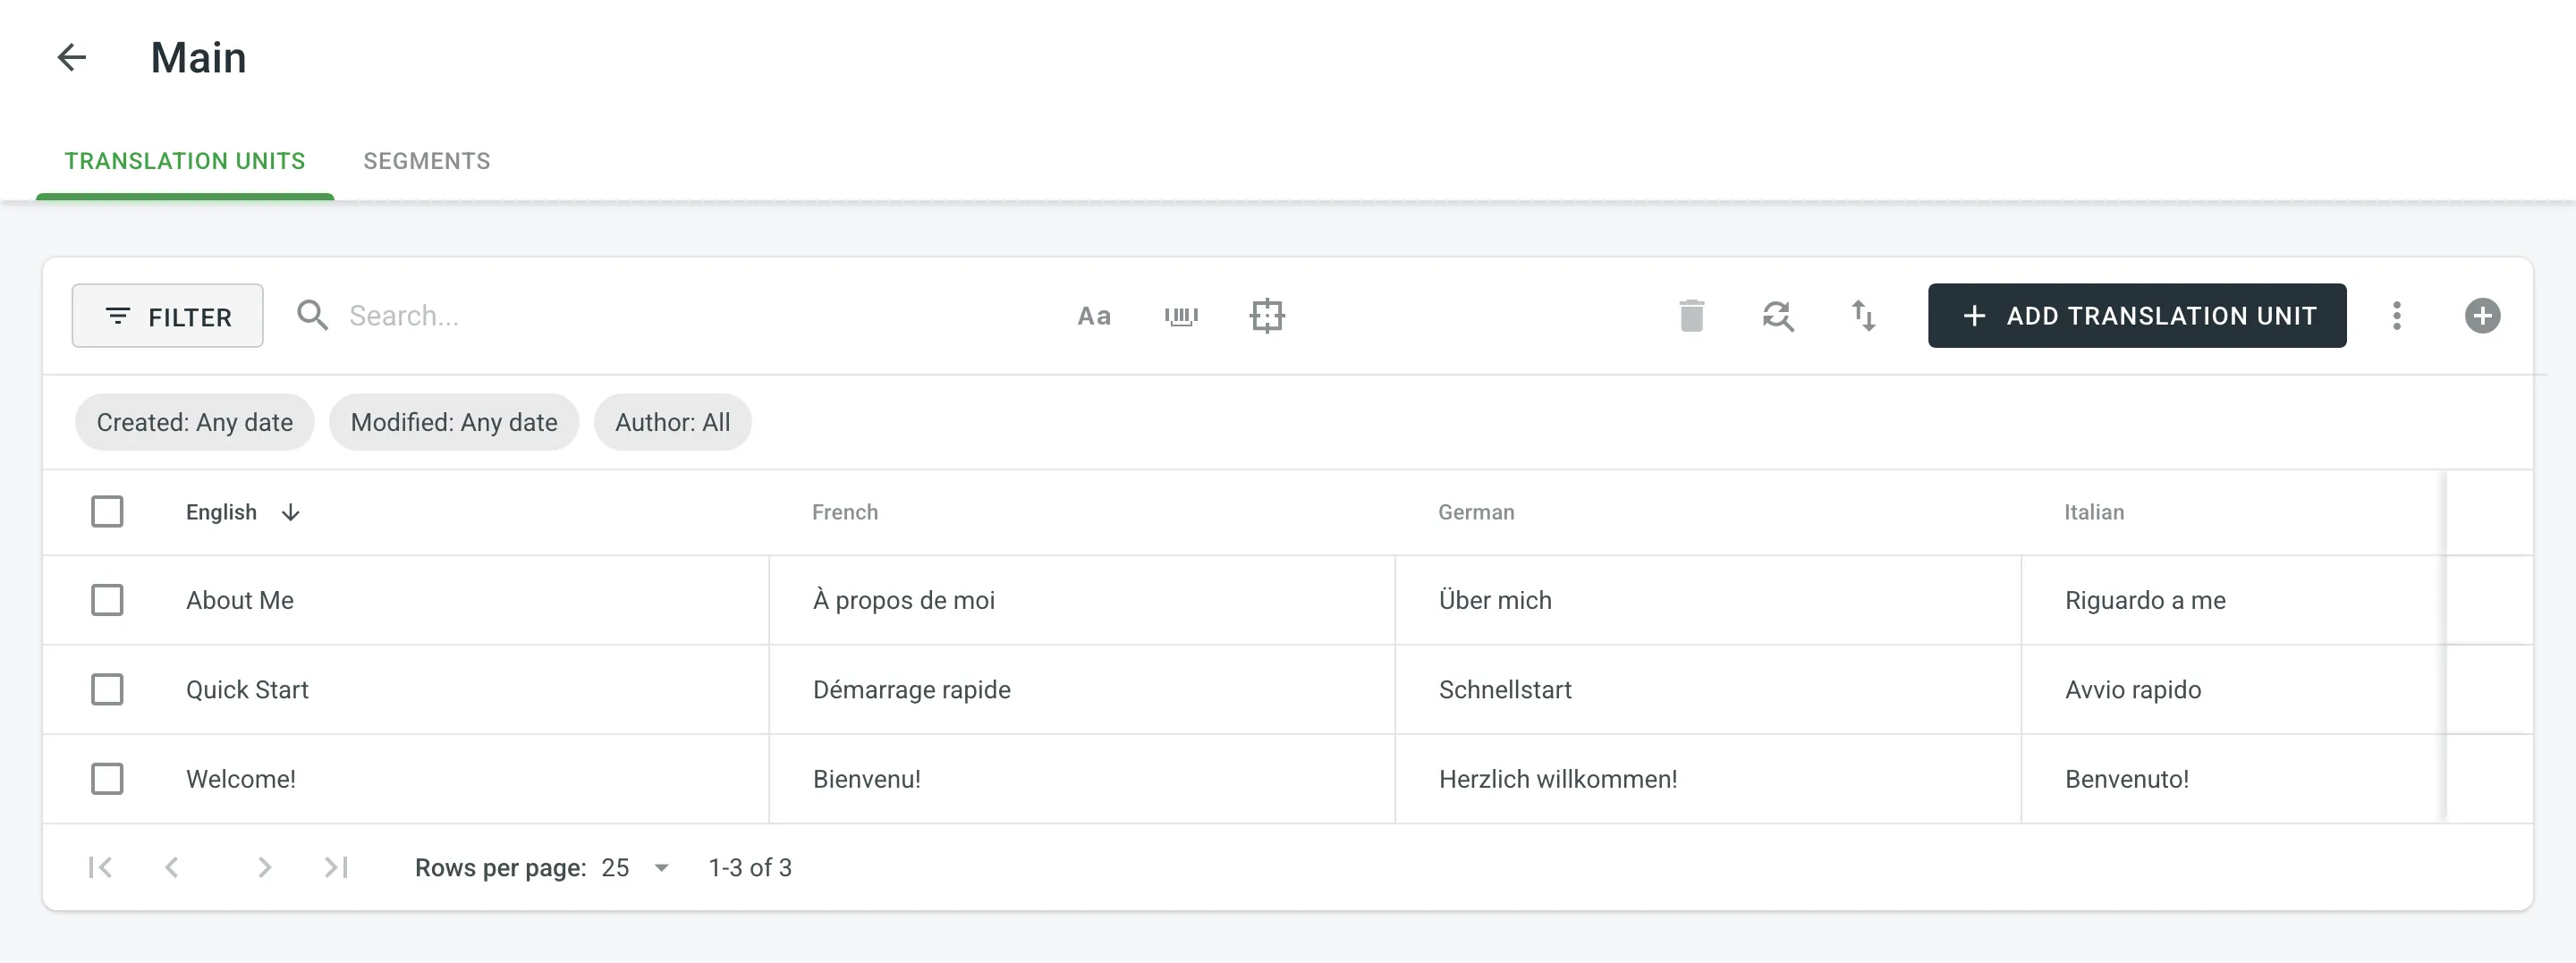 On the Segments page, you can view TM content as individual segments (one segment per row) with the following details: * Segment – contains either source or target language text. * Language – specifies the language of the segment. * Usage count – specifies the number of times a segment has been used. * Created – specifies the date of the segment creation. * Last modified – specifies the date of the last modification of the segment. * Author – specifies the user who created the segment. 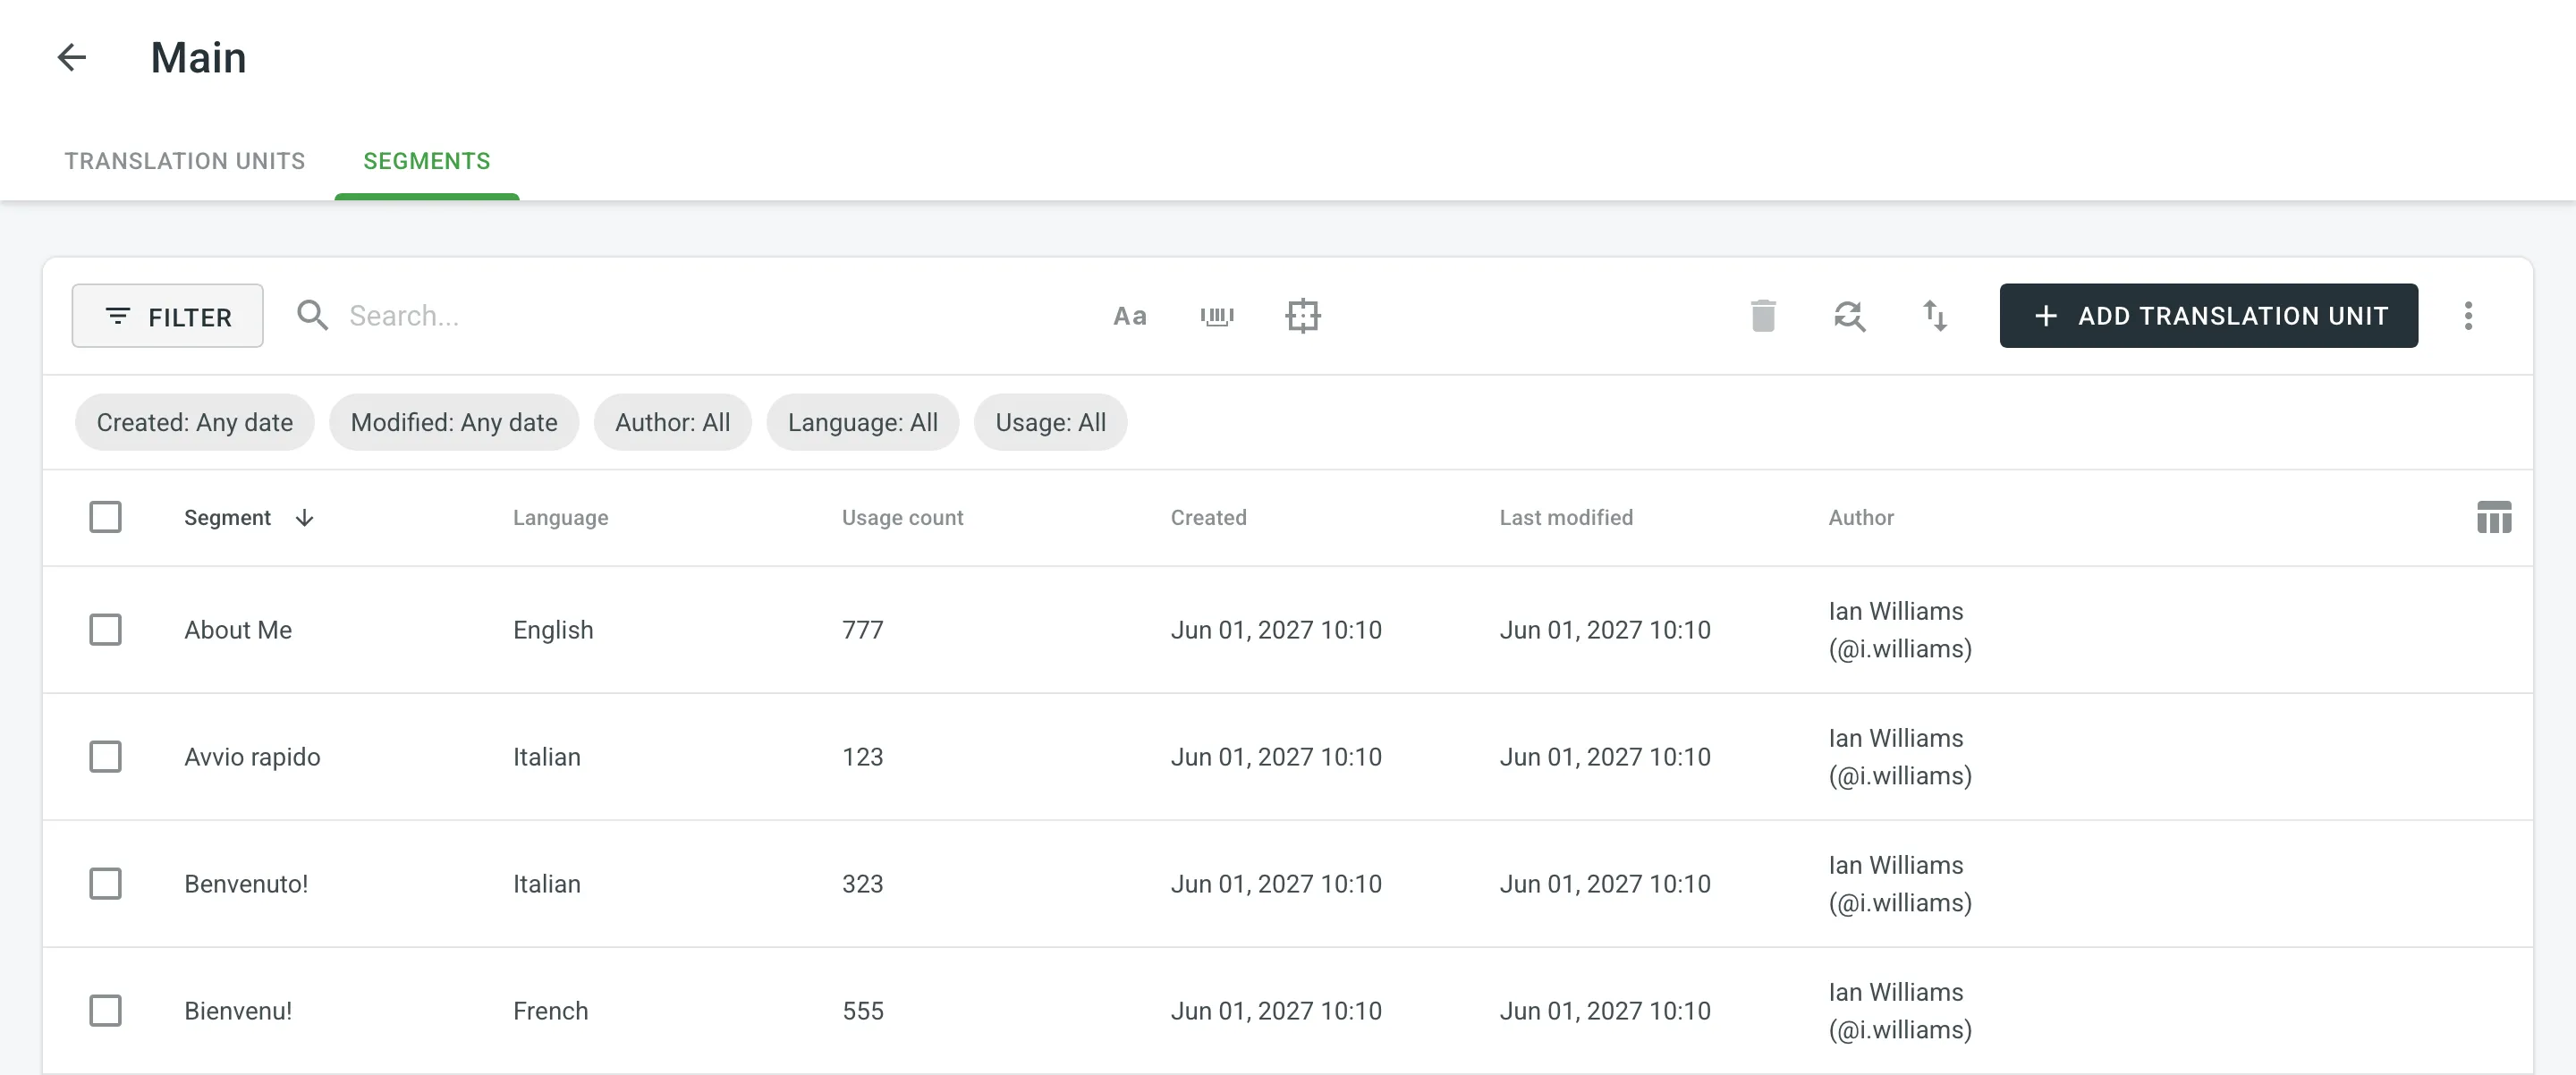 By default, all translation units and segments are displayed in the Translation Units and Segments pages. To filter the translation units or segments displayed, click and use the available filter options: * Created: All, Custom Range. * Modified: All, Custom Range. * Author: All, particular user. * Languages (Specific to the Segments page): All, particular language. * Usage (Specific to the Segments page): All, Used, Unused. To sort translation units or segments, click the column header you want to sort by: * Translation Units page – click a language column (e.g., English, French, etc.) to sort the translation units by that language’s text. * Segments page – click the Segment column to sort by segment text. Click once to sort in ascending order and click again to sort in descending order. ### [Editing Translation Units](#editing-translation-units) [Section titled “Editing Translation Units”](#editing-translation-units) You can edit both the source and translation parts of the existing translation unit. To edit a translation unit, follow these steps: 1. Open your organization’s **Workspace** and select **Translation memories** on the left sidebar. Alternatively, open your project and go to **Settings > Translation memories**. 2. Click on the needed TM. Alternatively, click **All Records** to view translation units of all available TMs in one list. 3. Hover over a translation unit and click to open it. 4. In the appeared dialog, edit or delete the segments of the needed languages. For each segment, you can see additional details like the language, creation date, update date, and, if available, the name of the contributor who originally submitted the translation. 5. Click **Save**. 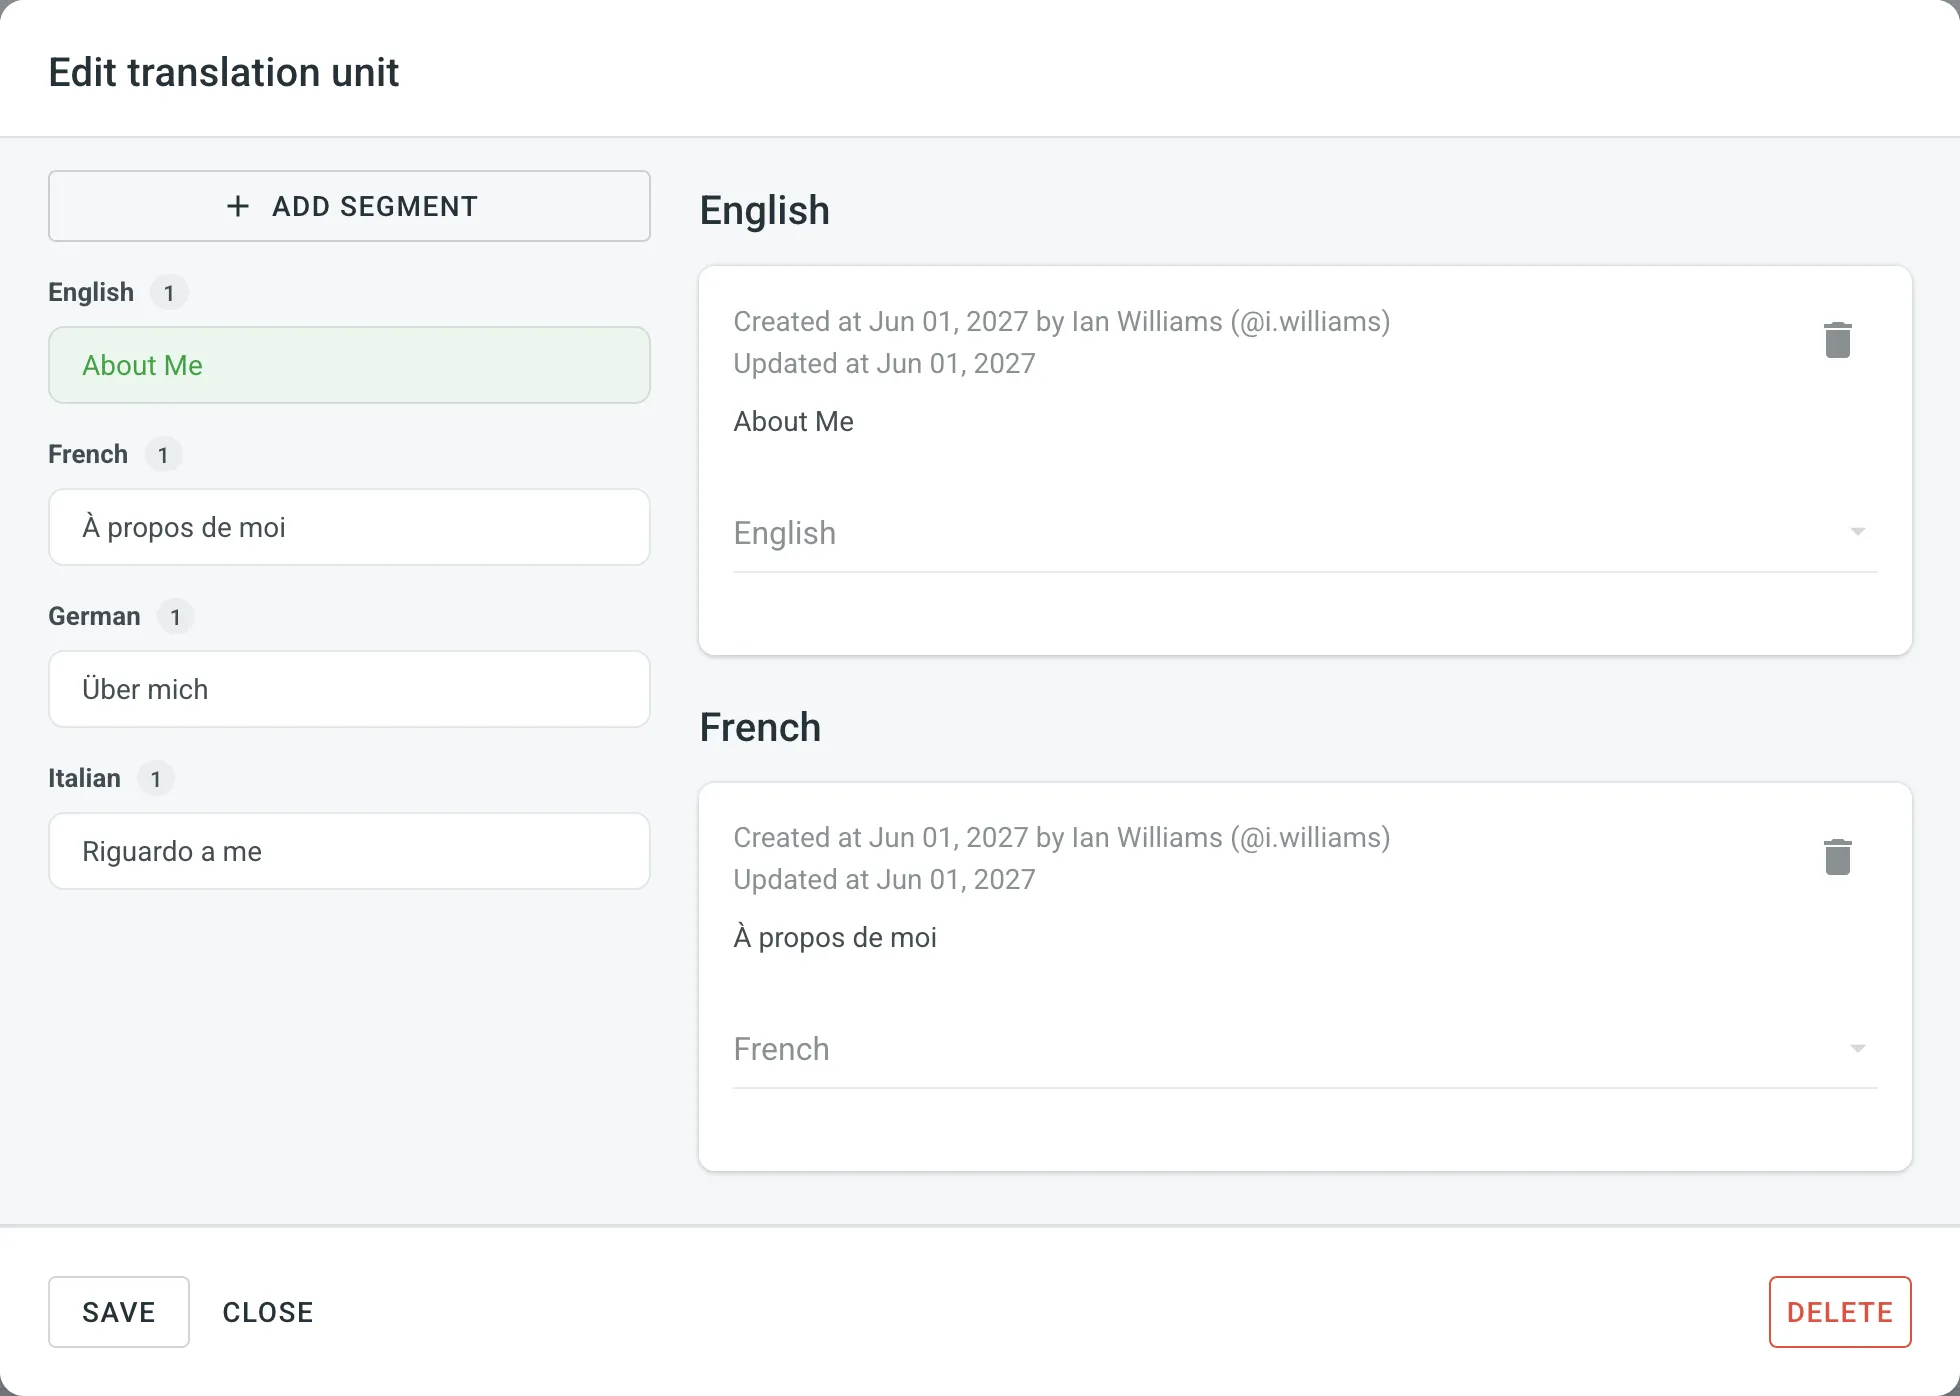 In addition to editing translation units via the **Translation memories** page, you can also do it in the Editor. Read more about [Editing TM Suggestions in the Editor](/enterprise/online-editor/#editing-tm-suggestions-in-the-editor). Another way to edit translation units in your TM is to download it (e.g., in TMX format), make the necessary changes locally on your device, and then reupload the modified TM back to Crowdin. Depending on what you modify in your TM, there could be different outcomes: * If you edit both the source and translation segments of a translation unit, then when you upload the TM to Crowdin, the locally modified translation unit will be treated as new upon re-upload, leaving the original translation unit unchanged. * If you only edit the translation segment of a translation unit, then when you upload the TM to Crowdin, the locally modified translation segment will be added as an alternative version segment to the existing translation unit, keeping the original translation intact but providing another option. If you want to have only the modified version of the translation units, follow these steps: 1. [Download](#downloading-tm-for-offline-management) the complete version of your TM to your device. 2. Make the necessary changes locally on your device. 3. Completely [clear the content of your TM](#deleting-translation-units-and-segments) in Crowdin. 4. [Upload](#downloading-and-uploading-tm) your locally modified TM to Crowdin. ### [Replacing in Segments](#replacing-in-segments) [Section titled “Replacing in Segments”](#replacing-in-segments) You can easily find and replace translations in segments within a selected TM using the *Find & Replace* feature. To replace current translations with the new ones, follow these steps: 1. Open your organization’s **Workspace** and select **Translation memories** on the left sidebar. Alternatively, open your project and go to **Settings > Translation memories**. 2. Click on the needed TM. 3. Click . 4. In the appeared dialog, select the language in which you want to search. *(Optional)* Use filters if necessary. 5. Enter the word, phrase, or sentence you want to substitute and the text to replace it with. *(Optional)* Use the *Match case* and *Exact match* options to refine the search results. 6. Click **Find** to preview the segments that will be replaced. 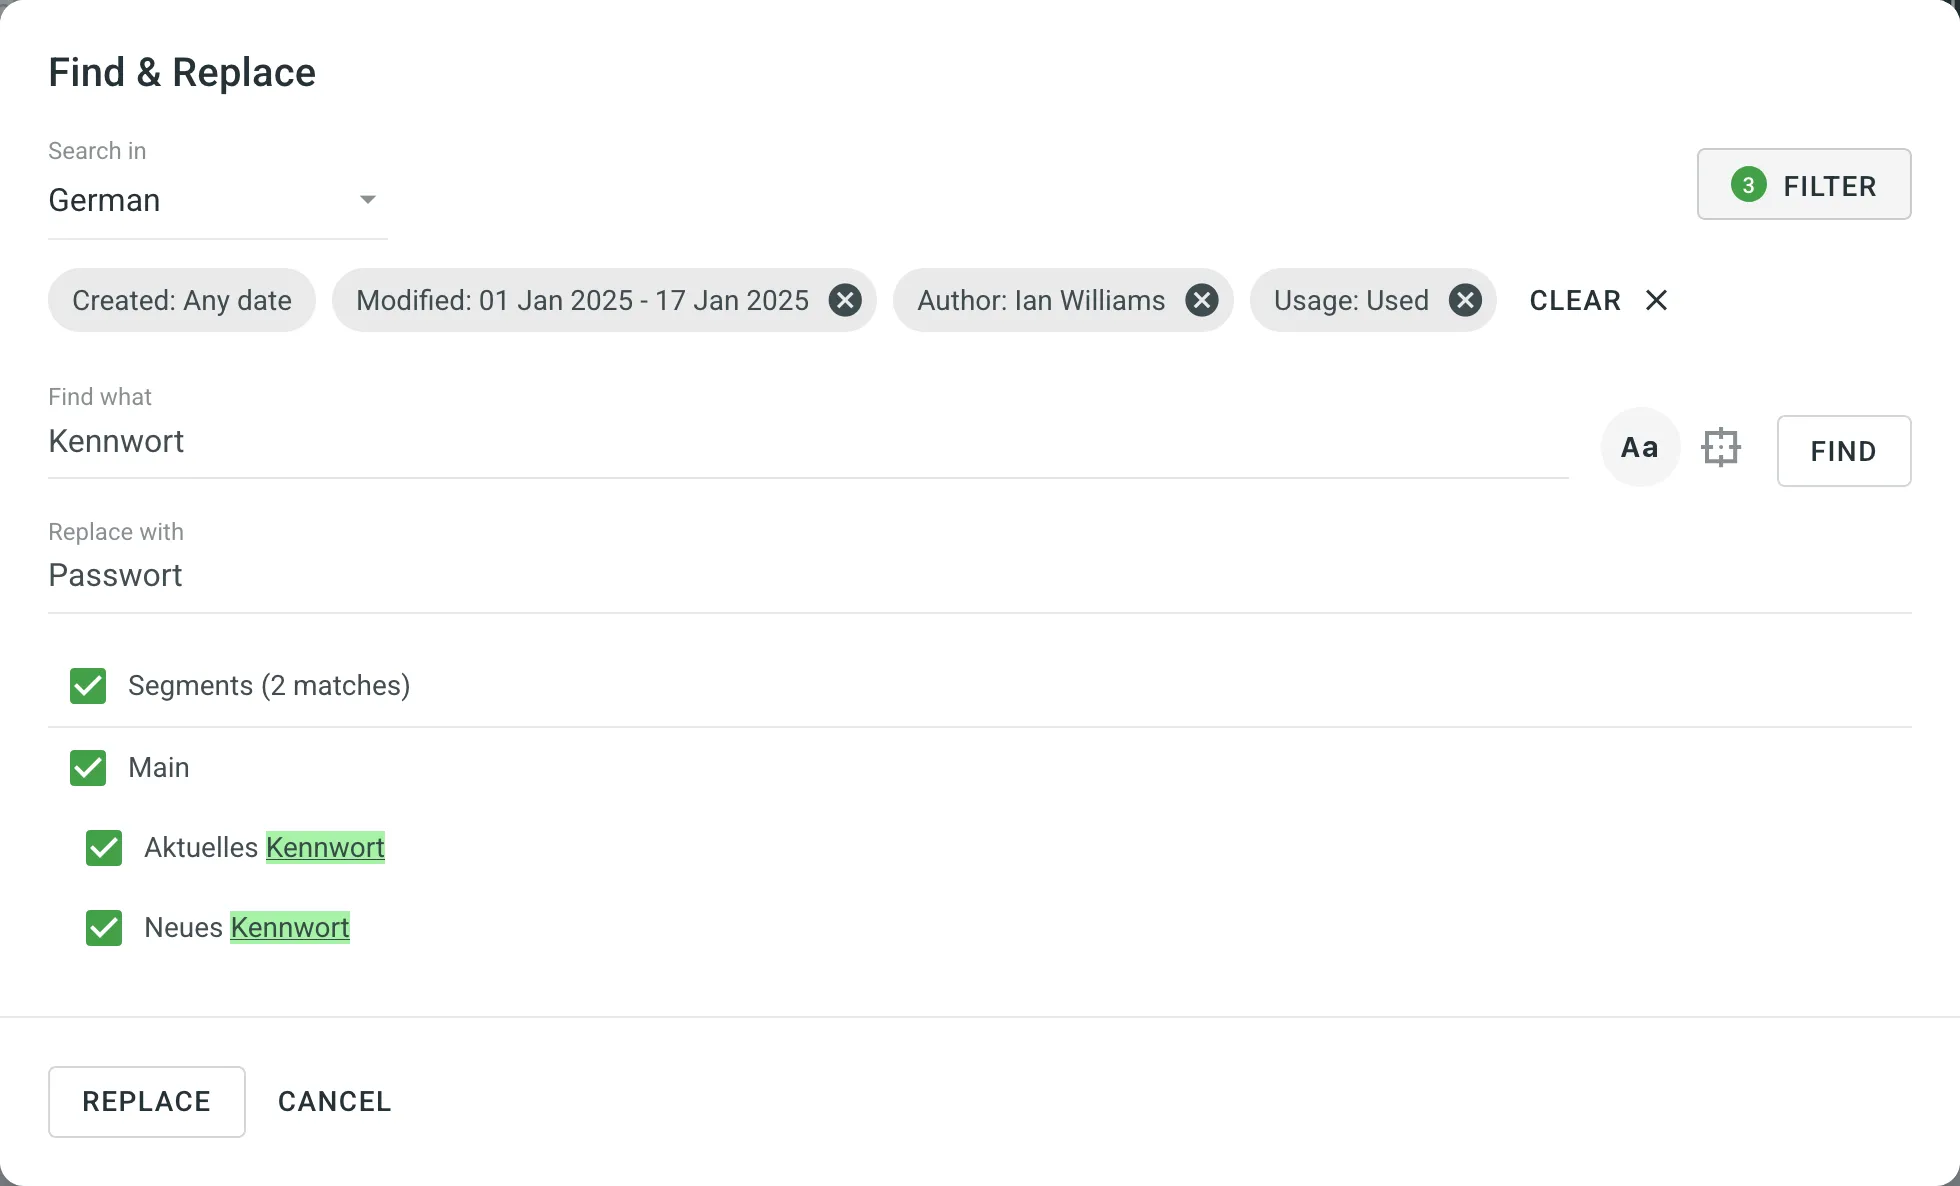 7. Select the segments you want to replace and click **Replace Selected** to finish. ### [Deleting Translation Units and Segments](#deleting-translation-units-and-segments) [Section titled “Deleting Translation Units and Segments”](#deleting-translation-units-and-segments) You can delete one, multiple, or all the translation units or segments at once. To delete all the translation units from TM, follow these steps: 1. On the Translation Units page, select the top checkbox above the translation unit list. 2. Confirm the selection of all translation units. 3. Click . 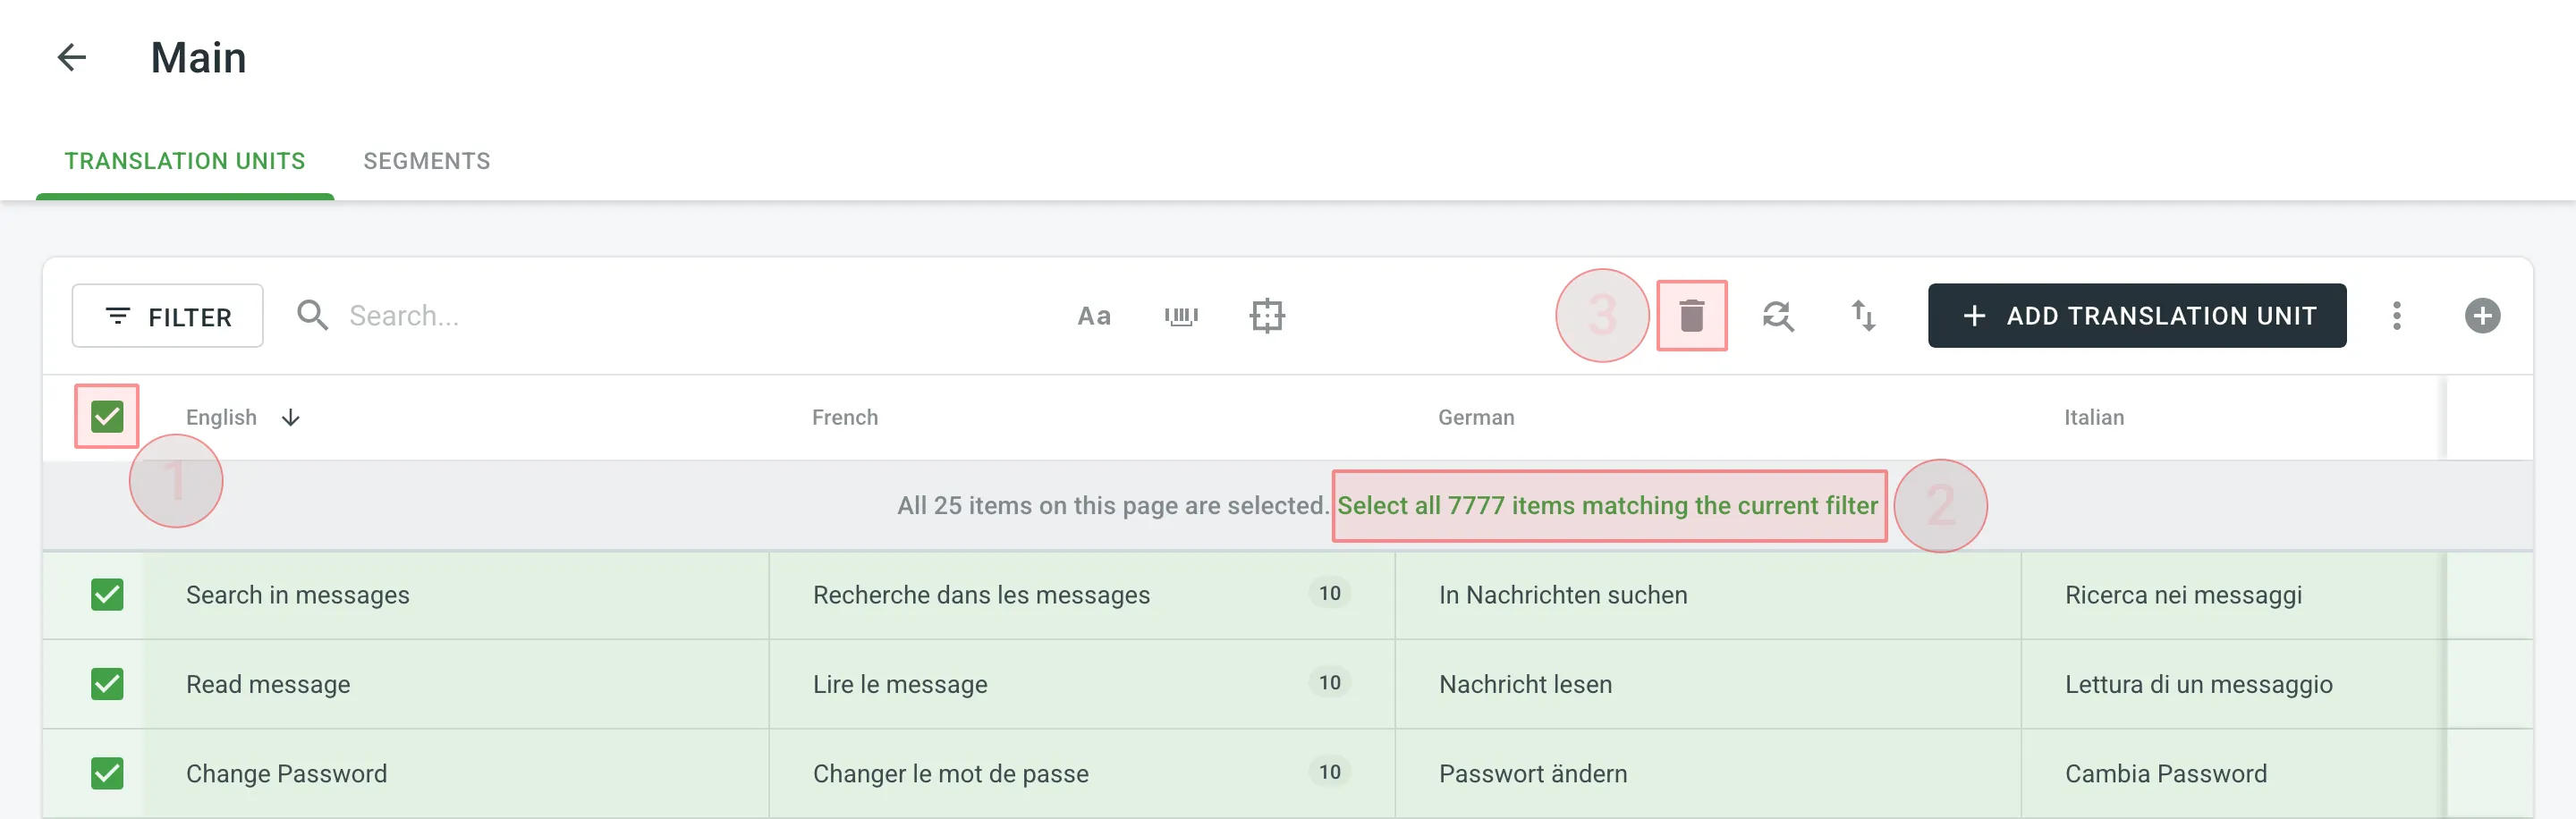 To delete all the segments from TM for only one particular language, follow these steps: 1. On the Segments page, click and select the needed language. 2. Select the top checkbox above the segment list. 3. Confirm the selection of all segments. 4. Click . 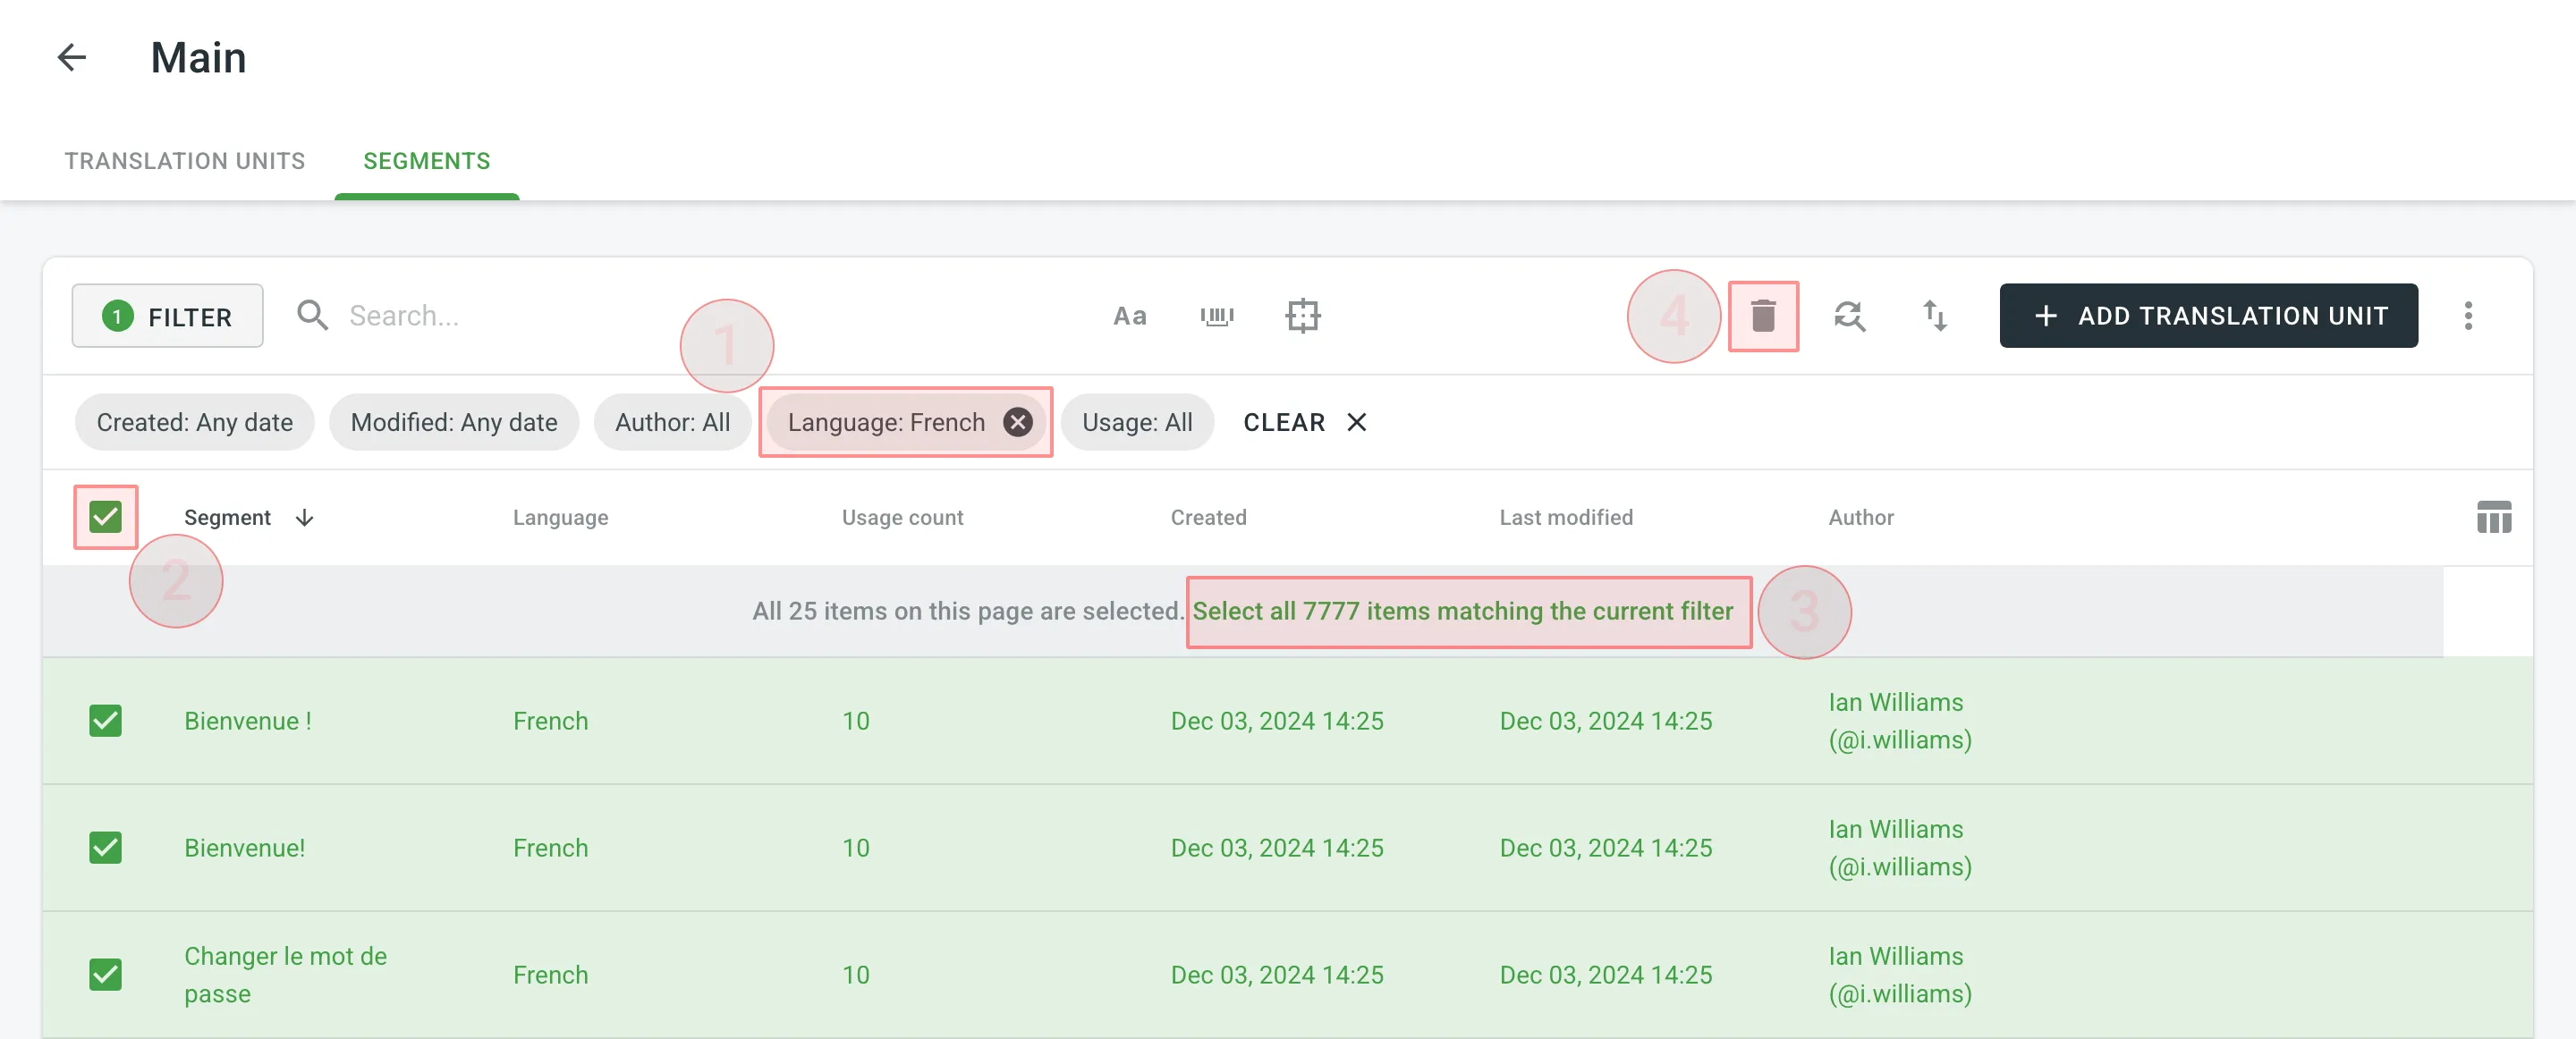 When dealing with the removal of translation units and translations, there could be three possible outcomes: * When deleting a translation unit from TM, the related translation won’t be deleted for a string in your Crowdin Enterprise project. * When you cancel the translation activity for a string on the **Activity** page, the translation for a string will be deleted, but the related translation unit will be preserved in TM. * When deleting a translation for a string in the Editor, both the translation and the related translation unit will be deleted. [TM Cleaner App ](https://store.crowdin.com/tm_cleaner_app)Use this app to clean your TM from duplicates and outdated translation units. ## [Downloading and Uploading TM](#downloading-and-uploading-tm) [Section titled “Downloading and Uploading TM”](#downloading-and-uploading-tm) To download or upload TMs, follow these steps: 1. Open your organization’s **Workspace** and select **Translation memories** on the left sidebar. Alternatively, open your project and go to **Settings > Translation memories**. 2. Click on the needed TM. 3. Click and select **Download** or **Upload**.  The owner, admins and managers can download and upload TM in the following file formats: TMX, XLSX, or CSV. Limitations The maximum file size is 2 GB for TMX and 200 MB for XLSX and CSV. If your file exceeds these limits, it is recommended to split it into several smaller files, and upload them one at a time. If you upload a TM in CSV or XLS/XLSX file formats, match columns with the corresponding languages in the configuration dialog. 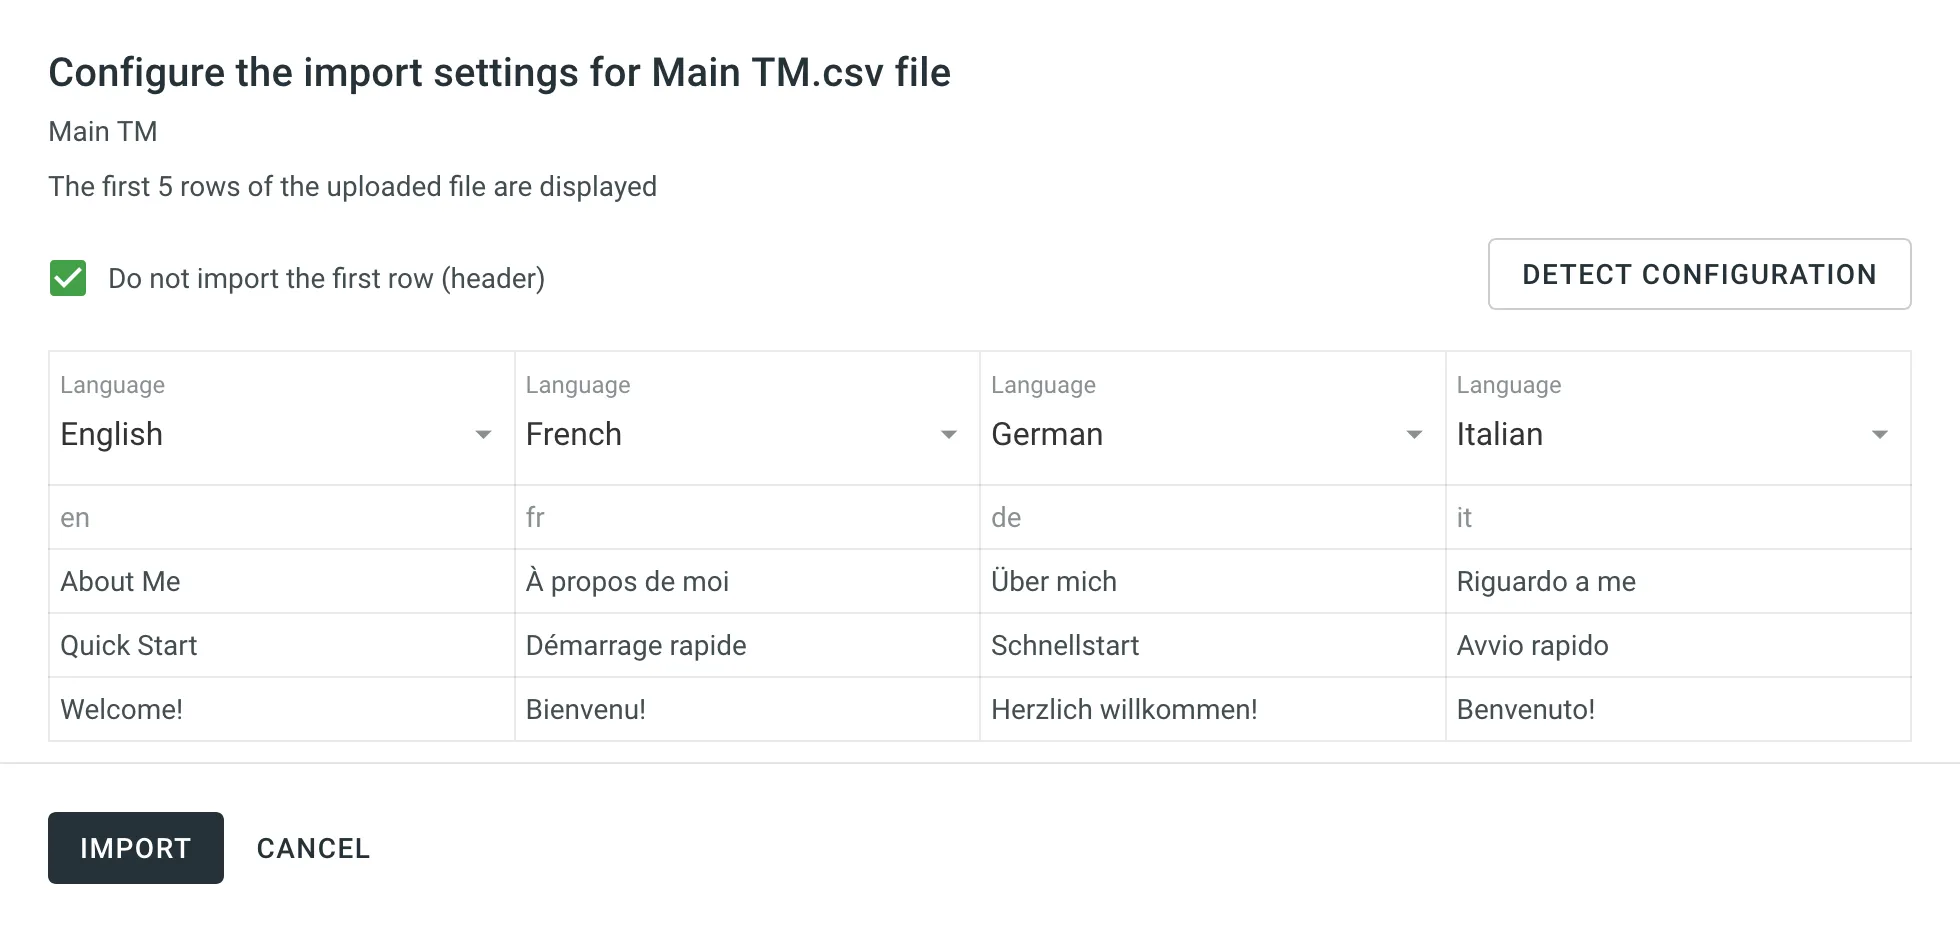 ### [Automatic Column Identification for TM in CSV and XLSX File Formats](#automatic-column-identification-for-tm-in-csv-and-xlsx-file-formats) [Section titled “Automatic Column Identification for TM in CSV and XLSX File Formats”](#automatic-column-identification-for-tm-in-csv-and-xlsx-file-formats) Once you upload your TM file in CSV or XLSX formats, the system automatically detects the file scheme based on the column names specified in the first row. The identification is performed in a case-insensitive manner. Columns that weren’t detected automatically will be left as **Not chosen** for manual configuration. Automatic column identification is especially helpful when you upload TM spreadsheets that contain many languages. To get the most out of the automatic column detection, we recommend that you name the language columns in your CSV or XLSX TM files using the values displayed below: * [Language name](/developer/language-codes/) (e.g., Ukrainian) * [Crowdin language code](/developer/language-codes/) (e.g., uk) * Locale (e.g., uk-UA) * Locale with underscore (e.g., uk\_UA) * Language code ISO 639-1 (e.g., uk) * Language code ISO 639-2/T (e.g., ukr) To redetect the TM file scheme, click **Detect Configuration**. ### [Downloading TM for Offline Management](#downloading-tm-for-offline-management) [Section titled “Downloading TM for Offline Management”](#downloading-tm-for-offline-management) When downloading a TM from Crowdin Enterprise in TMX format, you can get some additional metadata that might be useful for different usage scenarios with offline tools. Additional TM attributes provided by translation memory downloaded in TMX format: * `x-crowdin-metadata` – String identifier hash. * `creationid` – Translation author’s full name and username in Crowdin Enterprise. * `creationdate` – Translation creation date. * `changeid` – Full name and username of the person who updated a translation. * `changedate` – Translation update date. * `usagecount` – Translation suggestion’s number of usages in Crowdin Enterprise. * `lastusagedate` – The last date a translation suggestion was used in Crowdin Enterprise. Often translation vendors that work in Crowdin Enterprise export TMs from projects to manage them for their clients in various desktop applications (e.g., for cleaning TMs from irrelevant translations and further reimport back to Crowdin Enterprise). The TM attributes listed above allow better navigation and filtering of TM segments based on different criteria. Also, you might use cleaned and refreshed TMs to train MT engines only on product-specific data to ensure a higher quality of translations as a result. ## [Sharing TMs](#sharing-tms) [Section titled “Sharing TMs”](#sharing-tms) Using the shared TMs, you can pre-translate any of the projects in your organization. Also, TM suggestions from all TMs will appear in the Editor. To share TMs between all of the projects in your organization, follow these steps: 1. Open your organization’s **Workspace** and select **Translation memories** on the left sidebar. 2. Select **Share Translation Memories**. 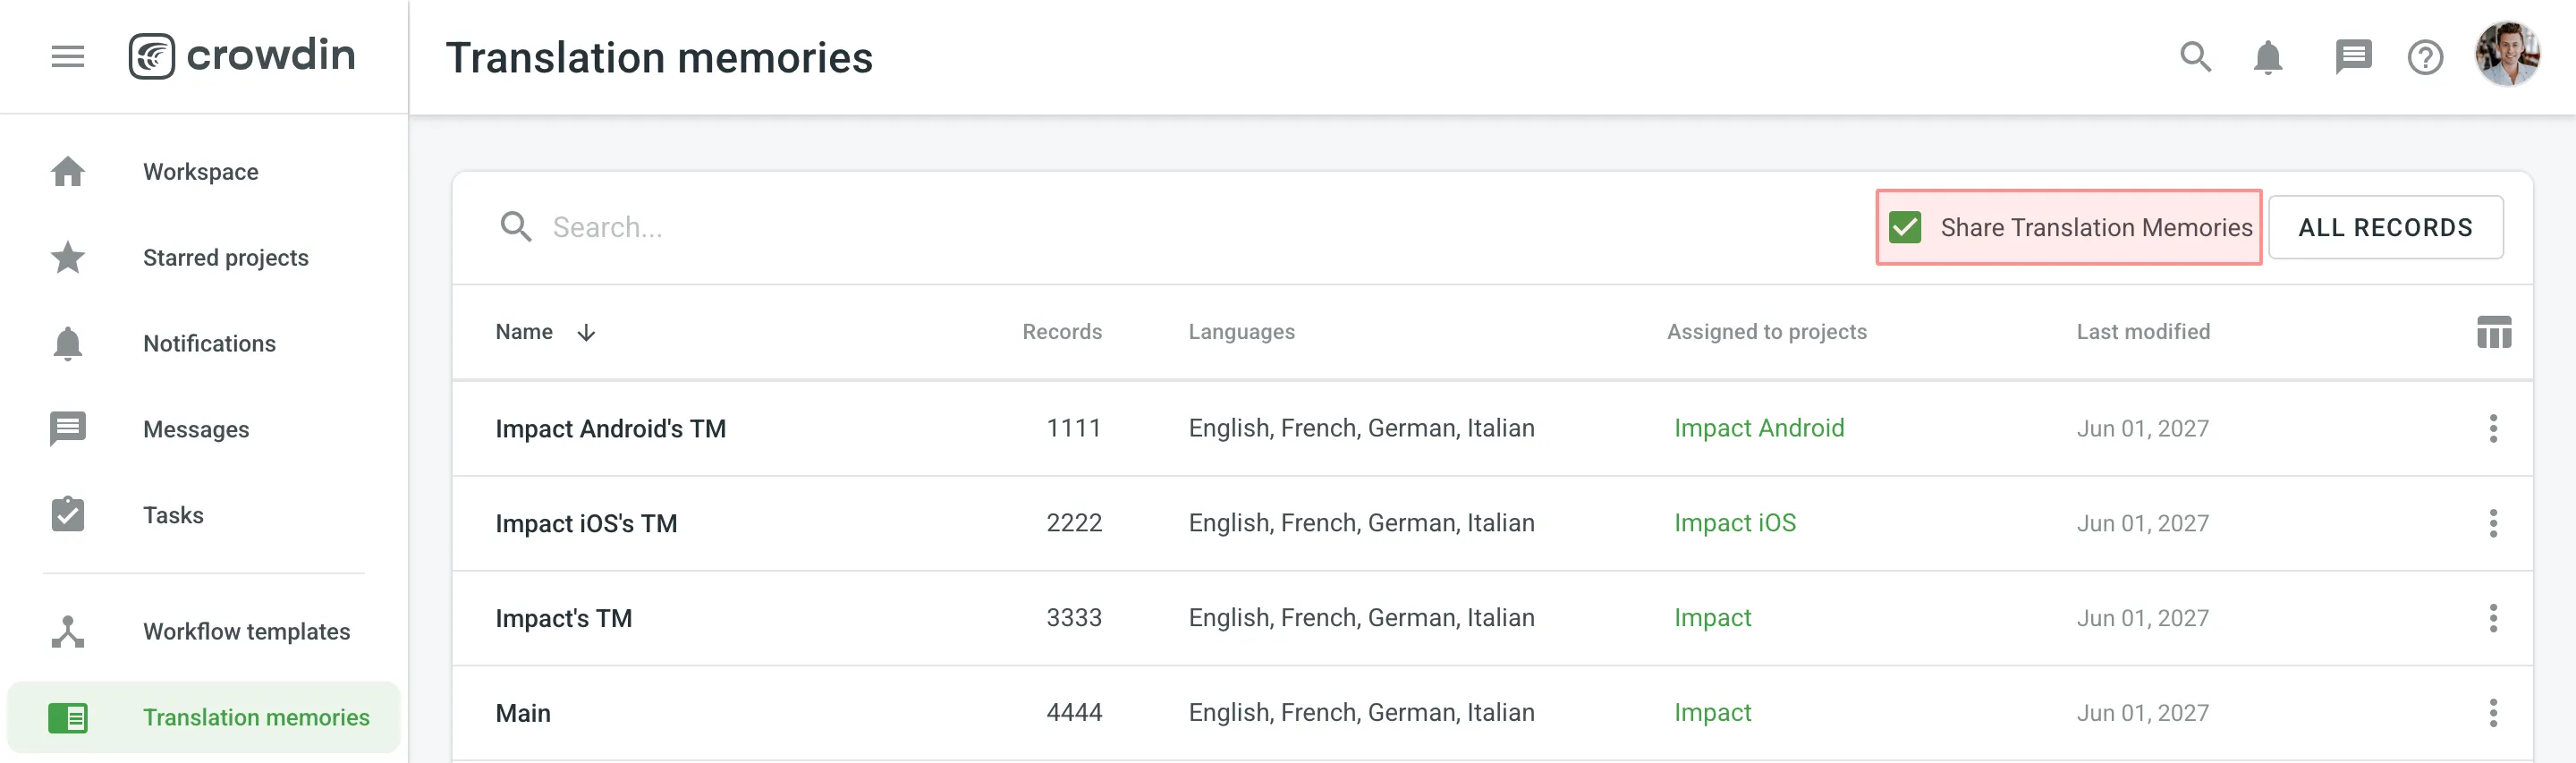 ## [Applying Translation Memory via Pre-translation](#applying-translation-memory-via-pre-translation) [Section titled “Applying Translation Memory via Pre-translation”](#applying-translation-memory-via-pre-translation) Pre-translation via TM allows you to leverage a configurable (40% to 100% match ratio) and Perfect matches. [TM Match Calculation ](#tm-match-calculation) [Pre-translation ](/enterprise/pre-translation/) ### [Prioritizing TM Suggestions during the Pre-translation via TM](#prioritizing-tm-suggestions-during-the-pre-translation-via-tm) [Section titled “Prioritizing TM Suggestions during the Pre-translation via TM”](#prioritizing-tm-suggestions-during-the-pre-translation-via-tm) During the pre-translation via TM, the system considers multiple parameters to select the most relevant TM suggestion. If the system finds only one suitable TM suggestion for a string, it will be applied during the pre-translation via TM. If the system finds two or more TM suggestions for one string, they will be sorted based on multiple parameters and applies the most suitable one. The following parameters are listed in the order the system uses them to decide which TM suggestion works better. If the decision can’t be made using the first parameter (i.e., two TM suggestions with 100% match), the system will use the next parameter until the decision is made. 1. Relevance – also known as TM match. Read more about [TM Match Calculation](#tm-match-calculation). 2. Auto-Substitution usage – verifying whether the TM suggestion was improved by the auto-substitution. Read more about [Auto-substitution](#tm-auto-substitution). 3. Assigned TM Priority – the priority of the TM a TM suggestion is stored in. Read more about [Prioritizing TM](/enterprise/project-settings/translation-memories/#prioritizing-tm). 4. Primary or dialect language – the primary or dialect language usage in TM suggestion’s source text (e.g., a TM suggestion from English will have a higher priority than English, Canada). 5. TM suggestion creation date – the date a TM suggestion was created (a TM suggestion with a more recent creation date will have a higher priority). To better understand how TM suggestions are prioritized during the pre-translation via TM, let’s go through a few hypothetical scenarios. Let’s imagine you have an untranslated string in your project with the following source text `Welcome!`. Once you run the pre-translation via TM, the system starts to search for TM suggestions in your TMs. * The system finds two TM suggestions with the source text `Welcome` and `Welcome!`. The translation from the `Welcome!` TM suggestion will be used since it has a higher TM match. * The system finds two TM suggestions: `Welcome!` and `Welcome!`. Both have the same source text, so the system checks whether the auto-substitution was used to improve these TM suggestions and picks the one that wasn’t improved by the auto-substitution. * The system finds two TM suggestions: `Welcome!` and `Welcome!`. Both have the same source text, and both weren’t improved by the auto-substitution. Then the system checks the priority of the TMs these TM suggestions are stored in and picks the one stored in the TM with higher priority. * The system finds two TM suggestions: `Welcome!` and `Welcome!`. Both have the same source text, both weren’t improved by the auto-substitution, and both are stored in the TMs with the same priority. Then the system checks the source languages of the TM suggestions and picks the one that uses the primary language. * The system finds two TM suggestions: `Welcome!` and `Welcome!`. Both have the same source text, both weren’t improved by the auto-substitution, both are stored in the TMs with the same priority, and both use primary source languages. Then the system checks the TM suggestion creation date and picks the one with the latest date. In rarer cases, there could be a situation when two or more TM suggestions are identical based on all the parameters listed above. In this case, the system picks the first one among identical. To improve accuracy, Crowdin minimizes the influence of HTML tags when determining TM matches. Instead of matching based on the original strings, the matching is conducted on strings where HTML tags are replaced with placeholders, similar to the behavior in the Editor. For example, a string `Hello world!` will match 100% with a string `Hello world!`. ## [TM Suggestions for Dialect Languages in the Editor](#tm-suggestions-for-dialect-languages-in-the-editor) [Section titled “TM Suggestions for Dialect Languages in the Editor”](#tm-suggestions-for-dialect-languages-in-the-editor) When the [**TM Suggestions for Dialects**](/enterprise/project-settings/translation-memories/) option is enabled, Crowdin will show TM suggestions from the primary language for dialect languages in the Editor. For instance, if you have Spanish and Spanish, Argentina as your target languages, and the option is enabled, the Editor will display TM suggestions from Spanish for Spanish, Argentina (indicated as “English -> Spanish” in the TM and MT Suggestions section). However, this behavior does not apply to the **Search TM** functionality. If you search for TM suggestions from the primary language in the Search TM tab while working with a dialect language, you will not find any results. ## [TM Match Calculation](#tm-match-calculation) [Section titled “TM Match Calculation”](#tm-match-calculation) Crowdin Enterprise calculates the TM match by comparing the source string to be translated and TM’s existing segments. There are three main types of TM matches: * Perfect Match - TM segment’s text and context completely match the source string * 100% Match - TM segment’s text matches the source string, but the context is different * Fuzzy Match (99% and less) - TM segment’s text is different to a certain extent compared to the source string If the calculations for Perfect and 100% TM match is relatively straightforward, the fuzzy matches’ calculation may not be so obvious. There are multiple different factors that affect the calculation of fuzzy matches, for example: * Word order * Punctuation * Formatting tags * Matches that are longer than the source string 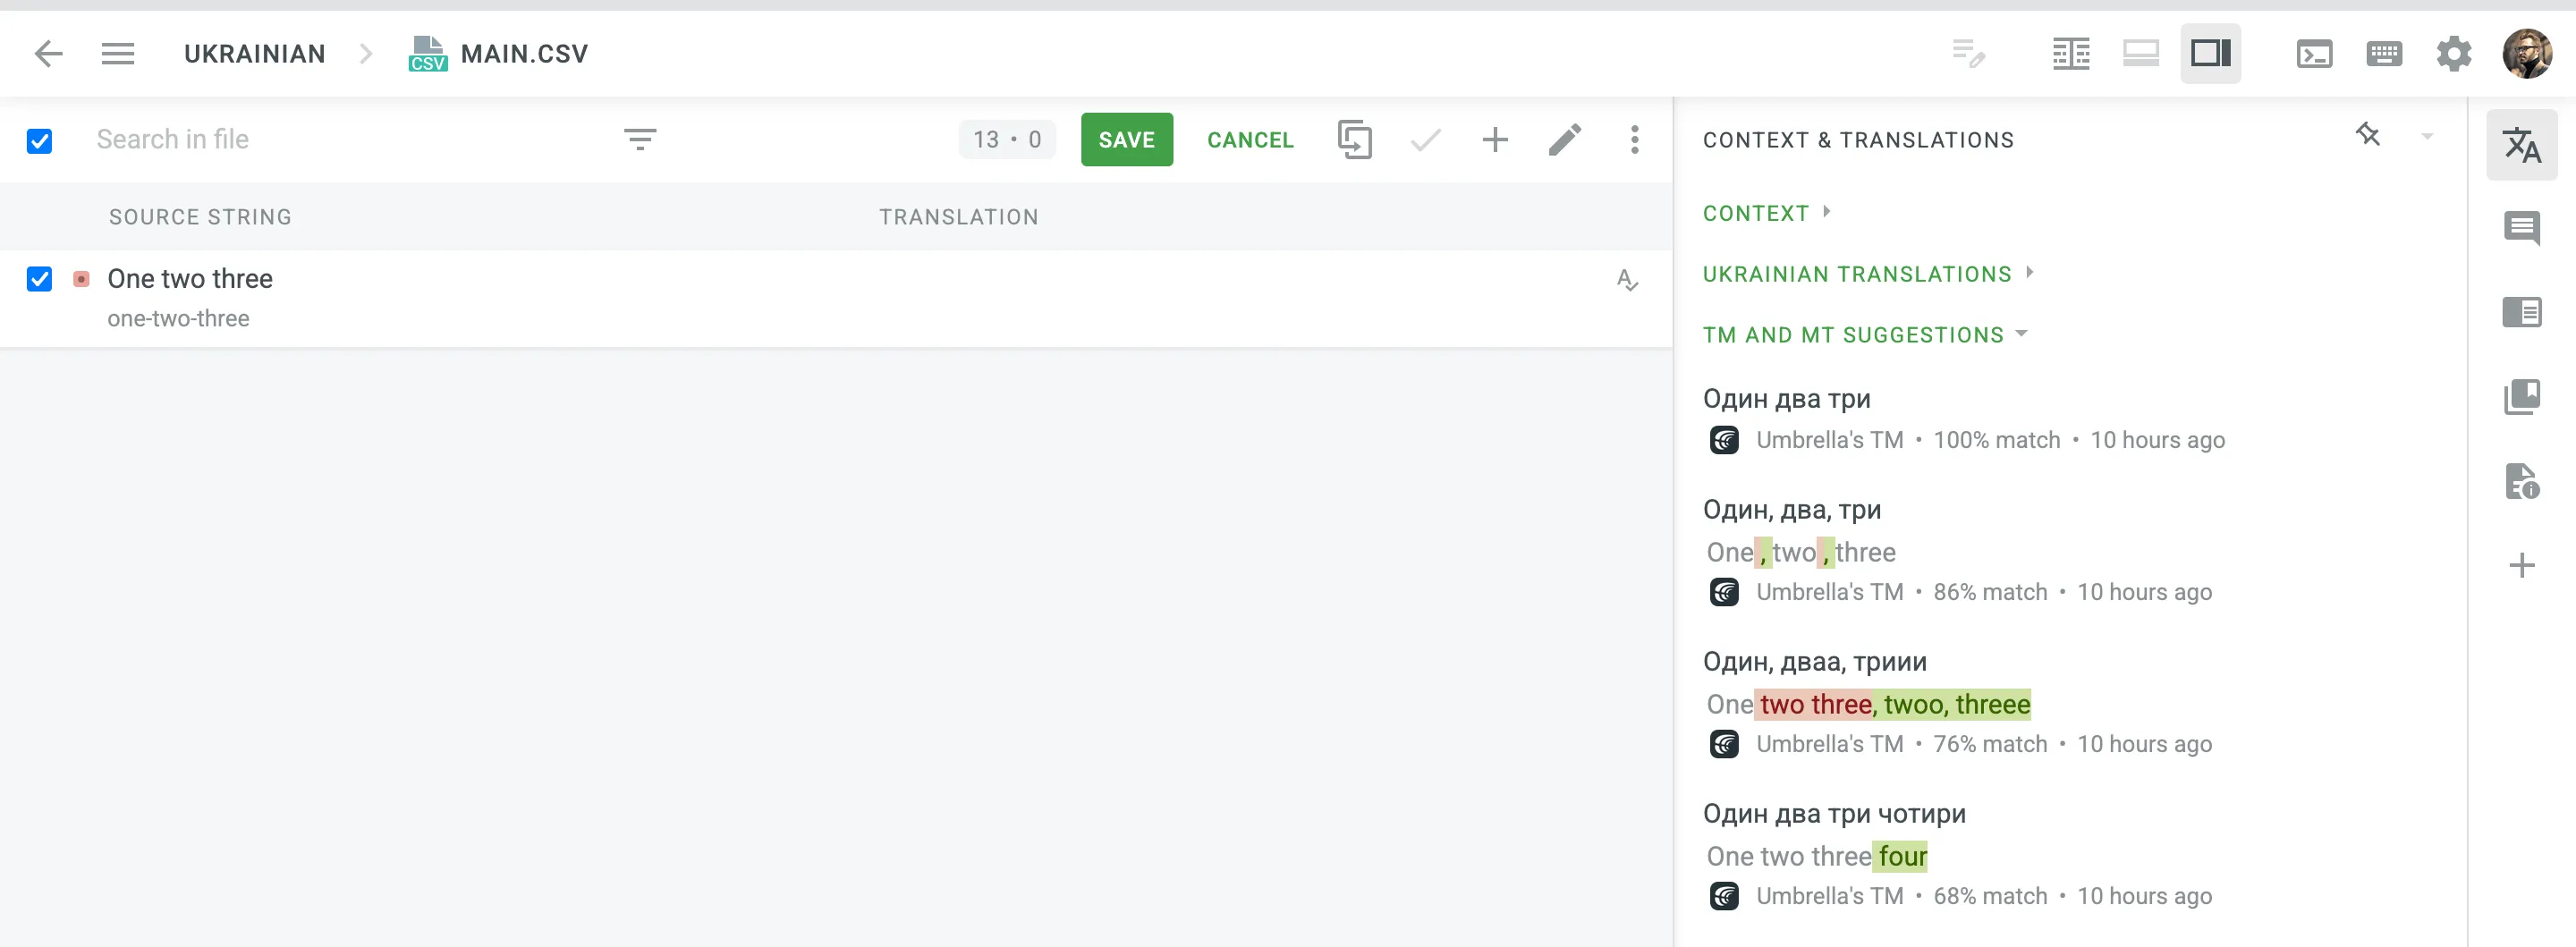 ## [TM Auto-Substitution](#tm-auto-substitution) [Section titled “TM Auto-Substitution”](#tm-auto-substitution) Auto-Substitution is aimed to increase the benefit of using the translation memory (TM) by suggesting translations with a higher similarity match. The feature substitutes the non-translatable elements (such as tags, HTML entities, placeholders, numbers, and more) in translations suggested by TM by the ones used in the source strings. To enable the Auto-substitution feature, open your project and go to **Settings > Translation Memories**. ### [Non-translatable Elements that can be Auto-substituted](#non-translatable-elements-that-can-be-auto-substituted) [Section titled “Non-translatable Elements that can be Auto-substituted”](#non-translatable-elements-that-can-be-auto-substituted) Auto-substitution feature can substitute the following non-translatable elements: | Non-translatable elements | Source string example | TM suggestion (German) | Improved TM suggestion | | ------------------------------------------------- | ------------------------------------------------- | -------------------------------------------------- | --------------------------------------------------- | | Tags | `Help` | `Hilfe` | `Hilfe` | | HTML entities | `Currency €` | `Währung ¥` | `Währung €` | | Line breaks | `Profile` | `Profil
` | `Profil` | | Escape sequences (\r\n, \r, \n, \t, unicode, hex) | `Translation \x42` | `Übersetzung \u4242` | `Übersetzung \x42` | | Non-escaped equivalents of \r\n, \r, \n, \t | `Translated by \n TM` | `Übersetzt vom Übersetzungsspeicher` | `Übersetzt vom \n Übersetzungsspeicher` | | Placeholders | `Example %s` | `Beispiel %1$s` | `Beispiel %s` | | Numbers | `Attempt 2` | `Versuch 5` | `Versuch 2` | | Letter case | `Log in` | `einloggen` | `Einloggen` | | Special characters | `Help?` | `Hilfe!` | `Hilfe?` | | URLs | `More Information: https://crowdin.com/features` | `Weitere Infos: https://crowdin.com/` | `Weitere Infos: https://crowdin.com/features` | | ICU syntax | `Get {discountPercent, number, percent} discount` | `Erhalte {discountValue, number, currency} Rabatt` | `Erhalte {discountPercent, number, percent} Rabatt` | ### [Auto-substitution for Pre-translation](#auto-substitution-for-pre-translation) [Section titled “Auto-substitution for Pre-translation”](#auto-substitution-for-pre-translation) Once you enable the TM auto-substitution, you can leverage improved TM suggestions during [pre-translation](/enterprise/pre-translation/). Be sure to set a minimum match ratio to 100%. This will result in including 100% TM matches along with the ones improved to 100% by TM auto-substitution. ### [Auto-substitution for TM Suggestions](#auto-substitution-for-tm-suggestions) [Section titled “Auto-substitution for TM Suggestions”](#auto-substitution-for-tm-suggestions) With the Auto-substitution feature, translators can see the improved TM suggestions in the Editor. The percentage below the improved suggestion shows the match percentage of the original TM suggestion and the improved one. 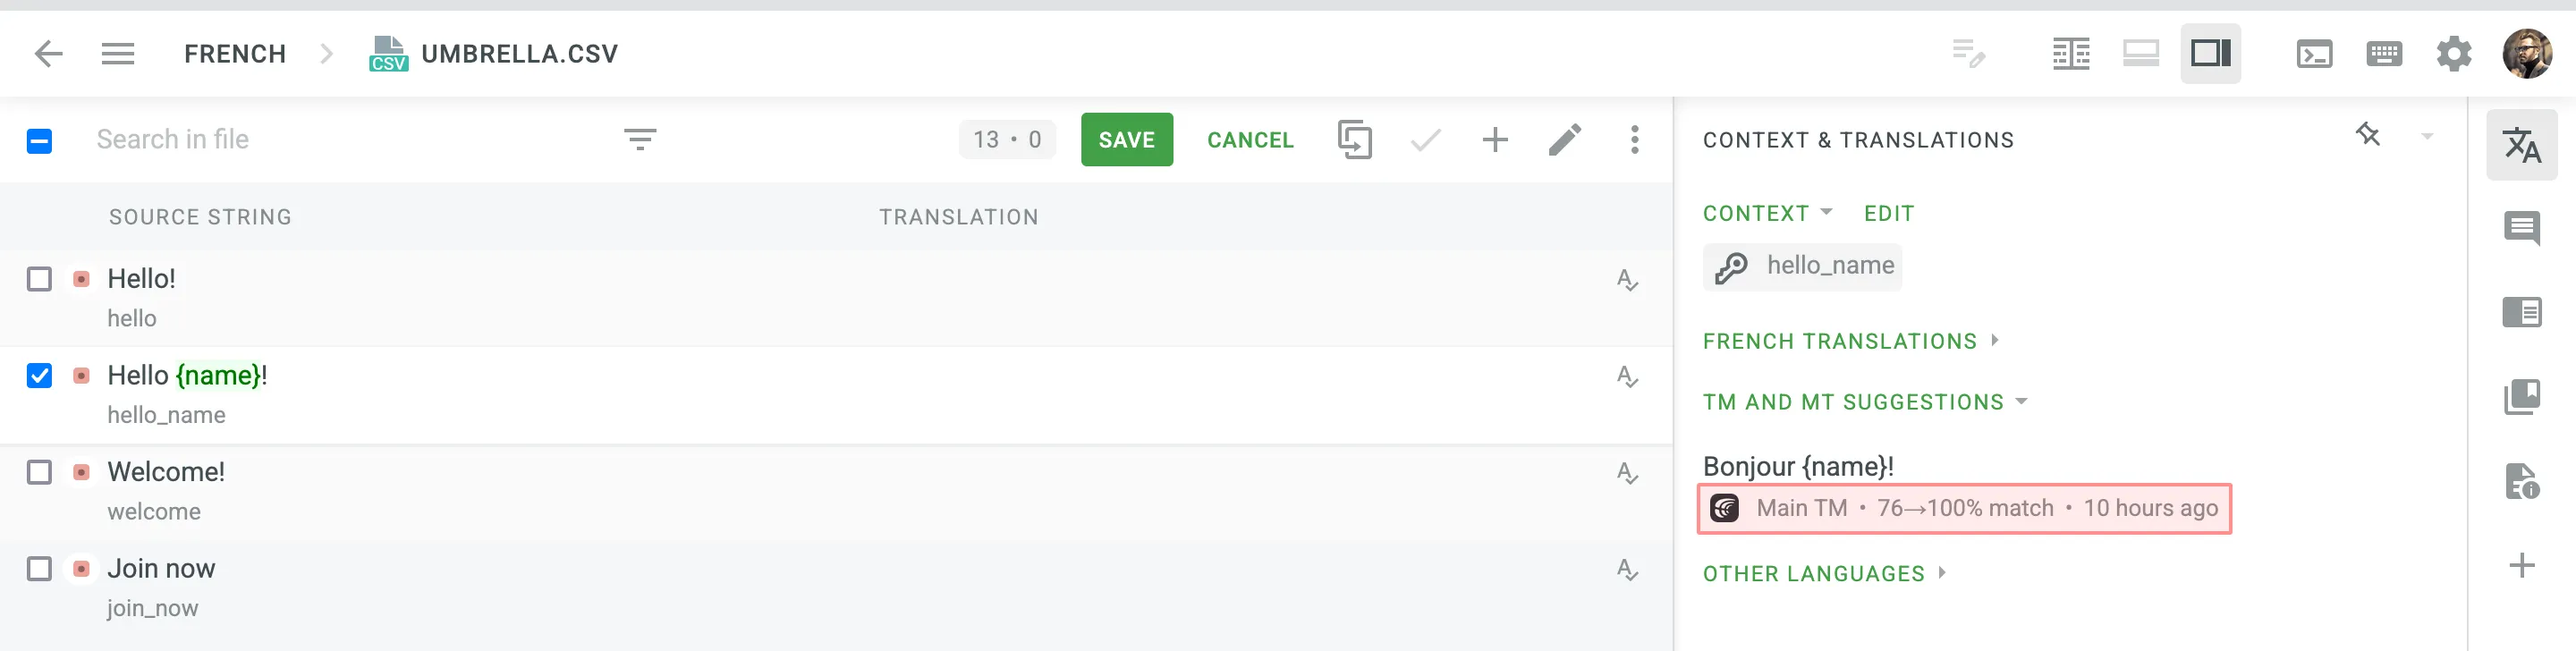 ### [Penalized TM Suggestions](#penalized-tm-suggestions) [Section titled “Penalized TM Suggestions”](#penalized-tm-suggestions) In some cases, you may want to apply penalties to TM suggestions to reduce their match percentage based on specific conditions. For example, you can set up a penalty for TM suggestions improved by the auto-substitution feature to prioritize exact matches over improved ones. The percentage below the improved and penalized suggestion shows the match percentage of the improved TM suggestion and the penalized one. Hover the cursor over the percentage to see more details. 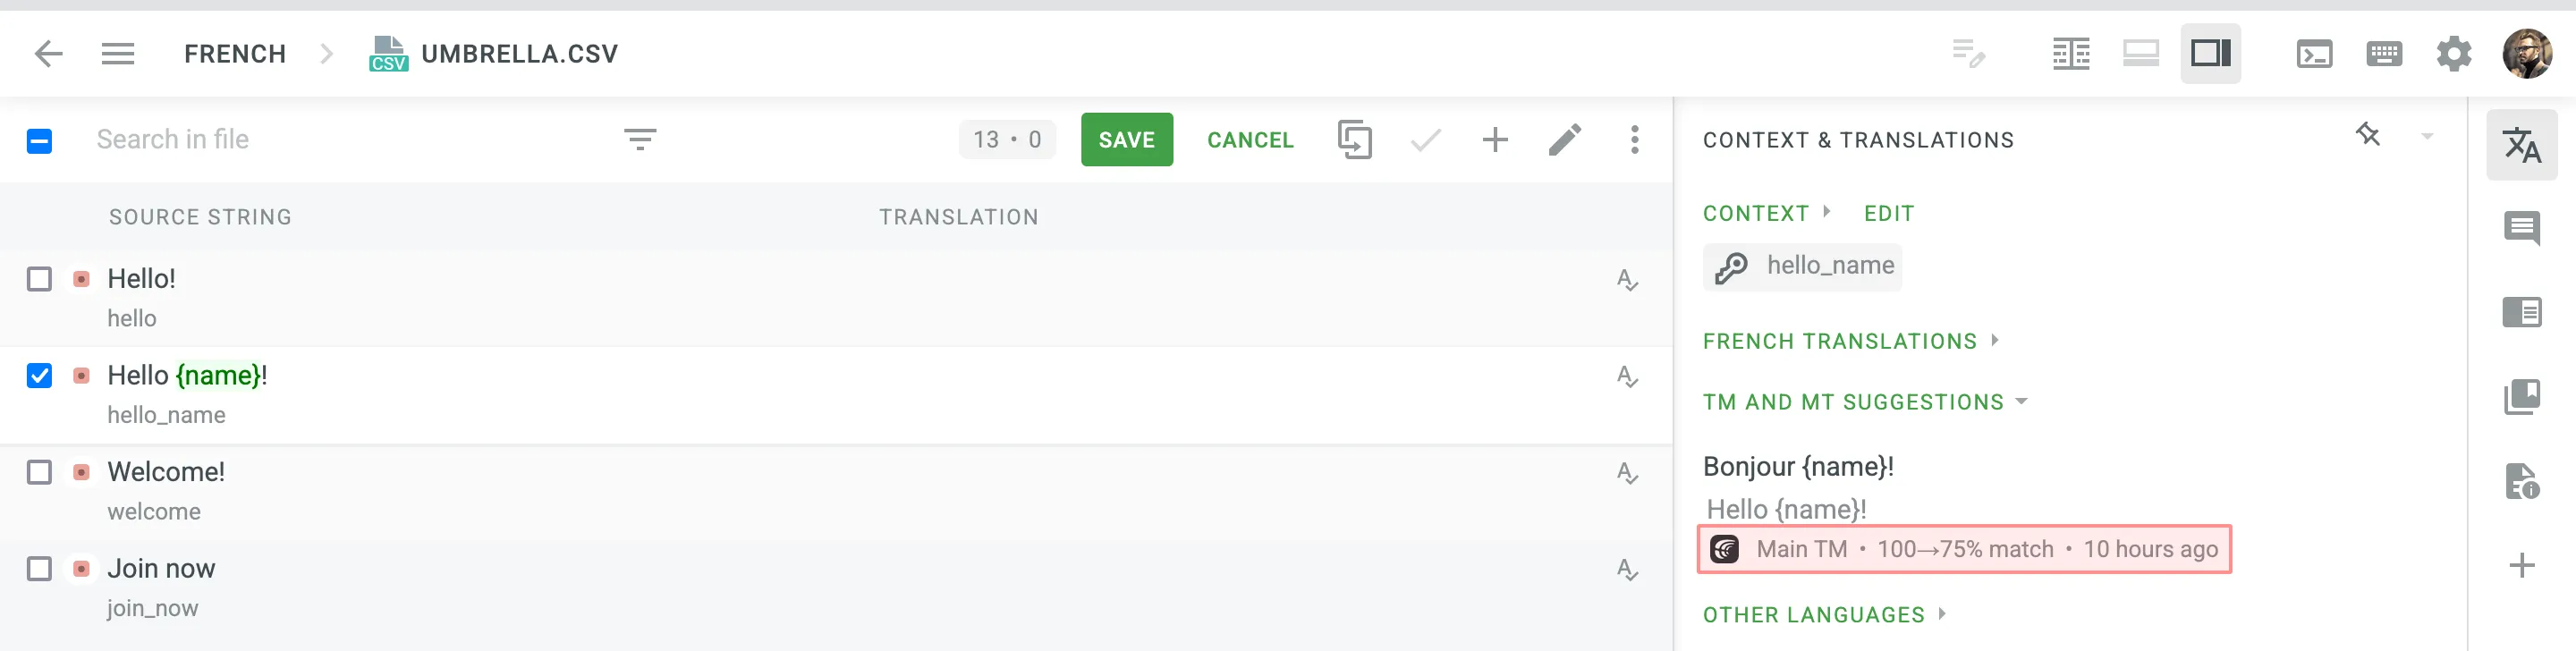 Read more about [TM Suggestion Penalties](/enterprise/project-settings/translation-memories/#penalties). ### [Cost Reports](#cost-reports) [Section titled “Cost Reports”](#cost-reports) Once the feature is enabled, it will affect how the [Costs Estimate](/enterprise/project-reports/#cost-estimate) and [Translation Cost](/enterprise/project-reports/#translation-cost) reports are calculated. **Costs Estimate** report would count TM suggestions that can potentially be improved by the auto-substitution feature based on the highest similarity match to which those strings can be improved. For example, a match that can be improved from a 75% match to a 100% match would be considered a 100% match. **Translation Cost** report would count TM suggestions improved by the auto-substitution feature as regular TM suggestions. For example, a match improved from a 75% match to a 100% match would be considered a 100% match.
# Translation and Proofreading by Vendor
> Configure translation and proofreading by vendor in your project workflow
Translation by Vendor and Proofreading by Vendor are the workflow steps designed to get translations and approvals from vendors you cooperate with. [Workflow Overview ](/enterprise/workflows/) [Vendors ](/enterprise/vendors/) ## [Adding Translation by Vendor and Proofreading by Vendor to Your Workflow](#adding-translation-by-vendor-and-proofreading-by-vendor-to-your-workflow) [Section titled “Adding Translation by Vendor and Proofreading by Vendor to Your Workflow”](#adding-translation-by-vendor-and-proofreading-by-vendor-to-your-workflow) You can add Translation by Vendor and Proofreading by Vendor to your project workflow in the workflow editor or the Workflow template editor. 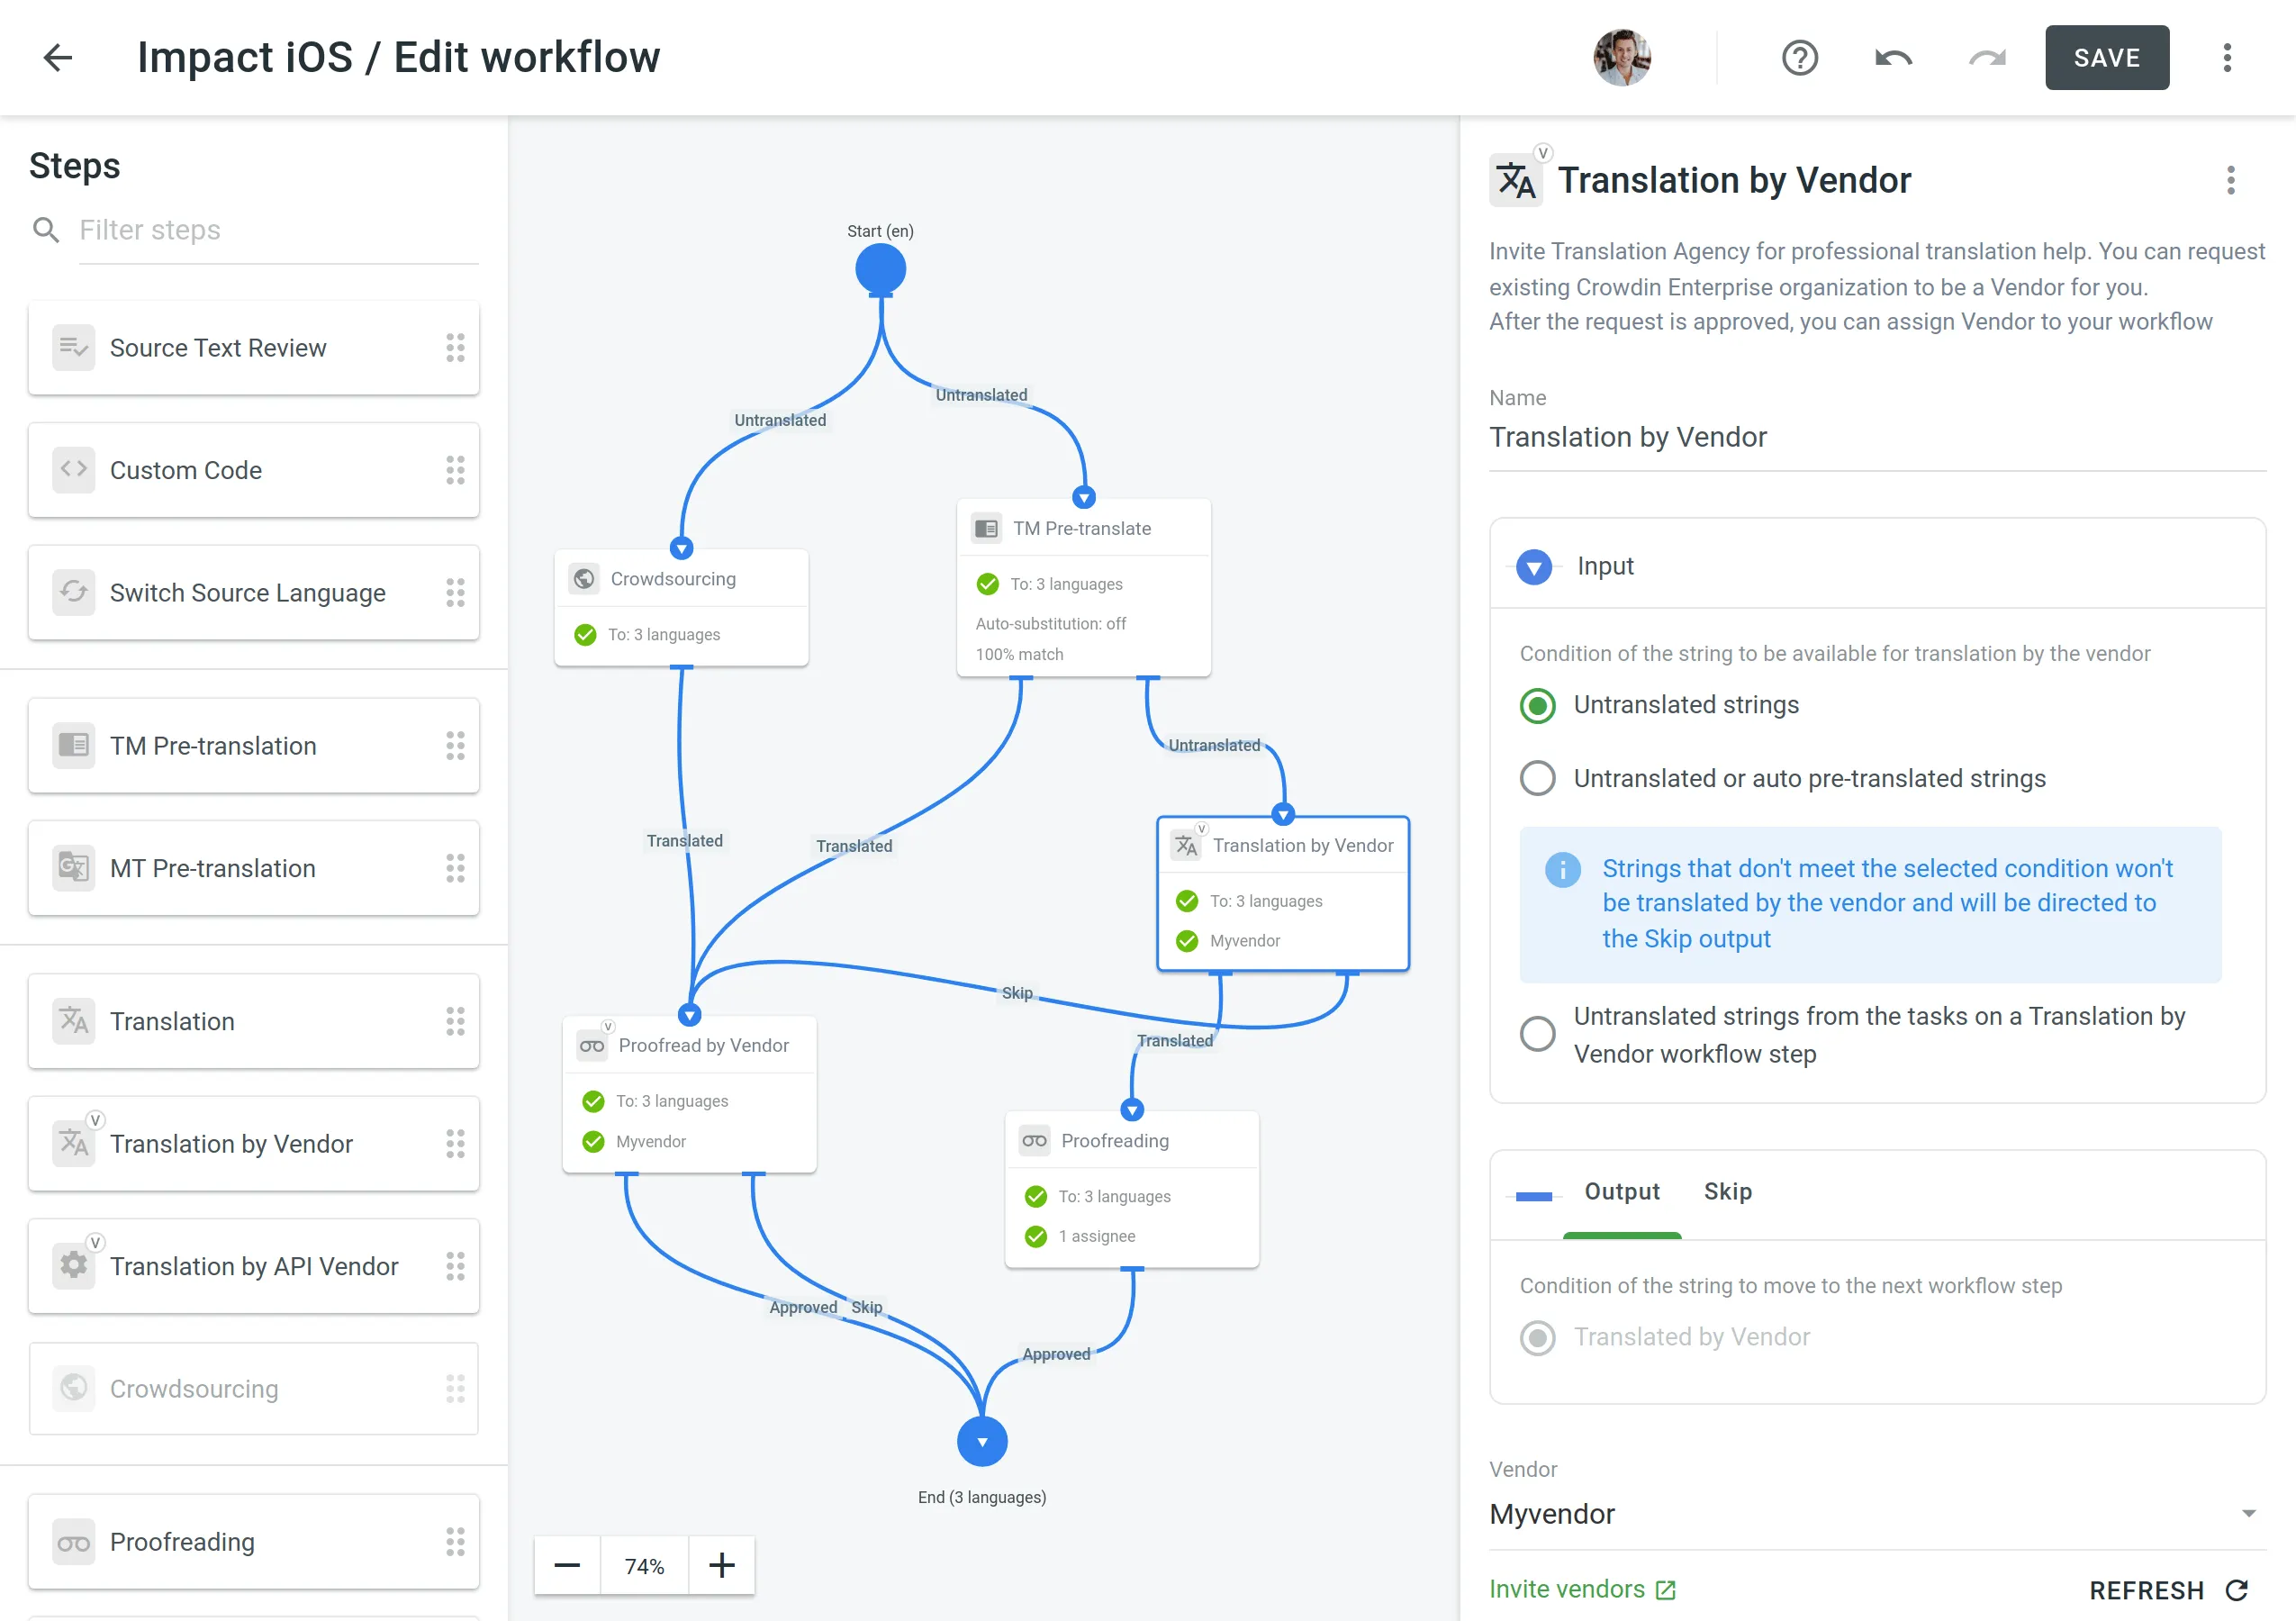 ## [Configuring Translation by Vendor and Proofreading by Vendor](#configuring-translation-by-vendor-and-proofreading-by-vendor) [Section titled “Configuring Translation by Vendor and Proofreading by Vendor”](#configuring-translation-by-vendor-and-proofreading-by-vendor) Once you added the Translation by Vendor workflow step to your project workflow, you can configure the following parameters: * Name – You can specify the needed name for the Translation by Vendor step. By default, it’s **Translation by Vendor**. * Input – Select the condition of the string to be available for translation by the vendor. You can choose between **Untranslated strings**, **Untranslated or auto pre-translated strings**, and **Untranslated strings from the tasks on a Translation by Vendor workflow step** options. * Vendor – Select the vendor you’d like to assign to the workflow step. Read more about [Inviting an Existing Organization to be Vendor](/enterprise/vendors/#inviting-an-existing-organization-to-be-a-vendor). * Comment (Optional) – Add a comment that will be visible to the assigned vendor. * Languages – Select the languages that require translations. You can also view the conditions of the string when it goes through the **Output** (string translated by vendor) and the **Skip** (string wasn’t translated by the vendor and skipped the workflow step). 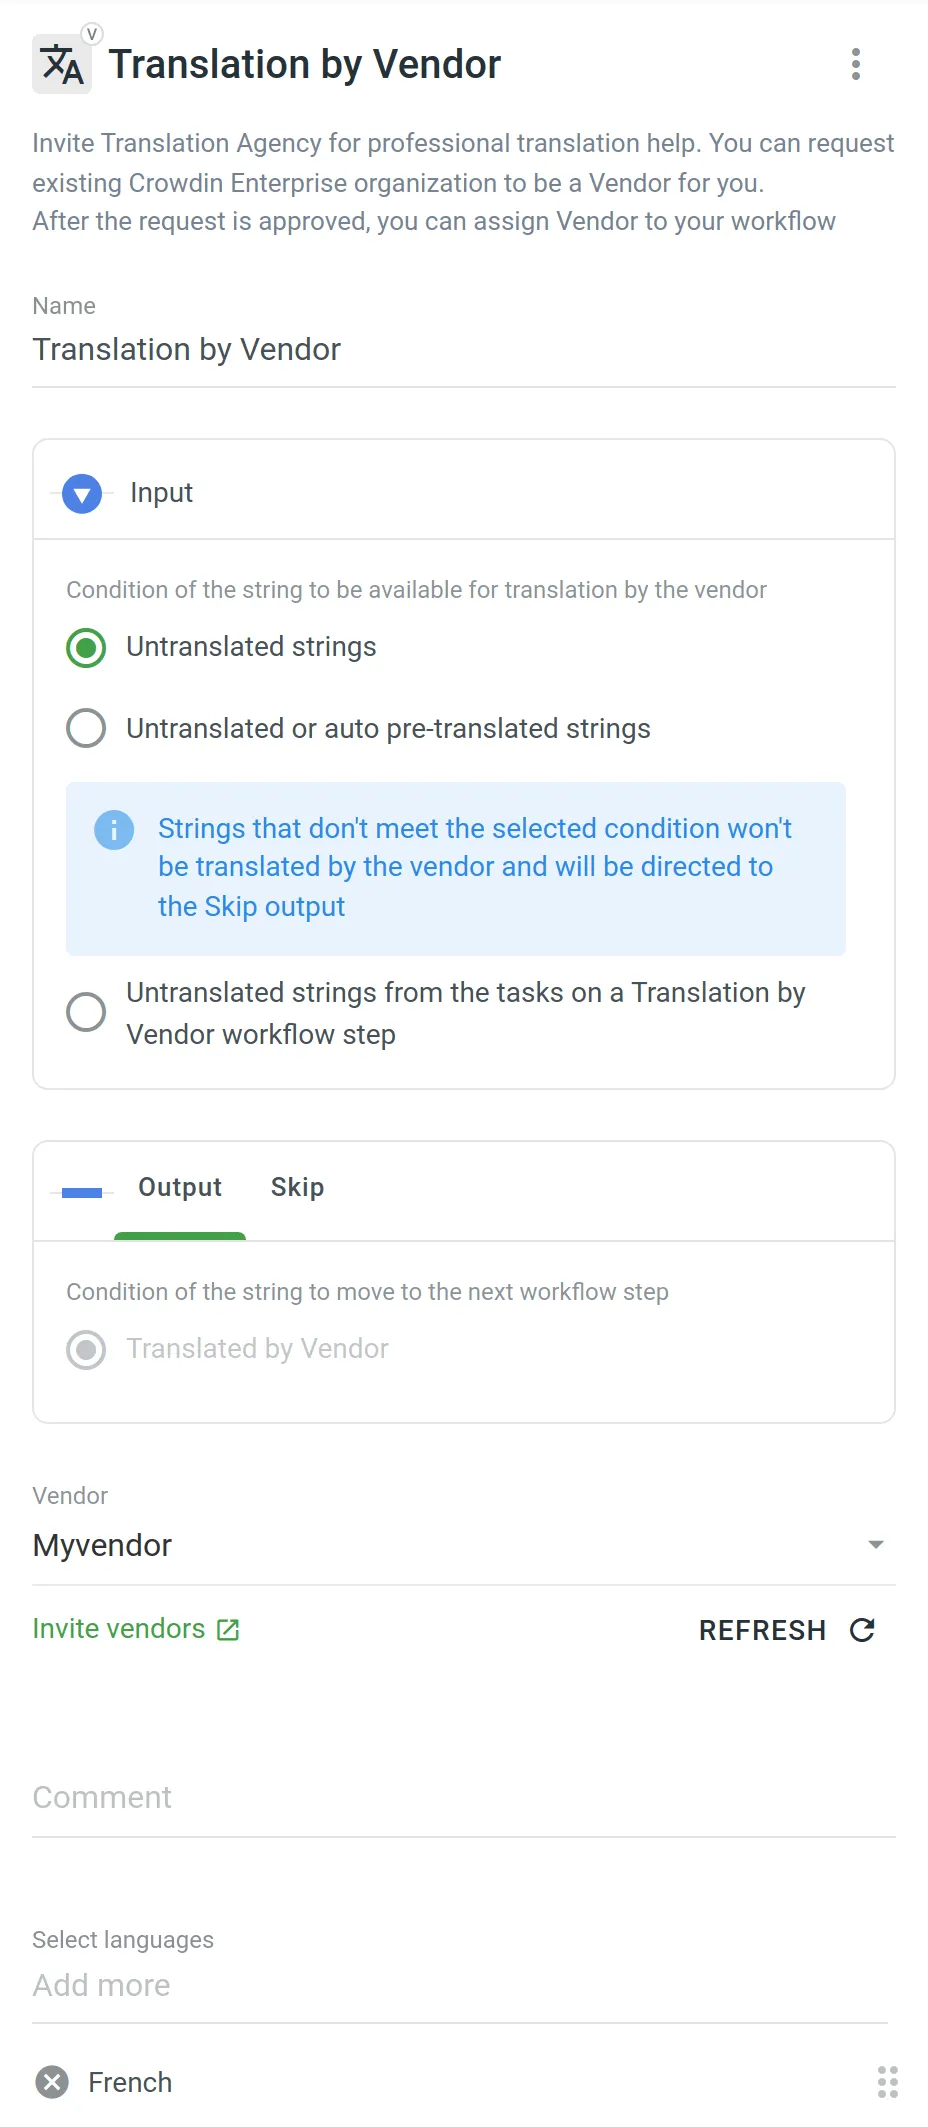 Similar settings also apply to the Proofreading by Vendor workflow step. The difference is that in the Input parameter you can select the condition of the string to be available for proofreading by the vendor. You can choose between **Translated strings**, **Translated strings without approval**, and **Not approved strings from the tasks on a Proofreading by Vendor workflow step** options. 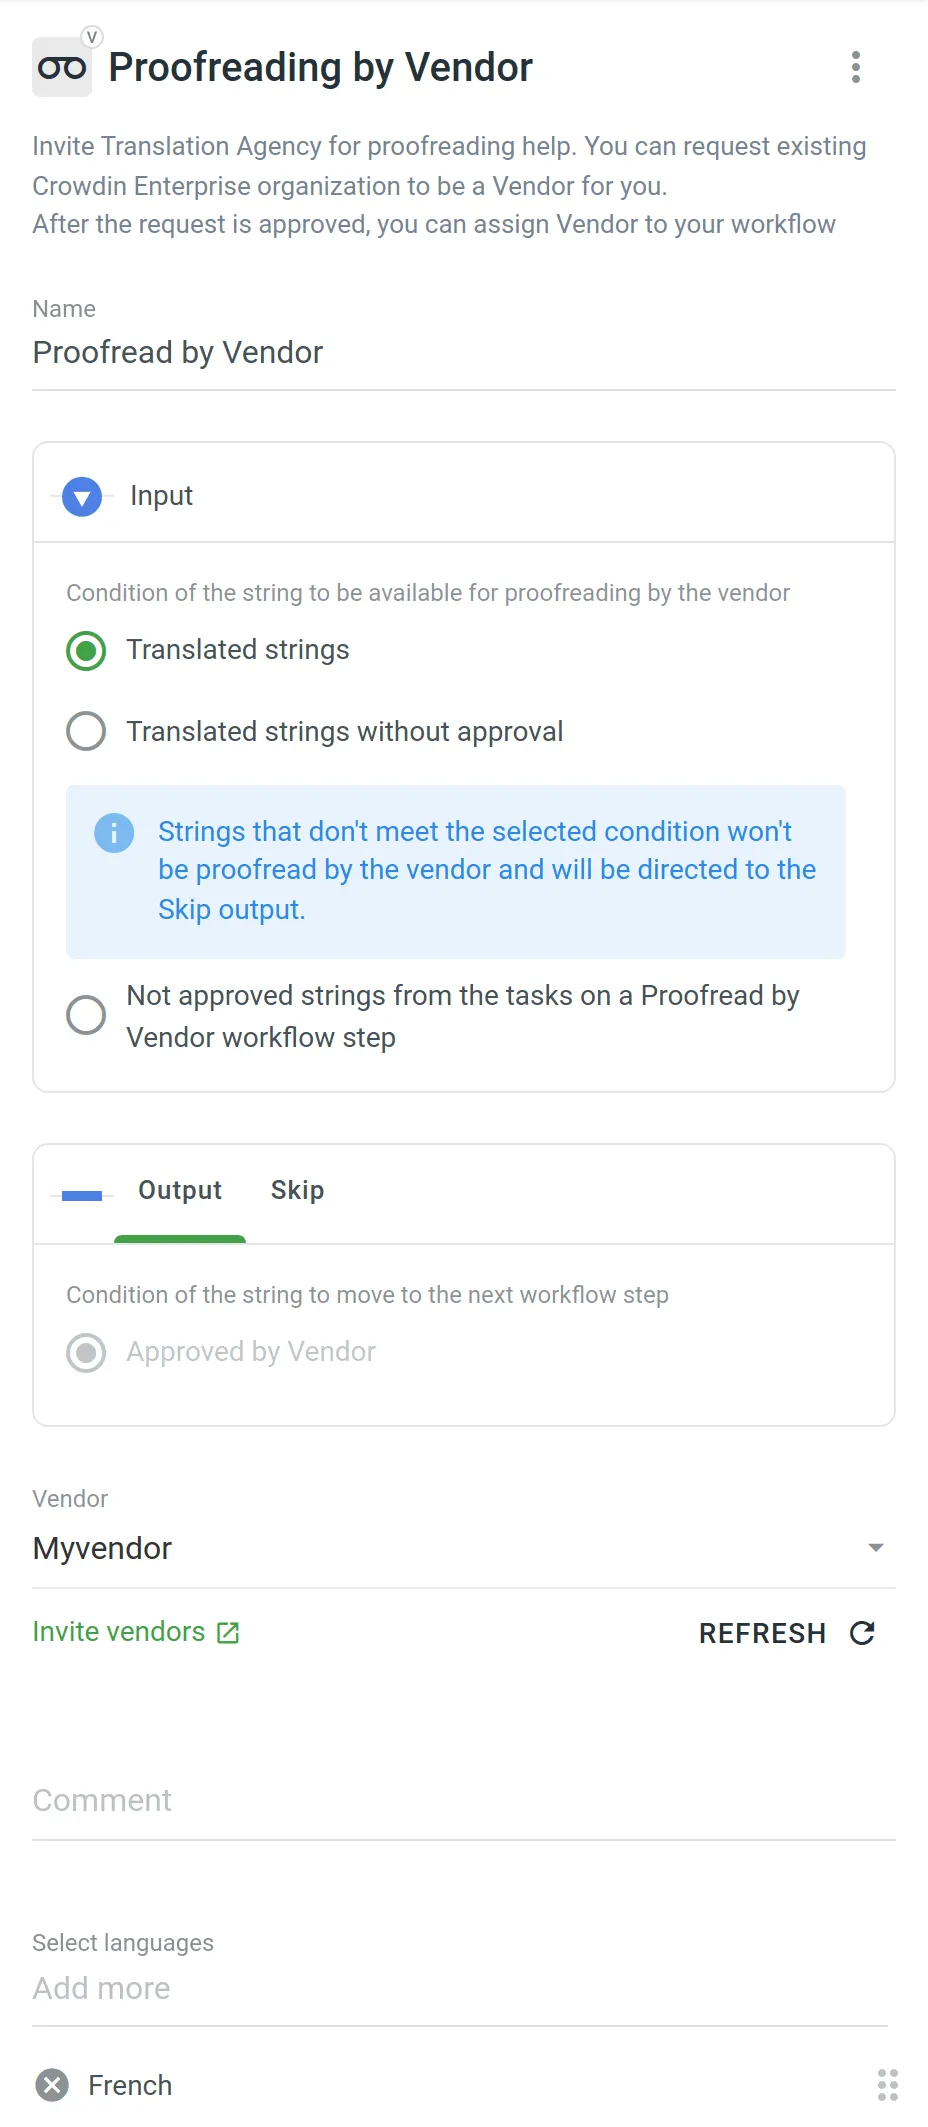 ### [Sending the Vendor Only the Content from the Tasks](#sending-the-vendor-only-the-content-from-the-tasks) [Section titled “Sending the Vendor Only the Content from the Tasks”](#sending-the-vendor-only-the-content-from-the-tasks) Both the Translation by Vendor and Proofreading by Vendor workflow steps let you control the content that will be sent to the vendor for translation and proofreading. This is especially useful when you have a defined budget for localization that should not be exceeded. First of all, you should configure the inputs of the Translation by Vendor and Proofreading by Vendor workflow steps by selecting the following options: * **Untranslated strings from the tasks on a Translation by Vendor workflow step** * **Not approved strings from the tasks on a Proofreading by Vendor workflow step** Then each time you’d like to send content to your vendor for translation and proofreading, you should create tasks selecting specific files on a specific workflow step. As a result, all the strings that meet the criteria configured on the Translation by Vendor and Proofreading by Vendor workflow steps will be included in the tasks and sent to the vendor. Read more about [Tasks](/enterprise/tasks/).
# Translation Strategies
> Approaches for translating and proofreading your content effectively
Once your organization is set up and your first project is created, choosing the right translation strategy is critical to ensuring effective and efficient localization. You need to decide who will translate and review the content added to your project, which can significantly impact the quality and turnaround time of your translations. Each project in Crowdin Enterprise has its own workflow, giving you the flexibility to combine different translation approaches according to your needs. Workflows allow you to optimize the translation process to different content types and localization requirements. Read more about [Workflows](/enterprise/workflows/). ## [Use Cases](#use-cases) [Section titled “Use Cases”](#use-cases) Use multiple translation methods in parallel or sequentially to find the winning combination for each project: * Assign in-house translators to the language pairs in which they specialize. Delegate translation into less common target languages to a translation agency. * Select a Translation Vendor from the Crowdin [Store](https://store.crowdin.com/). Assign them to both translation and proofreading workflow steps. * Pre-translate files using AI-powered tools or Machine Translation engines to assist your in-house translators. * Add the **TM Pre-translation** step to the project workflow to translate the same text used in different versions and parts of your product. * If you have an active community, choose **Crowdsourcing** as one of the workflow steps. Add **Proofreading** as the next step to review translations by professional linguists. ## [Assemble In-house Team of Translators](#assemble-in-house-team-of-translators) [Section titled “Assemble In-house Team of Translators”](#assemble-in-house-team-of-translators) You can invite translators and proofreaders you already work with to your organization or project. These could be: * In-house translators * Freelancers * Translators from the translation agencies you already work with When assembling your own team, invite each translator and proofreader individually and manage their permissions within your organization. You can assign specific workflow steps and target languages to ensure they only access the relevant resources. Read more about [Inviting People](/enterprise/inviting-people/) to an organization or project. ## [Send Request to a Translation Vendor](#send-request-to-a-translation-vendor) [Section titled “Send Request to a Translation Vendor”](#send-request-to-a-translation-vendor) Professional translation agencies can have separate organizations in Crowdin Enterprise. The collaboration between the organizations is based on client-vendor relations. You can choose a vendor from the Crowdin Store or invite the translation agency you already work with to be a vendor for you. For this, the agency should register a separate organization in Crowdin Enterprise. The good thing about cooperation with a Vendor organization is that there’s no need to invite each of the agency’s translators and proofreaders to your organization or project. You invite only the vendor organization, which receives a secured copy of the workflow steps it was assigned to as an incoming project. Once the incoming project is accepted, they will be able to assign their workflow and specific translators, which will not influence your project’s workflow in any way. All their translations will be marked as translations done by that vendor, not specific people. Professional translation services offer high-quality and efficient localization. These services are paid, so be sure to discuss rates and project costs with the vendor before starting the cooperation. Read more about [Inviting an Organization to be a Vendor](/enterprise/vendors/#inviting-an-existing-organization-to-be-a-vendor). ## [Pre-translate via AI, Machine Translation, or Translation Memory](#pre-translate-via-ai-machine-translation-or-translation-memory) [Section titled “Pre-translate via AI, Machine Translation, or Translation Memory”](#pre-translate-via-ai-machine-translation-or-translation-memory) AI-powered pre-translation tools, Machine Translation (MT) engines, and Translation Memory (TM) are all effective methods for pre-translating project files. Each method offers unique benefits for assisting human translators, speeding up localization, and reducing translation costs. After the pre-translation, human translators can review and refine these translations to ensure high-quality results. ### [AI-powered Pre-Translation](#ai-powered-pre-translation) [Section titled “AI-powered Pre-Translation”](#ai-powered-pre-translation) Crowdin Enterprise integrates with top AI providers such as OpenAI, Google Gemini, Microsoft Azure OpenAI, and more. AI-powered translations provide context-aware and high-quality translations that significantly enhance efficiency. You can expand your AI provider options by installing respective applications from the Crowdin [Store](https://store.crowdin.com/tags/ai). Read more about [Crowdin AI](/enterprise/crowdin-ai/). ### [Machine Translation (MT) Engines](#machine-translation-mt-engines) [Section titled “Machine Translation (MT) Engines”](#machine-translation-mt-engines) Crowdin Enterprise supports integration with the most popular MT engines, including Google Translate and AutoML Translation, Microsoft Translator, DeepL Pro, and Amazon Translate. Similarly to AI providers, you can add more MT engines of your choice from the Crowdin [Store](https://store.crowdin.com/tags/mt). Read more about the [Machine Translation engines](/enterprise/machine-translation/). ### [Translation Memory (TM)](#translation-memory-tm) [Section titled “Translation Memory (TM)”](#translation-memory-tm) Translation Memory stores source strings and their translations into various languages. TM is automatically created for each Crowdin Enterprise project, and you can also upload your existing TMs. TM pre-translation helps you speed up the translation process by leveraging previously translated content, which is especially useful for translating repeated or similar strings, thereby reducing translation costs. Read more about [Translation Memory](/enterprise/translation-memory/). ## [Engage Your Community](#engage-your-community) [Section titled “Engage Your Community”](#engage-your-community) Crowdsourcing is a localization practice that engages your product’s community to translate your content. Translations made by community members can be reviewed by professional linguists or go directly to production. Invite your community via social media or other communication channels you use. Read more about [Crowdsourcing](/enterprise/crowdsourcing/).
# Uploading Source Files
> Learn how to upload source files to your project for translation
Once you’ve [created a project](/enterprise/creating-project/), the next step would be preparing source files for upload. Crowdin Enterprise supports a wide range of [file formats](/enterprise/supported-formats/), including Android XML, iOS Strings, XML, JSON, etc. When you have your files prepared, you can add them to your Crowdin Enterprise project for translation. Crowdin Enterprise offers a few options for adding content to a project: * Manually via the web interface (UI). * Integrate your Crowdin Enterprise project with the tools you already use. Explore available integrations on the [Crowdin Store](https://store.crowdin.com/). * Use the [API](/developer/api/) or [Developer Tool](/developer/dev-tools/) of your choice. Usually, this task is accomplished by developers. You can [invite your colleague developer](/enterprise/inviting-people/) to assist you with this step. You can also use Crowdin sample files to test the translation workflows before starting your project with the actual source files. ## [Uploading Files](#uploading-files) [Section titled “Uploading Files”](#uploading-files) To upload files via the web interface, follow these steps: * File-based project 1. Open your project and go to **Sources > Files**. 2. Drag and drop files from your machine anywhere within the **Files** section — to the root of the project or directly into an existing folder. You can upload ZIP archives if you want to add a structured set of folders and files. 3. *(Optional)* Click **Upload Files** or **File** and select **Upload** to add files, **Use Samples** to test translation workflows, **Set Up Integration** to synchronize content automatically, or **Invite Developer** if content uploads will be handled by your developer teammate. You can also click **File** to access additional options, such as **Create String Vault** (adds an empty CSV file) or another **Set Up Integration** shortcut. 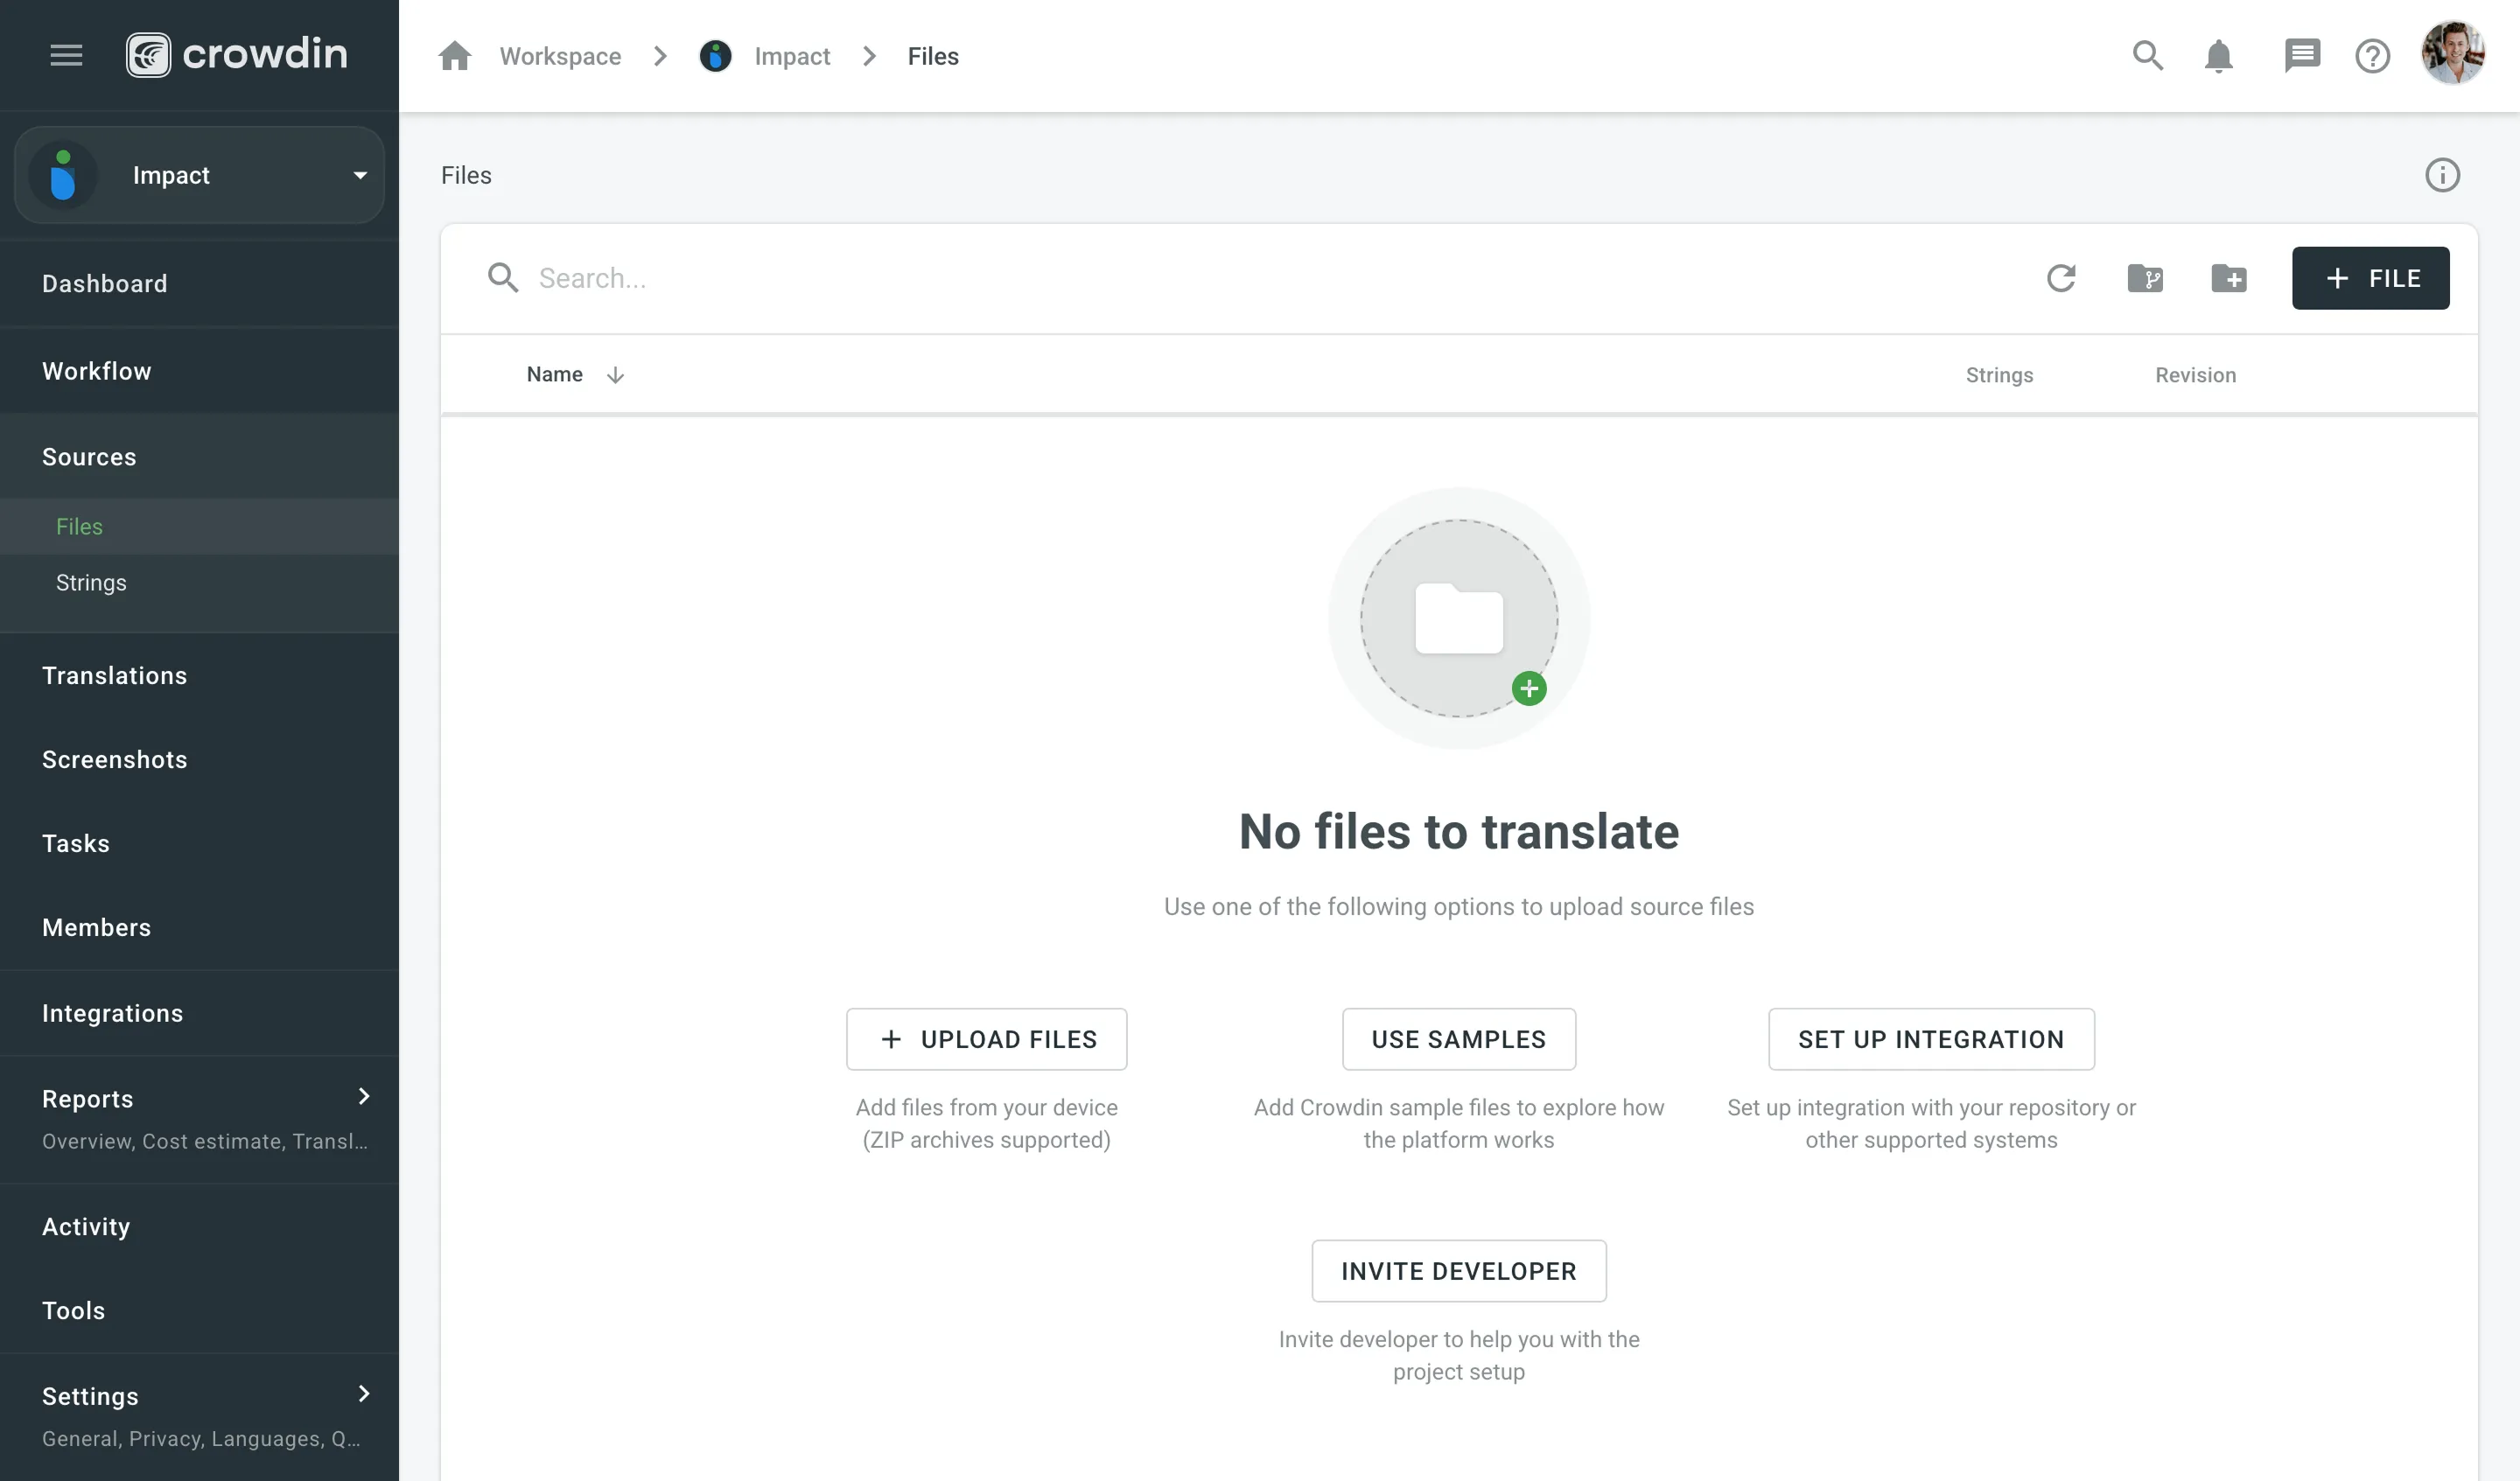 * String-based project 1. Open your project and select **Upload** on the left sidebar. 2. Select the target branch to which you’re uploading source files. By default, the `main` branch is selected. Create new branches if needed. 3. Drag and drop files from your machine, or click **Select Files**. You can also upload ZIP archives if you want a set of files to be added. 4. Crowdin Enterprise automatically tries to detect whether you’re uploading source content or translations. Verify the detection is correct and adjust the language settings if needed (e.g., English (source) should be selected for source files if the project’s source language is English). 5. *(Optional)* In the **Source files** section, to the right of the uploaded file list, configure [advanced source file import settings](#advanced-import-settings). 6. Click **Upload** to finish uploading the source content. 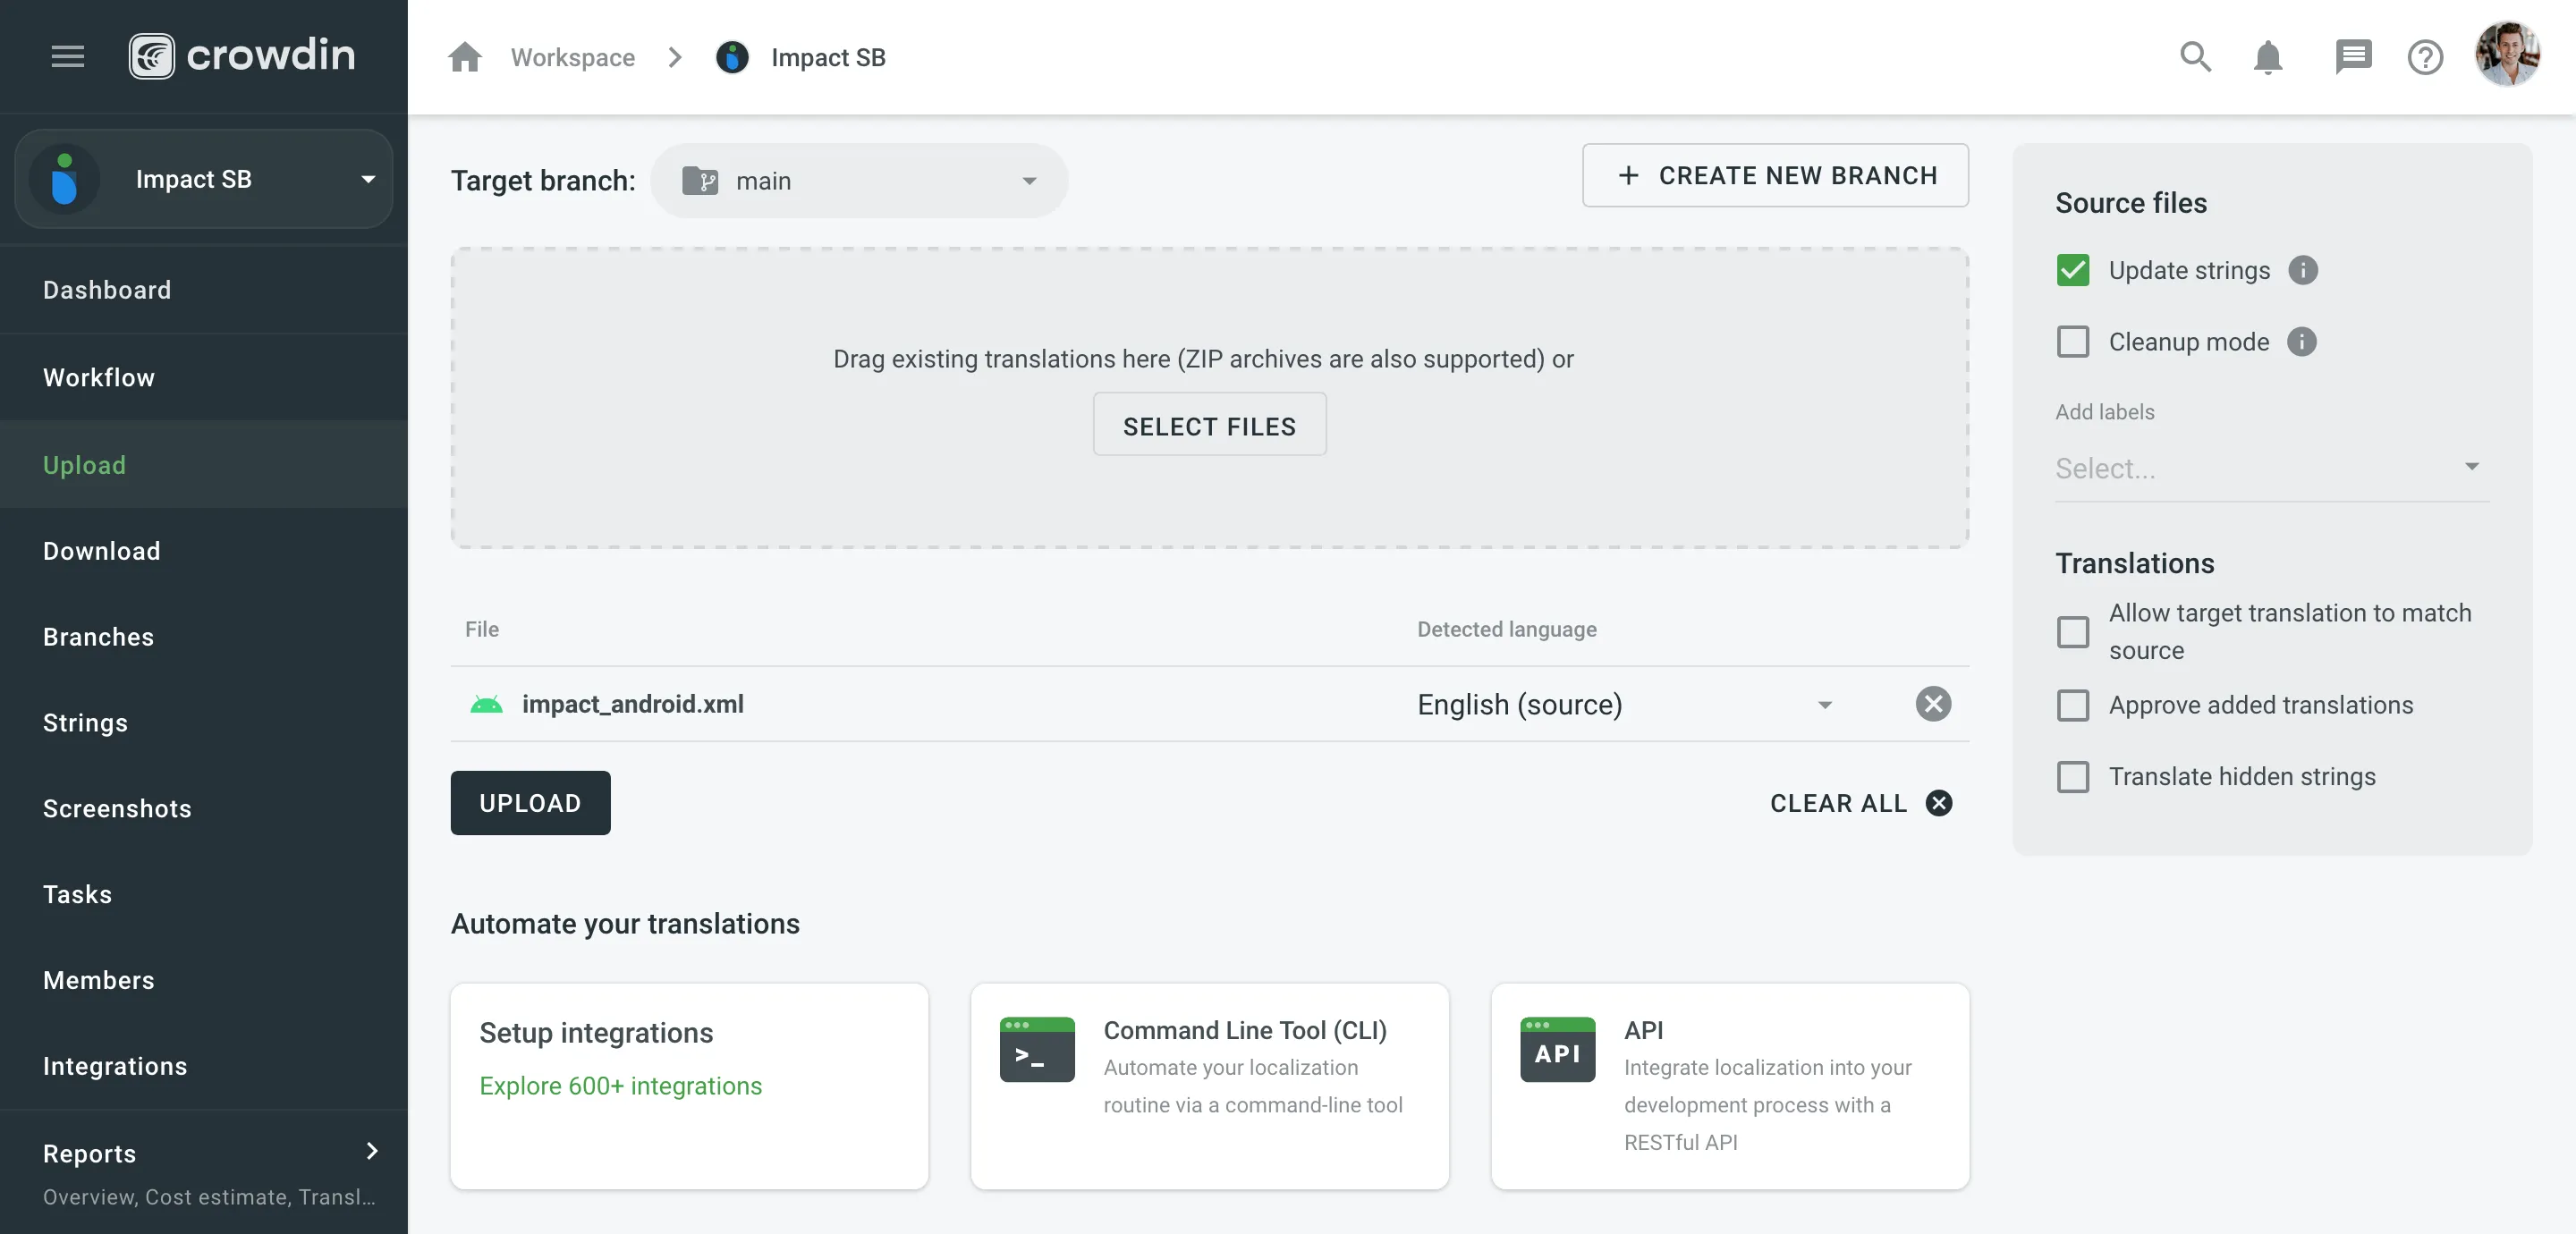 Read more about [project types](/enterprise/creating-project/#project-types). Limitations The maximum file size is 100 MB. If your file exceeds this limit, it is recommended to split it into several smaller files, and upload them one at a time. ### [XML, CSV, and XLSX Files](#xml-csv-and-xlsx-files) [Section titled “XML, CSV, and XLSX Files”](#xml-csv-and-xlsx-files) Some file formats, such as XML, CSV, XLSX, and others, might require additional configuration. * [CSV/XLSX File Configuration](/enterprise/csv-xlsx-configuration/) * [XML File Configuration](/enterprise/xml-configuration/) * [Parser Configuration](/enterprise/project-settings/parser-configuration/) Limitations The XLSX/XLS file size is limited to 2 000 000 cells. ### [HTML Files with Relative URLs](#html-files-with-relative-urls) [Section titled “HTML Files with Relative URLs”](#html-files-with-relative-urls) To display images and styles in the HTML file used outside of the website, where it belongs, add the ` Please note that we only specified a relative address for the image. Since we specified a base URL in the head section, the browser will look for the image at "https://www.w3schools.com/images/stickman.gif".
``` Once you add the `Text
` | | `src` | translatable if contained in `img`, `iframe`, `embed`, `video`, `audio`, `source`\*, `track`\* tags \* – if nested in the parent tags `video`, `audio` | `` | | `href` | translatable if contained in `a` tag | `Site name` | | `data` | translatable if contained in `object` tag | `` | | `value` | translatable if contained in `input`, `button` tags | `` | | `placeholder` | translatable if contained in `input`, `textarea` tags | `` | | `alt` | translatable if contained in `img` tag | ` ` | | `label` | translatable if contained in `optgroup`, `track`\* tags \* – if nested in the parent tags `video`, `audio` | `
` into `\<\/h1\>`. * The second module checks if all closing tags are present and adds them if they are missing. The processing order of these modules will lead to different results: * If the HTML tag escaping module runs first, followed by the tag verification module, the output might be: * `` | `Profil` | | Escape sequences (\r\n, \r, \n, \t, unicode, hex) | `Translation \x42` | `Übersetzung \u4242` | `Übersetzung \x42` | | Non-escaped equivalents of \r\n, \r, \n, \t | `Translated by \n TM` | `Übersetzt vom Übersetzungsspeicher` | `Übersetzt vom \n Übersetzungsspeicher` | | Placeholders | `Example %s` | `Beispiel %1$s` | `Beispiel %s` | | Numbers | `Attempt 2` | `Versuch 5` | `Versuch 2` | | Letter case | `Log in` | `einloggen` | `Einloggen` | | Special characters | `Help?` | `Hilfe!` | `Hilfe?` | | URLs | `More Information: https://crowdin.com/features` | `Weitere Infos: https://crowdin.com/` | `Weitere Infos: https://crowdin.com/features` | | ICU syntax | `Get {discountPercent, number, percent} discount` | `Erhalte {discountValue, number, currency} Rabatt` | `Erhalte {discountPercent, number, percent} Rabatt` | ### [Auto-substitution for Pre-translation](#auto-substitution-for-pre-translation) [Section titled “Auto-substitution for Pre-translation”](#auto-substitution-for-pre-translation) Once you enable the TM auto-substitution, you can leverage improved TM suggestions during [pre-translation](/enterprise/pre-translation/). Be sure to set a minimum match ratio to 100%. This will result in including 100% TM matches along with the ones improved to 100% by TM auto-substitution. ### [Auto-substitution for TM Suggestions](#auto-substitution-for-tm-suggestions) [Section titled “Auto-substitution for TM Suggestions”](#auto-substitution-for-tm-suggestions) With the Auto-substitution feature, translators can see the improved TM suggestions in the Editor. The percentage below the improved suggestion shows the match percentage of the original TM suggestion and the improved one.  ### [Penalized TM Suggestions](#penalized-tm-suggestions) [Section titled “Penalized TM Suggestions”](#penalized-tm-suggestions) In some cases, you may want to apply penalties to TM suggestions to reduce their match percentage based on specific conditions. For example, you can set up a penalty for TM suggestions improved by the auto-substitution feature to prioritize exact matches over improved ones. The percentage below the improved and penalized suggestion shows the match percentage of the improved TM suggestion and the penalized one. Hover the cursor over the percentage to see more details.  Read more about [TM Suggestion Penalties](/enterprise/project-settings/translation-memories/#penalties). ### [Cost Reports](#cost-reports) [Section titled “Cost Reports”](#cost-reports) Once the feature is enabled, it will affect how the [Costs Estimate](/enterprise/project-reports/#cost-estimate) and [Translation Cost](/enterprise/project-reports/#translation-cost) reports are calculated. **Costs Estimate** report would count TM suggestions that can potentially be improved by the auto-substitution feature based on the highest similarity match to which those strings can be improved. For example, a match that can be improved from a 75% match to a 100% match would be considered a 100% match. **Translation Cost** report would count TM suggestions improved by the auto-substitution feature as regular TM suggestions. For example, a match improved from a 75% match to a 100% match would be considered a 100% match. # Translation and Proofreading by Vendor > Configure translation and proofreading by vendor in your project workflow Translation by Vendor and Proofreading by Vendor are the workflow steps designed to get translations and approvals from vendors you cooperate with. [Workflow Overview ](/enterprise/workflows/) [Vendors ](/enterprise/vendors/) ## [Adding Translation by Vendor and Proofreading by Vendor to Your Workflow](#adding-translation-by-vendor-and-proofreading-by-vendor-to-your-workflow) [Section titled “Adding Translation by Vendor and Proofreading by Vendor to Your Workflow”](#adding-translation-by-vendor-and-proofreading-by-vendor-to-your-workflow) You can add Translation by Vendor and Proofreading by Vendor to your project workflow in the workflow editor or the Workflow template editor.  ## [Configuring Translation by Vendor and Proofreading by Vendor](#configuring-translation-by-vendor-and-proofreading-by-vendor) [Section titled “Configuring Translation by Vendor and Proofreading by Vendor”](#configuring-translation-by-vendor-and-proofreading-by-vendor) Once you added the Translation by Vendor workflow step to your project workflow, you can configure the following parameters: * Name – You can specify the needed name for the Translation by Vendor step. By default, it’s **Translation by Vendor**. * Input – Select the condition of the string to be available for translation by the vendor. You can choose between **Untranslated strings**, **Untranslated or auto pre-translated strings**, and **Untranslated strings from the tasks on a Translation by Vendor workflow step** options. * Vendor – Select the vendor you’d like to assign to the workflow step. Read more about [Inviting an Existing Organization to be Vendor](/enterprise/vendors/#inviting-an-existing-organization-to-be-a-vendor). * Comment (Optional) – Add a comment that will be visible to the assigned vendor. * Languages – Select the languages that require translations. You can also view the conditions of the string when it goes through the **Output** (string translated by vendor) and the **Skip** (string wasn’t translated by the vendor and skipped the workflow step).  Similar settings also apply to the Proofreading by Vendor workflow step. The difference is that in the Input parameter you can select the condition of the string to be available for proofreading by the vendor. You can choose between **Translated strings**, **Translated strings without approval**, and **Not approved strings from the tasks on a Proofreading by Vendor workflow step** options.  ### [Sending the Vendor Only the Content from the Tasks](#sending-the-vendor-only-the-content-from-the-tasks) [Section titled “Sending the Vendor Only the Content from the Tasks”](#sending-the-vendor-only-the-content-from-the-tasks) Both the Translation by Vendor and Proofreading by Vendor workflow steps let you control the content that will be sent to the vendor for translation and proofreading. This is especially useful when you have a defined budget for localization that should not be exceeded. First of all, you should configure the inputs of the Translation by Vendor and Proofreading by Vendor workflow steps by selecting the following options: * **Untranslated strings from the tasks on a Translation by Vendor workflow step** * **Not approved strings from the tasks on a Proofreading by Vendor workflow step** Then each time you’d like to send content to your vendor for translation and proofreading, you should create tasks selecting specific files on a specific workflow step. As a result, all the strings that meet the criteria configured on the Translation by Vendor and Proofreading by Vendor workflow steps will be included in the tasks and sent to the vendor. Read more about [Tasks](/enterprise/tasks/). # Translation Strategies > Approaches for translating and proofreading your content effectively Once your organization is set up and your first project is created, choosing the right translation strategy is critical to ensuring effective and efficient localization. You need to decide who will translate and review the content added to your project, which can significantly impact the quality and turnaround time of your translations. Each project in Crowdin Enterprise has its own workflow, giving you the flexibility to combine different translation approaches according to your needs. Workflows allow you to optimize the translation process to different content types and localization requirements. Read more about [Workflows](/enterprise/workflows/). ## [Use Cases](#use-cases) [Section titled “Use Cases”](#use-cases) Use multiple translation methods in parallel or sequentially to find the winning combination for each project: * Assign in-house translators to the language pairs in which they specialize. Delegate translation into less common target languages to a translation agency. * Select a Translation Vendor from the Crowdin [Store](https://store.crowdin.com/). Assign them to both translation and proofreading workflow steps. * Pre-translate files using AI-powered tools or Machine Translation engines to assist your in-house translators. * Add the **TM Pre-translation** step to the project workflow to translate the same text used in different versions and parts of your product. * If you have an active community, choose **Crowdsourcing** as one of the workflow steps. Add **Proofreading** as the next step to review translations by professional linguists. ## [Assemble In-house Team of Translators](#assemble-in-house-team-of-translators) [Section titled “Assemble In-house Team of Translators”](#assemble-in-house-team-of-translators) You can invite translators and proofreaders you already work with to your organization or project. These could be: * In-house translators * Freelancers * Translators from the translation agencies you already work with When assembling your own team, invite each translator and proofreader individually and manage their permissions within your organization. You can assign specific workflow steps and target languages to ensure they only access the relevant resources. Read more about [Inviting People](/enterprise/inviting-people/) to an organization or project. ## [Send Request to a Translation Vendor](#send-request-to-a-translation-vendor) [Section titled “Send Request to a Translation Vendor”](#send-request-to-a-translation-vendor) Professional translation agencies can have separate organizations in Crowdin Enterprise. The collaboration between the organizations is based on client-vendor relations. You can choose a vendor from the Crowdin Store or invite the translation agency you already work with to be a vendor for you. For this, the agency should register a separate organization in Crowdin Enterprise. The good thing about cooperation with a Vendor organization is that there’s no need to invite each of the agency’s translators and proofreaders to your organization or project. You invite only the vendor organization, which receives a secured copy of the workflow steps it was assigned to as an incoming project. Once the incoming project is accepted, they will be able to assign their workflow and specific translators, which will not influence your project’s workflow in any way. All their translations will be marked as translations done by that vendor, not specific people. Professional translation services offer high-quality and efficient localization. These services are paid, so be sure to discuss rates and project costs with the vendor before starting the cooperation. Read more about [Inviting an Organization to be a Vendor](/enterprise/vendors/#inviting-an-existing-organization-to-be-a-vendor). ## [Pre-translate via AI, Machine Translation, or Translation Memory](#pre-translate-via-ai-machine-translation-or-translation-memory) [Section titled “Pre-translate via AI, Machine Translation, or Translation Memory”](#pre-translate-via-ai-machine-translation-or-translation-memory) AI-powered pre-translation tools, Machine Translation (MT) engines, and Translation Memory (TM) are all effective methods for pre-translating project files. Each method offers unique benefits for assisting human translators, speeding up localization, and reducing translation costs. After the pre-translation, human translators can review and refine these translations to ensure high-quality results. ### [AI-powered Pre-Translation](#ai-powered-pre-translation) [Section titled “AI-powered Pre-Translation”](#ai-powered-pre-translation) Crowdin Enterprise integrates with top AI providers such as OpenAI, Google Gemini, Microsoft Azure OpenAI, and more. AI-powered translations provide context-aware and high-quality translations that significantly enhance efficiency. You can expand your AI provider options by installing respective applications from the Crowdin [Store](https://store.crowdin.com/tags/ai). Read more about [Crowdin AI](/enterprise/crowdin-ai/). ### [Machine Translation (MT) Engines](#machine-translation-mt-engines) [Section titled “Machine Translation (MT) Engines”](#machine-translation-mt-engines) Crowdin Enterprise supports integration with the most popular MT engines, including Google Translate and AutoML Translation, Microsoft Translator, DeepL Pro, and Amazon Translate. Similarly to AI providers, you can add more MT engines of your choice from the Crowdin [Store](https://store.crowdin.com/tags/mt). Read more about the [Machine Translation engines](/enterprise/machine-translation/). ### [Translation Memory (TM)](#translation-memory-tm) [Section titled “Translation Memory (TM)”](#translation-memory-tm) Translation Memory stores source strings and their translations into various languages. TM is automatically created for each Crowdin Enterprise project, and you can also upload your existing TMs. TM pre-translation helps you speed up the translation process by leveraging previously translated content, which is especially useful for translating repeated or similar strings, thereby reducing translation costs. Read more about [Translation Memory](/enterprise/translation-memory/). ## [Engage Your Community](#engage-your-community) [Section titled “Engage Your Community”](#engage-your-community) Crowdsourcing is a localization practice that engages your product’s community to translate your content. Translations made by community members can be reviewed by professional linguists or go directly to production. Invite your community via social media or other communication channels you use. Read more about [Crowdsourcing](/enterprise/crowdsourcing/). # Uploading Source Files > Learn how to upload source files to your project for translation Once you’ve [created a project](/enterprise/creating-project/), the next step would be preparing source files for upload. Crowdin Enterprise supports a wide range of [file formats](/enterprise/supported-formats/), including Android XML, iOS Strings, XML, JSON, etc. When you have your files prepared, you can add them to your Crowdin Enterprise project for translation. Crowdin Enterprise offers a few options for adding content to a project: * Manually via the web interface (UI). * Integrate your Crowdin Enterprise project with the tools you already use. Explore available integrations on the [Crowdin Store](https://store.crowdin.com/). * Use the [API](/developer/api/) or [Developer Tool](/developer/dev-tools/) of your choice. Usually, this task is accomplished by developers. You can [invite your colleague developer](/enterprise/inviting-people/) to assist you with this step. You can also use Crowdin sample files to test the translation workflows before starting your project with the actual source files. ## [Uploading Files](#uploading-files) [Section titled “Uploading Files”](#uploading-files) To upload files via the web interface, follow these steps: * File-based project 1. Open your project and go to **Sources > Files**. 2. Drag and drop files from your machine anywhere within the **Files** section — to the root of the project or directly into an existing folder. You can upload ZIP archives if you want to add a structured set of folders and files. 3. *(Optional)* Click **Upload Files** or **File** and select **Upload** to add files, **Use Samples** to test translation workflows, **Set Up Integration** to synchronize content automatically, or **Invite Developer** if content uploads will be handled by your developer teammate. You can also click **File** to access additional options, such as **Create String Vault** (adds an empty CSV file) or another **Set Up Integration** shortcut.  * String-based project 1. Open your project and select **Upload** on the left sidebar. 2. Select the target branch to which you’re uploading source files. By default, the `main` branch is selected. Create new branches if needed. 3. Drag and drop files from your machine, or click **Select Files**. You can also upload ZIP archives if you want a set of files to be added. 4. Crowdin Enterprise automatically tries to detect whether you’re uploading source content or translations. Verify the detection is correct and adjust the language settings if needed (e.g., English (source) should be selected for source files if the project’s source language is English). 5. *(Optional)* In the **Source files** section, to the right of the uploaded file list, configure [advanced source file import settings](#advanced-import-settings). 6. Click **Upload** to finish uploading the source content.  Read more about [project types](/enterprise/creating-project/#project-types). Limitations The maximum file size is 100 MB. If your file exceeds this limit, it is recommended to split it into several smaller files, and upload them one at a time. ### [XML, CSV, and XLSX Files](#xml-csv-and-xlsx-files) [Section titled “XML, CSV, and XLSX Files”](#xml-csv-and-xlsx-files) Some file formats, such as XML, CSV, XLSX, and others, might require additional configuration. * [CSV/XLSX File Configuration](/enterprise/csv-xlsx-configuration/) * [XML File Configuration](/enterprise/xml-configuration/) * [Parser Configuration](/enterprise/project-settings/parser-configuration/) Limitations The XLSX/XLS file size is limited to 2 000 000 cells. ### [HTML Files with Relative URLs](#html-files-with-relative-urls) [Section titled “HTML Files with Relative URLs”](#html-files-with-relative-urls) To display images and styles in the HTML file used outside of the website, where it belongs, add the `
![]() Please note that we only specified a relative address for the image. Since we specified a base URL in the head section, the browser will look for the image at "https://www.w3schools.com/images/stickman.gif".
Please note that we only specified a relative address for the image. Since we specified a base URL in the head section, the browser will look for the image at "https://www.w3schools.com/images/stickman.gif".
Text
` | | `src` | translatable if contained in `img`, `iframe`, `embed`, `video`, `audio`, `source`\*, `track`\* tags \* – if nested in the parent tags `video`, `audio` | `` | | `href` | translatable if contained in `a` tag | `Site name` | | `data` | translatable if contained in `object` tag | `` | | `value` | translatable if contained in `input`, `button` tags | `` | | `placeholder` | translatable if contained in `input`, `textarea` tags | `` | | `alt` | translatable if contained in `img` tag | `` | | `label` | translatable if contained in `optgroup`, `track`\* tags \* – if nested in the parent tags `video`, `audio` | `Hello World!` => `\Hello World!` => `\Hello World!
` * If the order is reversed, with the tag verification module running first, the output will be: * `Hello World!` => `Hello World!
` => `\Hello World!\<\/h1\>` Caution When multiple file-processing modules of the same type (e.g., `file-post-export`) share identical order value, unexpected behavior may occur. In such cases, the system selects which module to execute first based on the installation date of file-processing apps, potentially disrupting the intended processing sequence. Therefore, it is recommended to adjust the identical order values to ensure that files are processed in the desired sequence. ### [Editing File Processor settings](#editing-file-processor-settings) [Section titled “Editing File Processor settings”](#editing-file-processor-settings) To Edit the File Processor settings, follow these steps: 1. Open your project and go to the **Settings > File Processors** tab. 2. Click toward the needed processor and select **Edit**. 3. Make the necessary changes and click **Submit**. The processor settings may vary depending on the processor you are using.
# Glossary Settings
> Configure and manage glossaries for your project
With a glossary, you can create, store, and manage all the project terminology in one place. The main aim of terminology is to explain some specific terms or the ones often used in the project to be translated properly and consistently. Read more about [Glossary](/glossary/). ## [Assigning Glossary](#assigning-glossary) [Section titled “Assigning Glossary”](#assigning-glossary) To assign a glossary to your project, in the **Glossaries** section, select the needed glossaries from the list. 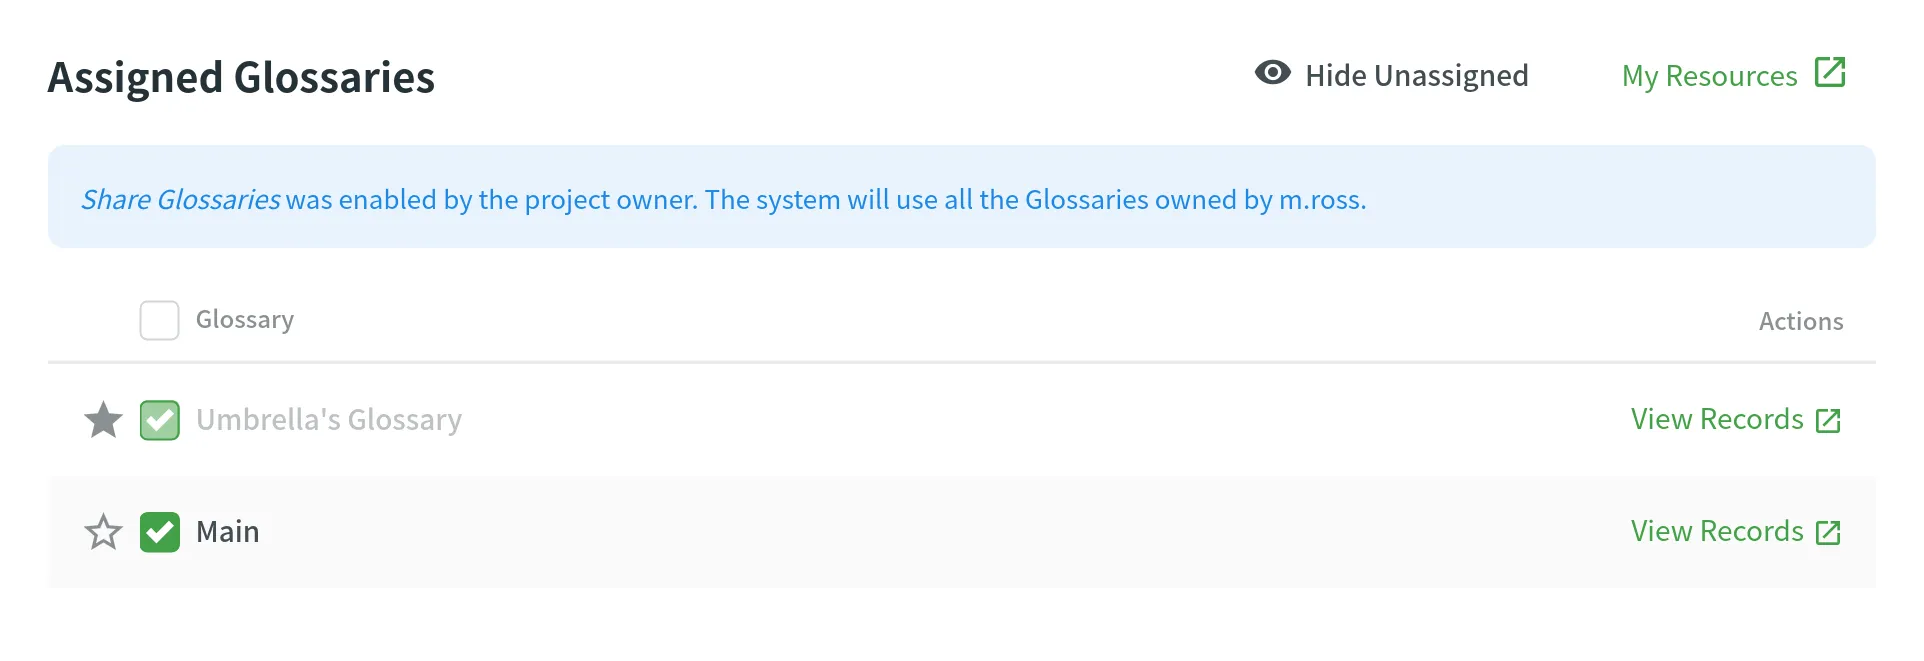 ## [Changing Default Glossary](#changing-default-glossary) [Section titled “Changing Default Glossary”](#changing-default-glossary) To change your project’s default glossary, in the **Glossaries** section, click the icon next to the needed glossary in the list.
# Import Settings
> Configure how placeholders, duplicates, and word counts are handled
In the **Import** section of the Project Settings, you can configure how Crowdin should handle placeholders, duplicate strings, and word counts in your project. ## [Source Strings](#source-strings) [Section titled “Source Strings”](#source-strings) Improve the translation consistency and streamline your workflow by unifying placeholders and handling duplicate strings. ### [Unify Placeholders](#unify-placeholders) [Section titled “Unify Placeholders”](#unify-placeholders) Enable the transformation of the placeholders to the unified format to improve the work with TM suggestions. On export, the placeholders in translations are transformed back to the original format. If your project contains iOS strings, iOS XLIFF, and Android XML files, you can enable the **Unify placeholders** option, and the system will transform placeholders into a unified look. For example, Crowdin will make the Android string `Hello, %s!`, and the iOS string `Hello, %@!` look in the Editor this way: `Hello, [%s]!`. This option is beneficial when you work with TM since TM suggestions from iOS strings, iOS XLIFF, and Android XML will be completely interchangeable. Crowdin will transform the translation placeholders back to the original format on export. This option only applies to iOS strings, iOS XLIFF, and Android XML formats. ### [Duplicate Strings](#duplicate-strings) [Section titled “Duplicate Strings”](#duplicate-strings) You can save time by translating all duplicates with the same translation and hiding these instances from translators. This can affect accuracy. Crowdin’s localization process is based on translating source strings to the defined target languages. Source strings are uploaded to the system in localization files. Each unique source string first uploaded or added (for CSV and other formats supporting [string editing](/string-management/#string-editing)) in Crowdin is considered a master string. All other strings that are identical to the master string but were uploaded or created later are considered duplicate strings. #### [Duplicate Strings Management](#duplicate-strings-management) [Section titled “Duplicate Strings Management”](#duplicate-strings-management) If your project contains duplicated strings, you can choose how the system should treat them using the following options: * **Show** – translators will translate each instance (string) separately. Duplicate strings won’t be hidden. * **Show, but auto-translate them** – duplicate strings will be automatically translated but remain visible to translators. Once the master string is translated, its translation is automatically shared with all duplicates. Translators can review and re-translate each duplicate with their own translation as needed. If a unique translation is provided for a specific duplicate, it will override the shared translation for that string alone, allowing for precise context-specific translations without affecting the other duplicates. If a translator removes a duplicate’s unique translation, it will be automatically translated with a translation from a master string. * **Show within a version branch (regular detection)** – duplicates will be hidden only between [version branches](/version-management/). * **Show within a version branch (strict detection)** – duplicates will be hidden only between version branches. * **Hide (regular detection)** – all duplicates will share the same translation. * **Hide (strict detection)** – all duplicates will share the same translation. Regular duplicate detection – when comparing strings, Crowdin considers only source texts. Strict duplicate detection – when comparing strings, Crowdin considers both string identifiers (keys) and source texts. #### [Show all duplicates](#show-all-duplicates) [Section titled “Show all duplicates”](#show-all-duplicates) When this option is selected, all duplicate strings will be visible to translators. Each duplicate will require a separate translation. 💡 **Use case**: works perfectly for projects where the same words might have various meanings depending on the context. #### [Show, but auto-translate duplicates](#show-but-auto-translate-duplicates) [Section titled “Show, but auto-translate duplicates”](#show-but-auto-translate-duplicates) When this option is selected, all duplicate strings are shown and automatically translated. Once the master string is translated, its translation is automatically shared among all duplicates. This allows translators to review and re-translate duplicate strings if necessary. 💡 **Use case**: works excellently if you want to save time but still require automatic translations to be reviewed. To better illustrate how the **Show, but auto-translate them** option works, consider the following five-string JSON file: two strings are unique, and three strings have identical source text. ```json { "hello": "Hello", "welcome": "Welcome!", "save1": "Save", "save2": "Save", "save3": "Save" } ``` Upon importing this file, the system marks the first of these identical strings (`"save1": "Save"`) as the master string with the “Master” marking, while the subsequent two identical strings (`"save2": "Save"` and `"save3": "Save"`) are labeled as duplicates of this master string with the “Duplicate” marking. Once you set the Duplicate strings option to **Show, but auto-translate them**, the system keeps all five strings visible to translators and for the master string and its two duplicates, automatic translation propagation is enabled. This means that translations are automatically shared from the master string to its duplicates. Let’s consider the following scenarios: * *Master string is translated first* – the system immediately propagates the translation of the master string to its duplicates. As a result, all three identical strings (the master string and its two duplicates) are displayed with translations. However, translators can review and re-translate each duplicate with their own translation as needed. If a unique translation is provided for a specific duplicate, it will override the shared translation for that string alone, allowing for precise context-specific translations without affecting the other duplicates. If a translator removes a duplicate’s unique translation, it will be automatically translated with a translation from a master string. * *One of the duplicates is translated first* – the system does not propagate the translation of the duplicate to the master string or the other duplicate. Consequently, one duplicate string is displayed with a translation, while the master string and the other duplicate remain untranslated. #### [Show within a version branch. Duplicates will be hidden only between version branches](#show-within-a-version-branch-duplicates-will-be-hidden-only-between-version-branches) [Section titled “Show within a version branch. Duplicates will be hidden only between version branches”](#show-within-a-version-branch-duplicates-will-be-hidden-only-between-version-branches) When this option is selected, only the master strings that were originally uploaded to the system will be available for translation. All duplicate strings will automatically get the translations of the original strings and will be hidden in all version branches. This option is available in two versions: regular duplicate detection, strict duplicate detection. If your source files contain strings with apparent identifiers (keys), it’s better to use a *strict* version of this option. In other cases, feel free to use a *regular* one. Here are a few things to keep in mind: * The system always checks the path to the string throughout the branches. For example, even if the strings are the same in different version branches (`branch1` and `branch2`), but their paths are different (branch1 - `/localization/android.xml` and branch2 - `/localization/apps/android.xml`), they won’t be recognized as duplicates. * This option works only for the strings located in the files that have the same format. For example, if there is the same string in `android.xml` and `ios.strings` files, it won’t be recognized as a duplicate. 💡 **Use case**: works perfectly for continuous projects with various version branches. Allows translators to work with unique strings in separate branches. #### [Hide all duplicates](#hide-all-duplicates) [Section titled “Hide all duplicates”](#hide-all-duplicates) When this option is selected, the system spots the duplicate strings in all files. Only the master strings that were originally uploaded are visible and should be translated. The hidden duplicate strings will automatically share the translations from the corresponding master strings. This option is available in two versions: regular duplicate detection, strict duplicate detection. If your source files contain strings with apparent identifiers (keys), it’s better to use a *strict* version of this option. In other cases, feel free to use a *regular* one. 💡 **Use case**: works great for projects with narrow scopes where all duplicates share the same context. ## [Word count](#word-count) [Section titled “Word count”](#word-count) You can set the preferred way Crowdin should count words in your project. Specifically, it applies to whether HTML tags should be counted as regular words or not. By default, Crowdin considers HTML tags as regular words for most of the supported formats, excluding the following ones: HTML, Front Matter HTML, HAML, MD, Front Matter MD, XML, WEBXML, IDML, XLIFF, XLIFF 2.0, ADOC, DOCX, DITA. * **Auto (default)** – HTML tags will be counted as regular words or skipped depending on the source file format. * **Count tags** – all HTML tags will be counted as regular words. * **Skip tags** – all HTML tags won’t be counted. More information about Crowdin [Word Counter](/word-counter/).
# Label Settings
> Use labels in your project to easily organize your resources
Use labels in your project to easily organize resources (e.g., screenshots, strings, etc.) by specific topics. Once you add labels, you can filter items by those labels. If you already use labels for your source strings, you can use the same labels for screenshots. ## [Managing Project Labels](#managing-project-labels) [Section titled “Managing Project Labels”](#managing-project-labels) To create, edit, or remove project labels, follow these steps: 1. Open your project **Settings** tab. 2. Select the **Labels** section. 3. In the appeared screen, add new labels and edit or remove existing ones. 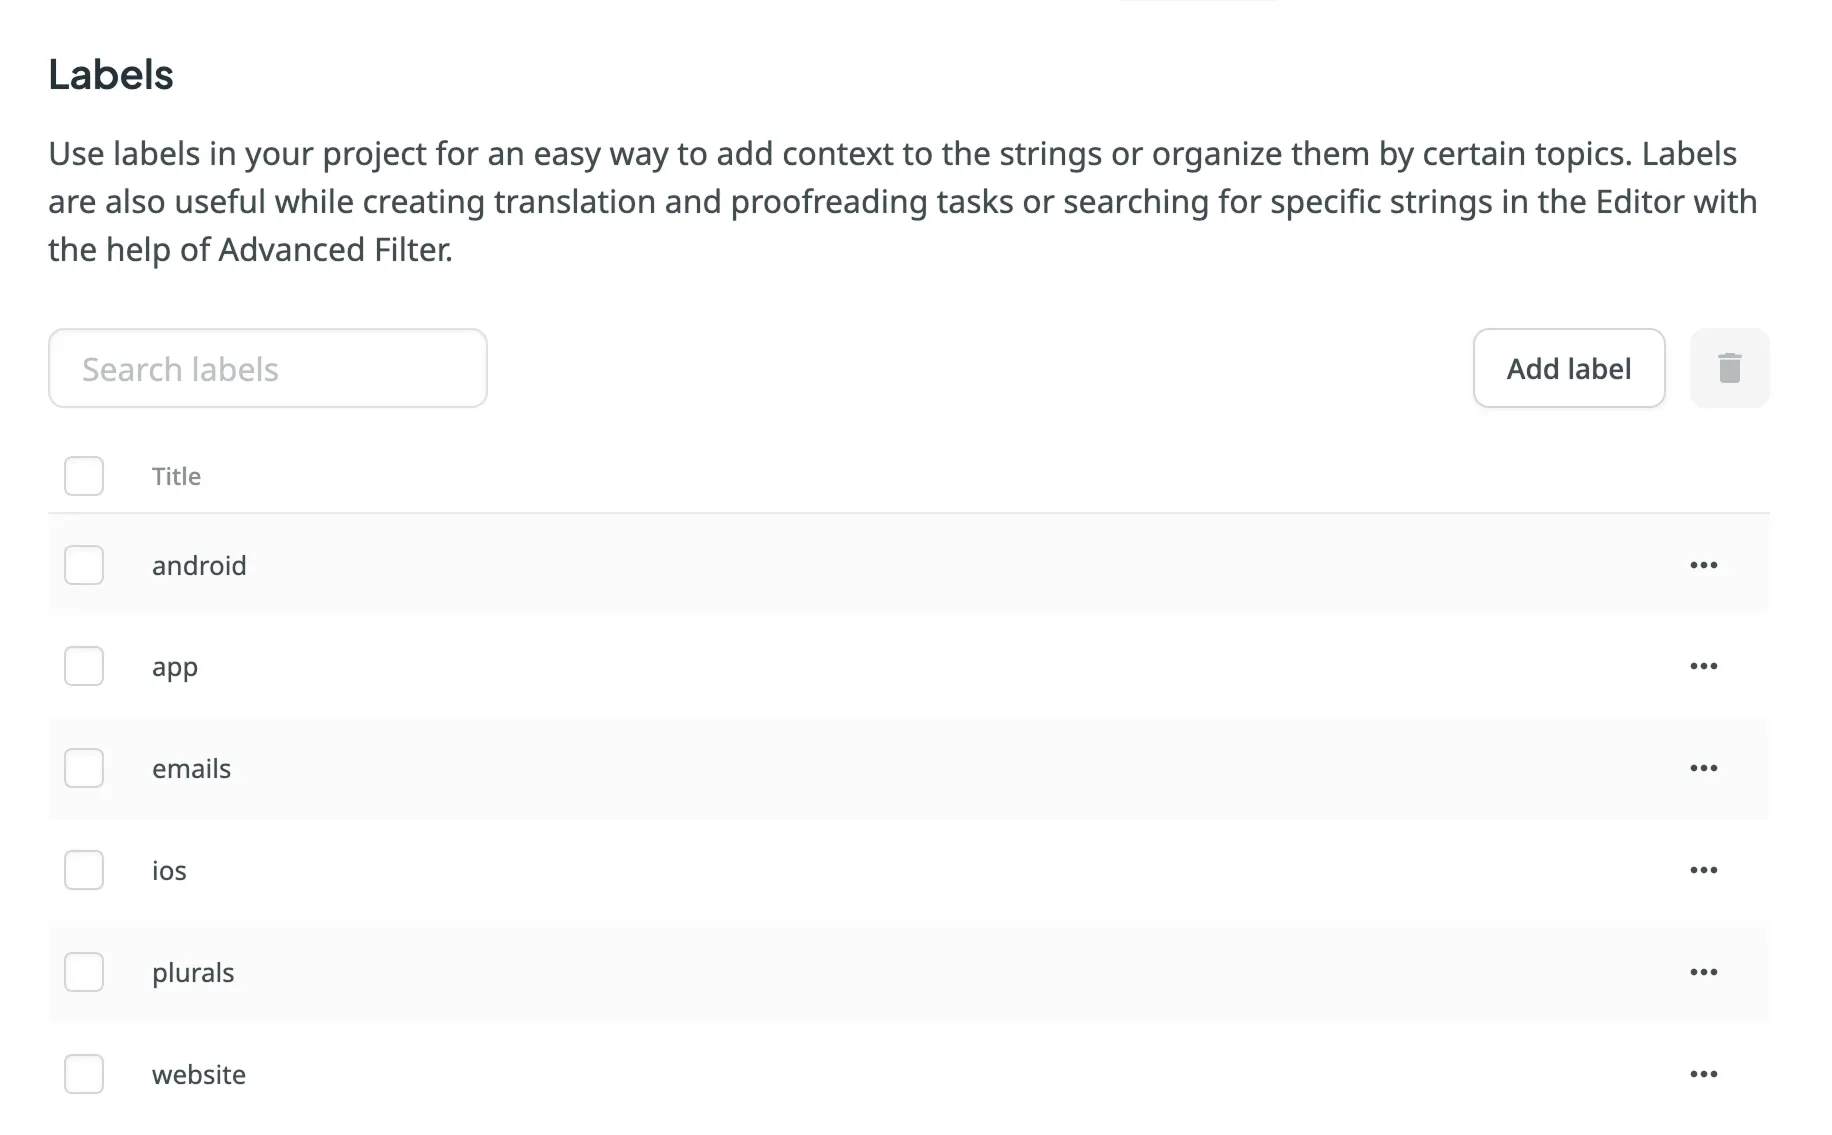 To edit or remove a label, click on the label you want to edit or remove and select the appropriate action. Use the **Search** field above the label list to quickly find specific labels. Caution Labels are case insensitive (e.g., `Label` and `label` are treated as identical). ## [See Also](#see-also) [Section titled “See Also”](#see-also) [Adding Labels to Strings ](/string-management/#labels) [Adding Labels to Screenshots ](/screenshots/#labels)
# Language Settings
> Manage your project source and target languages
In the Languages section, you can manage your project source and target languages and configure language mapping to use custom language codes. ## [Source Language](#source-language) [Section titled “Source Language”](#source-language) The source language is the language you’re translating from. If you want to change the source language for your project, select a new language from the drop-down list and click **Update**. Here are a few points you should be aware of when changing the project’s source language: * Please note that there might be a plural form mismatch for imported strings depending on the new source language. For example, some plural forms might not be displayed in the Editor, or some plural form translations might be used in other ones on translation export. We recommend updating the source files if the new source language has different plural forms than the initial one. * If you had an opened browser tab with the Editor during the source language update, you might need to refresh it for changes to take effect and continue translating from the new source language. ## [Target Languages](#target-languages) [Section titled “Target Languages”](#target-languages) The **Target Languages** section allows you to add or remove target languages in your project, copy the target languages list from one project to another, and add custom languages. You can update your target languages anytime. To add or remove target languages in your project, follow these steps: 1. Open your project and go to **Settings > Languages**. 2. In the **Target Languages** section, you can make the following changes: * Select the languages you want to add to the project in the left panel. * Click on the languages you want to remove from the project in the right panel. 3. Click **Save**. 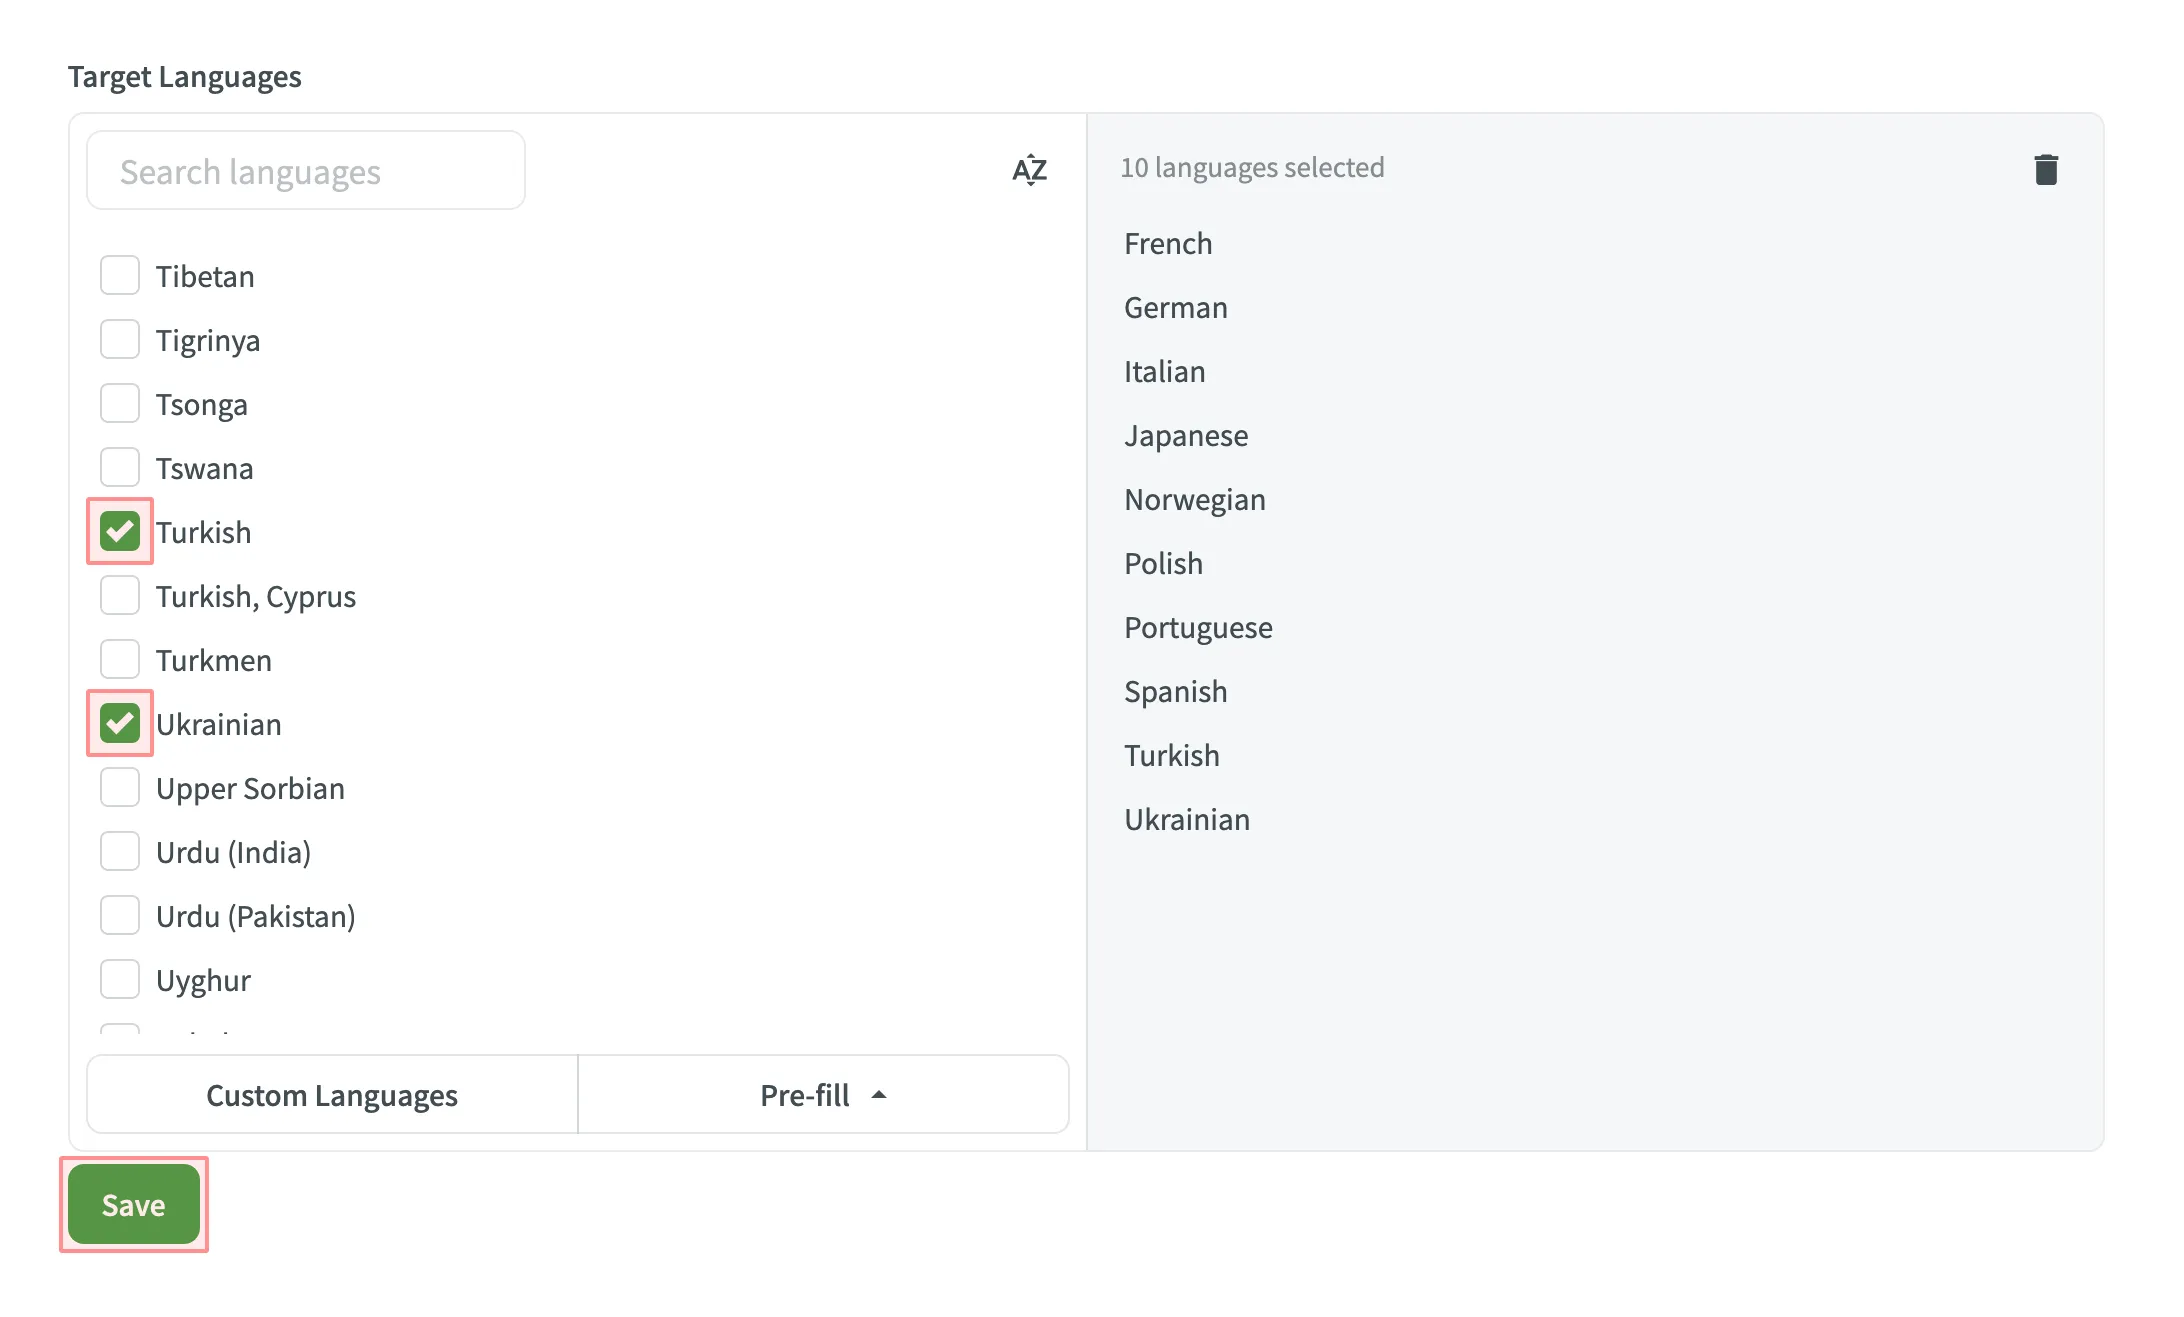 ### [Copying Target Languages](#copying-target-languages) [Section titled “Copying Target Languages”](#copying-target-languages) If you translate multiple projects into the same target languages, you can copy the target languages list from one project to another in a few clicks: 1. Open your project and go to **Settings > Languages**. 2. In the **Target Languages** section, click **Pre-fill** and select **Copy From Project…**. 3. Select the project you’d like to copy target languages from and click **Choose**. 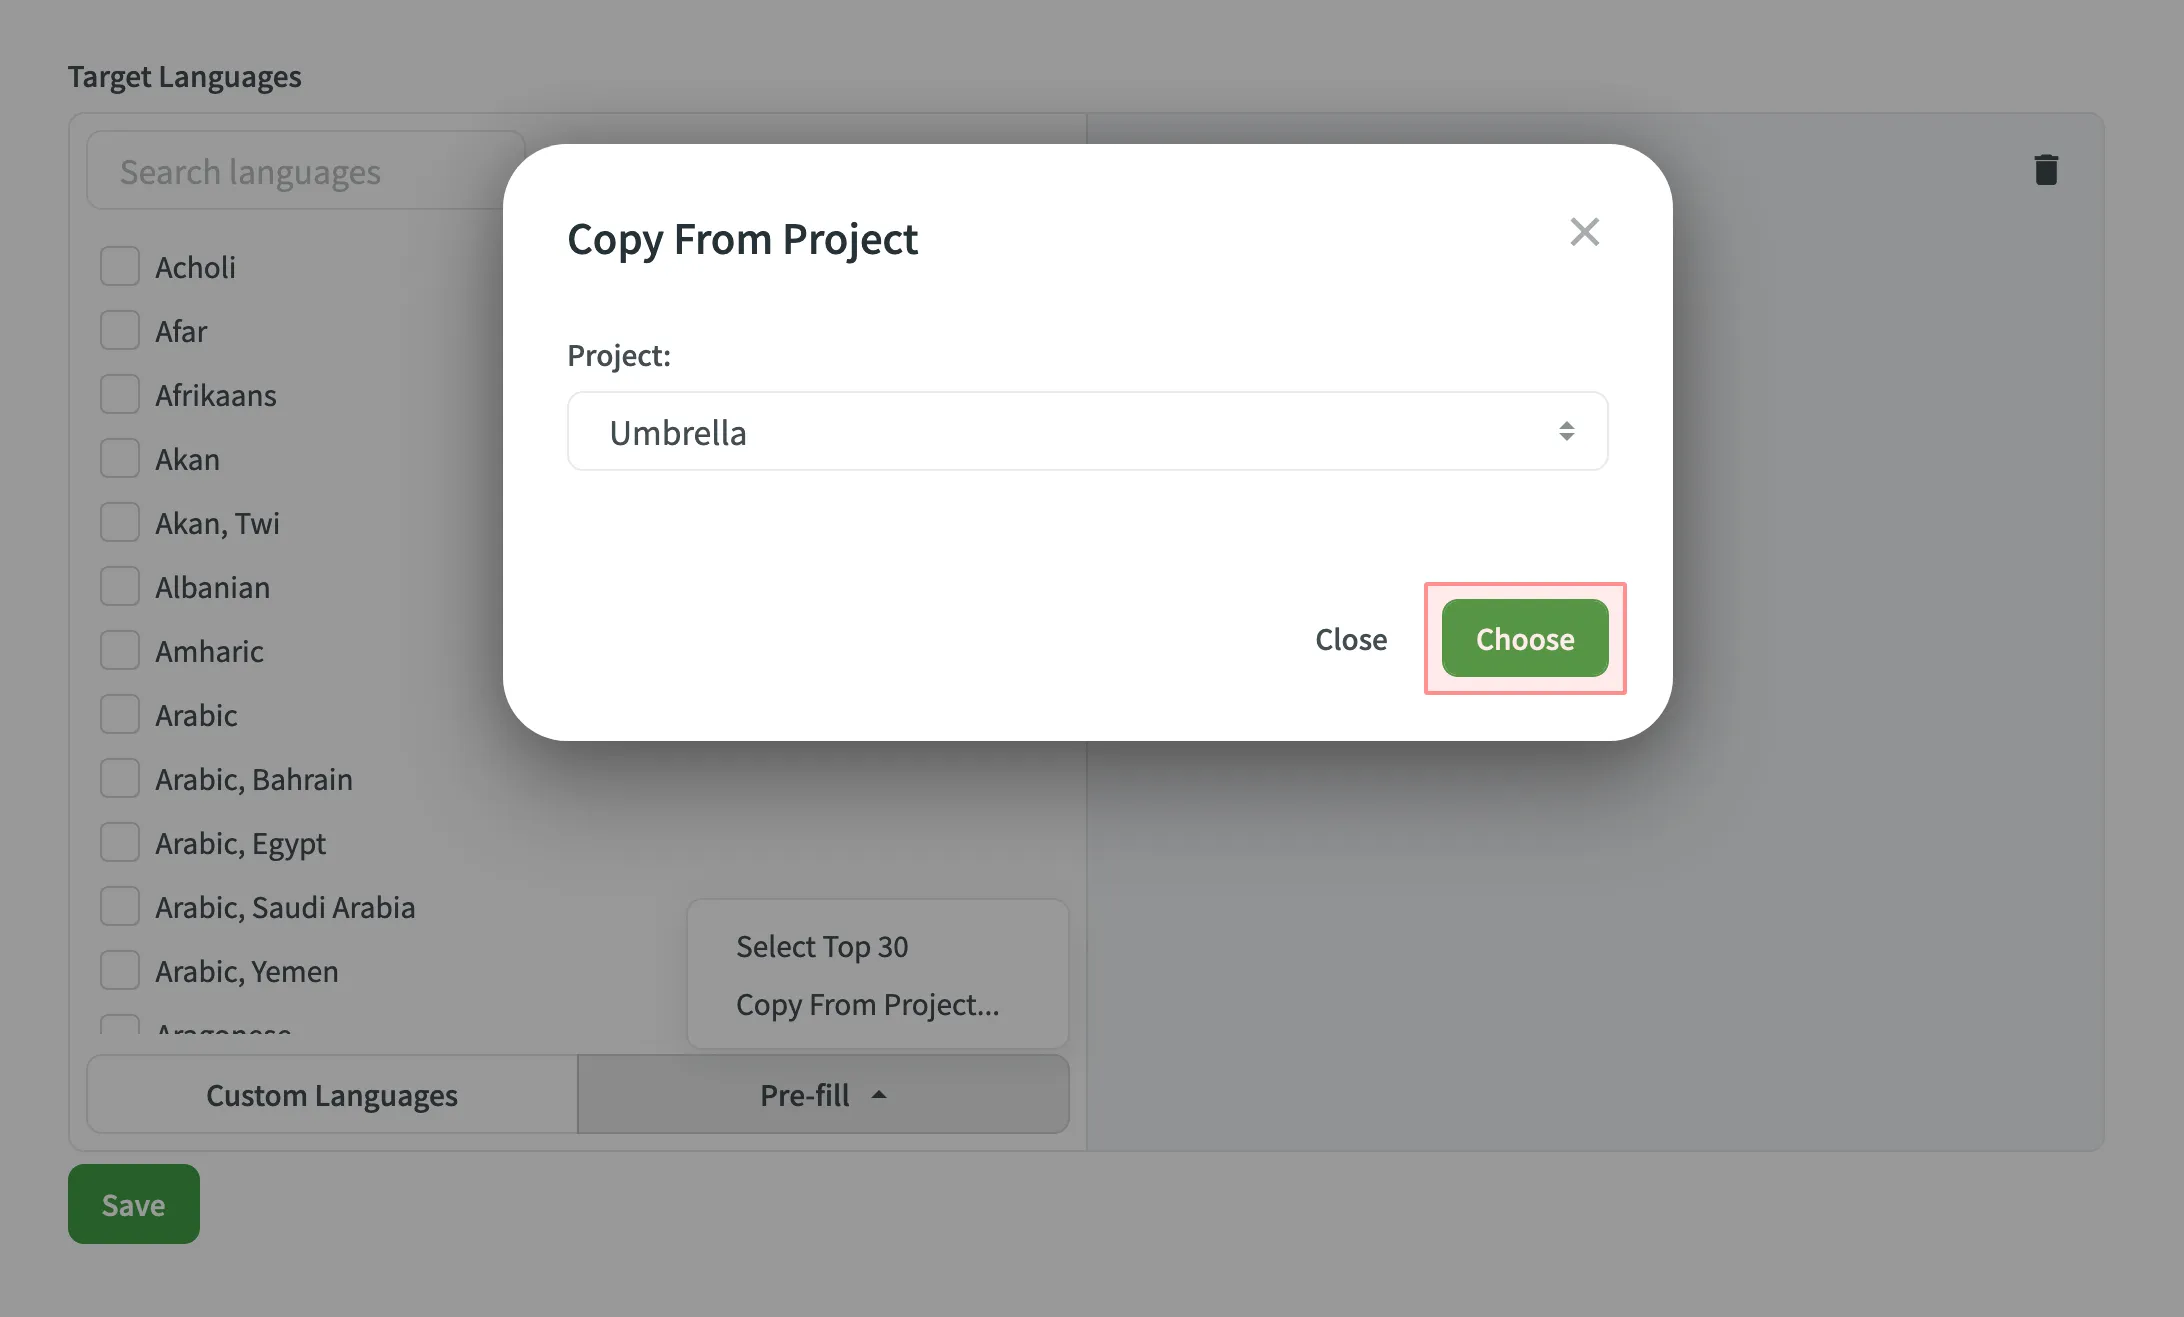 4. Click **Save**. ### [Adding Custom Languages](#adding-custom-languages) [Section titled “Adding Custom Languages”](#adding-custom-languages) If you’d like to translate your project into rare or less common target languages that are not officially supported at the moment, you can still add them as custom languages. To add a custom language, follow these steps: 1. Open your project and go to **Settings > Languages**. 2. In the **Target Languages** section, click **Custom Languages**. 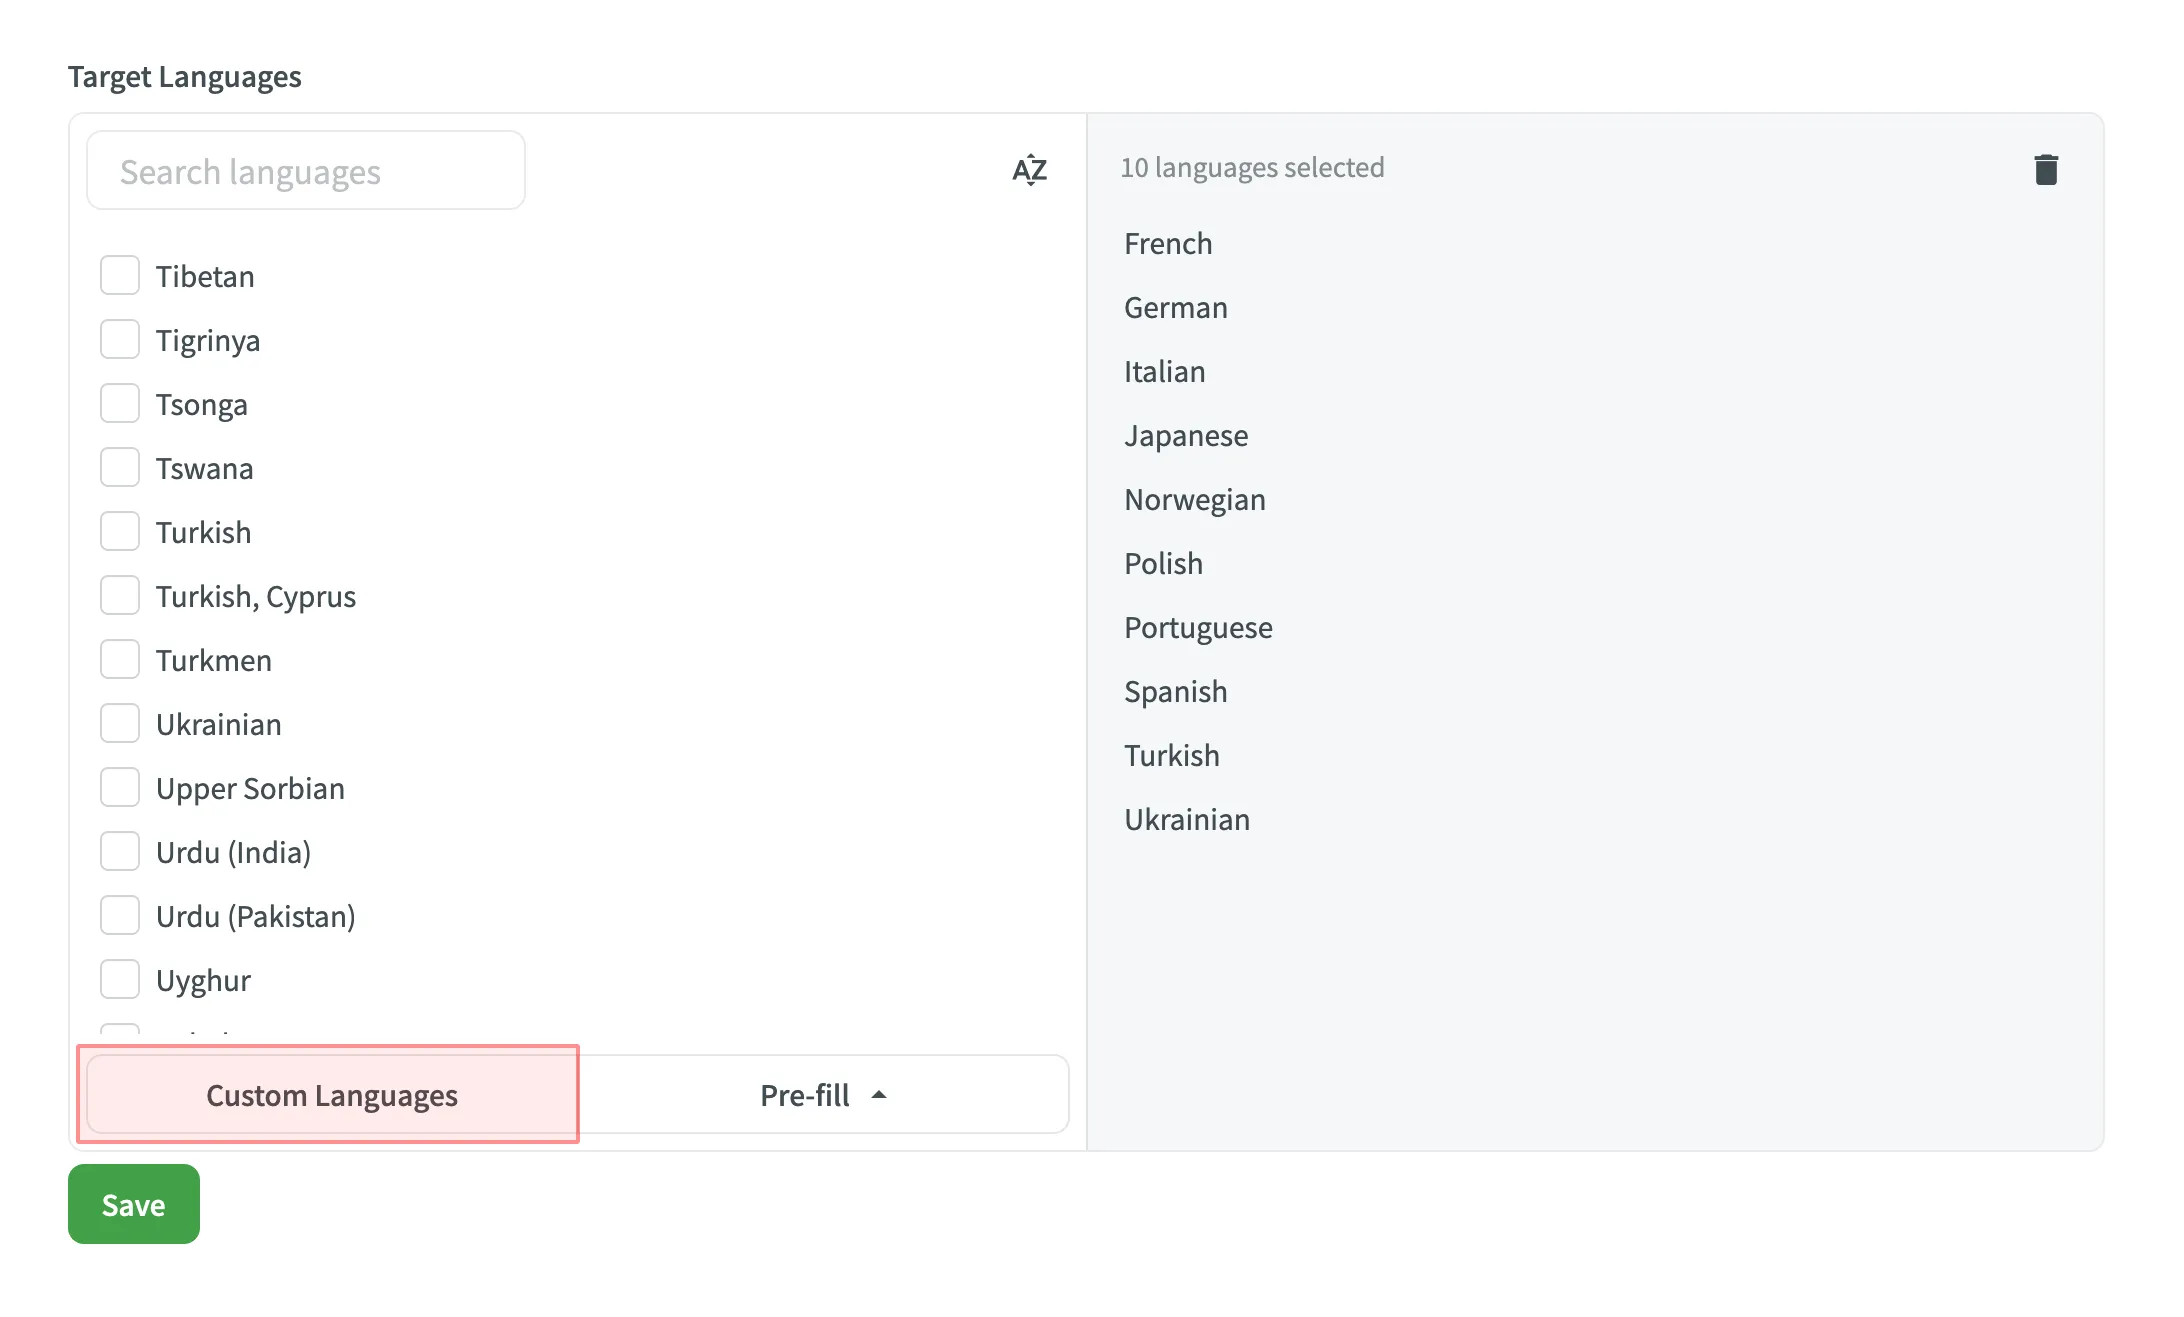 3. Click **Add**. 4. Specify a language name. 5. If your custom language is a dialect of any of the supported languages, select it from **The dialect of** drop-down menu. 6. Fill in language code fields. 7. Set the preferred text direction and plural forms options. 8. Click **Save**. 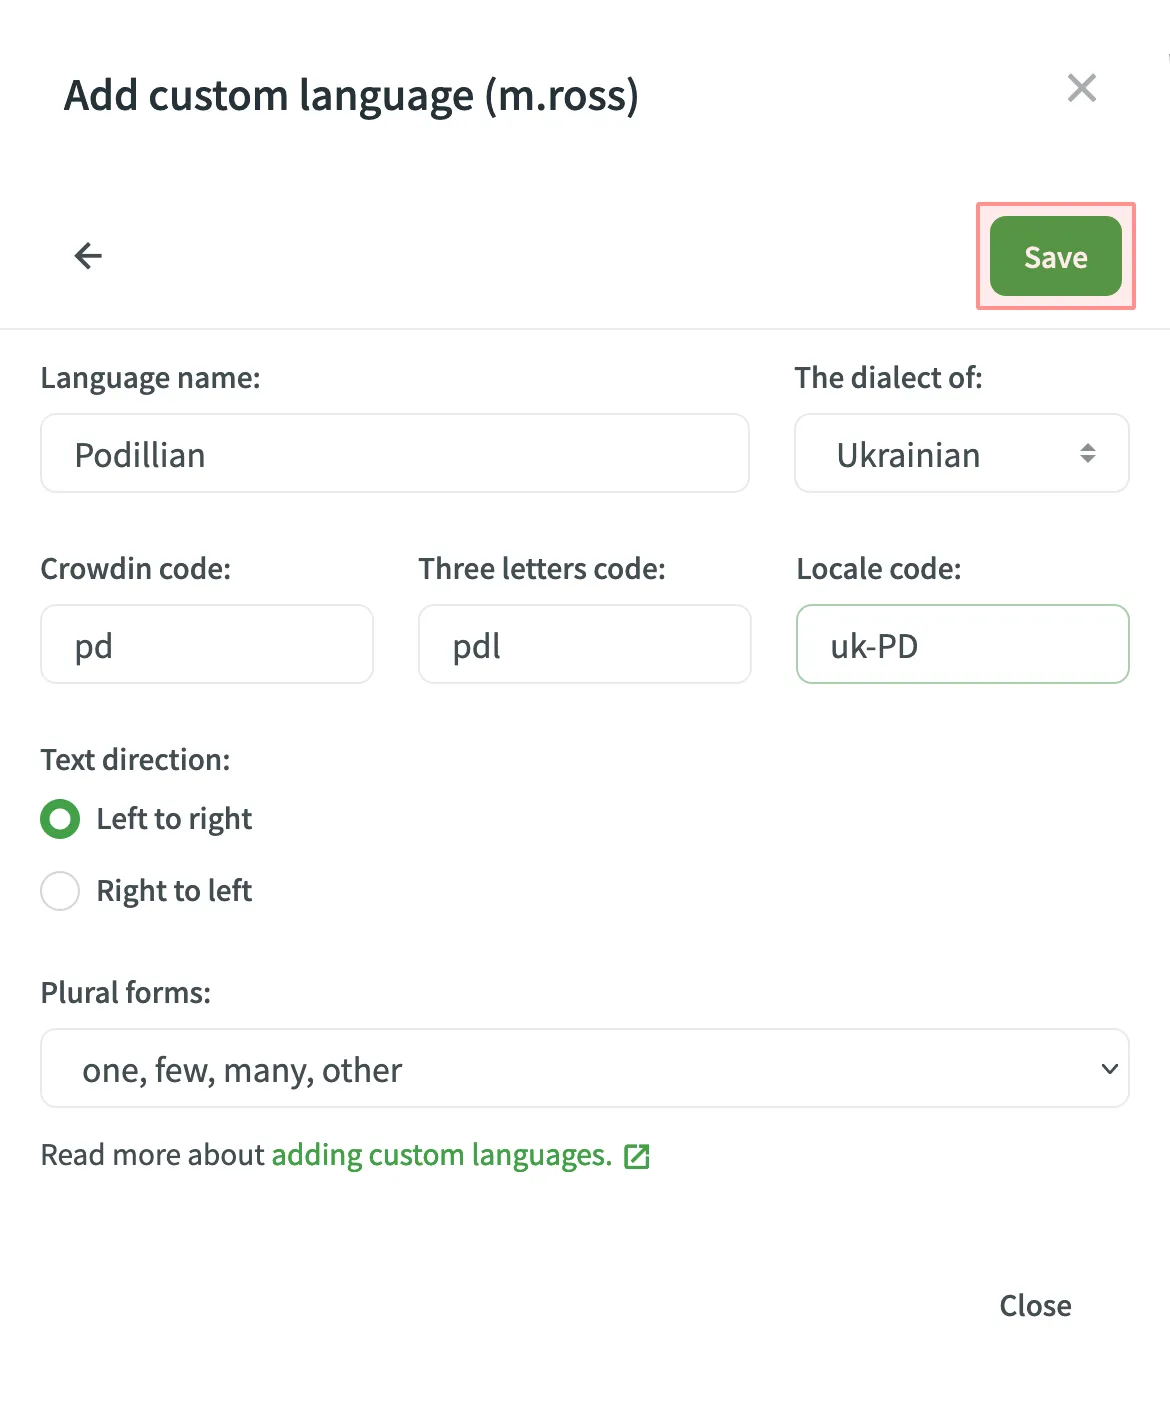 ### [Adding Custom Language Codes](#adding-custom-language-codes) [Section titled “Adding Custom Language Codes”](#adding-custom-language-codes) To add language mapping, follow these steps: 1. Open your project and go to **Settings > Languages**. 2. Scroll down to the **Add custom language codes** section. 3. Click **Language Mapping**. 4. Choose the necessary language and placeholder. 5. Add custom code. 6. You can map as many languages as you need. Click **Add Mapping** to add another custom code. 7. Click **Save**. 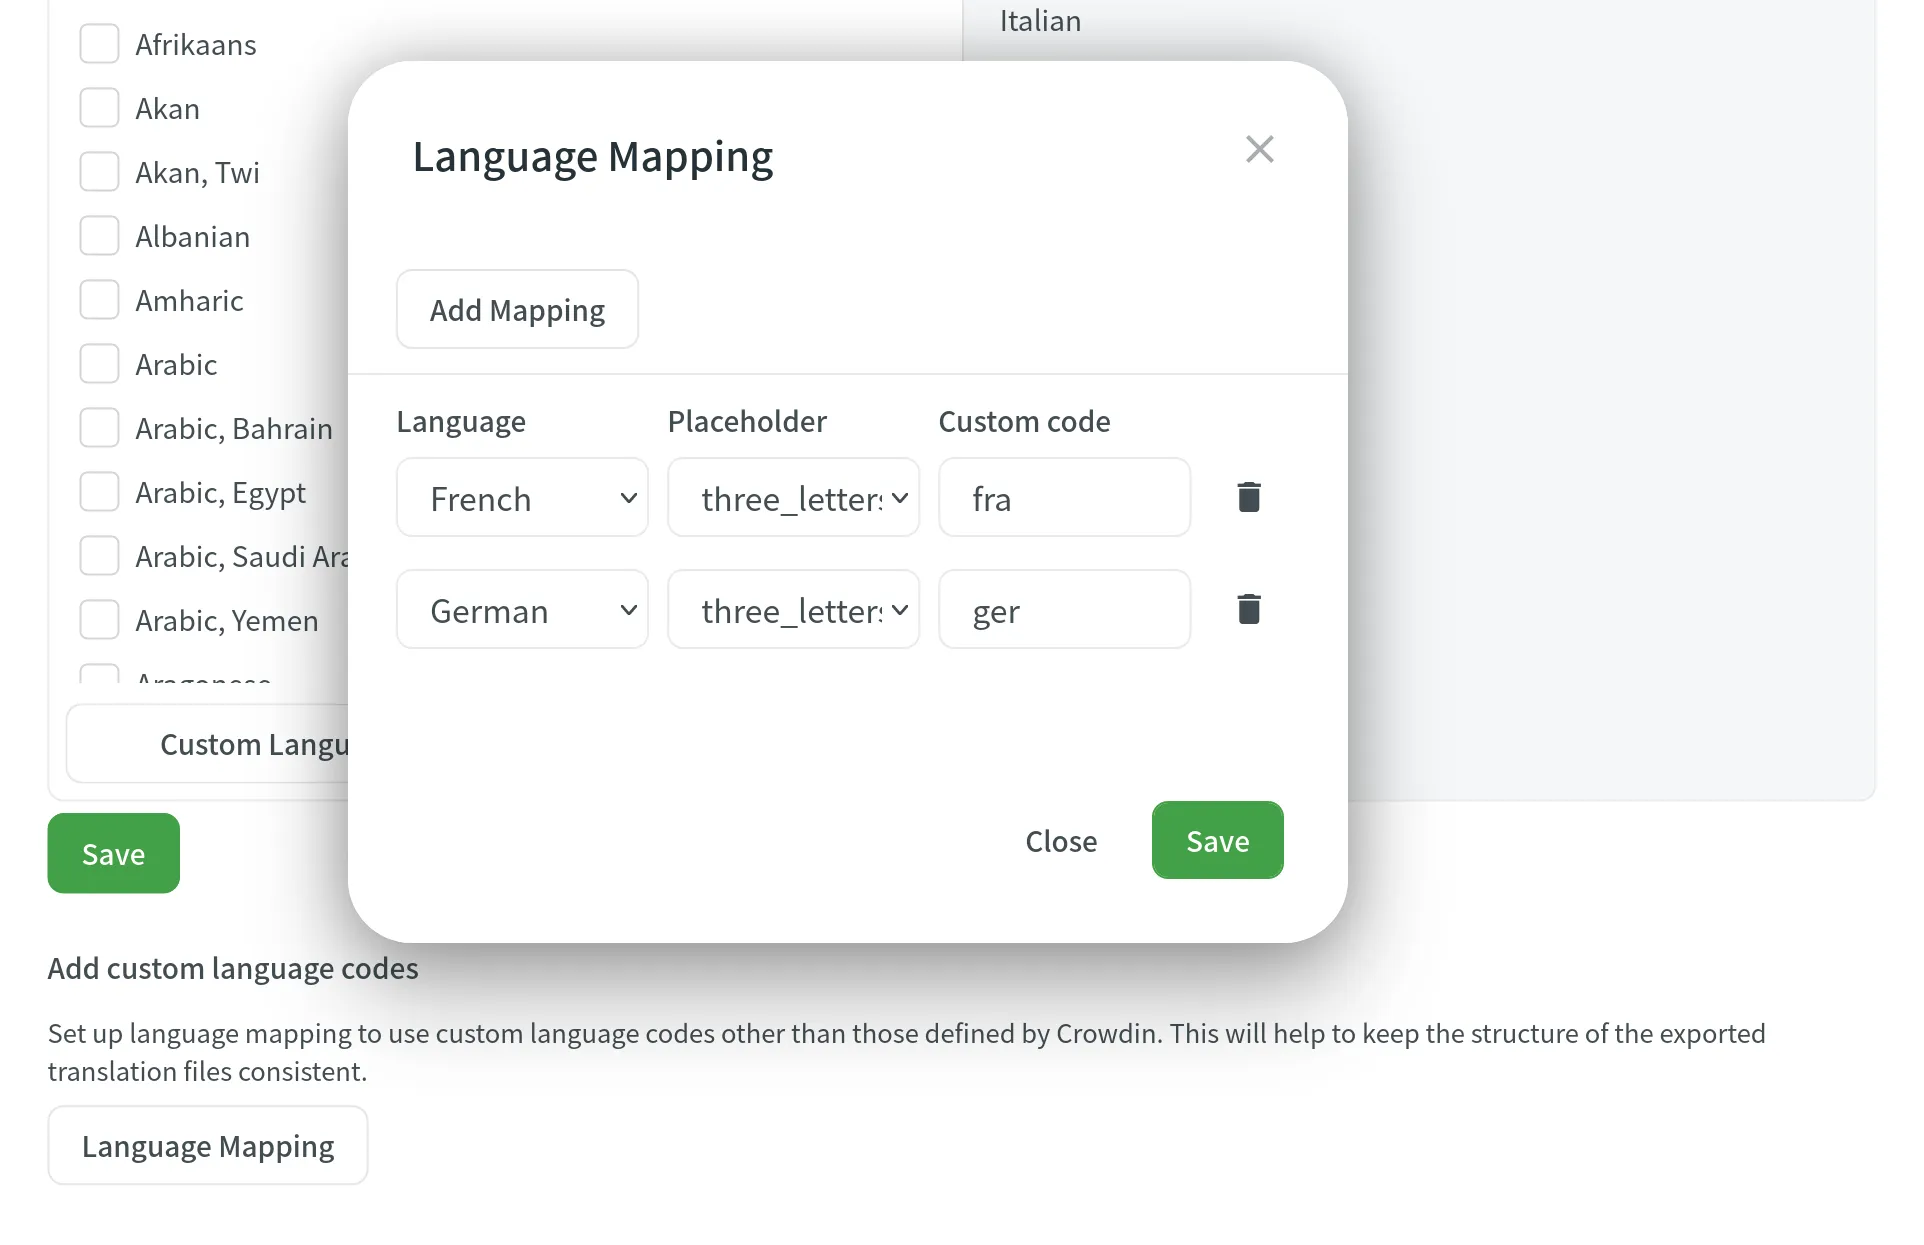 ## [See Also](#see-also) [Section titled “See Also”](#see-also) [Supported Languages ](/developer/language-codes/)Explore the list of languages supported by Crowdin.
# Machine Translation Settings
> Configure machine translation settings for your project
In the **Machine Translation** section, you can manage the following settings: * **Show machine translation suggestions** – enable MT suggestions from machine translation engines such as Microsoft Translator, Google Translate, and others to be displayed in the Editor. ## [See Also](#see-also) [Section titled “See Also”](#see-also) [MT Engines ](https://store.crowdin.com/categories/machine-translation)Explore the list of supported machine translation engines and learn how to configure them. [Machine Translation ](/machine-translation/)Learn how to configure machine translation engines. [Pre-Translation ](/pre-translation/)Speed up the translation process and ease the work of translators.
# Parser Configuration Settings
> Configure import and export behavior for supported file formats
The Parser configuration feature lets you change the default import and export behavior predefined for file formats supported by Crowdin. Parser configuration in a specific project is applied only to files stored in this project. You can set the parser configuration for all files of a certain format or single files. Once you save the parser configuration for some file format, you can upload source files to your project, and Crowdin will apply your settings accordingly. You can configure import and export behavior for the following formats: Java Properties, Generic XML, DITA, AsciiDoc, Plain text, MadCap Flare, HTML, Office documents, Adobe FrameMaker, Adobe InDesign, Markdown, and MediaWiki.  Caution Some parser settings may be unavailable in [string-based](/creating-project/#string-based-project) projects. ## [Parser Configuration Parameters](#parser-configuration-parameters) [Section titled “Parser Configuration Parameters”](#parser-configuration-parameters) Some parameters are common to all formats, while others are format-specific. In the table below, you can see the available parser parameters and formats they could be configured for. | Parameter | Description | Format | | --------------------------------- | -------------------------------------------------------------------------------------------------------------------------------------------------------------------------------------------------------------------------------------------------------------------------------------------------------------------------------------------------------------------------------------------------- | ------------------------------------------------------------------------------------------------------------------------------------ | | Content segmentation | On import, the source file’s content will be split into shorter text segments using predefined segmentation rules (SRX 2.0). | Generic XML, DITA, AsciiDoc, MadCap Flare, HTML, Office documents, Adobe FrameMaker, Adobe InDesign, Markdown | | Custom segmentation rules | Defines your own segmentation rules.Read more about [Custom Segmentation](/custom-segmentation/). | Generic XML, DITA, AsciiDoc, Plain text, MadCap Flare, HTML, Office documents, Adobe FrameMaker, Adobe InDesign, Markdown, MediaWiki | | Excluded elements | Defines a list of CSS style selectors for elements that should not be available for translation (e.g., code, pre > code, .code-block). Applicable only to block elements. Inline elements are ignored. | HTML, HTML with Front Matter | | Excluded front matter elements | Defines a list of front matter elements that should not be available for translation (e.g., keywords, “internal.description”, tags). The path elements should be delimited by a period. The keys containing a period must be enclosed in quotation marks. | HTML with Front Matter, MDX | | Exclude code blocks | Defines whether to import code blocks. Applicable only to code blocks. Inline elements with code are ignored. | MDX | | Translate content | Texts stored inside the tags will be available for translation. | Generic XML | | Translate attributes | Tag attributes will be available for translation. | Generic XML | | Translatable elements | Defines the specific nodes and attributes to be available for translation. | Generic XML | | Escape single quote | Defines the behavior regarding a single quote escaping in exported translations. Available options:- Do not escape single quote - Escape single quote by backslash (`It's okay`⇒`It\'s okay`) - Escape single quote by another single quote (`It's okay`⇒`It''s okay`) - Escape single quote by another single quote only in strings containing variables `{0}` (`{0} it's okay`⇒`{0} it''s okay`) | Java Properties | | Escape special characters | Any special characters (i.e., `=`, `:`, `!`, `#`) will be escaped by a backslash `\` in exported translations. | Java Properties | | Clean tags aggressively | Additional formatting tags related to text spacing will be removed on import. Useful when translating Office documents converted from other formats (e.g., PDF, etc.), and the conversion introduced lots of unnecessary formatting tags. | Office documents | | Translate hyperlink URLs | Hyperlink URLs will be available for translation. | Office documents | | Translate hidden text | The hidden text will be available for translation. | Office documents | | Translate hidden rows and columns | The hidden rows and columns will be available for translation. | Office documents | | Import hidden slides | The hidden slides will be available for translation. | Office documents | | Import notes | The slide notes will be available for translation. | Office documents | ## [Parser Configuration for All Project Files of a Specific Format](#parser-configuration-for-all-project-files-of-a-specific-format) [Section titled “Parser Configuration for All Project Files of a Specific Format”](#parser-configuration-for-all-project-files-of-a-specific-format) To set the preferred parser configuration for all files of a specific format, follow these steps: 1. Open your project and go to **Settings > Parser configuration**. 2. Choose the needed file format and click Edit. 3. Set the preferred settings. 4. Click **Save**. To add a new file format, click **Add Apps** and install the required format. ## [Parser Configuration for a Single File](#parser-configuration-for-a-single-file) [Section titled “Parser Configuration for a Single File”](#parser-configuration-for-a-single-file) In some cases, you might need to set the parser configuration not for all files of some file format but just for a single file. To set the parser configuration for a single file, follow these steps: 1. Open your project and go to **Sources > Files**. 2. Double-click on the needed file. 3. In the appeared dialog, switch to the **Parser configuration** tab. 4. Set the preferred settings. 5. Click **Save**. Once you save the file parser configuration, Crowdin will reimport this file and apply your settings. Read more about [file management](/file-management/) in Crowdin.
# Pre-Translate Settings
> Configure the automatic pre-translation of new content in project
In the **Pre-translate** section of the Project Settings, you can configure the automatic pre-translation of new content uploaded to the project. You can choose to use translation memory, machine translation engines, or AI-powered translations to pre-translate the content.  When the **Pre-translate New Content Automatically** is enabled, Pre-translate will be triggered when new content is uploaded, when target languages are changed, and when file settings are changed. ## [TM Pre-translate](#tm-pre-translate) [Section titled “TM Pre-translate”](#tm-pre-translate) You can enable and configure the automatic pre-translation via TM. When enabled, the system will automatically apply translations from your TM in the following cases: when there is newly uploaded content, when target languages change, or after file settings are modified. * **Match Ratio** – select TM Match type of TM suggestions that should be applied during automatic pre-translation: * 100% Match * Perfect Match * **Approve Added Translations** – select whether to approve new translations. Further configure it with the following options: * With perfect match – approves only Perfect match translations. * With perfect match (approved previously) – approve Perfect match translations that were previously approved. * All (skip auto-substituted suggestions) – approve all except auto-substituted translations. * All – approve all new translations added during the pre-translation. Read more about [Translation Memory](/translation-memory/). ## [MT Pre-translate](#mt-pre-translate) [Section titled “MT Pre-translate”](#mt-pre-translate) Enable and configure the automatic pre-translation via MT. When enabled, the system will automatically apply translations provided by the selected MT engine in the following cases: when there is newly uploaded content, when target languages change, or after file settings are modified. You can configure the automatic pre-translation via MT by selecting the preferred MT engine and specifying all or selected project languages. Read more about [Machine Translation](/machine-translation/). ## [AI Pre-translate](#ai-pre-translate) [Section titled “AI Pre-translate”](#ai-pre-translate) Enable and configure automatic pre-translation via AI. When enabled, the system will automatically apply translations provided by the selected AI engine in the following cases: when new content is uploaded, when target languages change, or after file settings are modified. You can choose your preferred AI prompt and specify all or selected project languages. You can configure several different prompts for different languages. Click the plus button to configure a new prompt for AI Pre-translation. Read more about [Crowdin AI](/crowdin-ai/).
# Privacy & Collaboration Settings
> Configure the visibility of your project and its contents
In the *Privacy & Collaboration* section of the *Project Settings* you can manage the visibility of your project and its contents. You can also configure the notifications sent to project participants. ## [Project visibility](#project-visibility) [Section titled “Project visibility”](#project-visibility) Set the preferred visibility for your project with the following options: * **Public project** – public projects can be found via search engines and Crowdin search. Crowdin users can join public projects without approval if the **Moderated project joining** option is disabled. * **Private project** – private projects can’t be found via search engines and Crowdin search. Only the invited users can join the project. ## [Privacy](#privacy) [Section titled “Privacy”](#privacy) Configure your project privacy settings with the following options: * **Two-factor authentication** – specify which project members are required to enable two-factor authentication in their **Account Settings > Account** tab to access the private project. This role-based option provides the following configurations: * **Turned off** – two-factor authentication is not required (default). * **All project members** – requires all project members to enable two-factor authentication, disabling other member category options. * **Managers** – requires only members with the Manager role to enable two-factor authentication. * **Developers** – requires only members with the Developer role to enable two-factor authentication. You can select the **Managers** and **Developers** options individually or together. After selecting your preferred categories, click **Update** to save changes. * **Moderated project joining** – require users to send requests to join the translation team of the preferred language. After the review, a project manager or proofreader can approve or decline the request. After joining the project, multilingual translators can submit new requests to join translation teams in other target languages. * **Task-based access control** – allow project members to work with tasks they are assigned to, even if they do not have full access to the language in the project. * **Allow offline translation** – allow translators to download source files to their machines for offline translation and upload translations back into the project. The project owner and managers can always download sources and upload translations, not depending on the option status. * **Allow proofreaders to access hidden strings** – allow proofreaders to work with hidden strings. The project owner and managers can always work with hidden strings, not depending on the option status. ## [Glossary Access Settings](#glossary-access-settings) [Section titled “Glossary Access Settings”](#glossary-access-settings) Control the level of access that project members have over glossary terms. The project owner and managers always have full control over glossary terms, regardless of these settings. Configure the preferred glossary access level with the following options: * **Read only** – allow members to view existing glossary terms without the possibility to modify them. This option provides access for reference only. * **Manage drafts** – allow members to view, add, edit, and delete draft glossary terms, and view approved terms. This option allows members to contribute to drafts without altering approved terms. * **Full access** – allow members to view, add, edit, and delete glossary terms, as well as edit concept details. This option provides members with full control over glossary terms and their details. ## [Notifications](#notifications) [Section titled “Notifications”](#notifications) Project notifications are disabled by default. Enable the necessary notifications for an agile translation process. Such approach helps to avoid creating additional tasks for every contributor. * **Notify translators about new strings** – translators will receive an email notification about newly added content for translation each time after the update. The **Receive emails** option should be activated in the translator’s profile. * **Notify project managers and developers about new strings** – project managers will receive an email notification about newly added content for translation each time after the update. * **Notify project managers and developers about language translation/proofreading completion** – project managers will receive the notification when some target language (all source files) is fully translated or fully proofread.
# QA Check Settings
> Configure QA checks to ensure the quality of translations
The main aim of quality assurance (QA) checks is to help you efficiently handle different language-specific aspects in translations and ensure they are formatted the same way as the source strings and will fit the UI just as well. Some typical QA check issues include missed commas, extra spaces, or typos. With QA checks, a proofreader will see all those kinds of issues that should be fixed, as they will be highlighted in the Side-by-Side mode in the Editor. QA checks help to detect some common mistakes easily and quickly. It’s recommended to review and resolve all QA check issues before building your project and downloading translations.  In the **QA Checks** section, you can manage the types of QA issues to be highlighted in the Editor during the translation process. ## [Configure QA Checks](#configure-qa-checks) [Section titled “Configure QA Checks”](#configure-qa-checks) By default, QA checks are enabled. To select the needed QA checks in your project, follow these steps: 1. Open your project and go to **Settings > QA Checks**. 2. Ensure that **Enable QA Checks** is selected.  3. Select the QA check types according to your preferences. 4. For each selected QA check type, choose whether it should be possible to save translations with QA issues by selecting one of two options: **Error** and **Warning**. * **Warning** – translators are notified about QA issues with suggestions for fixes, but they can still save the translation using the **Save anyway** button. * **Error** – translators are notified about QA issues with suggestions for fixes, and they cannot save the translation until all issues are resolved. 5. Scroll down to the bottom of the QA Checks list and click **Save**.  Once enabled, QA checks will work in the background and scan the translations for potential QA issues. ## [QA Check Parameters](#qa-check-parameters) [Section titled “QA Check Parameters”](#qa-check-parameters) **Empty translation** – strings that lack translation. **Length issues** – translated strings that are longer than the limit of characters you set. **Tags mismatch** – strings containing HTML tags might lack some opening or closing tags in translations. **Spaces mismatch** – multiple spaces in a row, missing spaces. **Variables mismatch** – placeholders that lack some parts of code or have the odd ones. **Punctuation mismatch** – punctuation mistakes or differences in the punctuation marks. **Character case mismatch** – lower or upper case used differently in source and translated strings. **Special characters mismatch** – new paragraphs, currency signs, and other special characters used differently in source and translated strings. **“Incorrect translation” issues** – created issues with the “current translation is wrong” tag. **Spelling mistakes** – words that aren’t present in the dictionaries Crowdin supports. Limitations Currently available for specific languages only. **ICU syntax** – the correct usage of ICU message syntax in translations. **Consistent terminology** – checks whether the source words are translated accordingly to the respective glossary terms. Limitations Currently available for English, German, Spanish, French, Italian, Dutch, Norwegian, Norwegian Bokmal, Polish, Russian, Swedish, Ukrainian, Japanese, Korean, Chinese Simplified, and Turkish. **Duplicate translation** – translations that duplicate already existing translations. **FTL syntax** – the correct usage of the FTL syntax in translations. **Android syntax** – the correct usage of the Android syntax in translations. **Numbers mismatch** – checks for inconsistencies or missing numbers between the source and translations. **AI-powered check** – uses AI to detect translation issues, improving accuracy and ensuring translations meet project-specific quality standards. Requires configuring an AI prompt with defined evaluation criteria. Read more about [Configuring AI-powered check](/crowdin-ai/#setting-up-ai-qa-check). ## [QA Status Options](#qa-status-options) [Section titled “QA Status Options”](#qa-status-options) OFF – when it’s not enabled. IN PROGRESS – while it’s working. NO ISSUES – when it found no mistakes. ISSUES FOUND – when it found some mistakes. ## [More Information On Found Issues](#more-information-on-found-issues) [Section titled “More Information On Found Issues”](#more-information-on-found-issues) If the QA check status is *Issues Found*, you can click on it, then click **View Issues** to get detailed information on the found issues. 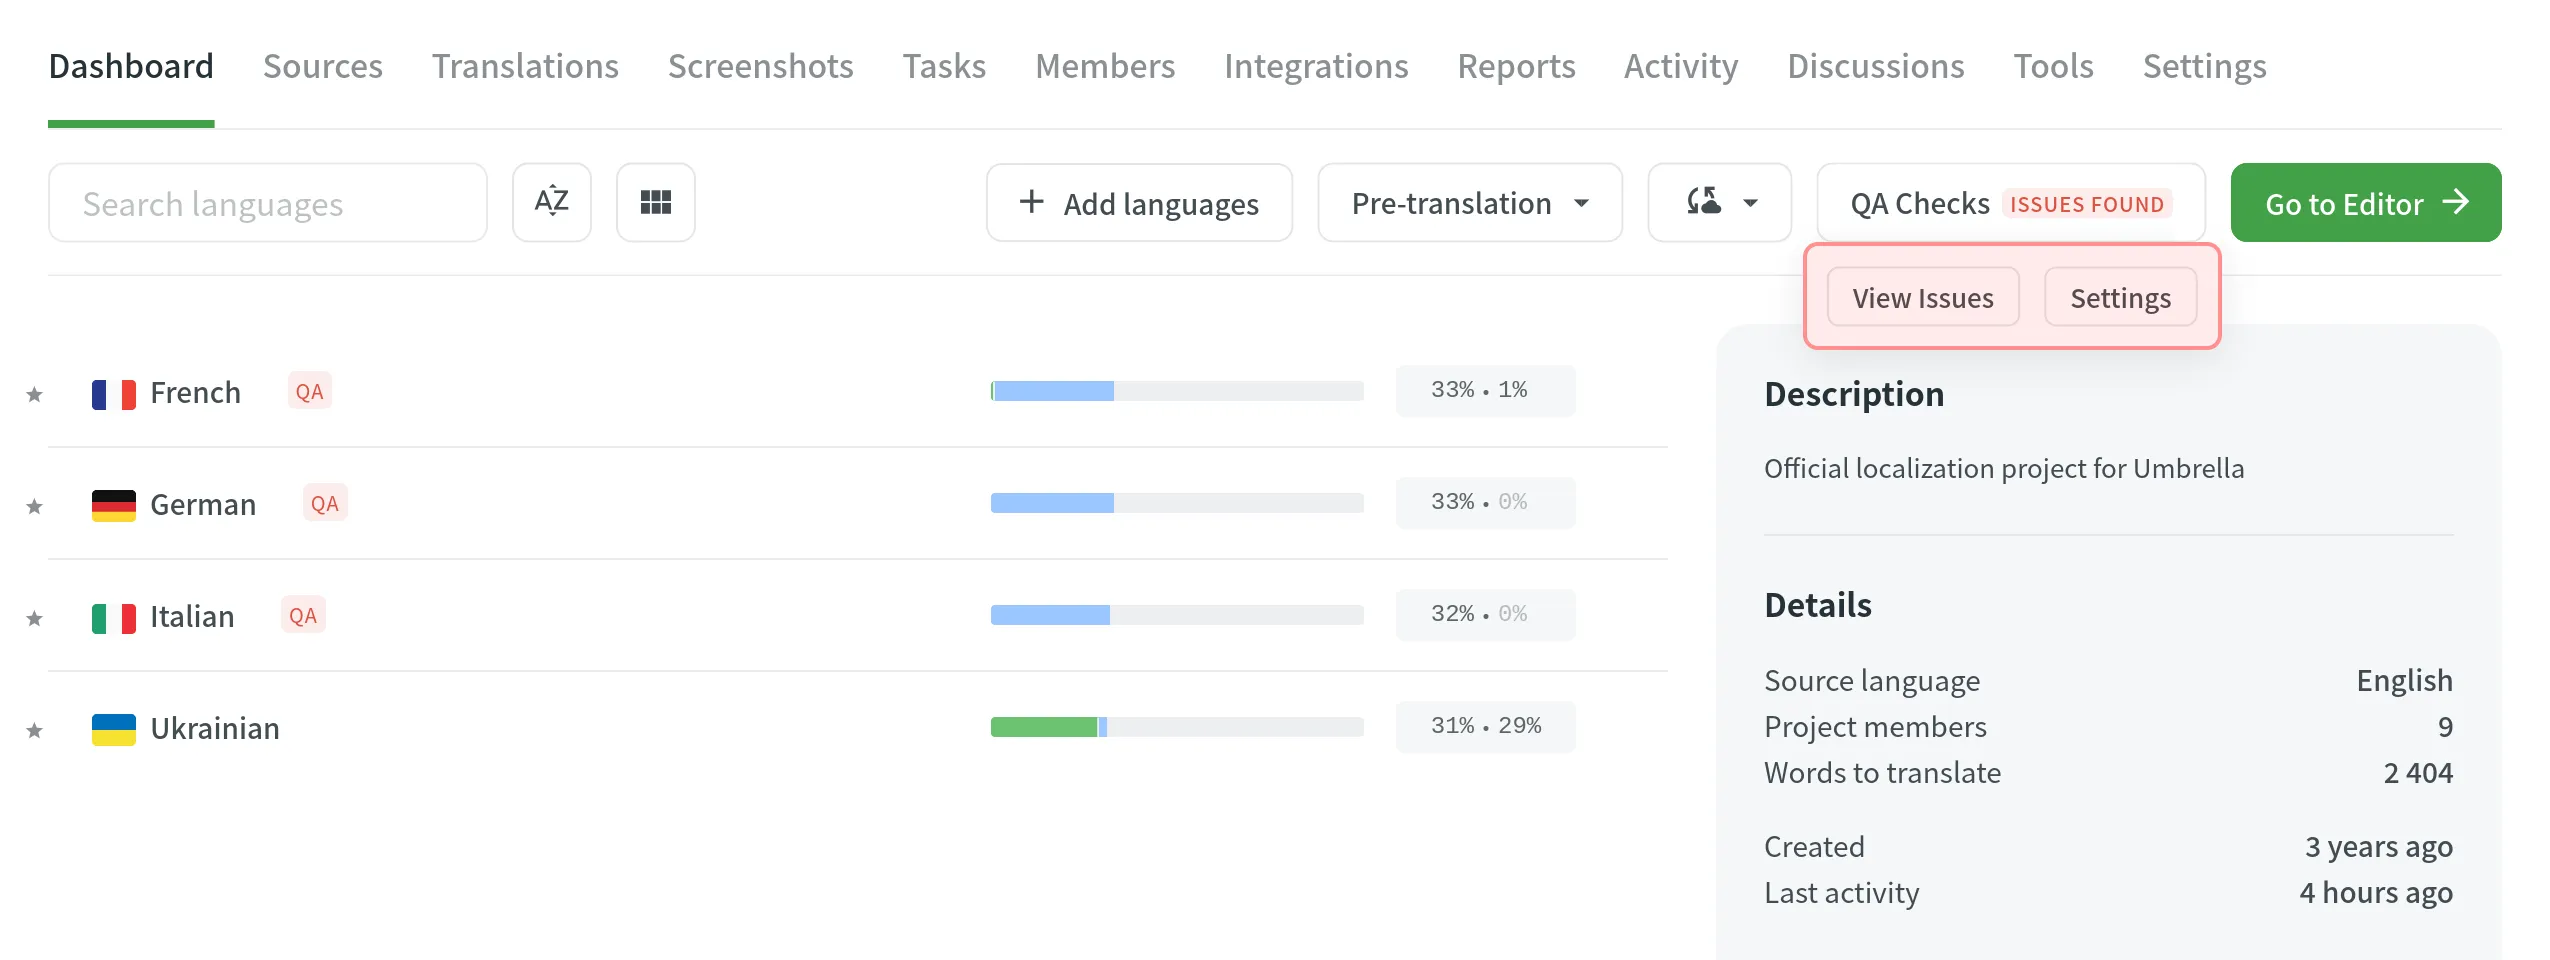 In the unfolded language details section, you will see the number of issues found. To see them in detail, click **Suggestions with QA issues**. 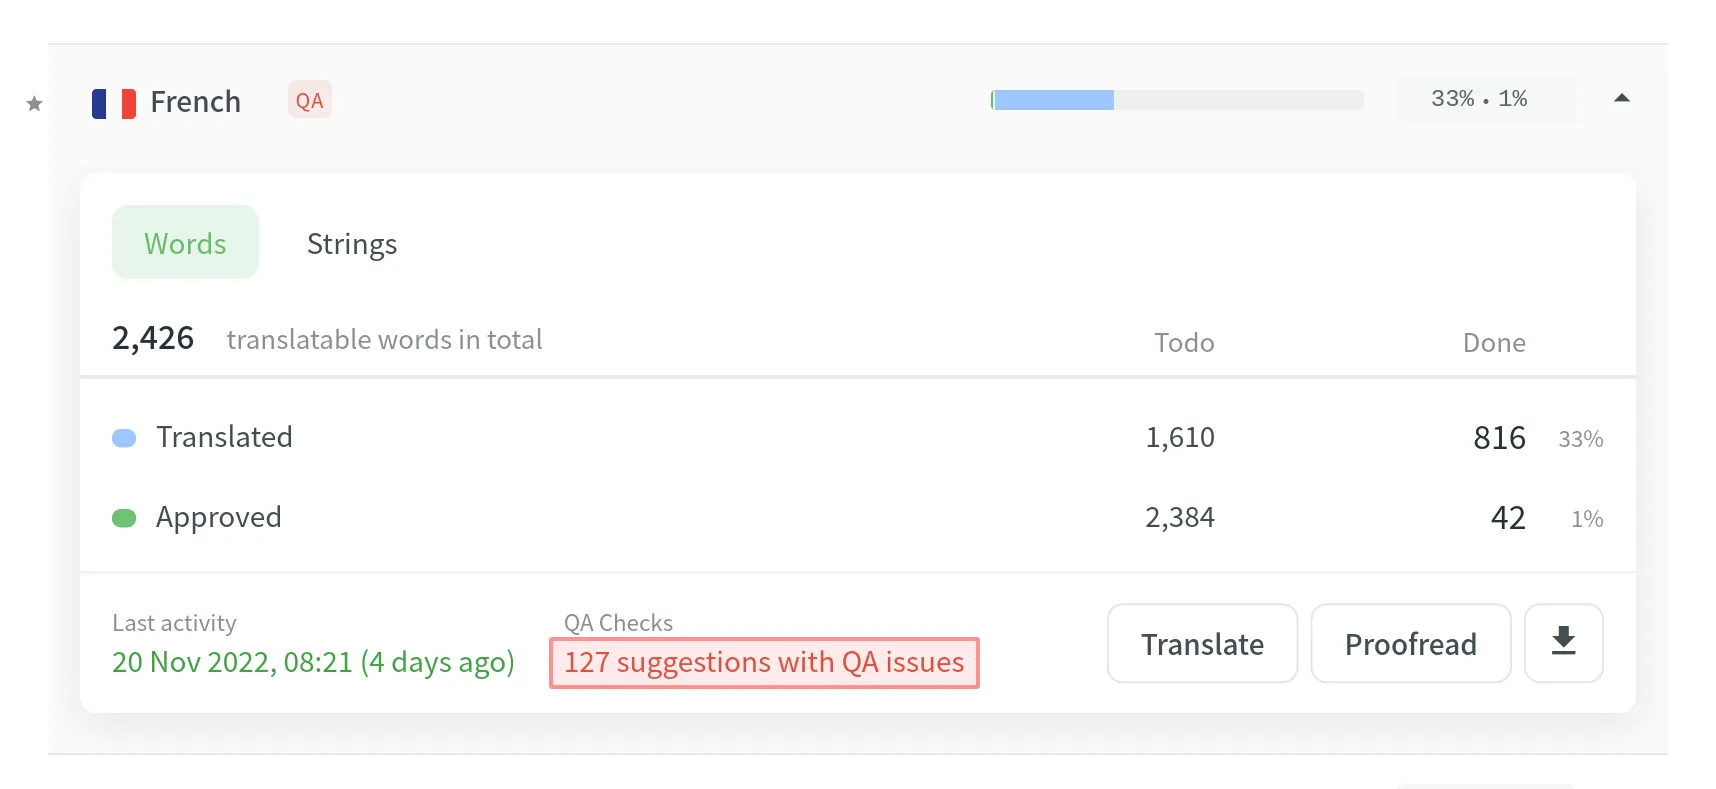 After it, you will be redirected to the [Side-by-Side mode](/online-editor/#side-by-side-mode) of the Editor to check the list of strings with QA issues. You can approve the existing translations if they are supposed to be the way they are or make changes and then approve the translations. ## [Spell Checker Ignore List](#spell-checker-ignore-list) [Section titled “Spell Checker Ignore List”](#spell-checker-ignore-list) If your project contains some uncommon words that are not recognized by the Spell checker, you can add them to the Ignore list to exclude them from being checked.  To review the words added to the Ignore list for the Spell checker, follow these steps: 1. Open your project and go to **Settings > QA Checks**. 2. Click *Spellcheck Ignore list* at the bottom of the page. In the opened window you can see the list of words added to the ignore list. You can filter or remove them from the list if necessary.
# Translation Memory Settings
> Configure and assign Translation Memories for your project
The project TM is automatically created for each project. By default, every approved or last added translation is saved to the project TM. This behavior can be customized to save only approved translations. * **Enable Auto-Substitution** – the feature substitutes the non-translatable elements (such as tags, HTML entities, placeholders, numbers, and more) in TM translation suggestions with the ones used in the source text. The feature improves the TM suggestions applied during pre-translation and those shown as translation suggestions in the Editor. Improved suggestions are included in the Translation Costs report, and improvable ones are included in the Costs Estimation report. * **TM Suggestions for Dialects** – the feature allows you to display and use TM suggestions from the primary language for dialects if no dialect-specific suggestions are available. * **Use global Translation Memory** – translators will have access to the Global Translation Memory, where all translations from the projects with this feature enabled are stored. * **Save only approved suggestion to Translation Memory** – when selected, translations are saved to the project default TM only after they are approved. This option is especially useful for public or crowdsourced projects where you want to ensure only reviewed translations are stored in the TM. * **TM Match Context Type** – the feature allows you to choose what should be considered as string context when suggesting Perfect (101%) match Translation Memory (TM) suggestions. You can choose between the following options: * Key and Context – when selected, the system considers both the key and context of strings for suggesting Perfect match TM suggestions. This mode is particularly useful for key-value file formats. * Auto – when selected, the system automatically applies the most suitable context consideration mode based on your file format. * Previous and next segment – when selected, the system considers the segments immediately preceding and following the current segment for context. Most applicable to HTML-based and other formats without a defined key-value structure. Read more about [TM Auto-Substitution](/translation-memory/#tm-auto-substitution). ## [Penalties](#penalties) [Section titled “Penalties”](#penalties) In the **Penalties** section, you can configure penalties that decrease the match percentage of TM suggestions based on specific conditions. This feature helps when you want to fine-tune the relevance of TM suggestions to your specific requirements. 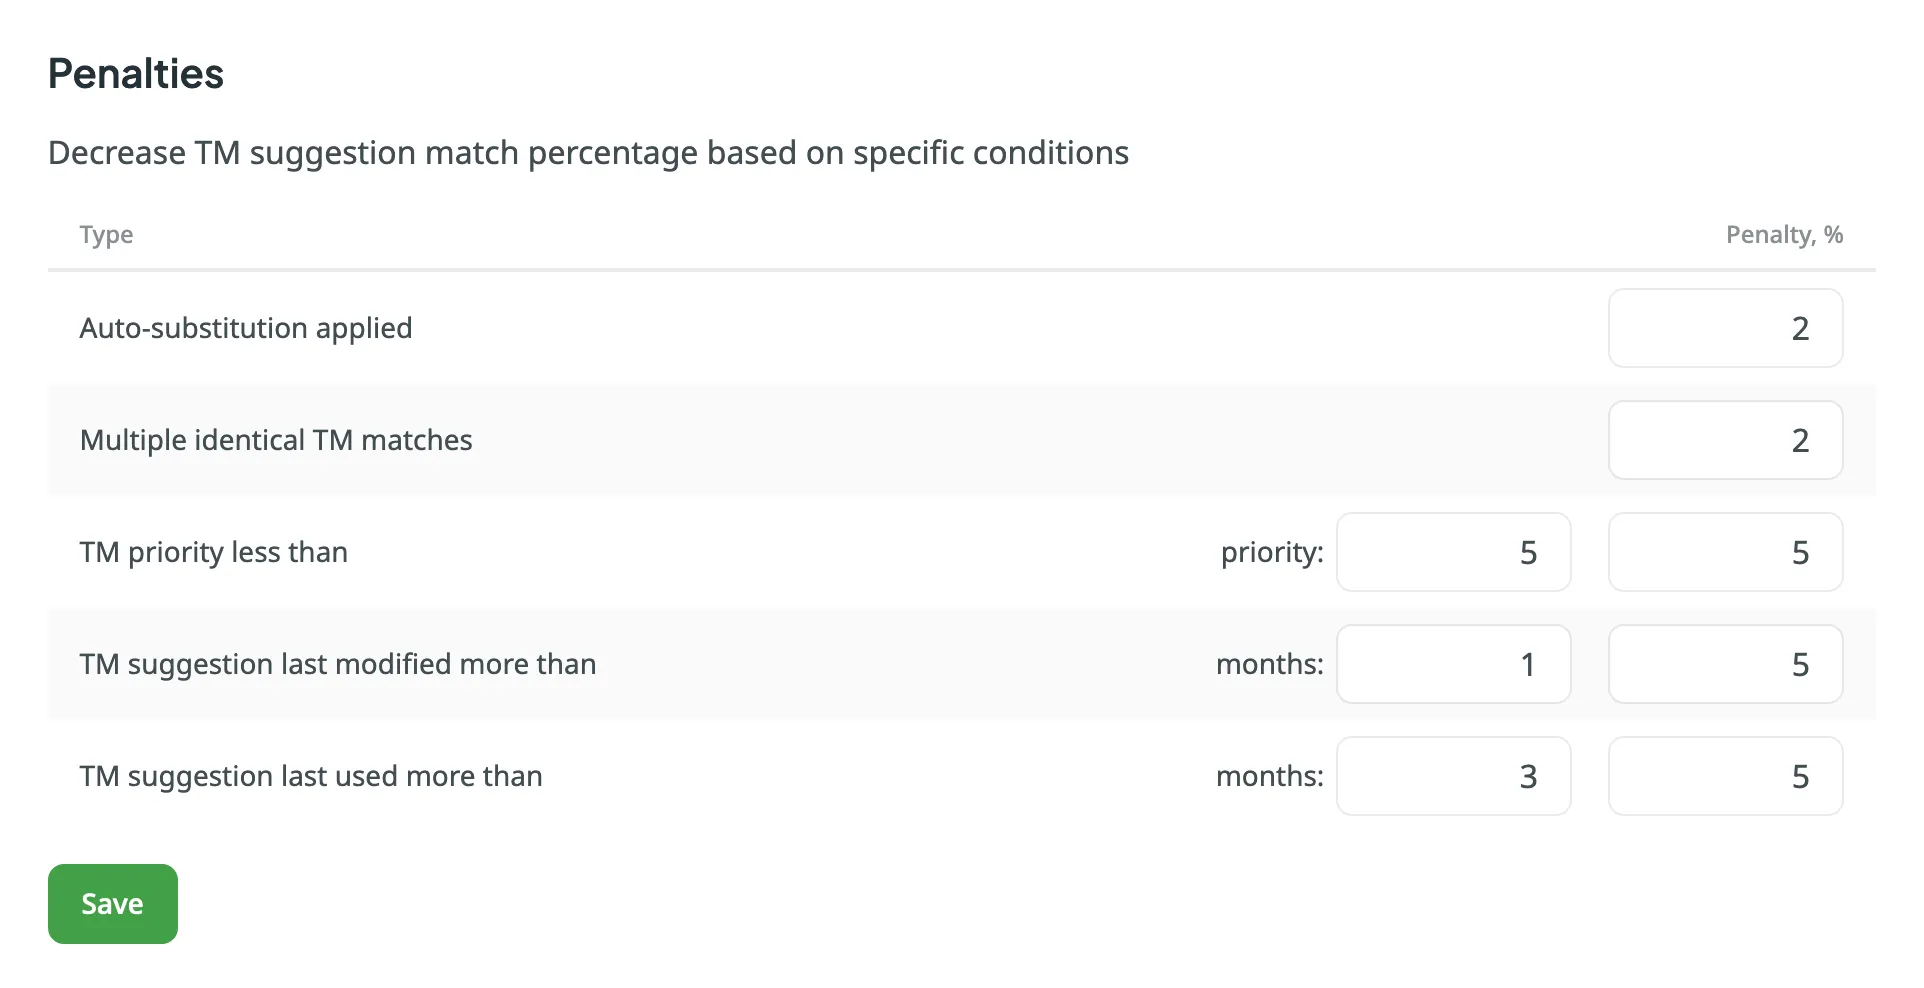 You can configure the penalties using the following options: * **Auto-substitution Applied** – penalize TM suggestions to which an auto-substitution was applied. * **Multiple Identical TM Matches** – penalize TM suggestions where multiple identical TM matches are found. * **TM Priority Less Than** – penalize TM suggestions that originate from a TM with a priority lower than a specified value. Besides a penalty value, you can also set the preferred TM priority threshold. * **TM Suggestion Last Modified More Than** – penalize TM suggestions that were last modified more than a specified number of months ago. Besides a penalty value, you can also set the threshold in months. * **TM Suggestion Last Used More Than** – penalize TM suggestions that were last used more than a specified number of months ago. Besides a penalty value, you can also set the threshold in months. ## [Assigning TM](#assigning-tm) [Section titled “Assigning TM”](#assigning-tm) To assign a TM to your project, in the **Assigned Translation Memories** section, select the needed TMs from the list. 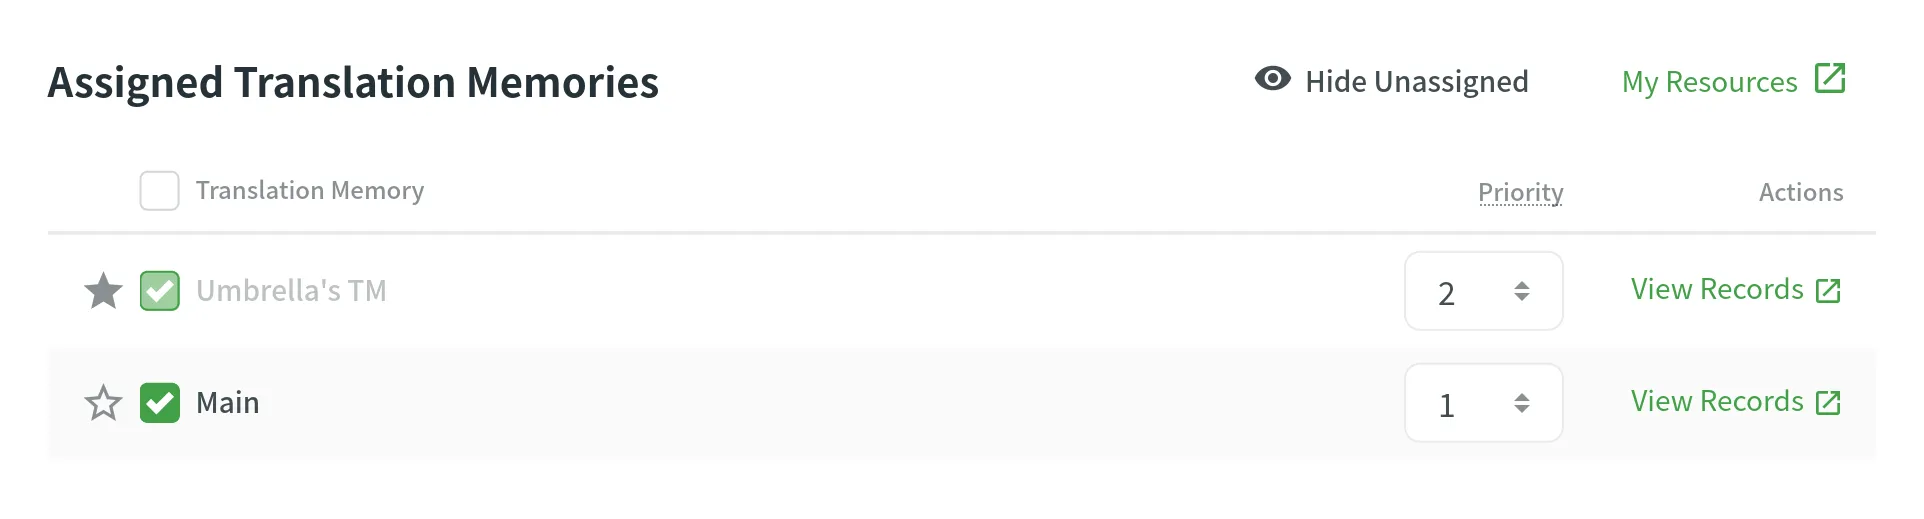 ## [Prioritizing TM](#prioritizing-tm) [Section titled “Prioritizing TM”](#prioritizing-tm) When you assign a few TMs to the project, you can set the needed priority for each of them. As a result, TM suggestions from the TM with the higher priority will be displayed in the first place. The default TM priority value is set to 1. A higher number has a higher priority (for example, 5 has a higher priority than 1). For example, if you assigned four TMs to your project, you can set the priority of 4 to the most important TM, the one that should be used in the first place. And respectively set lower priorities to other TMs. To set the priority for TMs, in the **Assigned Translation Memories** section, set the preferred priority for assigned TMs from the respective drop-down list. 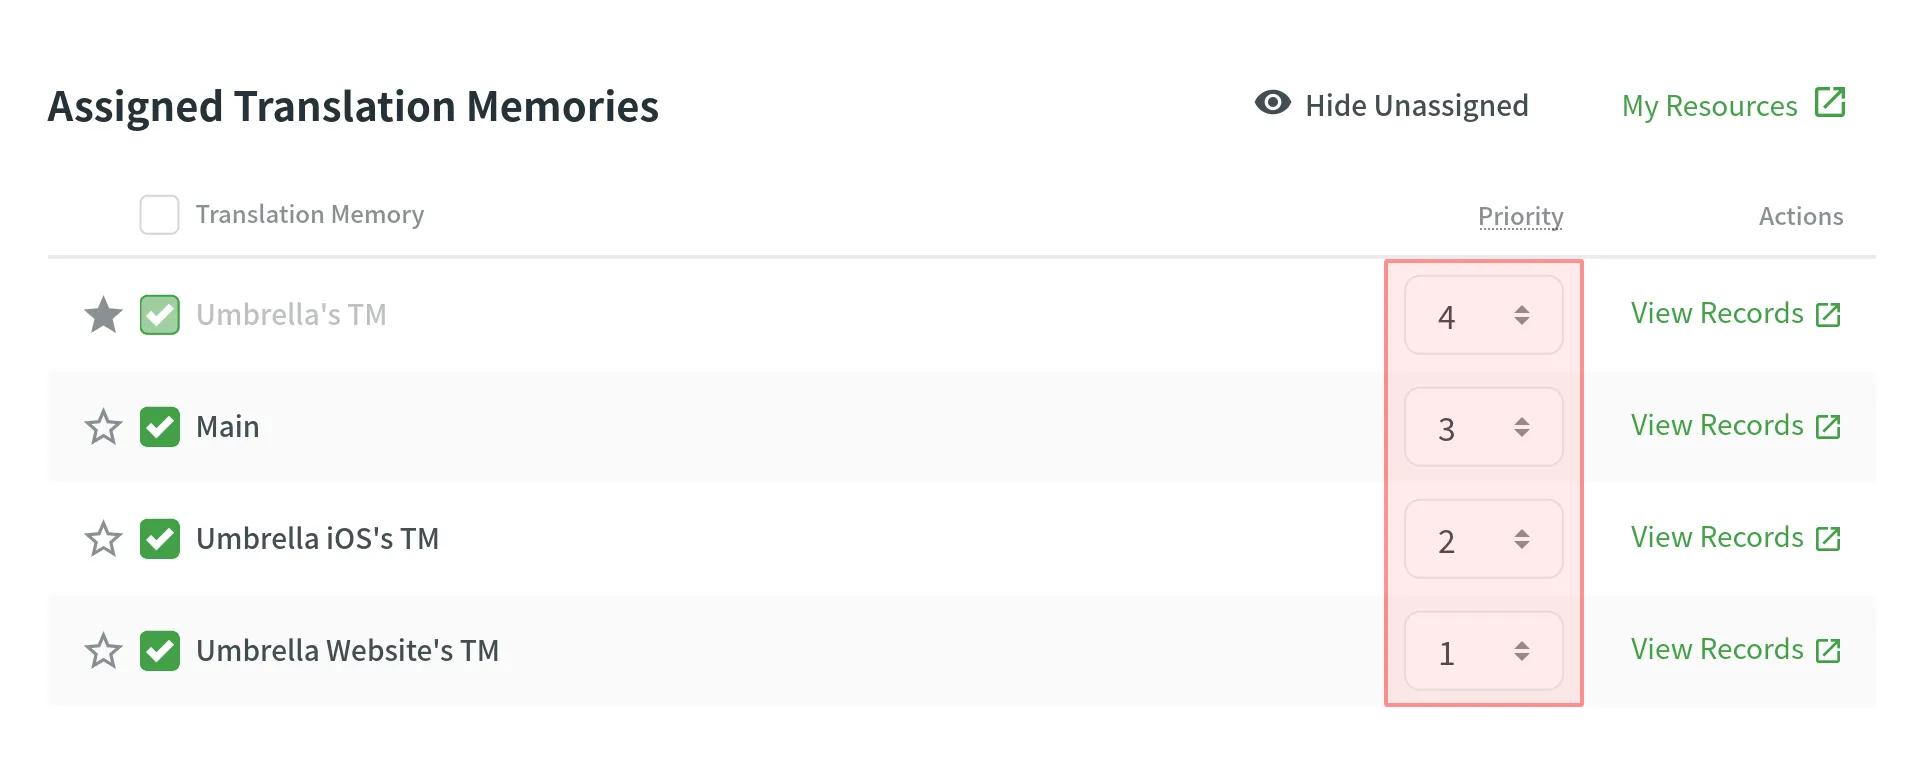 ## [Changing Default TM](#changing-default-tm) [Section titled “Changing Default TM”](#changing-default-tm) To change your project’s default TM, in the **Assigned Translation Memories** section, click the icon next to the needed TM in the list.
# Roles
> Learn about the roles and permissions that users can have in Crowdin
Roles in Crowdin define the level of access and control users have within the platform. By assigning roles, you can manage user permissions across the Editor, project settings, and resources. Below you can find descriptions of each role and its associated permissions. ## [Owner](#owner) [Section titled “Owner”](#owner) Owner is the user who created the project and has complete control over it. The owner can invite users to the project and manage their access, work with source and translation files, configure project settings, and manage account-level resources such as AI providers, MT engines, and more. ## [Manager](#manager) [Section titled “Manager”](#manager) Manager has similar rights to the project owner within assigned projects. They can manage project members, files, localization resources (i.e., TMs and Glossaries), tasks, integrations, reports, and other project-specific resources. Managers can’t delete projects or configure the project owner’s account-level resources such as AI providers or MT engines. **Use case:** Suitable for trusted team members who manage the full localization process within specific projects. ## [Developer](#developer) [Section titled “Developer”](#developer) Developer can upload source files, edit translatable text, connect integrations, and access the API. They don’t have permissions to manage project members, tasks, or reports. **Use case:** Suitable for users handling the technical aspects of localization, such as file management, integration setup, or automation. ## [Language Coordinator](#language-coordinator) [Section titled “Language Coordinator”](#language-coordinator) Language Coordinator can manage certain project features only for their assigned languages. They can translate and approve strings, manage project members and join requests, generate project reports, create tasks, and pre-translate content. Language Coordinators cannot access other project settings such as source files, integrations, or project configurations. **Use case:** Suitable for users coordinating translations across specific project languages. ## [Proofreader](#proofreader) [Section titled “Proofreader”](#proofreader) Proofreader can translate and approve strings within assigned projects. They do not have access to project settings or management functions. **Use case:** Suitable for users focused on finalizing translations and ensuring quality. ## [Translator](#translator) [Section titled “Translator”](#translator) Translator can add translations and vote on suggestions made by others. They do not have the ability to approve translations or access project settings. **Use case:** Suitable for users responsible for providing translations without additional management responsibilities. ## [Blocked](#blocked) [Section titled “Blocked”](#blocked) Blocked users cannot access the project and are restricted from performing any actions. **Use case:** Used when a user’s access to the project needs to be revoked. ## [See Also](#see-also) [Section titled “See Also”](#see-also) [Changing Roles ](/project-members/#changing-role)Learn how to change the role of a project member.
# Screenshots
> Provide translators with additional context for the source strings
Screenshots are a great way to provide translators with additional context for the source strings in your project and, as a result, get more relevant and consistent translations. With screenshots, your team can see which strings are used together on the same page, whether short texts stand for titles, buttons, etc. [Translate Your UI with Crowdin's Screen Translation Feature ](https://crowdin.com/translate-ui-with-crowdin)Crowdin's Screen Translation simplifies UI localization by allowing users to translate interface elements with a real-time preview of your app design. Tag source strings to the screenshots to display them to translators in the Editor in the context section below the source string.  ## [Upload Screenshots](#upload-screenshots) [Section titled “Upload Screenshots”](#upload-screenshots) To upload screenshots into your project, follow these steps: 1. Open your project and go to the **Screenshots** tab. 2. Drag images from your machine, or click **Upload**. 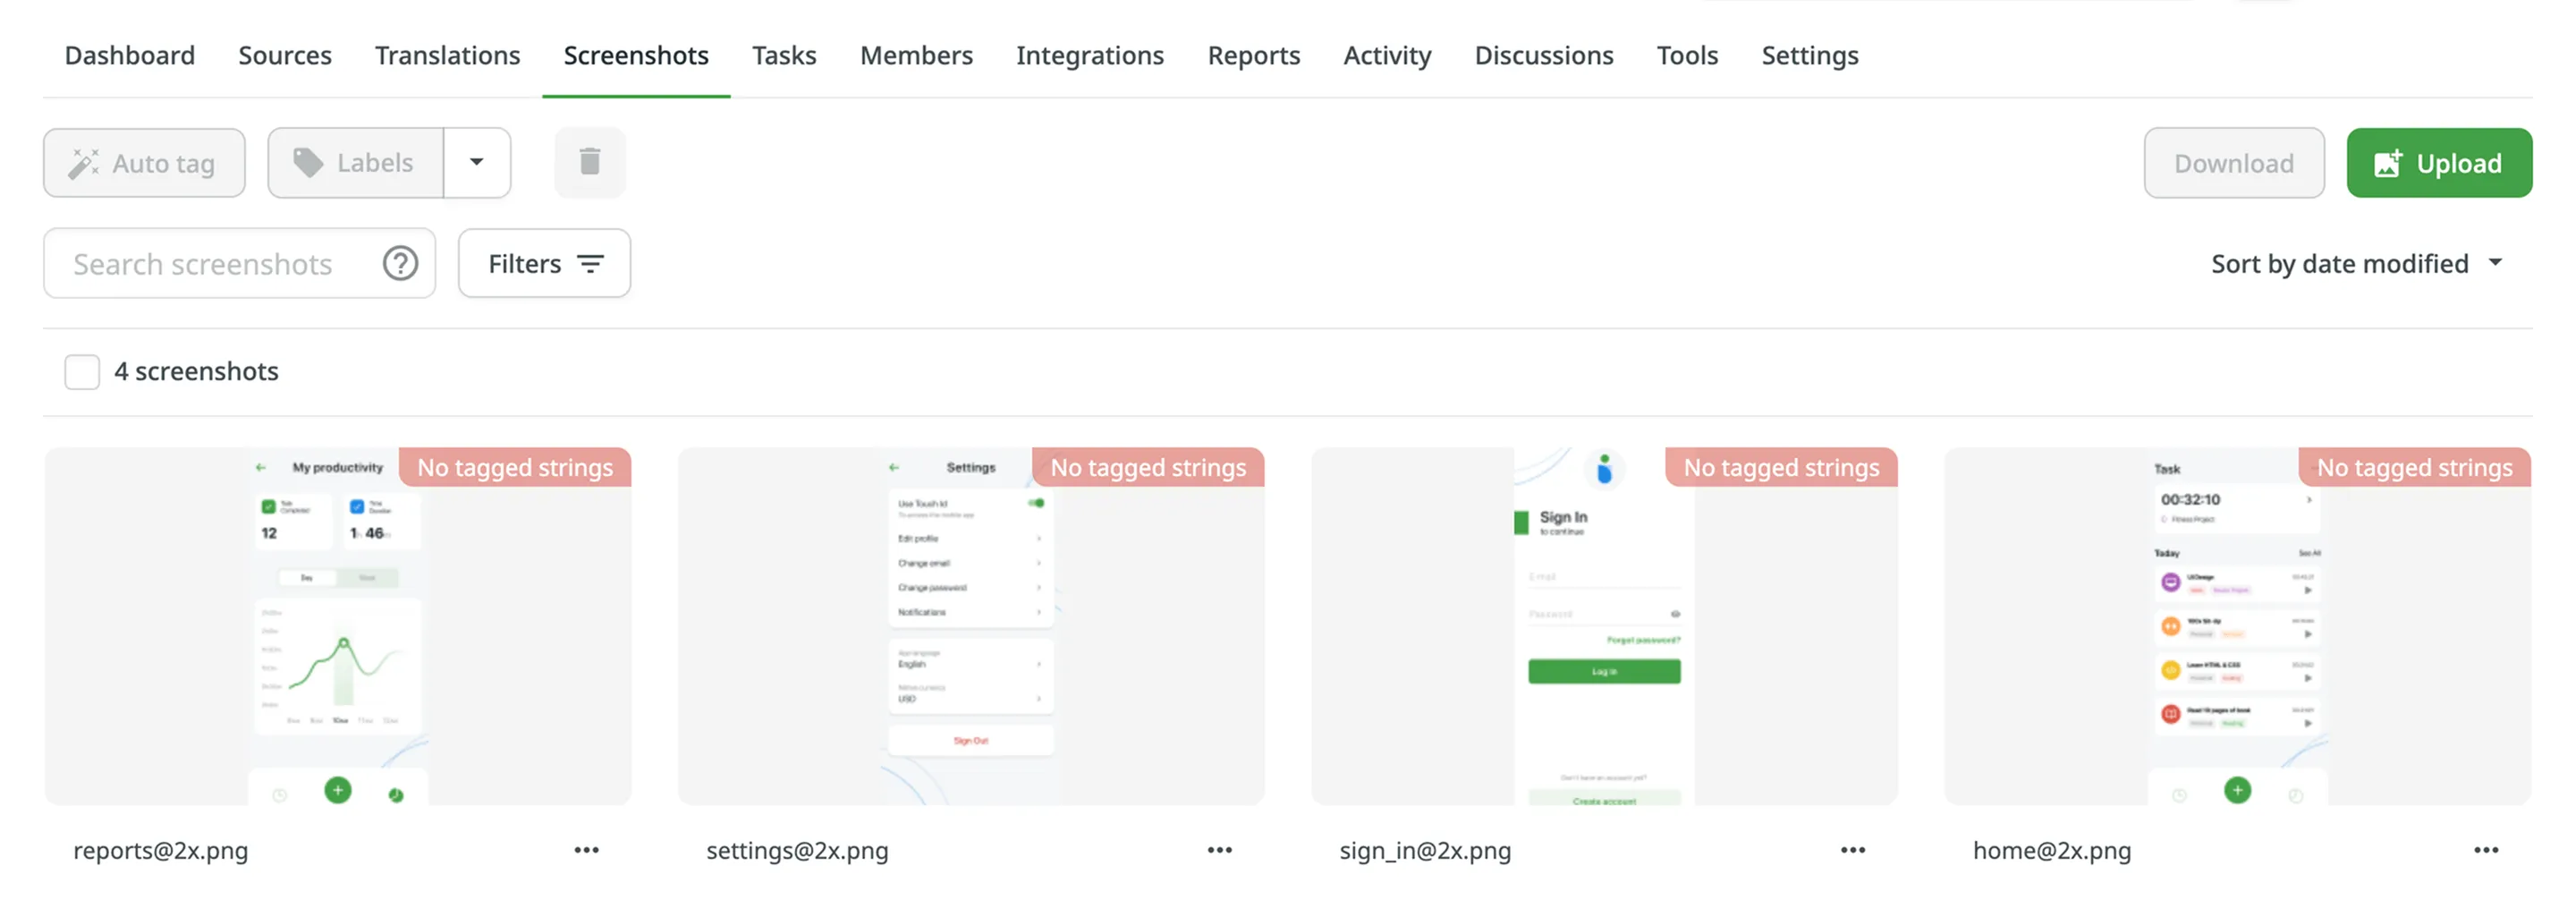 ## [Tag Strings](#tag-strings) [Section titled “Tag Strings”](#tag-strings) To show translators where certain strings are located in the UI tag strings on the screenshots. In Crowdin, you can tag strings using the following methods: * Auto tag * Text recognition * Drag and drop ### [Tag Strings Automatically](#tag-strings-automatically) [Section titled “Tag Strings Automatically”](#tag-strings-automatically) Texts within an image will be detected automatically. Then the matching strings will be searched in the project according to the selected filter. As a result, the ones found will be tagged on the screenshot. 1. Open the screenshot with a double-click. 2. Click . 3. Once the strings are tagged on the screenshot, click **Save**. 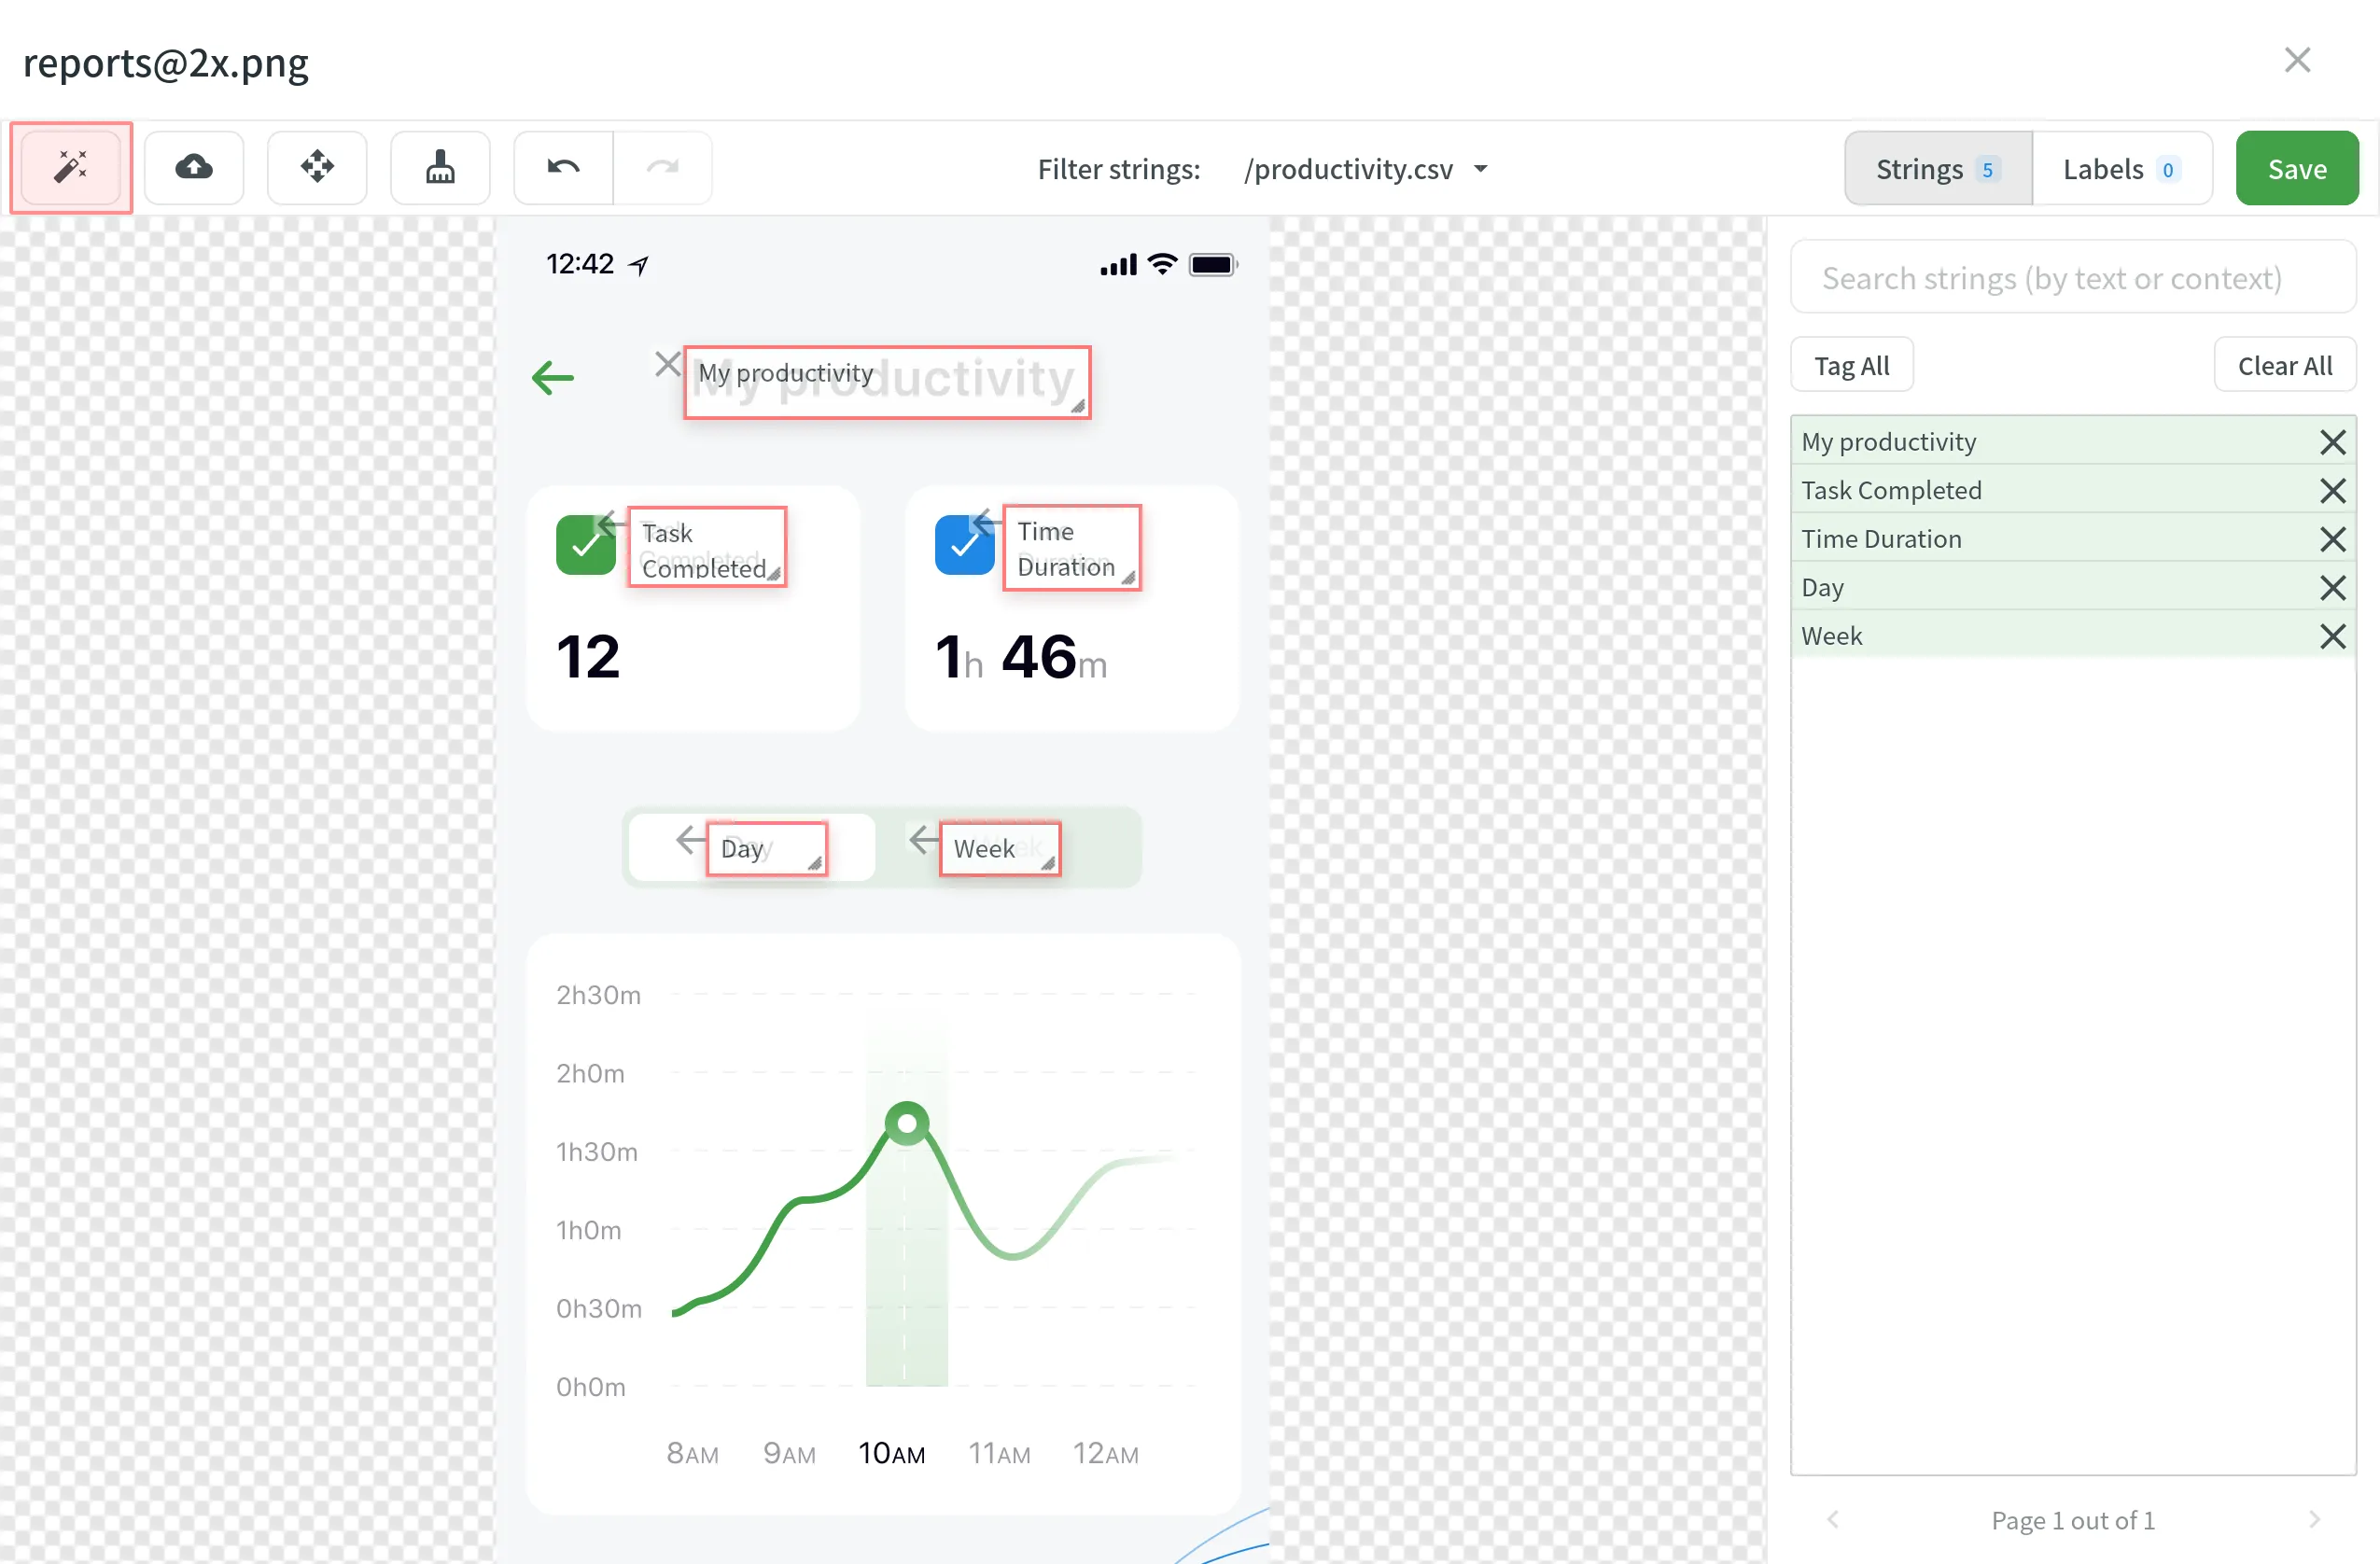 To tag strings automatically on a single screenshot without opening it: 1. Click on the needed screenshot. 2. Select **Auto tag**. You can also tag strings automatically on multiple screenshots at once: 1. Select multiple screenshots by holding `Ctrl` or `Shift` . 2. Click **Auto tag**. If you use In-Context, you might find helpful its integrated feature for taking screenshots of the website pages. [Adding Screenshots via In-Context ](/developer/in-context-localization/#adding-screenshots-via-in-context)In-Context Localization is a feature that allows you to preview your website or application in Crowdin and translate strings directly in the context. ### [Tag Strings with Text Recognition](#tag-strings-with-text-recognition) [Section titled “Tag Strings with Text Recognition”](#tag-strings-with-text-recognition) The system will search for a string that matches the text you select among all the strings in your project. If several similar strings are found, you will see all of them and be able to select the best-matching one. 1. Open the screenshot with a double-click. 2. Highlight the text on the screenshot. 3. Once finished tagging all the strings, click **Save**.  If text highlighting is inactive, the **Text recognition** feature might be unavailable for your project’s source language. ### [Tag Strings Manually](#tag-strings-manually) [Section titled “Tag Strings Manually”](#tag-strings-manually) Drag the listed strings to the text on the screenshot manually. 1. Open the screenshot with a double-click. 2. Click **Strings** to open the string list panel. 3. Sort and filter the listed strings. You can select all or specific files and search strings by text or context. 4. Drag the needed string from the list in the right panel to the corresponding text on the screenshot. Alternatively, click on the strings to tag them in the screenshot without specifying the exact place where they should appear. 5. *(Optional)* To view additional string details or edit them: * Click the button above the string list to show more details (file name and string context). * Hover over a string and click the to open the **Edit String** dialog. You can: * Update the identifier. * Update the source text. * Add or update the context. * Add or update the labels. * Set the **Max. length of the translated text**. * Click **Save** after making the changes. 6. Click **Save** when you finish tagging. Read more about [String Editing](/string-management/#string-editing). 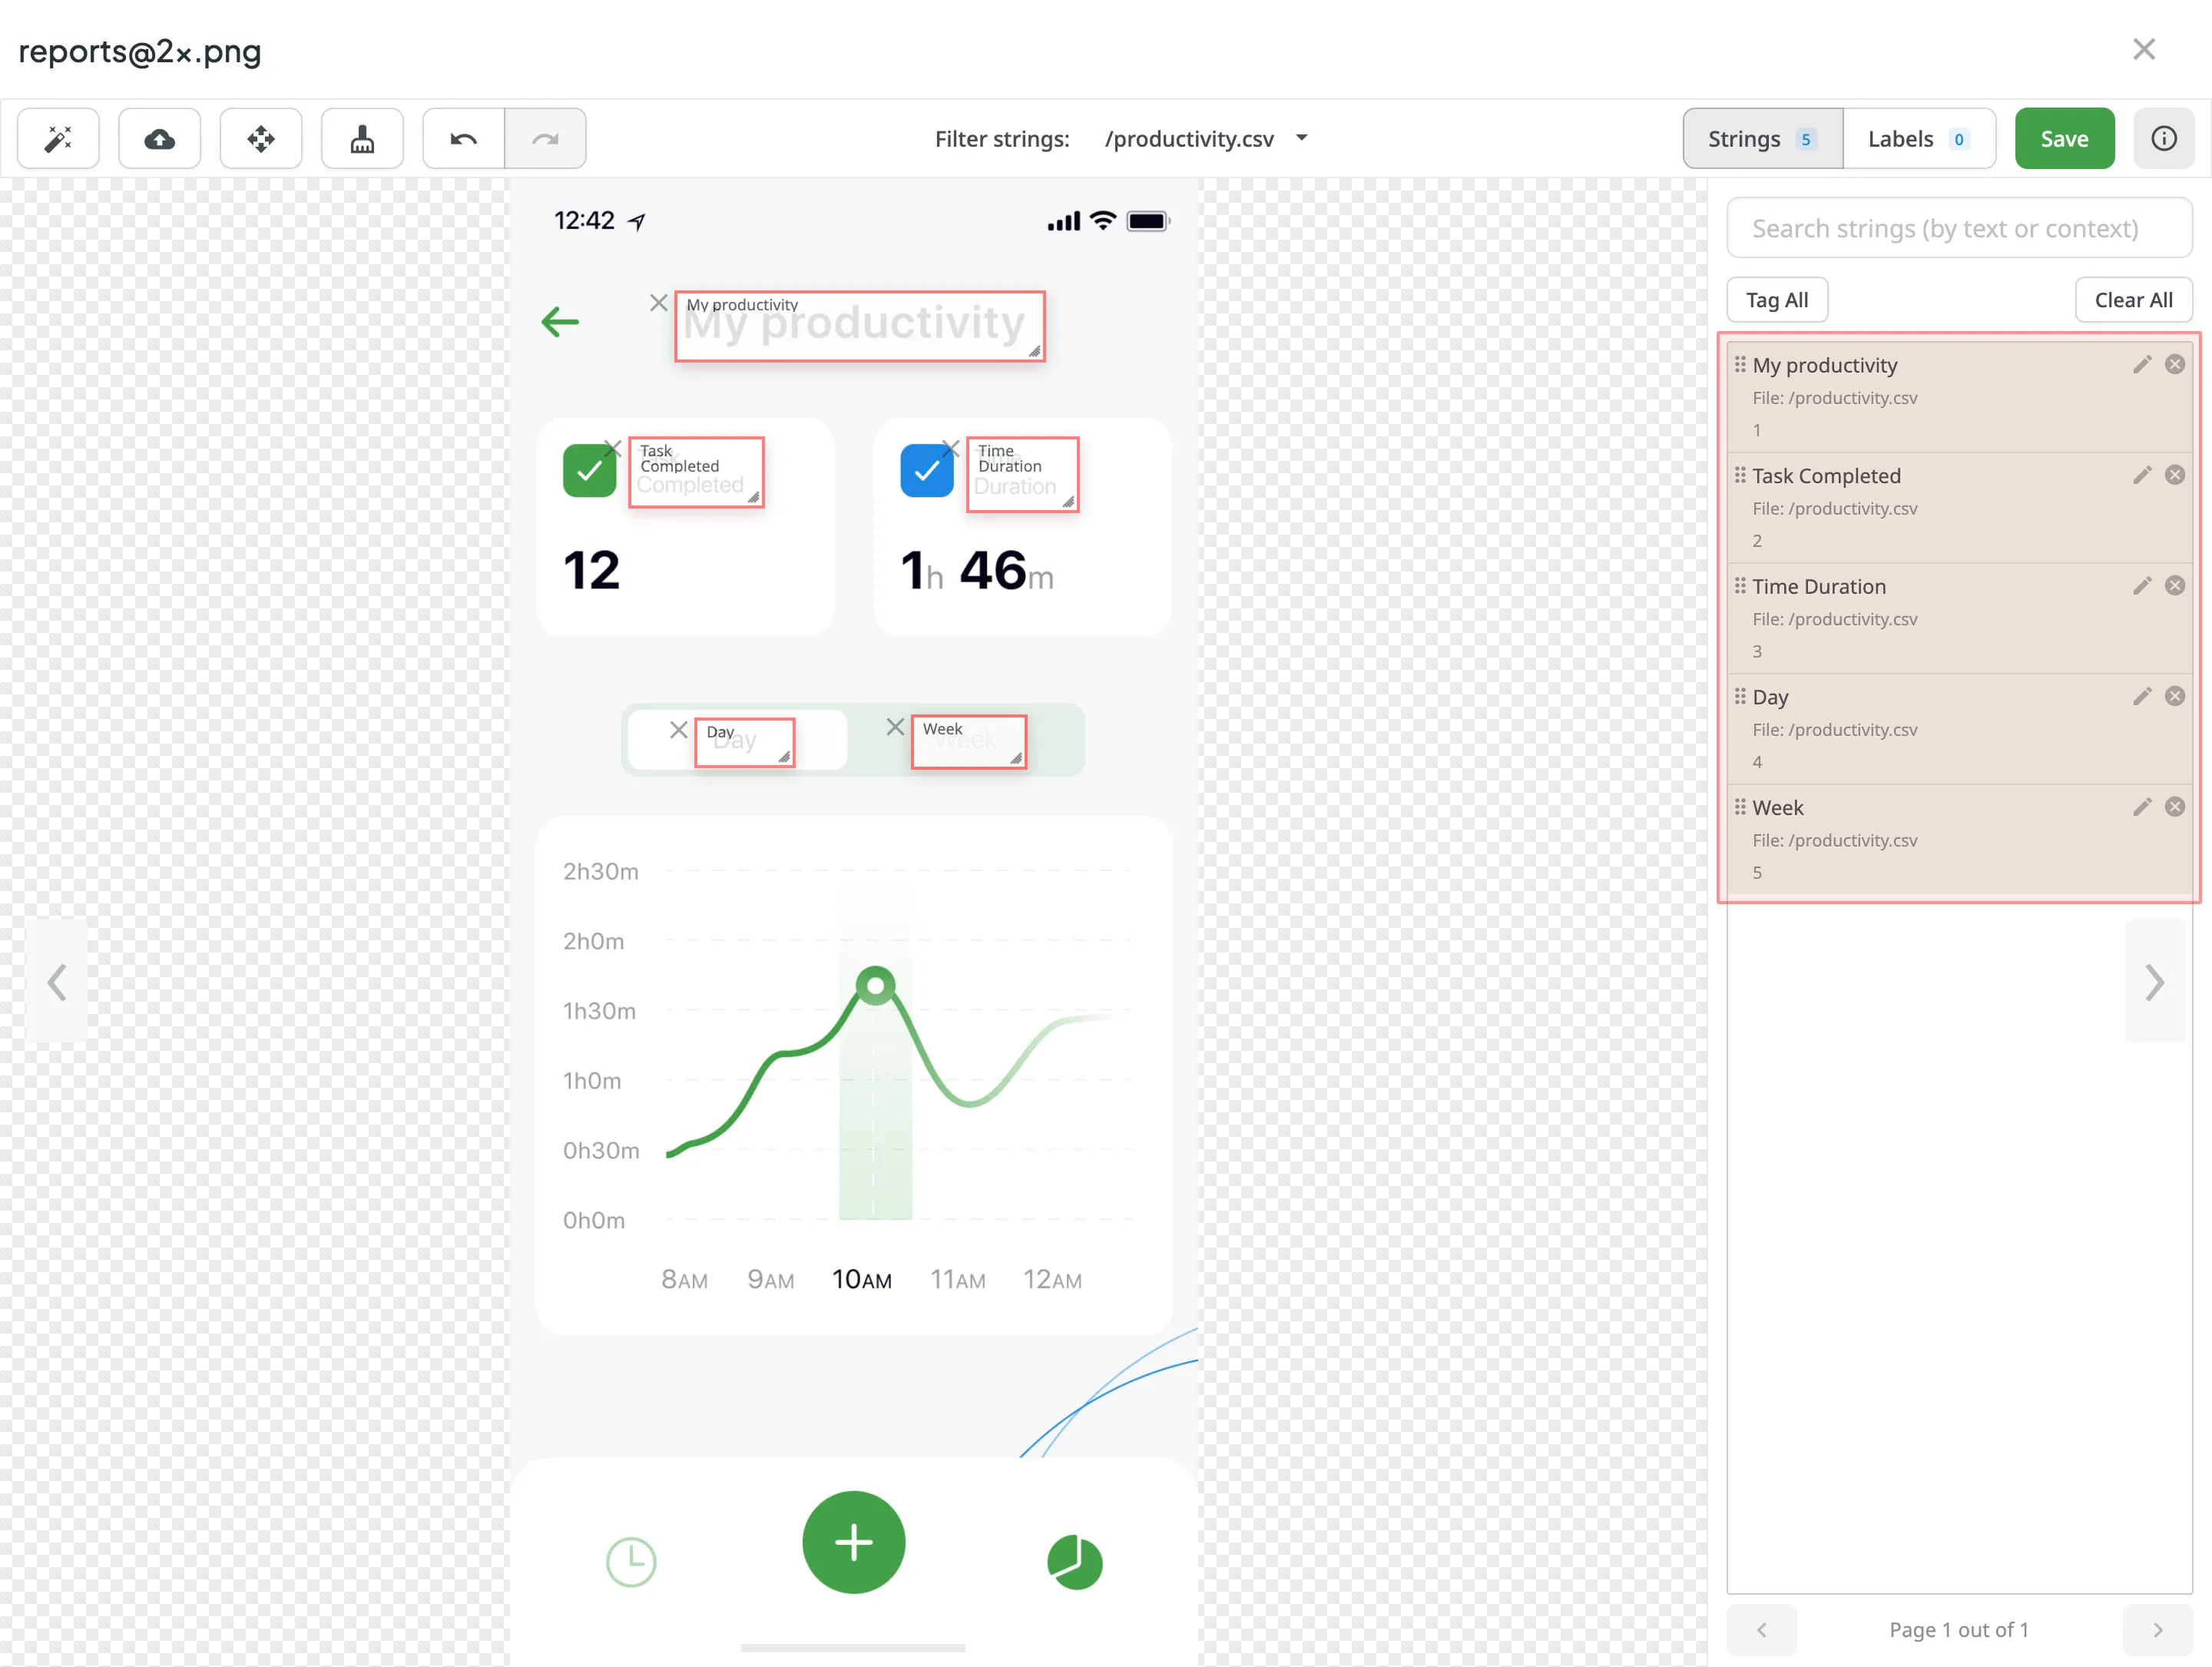 To tag all the strings from the selected file to your screenshot, follow these steps: 1. Select the file you need. 2. Click **Tag All** > **Save**. ### [Drag and Scroll Screenshots](#drag-and-scroll-screenshots) [Section titled “Drag and Scroll Screenshots”](#drag-and-scroll-screenshots) When tagging high-resolution screenshots, you can hold `Ctrl` to drag and scroll the screenshot with a mouse revealing the remaining part. Alternatively, click to drag and scroll the screenshot without holding `Ctrl` . ### [Removing Tagged Strings from Screenshot](#removing-tagged-strings-from-screenshot) [Section titled “Removing Tagged Strings from Screenshot”](#removing-tagged-strings-from-screenshot) If you need to remove all the strings tagged on the screenshot, click . ## [Labels](#labels) [Section titled “Labels”](#labels) Use labels in your project for an easy way to organize screenshots by certain topics. Once you add labels to your screenshots, you can filter them by added labels. If you already use labels for your source strings, you can also use the same labels for screenshots. [Managing Project Labels ](/project-settings/labels/)Learn how to make your Crowdin project labels. ### [Adding Labels to Screenshots](#adding-labels-to-screenshots) [Section titled “Adding Labels to Screenshots”](#adding-labels-to-screenshots) There are a few possible ways you can add labels to the screenshots. ##### [Add labels to one screenshot at a time](#add-labels-to-one-screenshot-at-a-time) [Section titled “Add labels to one screenshot at a time”](#add-labels-to-one-screenshot-at-a-time) 1. Open the screenshot with a double-click. 2. Click . 3. Select needed labels in the **Labels** field. 4. Click **Save**. 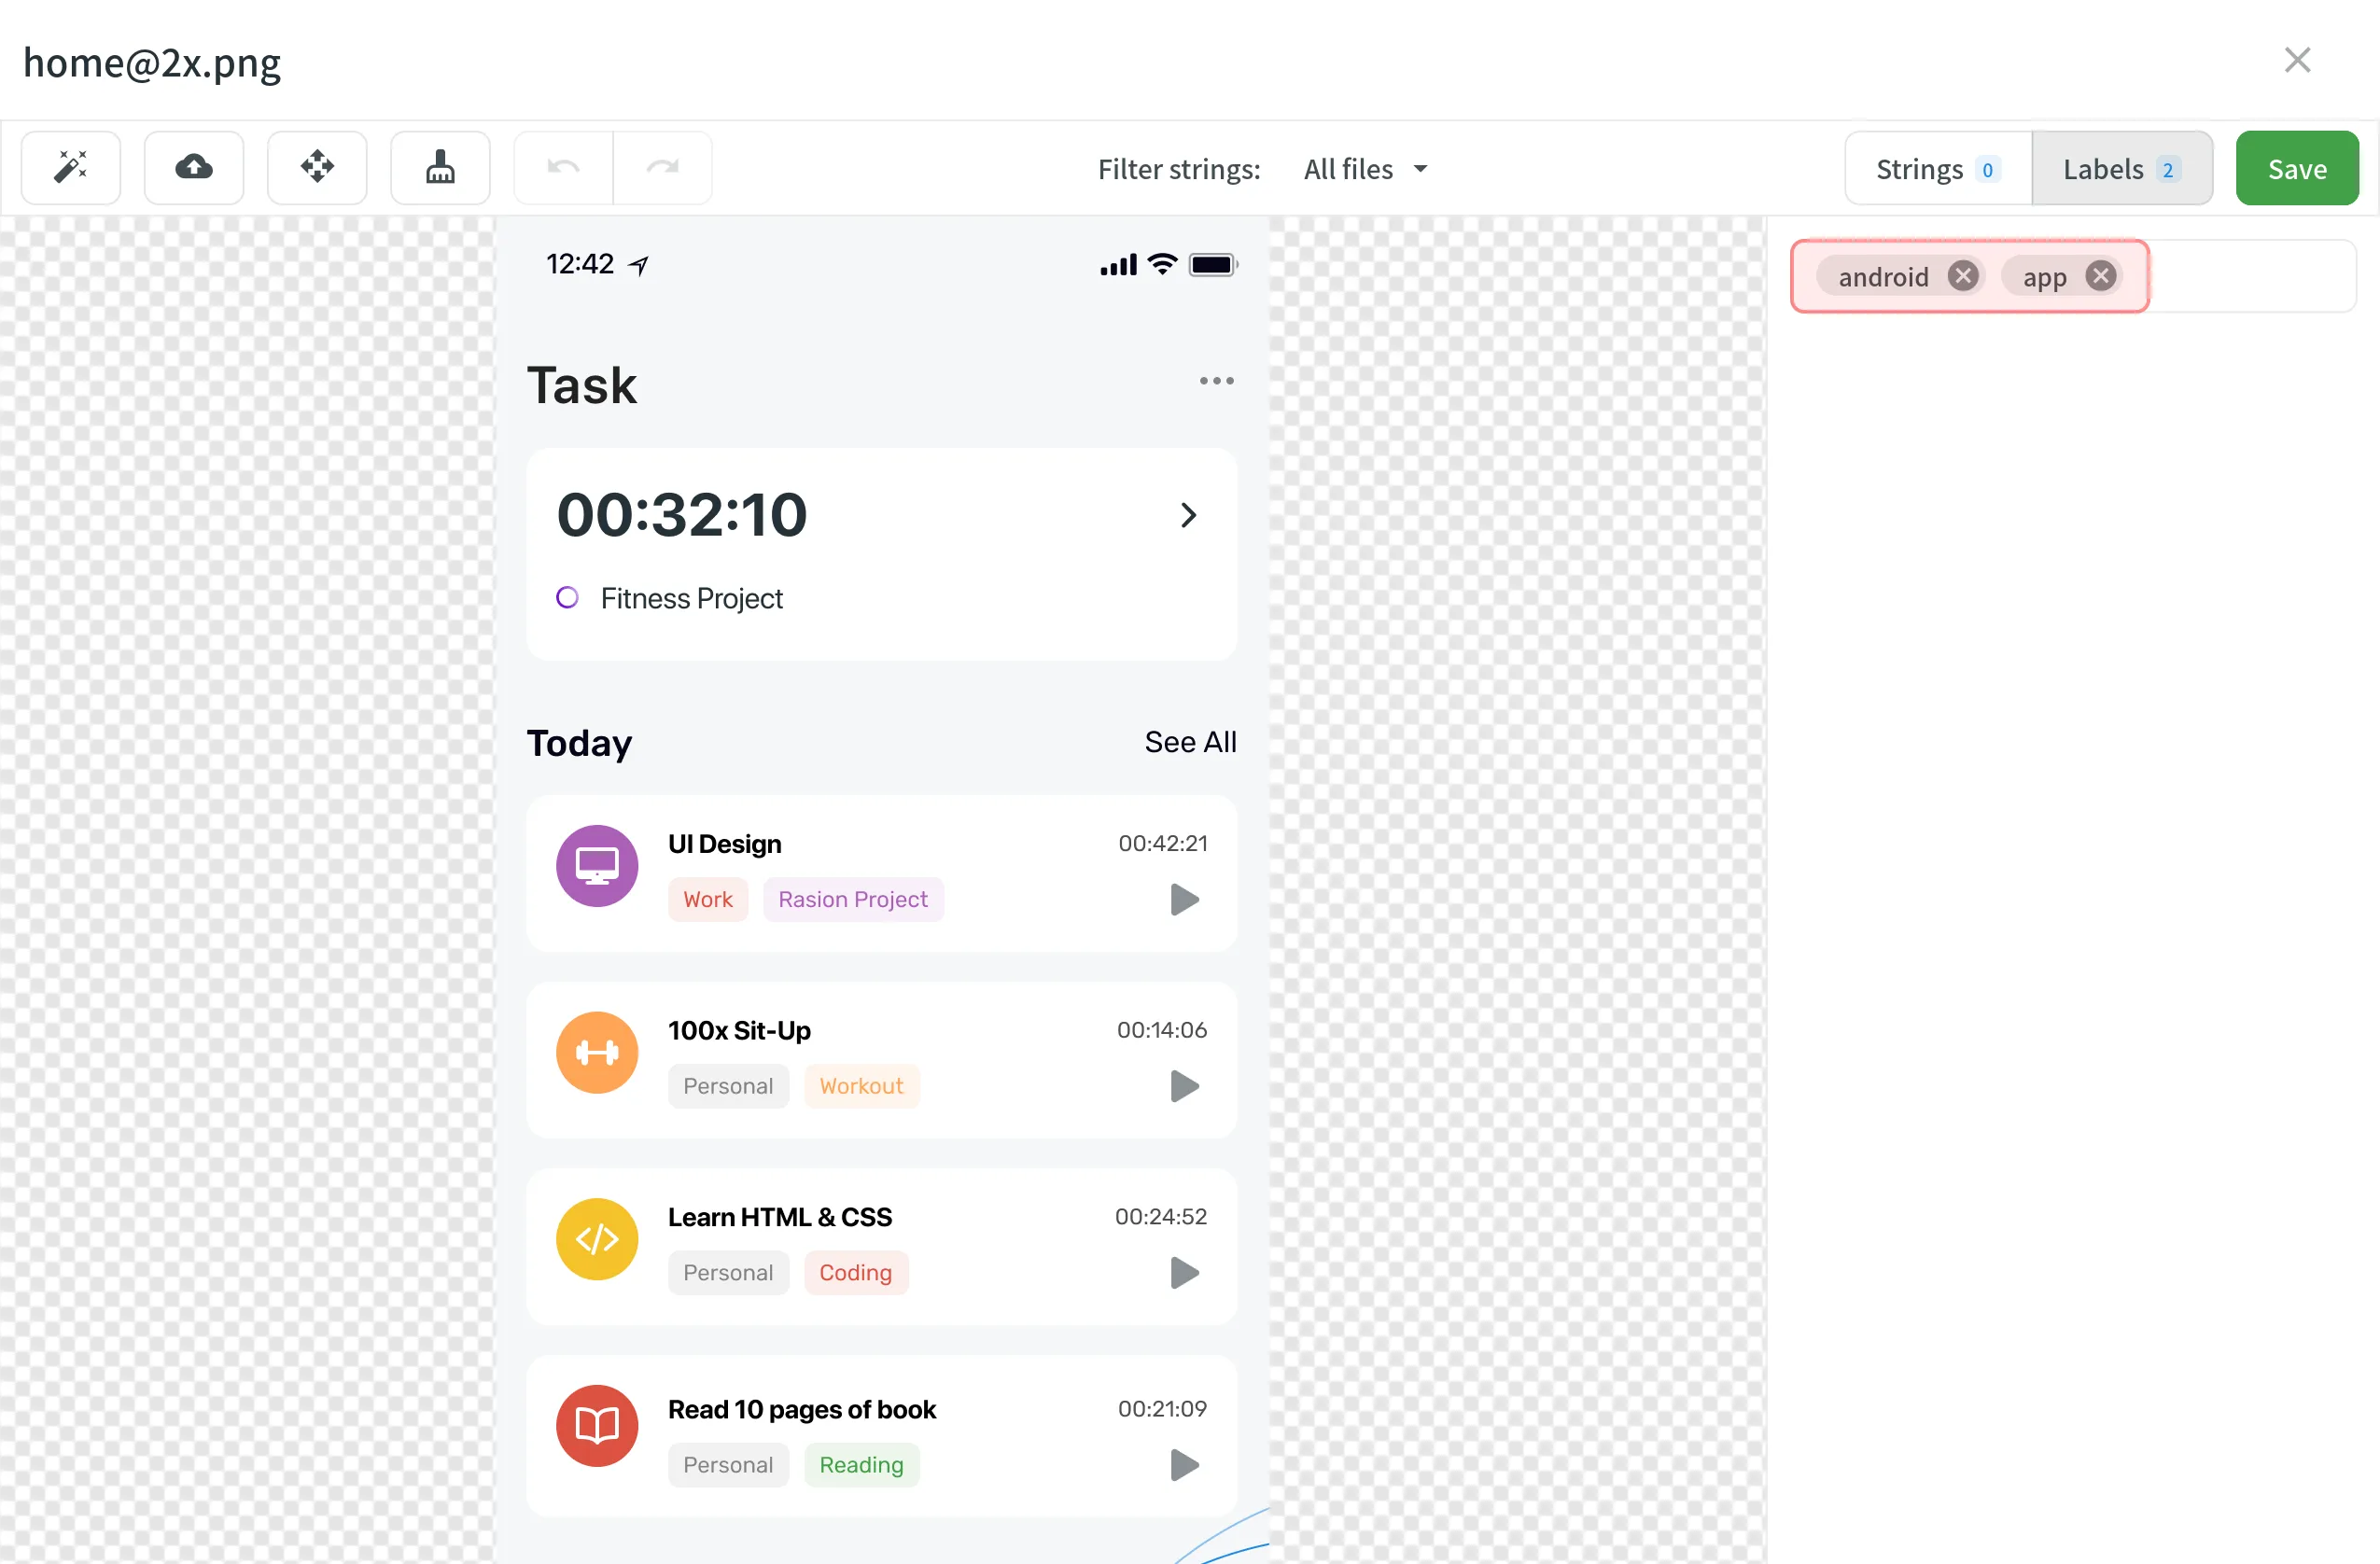 ##### [Add labels to multiple screenshots](#add-labels-to-multiple-screenshots) [Section titled “Add labels to multiple screenshots”](#add-labels-to-multiple-screenshots) 1. Select multiple screenshots you want to add the same labels to holding `Ctrl` or `Shift` . 2. Click **Labels**. 3. Select needed labels in the **Labels to be added** field. 4. Click **Save**. 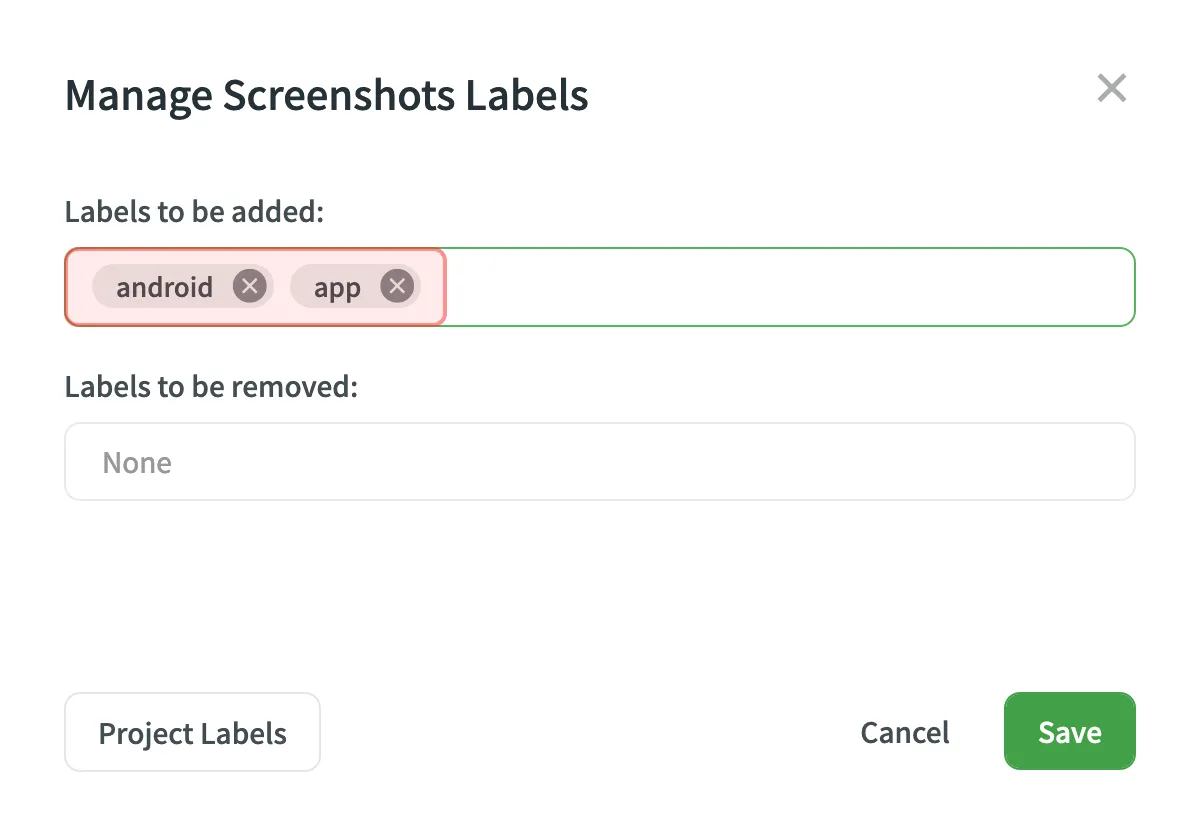 ## [Update Screenshots](#update-screenshots) [Section titled “Update Screenshots”](#update-screenshots) You can upload a new screenshot that will replace the current one. The already tagged strings that are relevant would remain tagged. If the text on the screenshot changed its location, strings would remain tagged but on the new locations. To update the screenshot, follow these steps: 1. Open the screenshot with a double-click. 2. Click and select a new screenshot from your machine or use Drag\&Drop. 3. Click **Save**. ## [Rename Screenshots](#rename-screenshots) [Section titled “Rename Screenshots”](#rename-screenshots) To rename a screenshot, follow these steps: 1. Click on the needed screenshot and select **Rename**. 2. Specify a new name. 3. Press `Enter` . ## [Download Screenshots](#download-screenshots) [Section titled “Download Screenshots”](#download-screenshots) You can download screenshots and reuse them in other projects or elsewhere. To download screenshots, follow these steps: 1. Select one or multiple screenshots holding `Ctrl` or `Shift` . 2. Click **Download**. Alternatively, click on the needed screenshot and select **Download**. ## [Delete Screenshots](#delete-screenshots) [Section titled “Delete Screenshots”](#delete-screenshots) To delete a screenshot, follow these steps: 1. Select one or multiple screenshots holding `Ctrl` or `Shift` . 2. Click **Delete screenshot**.
# Information Security Policy
> Crowdin Information Security Policy objectives and basic principles
Crowdin Information Security Policy (hereinafter the Policy) defines the objectives and basic principles of information security. Information security means implementation and maintenance of the appropriate level of its properties. The Policies requirements apply to the entire Crowdin organization and all business processes, and are available mandatory for all employees as well as those involved in these business processes. Compliance with the requirements of the Policy is an important aspect for achieving Crowdin’s strategic goals and objectives. Crowdin information security policy meets the requirements of ISO / IEC 27001: 2022. This policy sets up: * The context of the Organization * Internal and external issues relevant to the purpose of Crowdin * Interested parties that are relevant to the Information security management systems (hereinafter ISMS) * The requirements of these interested parties relevant to the ISMS * Information security objectives * Information security policy commitments * Responsibilities for Information Security * Measurement Information security processes are described, formally defined and approved, Crowdin’s guidance in the form of standards, policies, regulations and other internal regulatory documents. ## [Context of the organization](#context-of-the-organization) [Section titled “Context of the organization”](#context-of-the-organization) According to ISO, defining the context of an Organization is a “business environment”, “a combination of internal and external factors and conditions that may influence the organization’s approach to its products, services and investments and interested parties”. Crowdin is a product company with more than 2 million user accounts. Crowdin’s software solution empowers companies of any shape and size to accelerate their growth by reaching people who speak different languages. Crowdin team works passionately toward a shared goal: to expand the potential of agile localization. From day one till now, Crowdin’s mission has always been to keep it simple and wow Crowdin’s customers with an outstanding user experience and the latest technology solutions. Crowdin’s main industrial sector is Software as a service. The purpose of the ISMS is to ensure that Crowdin is still able to meet its defined business objectives and comply with its policies in the face of potential and actual security incidents. Policies have been set by the organization in a variety of areas and these must be taken account of during the information security planning process to ensure that they are met. The main relevant policies are: * Business Continuity Plan * Information Security Management Framework * Risk Assessment Methodology * Risk Treatment Guideline * Incident Response Plan * Acceptable Use Policy * Access Control Policy * Clear Desk and Clear Screen Policy * Control Against Malware Policy * Cryptography Policy * Human Resources Security Policy * Information Backup Policy * Information Classification and Labeling Policy * IS Risk Management Policy * Logging and Monitoring Policy * Monitoring and evaluating the effectiveness of ISMS Policy * Network Security Policy * Password Policy * Physical Security Policy * Security in Development and Maintenance Processes Policy * Segregation of Duties Policy * Supplier Relationship Security Policy * Workstation Security Policy * Сhange Management Policy * Communication Procedure * Corrective and Preventive Actions Procedure * Disciplinary procedure * Document control procedure * Internal Audit Procedure * Inventory and assessment of information assets procedures * Risk Management Procedure * Maintaining confidentiality in the work * Management Review Procedure * User Access Management Procedure * Vulnerability Management Policy * Security in Customer Support Policy ## [Internal and external issues](#internal-and-external-issues) [Section titled “Internal and external issues”](#internal-and-external-issues) There are a number of internal and external issues that are relevant to the purpose of Crowdin and that affect the ability of the ISMS to achieve its intended outcomes. Internal issues: * Adopted standards, guidelines and models * Significant organizational changes * Governance and organizational structure * Contractual relationships * Resources and knowledge (e.g. capital, people, processes and technologies) * Relationship with staff and stakeholders, including partners and suppliers * etc. External issues: * Changes in technology * Government regulations and changes in the law * Competition * Economic shifts in the market * Supply chain * Society and culture * Interest and inflation rate * Data protection * Supporting technologies and infrastructure * Automation and artificial intelligence * Military conflicts and political changes * etc. These general internal and external issues will be considered in more detail as part of the risk assessment process and will be regularly reviewed and monitored. ## [The interested parties that are relevant to the ISMS of Crowdin have been determined below with their individual expectations.](#the-interested-parties-that-are-relevant-to-the-isms-of-crowdin-have-been-determined-below-with-their-individual-expectations) [Section titled “The interested parties that are relevant to the ISMS of Crowdin have been determined below with their individual expectations.”](#the-interested-parties-that-are-relevant-to-the-isms-of-crowdin-have-been-determined-below-with-their-individual-expectations) An interested party is defined as a person or organization that can affect, be affected by, or perceive themselves to be affected by a decision or activity. The following are defined as interested parties that are relevant to the ISMS: * Business Owners * Governance * Customers * Suppliers and partners * Regulatory bodies * Customer user groups * Emergency Services * Employees of the Organization * Contractors providing services to the Organization * Competitors * Investors * The media * Emergency Services * Auditor | Interested party | Expectations | Requirement | | -------------------------------------------------- | ---------------------------------------------------------------------------------------------------------------------------- | --------------------------------------------------------------------------------------------------------------------------------------------------------- | | Owners of the business | Effective information security influences the organization’s financial success | Return on capital | | Governance | Organisational reputation must be protected | Documentary and practical confirmation of the implementation of ISMS | | Customers, Customer user groups | The confidentiality, integrity and availability of data is secured at all times | ISMS ISO 27001 Certificate | | Suppliers and partners | Adhering to agreements and payment terms | Evidence of adhering to agreements and payment terms | | Regulatory bodies | The activities of the Organization comply with current legislation | Official confirmation of legal requirements (reports, certificates, etc.) | | Employees of the Organization | Personal data security, social welfare benefits, appropriate remuneration, training & support, safe working environment etc. | Legislative documents and regulations, NDA terms & conditions, clear instructions on how to handle sensitive data etc. | | Contractors providing services to the Organization | Adhering to agreements and payment terms; Personal data security, social welfare benefits, appropriate remuneration | Evidence of adhering to agreements and payment terms; Legislative documents and regulations, NDA, clear instructions on how to handle sensitive data etc. | | Competitors | The Organization responding to rival marketing campaigns with its own initiatives and set prices competitively | Results of market monitoring | | Investors | Profitability, expected return on investment | Return on investment, Financial Statements | | The media | Transparency regarding security incidents | Coverage of data breaches and a wider public interest in the way organisations protect personal information | | Auditors | Expect that a proportionate level of security controls are in place at all times to protect assets | Documentary and practical confirmation of the implementation of ISMS | | Emergency Services | Safe working environment etc. | Fire Safety, First aid provision etc. | ## [Information security objectives:](#information-security-objectives) [Section titled “Information security objectives:”](#information-security-objectives) * Ensure compliance with the requirements of ISO / IEC 27001: 2022 which will allow Crowdin to be a certified company and trusted supplier for its customers. ([View Certificate](/Certificate_ISO_27001_2024_12_12.pdf)). Ensure compliance with relevant laws, regulations (legislation of Estonia, Ukraine), contractual agreements, and organizational policies related to information security. * Ensure the availability, integrity and confidentiality of both customer and employee data, confidentiality of internal business processes. * Continuously reduce risks within the organization’s ISMS. * Prevent or minimize potential IS incident damage. This strategic objectives are supported by annual KPIs, described in more detail in the *ISMS-PL-Monitoring and evaluating the effectiveness of ISMS Policy* policy: * Availability time of the service (>99,95% yearly) * Data confidentiality incidents count (goal: 0) * Data integrity incidents count (goal: 0) * Physical security incidents count (goal: 0) * Prioritized issues to be fixed immediately (goal: <100) * Vulnerabilities count found during pentest (security level: strong or very strong) * Vulnerabilities count found via reporting program (goal: no critical reports) * Planned ISMS tasks done in previous period (goal: 100%) * Quantity of unsuccessful or defective system updates (goal <25) * Active risks distribution (decrease or increase of identified risks number) (goal <10 risks classified as very high) * Phishing testing: percentage of compromised users (goal: 0%) ## [What will be done](#what-will-be-done) [Section titled “What will be done”](#what-will-be-done) Current policies, processes, and security measures will be continuously reviewed. Any gaps in alignment with ISO/IEC 27001:2022 standards will be identified and addressed. A proactive risk management strategy will be maintained. This strategy includes conducting regular risk assessments, vulnerability scans, and security audits. Identified risks will be analyzed, and continuous mitigation measures will be implemented. ## [What resources will be required](#what-resources-will-be-required) [Section titled “What resources will be required”](#what-resources-will-be-required) * Professionals with expertise in information security, data protection, and risk management. * Security technologies, including secure data storage solutions, device management solutions, encryption technologies, vulnerability assessment tools. * Skilled auditors and analysts to assess the effectiveness of implemented security measures and identify areas for improvement. * Access to up-to-date threat intelligence sources * Adequate budget allocation to support investments in security technologies, personnel, training programs, and processes improvements. ## [Who will be responsible](#who-will-be-responsible) [Section titled “Who will be responsible”](#who-will-be-responsible) The ISMS Committee has the final responsibility for Information Security Risks across Crowdin. Detailed information about the functions, regulation, duties and responsibilities of the ISMS Committee is in the Regulation on ISMS Committee. Managers/Head of Departments are responsible for information security within their departments/teams. They must ensure that the department/team has communicated their own informational security needs to the CISO. CISO is clearly accountable for the provision of appropriate, timely advice to the management to ensure that an effective information risk management framework is implemented, operated and maintained in alignment with the business strategy, the business and the legal requirements. All personnel, regardless of function, level and role, shall have explicit personal responsibilities for Information Security Management. Responsibilities are described in detail in the *ISMS-FR-Information Security Management Framework*, and in other corresponding policies. ## [When it will be completed](#when-it-will-be-completed) [Section titled “When it will be completed”](#when-it-will-be-completed) Continuous monitoring and improvement of ISMS will be an ongoing task to maintain compliance. Regular risk assessments and mitigation activities will be scheduled periodically. Vulnerability assessments will be conducted regularly as part of the organization’s ongoing security practices. Proactive measures will be implemented immediately upon identification of vulnerabilities to ensure continuous protection. The Incident Response Plan is annually reviewed, updated and tested to ensure its effectiveness in minimizing potential damage in the event of a security incident. ## [How the results will be evaluated](#how-the-results-will-be-evaluated) [Section titled “How the results will be evaluated”](#how-the-results-will-be-evaluated) Systems, processes and activities that can be monitored in the ISMS include, but are not limited to: * Audit; * Risk assessment process; * Risk management of third parties; * Business continuity management; * The maturity of implementation of ISMS processes; * Incident management; * Vulnerability management; * Configuration management; * Training and level of awareness raising activities; * Access control, firewall and other event logs; * Management of physical and environmental safety; and * System monitoring. The organization’s compliance with ISO/IEC 27001:2022 is evaluated through internal audit, management review, ISMS committee meetings. Annual external audits conducted by certification bodies will further validate our compliance status. Key performance indicators defined will be closely monitored. Any security breaches or incidents will trigger immediate investigation and corrective action to ensure the security of customer and employee data, as well as our internal business processes. Monitoring and evaluating the effectiveness of ISMS processes is described in the *ISMS-PL-Monitoring and evaluating the effectiveness of ISMS Policy*.
# Sketch Plugin
> Start localizing at the design stage
With the Crowdin plugin for Sketch, you can use texts from Crowdin in your designs to save time for both designers and developers. These could include original or translated texts. If necessary, you can add new ones (e.g., dialog titles, button labels) and send them to translators in Crowdin. ## [Use Cases](#use-cases) [Section titled “Use Cases”](#use-cases) * Quickly generate multilingual creative assets. * Translate mockups and test them in different languages before the programming starts. * Stop using ‘Lorem Ipsum’, add real texts from Crowdin to your prototypes instead. * Create and upload source strings from your designs to your Crowdin project. This way, uploaded strings could be used by developers, which reduces time spent on development. * Upload tagged screenshots to your Crowdin project. ## [Installation](#installation) [Section titled “Installation”](#installation) You can [download the latest release](https://github.com/crowdin/sketch-crowdin) from our GitHub repository. 1. Download the installation file. 2. Unzip it. 3. Double-click on the *sketch-crowdin.sketchplugin* file for auto installation. Crowdin plugin for Sketch can also be installed with [Sketch Runner](https://sketchrunner.com/). ## [Configuration](#configuration) [Section titled “Configuration”](#configuration) ### [Setting up Credentials](#setting-up-credentials) [Section titled “Setting up Credentials”](#setting-up-credentials) To specify your Crowdin credentials in Sketch, follow these steps: 1. Click **Plugins > Crowdin**. 2. Switch to **Settings**. 3. Provide your Personal Access Token. 4. Click **Connect to Crowdin**.  To generate a new token in Crowdin, follow these steps: 1. Go to *Account Settings > API* tab, *Personal Access Tokens* section, and click **New Token**. 2. Specify *Token Name* and click **Create**. ### [Selecting a Project](#selecting-a-project) [Section titled “Selecting a Project”](#selecting-a-project) To select the Crowdin project you’d like to work with, click the **Select Project** drop-down menu in **Settings**, and select a project from the list. Later on, you can use the same drop-down menu to switch to another project if needed. Additionally, you can select the specific branch your content will be uploaded to.  ## [UI Localization](#ui-localization) [Section titled “UI Localization”](#ui-localization) Use the *Strings* tab when localizing UI and working on dynamic pages with your development and marketing teams. In this tab, you can add source strings from Crowdin to your designs in Sketch in a click. After the texts are used in the designs, you can automatically upload tagged screenshots for translators’ reference back to Crowdin. ### [Using Source Strings from Crowdin in Sketch](#using-source-strings-from-crowdin-in-sketch) [Section titled “Using Source Strings from Crowdin in Sketch”](#using-source-strings-from-crowdin-in-sketch) 1. Open the Crowdin plugin for Sketch. 2. In the *Strings* tab, use the *Search* field to find the specific copy. You can search strings by source text, string identifier, or context. 3. Select the text layer you want to add text to and click on the needed string.  After using the source strings from Crowdin in your designs, you can [preview translations](#previewing-strings) for these strings in Sketch and [upload screenshots](#uploading-tagged-screenshots-to-crowdin) for them to your Crowdin project. ### [Adding Source Strings from Sketch to Crowdin](#adding-source-strings-from-sketch-to-crowdin) [Section titled “Adding Source Strings from Sketch to Crowdin”](#adding-source-strings-from-sketch-to-crowdin) You can add the strings that are already used in the designs or create and add completely new strings. 1. Open the Crowdin plugin for Sketch. 2. To add the strings used in the designs, select the whole artboard, multiple artboards, or the needed strings on the artboards. Alternatively, skip this step if you want to add a new string. 3. In the *Strings* tab, click **Add String**. 4. In the appeared dialog, fill in the required fields. 5. (Optional) To add labels to the strings, alternately select them from the **Label** drop-down menu and click **Save**.  To add the same strings into multiple files in Crowdin, alternately select the needed files from the **File** drop-down menu. If some artboards contain hidden elements that should not be added to Crowdin, clear the **Push hidden elements** option. Added strings will be transferred to your Crowdin project and also will be displayed in the list of the **Strings** tab. You can edit or delete the strings from the same list anytime. The respective changes will also be applied to the strings in your Crowdin project. ### [Key Naming Pattern Settings](#key-naming-pattern-settings) [Section titled “Key Naming Pattern Settings”](#key-naming-pattern-settings) To simplify adding strings from Sketch to the Crowdin project, you can set up the desired key naming pattern for the source string identifiers in the plugin settings. The Crowdin plugin for Sketch will suggest the string identifiers for new strings based on the selected pattern. While adding new source strings, you can always edit the suggested identifier to the preferred look. To select the key naming pattern, follow these steps: 1. Open the Crowdin plugin for Sketch. 2. Switch to **Settings**. 3. In the *Key naming pattern* section, select the preferred option from the drop-down menu. ### [Uploading Tagged Screenshots to Crowdin](#uploading-tagged-screenshots-to-crowdin) [Section titled “Uploading Tagged Screenshots to Crowdin”](#uploading-tagged-screenshots-to-crowdin) 1. Open the Crowdin plugin for Sketch. 2. In the *Strings* tab, use texts from the Crowdin project in your designs. Click **Upload Screenshots** to upload screenshots of the artboards that include the used texts. 3. To update screenshots on Crowdin, click **Upload Screenshots** again.  Read more about [Screenshots](/screenshots/). ### [Previewing Strings](#previewing-strings) [Section titled “Previewing Strings”](#previewing-strings) Preview translations from Crowdin for the strings used in the designs in Sketch. You can preview translations in the new frames or the original ones. When previewing translations in the new frames, you can populate them with the actual translations or with string keys for further use by developers. To preview strings populated with translations, follow these steps: 1. Open the Crowdin plugin for Sketch. 2. In the *Strings* tab, *Preview Strings* section, select *Preview in duplicated artboards* or *Preview in the current artboards*. 3. Select *Create with language*. 4. Select the target language you want to preview translations for. You can also choose *All languages*. 5. Choose the content you want to preview in Sketch. Select *Page* or *Artboard*.  To preview strings populated with key names, follow these steps: 1. Open the Crowdin plugin for Sketch. 2. In the *Strings* tab, *Preview Strings* section, select *Preview in duplicated artboards*. 3. Select *Create with key names*. 4. Choose the content you want to preview in Sketch. Select *Page* or *Artboard*.  ## [Marketing Visuals Localization](#marketing-visuals-localization) [Section titled “Marketing Visuals Localization”](#marketing-visuals-localization) Use the *Translation* tab to localize static pages, like brochures and banners. In this tab, you can send texts with context for translators to Crowdin and upload translated copies back to Sketch. ### [Sending Texts for Translation to Crowdin](#sending-texts-for-translation-to-crowdin) [Section titled “Sending Texts for Translation to Crowdin”](#sending-texts-for-translation-to-crowdin) You can send text for translation either from selected or all artboards from a Sketch file. Translators will work with those texts in the list view and use designs as an additional context for even higher translation quality. In Crowdin, a root folder *Sketch plugin* will be created. It will contain a subfolder named after your Sketch file with HTML files for each artboard inside. If needed, you can disable content segmentation in the plugin **Settings** so the long texts will not be split into sentences. To send Sketch designs for translation, follow these steps: 1. Open the necessary Sketch file. 2. Go to **Plugins > Crowdin**. 3. In the *Translation* tab, *Send Texts* section, select content you’d like to translate. Select *Page* or *Artboard*.  When the source files are uploaded to your Crowdin project, you can invite contributors to translate and proofread them. Read more about [translation strategies](/translation-strategies/). ### [Uploading Translations from Crowdin to Sketch](#uploading-translations-from-crowdin-to-sketch) [Section titled “Uploading Translations from Crowdin to Sketch”](#uploading-translations-from-crowdin-to-sketch) You can synchronize texts between Sketch and Crowdin projects whenever you want to test the translated copy inside Sketch or generate multilingual assets. To upload translated copies to Sketch, follow these steps: 1. Open the necessary Sketch file. 2. Go to **Plugins > Crowdin**. 3. In the *Translation* tab, *Get Translations* section, select the target language you want to upload translations for. You can also Select *All languages*. 4. Select the content you want to preview in Sketch. Select *Page* or *Artboard*.  After uploading translations to Sketch, the modified file will contain a separate artboard with translations for each target language. The newly uploaded translated versions won’t override the ones you uploaded previously. You can always delete the translated copies you no longer need. If you’d like the newly uploaded translated versions to override the previously uploaded ones, open the plugin **Settings** and select **Override existing translations**.
# String Management
> Manage source strings in your translation project
You can view all the project’s strings and manage strings settings via **Sources > Strings**. ## [Changing Strings Visibility](#changing-strings-visibility) [Section titled “Changing Strings Visibility”](#changing-strings-visibility) If some strings contain data that is not supposed to be translated (e.g., placeholders, other technical entities), you can hide them from translators. To do this: 1. Open your project and go to **Sources > Strings**. 2. Select the necessary strings by clicking the checkbox next to each one. 3. Click **Hide**.  ## [Filtering Strings](#filtering-strings) [Section titled “Filtering Strings”](#filtering-strings) By default, all source strings of the project are displayed in **Sources > Strings**. If necessary, you can filter out strings using the available filter options (Issues: Show All, With Unresolved Issues, Without Unresolved Issues; Comments: Show All, With Comments, Without Comments; Screenshots: Show All, With Screenshots, Without Screenshots; Visibility: Show All, Hidden and Visible) and project labels. 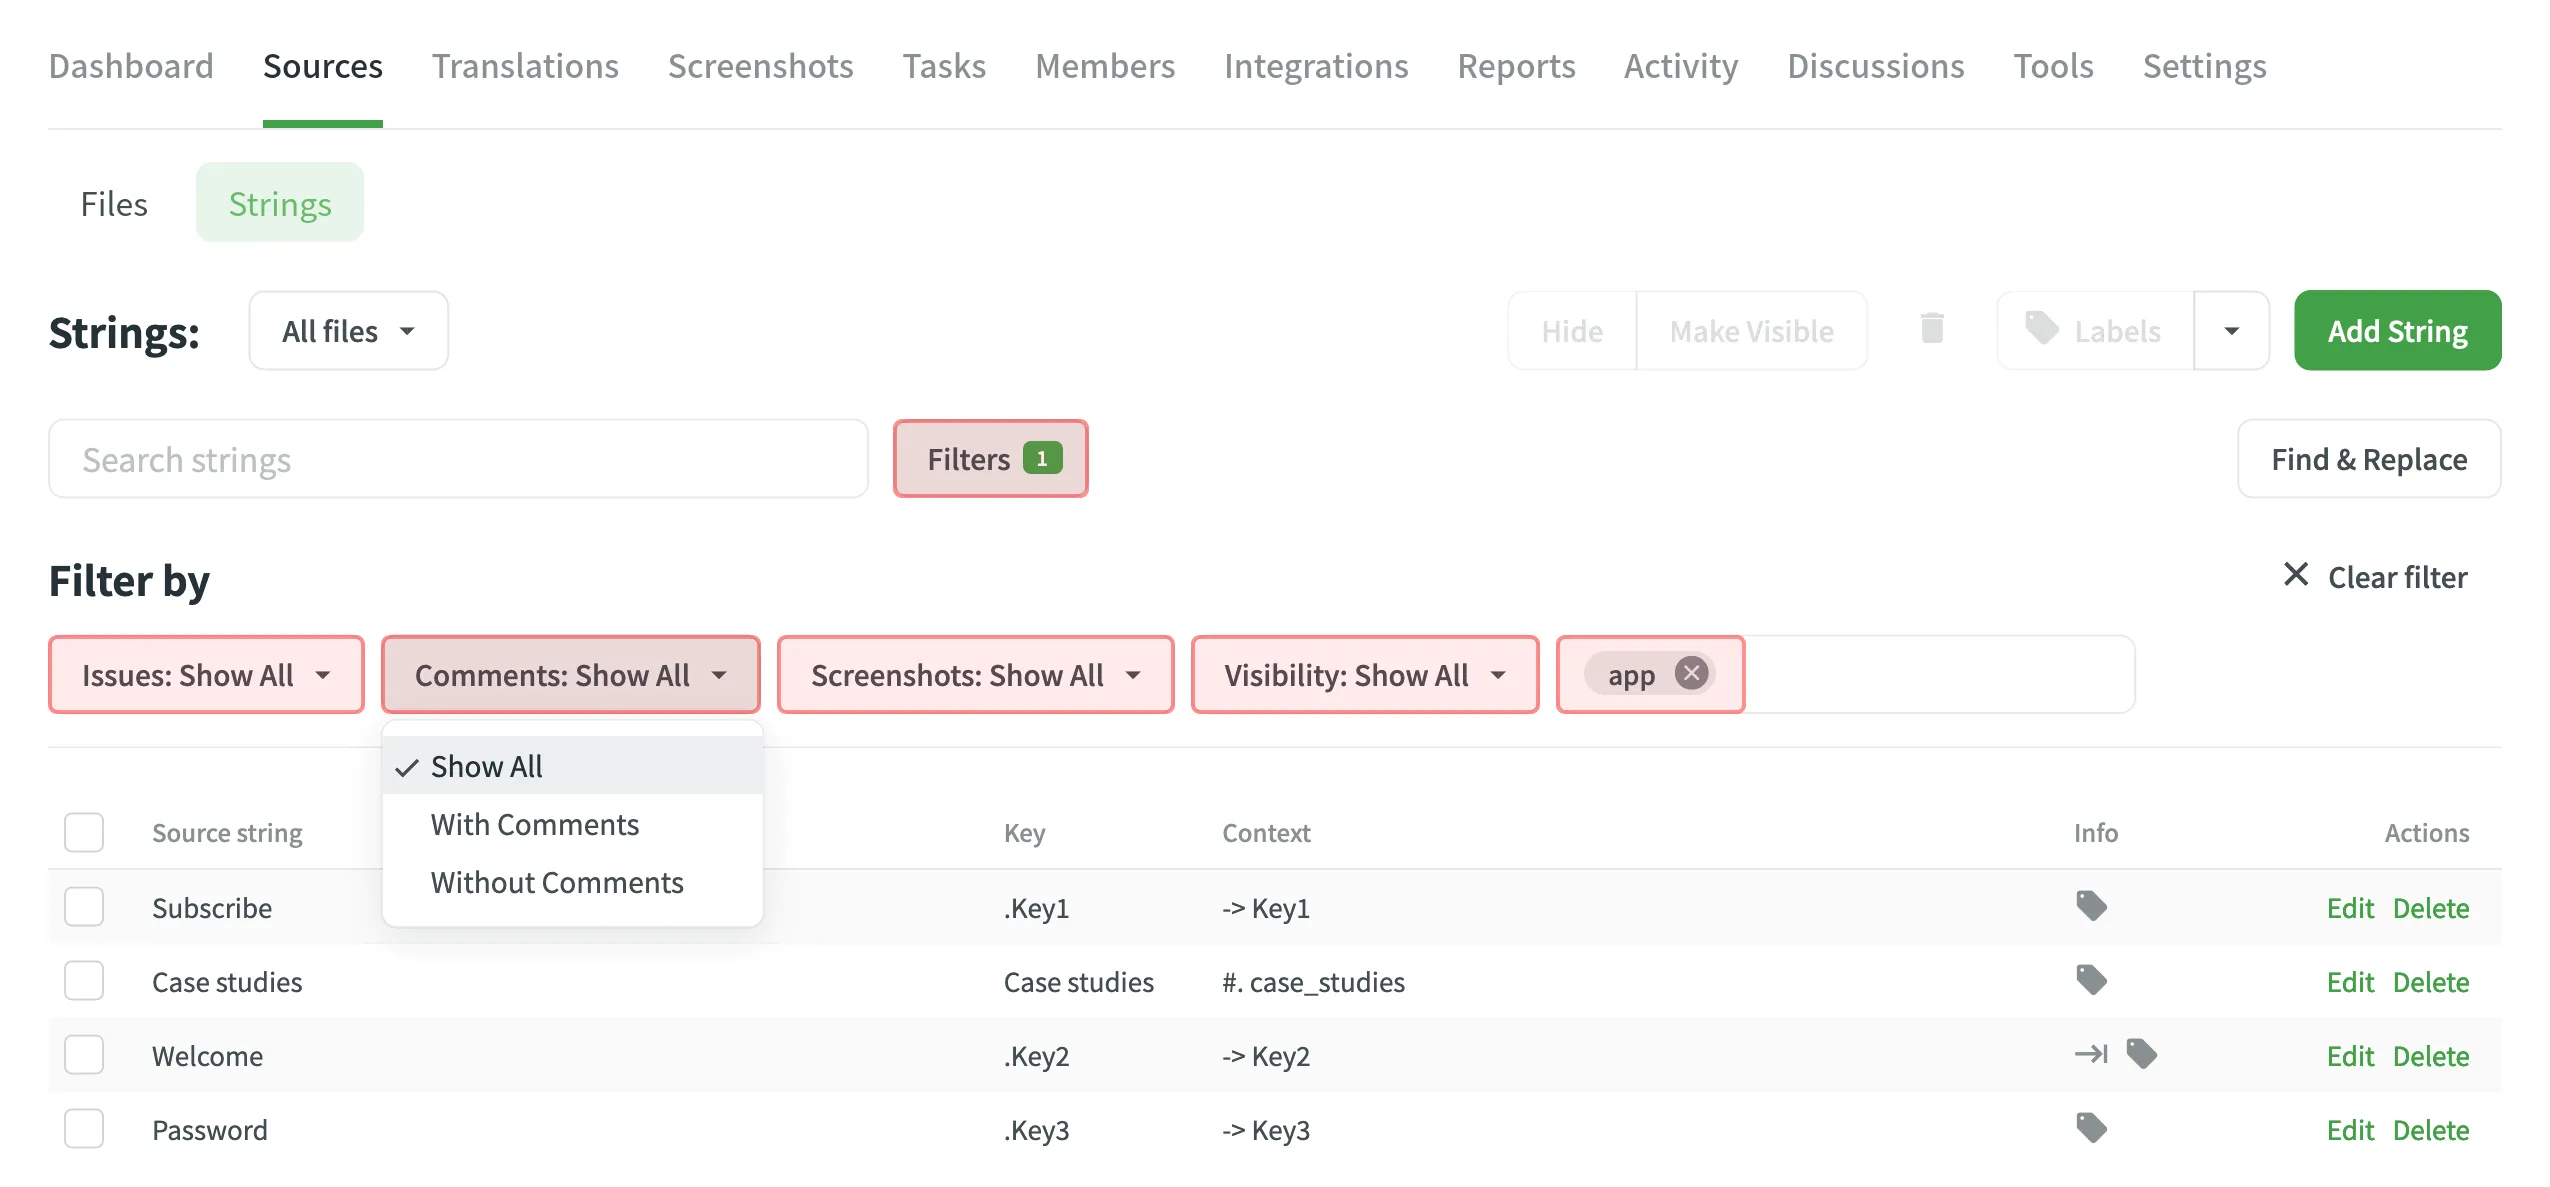 ## [Adding Strings](#adding-strings) [Section titled “Adding Strings”](#adding-strings) You can add strings to your projects directly in Crowdin. To add a new string, follow these steps: * File-based project 1. Open your project and go to **Sources > Strings**. 2. Click **Add String**. 3. In the appeared dialog, enter the necessary details for the string: * *String* – specify the text that needs translation. * *(Optional)* *Plurals* – select this option to add plural forms and enter the text for each form based on the project’s source language requirements. * *Identifier* – specify a unique key for the string, often used for referencing the translated text in the application. * *(Optional)* *Context* – add additional information to help translators understand the intended meaning. * *(Optional)* [*Labels*](#labels) – specify labels to organize strings or provide extra context. * *(Optional)* *Maximum Translation Length* – set a character limit for the translation. * *(Optional)* File-specific identifiers – specify unique keys for each file format when adding the string to multiple files. This ensures that the string meets the different identifier requirements based on the file formats it will be used in. * *Files* – choose the source files where this string should be added. 4. Click **Add** to add the new string to your project. * String-based project 1. Open your project and go to the **Strings** tab. 2. Click **Add String**. 3. In the appeared dialog, enter the necessary details for the string: * *Branches* – choose the branches where this string should be added. * *String* – specify the text that needs translation. You can leave this field empty to create placeholder strings for future content or development purposes. * *(Optional)* *Plurals* – select this option to add plural forms and enter the text for each form based on the project’s source language requirements. * *Identifier* – specify a unique key for the string, often used for referencing the translated text in the application. * *(Optional)* *Context* – add additional information to help translators understand the intended meaning. * *(Optional)* [*Labels*](#labels) – specify labels to organize strings or provide extra context. * *(Optional)* *Maximum Translation Length* – set a character limit for the translation. * *(Optional)* File-specific identifiers – specify unique keys for each branch when adding the string to multiple branches. This ensures that the string meets the different identifier requirements based on the file formats it will be used in. 4. Click **Add** to add the new string to your project. Read more about [project types](/creating-project/#project-types). Limitations The maximum identifier length is 512 characters. ## [String Editing](#string-editing) [Section titled “String Editing”](#string-editing) You can add context to the string, add or remove labels, set the max. length of the translation. Once the translation limits are exceeded, the system notifies the contributor that the translation should be shorter.  To edit some particular word or phrase that appears in multiple source strings, you can use the **Find & Replace** feature in **Sources > Strings**. Caution When editing the identifier of a string contained in a group of strings (string array for Android XML, segments for XLIFF), the existing translations will be removed for all group strings but the edited one. ### [Formats That Support Online Editing](#formats-that-support-online-editing) [Section titled “Formats That Support Online Editing”](#formats-that-support-online-editing) Some file formats allow editing (adding, deleting, and modifying) of the source text and string identifiers directly in Crowdin, so you can make the necessary corrections without having to update the source file via **Sources > Files**. The following file formats support editing the source text and string identifiers directly in Crowdin: * [Android XML](https://store.crowdin.com/android-xml) * [iOS Strings](https://store.crowdin.com/strings) * [Apple Strings Catalog](https://store.crowdin.com/string_catalog) * [JSON](https://store.crowdin.com/json) * [i18next JSON](https://store.crowdin.com/i18next-json) * [Chrome JSON](https://store.crowdin.com/chrome-json) * [XLIFF 1.2](https://store.crowdin.com/xliff) * [XLIFF 2.0](https://store.crowdin.com/xliff2.0) * [Angular XLF](https://store.crowdin.com/angular) * [GNU Gettext PO](https://store.crowdin.com/gnu-gettext) * [Unreal Engine Gettext PO](https://store.crowdin.com/gettext-unreal) * [YAML](https://store.crowdin.com/yaml) * [RESX](https://store.crowdin.com/resx) * [CSV](https://store.crowdin.com/csv) * [XLSX](https://store.crowdin.com/xlsx-excel) * [ARB](https://store.crowdin.com/arb) * [Java Properties](https://store.crowdin.com/java-properties) * [Properties Play](https://store.crowdin.com/properties-play) * [Properties XML](https://store.crowdin.com/properties-xml) ### [Labels](#labels) [Section titled “Labels”](#labels) Use labels in your project for an easy way to add context to the strings or organize them by certain topics. Labels are also useful while creating translation and proofreading tasks or searching for specific strings in the Editor with the help of [Advanced Filter](/online-editor/#advanced-filter). [Managing Project Labels ](/project-settings/labels/)Learn how to make your Crowdin project labels. There are a few possible ways you can add labels to the strings. ##### [Add labels to one string at a time via the *Edit String* dialog](#add-labels-to-one-string-at-a-time-via-the-edit-string-dialog) [Section titled “Add labels to one string at a time via the Edit String dialog”](#add-labels-to-one-string-at-a-time-via-the-edit-string-dialog) 1. Click **Edit** on the string in the list. 2. Select needed labels in the *Labels* field. 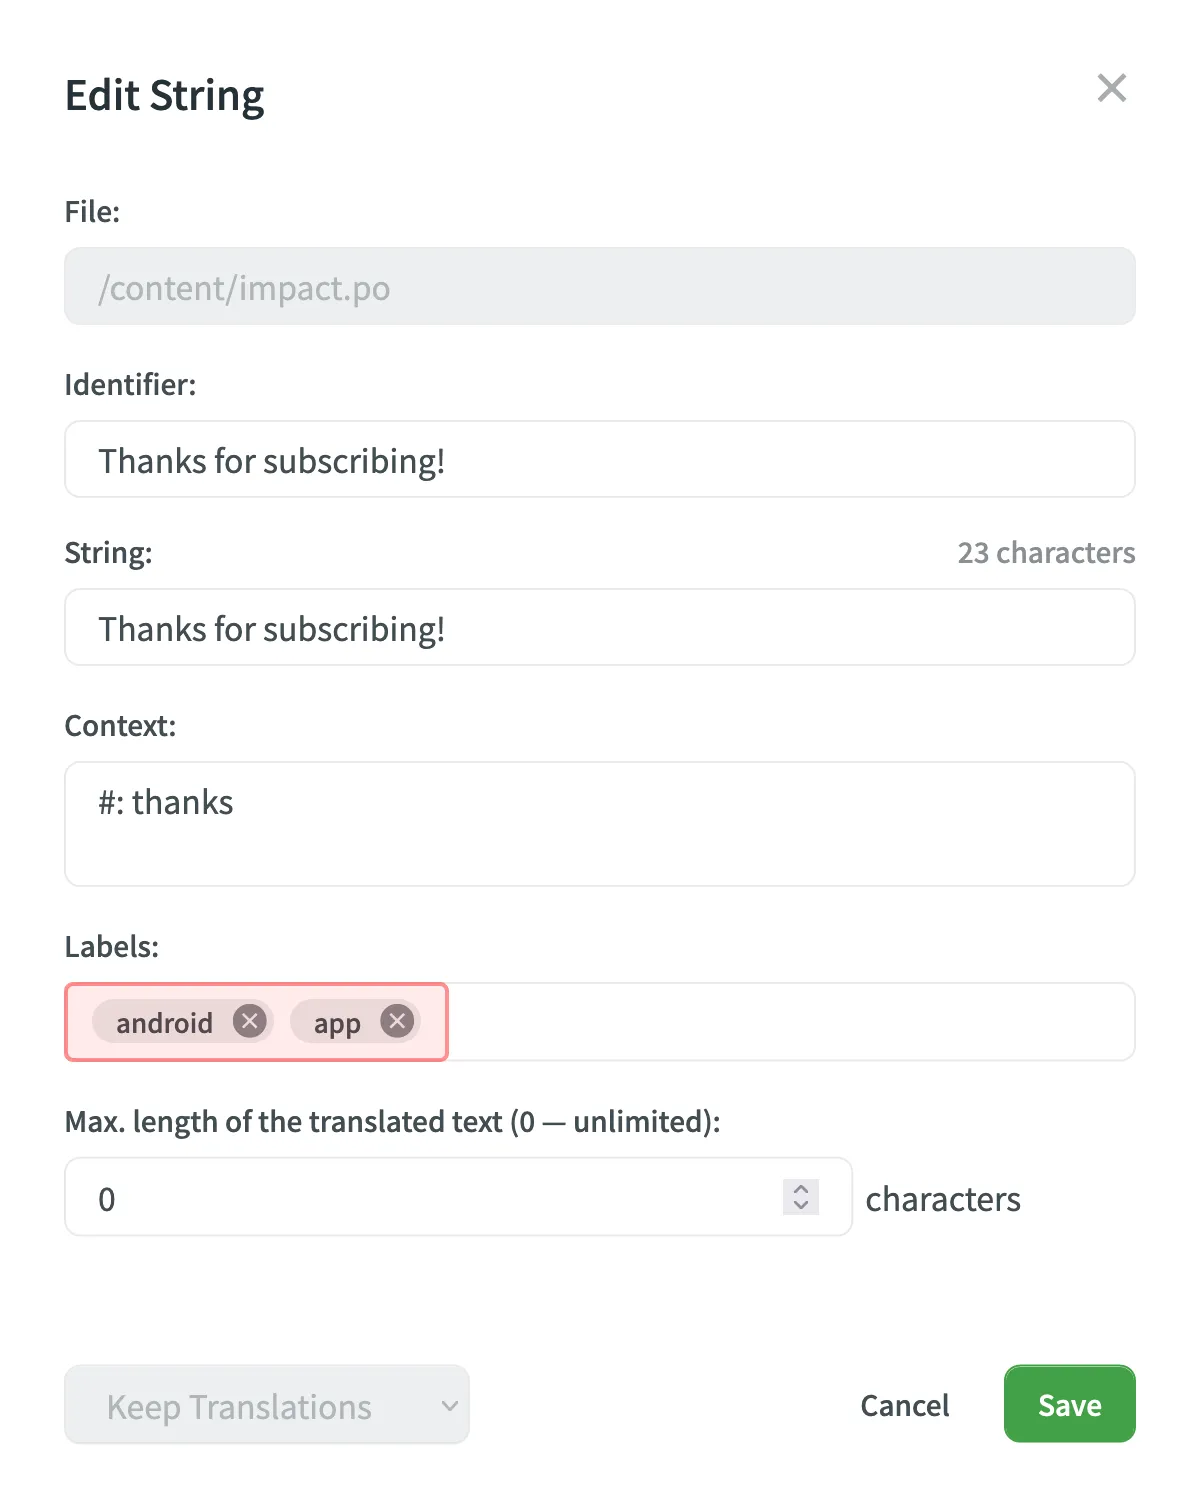 3. Click **Save**. ##### [Add labels to multiple strings via the *Manage Strings Labels* dialog](#add-labels-to-multiple-strings-via-the-manage-strings-labels-dialog) [Section titled “Add labels to multiple strings via the Manage Strings Labels dialog”](#add-labels-to-multiple-strings-via-the-manage-strings-labels-dialog) 1. Select a few strings you want to add the same labels to. 2. Click **Labels**. 3. Select needed labels in the *Labels to be added* field. 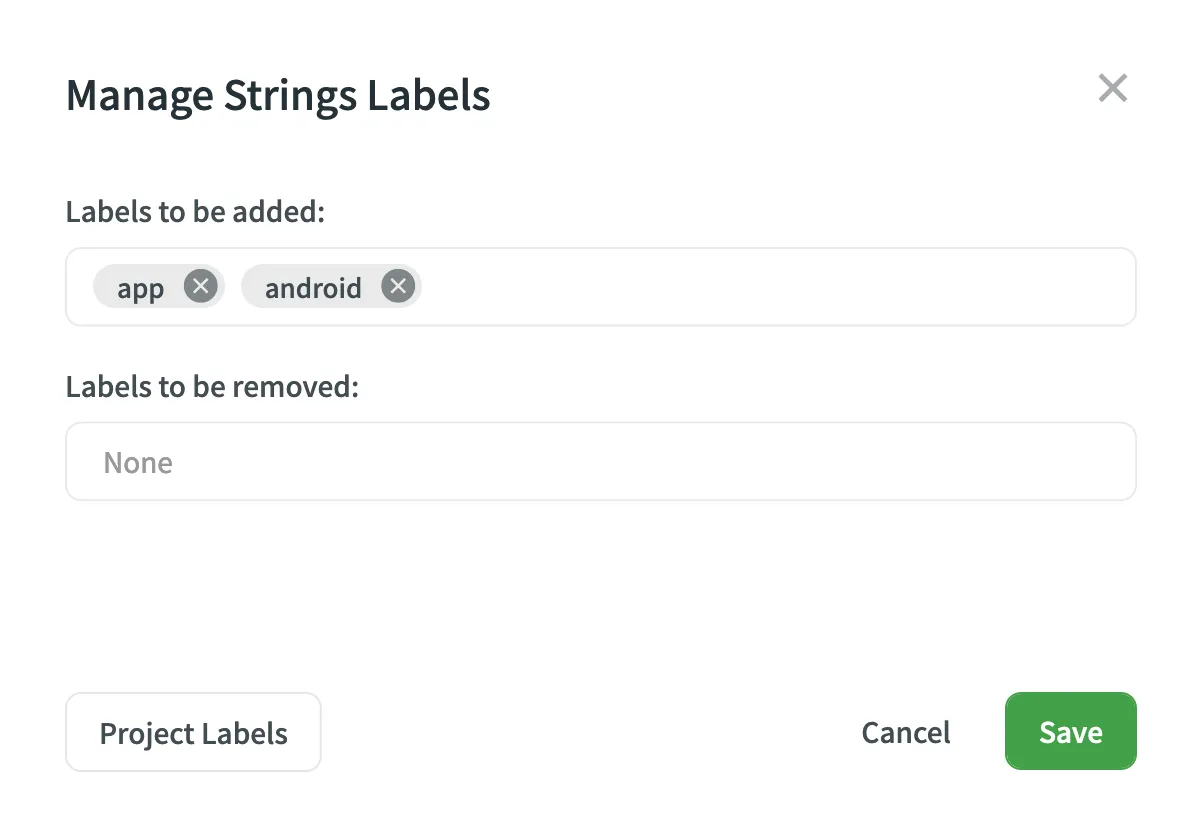 4. Click **Save**. ##### [Add labels to the source strings in CSV and XLSX files using a dedicated column for labels](#add-labels-to-the-source-strings-in-csv-and-xlsx-files-using-a-dedicated-column-for-labels) [Section titled “Add labels to the source strings in CSV and XLSX files using a dedicated column for labels”](#add-labels-to-the-source-strings-in-csv-and-xlsx-files-using-a-dedicated-column-for-labels) Read more about [Configuring Columns for Import](/csv-xlsx-configuration/#configuring-columns-for-import).
# List of Sub-processors
> Learn about Crowdin's sub-processors and their purpose
Effective date: May 31, 2024 Crowdin provides a great deal of transparency regarding how we use your data, how we collect your data, and with whom we share your data. To that end, we provide this page, which details our sub-processors, how we use cookies, and where and how we perform any tracking on Crowdin. ## [Crowdin Sub-processors](#crowdin-sub-processors) [Section titled “Crowdin Sub-processors”](#crowdin-sub-processors) When we share your information with third party sub-processors, such as our vendors and service providers, we remain responsible for it. We work very hard to maintain your trust when we bring on new vendors, and we require all vendors to enter into data protection agreements with us that restrict their processing of Users’ Personal Information. | Sub-processor | Purpose and Description | Entity Country | | ------------------------ | ----------------------------------------------------------------- | ------------------------ | | Amazon Web Services | Hosting services, file storage and backup services | United States of America | | FastSpring | Subscription credit card payment processor | United States of America | | Google Workspace | Internal company infrastructure | United States of America | | Google Analytics | Website analytics and performance | United States of America | | Google Cloud | Screenshots Processing | United States of America | | HubSpot | Customer relations management | United States of America | | Apollo | Sales intelligence software | United States of America | | Help Scout | Customer support ticketing system | United States of America | | Amazon QuickSight | Business intelligence software | United States of America | | Xero | Corporate billing system | United States of America | | Atlassian Inc. - Jira | Proprietary issue tracking product developed by Atlassian | United States of America | | Slack Technologies, Inc. | Communication software | United States of America | | Crowdin LLC | Provides a portion of product services for Crowdin | Ukraine | | Sentry | Application monitoring and error management | United States of America | | Docusign | Service for storing signed documents | United States of America | | Open AI | Provides AI models in support of Crowdin’s AI/ML-powered features | Ireland | | Microsoft Corporation | Business analytics tool and a suite of ERP and CRM applications | United States of America | ## [Crowdin Feature Specific Sub-processors](#crowdin-feature-specific-sub-processors) [Section titled “Crowdin Feature Specific Sub-processors”](#crowdin-feature-specific-sub-processors) These are only available to Crowdin customers who have opted in to the use of certain Crowdin features. | Sub-processor | Purpose and Description | Entity Country | | --------------- | ----------------------------------------------------------------- | ------------------------ | | Google Gemini | Provides AI models in support of Crowdin’s AI/ML-powered features | United States of America | | Microsoft Azure | Provides AI models in support of Crowdin’s AI/ML-powered features | United States of America | | Mistral AI | Provides AI models in support of Crowdin’s AI/ML-powered features | France | | Anthropic | Provides AI models in support of Crowdin’s AI/ML-powered features | United States of America | | DeepL | Machine translation services | Germany | | Convertio | Processing of PDF files uploaded by users | Cyprus | ## [Sub-processor Updates](#sub-processor-updates) [Section titled “Sub-processor Updates”](#sub-processor-updates) Prior to engaging any sub-processors, we perform due diligence to evaluate their privacy, security and confidentiality practices, and execute an agreement with them that implements their obligations. When we bring on a new vendor or other sub-processor who handles our Users’ Personal Information, or remove a sub-processor, or we change how we use a sub-processor, we will update this page. If you have questions or concerns about a new sub-processor, we’d be happy to help. Also, if you’d like to be notified when we add a new sub-processor, please contact us and we’ll add you to the email list. Please contact us at
# Supported Formats
> Explore the list of localization formats supported by Crowdin
Crowdin supports a wide range of localization formats, including but not limited to files for mobile, software, documents, subtitles, and graphic assets. ## [Localization Formats and Documents](#localization-formats-and-documents) [Section titled “Localization Formats and Documents”](#localization-formats-and-documents) * Mobile application formats * Web and desktop software formats * Documentation and video subtitles  50 Supported Formats [View on Store ](https://store.crowdin.com/categories/file-formats) ## [Graphics and Assets](#graphics-and-assets) [Section titled “Graphics and Assets”](#graphics-and-assets) Localize images associated with your product to improve your product’s user experience. 1. Upload graphics to Crowdin. 2. Add all the necessary references for a translator to understand how these graphics should be handled. 3. Wait for translators to upload localized files. 4. Download the localized graphics and use them in production.  ## [Converted File Formats](#converted-file-formats) [Section titled “Converted File Formats”](#converted-file-formats) On import, some file formats are automatically converted into other formats to be further parsed and processed. You can see the list of the initial file formats and the file formats they’re being converted into in the table below. | Initial file format | Converted file format | | ------------------- | --------------------- | | DOC | DOCX | | PPT | PPTX | | RTF | DOCX | | PDF | DOCX | ## [Custom Services](#custom-services) [Section titled “Custom Services”](#custom-services) ## [Custom File Formats](#custom-file-formats) [Section titled “Custom File Formats”](#custom-file-formats) File formats that are not officially supported will be recognized as plain text files (if they contain text) or as graphic assets. Our team can add special code to support your original file formats and ensure that translators see only translatable text rather than the entire file content. This approach allows you to manage custom file formats more effectively. [Contact](https://crowdin.com/contacts) our support team to start working with custom file formats in your project. Alternatively, you can implement support for a custom format yourself by developing a [Crowdin app](/developer/crowdin-apps-about/) incorporating the [Custom File Format](/developer/crowdin-apps-module-custom-file-format/) module. ## [Custom File Export](#custom-file-export) [Section titled “Custom File Export”](#custom-file-export) By default, we export the translations in the same format as the source files. For example, if you upload an XML file to Crowdin, you’ll have the XML file exported. Our developers can create a special processor if you want to configure custom settings for your file export. For example, you upload a key-value file that doesn’t support [string editing](/string-management/#string-editing) by default and want to modify it directly in Crowdin. We can temporarily convert your file to CSV file format to allow you to add strings online. The exported file will remain in the original format. [Contact](https://crowdin.com/contacts) our support team, and we’ll gladly help you set custom export options based on your needs. ## [Custom Placeholders](#custom-placeholders) [Section titled “Custom Placeholders”](#custom-placeholders) Crowdin supports all the placeholders typical for the supported file formats. They are all automatically highlighted in the Editor, so translators know that they shouldn’t be translated. Even if the translator tries to save the translation with some modified or missing placeholder, enabled QA checks will notify the translator about the mistake. As various file formats allow the creation of custom placeholders, we can also add support for the custom ones you use in your project. To request the support of your custom placeholders, [contact](https://crowdin.com/contacts) our support team.
# Project Tasks
> Create and assign tasks for translating or proofreading content
Create and assign tasks for translating or proofreading content to specific project members or vendors. You can set due dates, split words among assignees, receive notifications about task changes and updates, and discuss tasks with other project members in the comments. ## [Creating New Task](#creating-new-task) [Section titled “Creating New Task”](#creating-new-task) To create a new task, follow these steps: * File-based project 1. Open your project and go to the **Tasks** tab. 2. Click **Create Task**. 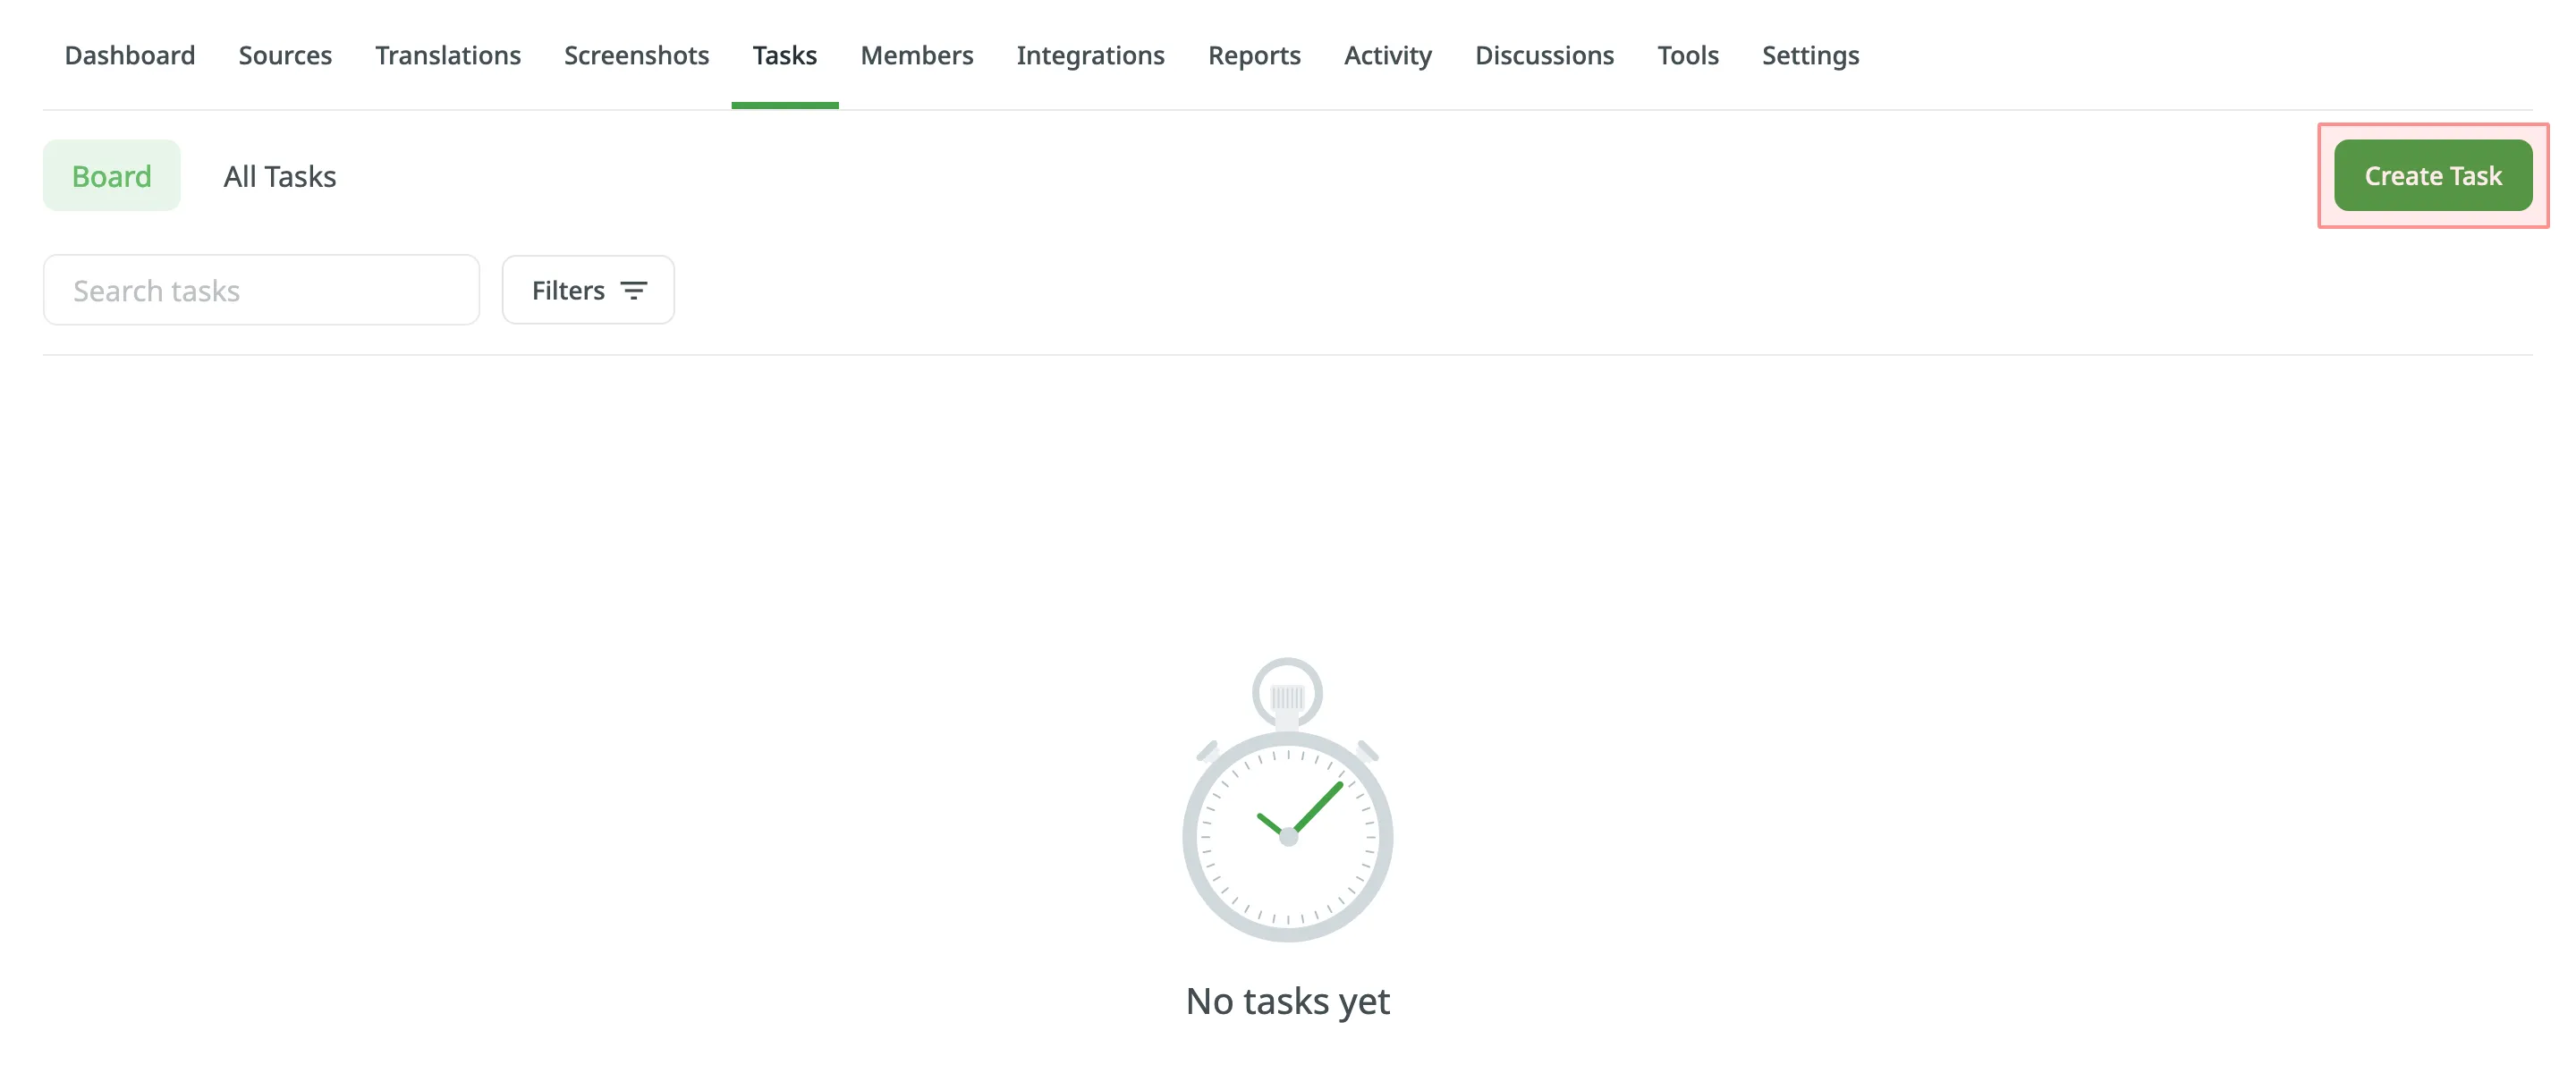 3. Set the task parameters: * *Title* – specify the name of the task that will be visible to translators or proofreaders. * *Description* (optional) – add any additional details that may be helpful. * *Type* – select between *Translate by own translators*, *Proofread by own proofreaders*, *Translate by vendor*, and *Proofread by vendor*. * *[Create a pending proofreading task](#sequential-tasks)* (only for Translate by own translators) – creates a separate proofreading task that starts once the translation is completed. * *[Preceding task](#sequential-tasks)* (only for Proofread by own proofreaders) – link the task to a previously created translation task to inherit its scope and language settings. * *Skip strings already included in other tasks* – skip strings that are already assigned to other tasks. * *[Create Cost Estimate Report](#generating-cost-estimate-report-for-tasks)* – automatically generate a cost estimate based on selected content and the rates template. * *Rates template* – select the template to be used for calculating the estimate. * *String filters* – filter which strings should be included in the task: * *Strings* – select whether to include all untranslated or not approved strings, or only those modified within a specific period. * *Filter by labels* (optional) – include only strings with specified labels. Additionally, choose how selected labels should be matched: * *All selected labels* – includes only strings that have all selected labels (AND logic). * *Any selected label* – includes strings that have at least one of the selected labels (OR logic). * *Exclude by labels* (optional) – exclude strings with specified labels. Additionally, choose how selected labels should be matched: * *All selected labels* – excludes only strings that have all selected labels (AND logic). * *Any selected label* – excludes strings that have at least one of the selected labels (OR logic). * *Include pre-translated strings only* (only for Proofread by own proofreaders) – include only strings that were previously pre-translated. * *Files* – select files to include in the task. * *Languages* – select target languages (a separate task will be created for each selected language). 4. Click **Assign** to assign users to the task for each language separately. 5. *(Optional)* Use a saved [template](#task-templates) to apply language and member assignment settings, or save the current configuration for future use. 6. Click **Create Task**. 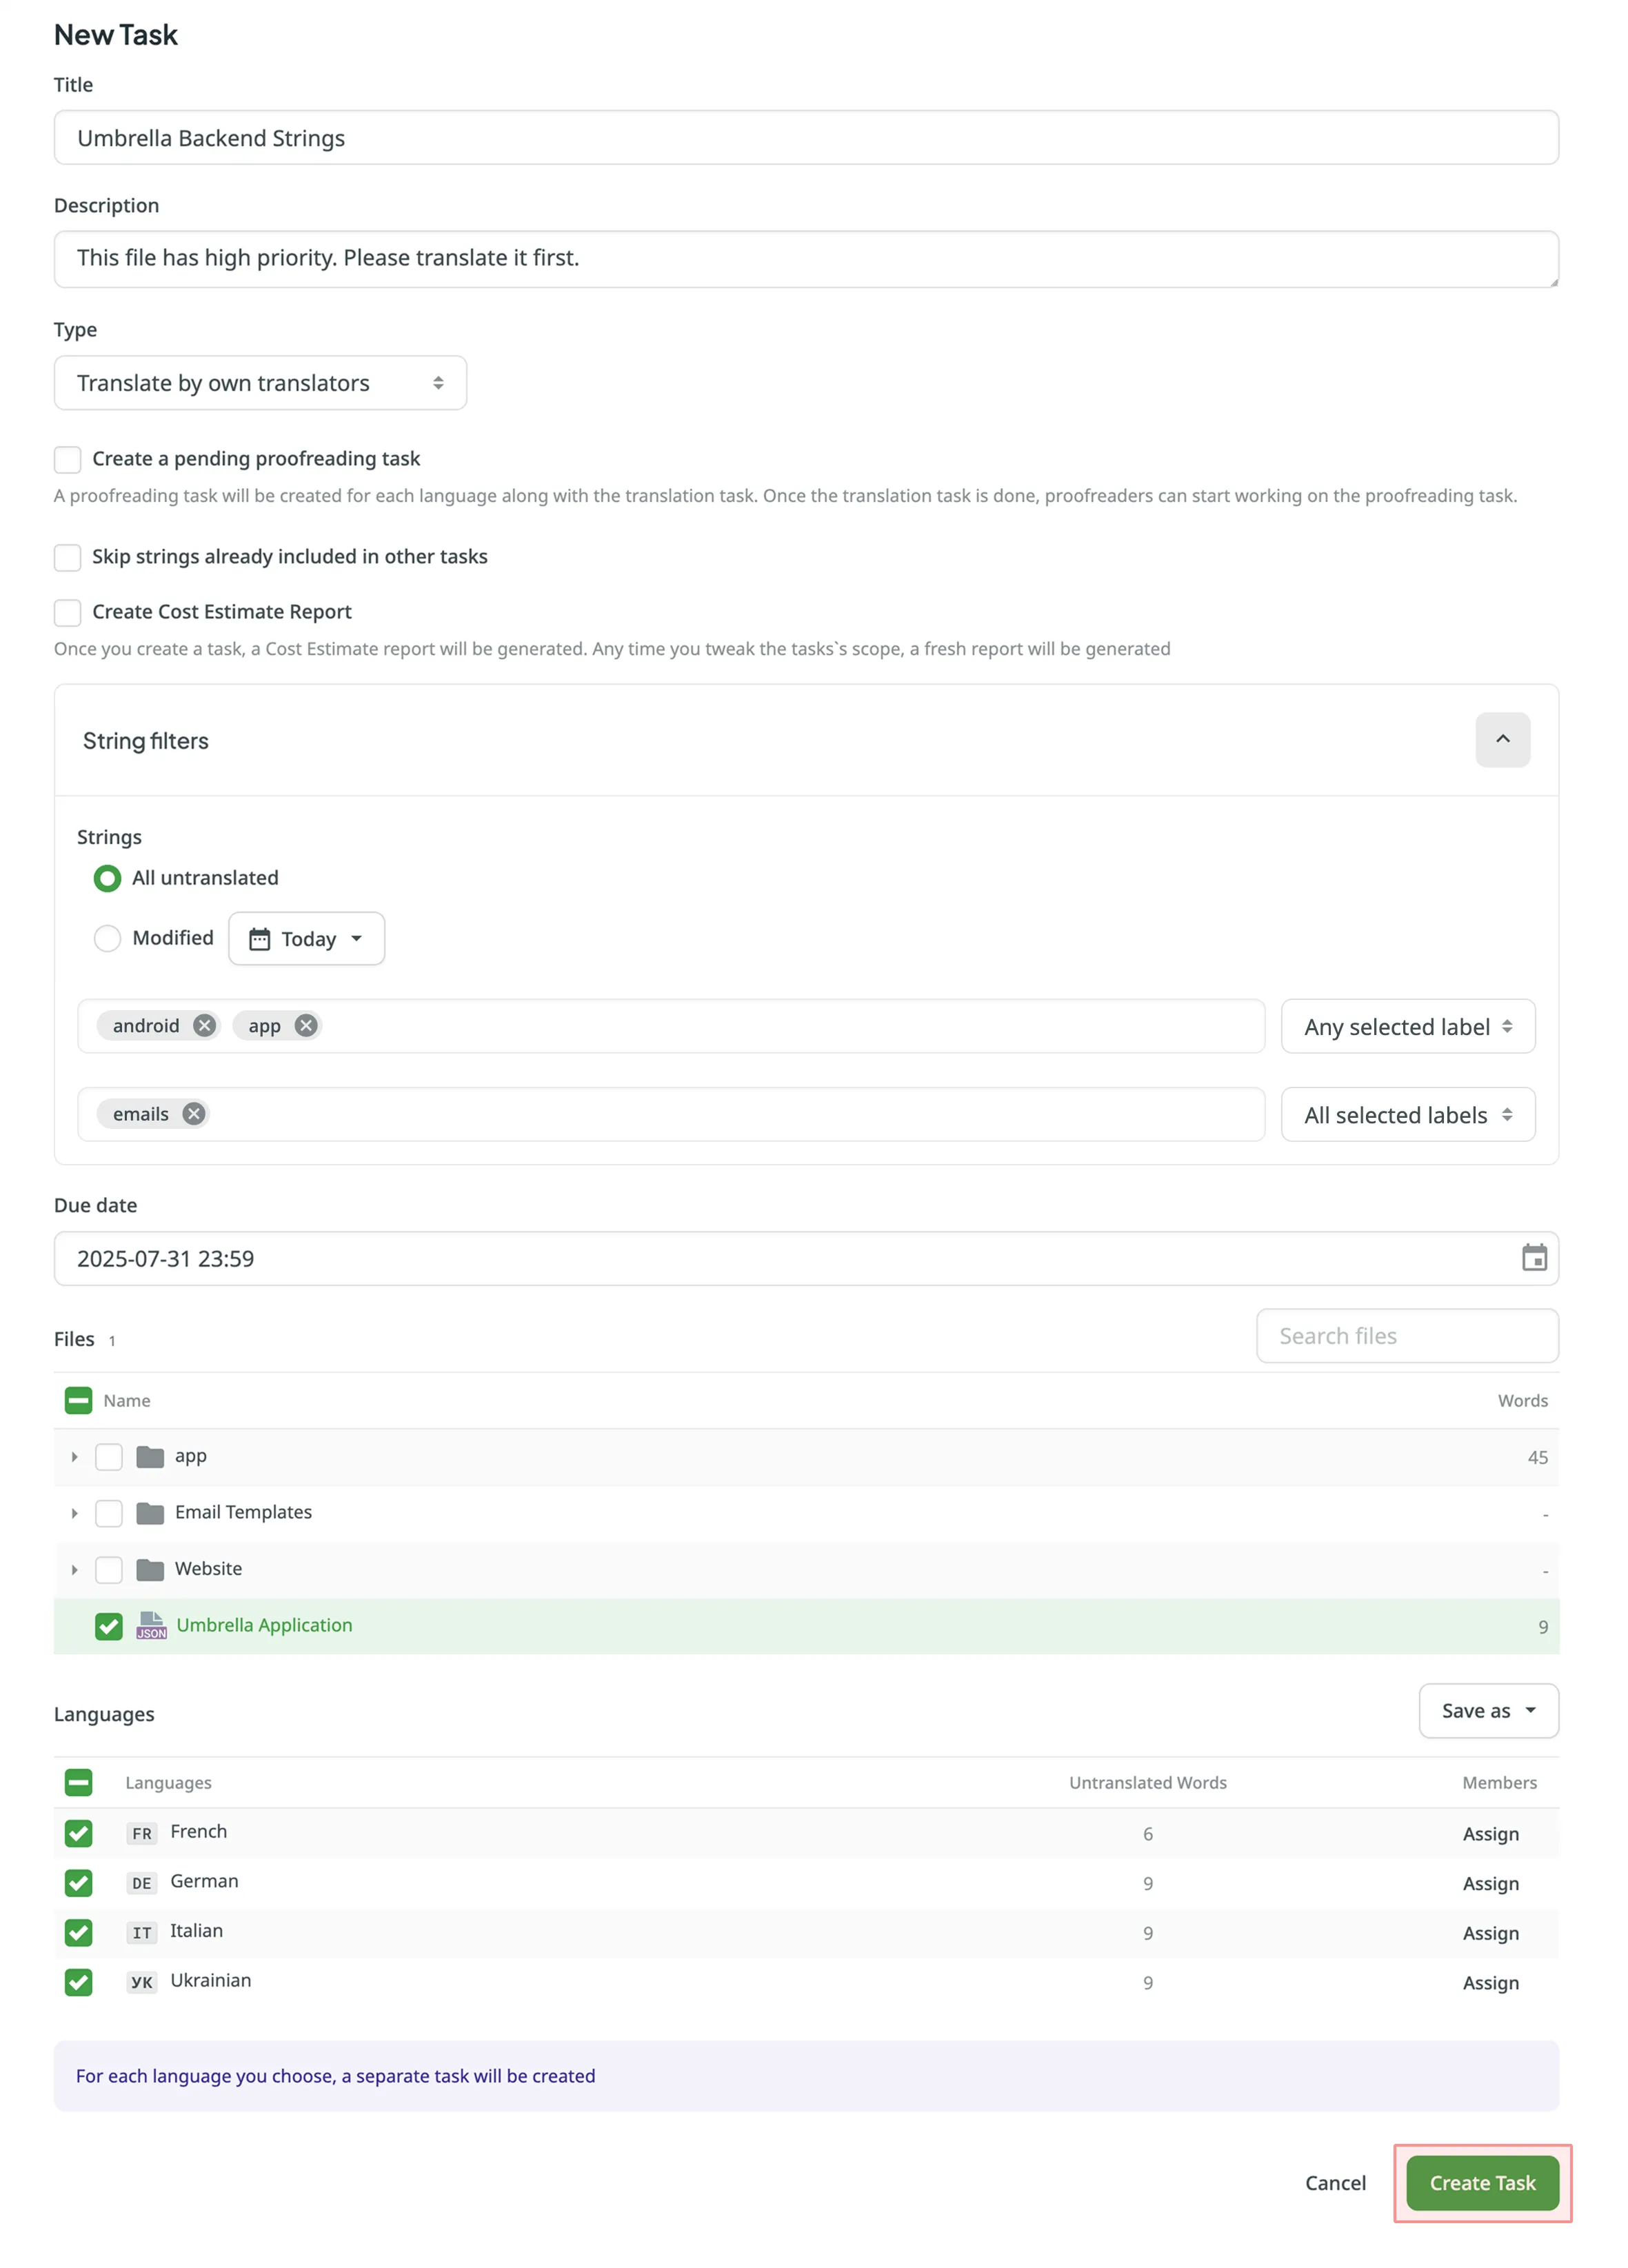 * String-based project 1. Open your project and go to the **Tasks** tab. 2. Click **Create Task**. 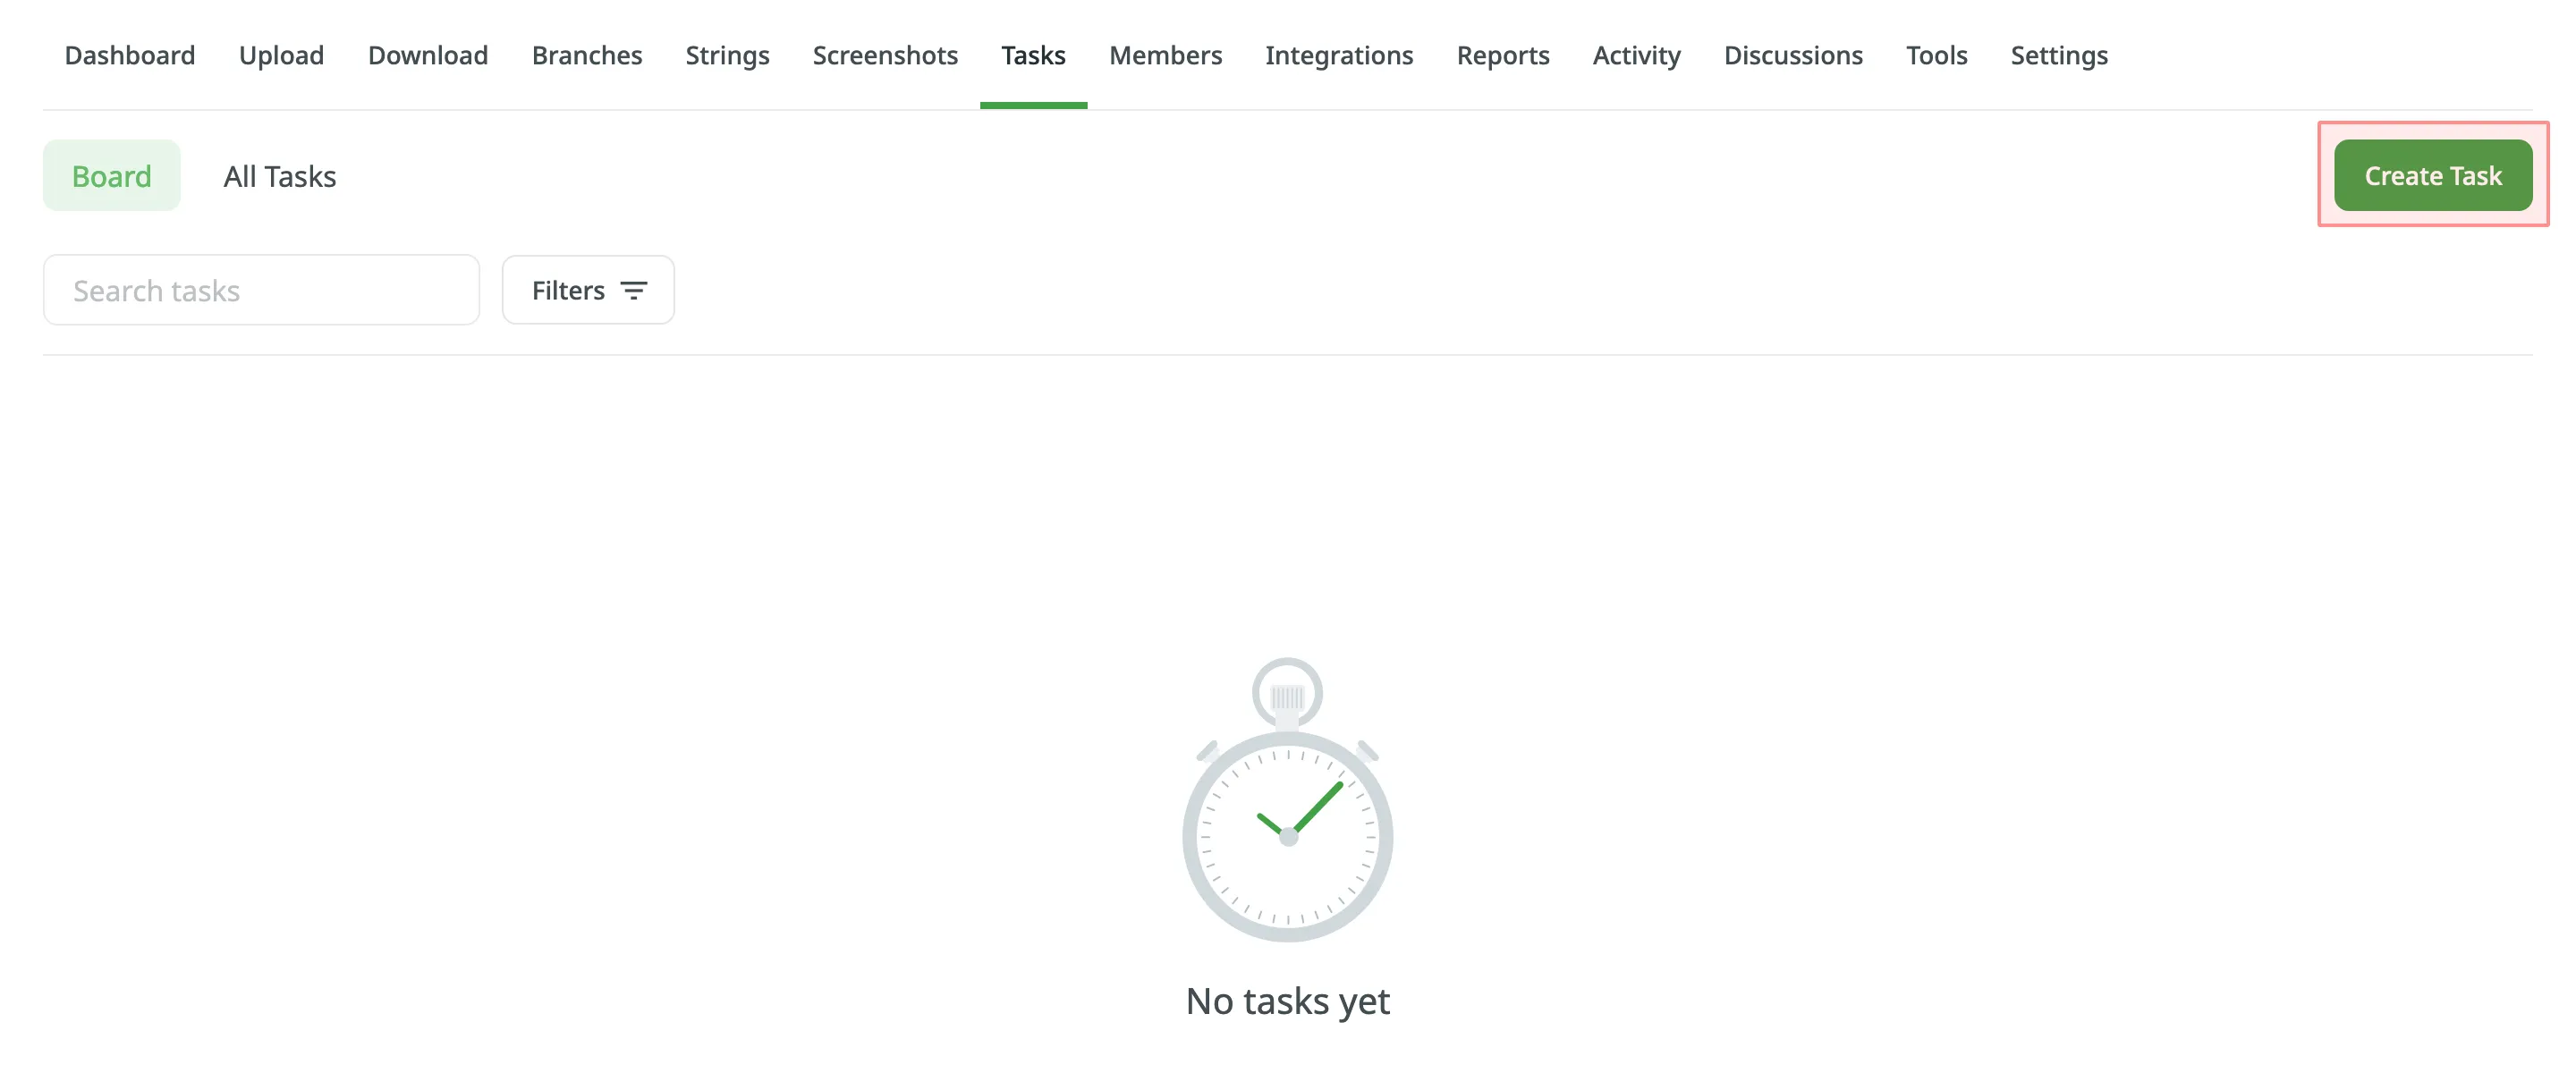 3. Set the task parameters: * *Title* – specify the name of the task that will be visible to translators or proofreaders. * *Description* (optional) – add any additional details that may be helpful. * *Type* – select between *Translate by own translators*, *Proofread by own proofreaders*, *Translate by vendor*, and *Proofread by vendor*. * *[Create a pending proofreading task](#sequential-tasks)* (only for Translate by own translators) – creates a separate proofreading task that starts once the translation is completed. * *[Preceding task](#sequential-tasks)* (only for Proofread by own proofreaders) – link the task to a previously created translation task to inherit its scope and language settings. * *Skip strings already included in other tasks* – skip strings that are already assigned to other tasks. * *[Create Cost Estimate Report](#generating-cost-estimate-report-for-tasks)* – automatically generate a cost estimate based on selected content and the rates template. * *Rates template* – select the template to be used for calculating the estimate. * *String filters* – filter which strings should be included in the task: * *Strings* – select whether to include all untranslated or not approved strings, or only those modified within a specific period. * *Filter by labels* (optional) – include only strings with specified labels. Additionally, choose how selected labels should be matched: * *All selected labels* – includes only strings that have all selected labels (AND logic). * *Any selected label* – includes strings that have at least one of the selected labels (OR logic). * *Exclude by labels* (optional) – exclude strings with specified labels. Additionally, choose how selected labels should be matched: * *All selected labels* – excludes only strings that have all selected labels (AND logic). * *Any selected label* – excludes strings that have at least one of the selected labels (OR logic). * *Include pre-translated strings only* (only for Proofread by own proofreaders) – include only strings that were previously pre-translated. * *Branches* – select branches to include in the task. * *Languages* – select target languages (a separate task will be created for each selected language). 4. Click **Assign** to assign users to the task for each language separately. 5. *(Optional)* Use a saved [template](#task-templates) to apply language and member assignment settings, or save the current configuration for future use. 6. Click **Create Task**. 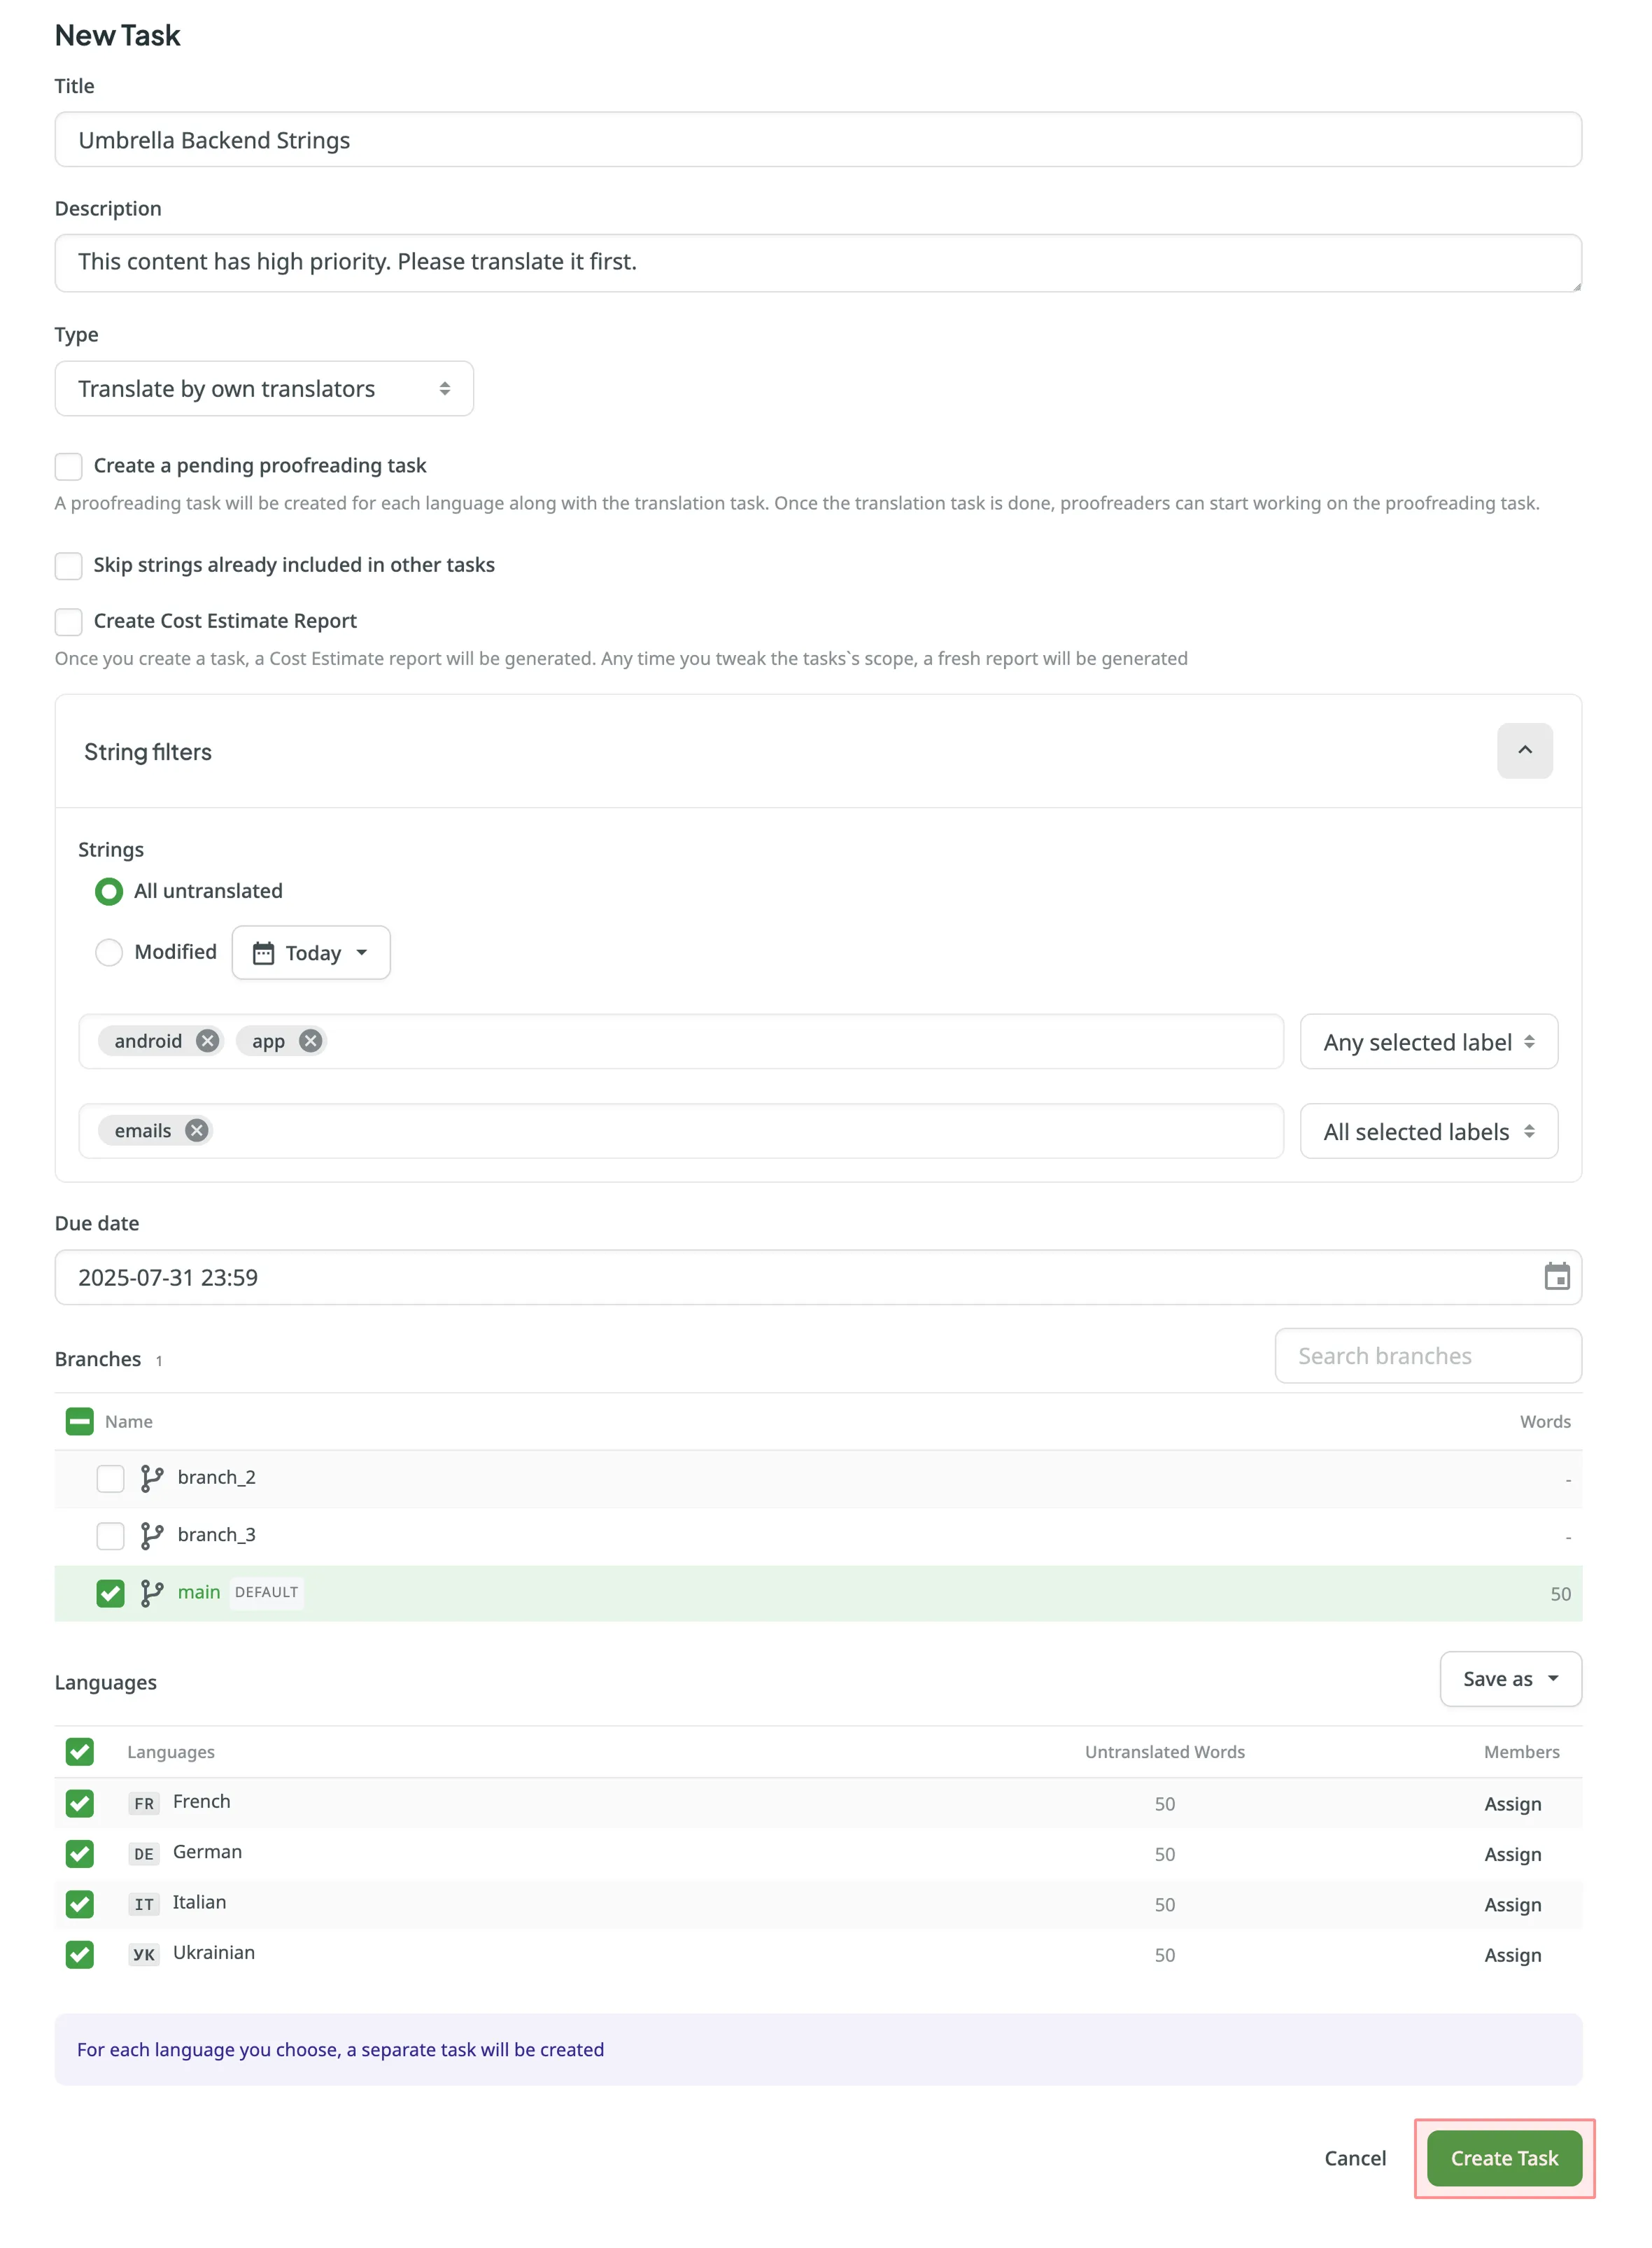 Read more about [project types](/creating-project/#project-types). ### [Splitting Content](#splitting-content) [Section titled “Splitting Content”](#splitting-content) Splitting content between several members allows you to speed up the translation or proofreading process. While in string-based and file-based projects this option is called differently (i.e., **Split strings** and **Split files**), the basic principle of its behavior remains the same. To split content between several members select **Split files** (in file-based project) or **Split strings** (in file-based project) in the **Assign users** dialog. You can set the approximate amount of words for each assignee. 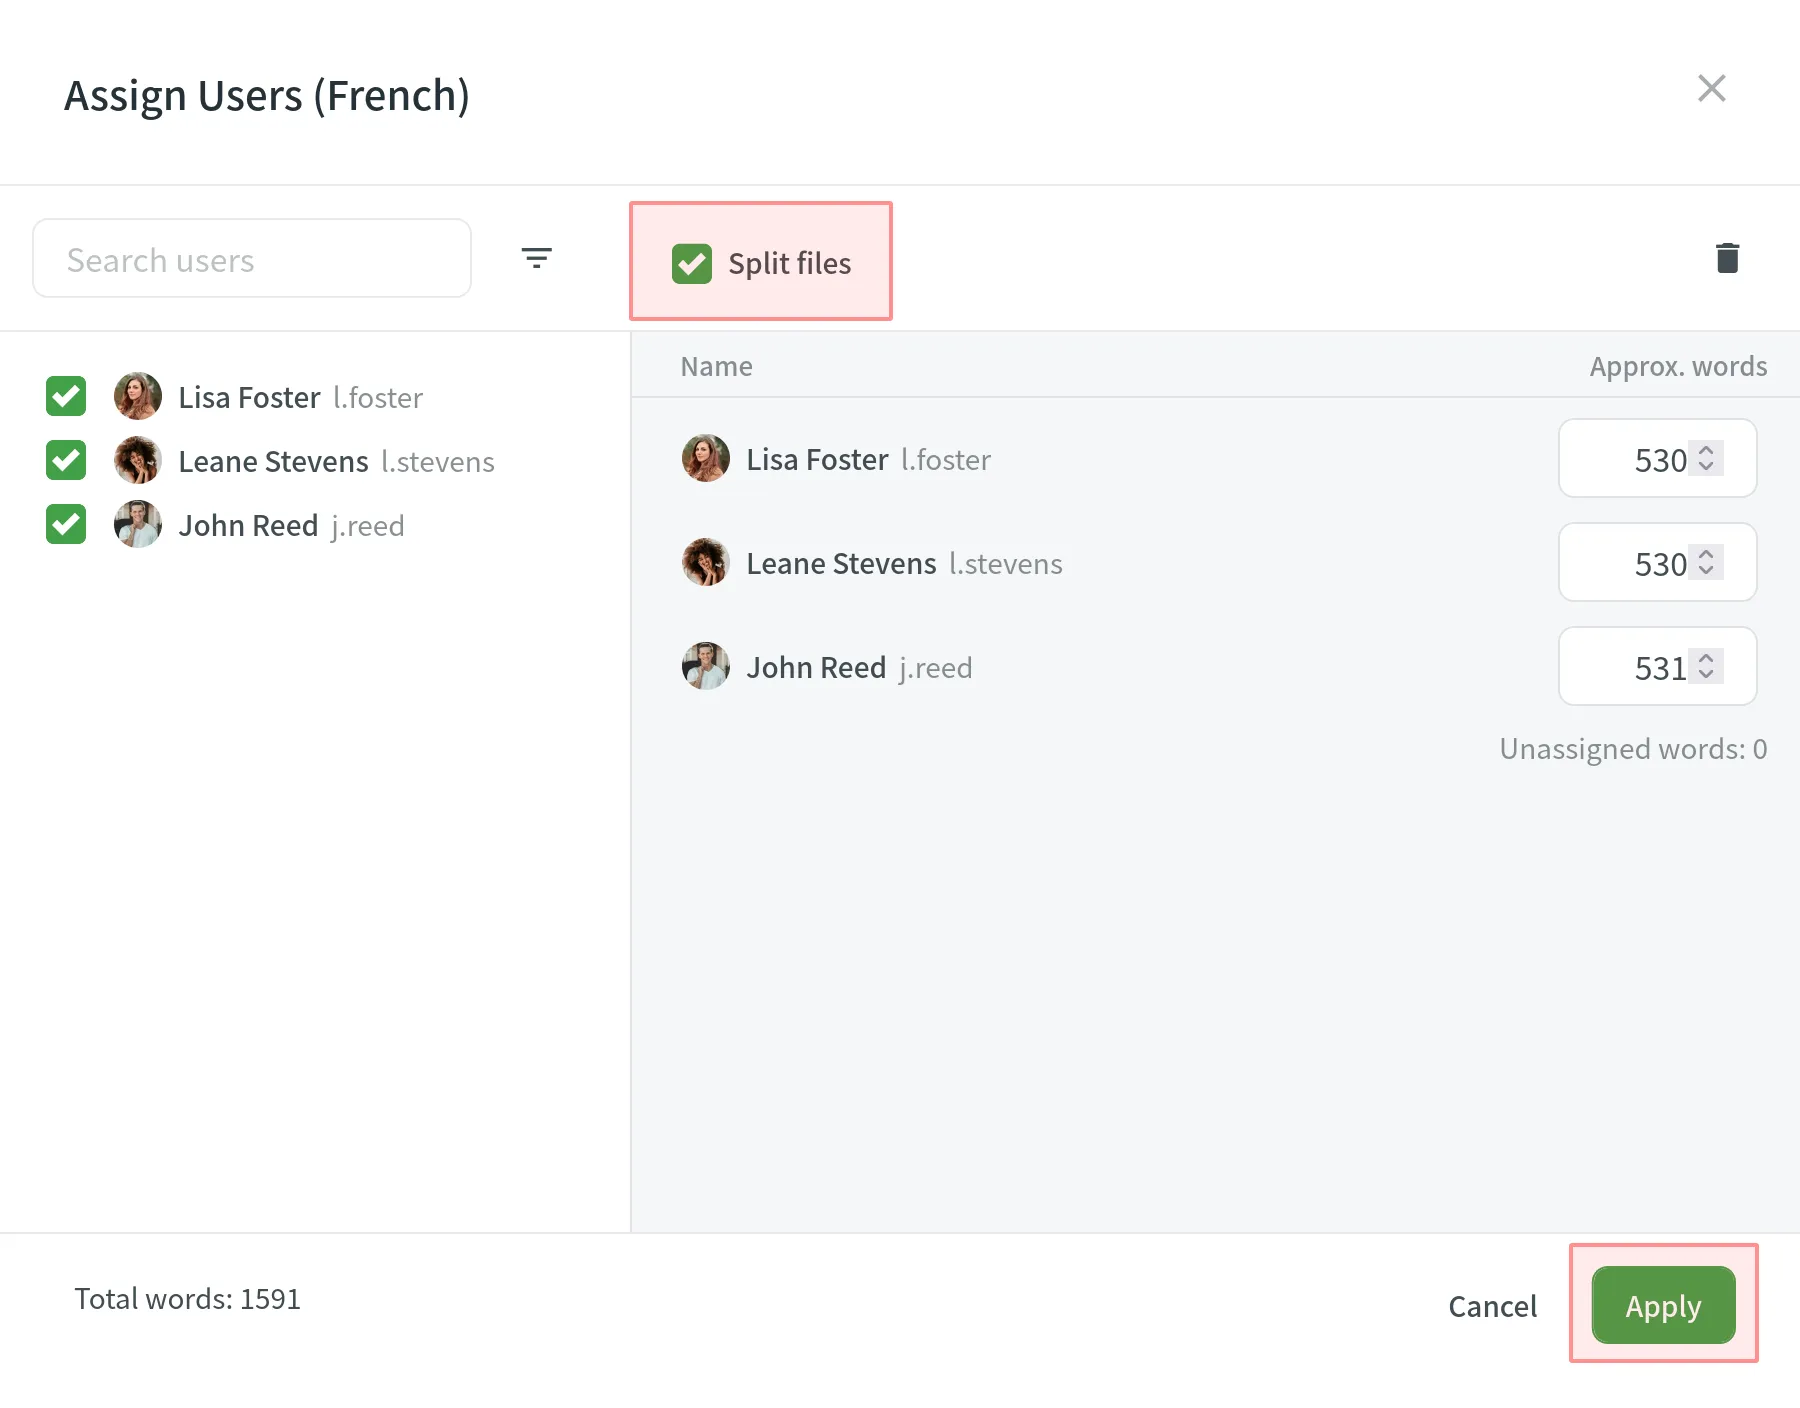 ### [Generating Cost Estimate Report for Tasks](#generating-cost-estimate-report-for-tasks) [Section titled “Generating Cost Estimate Report for Tasks”](#generating-cost-estimate-report-for-tasks) To automatically estimate the cost of translation or proofreading for a task, select the **Create Cost Estimate Report** option during task creation. Once selected, a required [**Rates Template**](/project-reports/#rate-templates) drop-down will appear. Choose a saved template to calculate the cost estimate based on the selected strings or files. After the task is created, a Cost Estimate report will be generated automatically and become available in the [Archive](/project-reports/#archive) section. The estimated cost will also be displayed on the task card in the Board section. You can open the task to view the **Estimated Cost** section, which includes the following details: * The calculated cost based on the selected rates template * A clickable report title (e.g., Report #123) that links to the full report in the Archive section * The report generation date If the task scope changes (e.g., files or strings are modified), a new Cost Estimate report will be generated automatically to reflect the updated estimate. ### [Task Templates](#task-templates) [Section titled “Task Templates”](#task-templates) Use task templates to save the configuration of the **Languages** section, including target languages and member assignments. Templates help you quickly apply these configurations when creating new tasks, saving time and ensuring consistency. #### [Saving Templates](#saving-templates) [Section titled “Saving Templates”](#saving-templates) To save the language and member assignment settings as a template, follow these steps: 1. In the **Languages** section, click **Save as**. 2. Select **New template** from the drop-down menu. 3. In the dialog that appears, enter a name for your template. 4. Click **Save**. Your template is now saved and available for future tasks. 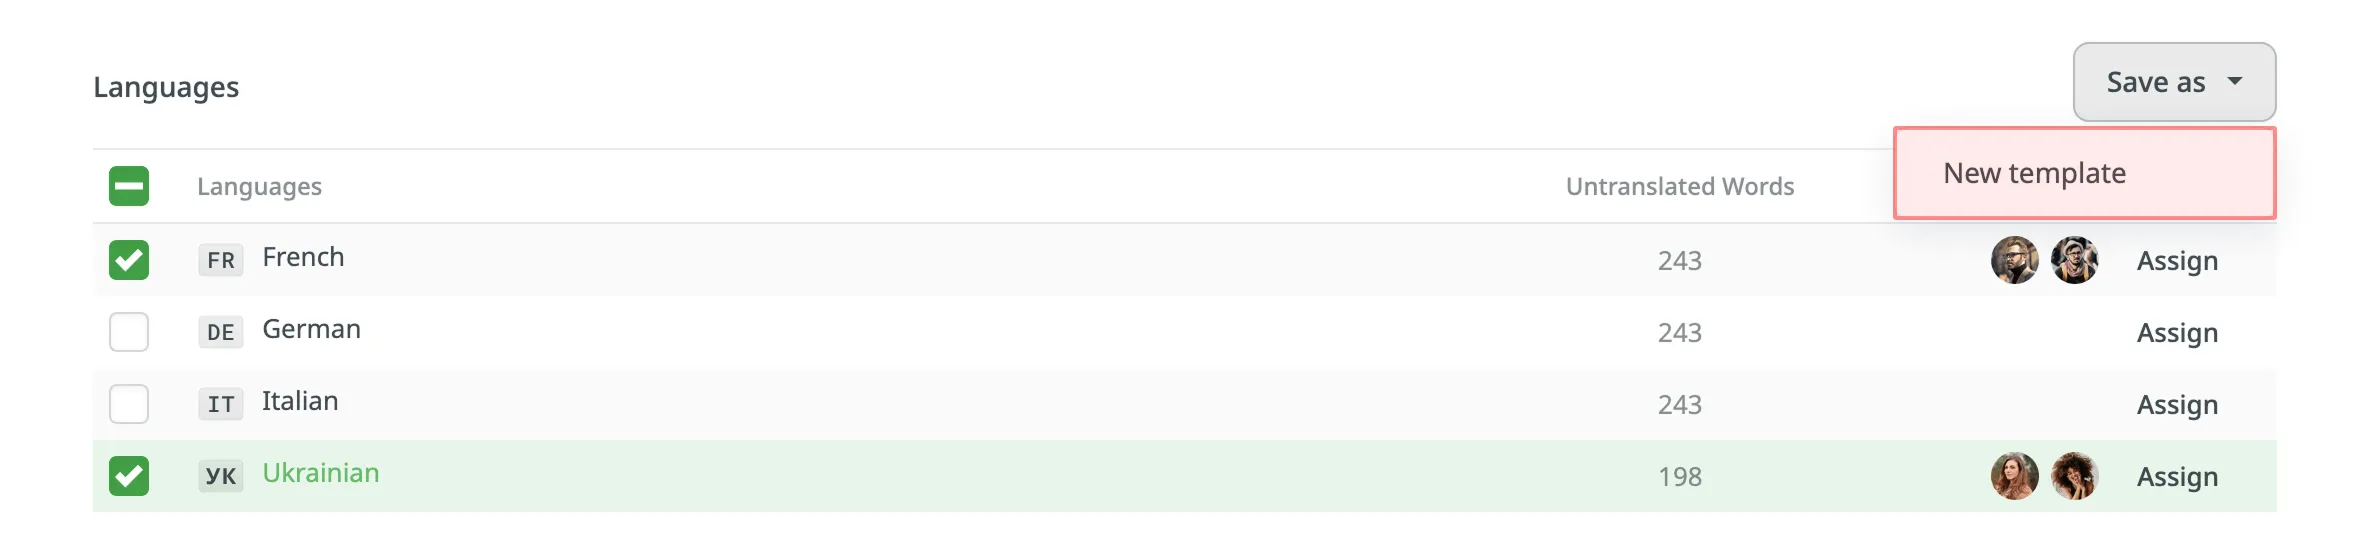 #### [Applying Templates](#applying-templates) [Section titled “Applying Templates”](#applying-templates) To apply a saved template to a new task, follow these steps: 1. In the **Languages** section, click on the template name to apply it immediately. 2. Alternatively, click next to the template name and select **Apply**. #### [Managing Templates](#managing-templates) [Section titled “Managing Templates”](#managing-templates) To rename or delete a saved template, follow these steps: 1. In the **Languages** section, click next to the template name. 2. Select one of the following options: * **Rename** – Enter a new name for your template. * **Delete** – Permanently remove the template. 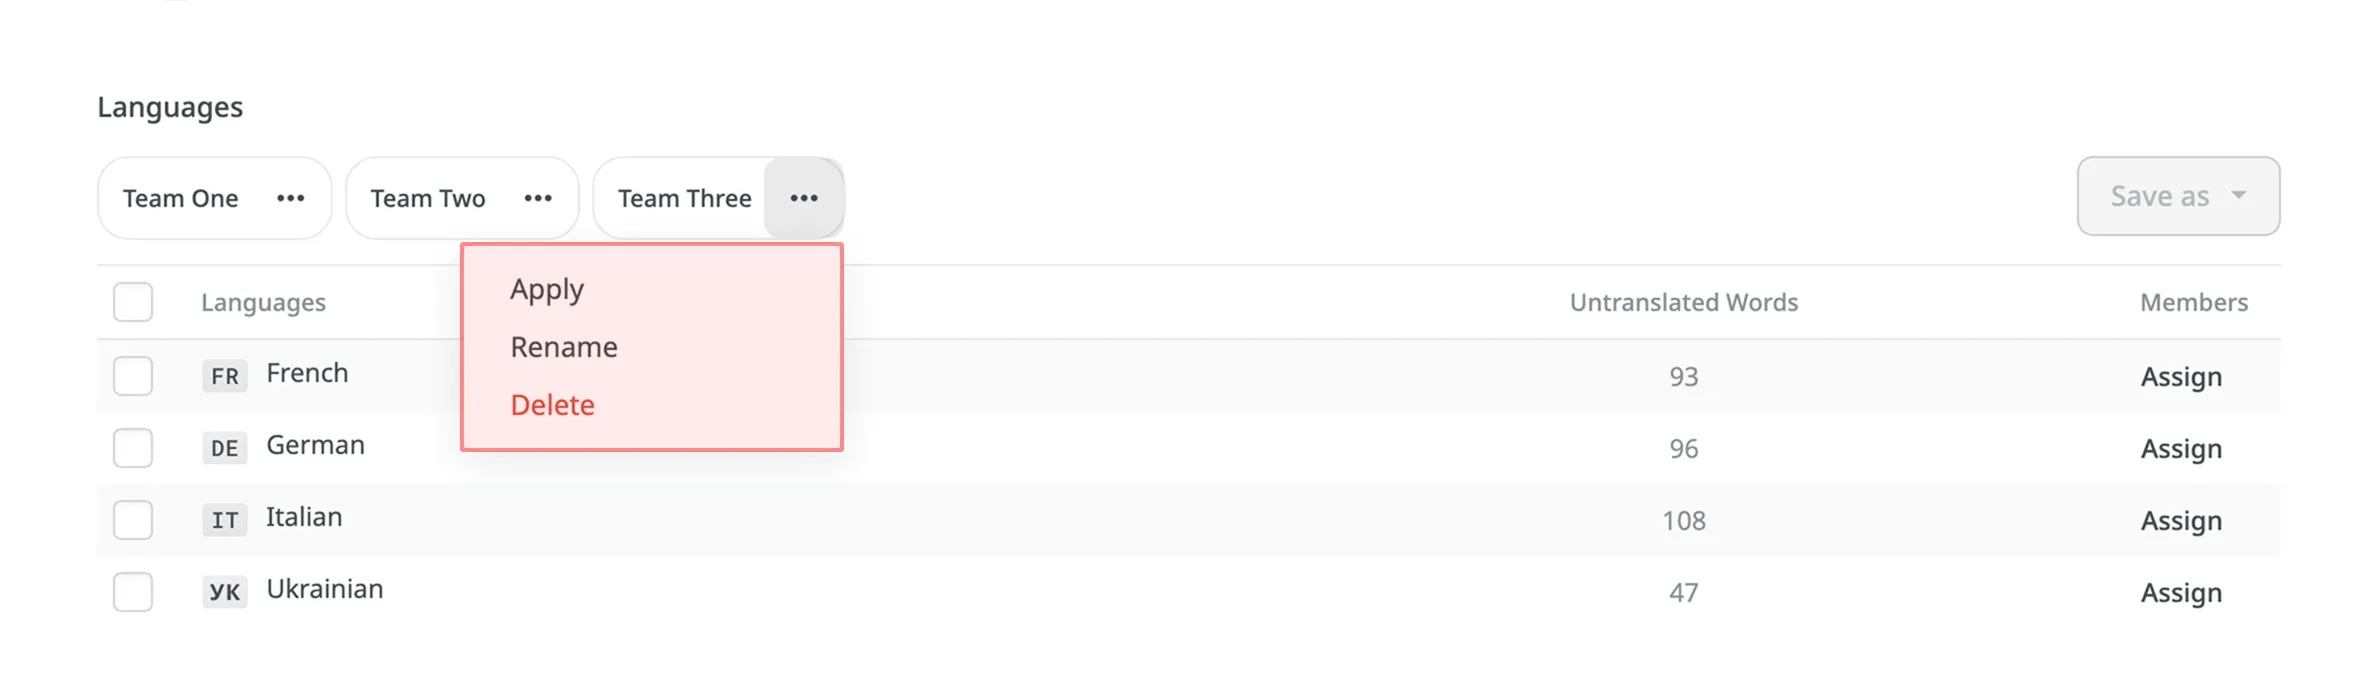 ## [Project Tasks](#project-tasks) [Section titled “Project Tasks”](#project-tasks) In the **Tasks** tab, you can view all the project tasks in the following two sections: *Board*, *All Tasks*. ### [Board](#board) [Section titled “Board”](#board) In the *Board* section, tasks are organized into three columns: To Do, In Progress, and Done. This layout provides a clear view and visualization of the current status of all tasks. Within each column, tasks are further grouped by target languages. Each target language group can be collapsed to hide task cards or expanded to display them. This feature is particularly useful for decluttering the view and focusing on specific languages. Use the **Search tasks** field to search for tasks by name or [filter tasks](#filtering-tasks) using various filter options. To view the task details, open it by clicking on the task name.  ### [All Tasks](#all-tasks) [Section titled “All Tasks”](#all-tasks) The All Tasks section provides a list view of all project tasks. It is particularly useful for efficiently managing large volumes of tasks. The All Tasks section also allows you to select multiple tasks and perform bulk actions. These include changing the assignee, updating the status, or deleting tasks in a single operation. Similar to the Board section, the All Tasks also allows you to use the **Search tasks** field and [filter](#filtering-tasks). Additionally, you can sort the task list in ascending or descending order using the available sort options (ID, Created at, Resolved at, Due Date). ### [Editing Task](#editing-task) [Section titled “Editing Task”](#editing-task) To change the task details, follow these steps: 1. Open your project and go to the **Tasks** tab. 2. Click on the name of the task you want to change either in the Board or All tasks section. 3. Click in the upper-right corner and select **Edit**. 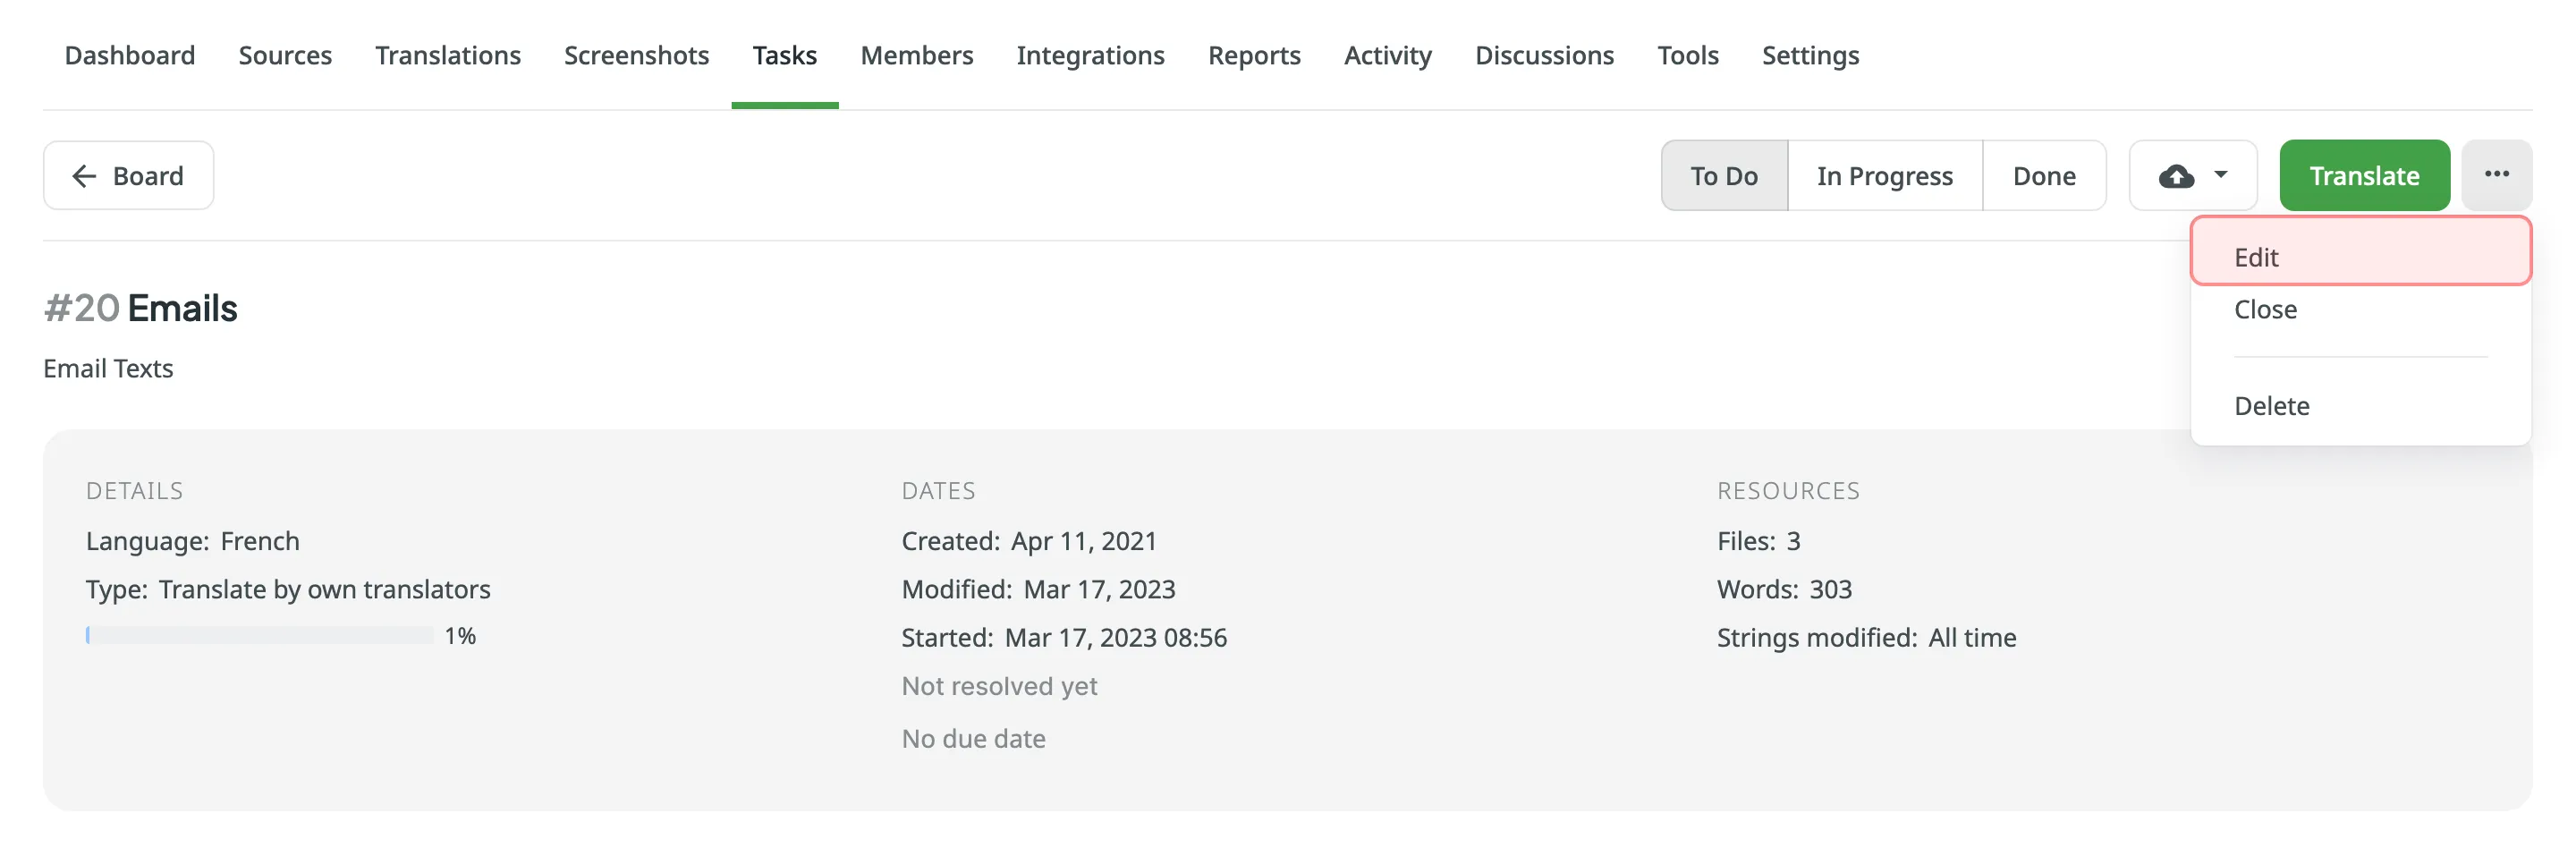 4. Make the necessary edits and click **Save**. ### [Filtering Tasks](#filtering-tasks) [Section titled “Filtering Tasks”](#filtering-tasks) By default, all project tasks are displayed in the **Tasks** tab either in the Board or All Tasks sections. If necessary, you can filter tasks using the available filter options: * Assignee: All users or particular user. * Created by: All users or particular user. * Language: All languages or particular language. * File: All files or particular file or folder. * Due date: All, Overdue now, Custom Range. * Type: All types, Translate by own translators, Proofread by own proofreaders, Translate by vendor, Proofread by vendor. * Status: All statuses, To Do, In Progress, Done, Closed.  ### [Changing Task Status](#changing-task-status) [Section titled “Changing Task Status”](#changing-task-status) To change the task status in the Board section, select the task assigned to you and drag it to the column with the status you need. 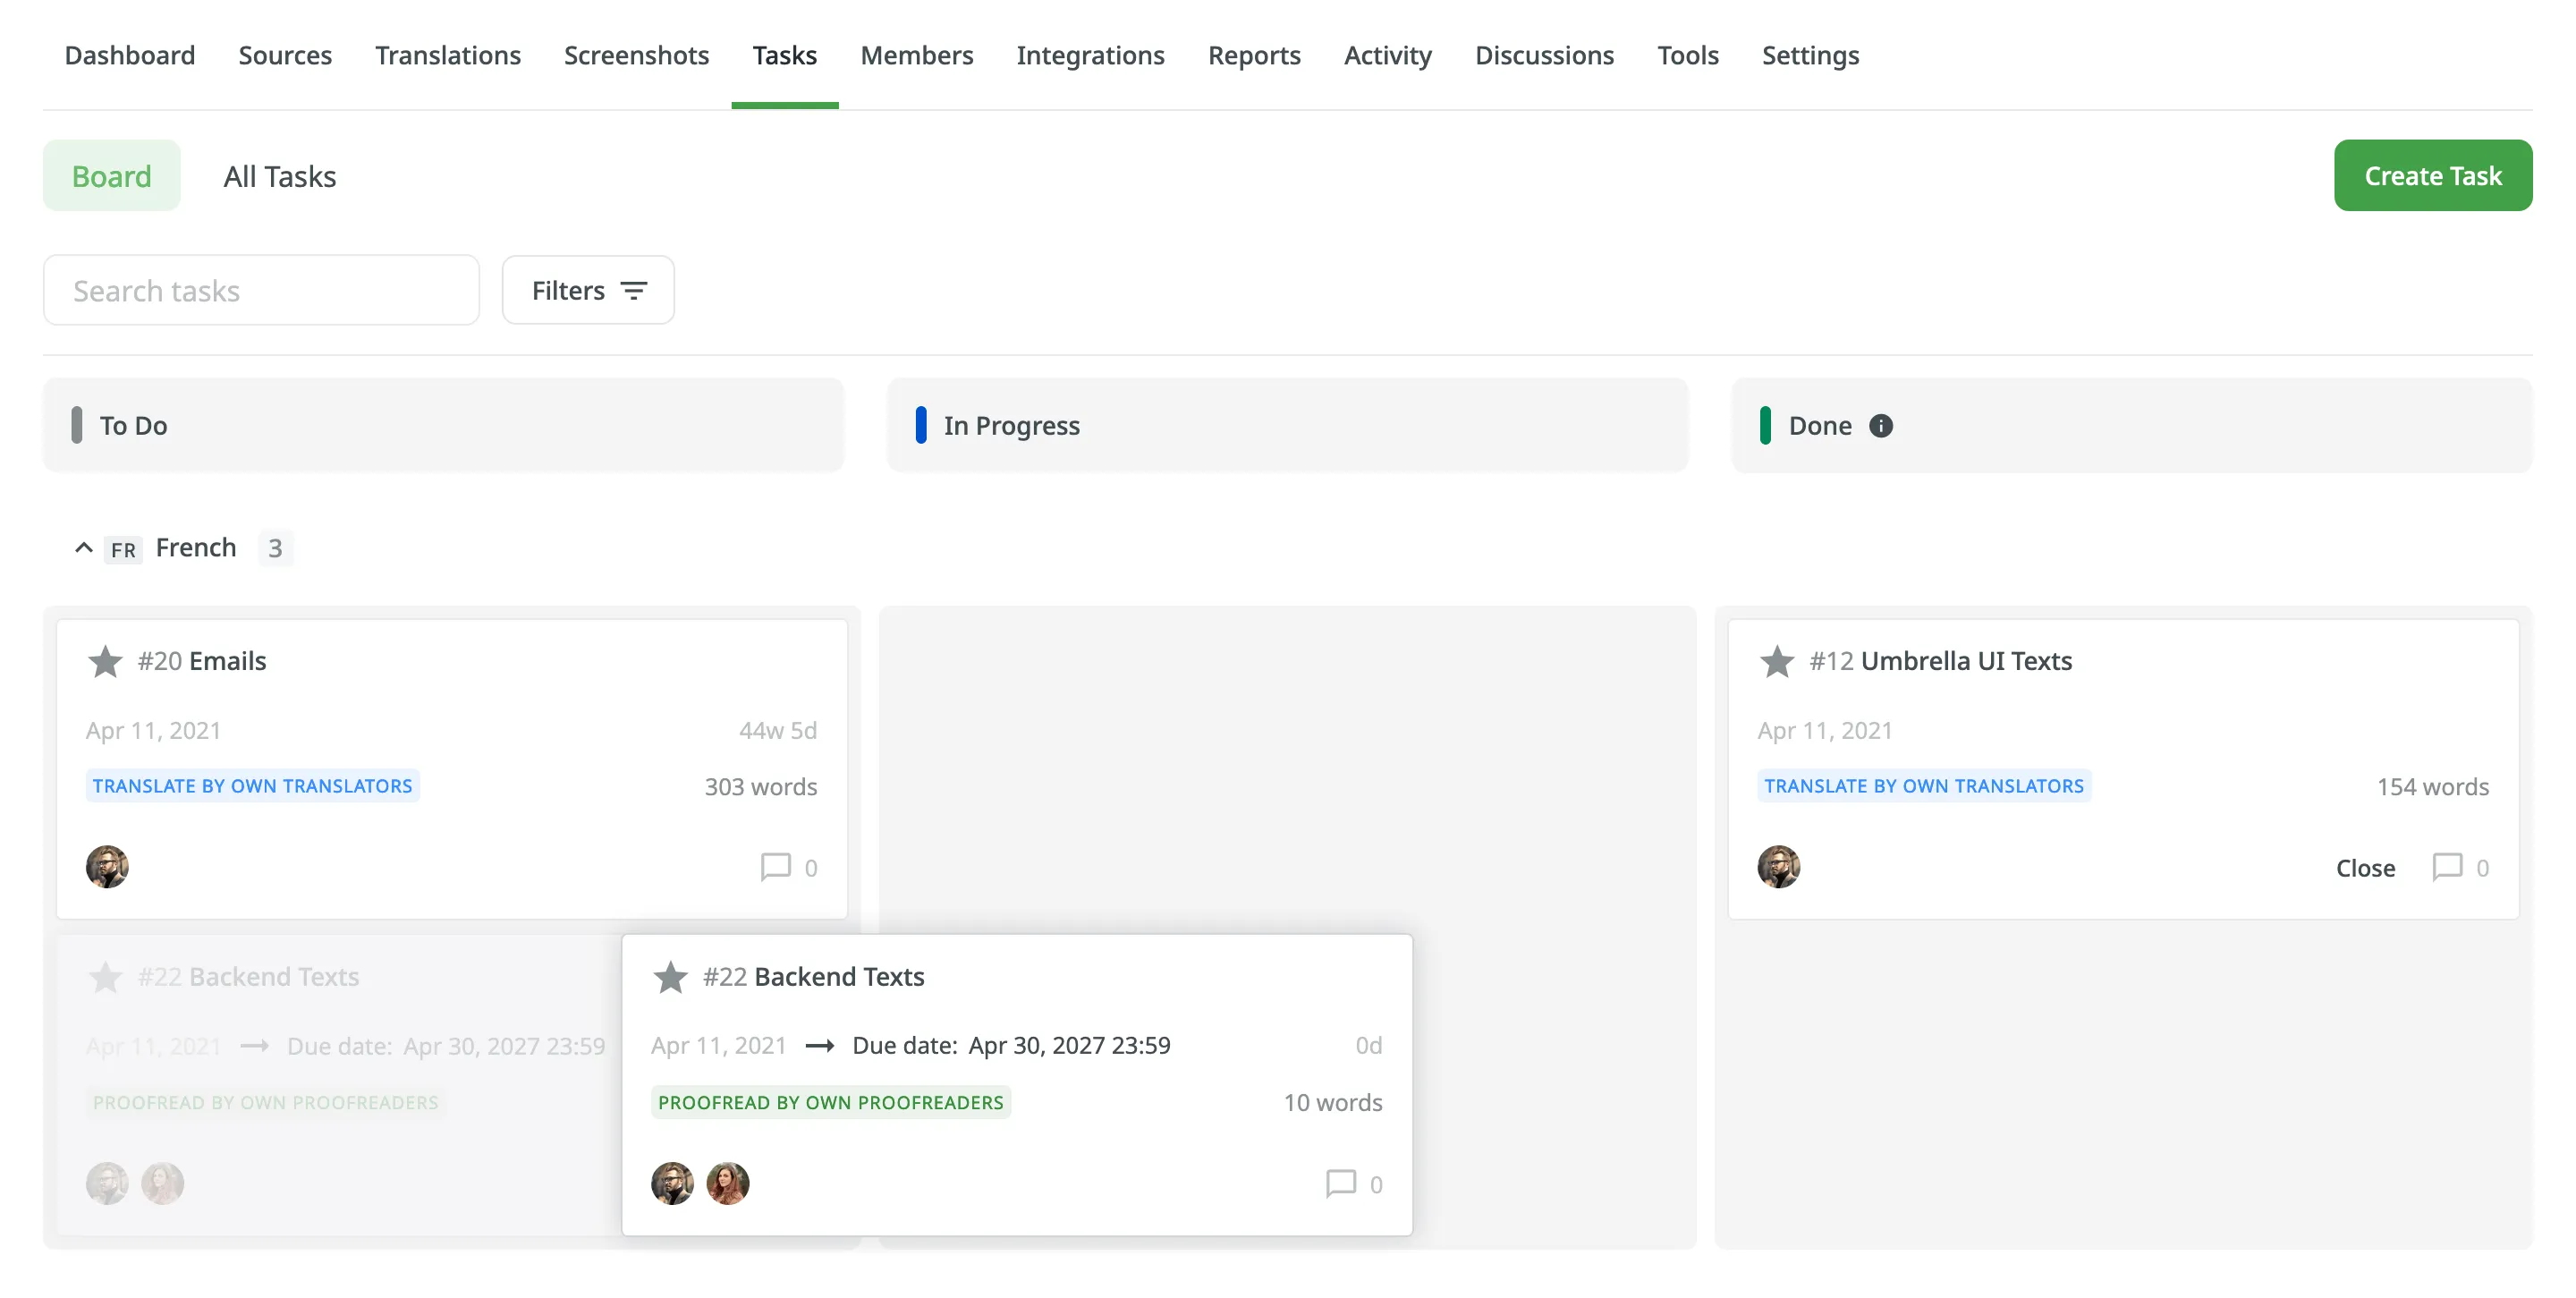 To change the task status in the All Tasks section, select the needed task, click **Change status**, and select the new status. Alternatively, in either of the two sections, you can change the task status directly in the task itself using the respective buttons: To Do, In Progress, Done. ### [Closing Task](#closing-task) [Section titled “Closing Task”](#closing-task) To close the task when it’s finished, move it to the **Done** column and click **Close**. 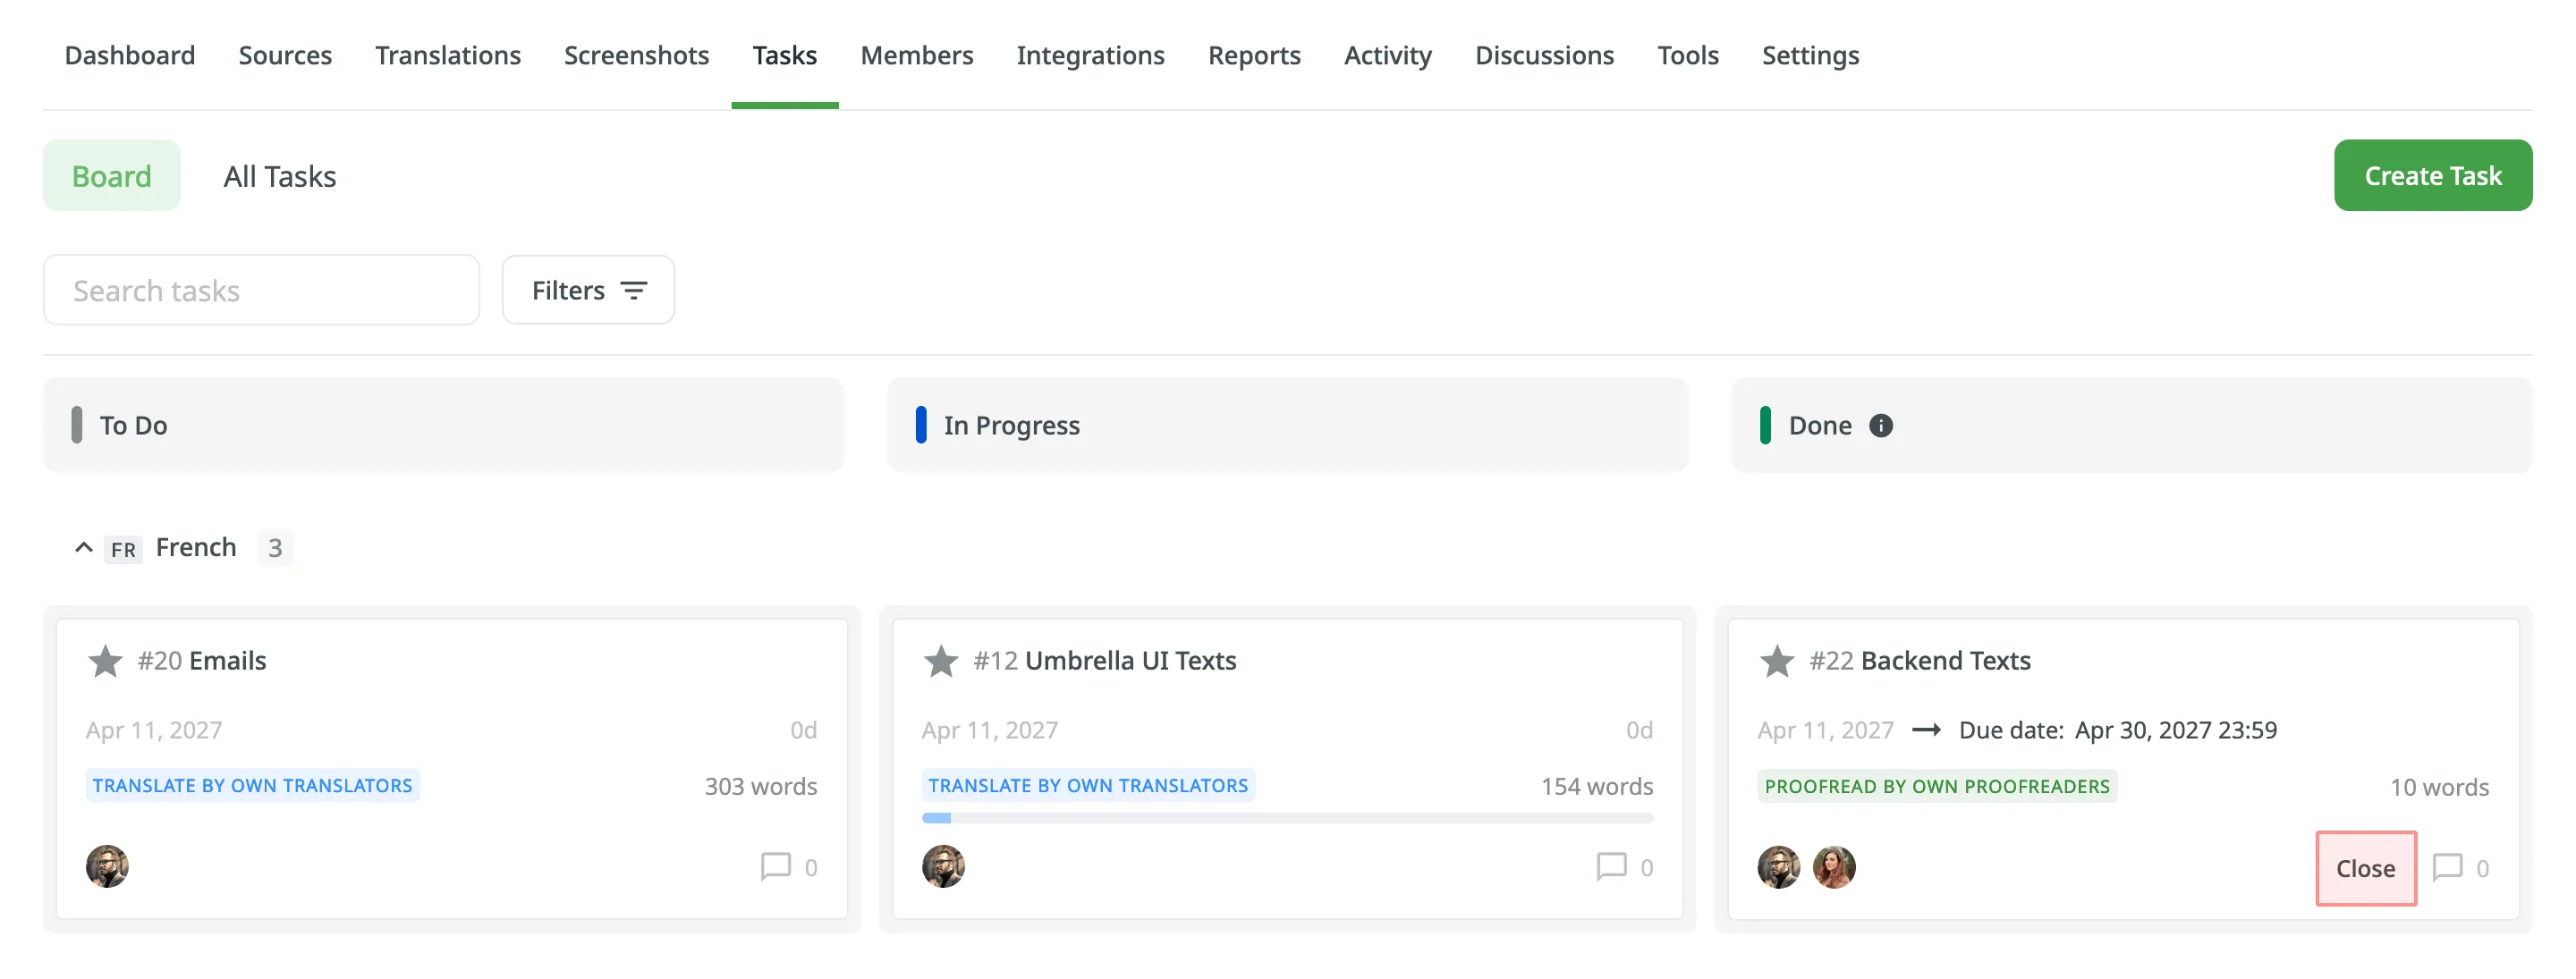 To view the list of closed tasks, open the All Tasks section and use the filter **Status: Closed**. ## [Sequential Tasks](#sequential-tasks) [Section titled “Sequential Tasks”](#sequential-tasks) Sequential tasks streamline the management of translation and proofreading processes in a structured, step-by-step manner. This feature is particularly useful for managing content that requires translation followed by proofreading, ensuring a smooth workflow. Once created, sequential tasks are represented on the Tasks Board, displaying both the translation task and its linked pending proofreading task.  ### [Key Approaches](#key-approaches) [Section titled “Key Approaches”](#key-approaches) The concept of sequential tasks is based on two primary approaches: * **Creating a translation task with its associated pending proofreading task:** * Start by creating a translation task and specifying the target languages and work scope. * Select **Create a pending proofreading task** to generate the associated proofreading task. You can set separate due dates for the translation and proofreading tasks if needed.  * While translators work on the translation task, the linked proofreading task remains pending. * When the translation task is completed, the status of the associated proofreading task changes from Pending to To Do. Proofreaders will then receive notifications that it’s ready for review. * **Creating a proofreading task and linking it to a translation task:** * Create a proofreading task and select the translation task you want to link it with from the **Preceding task** drop-down menu. You can link it to either a completed or an active translation task.  * The languages and work scope are automatically inherited from the linked translation task. * The proofreading task remains pending until the linked translation task is completed. * As with the first approach, proofreaders receive notifications when the proofreading task is ready for review. ### [Task Types Supported](#task-types-supported) [Section titled “Task Types Supported”](#task-types-supported) Sequential tasks are available for the following task types: * Translate by own translators * Proofread by own translators * Translate by vendor: * Crowdin Language Services * Vendors that manage the translation process with a dedicated manager * Proofread by vendor: * Crowdin Language Services * BLEND * Vendors that manage the translation process with a dedicated manager ### [Sequential Task Management](#sequential-task-management) [Section titled “Sequential Task Management”](#sequential-task-management) * When editing a pending proofreading task, changes are limited to fields that do not affect the scope of the task. * Pending proofreading tasks can be deleted if necessary. In this case, linked translation tasks are preserved. * Deleting a translation task with an associated sequential proofreading task results in the deletion of both tasks simultaneously. ## [See Also](#see-also) [Section titled “See Also”](#see-also) [Task-based access control ](/project-settings/privacy-collaboration/#privacy)Allow project members to work with tasks they are assigned to, even if they do not have full access to the language in the project. [User Tasks ](/user-tasks/)Learn how to view, filter, and manage tasks assigned to you. [Crowdin Language Services ](/crowdin-language-services/)Order professional translations and proofreading services.
# Terms
> Crowdin Terms of Service
Last revised on July 20, 2020 ### [In This Article](#in-this-article) [Section titled “In This Article”](#in-this-article) * [1. DEFINITIONS](#1-definitions) * [2. AUTHORITY TO ENTER INTO THESE TERMS WITH SUPPLIER](#2-authority-to-enter-into-these-terms-with-supplier) * [3. MODIFICATIONS TO TERMS](#3-modifications-to-terms) * [4. OUR RESPONSIBILITIES](#4-our-responsibilities) * [5. USING THE CROWDIN SERVICES](#5-using-the-crowdin-services) * [6. PAYMENT](#6-payment) * [7. CLIENT DATA](#7-client-data) * [8. SERVICES](#8-services) * [9. DATA PROCESSING CONTRACT](#9-data-processing-contract) * [10. RESTRICTIONS](#10-restrictions) * [11. PRIVACY](#11-privacy) * [12. INTELLECTUAL PROPERTY RIGHTS](#12-intellectual-property-rights) * [13. THIRD-PARTY SITES, PRODUCTS AND SERVICES](#13-third-party-sites-products-and-services) * [14. DISCLAIMERS; NO WARRANTY](#14-disclaimers-no-warranty) * [15. INDEMNIFICATION](#15-indemnification) * [16. LIMITATION OF LIABILITY](#16-limitation-of-liability) * [17. TERMINATION OF THESE TERMS](#17-termination-of-these-terms) * [18. WHO YOU ARE CONTRACTING WITH](#18-who-you-are-contracting-with) * [19. GENERAL PROVISIONS](#19-general-provisions) *** Welcome to [www.crowdin.com](https://crowdin.com). These Terms of Service contain the terms and conditions that govern all use of our Platform (as defined below) and Services (as defined below) and all content, services and/or products available on or through the Platform (collectively, the “Crowdin Services”). The Crowdin Services are offered to you subject to your acceptance, without modification (other than Special Terms (as defined below) agreed by the parties pursuant to these Terms of Service), of all of the terms and conditions contained herein and all other operating rules, policies (including, without limitation, our [Privacy Policy](/privacy-policy/), the Guidelines (as defined below) and any future modifications thereof, and procedures that may be published from time to time on the Platform or made available to you on or through the Crowdin Services (collectively, the “Terms”). When accepted by you (as defined below), these Terms form a legally binding contract between you and Supplier (as defined below). If you are entering into these Terms on behalf of an entity, such as your employer or the company you work for, you represent that you have the legal authority to bind that entity. PLEASE READ THESE TERMS CAREFULLY. BY REGISTERING FOR, ACCESSING, BROWSING, AND/OR OTHERWISE USING THE CROWDIN SERVICES, YOU ACKNOWLEDGE THAT YOU HAVE READ, UNDERSTOOD, AND AGREE TO BE BOUND BY THESE TERMS. IF YOU DO NOT AGREE TO BE BOUND BY THESE TERMS, DO NOT ACCESS, BROWSE OR OTHERWISE USE THE PLATFORM OR THE CROWDIN SERVICES. Supplier may, in its sole discretion, elect to suspend or terminate access to, or use of the Crowdin Services to anyone who violates these Terms. If you register for a free trial of the Crowdin Services, the applicable provisions of these Terms will govern that free trial. The original language of these Terms is English. Supplier may make available translations for convenience. In case of conflicts between the original English version and any translation, the English version shall prevail. ## [1. DEFINITIONS](#1-definitions) [Section titled “1. DEFINITIONS”](#1-definitions) | | | | ------------------------------------ | ------------------------------------------------------------------------------------------------------------------------------------------------------------------------------------------------------------------------------------------------------------------------- | | Account | the primary means for accessing and using the Crowdin Services, subject to payment of a Fee designated in the selected Plan. | | Activity | translation and proofreading activities, builds, setting updates, source strings updates, comments, and issues, tasks that are associated with a Project. | | Authorization | the set of rights and privileges on the Web Site assigned to a User by a Client. | | Client | a natural or legal person who has accepted these Terms with the Supplier. | | Client Data | Files and any other digital data and information, including translations which are subjected to the Crowdin Services or otherwise inserted to the System by the Client. | | Content | any data and information, other than Client Data, available through Crowdin Services or contained within the structure of the System, articles, documents, brochures, presentations, pictures, images, audiovisual works, other informational materials owned by Crowdin. | | Crowdin Enterprise User | a natural or legal person who has accepted these Terms with the Supplier under Crowdin Enterprise. | | Fee | regular payment for using the activated Account. | | Files | documents of any kind (images, spreadsheets, text files, etc.) that are inserted to the System by the Client, and usually associated with particular Projects. | | Free Trial | temporary access for the purposes of trying out the Web Site and Crowdin Services in accordance with any selected Plan without paying a Fee. | | Guidelines | additional guidelines or rules applicable to specific features, applications, products, or services which may be posted from time to time on the Platform or otherwise made available on or through the Crowdin Services. | | Crowdin OÜ | Crowdin OÜ, a private limited company established under the laws of the Republic of Estonia, having its principal place of business at Mustamäe tee 44/1, Kristiine linnaosa, Tallinn, Harju maakond, Republic of Estonia, 10621 Register under code 14479905. | | Crowdin Materials | the visual interfaces, graphics, design, systems, methods, information, computer code, software, services, “look and feel”, organization, compilation of the content, code, data, and all other elements of the Crowdin Services. | | Crowdin Services | the Web Site, System, Content, Platform, and all content, services and/or products available on or through the Platform, subject to the plan selected by the Client. | | Plan | various criteria related to the use and functionality of the Crowdin Services and on which the Fee is based. | | Platform | the Crowdin Localization management application. | | Private Project | a Project for which the terms of participation are established by the Project Owner. | | Project | the planned set of interrelated Localization and translation tasks to be executed over a fixed period and within certain cost and other limitations. | | Project Owner | the Client that created the Project. | | Public Project With Open Policy | a Project which any Client can join without a confirmation from the Project Owner. Any Client Data posted may become public at the discretion of the Project Owner. | | Public Project with Moderated Policy | a Project which a Client can join only after the confirmation from the Project Owner. Any Client Data posted may become public at the discretion of the Project Owner. | | Reseller | third party entity that (i) purchases Crowdin Services from Supplier and resells such Crowdin Services to Clients, (ii) bills such Clients directly and (iii) provides such Clients with customer service. | | Special Terms | any particulars, specifications and conditions by which the parties have agreed to deviate from these Terms. | | Supplier | as the context requires, Crowdin OÜ. | | System | the integrated cloud computing solution for providing the Crowdin Services, including applications, software, hardware, data bases, interfaces, associated media, documentation, updates, new releases, and other components or materials provided therewith. | | User | a natural person granted with the Authorization to use the Account on behalf of a Client. | | Web Site | the compilation of all web documents (including images, php, and html files) made available via [www.crowdin.com](http://www.crowdin.com) or its sub domains or domains with identical names under other top domains and owned by Supplier. | | Workflow | the movement of tasks through a work process that ensures that specific Users perform activities in a specific sequence. | ## [2. AUTHORITY TO ENTER INTO THESE TERMS WITH SUPPLIER](#2-authority-to-enter-into-these-terms-with-supplier) [Section titled “2. AUTHORITY TO ENTER INTO THESE TERMS WITH SUPPLIER”](#2-authority-to-enter-into-these-terms-with-supplier) The use of the Crowdin Services is subject to acceptance of these Terms. To accept these Terms for itself or on behalf of a Client, a person must have the legal capacity to do so. In the case of an individual, the individual must be at least 18 years of age or have valid authorization from his/her legal representative or custodian. Special terms may apply for special education accounts (see section [GitHub Student Developer Pack. Special Educational Account Terms](/terms/#special-educational-account). In the case of a legal entity, the entity must be duly incorporated and in good standing. The Terms are accepted as soon as one of the following occurs first: the person has received the confirmation of the creation of the Account and necessary credentials from Supplier in order to log in to his/her/its Account; or for those Crowdin Services and parts of the Web Site the use of which is not dependent on creating an Account, upon the moment of gaining access to such services. You may not, without Supplier’s prior written consent, access the Crowdin Services (i) for production purposes, (ii) if you are a competitor of Crowdin, (iii) to monitor the availability, performance or functionality of the Crowdin Services or (iv) for other benchmarking or competitive purposes. Once accepted, these Terms remain effective until terminated as provided for herein. ### [2.1 GitHub Student Developer Pack. Special Educational Account Terms.](#special-educational-account) [Section titled “2.1 GitHub Student Developer Pack. Special Educational Account Terms.”](#special-educational-account) For the use of the Special Student Account, the person must be at least 13 years old and be a verified member of the GitHub Student Developer Pack. By using the Special Education Account, the person represents that he or she has a parent’s or guardian’s permission to use the Special Education Account and they jointly read and accepted these Terms and Conditions. ## [3. MODIFICATIONS TO TERMS](#3-modifications-to-terms) [Section titled “3. MODIFICATIONS TO TERMS”](#3-modifications-to-terms) Supplier reserves the right, at its sole discretion, to change, modify, add, or remove portions of the Terms at any time by posting such changes on or through the Platform or the Crowdin Services. Please check these Terms periodically for changes. Your continued use of the Crowdin Services after such changes have been posted as provided above constitutes your binding acceptance of such changes. Such amended Terms will automatically be effective upon the earlier of (i) your continued use of the Crowdin Services, or (ii) 30 days from posting of such modified Terms on or through the Platform. Notwithstanding the foregoing, the resolution of any dispute that arises between you and Supplier will be governed by the Terms in effect at the time such dispute arose. ## [4. OUR RESPONSIBILITIES](#4-our-responsibilities) [Section titled “4. OUR RESPONSIBILITIES”](#4-our-responsibilities) ### [4.1. Provision of Crowdin Services.](#41-provision-of-crowdin-services) [Section titled “4.1. Provision of Crowdin Services.”](#41-provision-of-crowdin-services) Supplier will (a) make the Crowdin Services, Content and Client Data available to a Client pursuant to these Terms, (b) provide applicable standard support for the Crowdin Services to Client at no additional charge, and/or upgraded support (for an additional charge, if applicable), (c) use commercially reasonable efforts to make the Crowdin Services available 24 hours a day, 7 days a week, except for: (i) planned downtime (of which Supplier shall give advance electronic notice as provided in the Guidelines), and (ii) any unavailability caused by circumstances beyond Supplier’s reasonable control, including, for example, an act of God, act of government, flood, fire, earthquake, civil unrest, act of terror, strike or other labor problem, Internet service provider failure or delay, or denial of service attack. ### [4.2. Protection of Client Data.](#42-protection-of-client-data) [Section titled “4.2. Protection of Client Data.”](#42-protection-of-client-data) Supplier will maintain administrative, physical, and technical safeguards for protection of the security, confidentiality, and integrity of Client Data, as described in the Guidelines. Those safeguards will include, but will not be limited to, measures for preventing access, use, modification or disclosure of Client Data by Supplier personnel except (a) to provide the Crowdin Services and prevent or address service or technical problems, (b) as compelled by law in accordance with Section 7.4 (Compelled Disclosure) below, or (c) as a Client or User expressly permit in writing. The Services may be performed using equipment or facilities located in the European Union, the United States, and Ukraine. The Supplier’s service providers located outside the EU are either Privacy Shield compliant or have executed Standard Contractual Clauses (as approved by the European Commission) that provide legal grounds for assuring that, when processed outside the European Union, the personal data of EU citizens when using the Crowdin Service will receive from the Supplier and its service providers located outside the EU an adequate level of protection within the meaning of Article 46 of Regulation (EU) 2016/679 (General Data Protection Regulation). By agreeing to these Terms, the Client grants the Supplier a general authorization in the meaning of Article 28 (2) of Regulation (EU) 2016/679 to engage processors for the purposes of providing the Crowdin Services. For more information about processors or if you want to subscribe to an email list and receive updates on the changes to the list of sub-processors, please see our [List of Sub-processors](/sub-processors/) ## [5. USING THE CROWDIN SERVICES](#5-using-the-crowdin-services) [Section titled “5. USING THE CROWDIN SERVICES”](#5-using-the-crowdin-services) ### [5.1 Establishing an Account.](#51-establishing-an-account) [Section titled “5.1 Establishing an Account.”](#51-establishing-an-account) Certain features, functions, parts or elements of the Crowdin Services can be used or accessed only by holders of an Account. The person who wishes to create an Account must: 1. complete the sign-up form on the Web Site or alternative process provided by a Reseller if access to the Crowdin Services is purchased from a Reseller; 2. and accept these Terms by clicking “Sign up” or other similar button. Each Client may have only one Account. If several persons need to use an Account on behalf of Client, Client must designate such persons as Users. Each such User shall be subject to the restrictions set forth in these Terms. If Client has designated Users and granted them Authorization, such Users will be deemed to be authorized to act on behalf of Client when using the Account. Supplier is not responsible for and shall have no liability for verifying the validity of Authorization of any User. However, Supplier may, in its discretion, request additional information or proof of the person’s credentials. If Supplier is not certain if a User has been granted Authorization, Supplier may, in its sole discretion, prevent such User from accessing the Crowdin Services and/or suspend or terminate the Account. A User may be associated with multiple Clients and Accounts. Blocking a User from one Account or Project will not remove the User from the Platform if he/she is connected to multiple Accounts. The Client and any User associated with an Account must provide Supplier with true, accurate, current, and complete information about the Client, Users and Account and keep it up to date. ### [5.2 Logging Into an Account.](#52-logging-into-an-account) [Section titled “5.2 Logging Into an Account.”](#52-logging-into-an-account) Client creates a username and password (“Login Credentials”) to be used to log in to its Account unless the Client uses the single sign-on feature or another service to log in. These Login Credentials must not be used by multiple persons. If Client has designated several Users, each User should create separate Login Credentials. Client and each User are responsible for keeping confidential all login credentials associated with an Account. Client must promptly notify Supplier of any disclosure, loss or unauthorized use of any Login Credentials. ### [5.3 Termination of Account.](#53-termination-of-account) [Section titled “5.3 Termination of Account.”](#53-termination-of-account) Client may terminate these Terms by terminating the Account at any time as provided in Section 17. Supplier shall permanently delete the Account within six months of the effective date of the termination. ### [5.4 Fees.](#54-fees) [Section titled “5.4 Fees.”](#54-fees) The use of an Account is subject to a Fee. Different rates apply to different Plans. The applicable Fee is charged in advance on monthly or annual payment intervals, unless agreed otherwise between parties. In case of cancellation by Supplier, Supplier shall refund due amount of money paid by the Client for the unused Software Services except the amounts of the discount provided to the Client for the Annual Subscription. If, after signing up, Client elects to upgrade to a more expensive Plan, the unused portion of any prepaid Fees shall be applied to the Fee of the more expensive Plan. All Fees are stated net and are exclusive of all taxes, VAT, levies, fees, withholdings, or duties applicable under any applicable law, unless stated otherwise stated herein. Client is solely responsible for the payment of such taxes, VAT, levies, fees, withholdings, or duties. The Client shall not make any deductions, withholdings or reduction of the Fees without first obtaining Supplier’s written consent. In the event the net amount received by Supplier is less than the Fee, Supplier shall have the right to stop providing the Services. ### [5.5 Changing Plans.](#55-changing-plans) [Section titled “5.5 Changing Plans.”](#55-changing-plans) Any Client has the right to upgrade or downgrade a current Plan at any time by selecting a new Plan among the collection of Plans determined by the Supplier. In such an event, the Client’s credit card on file with the Supplier will automatically be charged with a Fee for the next payment interval with the rate stipulated in the new Plan. Downgrading of the current Plan may cause the loss of features or capacity of the Account. ### [5.6 Free Trial.](#56-free-trial) [Section titled “5.6 Free Trial.”](#56-free-trial) A new Client may be entitled to a Free Trial, unless the Client has applied for the Account as a result of an ongoing marketing campaign organized by the Supplier in cooperation with its partners. The Client is not required to provide any credit card information during the period of Free Trial. If the period of Free Trial has expired, the Account will be automatically deactivated. In order to prevent deactivation or to reactivate the Account, the Client is required to select a suitable Plan and pay the first Fee. If the Client does not pay the first Fee within 2 weeks as of the expiry of the Free Trial, Supplier has the right to permanently delete the Account, including all Client Data therein. ## [6. PAYMENT](#6-payment) [Section titled “6. PAYMENT”](#6-payment) The following provisions are applicable only if you purchase access to the Crowdin Services directly from Supplier. If you purchase access to the Crowdin Services through a Reseller, the payment terms are set forth in the agreement with your Reseller. ### [6.1 Credit Card Authorization.](#61-credit-card-authorization) [Section titled “6.1 Credit Card Authorization.”](#61-credit-card-authorization) Supplier’s payment processing partner listed in the list of processors may seek pre-authorization of Client’s credit card account prior to your purchase of Crowdin Services in order to verify that the credit card is valid and has the necessary funds or credit available to cover your purchase. You authorize such credit card account to pay any amounts described herein, and authorize Supplier to charge all sums described in these Terms to such credit card account. You agree to provide Supplier updated information regarding your credit card account upon Supplier’s request and any time the information earlier provided is no longer valid. ### [6.2 Electronic Invoice.](#62-electronic-invoice) [Section titled “6.2 Electronic Invoice.”](#62-electronic-invoice) In case the Client is willing to pay via Purchase Order or Wire Transfer, the invoice for payment will be issued on request, all requests should be sent to . The electronic invoices are available only for annual and semi-annual payment intervals. Client must pay the invoice by the due date indicated on the invoice. ## [7. CLIENT DATA](#7-client-data) [Section titled “7. CLIENT DATA”](#7-client-data) ### [7.1 Uploading Client Data to Platform.](#71-uploading-client-data-to-platform) [Section titled “7.1 Uploading Client Data to Platform.”](#71-uploading-client-data-to-platform) If the Client uploads Client Data to the Platform, such Client Data and any processing of such Client Data must be in compliance with these Terms and applicable law. By uploading Client Data to the Platform and/or using Crowdin Services, the Client represents that the Client has all necessary legal rights, title and interest in and to the Client Data whether posted and/or uploaded by the Client or with Client’s authorization or made available on or through the Crowdin Services by Supplier. By uploading Client Data to the Platform, Client authorizes Supplier to process the Client Data. The Client is responsible for ensuring that: * the Client and any of the Users associated with the Account do not create, transmit, display or make otherwise available any Client Data that violates the terms of these Terms, the rights of Supplier or is harmful (for example viruses, worms, malware and other destructive codes), offensive, threatening, abusive, harassing, tortuous, defamatory, vulgar, obscene, invasive of another’s privacy, hateful or otherwise unlawful; * and the Client and all of the Users associated with the Account have the necessary rights to use the Client Data, including to insert it into the Platform and process it by means of the Account. * the Account or Client Data is not used for any illegal or unlawful activities. ### [7.2 No Guarantee of Accuracy.](#72-no-guarantee-of-accuracy) [Section titled “7.2 No Guarantee of Accuracy.”](#72-no-guarantee-of-accuracy) Supplier does not guarantee any accuracy with respect to any information contained in any Client Data, and strongly recommends that you think carefully about what you transmit, submit or post to or through the Crowdin Services. You understand that all information contained in Client Data is the sole responsibility of the person from whom such Client Data originated. This means that Client, and not Supplier, is entirely responsible for all Client Data that is uploaded, posted, transmitted, or otherwise made available through the Crowdin Services, as well as for any actions taken by the Suppliers or other Clients or Users or third parties as a result of such Client Data. Supplier has no obligations to monitor the use of or ensure that the Client Data does not infringe upon the intellectual property rights of other Clients, Users or third parties. Client or User (as the case may be) is solely responsible for securing all necessary rights to the Client Data. ### [7.3 Unlawful Client Data.](#73-unlawful-client-data) [Section titled “7.3 Unlawful Client Data.”](#73-unlawful-client-data) Supplier is not obliged to pre-screen, monitor or filter any Client Data or acts of its processing by the Client in order to discover any unlawful nature therein. However, if such unlawful Client Data or the action of its unlawful processing is discovered or brought to the attention of Supplier or if there is reason to believe that certain Client Data is unlawful, Supplier has the right to: * notify the Client of such unlawful Client Data; * demand that the Client bring the unlawful Client Data into compliance with these Terms and applicable law; * temporarily or permanently remove the unlawful Client Data from the Web Site or Account, restrict access to it, suspend it or delete it. If Supplier is presented convincing evidence that the Client Data is not unlawful, Supplier may, at its sole discretion, restore such Client Data, which was removed from the Account or access to which was restricted. In addition, in the event Supplier believes in its sole discretion Client Data violates applicable laws, rules or regulations or these Terms, Supplier may (but has no obligation), to remove such Client Data at any time with or without notice. Crowdin OÜ as the data processor will assist the Client as the data controller in meeting the Client’s obligations under Regulation (EU) 2016/679, providing subject access, and allowing data subjects to exercise their rights under Regulation (EU) 2016/679. ### [7.4 Compelled Disclosure.](#74-compelled-disclosure) [Section titled “7.4 Compelled Disclosure.”](#74-compelled-disclosure) Supplier may disclose a Client’s confidential information to the extent compelled by law to do so. In such instance, Supplier will use commercially reasonable efforts to provide Client with prior notice of the compelled disclosure (to the extent legally permitted) and Client shall provide reasonable assistance, at its cost, if Client wishes to contest the disclosure. If Supplier is compelled by law to disclose Client’s confidential information as part of a civil proceeding to which Supplier is a party, and Client is not contesting the disclosure, Client will reimburse Supplier for its reasonable cost of compiling and providing secure access to that confidential information. ## [8. SERVICES](#8-services) [Section titled “8. SERVICES”](#8-services) ### [8.1 Use of the Crowdin Services.](#81-use-of-the-crowdin-services) [Section titled “8.1 Use of the Crowdin Services.”](#81-use-of-the-crowdin-services) Subject to these Terms, and the payment of the applicable service Fee, Supplier grants Client and its authorized users a non-exclusive, non-transferable, non-sub-licensable license to use the Crowdin Services to: * collect, store and organize Client Data, such as add new Localization resources, create Projects and add Workflows into these Projects, generate reports based on Client Data, invite Translation Vendors into Projects and monitor translation progress, add Files to be offered for context through Localization process; * organize communication though Comments and Discussions; * add new Users and grant them Authorizations, assign Activities to a particular User; * modify and delete Client Data; * customize the standard features of the Crowdin Services; * receive reasonable help and guidance and from Supplier regarding the use of the Crowdin Services. ### [8.2 Technical Support.](#82-technical-support) [Section titled “8.2 Technical Support.”](#82-technical-support) Supplier shall provide reasonable technical support to Client and its authorized User at the reasonable request of the Client. Supplier shall respond to enquiries of support from a Client utilizing the contacts set forth below as soon as reasonably possible. The contacts for all enquiries of support are: chat application on the Web Page, or e-mail: Notwithstanding the foregoing, if you purchased access to the Crowdin Services from a Reseller, then first-line technical support will be provided by the Reseller and not by the Supplier. ### [8.3 Modifications to Service.](#83-modifications-to-service) [Section titled “8.3 Modifications to Service.”](#83-modifications-to-service) Supplier reserves the right to modify the Crowdin Services or any part or element thereof from time to time without prior notice, including, without limitation: * rebranding the Crowdin Services at its sole discretion; * ceasing providing or discontinuing the development any particular Crowdin Service or part or element of the Platform temporarily or permanently; * taking such action as is necessary to preserve Supplier’s rights upon any use of the Crowdin Services that may be reasonably interpreted as violation of Supplier’s intellectual property rights, distribution of Internet viruses, worms, Trojan horses, malware, and other destructive activities or illegal activity. As applicable, Client may be notified of such modifications when logging in to the Account. Modifications, including change in applicable rates for the Crowdin Services, will become effective thirty (30) days before the effective date of such modification. If the Client does not accept the modification, the Client shall notify Supplier or Reseller (if Client purchased access to the Crowdin Services from a Reseller) before the effective date of the modification, and these Terms will terminate on the effective date of the modification. The Client’s continued use of the Crowdin Services, or any part or element thereof, after the effective date of a modification shall indicate its consent to the modifications. Supplier shall not be liable to the Client or to any third party for any modification, suspension or discontinuance of the Crowdin Services, or any part or element thereof. ## [9. DATA PROCESSING CONTRACT](#9-data-processing-contract) [Section titled “9. DATA PROCESSING CONTRACT”](#9-data-processing-contract) For the purposes of Article 28 of Regulation (EU) 2016/679, these Terms constitute the data processing contract between the Client as the data controller and the Supplier as the data processor. The Client hereby instructs the Supplier to process the data as described in these Terms. ### [9.1 Subject matter and nature of processing.](#91-subject-matter-and-nature-of-processing) [Section titled “9.1 Subject matter and nature of processing.”](#91-subject-matter-and-nature-of-processing) The Supplier provides the Platform where the Client, as the data controller, can collect, store and organize the personal data of data subjects determined by the Client. The Platform has been designed to work as a Localization management tool but, to the extent not regulated by these Terms, the Client decides how they use the Platform. ### [9.2 Duration.](#92-duration) [Section titled “9.2 Duration.”](#92-duration) The Supplier will process data on behalf of the Client until the termination of the Crowdin Services in accordance with these Terms. Upon termination, Crowdin will store the Client’s data for a period of six months, should the Client wish to reopen the Account to resume the use of the Crowdin Services or to export Client Data, unless instructed otherwise by the Client. The Supplier deletes or returns all the personal data to the controller after the end of the provision of services relating to processing, and deletes existing copies unless Union or Member State law requires storage of the personal data. ### [9.3 Parties’ rights and obligations.](#93-parties-rights-and-obligations) [Section titled “9.3 Parties’ rights and obligations.”](#93-parties-rights-and-obligations) The Client’s rights and obligations regarding Client Data are provided in sections 4 through 10 of these Terms. The Supplier ensures that persons authorised to process the personal data have committed themselves to confidentiality or are under an appropriate statutory obligation of confidentiality. The Supplier takes all measures required pursuant to Article 32 of Regulation (EU) 2016/679. The Supplier undertakes to make available to the controller all information necessary to demonstrate compliance with their obligations and to allow for and contribute to audits, including inspections, conducted or mandated by the Client as the data controller. ## [10. RESTRICTIONS](#10-restrictions) [Section titled “10. RESTRICTIONS”](#10-restrictions) ### [10.1 Prohibited Activities.](#101-prohibited-activities) [Section titled “10.1 Prohibited Activities.”](#101-prohibited-activities) Client and its authorized Users may use the Crowdin Services and any part or element thereof only in the scope, with the means and for purposes as identified in these Terms and applicable law. By way of example, neither the Client nor any User may: * use the Crowdin Services or any part or element thereof to commit a crime, breach any applicable law or entice or invite others to carry out such illegal actions; * copy, duplicate, distribute, modify, adapt, hack, create derivative works, reverse engineer or decompile the Crowdin Services or any part or element thereof, or attempt to extract the source code thereof, unless (i) it is expressly allowed under applicable law, and (ii) to the extent that the Supplier is not permitted by that applicable law to exclude or limit the foregoing rights; * use the Crowdin Services or any part or element thereof unless it has agreed to these Terms. ### [10.2 Certain Uses Require Supplier Consent.](#102-certain-uses-require-supplier-consent) [Section titled “10.2 Certain Uses Require Supplier Consent.”](#102-certain-uses-require-supplier-consent) The Client or any User may not, without Supplier’s prior express written consent (e-mail, fax, Skype, etc.): * sell, resell, lease, license, sublicense, distribute, provide, disclose, divulge, exploit or otherwise grant Access or make the Crowdin Services available in whole or in part to any third perties, unless such third party is another authorized User of the same Client; * use the Crowdin Services or any part or element thereof in a scope, with means or for purposes other than those for which their functionality was created; * use the Crowdin Services or any part or element thereof by means of programs that send them automatic enquiries or requests, unless such program has been made available by Supplier; ## [11. PRIVACY](#11-privacy) [Section titled “11. PRIVACY”](#11-privacy) Supplier takes the privacy of its Clients and Users very seriously. Supplier’s [Privacy Policy](/privacy-policy/) is hereby incorporated into these Terms by reference. Please read the Privacy Policy carefully as it governs Supplier’s collection, use, and disclosure of Client’s or User’s personal information. ## [12. INTELLECTUAL PROPERTY RIGHTS](#12-intellectual-property-rights) [Section titled “12. INTELLECTUAL PROPERTY RIGHTS”](#12-intellectual-property-rights) ### [12.1 Crowdin’s Intellectual Property Rights in the Crowdin Services.](#121-crowdins-intellectual-property-rights-in-the-crowdin-services) [Section titled “12.1 Crowdin’s Intellectual Property Rights in the Crowdin Services.”](#121-crowdins-intellectual-property-rights-in-the-crowdin-services) The Crowdin Services, Crowdin Materials, Crowdin trade names and trademarks, and any parts or elements thereof are solely and exclusively owned and operated by Supplier and its third party vendors and hosting partners. Crowdin Materials are protected by copyright, trade dress, patent, trade secrets, and trademark laws, international conventions and treaties, and all other relevant intellectual property and proprietary rights laws. Supplier, its affiliates and licensors retains all right, title and interest in such Crowdin Services, Crowdin Materials, Crowdin trade names and trademarks, and any parts or elements. Your use of the Crowdin Services and Crowdin Materials, and any parts or elements does not grant to you any ownership right or intellectual property rights therein. Any commercial or promotional distribution, publishing or exploitation of the Crowdin Materials is strictly prohibited unless you have received the express prior written permission from Supplier or the otherwise applicable rights holder. Supplier reserves all rights to the Crowdin Services, Crowdin Materials and Crowdin trade names and trademarks not expressly granted in the Terms. ### [12.2 Content Owned by Crowdin.](#122-content-owned-by-crowdin) [Section titled “12.2 Content Owned by Crowdin.”](#122-content-owned-by-crowdin) Subject to these Terms and the payment of the applicable service Fee, Supplier grants Client and its authorized users a non-exclusive, non-transferable, non-sub-licensable license to download a single copy of any part of the Content solely for your personal, non-commercial use if you retain all copyright and proprietary notices that are contained in such part of the Content. You expressly acknowledge that you do not acquire any ownership rights by downloading any copyrighted material from or through the Platform or the Crowdin Services. You shall not copy, distribute or publish any Content or any information obtained or derived therefrom except as permitted on or through the Crowdin Services or as otherwise permitted by applicable law. ### [12.3 Client Data.](#123-client-data) [Section titled “12.3 Client Data.”](#123-client-data) 1. Special Terms apply to Crowdin Enterprise Users as specified in Section 12.3.3. Supplier may use Client Data in an aggregated or anonymized format for research, educational and other similar purposes. Supplier may not otherwise use or display Client Data without Client’s written consent. Supplier respects your right to exclusive ownership of your Client Data. Unless specifically permitted by you, your use of the Crowdin Services does not grant Supplier the license to use, reproduce, adapt, modify, publish or distribute the Client Data created by you or stored in your Account for Supplier’s commercial, marketing or any similar purpose. Client expressly grants Supplier the right to use and analyze aggregate system activity data associated with use of the Crowdin Services by Client and its Users for the purposes of optimizing, improving or enhancing the way the Crowdin Services operate, and to create new features and functionality in connection with the Crowdin Services in the sole discretion of Supplier. 2. Client is solely responsible for its own Client Data and the consequences of posting or publishing them on or through the Crowdin Services. In connection with Client Data, Client affirms, represents, and warrants that: (i) Client either owns its Client Data or has the necessary licenses, rights, consents, and permissions to use and authorize the Suppliers to display or otherwise use the Client Data under all patent, trademark, copyright, trade secrets, or other proprietary rights in and to your Client Data in a manner consistent with the intended features of the Crowdin Services and these Terms, and to grant the rights and license which are necessary to perform services hereunder, and (ii) Client Data, Supplier’s or any Crowdin Licensee’s use of such Client Data pursuant to these Terms, and Supplier’s or any Crowdin Licensee’s exercise of the license rights which are necessary to perform services hereunder. Client further affirms, represents, and warrants do that the Client does not and will not: (a) infringe, violate, or misappropriate any third-party right, including any copyright, trademark, patent, trade secret, moral right, privacy right, right of publicity, or any other intellectual property or proprietary right; (b) violate any applicable law or regulation anywhere in the world; or (c) require obtaining a license from or paying any fees and/or royalties by Supplier to any third party for the performance of any Crowdin Services Client has chosen to be performed by Supplier or for the exercise of any rights granted in these Terms, unless Client and Supplier otherwise agree. 3. Special Terms for Crowdin Enterprise Users. (For Crowdin Users Only) As part of your voluntary contribution to any Crowdin project, by agreeing to these terms, you are acknowledging and agreeing that your name, username and email address will become embedded and part of the project and organization, which may be available to organization admins. You understand the removal of this information would be impermissibly destructive to the project and the interests of all those who contribute, utilize, and benefit from it. Therefore, in consideration of your participation in any project, you understand that retaining your name, username and email address, as described above, does not require your consent and that the right of erasure, as spelled out in the GDPR Article 17 (1) b does not apply. The legal basis for our lawful processing of this personal data is Article 6 (1) f (“processing is necessary for the purposes of the legitimate interests pursued by the controller”). ### [12.4 Feedback.](#124-feedback) [Section titled “12.4 Feedback.”](#124-feedback) If Client or a User provides Suppliers with any comments, bug reports, feedback, or modifications for the Crowdin Services (“Feedback”), Supplier shall have the right to use such Feedback at its discretion, including, but not limited to the incorporation of such suggested changes into the Crowdin Services. Client or User (as applicable) hereby grants Supplier a perpetual, irrevocable, nonexclusive, royalty free license under all rights necessary to incorporate, publish, reproduce, distribute, modify, adapt, prepare derivative works of, publicly display, publicly perform, exploit and use your Feedback for any purpose. Supplier shall have the right to modify or remove any Feedback provided in the public areas of the Web Site if the Supplier deems, at its discretion, harmful, offensive, threatening, abusive, harassing, tortuous, defamatory, vulgar, obscene, invasive of another’s privacy, hateful or otherwise unlawful. ### [12.5. Public Projects.](#125-public-projects) [Section titled “12.5. Public Projects.”](#125-public-projects) Client or User (as the case may be) understands and agrees that any Client Data posted publicly and/or via Public Projects on the Crowdin Platform, may be viewed by others and Client or User agrees to allow others to view and use such Client Data. Client or User hereby grants Supplier and other Clients a perpetual, irrevocable, nonexclusive, royalty free license under all rights necessary to incorporate, publish, reproduce, distribute, modify, adapt, prepare derivative works of, publicly display, publicly perform, exploit and use such Client Data, unless otherwise is stated in a written contract between Client or User and a respective party. ### [12.6. Responsibilities of Project Owners.](#126-responsibilities-of-project-owners) [Section titled “12.6. Responsibilities of Project Owners.”](#126-responsibilities-of-project-owners) Project Owner is solely responsible for obtaining all necessary rights, licenses, agreements, authorizations and consents, by whatever name called, to display, publish, reproduce, distribute, modify, adapt, prepare derivative works of, perform, exploit, process and use all Client Data posted on the Project, regardless of whether it is posted by the Project Owner or a third party. ## [13. THIRD-PARTY SITES, PRODUCTS AND SERVICES](#13-third-party-sites-products-and-services) [Section titled “13. THIRD-PARTY SITES, PRODUCTS AND SERVICES”](#13-third-party-sites-products-and-services) The Crowdin Services may include links to other websites or services (“Linked Sites”) solely as a convenience to Clients. Unless otherwise specifically and explicitly indicated, Supplier does not endorse any such Linked Sites or the information, material, products, or services contained on or accessible through Linked Sites. Furthermore, Supplier makes no express or implied warranties with regard to the information, material, products, or services that are contained on or accessible through Linked Sites. ACCESS AND USE OF LINKED SITES, INCLUDING THE INFORMATION, MATERIAL, PRODUCTS, AND SERVICES ON LINKED SITES OR AVAILABLE THROUGH LINKED SITES, IS SOLELY AT YOUR OWN RISK. Any content referred to as community provided is provided by third parties and not developed or maintained by Crowdin. By using any community marked code or libraries in your software development, you acknowledge and agree that Crowdin is not in any way responsible for the performance or damages caused by such community provided code or library. ## [14. DISCLAIMERS; NO WARRANTY](#14-disclaimers-no-warranty) [Section titled “14. DISCLAIMERS; NO WARRANTY”](#14-disclaimers-no-warranty) UNLESS OTHERWISE EXPRESSLY STATED BY SUPPLIER, THE CROWDIN SERVICES, CROWDIN MATERIAL, AND ANY CONTENT, SERVICES, OR FEATURES MADE AVAILABLE IN CONJUNCTION WITH OR THROUGH THE CROWDIN SERVICES ARE PROVIDED “AS IS” AND “AS AVAILABLE” WITHOUT WARRANTIES OF ANY KIND EITHER EXPRESS OR IMPLIED. TO THE FULLEST EXTENT PERMISSIBLE PURSUANT TO APPLICABLE LAW, SUPPLIER AND ITS AFFILIATES DISCLAIM ALL WARRANTIES, STATUTORY, EXPRESS OR IMPLIED, INCLUDING, BUT NOT LIMITED TO, IMPLIED WARRANTIES OF MERCHANT ABILITY, FITNESS FOR A PARTICULAR PURPOSE, NON-INFRINGEMENT OF PROPRIETARY RIGHTS, CORRECTNESS, ACCURACY, AND RELIABILITY. UNLESS OTHERWISE EXPRESSLY STATED BY SUPPLIER, SUPPLIER AND ITS AFFILIATES DO NOT WARRANT THAT THE CROWDIN SERVICES AND ANY CONTENT, CLIENT DATA SERVICES, OR FEATURES MADE AVAILABLE IN CONJUNCTION WITH OR THROUGH THE CROWDIN SERVICES WILL BE UNINTERRUPTED OR ERROR-FREE, THAT DEFECTS WILL BE CORRECTED, OR THAT THE CROWDIN SERVICES AND ANY CONTENT, CLIENT DATA, SERVICES, OR FEATURES MADE AVAILABLE IN CONJUNCTION WITH OR THROUGH THE CROWDIN SERVICES OR THE SERVER THAT MAKES THEM AVAILABLE ARE FREE OF VIRUSES OR OTHER HARMFUL COMPONENTS. UNLESS OTHERWISE EXPRESSLY STATED BY SUPPLIER, SUPPLIER AND ITS AFFILIATES DO NOT WARRANT OR MAKE ANY REPRESENTATIONS REGARDING THE USE OR THE RESULTS OF THE USE OF THE PLATFORM, THE Crowdin SERVICES, Crowdin MATERIAL OR ANY LINKED SITES, IN TERMS OF CORRECTNESS, ACCURACY, RELIABILITY, OR OTHERWISE. THE LAWS OF CERTAIN COUNTRIES AND STATES DO NOT ALLOW LIMITATIONS ON IMPLIED WARRANTIES OR THE EXCLUSION OR LIMITATION OF CERTAIN DAMAGES. IF THESE LAWS APPLY TO YOU, SOME OR ALL OF THE ABOVE DISCLAIMERS, EXCLUSIONS, OR LIMITATIONS MAY NOT APPLY TO YOU, AND YOU MIGHT HAVE ADDITIONAL RIGHTS. ## [15. INDEMNIFICATION](#15-indemnification) [Section titled “15. INDEMNIFICATION”](#15-indemnification) You agree to defend, indemnify and hold harmless Supplier and its affiliates, and their respective directors, officers, employees and agents, from any claims, losses, damages, liabilities, including attorney’s fees, arising out of your use or misuse of the Crowdin Services, Crowdin Materials, representations made to the Supplier, its affiliates and/or third parties, violation of these Terms, violation of the rights of any other person or entity, or any breach of the foregoing representations, warranties, and covenants. Supplier reserves the right, at its own expense, to assume the exclusive defense and control of any matter for which you are required to indemnify Supplier, and you agree to cooperate with such defense of these claims. ## [16. LIMITATION OF LIABILITY](#16-limitation-of-liability) [Section titled “16. LIMITATION OF LIABILITY”](#16-limitation-of-liability) ### [16.1 No Liability:](#161-no-liability) [Section titled “16.1 No Liability:”](#161-no-liability) Supplier shall not be liable to the Client or User for any consequences resulting from: * any modifications in these Terms, calculation and rates of Fees, the Crowdin Services, Crowdin Material, or any part or element thereof (including but not limited to Account), * including any error, permanent or temporary interruption, discontinuance, suspension or other type of unavailability of the Crowdin Services or Crowdin Material; * deletion of, corruption of, or failure to store any Client Data; * use of Client Data by the Client or any of the Users associated with the Account; * upgrading or downgrading the current Plan; * any disclosure, loss or unauthorized use of the login credentials of Client or any authorized User due to Client’s failure to keep them confidential; * the Client’s use of the Account or the Crowdin Services by means of browsers other than those accepted or supported by the Supplier; * the application of any remedies against the Client or authorized Users by the Supplier, for example if the Client or User has committed a crime or conducted a breach of applicable law by using the Crowdin Services or any part or element thereof; * the differences between technologies and platforms used for access, for example if certain features, functions, parts or elements of the Crowdin Services are designed for use on a personal computer or laptop and do not function on a mobile platform or a tablet; * the Supplier’s application of the remedies described in these Terms, even if the reasonable grounds or legal basis for the application of these remedies turned out to be unfounded or invalid afterwards. In addition, Supplier and its affiliates shall not be liable to the Client for any claim by any User, person, Organization or third parties against the Client arising out of the Client’s failure to: * provide Supplier with accurate information about the Client, Users or Account; * notify Supplier of any reasons due to which a User does not have the right to use the Account on behalf of the Client; * provide any Products which it has agreed to provide to such a person or Organization (whether such failure arises as a result of Supplier’s negligence, breach if these Terms or otherwise); * ensure the lawfulness of the Client Data; * obtain the necessary rights to use the Client Data; or * abide by any of the restrictions described in these Terms. ### [16.2 Limitation of Liability.](#162-limitation-of-liability) [Section titled “16.2 Limitation of Liability.”](#162-limitation-of-liability) IN NO EVENT SHALL THE AGGREGATE LIABILITY OF CROWDIN AND ITS AFFILIATES ARISING OUT OF OR RELATED TO THESE TERMS EXCEED THE TOTAL AMOUNT PAID BY CLIENT HEREUNDER FOR THE CROWDIN SERVICES GIVING RISE TO THE LIABILITY IN THE SIX MONTHS PRECEDING THE FIRST INCIDENT OUT OF WHICH THE LIABILITY AROSE. THE FOREGOING LIMITATION WILL APPLY WHETHER AN ACTION IS IN CONTRACT OR TORT AND REGARDLESS OF THE THEORY OF LIABILITY, BUT WILL NOT LIMIT CLIENT’S PAYMENT OBLIGATIONS UNDER THE “PAYMENT” SECTION ABOVE. ### [16.3 Exclusion of Consequential and Related Damages.](#163-exclusion-of-consequential-and-related-damages) [Section titled “16.3 Exclusion of Consequential and Related Damages.”](#163-exclusion-of-consequential-and-related-damages) IN NO EVENT WILL EITHER PARTY OR ITS AFFILIATES HAVE ANY LIABILITY ARISING OUT OF OR RELATED TO THESE TERMS FOR ANY LOST PROFITS, REVENUES, GOODWILL, OR INDIRECT, SPECIAL, INCIDENTAL, CONSEQUENTIAL, COVER, BUSINESS INTERRUPTION OR PUNITIVE DAMAGES, WHETHER AN ACTION IS IN CONTRACT OR TORT AND REGARDLESS OF THE THEORY OF LIABILITY, EVEN IF A PARTY OR ITS AFFILIATES HAVE BEEN ADVISED OF THE POSSIBILITY OF SUCH DAMAGES OR IF A PARTY’S OR ITS AFFILIATES’ REMEDY OTHERWISE FAILS OF ITS ESSENTIAL PURPOSE. THE FOREGOING DISCLAIMER WILL NOT APPLY TO THE EXTENT PROHIBITED BY LAW. ## [17. TERMINATION OF THESE TERMS](#17-termination-of-these-terms) [Section titled “17. TERMINATION OF THESE TERMS”](#17-termination-of-these-terms) ### [17.1 For Convenience.](#171-for-convenience) [Section titled “17.1 For Convenience.”](#171-for-convenience) These Terms may be terminated for convenience upon written notice to the other party as indicated in the “Notice” Section below: * by the Client any time by clicking the no-questions-asked cancellation link on the Web Site, when logged in to the Account, or if the Client is paying for the Service with a PayPal account, by revoking the billing agreement on its PayPal profile; or if the client is paying for the Service via a Reseller, by means agreed upon between the Client and the Reseller; * by Supplier upon decision to end provision of the Crowdin Services and close the Platform; or * immediately by either party, if proceedings are initiated for the other party’s liquidation or insolvency or a negotiated settlement with the other party’s creditors is concluded or an assignment is made on behalf of the other party for the benefit of creditors. ### [17.2 For Cause.](#172-for-cause) [Section titled “17.2 For Cause.”](#172-for-cause) These Terms may be terminated for default upon written notice to the other party as indicated in the “Notice” Section below: * by either party in case of breach of these Terms by the other party, if the breach has not been cured within 30 days of receipt of a notice from the non-breaching party; or * immediately by either party if the other party breaches its obligations, as applicable under Sections 12 **Intellectual Property Rights** and 15 **Indemnification** of these Terms. * immediately by the Supplier, in its sole discretion, in the event of material breach of these Terms or to prevent any unlawful or illegal activity or use. ### [17.3 Effect of Termination.](#173-effect-of-termination) [Section titled “17.3 Effect of Termination.”](#173-effect-of-termination) Upon termination of these Terms, Supplier shall deactivate and permanently delete the Account, within six months of the effective date of termination of these Terms. If the Client has specifically requested for an earlier deletion of the Account, Supplier shall fulfill such request within 1 month of its receipt of such request. Client must: * stop using and prevent the further usage of the Crowdin Services, including, without limitation, the Platform; * pay any amounts owed to Supplier under these Terms; and * discharge any liability incurred by the Client before under these Terms prior to their termination; and The following provisions shall survive the termination of these Terms: Sections 1, 7.4, 10, 11, 12, 14, 15, 16, 18 and 19. ### [17.4 Remedies.](#174-remedies) [Section titled “17.4 Remedies.”](#174-remedies) If Supplier terminates these Terms as a result of an uncured breach by a Client or User, Supplier is entitled to use the same or similar remedies against any other persons who use the Crowdin Services in conflict with these Terms. Notwithstanding the foregoing, Supplier may also apply any other remedies available to it under the applicable law. Upon application of any remedies, the Client or User may lose Access or suffer a loss of certain features, functions, parts or elements of the Crowdin Services. If Supplier has reasonable grounds to believe that the Client’s or User’s use of the Crowdin Services, including the Account may harm any third parties, Supplier has the right to take adequate measures under its control to prevent, stop and eliminate the harm, where possible, in order to protect those third parties. ## [18. WHO YOU ARE CONTRACTING WITH](#18-who-you-are-contracting-with) [Section titled “18. WHO YOU ARE CONTRACTING WITH”](#18-who-you-are-contracting-with) ### [18.1 General.](#181-general) [Section titled “18.1 General.”](#181-general) By accepting these Terms, the Client is contracting with the Supplier Crowdin OÜ, registered at Mustamäe tee 44/1, Kristiine linnaosa, Tallinn, Harju maakond, Republic of Estonia, 10621 ### [18.2 Governing Law and Jurisdiction.](#182-governing-law-and-jurisdiction) [Section titled “18.2 Governing Law and Jurisdiction.”](#182-governing-law-and-jurisdiction) This Agreement shall be governed by and construed and enforced in accordance the substantive law of the Republic of Estonia. In the event of a dispute, controversy or claim arising out of or in relation to these Terms, including but not limited to the formation, validity, breach or termination thereof, the parties shall attempt to solve the matter amicably in mutual negotiations. In the event a mutually acceptable resolution cannot be reached within a reasonable time, either party will be entitled to seek all available remedies, including legal remedies subject to the terms and conditions set forth below. Notwithstanding the foregoing and subject to the terms and conditions set forth below, either party may seek injunctive relief with respect to any disputed matter to the extent possible under applicable law. Should an amicable settlement between parties not be possible, the dispute shall be finally solved in court or by arbitration as designated herein subject to the terms and conditions set forth below. The United Nations Convention on Contracts for the International Sale of Goods (Vienna Convention of 1980) shall not be applied to these Terms. Any questions relating to these Terms which are not expressly or implicitly settled by the provisions contained in these Terms shall be governed by and construed in accordance with the laws of the Republic of Estonia, without giving effect to any principles of conflicts of law. Court having exclusive jurisdiction is Harju County. We each agree that we shall bring any dispute against the other in our respective individual capacities and not as a plaintiff or class member in any purported class, representative proceeding or as an association. In addition, we each agree that disputes shall be arbitrated only on an individual basis and not in a class, consolidated or representative action. The arbitrator does not have the power to vary these provisions. If any part of this provision is ruled to be unenforceable, then the balance of this provision shall remain in full effect and construed and enforced as if the portion ruled unenforceable were not contained herein. Use of the Crowdin Services is not authorized in any jurisdiction that does not give effect to all provisions of these Terms, including without limitation, this section. Notwithstanding the foregoing, you and the Suppliers agree that nothing herein shall be deemed to waive, preclude, or otherwise limit either party’s right to (i) pursue enforcement actions through applicable federal, state, or local agencies where such actions are available, (ii) seek injunctive relief in a court of law, or (iii) to file suit in a court of law to address intellectual property infringement claims. ## [19. GENERAL PROVISIONS](#19-general-provisions) [Section titled “19. GENERAL PROVISIONS”](#19-general-provisions) ### [19.1 Relationship of the Parties.](#191-relationship-of-the-parties) [Section titled “19.1 Relationship of the Parties.”](#191-relationship-of-the-parties) The parties will act solely as independent contractors. These Terms shall not be construed as creating an agency, partnership, joint venture, fiduciary duty, or any other form of legal association between the Client and either Supplier, and the Client shall not represent to the contrary, whether expressly, by implication, appearance or otherwise. These Terms are not for the benefit of any third parties. ### [19.2 Severability.](#192-severability) [Section titled “19.2 Severability.”](#192-severability) If any term, condition or provision of these Terms is held to be invalid, unenforceable or illegal in whole or in part for any reason, that provision shall be enforced to the maximum extent permissible so as to effect the intent of the parties. The validity and enforceability of the remaining terms, conditions or provisions, or portions of them, shall not be affected. ### [19.3 Entire Agreement.](#193-entire-agreement) [Section titled “19.3 Entire Agreement.”](#193-entire-agreement) These Terms are the entire agreement between Client and Supplier regarding Client’s use of the Crowdin Services and supersedes all prior and contemporaneous agreements, proposals or representations, written or oral, concerning its subject matter. Except as otherwise provided herein, no modification, amendment, or waiver of any provision of these Terms will be effective unless in writing and signed by the party against whom the modification, amendment or waiver is to be asserted. ### [19.4 Assignment.](#194-assignment) [Section titled “19.4 Assignment.”](#194-assignment) Client may not, directly or indirectly, in whole or in part, by operation of law or otherwise, assign or transfer these Terms or delegate any of its rights and/or obligations under these Terms without Supplier’s prior written consent. Any attempted assignment, transfer or delegation without such prior written consent will be void and unenforceable. Notwithstanding the foregoing, the Client, or its permitted successive assignees or transferees, may assign or transfer these Terms or delegate any rights or obligations hereunder without consent: (1) to any entity controlled by, or under common control with the Client, or its permitted successive assignees or transferees; or (2) in connection with a merger, reorganization, transfer, sale of assets or product lines, or change of control or ownership of the Client, or its permitted successive assignees or transferees. ### [19.5 No Waiver.](#195-no-waiver) [Section titled “19.5 No Waiver.”](#195-no-waiver) Failure of either Party to exercise or enforce any provision of or any of its rights under these Terms shall not be deemed a waiver of future enforcement of that or any other provision or right. ### [19.6 Notices.](#196-notices) [Section titled “19.6 Notices.”](#196-notices) Except as otherwise specified in these Terms, all notices related to these Terms will be in writing and will be effective upon (a) personal delivery, (b) the second business day after mailing, or (c), except for notices of termination or an indemnifiable claim (“Legal Notices”), which shall clearly be identifiable as Legal Notices, the day of sending by email. Billing-related notices to you will be addressed to the relevant billing contact designated by you. All other notices to you will be addressed to the relevant Services system administrator designated by you. *** Your Crowdin Team.
# Translation Consistency
> Hints regarding how the source words were previously translated
Translation consistency is a feature designed to provide translators with informative hints regarding how the source words were previously translated. These hints show previous translations for individual words and the number indicating how many times each translation was used in the project. As the feature’s name states, its main task is to improve the consistency of translations within the project. As a result, you get higher-quality translations that will be used in your applications, websites, etc. ## [Overview](#overview) [Section titled “Overview”](#overview) Translation consistency is handled by an experimental machine learning technology. As soon as you start translating your project, machine learning algorithms engage, and the system shows previous translations for the source words and how often they were used in the project. The previous translation lists are formed based on the translations with the highest priority (approved, most voted, or last added ones) within the project. ## [Using Translation Consistency in Editor](#using-translation-consistency-in-editor) [Section titled “Using Translation Consistency in Editor”](#using-translation-consistency-in-editor) Hover over the source words underlined with the light dashed line to see the previous translations formed by the translation consistency feature. You can also search previous translations for specific source words using the *Search TM* tab.  ## [Supported Languages](#supported-languages) [Section titled “Supported Languages”](#supported-languages) Currently, translation consistency is available for the following source and target languages: **Source languages** * English * English, United States * English, United Kingdom **Target Languages** * Czech * Danish * Dutch * Finnish * French * German * Italian * Norwegian * Norwegian Bokmal * Polish * Portuguese * Romanian * Russian * Spanish * Swedish * Ukrainian New languages are added regularly.
# Translation Memory
> Learn how to manage Translation Memories in Crowdin
A Translation Memory (TM) is a database that stores translation units, which are segments of source text paired with their corresponding translations in different languages. It improves and speeds up the translation process by providing suggestions for identical or similar strings in your projects. A project TM is created automatically for each Crowdin project. By default, each translation made within the project is automatically added to the project’s TM. This behavior can be customized in the [project settings](/project-settings/translation-memories/) to save only approved translations. ## [Creating TM](#creating-tm) [Section titled “Creating TM”](#creating-tm) In addition to the project TMs that are automatically created with each project, you can create separate TMs and populate them with content by uploading your existing TMs in TMX, XLSX, or CSV formats. These TMs can then be assigned to the relevant projects as needed. To create a TM, follow these steps: 1. Open your profile home page and select **Translation Memories** on the left sidebar. 2. Click **Create TM**. 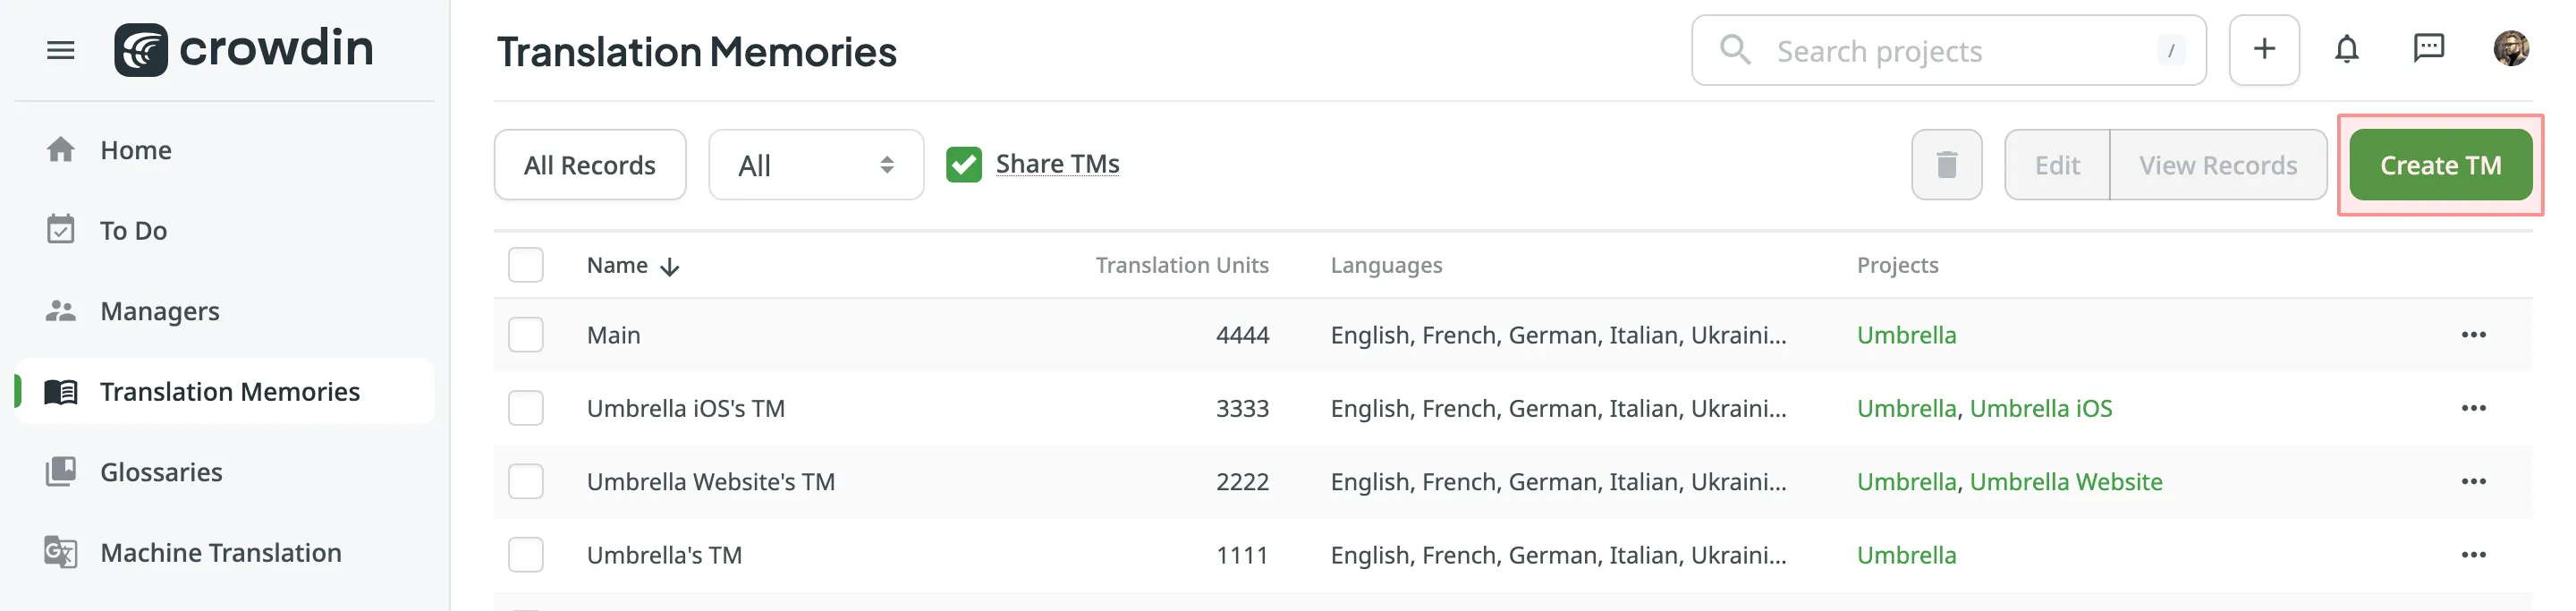 3. In the appeared dialog, name your TM and select a default language that will be displayed first in the table of translation units. 4. *(Optional)* Assign the TM to the needed projects. You can skip this step and assign a TM later. 5. Click **Create**. 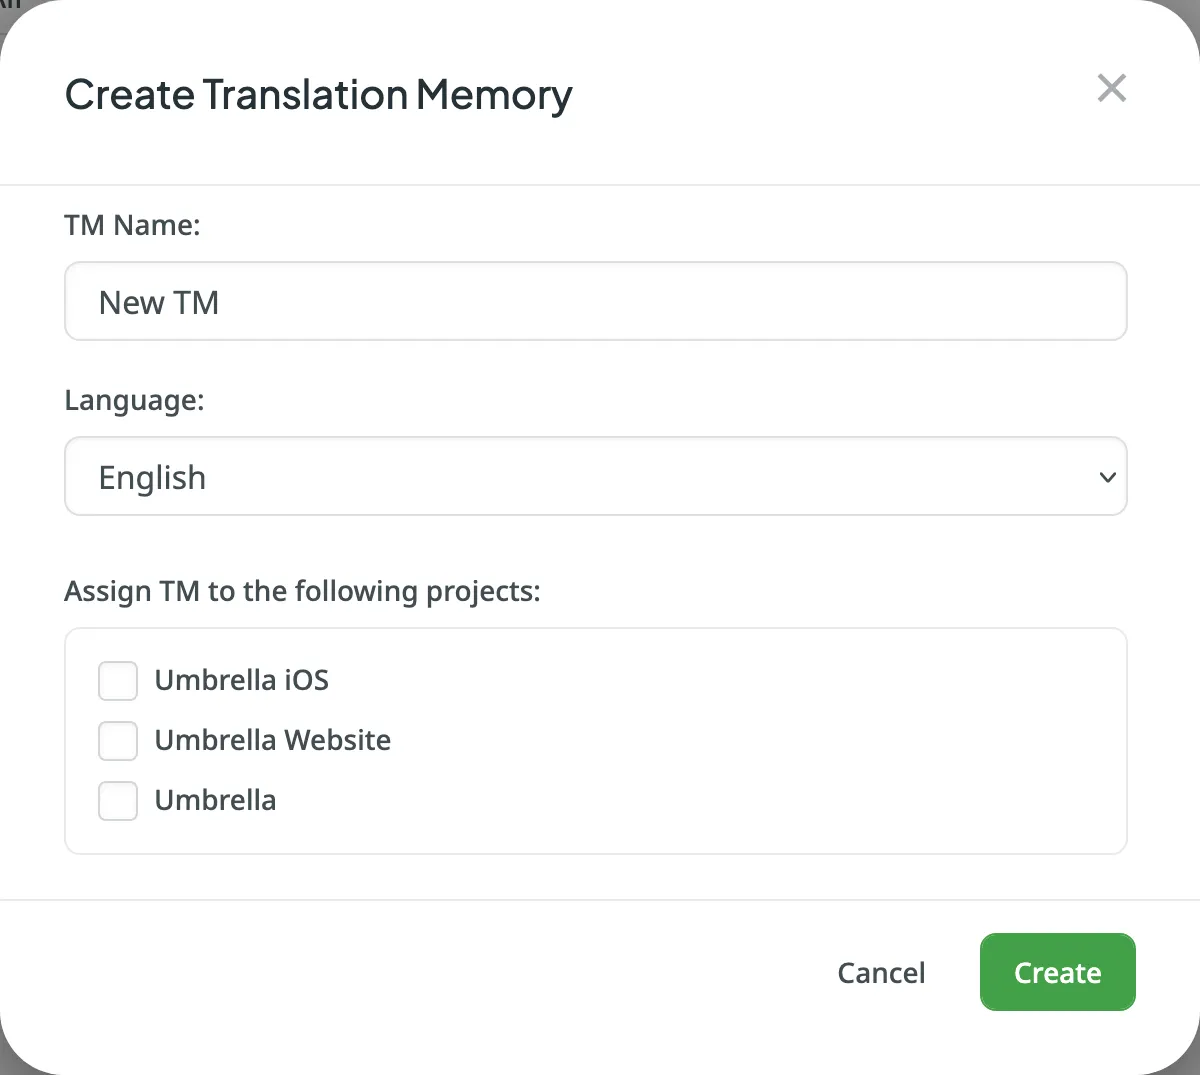 [Assigning TM ](/project-settings/translation-memories/#assigning-tm) [Prioritizing TM ](/project-settings/translation-memories/#prioritizing-tm) [Changing Default TM ](/project-settings/translation-memories/#changing-default-tm) ## [Managing Translation Units and Segments](#managing-translation-units-and-segments) [Section titled “Managing Translation Units and Segments”](#managing-translation-units-and-segments) You can create translation units from scratch, edit and delete existing translation units or segments of a particular TM or all available TMs. [Translation Memory Generator ](https://store.crowdin.com/tmg)Use this app to create a TM based on the translated Crowdin project. ### [Creating Translation Units](#creating-translation-units) [Section titled “Creating Translation Units”](#creating-translation-units) To create a translation unit, follow these steps: 1. Open your profile home page and select **Translation Memories** on the left sidebar. Alternatively, open your project and go to **Settings > Translation Memories**. 2. Select the needed TM and click **View Records**. 3. Click **Add Translation Unit**.  4. In the appeared dialog, select the language from the drop-down menu and type the translation of the segment. 5. Click **Add segment** to add more translations for the translation unit. 6. Click **Create**.  ### [Viewing and Filtering Translation Units and Segments](#viewing-and-filtering-translation-units-and-segments) [Section titled “Viewing and Filtering Translation Units and Segments”](#viewing-and-filtering-translation-units-and-segments) Once you open a translation memory, you can view and filter its translation units and segments using either the Translation Units or Segments pages. On the Translation Units page, you can view TM content grouped as translation units (one translation unit per row, each segment displayed in a separate language column). 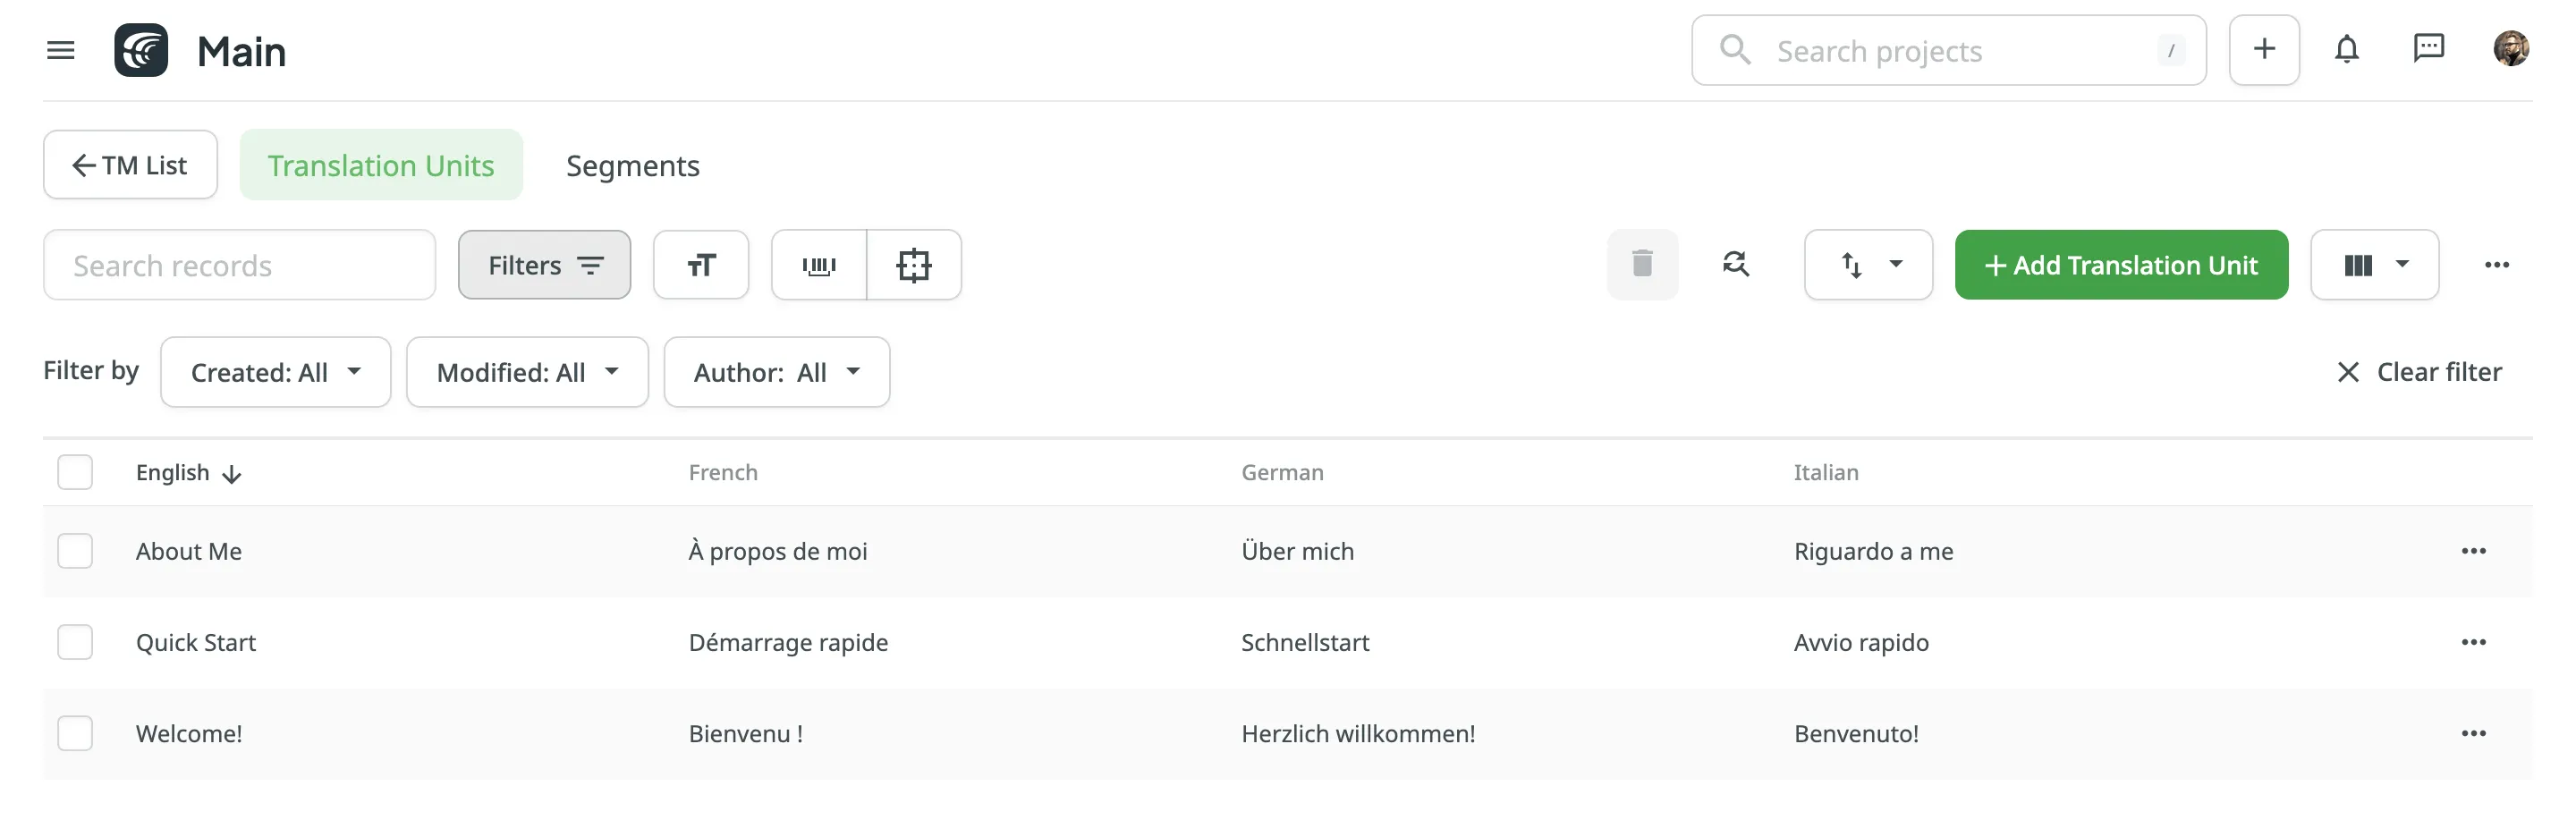 On the Segments page, you can view TM content as individual segments (one segment per row) with the following details: * Segment – contains either source or target language text. * Language – specifies the language of the segment. * Usage count – specifies the number of times a segment has been used. * Created – specifies the date of the segment creation. * Last modified – specifies the date of the last modification of the segment. * Author – specifies the user who created the segment. 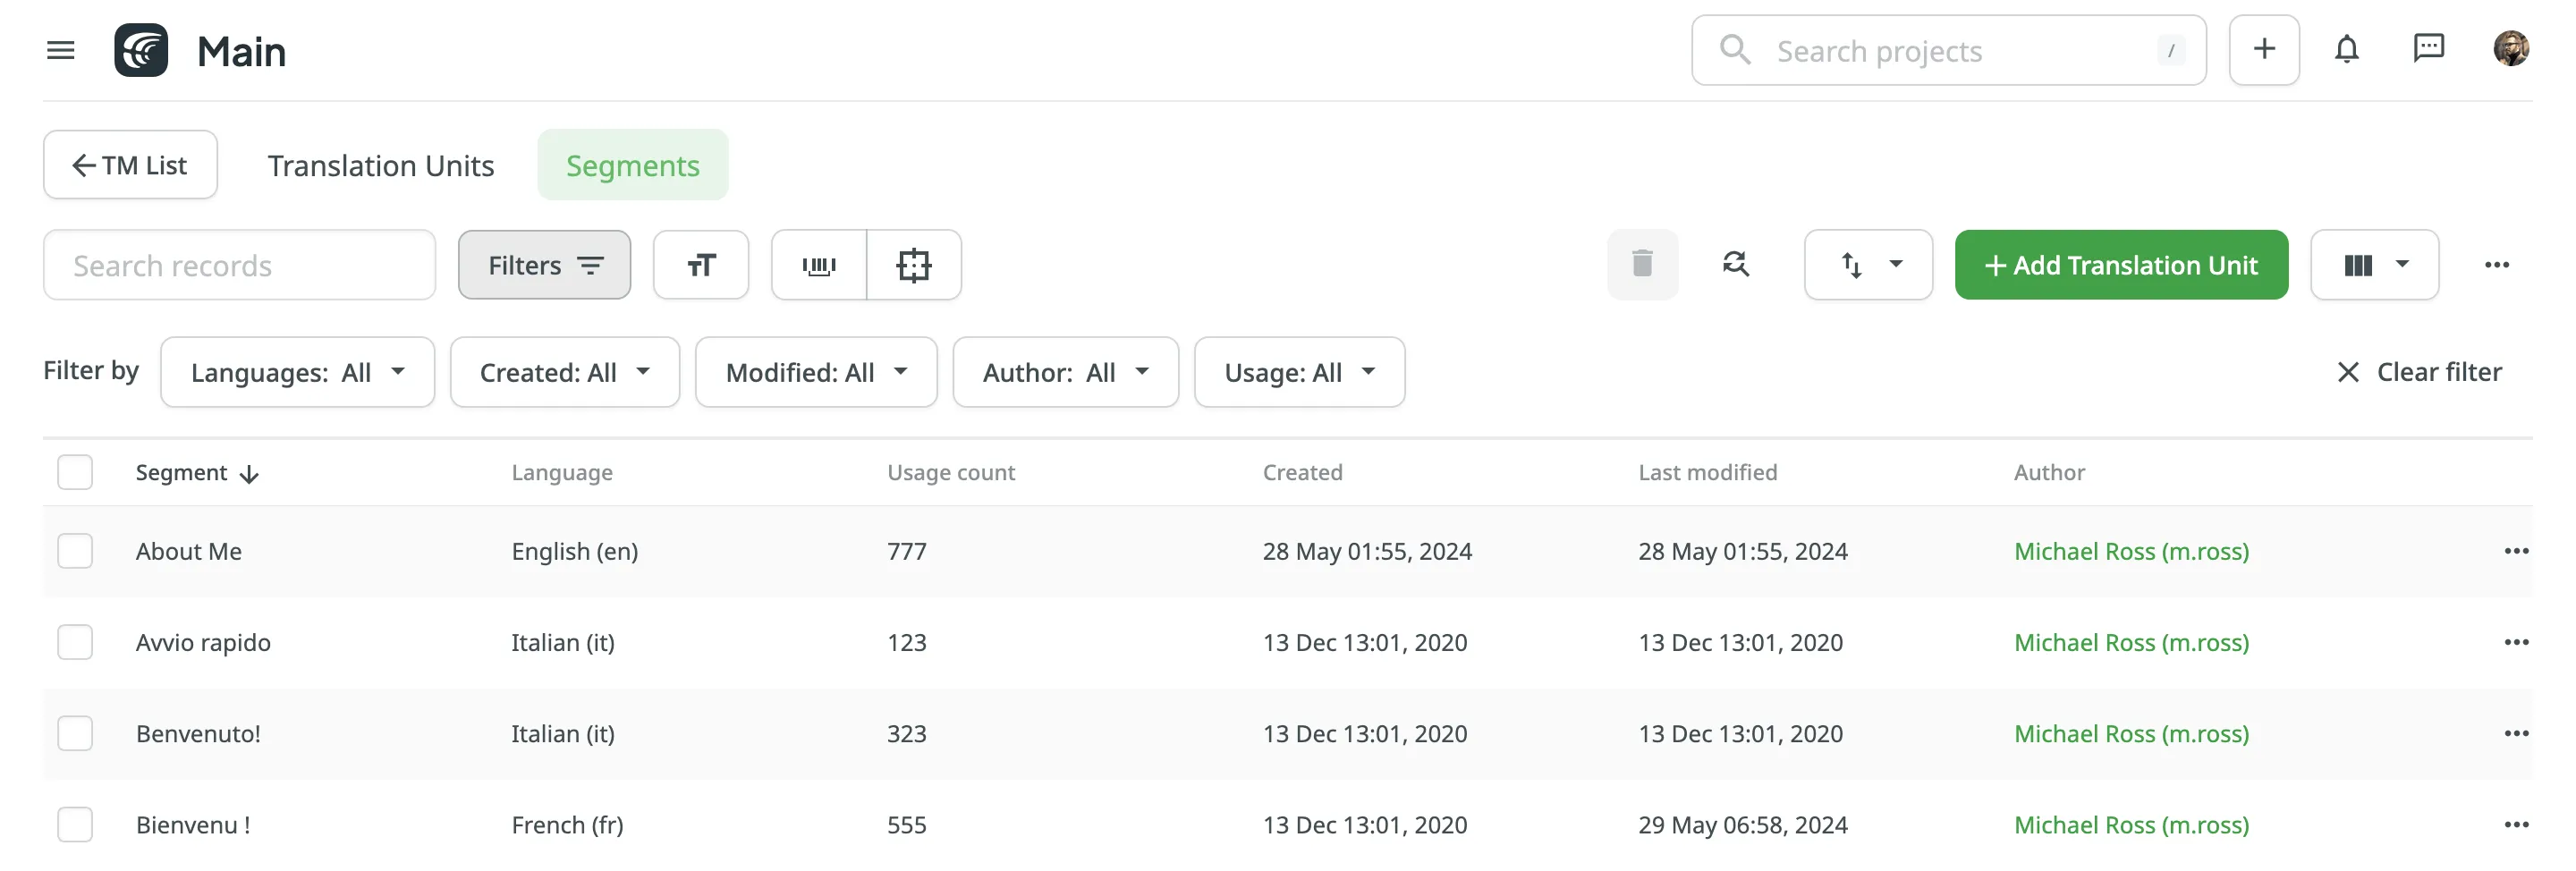 By default, all translation units and segments are displayed in the Translation Units and Segments pages. To filter the translation units or segments displayed, click and use the available filter options: * Created: All, Custom Range. * Modified: All, Custom Range. * Author: All, particular user. * Languages (Specific to the Segments page): All, particular language. * Usage (Specific to the Segments page): All, Used, Unused. To sort translation units or segments, click the column header you want to sort by: * Translation Units page – click a language column (e.g., English, French, etc.) to sort the translation units by that language’s text. * Segments page – click the Segment column to sort by segment text. Click once to sort in ascending order and click again to sort in descending order. ### [Editing Translation Units](#editing-translation-units) [Section titled “Editing Translation Units”](#editing-translation-units) You can edit both the source and translation parts of the existing translation unit. To edit a translation unit, follow these steps: 1. Open your profile home page and select **Translation Memories** on the left sidebar. Alternatively, open your project and go to **Settings > Translation Memories**. 2. Select the needed TM and click **View Records**. Alternatively, click **All Records** to view translation units of all available TMs in one list. 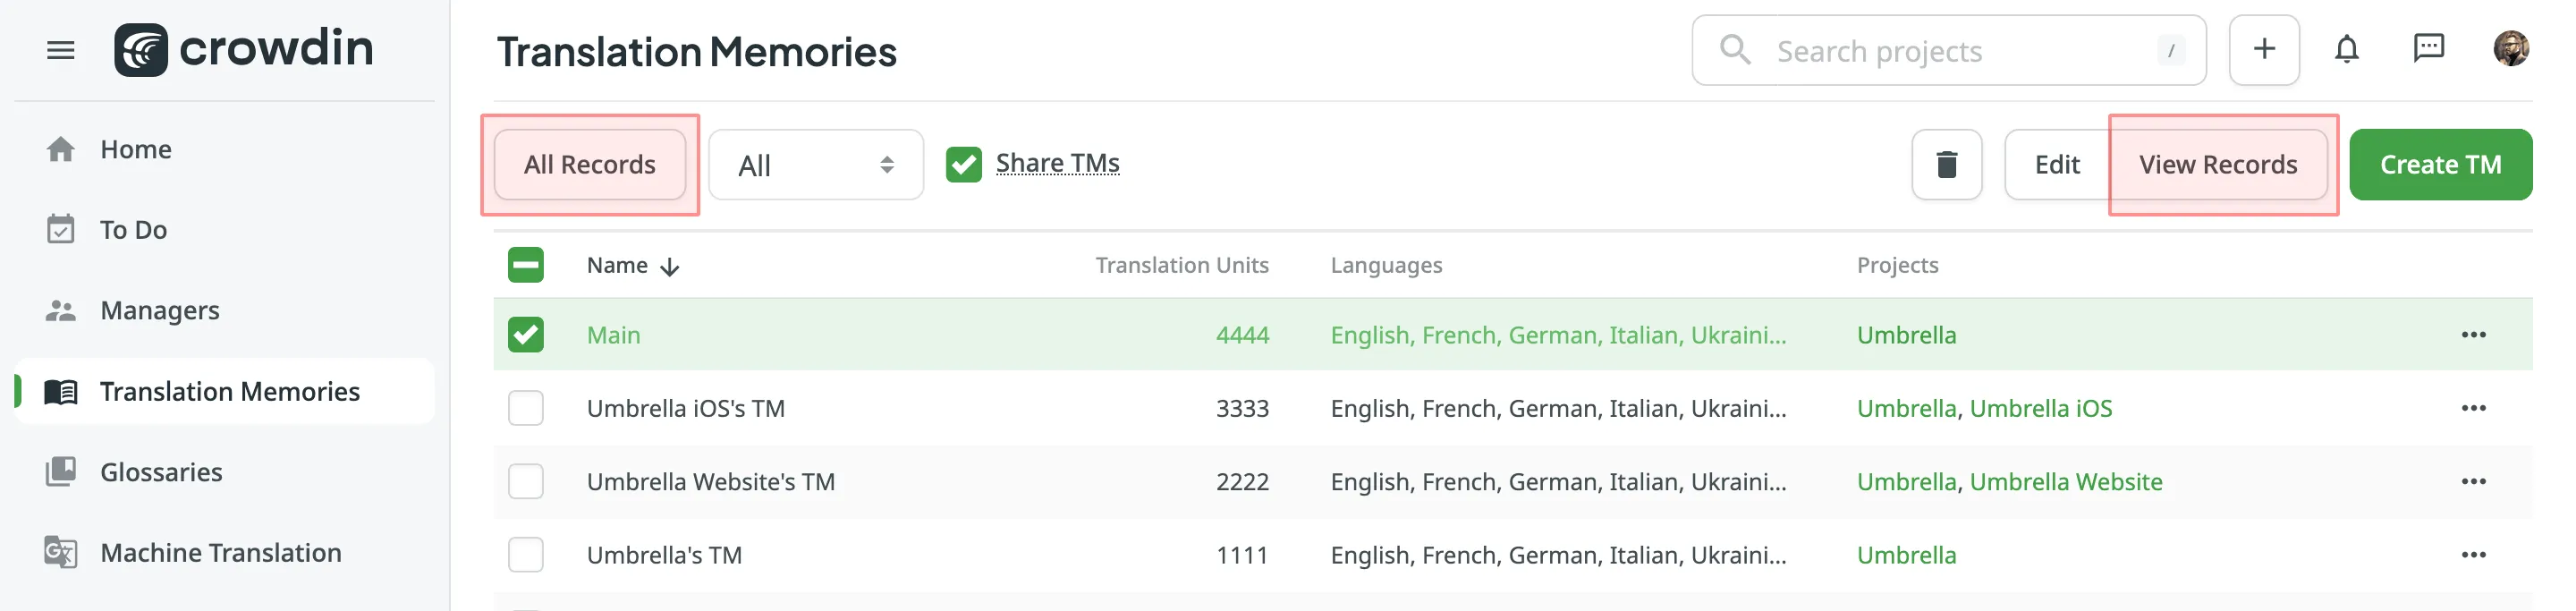 3. Open a translation unit with a double-click or click **Edit**. 4. In the appeared dialog, edit or delete the segments of the needed languages. For each segment, you can see additional details like the language, creation date, last modified date, and, if available, the name of the contributor who originally submitted the translation. 5. Click **Save**. 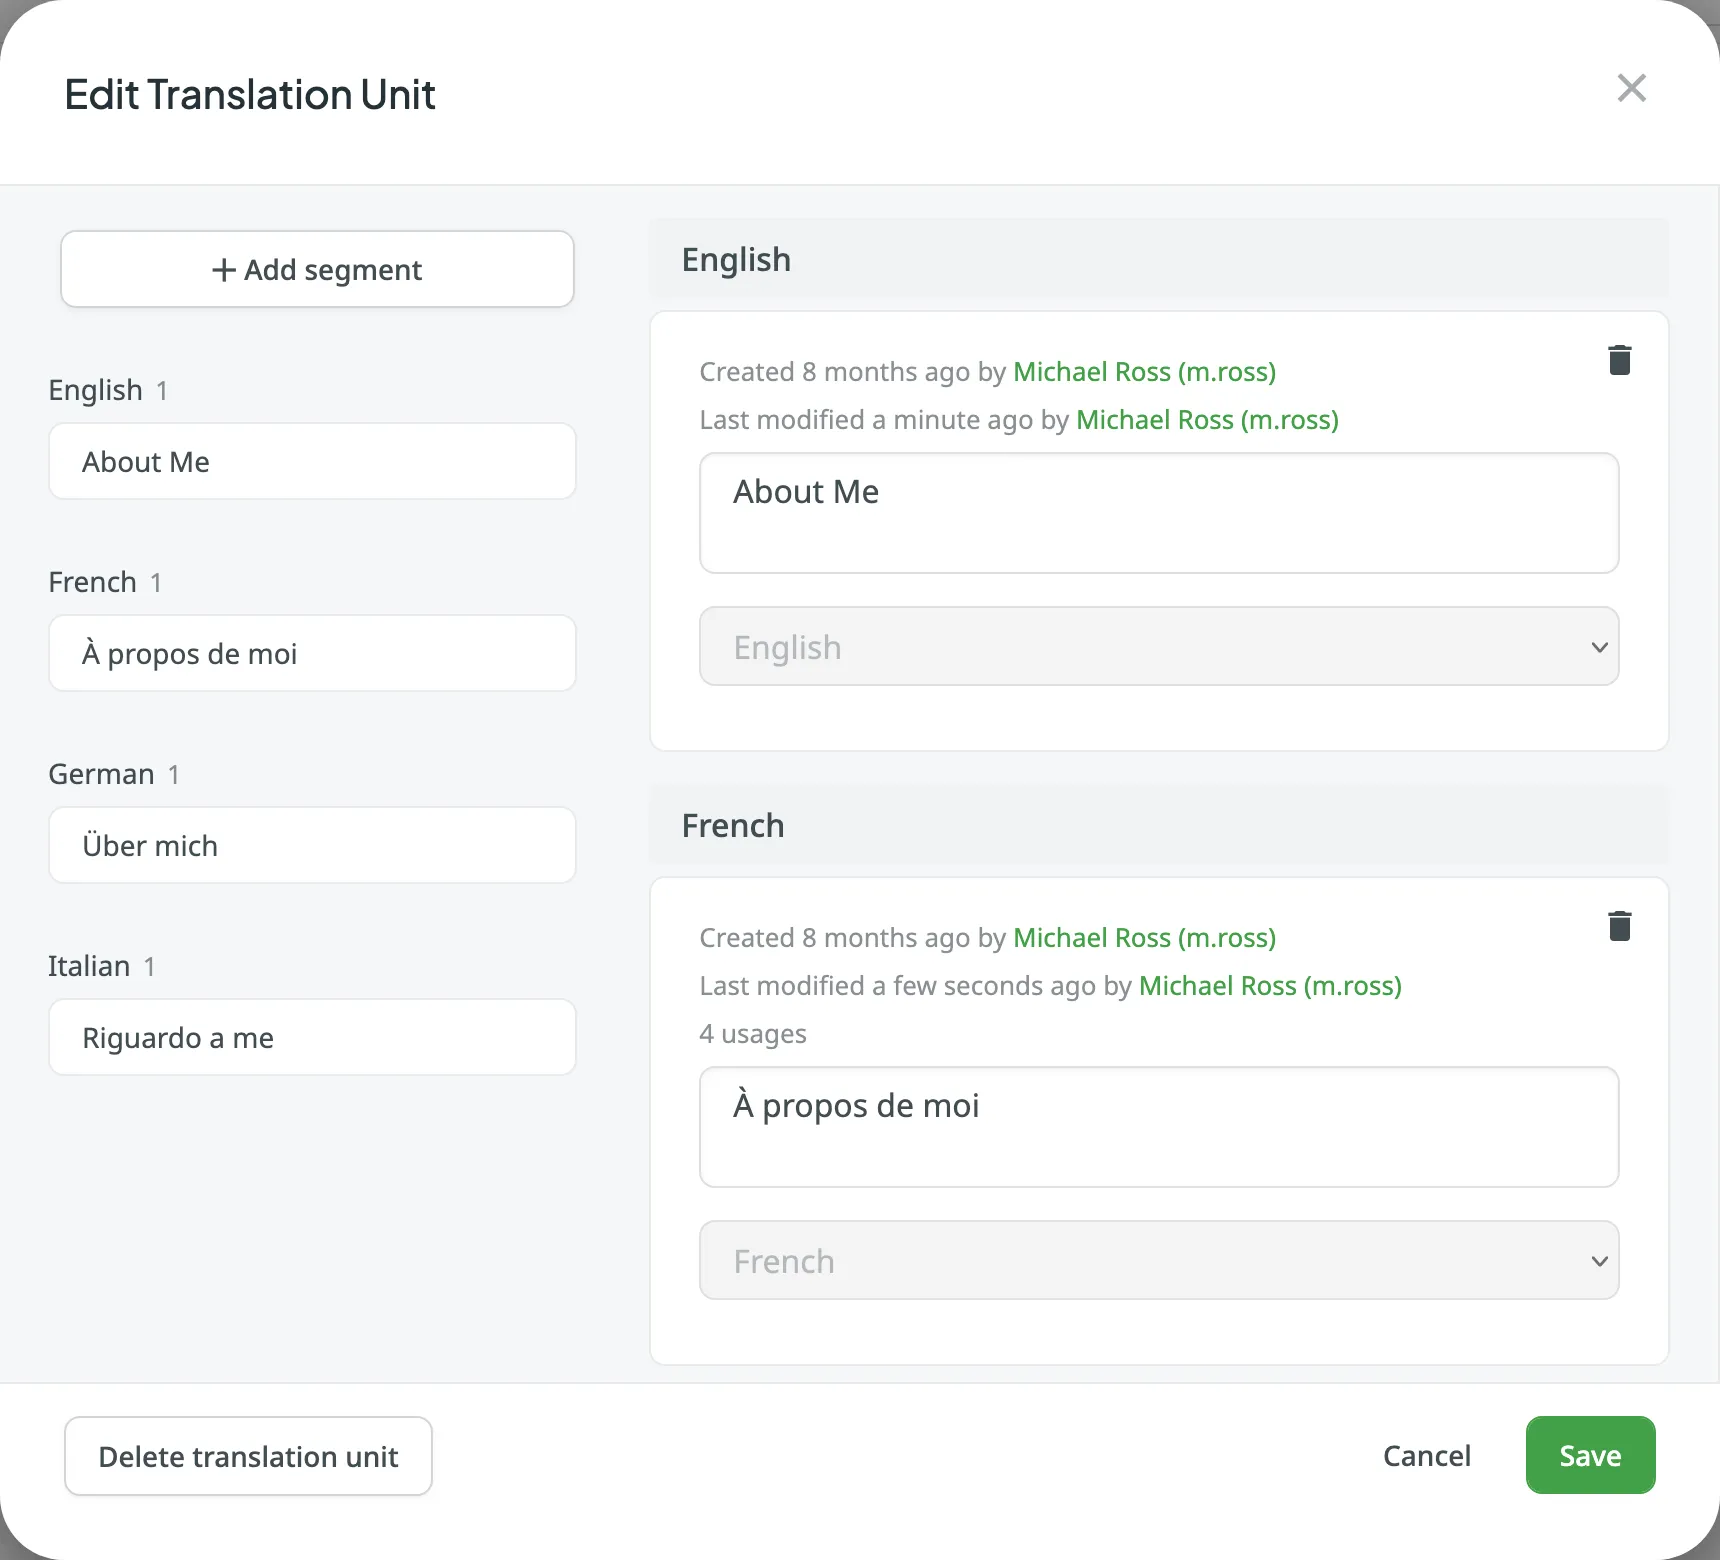 In addition to editing translation units via the **Translation Memories** page, you can also do it in the Editor. Read more about [Editing TM Suggestions in the Editor](/online-editor/#editing-tm-suggestions-in-the-editor). Another way to edit translation units in your TM is to download it (e.g., in TMX format), make the necessary changes locally on your device, and then reupload the modified TM back to Crowdin. Depending on what you modify in your TM, there could be different outcomes: * If you edit both the source and translation segments of a translation unit, then when you upload the TM to Crowdin, the locally modified translation unit will be treated as new upon re-upload, leaving the original translation unit unchanged. * If you only edit the translation segment of a translation unit, then when you upload the TM to Crowdin, the locally modified translation segment will be added as an alternative version segment to the existing translation unit, keeping the original translation intact but providing another option. If you want to have only the modified version of the translation units, follow these steps: 1. [Download](#downloading-tm-for-offline-management) the complete version of your TM to your device. 2. Make the necessary changes locally on your device. 3. Completely [clear the content of your TM](#deleting-translation-units-and-segments) in Crowdin. 4. [Upload](#downloading-and-uploading-tm) your locally modified TM to Crowdin. ### [Replacing in Segments](#replacing-in-segments) [Section titled “Replacing in Segments”](#replacing-in-segments) You can easily find and replace translations in segments within a selected TM using the *Find & Replace* feature. To replace current translations with the new ones, follow these steps: 1. Open your profile home page and select **Translation Memories** on the left sidebar. Alternatively, open your project and go to **Settings > Translation Memories**. 2. Select the needed TM and click **View Records**. 3. Click . 4. In the appeared dialog, select the language in which you want to search. *(Optional)* Use filters if necessary. 5. Enter the word, phrase, or sentence you want to substitute and the text to replace it with. *(Optional)* Use the *Match case* and *Exact match* options to refine the search results. 6. Click **Find** to preview the segments that will be replaced. 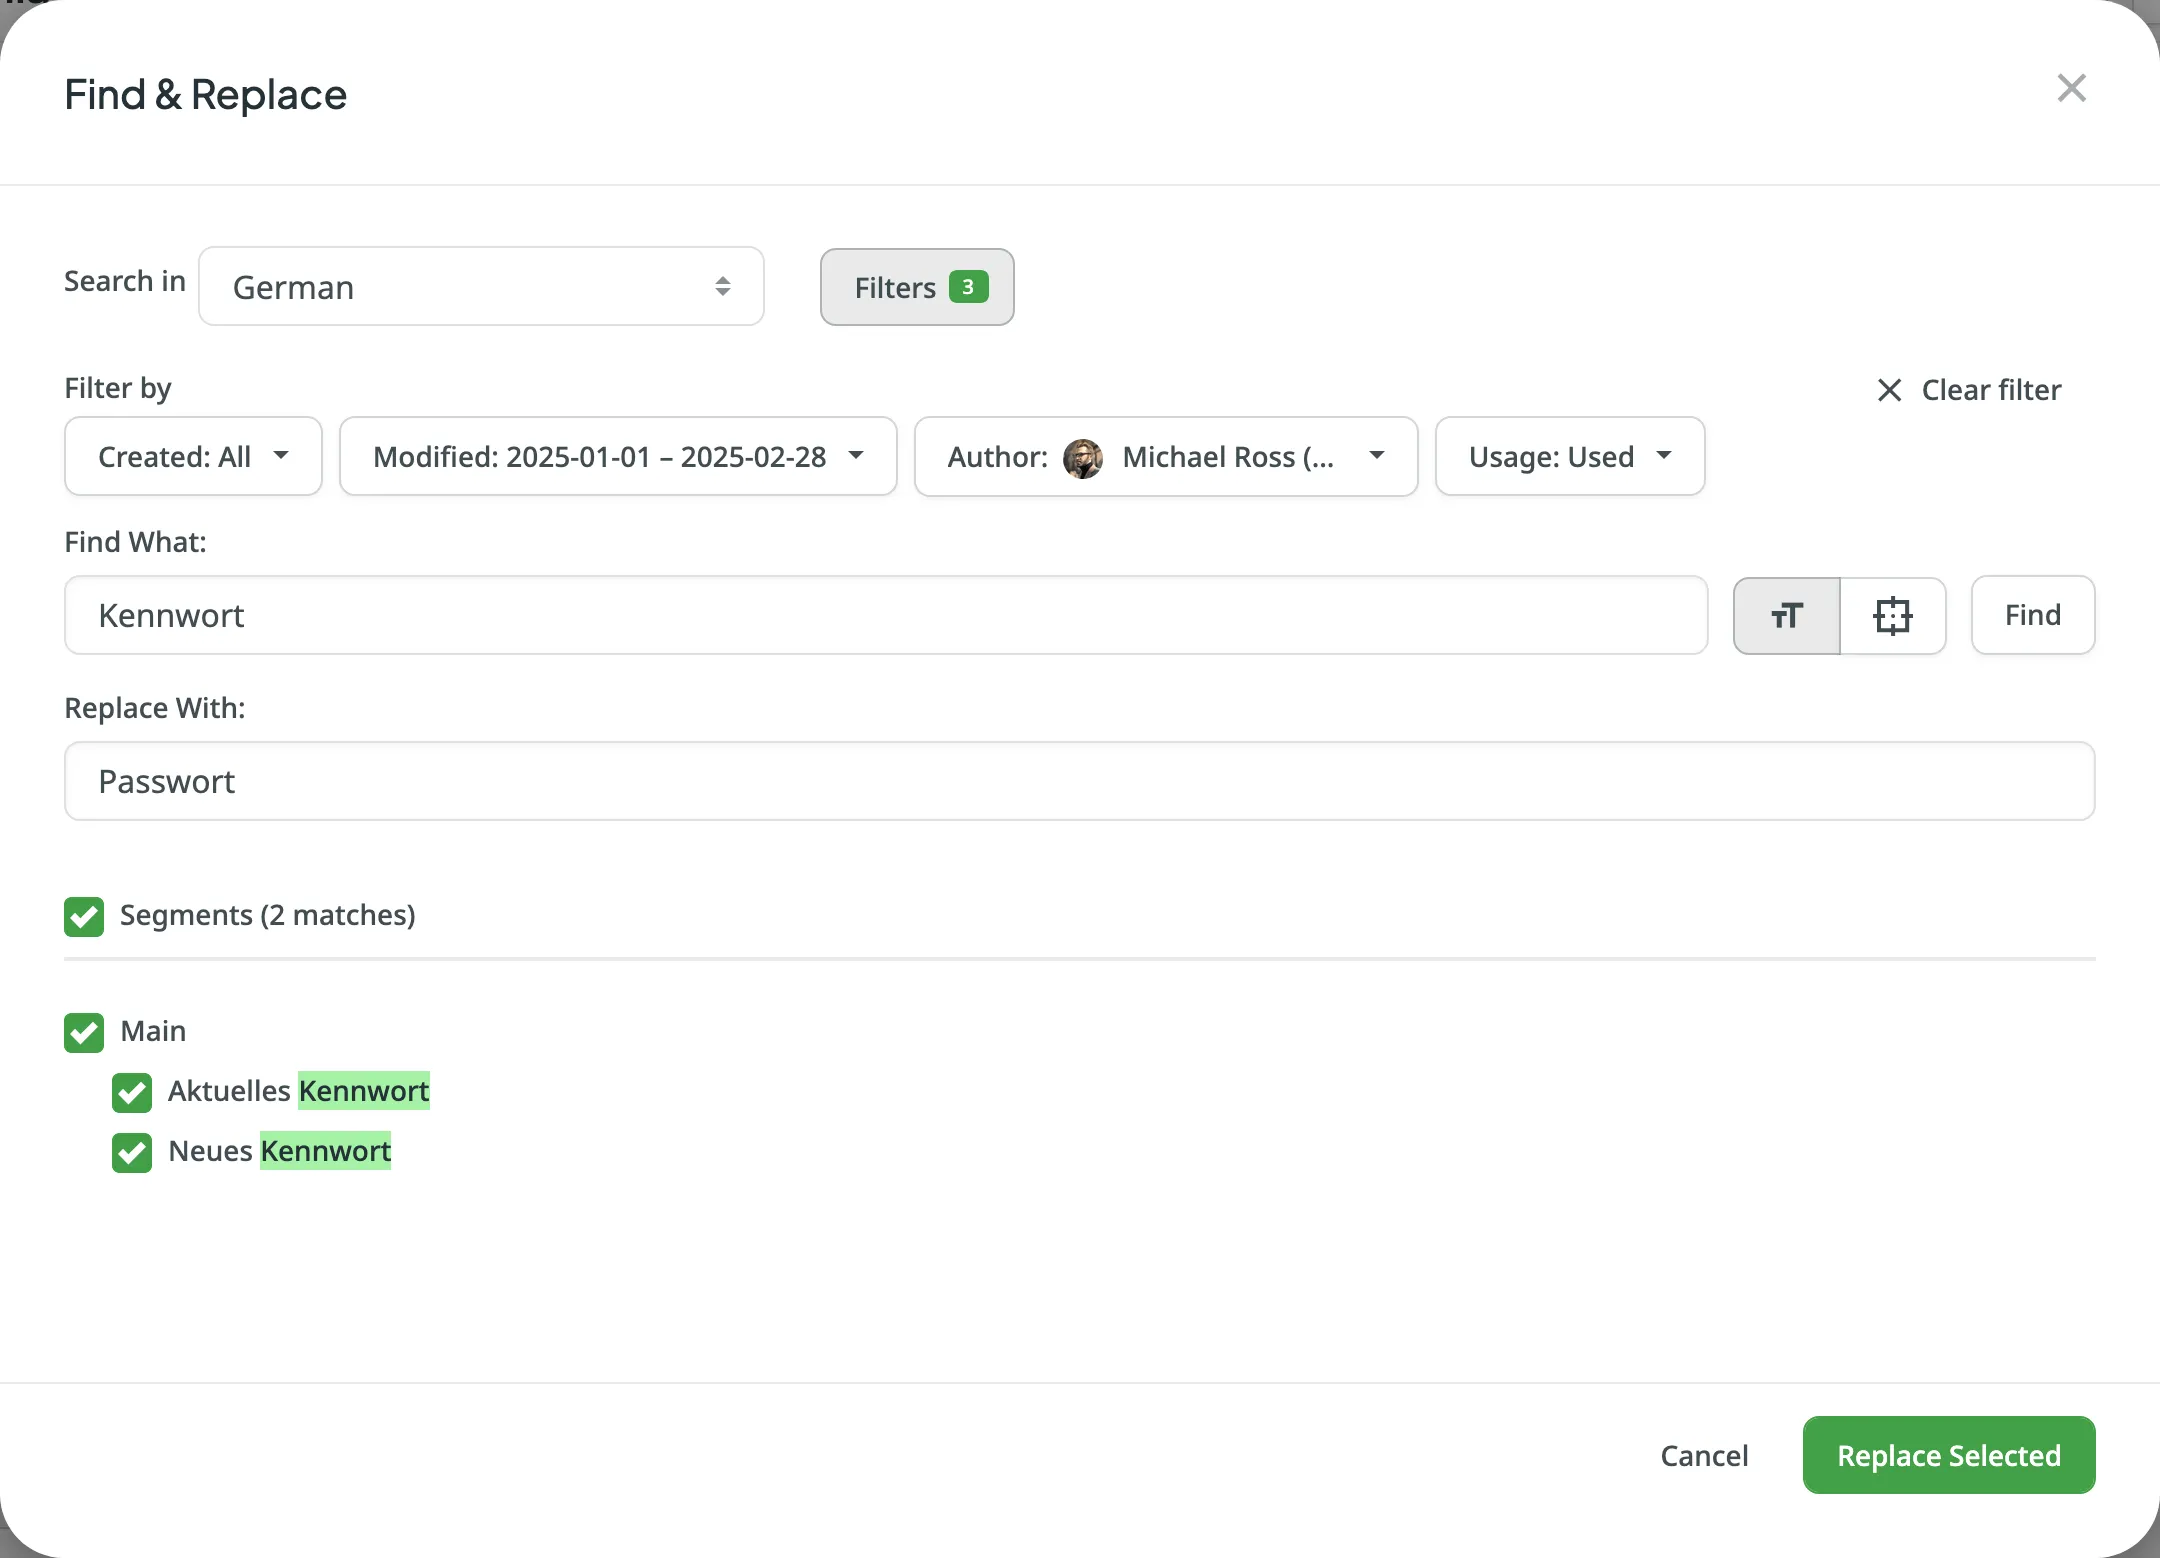 7. Select the segments you want to replace and click **Replace Selected** to finish. ### [Deleting Translation Units and Segments](#deleting-translation-units-and-segments) [Section titled “Deleting Translation Units and Segments”](#deleting-translation-units-and-segments) You can delete one, multiple, or all the translation units or segments at once. To delete all the translation units from TM, follow these steps: 1. On the Translation Units page, select the top checkbox above the translation unit list. 2. Confirm the selection of all translation units. 3. Click . 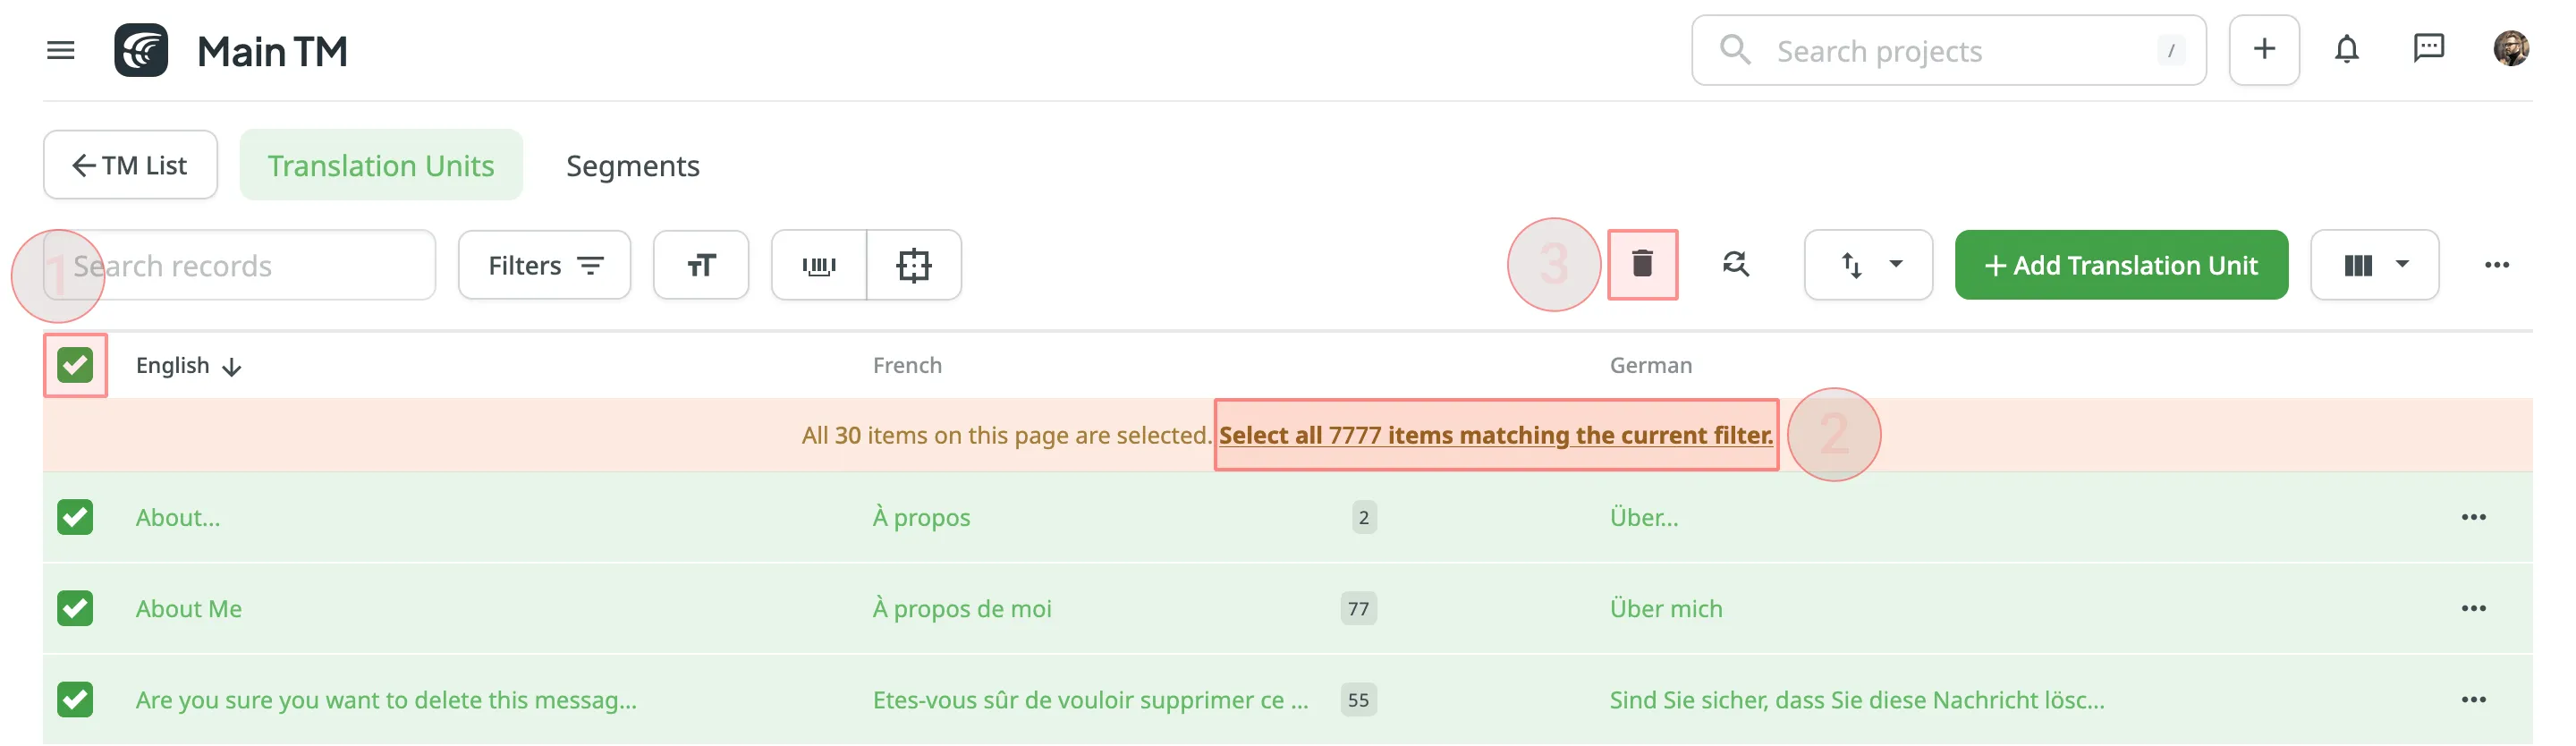 To delete all the segments from TM for only one particular language, follow these steps: 1. On the Segments page, click and select the needed language. 2. Select the top checkbox above the segment list. 3. Confirm the selection of all segments. 4. Click . 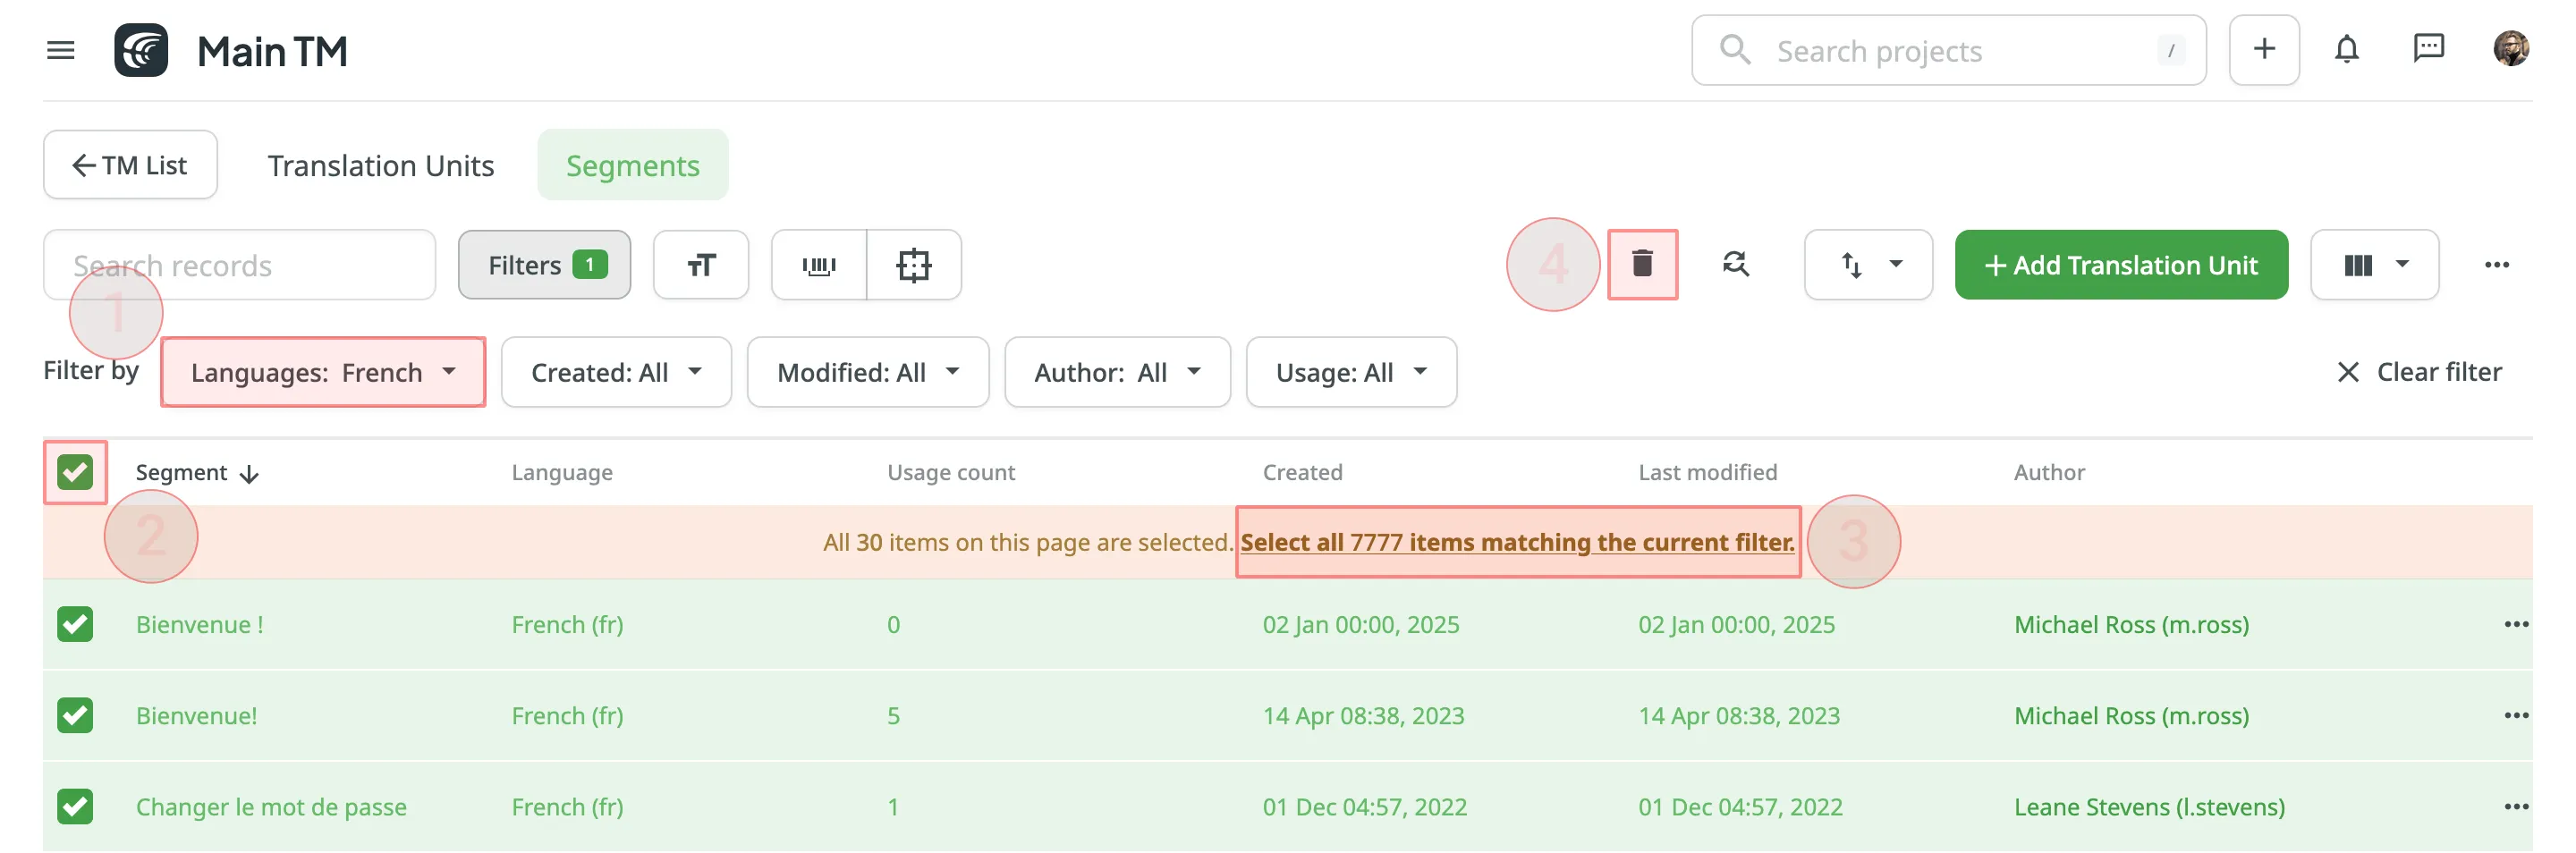 When dealing with the removal of translation units and translations, there could be three possible outcomes: * When deleting a translation unit from TM, the related translation won’t be deleted for a string in your Crowdin project. * When you cancel the translation activity for a string via the Activity tab, the translation for a string will be deleted, but the related translation unit will be preserved in TM. * When deleting a translation for a string in the Editor, both the translation and the related translation unit will be deleted. [TM Cleaner App ](https://store.crowdin.com/tm_cleaner_app)Use this app to clean your TM from duplicates and outdated translation units. ## [Downloading and Uploading TM](#downloading-and-uploading-tm) [Section titled “Downloading and Uploading TM”](#downloading-and-uploading-tm) To download or upload TMs, follow these steps: 1. Open your profile home page and select **Translation Memories** on the left sidebar. Alternatively, open your project and go to **Settings > Translation Memories**. 2. Click **View Records** on the needed TM. 3. Click and select **Download** or **Upload**. 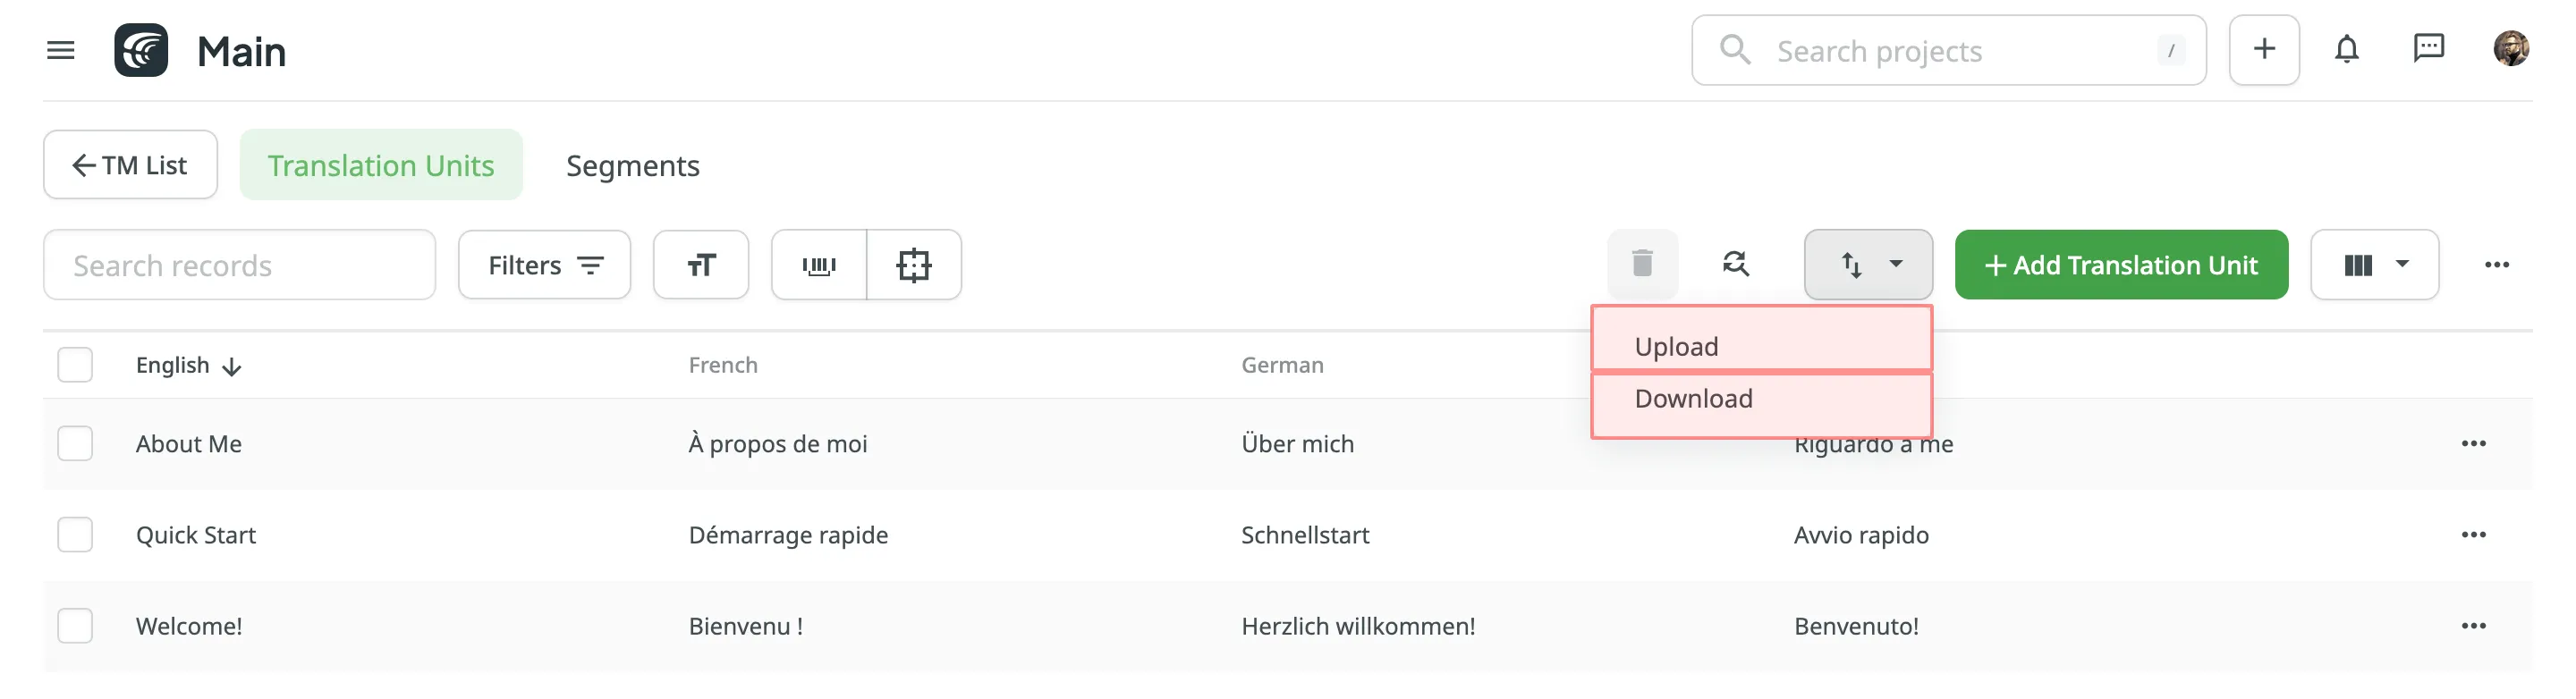 The project owner and managers can download and upload TM in the following file formats: TMX, XLSX, or CSV. Limitations The maximum file size is 200 MB. If your file exceeds this limit, it is recommended to split it into several smaller files, and upload them one at a time. If you upload a TM in CSV or XLS/XLSX file formats, match columns with the corresponding languages in the configuration dialog. 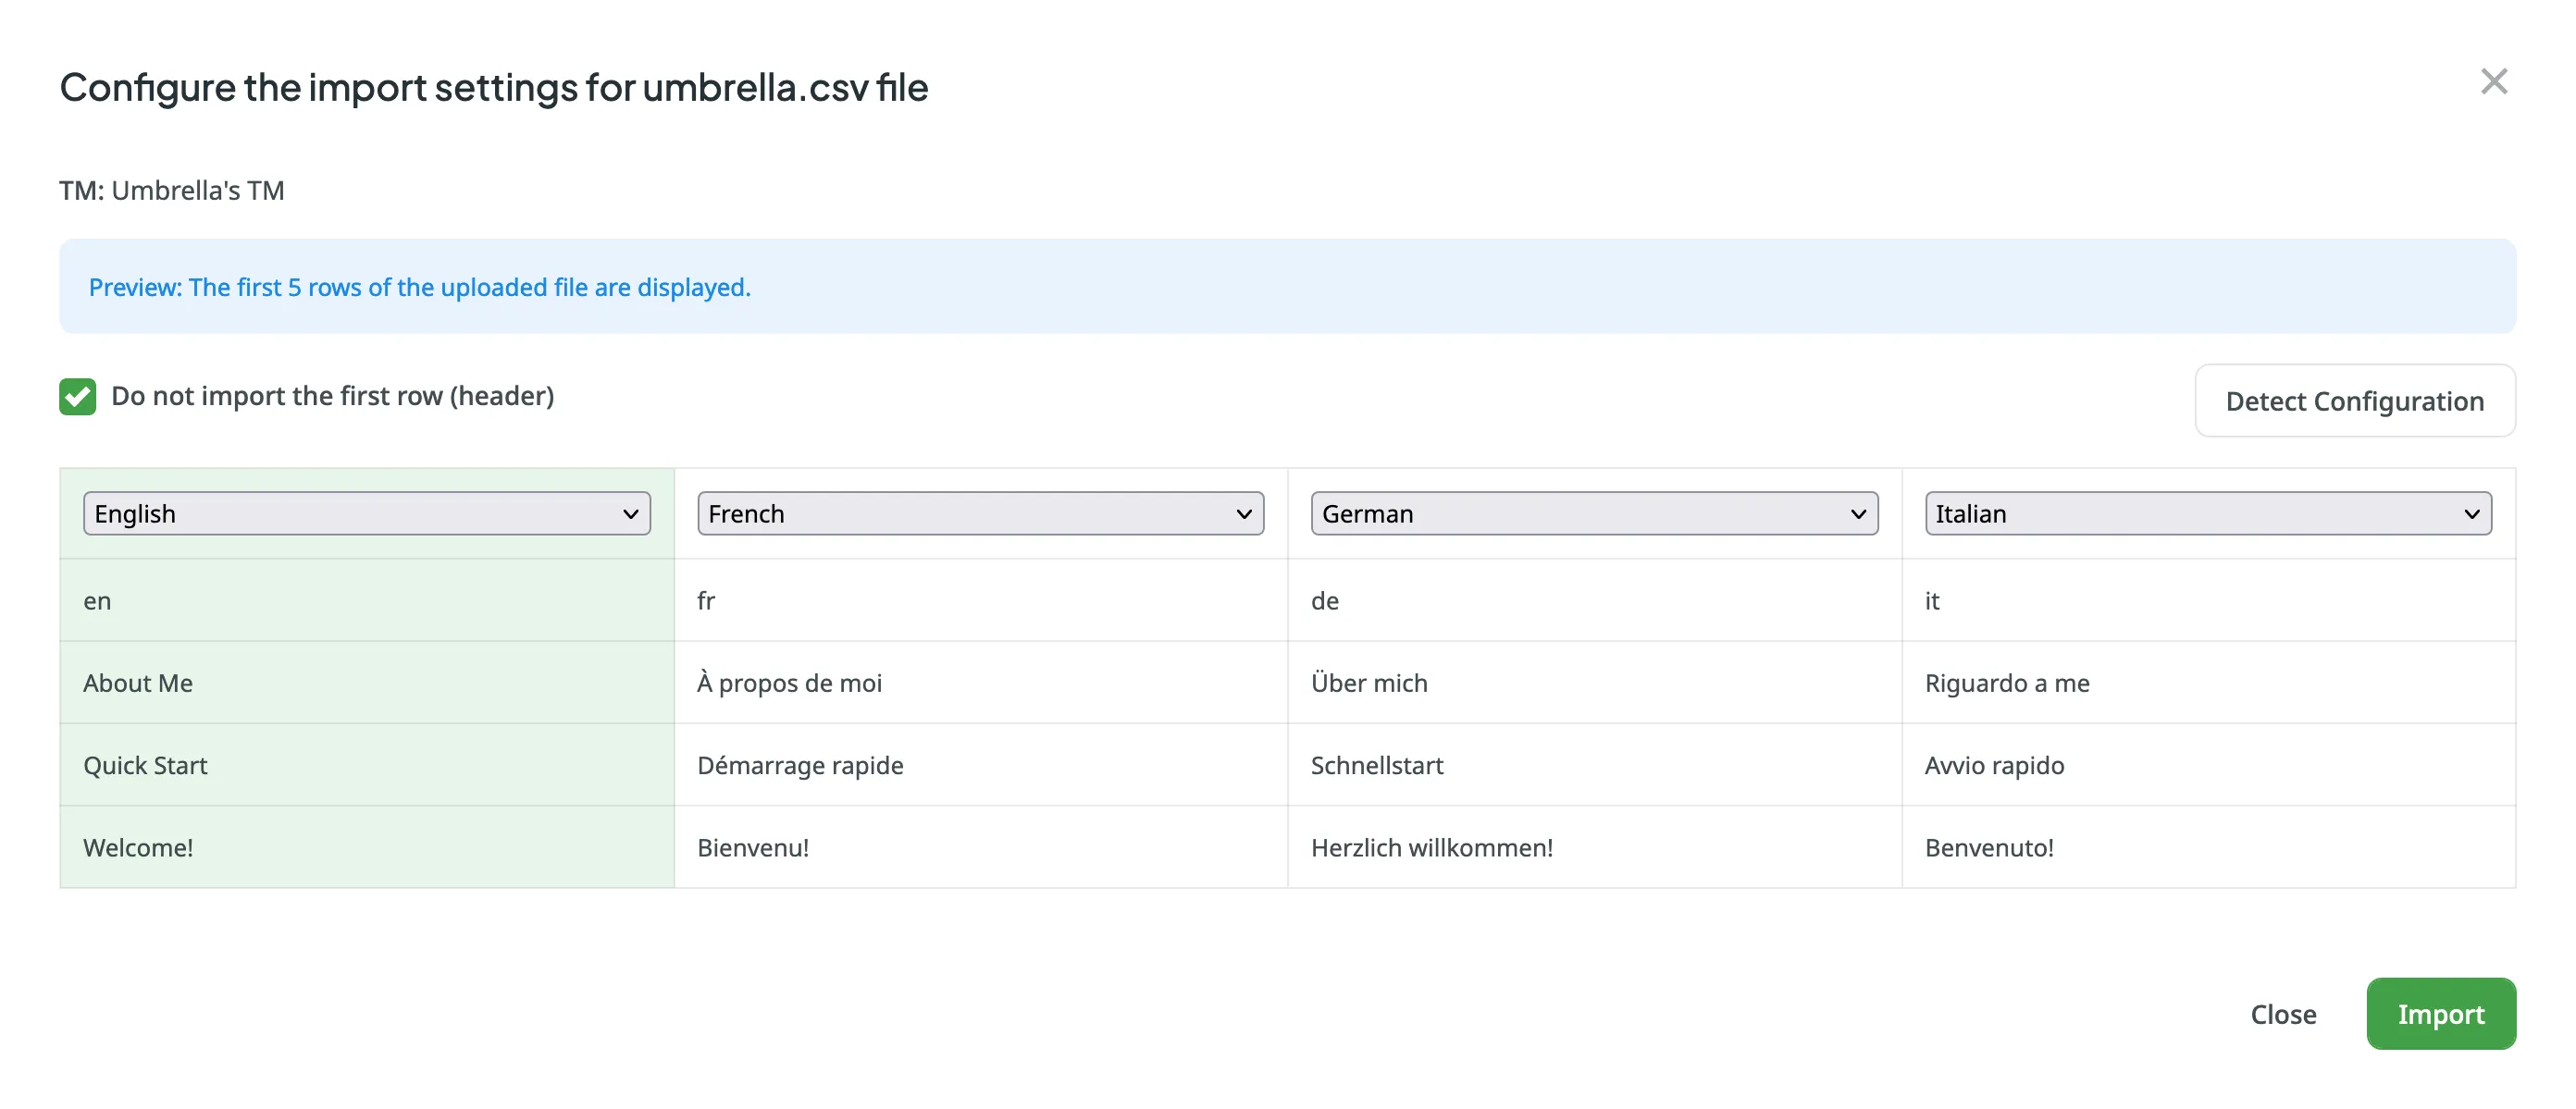 ### [Automatic Column Identification for TM in CSV and XLSX File Formats](#automatic-column-identification-for-tm-in-csv-and-xlsx-file-formats) [Section titled “Automatic Column Identification for TM in CSV and XLSX File Formats”](#automatic-column-identification-for-tm-in-csv-and-xlsx-file-formats) Once you upload your TM file in CSV or XLSX formats, the system automatically detects the file scheme based on the column names specified in the first row. The identification is performed in a case-insensitive manner. Columns that weren’t detected automatically will be left as **Not chosen** for manual configuration. Automatic column identification is especially helpful when you upload TM spreadsheets that contain many languages. To get the most out of the automatic column detection, we recommend that you name the language columns in your CSV or XLSX TM files using the values displayed below: * [Language name](/developer/language-codes/) (e.g., Ukrainian) * [Crowdin language code](/developer/language-codes/) (e.g., uk) * Locale (e.g., uk-UA) * Locale with underscore (e.g., uk\_UA) * Language code ISO 639-1 (e.g., uk) * Language code ISO 639-2/T (e.g., ukr) To redetect the TM file scheme, click **Detect Configuration**. ### [Downloading TM for Offline Management](#downloading-tm-for-offline-management) [Section titled “Downloading TM for Offline Management”](#downloading-tm-for-offline-management) When downloading a TM from Crowdin in TMX format, you can get some additional metadata that might be useful for different usage scenarios with offline tools. Additional TM attributes provided by translation memory downloaded in TMX format: * `x-crowdin-metadata` – String identifier hash. * `creationid` – Translation author’s full name and username in Crowdin. * `creationdate` – Translation creation date. * `changeid` – Full name and username of the person who updated a translation. * `changedate` – Translation update date. * `usagecount` – Translation suggestion’s number of usages in Crowdin. * `lastusagedate` – The last date a translation suggestion was used in Crowdin. Often translation vendors that work in Crowdin export TMs from projects to manage them for their clients in various desktop applications (e.g., for cleaning TMs from irrelevant translations and further reimport back to Crowdin). The TM attributes listed above allow better navigation and filtering of TM segments based on different criteria. Also, you might use cleaned and refreshed TMs to train MT engines only on product-specific data to ensure a higher quality of translations as a result. ## [Sharing TMs](#sharing-tms) [Section titled “Sharing TMs”](#sharing-tms) Using the shared TMs, you can pre-translate any of the projects you own. Also, TM suggestions from all TMs will appear in the Editor. To share TMs between all of the projects you own, follow these steps: 1. Open your profile home page and select **Translation Memories** on the left sidebar. 2. Select **Share TMs**. 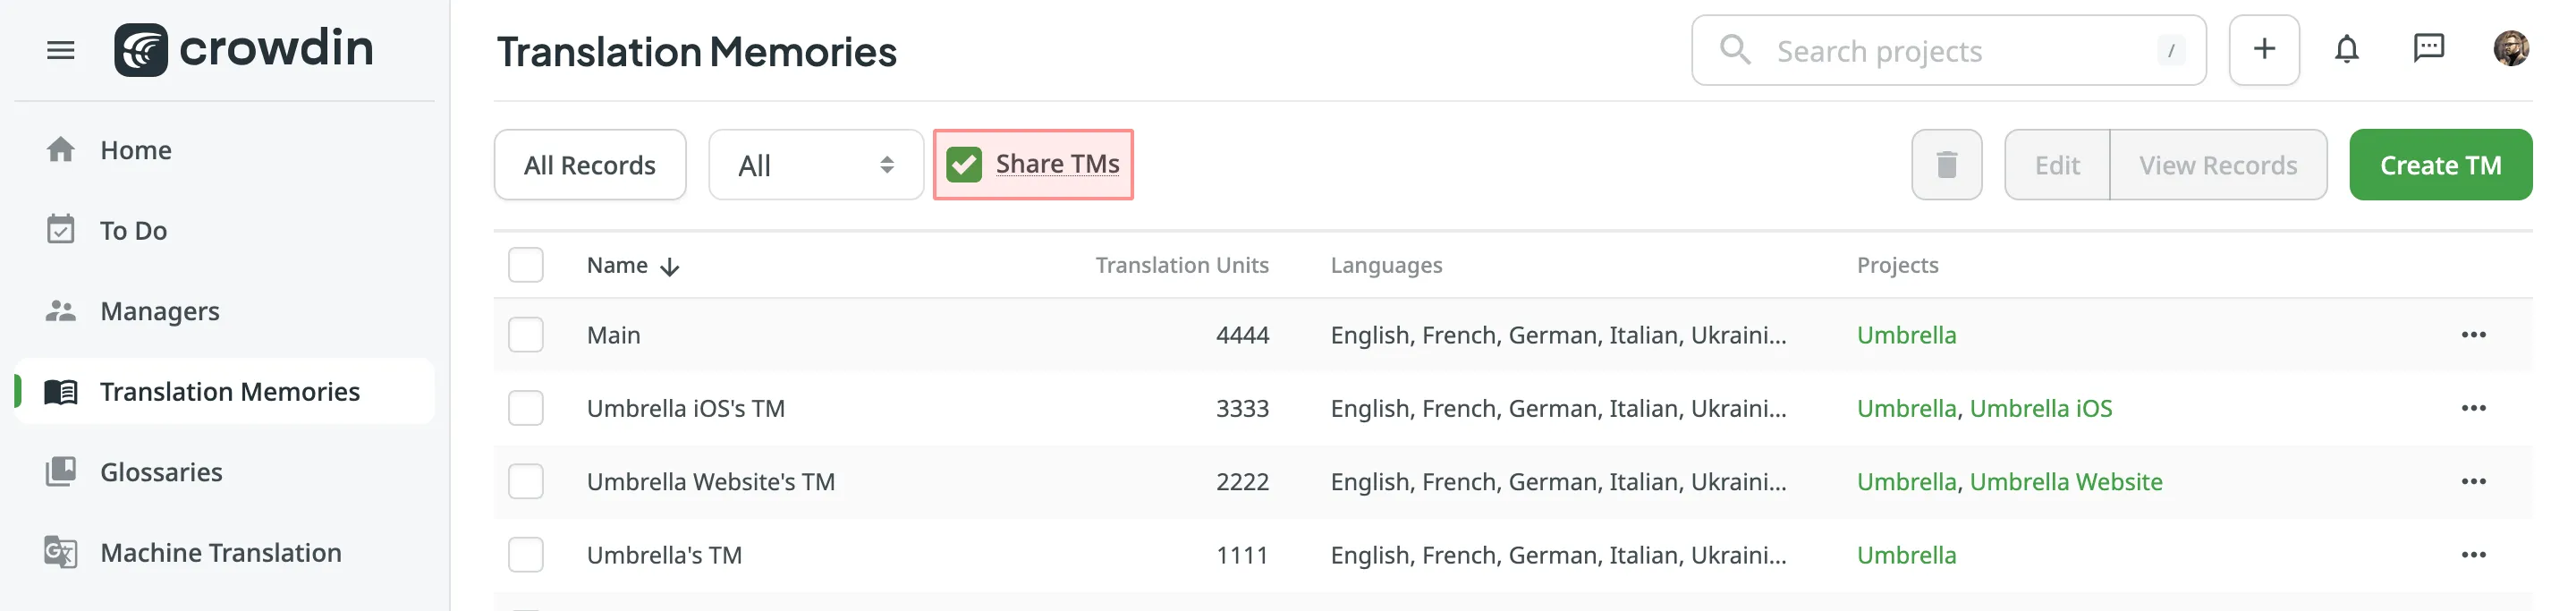 ## [Applying Translation Memory via Pre-translation](#applying-translation-memory-via-pre-translation) [Section titled “Applying Translation Memory via Pre-translation”](#applying-translation-memory-via-pre-translation) Pre-translation via TM allows you to leverage a minimum of 100% and Perfect matches. [TM Match Calculation ](#tm-match-calculation) [Pre-translation ](/pre-translation/) ### [Prioritizing TM Suggestions during the Pre-translation via TM](#prioritizing-tm-suggestions-during-the-pre-translation-via-tm) [Section titled “Prioritizing TM Suggestions during the Pre-translation via TM”](#prioritizing-tm-suggestions-during-the-pre-translation-via-tm) During the pre-translation via TM, the system considers multiple parameters to select the most relevant TM suggestion. If the system finds only one suitable TM suggestion for a string, it will be applied during the pre-translation via TM. If the system finds two or more TM suggestions for one string, they will be sorted based on multiple parameters and applies the most suitable one. The following parameters are listed in the order the system uses them to decide which TM suggestion works better. If the decision can’t be made using the first parameter (i.e., two TM suggestions with 100% match), the system will use the next parameter until the decision is made. 1. Relevance – also known as TM match. Read more about [TM Match Calculation](#tm-match-calculation). 2. Auto-Substitution usage – verifying whether the TM suggestion was improved by the auto-substitution. Read more about [Auto-substitution](#tm-auto-substitution). 3. Assigned TM Priority – the priority of the TM a TM suggestion is stored in. Read more about [Prioritizing TM](/project-settings/translation-memories/#prioritizing-tm). 4. Primary or dialect language – the primary or dialect language usage in TM suggestion’s source text (e.g., a TM suggestion from English will have a higher priority than English, Canada). 5. TM suggestion creation date – the date a TM suggestion was created (a TM suggestion with a more recent creation date will have a higher priority). To better understand how TM suggestions are prioritized during the pre-translation via TM, let’s go through a few hypothetical scenarios. Let’s imagine you have an untranslated string in your project with the following source text `Welcome!`. Once you run the pre-translation via TM, the system starts to search for TM suggestions in your TMs. * The system finds two TM suggestions with the source text `Welcome` and `Welcome!`. The translation from the `Welcome!` TM suggestion will be used since it has a higher TM match. * The system finds two TM suggestions: `Welcome!` and `Welcome!`. Both have the same source text, so the system checks whether the auto-substitution was used to improve these TM suggestions and picks the one that wasn’t improved by the auto-substitution. * The system finds two TM suggestions: `Welcome!` and `Welcome!`. Both have the same source text, and both weren’t improved by the auto-substitution. Then the system checks the priority of the TMs these TM suggestions are stored in and picks the one stored in the TM with higher priority. * The system finds two TM suggestions: `Welcome!` and `Welcome!`. Both have the same source text, both weren’t improved by the auto-substitution, and both are stored in the TMs with the same priority. Then the system checks the source languages of the TM suggestions and picks the one that uses the primary language. * The system finds two TM suggestions: `Welcome!` and `Welcome!`. Both have the same source text, both weren’t improved by the auto-substitution, both are stored in the TMs with the same priority, and both use primary source languages. Then the system checks the TM suggestion creation date and picks the one with the latest date. In rarer cases, there could be a situation when two or more TM suggestions are identical based on all the parameters listed above. In this case, the system picks the first one among identical. To improve accuracy, Crowdin minimizes the influence of HTML tags when determining TM matches. Instead of matching based on the original strings, the matching is conducted on strings where HTML tags are replaced with placeholders, similar to the behavior in the Editor. For example, a string `Hello world!` will match 100% with a string `Hello world!`. ## [TM Suggestions for Dialect Languages in the Editor](#tm-suggestions-for-dialect-languages-in-the-editor) [Section titled “TM Suggestions for Dialect Languages in the Editor”](#tm-suggestions-for-dialect-languages-in-the-editor) When the [**TM Suggestions for Dialects**](/project-settings/translation-memories/) option is enabled, Crowdin will show TM suggestions from the primary language for dialect languages in the Editor. For instance, if you have Spanish and Spanish, Argentina as your target languages, and the option is enabled, the Editor will display TM suggestions from Spanish for Spanish, Argentina (indicated as “English -> Spanish” in the TM and MT Suggestions section). However, this behavior does not apply to the **Search TM** functionality. If you search for TM suggestions from the primary language in the Search TM tab while working with a dialect language, you will not find any results. ## [TM Match Calculation](#tm-match-calculation) [Section titled “TM Match Calculation”](#tm-match-calculation) Crowdin calculates the TM match by comparing the source string to be translated and TM’s existing segments. There are three main types of TM matches: * Perfect Match - TM segment’s text and context completely match the source string * 100% Match - TM segment’s text matches the source string, but the context is different * Fuzzy Match (99% and less) - TM segment’s text is different to a certain extent compared to the source string If the calculations for Perfect and 100% TM match is relatively straightforward, the fuzzy matches’ calculation may not be so obvious. There are multiple different factors that affect the calculation of fuzzy matches, for example: * Word order * Punctuation * Formatting tags * Matches that are longer than the source string  ## [TM Auto-Substitution](#tm-auto-substitution) [Section titled “TM Auto-Substitution”](#tm-auto-substitution) Auto-Substitution is aimed to increase the benefit of using the translation memory (TM) by suggesting translations with a higher similarity match. The feature substitutes the non-translatable elements (such as tags, HTML entities, placeholders, numbers, and more) in translations suggested by TM by the ones used in the source strings. To enable the Auto-substitution feature, open your project and go to **Settings > Translation Memories**. ### [Non-translatable Elements that can be Auto-substituted](#non-translatable-elements-that-can-be-auto-substituted) [Section titled “Non-translatable Elements that can be Auto-substituted”](#non-translatable-elements-that-can-be-auto-substituted) Auto-substitution feature can substitute the following non-translatable elements: | Non-translatable elements | Source string example | TM suggestion (German) | Improved TM suggestion | | ------------------------------------------------- | ------------------------------------------------- | -------------------------------------------------- | --------------------------------------------------- | | Tags | `Help` | `Hilfe` | `Hilfe` | | HTML entities | `Currency €` | `Währung ¥` | `Währung €` | | Line breaks | `Profile` | `Profil
` | `Profil` | | Escape sequences (\r\n, \r, \n, \t, unicode, hex) | `Translation \x42` | `Übersetzung \u4242` | `Übersetzung \x42` | | Non-escaped equivalents of \r\n, \r, \n, \t | `Translated by \n TM` | `Übersetzt vom Übersetzungsspeicher` | `Übersetzt vom \n Übersetzungsspeicher` | | Placeholders | `Example %s` | `Beispiel %1$s` | `Beispiel %s` | | Numbers | `Attempt 2` | `Versuch 5` | `Versuch 2` | | Letter case | `Log in` | `einloggen` | `Einloggen` | | Special characters | `Help?` | `Hilfe!` | `Hilfe?` | | URLs | `More Information: https://crowdin.com/features` | `Weitere Infos: https://crowdin.com/` | `Weitere Infos: https://crowdin.com/features` | | ICU syntax | `Get {discountPercent, number, percent} discount` | `Erhalte {discountValue, number, currency} Rabatt` | `Erhalte {discountPercent, number, percent} Rabatt` | ### [Auto-substitution for Pre-translation](#auto-substitution-for-pre-translation) [Section titled “Auto-substitution for Pre-translation”](#auto-substitution-for-pre-translation) Once you enable the TM auto-substitution, you can leverage improved TM suggestions during [pre-translation](#applying-translation-memory-via-pre-translation). Be sure to set a minimum match ratio to 100%. This will result in including 100% TM matches along with the ones improved to 100% by TM auto-substitution. ### [Auto-substitution for TM Suggestions](#auto-substitution-for-tm-suggestions) [Section titled “Auto-substitution for TM Suggestions”](#auto-substitution-for-tm-suggestions) With the Auto-substitution feature, translators can see the improved TM suggestions in the Editor. The percentage below the improved suggestion shows the match percentage of the original TM suggestion and the improved one.  ### [Penalized TM Suggestions](#penalized-tm-suggestions) [Section titled “Penalized TM Suggestions”](#penalized-tm-suggestions) In some cases, you may want to apply penalties to TM suggestions to reduce their match percentage based on specific conditions. For example, you can set up a penalty for TM suggestions improved by the auto-substitution feature to prioritize exact matches over improved ones. The percentage below the improved and penalized suggestion shows the match percentage of the improved TM suggestion and the penalized one. Hover the cursor over the percentage to see more details.  Read more about [TM Suggestion Penalties](/project-settings/translation-memories/#penalties). ### [Cost Reports](#cost-reports) [Section titled “Cost Reports”](#cost-reports) Once the feature is enabled, it will affect how the [Costs Estimate](/project-reports/#cost-estimate) and [Translation Cost](/project-reports/#translation-cost) reports are calculated. **Costs Estimate** report would count TM suggestions that can potentially be improved by the auto-substitution feature based on the highest similarity match to which those strings can be improved. For example, a match that can be improved from a 75% match to a 100% match would be considered a 100% match. **Translation Cost** report would count TM suggestions improved by the auto-substitution feature as regular TM suggestions. For example, a match improved from a 75% match to a 100% match would be considered a 100% match.
# Translation Strategies
> Approaches for translating and proofreading your content effectively
Once you’ve created your project and uploaded source files for localization, it’s time to decide who will translate and proofread your content. This article covers all the possible approaches you can mix and match to meet your personal needs and preferences. ## [Invite Your Team of Translators](#invite-your-team-of-translators) [Section titled “Invite Your Team of Translators”](#invite-your-team-of-translators) Invite as many translators and proofreaders to your project as needed. You can also give the language coordinator or manager access to trusted project members to manage the translation process for you (invite translators, meet deadlines, and maintain quality). Send email invitations or share invitation links with access to your localization project in Crowdin. You can invite: * In-house translators * Freelancers * Translation agencies you already work with Manage the project members in the **Members** tab. For example, you can invite translators, proofreaders, and language coordinators, granting them access to all or only specific target languages. Read more about [Inviting People](/inviting-people/). ## [Order Professional Translations](#order-professional-translations) [Section titled “Order Professional Translations”](#order-professional-translations) Crowdin Vendors Store includes professional translation agencies you can hire to translate and proofread your project files. See the list of all available vendors in **Store > Vendors**. Some of the transition agencies are integrated with Crowdin via API. When you decide to work with them, Crowdin forwards your untranslated data directly to the agency, and once completed, the translations are uploaded back to the project. Read more about [Ordering Professional Translations](/ordering-professional-translations/). [Crowdin Language Services ](/crowdin-language-services/)Crowdin Language Services is a solution that allows you to order professional translations and proofreading services in a few clicks. [BLEND Integration ](/blend-integration/)Integrate your Crowdin projects with the BLEND agency and allow BLEND translators to work with translation files in Crowdin Editor. Professional translation is a paid service where the approximate cost for your project is calculated or negotiated during the purchase. ## [Configure Crowdin AI](#configure-crowdin-ai) [Section titled “Configure Crowdin AI”](#configure-crowdin-ai) Enhance your translation process with Crowdin AI, which leverages advanced AI-powered translations from leading providers such as OpenAI, Google Gemini, Microsoft Azure OpenAI, and more. Crowdin AI offers two main prompt types for use in different scenarios: * **Pre-translate**: Generate initial AI translations that can be later reviewed by human proofreaders. * **AI in Editor**: Provide AI-powered suggestions directly within the Editor to help translators with translation and proofreading tasks. By considering additional context at various levels, Crowdin AI ensures contextually accurate translations, improving overall efficiency and quality. Read more about [Crowdin AI](/crowdin-ai/). ## [Configure Machine Translation Engines](#configure-machine-translation-engines) [Section titled “Configure Machine Translation Engines”](#configure-machine-translation-engines) Crowdin integrates with the most popular Machine Translation (MT) engines such as Microsoft Translator, Google Translate, Google AutoML Translation, DeepL Translator, and Amazon Translate. Configure these engines to use manual or automated pre-translation via MT. A human translator can also review those translations and do post-editing if needed. Otherwise, you can configure an MT of your choice so the machine translations will be shown in the Editor as suggestions to assist your translators. Read more about [Pre-Translation](/pre-translation/). ## [Engage Your Community](#engage-your-community) [Section titled “Engage Your Community”](#engage-your-community) If you have a popular product and an active community eager to help you with translations, feel free to start crowdsourcing. It’s an excellent practice to cooperate with members on a volunteer basis and reward their efforts, providing them with some goods, discounts, or any other way that works for both parties. When working with community translators, a good workflow looks like the following: community translators translate the project, and once the translations are finished, you can order professional proofreading from a translation agency to ensure high translation quality.
# Uploading Source Files
> Learn how to upload source files to your project for translation
Once you’ve [created a project](/creating-project/), the next step would be preparing source files for upload. Crowdin supports a wide range of [file formats](/supported-formats/), including Android XML, iOS Strings, JSON, etc. When you have your files prepared, you can add them to your Crowdin project for translation. Crowdin offers a few options for adding content to a project: * Manually via the web interface (UI). * Integrate your Crowdin project with the tools you already use. Explore available integrations on the [Crowdin Store](https://store.crowdin.com/). * Use the [API](/developer/api/) or [Developer Tool](/developer/dev-tools/) of your choice. Usually, this task is accomplished by developers. You can [invite your colleague developer](/inviting-people/) to assist you with this step. You can also use Crowdin sample files to test the translation workflows before starting your project with the actual source files. ## [Uploading Files](#uploading-files) [Section titled “Uploading Files”](#uploading-files) To upload files via the web interface, follow these steps: * File-based project 1. Open your project and go to **Sources > Files**. 2. Drag and drop files from your machine anywhere within the **Files** tab — to the root of the project or directly into an existing folder. You can upload ZIP archives if you want to add a structured set of folders and files. 3. *(Optional)* Click **Upload Files** or **Add File** to add files, **Use Samples** to test translation workflows, **Set Up Integration** to synchronize content automatically, or **Invite Developer** if content uploads will be handled by your developer teammate. You can also click the drop-down arrow next to the **Add File** button to access additional options, such as **Create String Vault** (adds an empty CSV file) or another **Set Up Integration** shortcut. 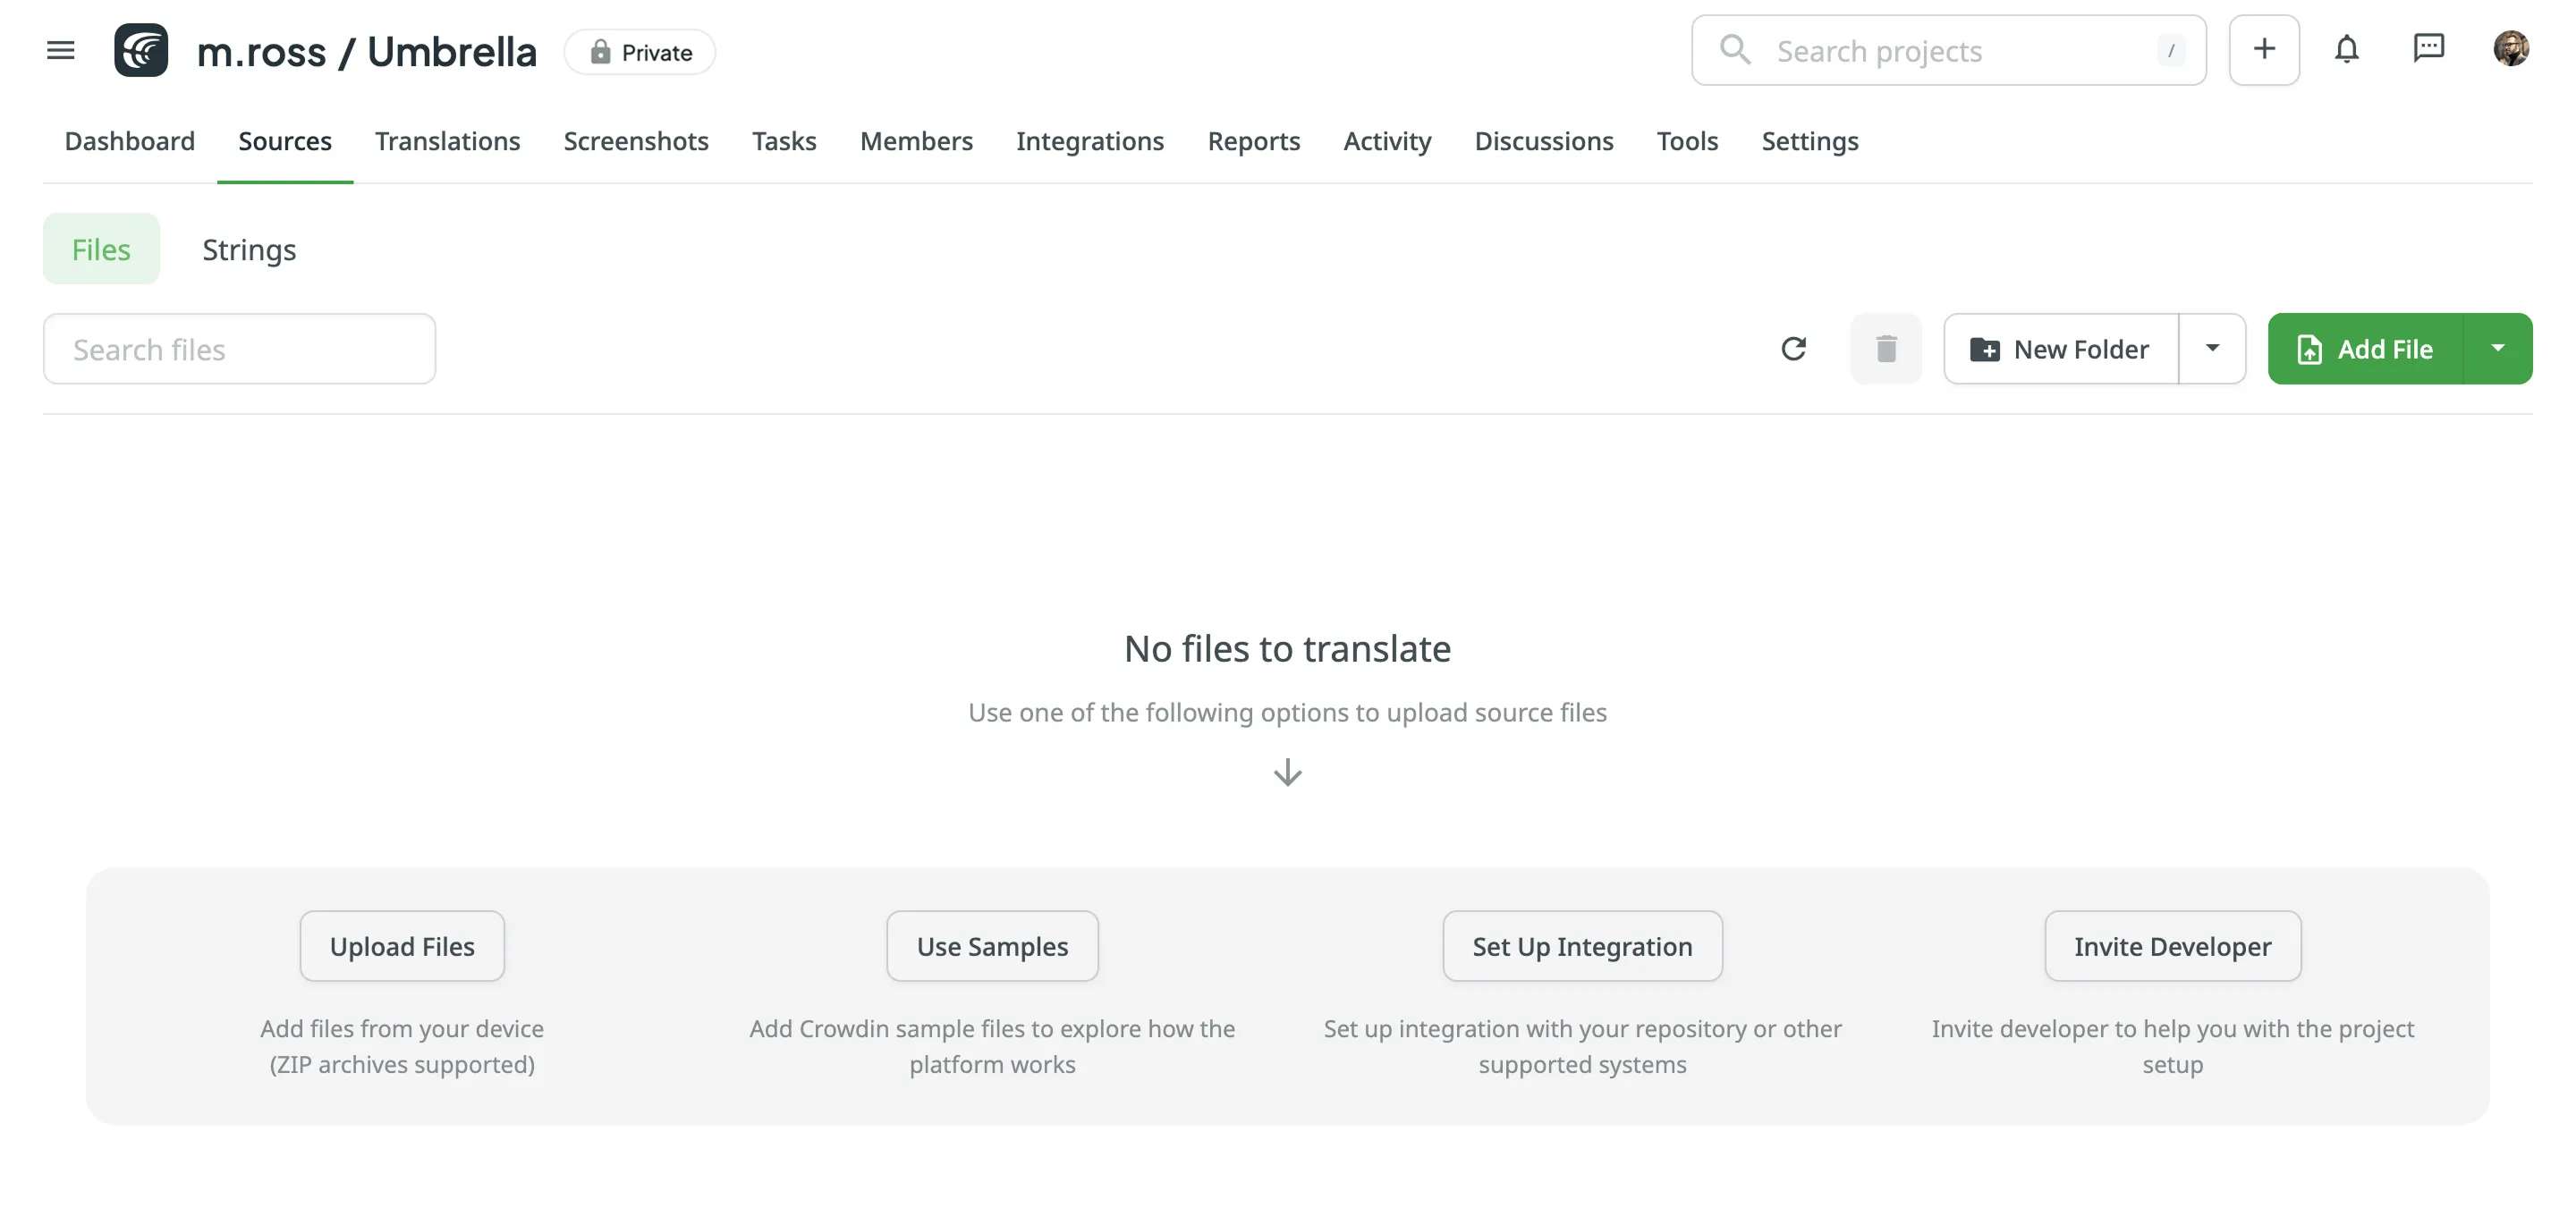 * String-based project 1. Open your project and go to the **Upload** tab. 2. Select the target branch to which you’re uploading source files. By default, the `main` branch is selected. Create new branches if needed. 3. Drag and drop files from your machine, or click **Select Files**. You can also upload ZIP archives if you want a set of files to be added. 4. Crowdin automatically tries to detect whether you’re uploading source content or translations. Verify the detection is correct and adjust the language settings if needed (e.g., English (source) should be selected for source files if the project’s source language is English). 5. *(Optional)* In the **Source files** section, to the right of the uploaded file list, configure [advanced source file import settings](#advanced-import-settings). 6. Click **Upload** to finish uploading the source content. 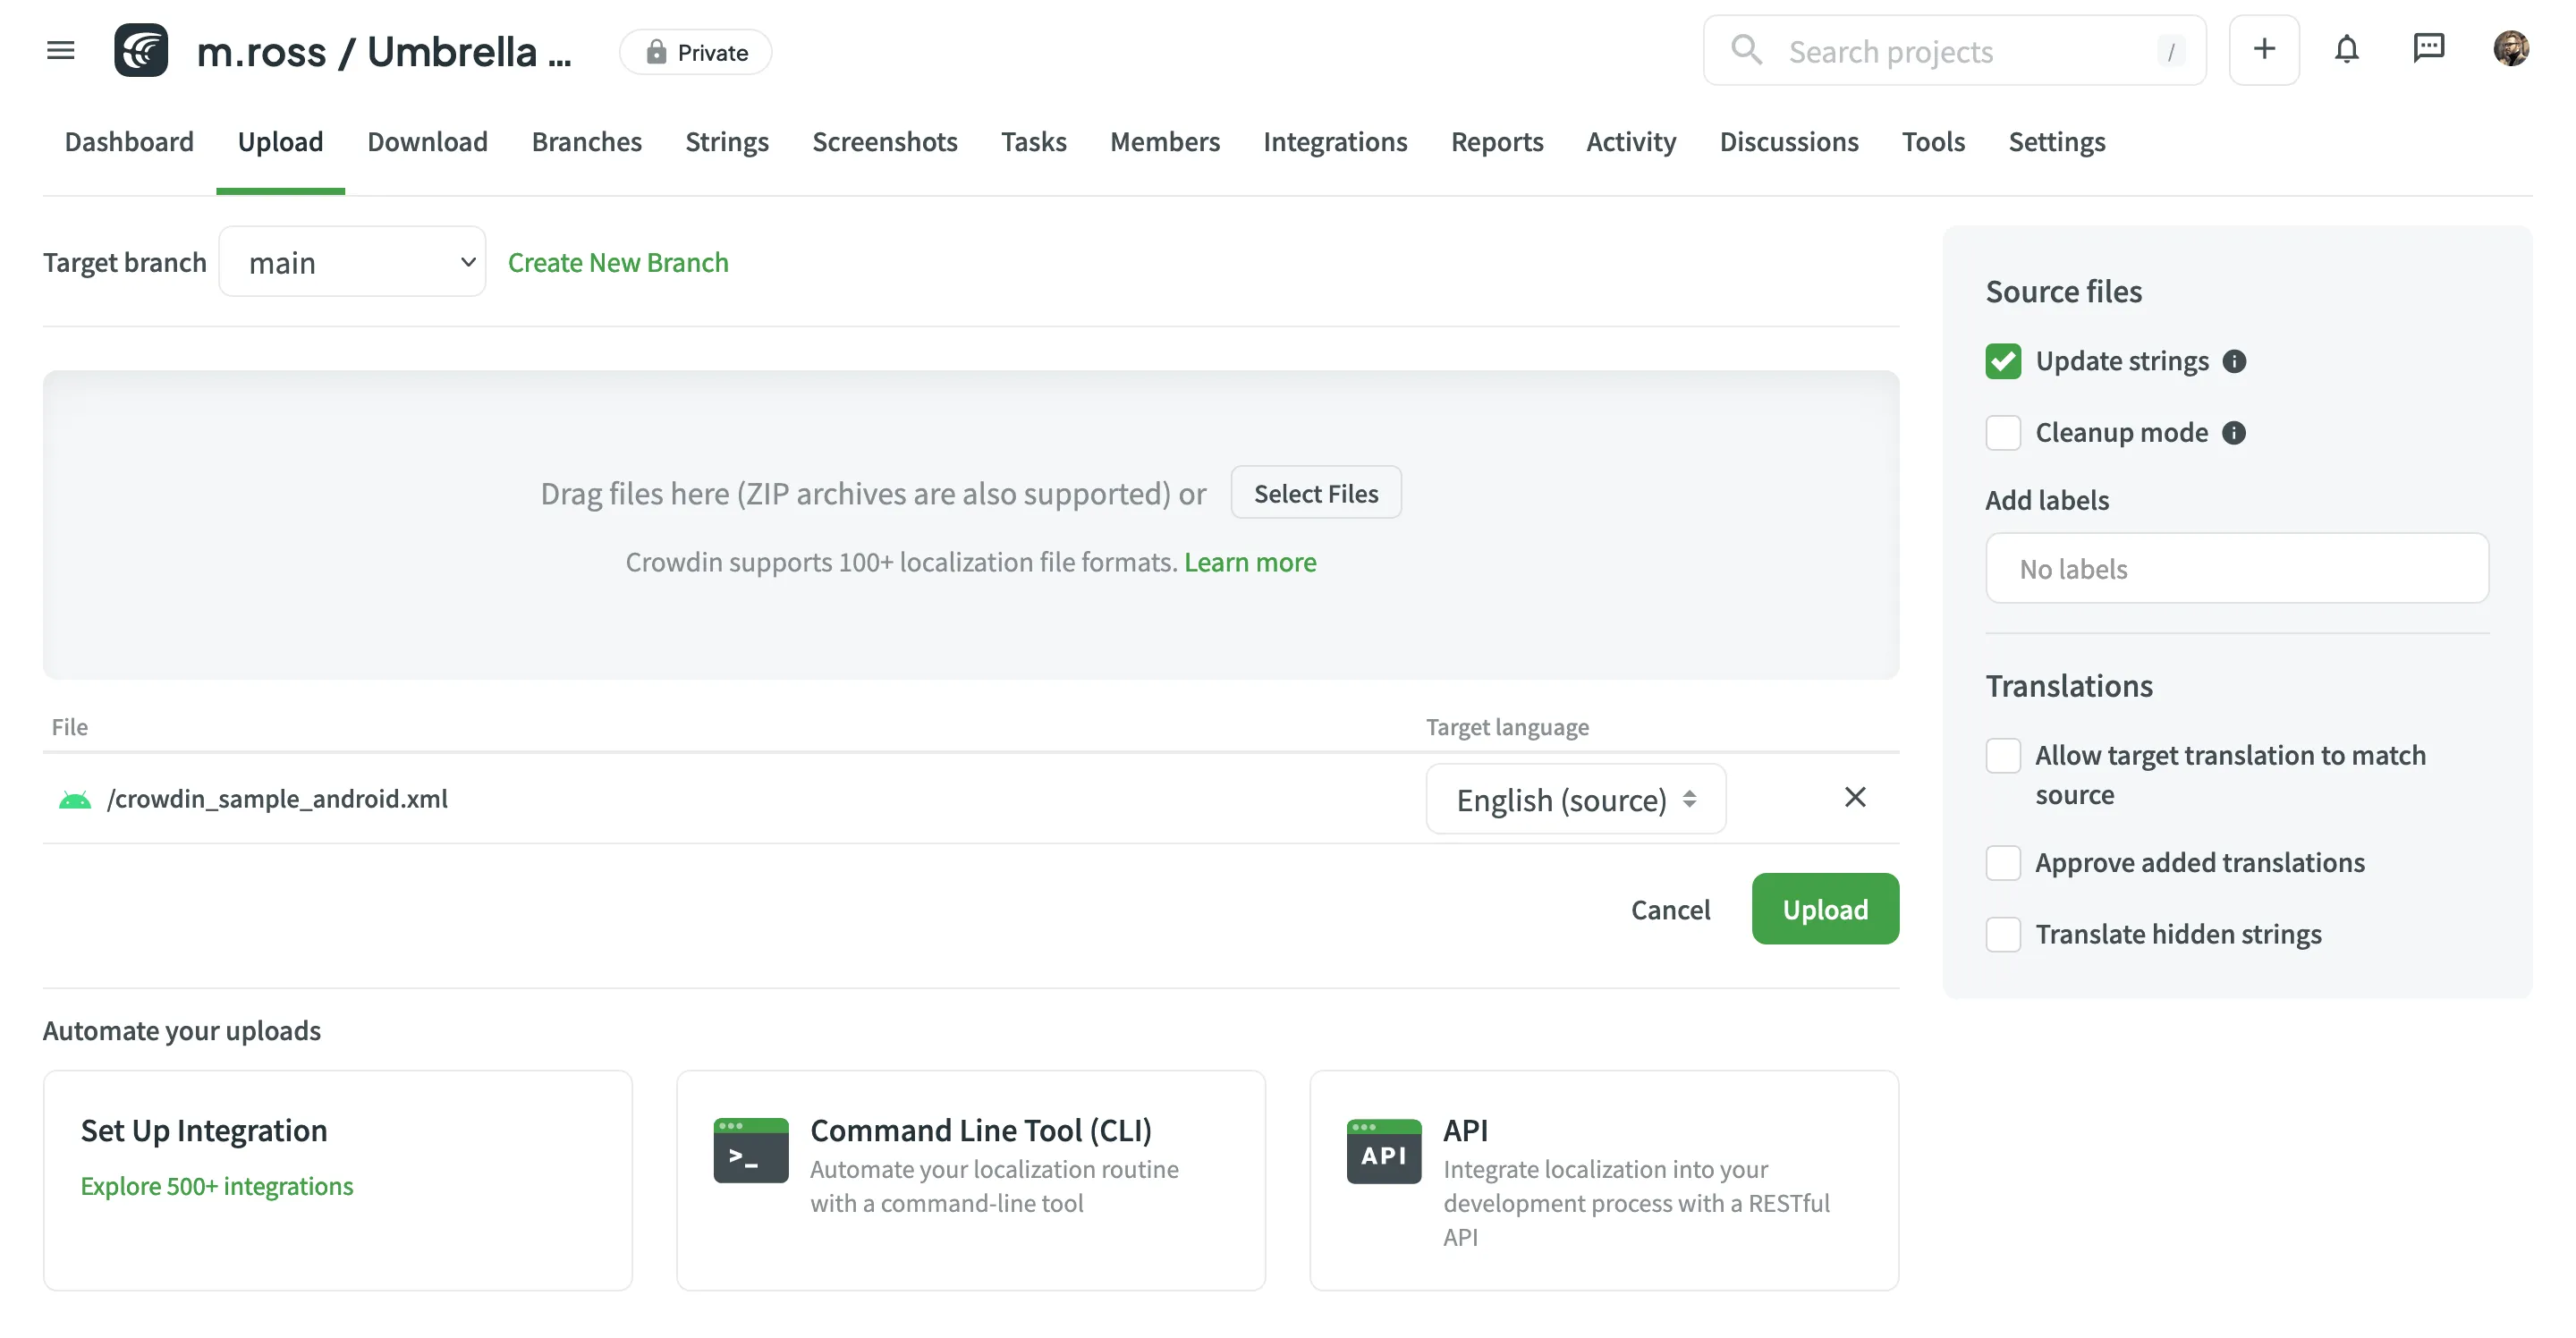 Read more about [project types](/creating-project/#project-types). Limitations The maximum file size is 100 MB. If your file exceeds this limit, it is recommended to split it into several smaller files, and upload them one at a time. ### [XML, CSV, and XLSX Files](#xml-csv-and-xlsx-files) [Section titled “XML, CSV, and XLSX Files”](#xml-csv-and-xlsx-files) Some file formats, such as XML, CSV, XLSX, and others, might require additional configuration. * [CSV/XLSX File Configuration](/csv-xlsx-configuration/) * [XML File Configuration](/xml-configuration/) * [Parser Configuration](/project-settings/parser-configuration/) Limitations The XLSX/XLS file size is limited to 2 000 000 cells. ### [HTML Files with Relative URLs](#html-files-with-relative-urls) [Section titled “HTML Files with Relative URLs”](#html-files-with-relative-urls) To display images and styles in the HTML file used outside of the website, where it belongs, add the `Please note that we only specified a relative address for the image. Since we specified a base URL in the head section, the browser will look for the image at "https://www.w3schools.com/images/stickman.gif".
``` Once you add the ` and provide your HackerOne handle. Details about the vulnerabilities we’re looking for, exclusions, and program conditions are available directly on HackerOne.
# Webhooks
> Integrate Crowdin with your services by configuring webhooks
Webhooks allow you to receive information about the key events that happen in your Crowdin project, like completed translations or proofreading. After you configure a webhook, Crowdin will start sending POST or GET requests with data to the webhook URL via HTTP. ## [Use Cases](#use-cases) [Section titled “Use Cases”](#use-cases) You can add webhooks to build integrations with the services or with your backend. For example: * Set up a webhook to send notifications to the system you use. * Pass information to the third-party services with the specific request requirements (for example, HTTP method, content type). * Create custom integrations with Crowdin. ## [Events](#events) [Section titled “Events”](#events) You can configure webhooks for different events that occur in the project, e.g., when a file is translated, proofread, or when a string is added or updated. Read more about [Webhook Events](/developer/webhooks/#events) on Crowdin Developer Portal. ## [Adding Webhooks](#adding-webhooks) [Section titled “Adding Webhooks”](#adding-webhooks) To configure webhooks in Crowdin, follow these steps: 1. Open your project and go to the **Tools** tab (for Account-level webhooks, open your **Account Settings**). 2. Select **Webhooks** and click **Add Webhook**.  You will need to provide the following information to register a webhook: * The webhook name (for example, “App Project Translated”). * The events to post to the URL. You can select either one event or a specific set of events. * The URL to which the webhook callbacks are sent as direct requests. Redirects are not supported and will result in a failed delivery. The endpoint must return a 2XX response within 30 seconds. * The request method that indicates the desired action to be performed for a given resource (use either `GET` or `POST`). * The content type for the POST request method (`multipart/form-data`, `application/json`, or `application/x-www-form-urlencoded`). * For the `application/json` content type, you can select **Batch webhooks** to merge multiple events into a single request. Optionally, you can add special headers to your webhook. They can be used for additional security, as an authorization method, and more. For example, if you add headers, your webhook endpoint can check them to ensure that information is coming from Crowdin. Limitations You can configure up to 20 webhook endpoints for project-level events. Depending on your approach to webhook management, you might need to add dedicated Crowdin IP addresses to your firewall to allow Crowdin to open the pre-configured webhook URLs. Read more about [IP Addresses](/developer/ip-addresses/#webhooks-ai-providers-and-mt-engines). ## [Custom Payloads](#custom-payloads) [Section titled “Custom Payloads”](#custom-payloads) Each event type in Crowdin has a specific payload format with the relevant event information. You can customize the webhook payload to add and organize the elements the way your system requires. To check the event’s possible variables, hover over the *Info* icon in the *Payload* section’s right upper corner. ## [Edit or Delete Webhooks](#edit-or-delete-webhooks) [Section titled “Edit or Delete Webhooks”](#edit-or-delete-webhooks) Within a specific project, you can access and manage configured webhooks by editing or deleting them directly from the displayed list. 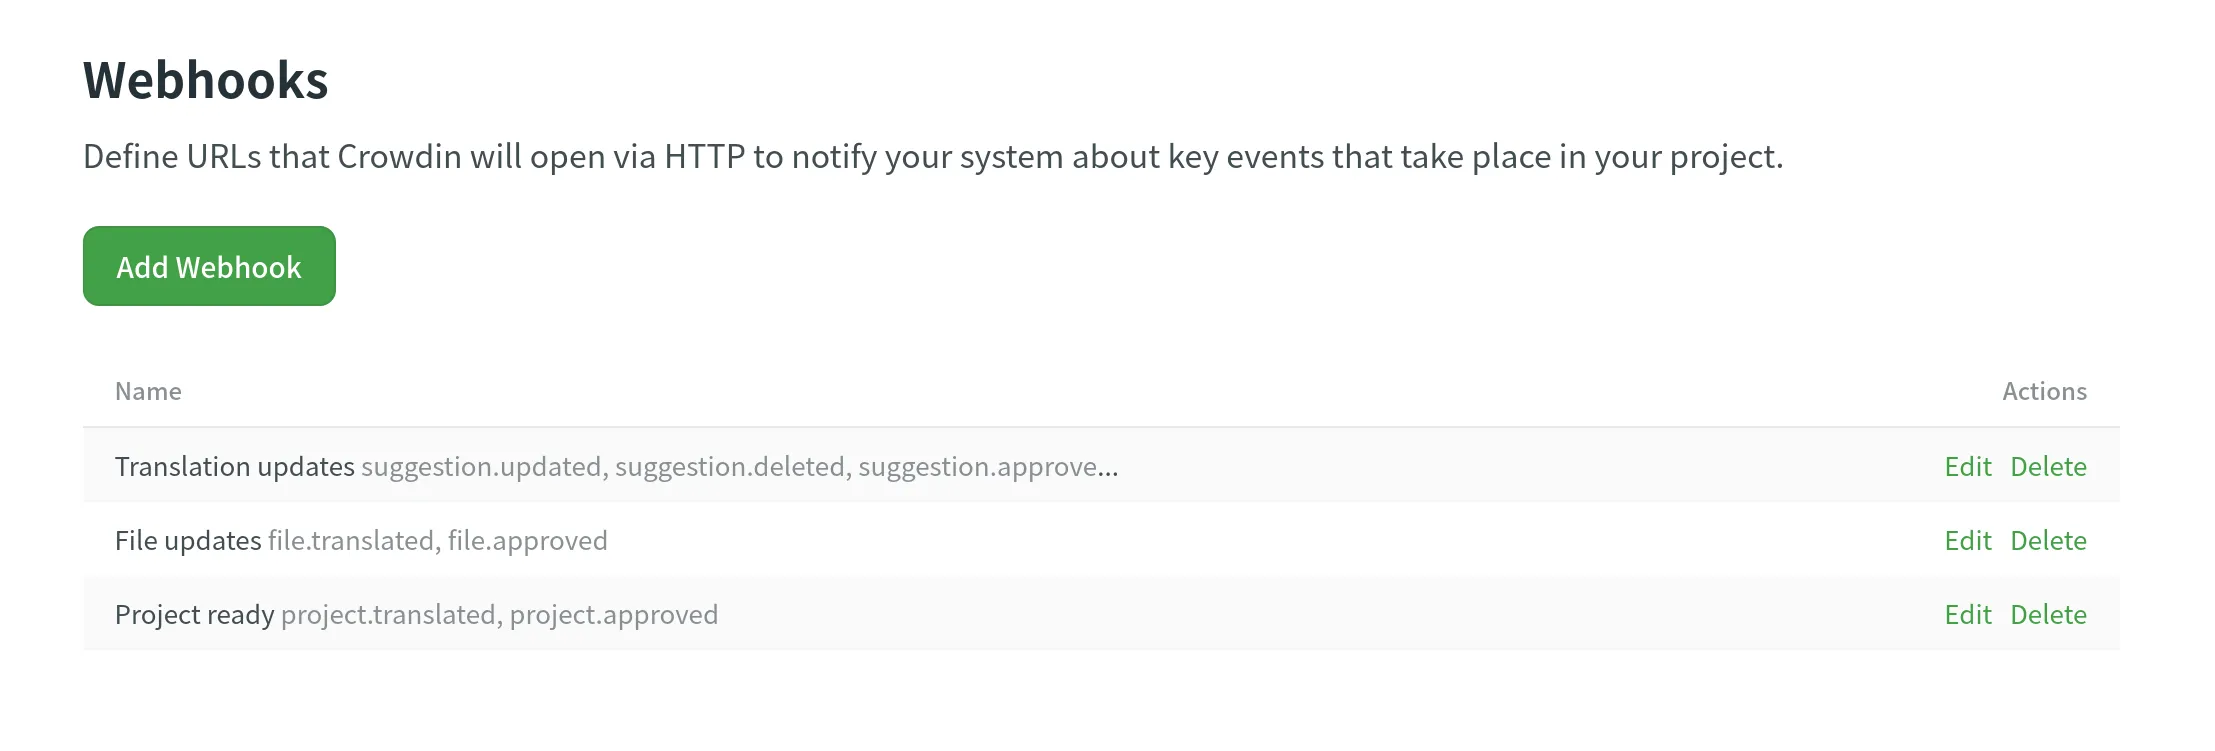 ## [Calls History](#calls-history) [Section titled “Calls History”](#calls-history) In the **Calls History** section, you can view the list of calls of all the configured webhooks. Use the filter to view all or only unsuccessful webhook notifications. 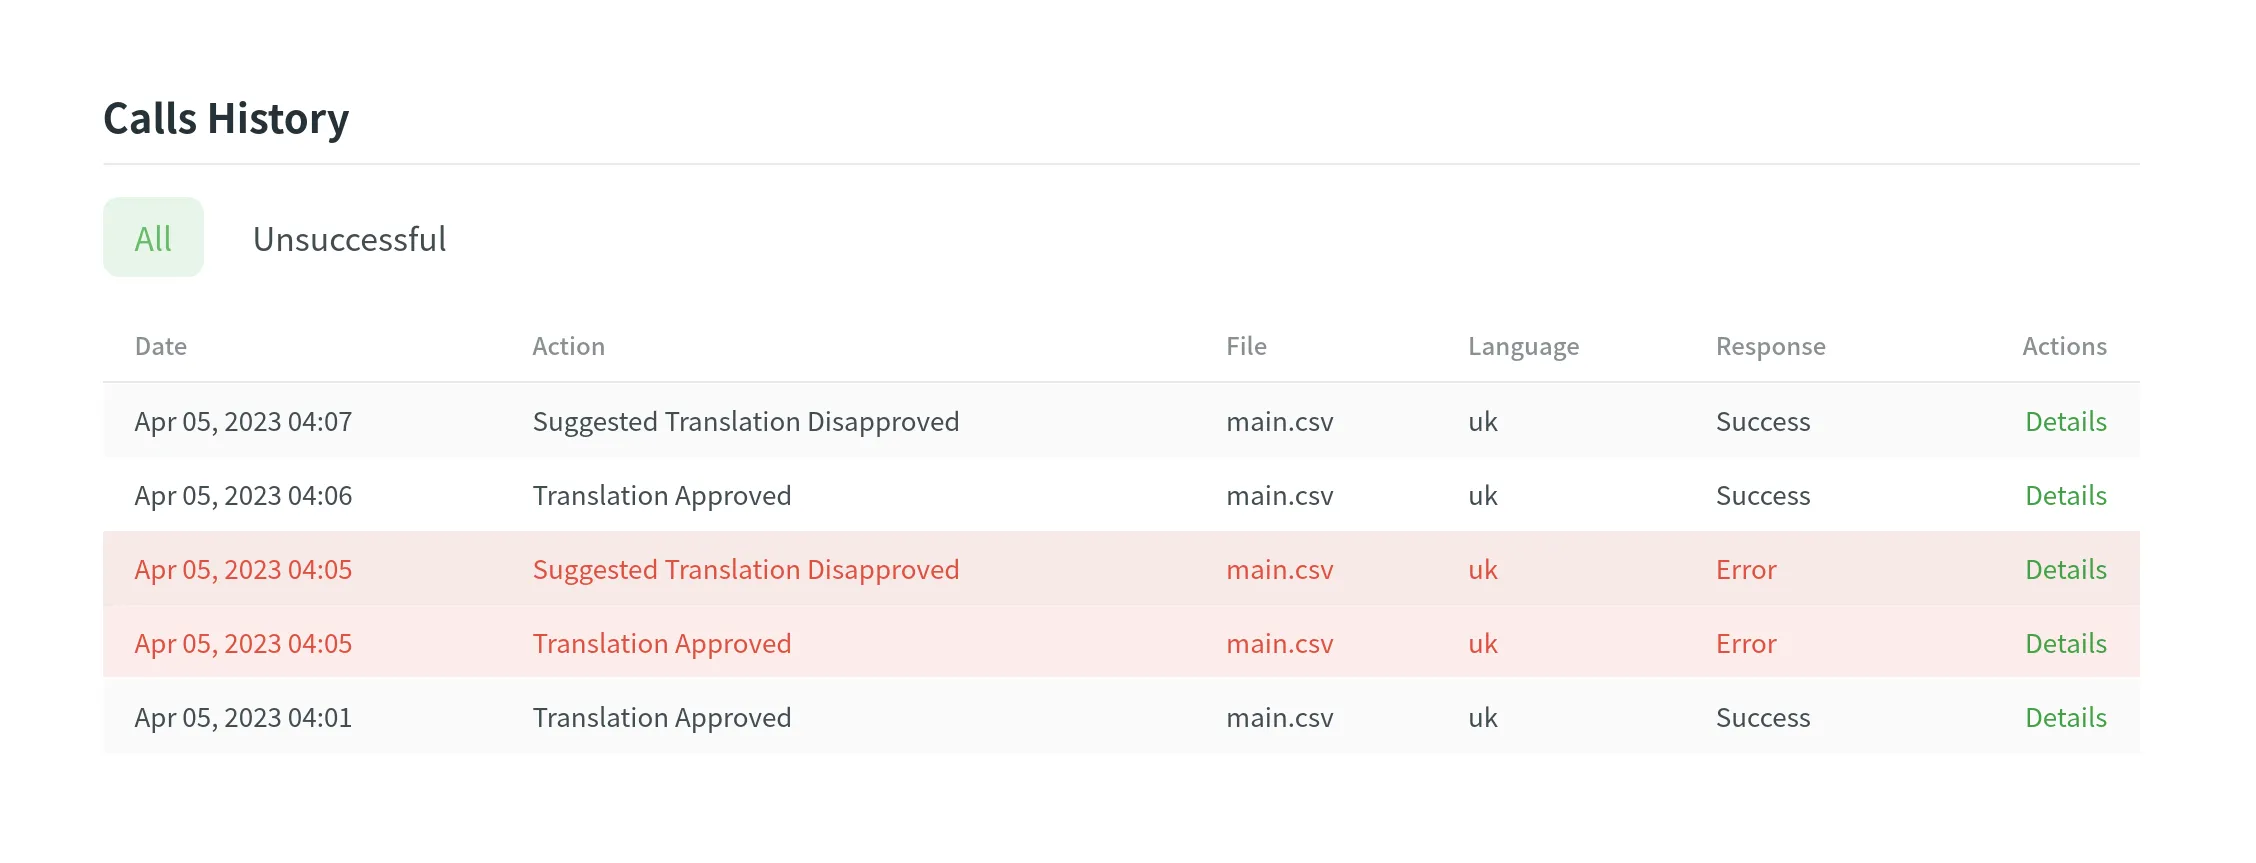 ## [Failing Webhooks](#failing-webhooks) [Section titled “Failing Webhooks”](#failing-webhooks) Webhooks that fail 100 or more times in the last 24 hours with response codes in the 4xx or 5xx ranges are automatically disabled. ### [Disabled Webhooks](#disabled-webhooks) [Section titled “Disabled Webhooks”](#disabled-webhooks) Disabled webhooks are listed in the **Webhooks** section with a cleared check mark, indicating that they are currently inactive due to persistent failures. To discover more about failed webhooks, navigate to the **Calls History > Unsuccessful** section. Here you can explore detailed information about the issues encountered by each failed webhook. ### [Manual Re-enabling](#manual-re-enabling) [Section titled “Manual Re-enabling”](#manual-re-enabling) Once you have identified and resolved the cause of the webhook failures, you can manually re-enable the webhooks to restore their functionality. In the **Webhooks** section, locate the disabled webhook and select it for re-enabling. ## [Sending Webhooks to Slack](#sending-webhooks-to-slack) [Section titled “Sending Webhooks to Slack”](#sending-webhooks-to-slack) With the help of Crowdin webhooks, you can send notifications about pre-configured event types directly to a specific Slack channel. To configure the webhooks’ sending to Slack, you’d need to create a simple Slack app. Read more about [Sending messages to Slack using Incoming Webhooks](https://api.slack.com/messaging/webhooks). As soon as you create and configure your Slack app, you’ll have a Webhook URL that should be used for the Webhooks configuration in Crowdin.
# Word Counter
> Learn how Crowdin counts words in your files
Below are the principles due to which Crowdin counts words: * A word is a combination of letters, punctuation marks, and special characters (e.g.:@ # $ % ^ & \* – \_ \` ‘ “) followed by space. * A sequence of punctuation marks or special characters is not considered a word. * By default, HTML tags are considered separate words for most formats, except the following ones: HTML, Front Matter HTML, HAML, MD, Front Matter MD, XML, WEBXML, IDML, XLIFF, XLIFF 2.0, ADOC, DOCX, MIF, DITA. You can change the default word count settings in your project’s **Settings > Import > Word count**. * URLs (e.g. `https://crowdin.com`) and emails (e.g. `support@crowdin.com`) are considered one word. * Hieroglyphs in Chinese, Japanese, and other hieroglyphic languages are counted as one word/hieroglyph. For example, “ライフ・イン・トウキョウ。” is counted as ten words. Other examples of how the words are counted: | **String** | **Words** | | --------------------------------------------- | ---------------------------------------- | | Number is -123.45 | 3 | | `here` | 1 / 7 (if non-HTML-based format is used) | | 0 – 1 at 2 | 4 | | two-in-one | 1 | | 2-in-one | 1 | | two-in-1 | 1 | | `%file_type%` | 1 | | hello?world | 1 | | hello ? world | 2 | | `☂ ☃ ☀⚤` | 0 | | © %company% | 1 | | 01/01/1980 | 3 | | Monday, August 8, 2011 | 4 | | `https://ka-graphie.example.com/6d8b.png` | 1 | | Let’s look | 2 | | Let’s look | 3 (another type of apostrophe is used) | | Word(s) | 2 | ## [Translatable HTML Attributes](#translatable-html-attributes) [Section titled “Translatable HTML Attributes”](#translatable-html-attributes) When working with HTML-based file formats, depending on the file structure, some HTML attribute values may be considered translatable while others not. You can see the list of attributes and situations when their values are considered translatable in the table below. | **Attribute** | **Details** | **Example** | | ------------- | ------------------------------------------------------------------------------------------------------------------------------------------------------ | ------------------------------------------------------------- | | `title` | translatable if contained in any HTML tag | `Text
` | | `src` | translatable if contained in `img`, `iframe`, `embed`, `video`, `audio`, `source`\*, `track`\* tags \* – if nested in the parent tags `video`, `audio` | `` | | `href` | translatable if contained in `a` tag | `Site name` | | `data` | translatable if contained in `object` tag | `` | | `value` | translatable if contained in `input`, `button` tags | `` | | `placeholder` | translatable if contained in `input`, `textarea` tags | `` | | `alt` | translatable if contained in `img` tag | `` | | `label` | translatable if contained in `optgroup`, `track`\* tags \* – if nested in the parent tags `video`, `audio` | `
` | `Profil` | | Escape sequences (\r\n, \r, \n, \t, unicode, hex) | `Translation \x42` | `Übersetzung \u4242` | `Übersetzung \x42` | | Non-escaped equivalents of \r\n, \r, \n, \t | `Translated by \n TM` | `Übersetzt vom Übersetzungsspeicher` | `Übersetzt vom \n Übersetzungsspeicher` | | Placeholders | `Example %s` | `Beispiel %1$s` | `Beispiel %s` | | Numbers | `Attempt 2` | `Versuch 5` | `Versuch 2` | | Letter case | `Log in` | `einloggen` | `Einloggen` | | Special characters | `Help?` | `Hilfe!` | `Hilfe?` | | URLs | `More Information: https://crowdin.com/features` | `Weitere Infos: https://crowdin.com/` | `Weitere Infos: https://crowdin.com/features` | | ICU syntax | `Get {discountPercent, number, percent} discount` | `Erhalte {discountValue, number, currency} Rabatt` | `Erhalte {discountPercent, number, percent} Rabatt` | ### [Auto-substitution for Pre-translation](#auto-substitution-for-pre-translation) [Section titled “Auto-substitution for Pre-translation”](#auto-substitution-for-pre-translation) Once you enable the TM auto-substitution, you can leverage improved TM suggestions during [pre-translation](#applying-translation-memory-via-pre-translation). Be sure to set a minimum match ratio to 100%. This will result in including 100% TM matches along with the ones improved to 100% by TM auto-substitution. ### [Auto-substitution for TM Suggestions](#auto-substitution-for-tm-suggestions) [Section titled “Auto-substitution for TM Suggestions”](#auto-substitution-for-tm-suggestions) With the Auto-substitution feature, translators can see the improved TM suggestions in the Editor. The percentage below the improved suggestion shows the match percentage of the original TM suggestion and the improved one.  ### [Penalized TM Suggestions](#penalized-tm-suggestions) [Section titled “Penalized TM Suggestions”](#penalized-tm-suggestions) In some cases, you may want to apply penalties to TM suggestions to reduce their match percentage based on specific conditions. For example, you can set up a penalty for TM suggestions improved by the auto-substitution feature to prioritize exact matches over improved ones. The percentage below the improved and penalized suggestion shows the match percentage of the improved TM suggestion and the penalized one. Hover the cursor over the percentage to see more details.  Read more about [TM Suggestion Penalties](/project-settings/translation-memories/#penalties). ### [Cost Reports](#cost-reports) [Section titled “Cost Reports”](#cost-reports) Once the feature is enabled, it will affect how the [Costs Estimate](/project-reports/#cost-estimate) and [Translation Cost](/project-reports/#translation-cost) reports are calculated. **Costs Estimate** report would count TM suggestions that can potentially be improved by the auto-substitution feature based on the highest similarity match to which those strings can be improved. For example, a match that can be improved from a 75% match to a 100% match would be considered a 100% match. **Translation Cost** report would count TM suggestions improved by the auto-substitution feature as regular TM suggestions. For example, a match improved from a 75% match to a 100% match would be considered a 100% match. # Translation Strategies > Approaches for translating and proofreading your content effectively Once you’ve created your project and uploaded source files for localization, it’s time to decide who will translate and proofread your content. This article covers all the possible approaches you can mix and match to meet your personal needs and preferences. ## [Invite Your Team of Translators](#invite-your-team-of-translators) [Section titled “Invite Your Team of Translators”](#invite-your-team-of-translators) Invite as many translators and proofreaders to your project as needed. You can also give the language coordinator or manager access to trusted project members to manage the translation process for you (invite translators, meet deadlines, and maintain quality). Send email invitations or share invitation links with access to your localization project in Crowdin. You can invite: * In-house translators * Freelancers * Translation agencies you already work with Manage the project members in the **Members** tab. For example, you can invite translators, proofreaders, and language coordinators, granting them access to all or only specific target languages. Read more about [Inviting People](/inviting-people/). ## [Order Professional Translations](#order-professional-translations) [Section titled “Order Professional Translations”](#order-professional-translations) Crowdin Vendors Store includes professional translation agencies you can hire to translate and proofread your project files. See the list of all available vendors in **Store > Vendors**. Some of the transition agencies are integrated with Crowdin via API. When you decide to work with them, Crowdin forwards your untranslated data directly to the agency, and once completed, the translations are uploaded back to the project. Read more about [Ordering Professional Translations](/ordering-professional-translations/). [Crowdin Language Services ](/crowdin-language-services/)Crowdin Language Services is a solution that allows you to order professional translations and proofreading services in a few clicks. [BLEND Integration ](/blend-integration/)Integrate your Crowdin projects with the BLEND agency and allow BLEND translators to work with translation files in Crowdin Editor. Professional translation is a paid service where the approximate cost for your project is calculated or negotiated during the purchase. ## [Configure Crowdin AI](#configure-crowdin-ai) [Section titled “Configure Crowdin AI”](#configure-crowdin-ai) Enhance your translation process with Crowdin AI, which leverages advanced AI-powered translations from leading providers such as OpenAI, Google Gemini, Microsoft Azure OpenAI, and more. Crowdin AI offers two main prompt types for use in different scenarios: * **Pre-translate**: Generate initial AI translations that can be later reviewed by human proofreaders. * **AI in Editor**: Provide AI-powered suggestions directly within the Editor to help translators with translation and proofreading tasks. By considering additional context at various levels, Crowdin AI ensures contextually accurate translations, improving overall efficiency and quality. Read more about [Crowdin AI](/crowdin-ai/). ## [Configure Machine Translation Engines](#configure-machine-translation-engines) [Section titled “Configure Machine Translation Engines”](#configure-machine-translation-engines) Crowdin integrates with the most popular Machine Translation (MT) engines such as Microsoft Translator, Google Translate, Google AutoML Translation, DeepL Translator, and Amazon Translate. Configure these engines to use manual or automated pre-translation via MT. A human translator can also review those translations and do post-editing if needed. Otherwise, you can configure an MT of your choice so the machine translations will be shown in the Editor as suggestions to assist your translators. Read more about [Pre-Translation](/pre-translation/). ## [Engage Your Community](#engage-your-community) [Section titled “Engage Your Community”](#engage-your-community) If you have a popular product and an active community eager to help you with translations, feel free to start crowdsourcing. It’s an excellent practice to cooperate with members on a volunteer basis and reward their efforts, providing them with some goods, discounts, or any other way that works for both parties. When working with community translators, a good workflow looks like the following: community translators translate the project, and once the translations are finished, you can order professional proofreading from a translation agency to ensure high translation quality. # Uploading Source Files > Learn how to upload source files to your project for translation Once you’ve [created a project](/creating-project/), the next step would be preparing source files for upload. Crowdin supports a wide range of [file formats](/supported-formats/), including Android XML, iOS Strings, JSON, etc. When you have your files prepared, you can add them to your Crowdin project for translation. Crowdin offers a few options for adding content to a project: * Manually via the web interface (UI). * Integrate your Crowdin project with the tools you already use. Explore available integrations on the [Crowdin Store](https://store.crowdin.com/). * Use the [API](/developer/api/) or [Developer Tool](/developer/dev-tools/) of your choice. Usually, this task is accomplished by developers. You can [invite your colleague developer](/inviting-people/) to assist you with this step. You can also use Crowdin sample files to test the translation workflows before starting your project with the actual source files. ## [Uploading Files](#uploading-files) [Section titled “Uploading Files”](#uploading-files) To upload files via the web interface, follow these steps: * File-based project 1. Open your project and go to **Sources > Files**. 2. Drag and drop files from your machine anywhere within the **Files** tab — to the root of the project or directly into an existing folder. You can upload ZIP archives if you want to add a structured set of folders and files. 3. *(Optional)* Click **Upload Files** or **Add File** to add files, **Use Samples** to test translation workflows, **Set Up Integration** to synchronize content automatically, or **Invite Developer** if content uploads will be handled by your developer teammate. You can also click the drop-down arrow next to the **Add File** button to access additional options, such as **Create String Vault** (adds an empty CSV file) or another **Set Up Integration** shortcut.  * String-based project 1. Open your project and go to the **Upload** tab. 2. Select the target branch to which you’re uploading source files. By default, the `main` branch is selected. Create new branches if needed. 3. Drag and drop files from your machine, or click **Select Files**. You can also upload ZIP archives if you want a set of files to be added. 4. Crowdin automatically tries to detect whether you’re uploading source content or translations. Verify the detection is correct and adjust the language settings if needed (e.g., English (source) should be selected for source files if the project’s source language is English). 5. *(Optional)* In the **Source files** section, to the right of the uploaded file list, configure [advanced source file import settings](#advanced-import-settings). 6. Click **Upload** to finish uploading the source content.  Read more about [project types](/creating-project/#project-types). Limitations The maximum file size is 100 MB. If your file exceeds this limit, it is recommended to split it into several smaller files, and upload them one at a time. ### [XML, CSV, and XLSX Files](#xml-csv-and-xlsx-files) [Section titled “XML, CSV, and XLSX Files”](#xml-csv-and-xlsx-files) Some file formats, such as XML, CSV, XLSX, and others, might require additional configuration. * [CSV/XLSX File Configuration](/csv-xlsx-configuration/) * [XML File Configuration](/xml-configuration/) * [Parser Configuration](/project-settings/parser-configuration/) Limitations The XLSX/XLS file size is limited to 2 000 000 cells. ### [HTML Files with Relative URLs](#html-files-with-relative-urls) [Section titled “HTML Files with Relative URLs”](#html-files-with-relative-urls) To display images and styles in the HTML file used outside of the website, where it belongs, add the `
![]() Please note that we only specified a relative address for the image. Since we specified a base URL in the head section, the browser will look for the image at "https://www.w3schools.com/images/stickman.gif".
Please note that we only specified a relative address for the image. Since we specified a base URL in the head section, the browser will look for the image at "https://www.w3schools.com/images/stickman.gif".
Text
` | | `src` | translatable if contained in `img`, `iframe`, `embed`, `video`, `audio`, `source`\*, `track`\* tags \* – if nested in the parent tags `video`, `audio` | `` | | `href` | translatable if contained in `a` tag | `Site name` | | `data` | translatable if contained in `object` tag | `` | | `value` | translatable if contained in `input`, `button` tags | `` | | `placeholder` | translatable if contained in `input`, `textarea` tags | `` | | `alt` | translatable if contained in `img` tag | `` | | `label` | translatable if contained in `optgroup`, `track`\* tags \* – if nested in the parent tags `video`, `audio` | `